Overview
This page is a step-by-step guide to the Assistant Editing workflow for Media Composer, covering how to:
- Organize Production Reports
- Prep the Script
- Configure the Media Composer Project
- Import the Script
- Transcode Footage using Davinci Resolve
- Link and Transcode Audio
- Synchronize Audio and Video
- Make Mix-Only Subclips
- Rename Subclips
- Set Green Action Markers
- Organize Footage in Bins
- Transcribe Notes and Label “NG”
- Assemble Scene Stringouts
- Assemble a Dailies Stringout
- Export and Upload Dailies to Frame.io
Organize Production Reports
The first job of the Assistant Editor is to organize by day any Camera Reports, Sound Reports, ShotPut Pro Offload Reports, and (if applicable) Script Supervisor Reports.
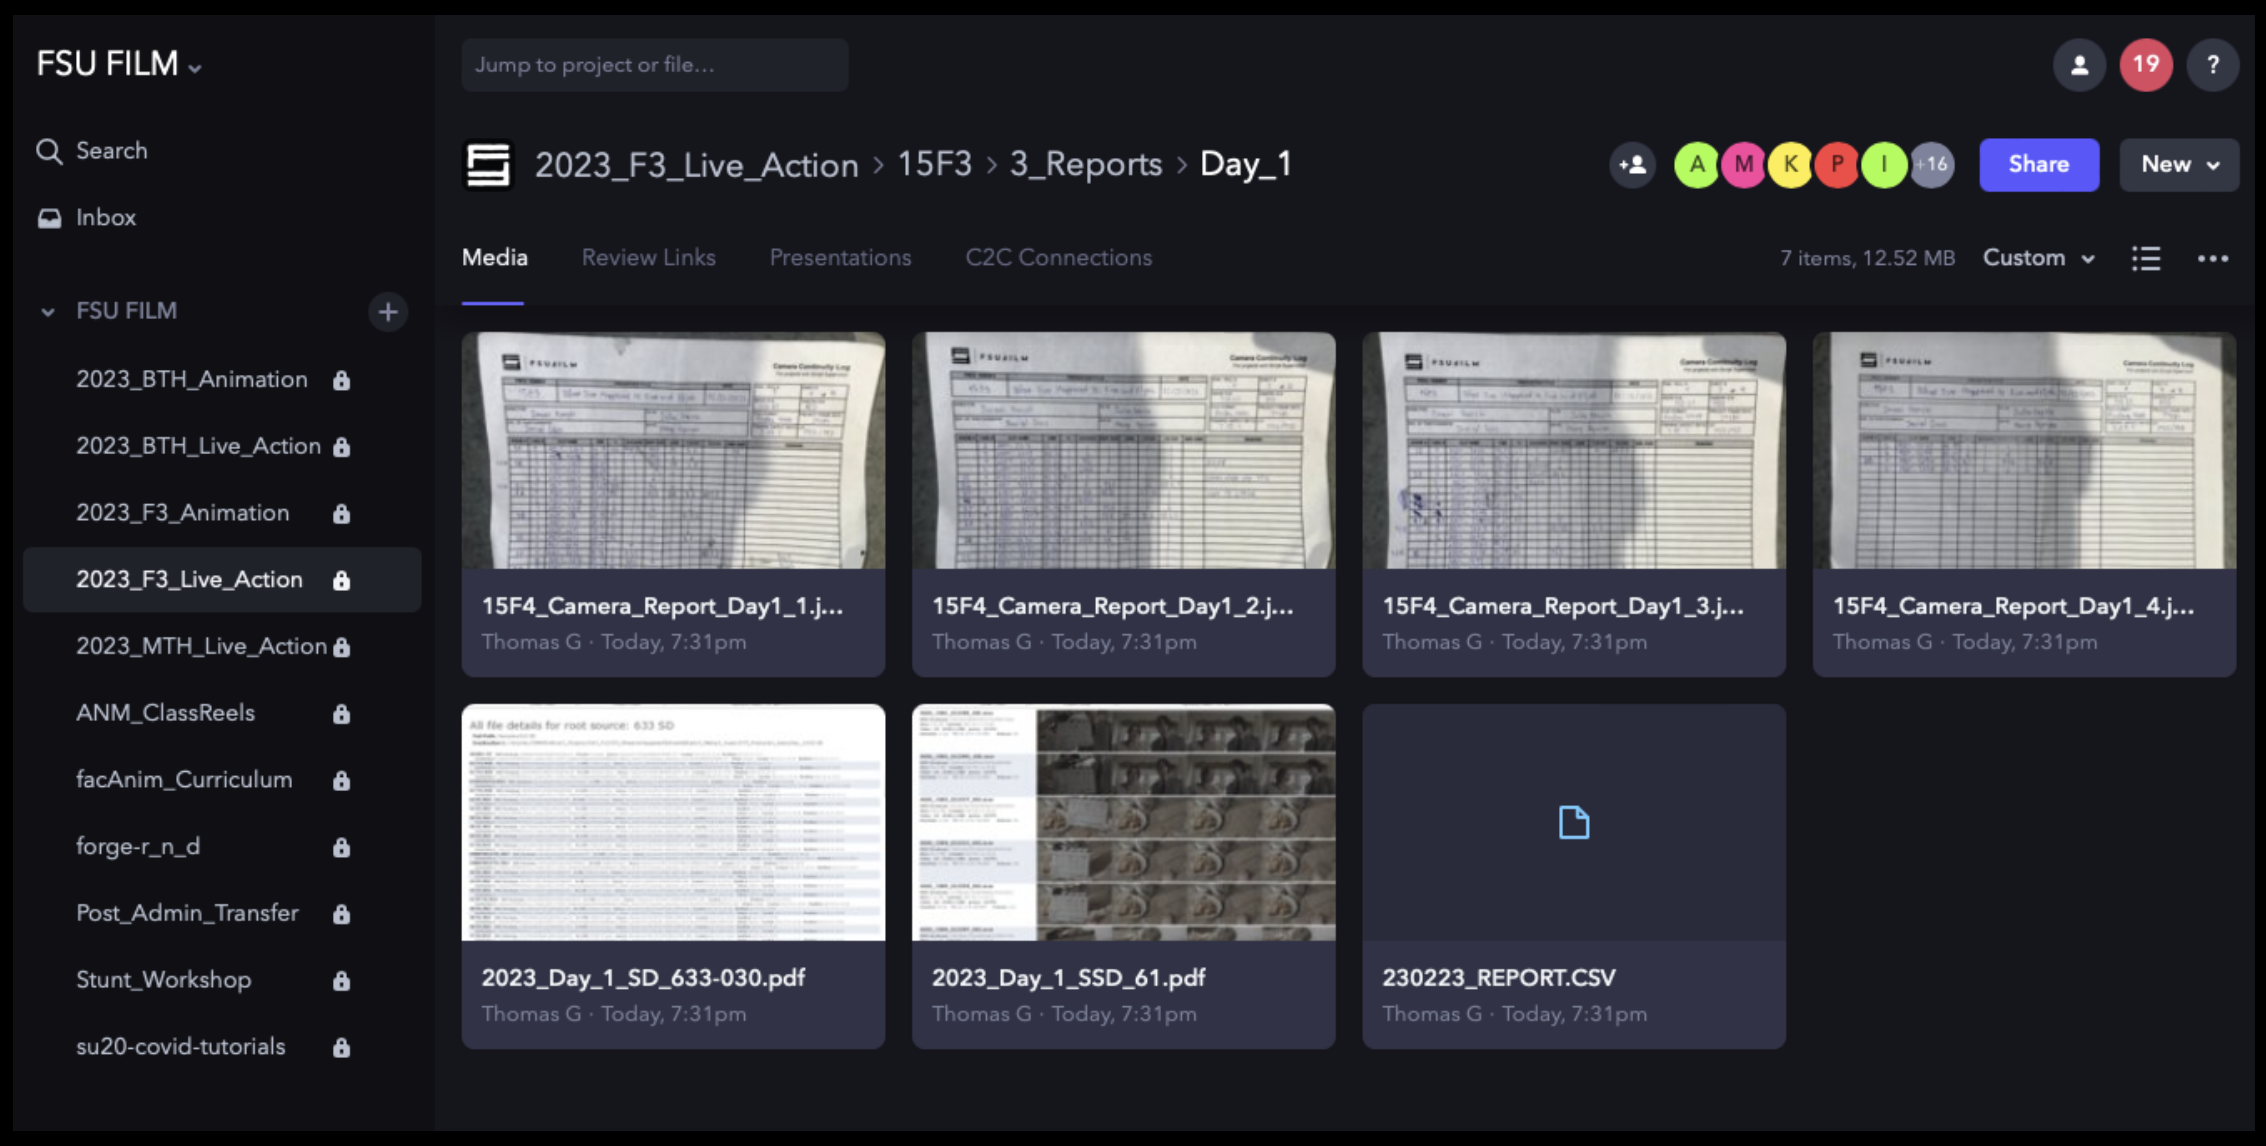
Most of these reports have already been made and you will only need to copy-and-paste them into the correct folder on the server to consolidate them together. The Camera Reports are analog so you will need to take clear pictures of them and to make a digital version.
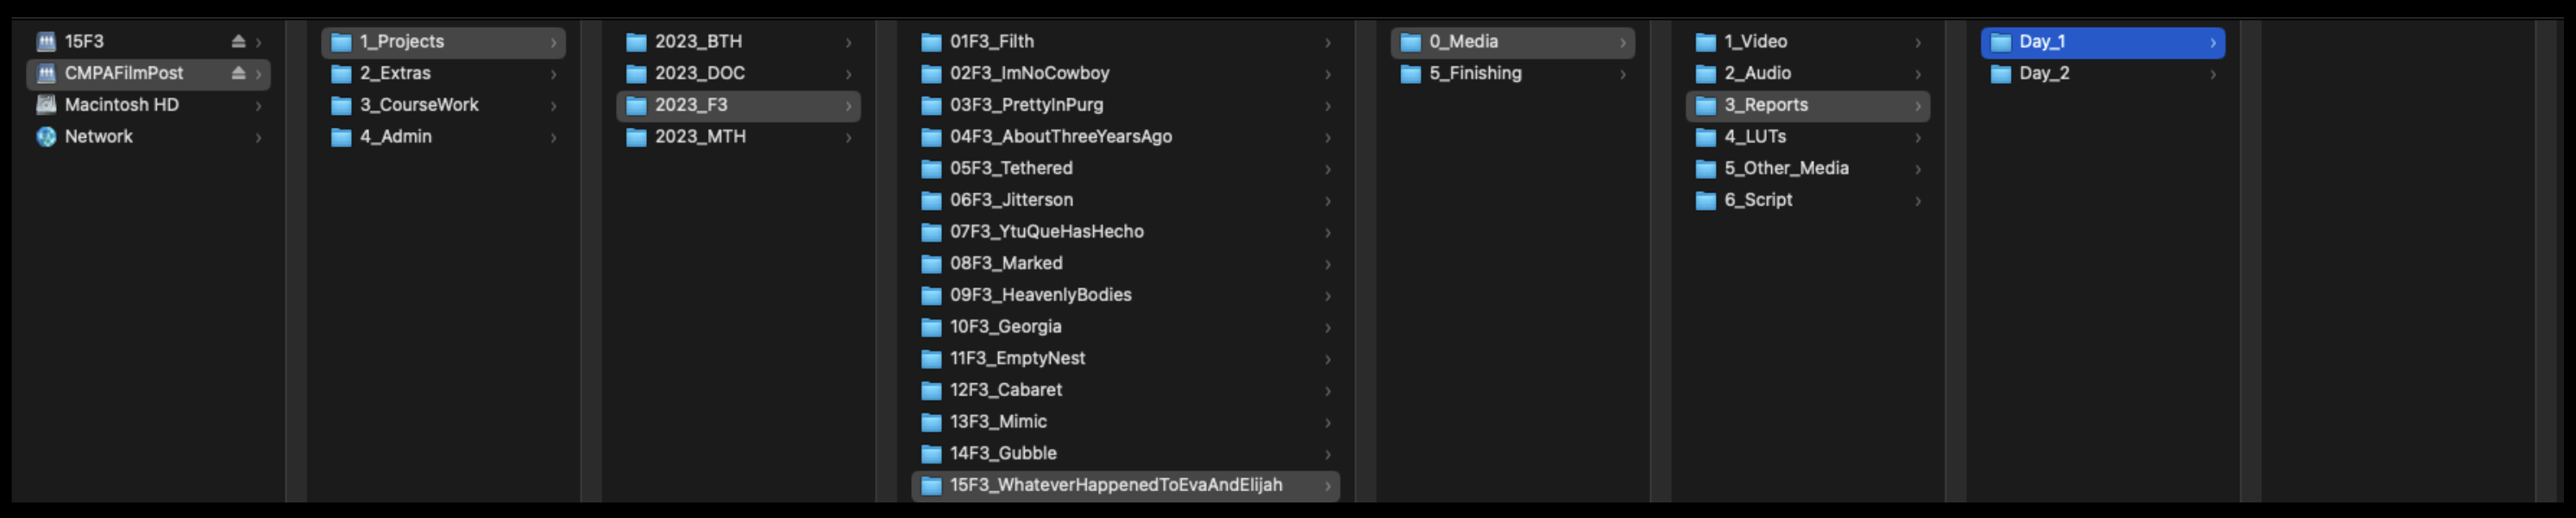
There should be a folder for each day’s report on the server:
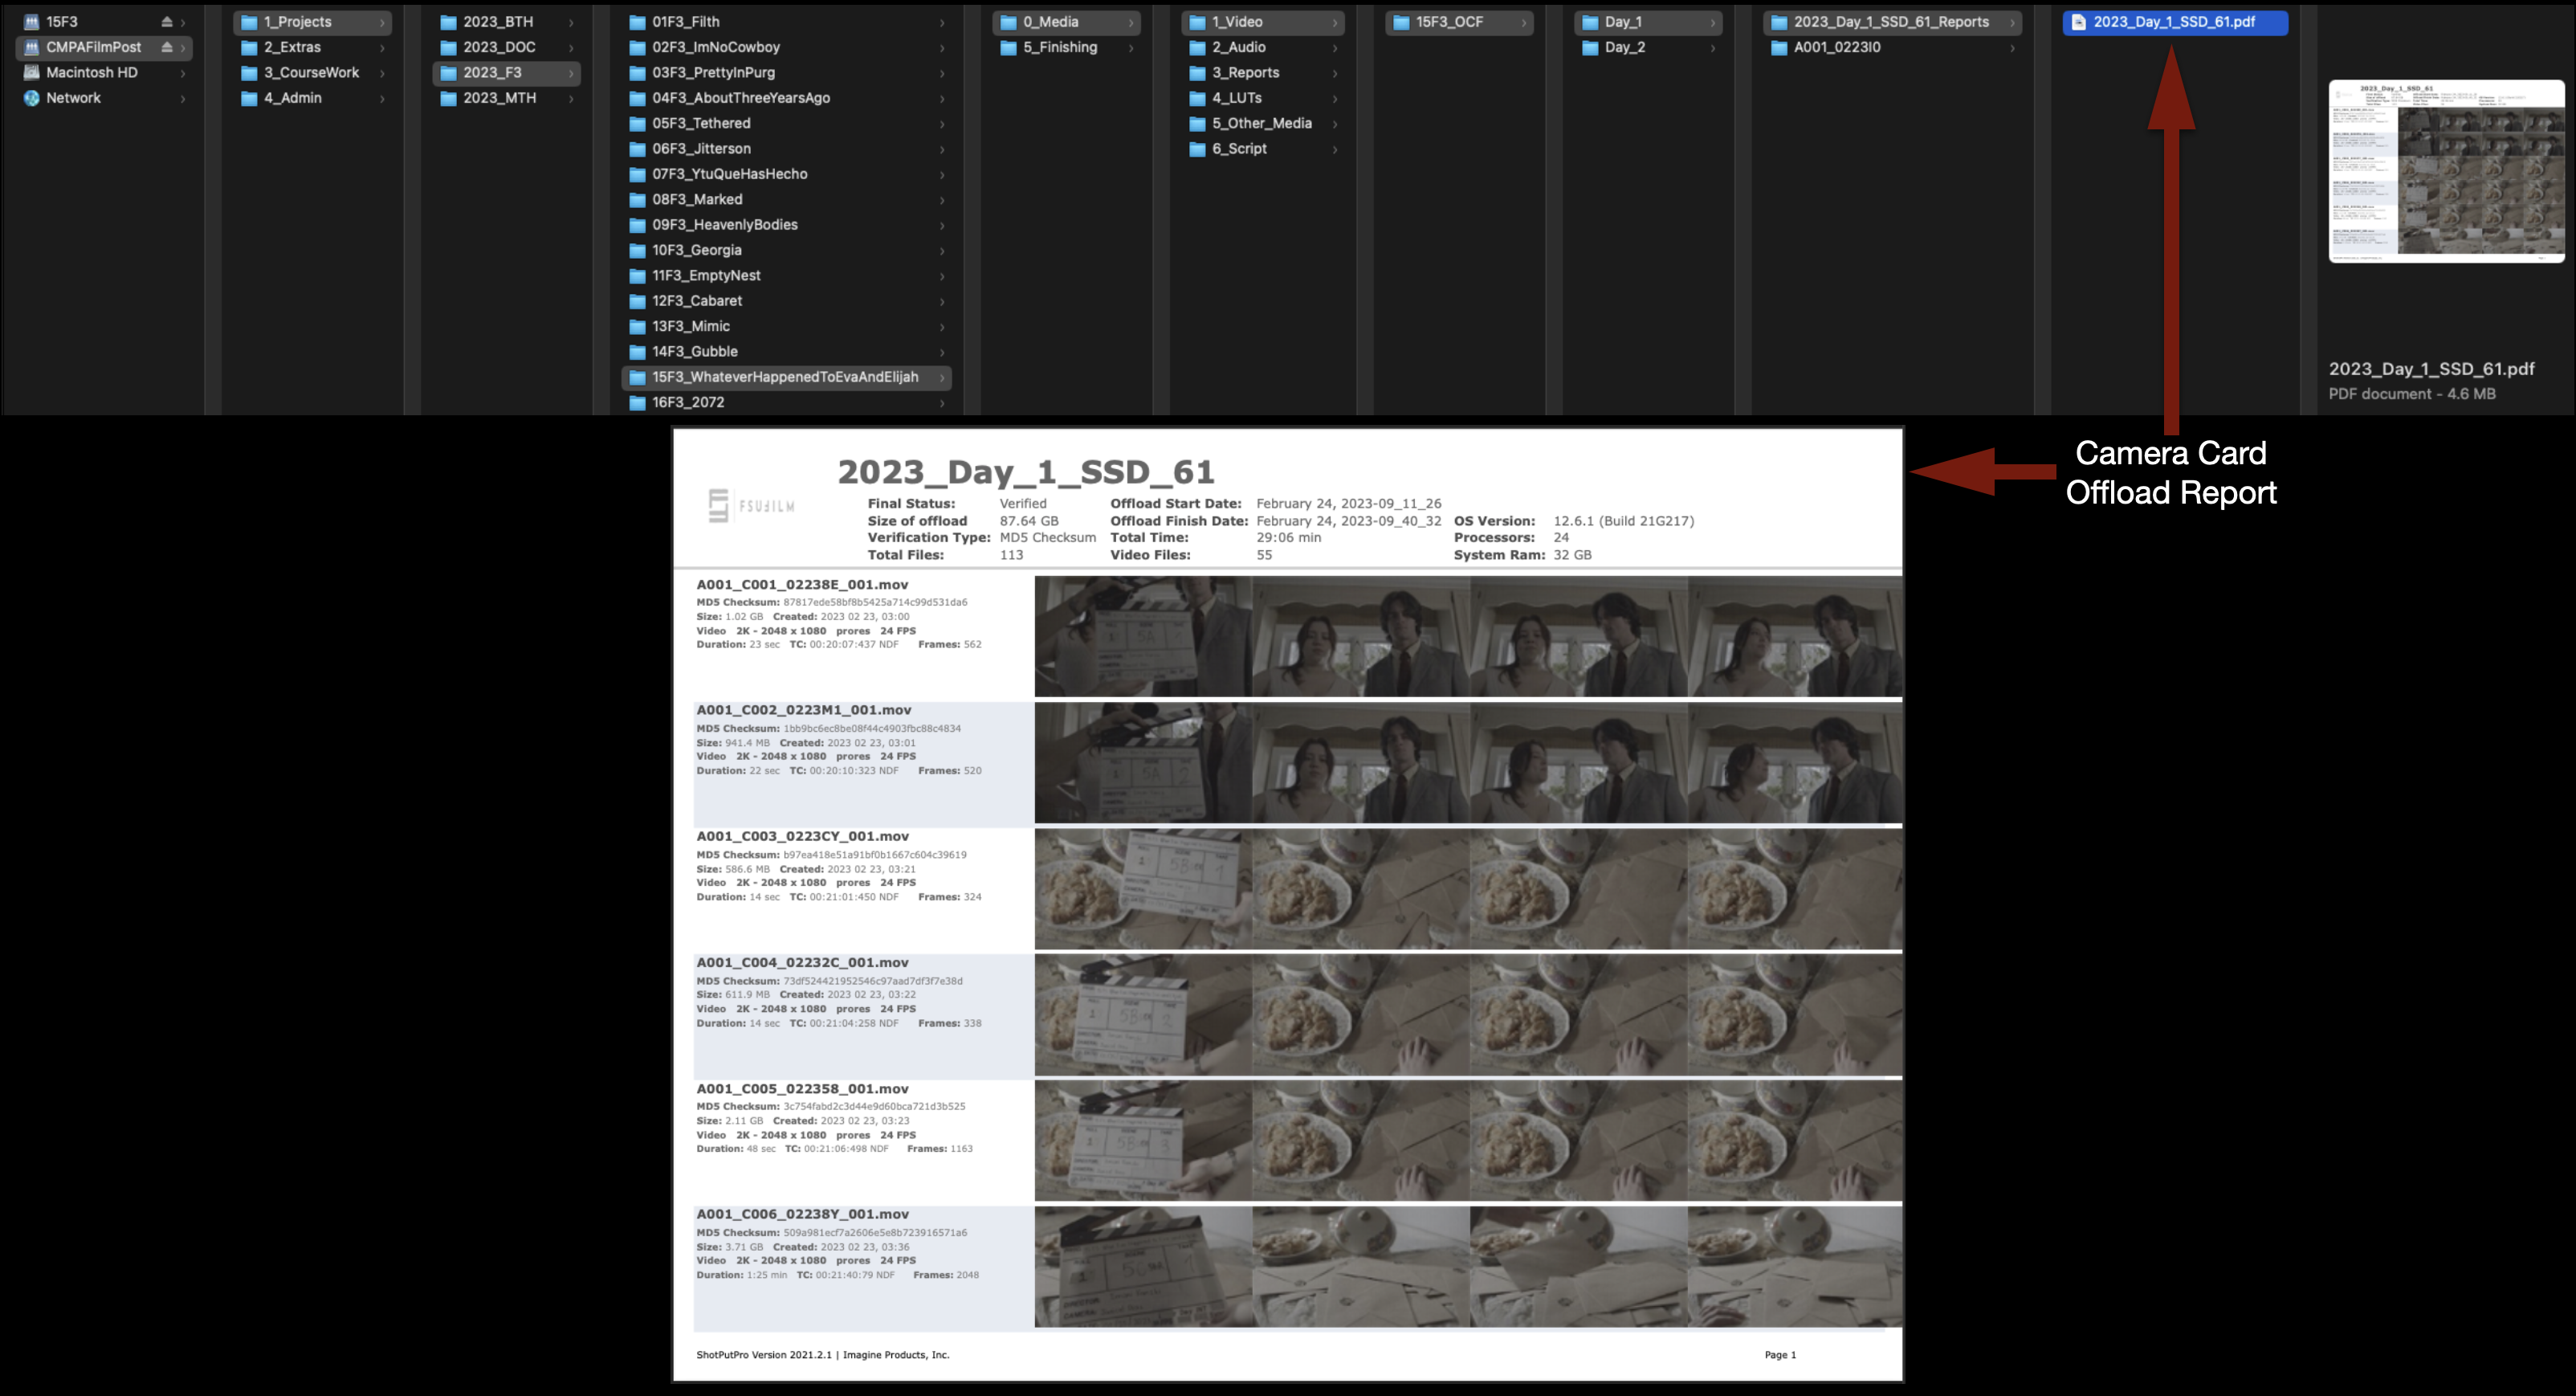
This is where you will find the Camera Card Offload Report:
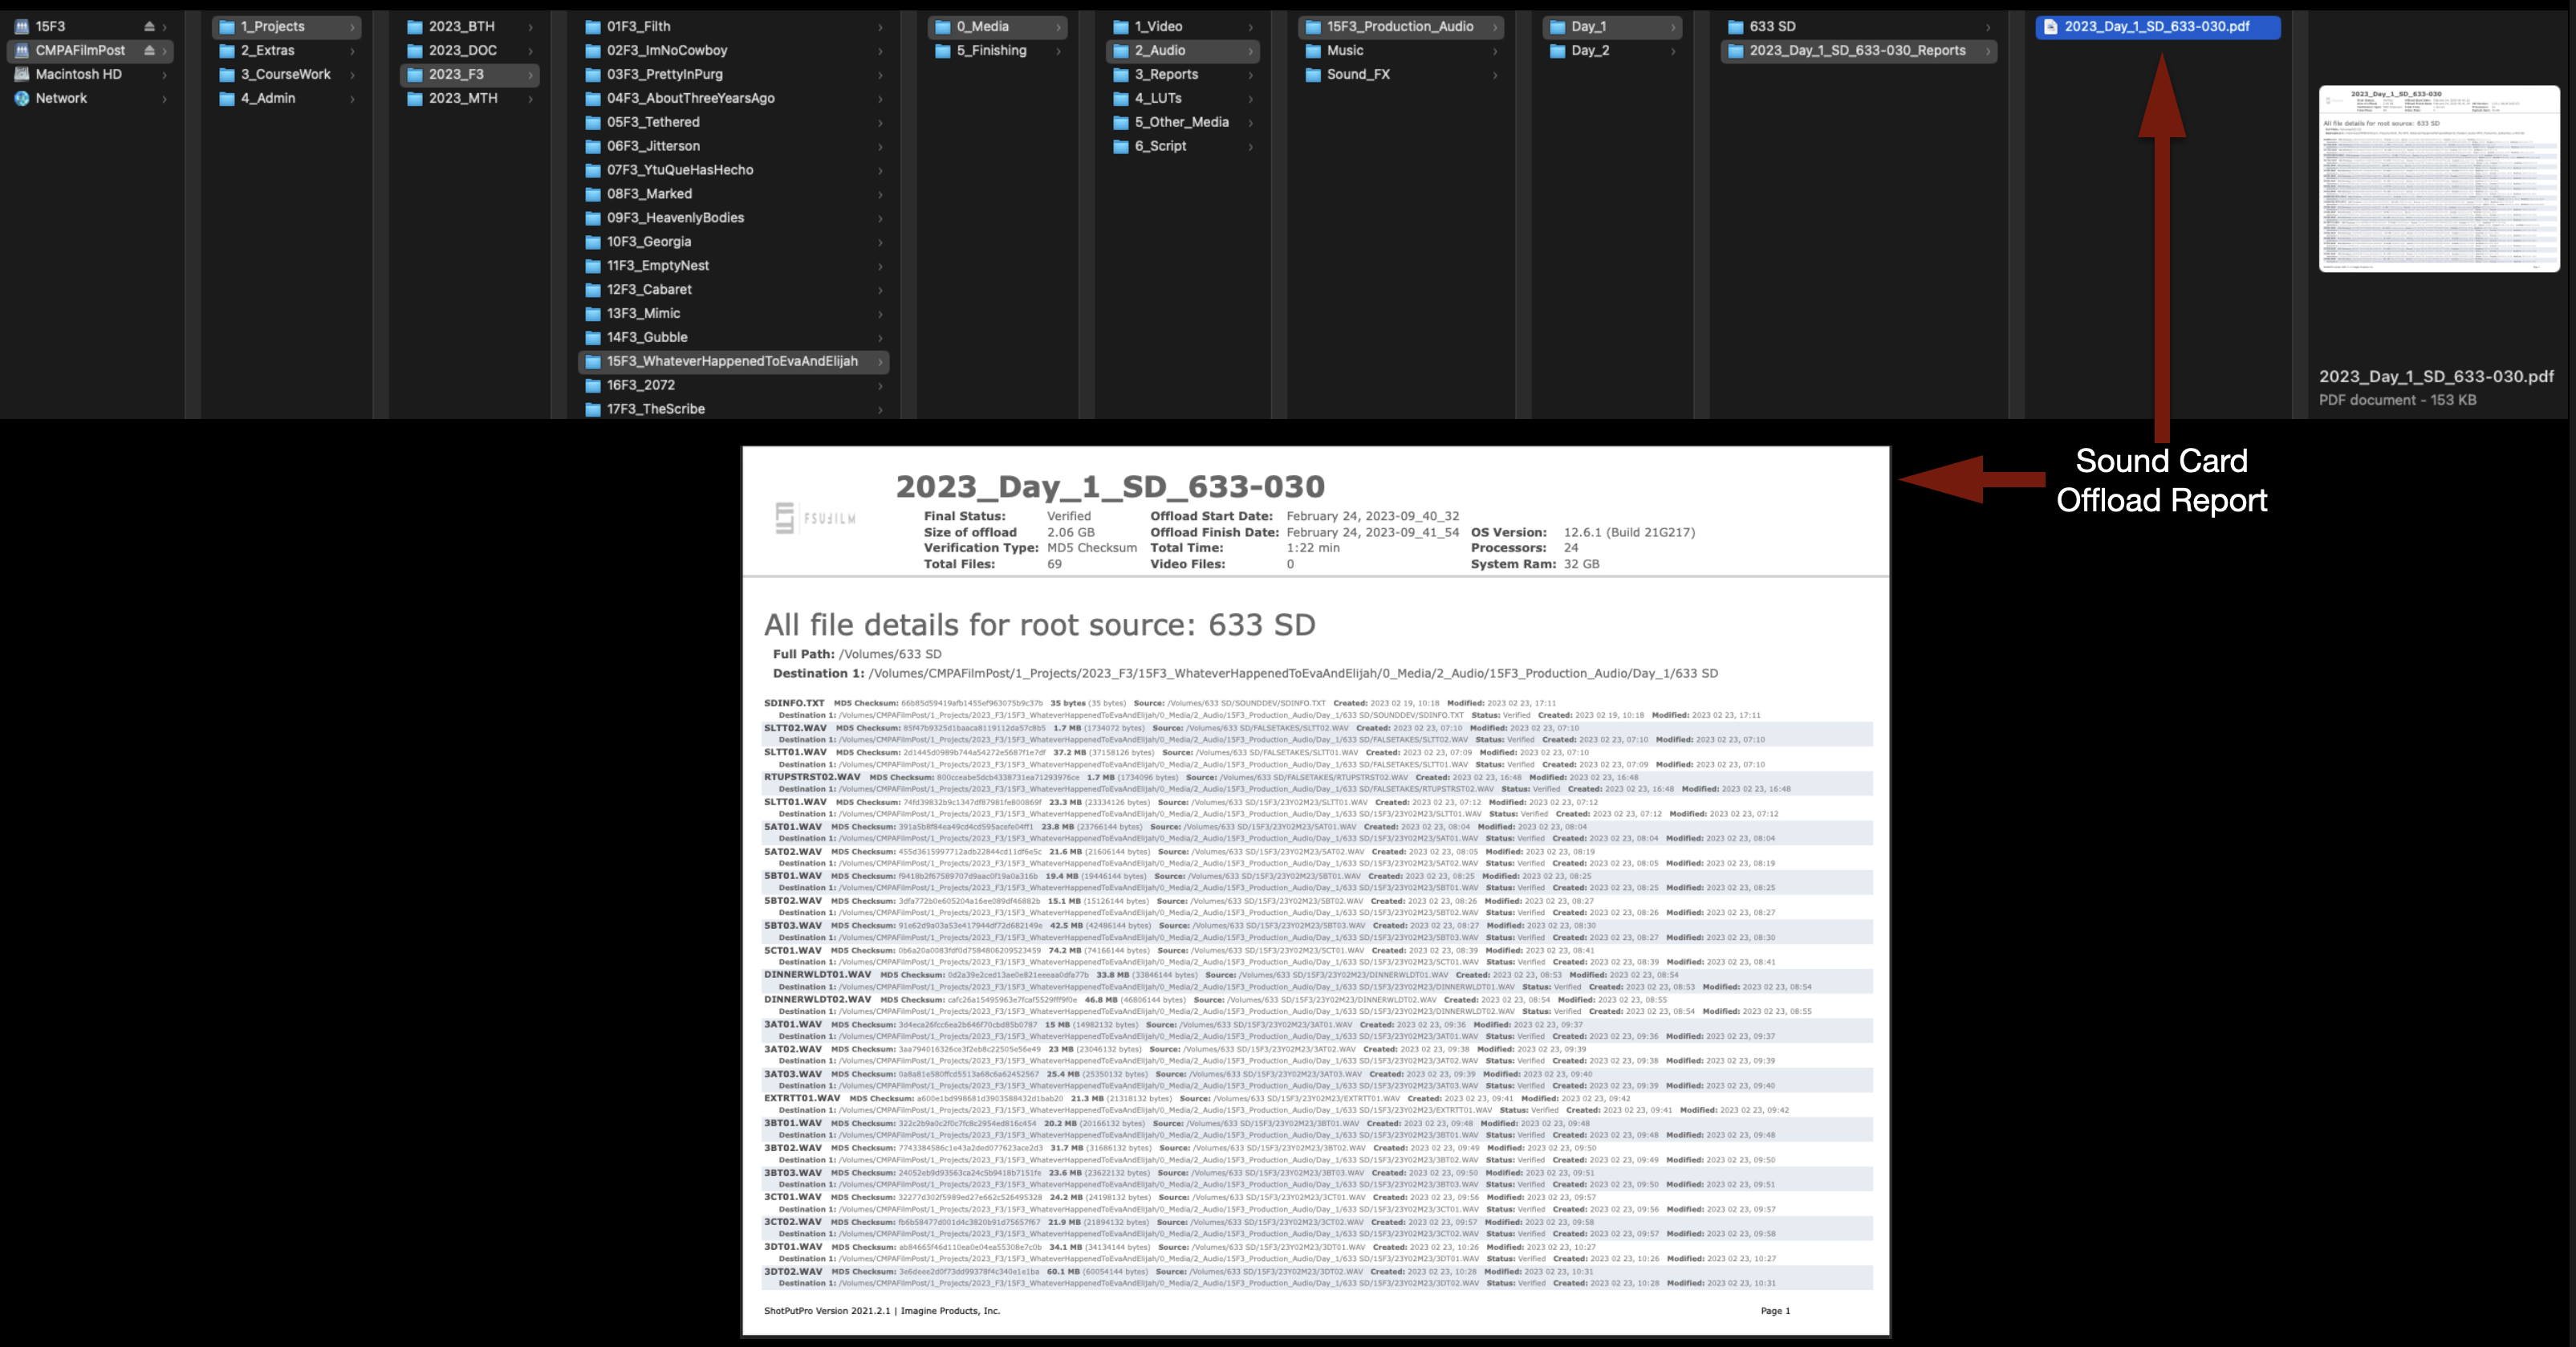
This is where you will find the Sound Card Offload Report:
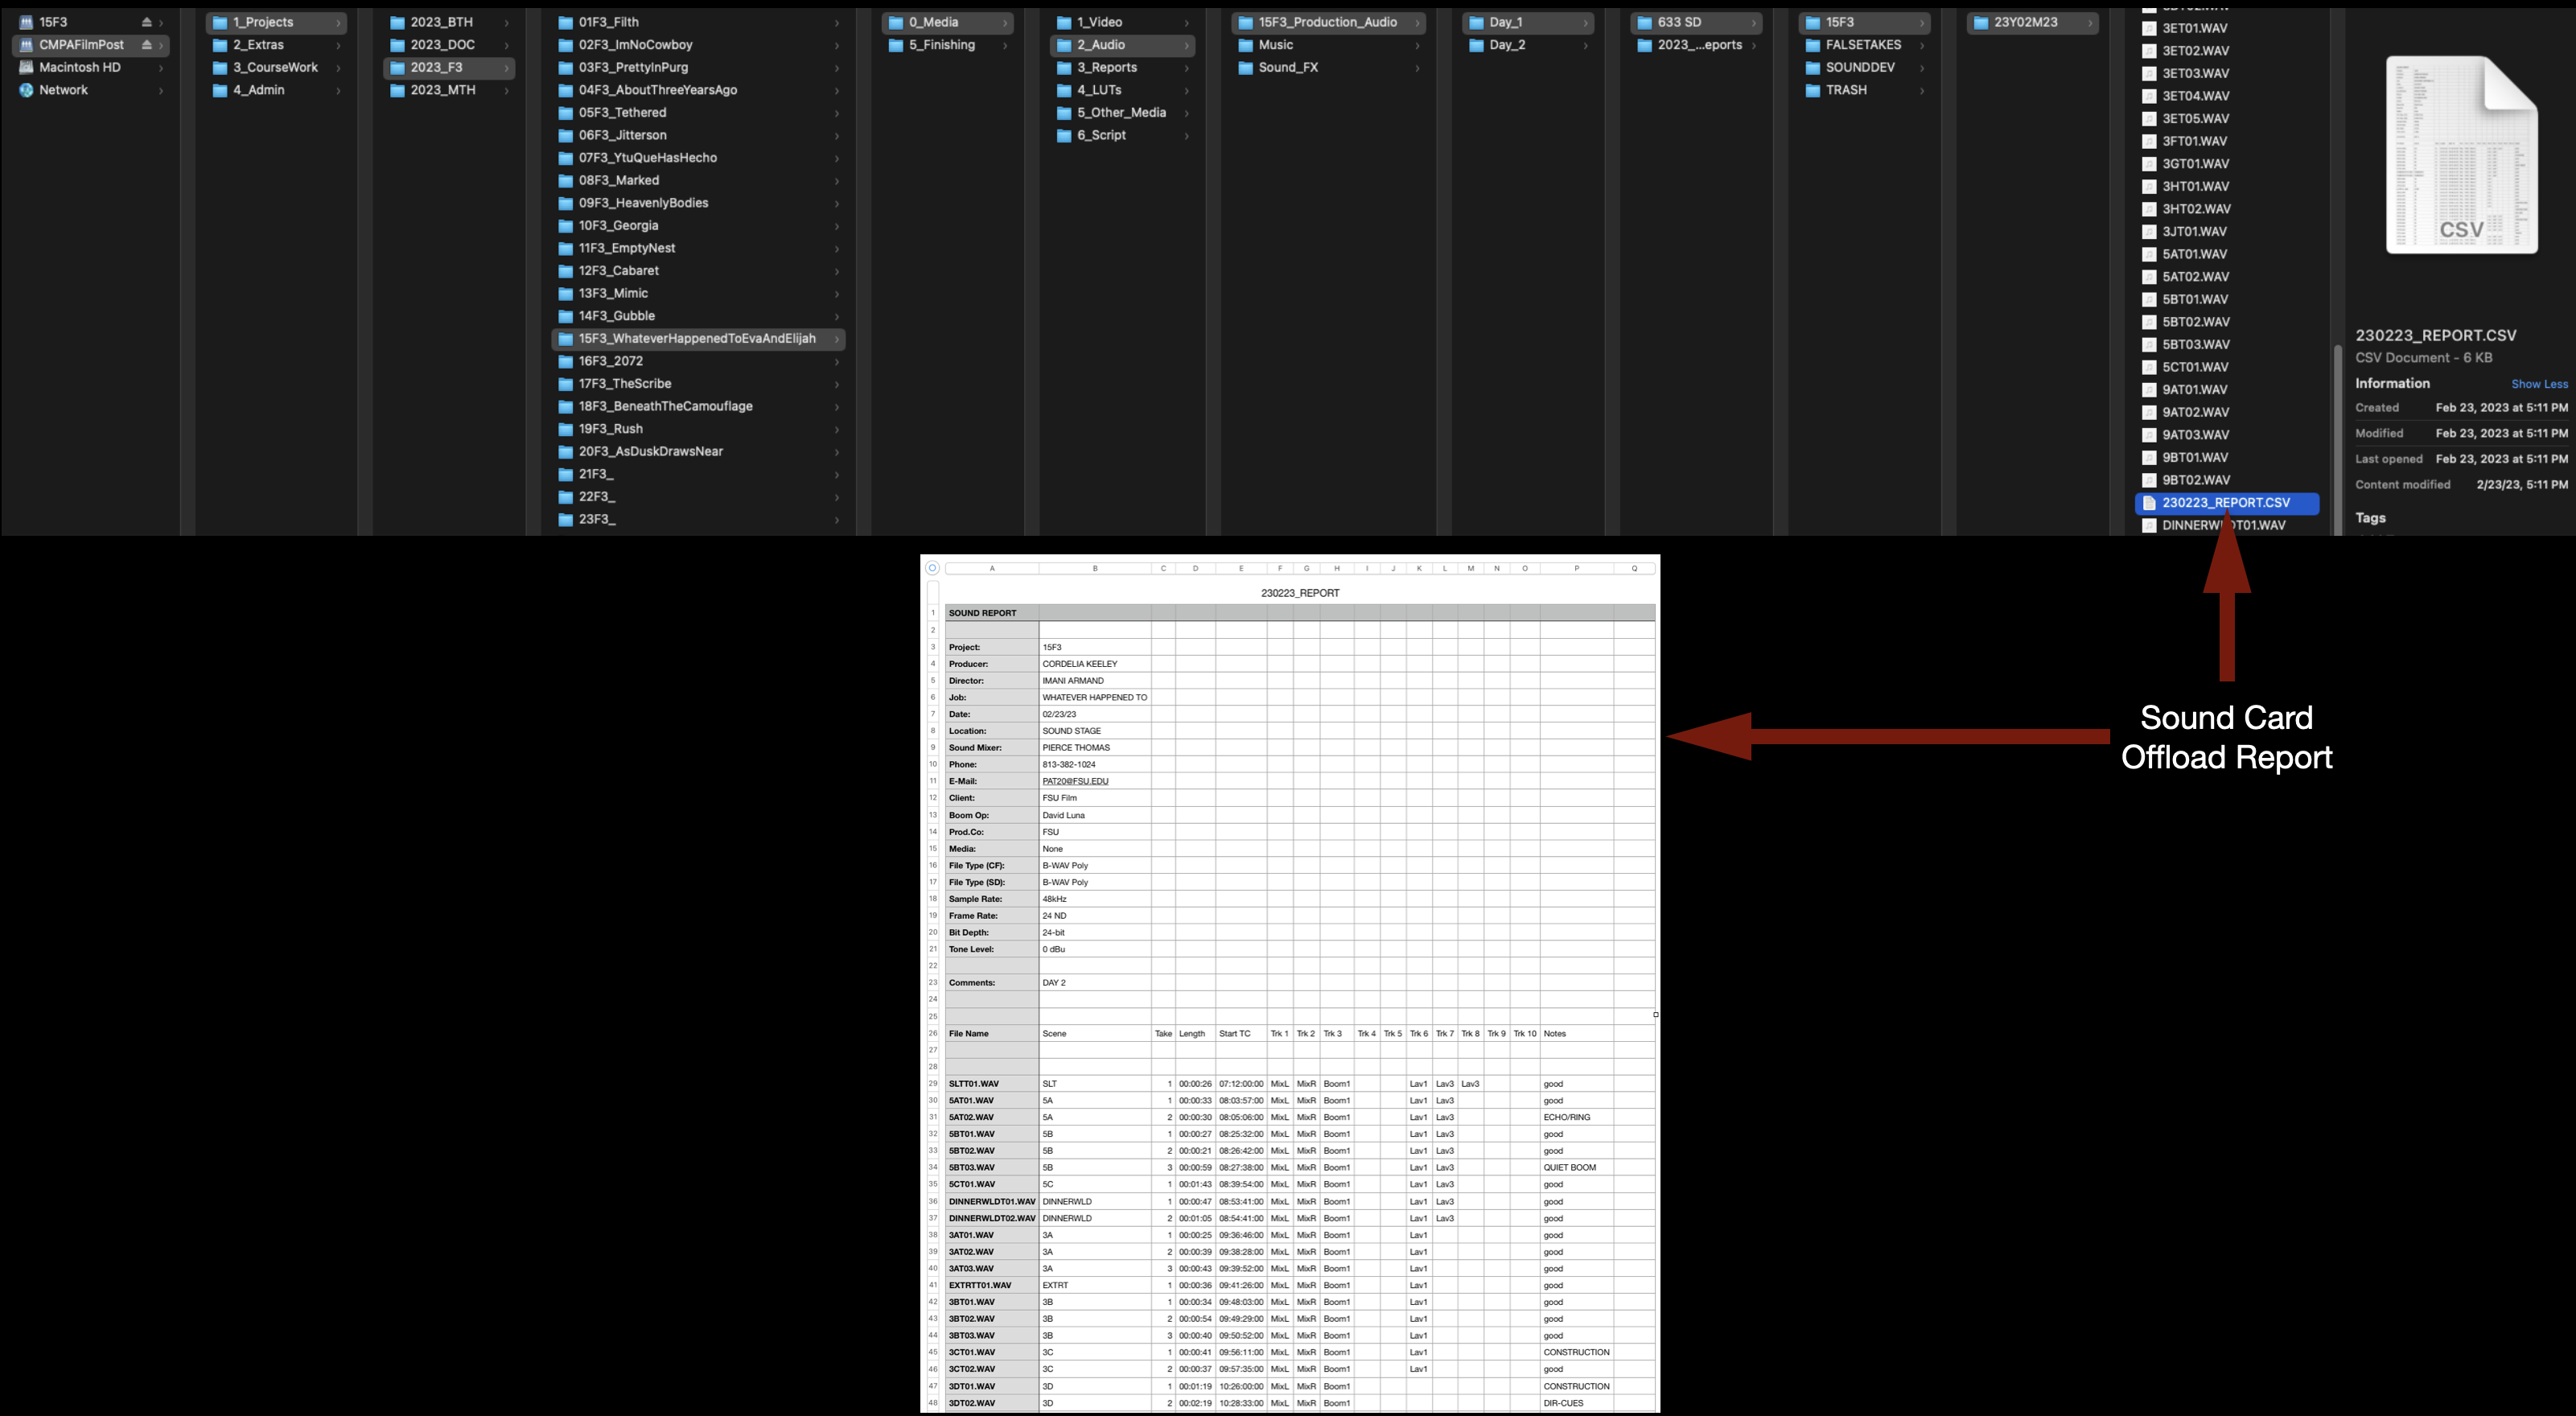
This is where you will find the Sound Report:
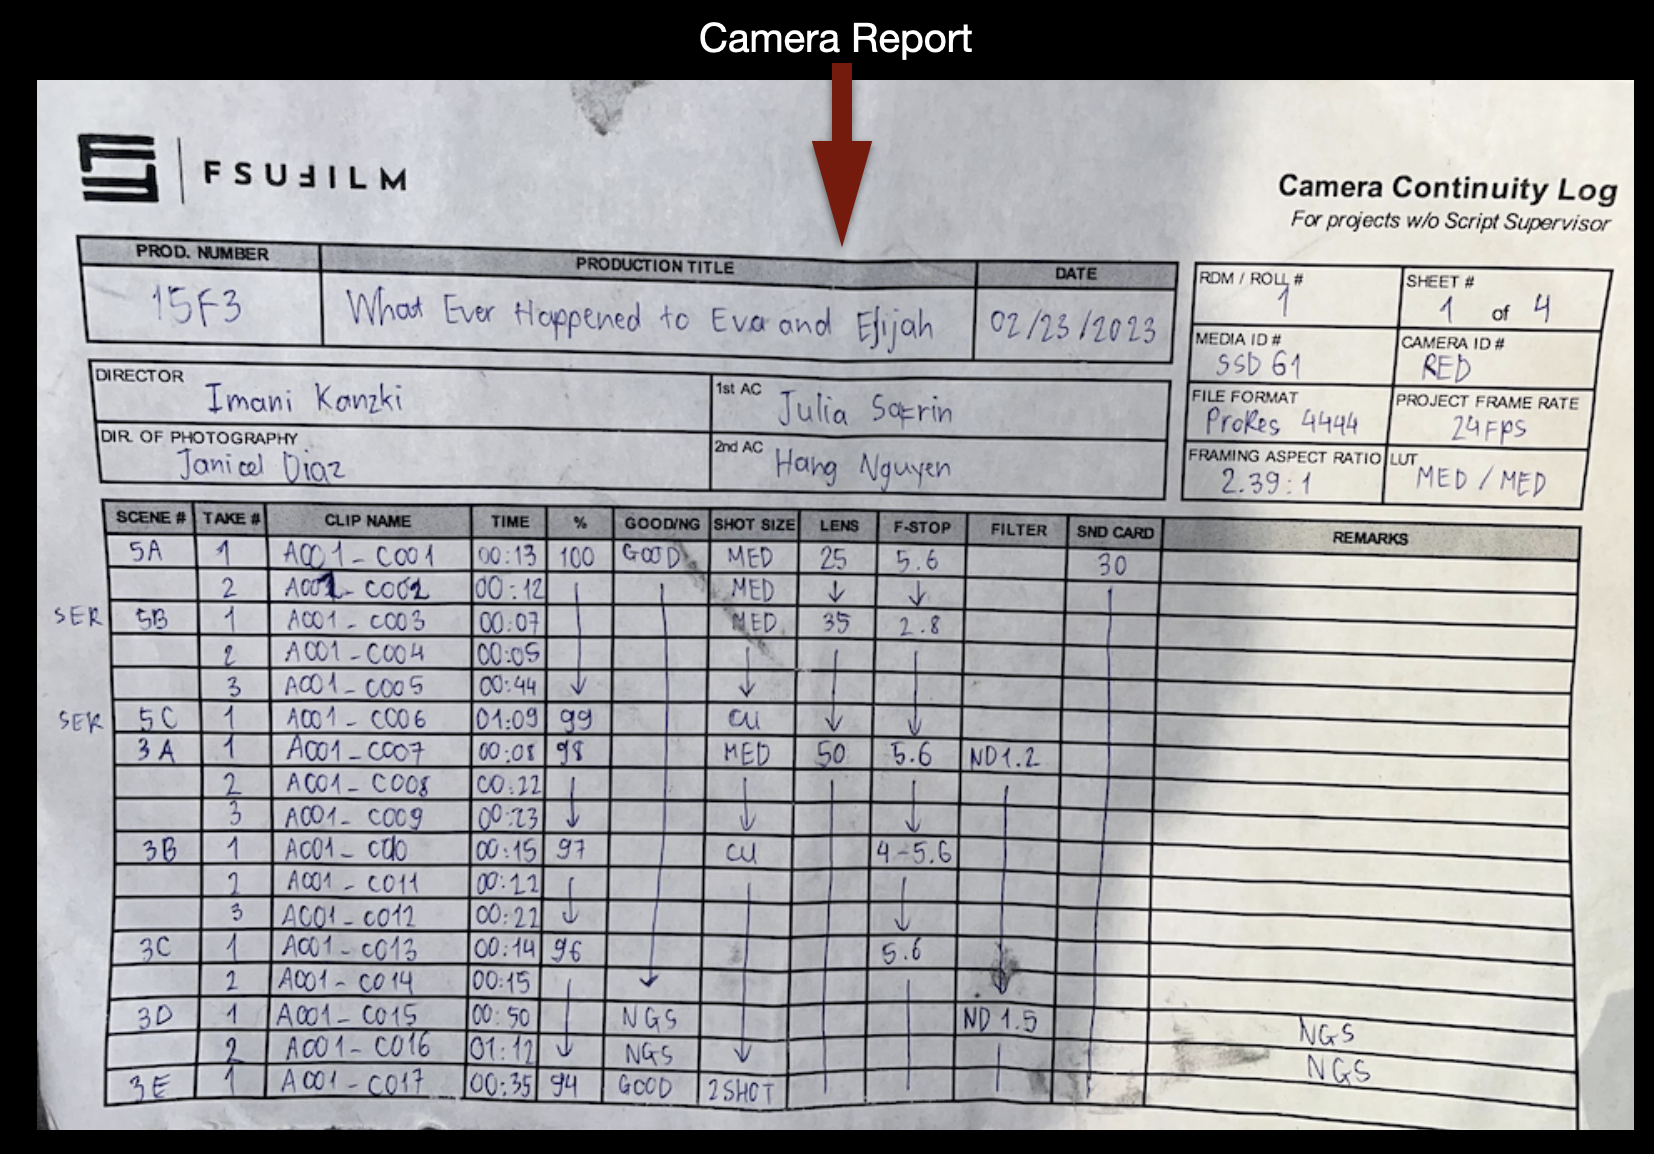
For the Camera Report, take a good picture of it to make a digital copy:
Copy-and-paste all of them into the Reports folder:

Then, upload each day’s folder to the corresponding folder on frame.io:
Prep the Script
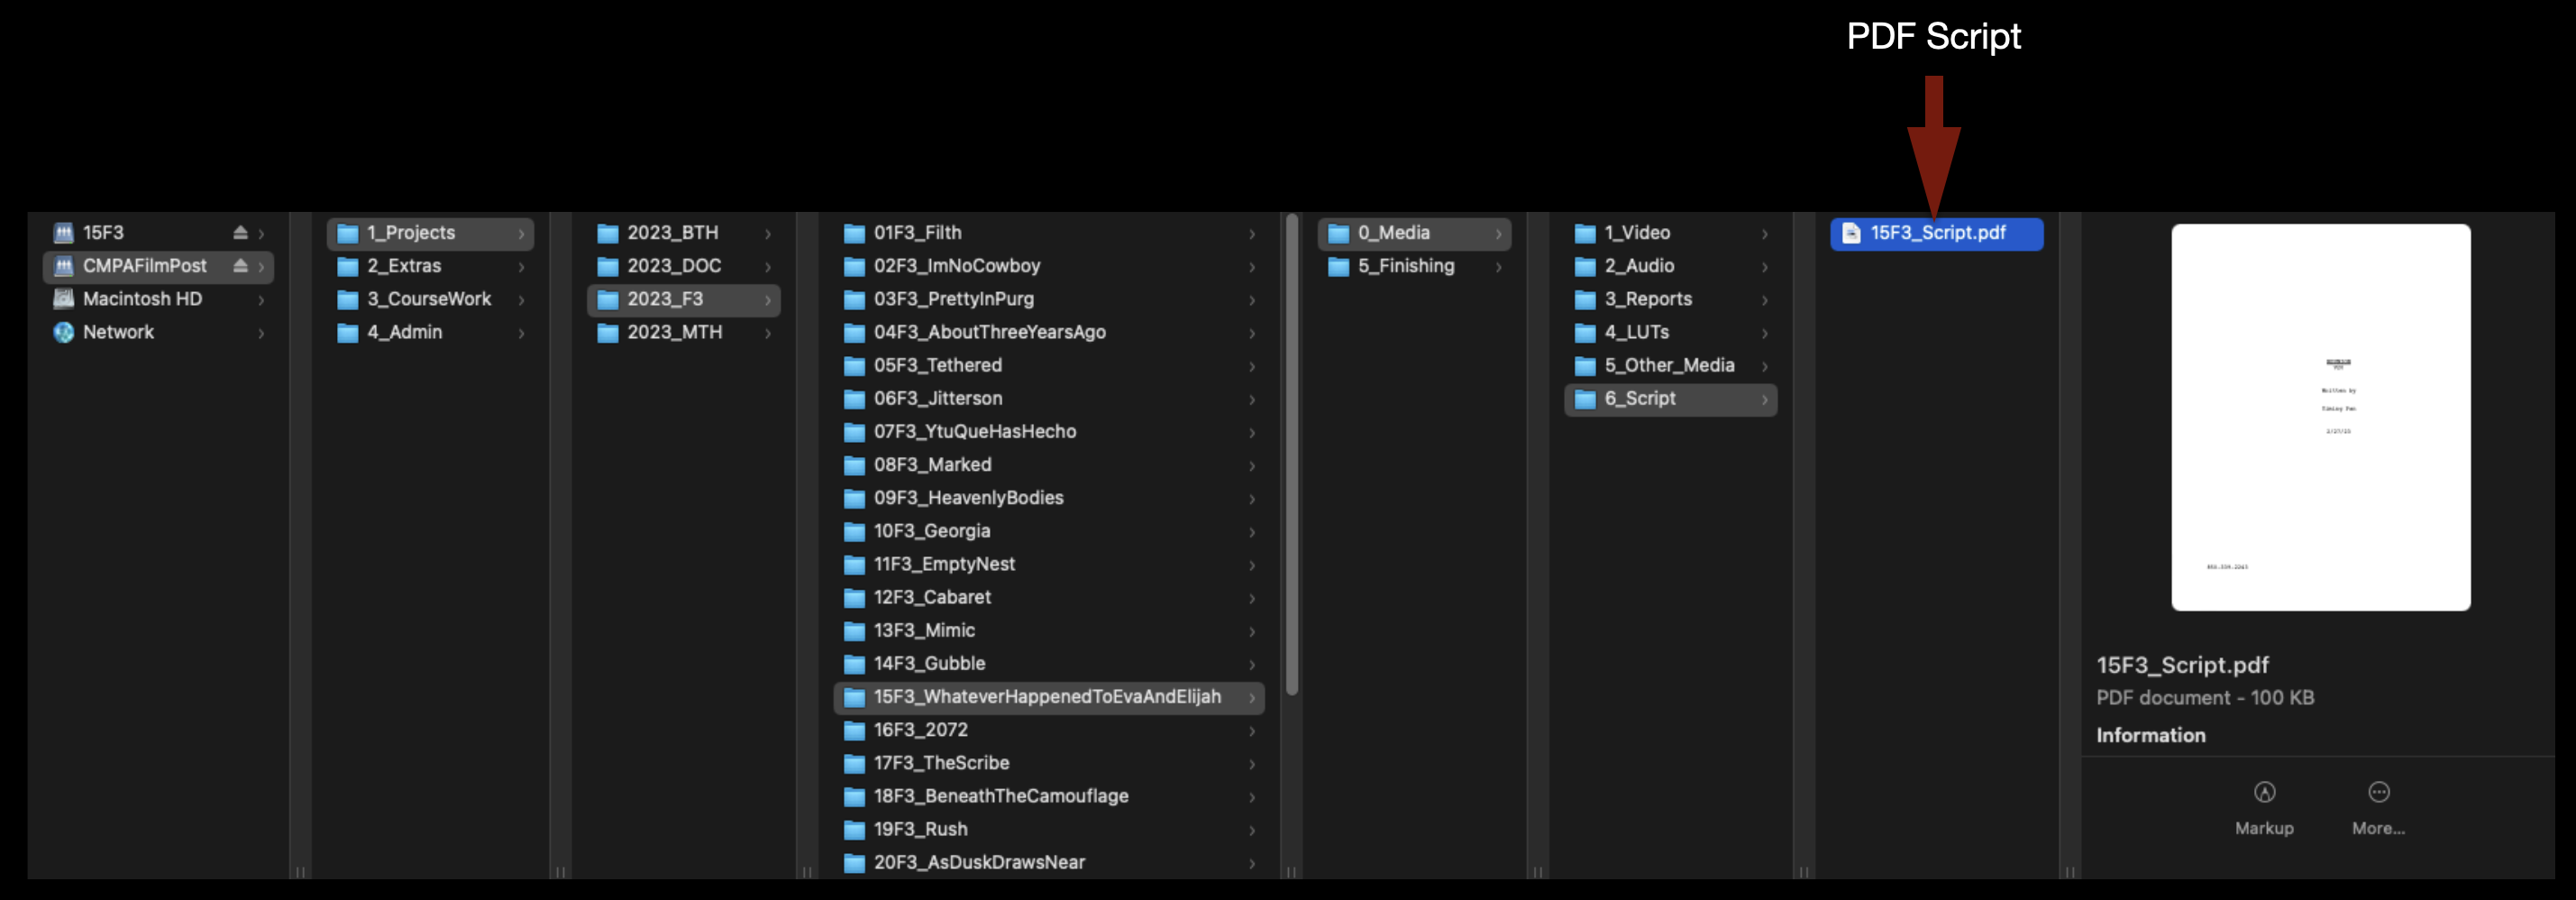
The Director of the film should have already supplied you with a PDF of the shooting script. The .pdf file can be saved in the folder shown below:
To import the script into the Media Composer project, it must first be converted from a .pdf file into a .txt file. In Finder, right-click on the .pdf file and select Open With > Microsoft Word. Once it opens in Microsoft Word, go to the File menu and select Save As…
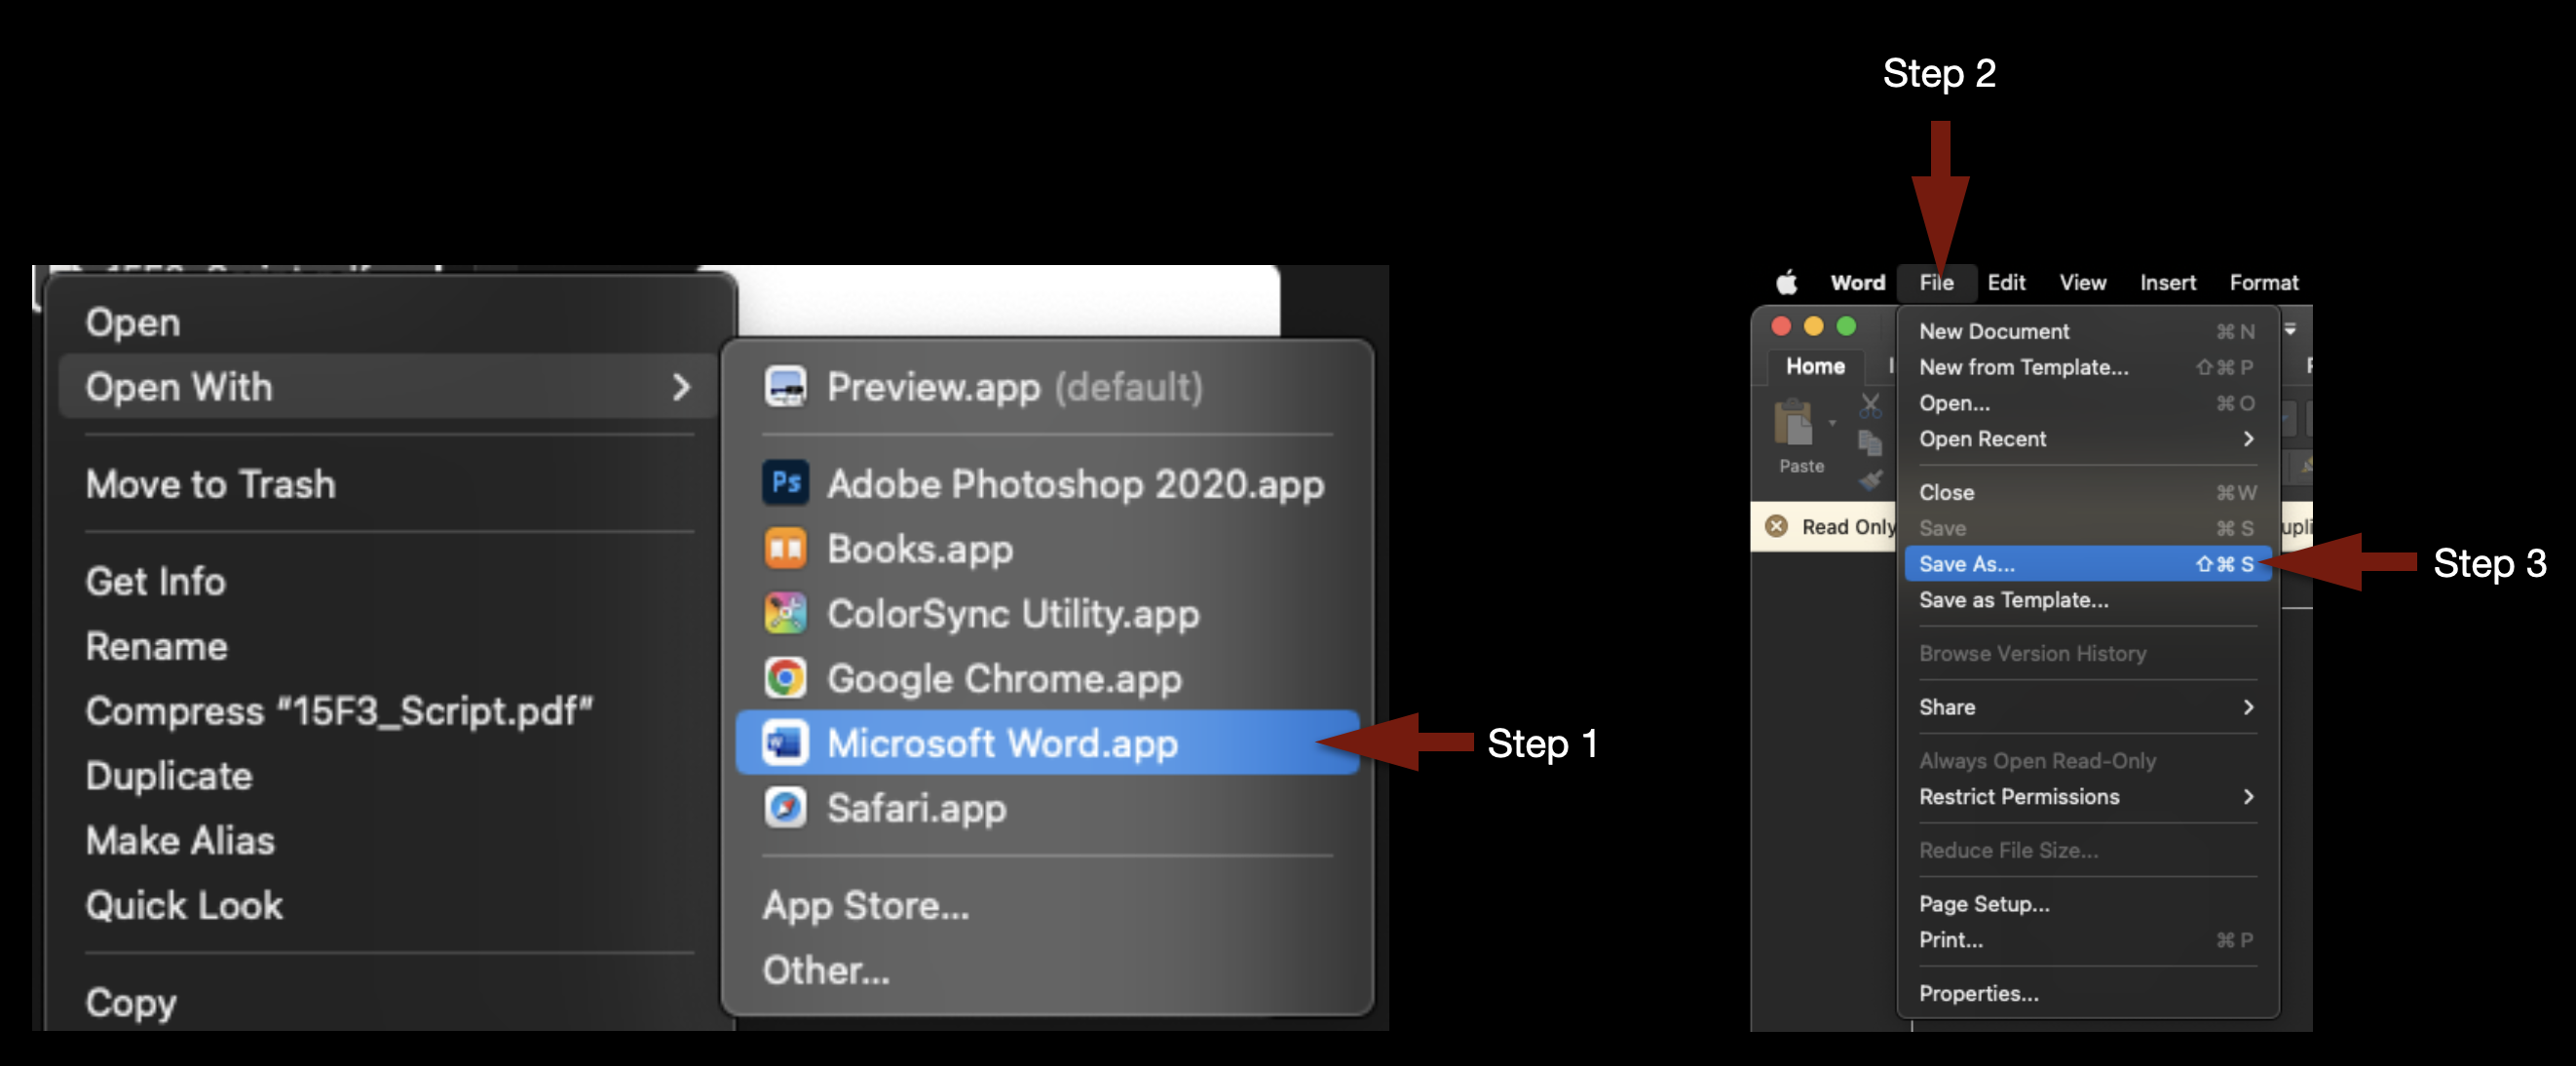
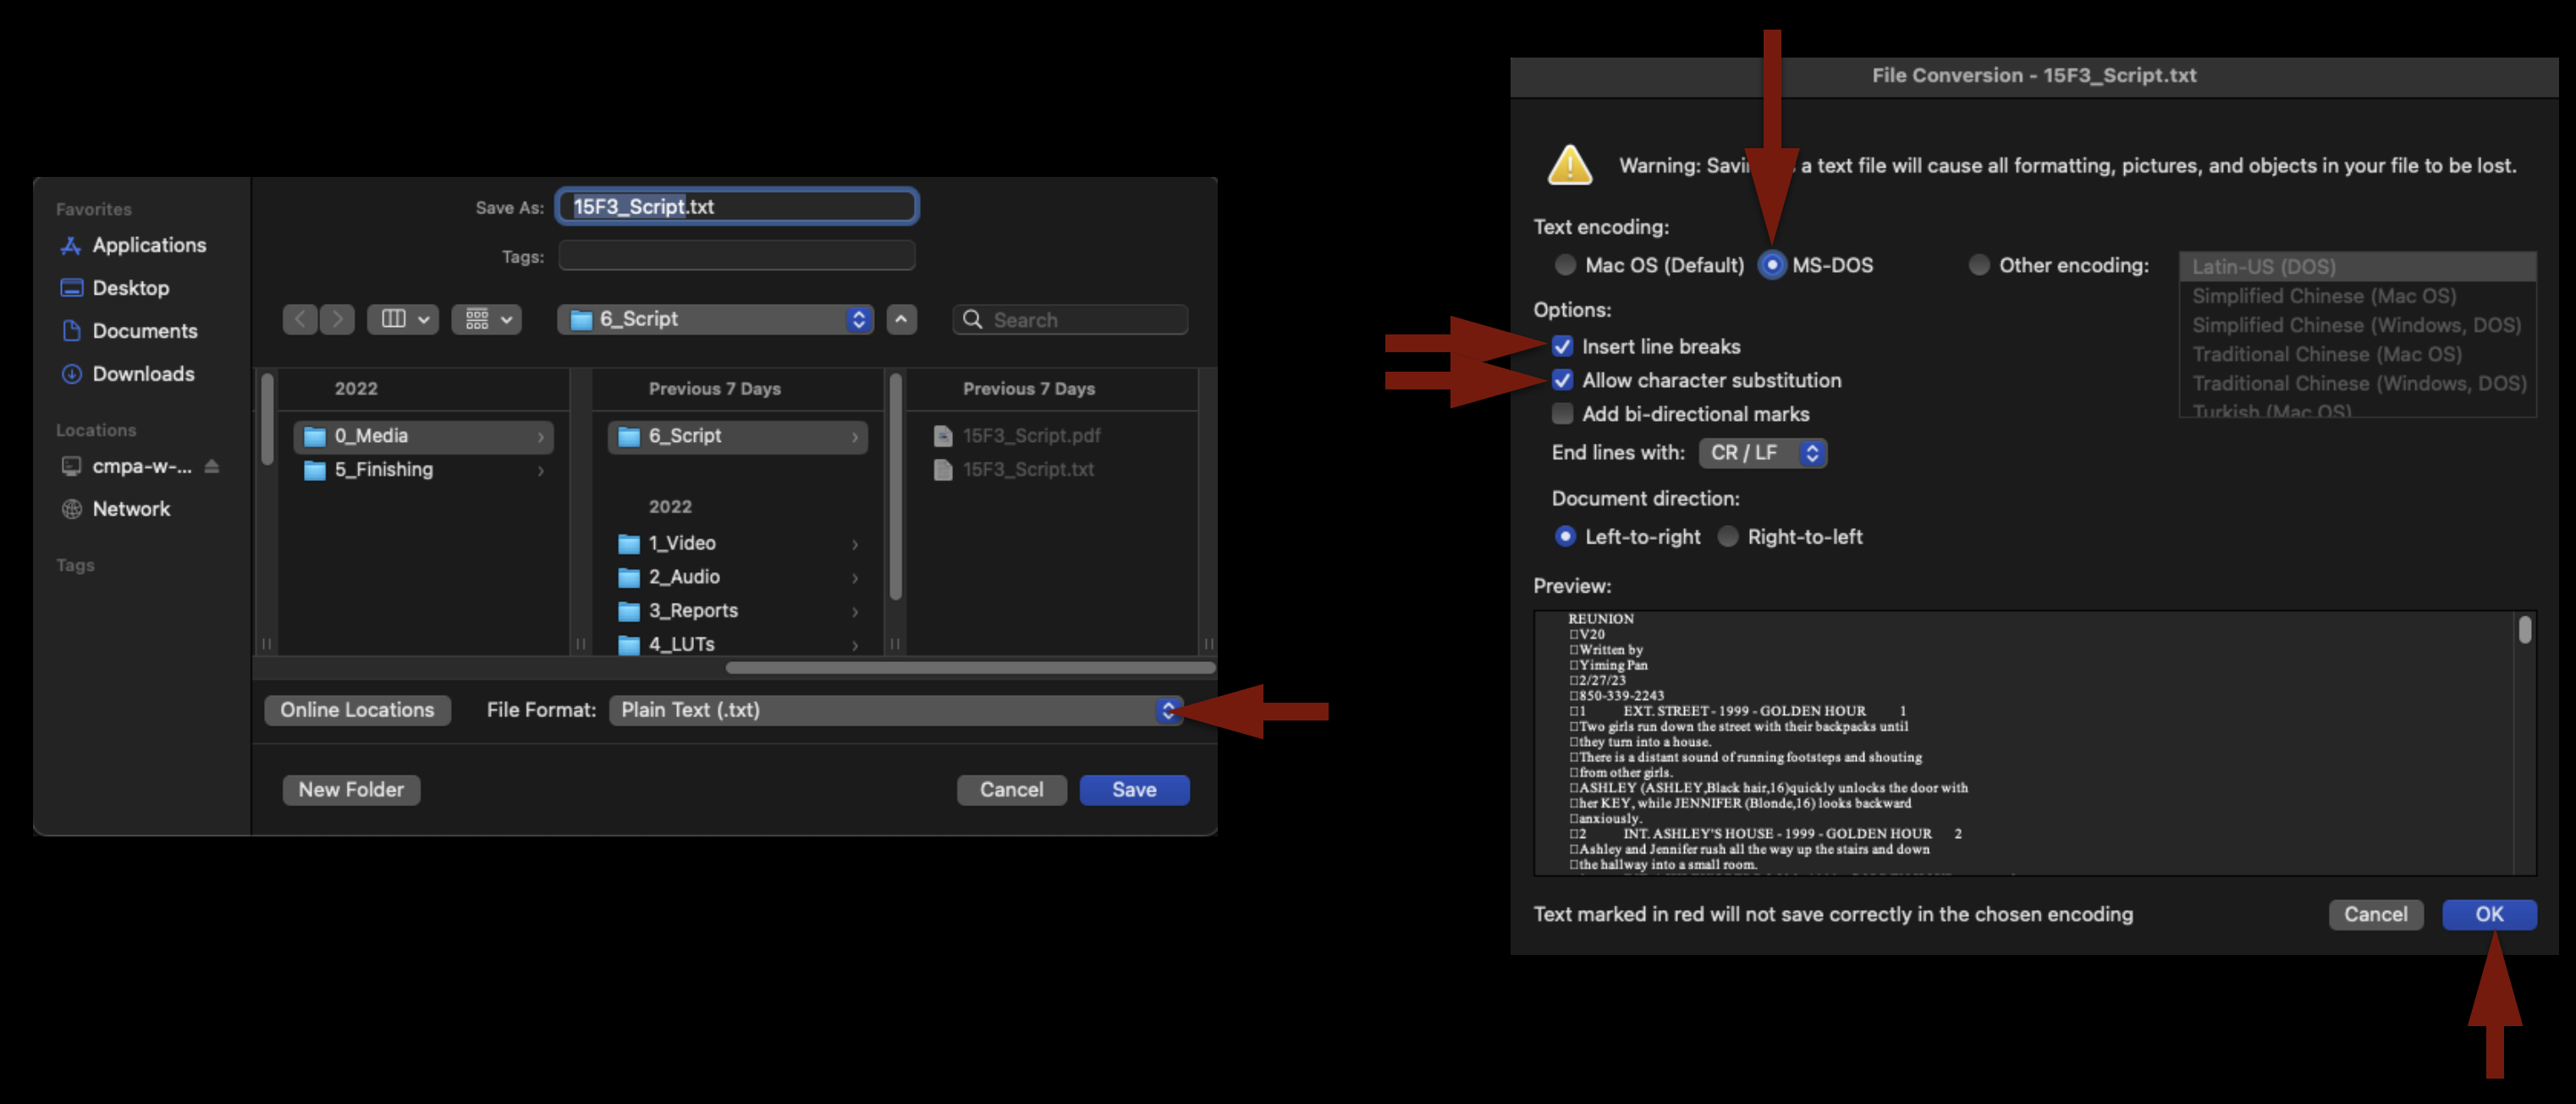
Under File Format change the type to “Plain Text (.txt)” and click “Save”. When the File Conversion screen appears, check the boxes as shown in the example below, then click “OK”.
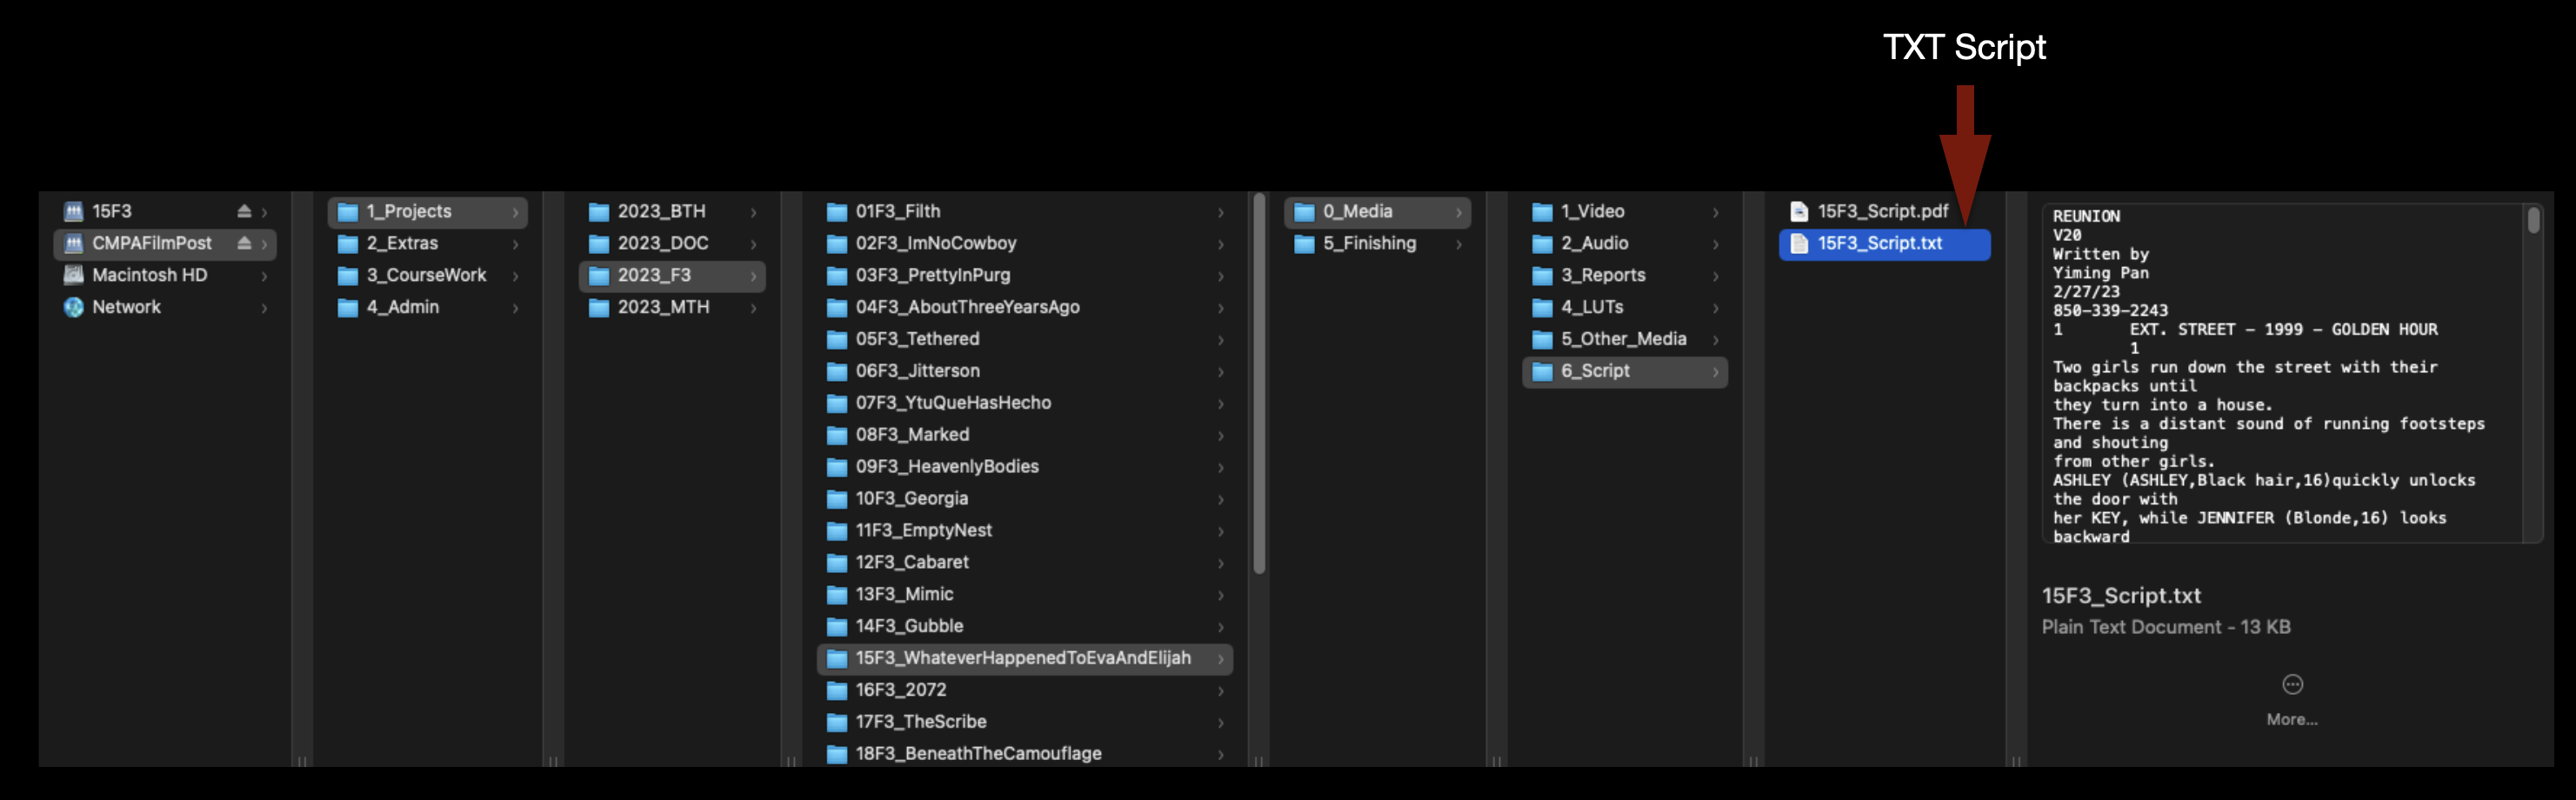
This will save the file as a .txt file, in the same folder:
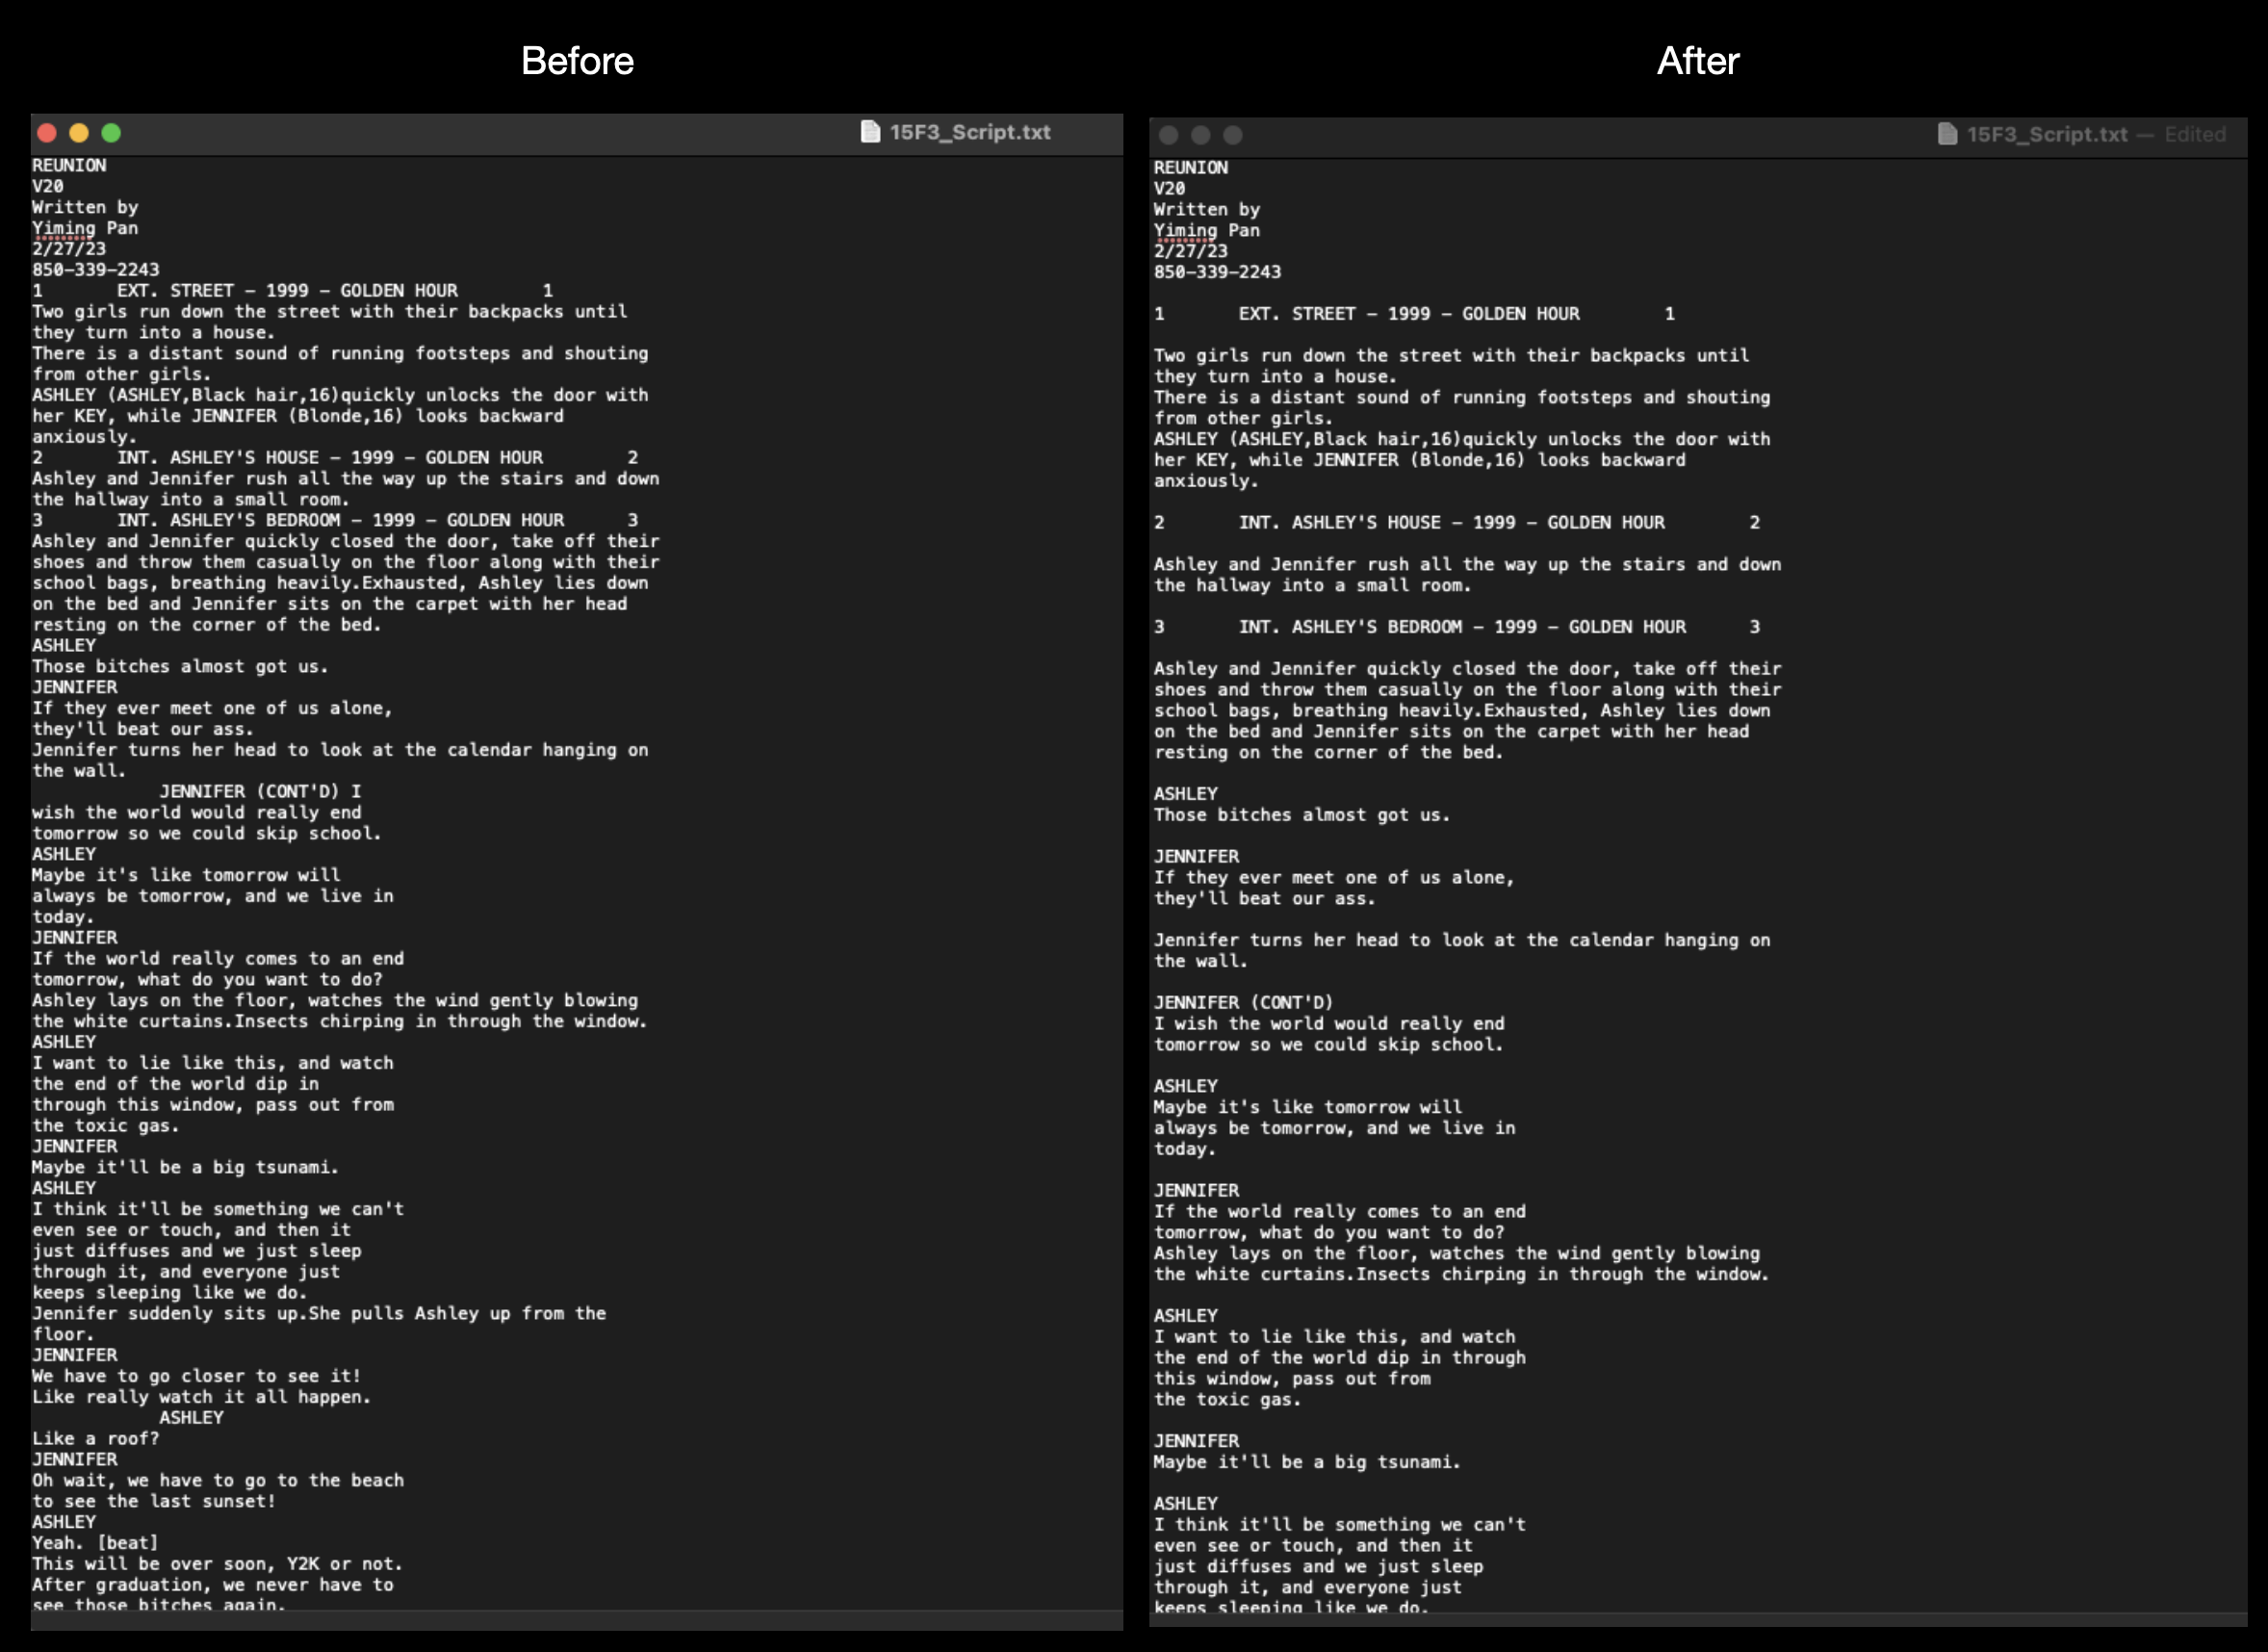
Open the script in the Text Edit app. Depending on how the script was originally formatted, you may notice that not all of the spacing has translated over. Use the return key to add the proper line spacing, as shown in the example below:
Configure the Media Composer Project
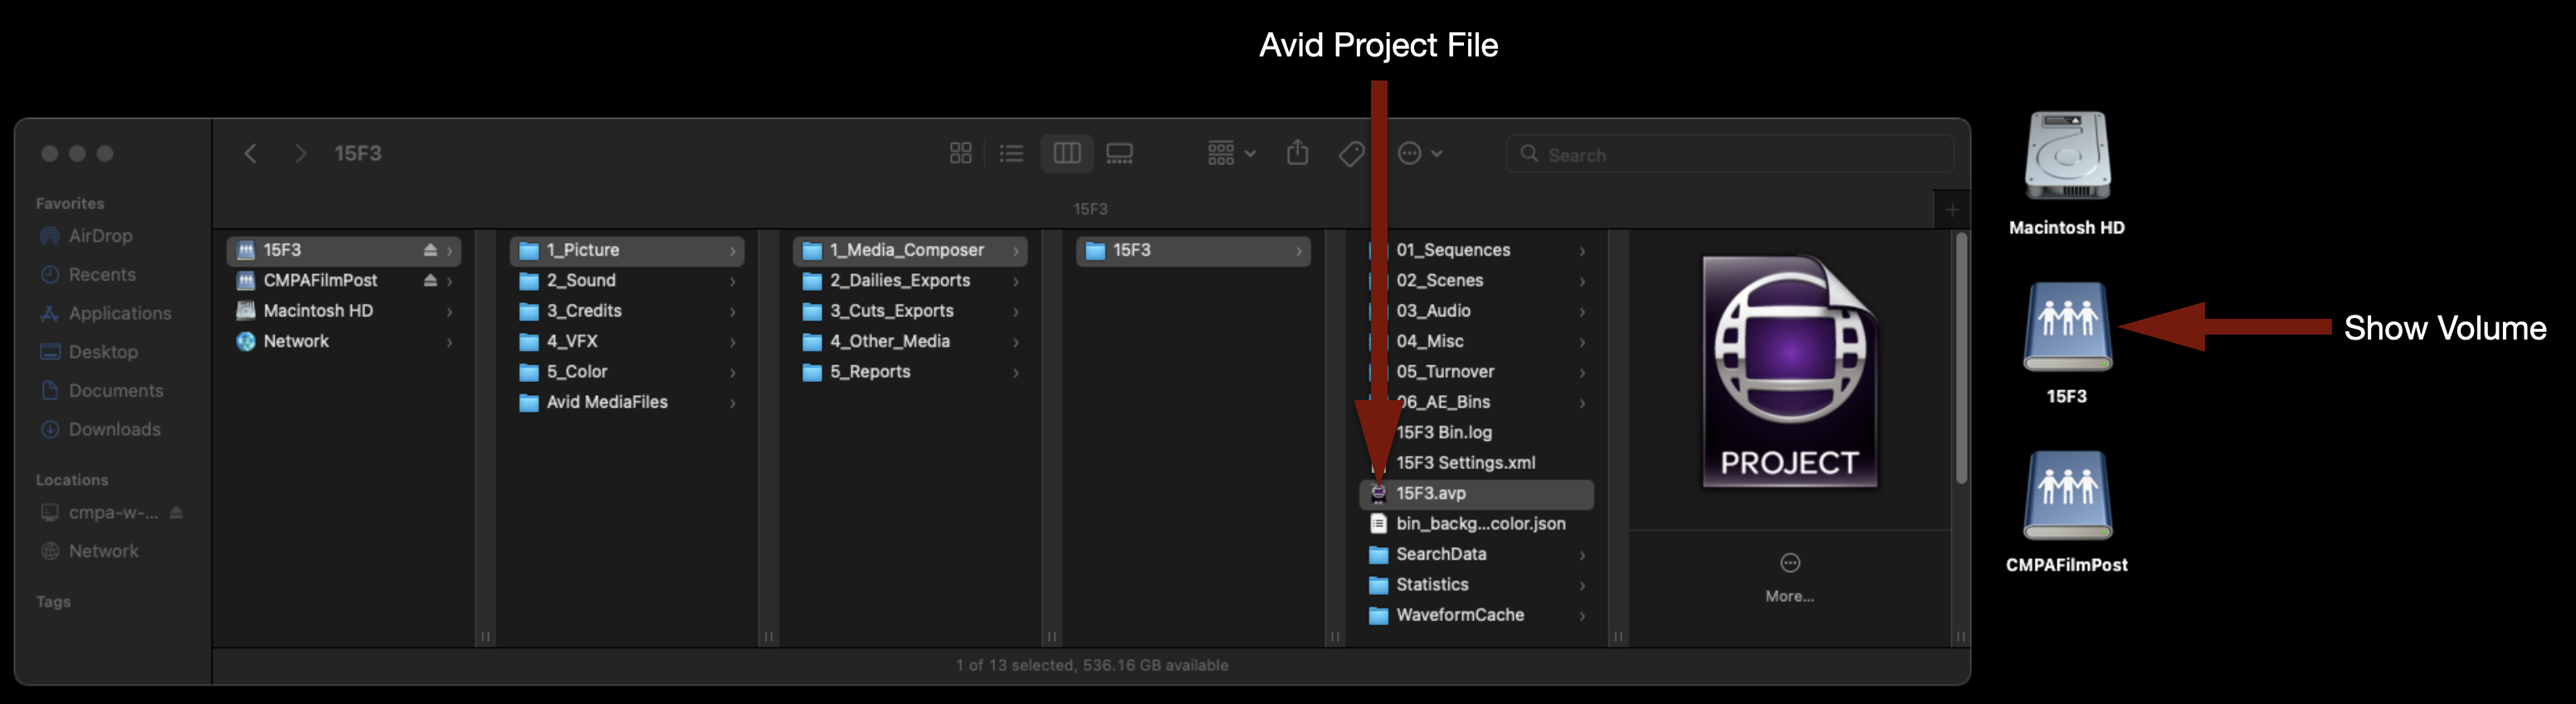
Make sure your Show Volume is mounted. Navigate to your show folder and launch the Media Composer project:
When it opens you will see the project template. These folders and bins must be maintained and kept organized.
Before you begin, double-check the Media Creation settings. Go to the Avid Media Composer menu and select Preferences. Navigate to the Project tab, then click “Media Creation”.
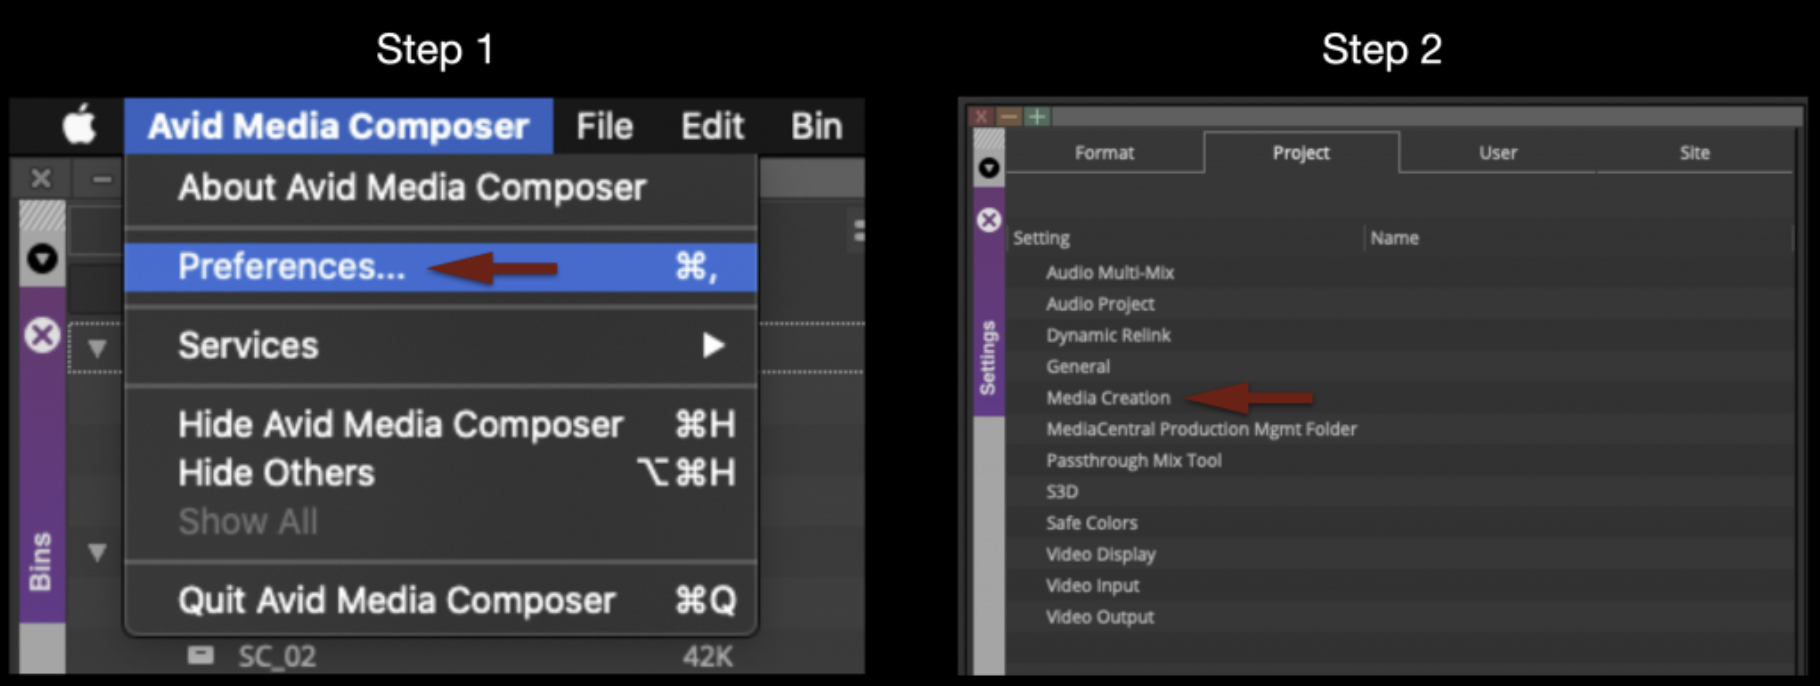
In the Media Creation window, make sure you select:
- Video Resolution: DNxHD SQ
- Video & Audio Drives: Your Show Volume

Select “Apply to All” for everything, then click “OK”.
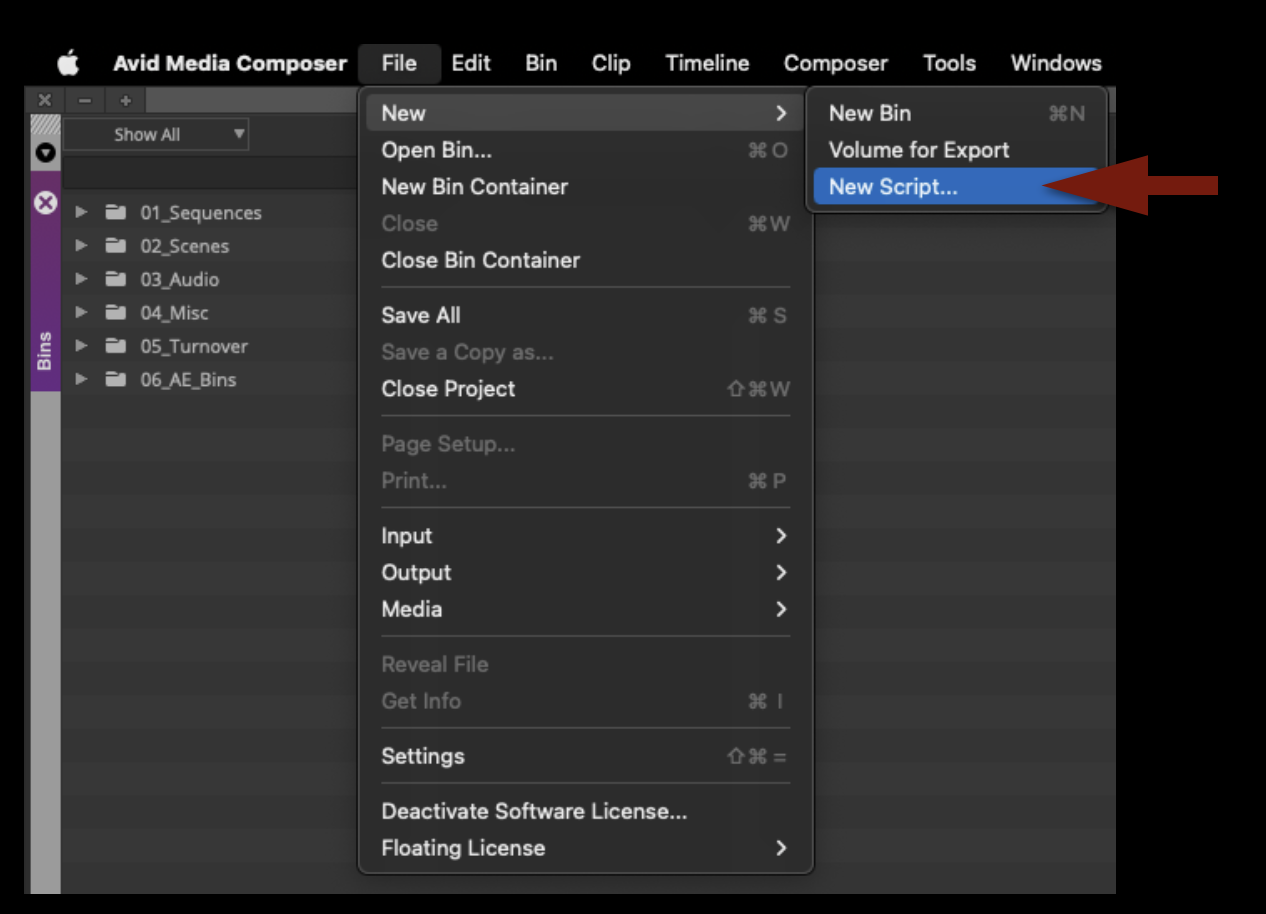
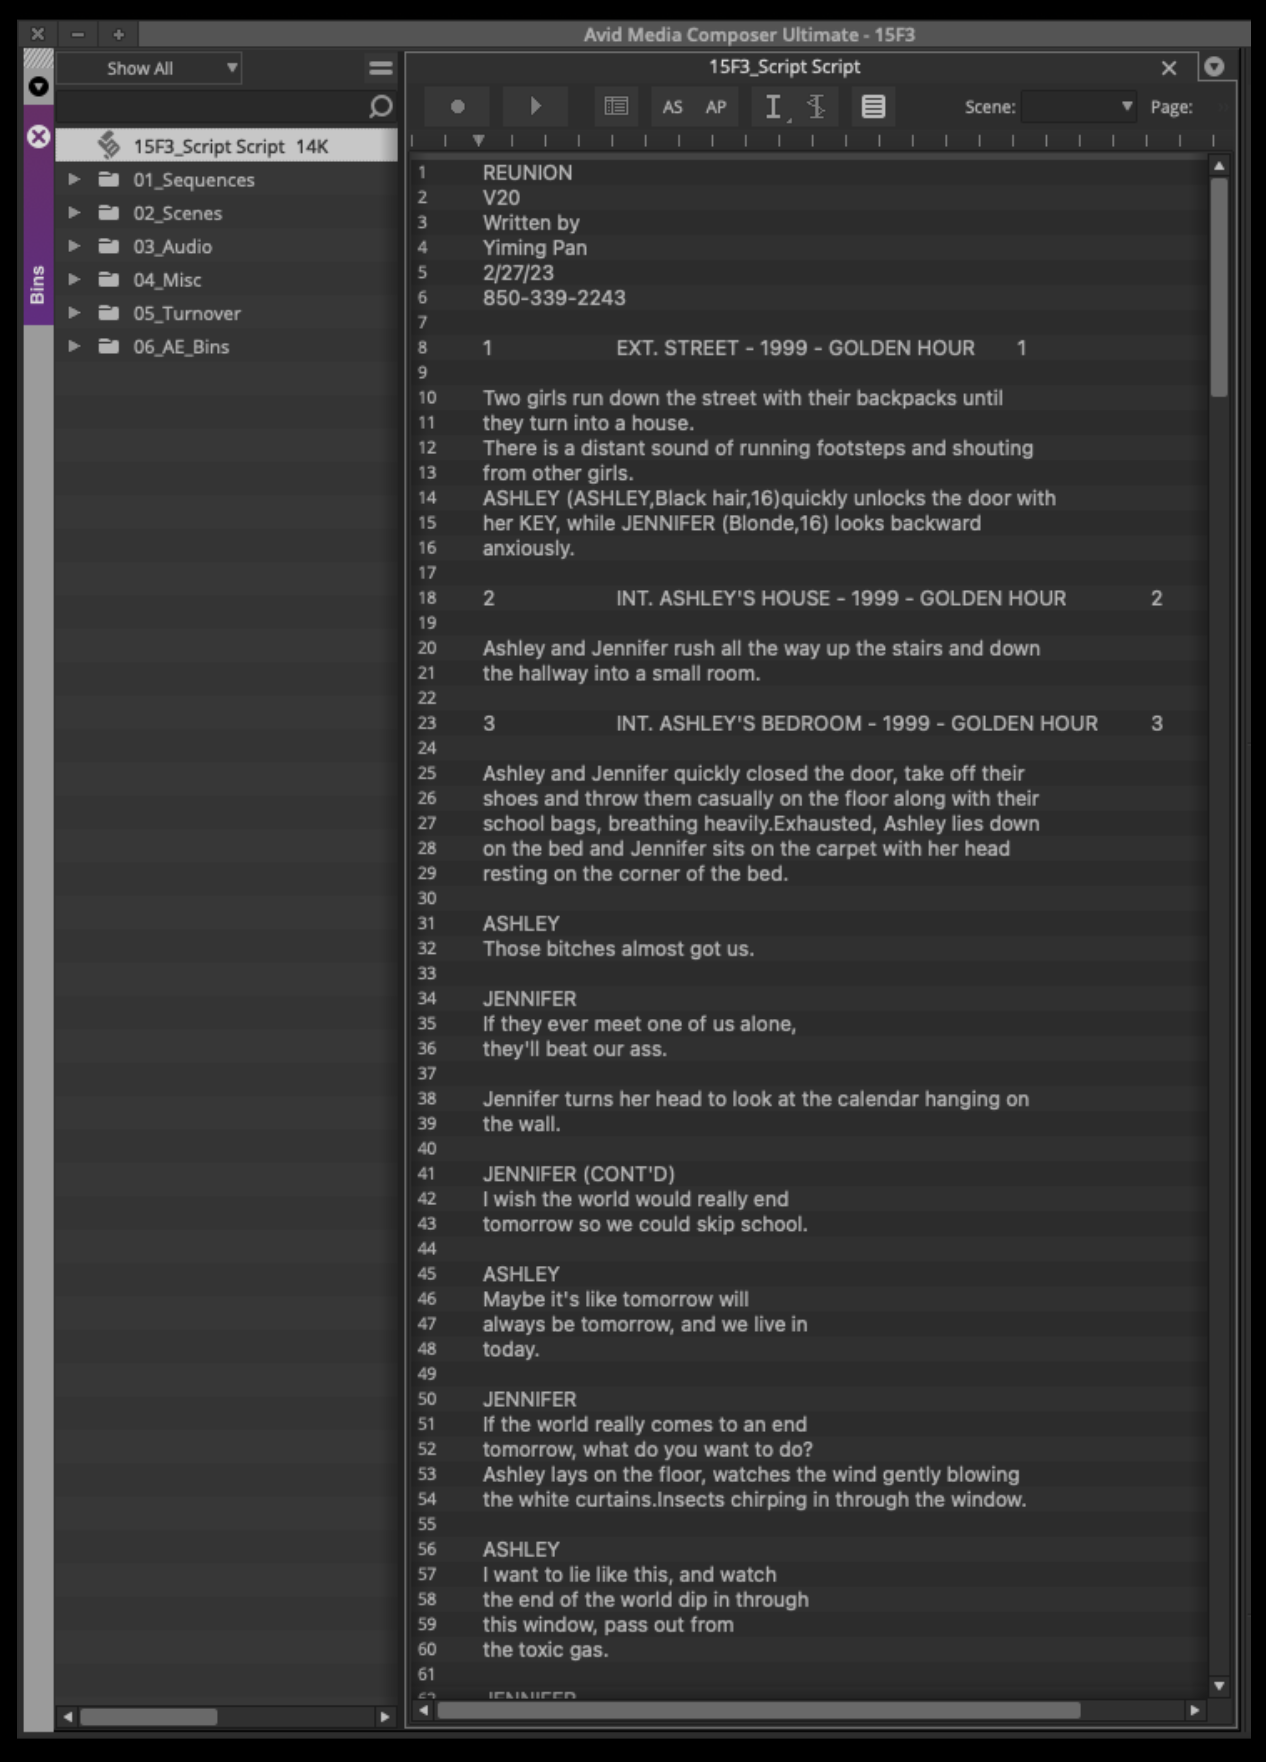
Import the Script
Go to the File menu and select New Script…
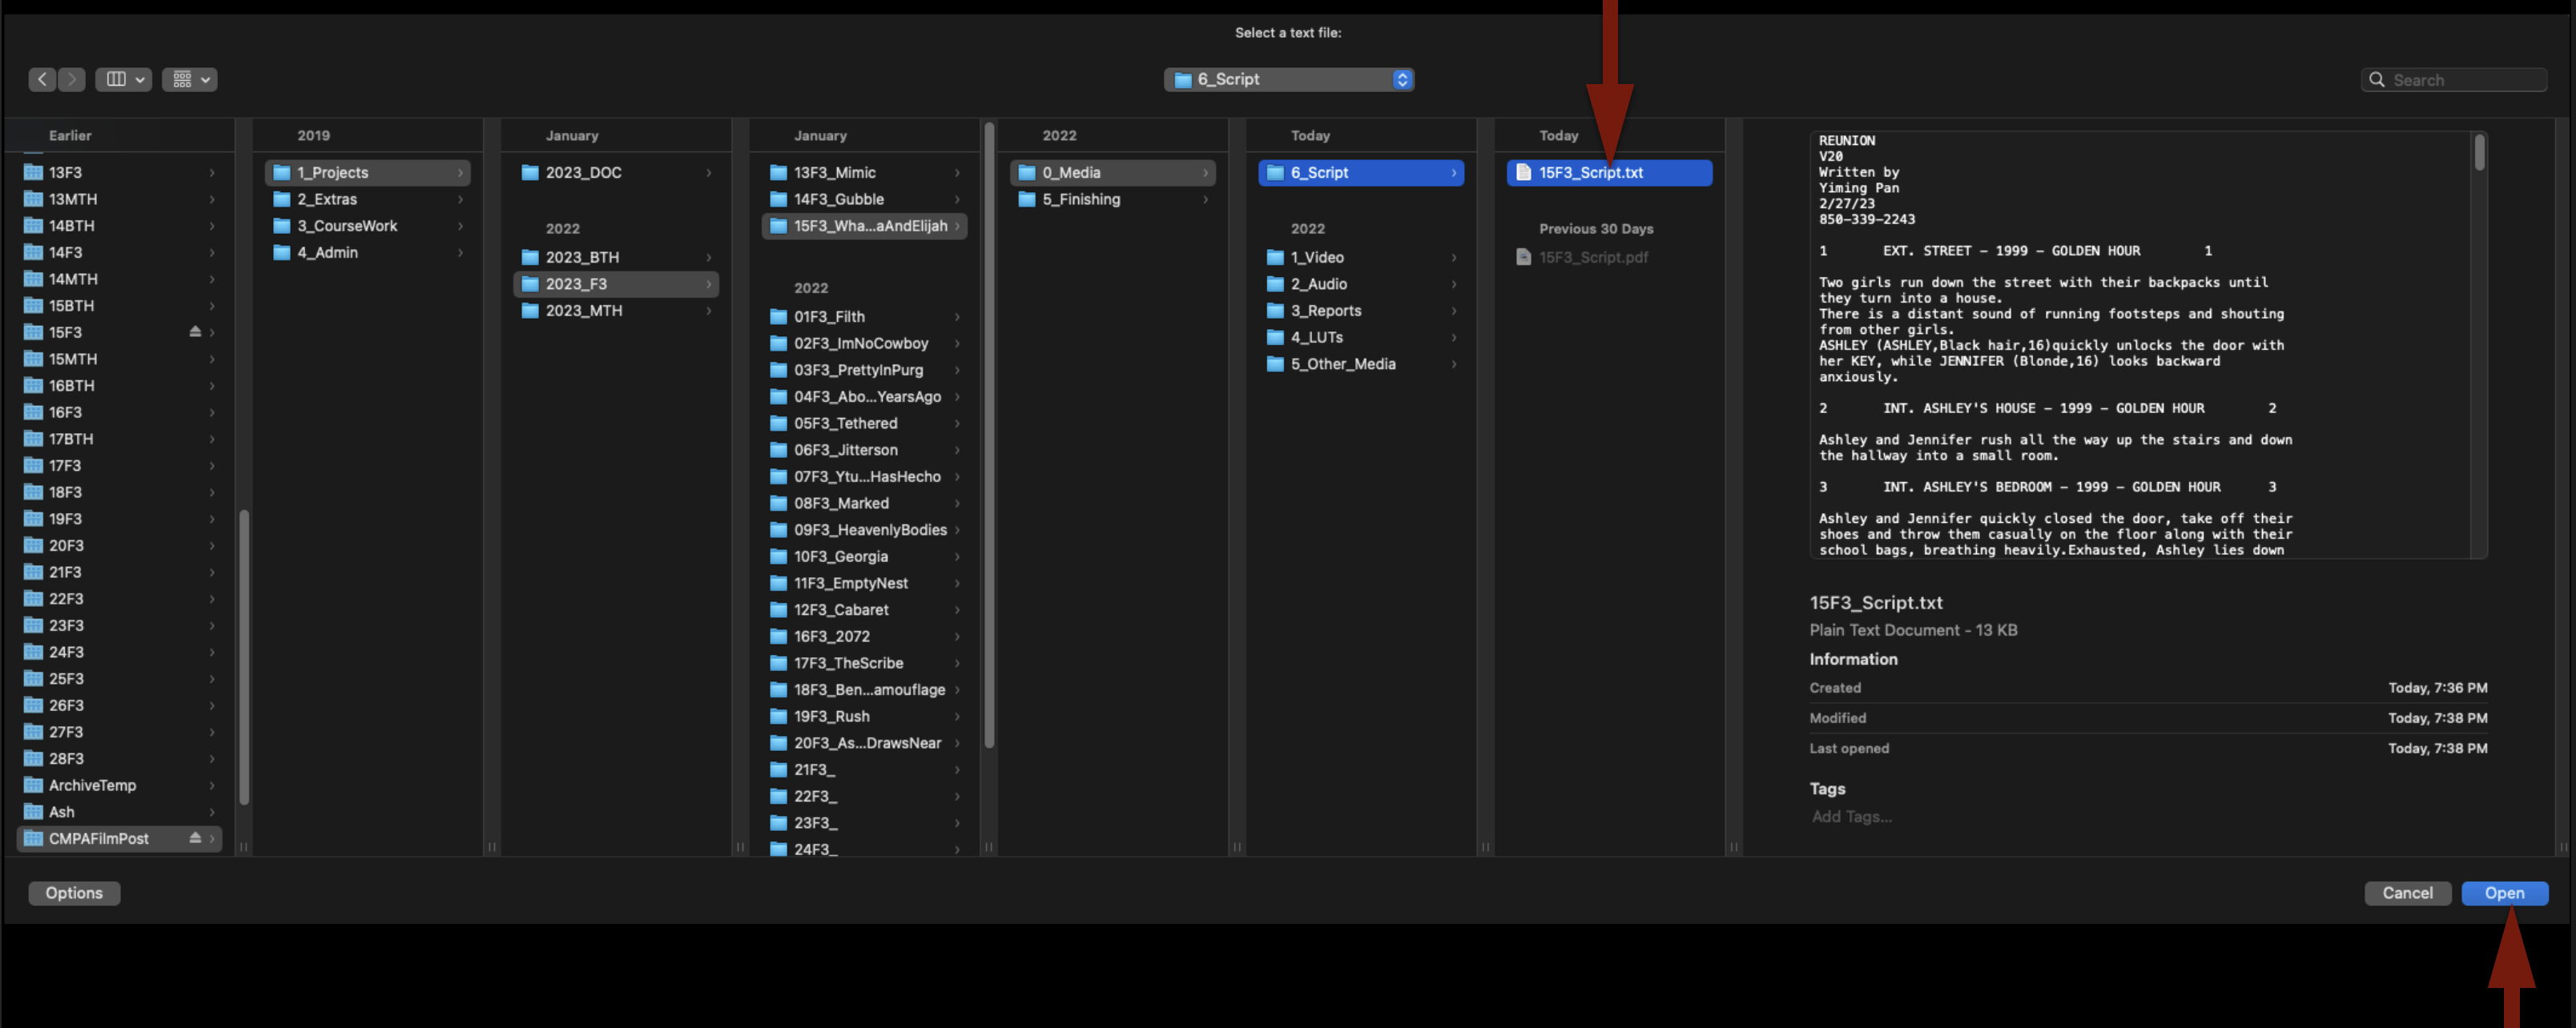
Navigate to where you saved the .txt version of the script and click “Open”:
This will import the script into your Media Composer project:
Transcode Footage Using Davinci Resolve
While it is possible to transcode your original camera files into Avid Media MXF files using Media Composer it is much quicker to use Davinci Resolve if you have to transcode more than a few clips.
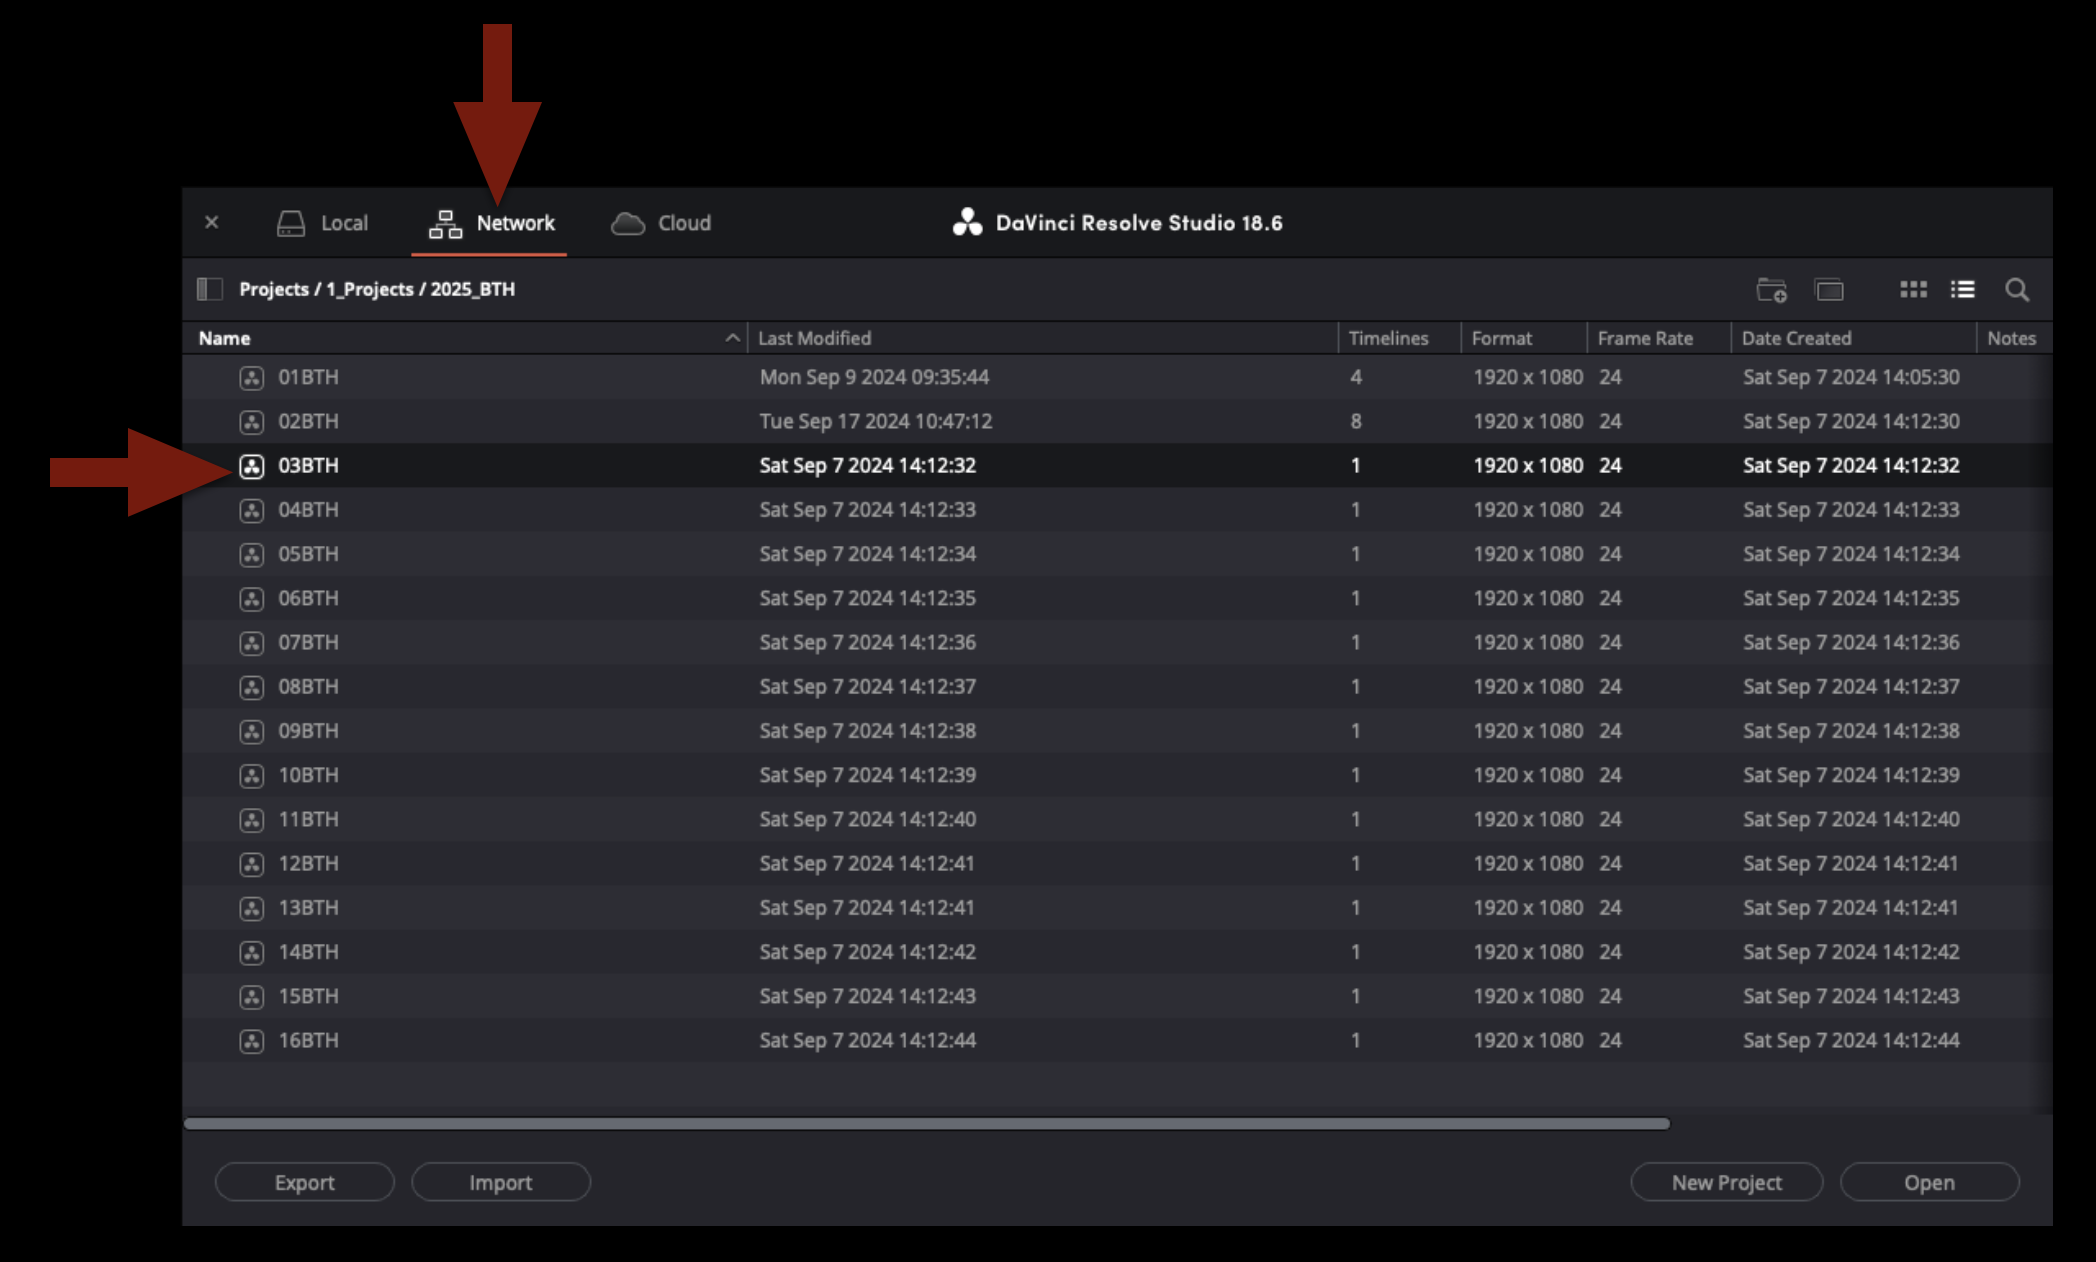
First close Media Composer and then open Davinci Resolve and make sure you are looking a the project window under “Network”. Then find your shows project under the proper folder path.
Once your project is open navigate to the “Media” page. The bottom portion of the screen will display the “Media Pool” where the project will be organized into bins. Find the bin that is labeled with the proper shot day of the footage you are going to transcode. Then in the top portion of the screen navigate to the location of your original camera files on the server. When you locate the folder containing all of the video files you wish to transcode, drag the entire folder into the bin.
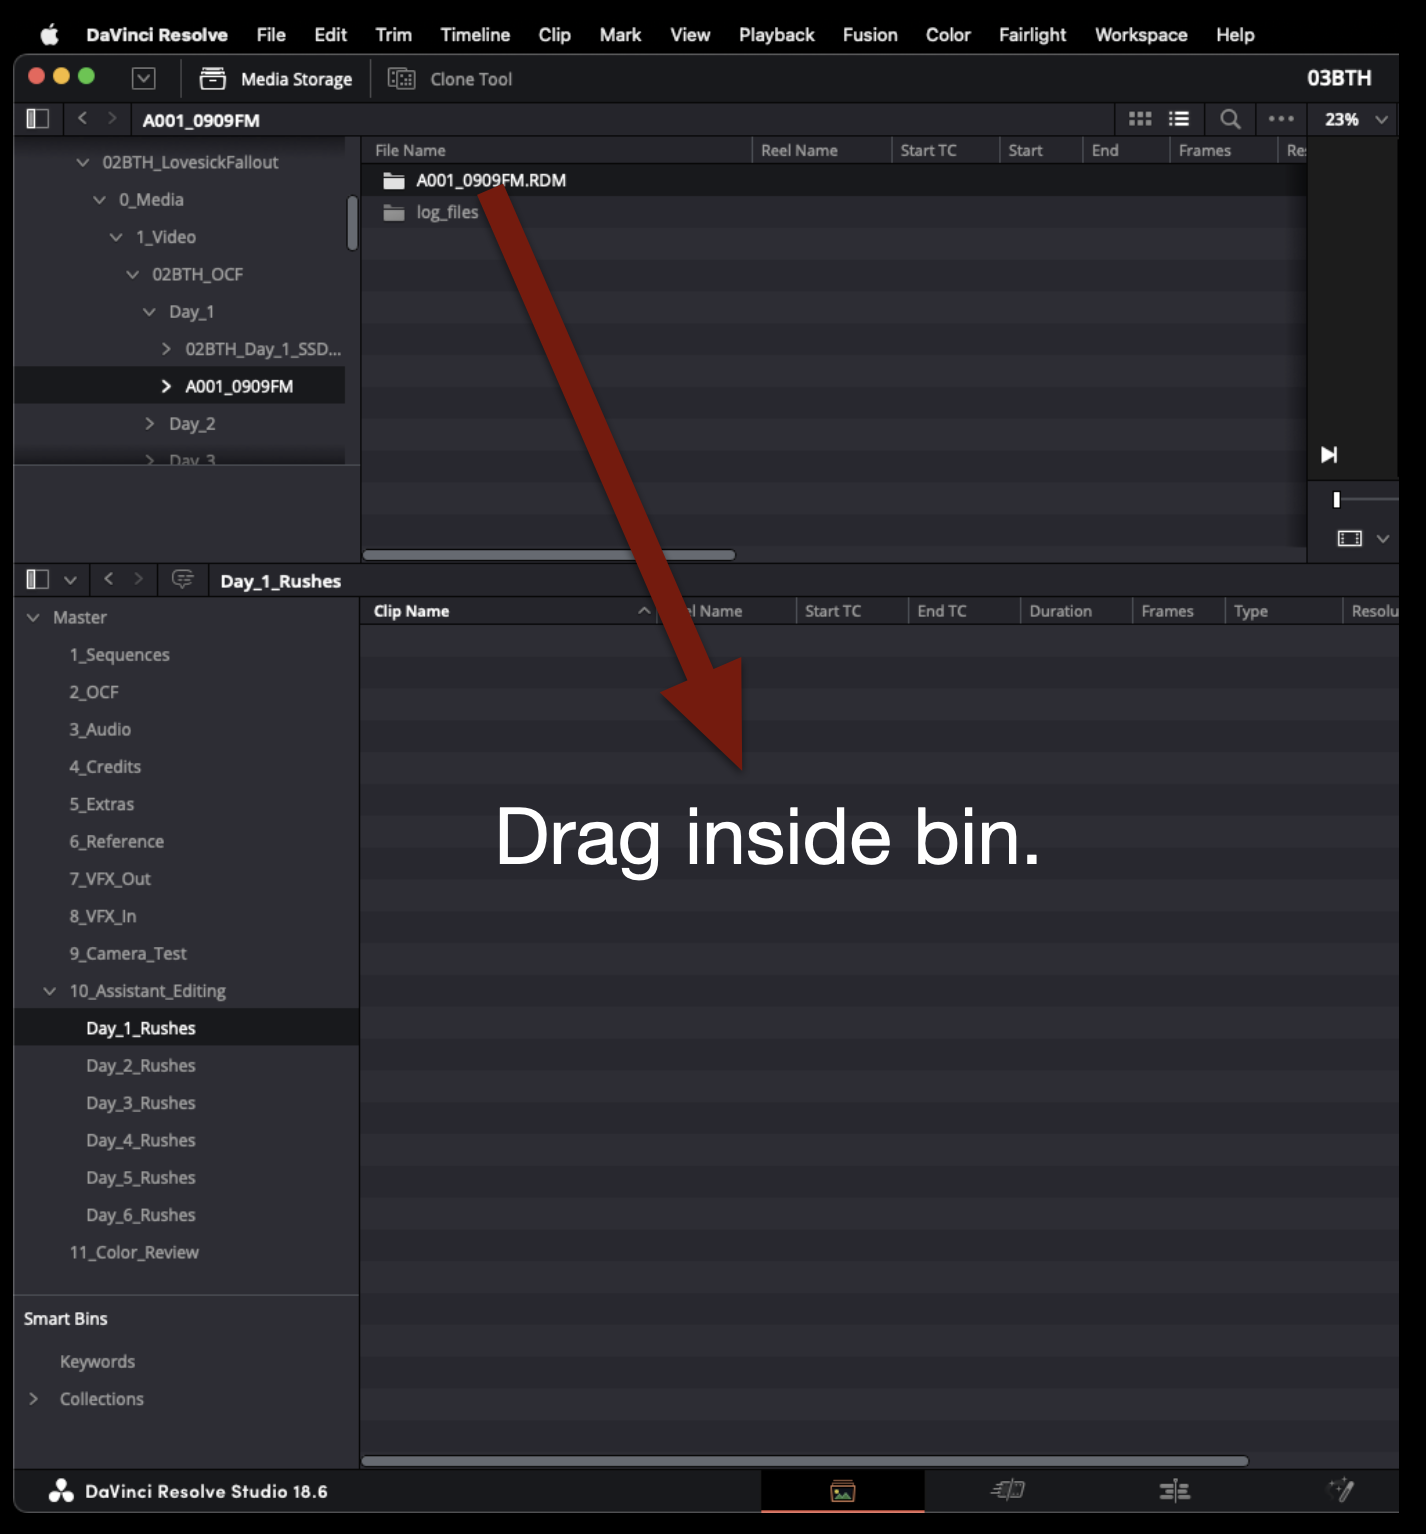
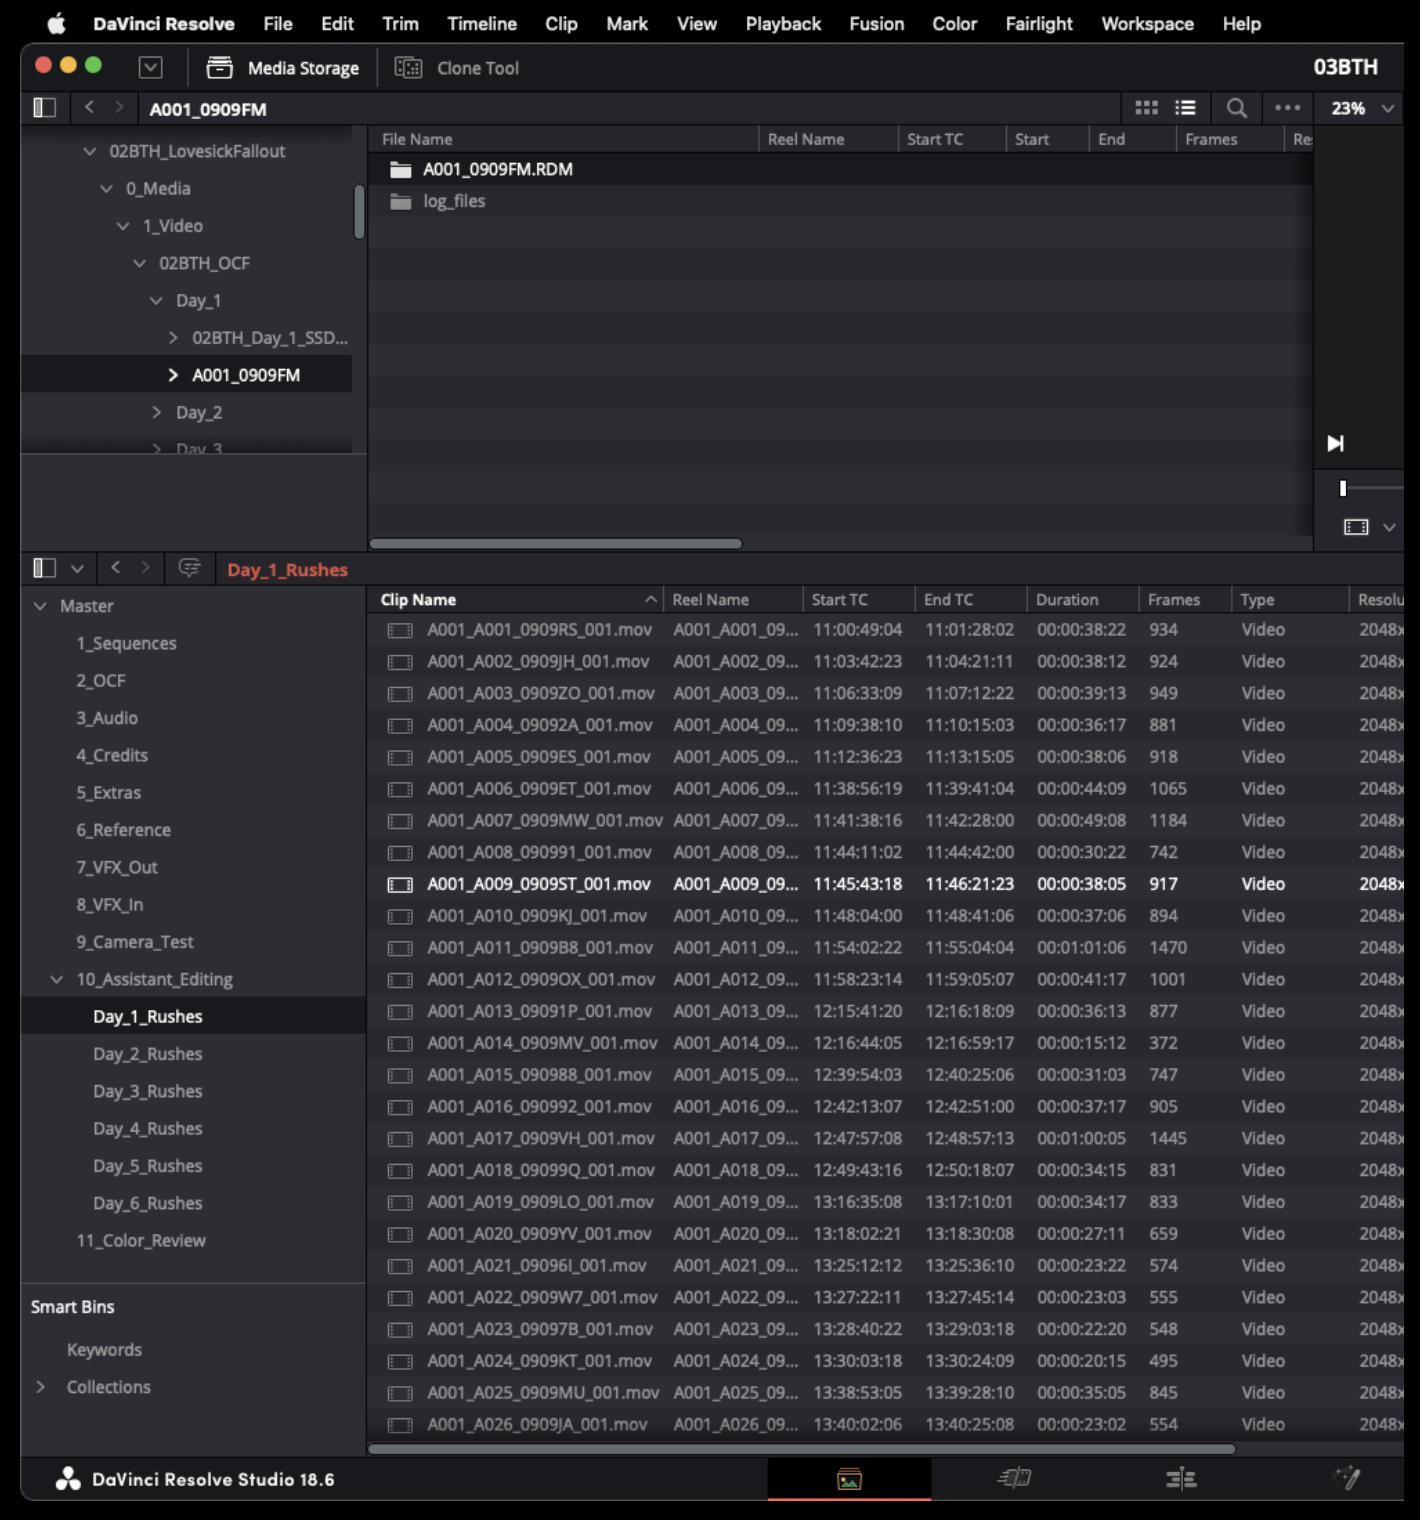
This will import the entire contents of the folder into the bin.
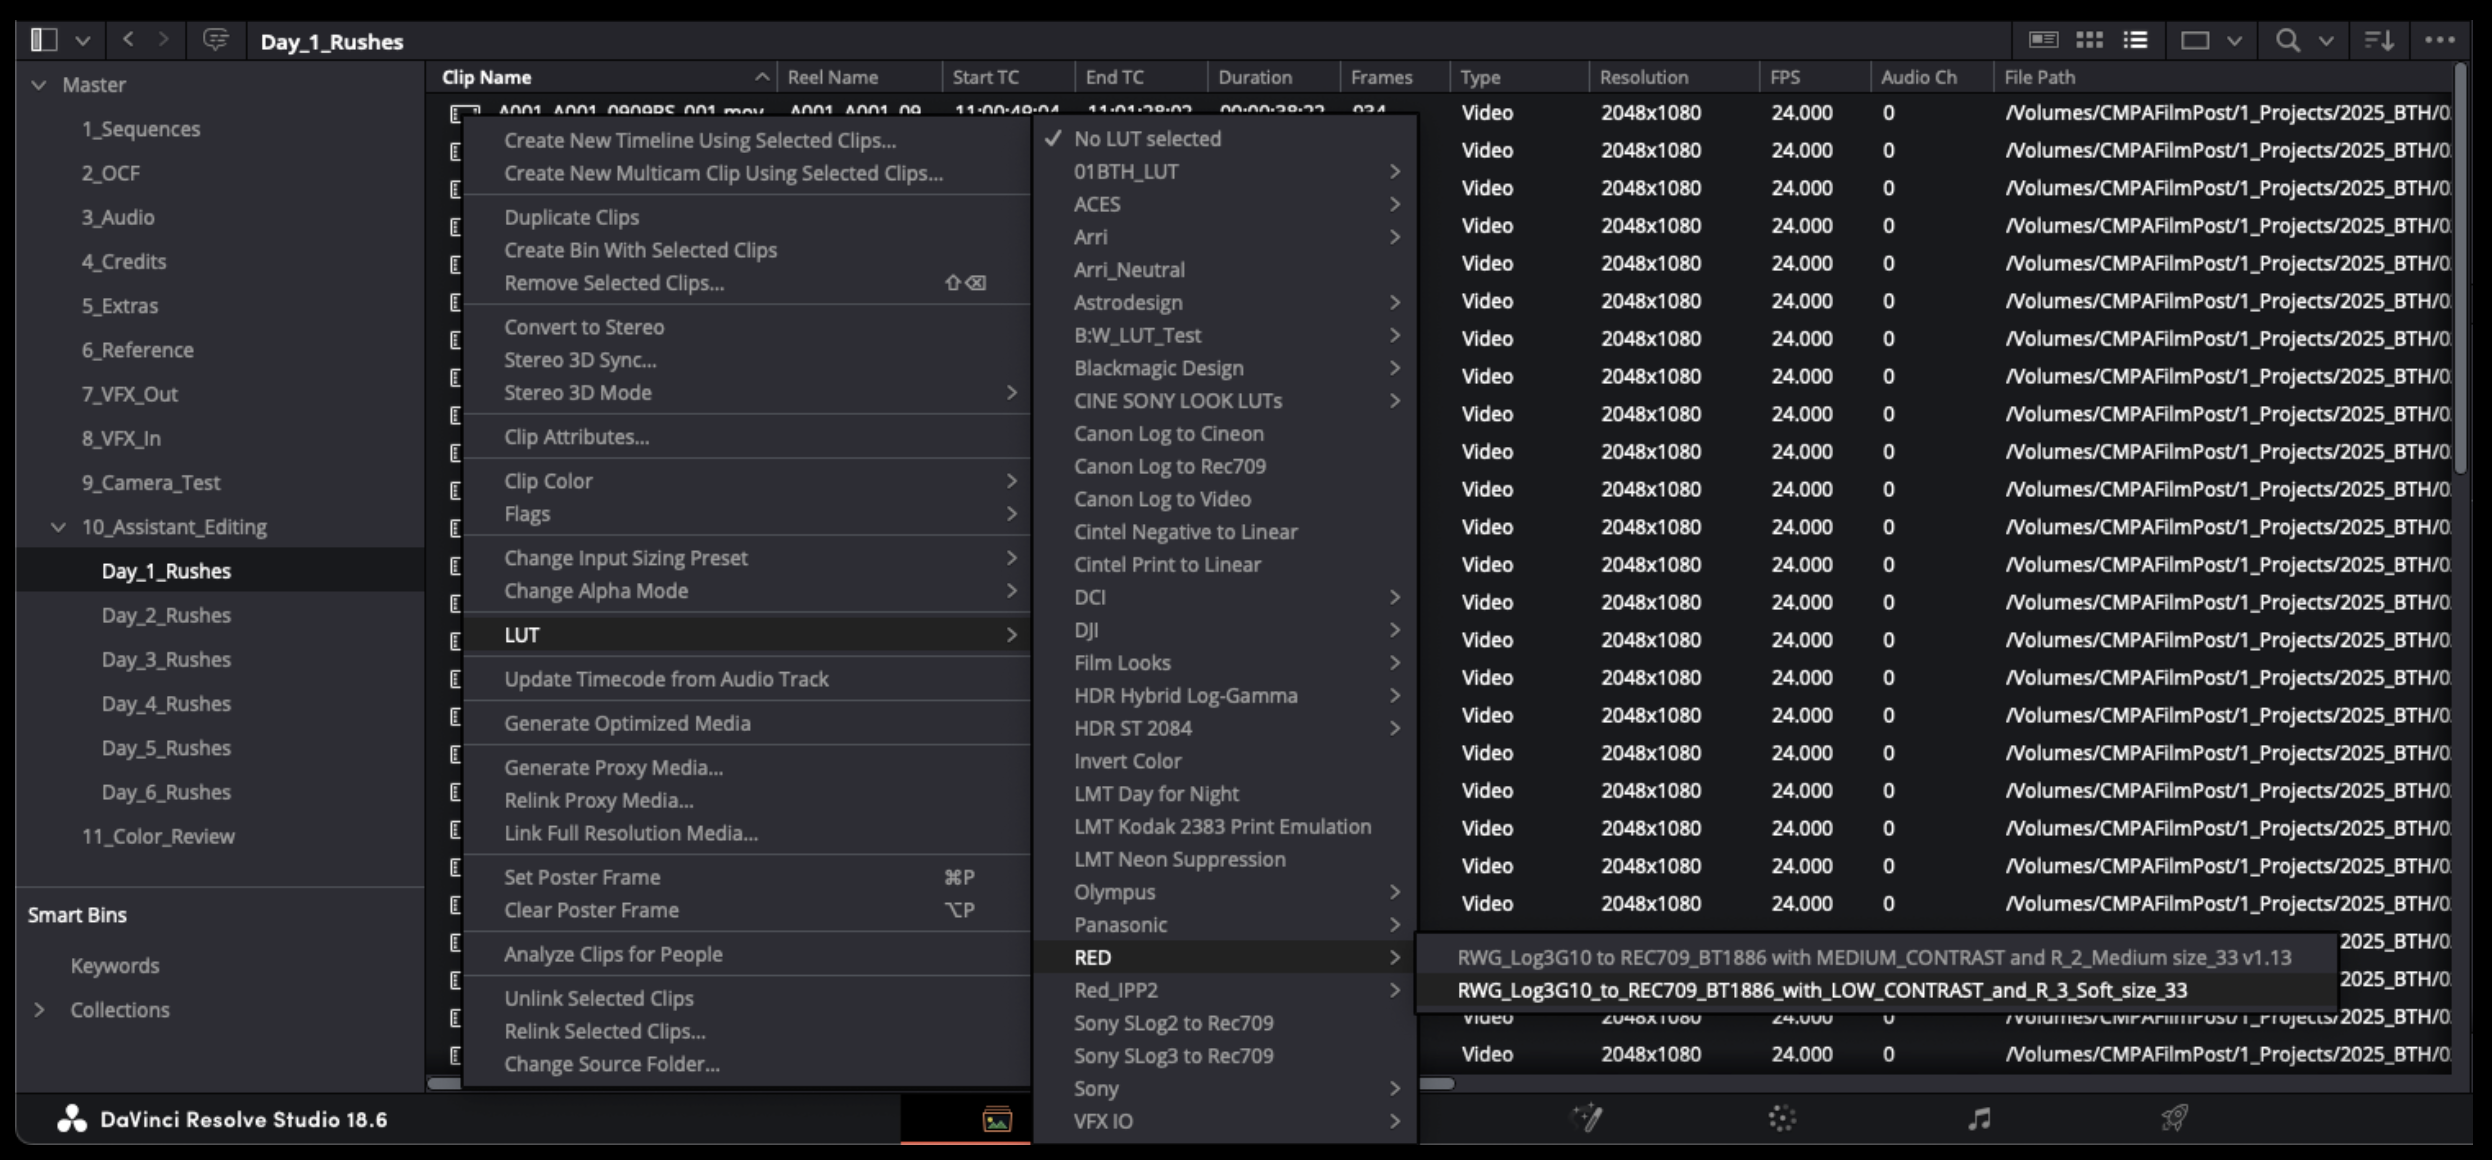
If your OCF were recorded in LOG then you will need to apply a LUT. Highlight all of the clips in the bin and right click on one of them. This will open a long drop down menu. Select LUT and then follow the options until you find the proper LUT to apply. You can find the name of the proper LUT by looking at the camera report
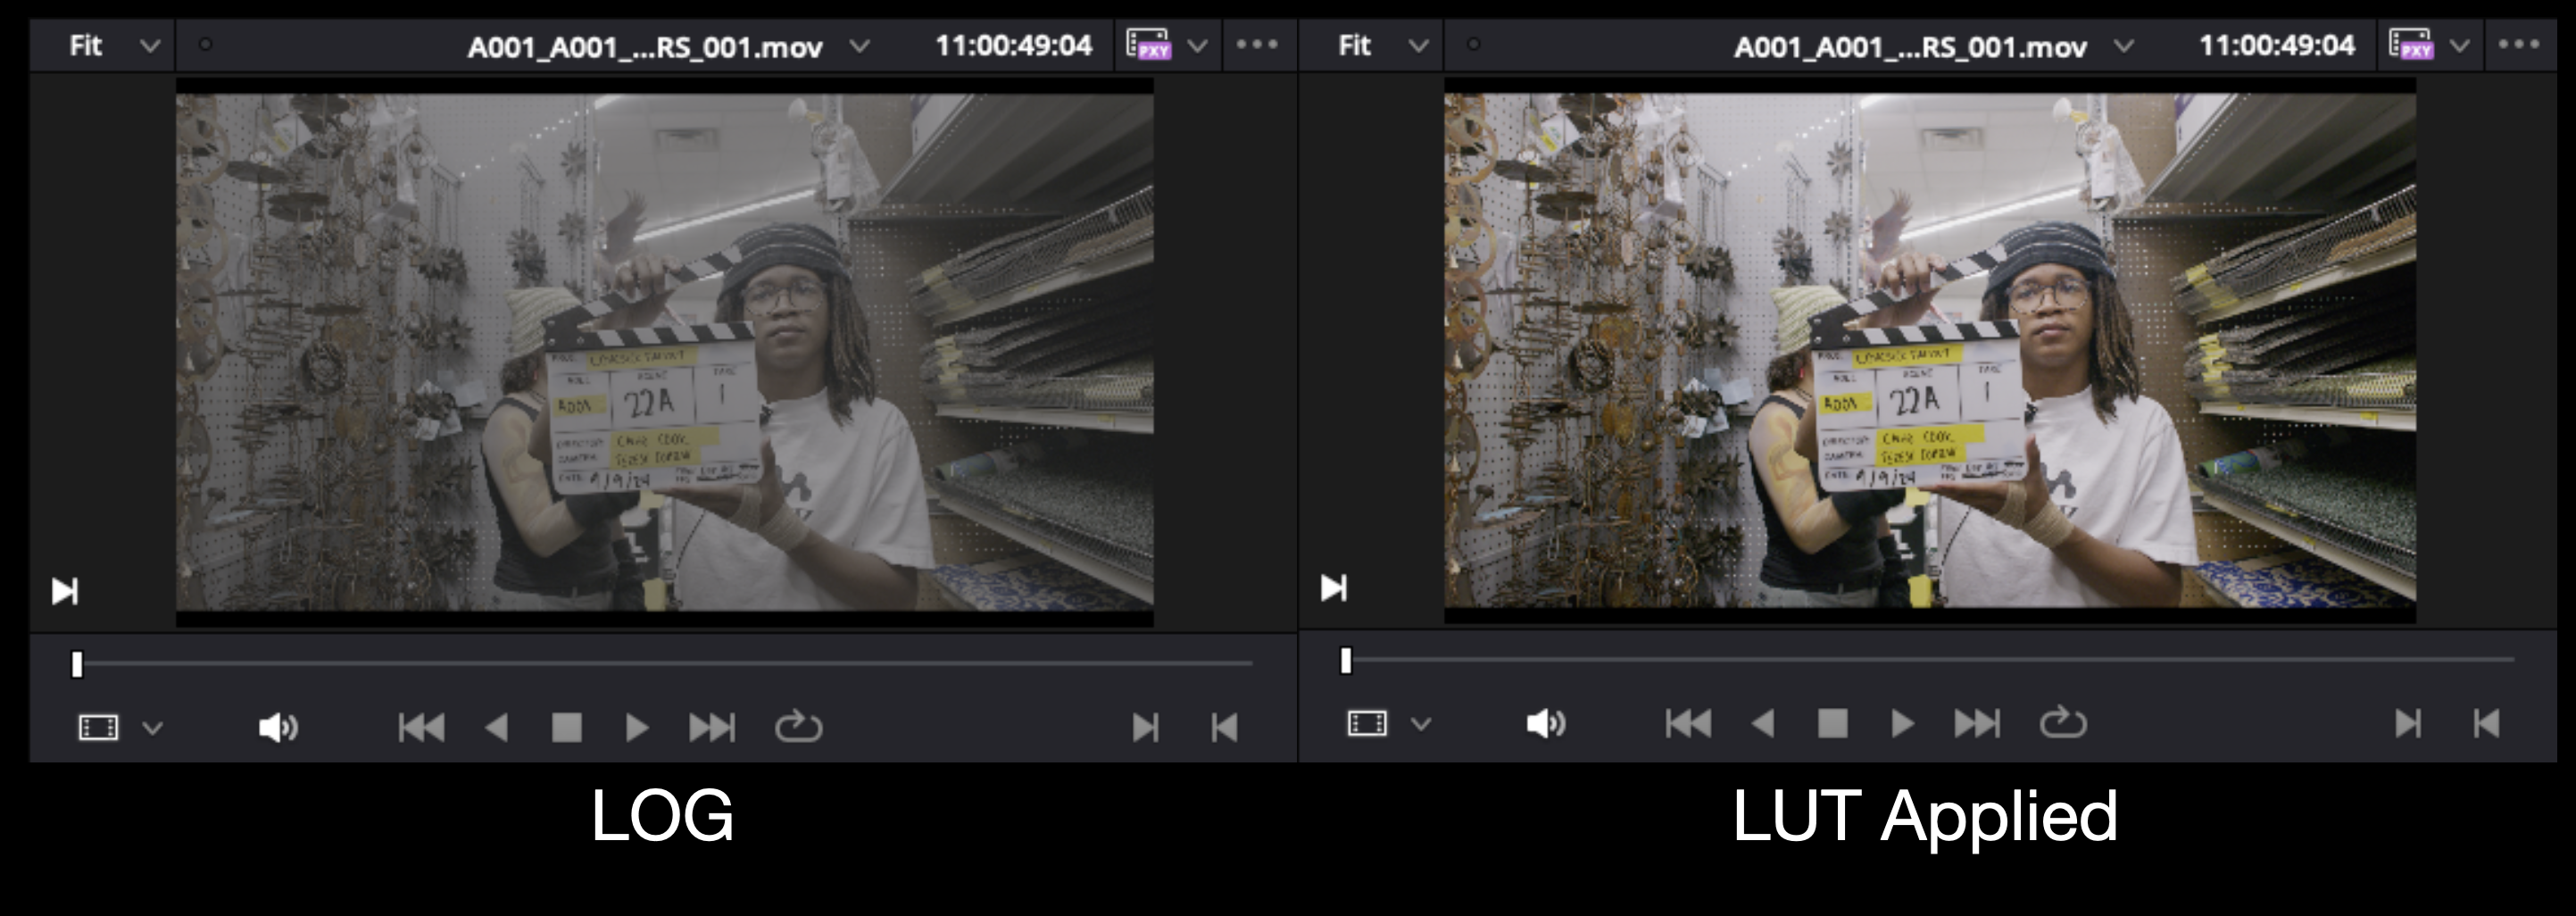
Once you have applied to LUT to all of the clips they should no longer appear in LOG as shown in the example below.
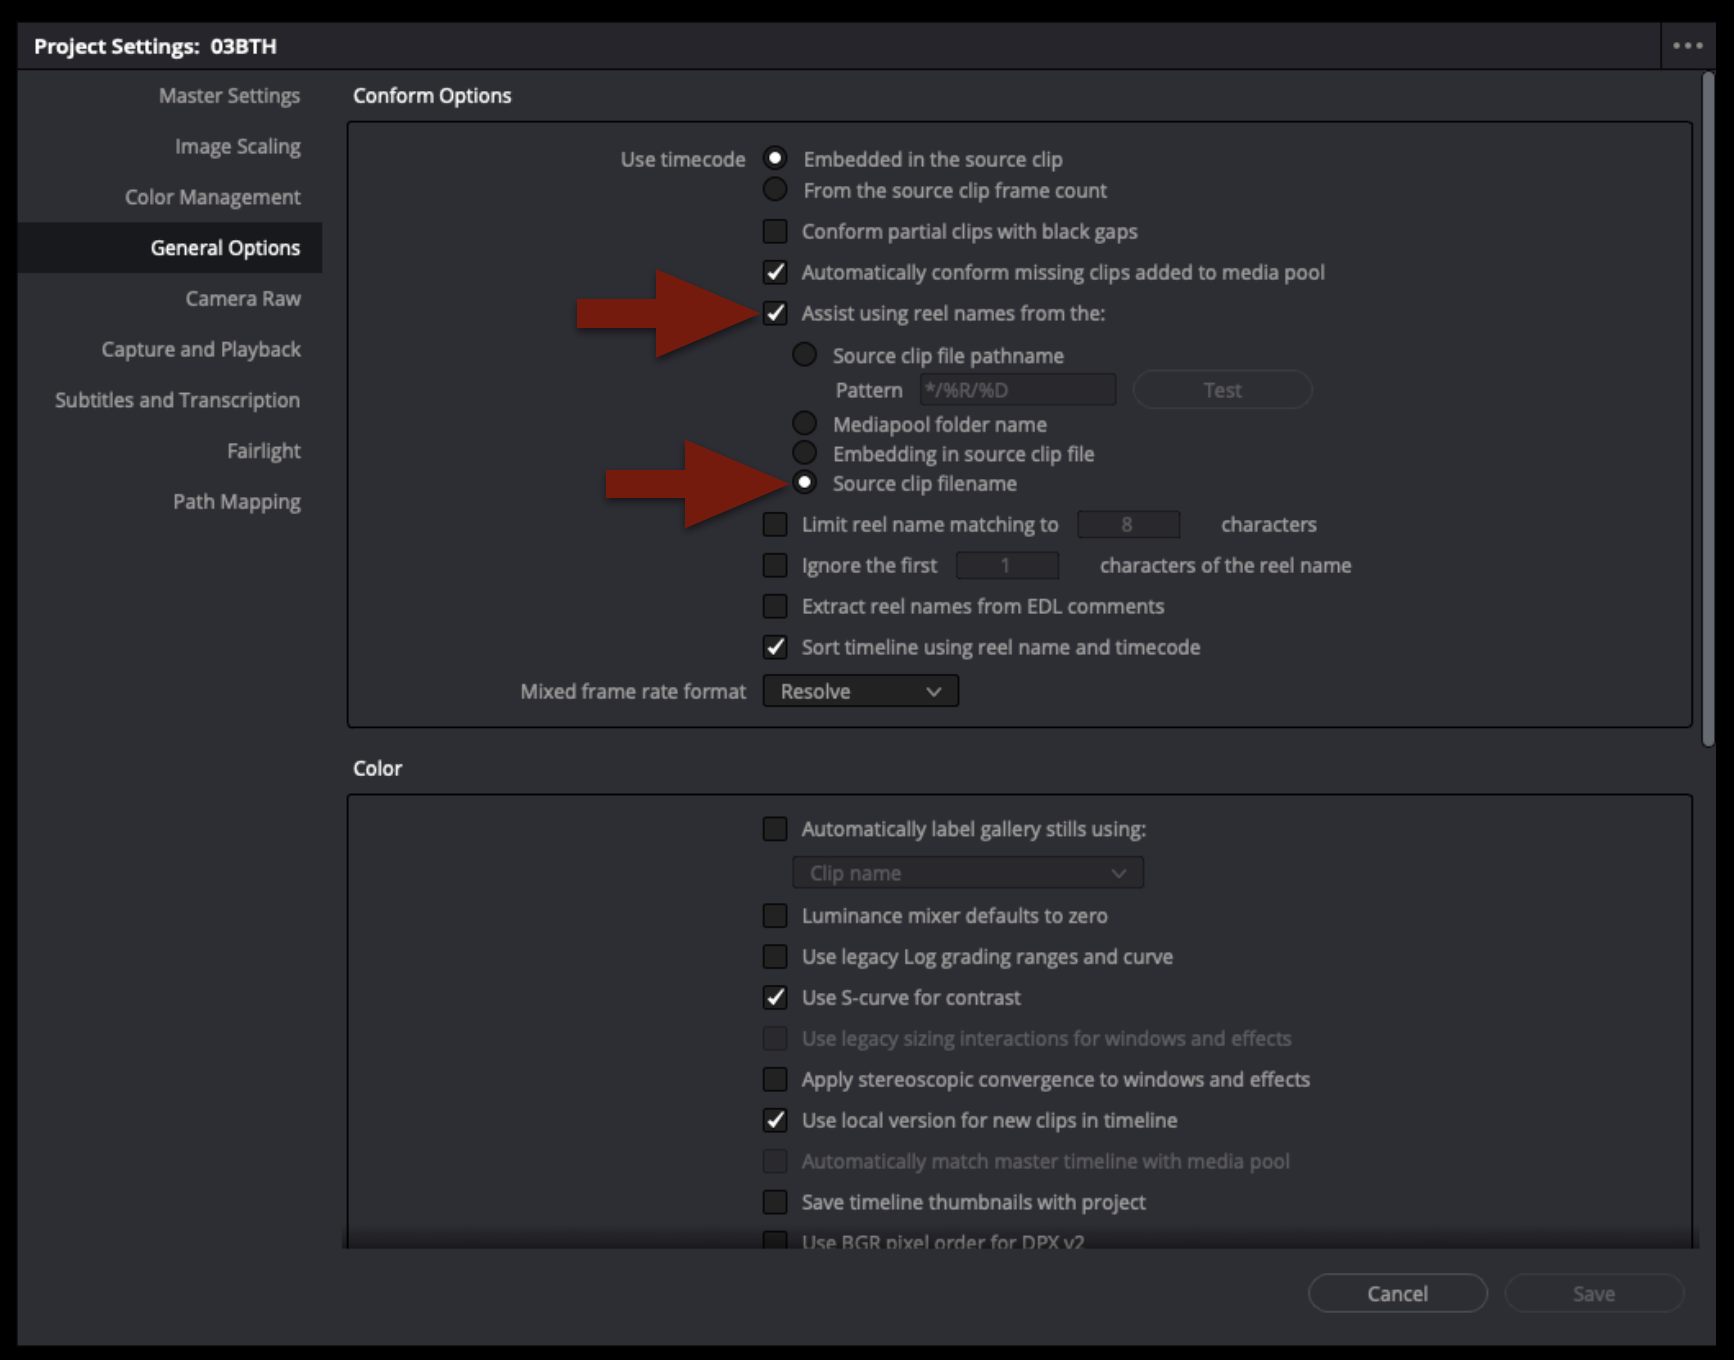
The next step is to check that the proper settings in the “Conform Options” are set. Open the project settings and then navigate under “General Options”. Ensure that “Assist using reel names from the source clip filename” is selected.
If the “Conform Options” are set correctly you will see that the columns for “Clip Names” and “Reel Names” will match.

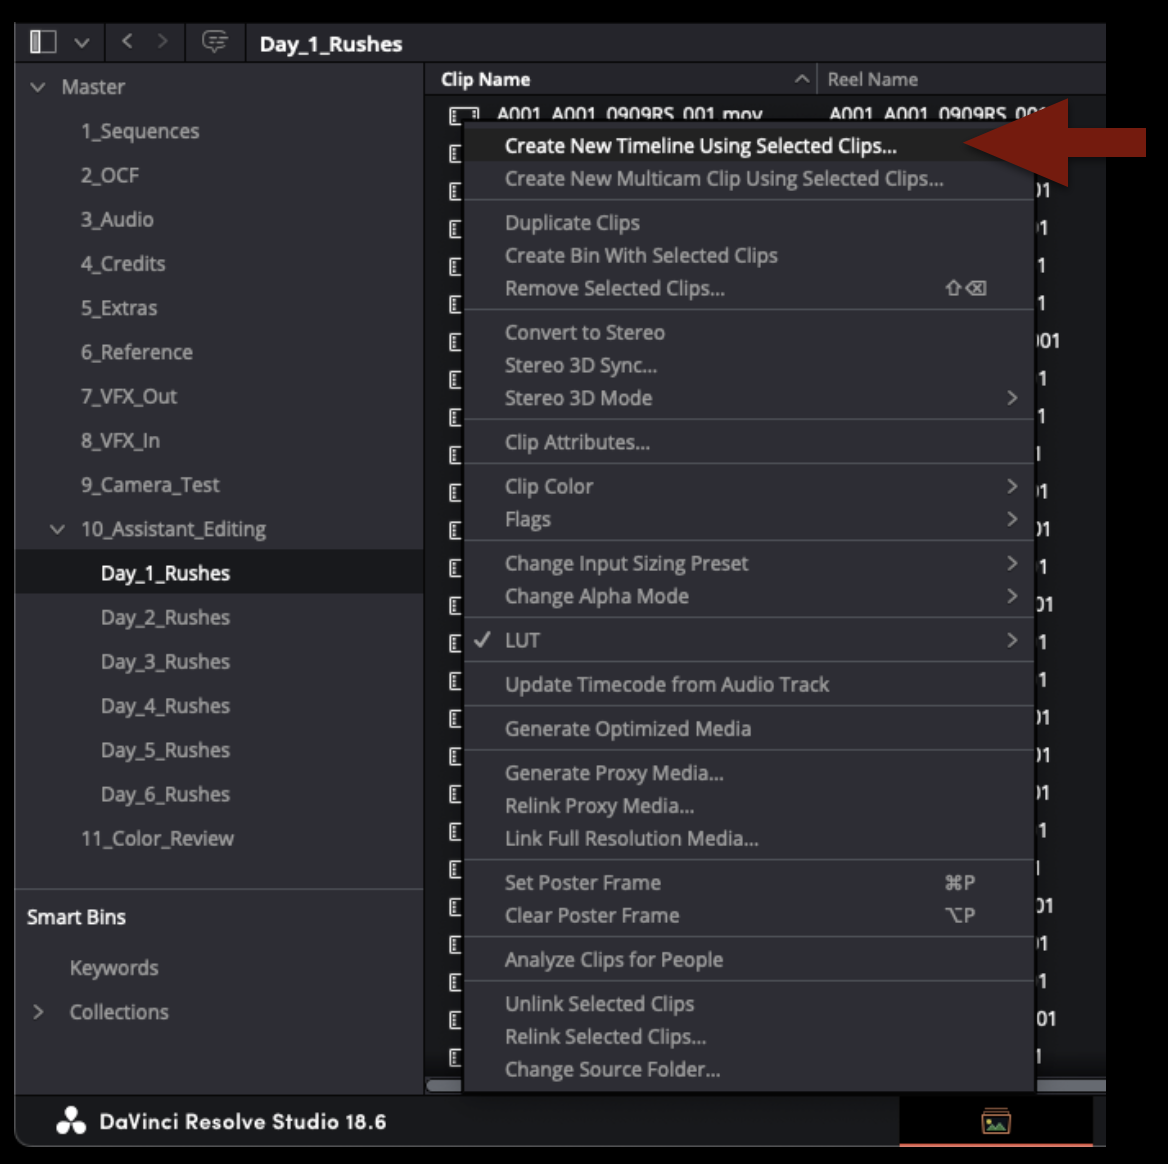
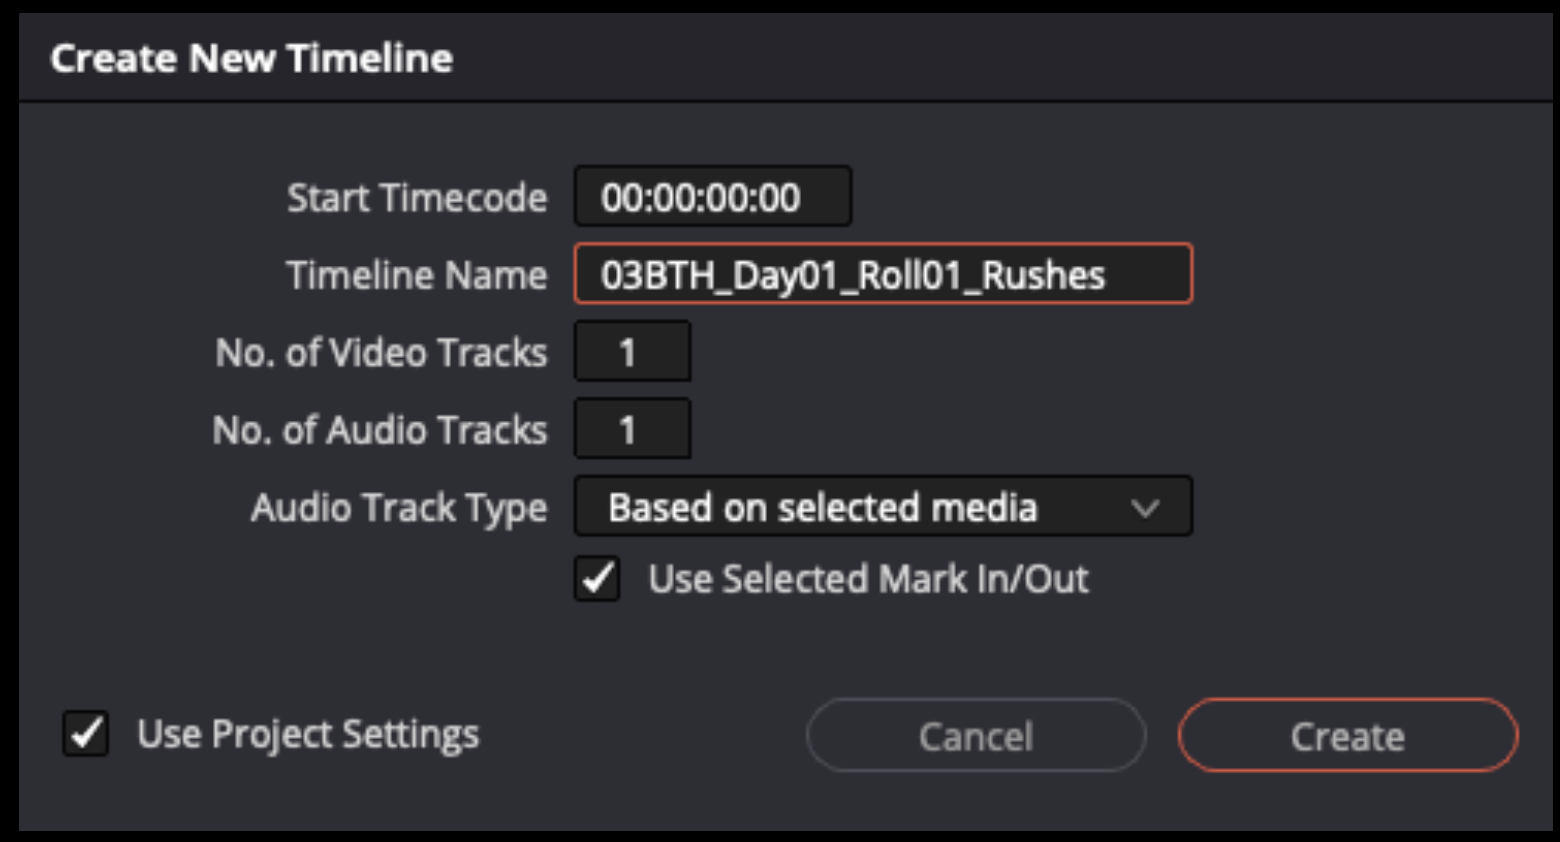
Next select all of the footage in the bin and right click to reveal a long drop down menu. Select the top option to create a new timeline using the selected clips.
It will ask you to name this new time line. Label it with “Show#”, “Day#”, and “Roll#” as shown in the example below.
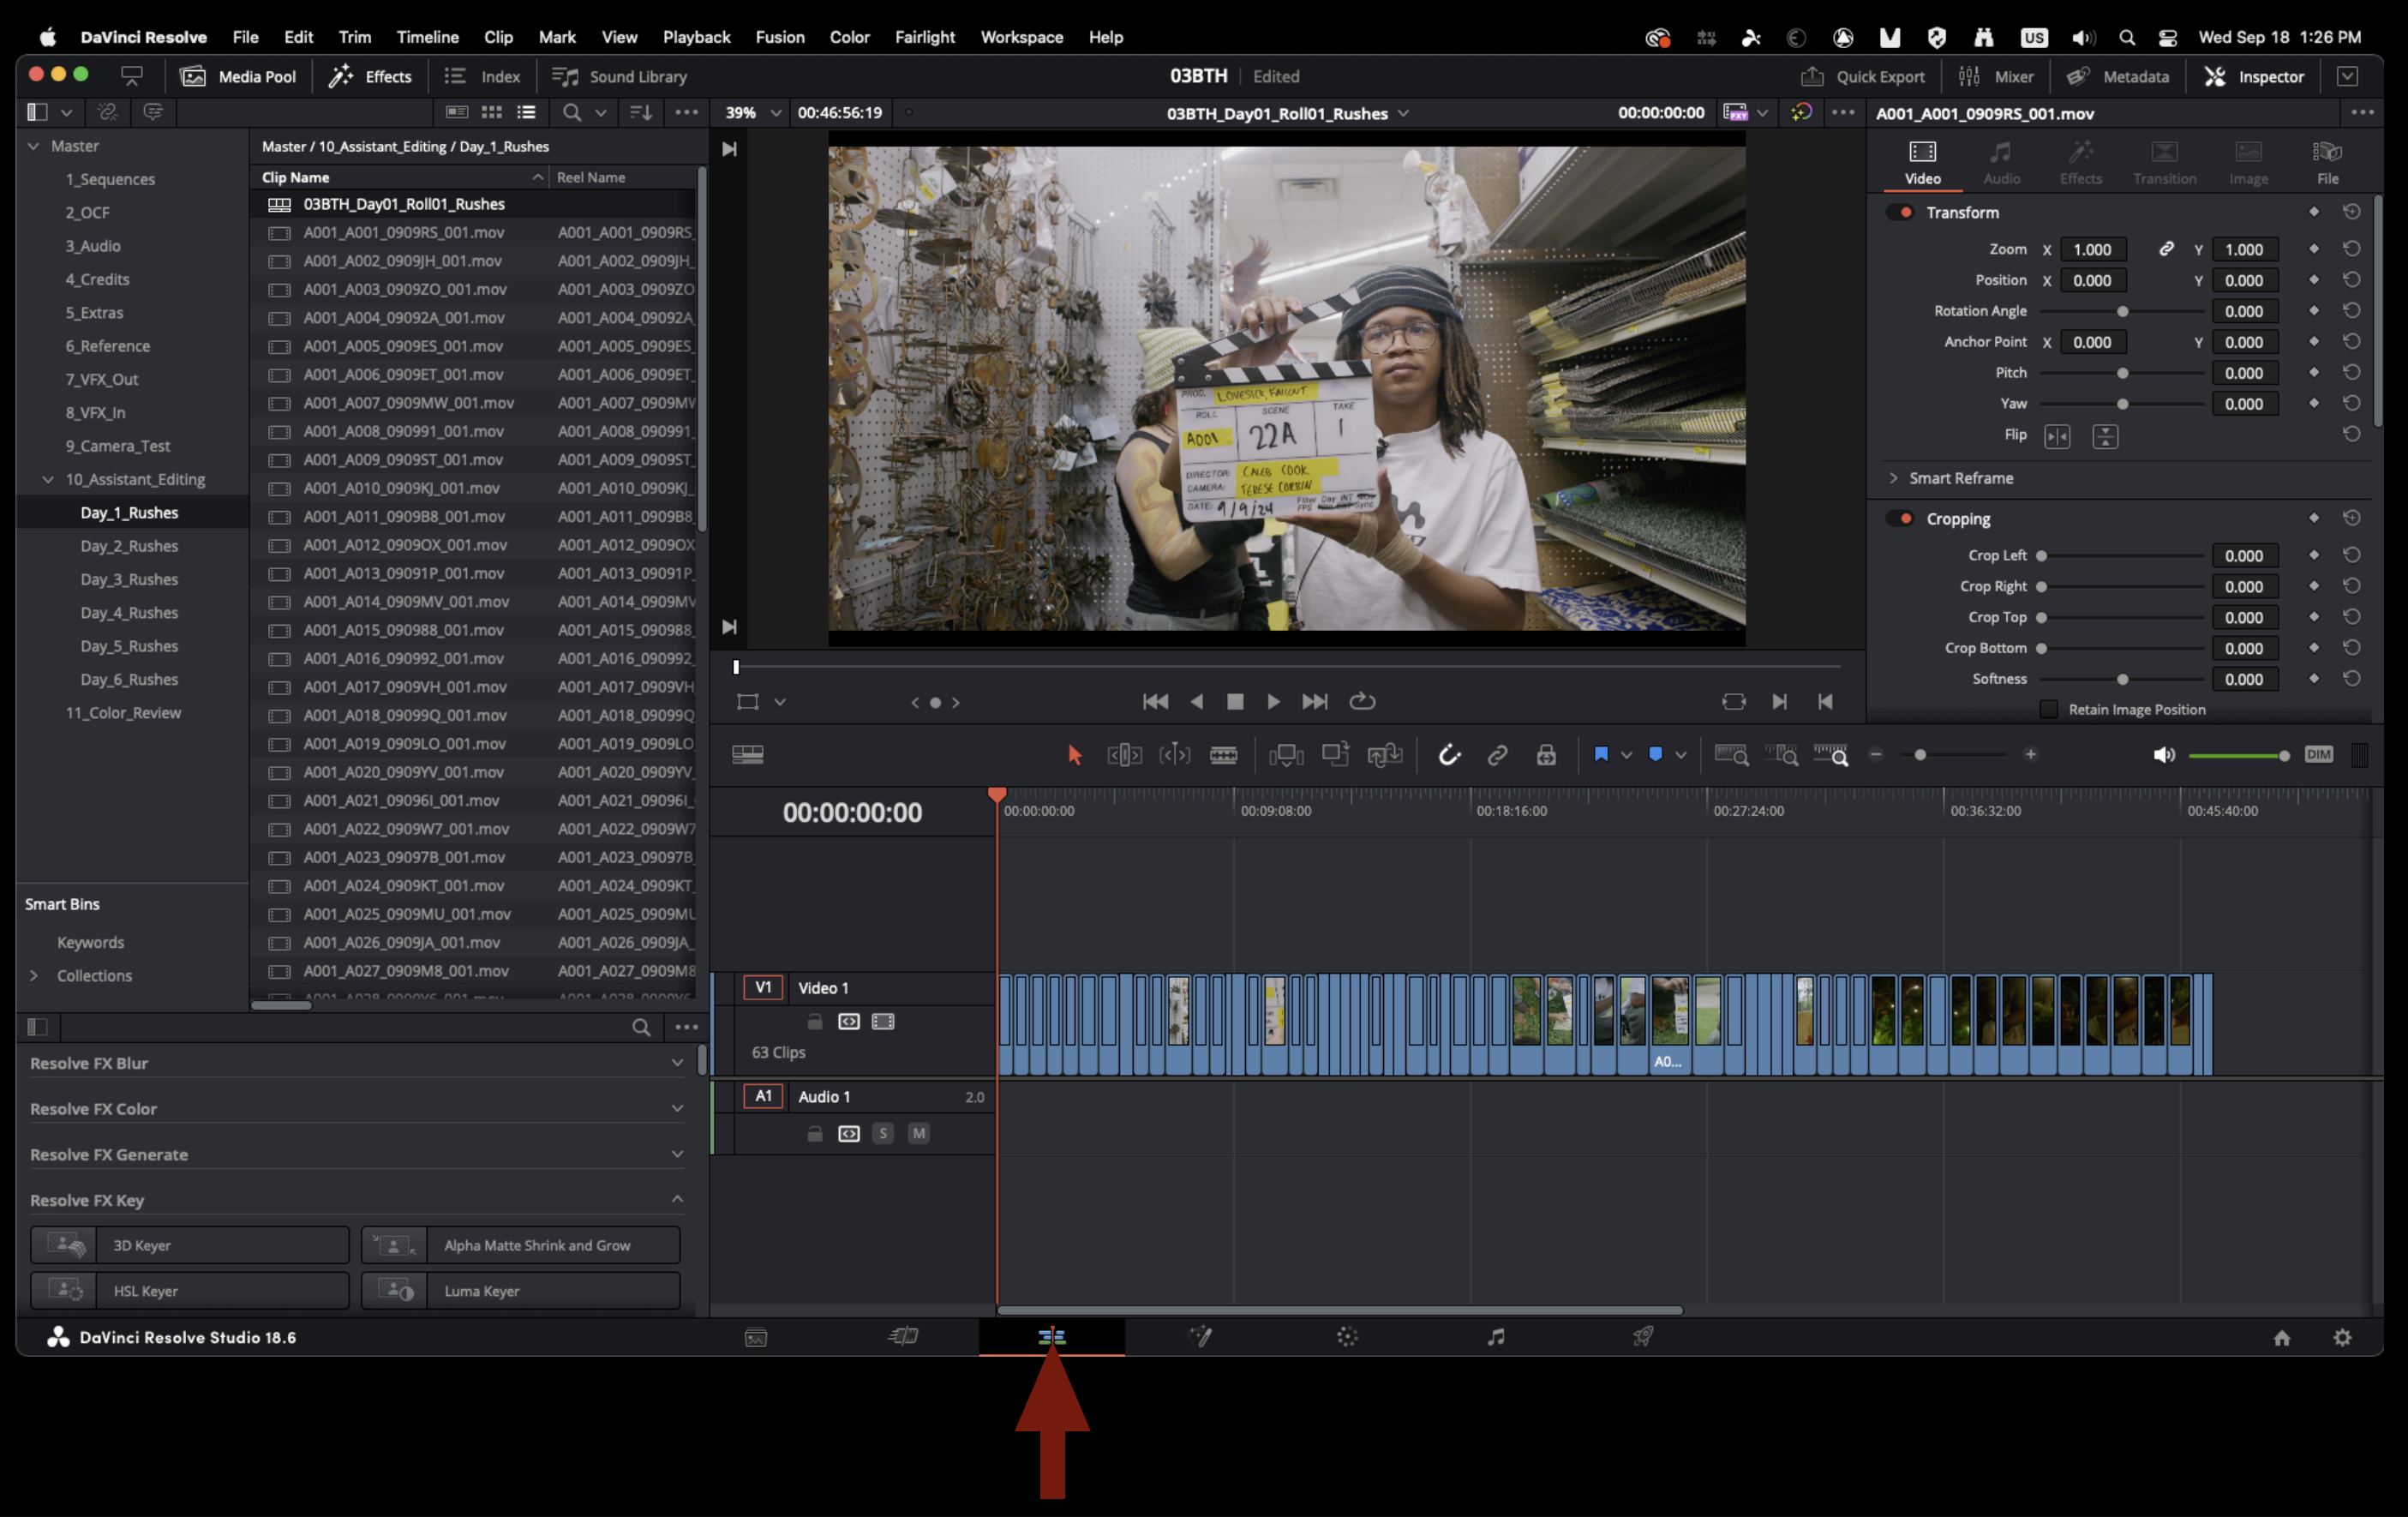
Navigate to the “Edit” page to see all of your footage strung together in the timeline you just created.
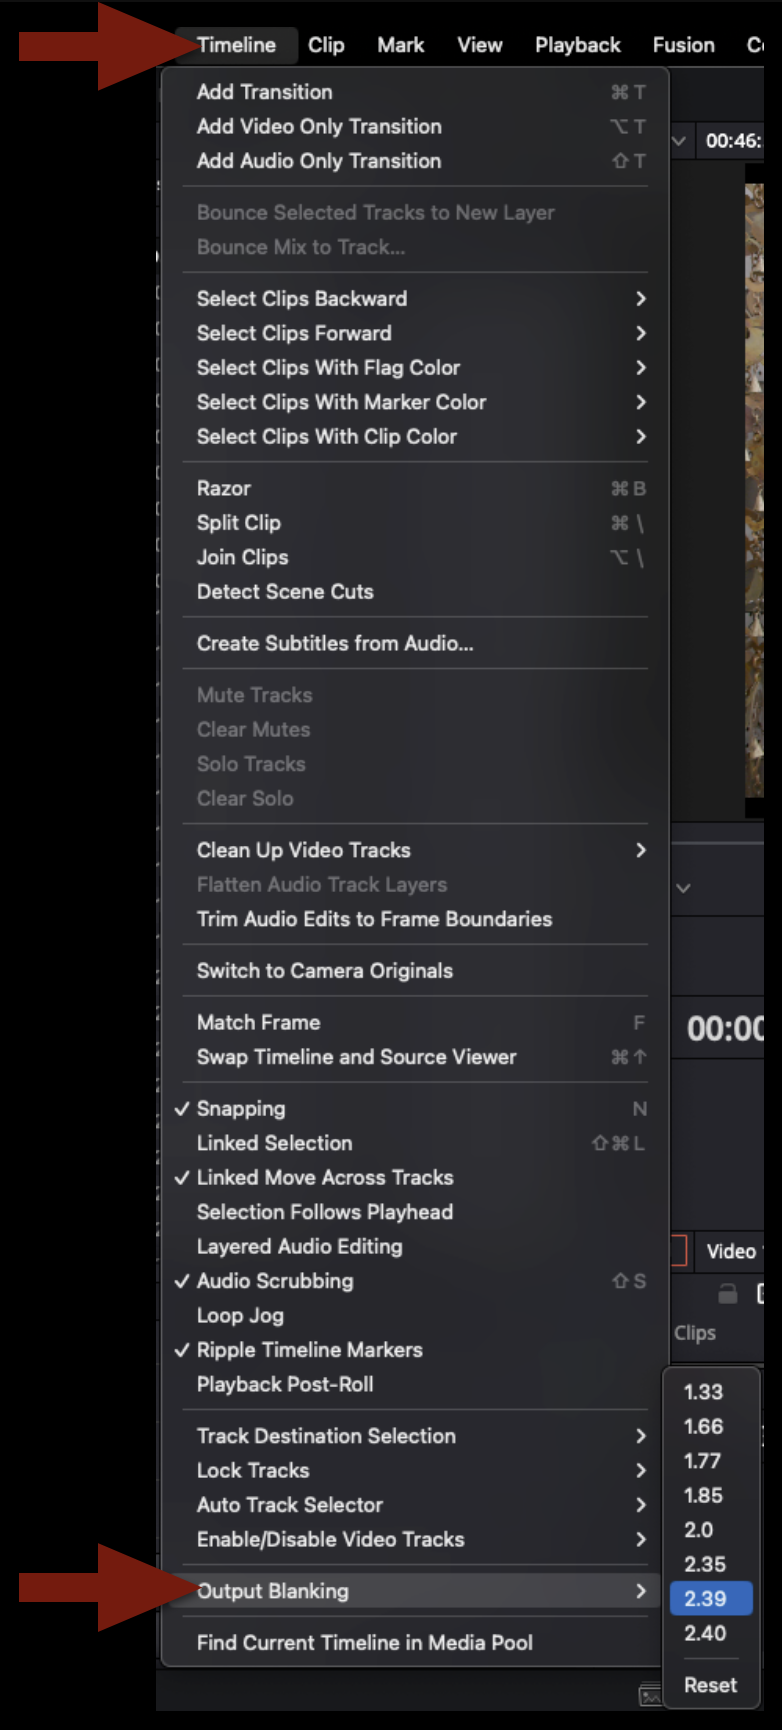
Next you will need to apply the proper masking to the timeline. Check the camera report to see what aspect ratio the footage was framed for. In resolve this can be applied by select “Timeline” rom teh top of the screen and applying the correct “output blanking.
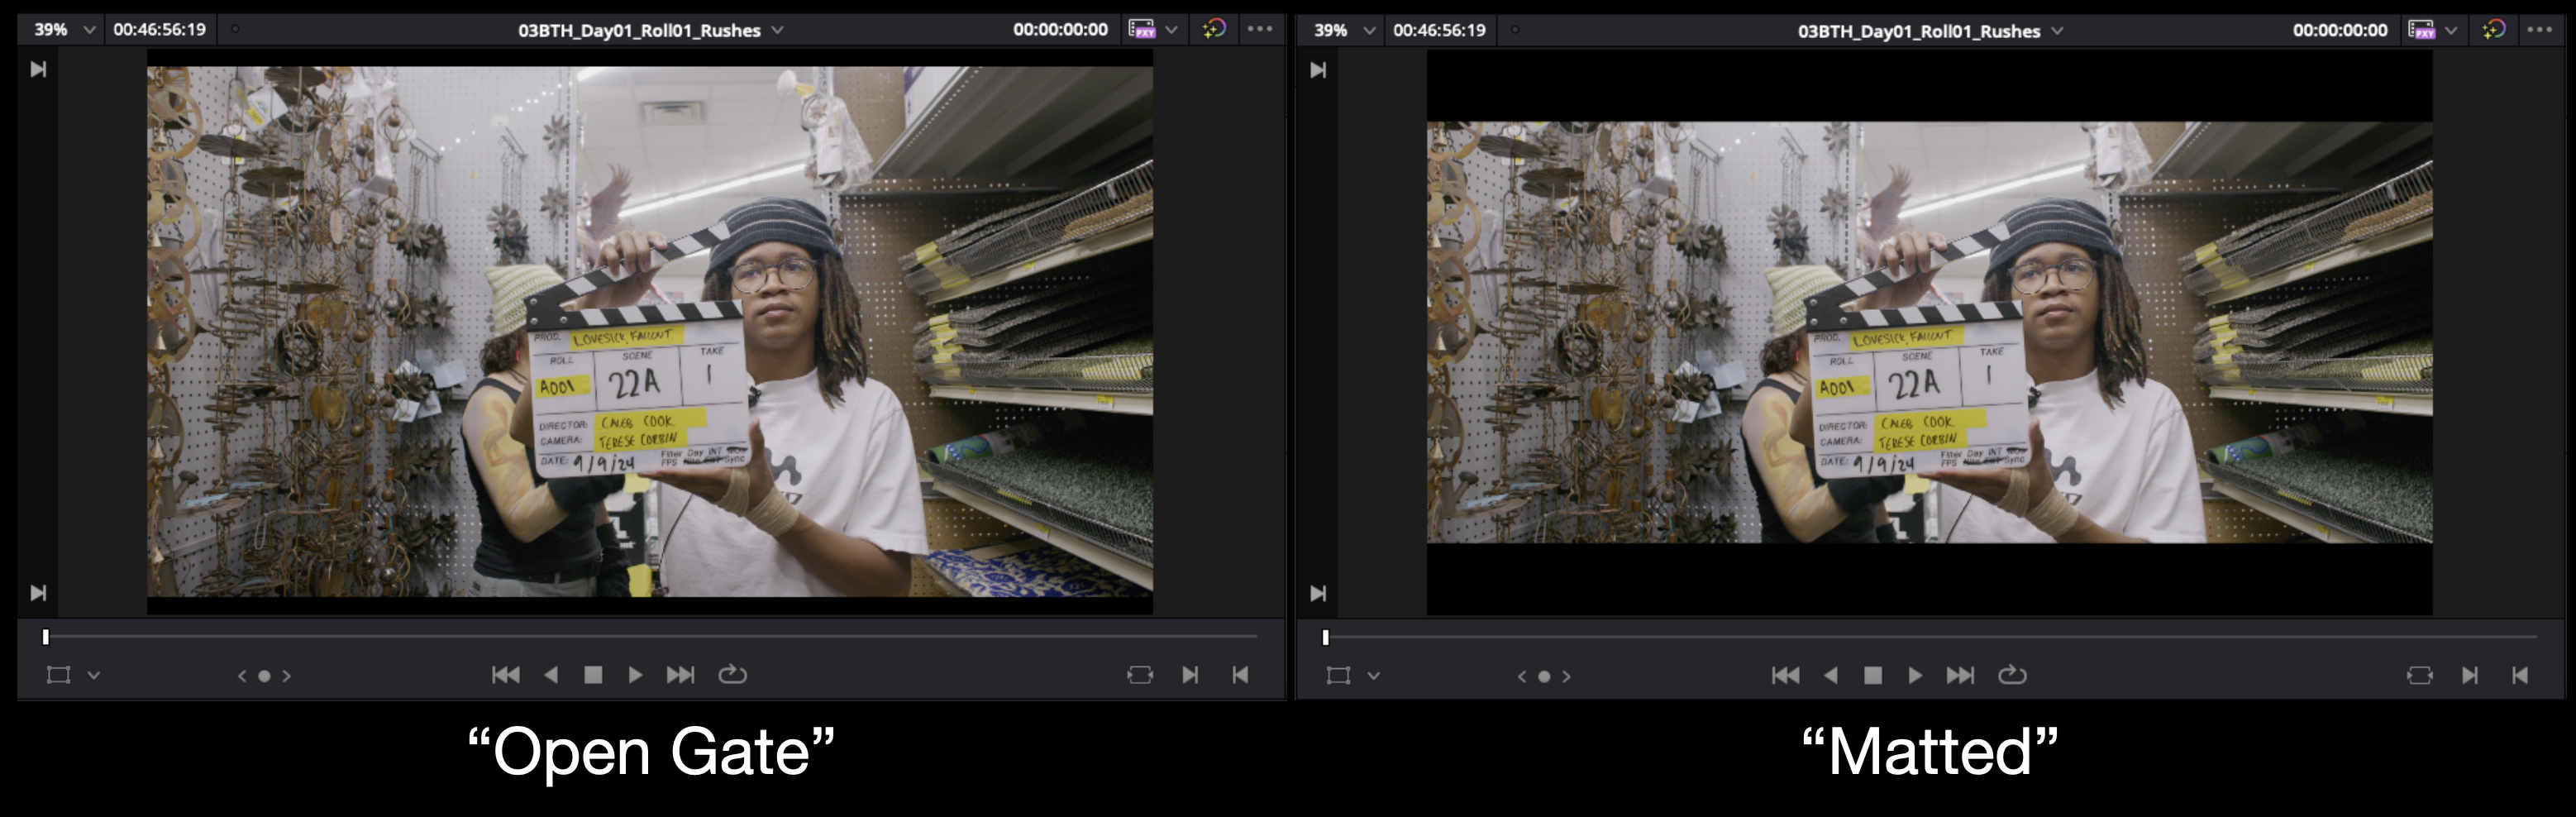
In the example below you will see an example after applying a 2.39:1 output blanking. If the camera report calls for an aspect ratio like 1.85:1 you may not notice any difference after applying that output blanking. You will need to scale the image a certain amount to get it to “fit” inside that output blanking. Consult the post staff for help if needed.
Navigate to the delivery page to begin exporting.
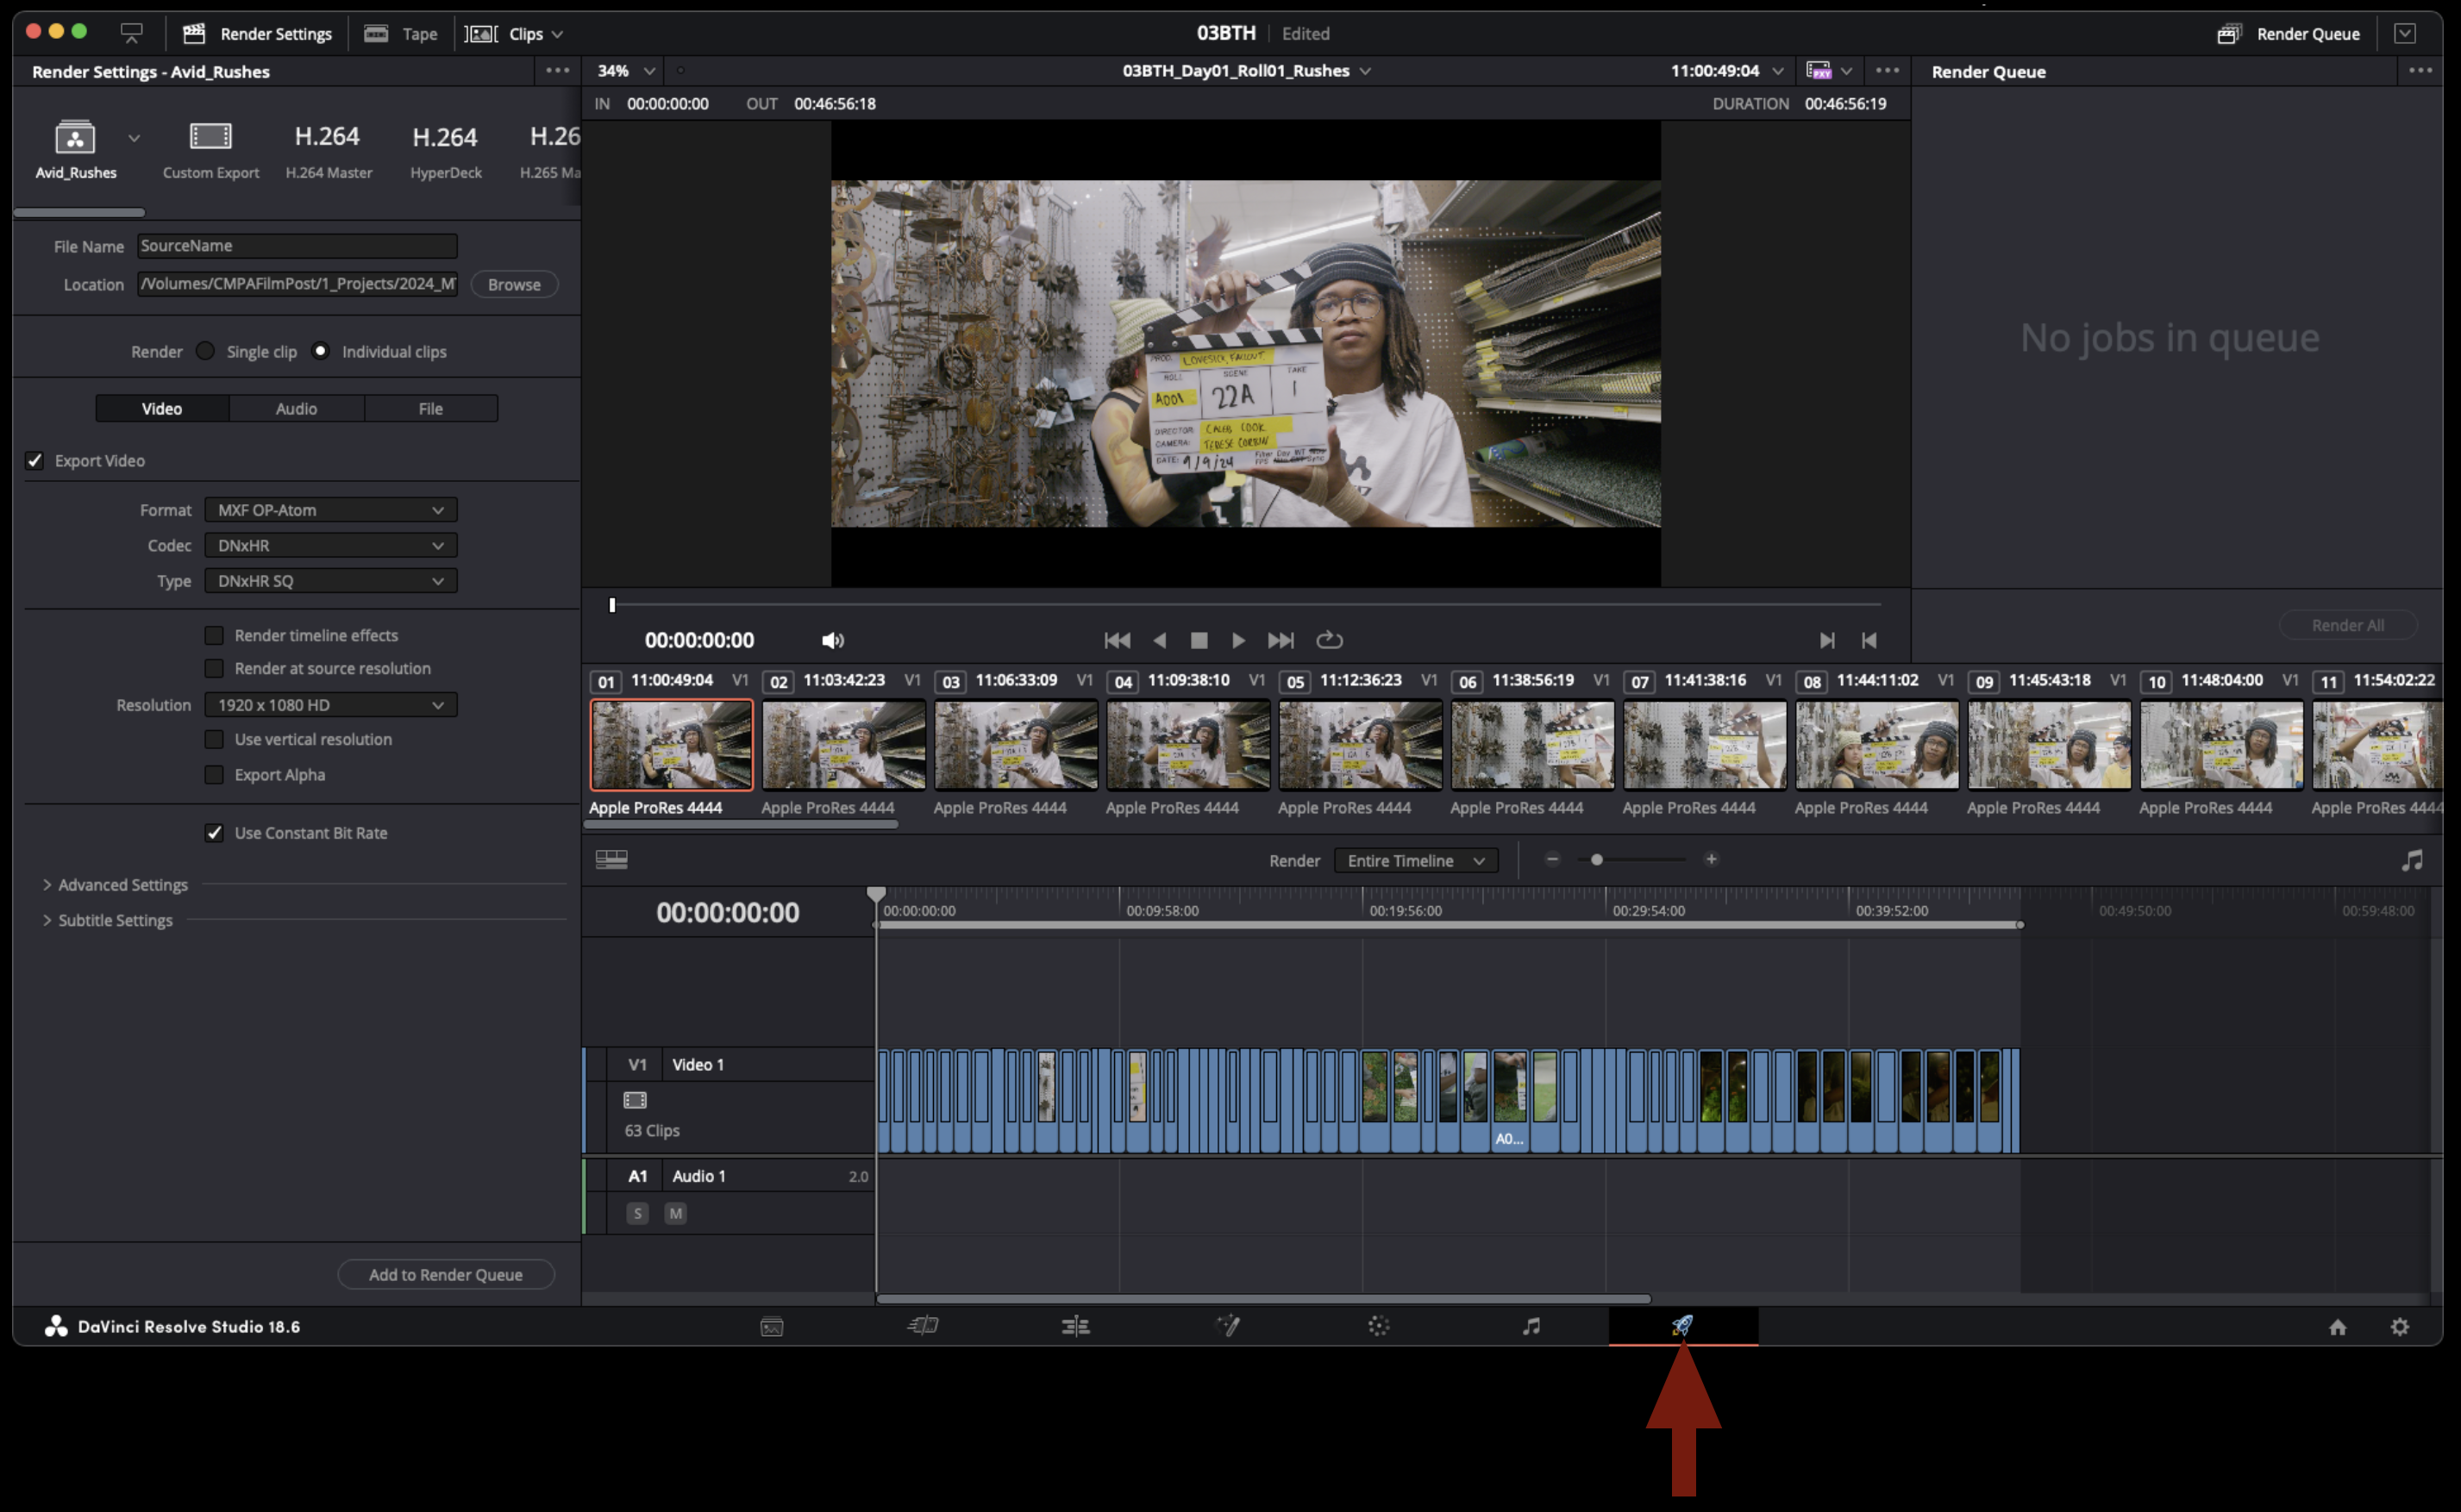
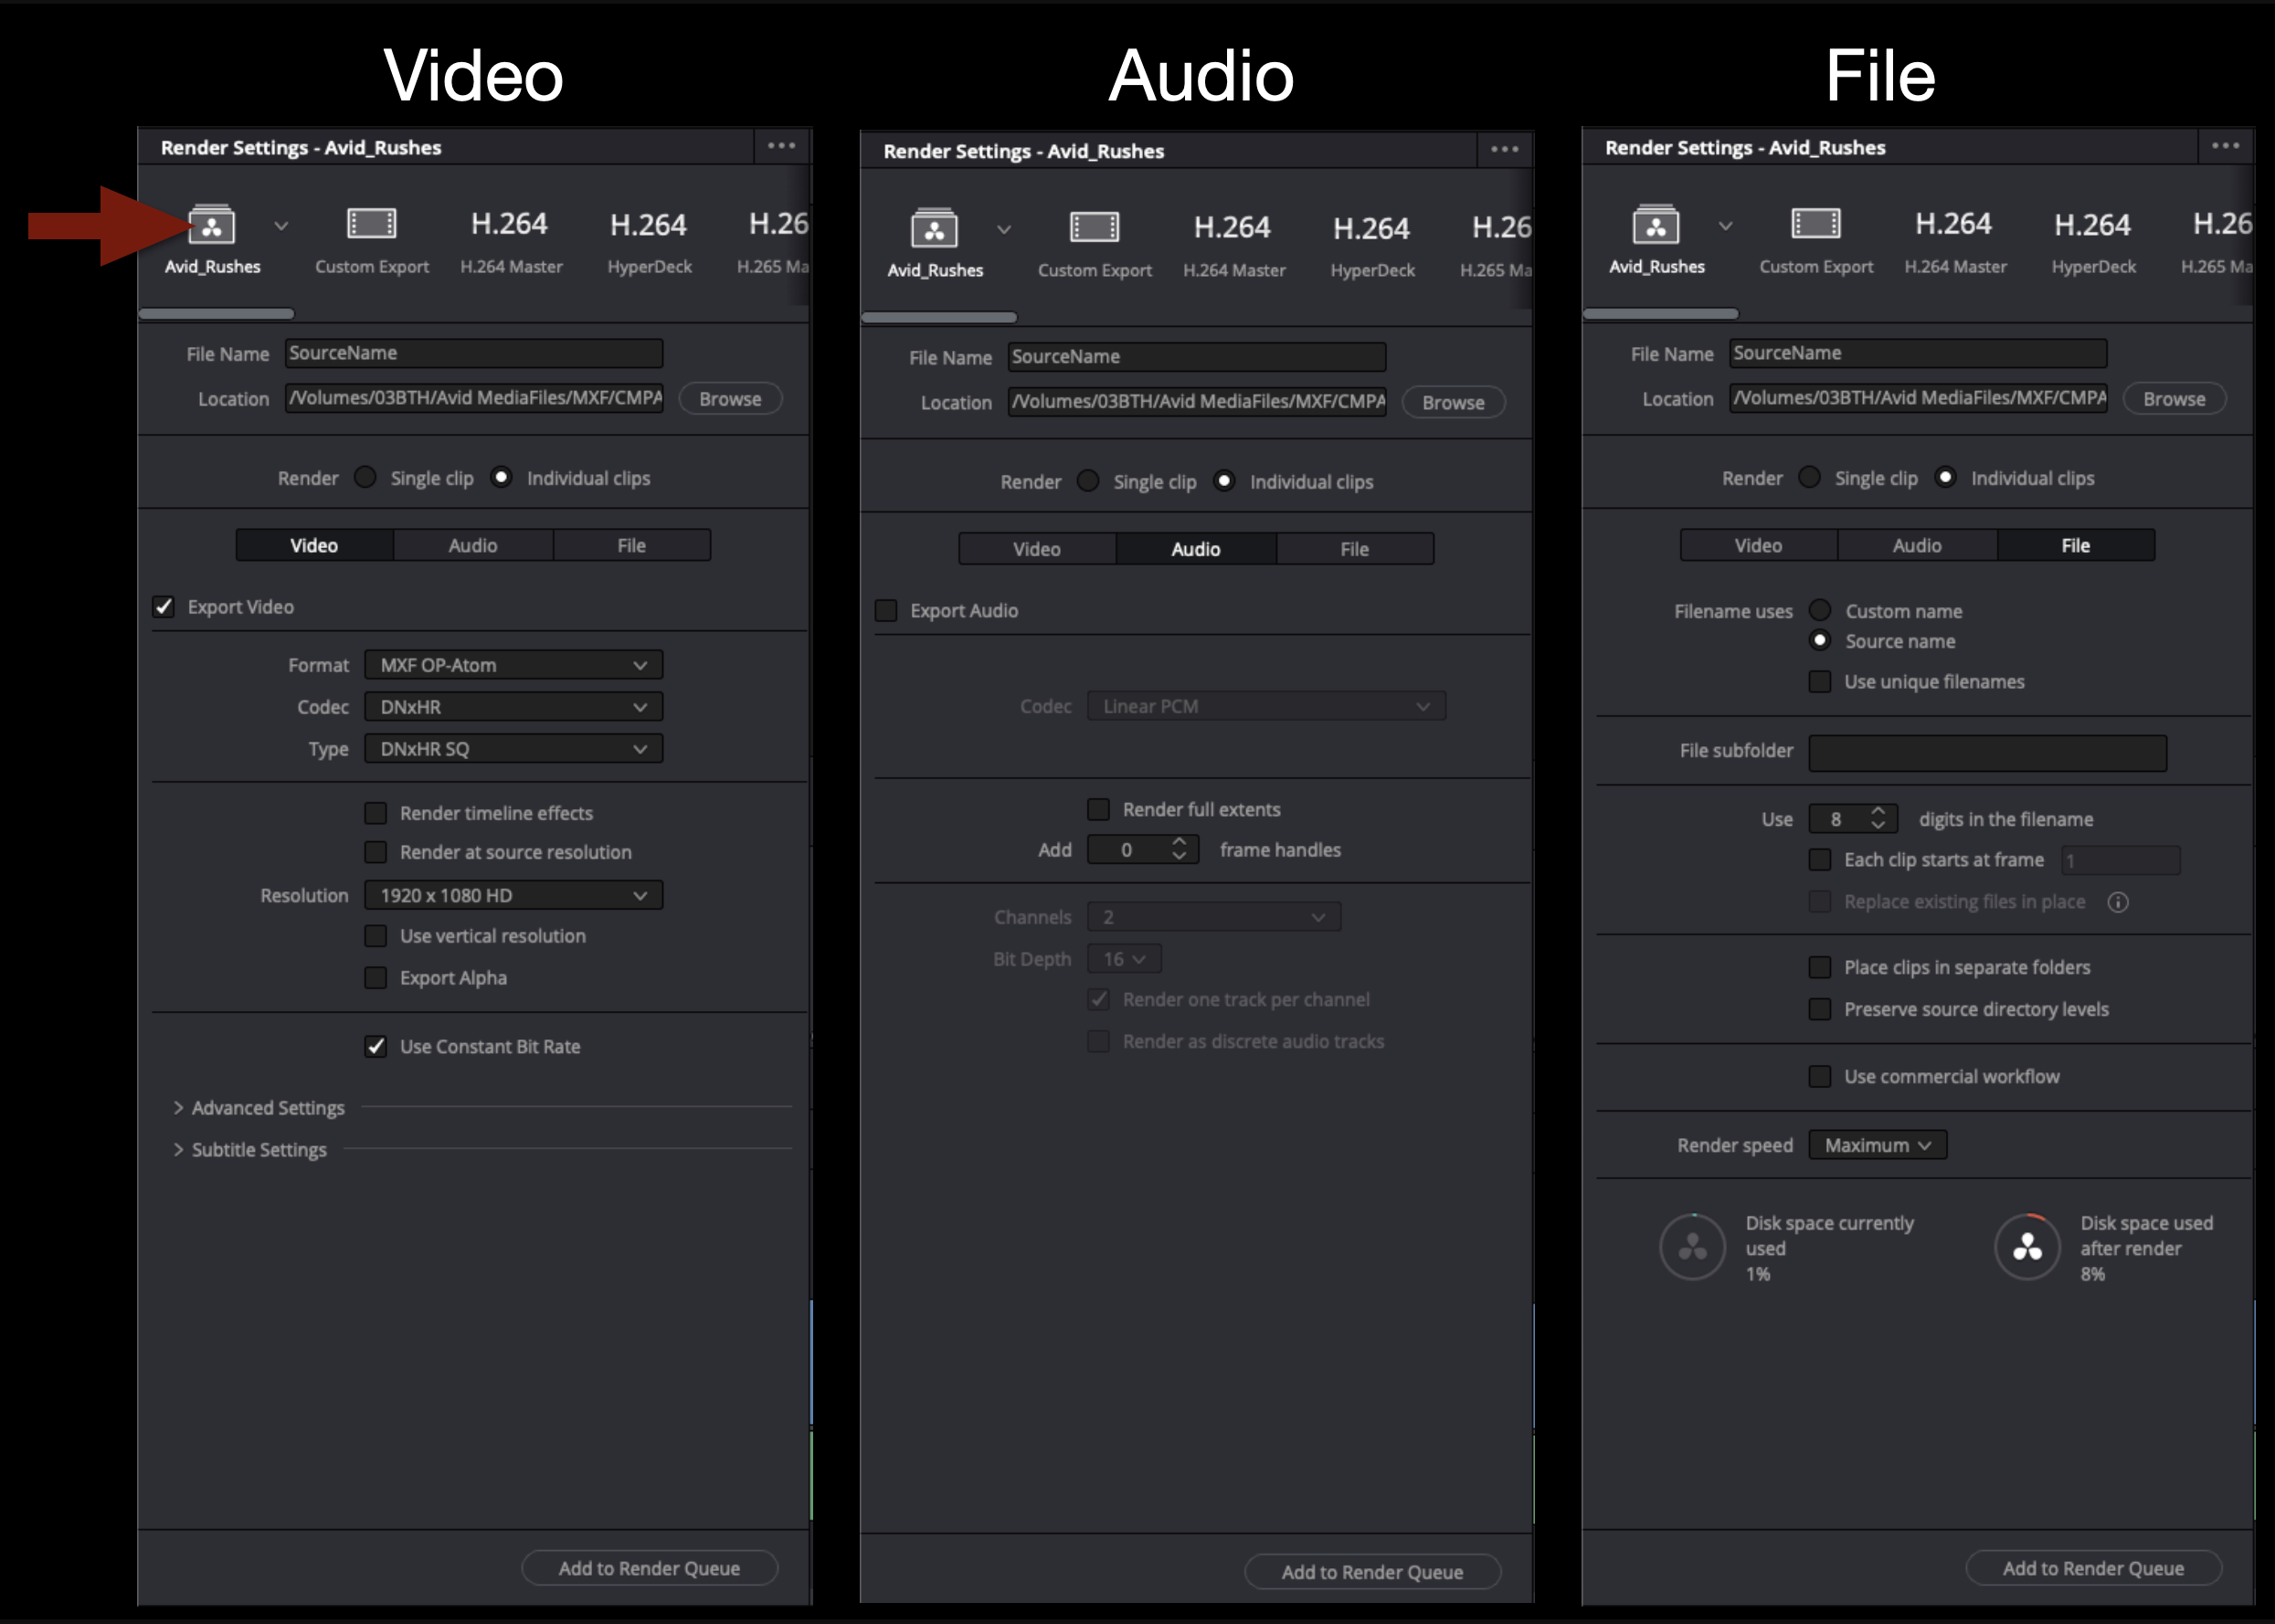
In the upper left hand corner you will find a preset labeled “Avid “Rushes”. Use this preset for exporting avid media mxf files. Check that the settings are as shown below.
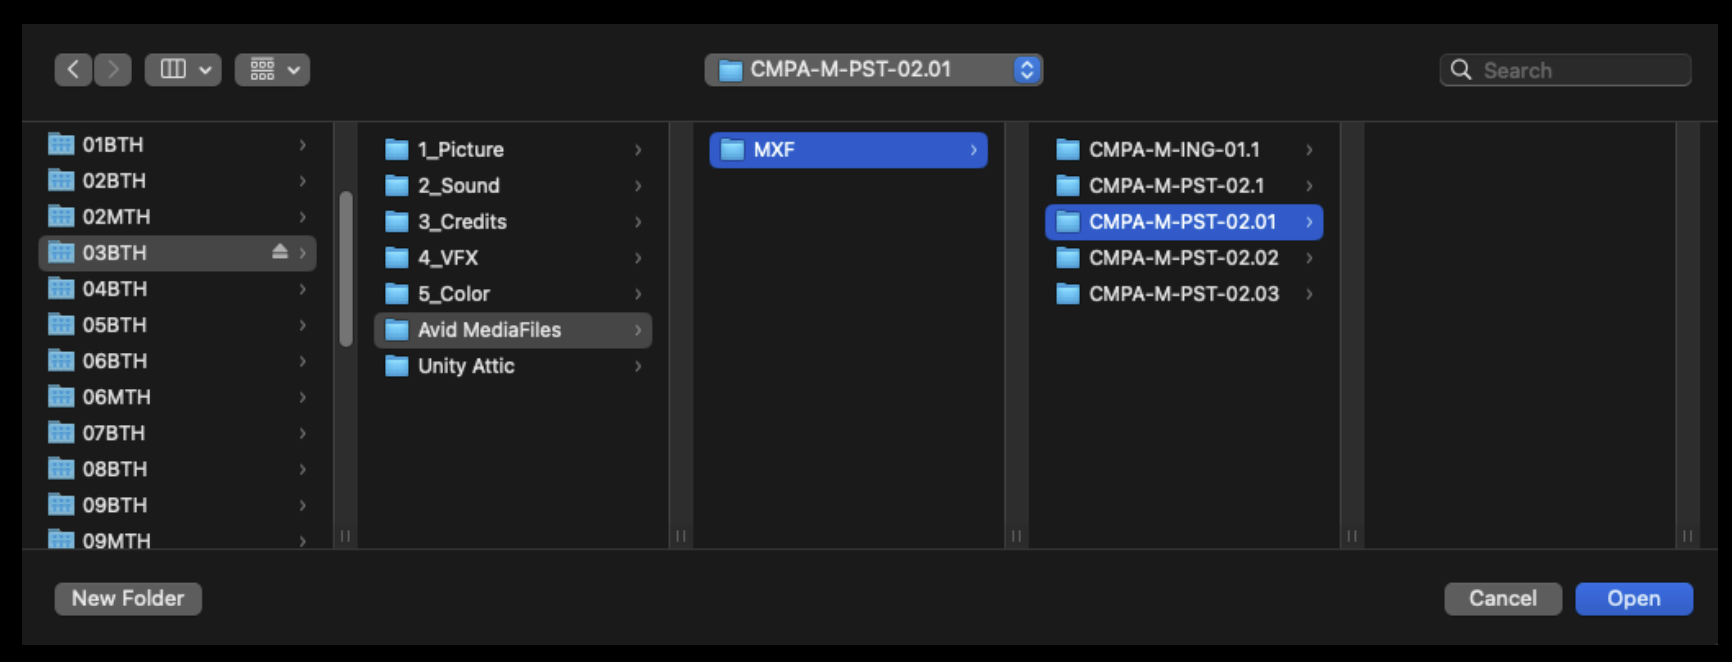
Select “Browse” to set the destination for this export. You will want to find or make a folder in the proper “Avid MediaFiles” folder for your show. This folder will need to reflect either the date the footage was shot or the day of shooting.
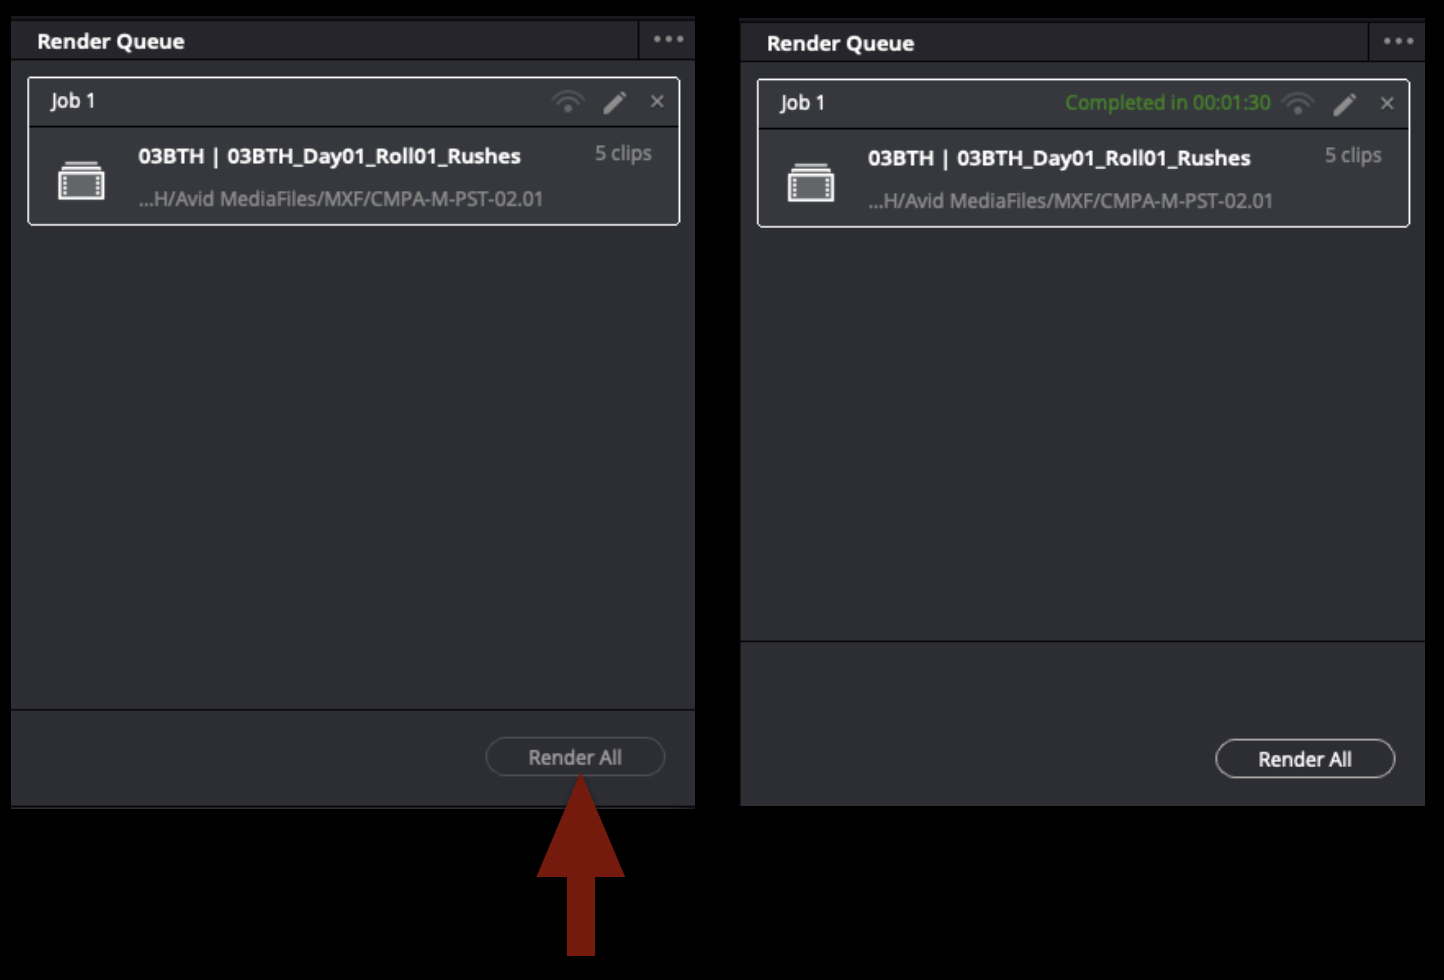
Once all of taht is set you can add the job to the render cue and render all. When the job is complete it will look like the example below. When this step is done you can save and quit Davinci Resolve.
If you navigate in the finder to where the target destination of teh export was set you will find that an .mxf files has been made for every clip. However Davinci Resolve does not generate the avid database files. These files get generated the next time Avid is opened and it will scan the Avid MediaFiles folders looking for new media. When it finds the new folder it will index taht media and generate the necessary database files.
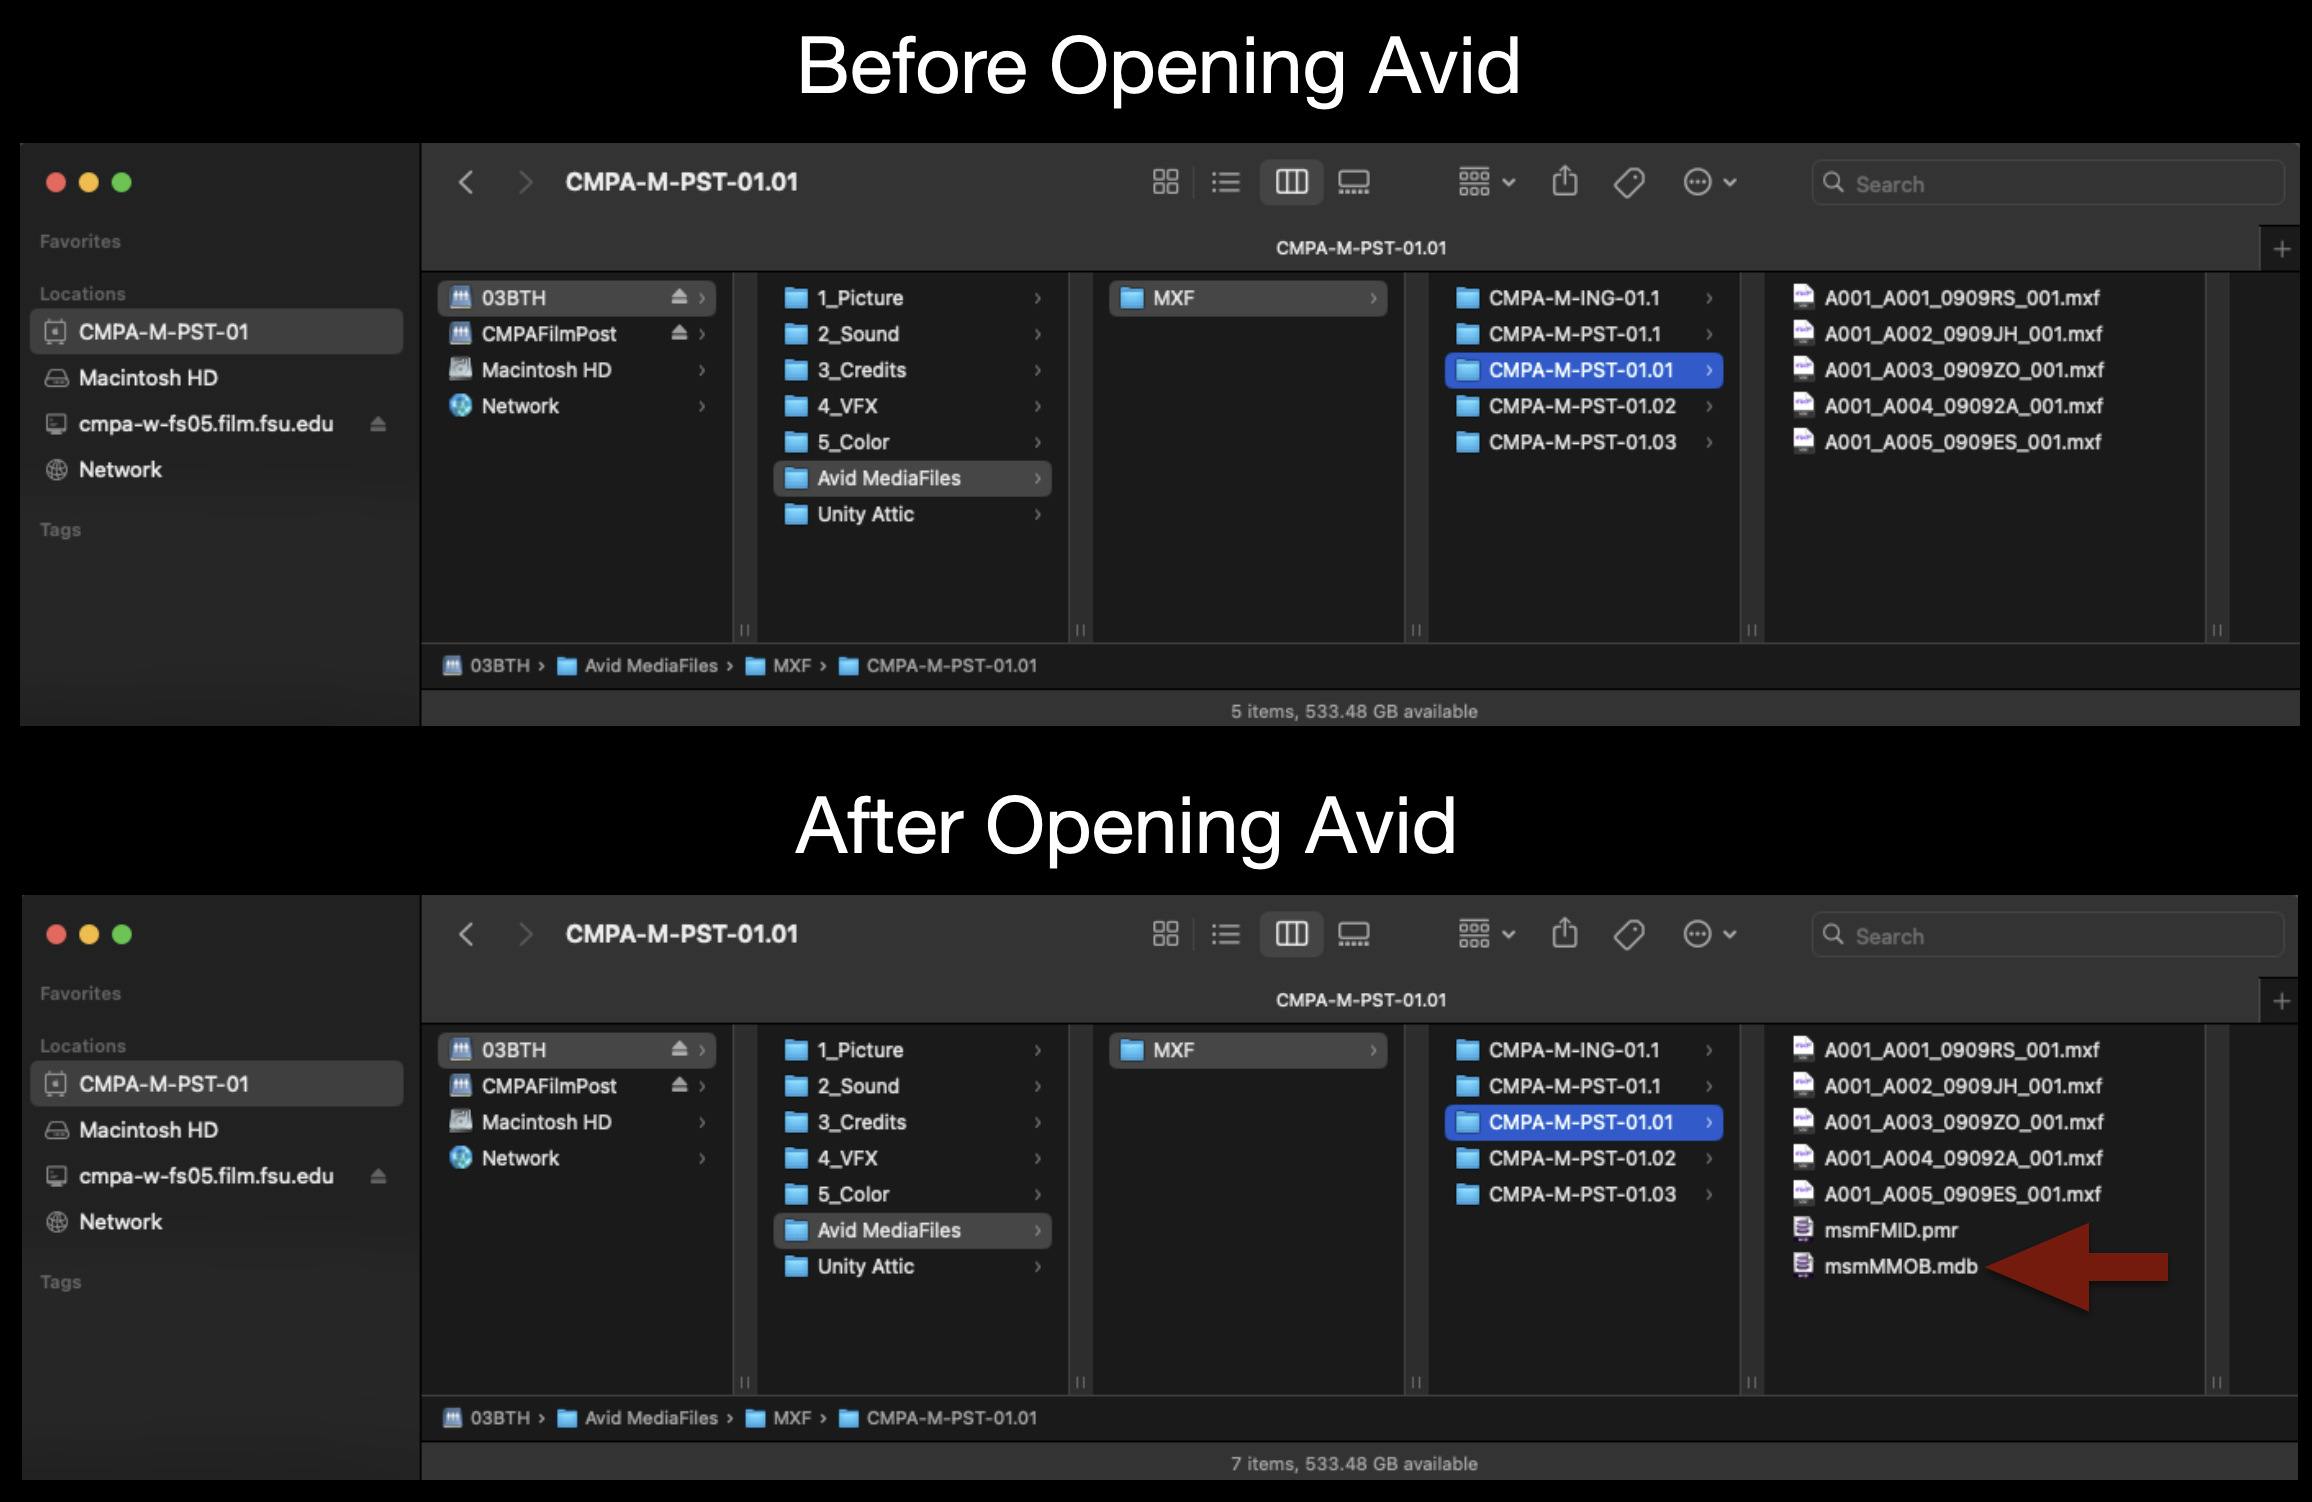
With your Media Composer project now open again to can bring this transcoded footage into the correct bin by dragging the “.mdb” database file into the bin.
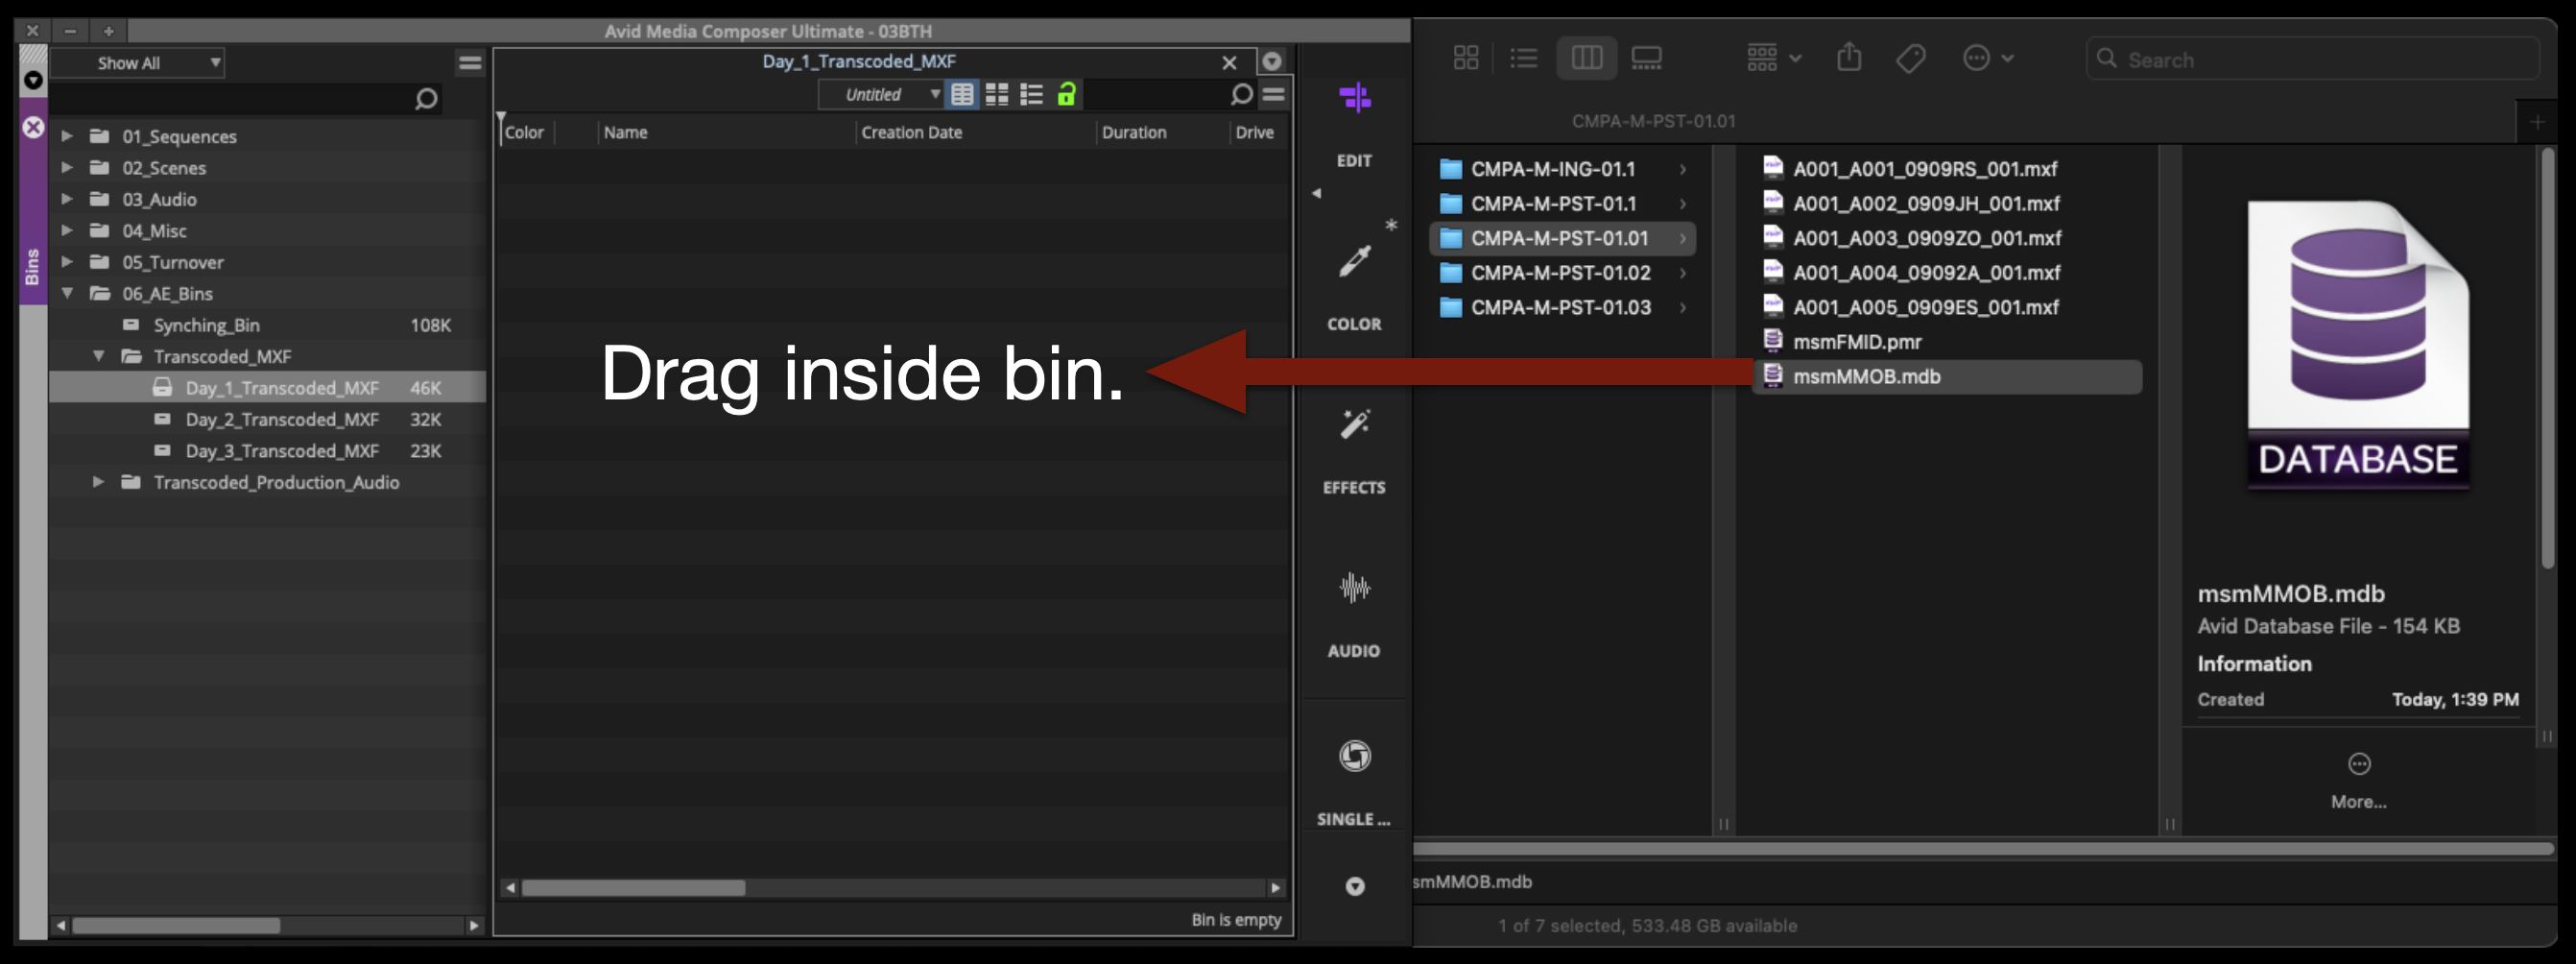
If everything was done properly the master clips will appear inside the avid bin.

Link and Transcode Audio
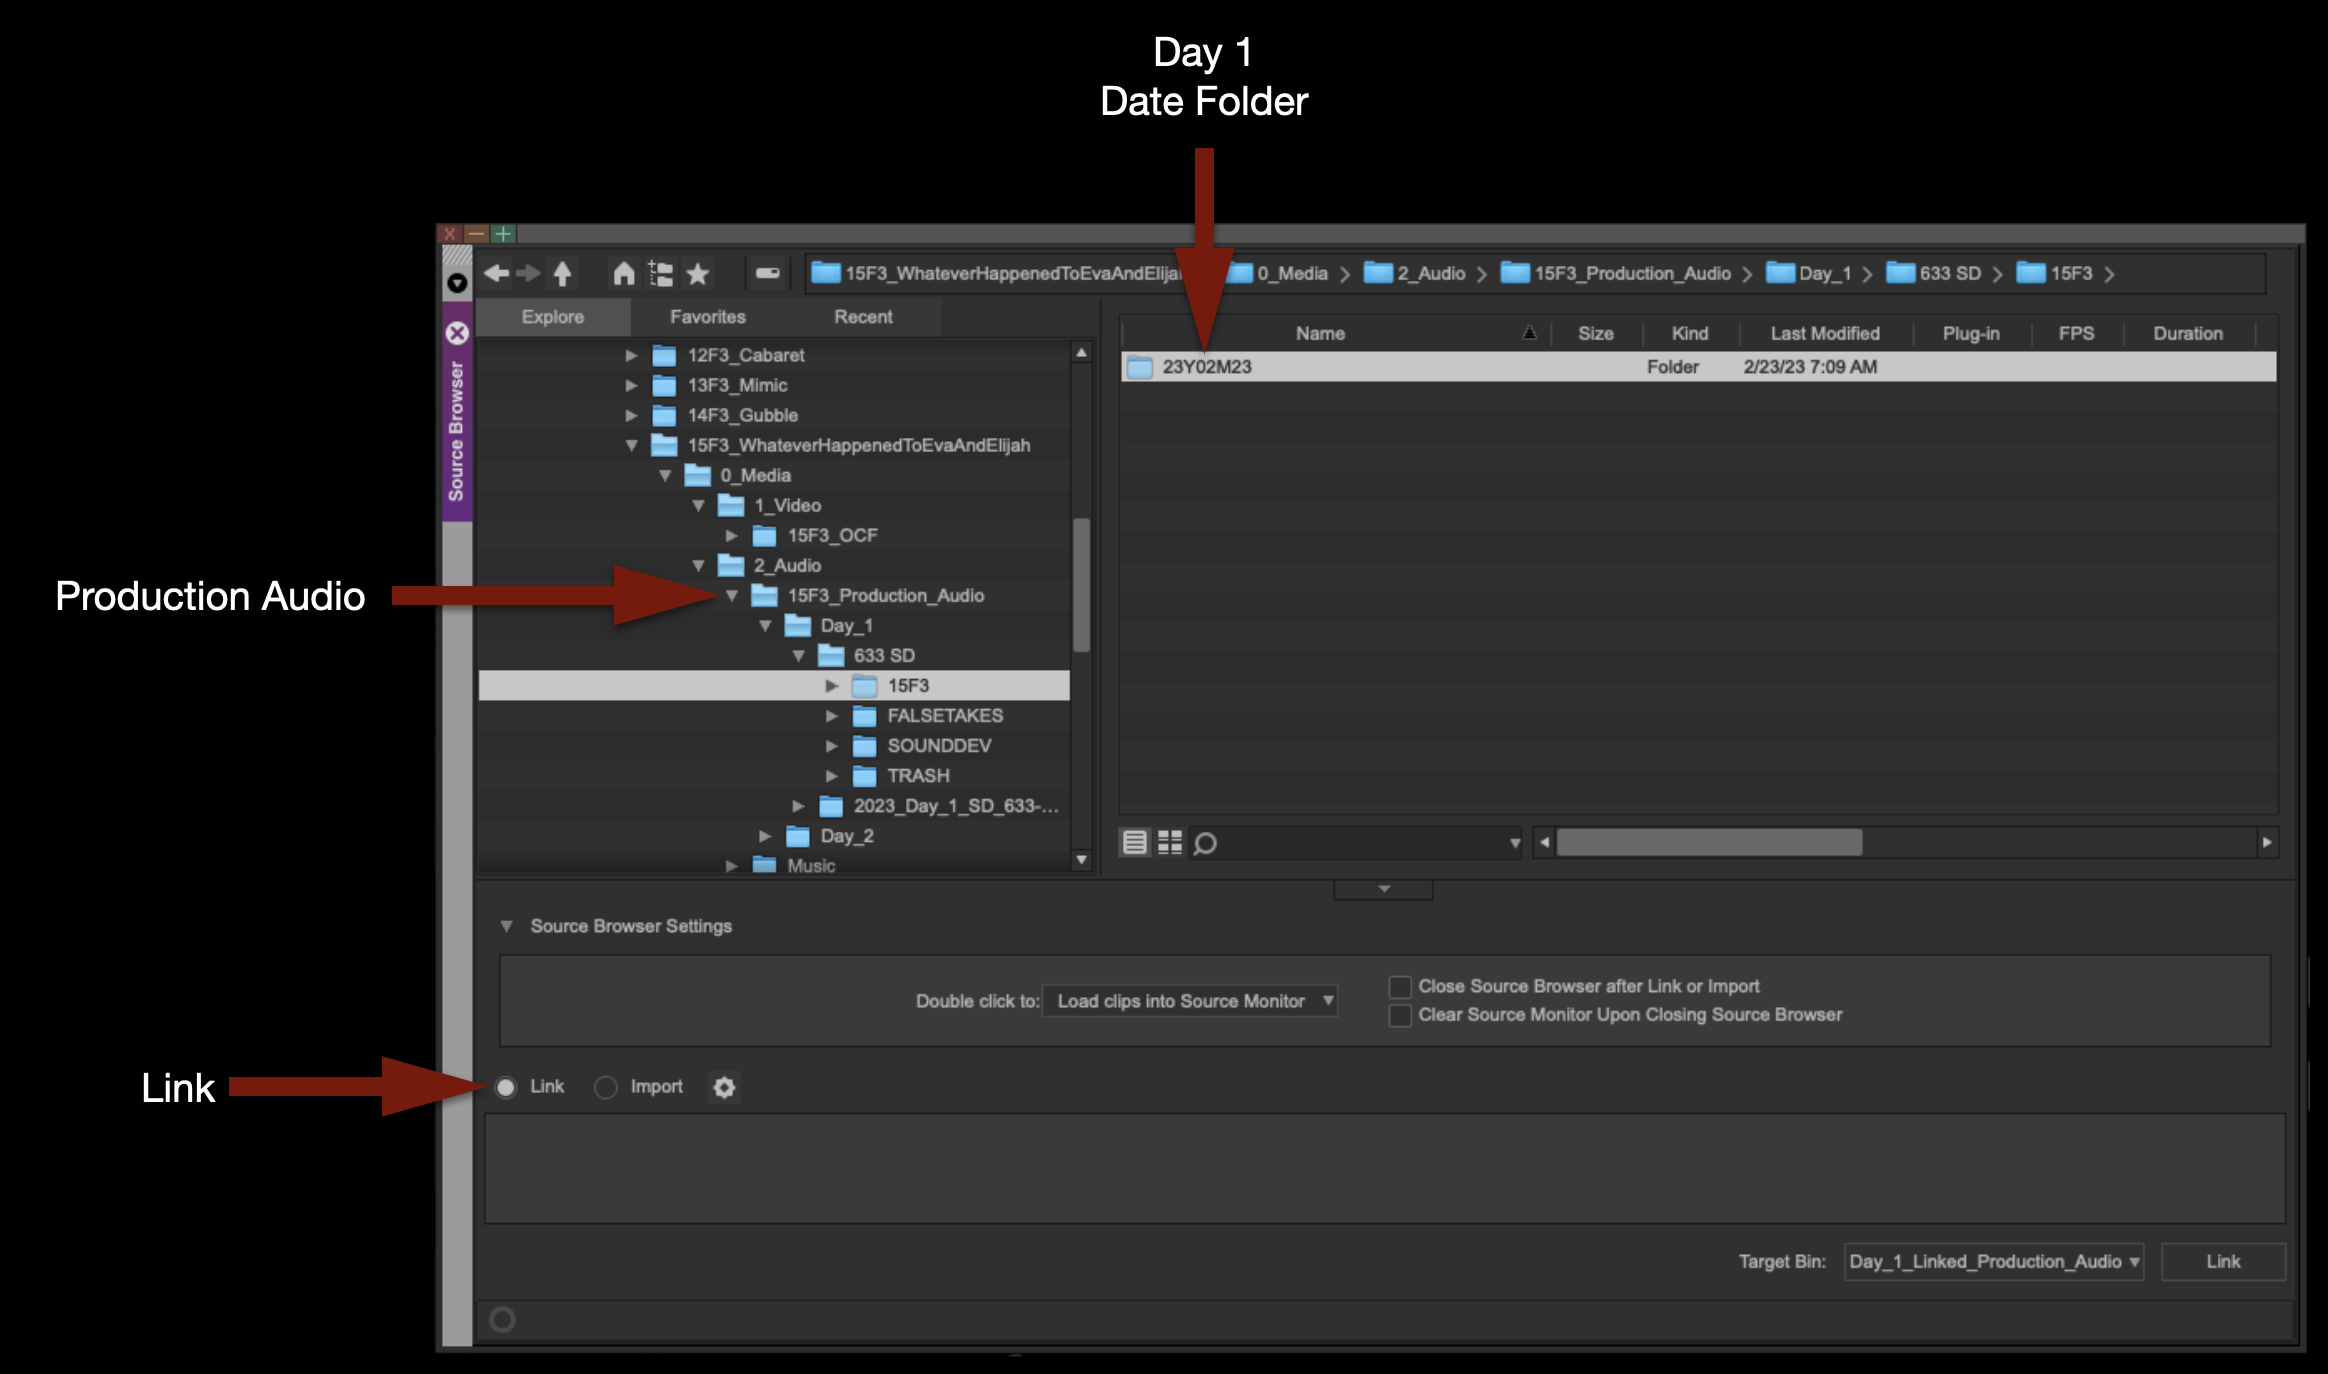
Open the Linked Production Audio bin for the proper day:
Right-click inside the bin and select “Import > Source Browser”.
Inside the Source Browser, navigate to a day’s worth of Production Audio. Make sure the Link icon is selected, and then click “Link”.
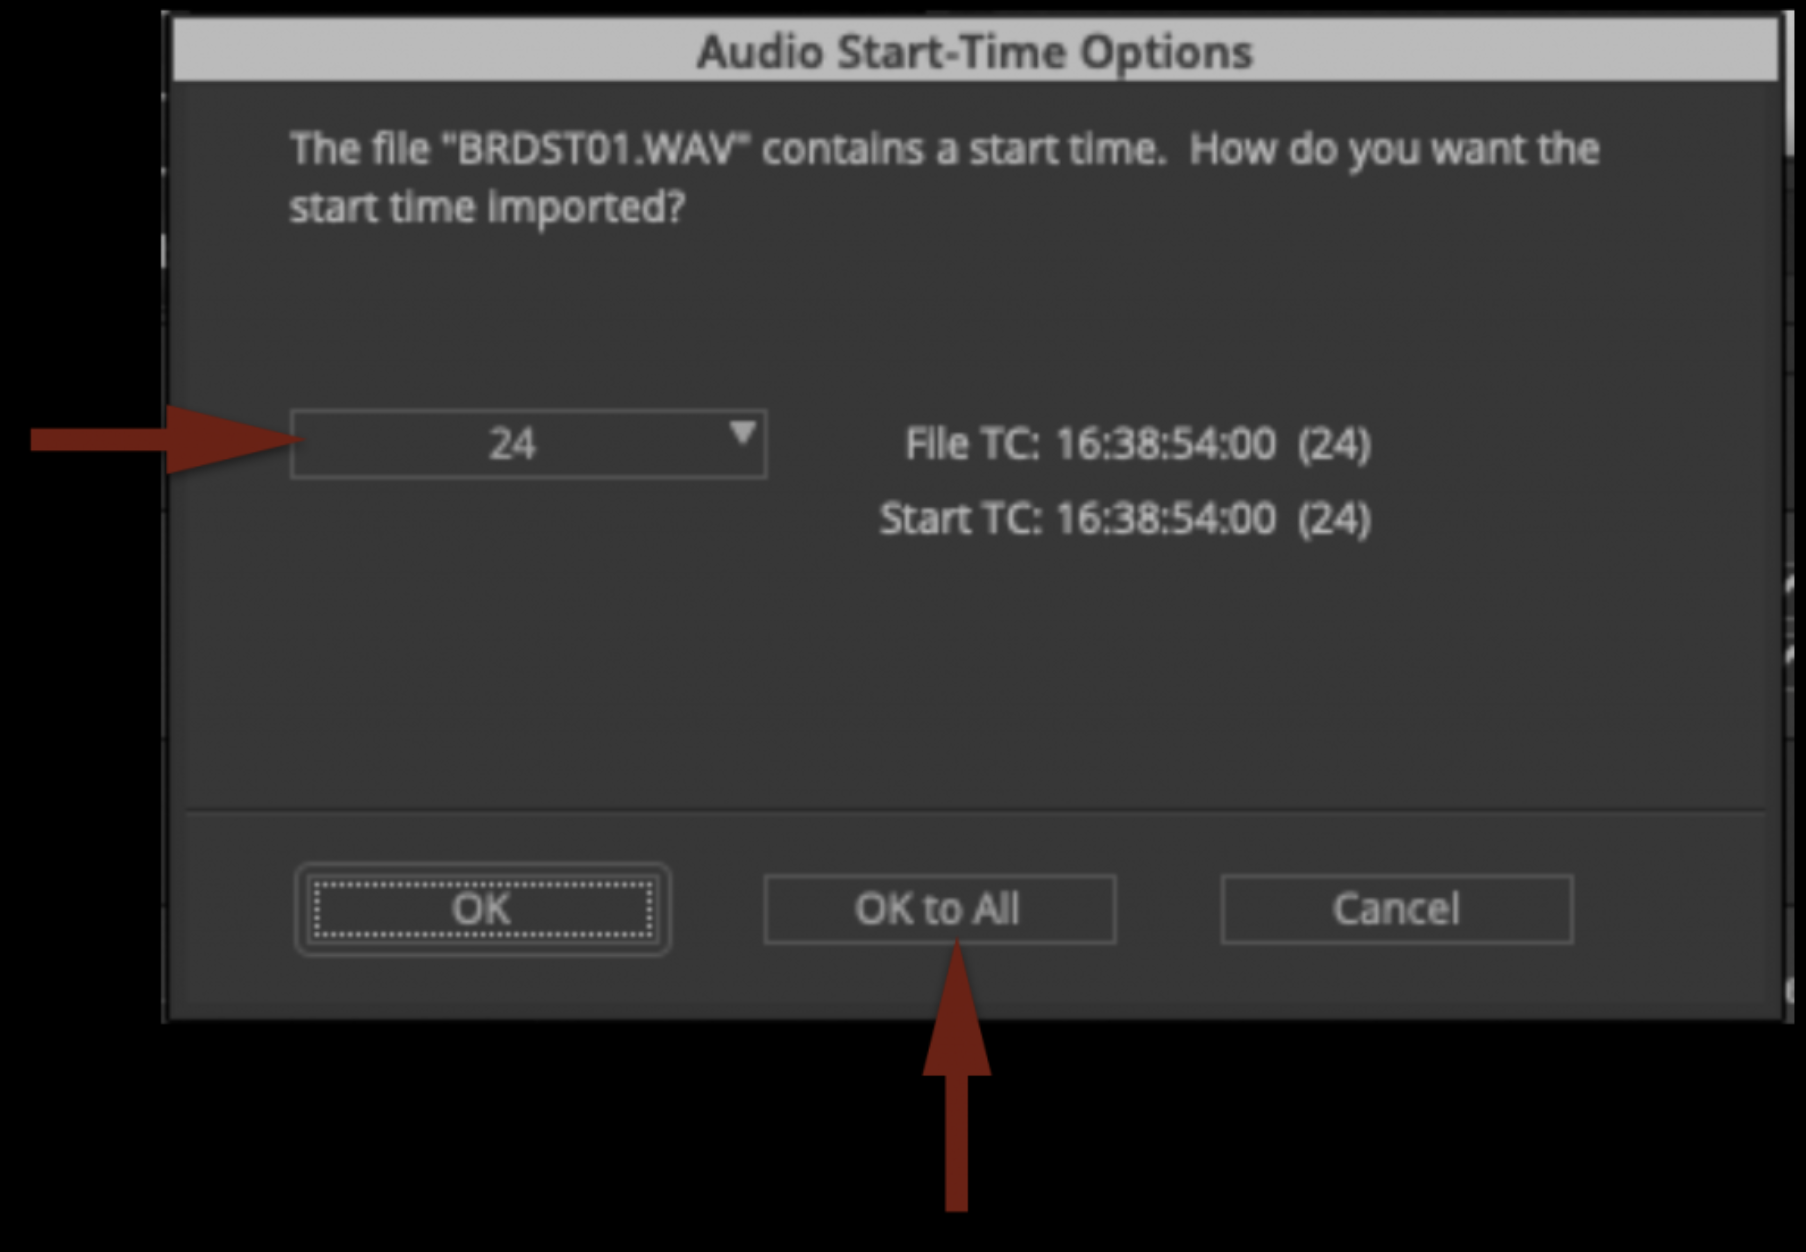
Before it links the media, it will ask you about Audio Start-Time Options. Make sure it is set to “24” and click “OK to All”.
The selected clips will begin linking:
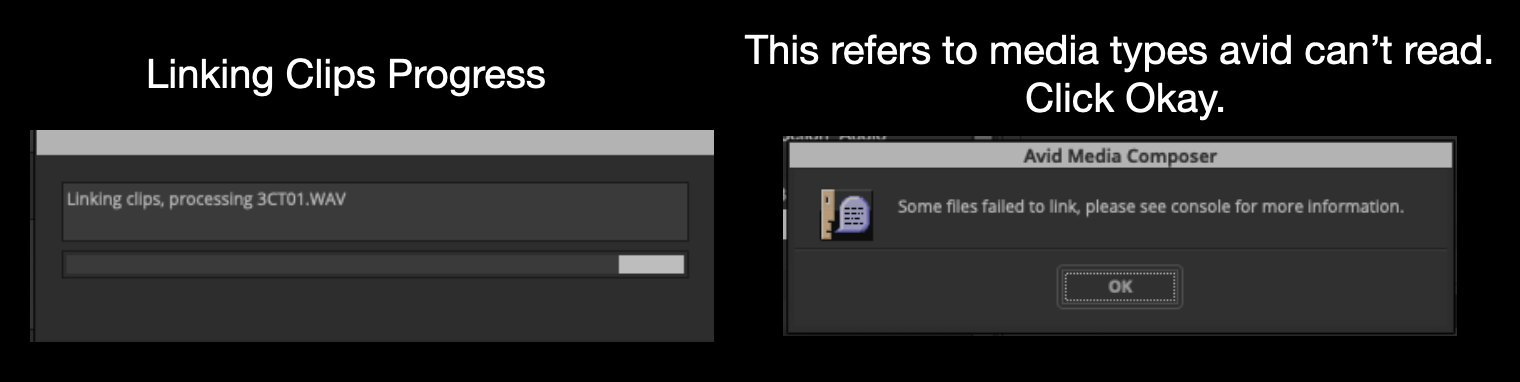
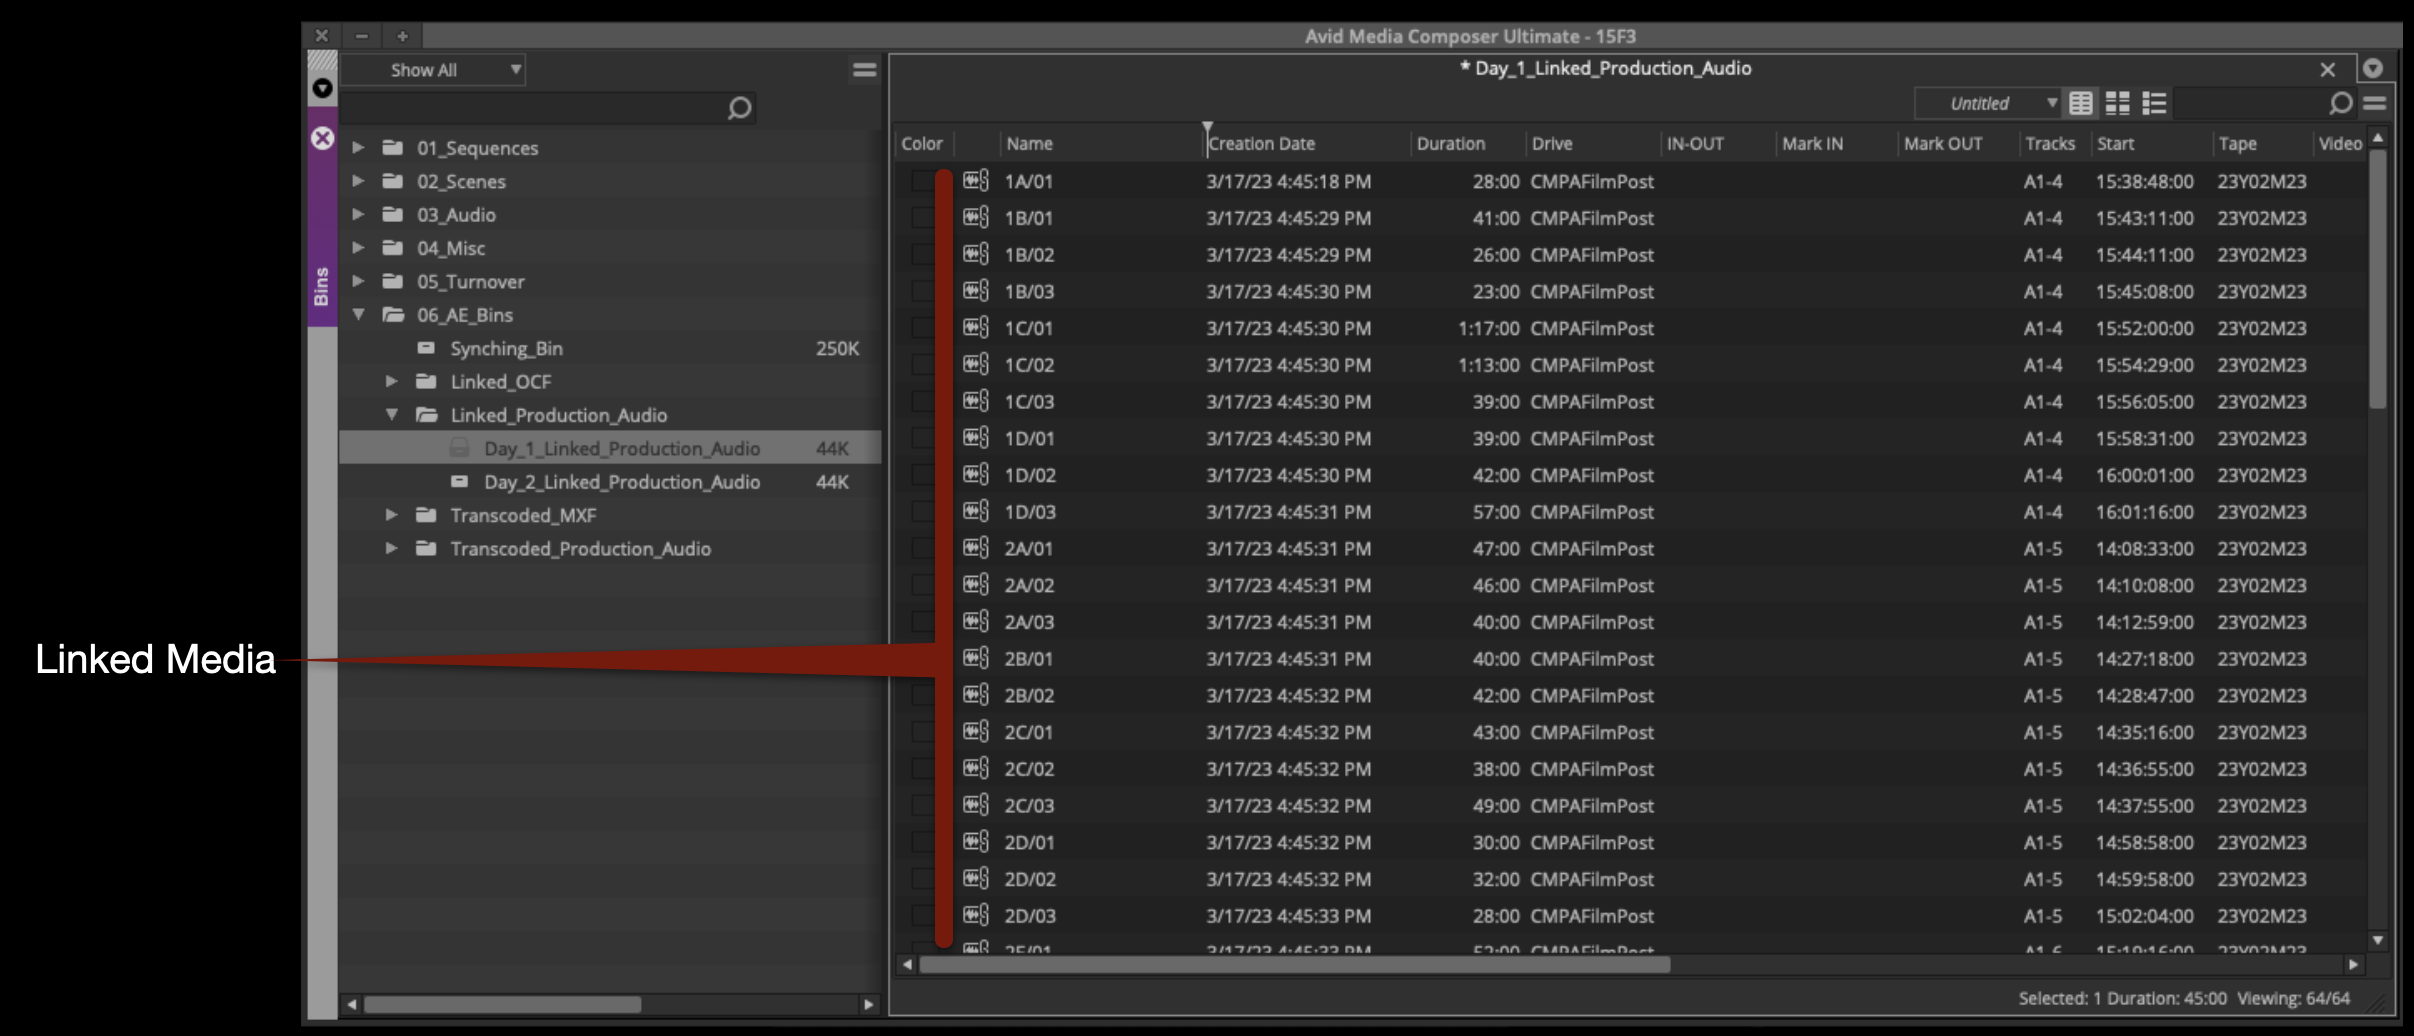
Notice that the icons have linked-chain symbols. This is to let you know that this is not Avid Media yet; it’s only linked to the original media on the CMPAFilmPost Server.
Highlight all of the linked files in the bin by hitting “Command + A”. Right-click on a clip and select “Consolidate/Transcode”. This will open the Consolidate/Transcode window.
THIS IS VERY IMPORTANT: Study all the options highlighted by the red arrows shown below. These settings determine how the media will be transcoded and used for editing in Media Composer. The radial button in the top left should be set to “Transcode”. Under the Target Drive, you should select your Show Volume. Do not select CMPAFilmPost. Then, double-check all of the red arrows on the right.
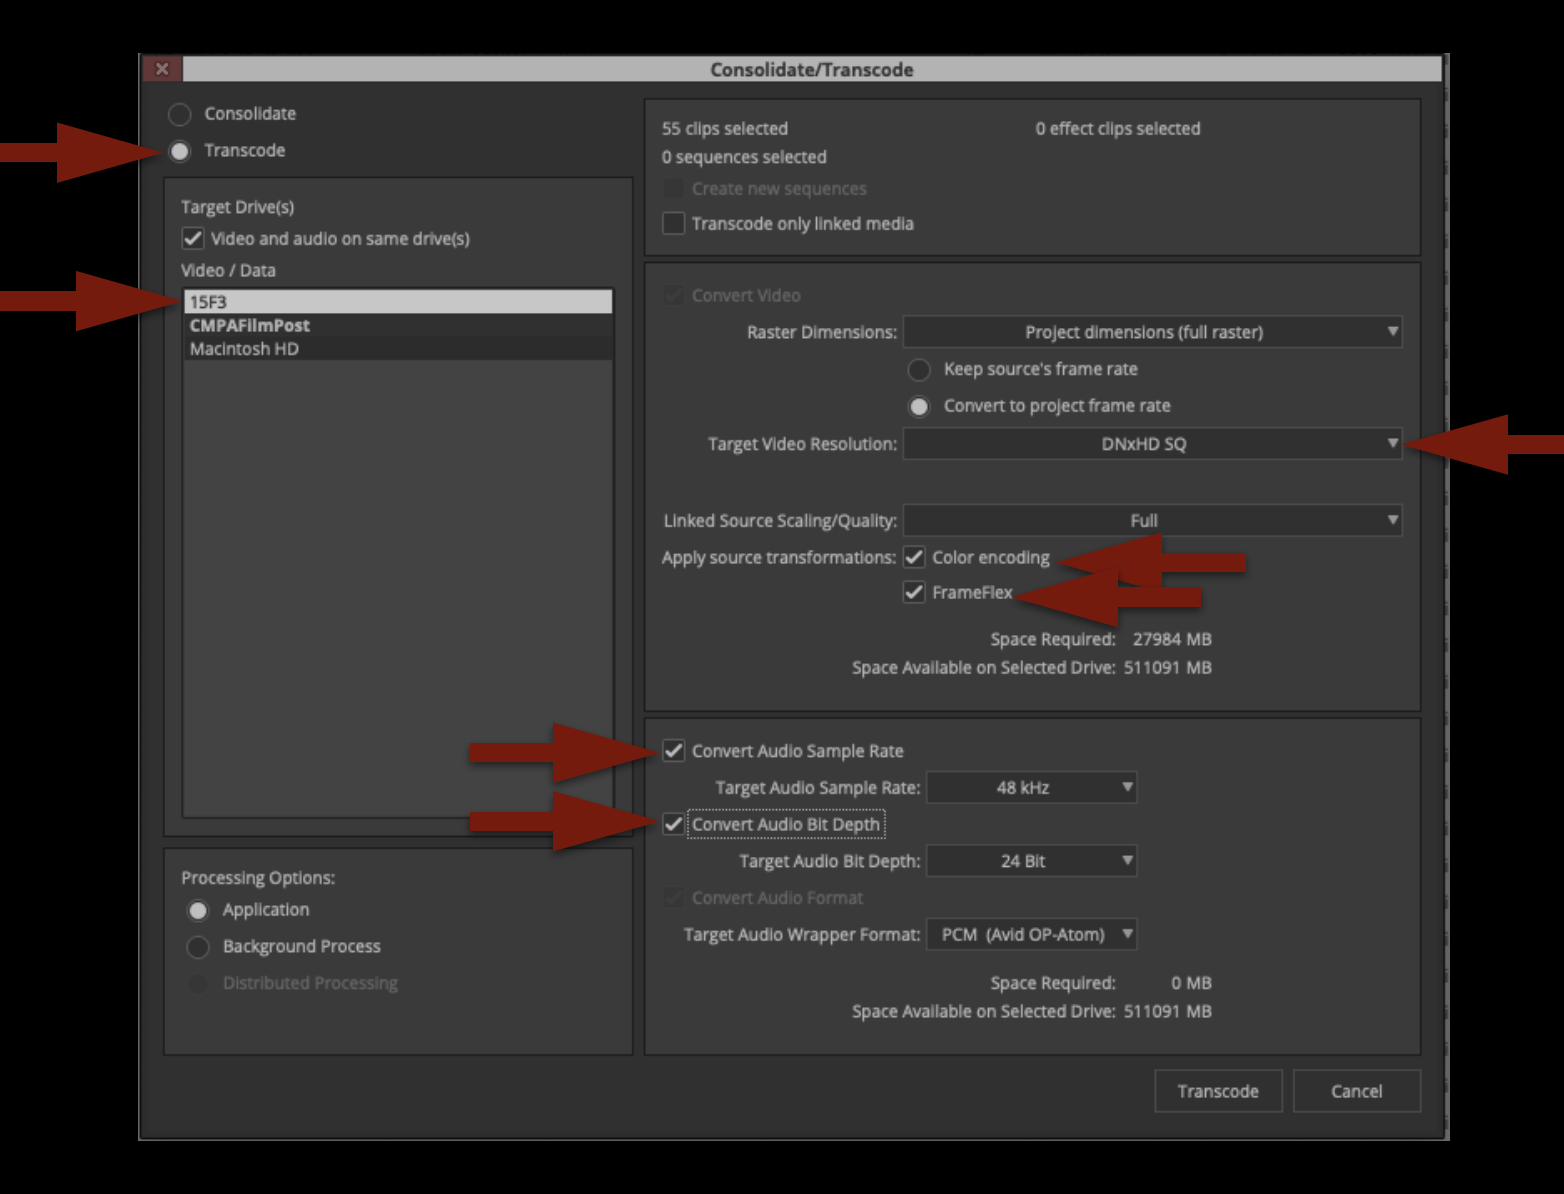
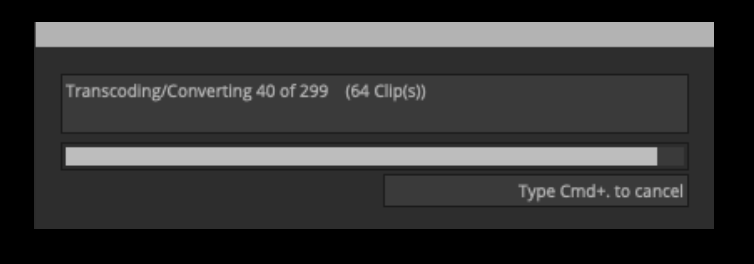
Once everything is set properly you can click “Transcode”. Since this is audio media, it will not take long at all to transcode. Don’t go anywhere!
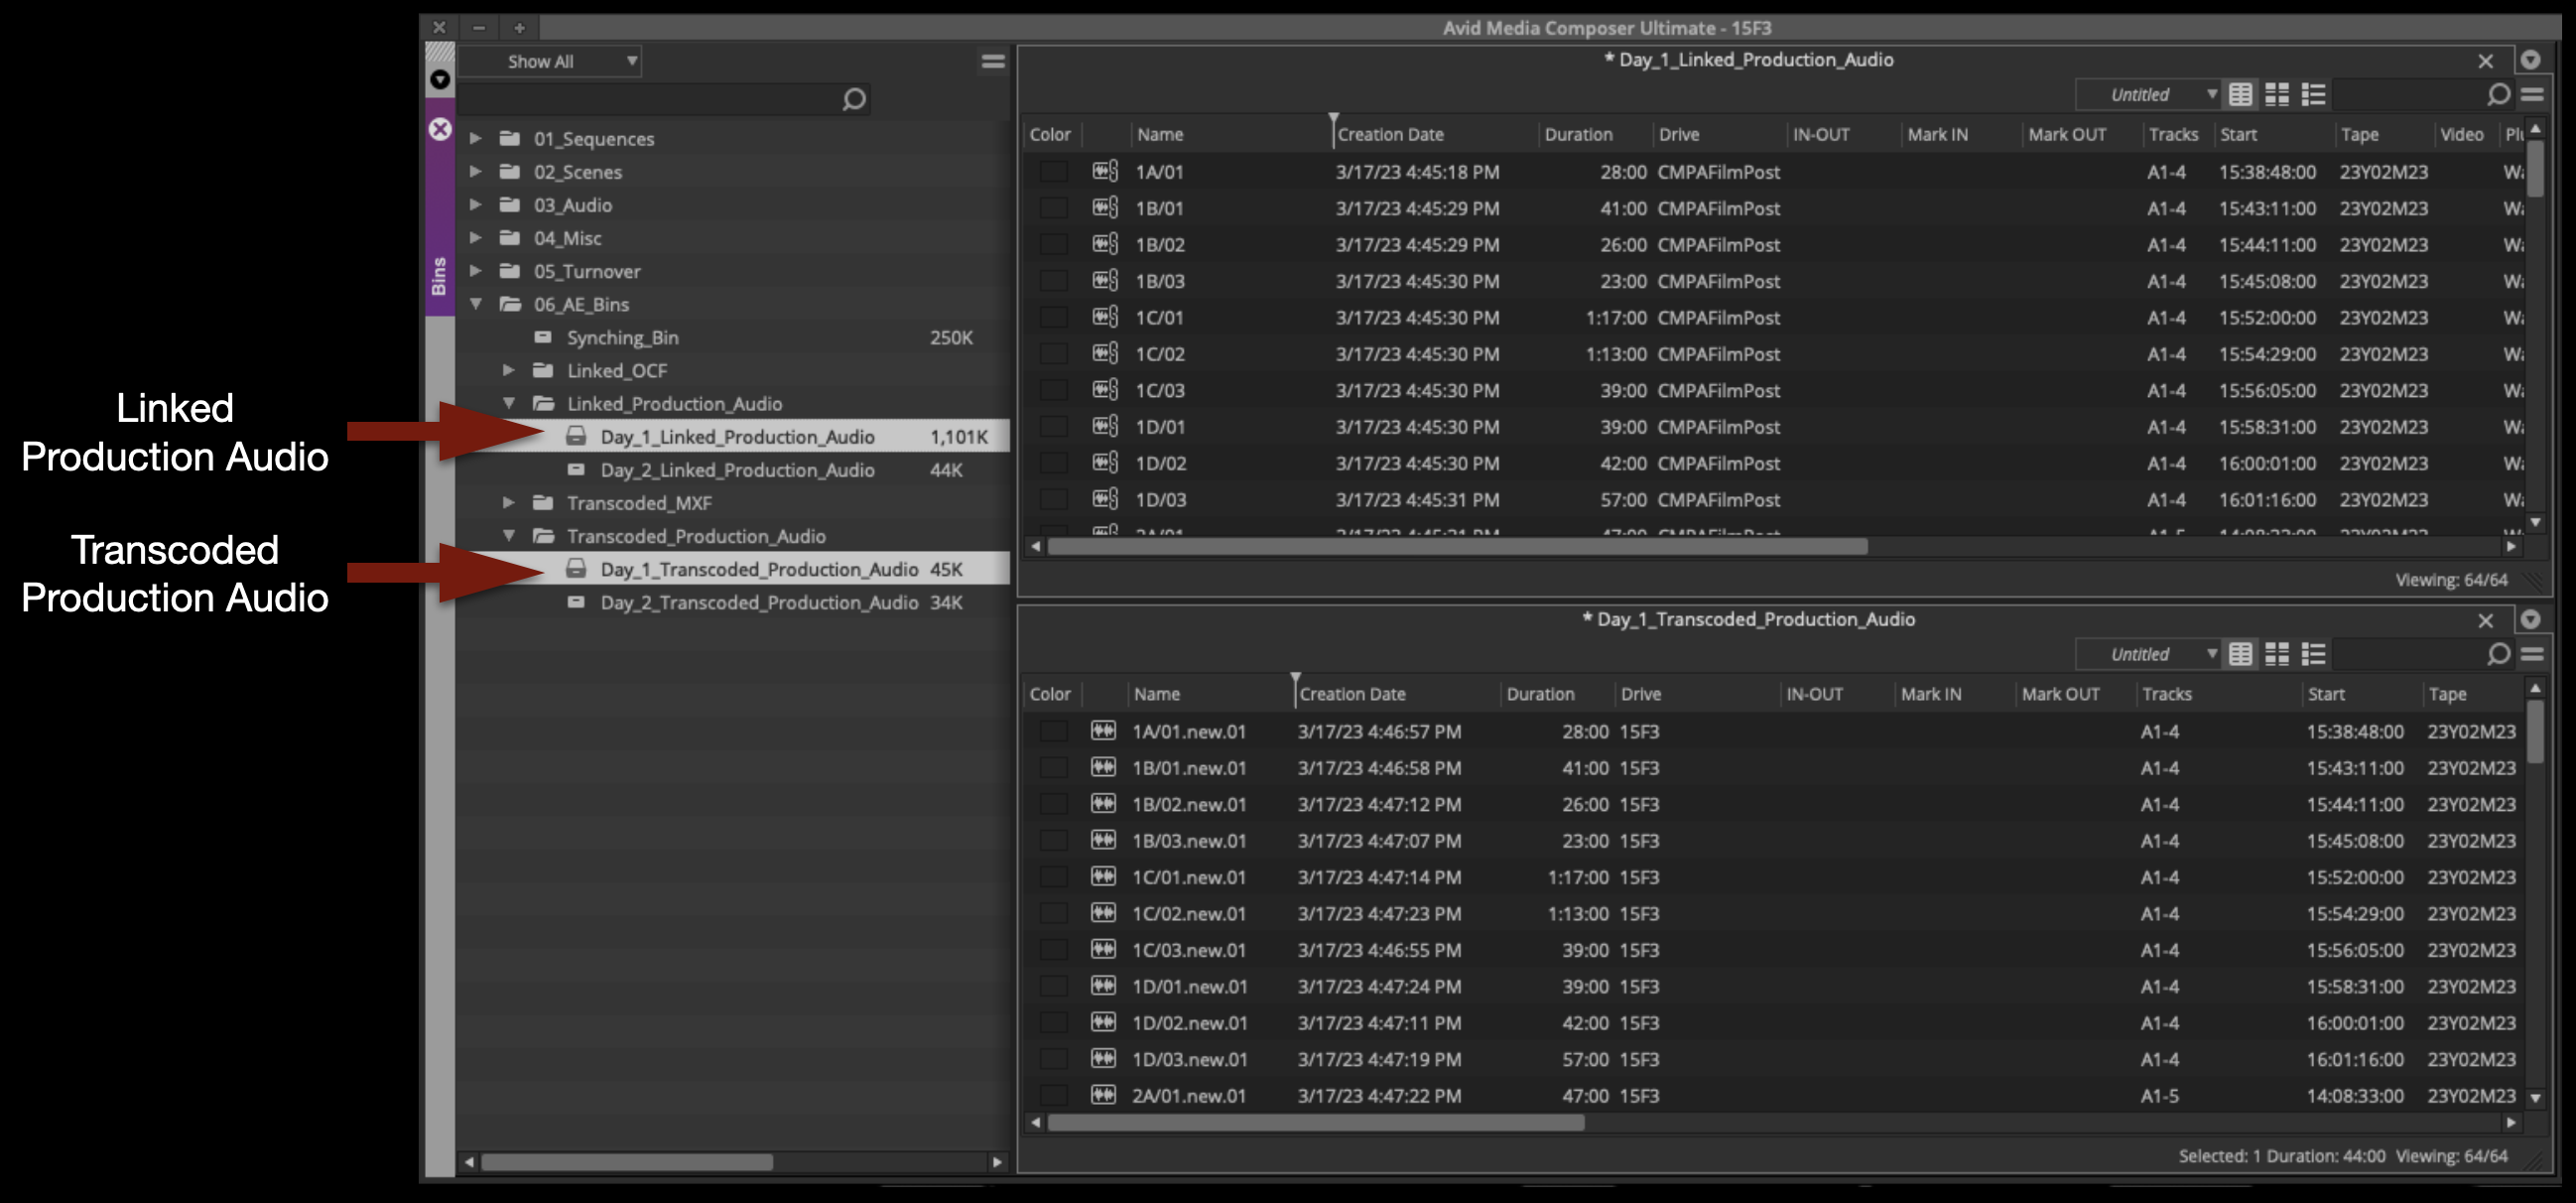
When the transcode is finished, you will notice that now you have two versions of everything in your bin. One is linked Production Audio and the other is Transcoded Production Audio:
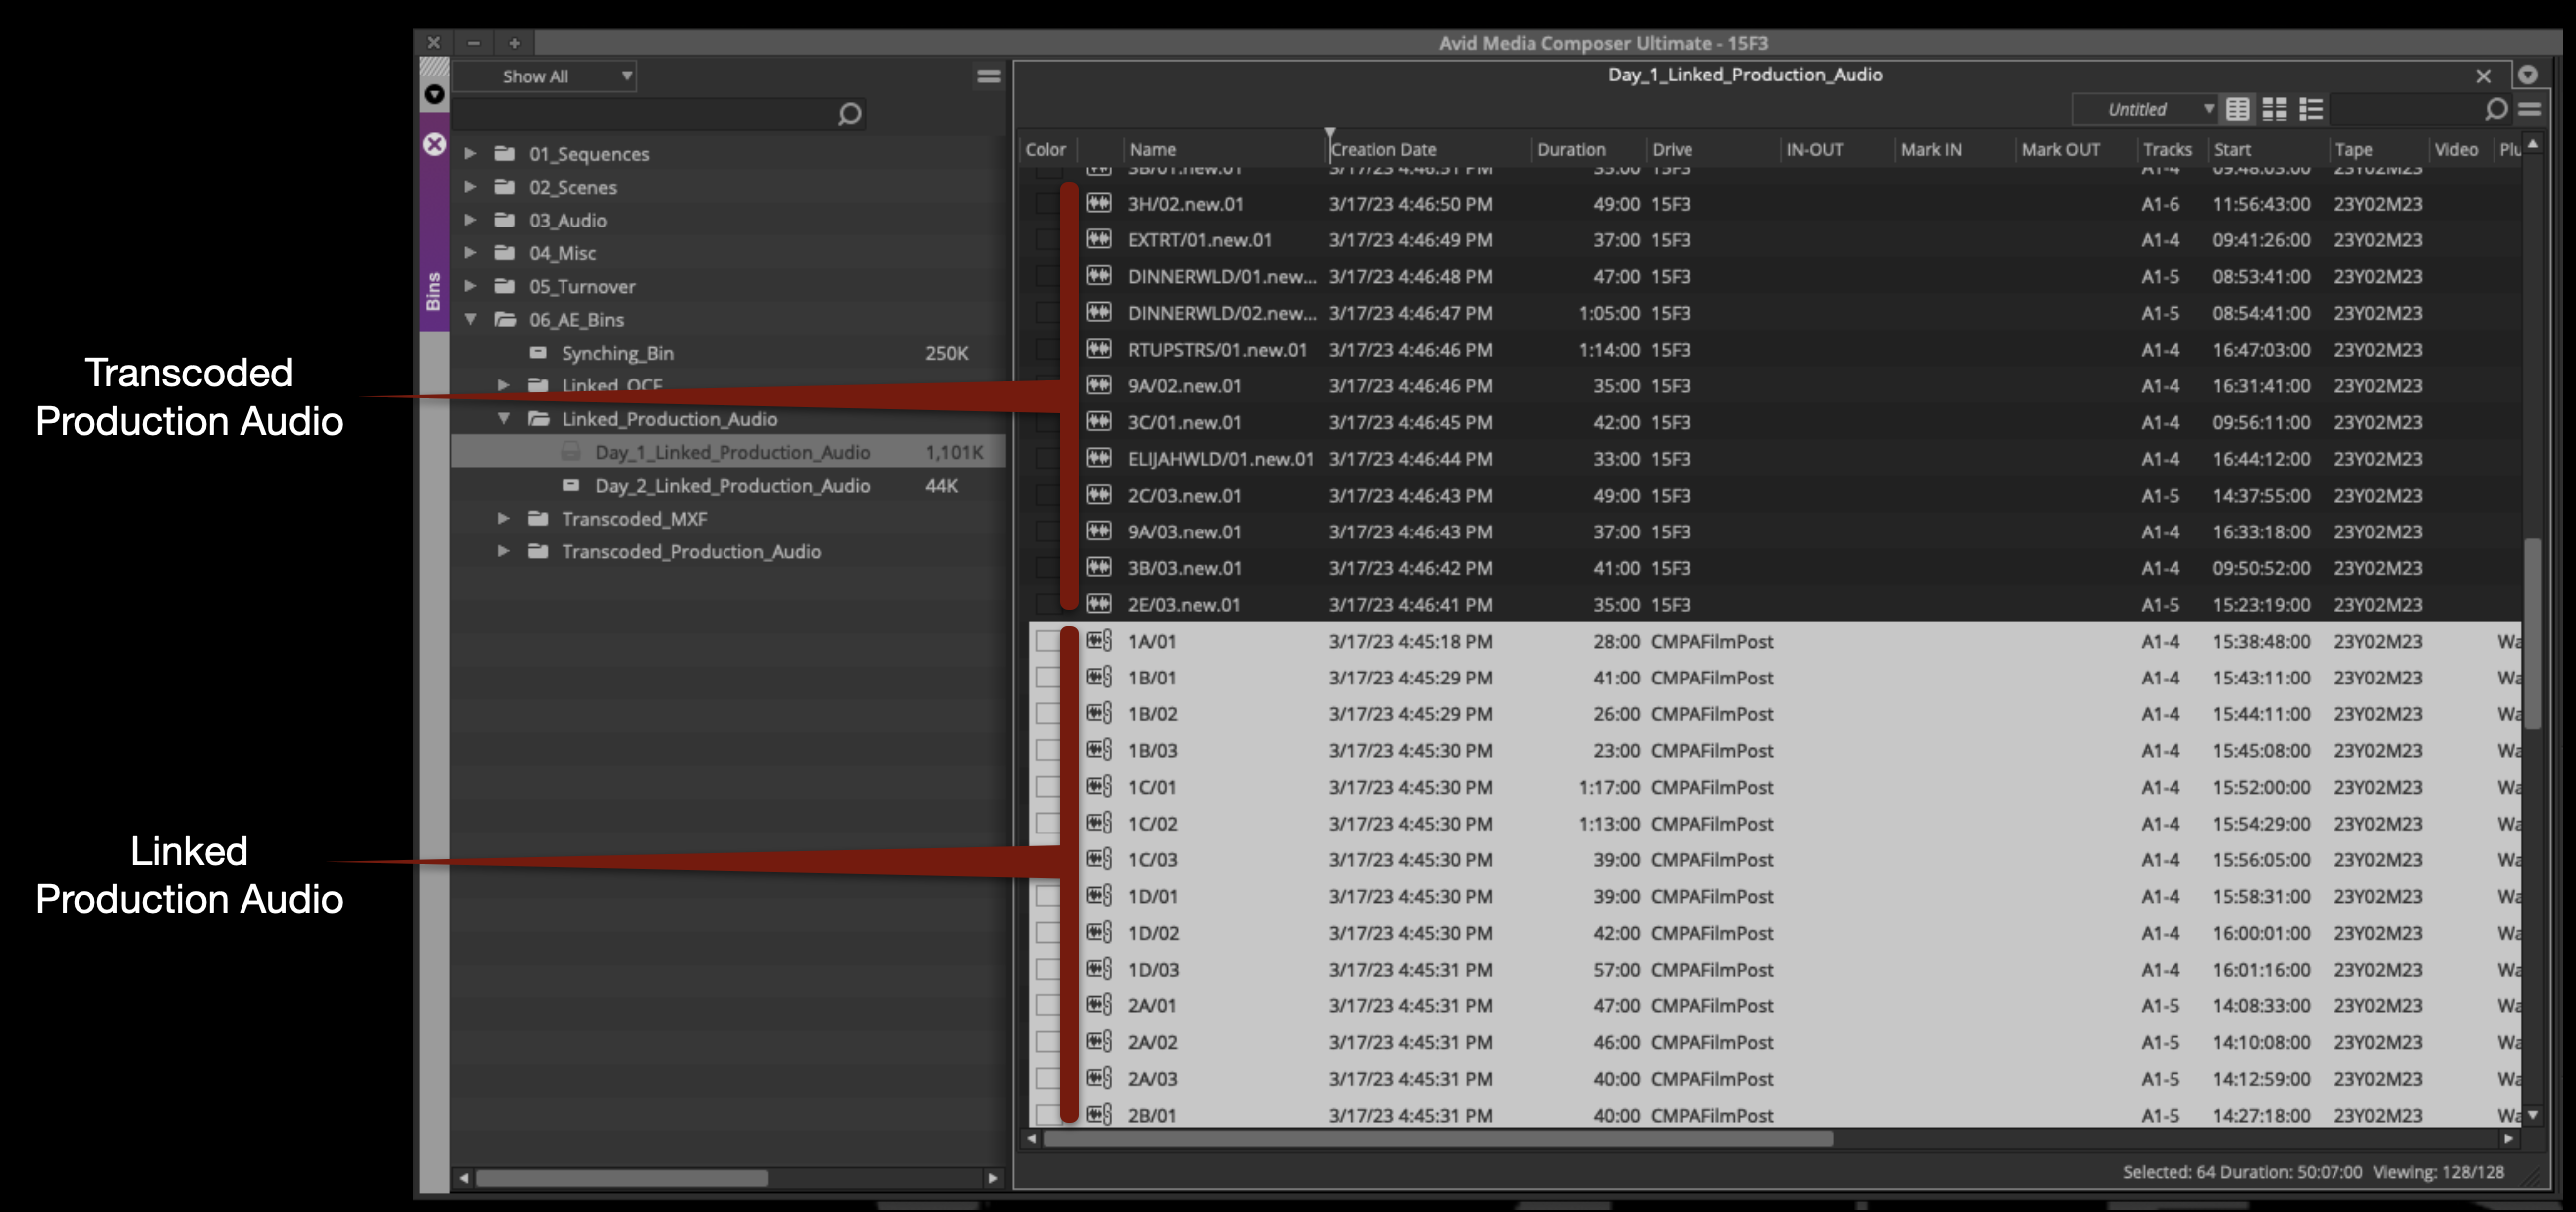
Move the Transcode Production Audio media to the proper bin:
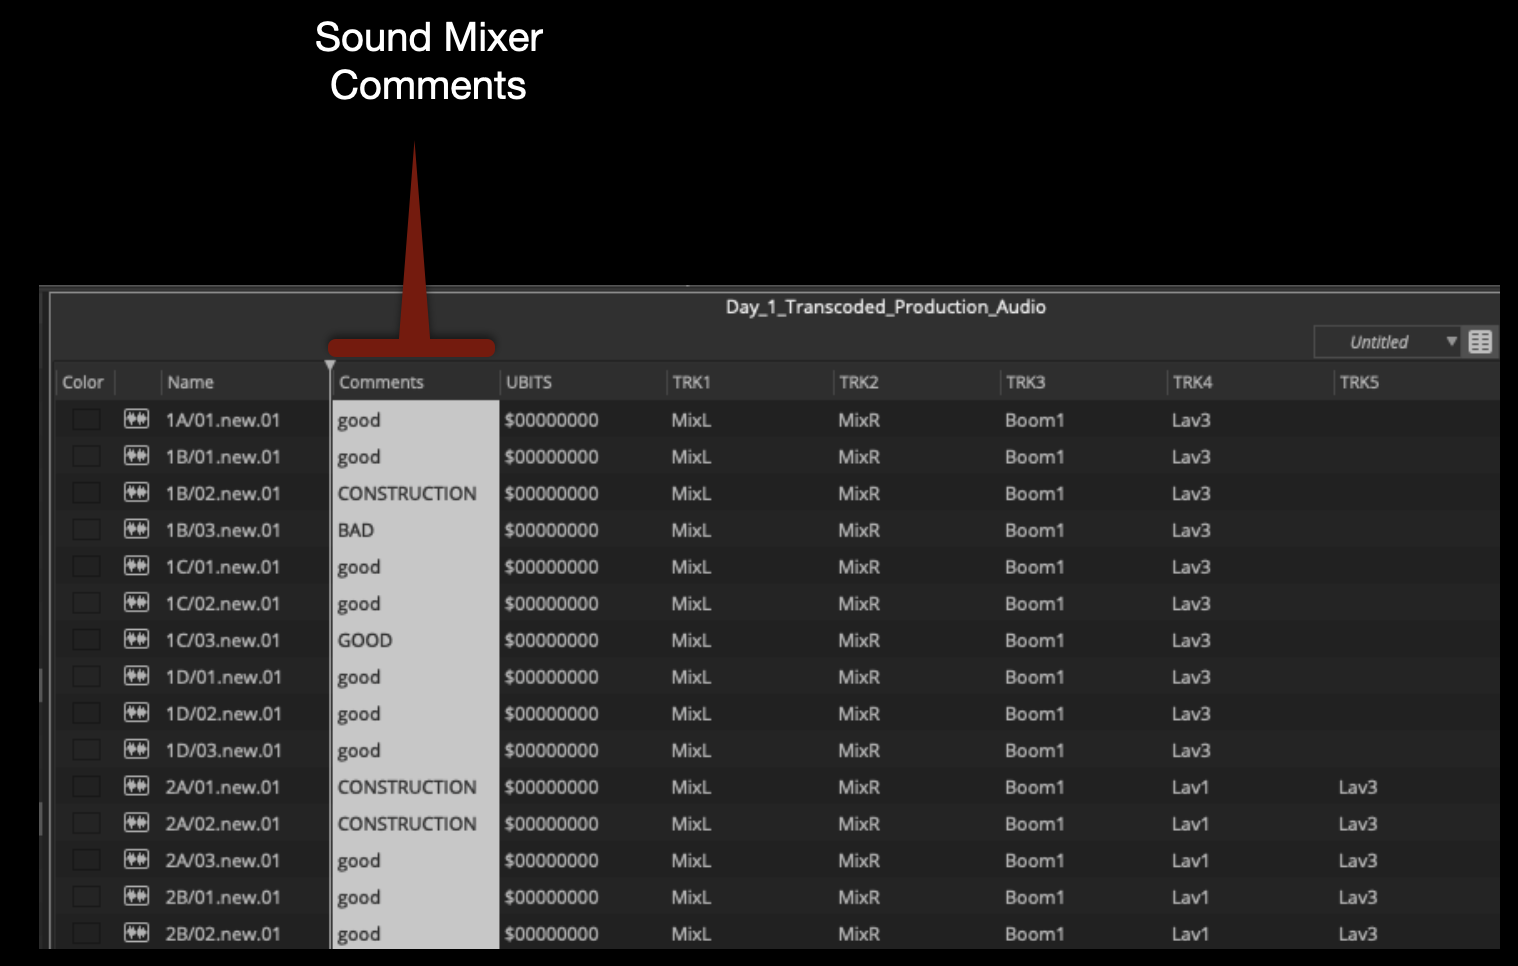
In the Transcoded Production Audio bin, take notice of a few things.
The Sound Mixer has most likely taken notes that will be useful later. These are in the Comments column:
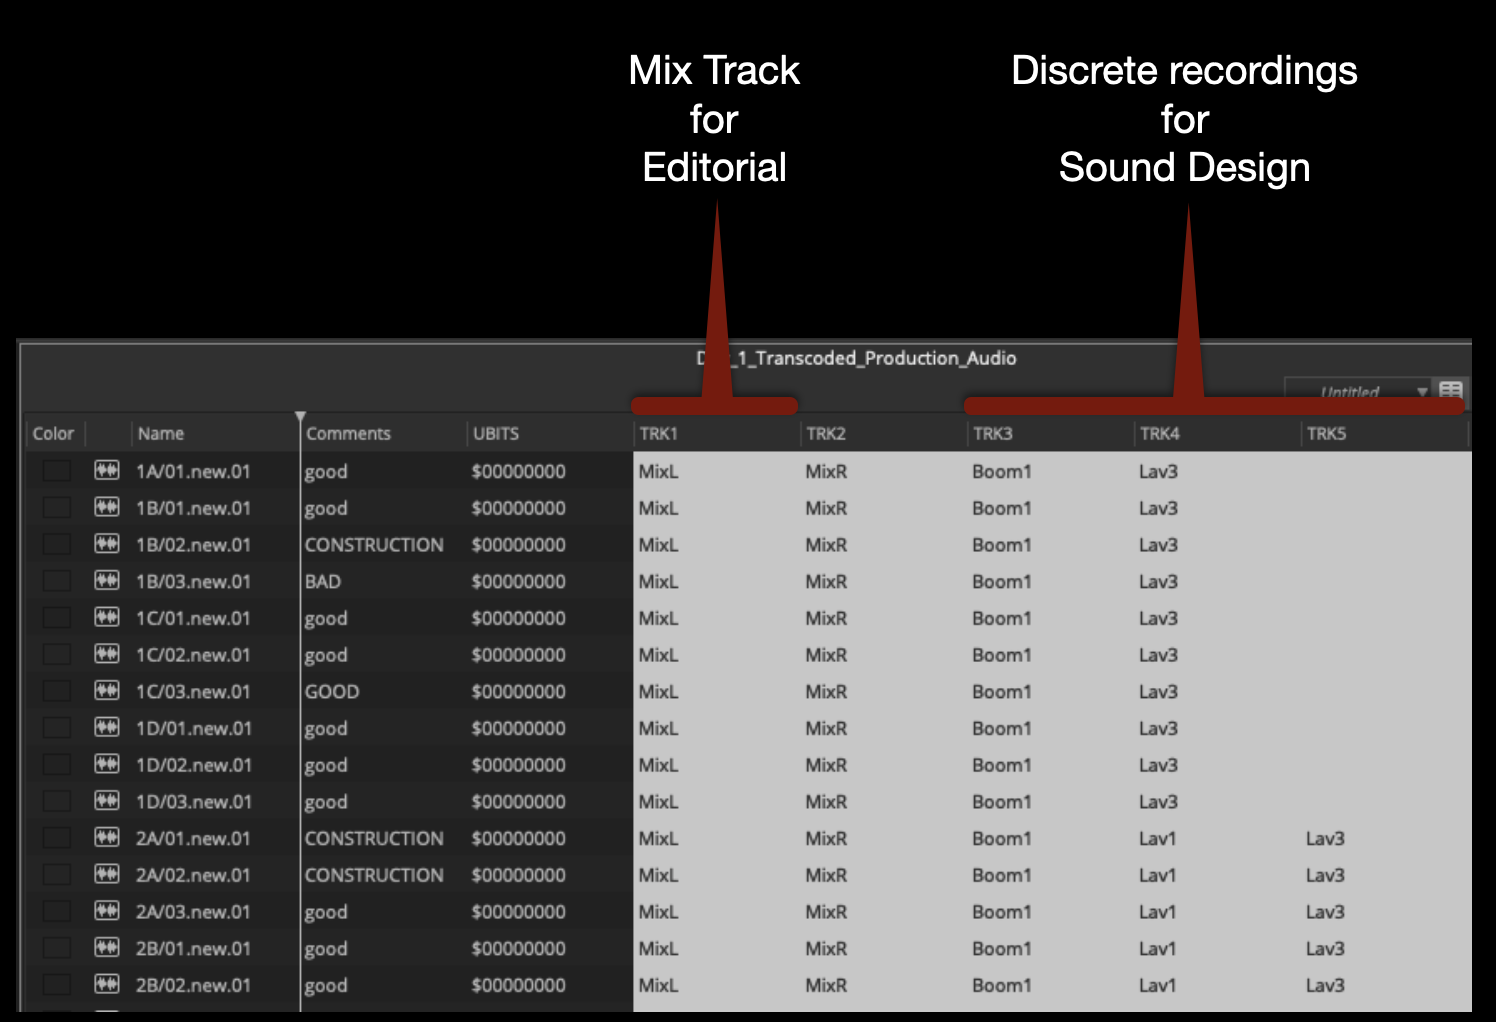
Also, you will see in the TRK columns that Track 1 and 2 are Mix tracks. These Mix tracks are a combination or “mix” of all of the booms and radio mics that were used during production. Later in the process you will make subclips with only Track 1 or “MixL” attached, for use during picture editing. Tracks 3 through 8 are discrete recordings that can be used individually when you get to sound design.
Synchronize Audio and Video
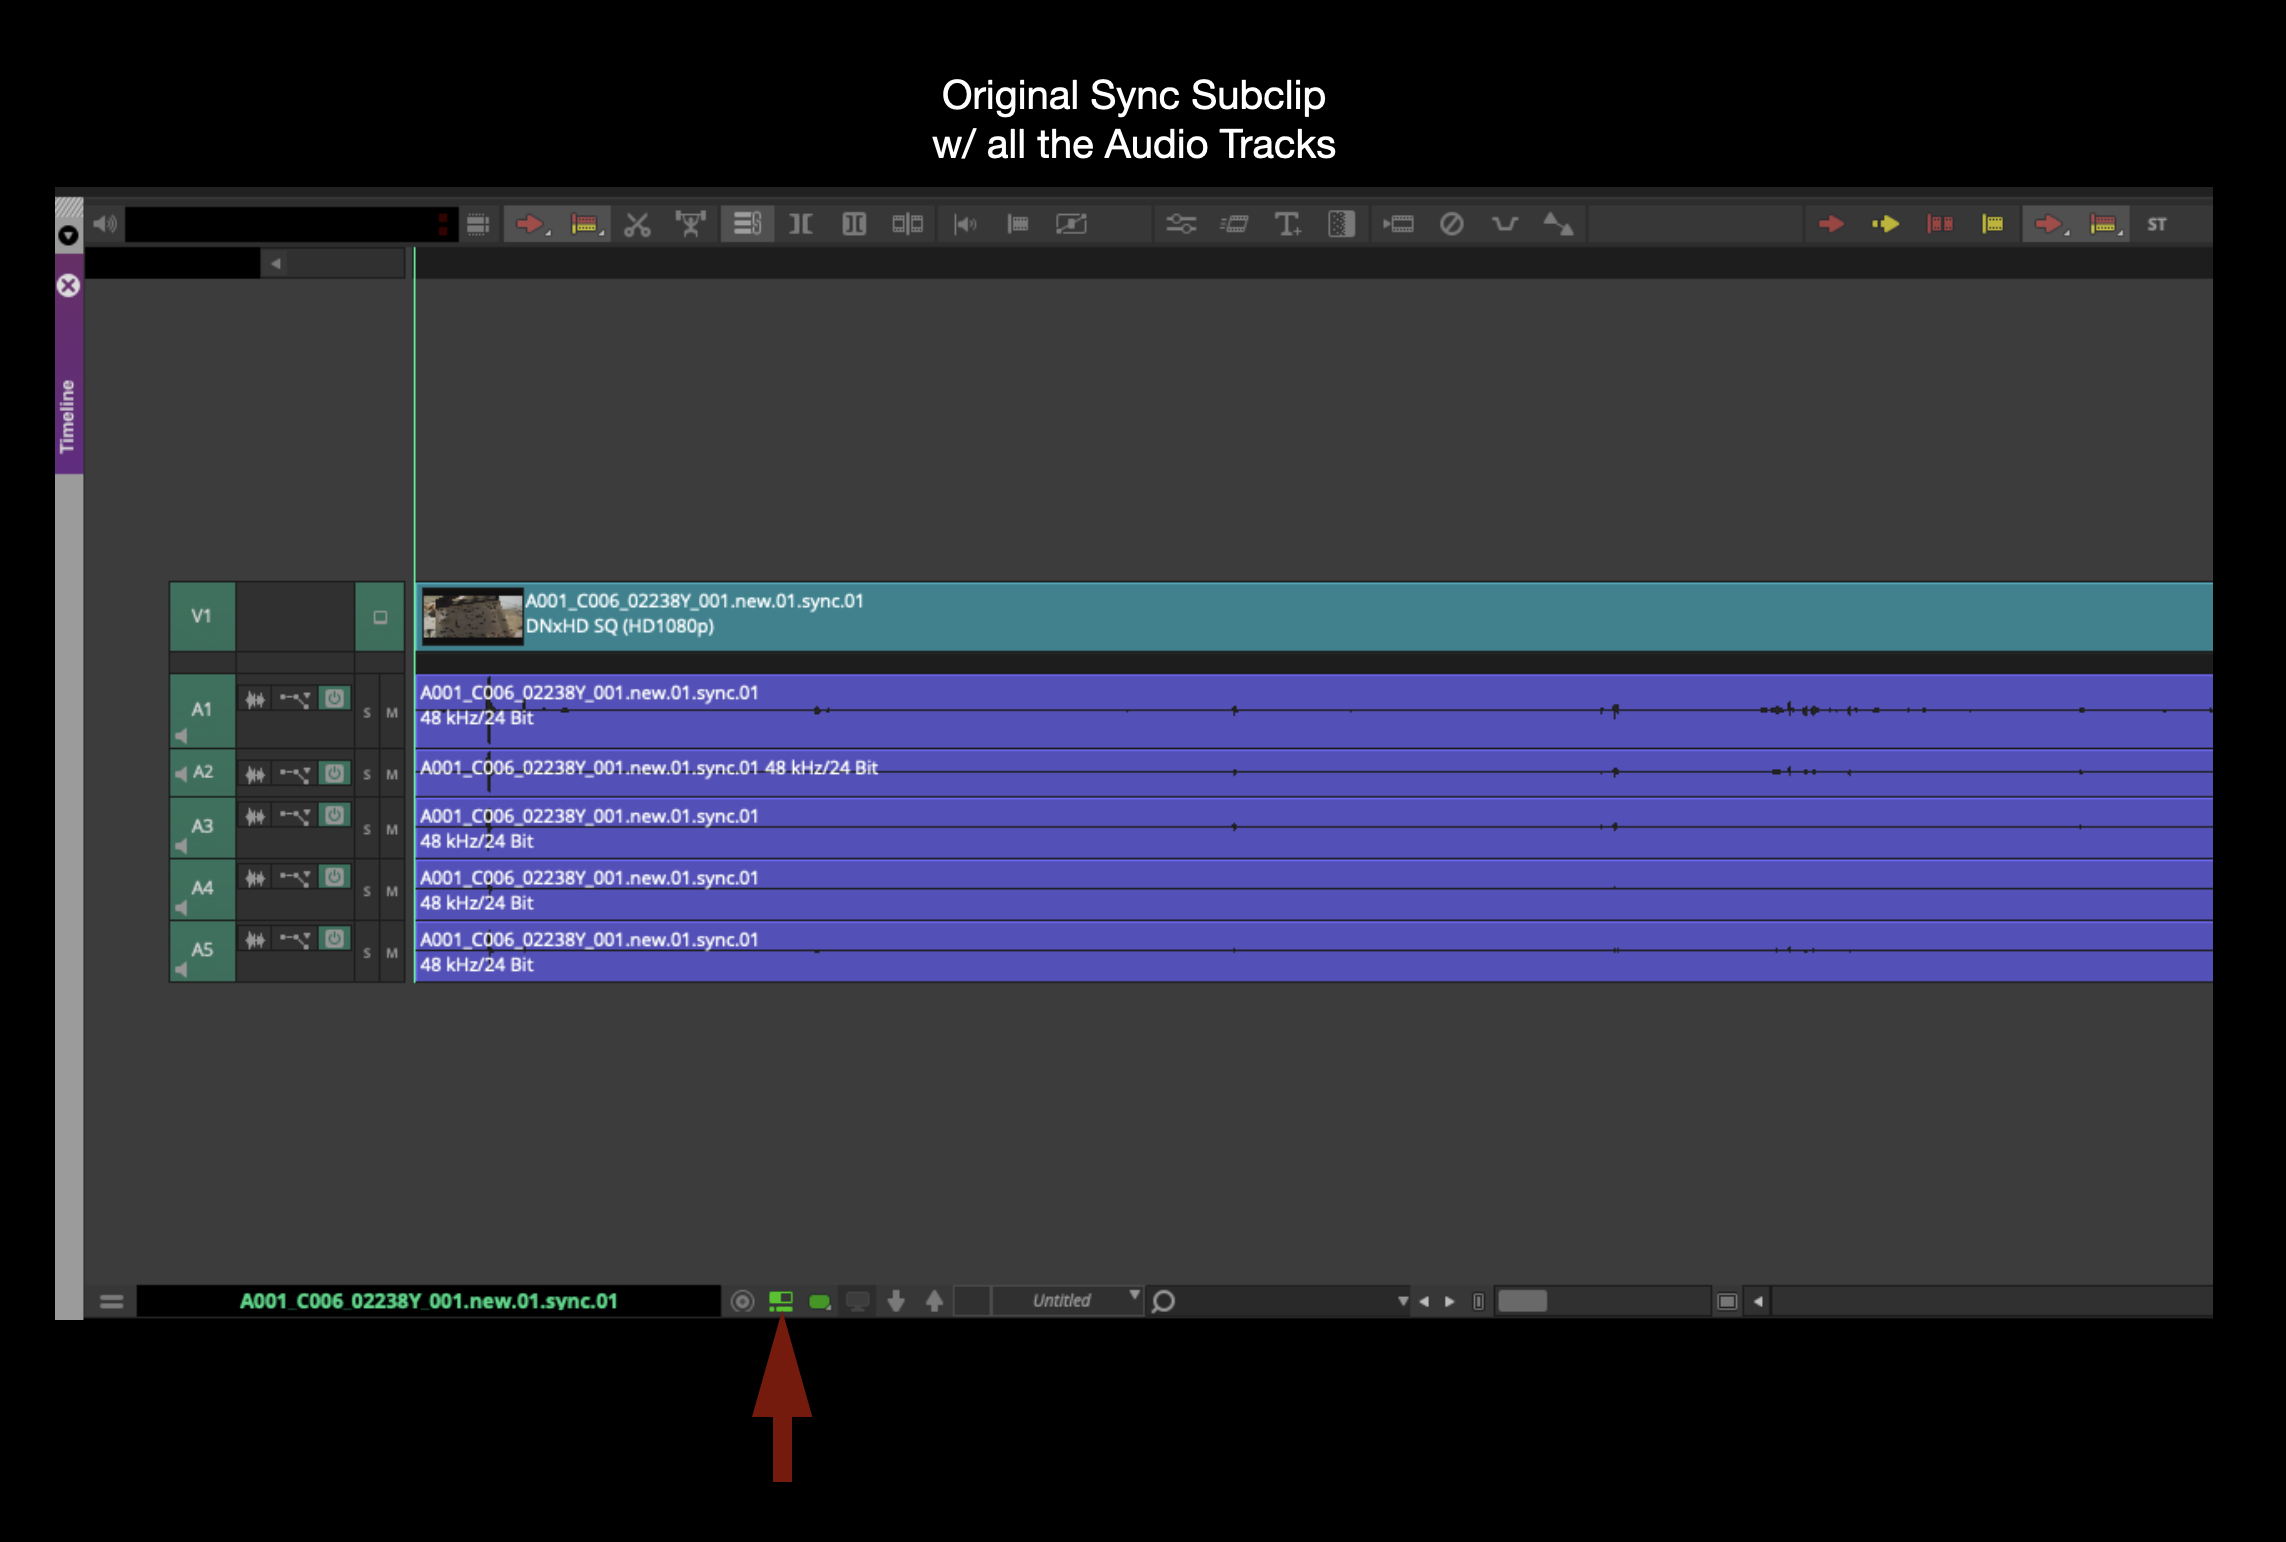
To synchronize master audio clips and master video clips, they need to be placed in the same bin. Move the day’s worth of audio and video together into the Synching Bin.
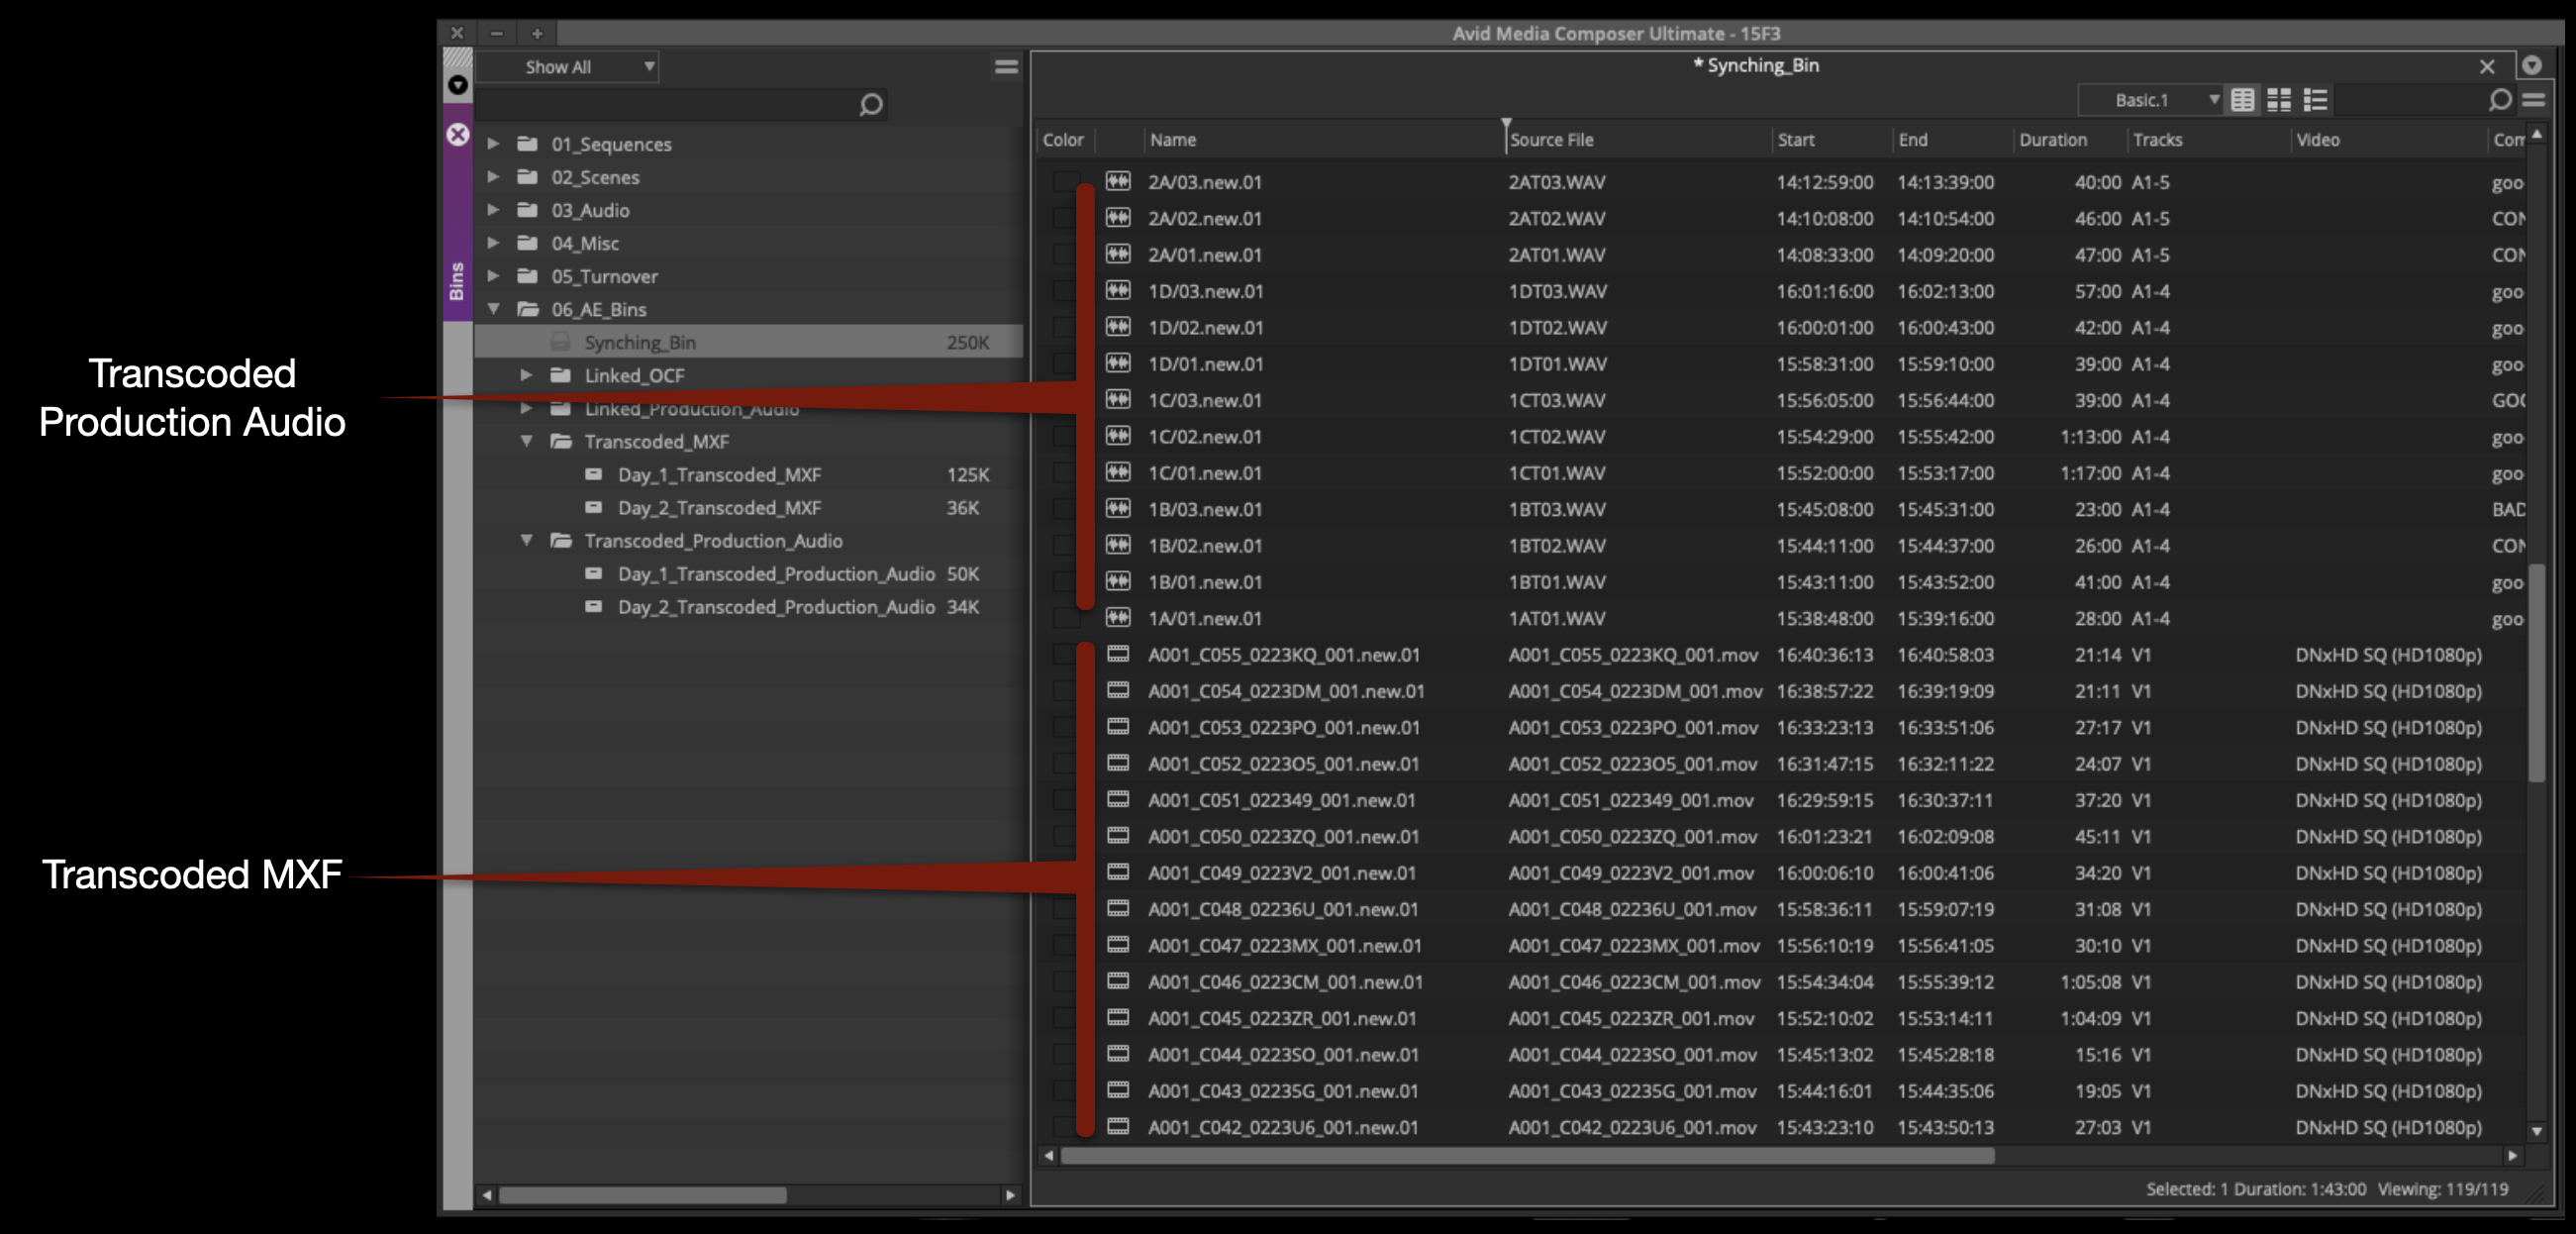
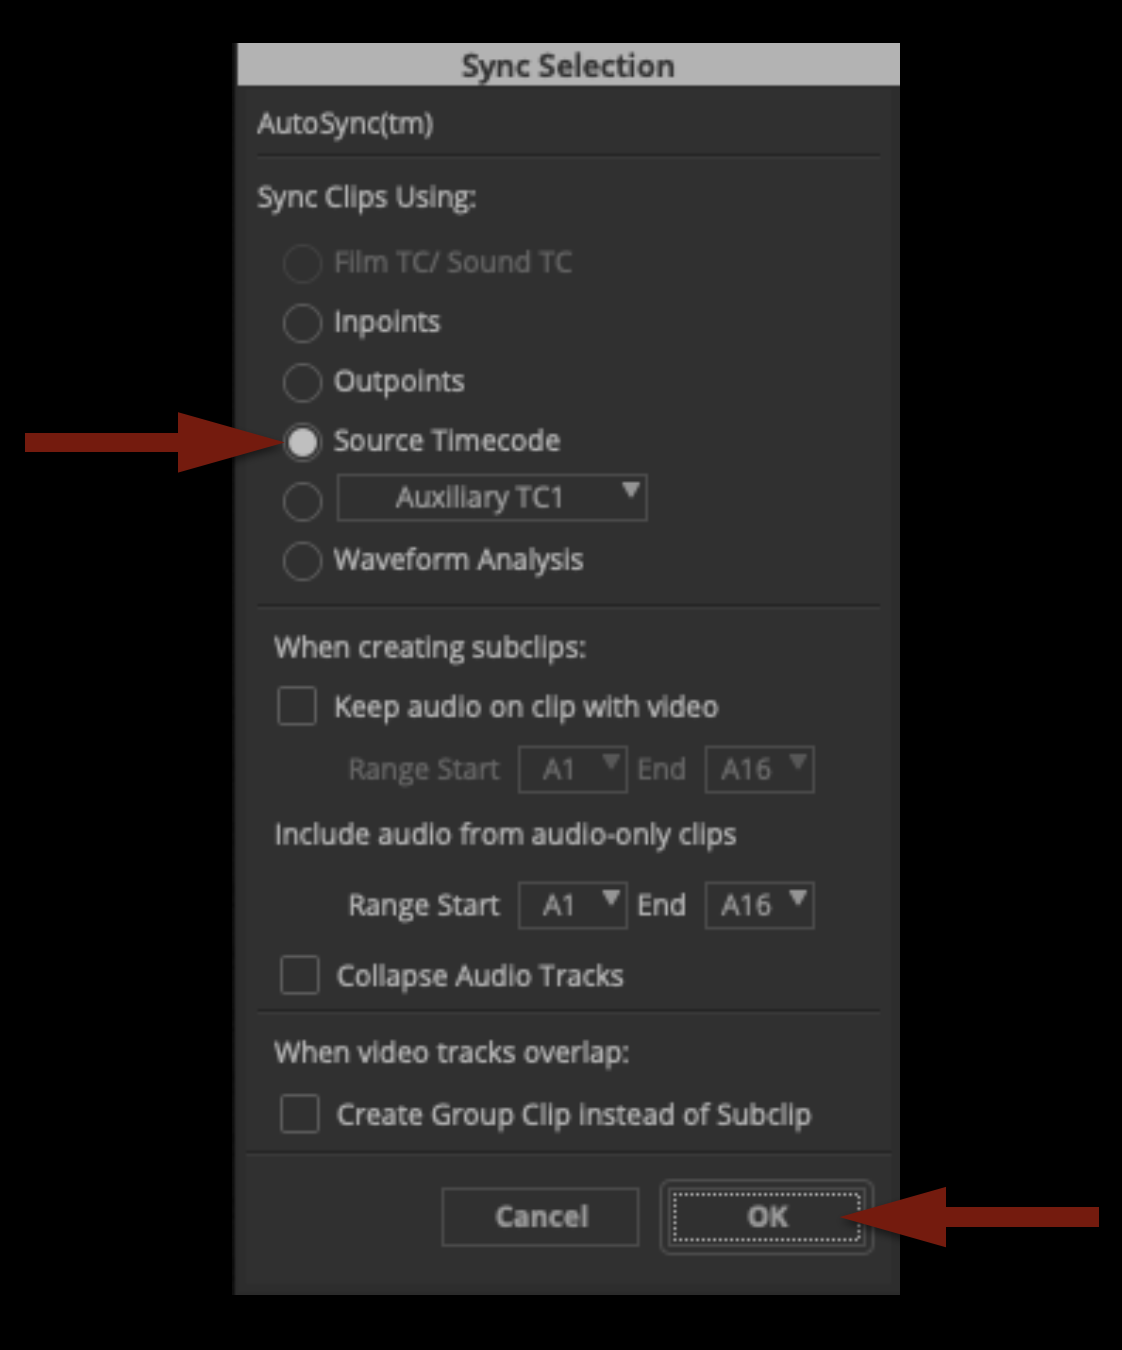
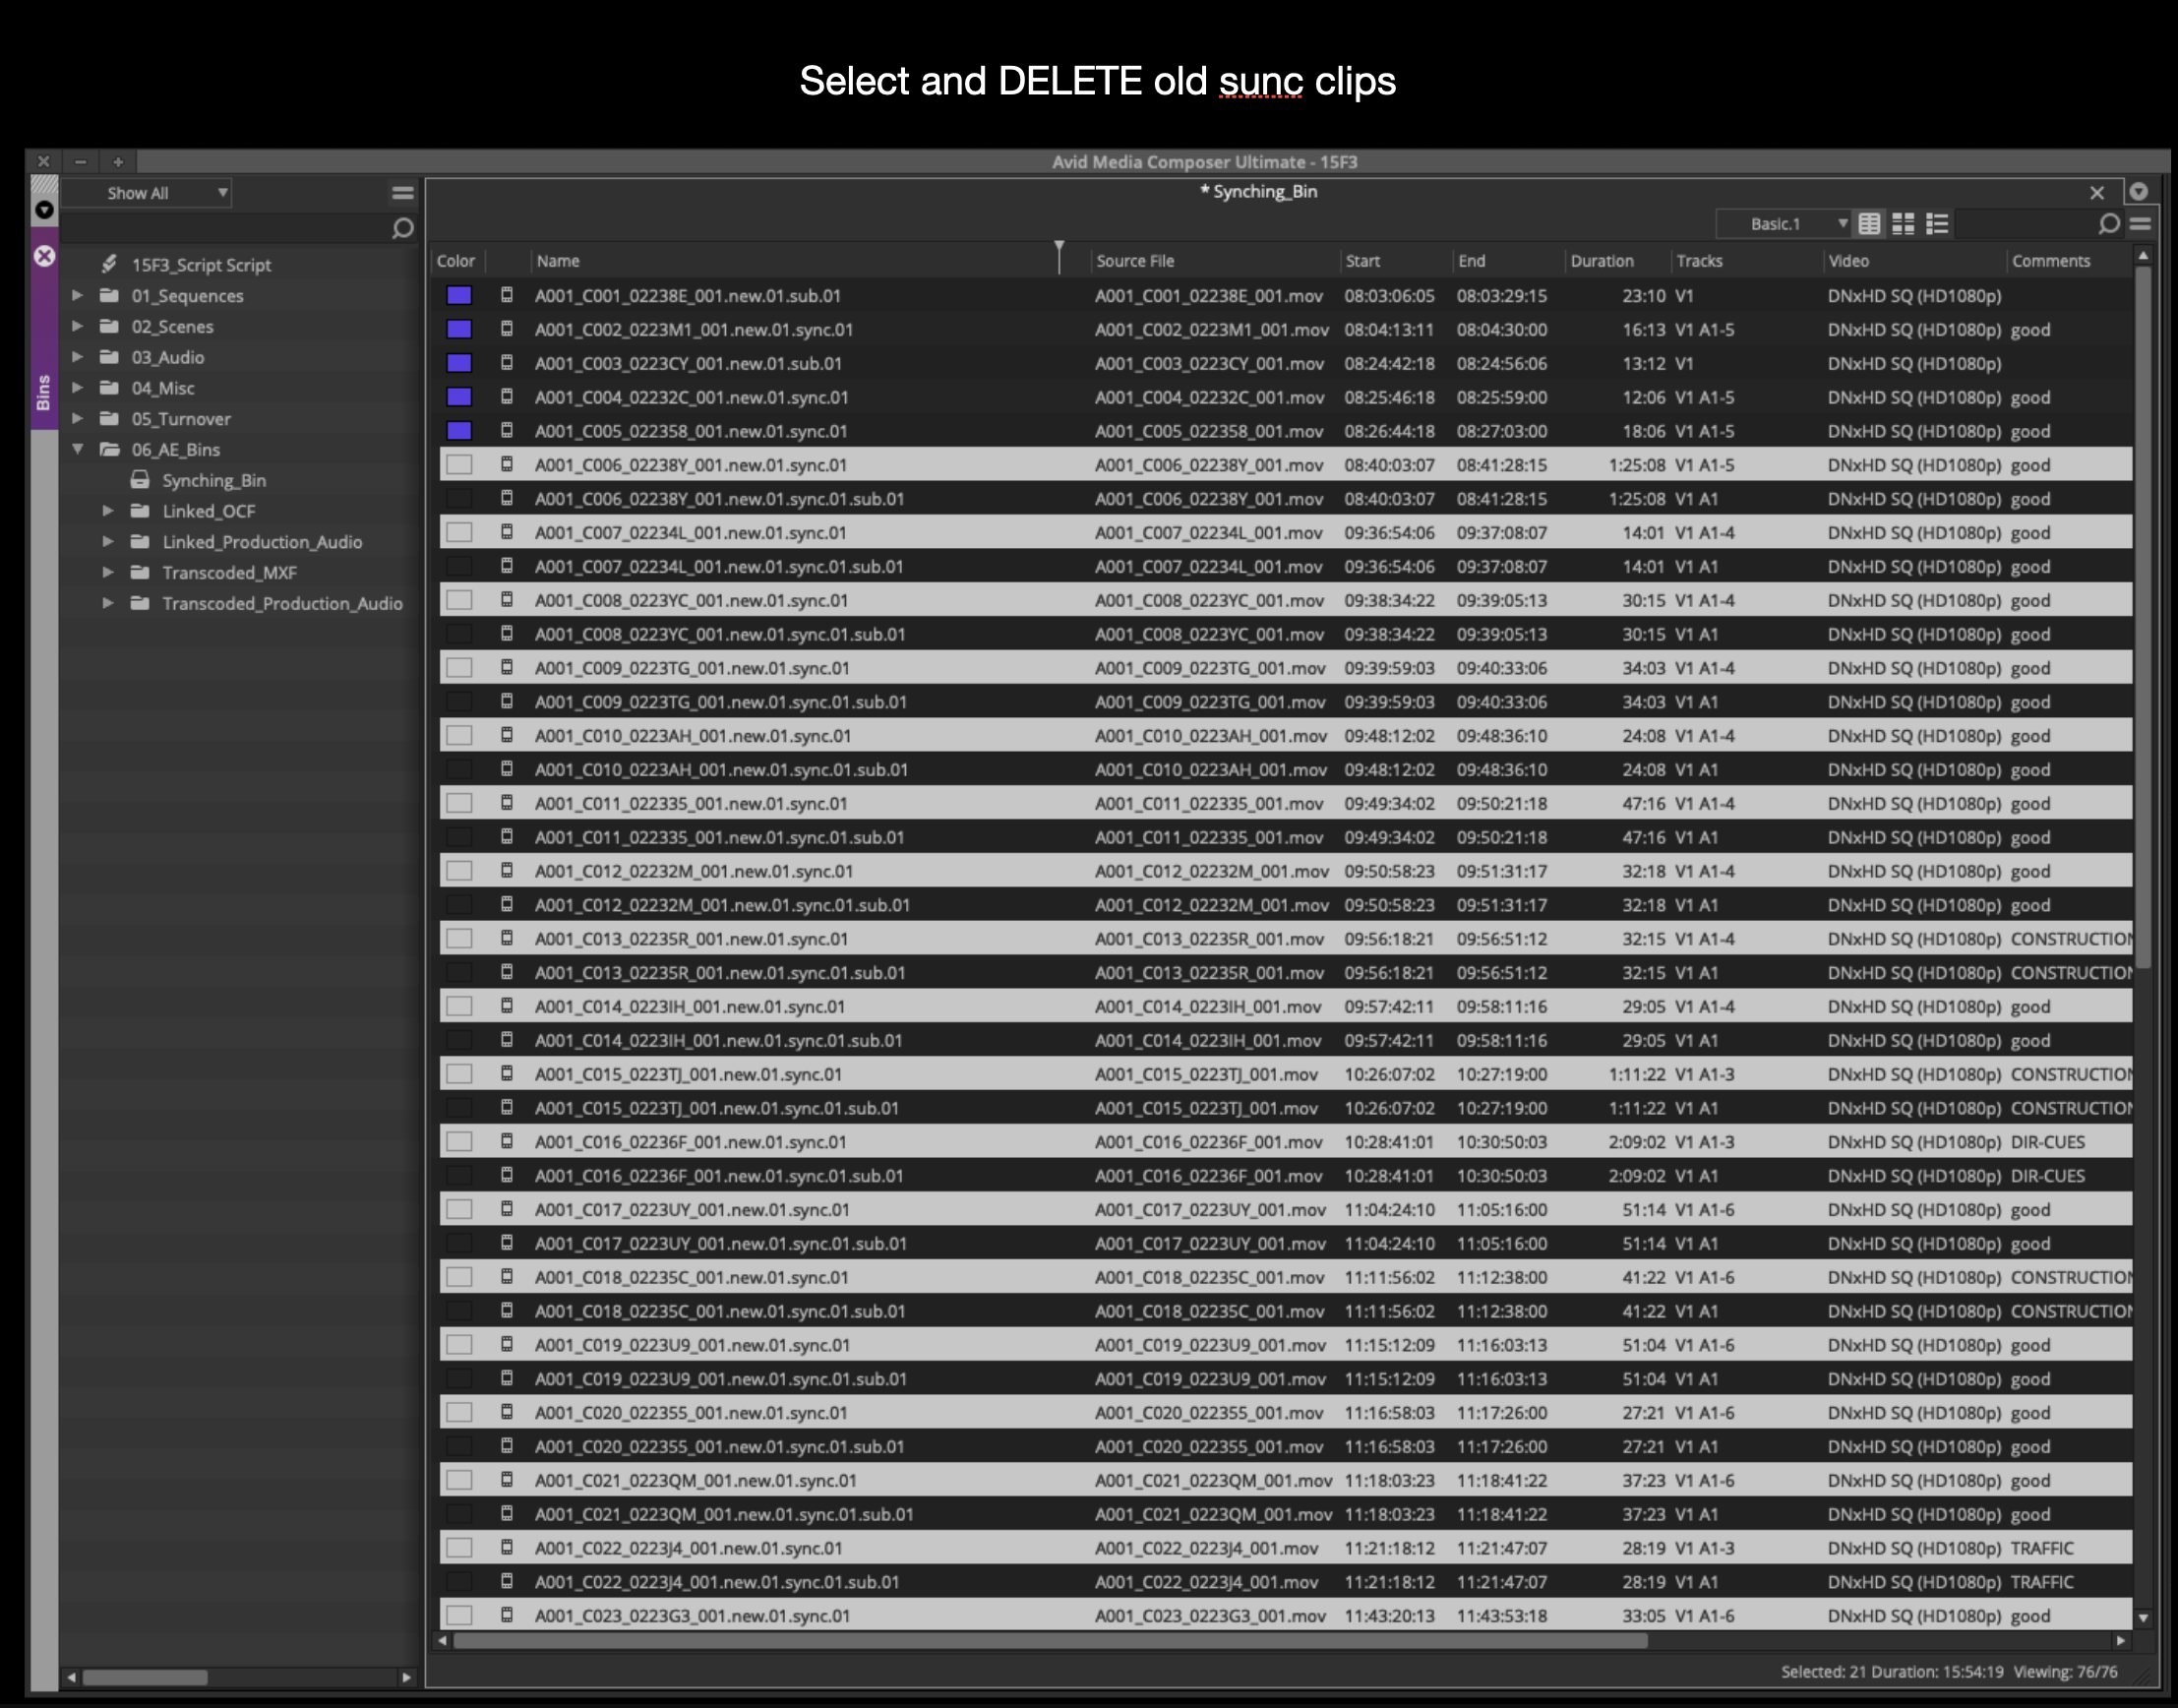
Select all the audio and video clips in the Syncing Bin. Right-click and select “AutoSync” from the contextual menu. The Sync Selection window will open. Make sure “Source Timecode” is selected and click “OK”.
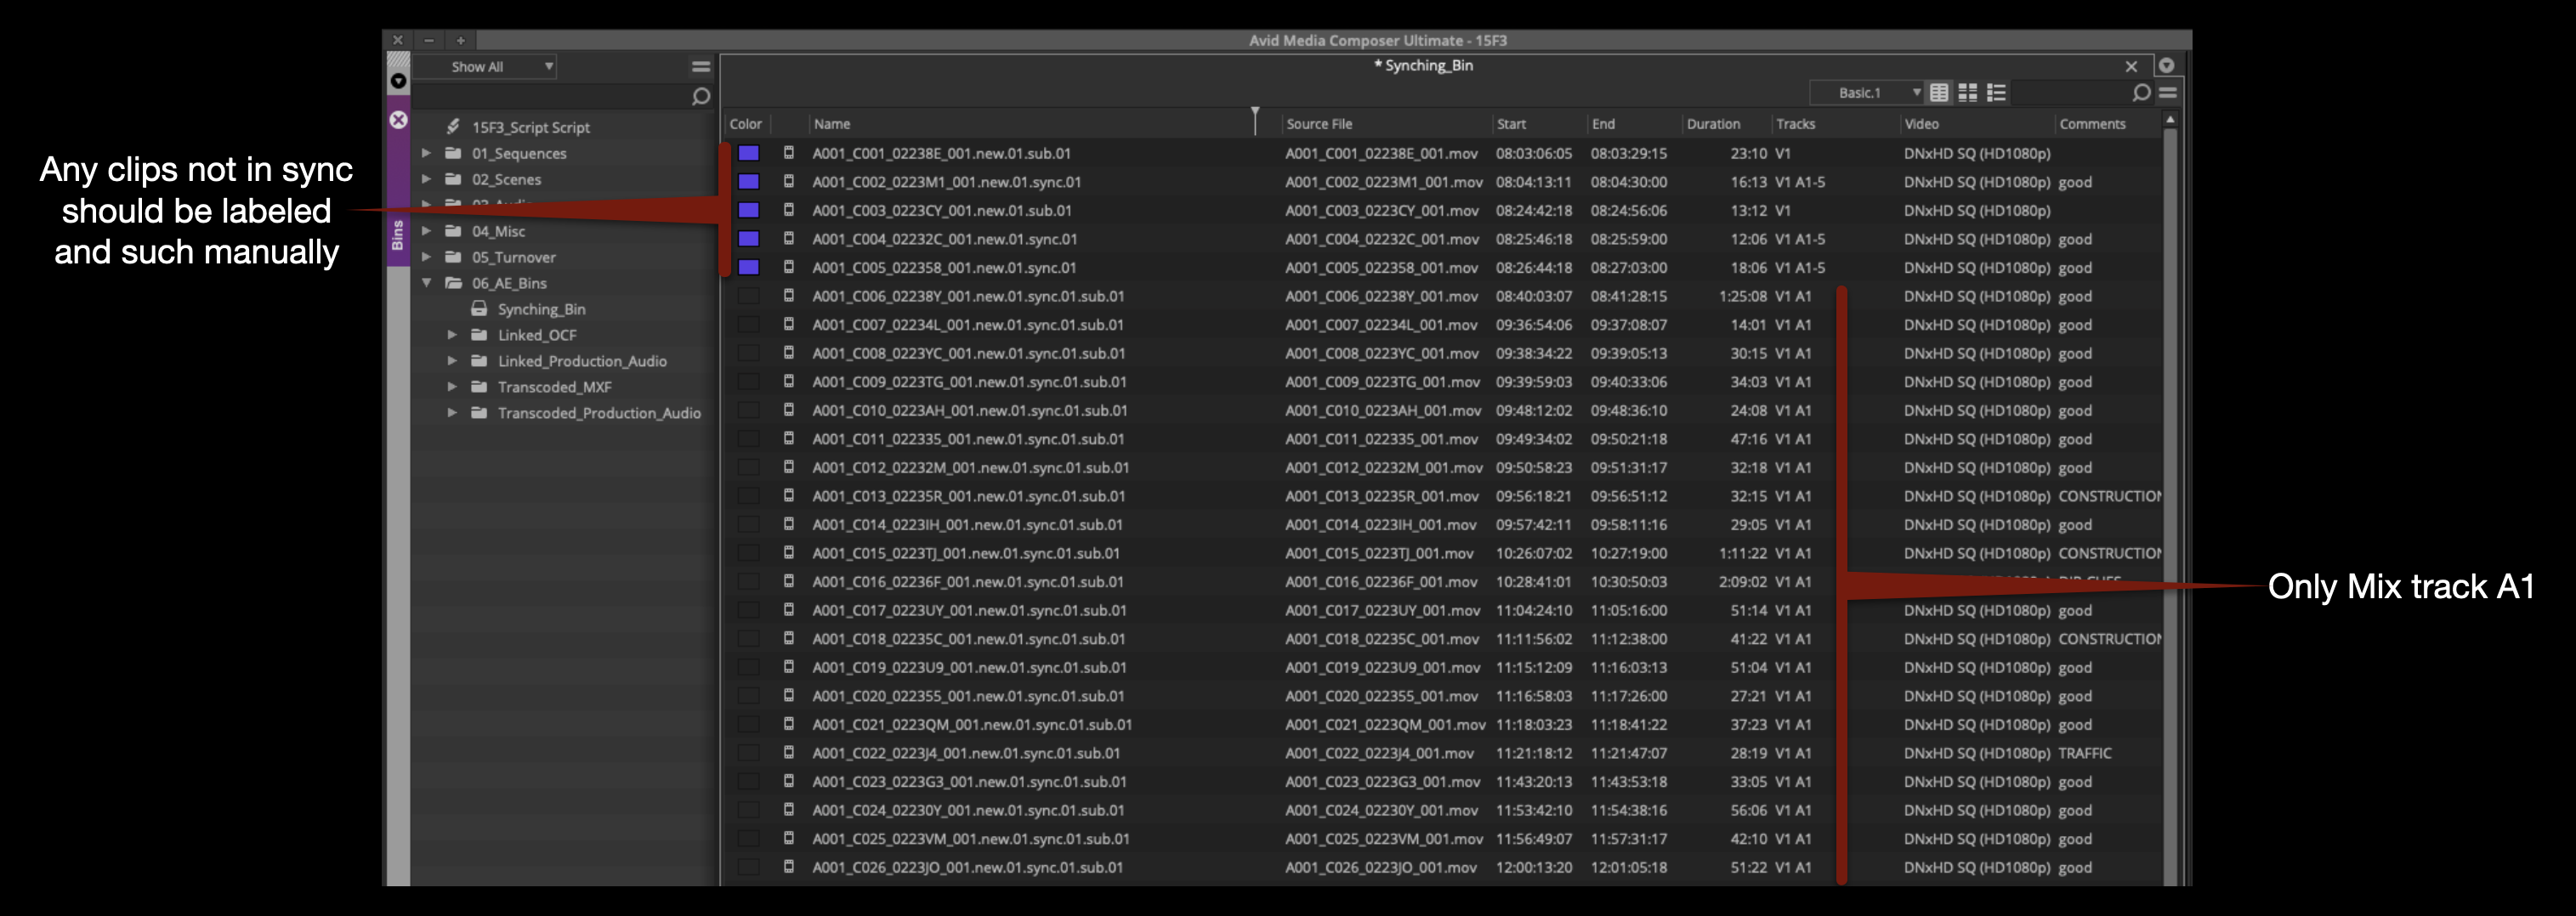
This makes a subclip out of every audio and video clip that has matching timecode. Anything that did not sync (because it couldn’t find a pair with matching timecode) will be left highlighted. Change the clip color of these to make it easier to keep track of them.
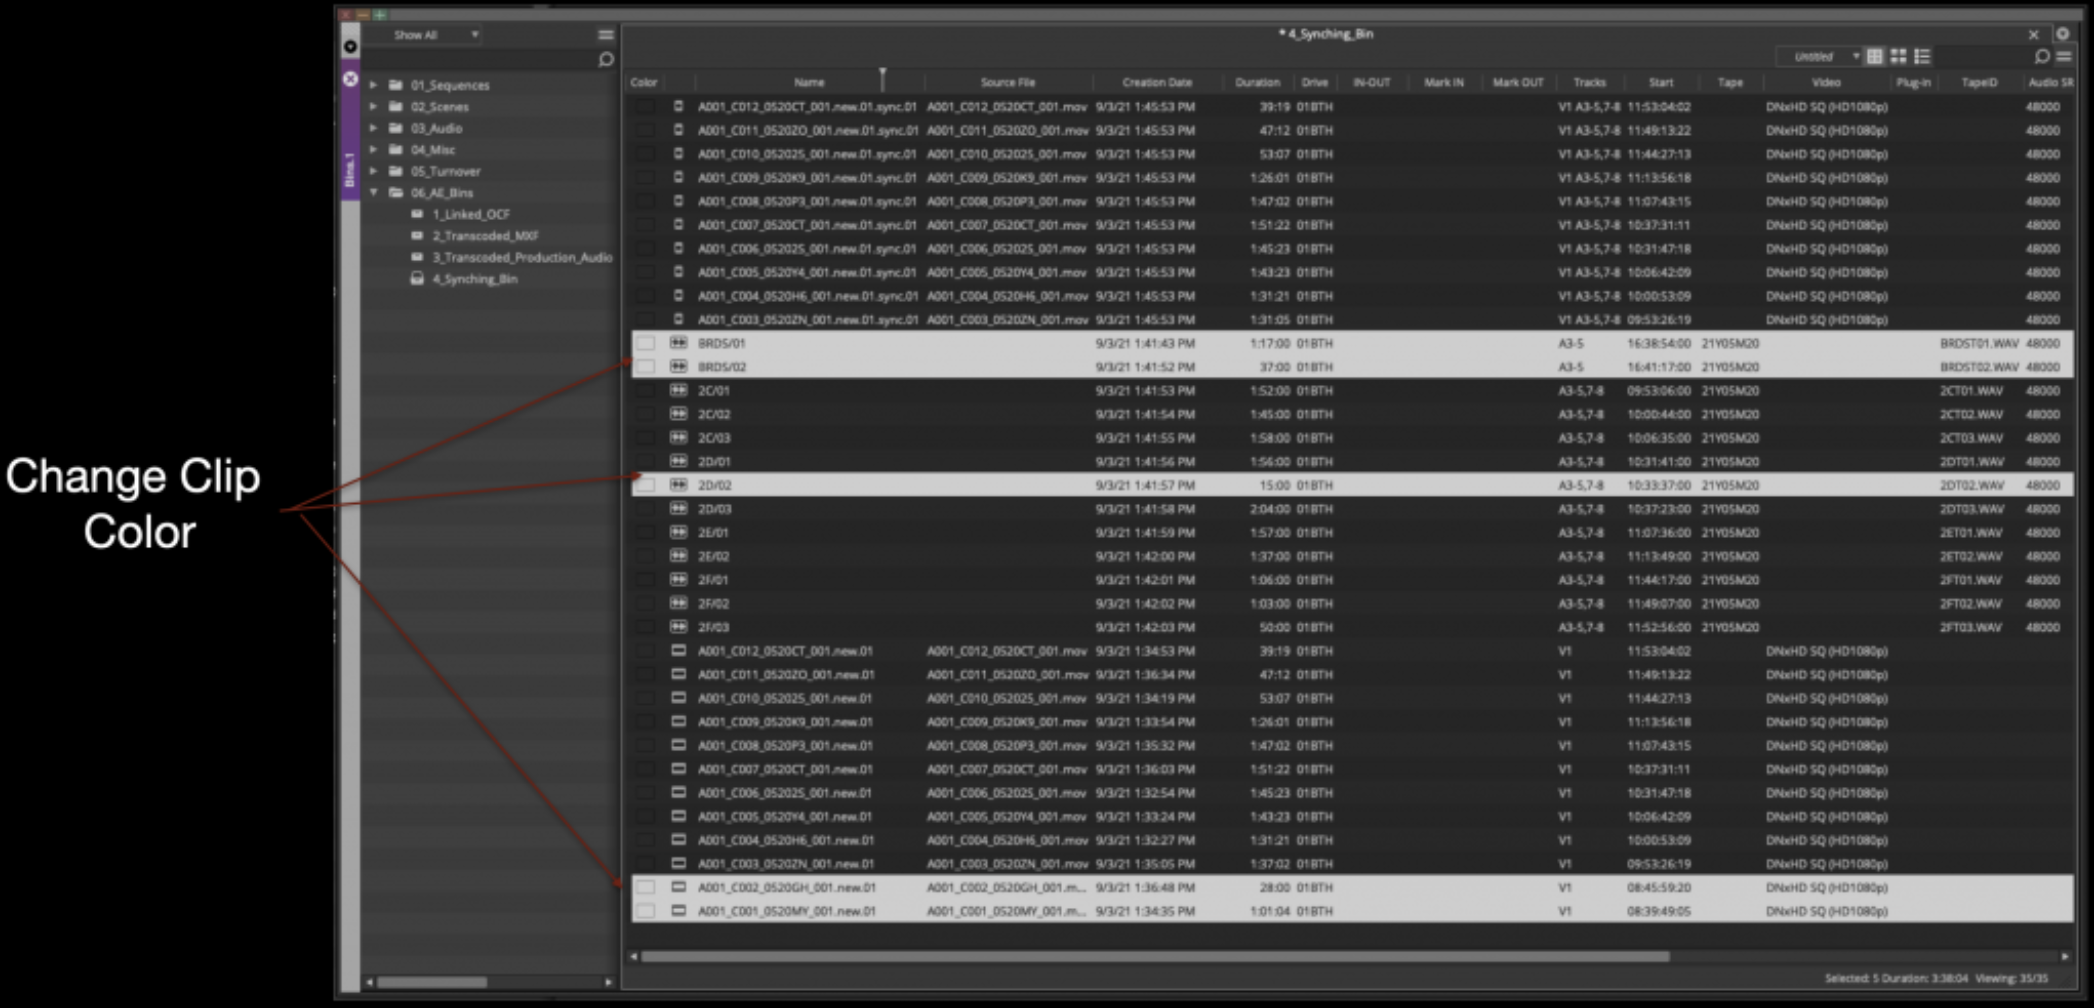
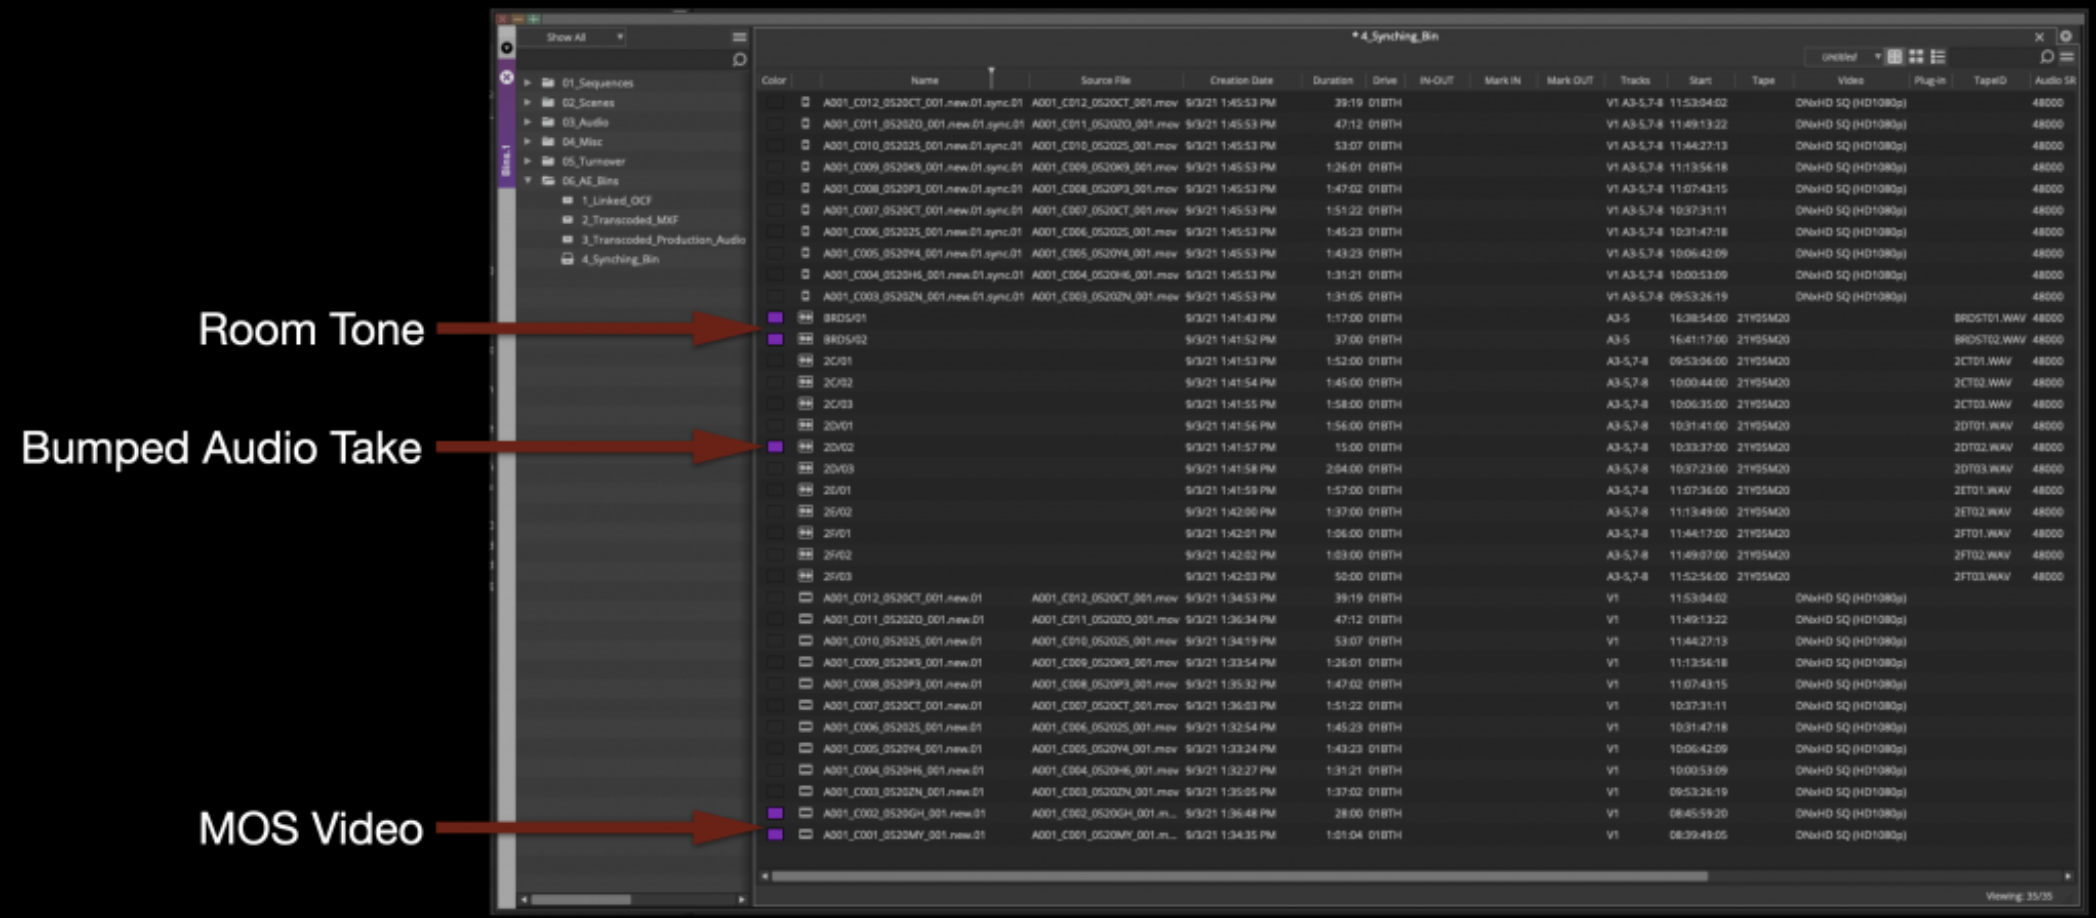
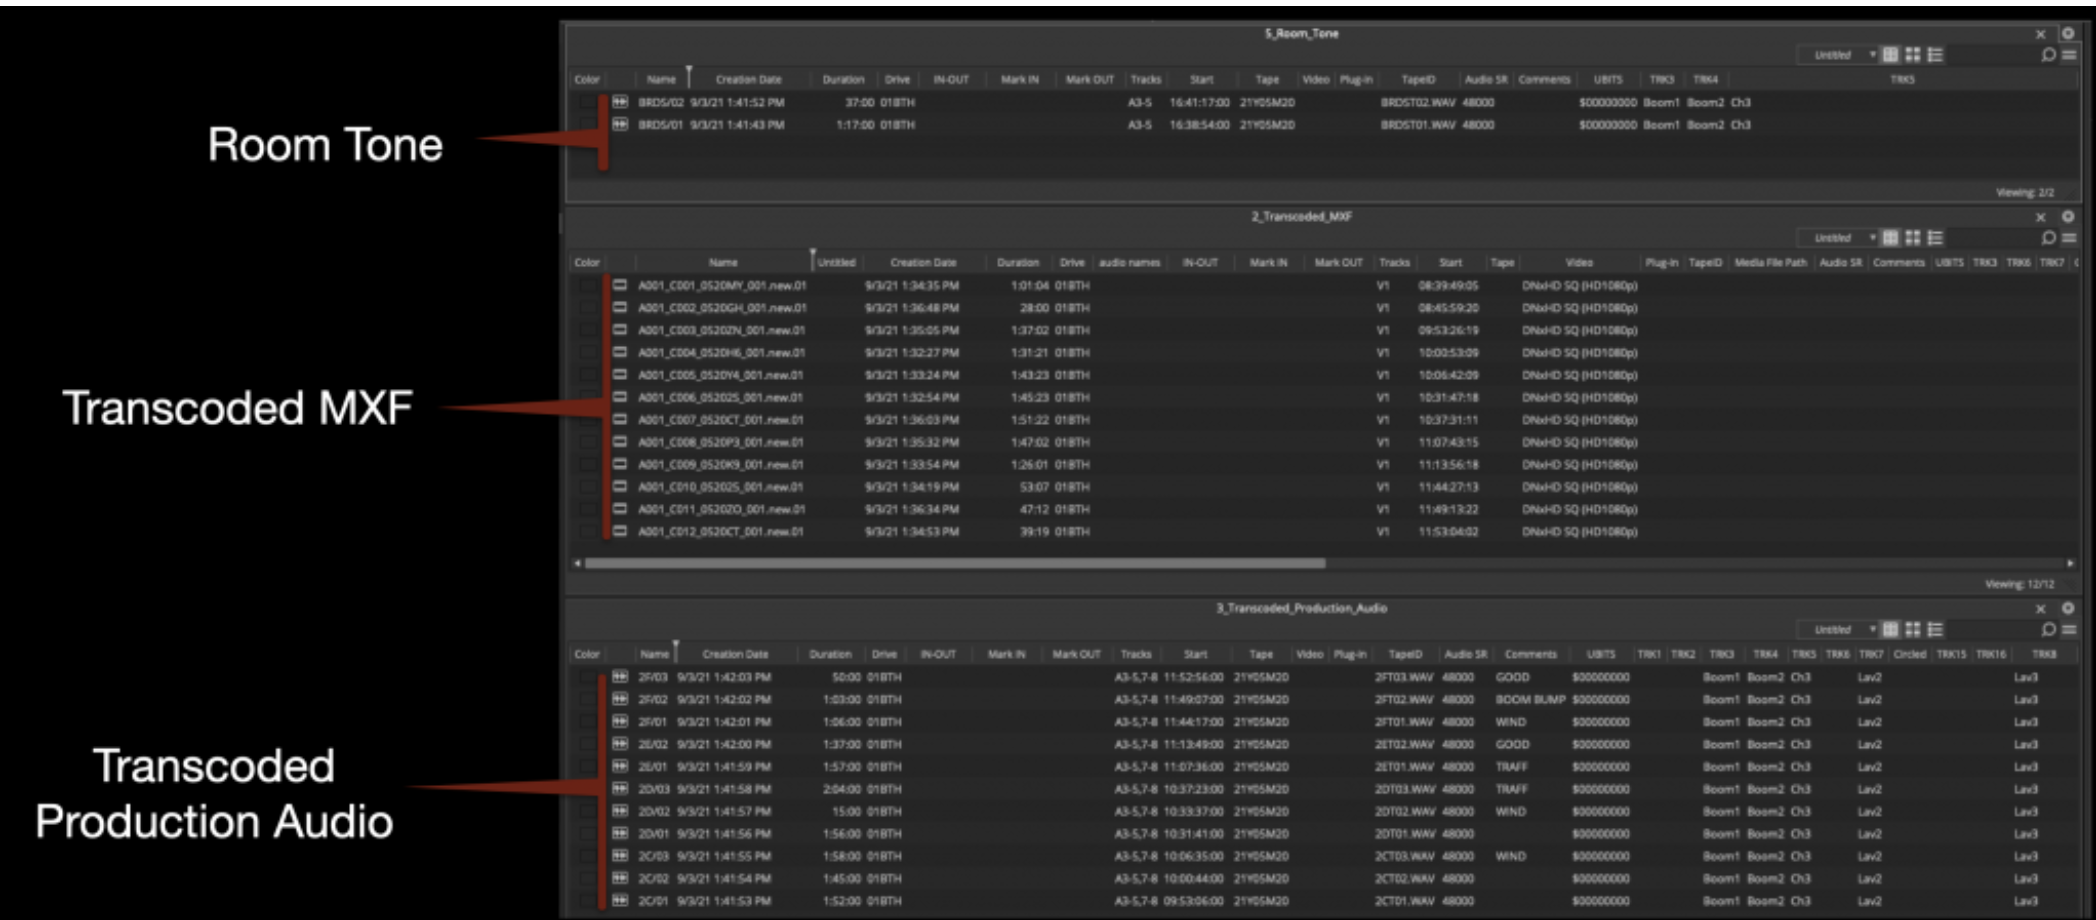
Below are some common examples of thing that won’t sync. Two audio master clips didn’t sync to anything because they are Room Tone. One audio master clip didn’t sync to anything because it was a bump take. Two video master clips didn’t sync to anything because they are MOS.
Move the master clips out of the Synching Bin and into their proper bins:
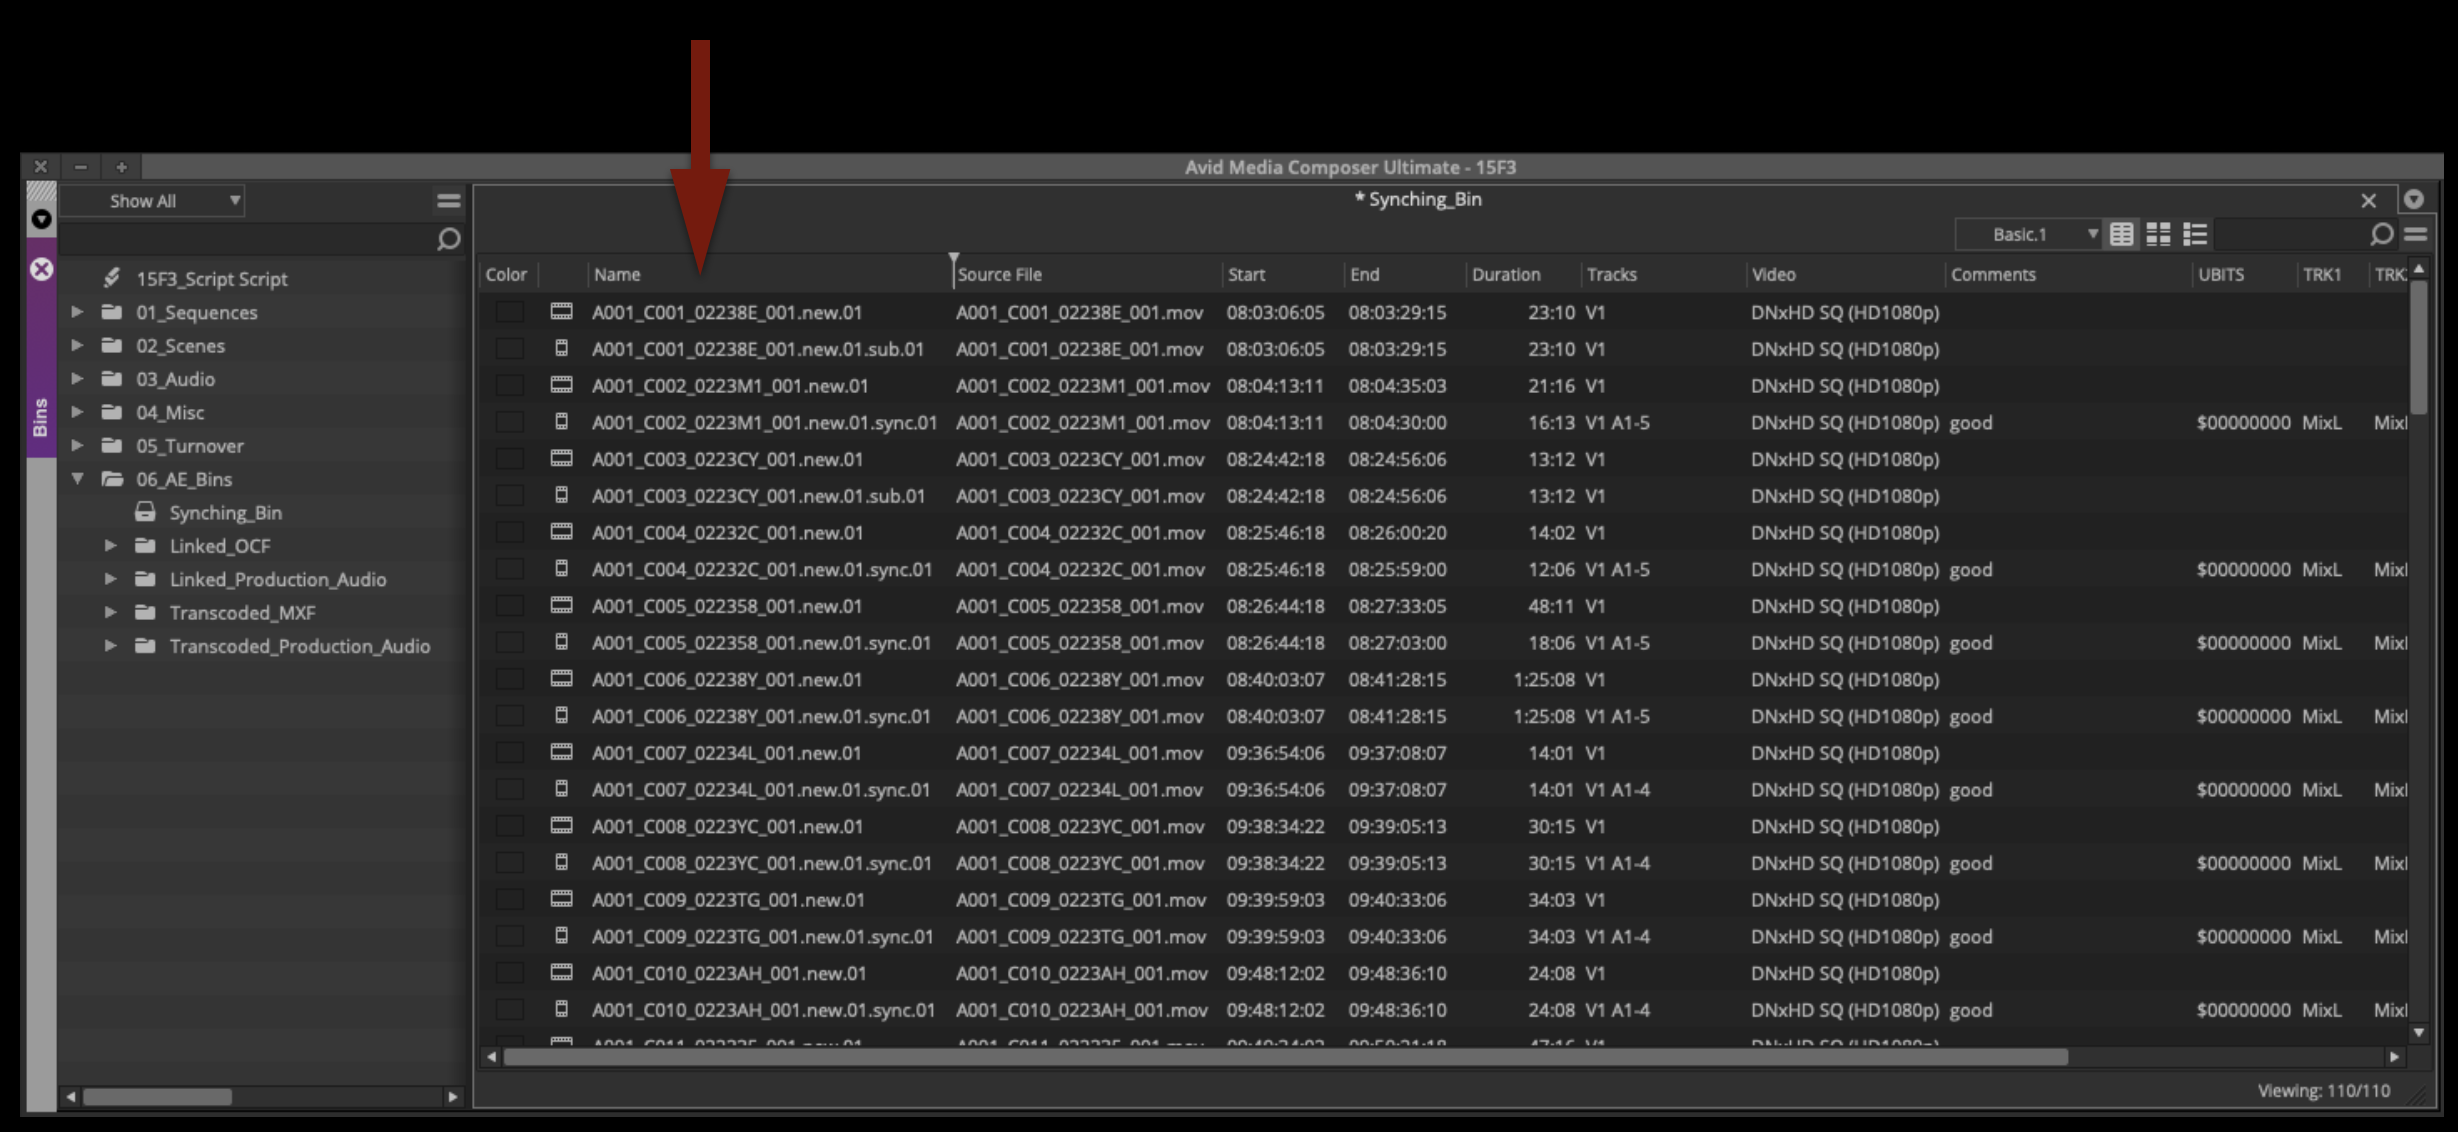
This will leave only the synched subclips in the Synching Bin. If you did have any MOS master clips, you will need to make subclips of them. The easiest way to make a subclip is to use the keyboard shortcut “Shift + C”. If this keyboard shortcut is not mapped in your suite, ask the Post Hall staff and they can show you how to map it.
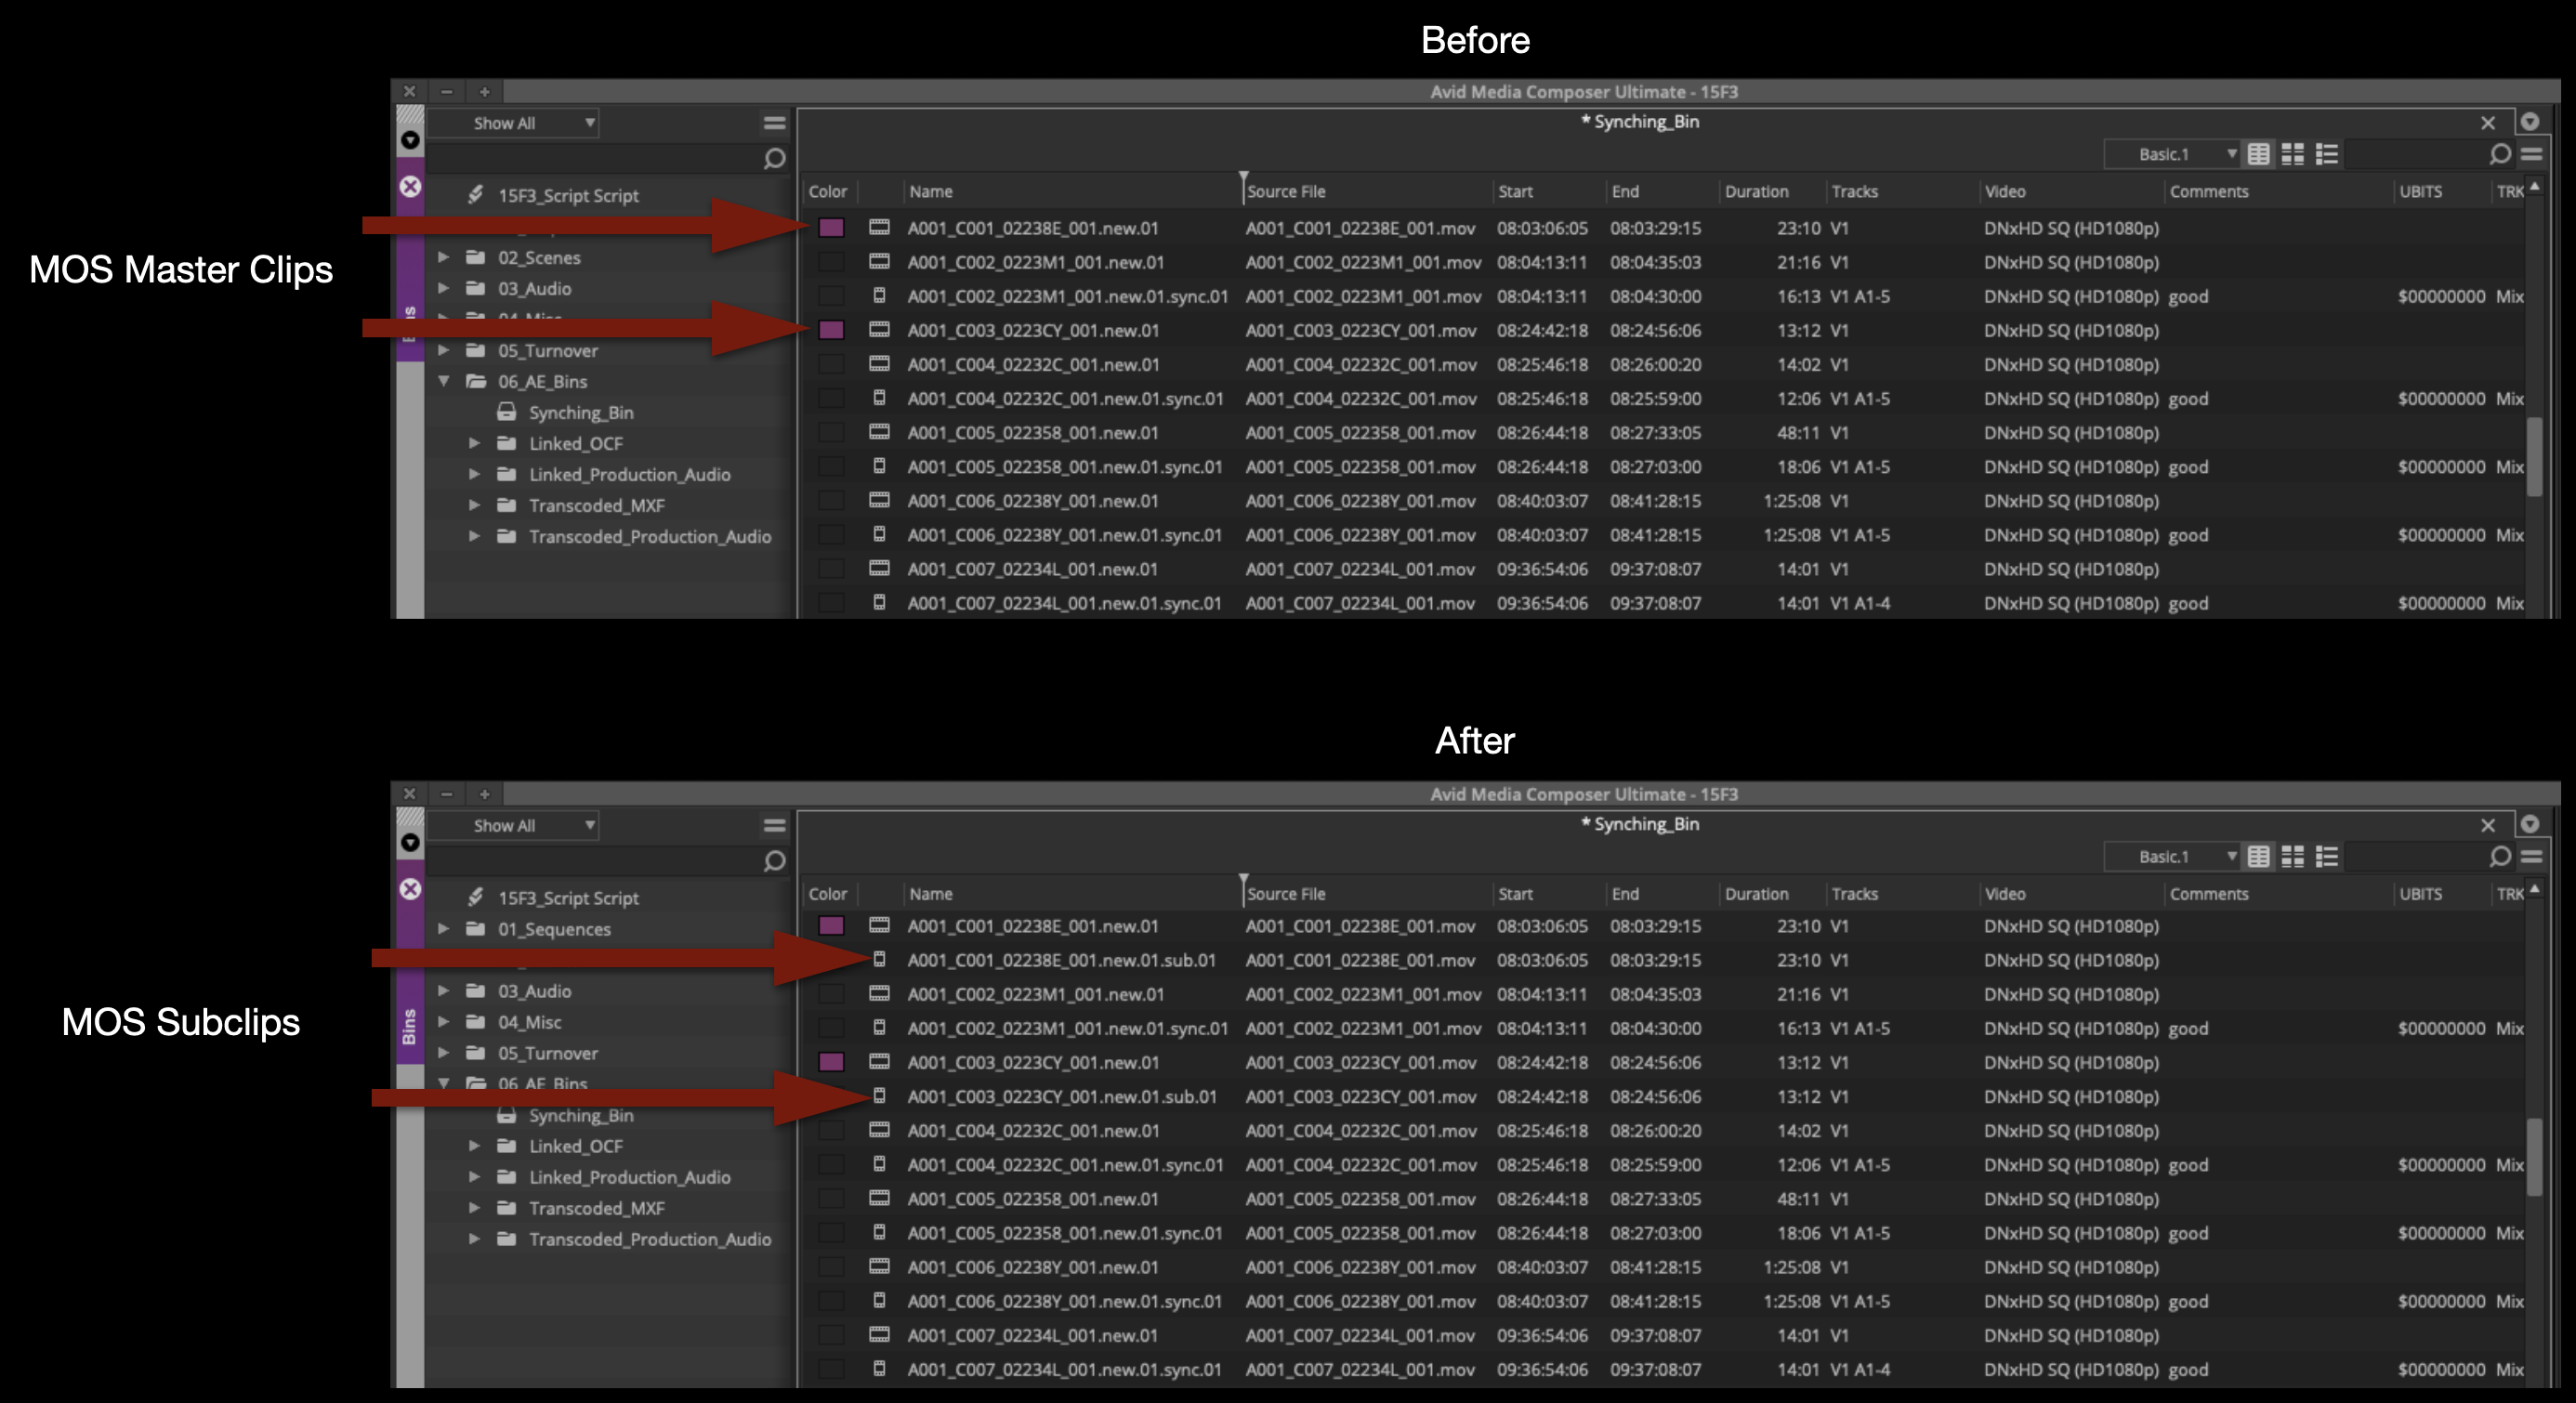
Double-click on the Name column to sort the contents of the Synching Bin alphanumerically. You should see a subclip for every master clip.
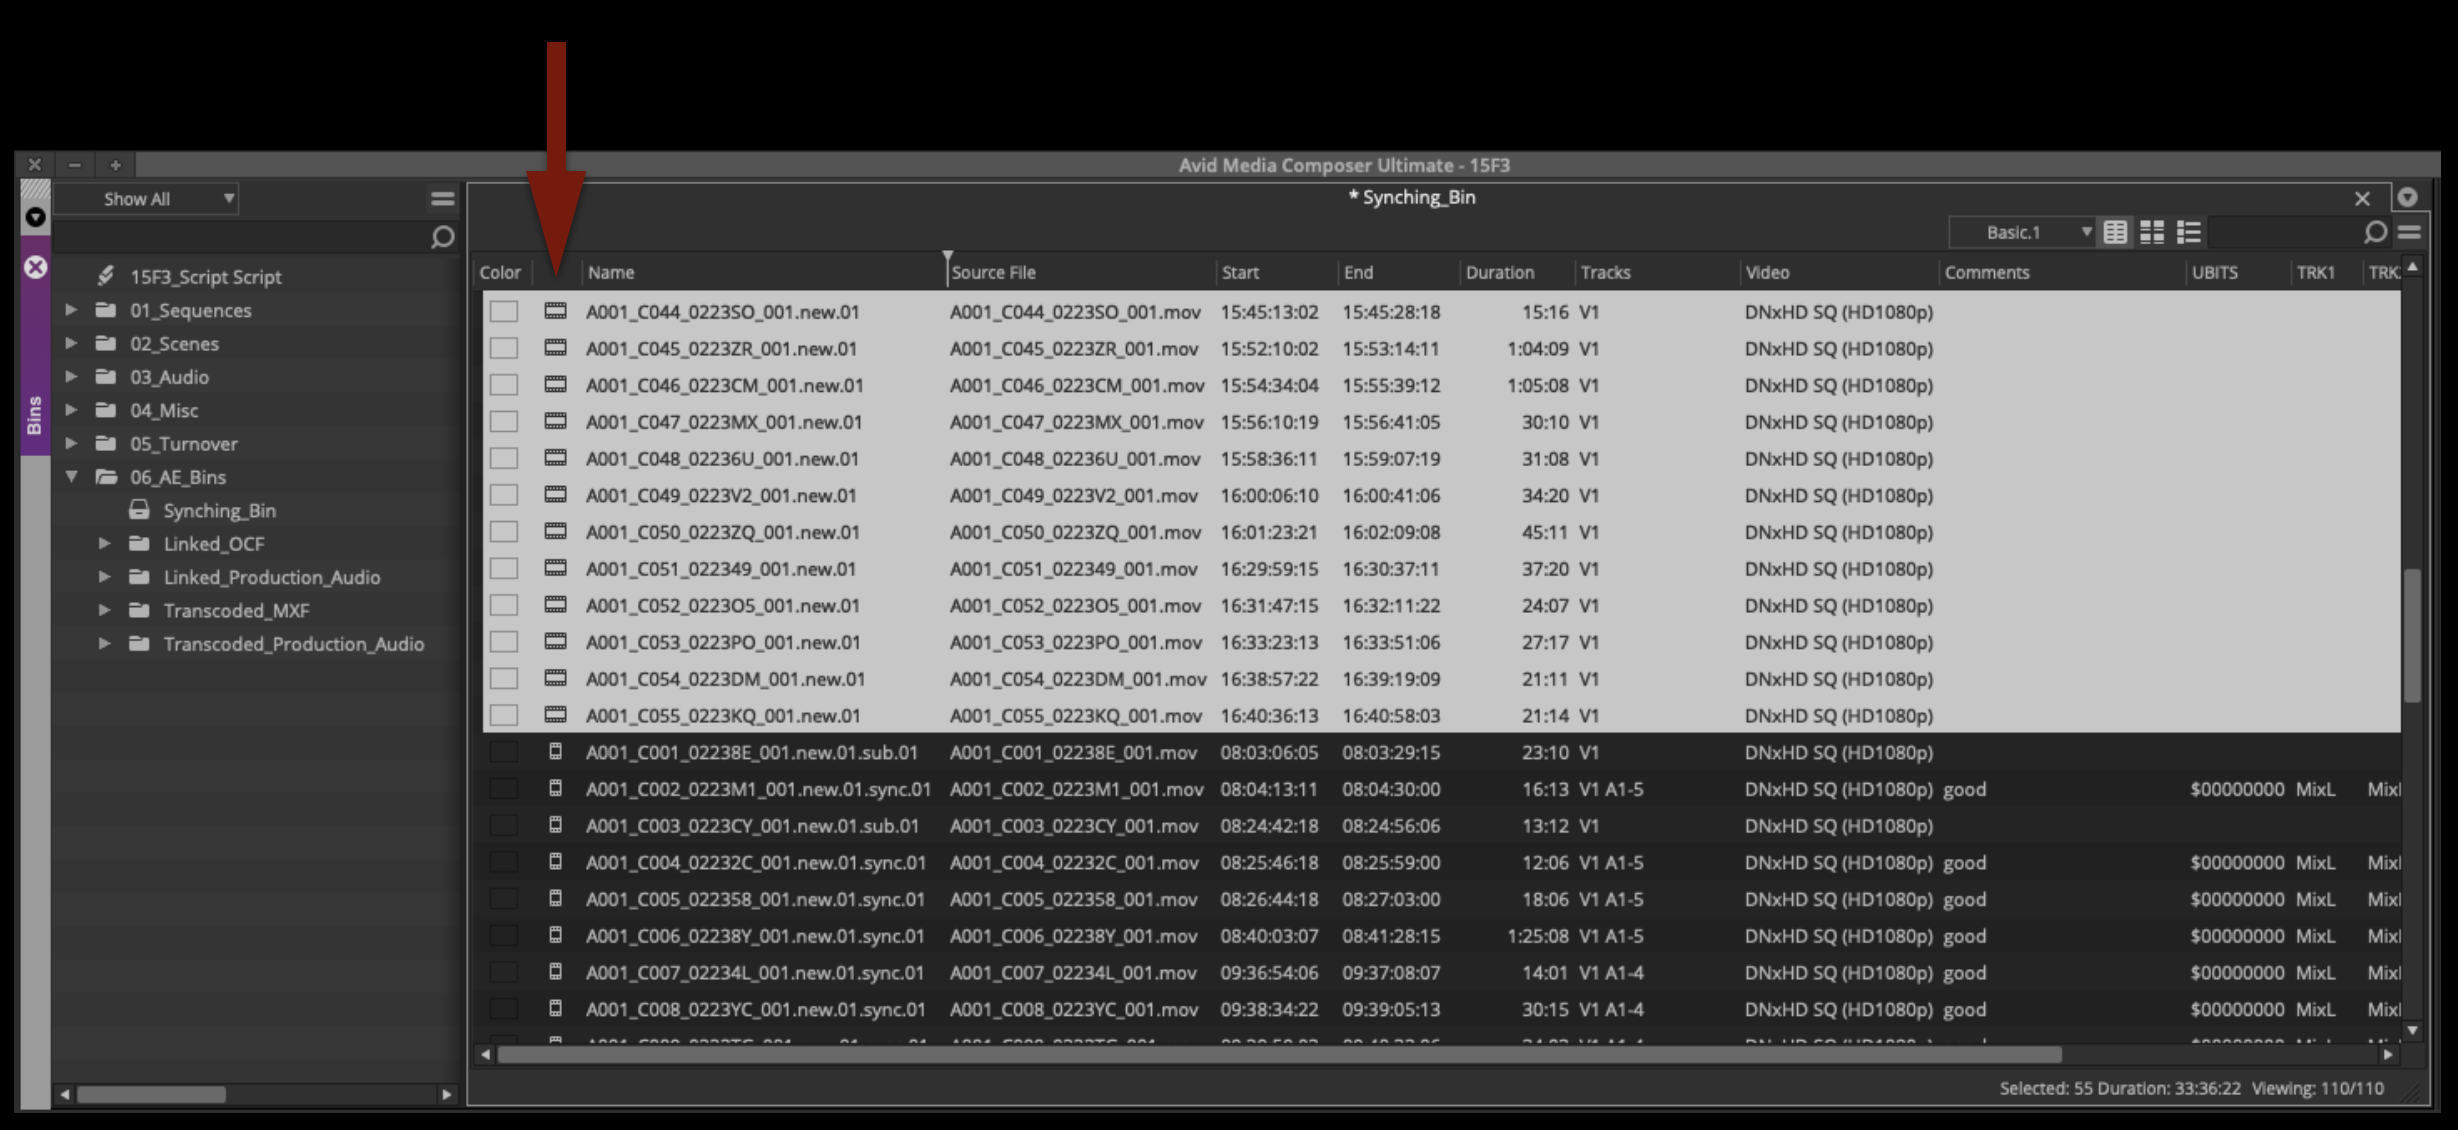
Double-click on the Type column to sort the contents of the Synching Bin by type. This will let you easily select all of the master clips and move them back to the Transcoded MXF Day Folder.
At this point you should have one subclip for every take in the synching bin.
Make Mix-Only Subclips
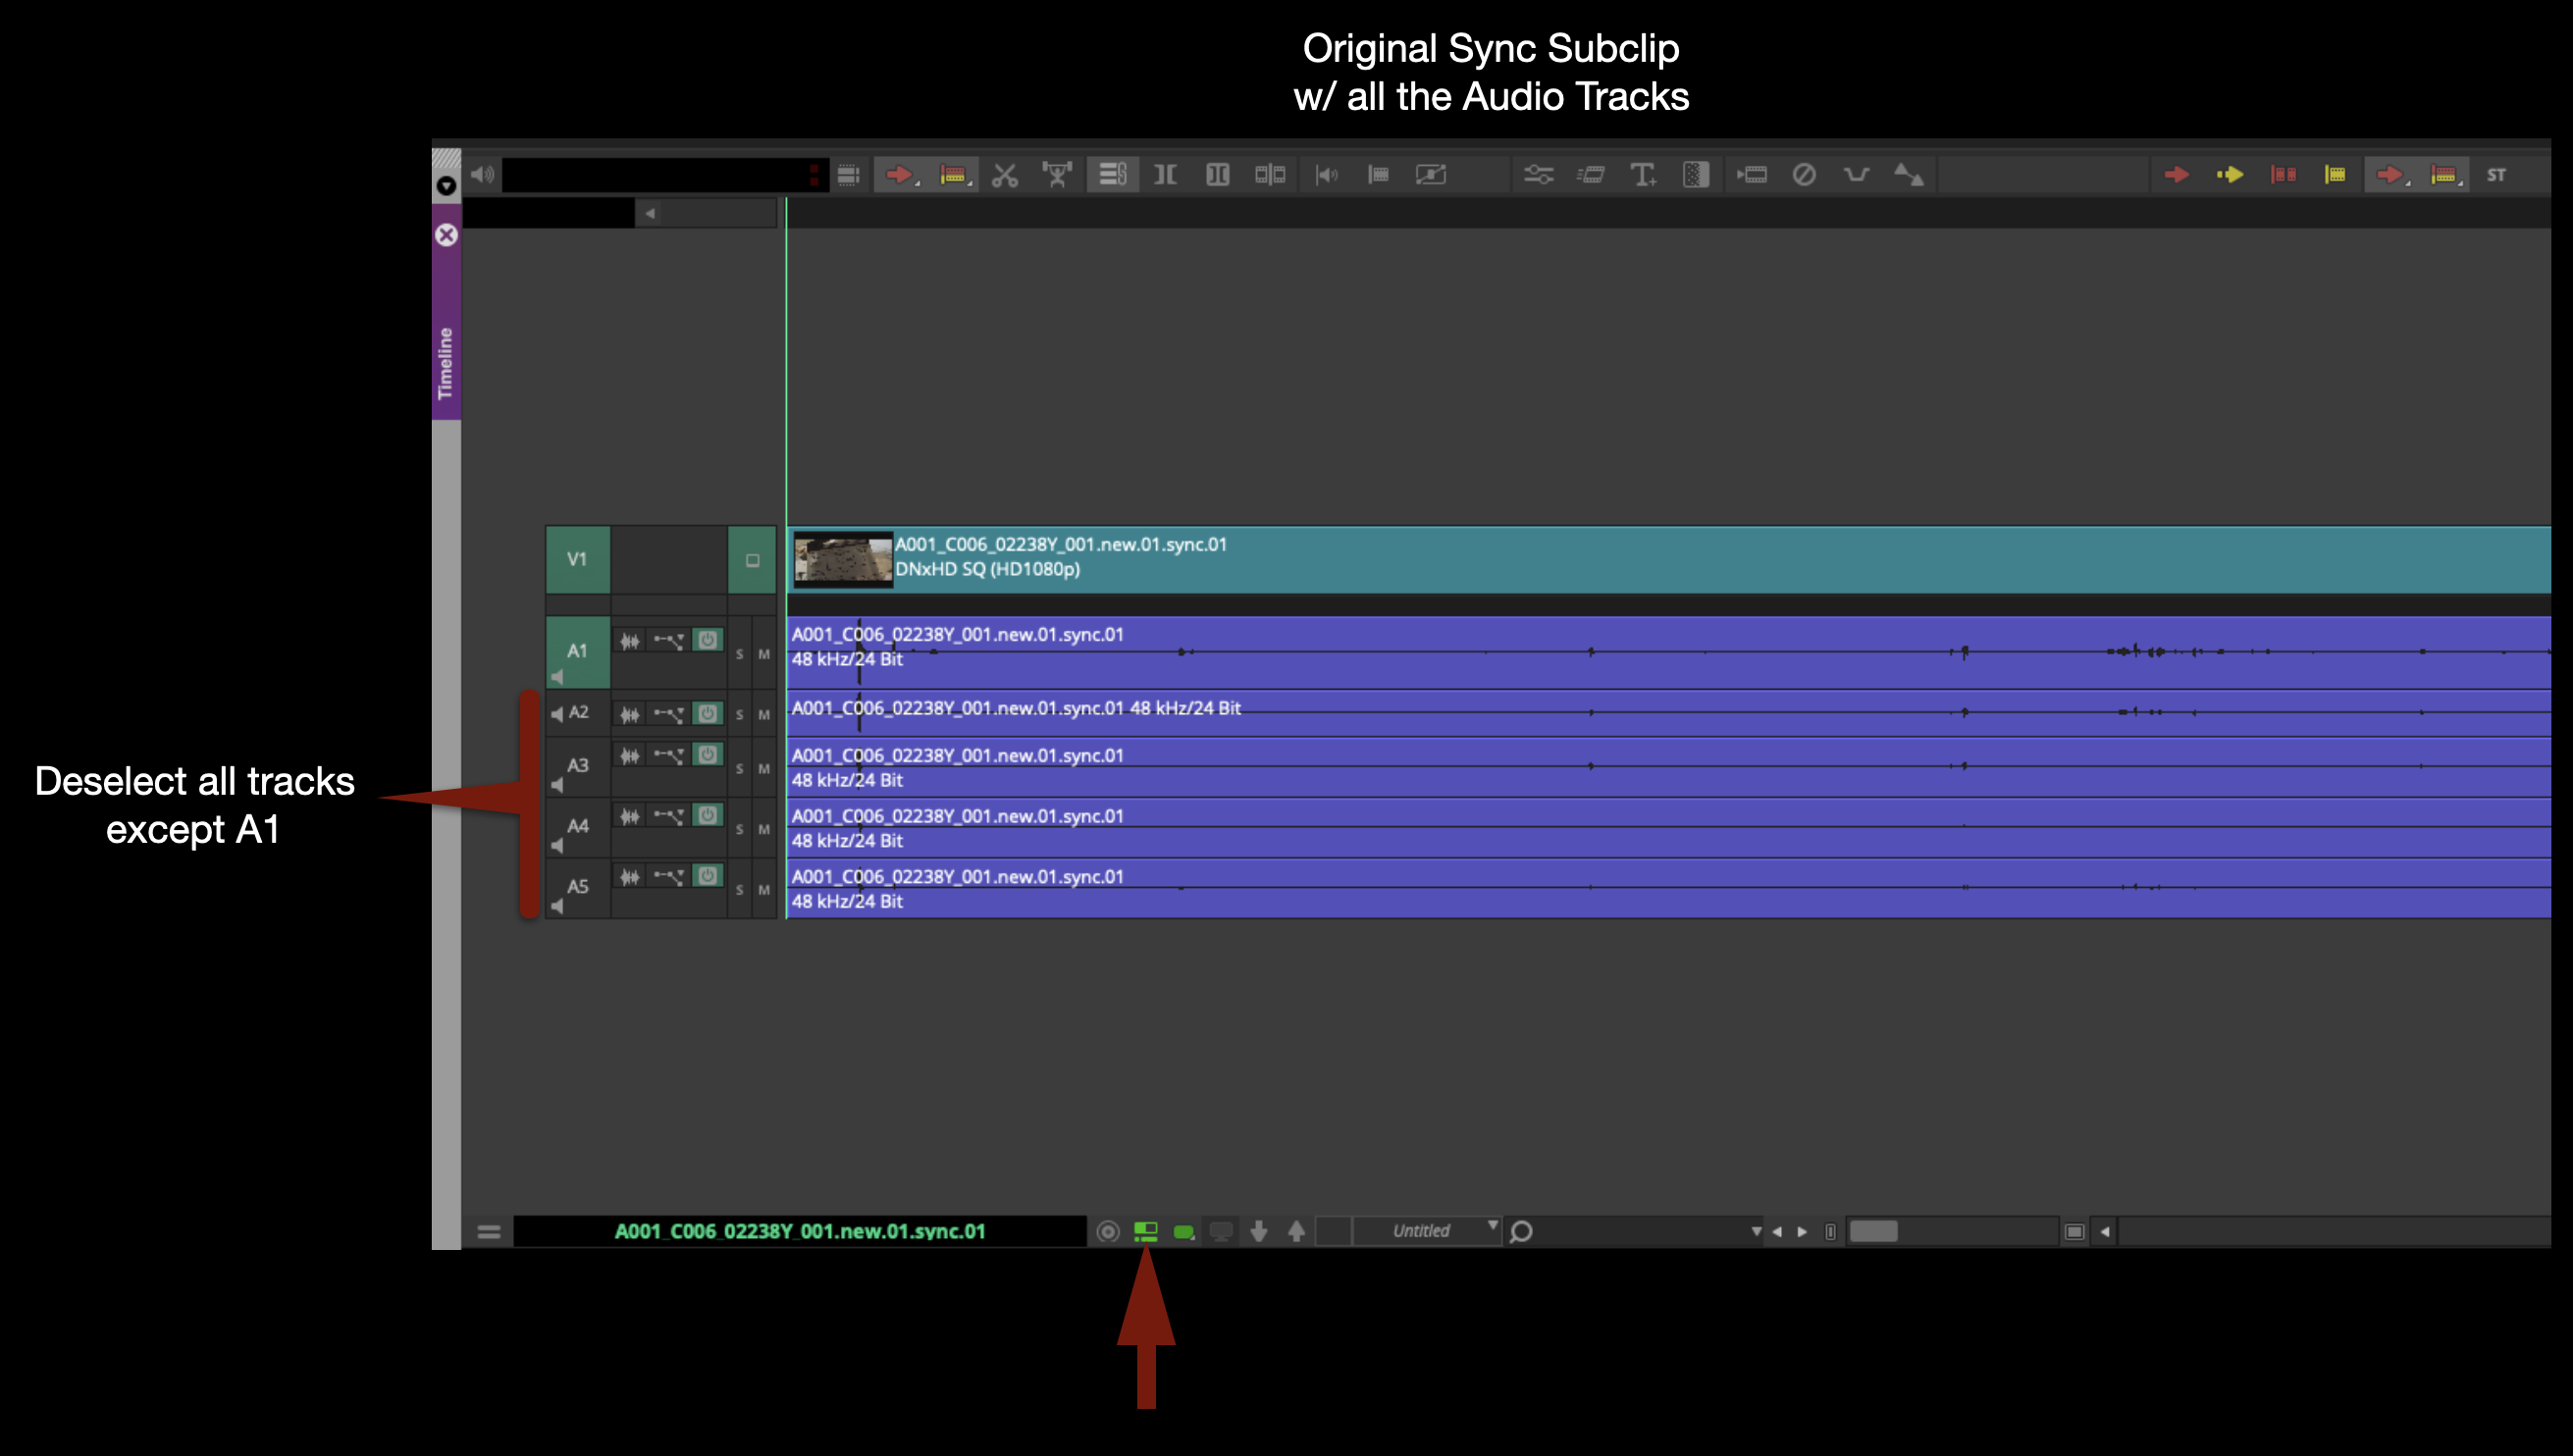
Now is the time to check the sync of each clip by listening to the clapper. But as you do, you will also need to make a new subclip of each current subclip. The reason is that the subclips currently in the Synching Bin have all the audio tracks attached to them and this is not a good way to edit. It will be much easier if the clips are prepped to include only the Mix track.
Starting from the top in the Synching Bin, double-click on each clip to open it in the Source window. Select “Toggle Timeline Source/Record” to see the audio waveforms of each track in the Timeline window.
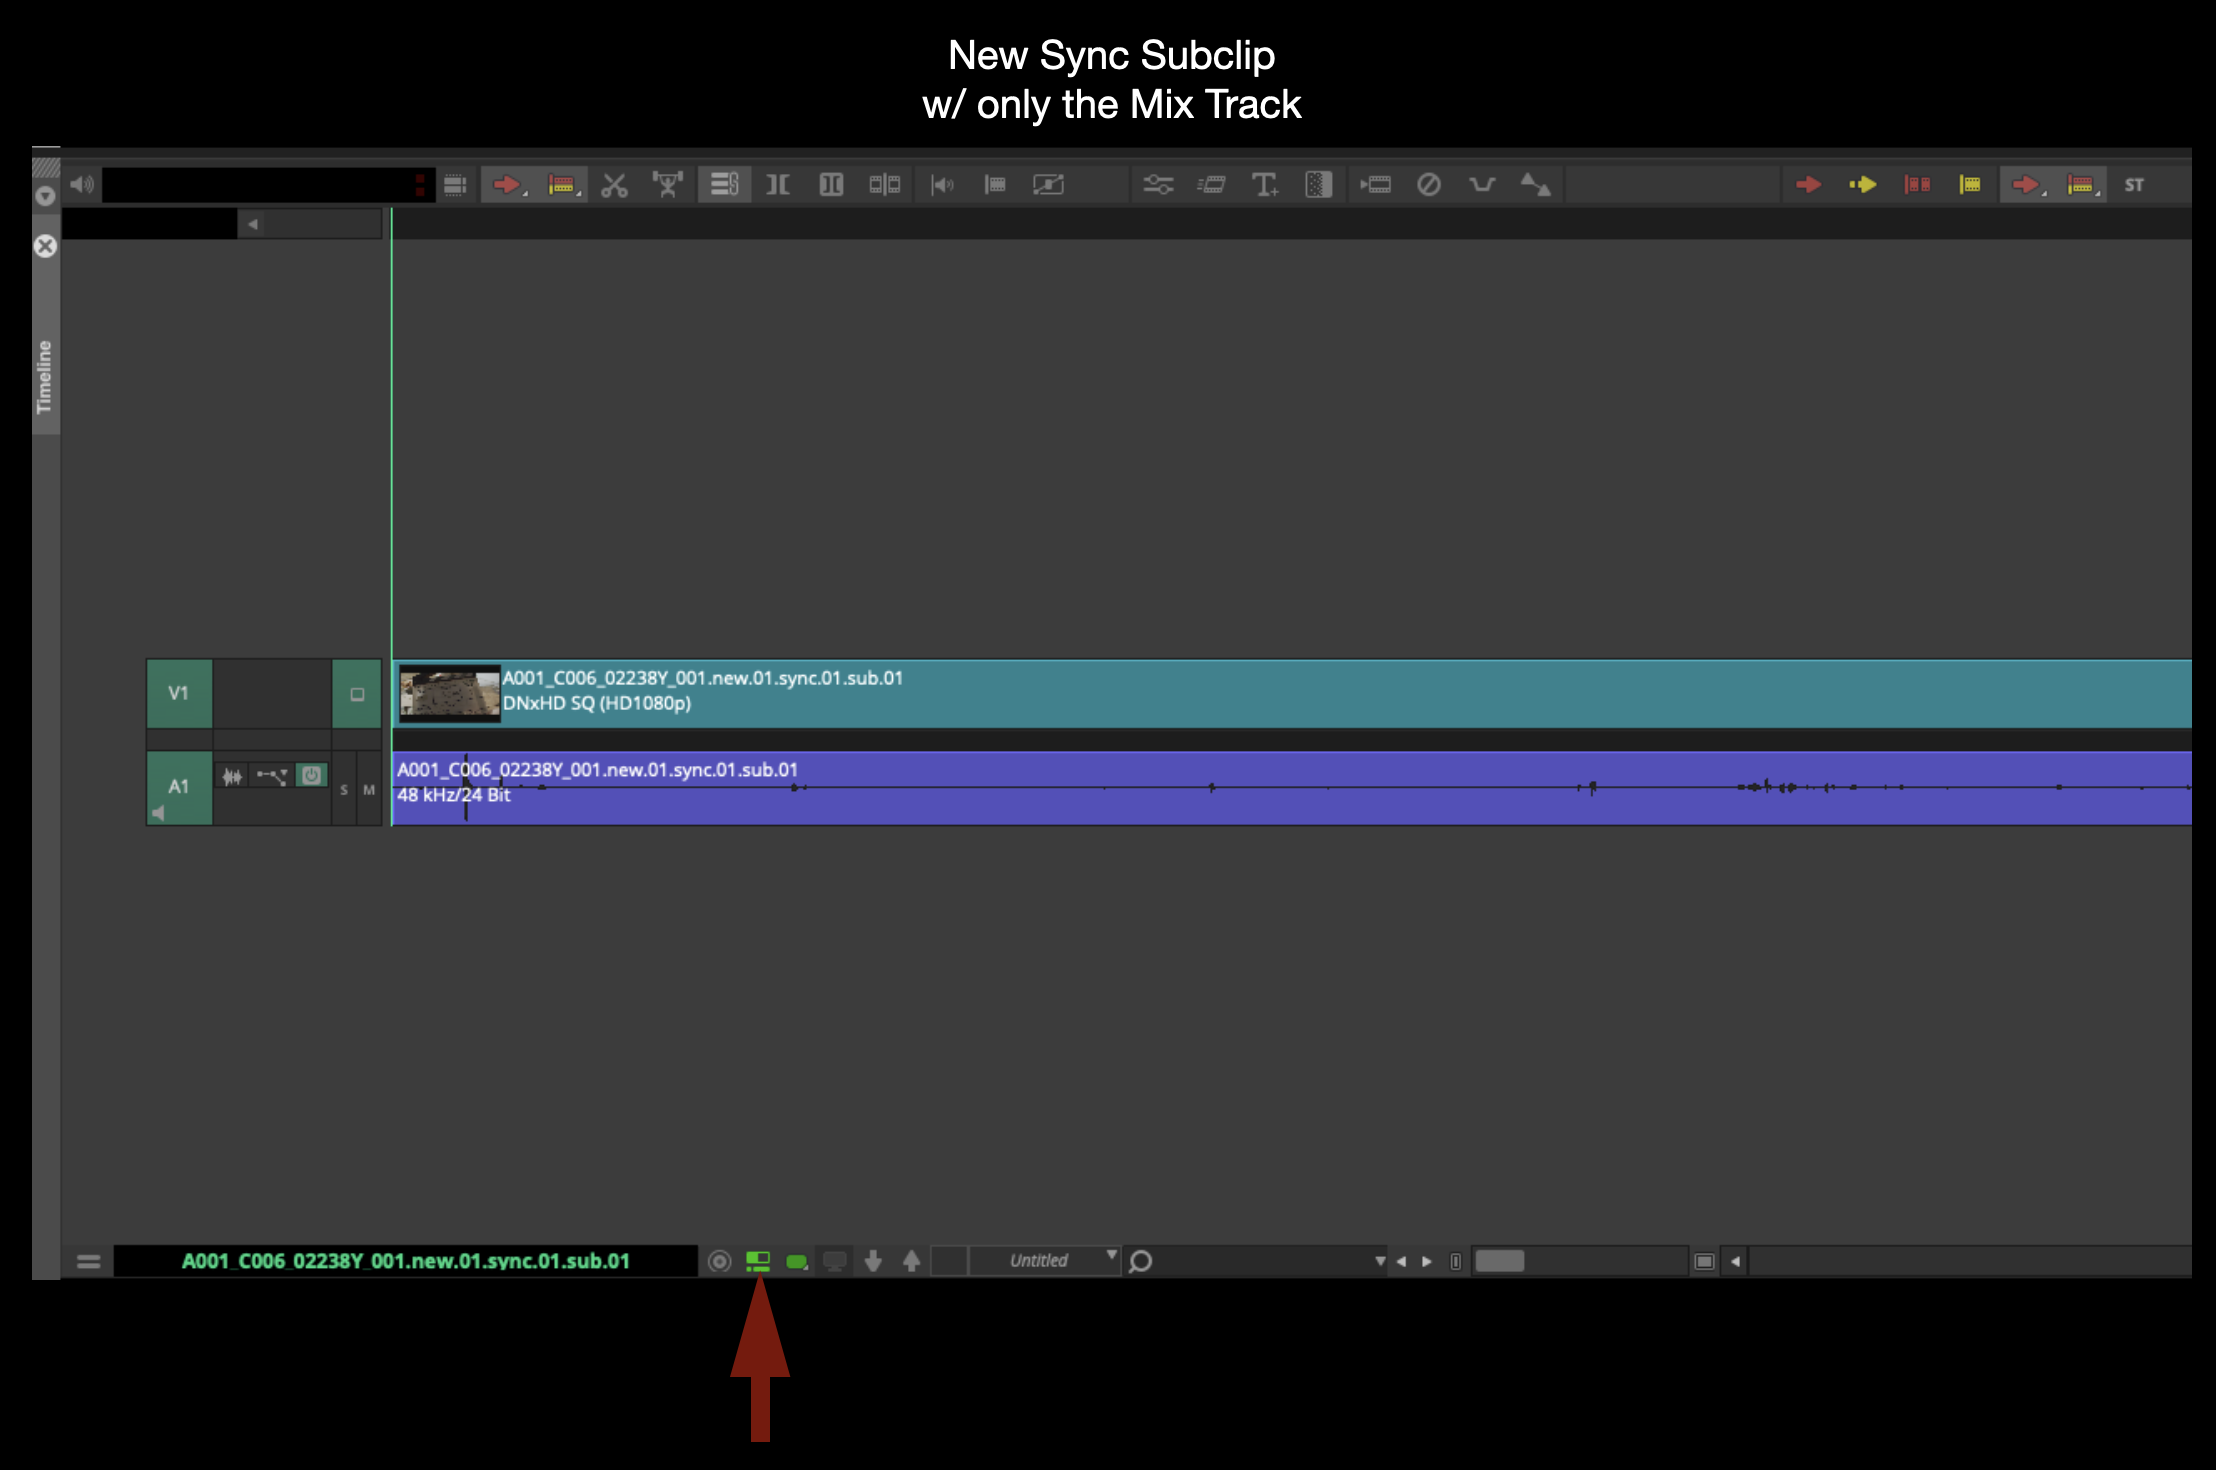
Hold down the “Shift” key and click-and-drag to deselect all the audio tracks except A1. Remember A1 is the Mix track. With only V1 and A1 selected, make a new subclip by hitting “Shift + C”. If this keyboard shortcut doesn’t work on your suite, ask the post staff to show you how to map it.
Check the new subclip by opening it in the Source Monitor. It should only have one Video track and one Audio track.
Do this for every subclip, checking for correct sync on the clapper as you go. If you find a clip that is out-of-sync, highlight it in a different color so you will remember when you come back to it.
When you finish doing this for every clip, you should have a new subclip for each clip with only one audio track.
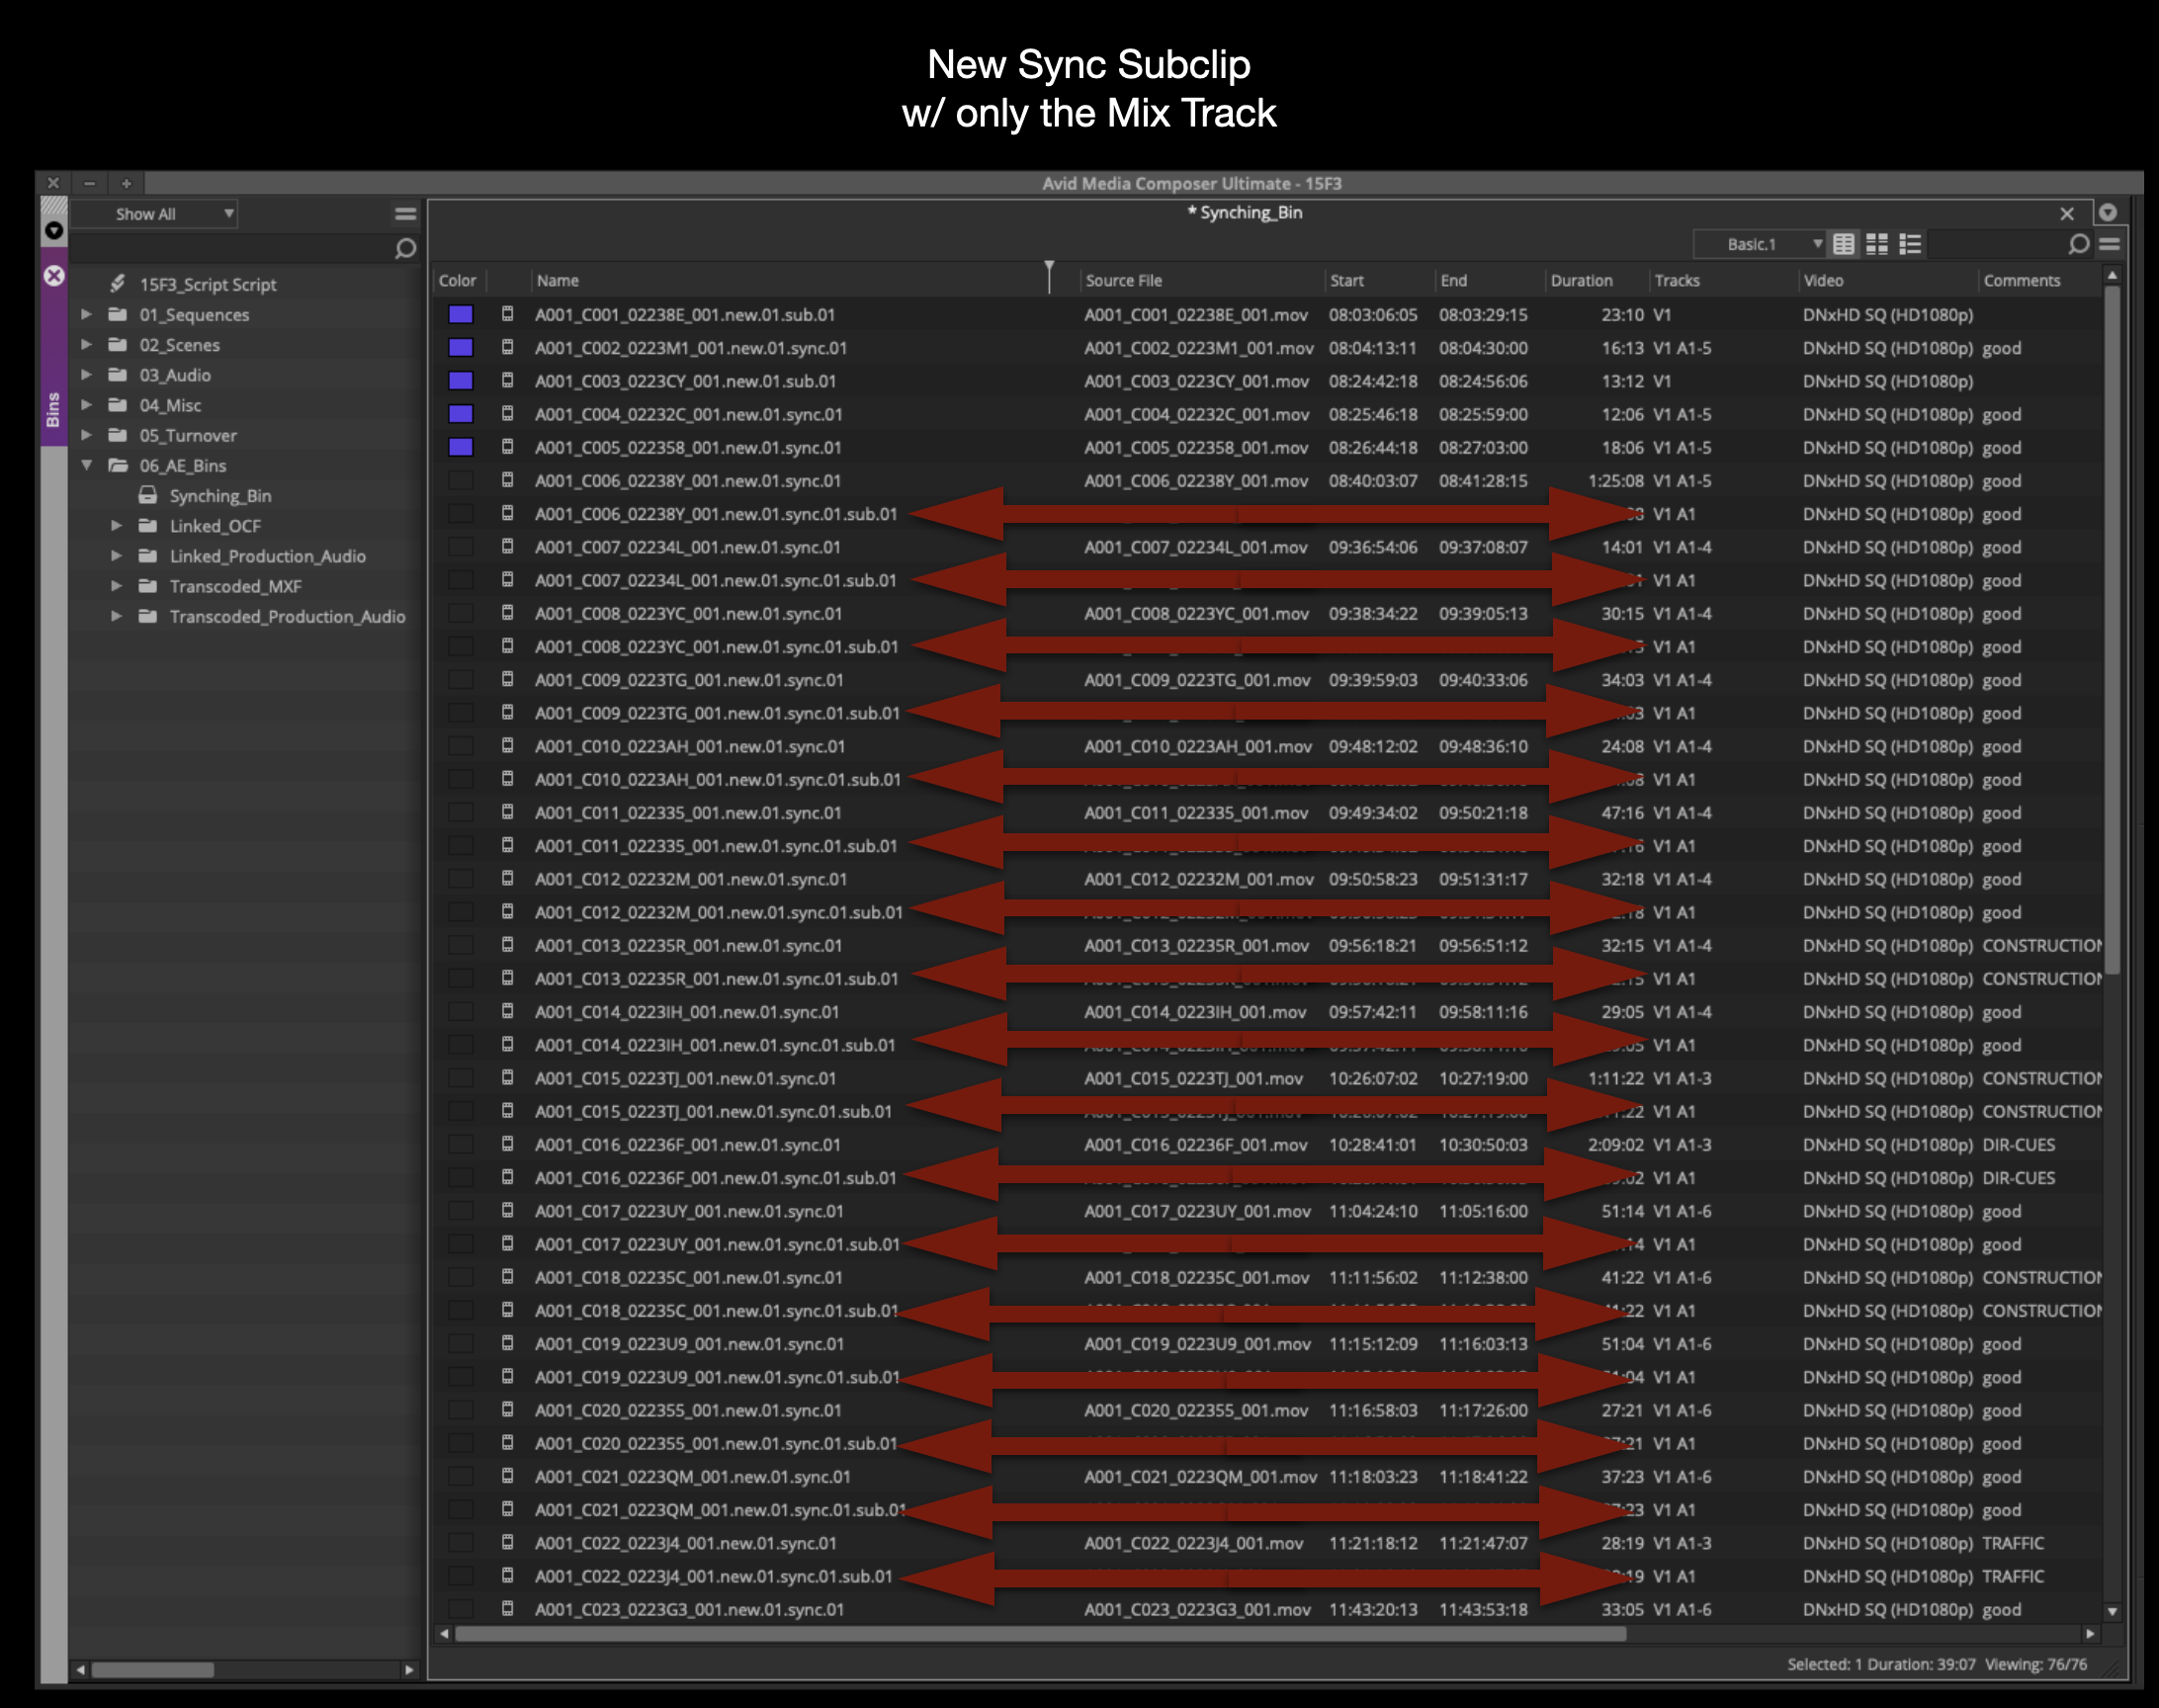
Select all the old subclips and delete them:
This should leave the Synching Bin with subclips that are either MOS or only have Audio Track A1 attached.
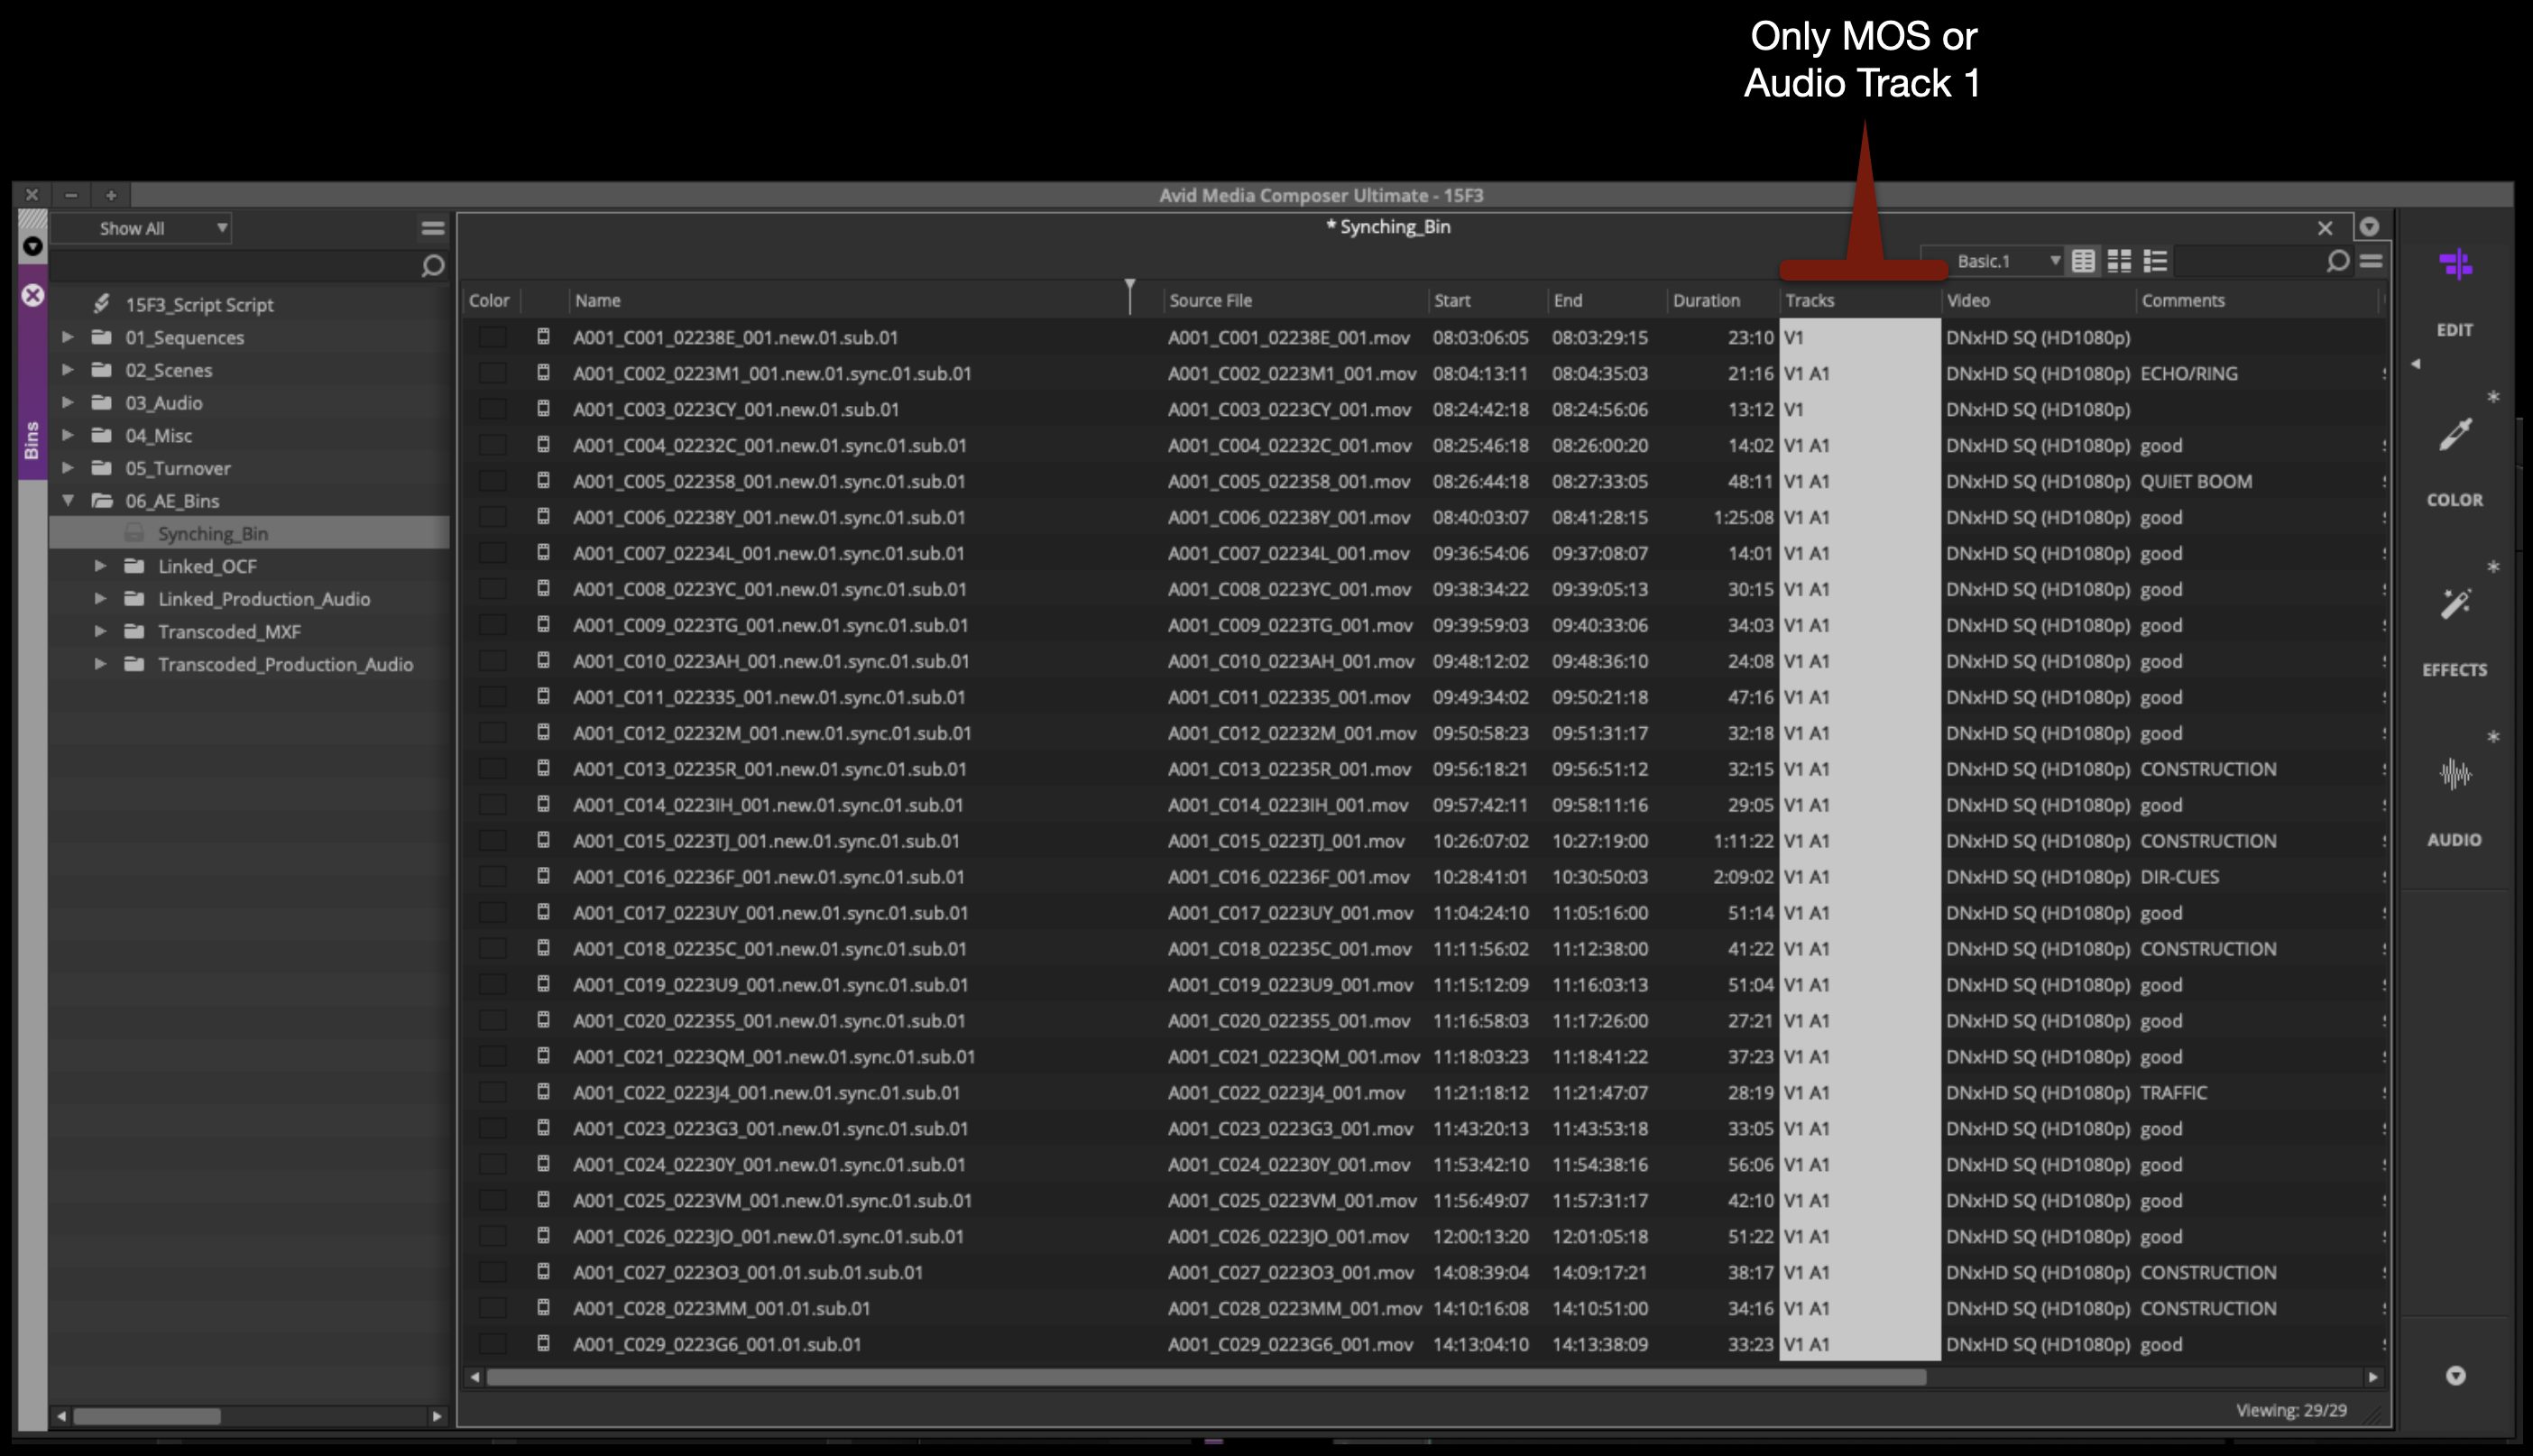
If you have any clips that are out-of-sync, they will need to be synched manually. Contact the post staff and they can show you how to do this.
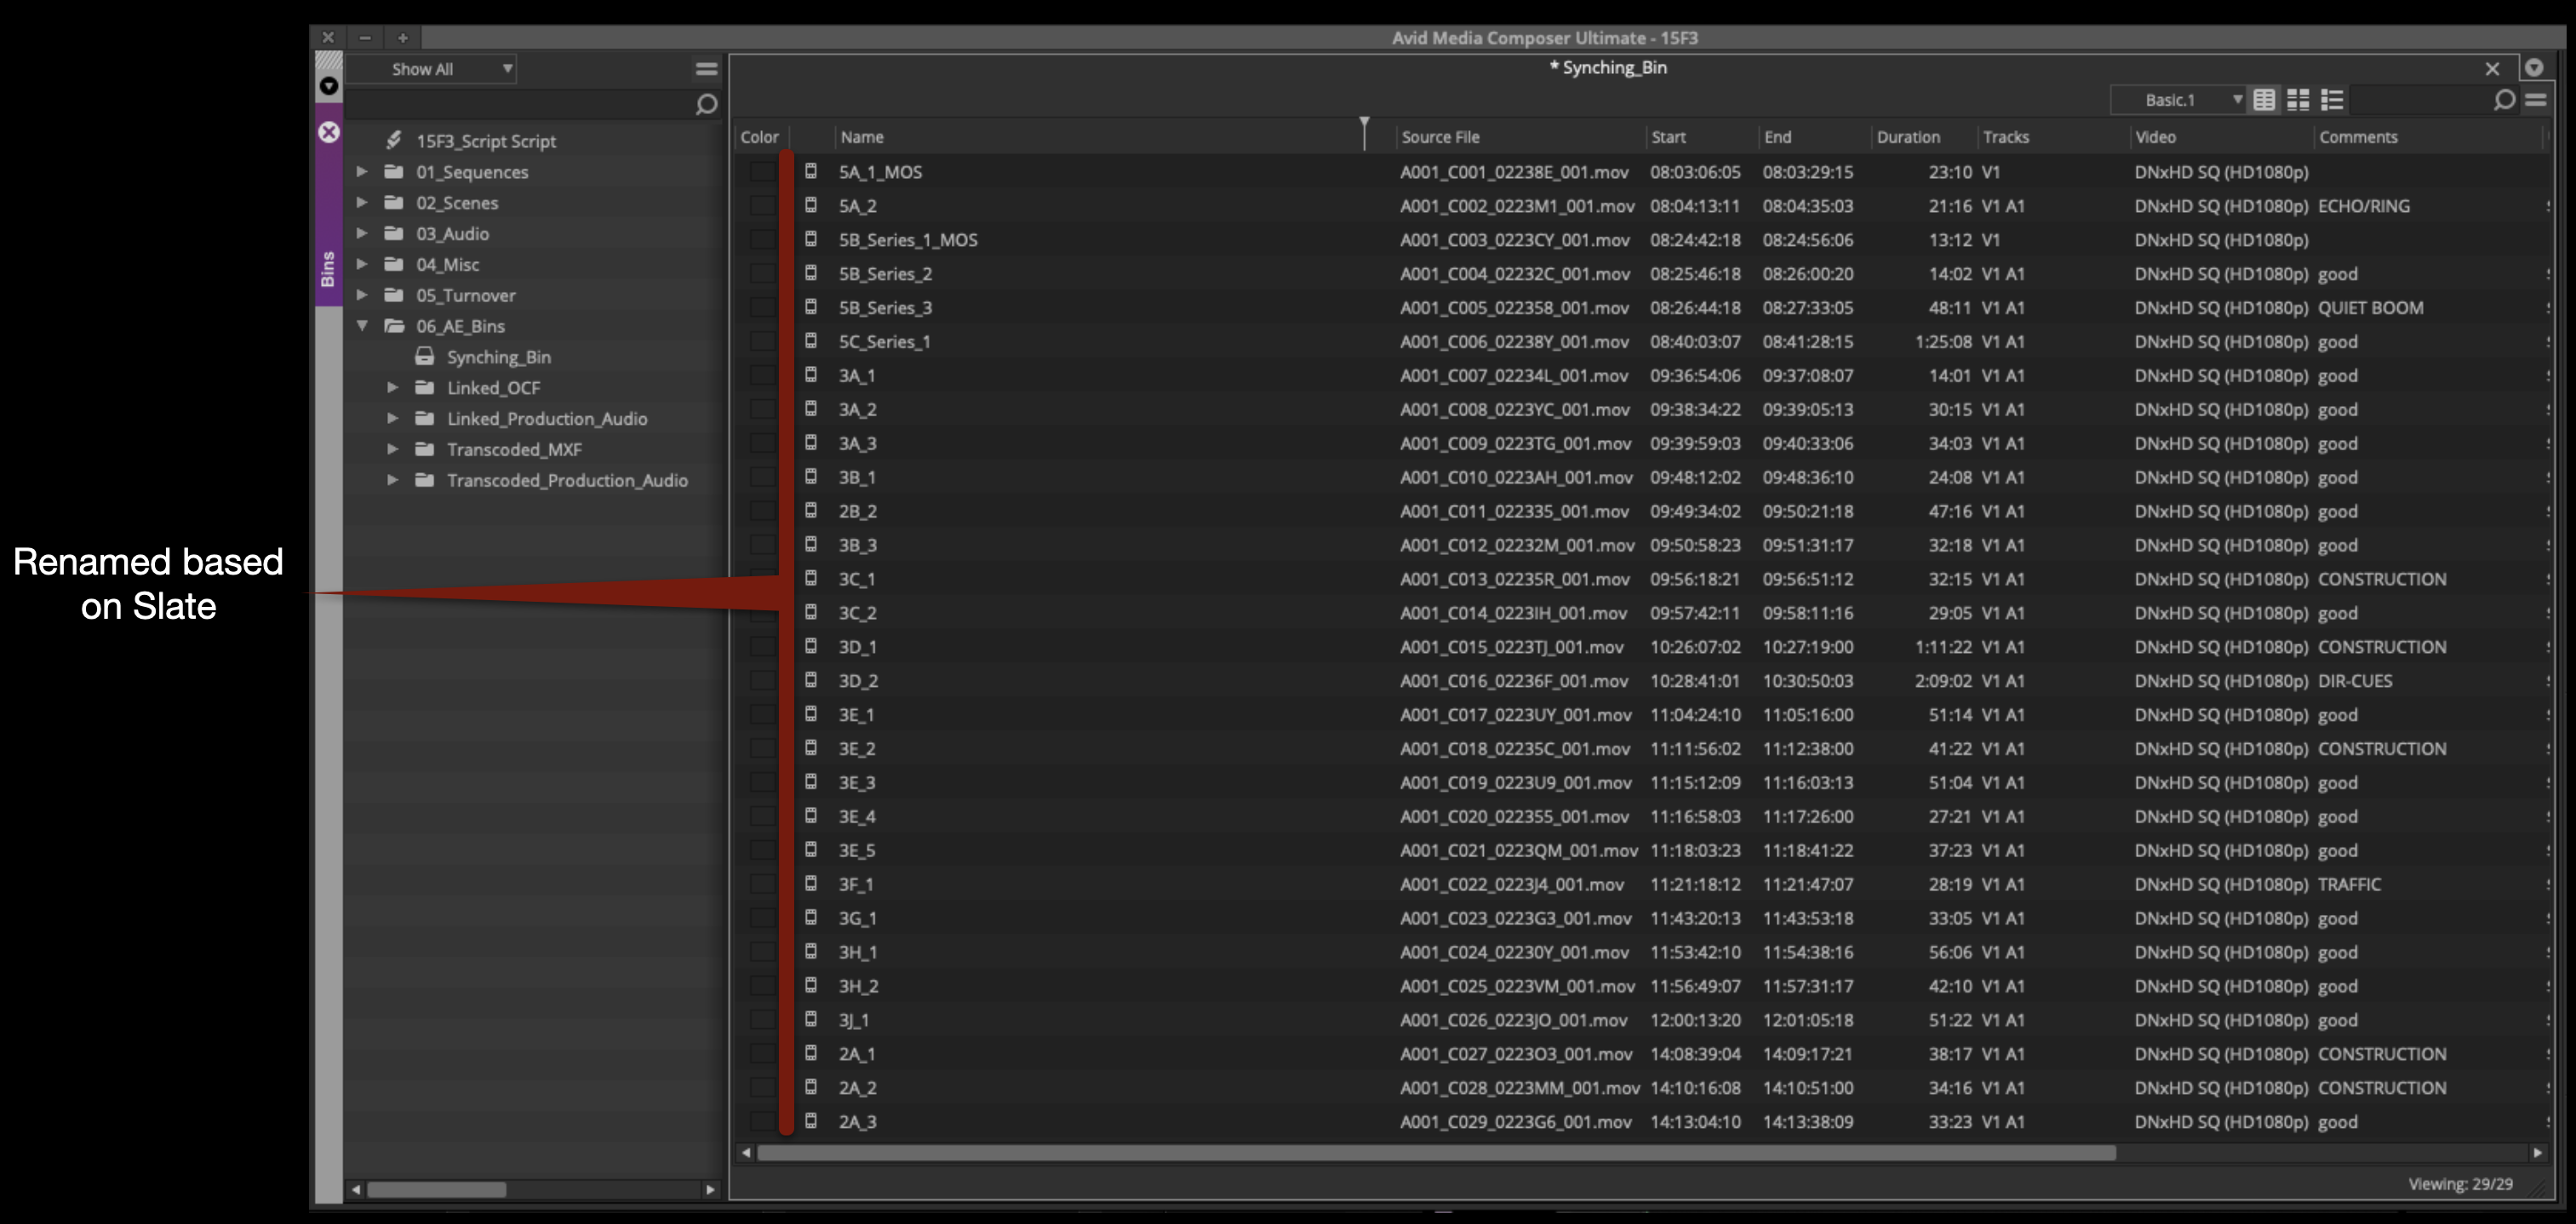
Rename Subclips
Go through each subclip and rename it based on what the slate is labeled:
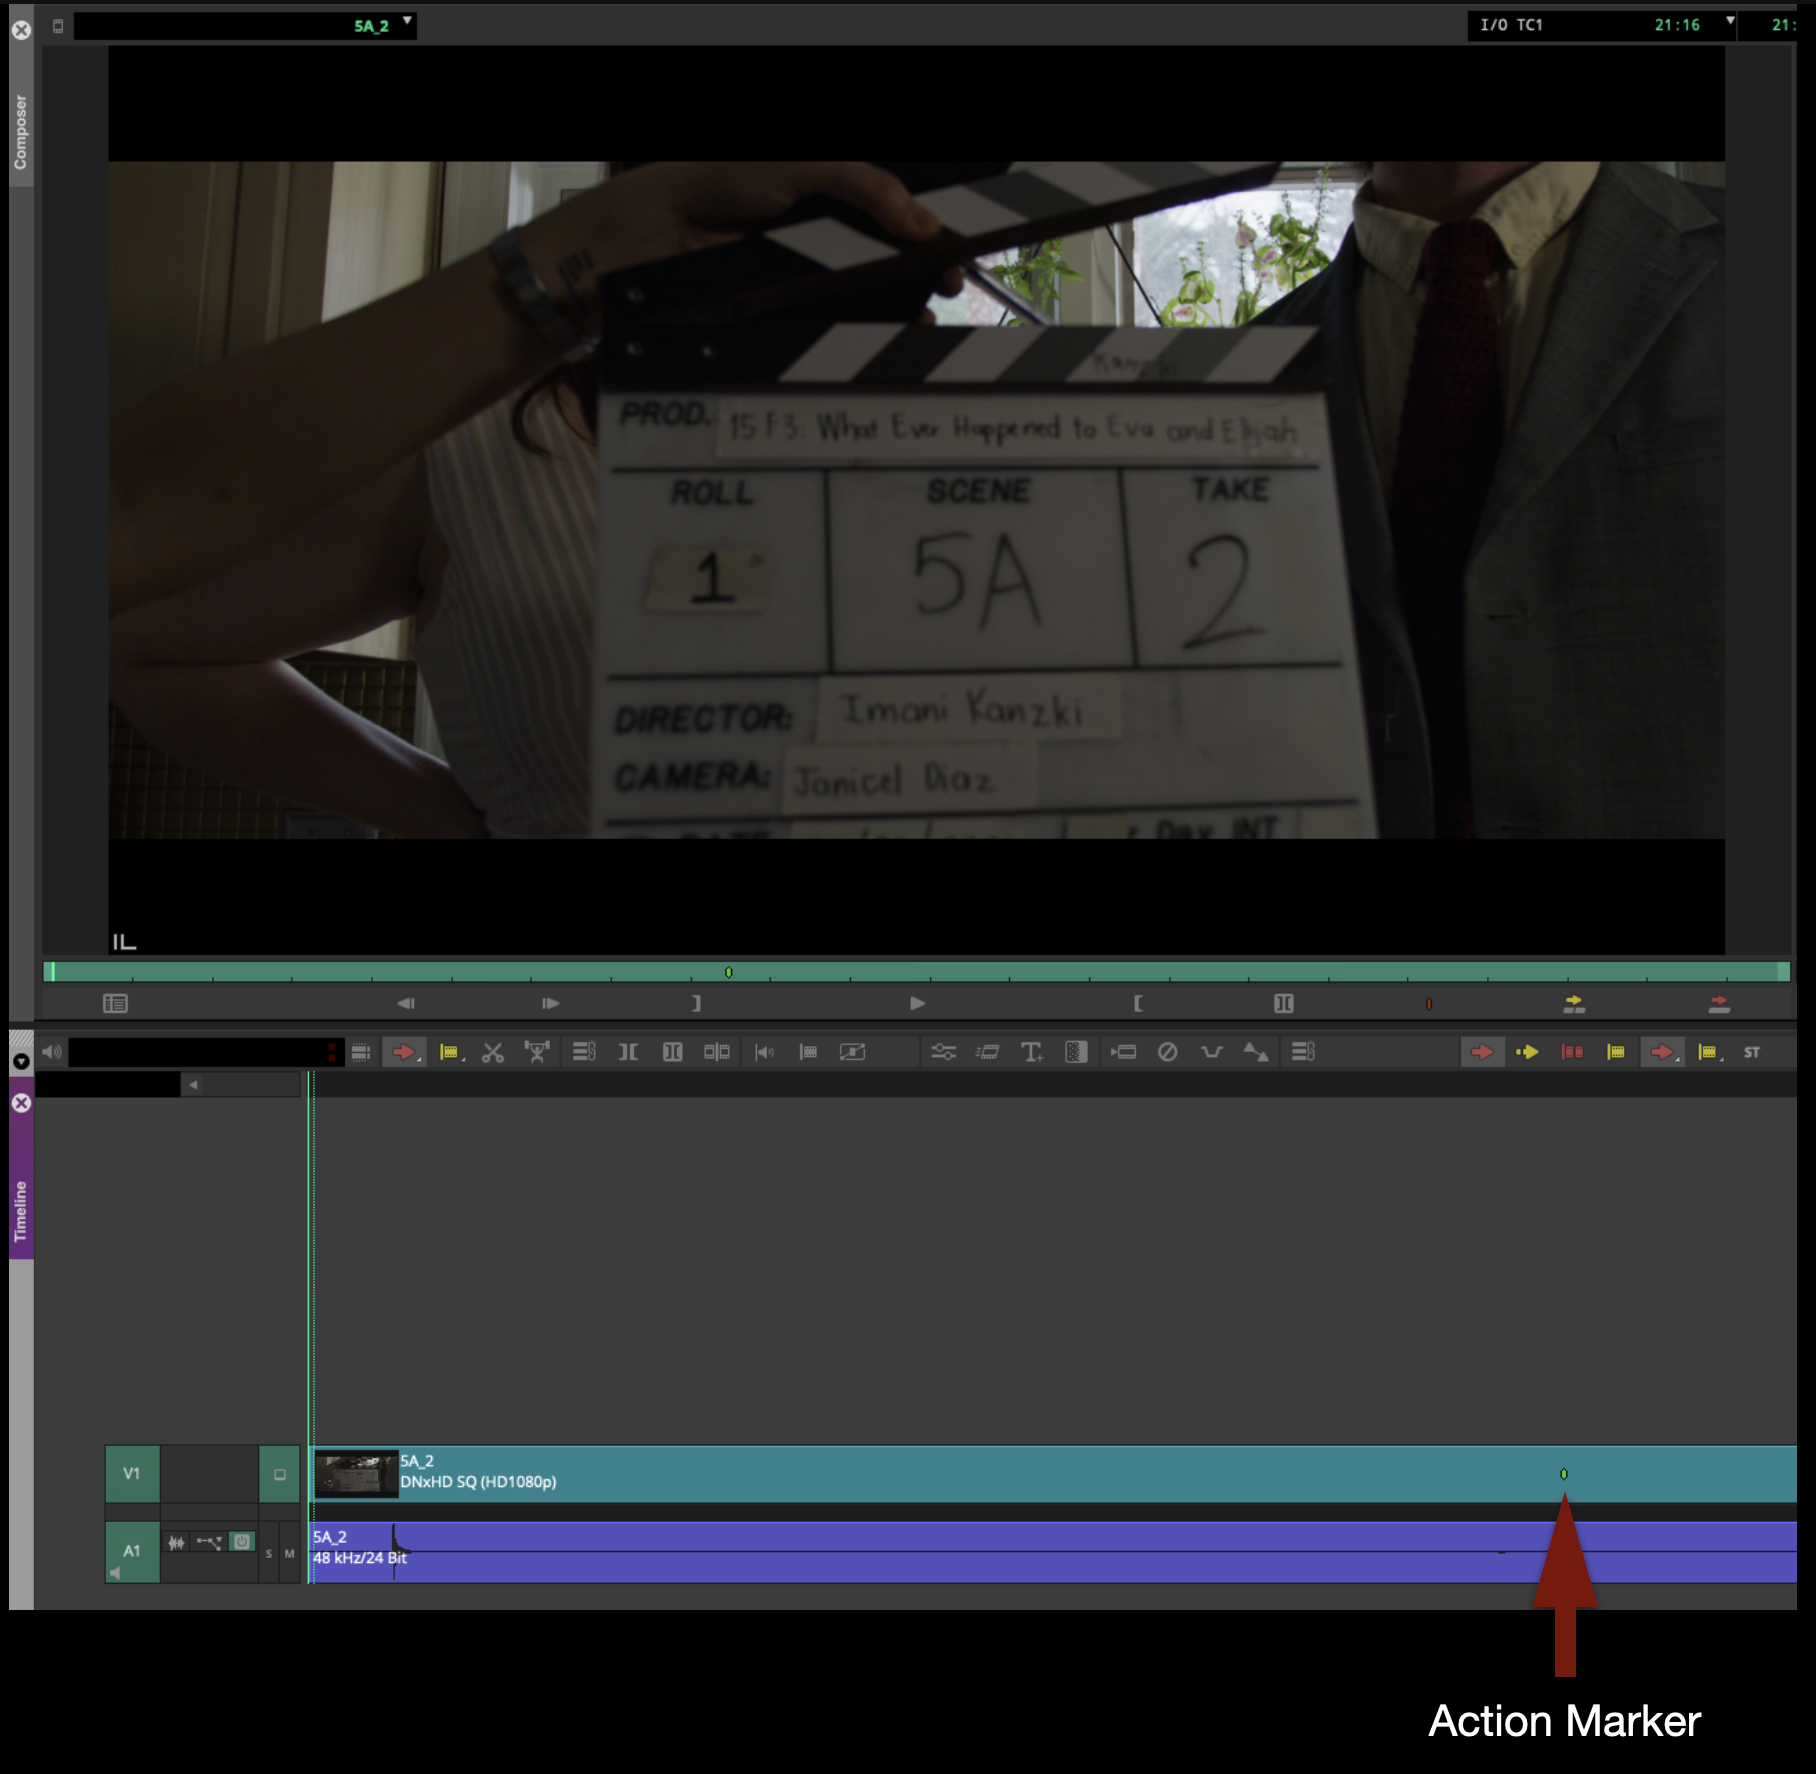
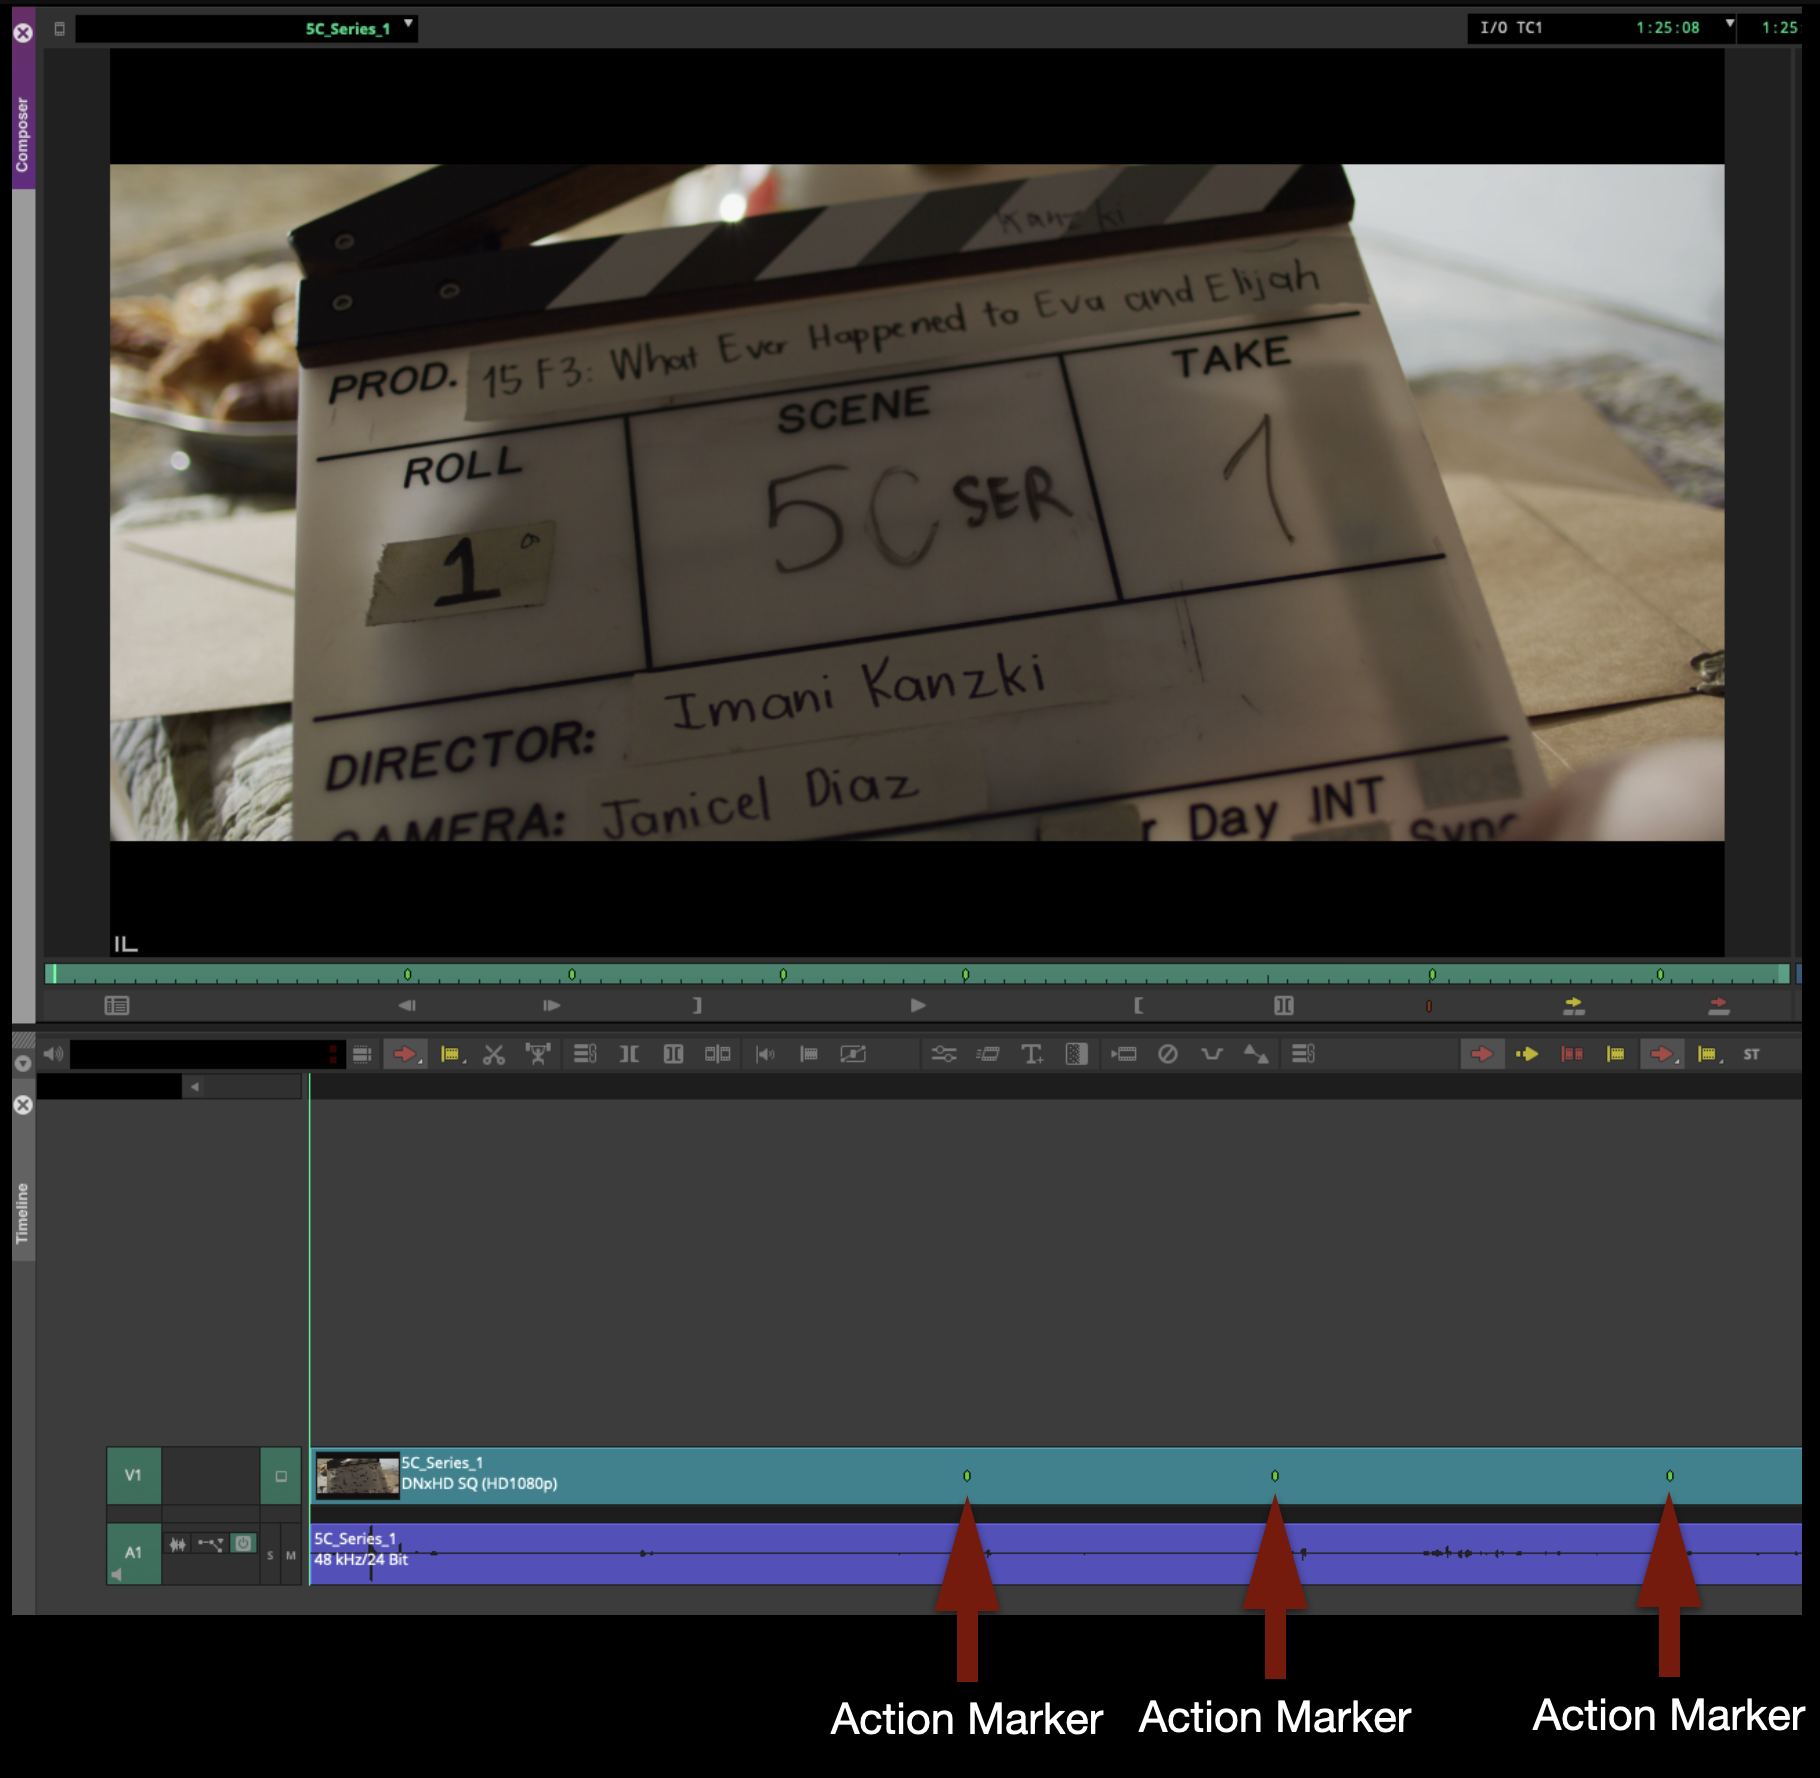
Set Green Action Markers
Once everything is renamed, mark the beginning of action for every clip. To do this, listen for when the Director calls “Action” on every clip and immediately hit the “1” key to attach a green marker to that timecode. This will allow the Editor to jump to the beginning of the action for each clip by hitting the “A” and “S” keys to jump between markers.
Normally there will only be one green marker on each clip:
For series takes, multiple green markers may be needed for reset actions:
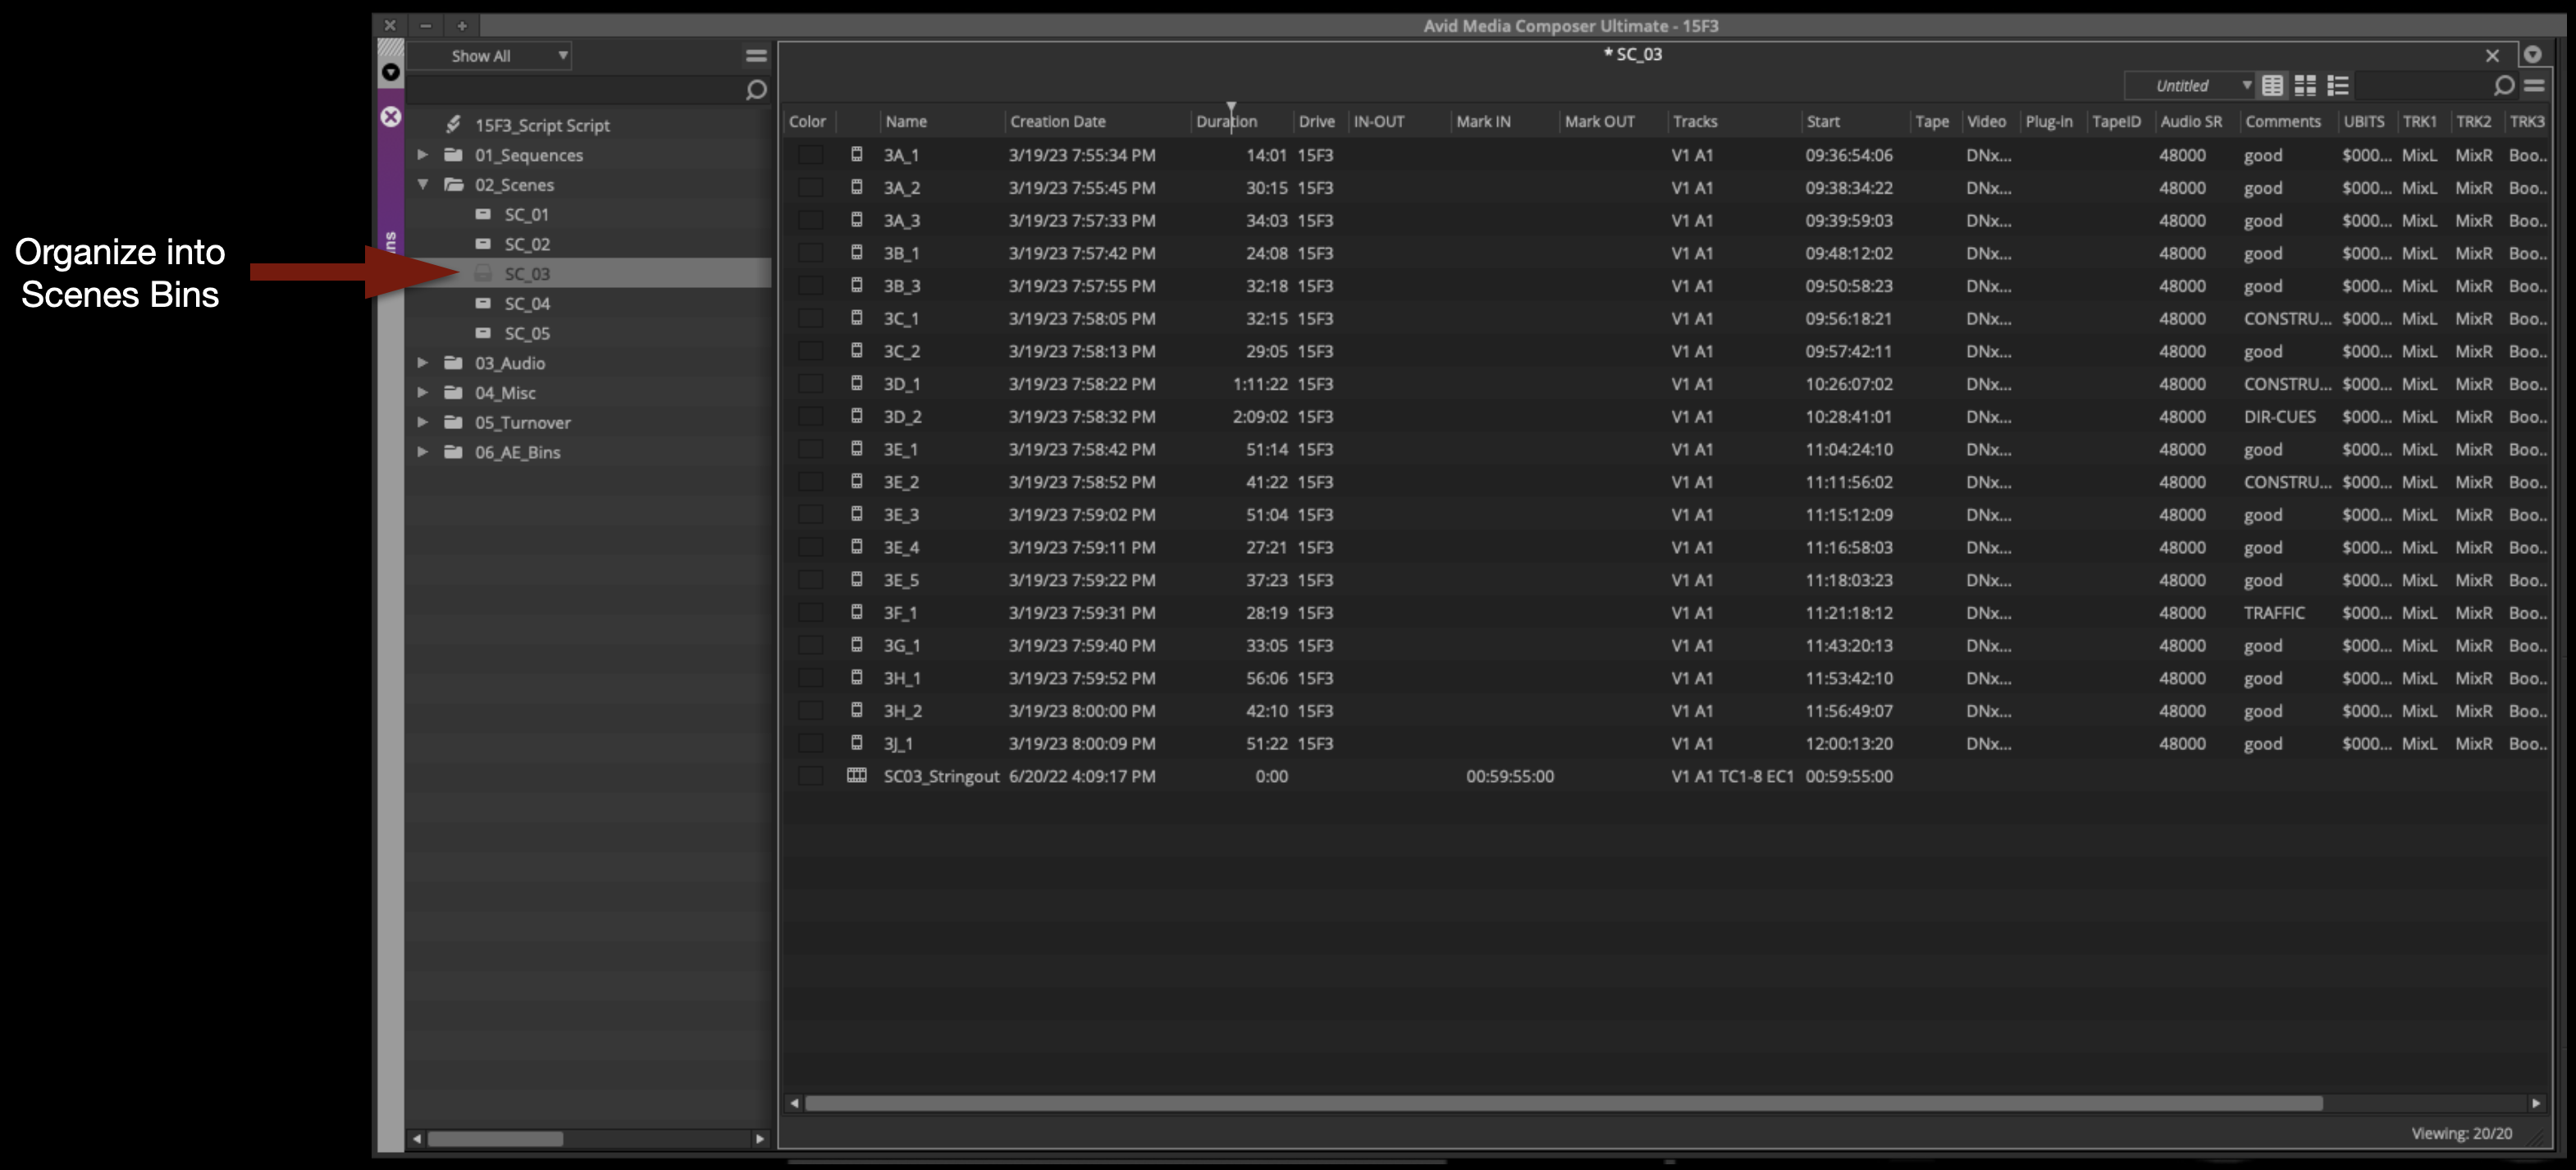
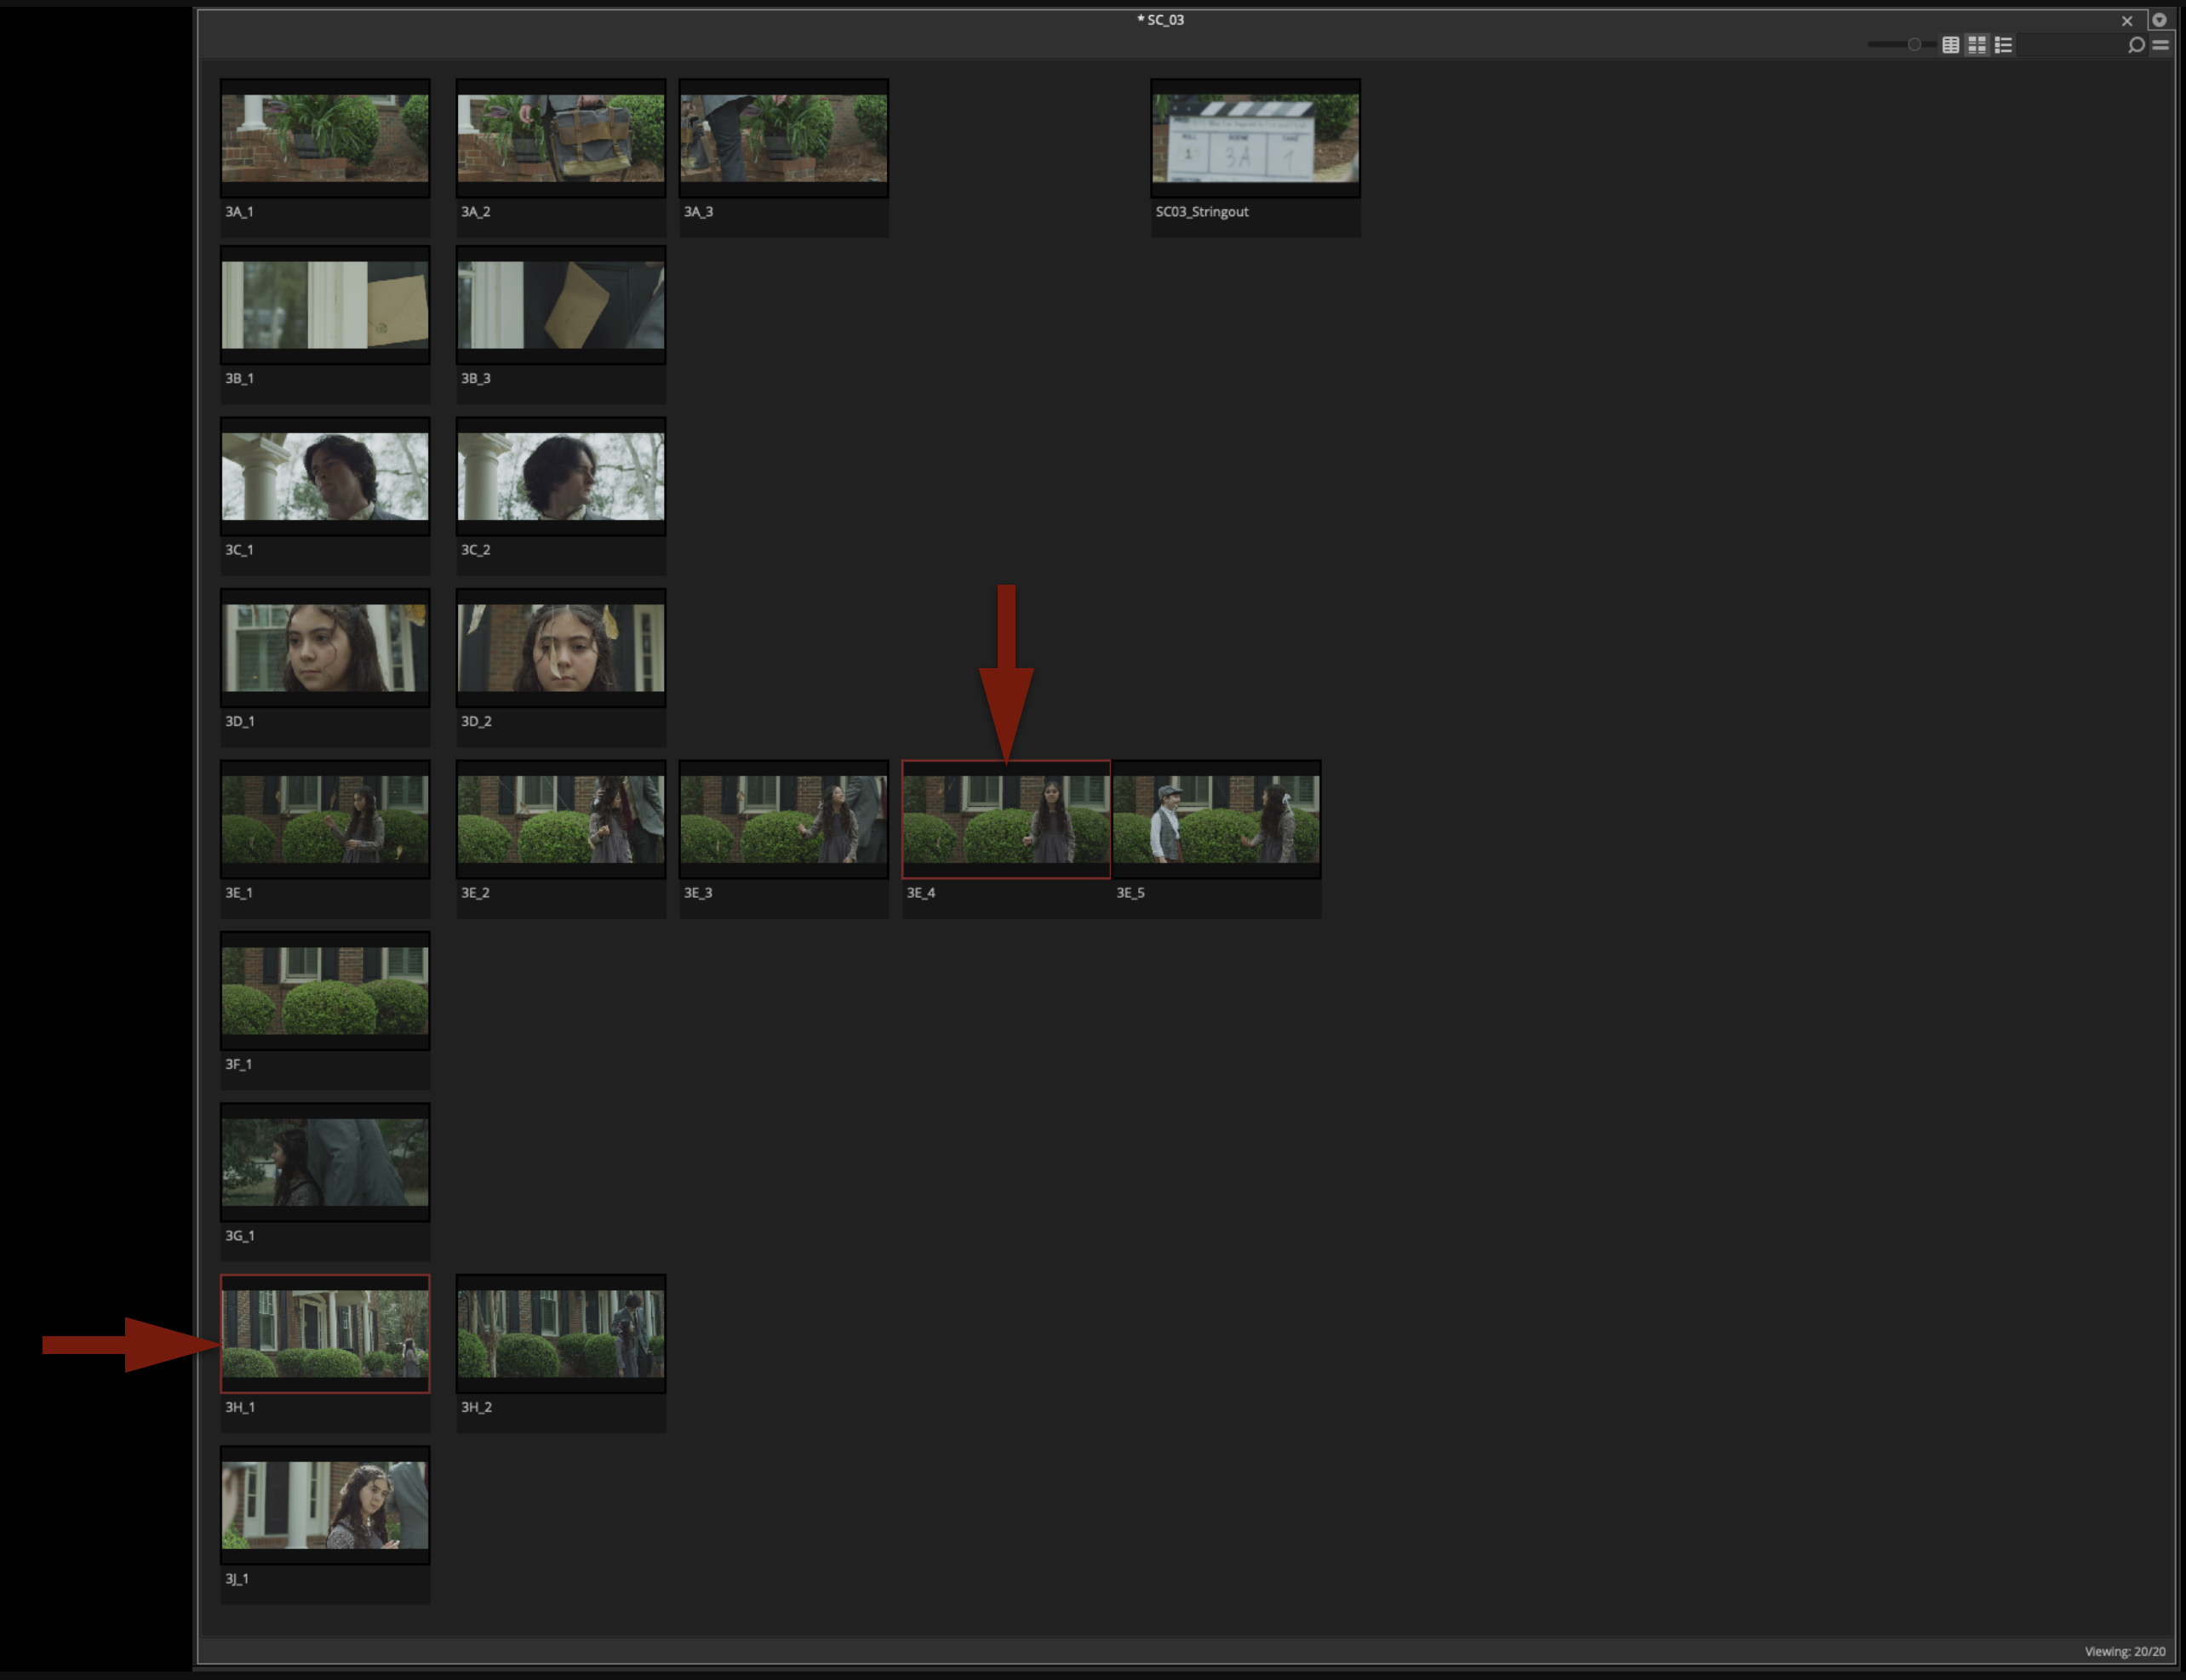
Organize Footage in Bins
Once all the green action markers have been set, you can move the subclips out of the Synching Bin and into the appropriate scene bins.
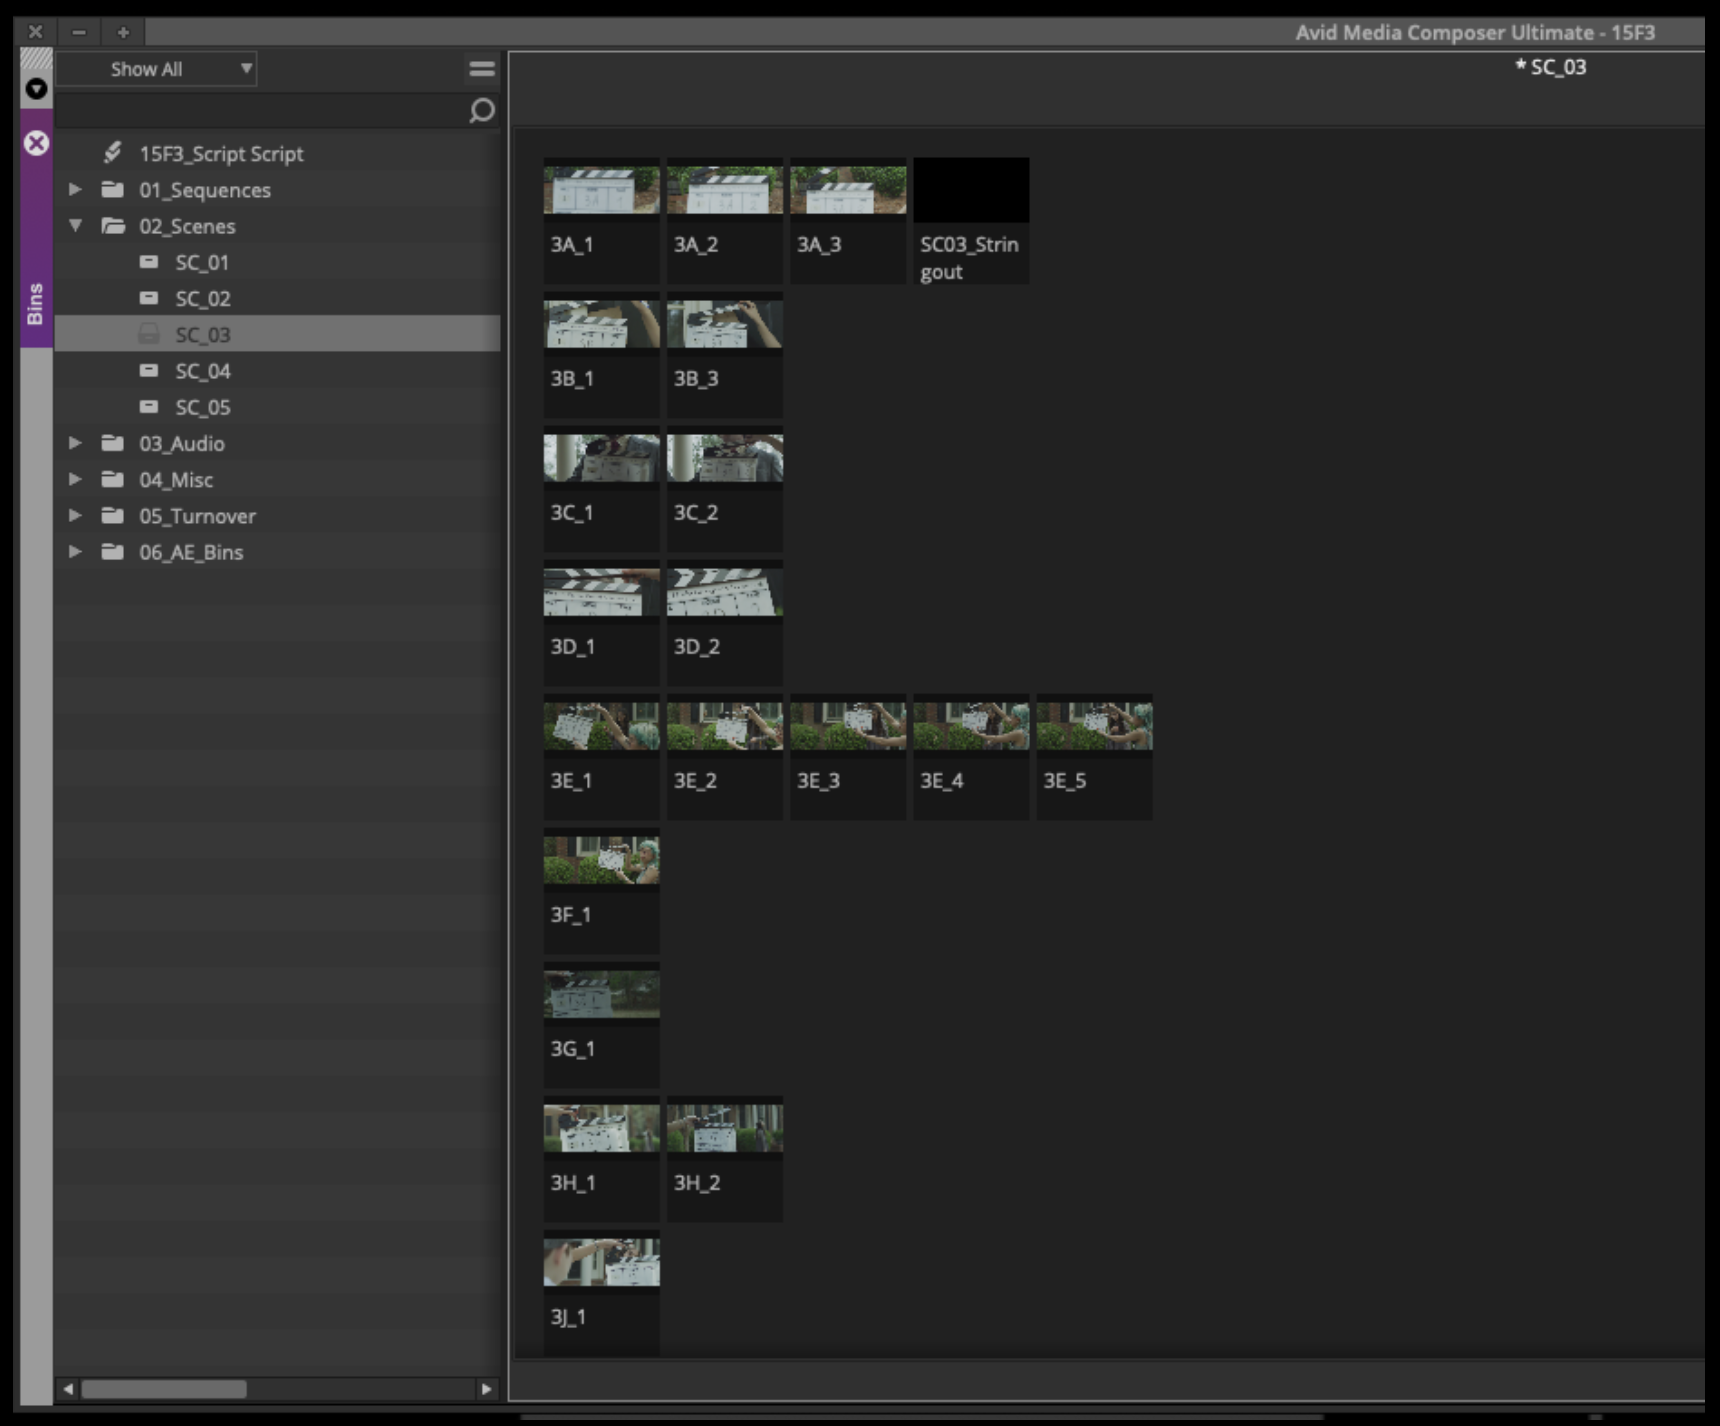
Switch the view in the scene bin to the thumbnail view:
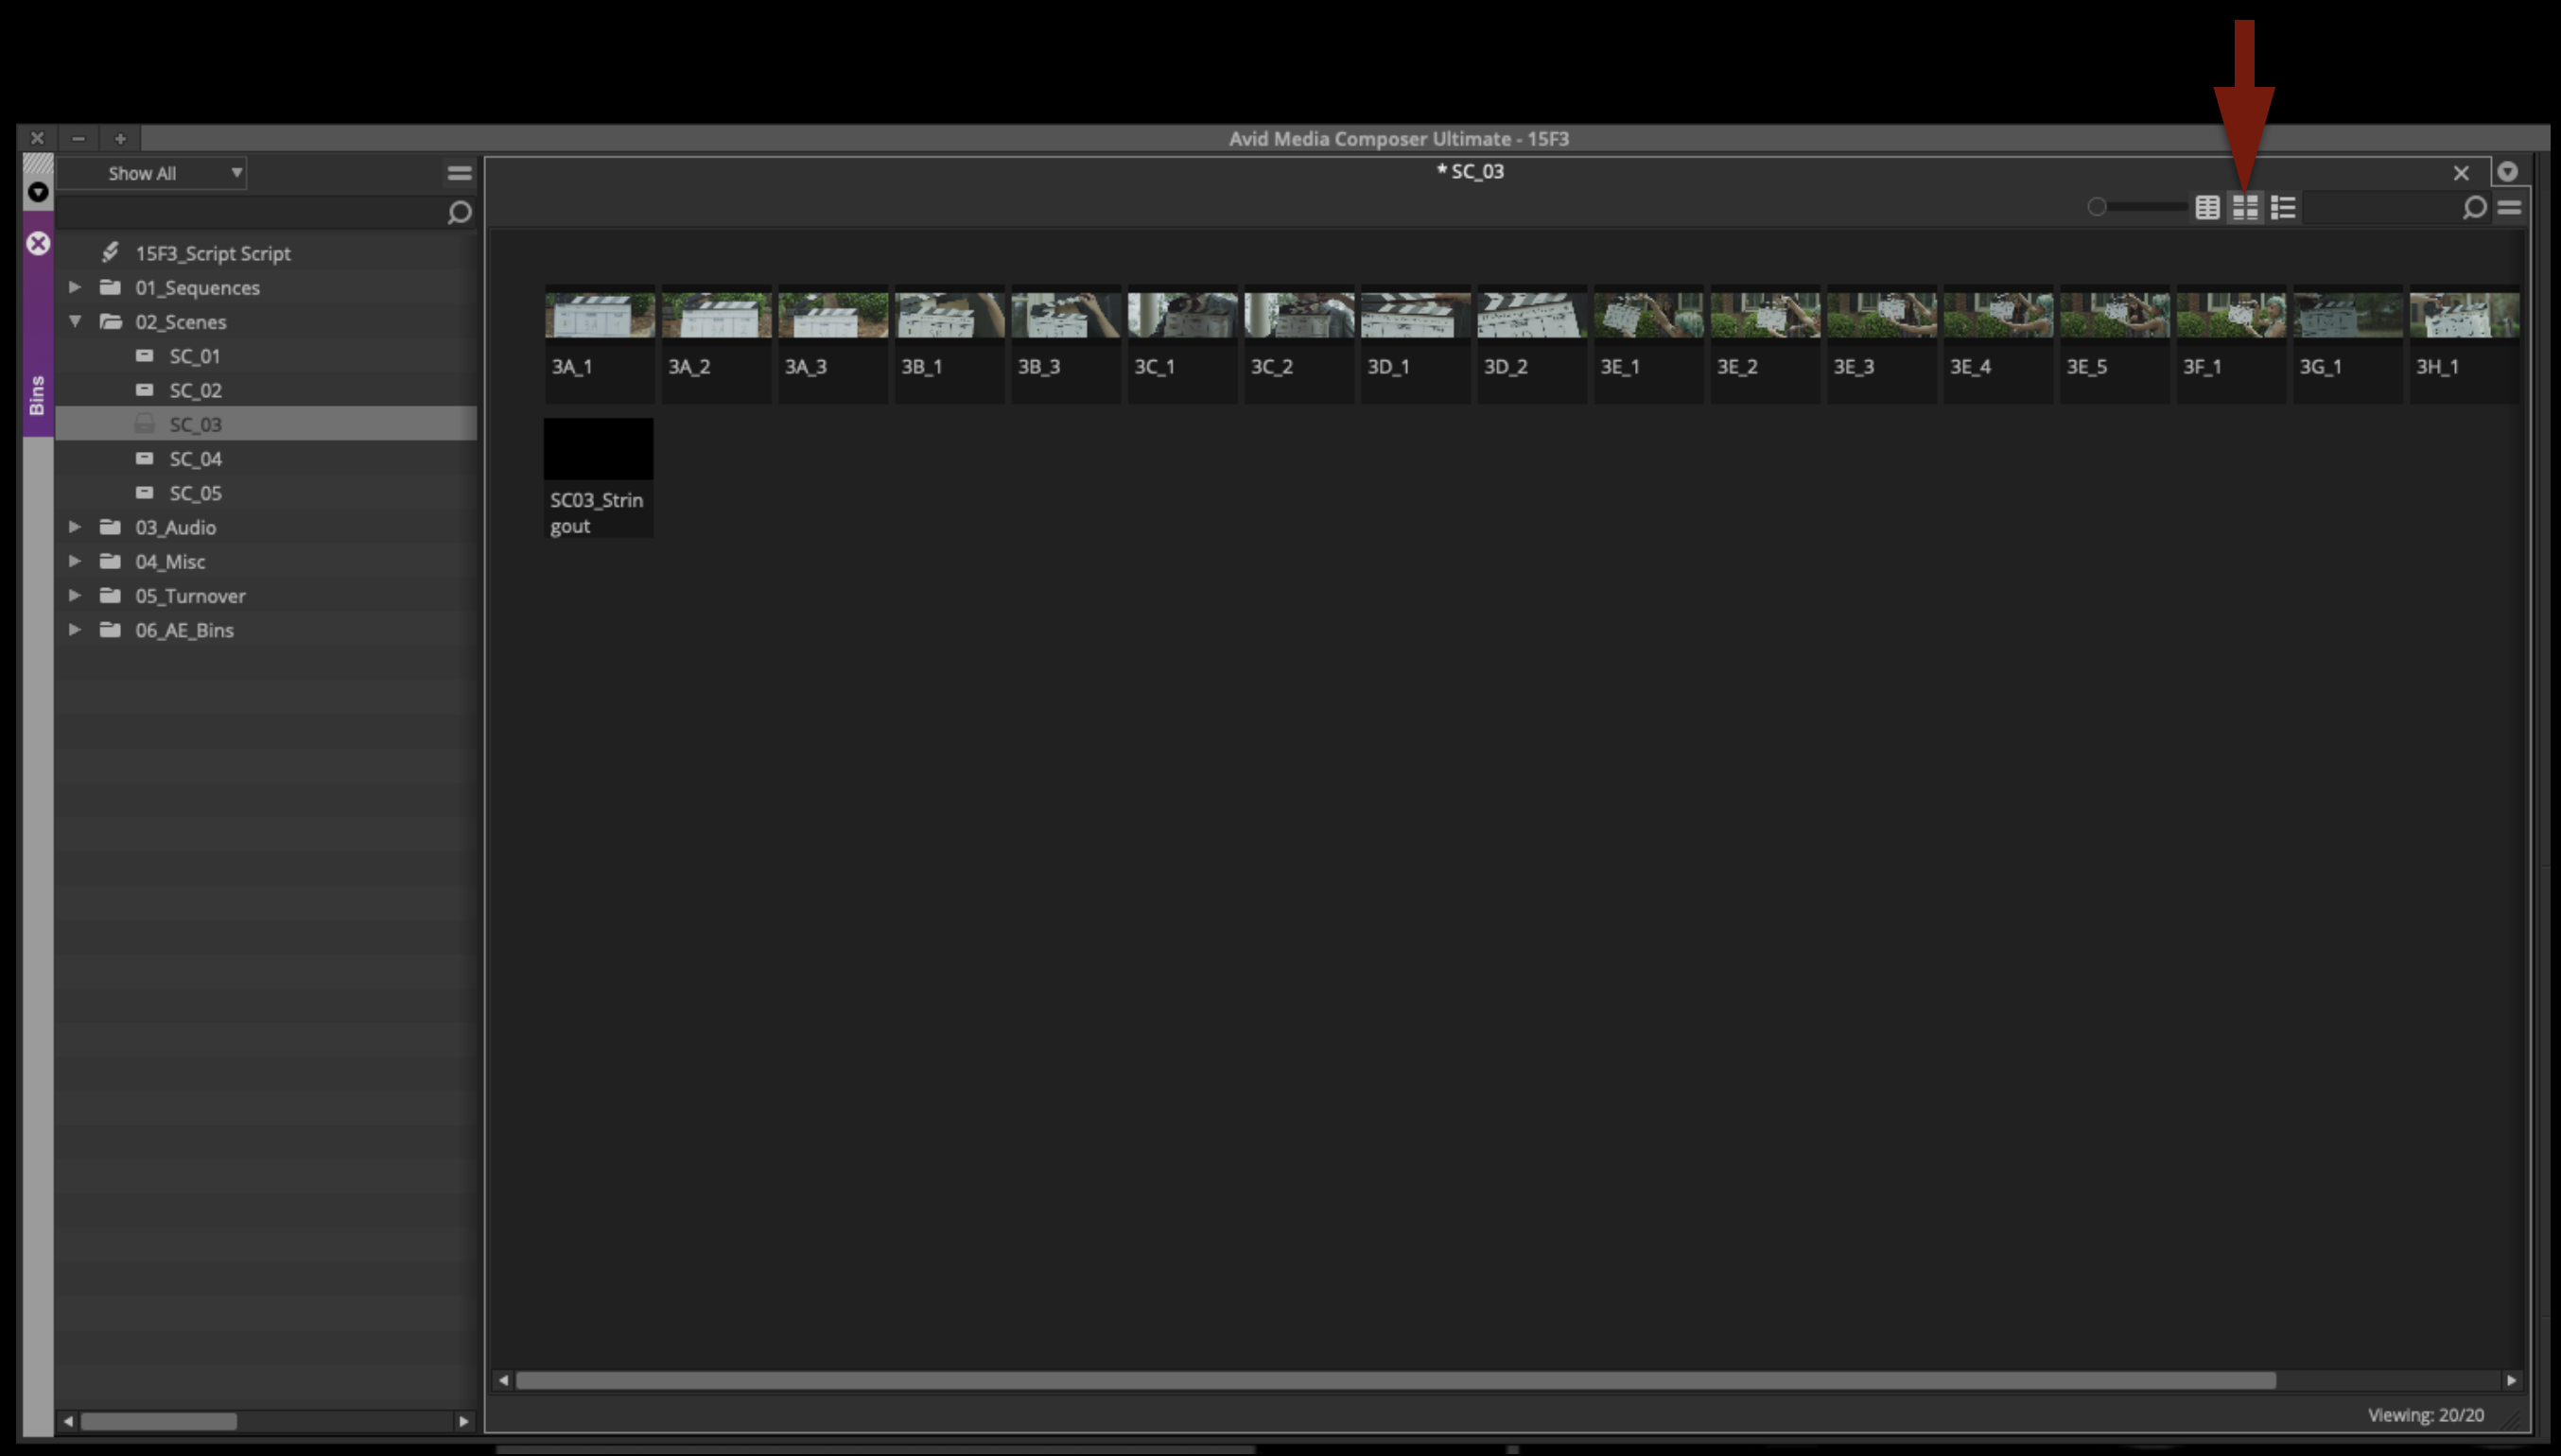
Drag the thumbnails around and organize each scene bin into rows of setups and columns of takes. Hit “Command + T” to snap the thumbnails to a grid to making organizing easier.
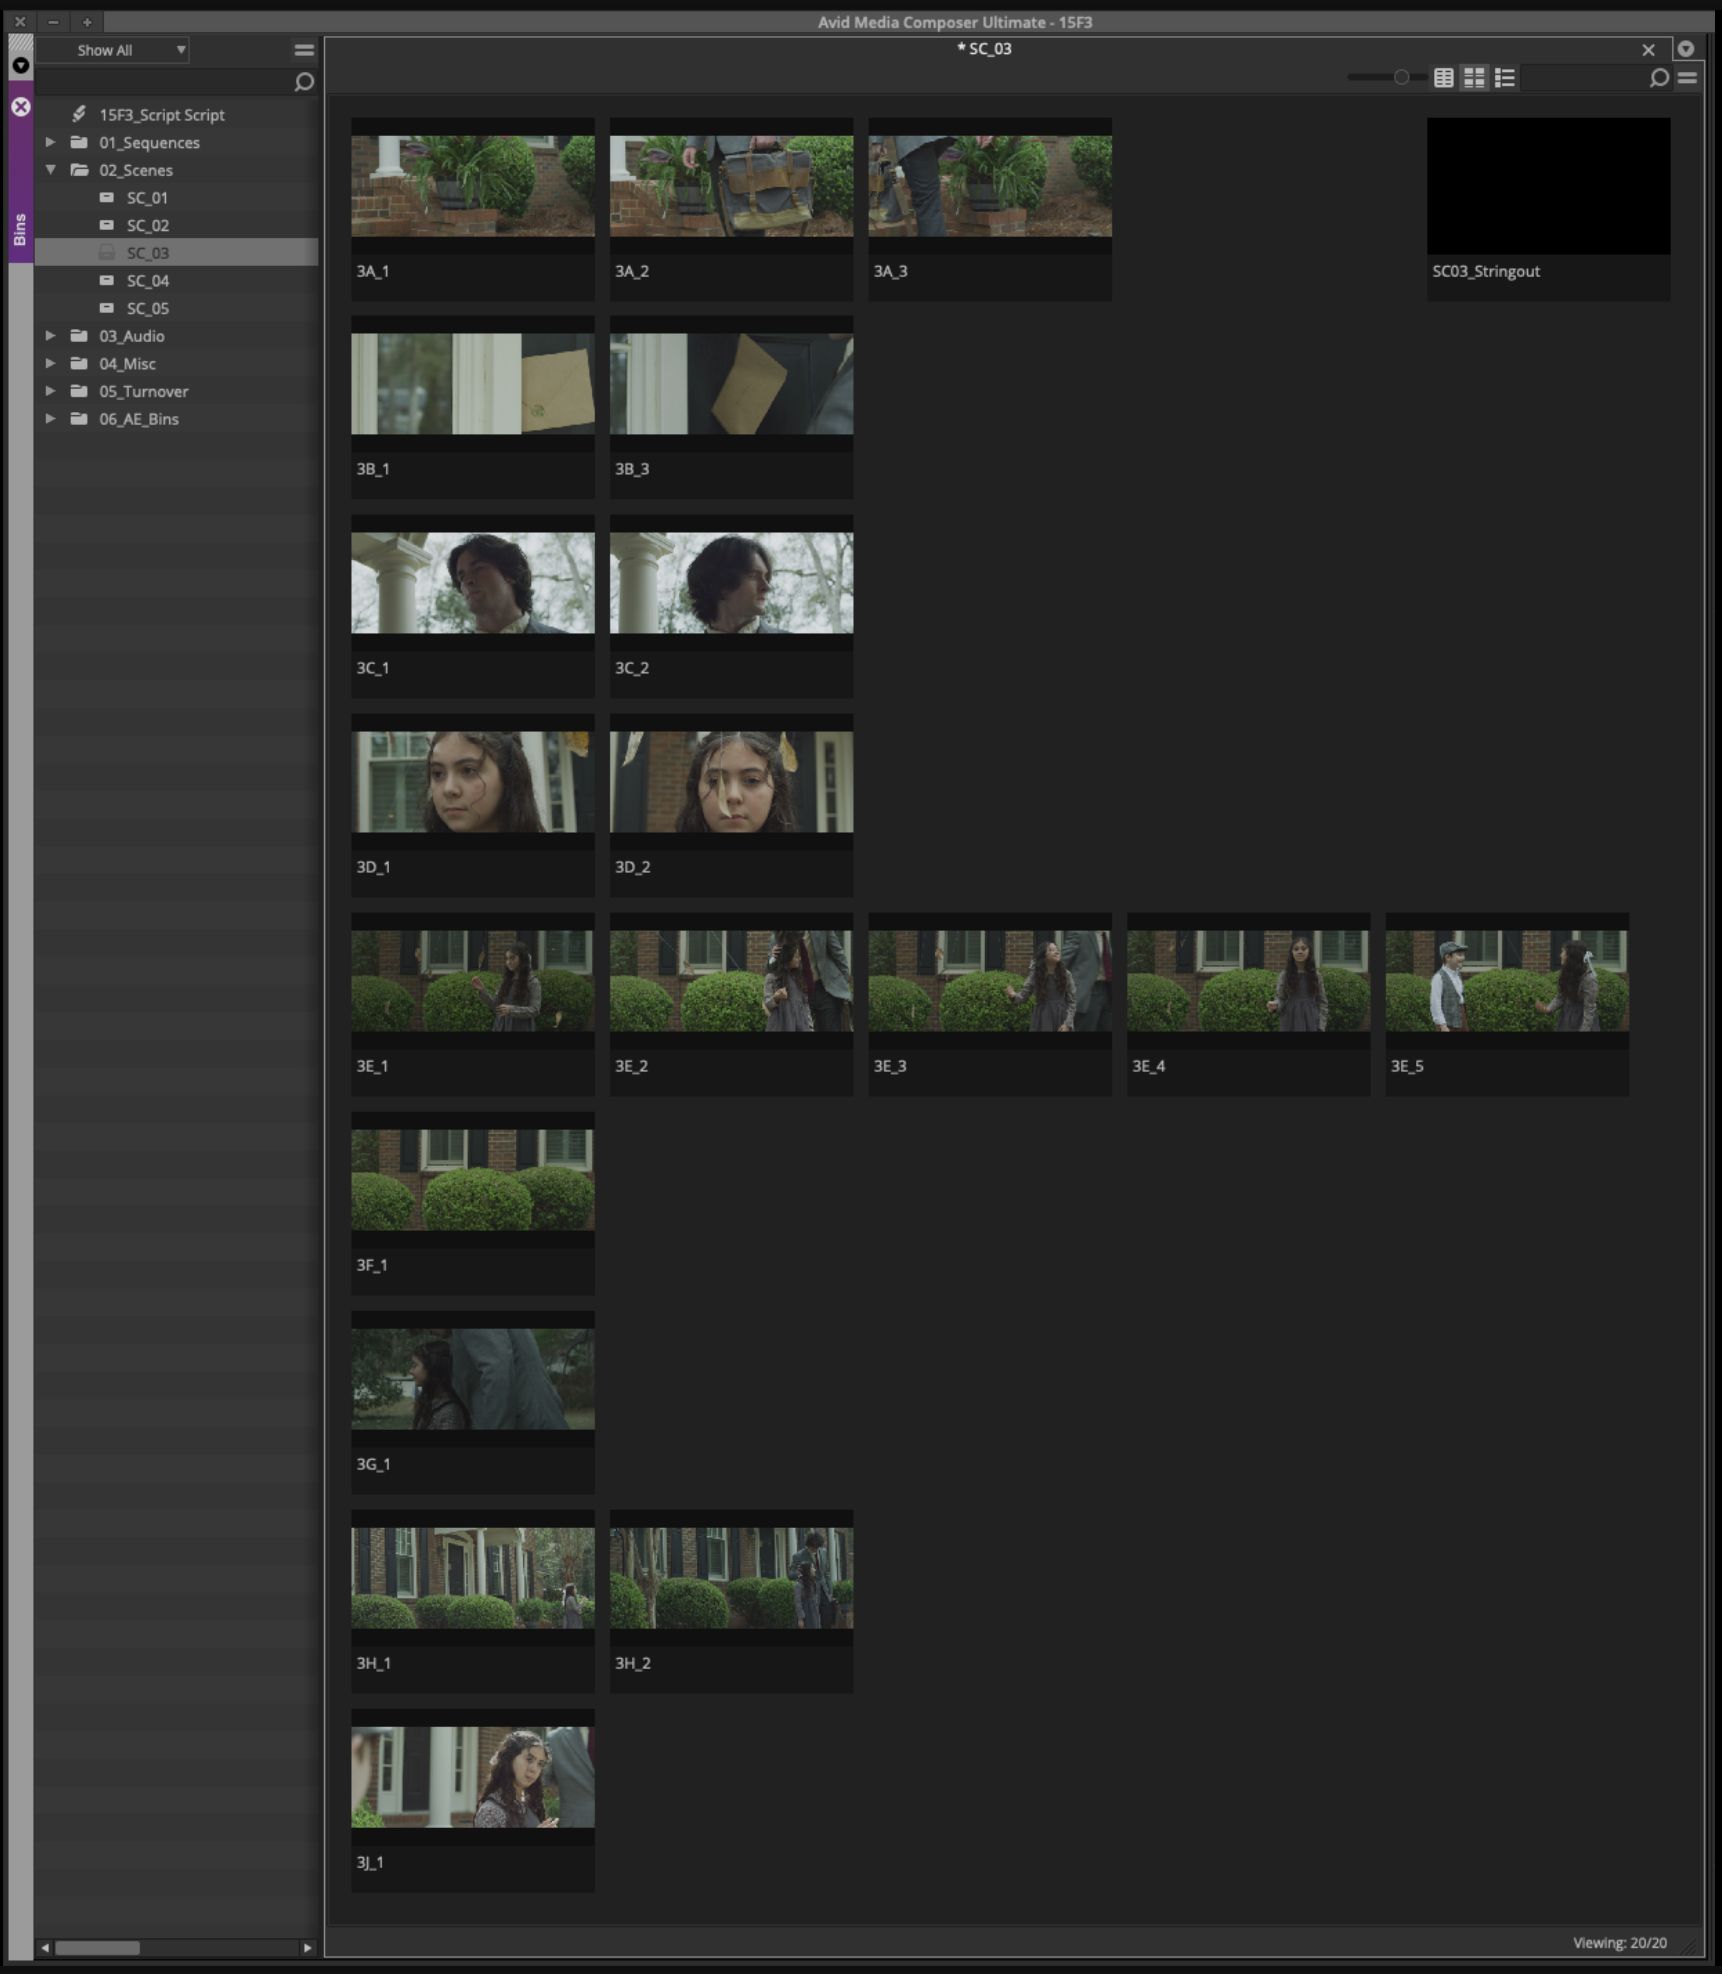
Next, change the thumbnail for each one. By default the thumbnail is the first frame of video, which is not helpful to an Editor as it usually only shows the slate. You can change the thumbnail by single-clicking on the clip and scrubbing with the JKL keys. Wherever you stop scrubbing, that thumbnail will be saved.
If a setup has only one take, set the thumbnail to what the majority of the shot represents. If a setup has multiple takes, set the early takes to the beginning of the action and the last takes to the end of the action. This way, the Editor can see at a glance what the motion of the camera or the changing of the blocking is, simply by looking across the different takes.
Transcribe Notes and Label “NG”
The Camera Report has notes for Good/NG, Shot Size, and Remarks:
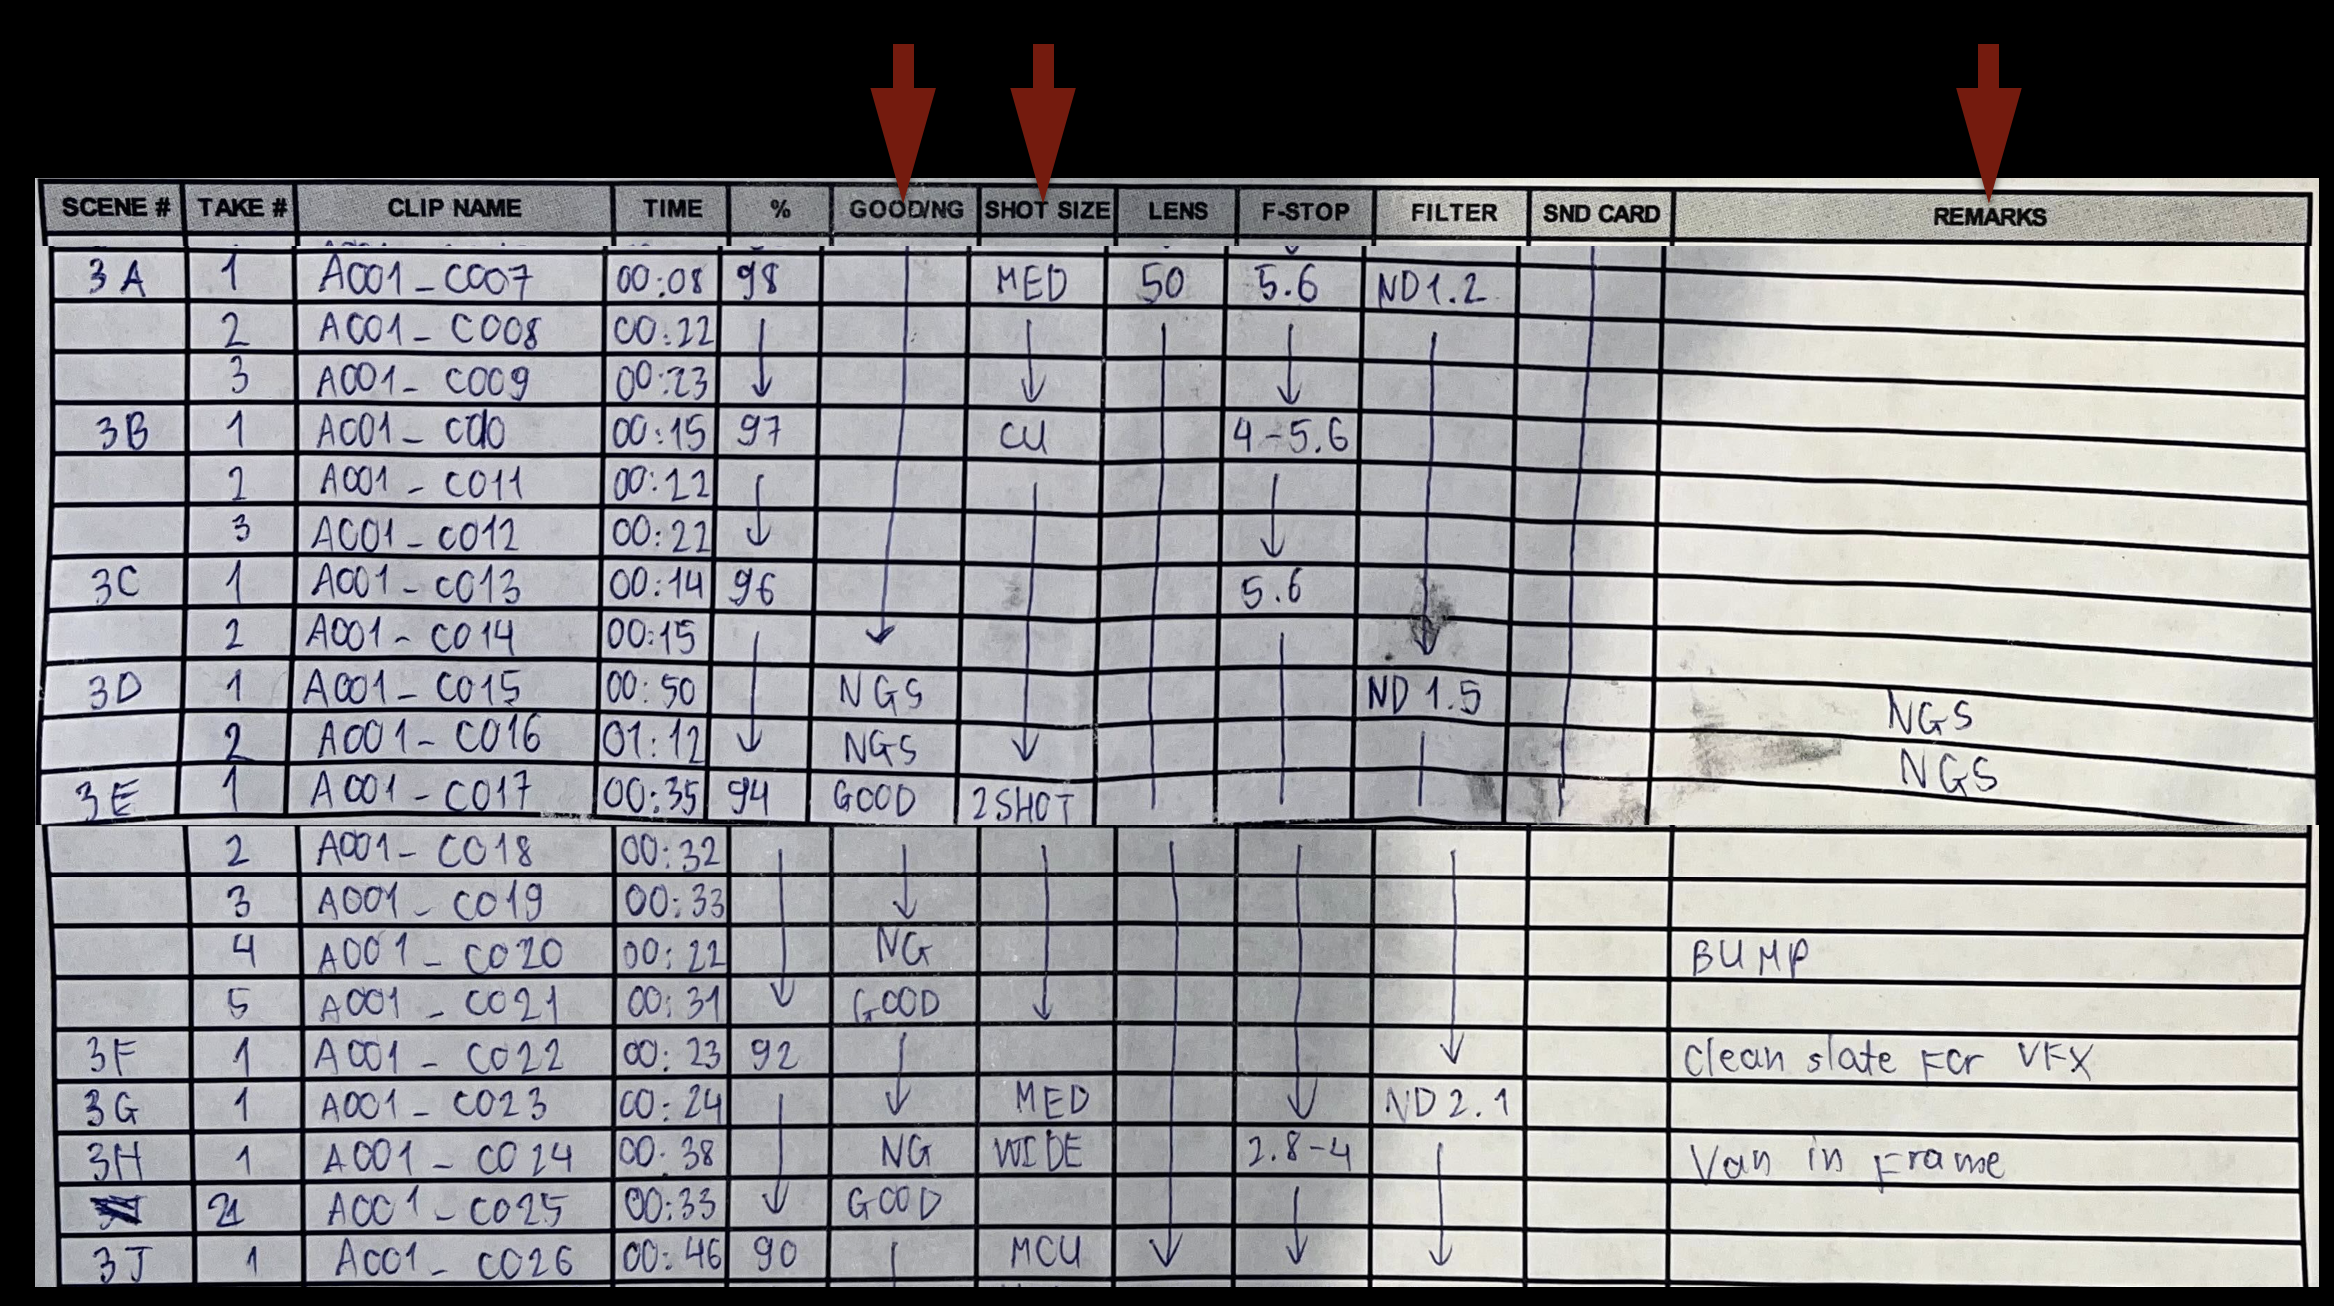
Select Script View, and transcribe all of these notes from the Camera Report onto the corresponding clips in the Comments section.
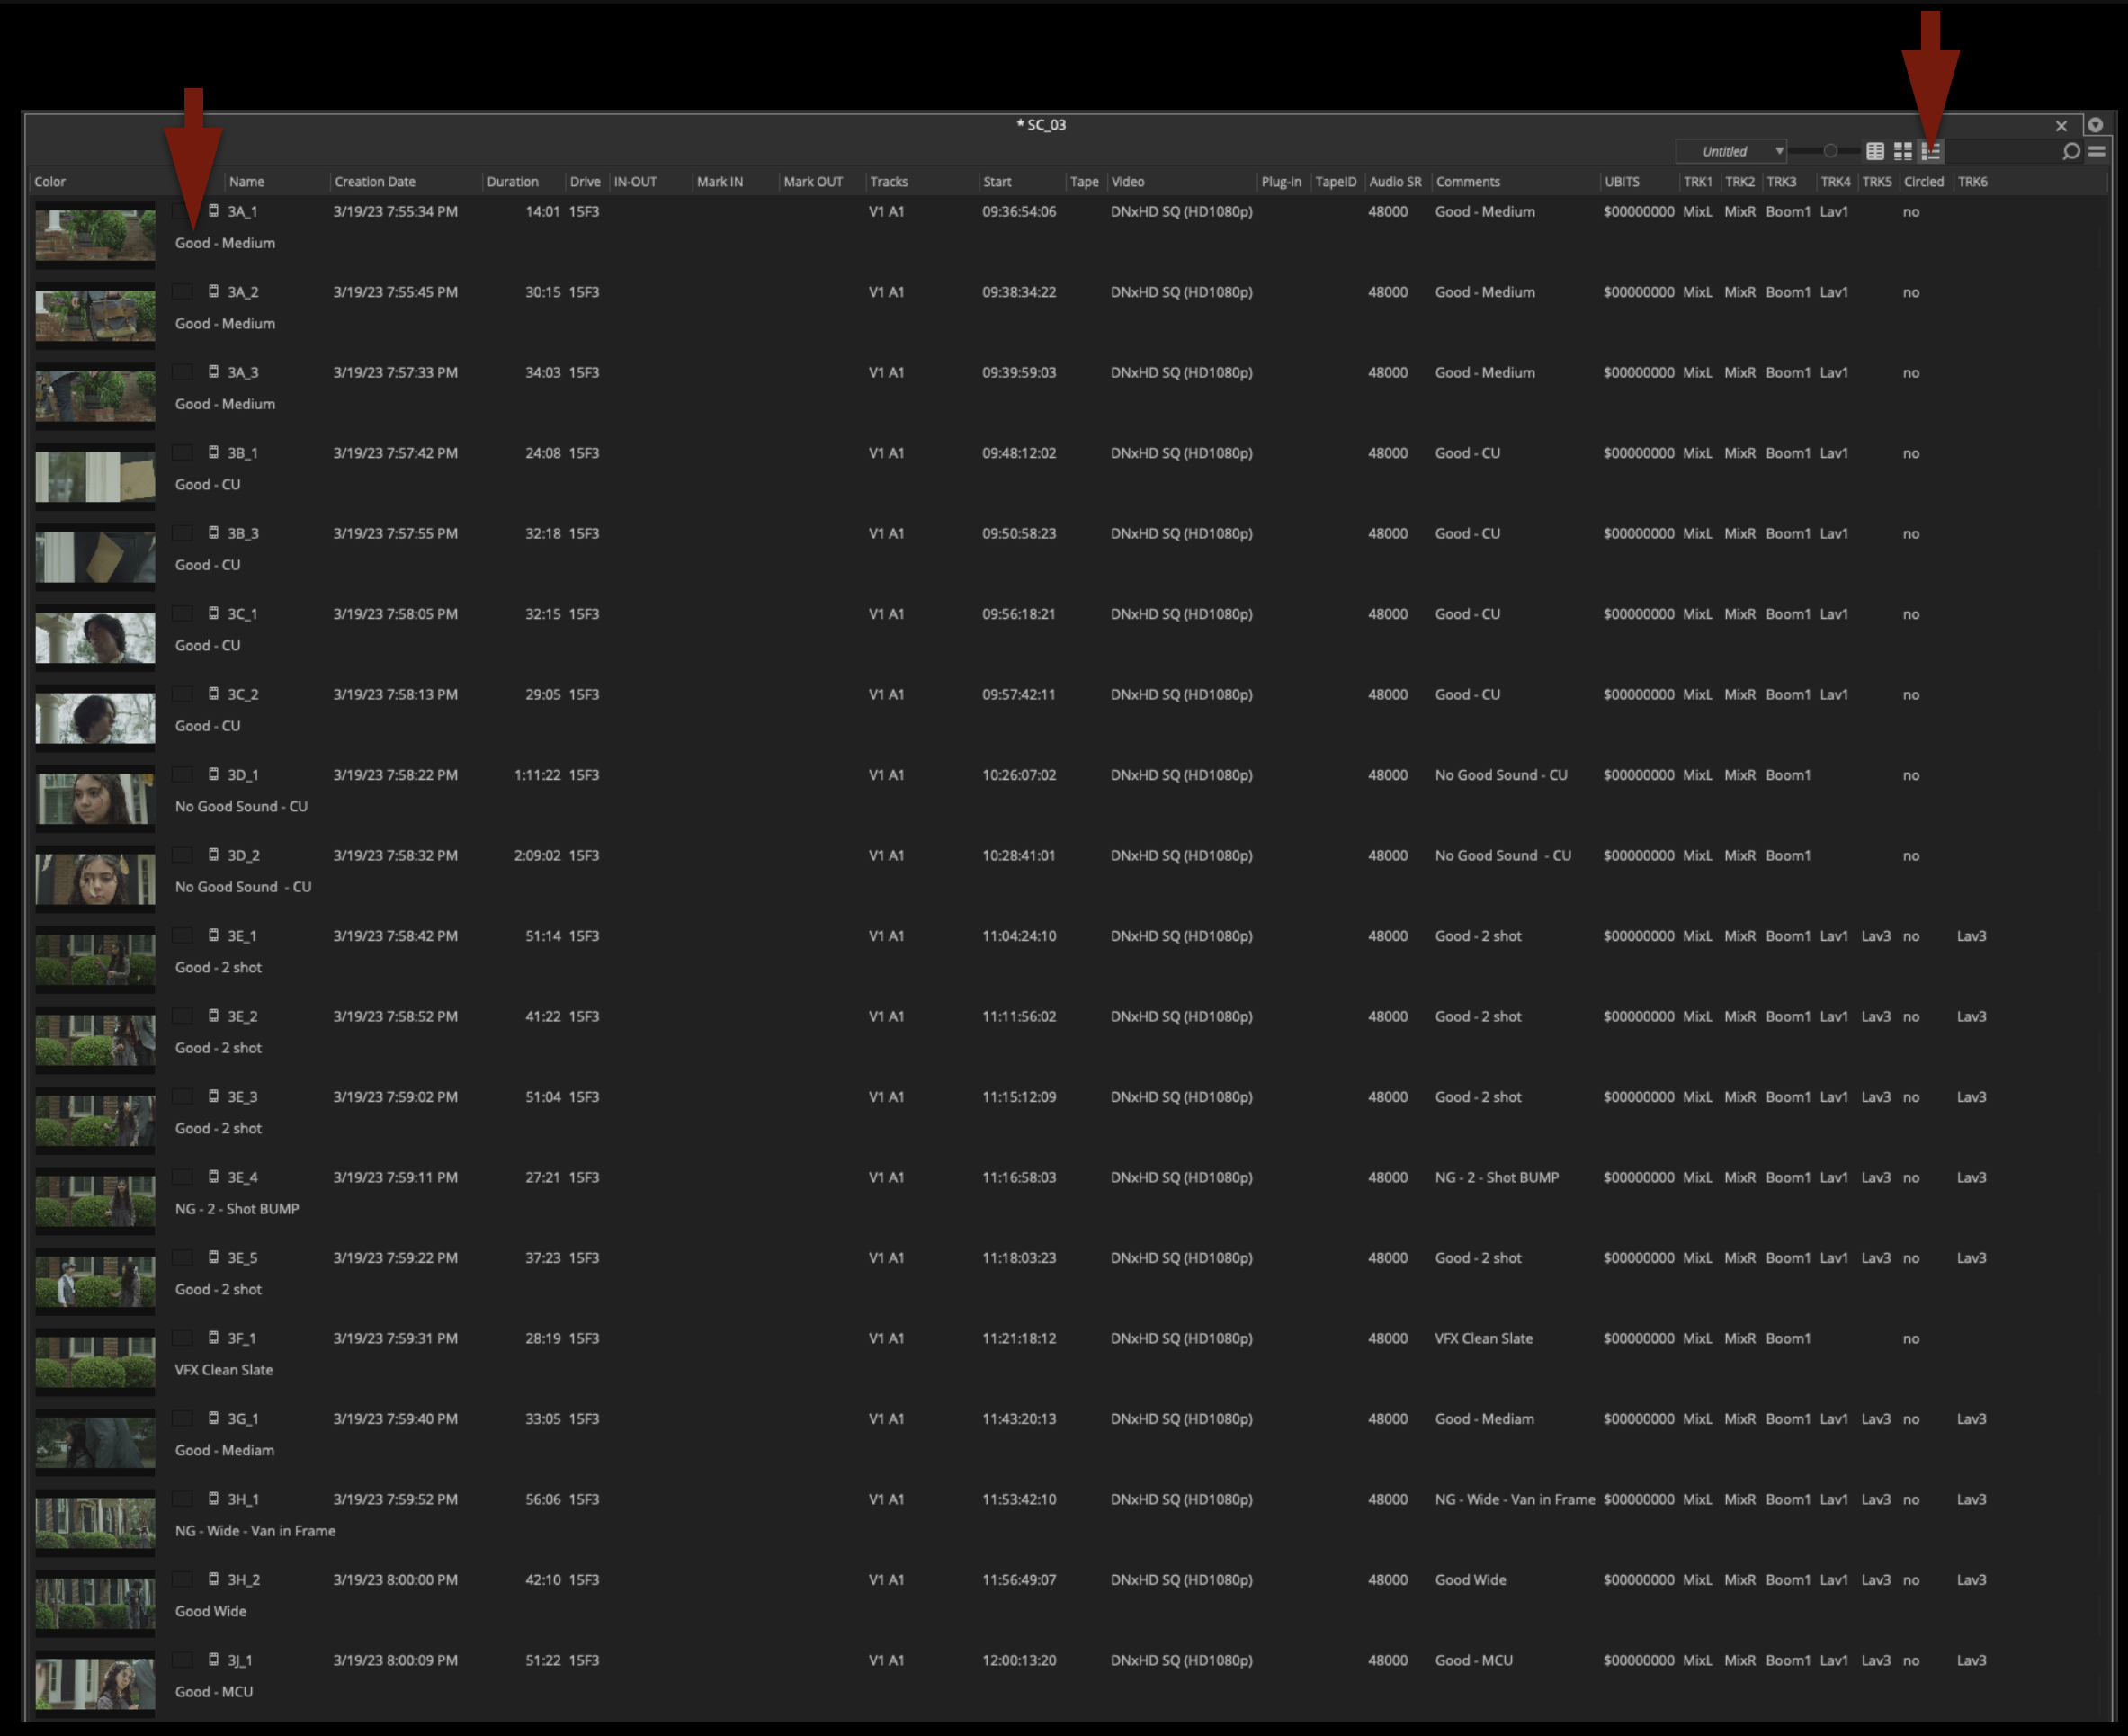
Any clips marked as “NG” or “No Good” should be labeled in red:
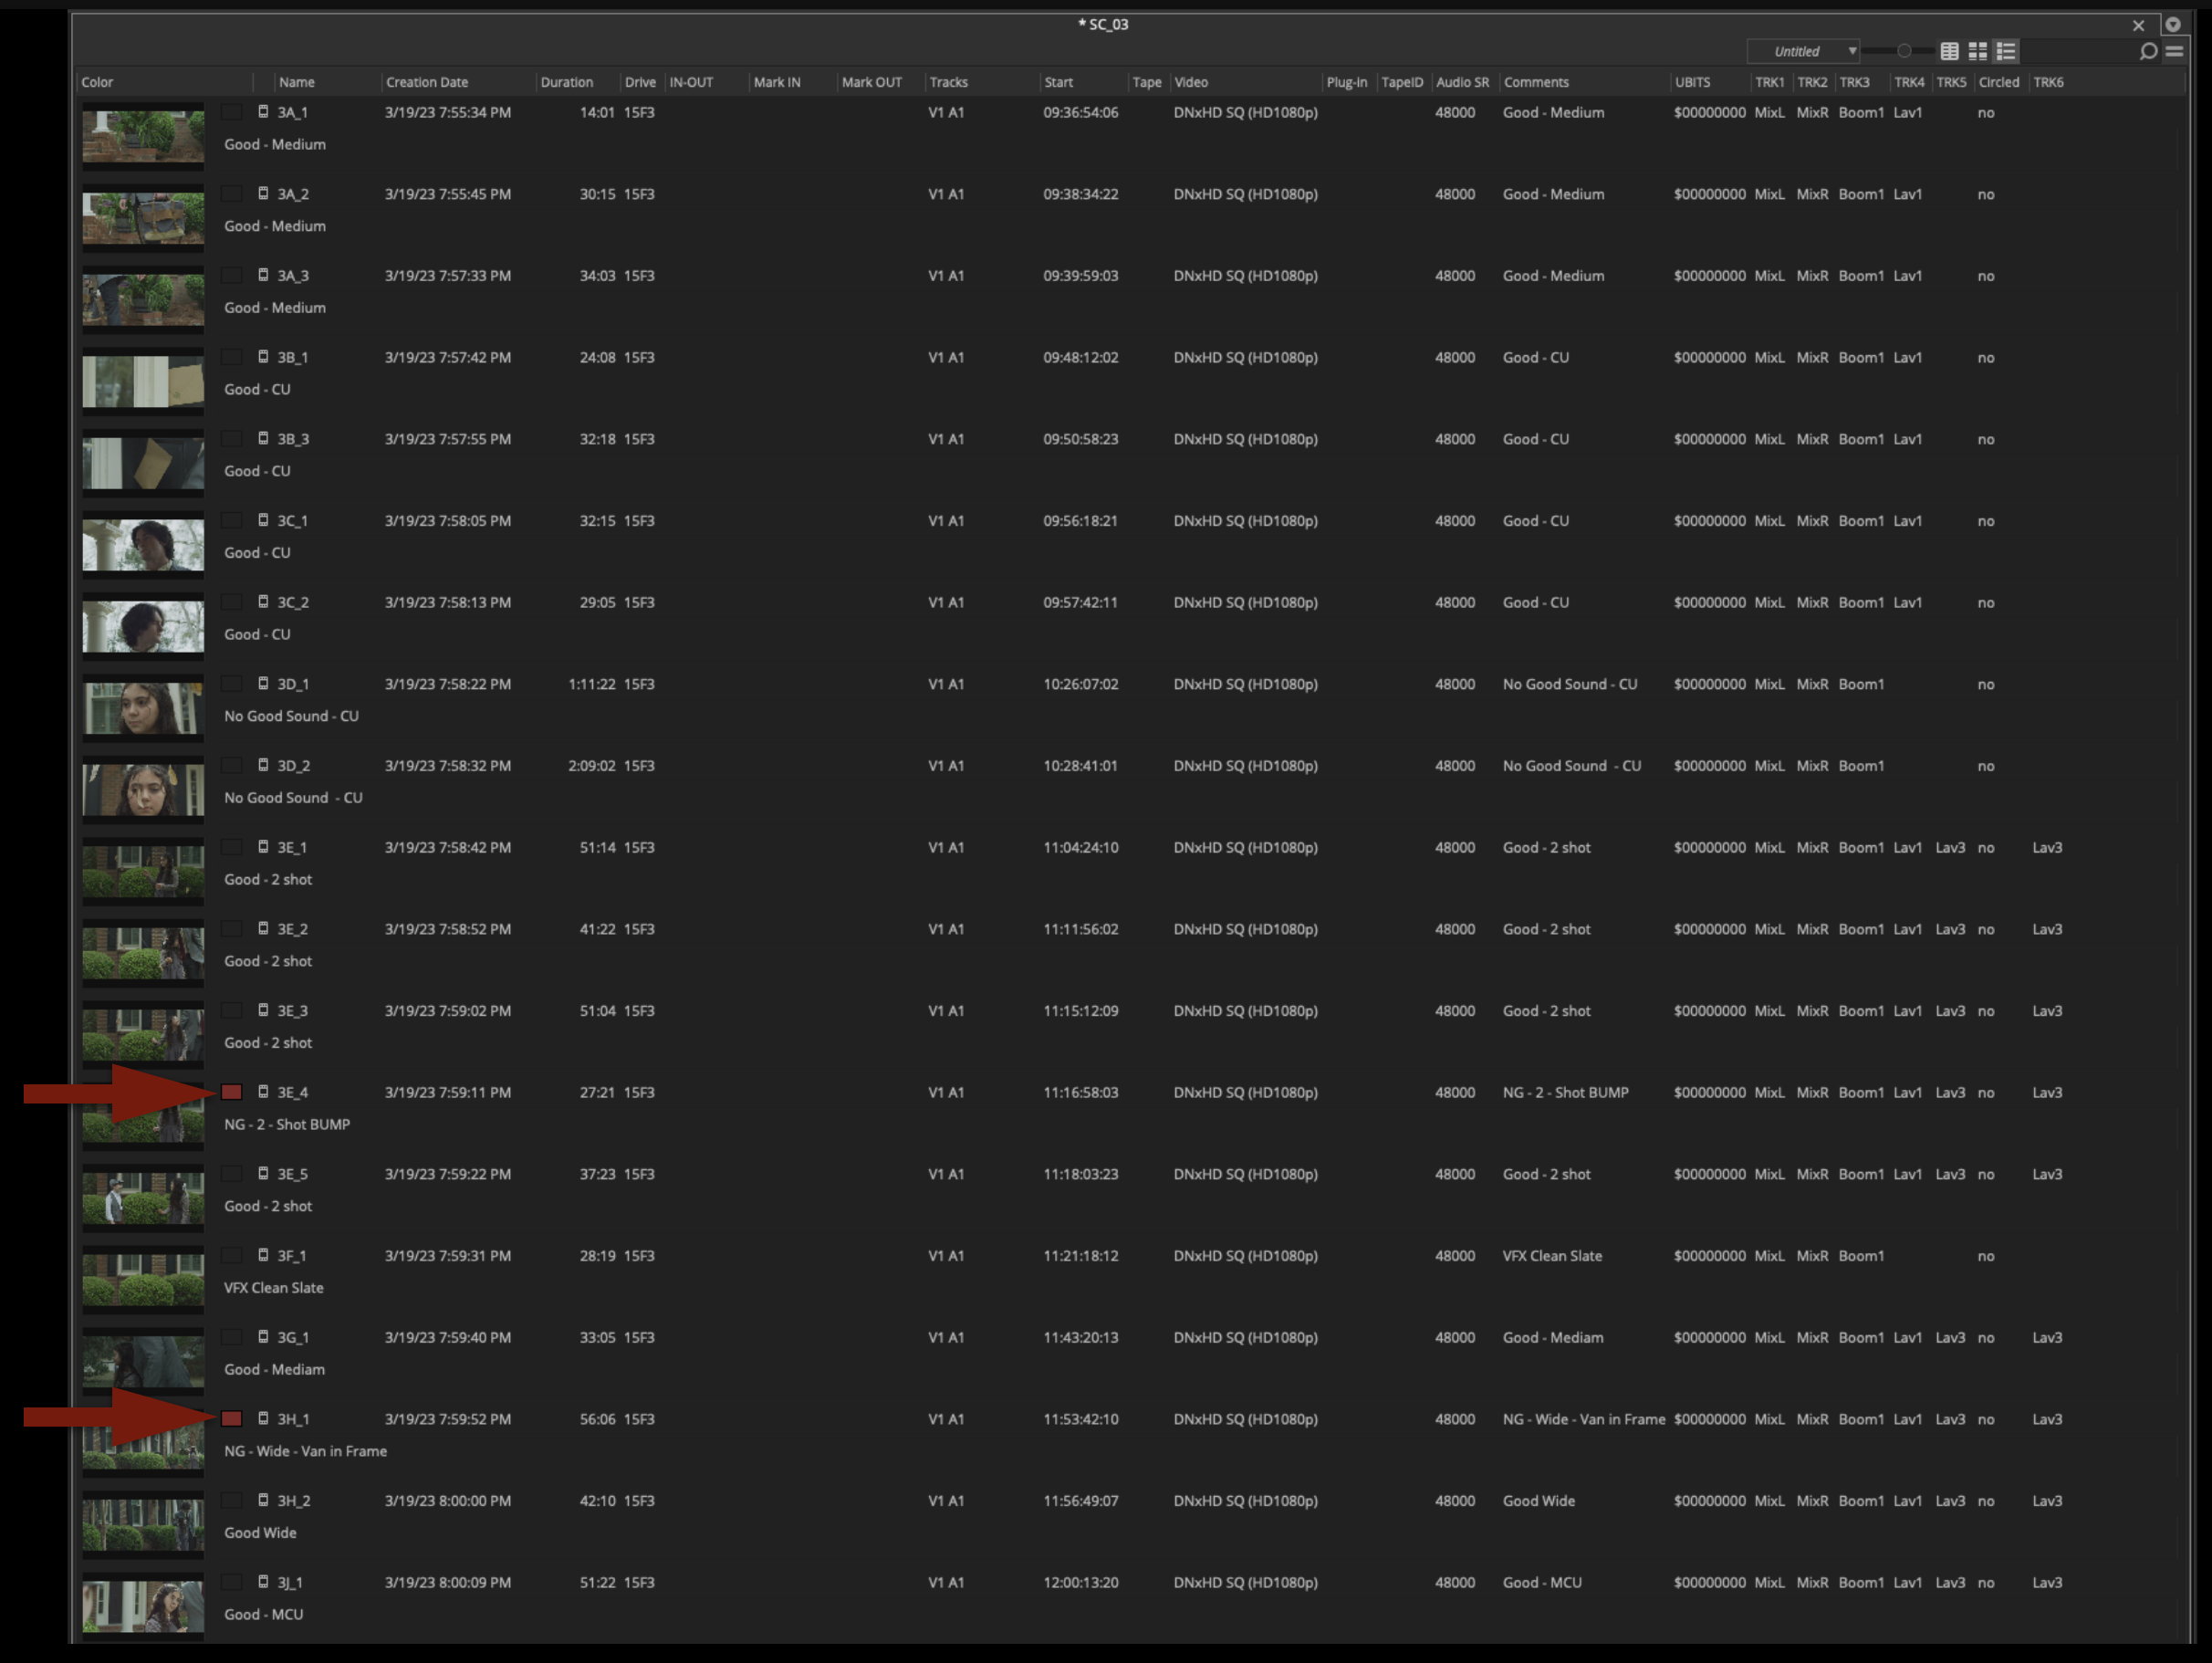
This color-coding should translate to the thumbnail view, so the Editor will easily be able to tell which takes are No Good.
Assemble Scene Stringouts
Inside every scene bin, there’s a sequence labeled as a “Scene Stringout” that’s already been made. A scene stringout is not the same thing as a dailies sequence. A dailies sequences is normally organized in shooting order by day, and exported out for the production to see the progress of the film as it is shot. Scene stringouts are organized by scene and are not exported. They are made by the Assistant Editor for the Editor to review all the options available while working on a particular scene.
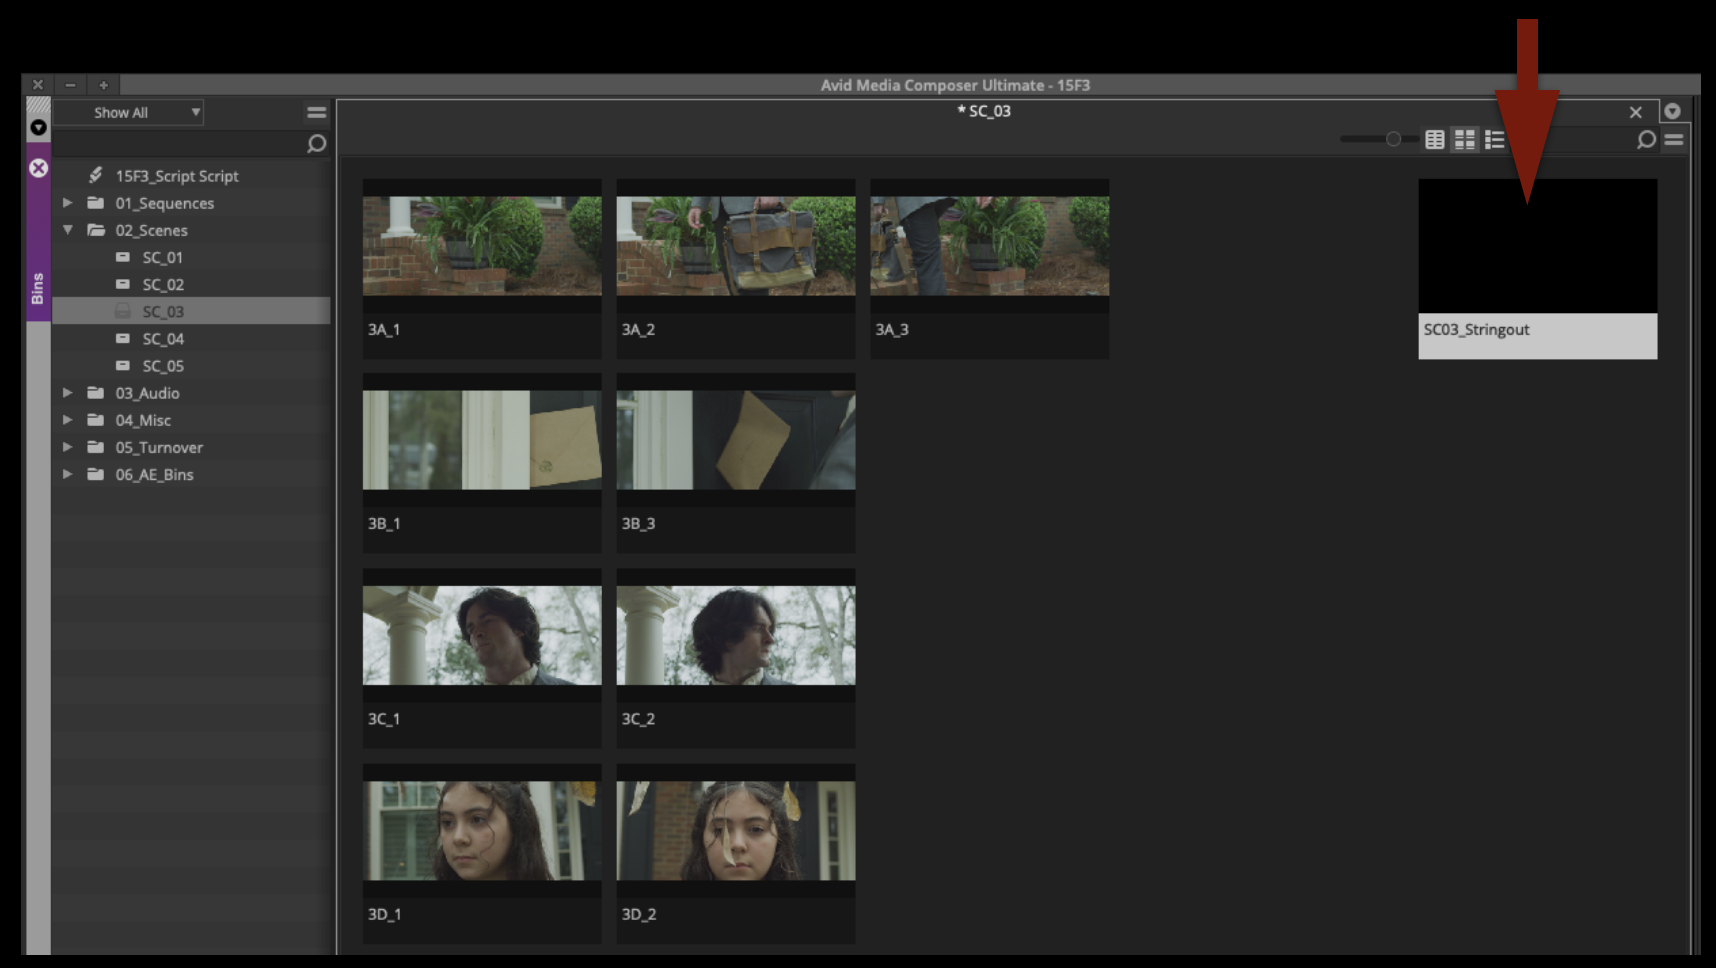
To assemble the scene stringout, open the sequence and the cut all the shots into the sequence in shot order.
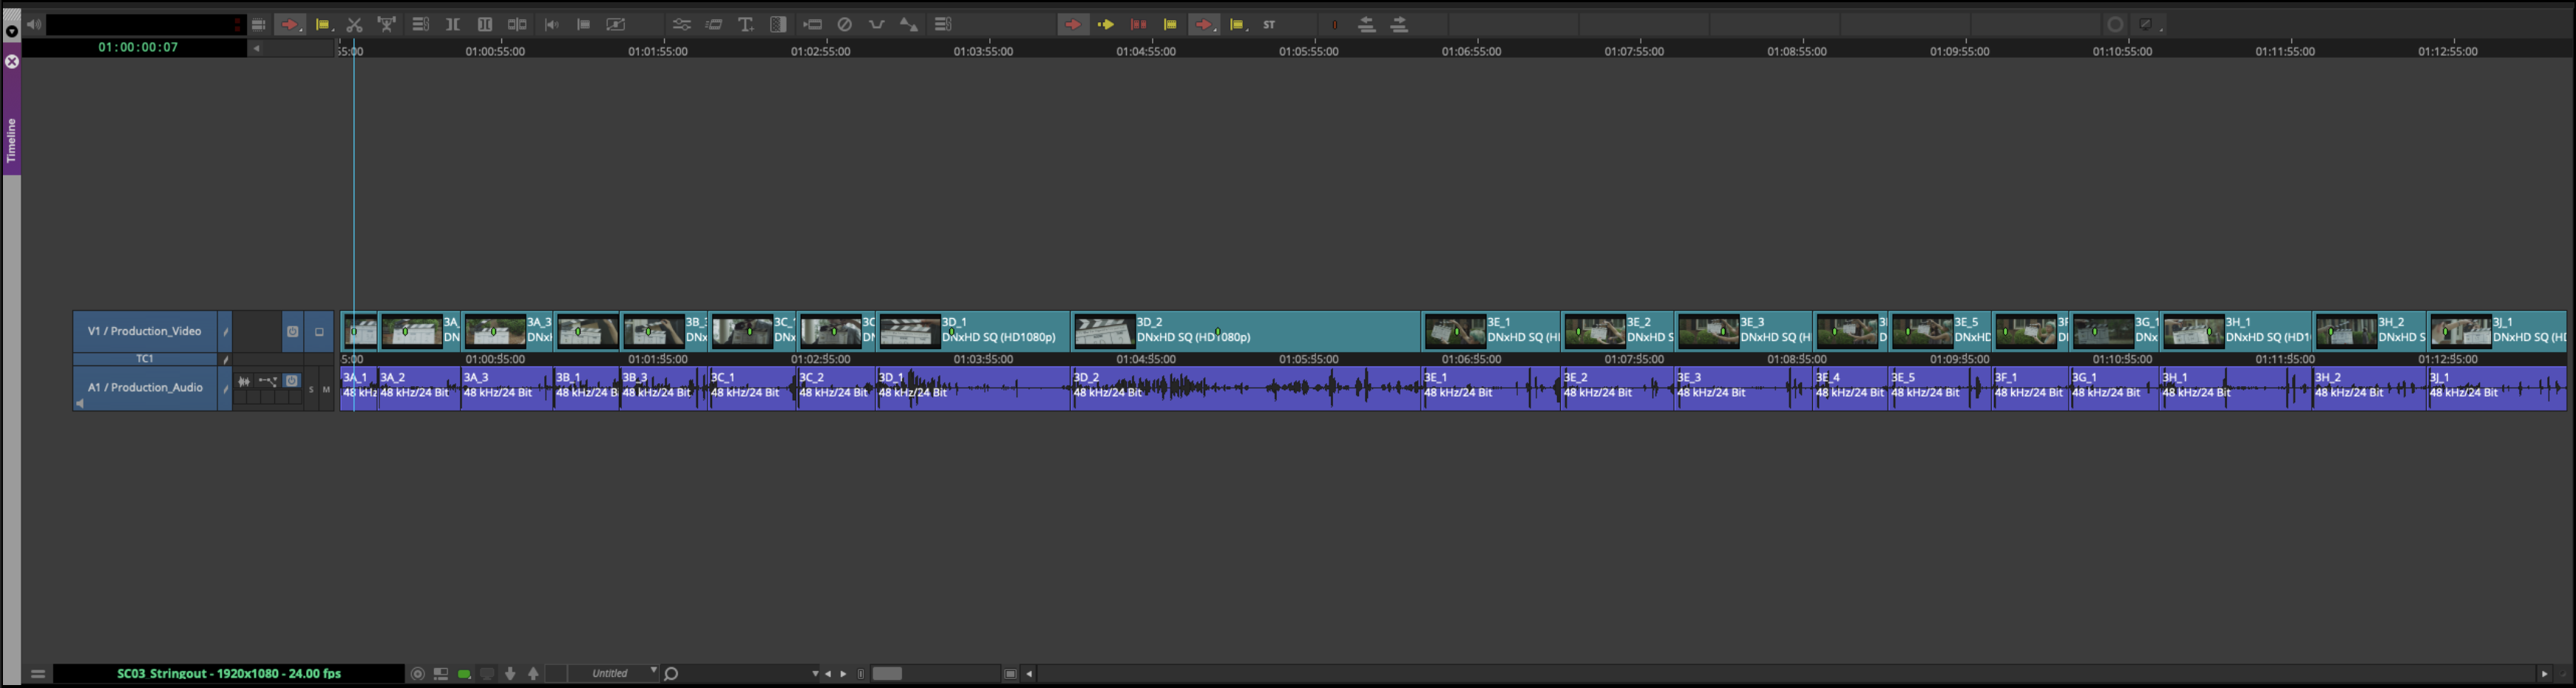
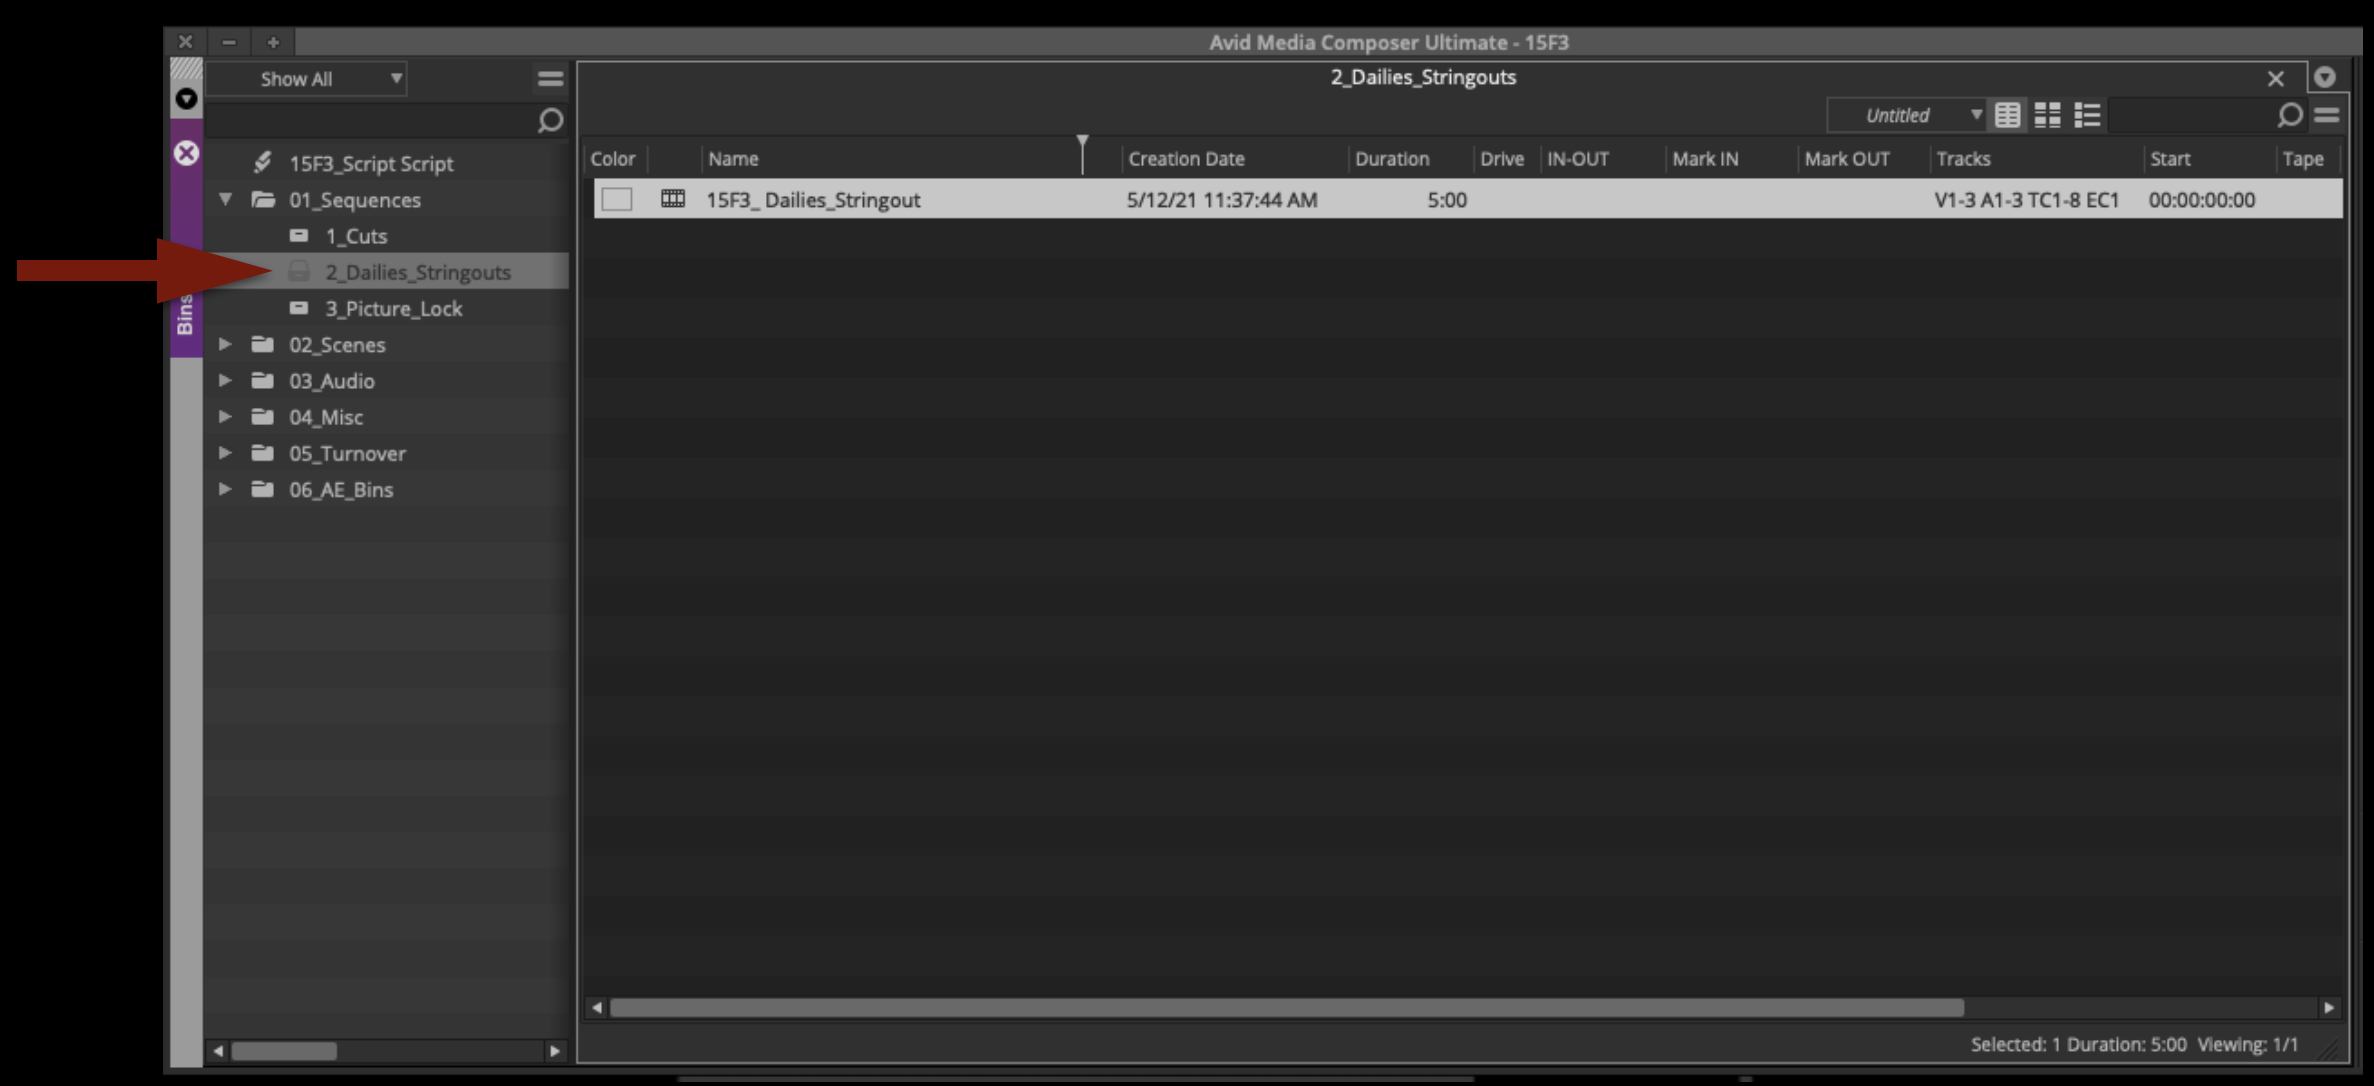
Assemble a Dailies Stringout
Open the Dailies Stringout sequence from the Dailies Stringout bin:
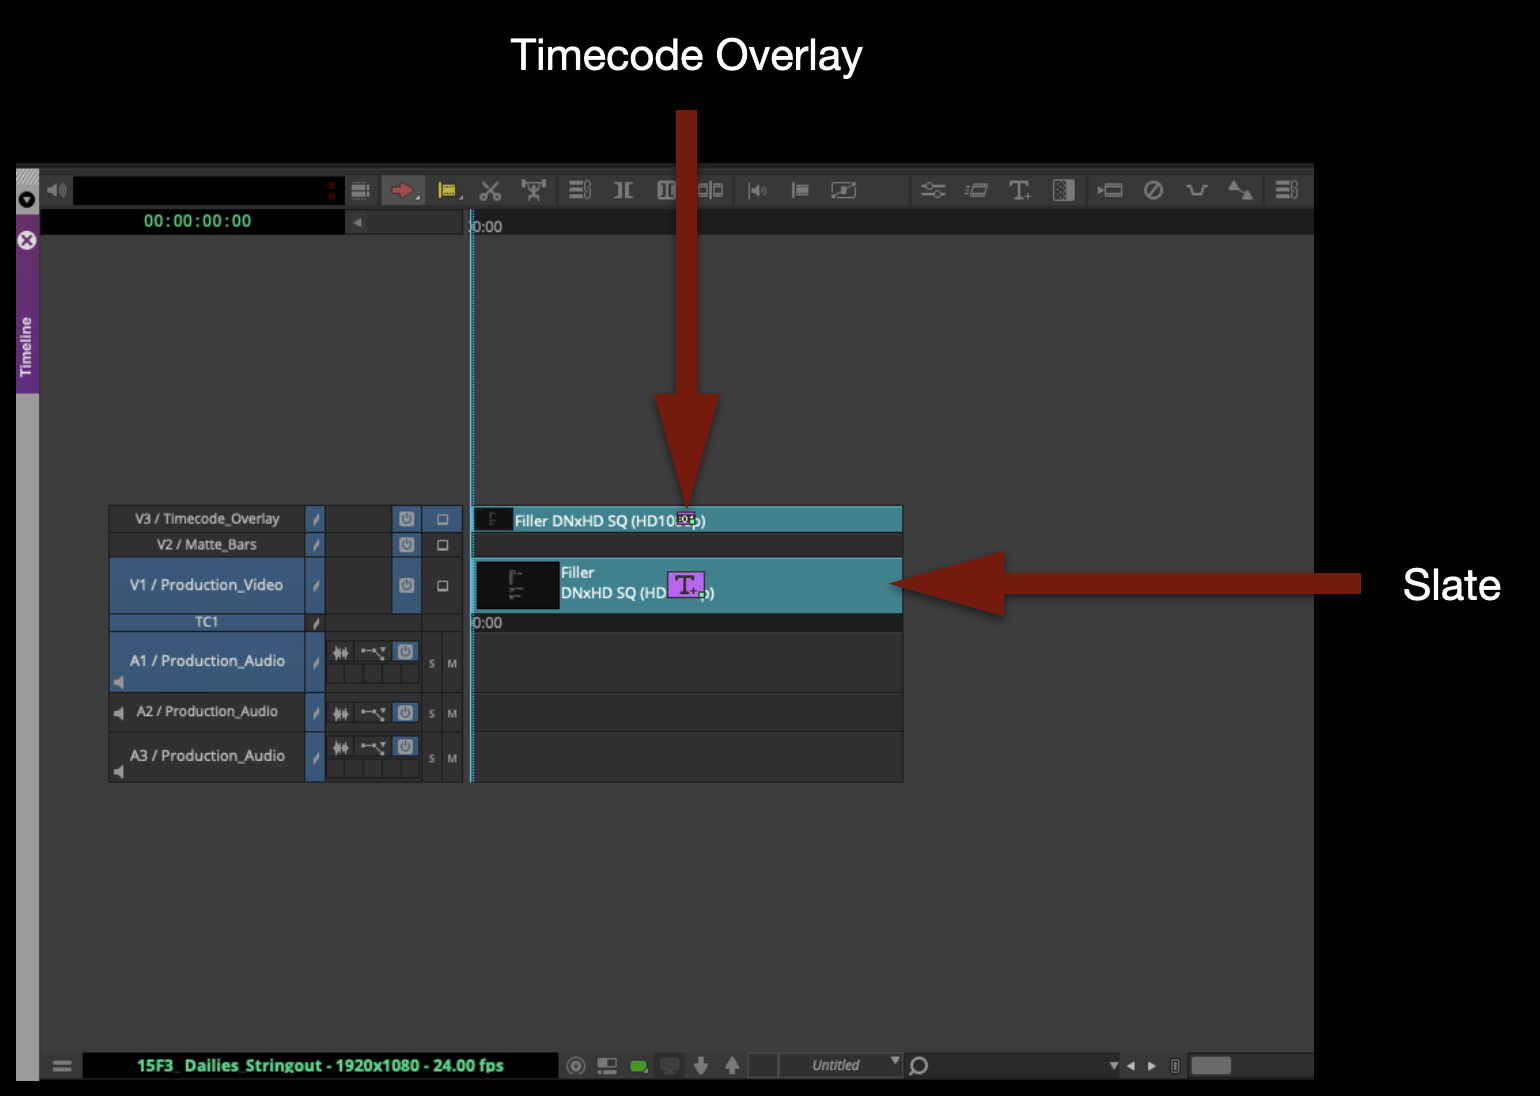
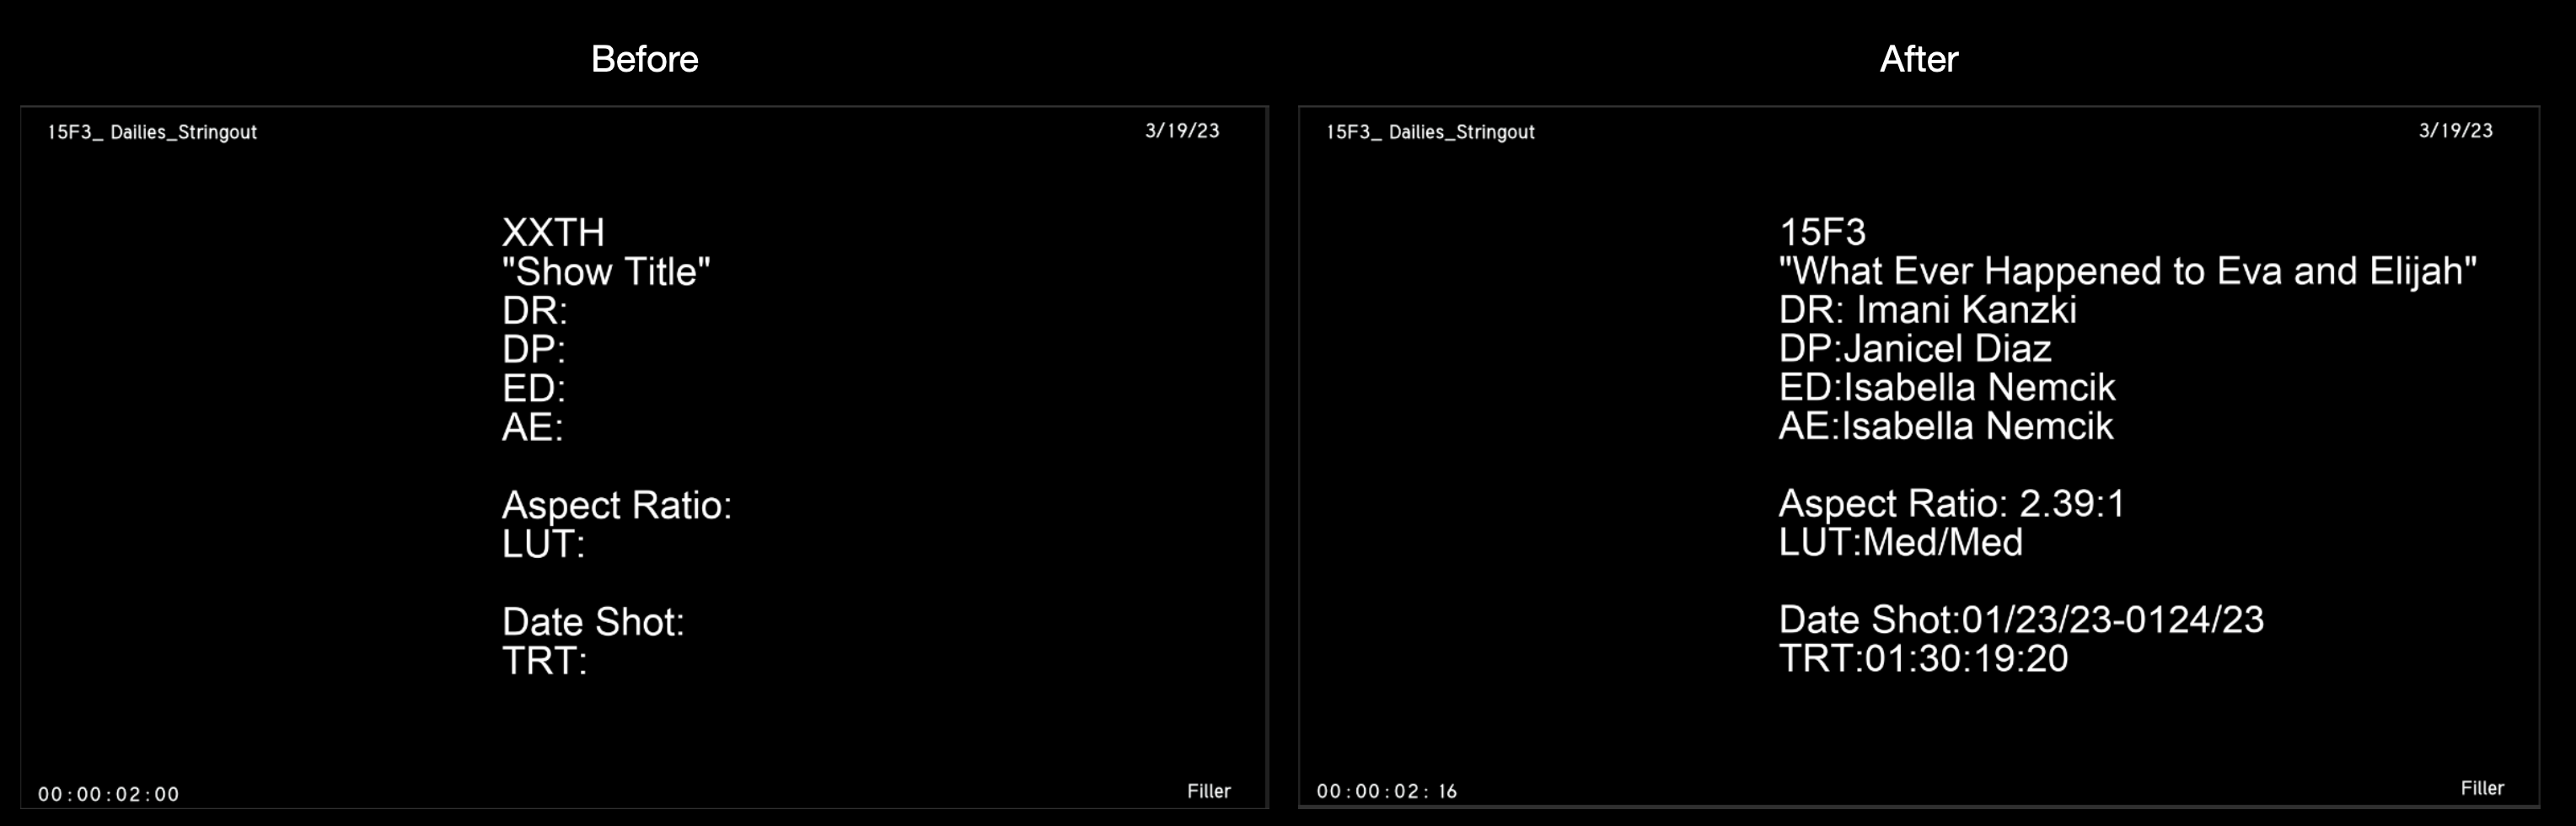
The sequence should already have a slate and Timecode Effect Burn-In:
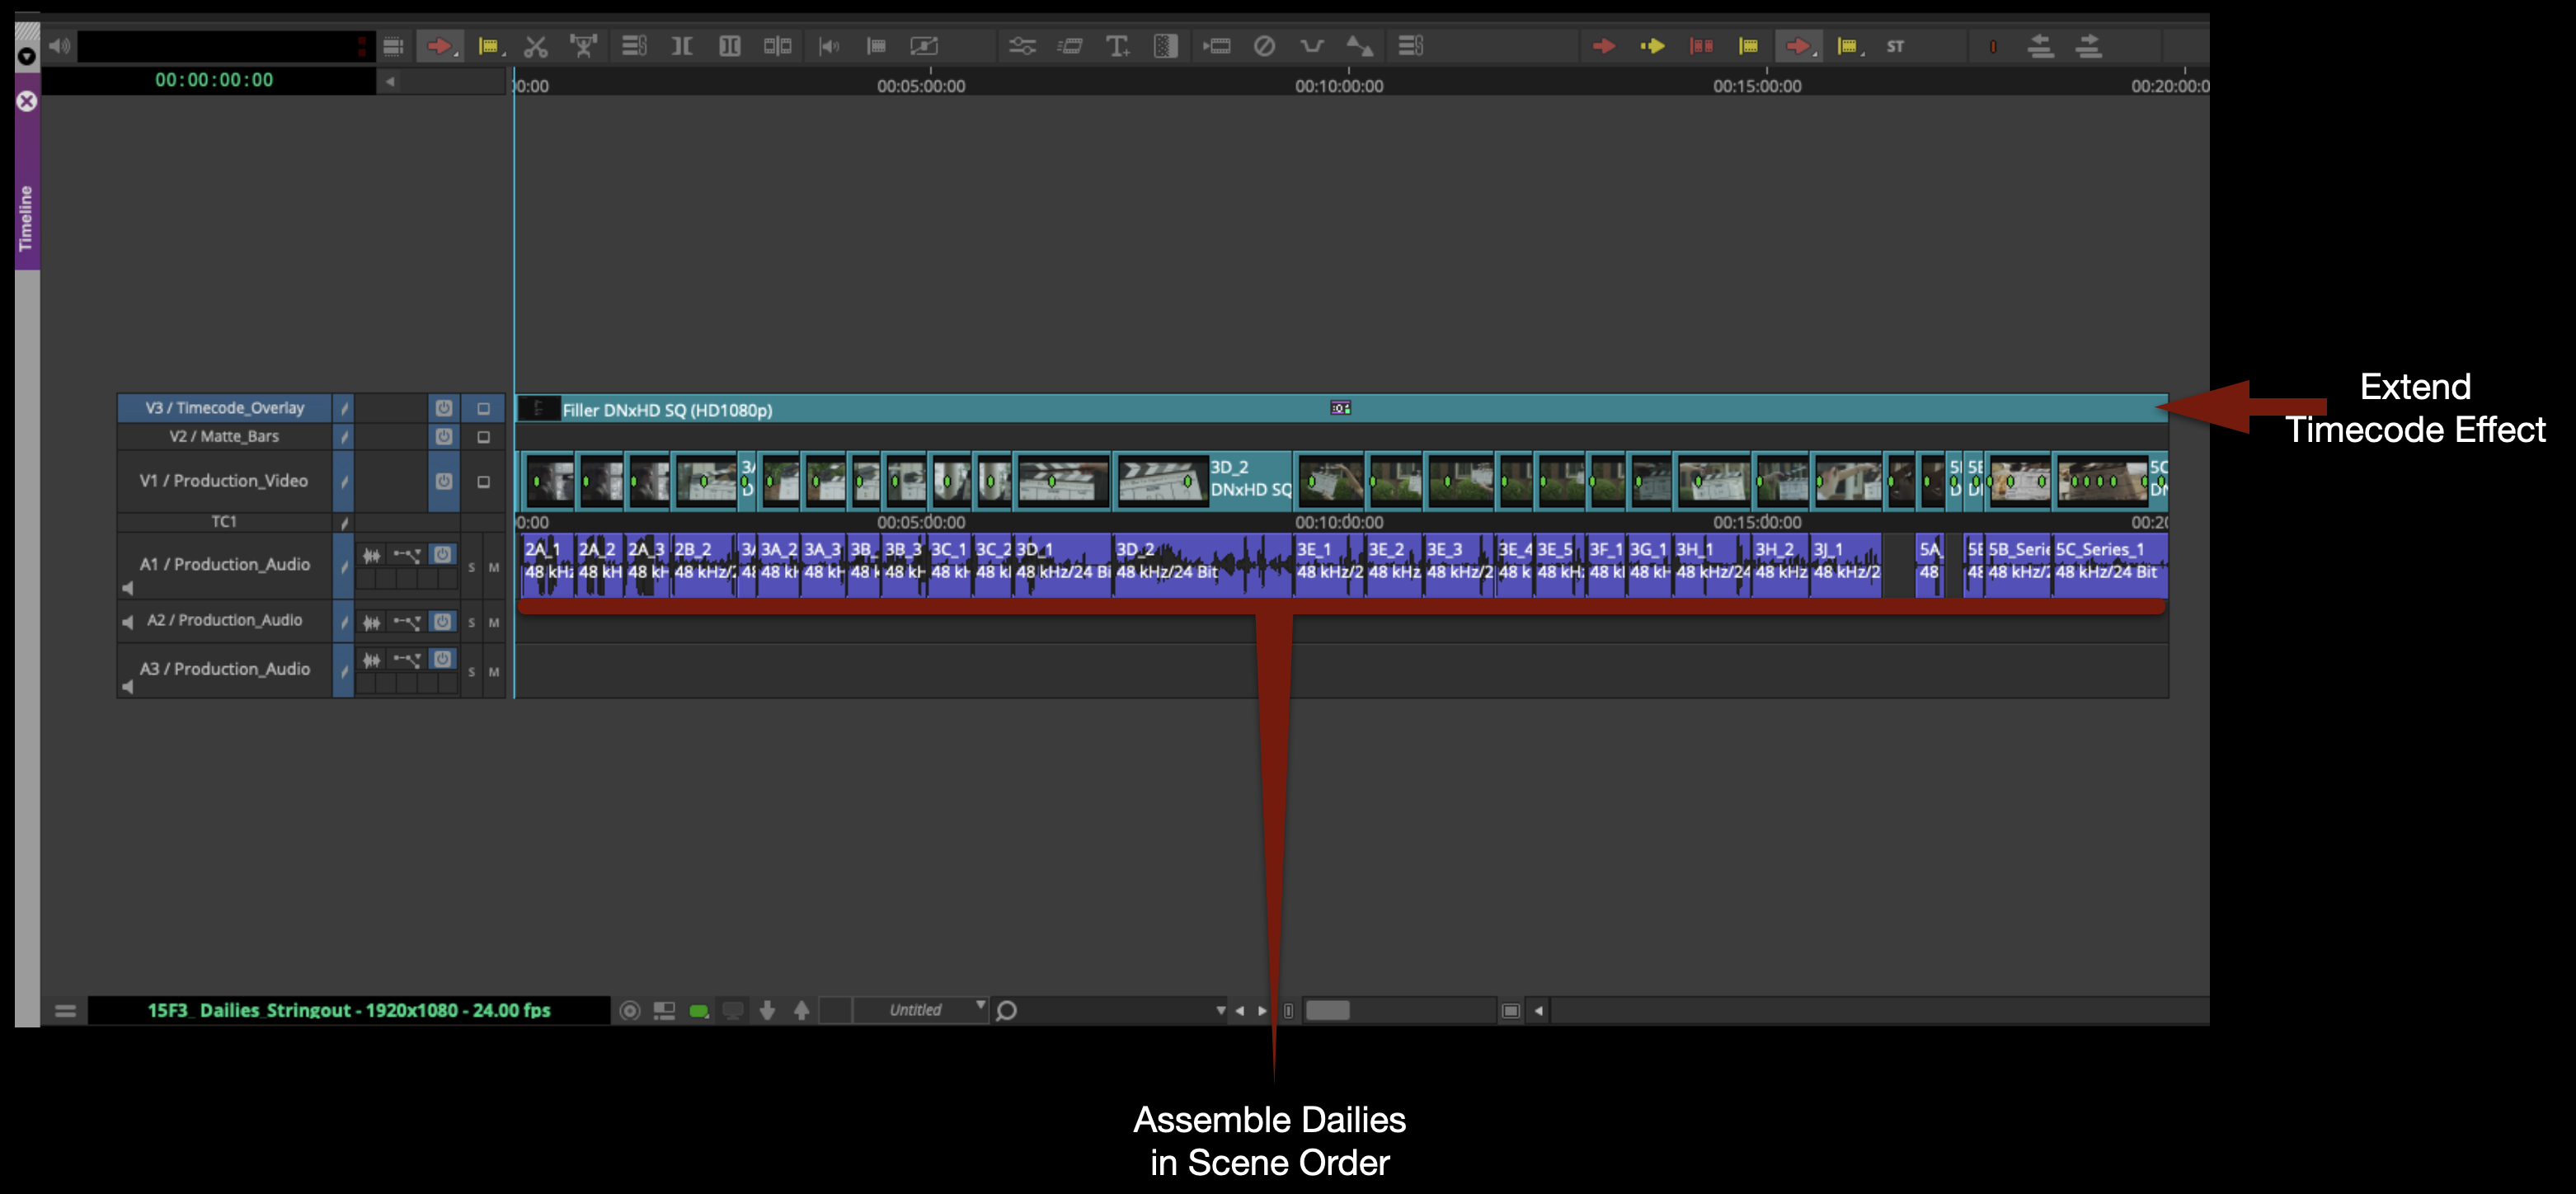
Assemble all the footage in scene order. Then, extend the Timecode Effect so that it covers everything on Video Track 1.
Most everything in the Timecode Effect should update automatically based on the metadata of the clips in the sequence and the sequence itself. But check that the date is correct in the”Text” option:
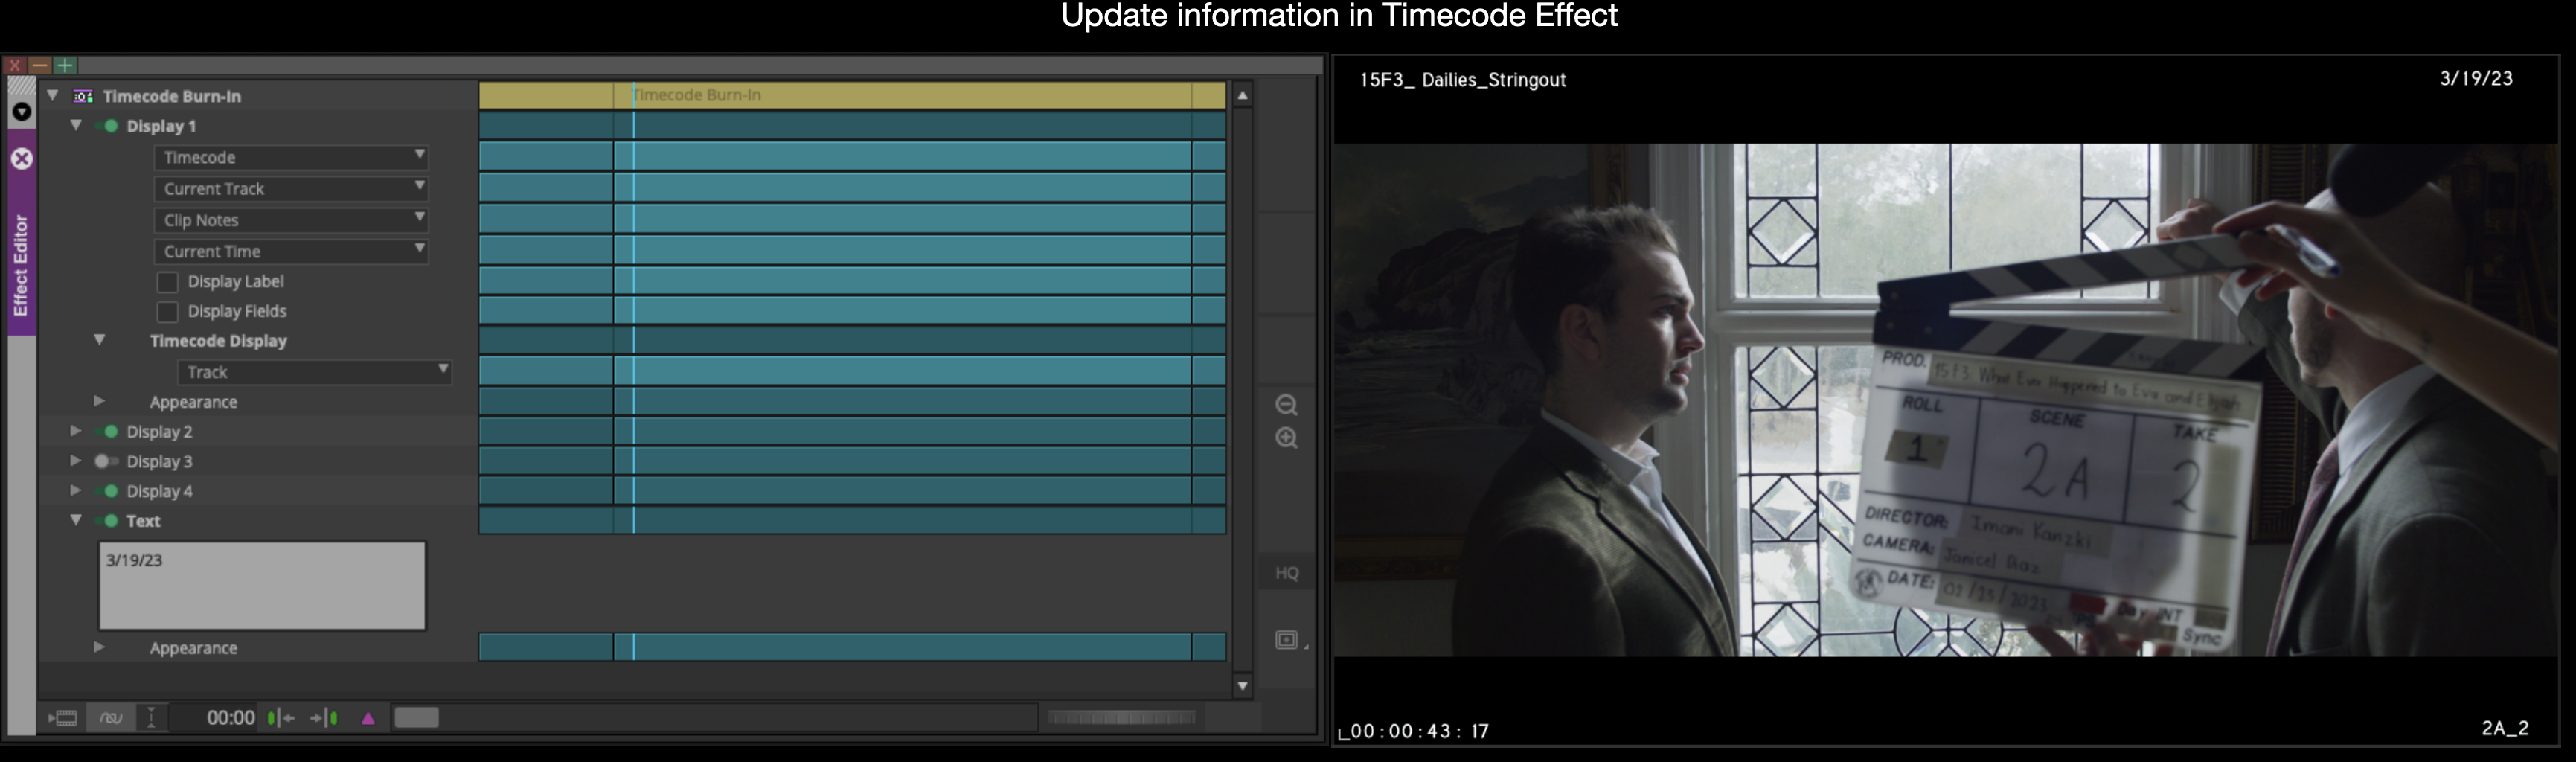
Enter the slate information:
Export and Upload Dailies to Frame.io
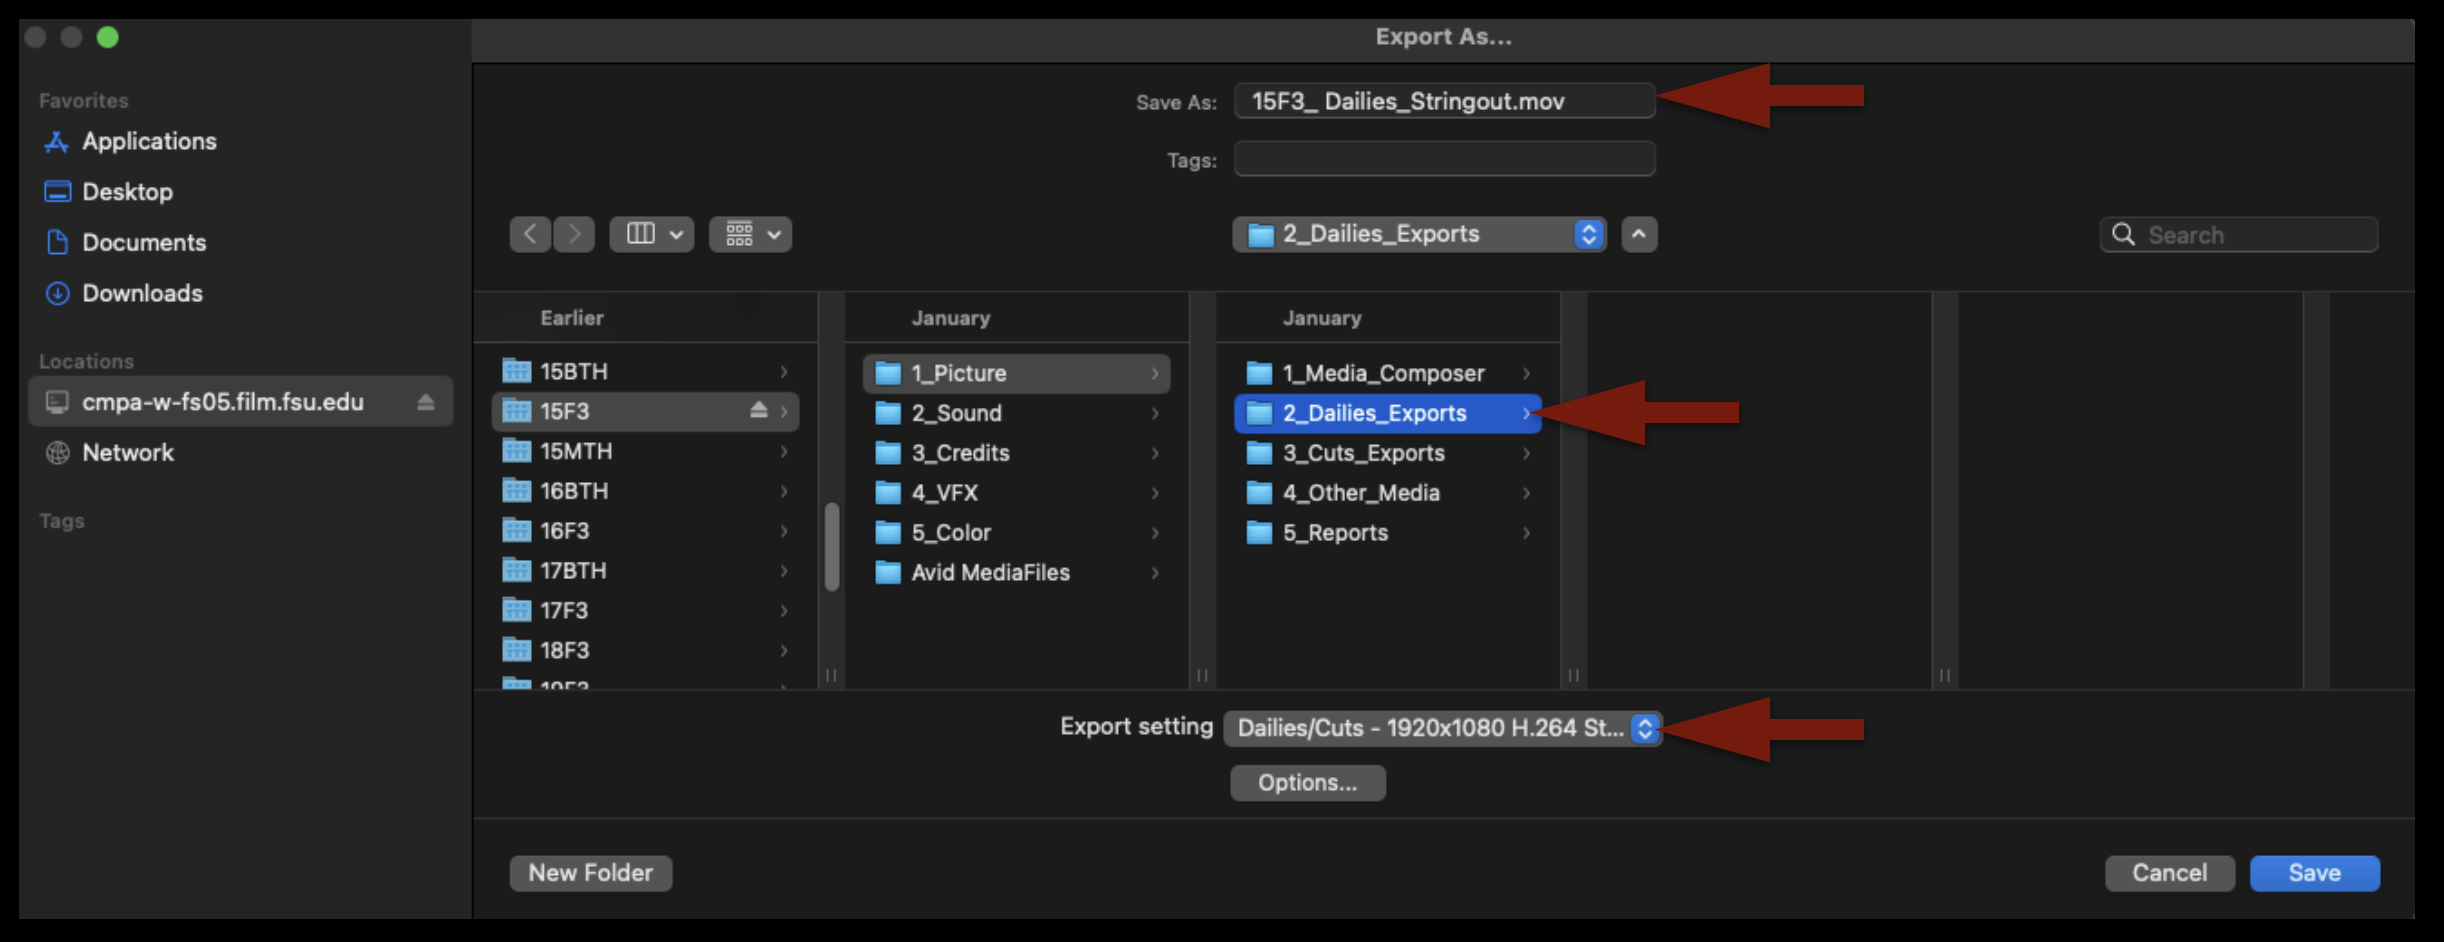
Mark In/Out for the entire timeline and select all video and audio tracks:

Right-click in the Program Monitor and select “Export”.
Check that the name of the file is correct, that it’s going the proper folder on your show volume, and that you are using the correct export setting:
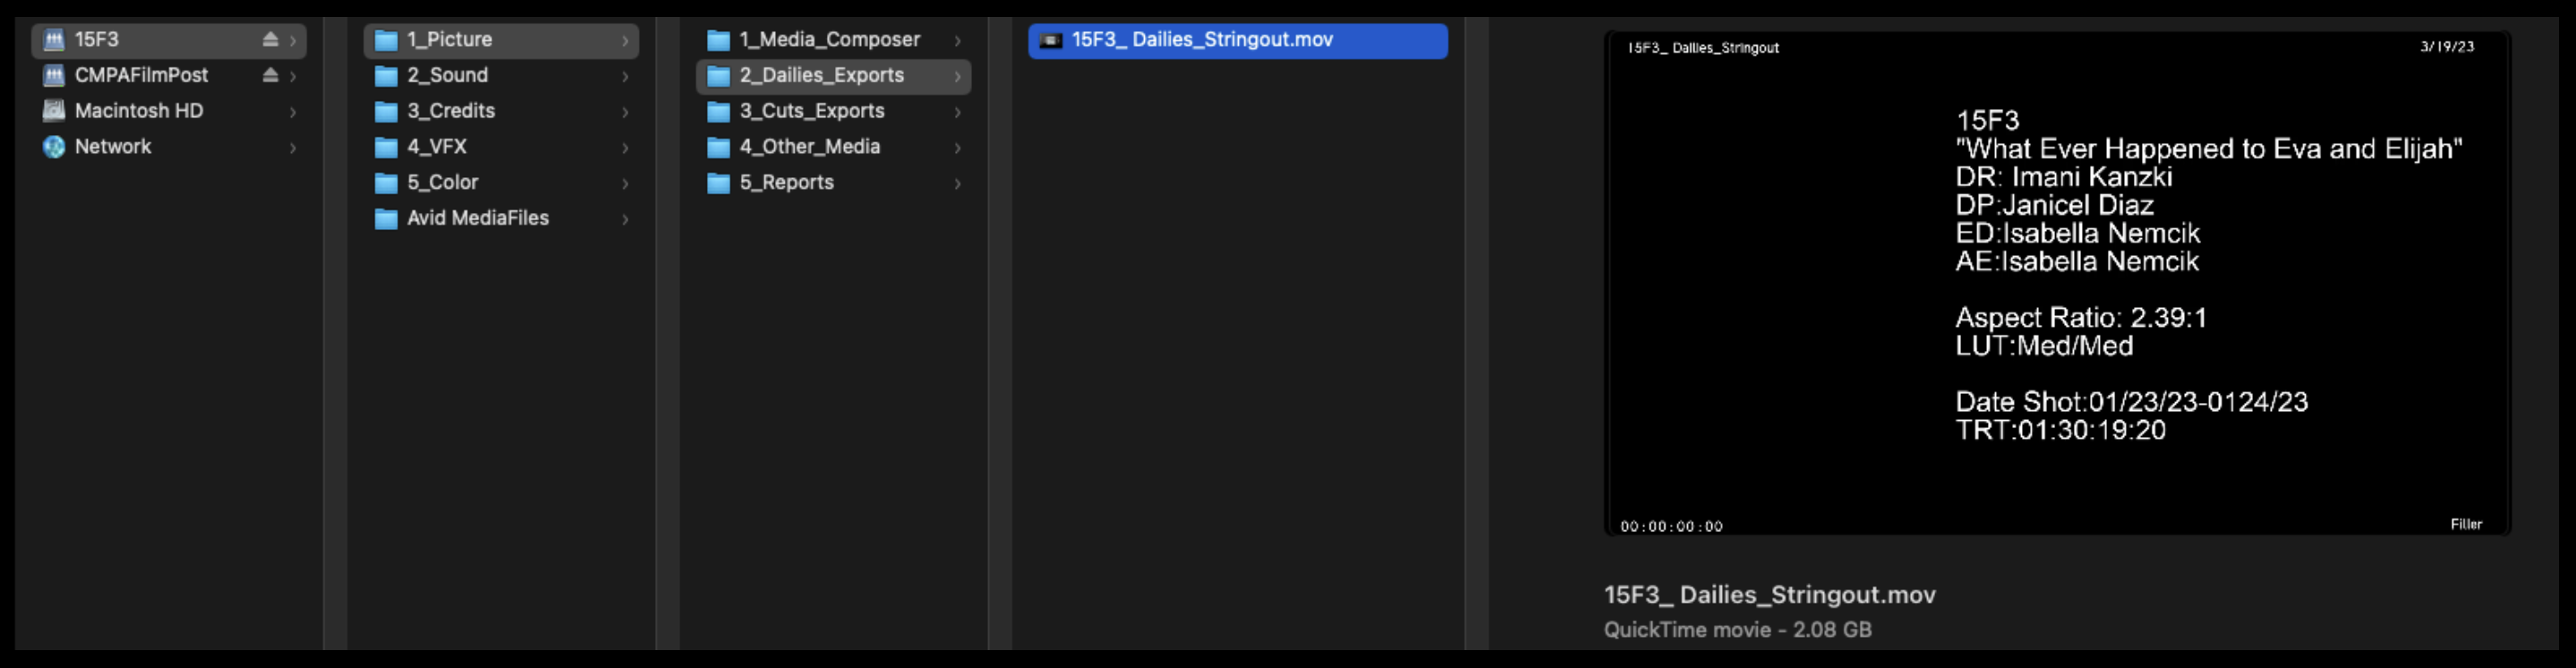
When the export is complete, open it in QuickTime Player and check that everything is correct. Then, upload to the proper folder on frame.io.
If you have need to send out a review link to the dailies stringout – e.g., so that a faculty member or another crew member can look at it — it’s simple to do. Follow the instructions here: Frame.io Review Links.
When you are finished, save your bins and close the project. Congratulations! Your work here is done!