FC

Location-based Hazards

Urban locations

Urban locations such as alleyways, beneath bridges, tunnels, abandoned structures, and storm channels may present health risks and other hazards. Potential hazards may include:

  1. BIOHAZARDS: Human or animal waste, mold, fungus, bacteria, body fluids, vermin, insects, and other potential biohazards.
  2. CHEMICAL HAZARDS: Asbestos, lead paint, solvents, insecticides, herbicides, and other potentially harmful chemicals.
  3. PHYSICAL HAZARDS: Rubbish, refuse, abandoned materials, broken glass, scrap metals, discarded needles, other waste or utility/electrical lines that can create a potential physical hazard.

The Producer should evaluate the type and scope of hazards and, if necessary, consult with appropriate professionals to create a plan to mitigate the hazards prior to the crew’s arrival at the location. This plan should be presented at the Director’s Prep.

If possible, the urban location should be locked-off and secured to maintain the cleanliness of the set. If that is not practical, Production should conduct daily cleaning activities before crew call to remove any sources of exposure or hazards that accumulated during the Production Company’s absence.

Electrical cables, props, and other equipment used at the location should be protected where practical. Cables should be supported off the ground whenever possible. Protective ground cover, such as layout board or other material, should be positioned in work areas to minimize contact with potentially affected areas. Props and equipment that come in contact with the ground should be disinfected. Washing facilities should be available for the cast and crew, who should be reminded to wash periodically and before meals. Long pants, long sleeved shirts, and hard-soled shoes are recommended to minimize contact. Proper personal protective equipment should be provided and used.

Rural locations

Rural locations such as fields, wooded areas, swamplands, rivers, and farms may present health risks and other hazards. Potential hazards may include:

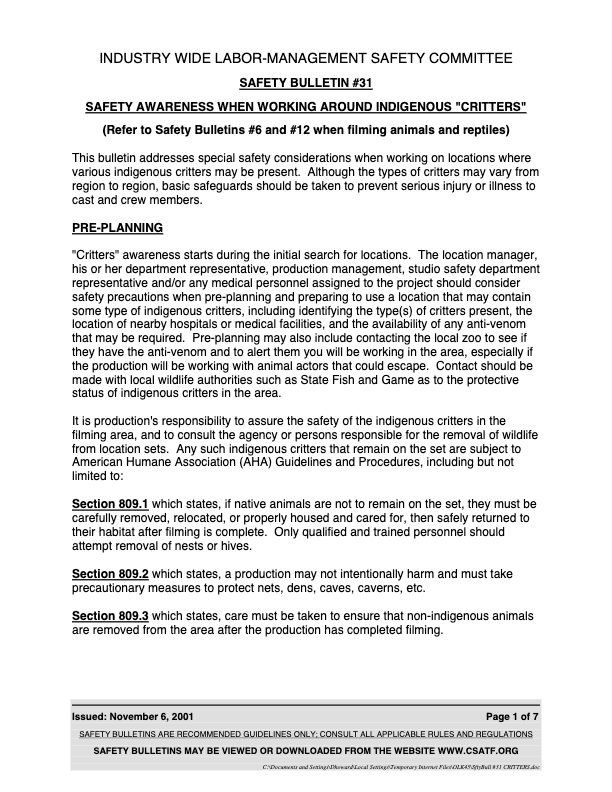
  1. CRITTERS: Ants, ticks, insects, spiders, snakes, alligators, marine animals, vermin, bears, bobcats, and other potentially dangerous wildlife.
  2. BIOHAZARDS: Human or animal waste, mold, fungus, bacteria, body fluids, and other potential biohazards.
  3. PHYSICAL HAZARDS: Poisonous plants, refuse, abandoned materials, water, sharp objects, and other potential physical hazards.

Consider safety precautions when pre-planning and preparing to use a rural location that may contain indigenous critters or environmental hazards. This should include: identifying the type(s) of critters or hazards present; the location of nearby hospitals or medical facilities; and the availability of any anti-venom that may be required. Identify the areas that may contain the plants and use the proper safeguards to avoid them. Pre-planning may also include contacting the local zoo to see if they have the anti-venom and to alert them you will be working in the area, especially if the production will be working with animal actors that could escape.

It is production’s responsibility to assure the safety of the indigenous critters in the filming area, and to consult the agency or persons responsible for the removal of wildlife from location sets. Any such indigenous critters that remain on the set are subject to American Humane Association Guidelines and Procedures.

Wear long pants with the pant legs tucked into socks or boots. A good boot above the ankle will provide better protection. It is also advisable to wear a long-sleeved shirt, dress in layers and wear light colors. (Generally, critters are dark in color; they are spotted easily against a light background.) Avoid heavy perfumes or after-shaves as they attract some pests. Apply repellents according to label instructions on the product. Applying repellents to clothing appears to be most effective.

Wear practical change clothes and shoes before leaving the location. Work clothes should be placed in a bag and taken home for laundering.

Wash often. Wash hands before eating, smoking or applying cosmetics.

In the case of bites or stings, serious allergic reactions are possible. If you have any known allergies, notify the set medic and/or safety representative prior to or when you first arrive at the location. If you are bitten or stung by an indigenous critter, immediately contact the set medic. If the encounter with the indigenous critter involves a life threatening situation, call 911.

Weather Conditions

These guidelines identify safety considerations that should be addressed when working outdoors in areas where there is a potential for inclement or severe weather conditions. Topics covered are:

Pre-Planning

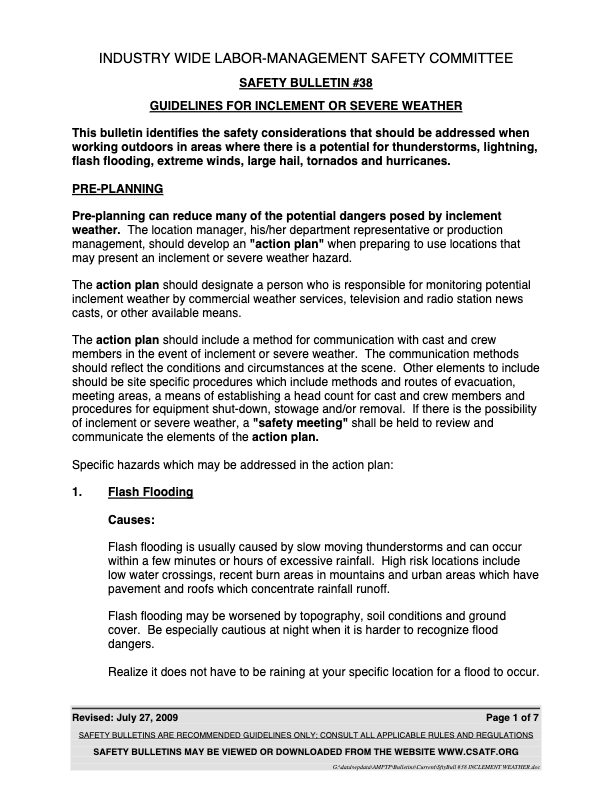
Pre-planning can reduce many of the potential dangers posed by inclement weather. The location manager, their department representative or production management, should develop an Action Plan when preparing to use locations that may present an inclement or severe weather hazard.

The Action Plan should designate a person who is responsible for monitoring potential inclement weather by commercial weather services, apps, television and radio station news casts, or other available means.

The Action Plan should include a method for communication with cast and crew members in the event of inclement or severe weather. The communication methods should reflect the conditions and circumstances at the scene. Other elements to include should be site specific procedures which include methods and routes of evacuation, meeting areas, a means of establishing a head count for cast and crew members and procedures for equipment shut-down, stowage and/or removal. If there is the possibility of inclement or severe weather, a safety meeting shall be held to review and communicate the elements of the Action Plan.

Lightning

Lightning results from the buildup and discharge of electrical energy in clouds. Lightning may strike several miles from an associated thunderstorm and may strike when no clouds or rain are present.

Potential Hazards

  • Electrocution
  • Burns
  • Falling debris
  • Concussion
  • Fire

Possible Actions

  • Activate the action plan
  • When working in lightning prone areas, the use of a lightning detector/meter is highly recommended. If a meter is not available, it is possible to estimate the distance of lightning by the thunder. When lightning is seen, count the seconds until thunder is heard and then divide the seconds counted by five to obtain the approximate distance in miles.
  • 30-30 rule: The first 30 means if you count to 30 seconds or less (from lightning to thunder), the lightning is within 6 miles of your location and you are in potential danger and should seek shelter. The second 30 means you should wait 30 minutes from the last flash or thunder to establish an “all clear.”
  • Seek shelter in a sturdy building, a hardtop automobile or truck with the windows rolled up. If such cover is not available seek shelter in wooded areas with thick small trees. Avoid isolated trees.
  • Avoid high ground and keep clear of tall objects, towers, aerial lifts, camera booms, scaffolding, fences or other metal equipment.
  • Avoid contact with any body of water.
  • Avoid using a telephone or cellular phone.
  • Where appropriate, shut down generators in accordance with the established action plan.
  • Avoid using other electrical equipment or appliances.
  • When instructed, move to the pre-determined evacuation area.
  • Do not attempt to return to the area until an “all clear” signal has been given by a regulatory authority and/or production management or 30 minutes after the last thunder sound is heard.

Hurricanes

A slow developing tropical weather phenomenon that forms over water. Its greatest impacts are felt near or on shorelines of land. You will not be surprised by a hurricane, as they are usually tracked by a weather service for many days. They are also known as cyclones or typhoons.

Potential Hazards

  • Severe winds and rainfall, which may cause extreme flooding
  • Storm surges
  • High waves possibility of persons being swept off their feet
  • Drowning
  • Localized tornados
  • Extreme damage to structures, roads, utilities, vehicles and boats
  • Severe injury due to flying debris

Possible Actions

  • In most cases, you will have several days warning to activate your action plan
  • Do not stay by shoreline
  • Pack and secure all equipment and remove to a safe area
  • Lower all aerial lifts, camera booms and other equipment. Remove to a safe area as time permits
  • If ordered to evacuate, leave area early — do not hesitate
  • Do not attempt to return to the area until an “all clear” signal has been given by a regulatory authority or production management

Additional Notes

  • OSHA mandates that aerial lifts and other like equipment are not to be operated when winds exceed 25 mph.
  • Be aware that many of the same precautions (e.g., eye protection and securing equipment), can also apply to man-made wind effects such as rotor wash from airplanes or helicopters and large ritter fans.

Tornados

A tornado is a violent windstorm characterized by twisting, funnel-shaped wind. Tornados tend to occur in the afternoon and evening hours.

Potential Hazards

  • Tornados are unpredictable and may form without warning
  • Winds can exceed 200 to 300 mph
  • Tornados may appear nearly transparent until dust and debris are picked up or a cloud forms within the funnel
  • Severe damage can occur to structures
  • The precise location of a touch down point cannot be determined

Possible Actions

  • If a watch or warning has been issued, the action plan should be activated
  • The crew should be regularly updated regarding any changes to potential weather conditions
  • All cast and crew members must follow all instructions given
  • No employees should be working on elevated equipment. This includes aerial lifts, scaffolds, camera booms, and other high areas
  • Evacuate the area immediately if instructed by a regulatory authority or production management
  • Only secure equipment if there is time and it can be done safely
  • Do not attempt to return to the area until an all clear signal has been given by a regulatory authority or production management

Flash Flooding

Flash flooding is usually caused by slow moving thunderstorms and can occur within a few minutes or hours of excessive rainfall. High-risk locations include low water crossings, recent burn areas in mountains and urban areas which have pavement and roofs which concentrate rainfall runoff. Flash flooding may be worsened by topography, soil conditions and ground cover. Be especially cautious at night when it is harder to recognize flood dangers. Realize it does not have to be raining at your specific location for a flood to occur.

Potential Hazards

  • Crew and equipment could become trapped or stranded as escape routes may be damaged and/or blocked.
  • Equipment and personnel could be swept away or covered by water, mud or debris.
  • Drowning
  • Electrocution
  • Mud slides

Possible Actions

  • Activate the action plan.
  • Secure equipment and all electrical power.
  • Remove all cast and crew from elevated equipment, scaffolds, booms and sets.
  • Stay clear of potential slide areas next to hillsides or on edges of cliff areas.
  • Follow directions for evacuation procedures as outlined in the action plan.
  • Gather at pre-determined evacuation point and ensure everyone is accounted for.
  • If you come upon a flowing stream where water is above ankles, STOP! Turn around and go another way.
  • Do not drive through moving water or a flooded roadway.
  • Do not attempt to return to the area until an “all clear” signal has been given by a regulatory authority or production management.

High Winds

High winds can be associated with extreme weather phenomenon including thunderstorms, tornados, hurricanes, and high and low pressure systems. During the summer months in the Western States, thunderstorms often produce little rain but very strong wind gusts (some up to 100 mph) and dust storms.

Potential Hazards

  • Flying debris
  • Dust
  • Possibility of persons being swept off their feet
  • Equipment can be blown over and carried for a distance
  • Set destruction
  • Eye injuries

Possible Actions

  • Activate the action plan
  • Remove all cast and crew from elevated areas, sets, scaffolding and other high objects
  • Lower all aerial, lighting, diffusion, camera boom equipment and tents
  • Tie down and secure all loose equipment
  • When instructed, seek refuge from the winds at your pre-determined safe area
  • Be aware and protect your eyes from potential injury
  • Do not attempt to return to the area until an “all clear” signal has been given by a regulatory authority or production management

Large Hail

Hail is usually associated with thunderstorms and is caused by freezing rain that can become very large.

Potential Hazards

  • May cause injuries to crew and damage to equipment

Possible Actions

  • If a watch or warning has been issued, the action plan should be activated and the crew should follow all instructions
  • Secure and protect all equipment
  • Get down from elevated areas, aerial lifts, booms, scaffold and other high areas
  • When instructed, seek shelter at your pre-determined safe area
  • Do not attempt to return to the area until an “all clear” signal has been given by a regulatory authority or production management

Severe Snow

A storm accompanied by strong winds creating blizzard conditions with blinding wind-driven snow, severe drifting, and dangerous wind chill.

Potential Hazards

  • Blinding conditions
  • Creation of snow drifts
  • Dangerous wind chill factor
  • Avalanche danger, being caught and/or buried
    • Usually triggered by victim or members of victims party
    • Generally occur with clear skies, little or no snow fall and light or calm winds
    • The weak layer often consists of surface hoar, facets or depth hoar
    • On 30-40 degree slopes, often at a convex part of the slope

Possible Actions

  • If a watch or warning has been issued, the action plan should be activated and the crew should follow all instructions
  • Secure and protect all equipment
  • Get down from elevated areas, aerial lifts, booms, scaffold and other high areas
  • Stay clear from potential avalanche areas
  • When instructed, seek shelter at your pre-determined safe area
  • Do not attempt to return to the area until an “all clear” signal has been given by a regulatory authority or production management

Extreme Hot Temperatures

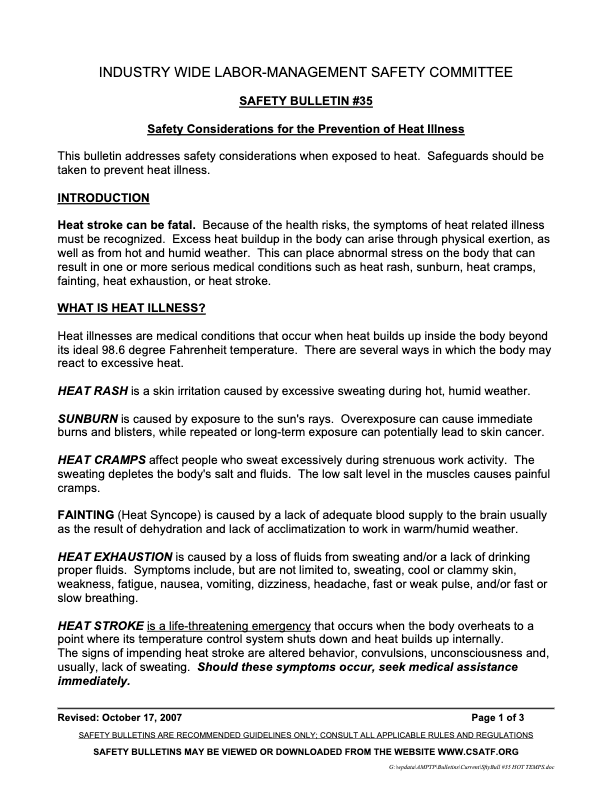
Heat illnesses are medical conditions that occur when heat builds up inside the body beyond its ideal 98.6 degree Fahrenheit temperature. There are several ways in which the body may react to excessive heat.

  • HEAT RASH is a skin irritation caused by excessive sweating during hot, humid weather.
  • SUNBURN is caused by exposure to the sun’s rays. Overexposure can cause immediate burns and blisters, while repeated or long-term exposure can potentially lead to skin cancer.
  • HEAT CRAMPS affect people who sweat excessively during strenuous work activity. The sweating depletes the body’s salt and fluids. The low salt level in the muscles causes painful cramps.
  • FAINTING (Heat Syncope) is caused by a lack of adequate blood supply to the brain usually as the result of dehydration and lack of acclimatization to work in warm/humid weather.
  • HEAT EXHAUSTION is caused by a loss of fluids from sweating and/or a lack of drinking proper fluids. Symptoms include, but are not limited to, sweating, cool or clammy skin, weakness, fatigue, nausea, vomiting, dizziness, headache, fast or weak pulse, and/or fast or slow breathing.
  • HEAT STROKE is a life-threatening emergency that occurs when the body overheats to a point where its temperature control system shuts down and heat builds up internally.

The signs of impending heat stroke are altered behavior, convulsions, unconsciousness and, usually, lack of sweating. Should these symptoms occur, seek medical assistance immediately.

Heat illness is preventable. Know your limits and take time to adjust to the heat. Above all, DRINK PLENTY OF WATER and immediately report any signs of heat illness in yourself or others.

Symptoms of Heat Illness

Early heat illness signs and symptoms may not always follow a progressive pattern from a mild condition such as heat rash up to the life-threatening condition of heat stroke. Thirst alone is a poor indicator of how the body is reacting to heat. Know the symptoms of heat illness to watch for:

  • Discomfort
  • Headache
  • Fatigue
  • Loss of coordination
  • Vomiting
  • Seizures
  • Fainting
  • Blurry vision
  • Confusion
  • Dizziness
  • Irritability
  • Poor concentration
  • Muscle pain/cramps
  • Lack of sweating or excessive sweating
  • Altered behavior

Tell a supervisor immediately if you think you or a co-worker are feeling ill from the heat.

Heat Illness Susceptibility Factors

There are many risk factors that increase susceptibility to heat illness. They include, but are not limited to:

  • Environmental Conditions:
    • Hot air temperature
    • High relative humidity
    • Physical activity
    • Radiant heat from the sun or other source
    • Personal protective equipment worn
    • Lack of air movement
  • Personal Conditions:
    • A history of heat illness
    • Insufficient water consumption
    • Over/under weight
    • Poor level of fitness
    • Lack of acclimatization
    • Poor medical condition
    • Use of prescription and over the counter medications and other drugs
    • Consumption of alcohol, caffeine, carbonated drinks, energy drinks
    • Advanced age or young age
    • On a low salt diet

Consult with a doctor if you know you have risk factors for heat illness.

Acclimatization

During the first few days of working in heat, the body needs time to adjust. This period of adjustment (acclimatization) varies by individual and can take up to a few weeks. During this acclimatization period you should:

  • Start work slowly and increase the pace gradually. During a heat wave there is still a risk for heat illness even if previously acclimatized.
  • Report to a supervisor if returning to work after an absence or illness, or when changing from a cool to a hot and/or humid climate.
  • Supervisors and employees should be aware that acclimatization to heat can take several days and work/rest cycles should be scheduled accordingly.

Hydration

Dehydration occurs quickly no matter how well acclimatized to the heat. The average person loses between 1 and 2 quarts of fluid an hour in perspiration during heavy exertion in hot weather. The only way to replace the loss (and help the body continue to cool itself) is to drink water.

  • Frequently drink small quantities of water throughout the entire work shift. A minimum of 1 quart (four 8-oz cups) per hour is recommended.
  • Don’t wait until thirsty to drink water. Being thirsty is not a good signal for the need to hydrate. Drink water both before and after work. Avoid substituting soft drinks and coffee for water.
  • Drinking water needs to be available for all employees at all work locations.
  • Know the location(s) of the closest drinking water supplies.

Wear Appropriate Work Clothes and Cool Down Under Cover

  • Know the nearest cool resting place(s). Get out of the sun or away from the source of heat and find a cool, preferably well ventilated, resting place when you are starting to overheat or need to cool down.
  • Wear light-colored loose fitting long-sleeved shirt and pants, and UV sunglasses or, if appropriate, other protective equipment.
  • Wear a wide brim hat (baseball caps do not cover the ears and neck).
  • Use sunscreen or sun block and reapply as needed.
  • Eat light meals. Hot, heavy meals add heat to the body.

Extreme Cold Temperatures

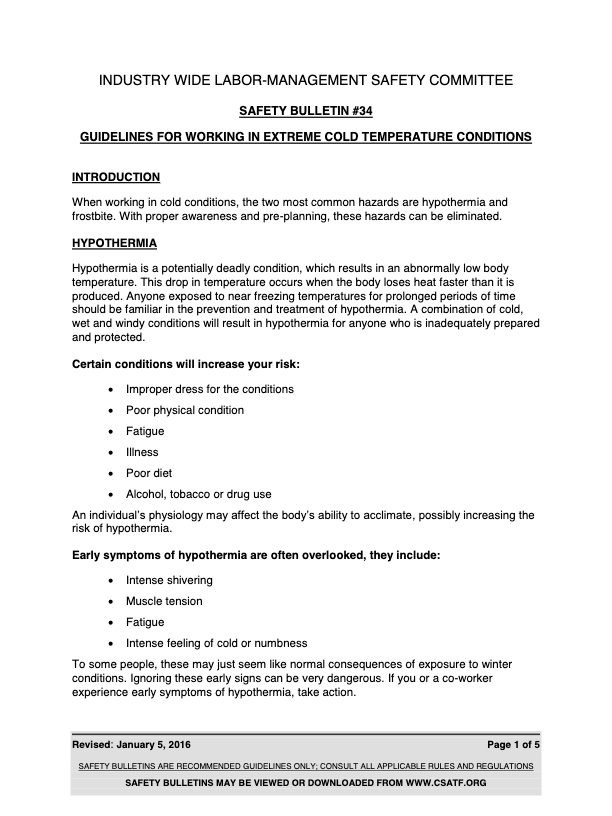
When working in cold conditions, the two most common hazards are hypothermia and frostbite. With proper awareness and pre-planning, these hazards can be eliminated.

Hypothermia

Hypothermia is a potentially deadly condition, which results in an abnormally low body temperature. A combination of cold, wet and windy conditions will result in hypothermia for anyone who is inadequately prepared and protected.

Early symptoms of hypothermia are often overlooked, they include:

  • Intense shivering
  • Muscle tension
  • Fatigue
  • Intense feeling of cold or numbness

To most people, these may just seem like normal consequences of exposure to winter conditions. Ignoring these early signs can be very dangerous. If you or a co-worker experience early symptoms of hypothermia, take action.

Also watch for additional behavioral signs including:

  • Slurred speech
  • Difficulty performing tasks
  • Loss of coordination
  • Lethargy
  • Erratic behavior, poor decisions
  • Irritability
  • Slow breathing and heart rate

At the first sign of any of these conditions, notify your supervisor and/or seek medical attention (i.e., set medic, studio hospital or medical provider) then go inside and get warm, before you attempt to complete the job or project you are working on.

Hypothermia Prevention

Preventing hypothermia is not difficult. In fact, it is much easier to avoid hypothermia than to treat it after the fact. You can prevent hypothermia if you pre-plan, know what the conditions are expected to be and plan your clothing accordingly.

Clothing:

  • Clothing does not warm you; it provides insulation to preserve your warmth. Layer your clothing
  • As much as half of your body heat is lost through your head and neck, so keep them covered
  • Keep rain and wind out of your clothing
  • Avoid overheating and sweating by ventilating as needed
  • Wool clothing is best followed by synthetics, down is okay if kept dry, but cotton is a bad choice

Food and behavior:

  • Watch what you eat. Minor changes to your normal behavior are an important step in preventing hypothermia
  • This is not the time for a starvation diet. It is important to maintain your optimal metabolism
  • Take extra steps to stay warm and dry by preventing exposure to wind and water

If you are working in cold weather:

  • Do not diet; give your body the appropriate nutrients
  • This will increase your metabolism and help keep you warm
  • Continue to drink fluids, water is best. No alcohol.
  • If you do not need to be outside, go inside, even if it is only for a few minutes
  • If you cannot go inside, exercise, jog in place, shake your arms, these activities will increase your circulation and increase heat

If someone is showing signs of hypothermia:

  • Hypothermia symptoms should receive medical treatment as soon as possible
  • Prevent further heat loss by sheltering from exposure to wind and water
  • Bring the crew member inside to a warm area, if possible
  • Treat the crew member gently
  • Seek medical attention (*i.e., *set medic, studio hospital or medical provider)
  • Remove any wet clothing and replace with dry clothing
  • Wrap the crew member in blankets and cover their head
  • No caffeine, alcohol or tobacco should be used

Frostbite

Frostbite is more common than hypothermia. It is the result of the freezing of the extracellular fluid in the skin, which can permanently damage the tissue. This condition usually affects the extremities, such as the tips of fingers, the ears and nose but other exposed areas can also be affected. Like hypothermia, a combination of elements usually leads to frostbite not cold air alone. In fact, most frostbite is the result of conduction, the rapid transfer of heat, for example, touching cold metal surfaces with bare hands. Exposure to cold temperatures and wind can quickly result in frostbite.

Signs and Symptoms of Frostbite:

  • Mild frostbite affects the outer skin layers and appears as a blanching or whitening of the skin. This usually disappears as warming occurs, but the skin may appear red for several hours
  • In severe cases the skin will appear waxy-looking with a white, gray-yellow or gray-blue color. The affected parts will have no feeling and blisters may be present. The tissue will feel frozen or “wooden”
  • Other indicators are; swelling, itching, burning and deep pain as the area is warmed

Frostbite Prevention

Just as with hypothermia, frostbite is much easier to prevent than it is to treat. All of the items listed above for hypothermia would also apply for frostbite.

  • Wear proper clothing which insulates from the cold and provides protection from wind, rain and snow
  • Cover your neck and head
  • Protect your hands and feet (mittens are warmer than gloves but may limit activity)
  • Keep clothing and shoes loose, to ensure good circulation
  • Drink plenty of fluids
  • Do not diet; give your body the appropriate nutrients
  • Alcohol, tobacco or drugs should not be used
  • Keep moving, do not stand still
  • Take breaks to go inside and warm up
  • Never touch a cold metal object with your bare hands

Frostbite Treatment

If you think you may have frostbite, even a mild case, immediately seek medical attention. The following list will provide some guidelines for treating frostbite:

  • Get to a place where you can stay warm after thawing; do not allow the affected body area to refreeze
  • Seek medical attention (*i.e., *set medic, studio hospital or medical provider), re- warming should be conducted under medical supervision
  • Warm water is best for re-warming; do not rub or massage the area, or use dry heat (sunlamp, radiator, heating pad)
  • If blisters are present, leave them intact
  • No alcohol, tobacco or drugs should not be used

General Precautions

The following are some additional steps the production can take to minimize the risks:

  • Monitor local weather forecast information daily and conduct cold stress assessments for all areas
  • Provide adequate heated shelters for cast and crew
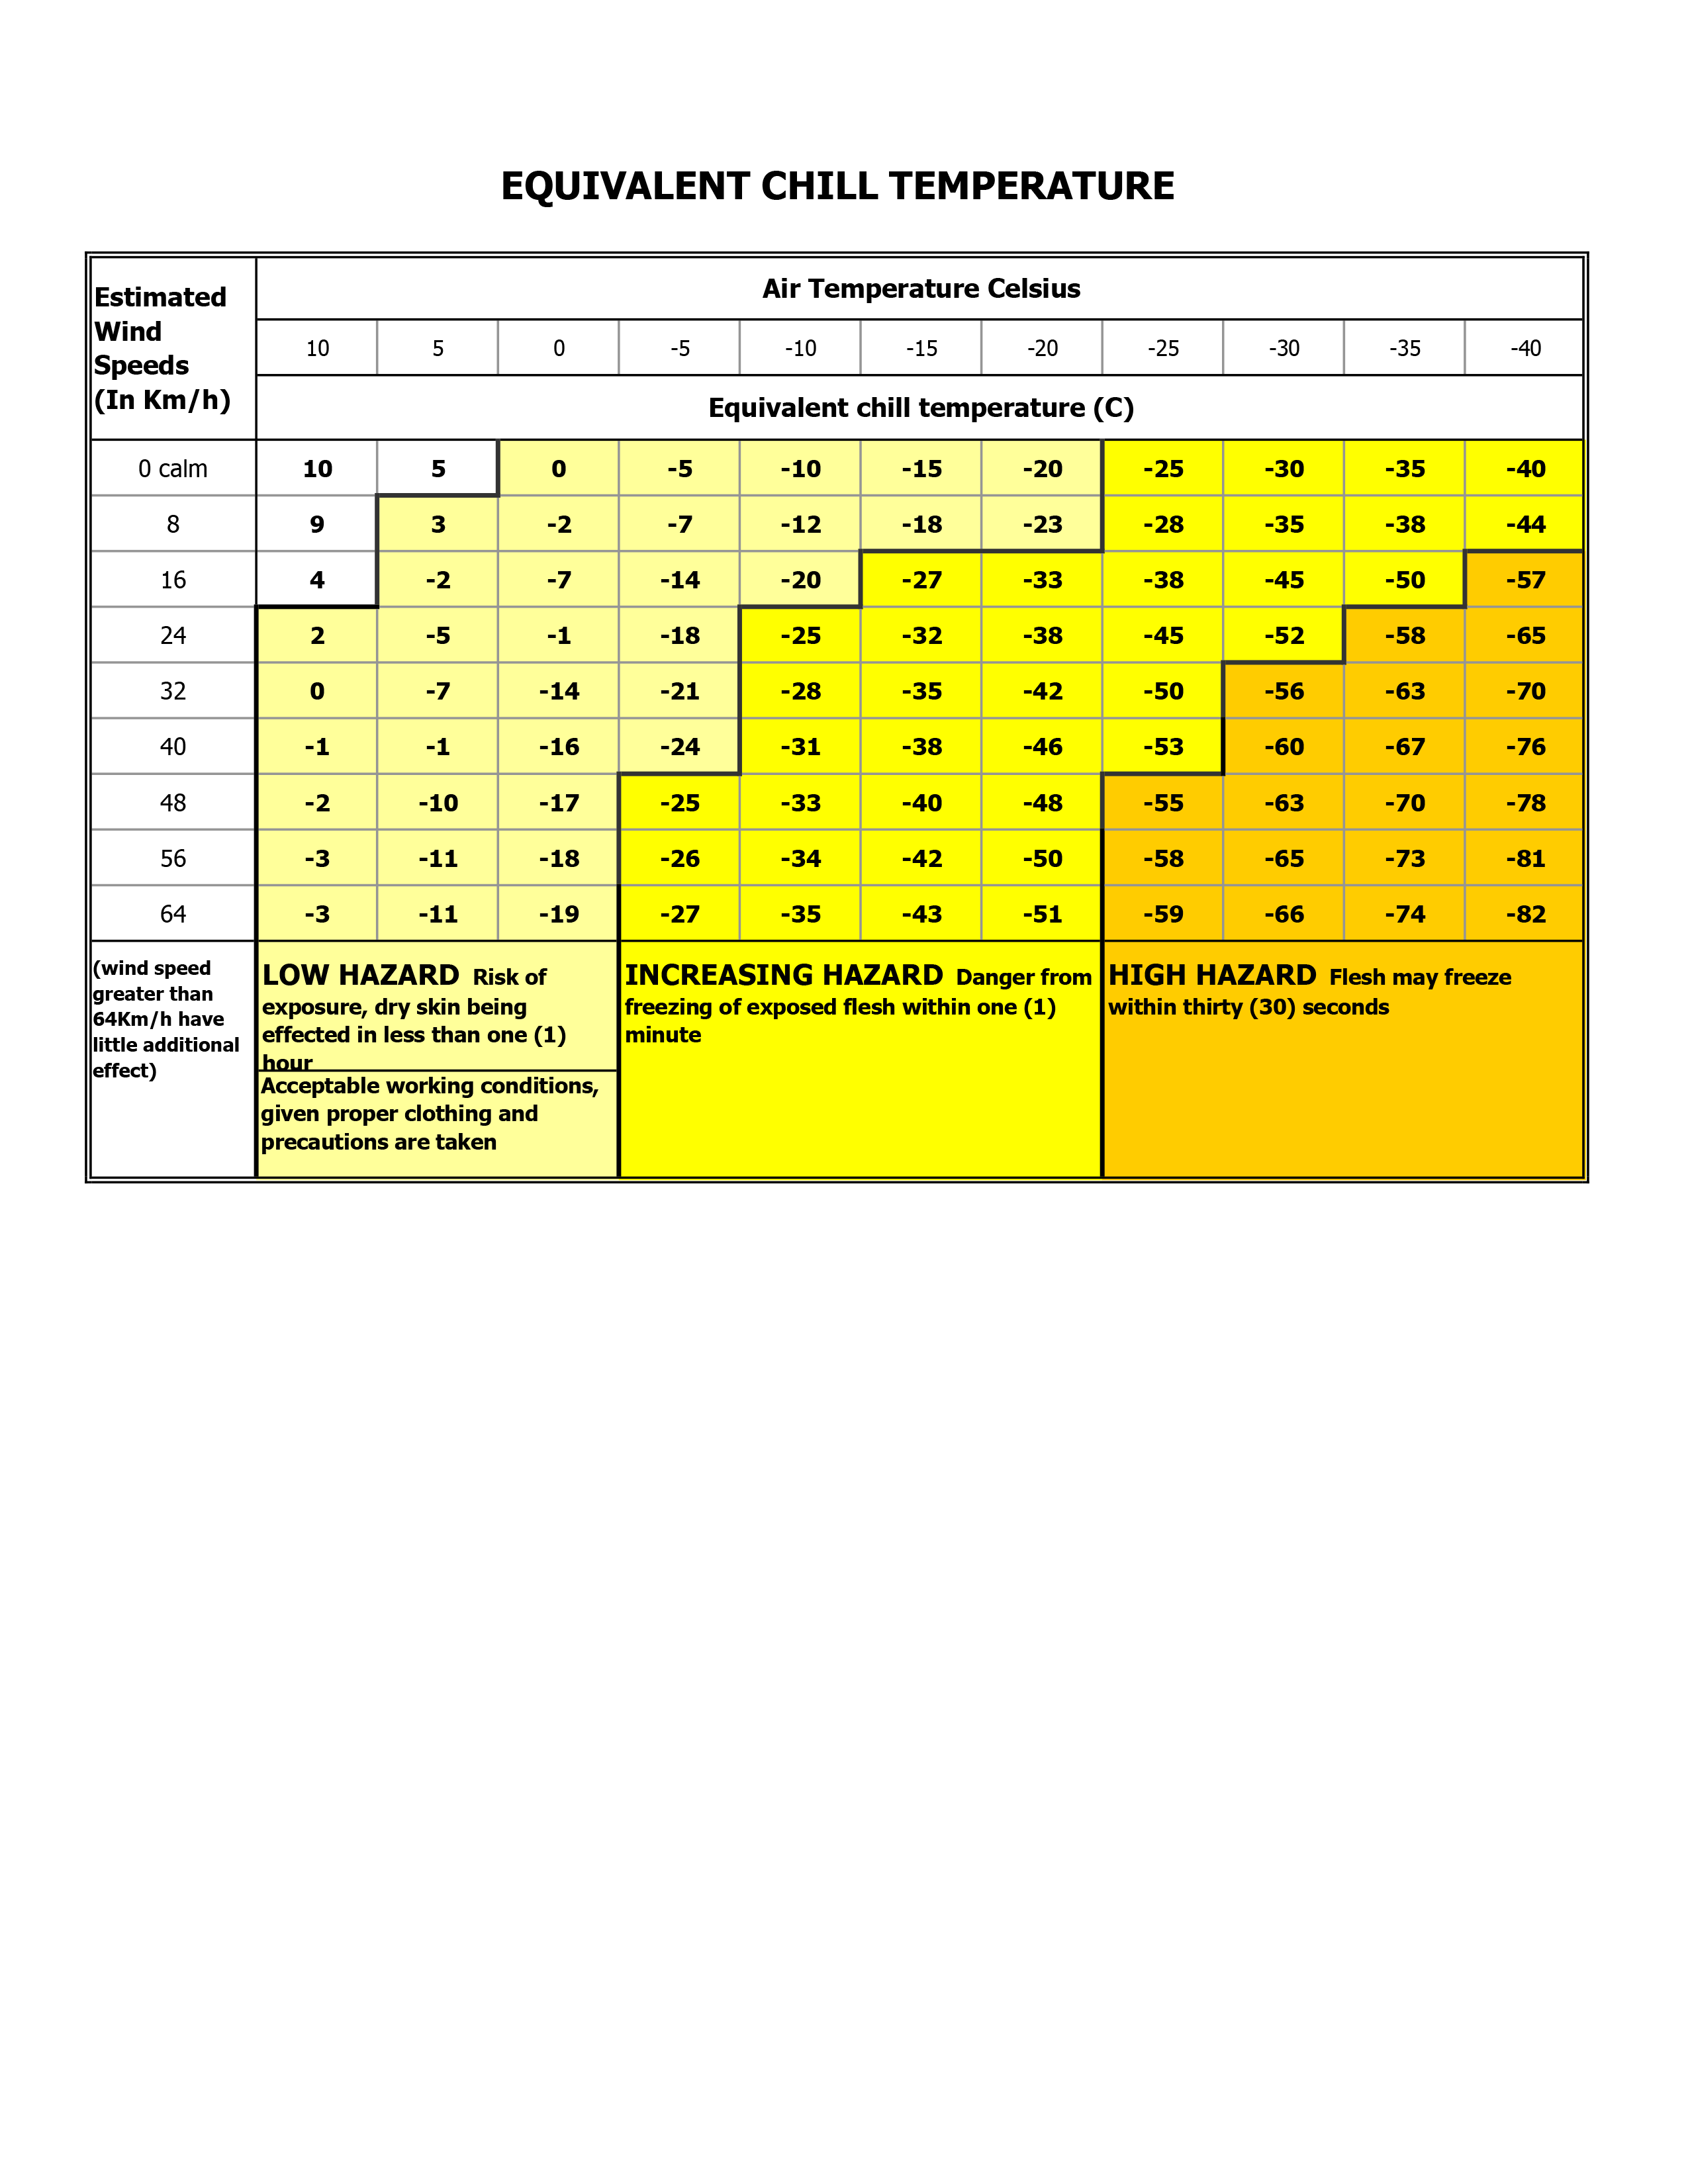
  • Maintain a suitable thermometer and anemometer (wind measuring device) at the site; these will be used to determine the equivalent chill temperature
  • Charts for establishing acceptable working conditions based on temperature and wind speed, are attached
  • Establish safe areas and paths, no wandering or sightseeing, this will reduce the risk of getting lost

Personal Protective Equipment

Suitable and effective Personal Protective Equipment (PPE) must be used where an activity presents a significant risk to health and safety and the risk cannot be reduced by any other means. This includes, but is not limited to:

  1. Working with electricity;
  2. Working with hazardous materials;
  3. Welding or cutting;
  4. Working around boats and water;
  5. Working with special effects, pyrotechnics, open flames, or hazardous objects;
  6. Construction, including alteration, painting, repairing, maintenance, renovation, removal or wrecking;
  7. Working around traffic;
  8. Working at heights.

PPE must not significantly increase other risks by reducing visibility or interfere with other safety measures. Personnel must be given appropriate instruction and training on how to use any PPE issued. Once issued, PPE must be worn as required and any defects must be reported to a supervisor.

Clothing

  • Clothing determined by the employer to be appropriate for the work being done shall be worn.
  • Jewelry, loose sleeves, exposed shirt tails, neckties, lapels, loose cuffs or other loose clothing shall not be worn around machinery in which it might become entangled.
  • Long hair shall be tied back when working around machinery and/or equipment with moving parts.
  • Costumes should be selected and prepared in anticipation of the potential risks and hazards.

Foot Protection

  • Appropriate foot protection shall be worn by employees who may be exposed to foot injuries from hot surfaces, corrosive materials, hazardous substances, falling objects, crushing or penetrating actions which may cause injuries, or who are required to work in abnormally wet or cold locations.
  • Personnel working around open flame and pyrotechnic material must always wear appropriate closed-toe footwear.

Hand Protection

  • Hand protection (gloves) shall be worn by employees whose work exposes them to potential injuries, such as exposure to cuts, burns, harmful physical hazards, chemical agents or electrical hazards which are encountered and capable of causing injury or impairments.
  • Hand protection should not be worn if there is a danger of it becoming entangled in moving machinery.
  • Hand protection should be appropriate for the type of exposure.
  • Gloves should be properly discarded when they become worn, contaminated, saturated or otherwise no longer usable.

Eye and Face Protection

  • Employees working where there is a risk of receiving eye injuries shall wear appropriate eye or face protection.
  • Side shield protection shall also be utilized when employees are exposed to the risk of flying objects/particles/materials entering the eyes from the side.
  • Suitable screens or shields isolating the hazardous exposure may be used if they provide adequate safeguarding for nearby employees.
  • Specialized forms of eye protection are required for certain types of work, such as welding.
  • The use of sunglasses or prescription eye glasses may not provide appropriate eye protection.

Ear Protection

  • When operating or near loud equipment, amplified sound, pyrotechnics or gun fire, consideration should be given to wearing appropriate hearing protection suitable for the hazards encountered.

Head Protection

  • Employees exposed to flying or falling objects and/or electric shock and burns shall be safeguarded by means of approved head protection.
  • Operation of vehicles, such as motorcycles, all terrain vehicles, bicycles, etc., may require the use of a helmet.

Safety Vests

Federal, State and local laws require safety vests to be worn and visible when working on active public roadways. Safety vests shall always be properly worn by employees under the following circumstances:

  • During set-up, rigging, filming or striking activities performed in or near an active public roadway, unless production has obtained full closure and control of the roadway. Alternative safety considerations should be made when wardrobe requirements would prevent cast from wearing safety vests while working in or near an active public roadway without full closure and control.
  • When directing traffic or responsible for lockup during partial lane closures where intermittent traffic control is used to control traffic.

Other conditions and locations may require the use of safety vests, such as railroads, subways, construction sites, airports, docks, etc.

The color of the safety vests must be either fluorescent orange-red or fluorescent yellow-green. The retro-reflective material shall be orange, yellow, white, silver, yellow- green or a fluorescent version of these colors.

Respiratory Protection

The need for respiratory protection is unique to the hazards of the workplace. Consult your employer regarding their specific respiratory protection policy.

Sanitation of PPE

  • PPE shall be kept clean and in good repair.
  • PPE not capable of being easily cleaned or disinfected shall be disposed of after use.
  • PPE must be properly stored when not in use.

Stage-Adjacent Areas

The sound-lock area between the sound stages and its storage room, the loading dock and wood shop are considered stage-adjacent areas, and fall under the following policies:

  • The sound-lock area between the two stage loading doors, its storage room, the loading dock, and wood shop are not storage areas and must not be used for storage of any kind.
  • The sound-lock storage room is for administrative use only.
  • The loading dock and wood shop may be used for spillover construction only upon receiving permission from the Stage Supervisor. Clear and safe access for anyone using the building or loading dock must always be available. Nothing may ever be left in these areas for more than two hours (this would be considered storage).
  • These areas may not be painted in any way, whether intentionally or accidentally. If it is necessary to use these areas to paint scenery, drop cloths or other protection must be used, and all precautions taken to assure that no paint will be left on any surface in these areas.
  • No building scraps, materials, or sawdust may be left overnight. These areas must be completely cleaned of all building materials, scraps, and scenery before 8:00 am each day, and thoroughly cleaned and swept at the end of the designated construction period.

Smoke, Flame & Explosives

Smoke Effects

Only controlled smoke emitters – such as electrical fog machines, haze machines, dry-ice systems, cigarettes, cigars and pipes – may be used on the stages. Flash paper/smoke-powder systems, smoke bombs, fireworks, and homemade, fire-based smoke are not permitted under any circumstances. If using smoke, care must be taken for the safety and comfort of crew and performers, the smoke must be prevented from escaping into other portions of the building.

If the intent is to make a thick smoke or fog, the stage supervisor must be informed so false fire alarms may be avoided. Triggering a fire alarm may result in a fine being imposed on the College, which will in turn impose a fine on the student production designer.

Open Flame

All flame use must be discussed at the original stage reservation meeting and approved by the Stage Supervisor. Only certain kinds of flame may be used on stage. Candles, flame bars (using propane), oil lamps, and other small gas-based fires may be approved as long as proper precautions are taken.

Any flame near the floor requires a substantial barrier, such as asbestos or concrete, to keep the flame from scorching or burning the floor. If the fire is to be near set pieces, the set must be treated with a commercial flameproof solution or paint designed for the kind of material the set is built from. A flame test must be conducted after the material has been treated to ensure the set piece is truly fire resistant.

The fire must be at least six feet from any soft goods (curtains, bedspreads, etc.).

Burning a log or a piece of furniture is not allowed on the College stages, but burning small items such as paper or money, or another small, quickly consumed prop, may be acceptable upon approval from the Stage Supervisor. In these cases, the fire should be done over a container of water if possible. Otherwise, the floor must be protected, and a container (such as a metal can) present to contain the fire as it burns out.

Whenever a fire is burning a dedicated crewmember must be standing by with a charged fire extinguisher. All fires should be extinguished or turned off when not needed for shooting or rehearsal. This will result in fewer accidents and less danger to the crew. Anything that has been burning may flare up in the presence of oxygen; therefore, do not place seemingly extinguished fires out of sight or near flammable items.

The fire extinguishers on the sound stages are for emergencies. The student production designer must provide a safety fire extinguisher for fire FX and it must be of the type approved for such FX (effects). The Stage Supervisor will approve the type of extinguisher needed.

Explosives

Please reference the Weapons Policy. Only approved explosives or explosive forces (such as squibs or air cannons) may be used on the sound stage after discussion with the Stage Supervisor. FSU Police must be notified, and only a licensed operator may deploy the explosive device. The area surrounding the direction in which the explosive force will be deployed must be cleared of any obstruction, and there must be sufficient distance from any equipment or materials to avoid damage to the stage. People in the vicinity must wear eye and ear protection, and care must be taken to avoid damage to structures, set pieces, and people. The student production designer is solely responsible for any damage that may occur due to the use of explosives.

Vehicles on the Stages

Vehicles are allowed on the sound stage only upon approval by the Stage Supervisor. The facility must be protected from ignition of their flammable materials, and from dripping oil and grease. In order to safely use a motor vehicle on a stage, the following policies are to be followed explicitly:

  • Prior to moving the vehicle onto the stage, the fuel tank must be professionally removed, or must only have a quarter of a tank of gas. Empty tanks have dangerous levels of easily ignitable fumes.
  • The battery must be removed from the vehicle, or the positive and negative battery cables must be disconnected and non-conductive material (leather or rubber) must cover the battery terminals. The vehicle will have to be pushed onto the stage, without power steering or brakes. The battery may not be replaced or reconnected until the vehicle is safely outside the building.
  • A faculty or staff member must be present to supervise when the vehicle is moved into and removed from the stage. The production must schedule this at a time when a faculty or staff member can be present.
  • Protective material – such as a tarp or old foam-core, NOT solids or sound blankets – must be placed under the engine, transmission, and differential to catch any fluid.
  • Open flames are prohibited from the stage while a vehicle is present.
  • Facilitation of dash lights and windshield wipers must be worked out in advance of the use of a vehicle onstage.

Rigging on the Stages

Rigging is dangerous and requires specific knowledge and skills. Anything to be rigged from the pods, grid, catwalks, or otherwise must be discussed with and approved by the Stage Supervisor, who may also refer you to the Set Operations Manager for further approval. The Stage Supervisor or the Set Operations Manager will also inspect and give final approval of any rigging before it may be used as part of production.

Stage Curtains, Cyclorama, and Green Screen

The black curtains, the cyclorama, and the large green screen are equipment and must be requested. The curtains and cyclorama are for stage use only and may not be used on location. Both the VFX Department and cinematography instructor must be consulted and sign off on any use of the green screen.

If approved for use, the curtains and/or cyclorama will be checked out to the production by the Stage Supervisor, and the large green screen by the ER staff. These items will be inspected on check-out and again on check-in.

The Stage Supervisor will teach the students proper care, hanging technique and folding of the curtains and cyclorama, and will also check for proper adherence to these guidelines.

Pod Use on the Stages

Use of the pods must be requested and approved at the initial meeting with the Stage Supervisor. If approved, the following protocols must be observed:

  • Proper hardware must be used for the installation of grip and lighting equipment. All cables and gels must be safely and solidly affixed prior to raising a pod.
  • Nobody may stand under a moving pod.
  • If the operator cannot see the pod or something it might hit, another student must stand where they can see the pod, the possible obstruction, and the operator, in order to assist and guide the operator.
  • The operator must let everyone on stage know of pod movements by speaking loudly enough to be heard by all on the stage, for example: “Pod #1 coming down!”
  • The operator or assisting student must make sure the cables are feeding in or out of the baskets properly, and that the winch cables are moving smoothly into the winch drum groove. If there is any suspicion that a pod may not be moving in a level fashion, or is laboring the motor as it moves, the operator must stop the pod immediately and summon the stage supervisor or set operations manager.
  • The pods are designed to stop 3 feet from the floor and 6 feet from the grid (ceiling). If a pod moves beyond these stops, notify the Stage Supervisor immediately.

Use of the pods for purposes other than hanging grip and lighting equipment requires approval of the Stage Supervisor at the initial stage reservation.

Load-In & Load-Out

Load-in and set-up are the processes of a production moving onto the reserved sound stage. Strike and load-out are defined as the tear down and removal of all set pieces and other items belonging to a production.

Load-In/Set-Up

  • A load-in date is set as part of the stage reservation, and the load-in date and time must be strictly followed.
  • Only approved sets, effects, equipment, and procedures may be loaded in.
  • The Stage Supervisor will check the stages to ascertain that all procedures and policies have been followed, and that all items are being set up and used as per the approved plan. Any infractions will be noted and presented to the student producer. In some cases, due to safety or damage concerns, the Stage Supervisor or the Set Operations Manager may stop the production until these concerns have been appropriately addressed. Violations in this or any sound stage policy will be treated as an “unprofessional act” and penalties assessed according to the College’s Professionalism Policy.

Strike and Load-Out

  • Both strike and load-out must occur during the time allotted in the original stage reservation meeting, except as noted in the policy for holding sets for dailies.
  • During strike and load-out the floor must be painted back to black, and the entire reserved space returned to a cleaned and normal state.
  • The sound-lock, exits, loading dock and other adjacent areas must continue to be kept clear.
  • Stock sets and existing scenery must be returned to the designated corral, and built scenery must be stored according to the policy for holding sets for dailies.
  • All other items, including equipment, props, scenery, trash, and other items must be removed from the College facility.
  • The Stage Supervisor will check for proper adherence to these rules and will note any infractions to the student producer.

Set Design

In order to accommodate the maximum variety of sets with the least damage to the stages and related equipment, and in order to allow for the storage of sets while waiting for dailies, there are strict policies in place for set design.

General Policies

  • The Stage Supervisor must approve all set construction. Details of said construction, including a set plan showing the set’s intended position on the stage, must be provided to the Stage Supervisor before construction can begin.
  • The College does not provide any building materials or tools, including power or hand tools. Students needing to construct a set must provide their own tools and materials.
  • Sets must be designed and drawn out in plan and elevation form with all dimensions.
  • Set plans must include all bracing and support to safely hold vertical and suspended units.
  • A list of intended building materials must accompany the designs. This includes lumber, metal, and plastics, as well as coatings and textures. Certain organic or potentially toxic materials may be forbidden.
  • If building on College property, a construction schedule and list of who will be building must accompany the plans. The list of personnel must include each person’s experience and tool skills.
  • Sets must be made of units no larger than the area 11’8”H x 8’W x 2’D.
  • The total of all units must be able to be stored in an area 11’8”H x 8’W x 8’D for Stage A, 11’8”H x 4’W x 8’D for Stage B. Larger items may not be stored on stage. It is the student’s responsibility to acquire storage for such pieces.
  • Sets may be secured to catwalks, pods, grids, or stage walls only by permission from the stage supervisor.
  • Sets may be screwed to the stage floor.
  • If the floor is to be painted, it must be done with flat un-textured latex paint. Complicated paint schemes should be painted on masonite or other floor coverings.
  • Plans for the removal and disposal of the set must be established before stage use will be approved. The student may have to pay a fee for dumpster use and disposal.

College-Owned Set Pieces

There are three types of College-owned set pieces:

  • Existing scenery are set segments, which upon approval by the Stage Supervisor, may be modified to suit the needs of the student production
  • Stock sets are complete sets built for use in classes and workshops. These sets are available for checkout only when they are not in use for classes and may not be modified.
  • Stock pieces are separate segments of the stock sets, which may be used in conjunction with existing scenery or newly built pieces. This must be discussed, and approval secured, at the initial meeting with the Stage Supervisor.

Supporting documentation requesting use of any or all of these items must be presented to the Stage Supervisor at the initial meeting.

Use of existing scenery, stock sets, and stock pieces is not guaranteed to any production. The Stage Supervisor will monitor the proper use and care of these items.

Building on the Stage

The student production designer must present supporting documentation, including set drawings, material and crew lists, to the Stage Supervisor at the initial meeting. Drawings may need multiple revisions before approval is granted. Once approval is secured, the production will be assigned dates for construction, load-in and strike.

The Stage Supervisor, the Set Operations Manager and ER employees will periodically check the stage for cleanliness and safety. All building materials and tools must be removed from the stage at wrap.

Handing Off Sets

In the instance where a set is built for one production but is desired for use by another, the set may remain on the stage only until the dailies from the first production have been viewed. The student production designers from both productions must sign a Hand-Off Agreement, and the new production must go through the procedure for requesting a stage for a built set. A new form must be filled out, but copies of the original set drawings may be attached, and there would be no need for a building schedule or crew list.

If the second production needs the set before or immediately after dailies screening of the first production, the set may remain in its corral on stage until the second production starts its setup. When the second production is not within the time the set is scheduled to remain on stage, the student producer and production designer from the second production must acquire an offsite storage space, and remove all items from the College facility to that space. The College does not provide, or in any way take responsibility for, off-site storage.

After the hand-off, the second production becomes the party responsible for the set and the stages.

Holding Sets for Dailies

Any set constructed for use on the stages must conform to the basic set design policy. At wrap and strike, the set must be broken down into smaller units conforming to the 11’8” x 8’ x 2’ dimension requirement. These may then be stored on the stage in a predetermined area selected by the stage supervisor. Pieces that do not fit into the predetermined area must be removed and stored at an off-site location acquired by the student production designer. Only one set can be stored on each stage. Immediately after dailies, an unneeded set must be disposed of, passed to another student production (see policy for hand-off of sets), or moved to off-site storage at a facility acquired by the student production designer. The College will not store, or be responsible for storage of, any items that do not fit into the allotted storage space.

If the supervising faculty determines that re-shoots are required, the Stage Supervisor and supervising faculty will together determine how much and what pieces of the set will be needed for re-shoots. All other pieces must then be removed from the College facility as usual. On-site storage of the required pieces will be arranged, and the student production designer must move the items to that location. After re-shoots the pieces may again be stored on stage until dailies have been screened. It will continue to be the responsibility of the student production designer to move and set-up these pieces until re-shoots are deemed finished and the items are permanently removed from the College. Only removal or hand-off to another production will resolve the student’s responsibility for these set pieces.