Category: Uncategorized

  • Turnover to Resolve

    Overview

    Turnover to DaVinci Resolve involves preparing and transferring the editorial materials needed for color correction, online finishing, and final mastering. This typically includes timelines, reference exports, media organization, metadata verification, and other supporting materials required to rebuild the project accurately within the finishing workflow.

    Careful turnover procedures are essential because missing media, incorrect timelines, naming inconsistencies, or organizational errors can create significant delays and technical problems during color and finishing. Standardized workflows help ensure smoother collaboration between editorial and finishing teams while reinforcing professional habits related to media management, version control, and post-production pipeline organization.

    How it Works

    In the industry, this process is referred to as “Onlining” or “Conforming” because this is where the picture edits made with the lower quality offline media in Media Composer are remade with the highest quality media. An Assistant Editor would normally be responsible for exporting all the necessary elements out of Media Composer. Those elements would then be sent to the facility that handles color grading and finishing. In our workflow, the Editor is responsible for both exporting the necessary files out of Media Composer and conforming to the highest quality media in DaVinci Resolve. This is to ensure that any issues during turnover can be caught immediately and the Resolve project is left ready for color grading.

    This step-by-step guide for color turnover covers how to:

    Export Reference Video From Media Composer

    A reference video of the locked sequence will need to be exported so that it can be used in Resolve as an offline reference video to check the conformed sequence against.

    Mount your Show Volume and launch your Media Composer project. Open the Locked Sequences bin. Select your locked sequence and hit “Command+D” to duplicate the sequence.
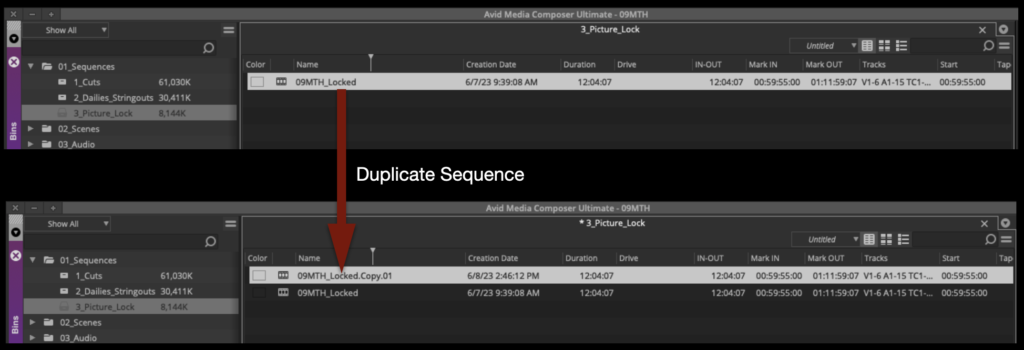
    Rename the new sequence Show#_Locked_Reference_Video and move it to the Color Turnover bin.
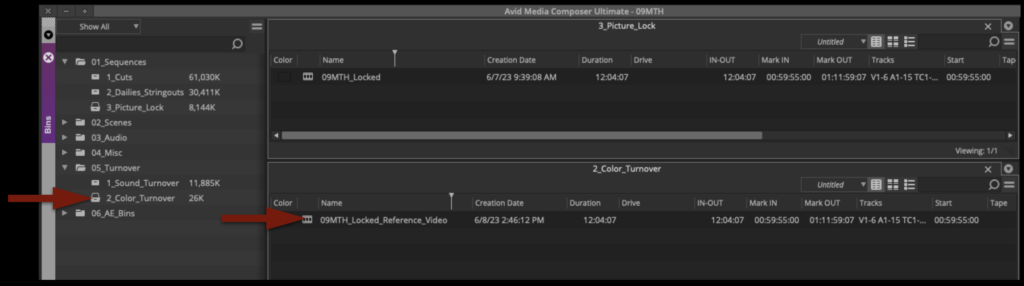
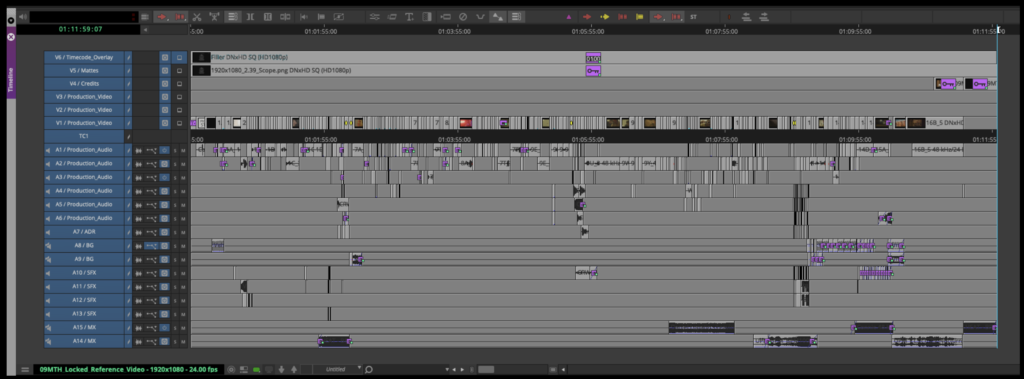
    Open the new sequence. Mark In and Out for the entire timeline and activate all tracks.
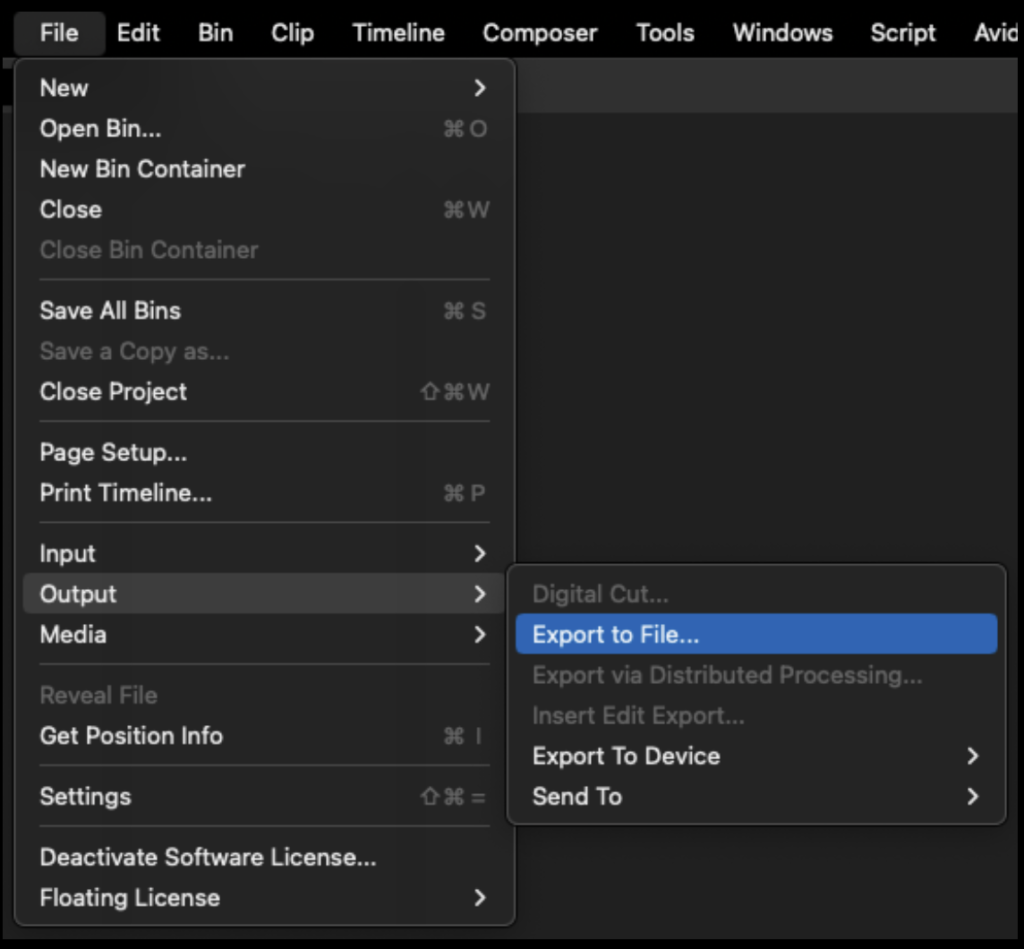
    From the task menu select File > Output > Export to File

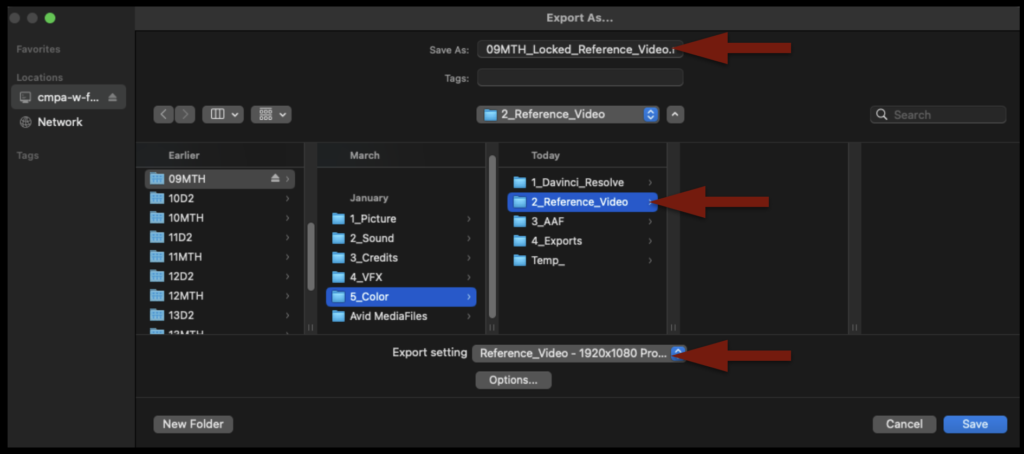
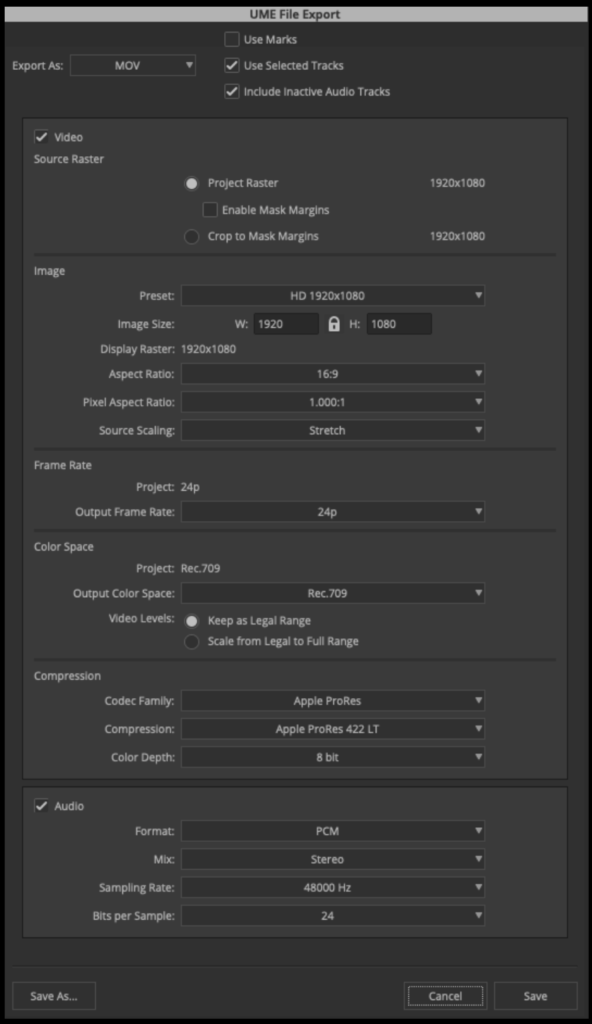
    Point the export to the Color > Reference Video folder on your Show Volume. Check that the name of the export will be correct. Select the “Reference Video” preset.

    Before clicking “Save” to export, double-check the preset by clicking “Options” and make sure the settings are exactly as shown in the example below:

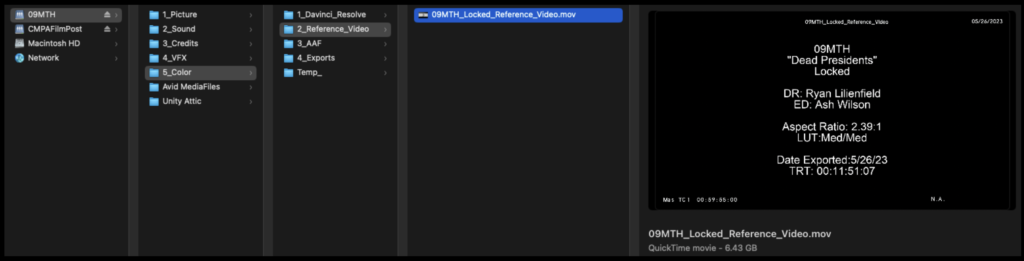
    When the export is complete, navigate in the Finder to where it was exported and open it in QuickTime Player to make sure everything is okay.

    Export AAF From Media Composer

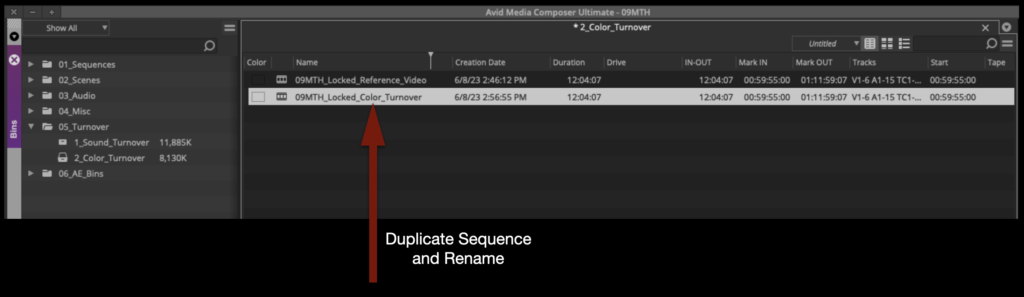
    Duplicate the sequence named “Locked Reference Video” and rename it show#Locked_Color_Turnover as shown in the example below:

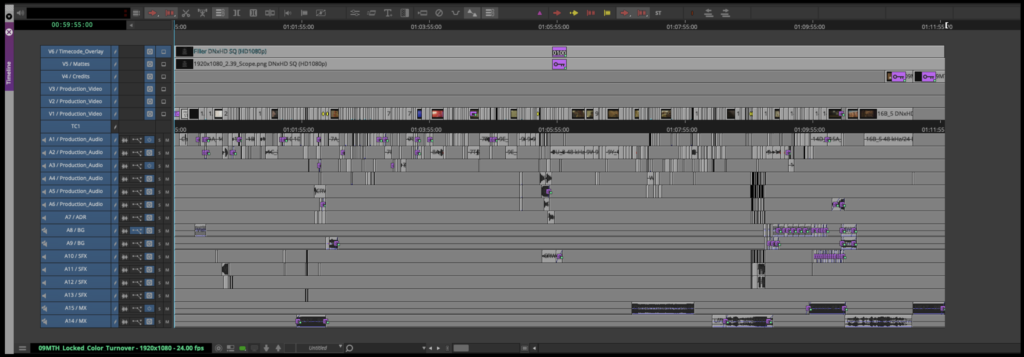
    Open the new sequence. Mark In and Out for the entire timeline and activate all tracks.

    From the task menu, select File > Output > Export to File…
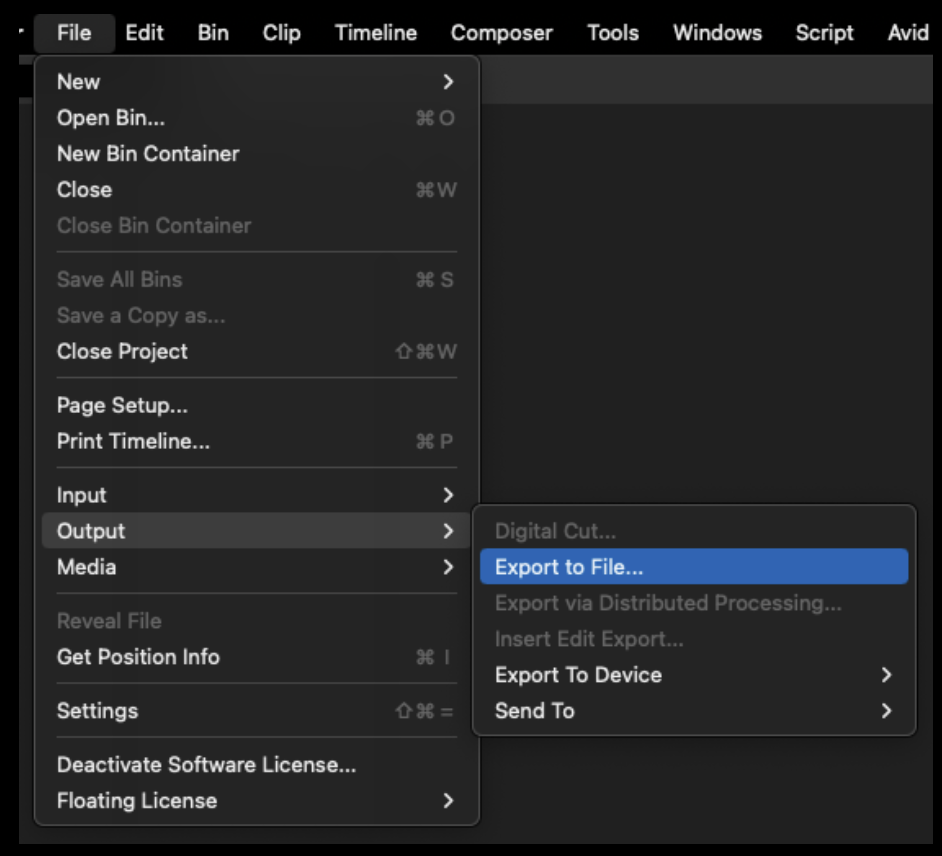
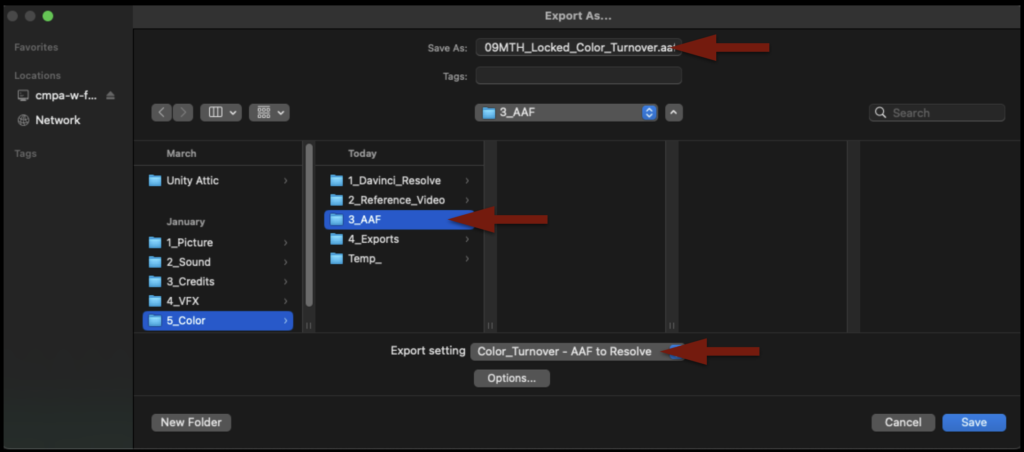
    Point the export to the Color > AAF folder on your Show Volume. Check that the name of the export will be correct. Select the “Color_Turnover – AAF to Resolve” preset.

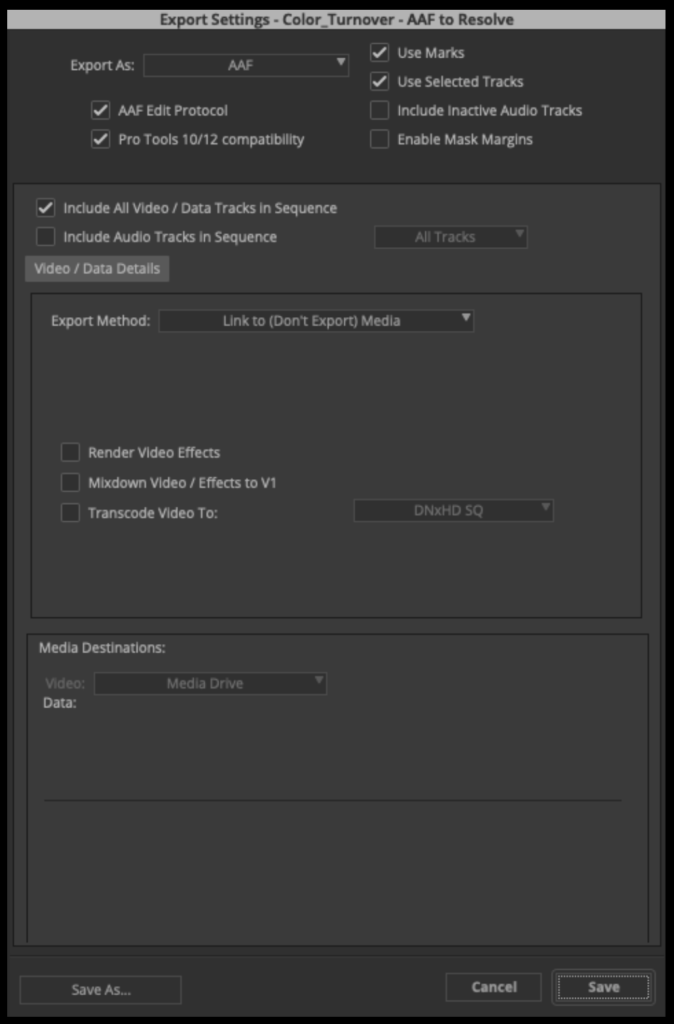
    Before clicking “Save” to export, double-check the preset by clicking “Options” and make sure the settings are exactly as shown in the example below:
    When the AAF is finished exporting, Media Composer will automatically import it back into the Color Turnover bin as a sequence. If you open the sequence, you will see that the AAF only held information describing the video tracks. That is all Resolve will need.
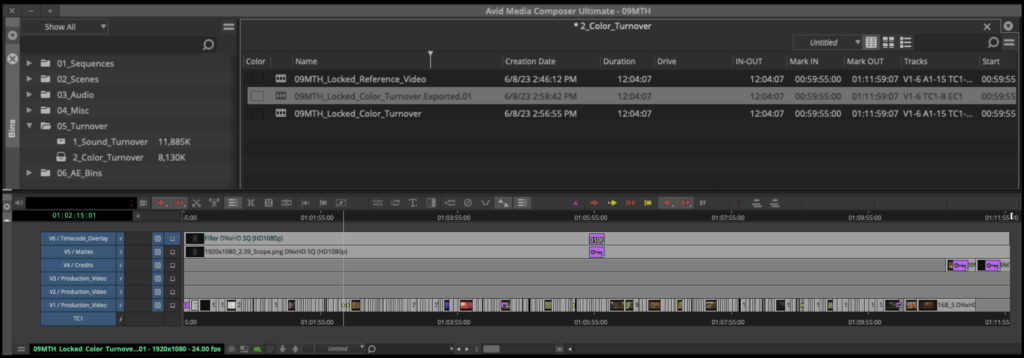
    After you check that, you can close Media Composer.

    Open Resolve Project

    Launch Resolve from the dock.

    You will be using the same Resolve project that your assistant editor used to make rushes when they sung dailies. So you need to open that same project. Navigate to the “Projects” folder, your “Cycle” folder, and then open your “Shows” project.

    Your project should already have several folders made and labeled inside the Media Pool.

    Some of the folders will already have media in them. The “extras” folder contains the media that is necessary for the online front sequence.

    All of the OCF will already be in the project from when the assistant editor last used it.

    Next, you will need to import any credits or titles. Navigate to your show’s Credits folder in the Finder and then select the Credits folder in the Media Pool.

    To import the credits and titles, drag them into the open folder in the Media Pool.

    Finally, you will need to import the reference video you exported out of Media Composer. Navigate to your show’s Reference Video folder in the Finder and then select the Reference Video folder in the Media Pool.

    DO NOT drag the reference video into the open folder in the Media Pool. It needs to be imported in a specific way so that Resolve can use it as an offline reference clip. Right-click on the video reference file and then select “Add as Offline Reference Clip”.

    Import AAF into Resolve

    In the Media Pool, right-click inside the Sequences folder. Then navigate to Timelines > Import > AAF

    Navigate in the Finder window to where you saved the AAF that was exported from Media Composer and click “Open”.

    Inside the Import AAF window, you will need to make some adjustments before clicking “Ok”:

    • Change the Timeline Name to Show#_Locked_Conform
    • Check “Automatically set project settings”
    • Check “Link to source camera files”
    • Check “Use sizing information”

    Since you did not select “Automatically import source clips into media pool,” it will prompt you to choose which folders in the Media Pool already contain the online media. Select the folders as shown in the example below and then click “Ok”.

    Do not be surprised if you get alerts that look like this in the Log after the AAF imports. This is a list of everything that was written into the AAF from Media Composer that cannot be reproduced in Resolve. In most cases this is limited to any use of the Avid Titler+ effect, the timecode burn in effect, or any stabilization that was done.
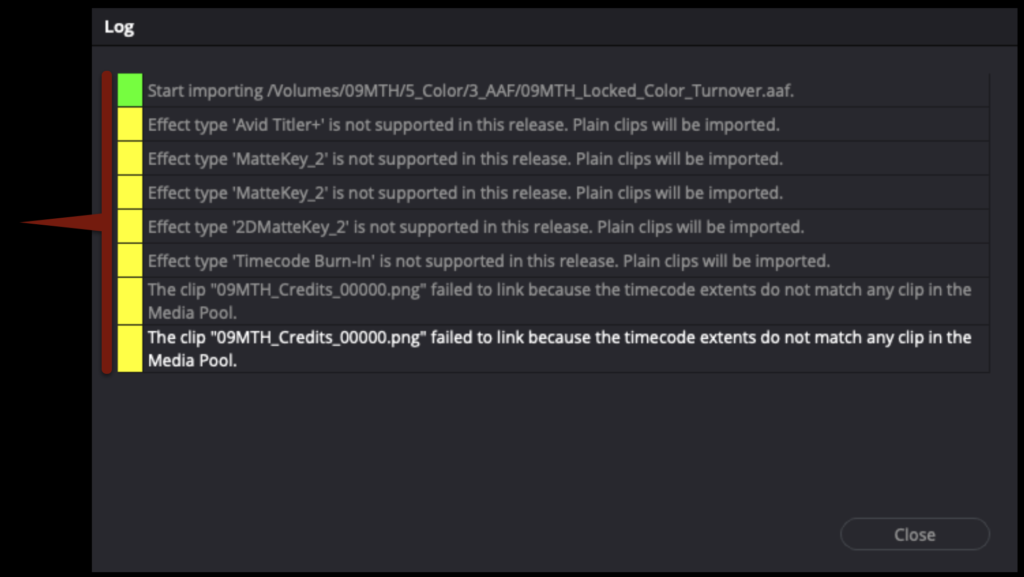
    You should see that your sequence from Media Composer is now imported into the Sequences folder in Resolve.

    Prep the Conform Sequence

    The locked sequence is now connected to the online media. Before you can check it against the offline reference video, you will need to do some prep work. In Media Composer, Video Track 5 held the aspect ratio matte. Most likely it has come over into Resolve, but often it has become connected to another piece of media or appears as offline. Since Resolve has its own way of handling aspect ratio mattes, you can delete the matte from Video Track 5. The Credits can also be brought down from Video Track 4 to Video Track 2. When you have done this your sequence should look like the example below.

    Since you deleted the aspect ratio matte from Video Track 5 you will need to reapply it. Go the task bar and select Timeline > Output Blanking > Your Aspect Ratio Matte. In the example below the 1.66:1 matte is being applied.

    Right-click on one of the empty video tracks over on the left and select “Delete Empty Tracks” to clean up the sequence.

    Right-click on the 2.0 audio track and select Change Track Type To > 5.1 > 5.1. This will prepare the sequence for eventually accepting the 5.1 audio mix.

    Once you have done all of the above, your timeline should look similar to the example below.

    Check the Conform Sequence

    Now that your sequence is prepped and cleaned up it is time to check it against the offline reference video to ensure it matches your picture lock sequence from Media Composer.

    Right-click on your sequence and then navigate to Timeline > Link Offline Reference Clip > Your Reference Video. This will link the reference video and your sequence together.

    To take advantage of the link, you will need to switch the source monitor to “offline” mode. When set to “offline” mode, the monitor on the left will no lower behave as a source monitor but instead it will display your reference video. In this mode, the left monitor will play the reference while simultaneously the right monitor will display your Resolve sequence.

    Before you check the Resolve sequence against the offline reference video, there is one last bit of prep. In Media Composer, your slate was created using the Avid Titler+ effect. Since that effect does not translate over into Resolve, you will need to apply the Text effect on th track above the SMPTE Countdown so that you can recreate the same text in Resolve. Make sure to extend the text effect so that it runs until the 2-pop.

    In the example below, you can see the reference video on the left with the text that was created in Media Composer and on the screen on the right the same text that has been recreated in Resolve.

    You are ready to begin checking your Resolve sequence against your reference video. If you right-click inside the right screen, you will see different options for Wipes and Overlays. With “No Wipe” applied, both screens should look very similar. However, it would be difficult to tell if they matched perfectly.

    To make this easier switch the right screen to “Difference” mode. This will lay the reference video on top of the Resolve sequence on the right. Any pixels where the two line up perfectly will appear black. Play through the entire film this way and make sure that in Difference mode the right screen stays black. If it does then you know that the sequence in Resolve matches the reference video perfectly.

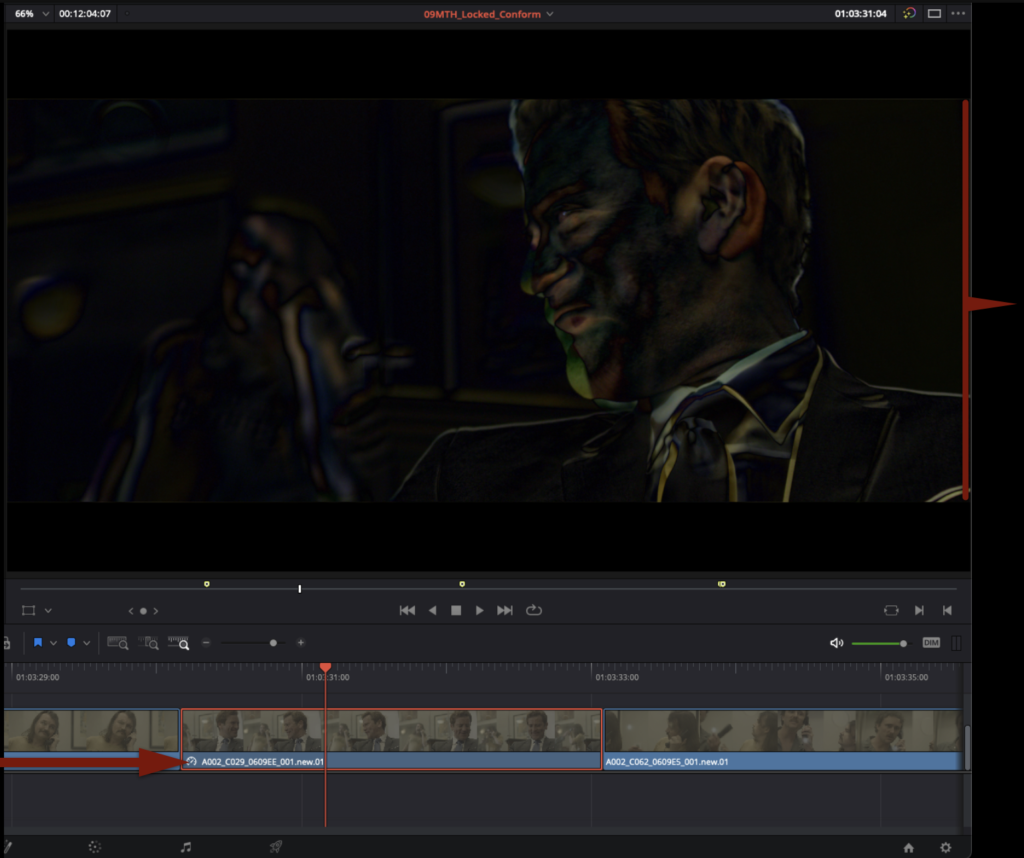
    It’s possible that the sequence in Resolve and the reference video won’t match perfectly. This could happen for many reasons: e.g., reframing in Media Composer, speed changes in Media Composer, or other effects. This is not a problem, but it does mean you will need to correct it.

    Below is an example of what it may look like if a reframe from Media Composer didn’t translate over perfectly. As you can see from the example, the fix is a simple manual adjustment in Resolve so that they match up.

    Another common reason why the Resolve sequence may not match the reference video is if a speed change has been applied. This may need to be tweaked in Resolve to allow it to match.
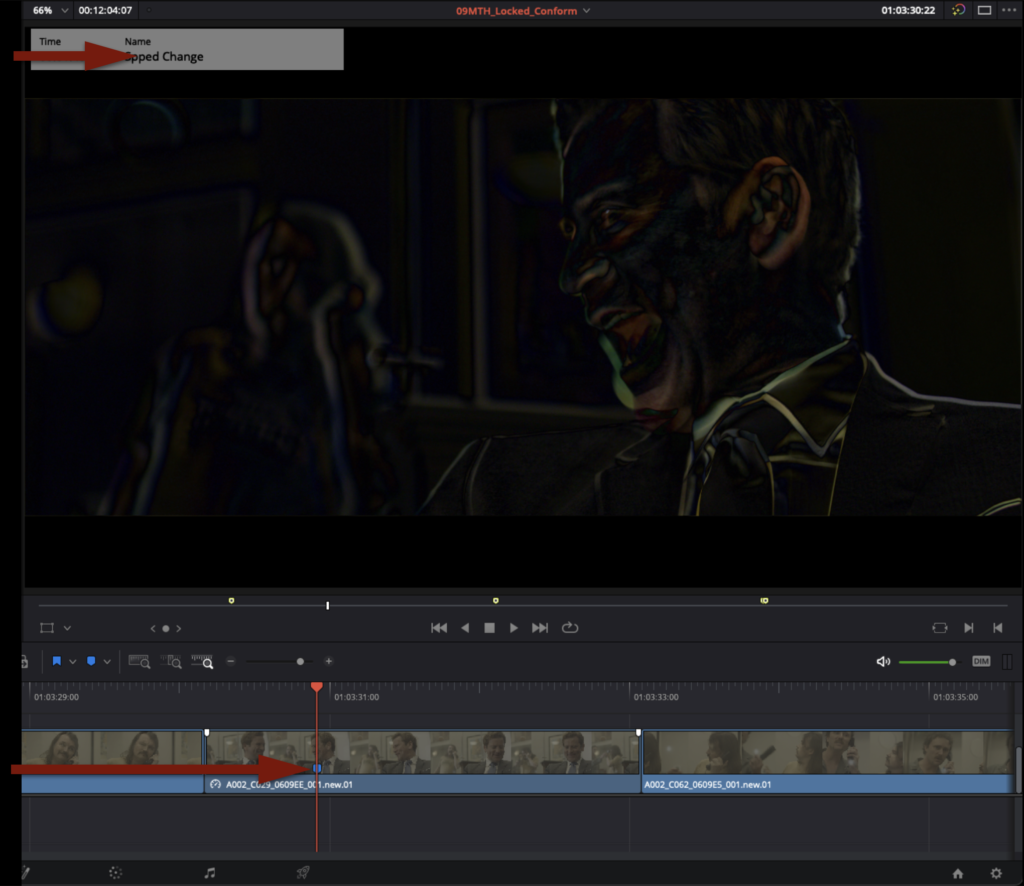
    If you cannot get any shot to match perfectly, mark that shot with a blue marker and name it with a brief description of the problem. After you have made it through the entire film, reach out to the Post Staff and they can help you with any shots marked in blue.
    Saving and Exporting Project

    Once you have finished checking your Resolve sequence against the reference video and they match perfectly, the project is ready for color grading. Save the project by hitting “Command+S”. Then type “Command+Q” to quit the project.

    Congratulations, you are done!

  • Calendar

    Fall 2026

    Aug 17-19Orientation
    Aug 24Fall semester begins at 9AM
    Sep 7Labor Day Holiday
    Nov 11Veterans Day Holiday
    Nov 25-27Thanksgiving Holiday
    Dec 10F1 screening at 7PM
    Dec 11Students dismissed for break at 6PM
    Dec 11M1 screening at 7PM

    Spring 2027

    Jan 6Spring semester begins at 9AM
    Jan 18MLK Day Holiday
    Mar 15-19Spring Break for BFAs
    April 30Students dismissed for break at 6PM
    April 30F2 Screening at 7PM
    May 1BFA graduation and capstone screening

    Summer 2027

    May 10Summer semester begins at 9AM
    May 14F3 Screening at 7PM
    May 31Memorial Day Holiday
    Jun 19Juneteenth Holiday
    Jul 3Independence Day Holiday
    Jul 30Students dismissed for break at 6PM
    Jul 30M2/M3 Screening at 7PM
    Jul 31MFA graduation and capstone screening
  • FSU Resource List

    Overview

    The FSU Resource List compiles campus and program-related resources available to students, including academic services, production support resources, technical facilities, administrative offices, student support services, and other tools that may assist students throughout the program.

    Health & Wellness

    • Counseling & Psychological Services
      The FSU Counseling & Psychological Services is dedicated to improving the overall well-being and resiliency of our students, faculty, and staff.
    • FSU Counseling & Psychological Services After Hours Line  
      In case of a mental health emergency after regular business hours and/or on weekends, please call our after-hours hotline at (850) 644-TALK (8255).
    • University Health Services
      The aim of University Health Services is to promote and improve the overall health and well-being of FSU students.
    • Noles C.A.R.E.
      Noles C.A.R.E. is a suicide prevention program which supports the goal of providing suicide prevention training, education, and resources to the campus community.
    • Medical Response Unit (MRU)
      MRU functions as a basic life support and quick response unit at FSU, as well as a safety net on campus IN ADDITION to the normal response already provided by the FSU police department and the community 911 system.Staffed by the trained student volunteers, the MRU is an affiliated project associated with University Health Services.FSU Police Department, Student Government Association, and FSU Division of Student Affairs.
    • The Center for Health Advocacy and Wellness (CHAW)
      CHAW at University Health Services encourages students to make healthy lifestyle decisions that facilitate academic success and lead to life-long health and wellness.
    • LIFT: FSU’s Collegiate Recovery Community
      The mission of LIFT is to support students interested in recovery from addiction and substance misuse thrive during their college experience. 
    • The Resilience Project  
      FSU has launched a new trauma-informed, multimedia, online college student mental health and wellness toolkit to help students build coping and stress management skills and connect them to FSU’s resources.
    • Campus Recreation 
      Campus Recreation offers a diverse selection of recreational programs and services for FSU students, faculty, and staff.
    • The Psychology Clinic 
      The Psychology Clinic is a medical health service, training, and research center operated by the Department of Psychology at Florida State University. They are dedicated to providing empirically supported treatment and assessment services to Tallahassee and surrounding communities.
    • Human Services Center
      The Human Services Center offers free individual, couples, and family counseling to students as well as youth and adults in the community.
    • Meditation Room 
      The Meditation Room is available to any member of the Florida State community who seek a quiet, simple place to reflect or meditate.
    • Nole Central
      Discover unique opportunities at FSU. Search for events, organizations and news articles happening around campus.

    Studying & Learning

    • The Academic Center for Excellence (ACE)
      ACE is a university learning center focused on helping students develop the study skills and success habits that are necessary in a large research university and valued by future employers.
    • New Student & Family Programs 
      New Student and Family Programs (NSFP) exists to aid in the transition of our new students and their family members to Florida State University.
    • Department of Student Support and Transitions 
      The Department of Student Support and Transitions supports, connects, and empowers all students as they navigate their academic and personal journeys.
    • Withdrawal Services  
      The Withdrawal Services staff provides support to students and their families when a student’s enrollment is unexpectedly interrupted due to unforeseen circumstances (personal, family, medical or mental health reasons, and/or other crisis).
    • Learning Resource Center (LRC)
      The LRC serves students, faculty and staff by providing technological support services, lab and classroom facilities, and multimedia equipment.
    • Program for Instructional Excellence (PIE) 
      The PIE, a unit of The Graduate School strives to enrich the learning experience for undergraduate students at FSU by supporting the teaching efforts of graduate student teaching assistants through its various services.
    • ProfessioNole Mentors Program 
      One of the Career Center’s longest-running signature programs, connects FSU students with Alumni and Friends of Florida State for career advice and guidance.
    • The Career Center 
      The FSU Career Center provides comprehensive career services to students, alumni, employers, faculty/staff and other members of the FSU community.

    Safety

    • FSU Alert 
      Florida State University’s emergency notification system. If there is a condition which threatens the health and safety of persons on campus, university officials will warn the campus community.
    • Green Dot 
      Green Dot is a bystander intervention initiative that recognizes that most people care about the high prevalence of power based personal violence but don’t have the tools to know how to be part of the solution.
    • FSU Reporting  
      This page allows you to share important information regarding incidents or concerning behavior happening in the Florida State University community.
    • Victim Advocate Program 
      The Victim Advocate Program provides free, confidential, and compassionate assistance to primary and secondary victims of crime, violence or abuse against, or by, Florida State University students and FSU-affiliated individuals through advocacy, education and training.
    • Investigations & Assessment 
      The Office of Investigations and Assessment (I&A) provides investigative services for allegations of misconduct concerning Recognized Student Organizations (RSOs), whether as a reporting or responding party.
    • Case Management Services
      The Case Manager works with individuals to provide emotional support, counseling, advocacy, and to identify immediate needs, making appropriate referrals to campus and community resources.
  • F3 Production Specs

    Overview

    F3 projects are expected to follow a defined set of production specifications and content parameters. These guidelines are designed to establish manageable limits for production scope, including factors such as page count, shoot days, cast size, locations, visual effects, stunts, intimacy, animals, weapons, and other complex production elements.

    These specifications help ensure that projects can be completed successfully within the available schedule, crew size, resources, and experience level associated with the course. The goal is not to limit creativity, but to help students learn how filmmakers shape strong stories within the practical constraints of time, safety, logistics, staffing, and available resources.

    Content specs

    Page count3 pages (minimum)
    4 pages (maximum)
    Story runtime3:00 (minimum)
    5:00 (maximum)
    Credits runtime1:00 for credits
    + 0:10 for leader
    Total runtime4:10 (minimum)
    6:10 (maximum)
    Quantity of scenesNo limit
    Quantity of locationsThe script can include a variety of locations as sluglines, but you should plan to be able to shoot them all at no more than two actual locations
    Quantity of charactersNo limit
    ChildrenYes
    AnimalsYes
    WeaponsYes
    StuntsYes
    IntimacyYes
    Visual EffectsMust be approved by the Head of Visual Effects before production

    Production specs

    All footage appearing on screen during the running time of these projects needs to be created by students during the assigned production days. This includes any content that needs to appear on screens within shots — e.g., a news broadcast that appears on a television within the scene. Producers will need to build time into the production schedule to create this embedded content during the assigned production days. 

    Shooting days2 days
    Length of workday12 hours
    Earliest call time6:00AM
    Latest wrap time12:00AM
    Night shootsNo
    Locations per day1 location by default. More than one location in a given day requires approval from Head of Production.
    Distance to locationWithin the studio zone
    Pick-up daysNo

    Capture specs

    Camera packageRED
    Frame rate24.000p
    Sensor mode7K FF
    Capture resolution2048 x 1080 (2K)
    Capture aspect ratio1.90:1
    Approved mattes1.37:1 • 1.66:1 • 1:85:1
    2.00:1 • 2.39:1
    Capture formatMOV
    CodecProRes 4444
    Gamma/color spaceRWG / Log3G10
    Color processingIPP2
    Output color spaceRec. 709
    Output tone mapLow Contrast
    Highlight roll-offVery Soft
    Sampling4:4:4 12-bit
    Bitrate302 Mbps (VBR)
    Production soundDual system

    Data allocation

    Pages per day2 pages
    Shooting ratio25:1
    Data rate2.6 GB/minute
    Data per page65 GB
    Data per day130 GB
    Total data260 GB
    Dailies per day50 minutes
    Total dailies100 minutes

    Post-Production

    Pic edit softwareMedia Composer
    Pic edit days5 days
    Pic edit locationPost Hall
    Sound design softwareProTools
    Sound design days6 days
    Sound design locationPost Hall
    Sound mix days0.25 days
    Sound mix locationMix A, Mix B
    VFX scope2D effects. Simple 3D effects only upon approval and test. All effects must be approved by the Head of Visual Effects.
    VFX softwareAfter Effects, Cinema 4D
    VFX days2-5 days (assigned by faculty)
    VFX locationDigital Artist Suites
    Coloring softwareDaVinci Resolve
    Coloring days1 day
    Coloring locationPost Hall