Overview
This page provides a step-by-step guide to the Assistant Editing workflow for the D1 project inside Avid Media Composer, providing instructions for how to:
- Configure the Media Composer project
- Link, modify, and transcode footage
- Make subclips for mono audio
- Label and organize footage in bins
- Set Start and Stop markers
- Assemble Scene String-outs
- Assemble a dailies reel
- Export and upload dailies to Frame.io
Media Composer Project
Make sure your “Show Volume” is mounted and navigate to your show folder and launch the media composer project.
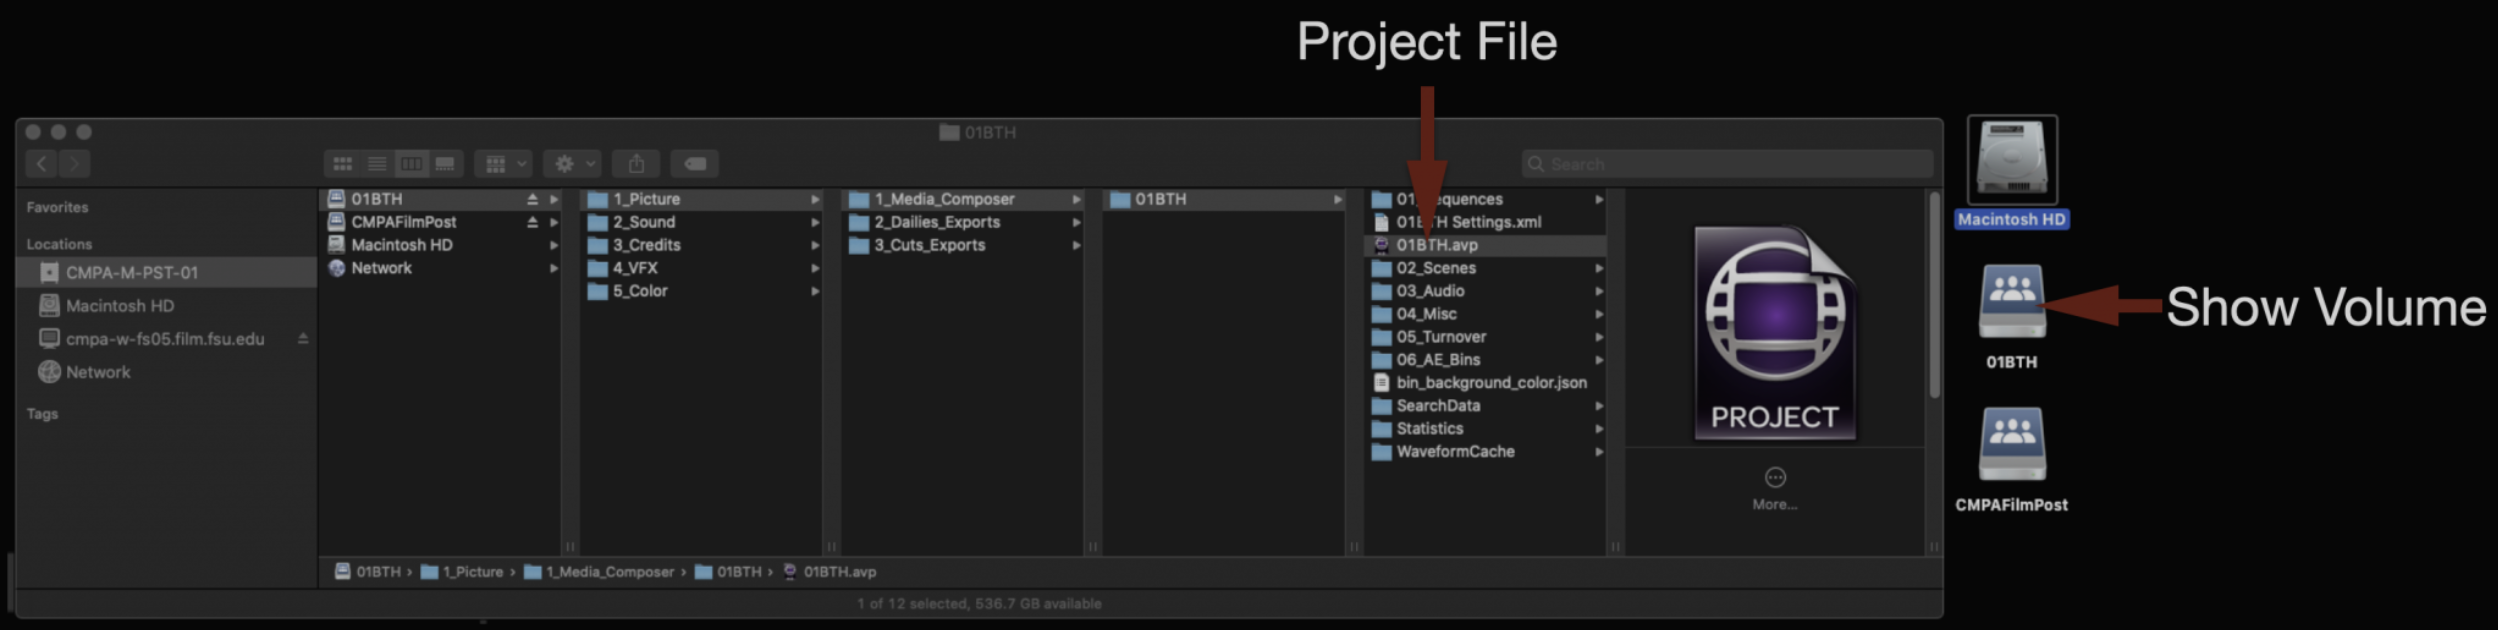
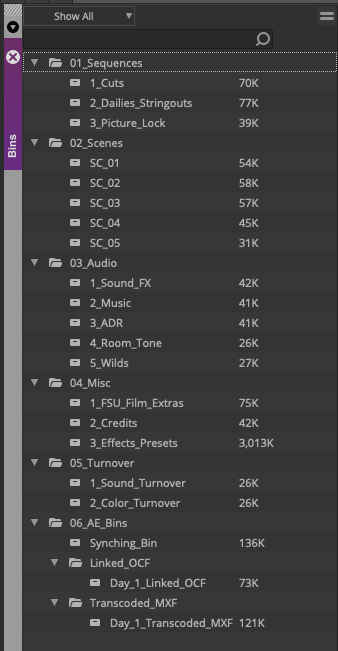
When it opens you will see the project template. These folders and bins must be maintained and kept organized.
Before you begin double check the “Media Creation Settings”. Go to preferences, project tab, and then Media Creation.

In the Media Creation window make sure you select:
- DNxHD SQ for Video Resolution
- Your Show Volume for the Video and Audio Drive
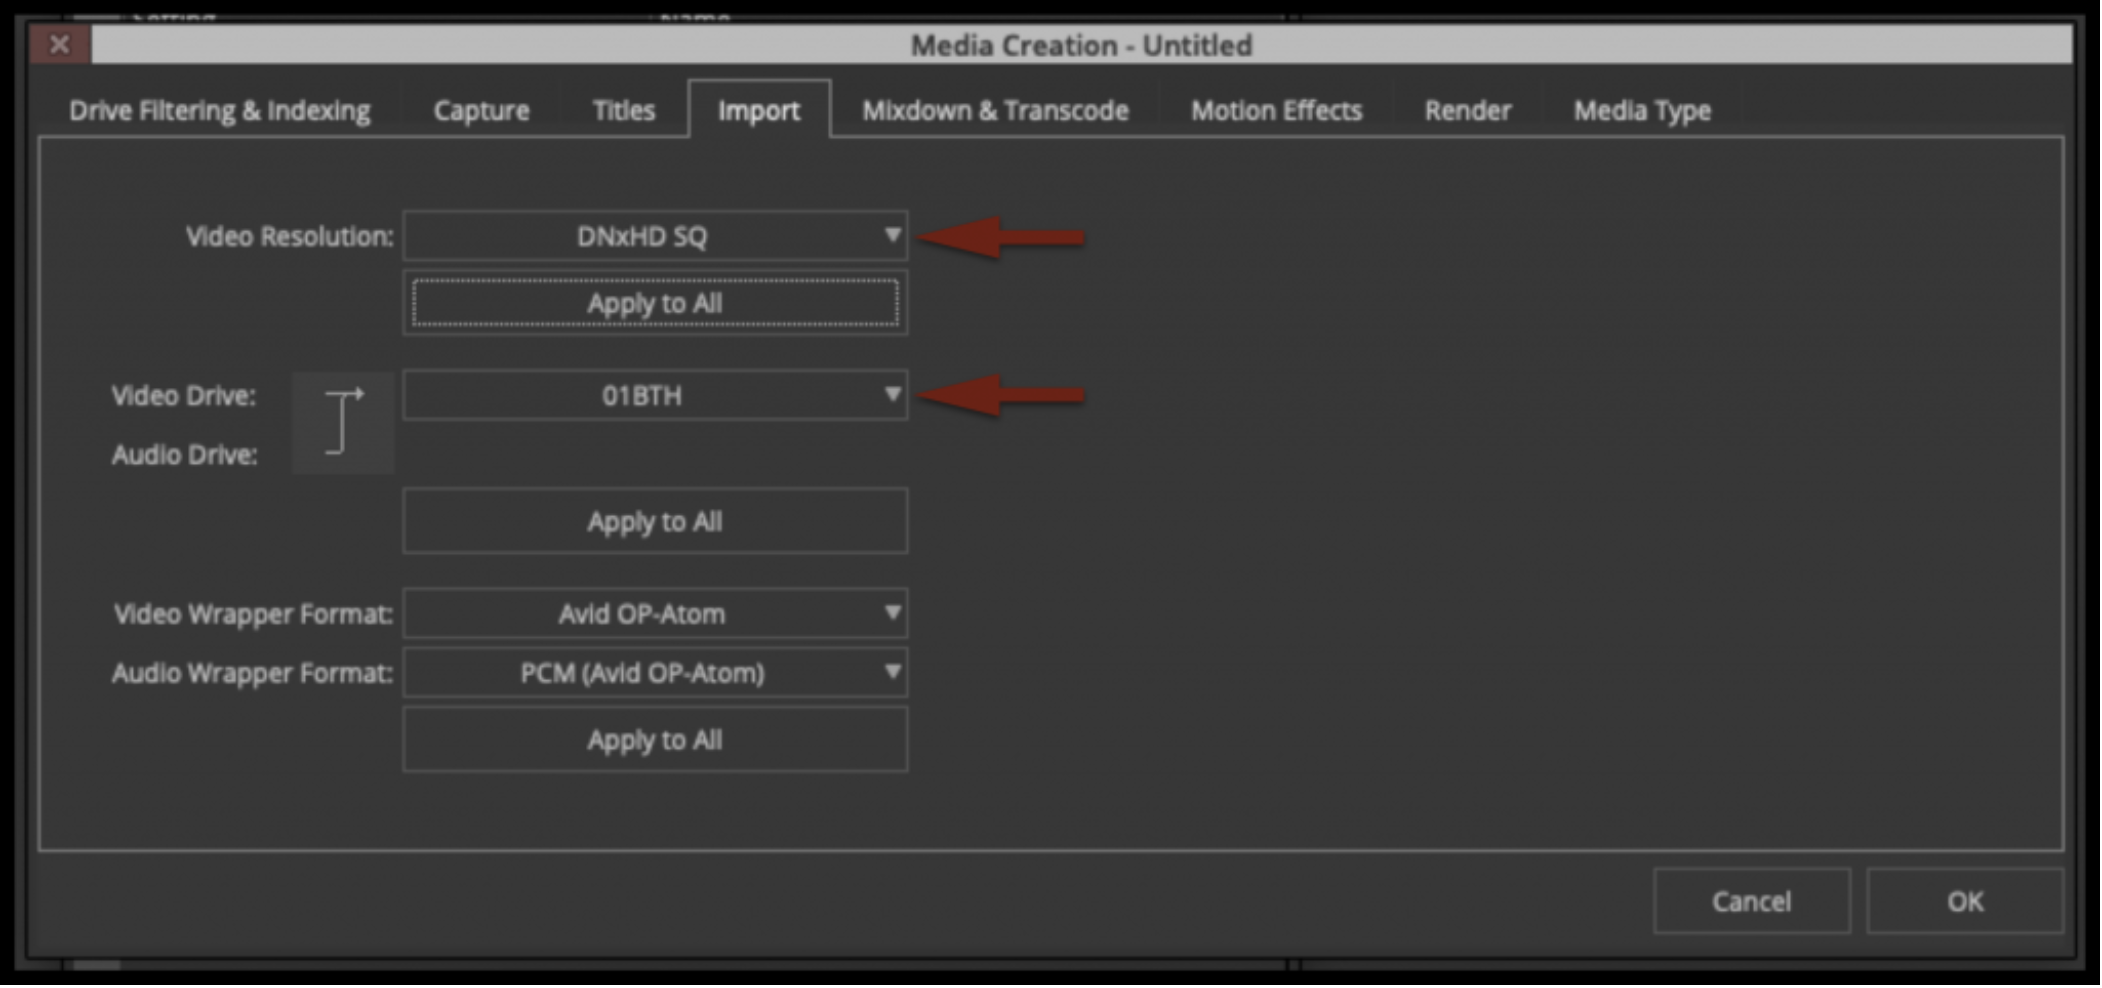
Select Apply to All for everything and then click Okay.
Link, Modify, and Transcode Footage
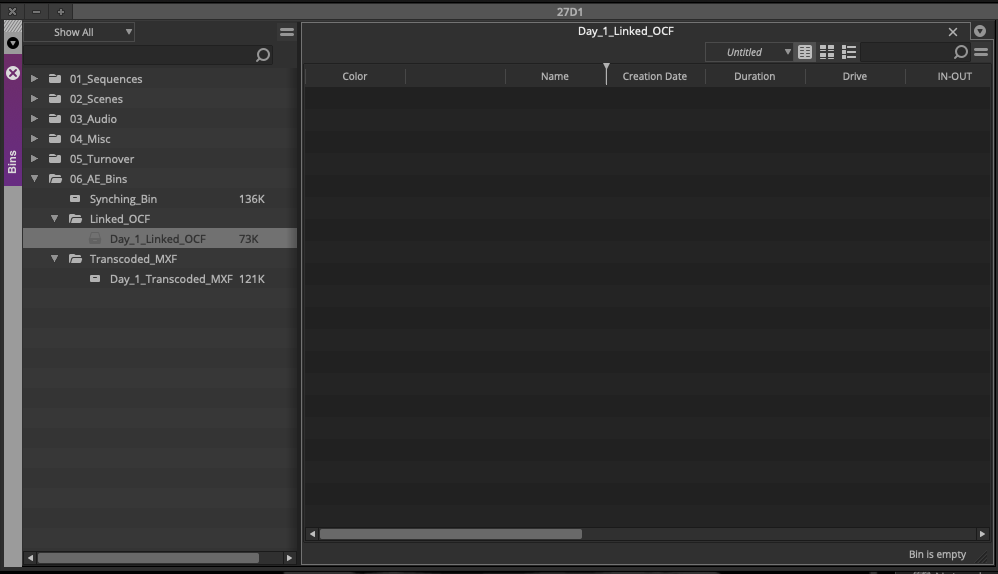
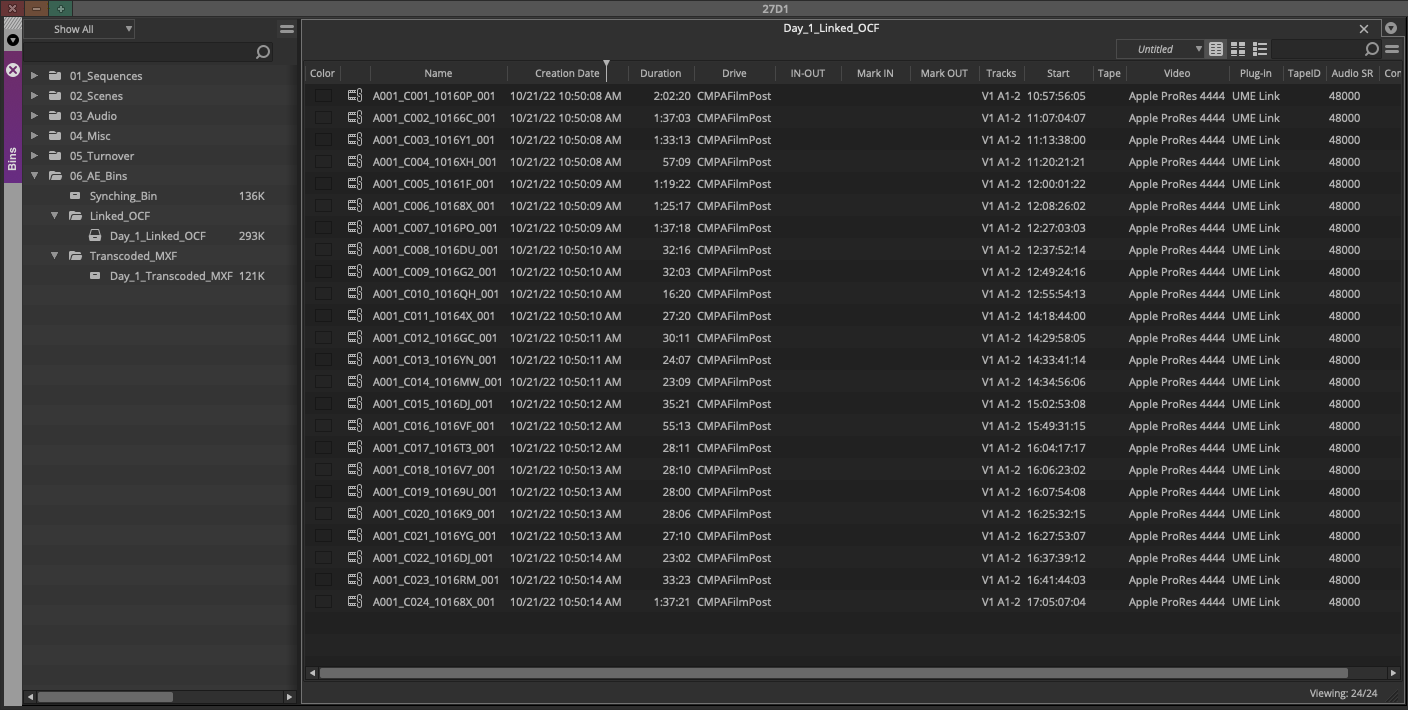
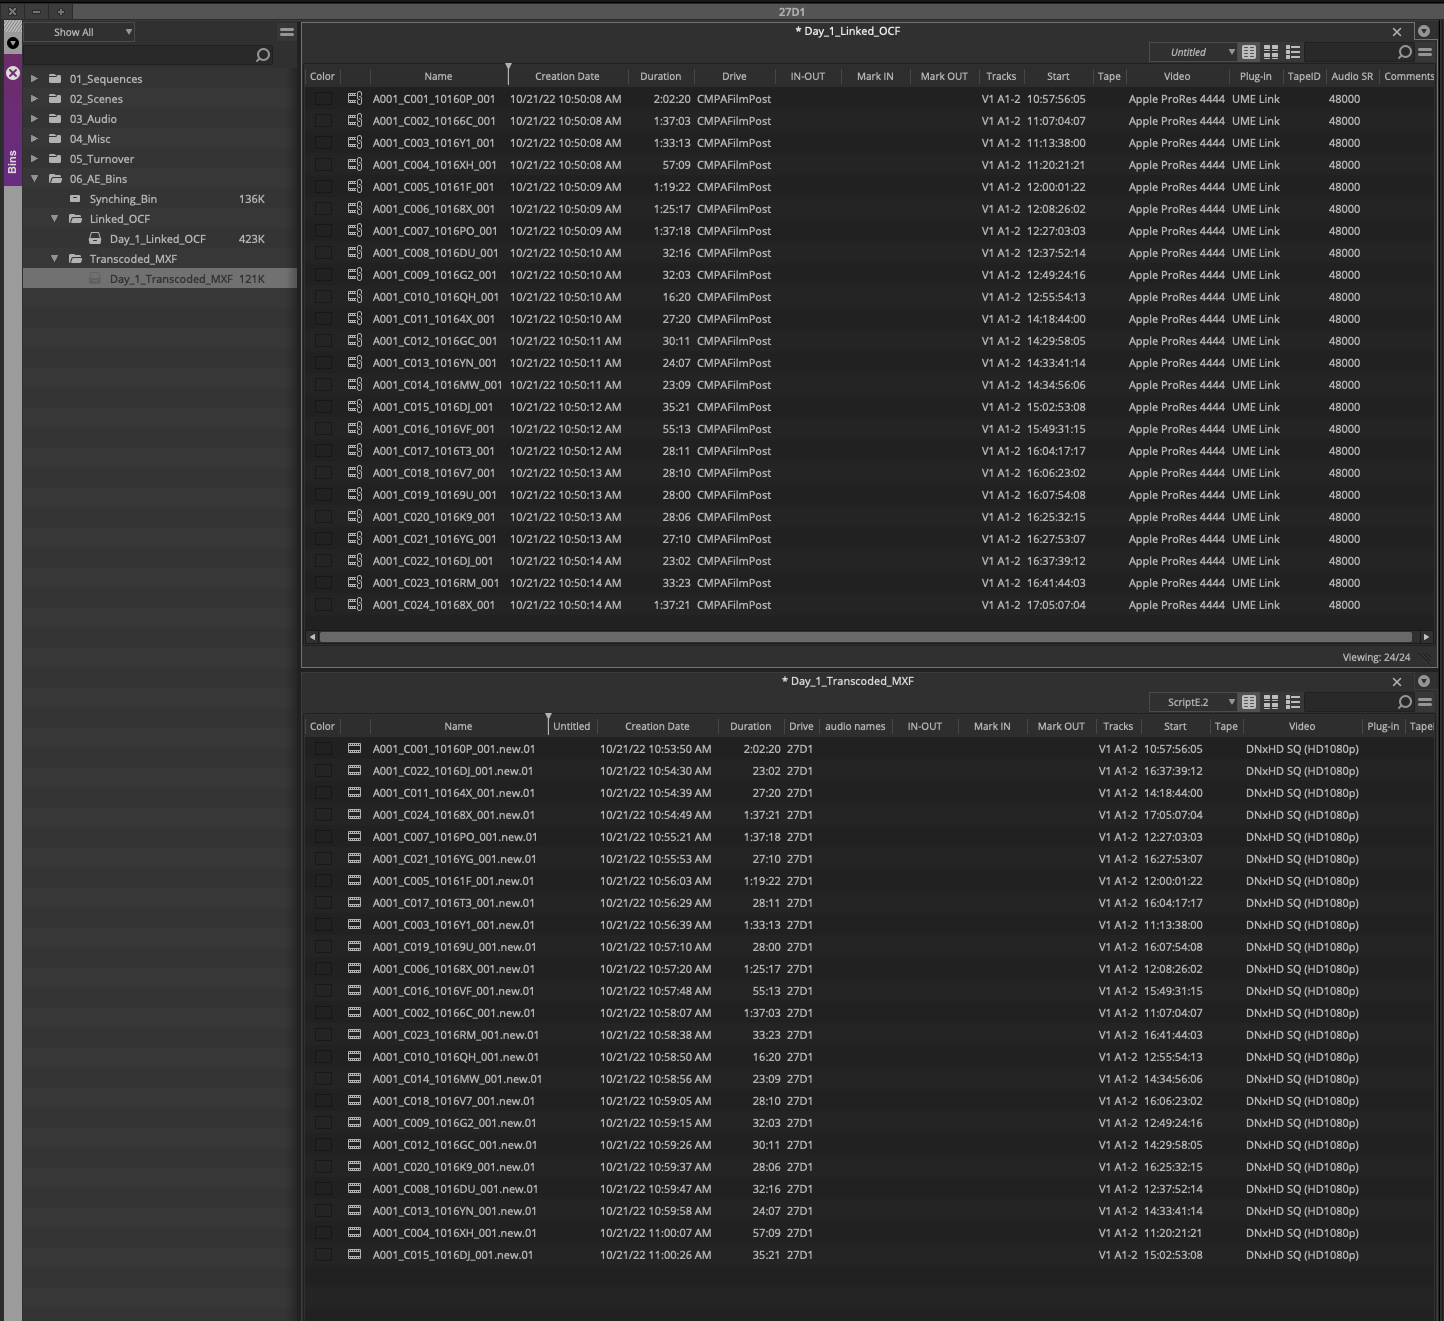
Open the Linked OCF bin.
Right click inside the bin and select Import – Source Browser.
Inside the Source Browser navigate to to a days worth of OCF, make sure the Link icon is selected, and then click Link.
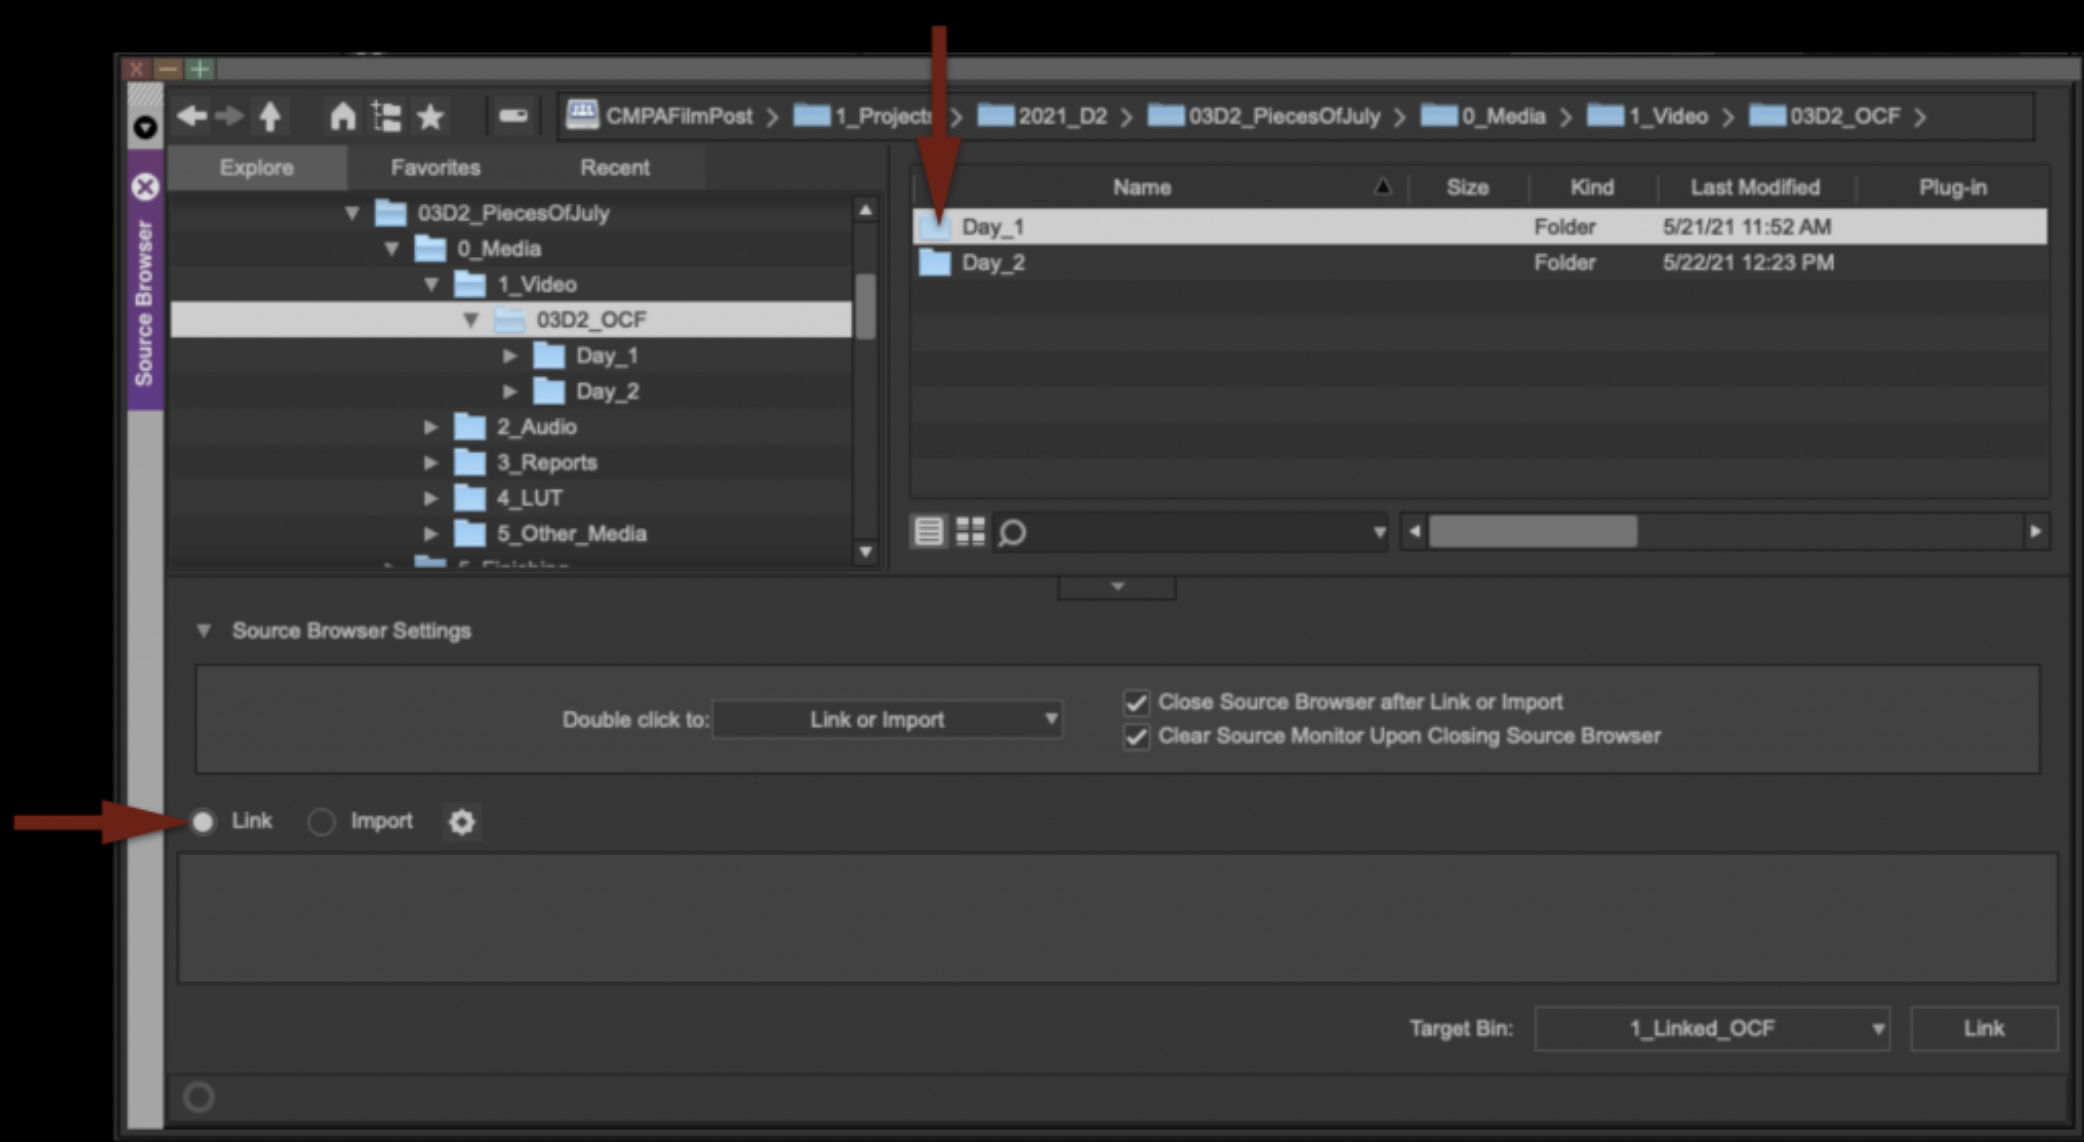
This will “Link” all of the select footage into the bin. Notice the icons a linked chain letting you know this is not Avid Media yet but only linked to the OCF on the CMPAFilmPost Server.
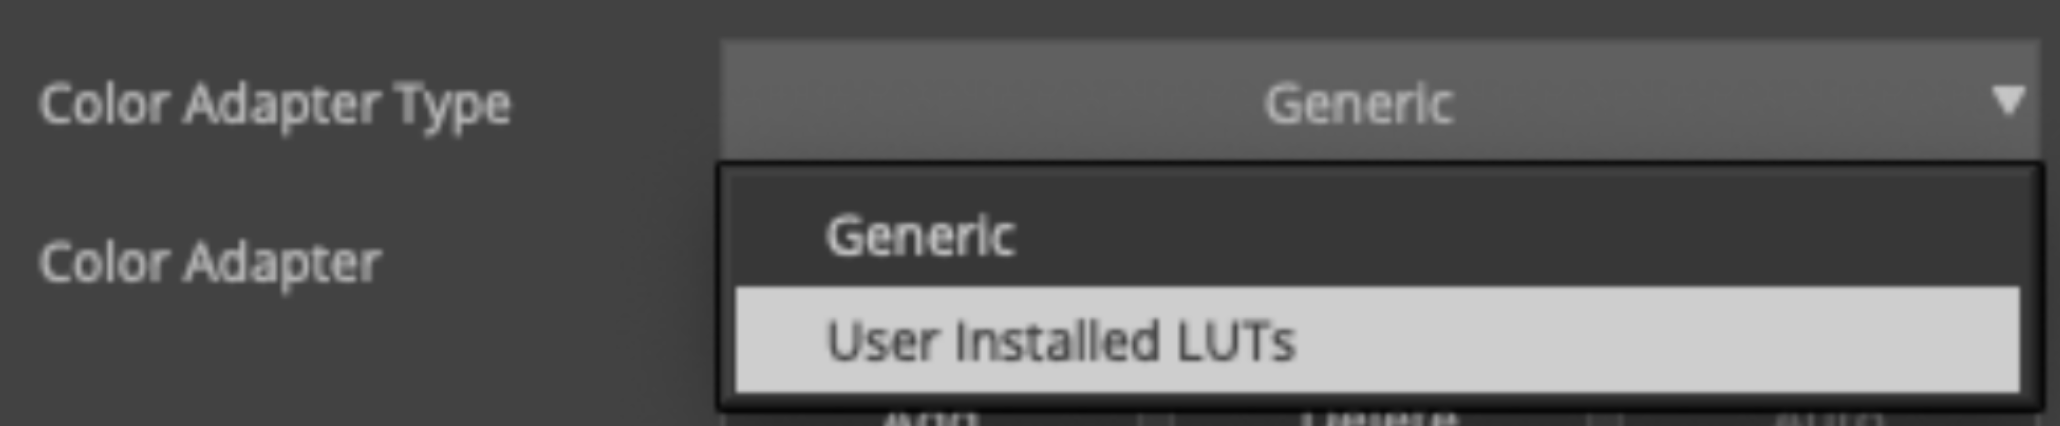
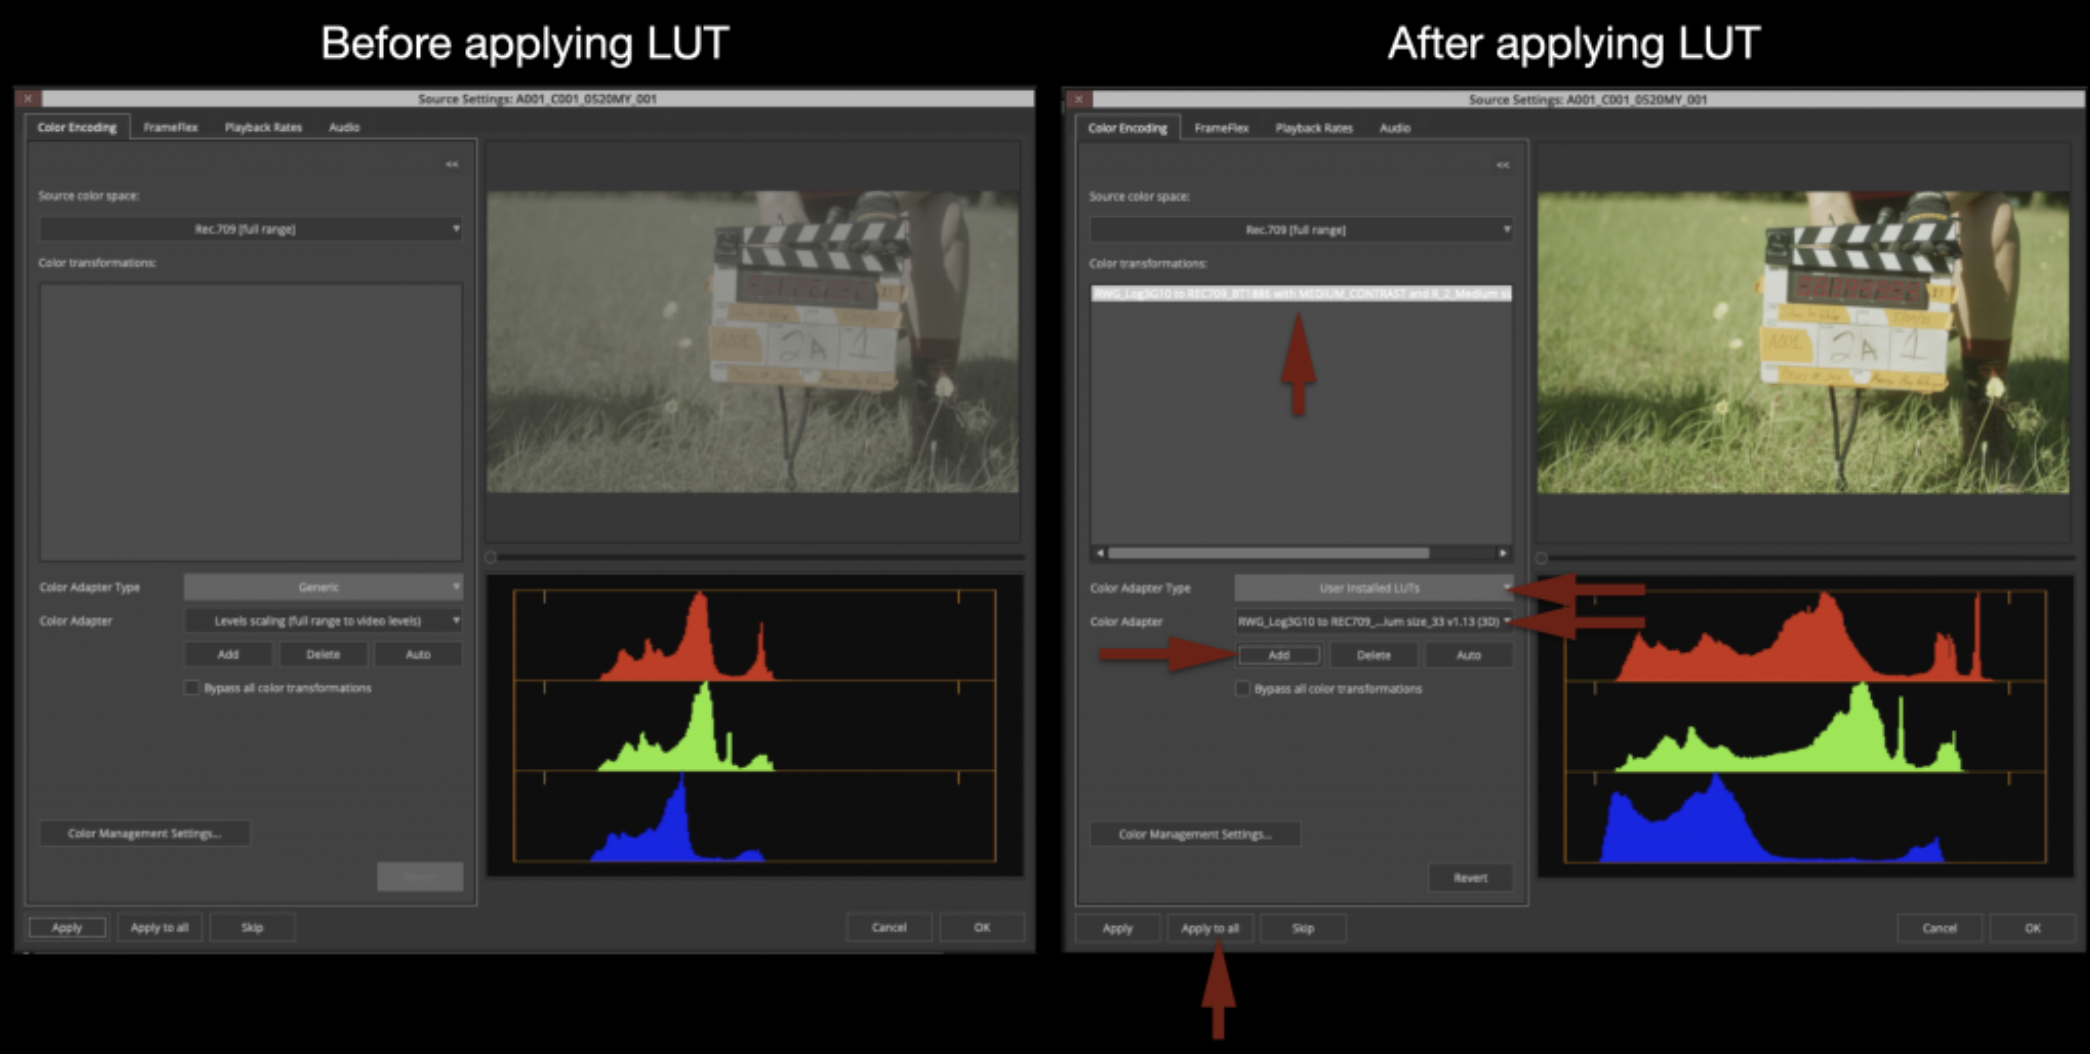
Highlight all of the linked files in the bin by hitting “Command + A”. Then right click on a clip and select “Source Settings”. This will open the “Source Settings” window. You will use the Color Encoding tab to apply a Look Up Table (LUT) to the OCF which is in Log. Then you will use the FrameFlex tab to set the proper aspect ratio.
In the Color Encoding Tab set the Color Adapter Type to “User Installed LUTs”
Then select your shows LUT from the list. Unless otherwise instructed by production you will use the default LUT which is Medium Contrast and Medium Size shown below.
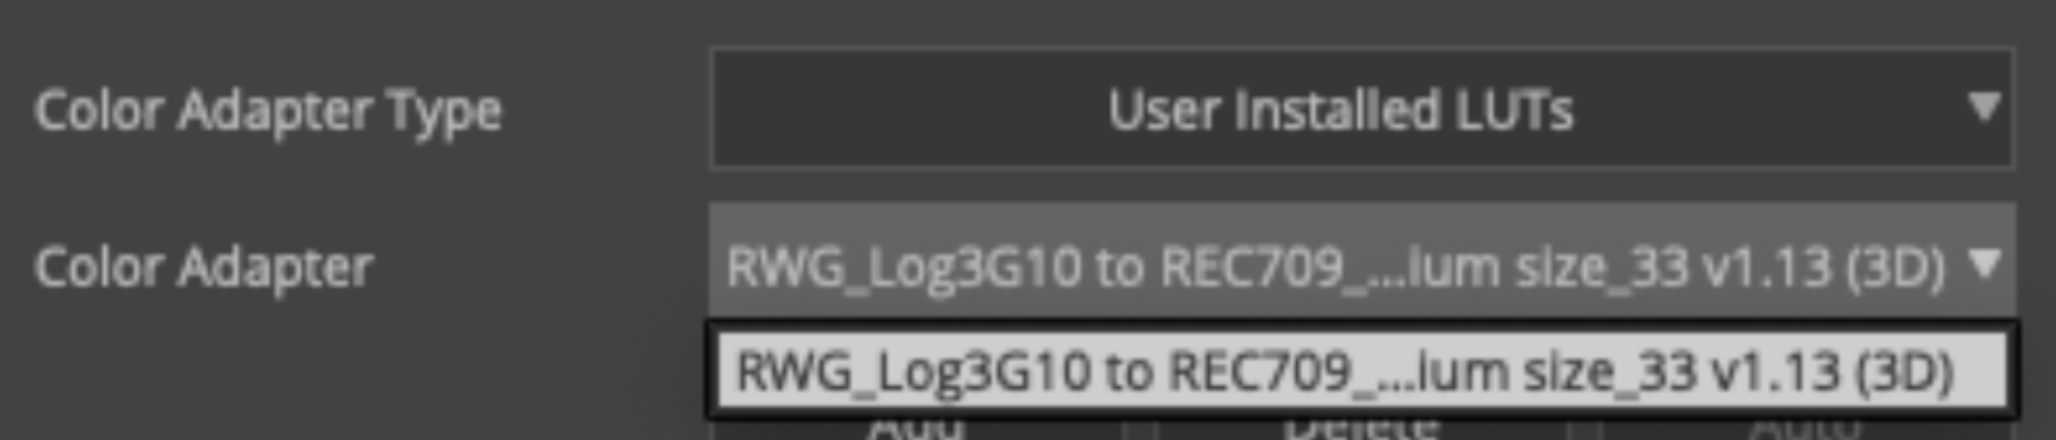
Then click “Add” and then “Apply to All”. This will change all of your linked footage from looking like a LOG video file (washed out and without contrast) to looking like a 709 video file (saturated and with contrast). This is what the DP would have been viewing on set.
Next use the FrameFlex Tab to set the proper aspect ratio. The only two options you need to modify are the “Frame Aspect Ratio” and the “Reformat” drop down menu shown with red arrows below.
The “Frame Aspect Ratio” will be set to one of the three approved aspect ratios of either 1.85:1, 2.39:1, or 1.375:1. Check with the production to see what aspect ratio they framed for.
The “Reformat” drop down should be set to Pillarbox/Letterbox.
Click “Apply to All”.
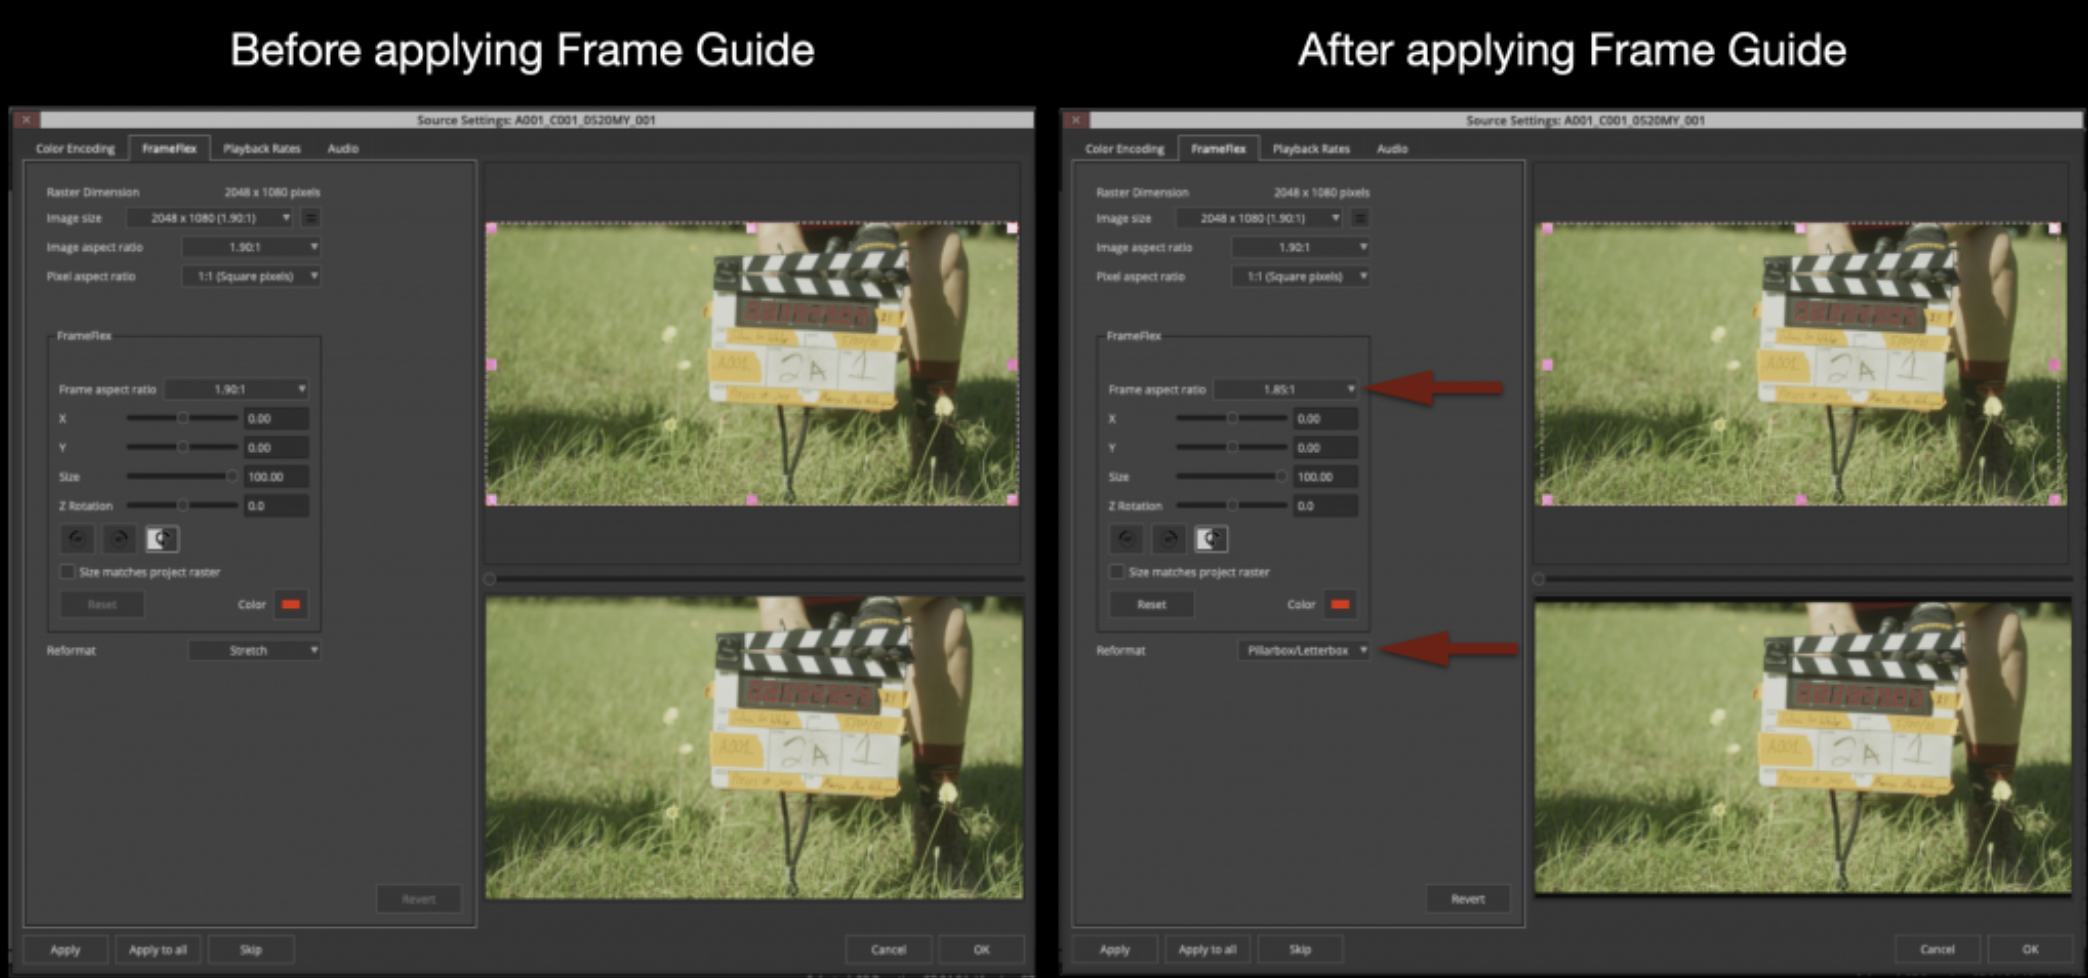
Changing these two parameters will ensure that when new Avid Media is created that is 1920×1080 it will have the correct aspect ratio burned in.
Now that all of your linked media has the proper color and framing its time to transcode to Avid Media. Highlight all of the linked files in the bin by hitting “Command + A”. Then right click on a clip and select “Consolidate/Transcode”.
This will open the “Consolidate/Transcode” window.
Study the options with the red arrows shown below. THIS IS VERY IMPORTANT as it determines the kind of media that will be transcoded and used for editing in Media Composer.
The radial button in the top left should be set to “Transcode” You should select your show volume under target drive. DO NOT SELECT CMPAFilmPost. Then double check all of the red arrows on the right.
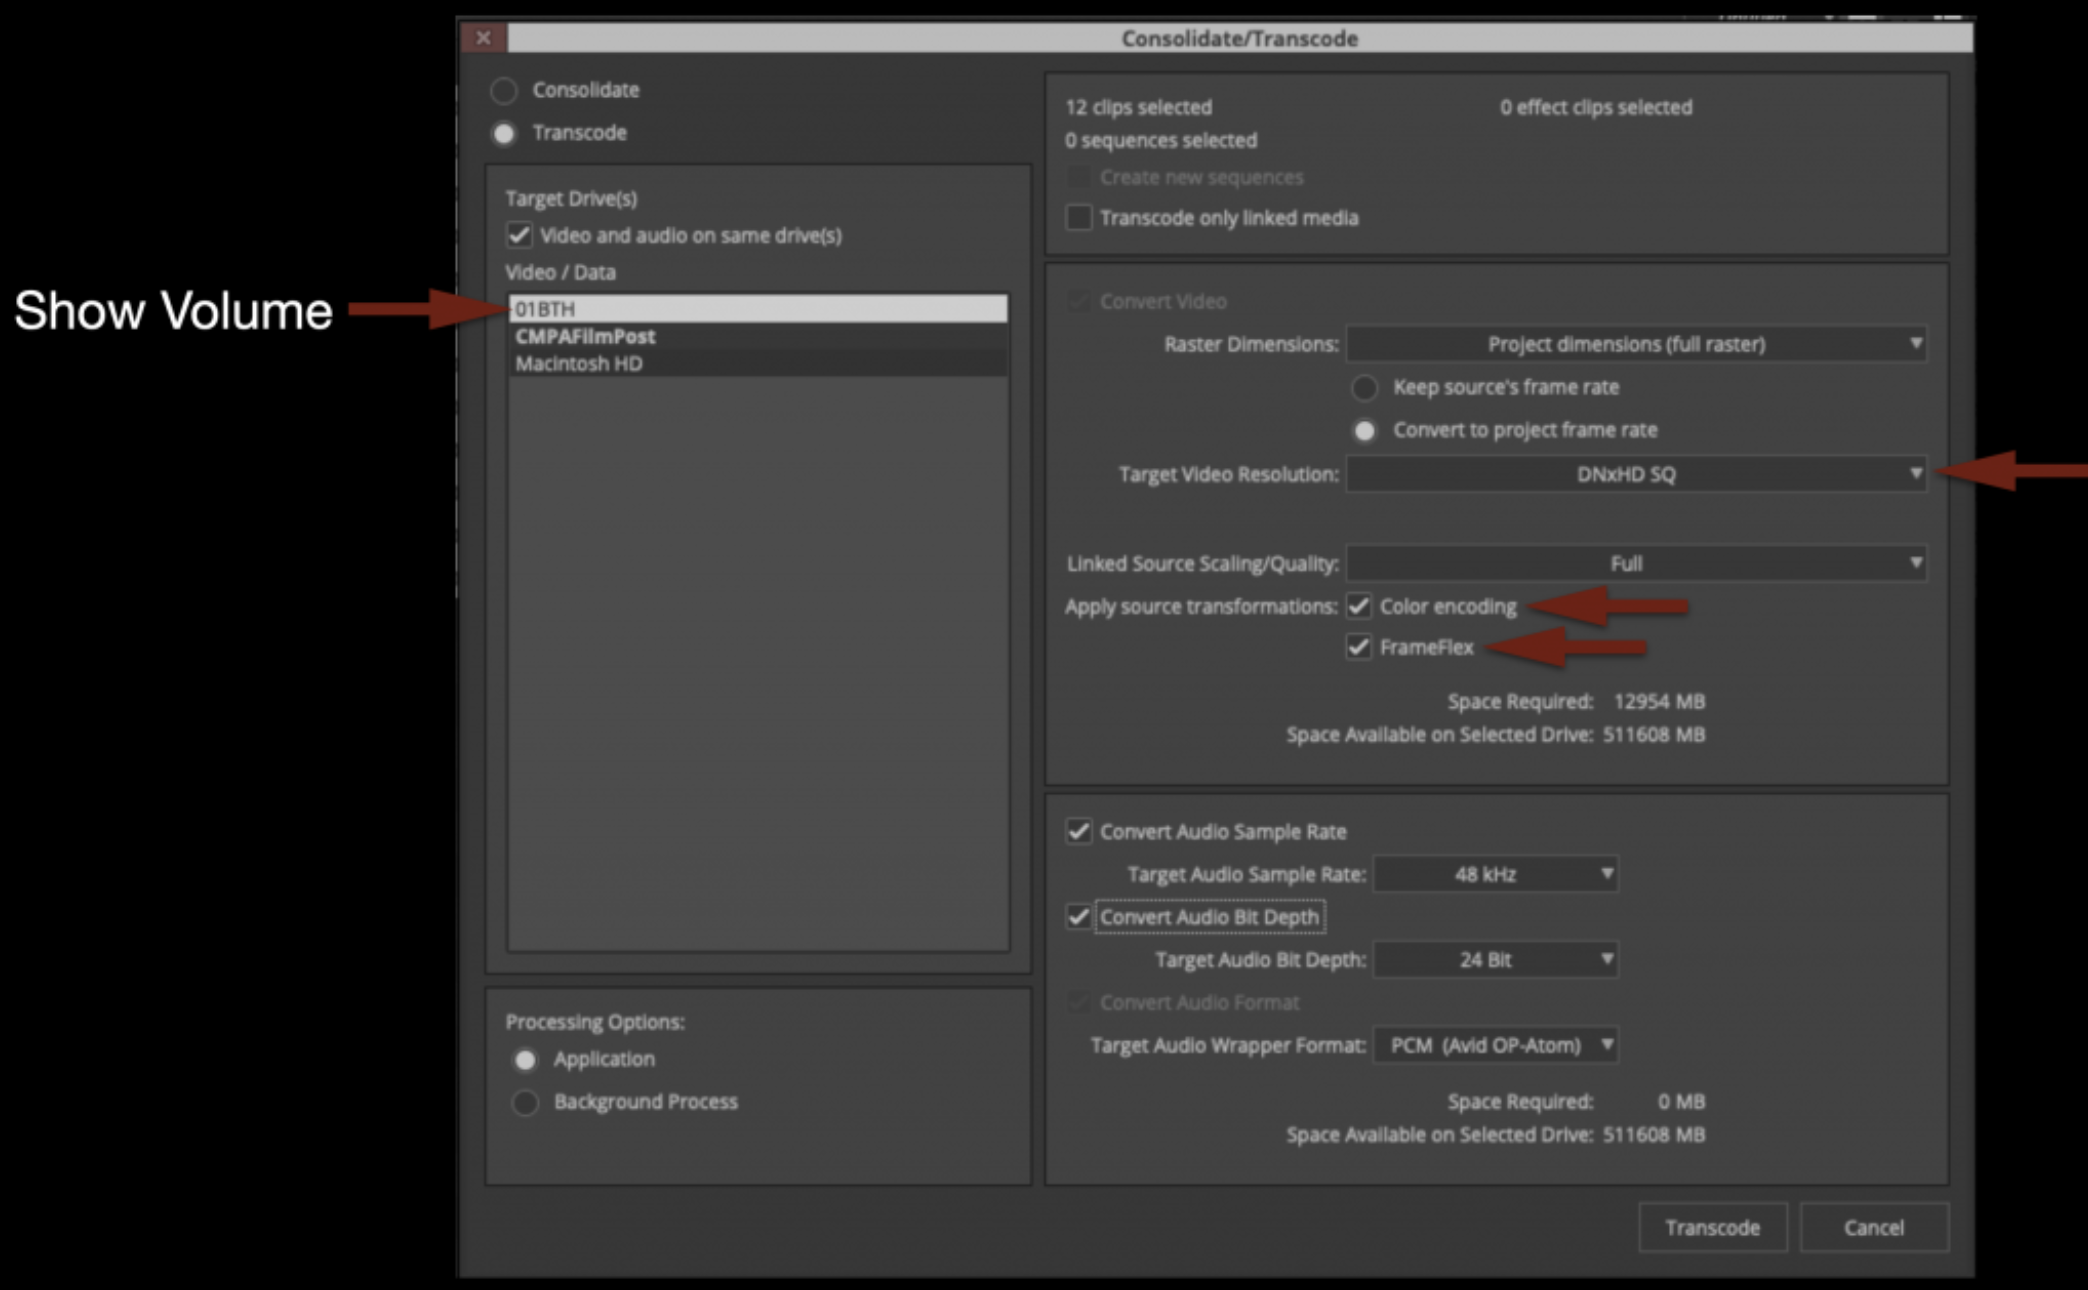
Once everything is set properly you can click “Transcode”. This process will take a few minutes as it generates new Avid Media so take a break and relax.

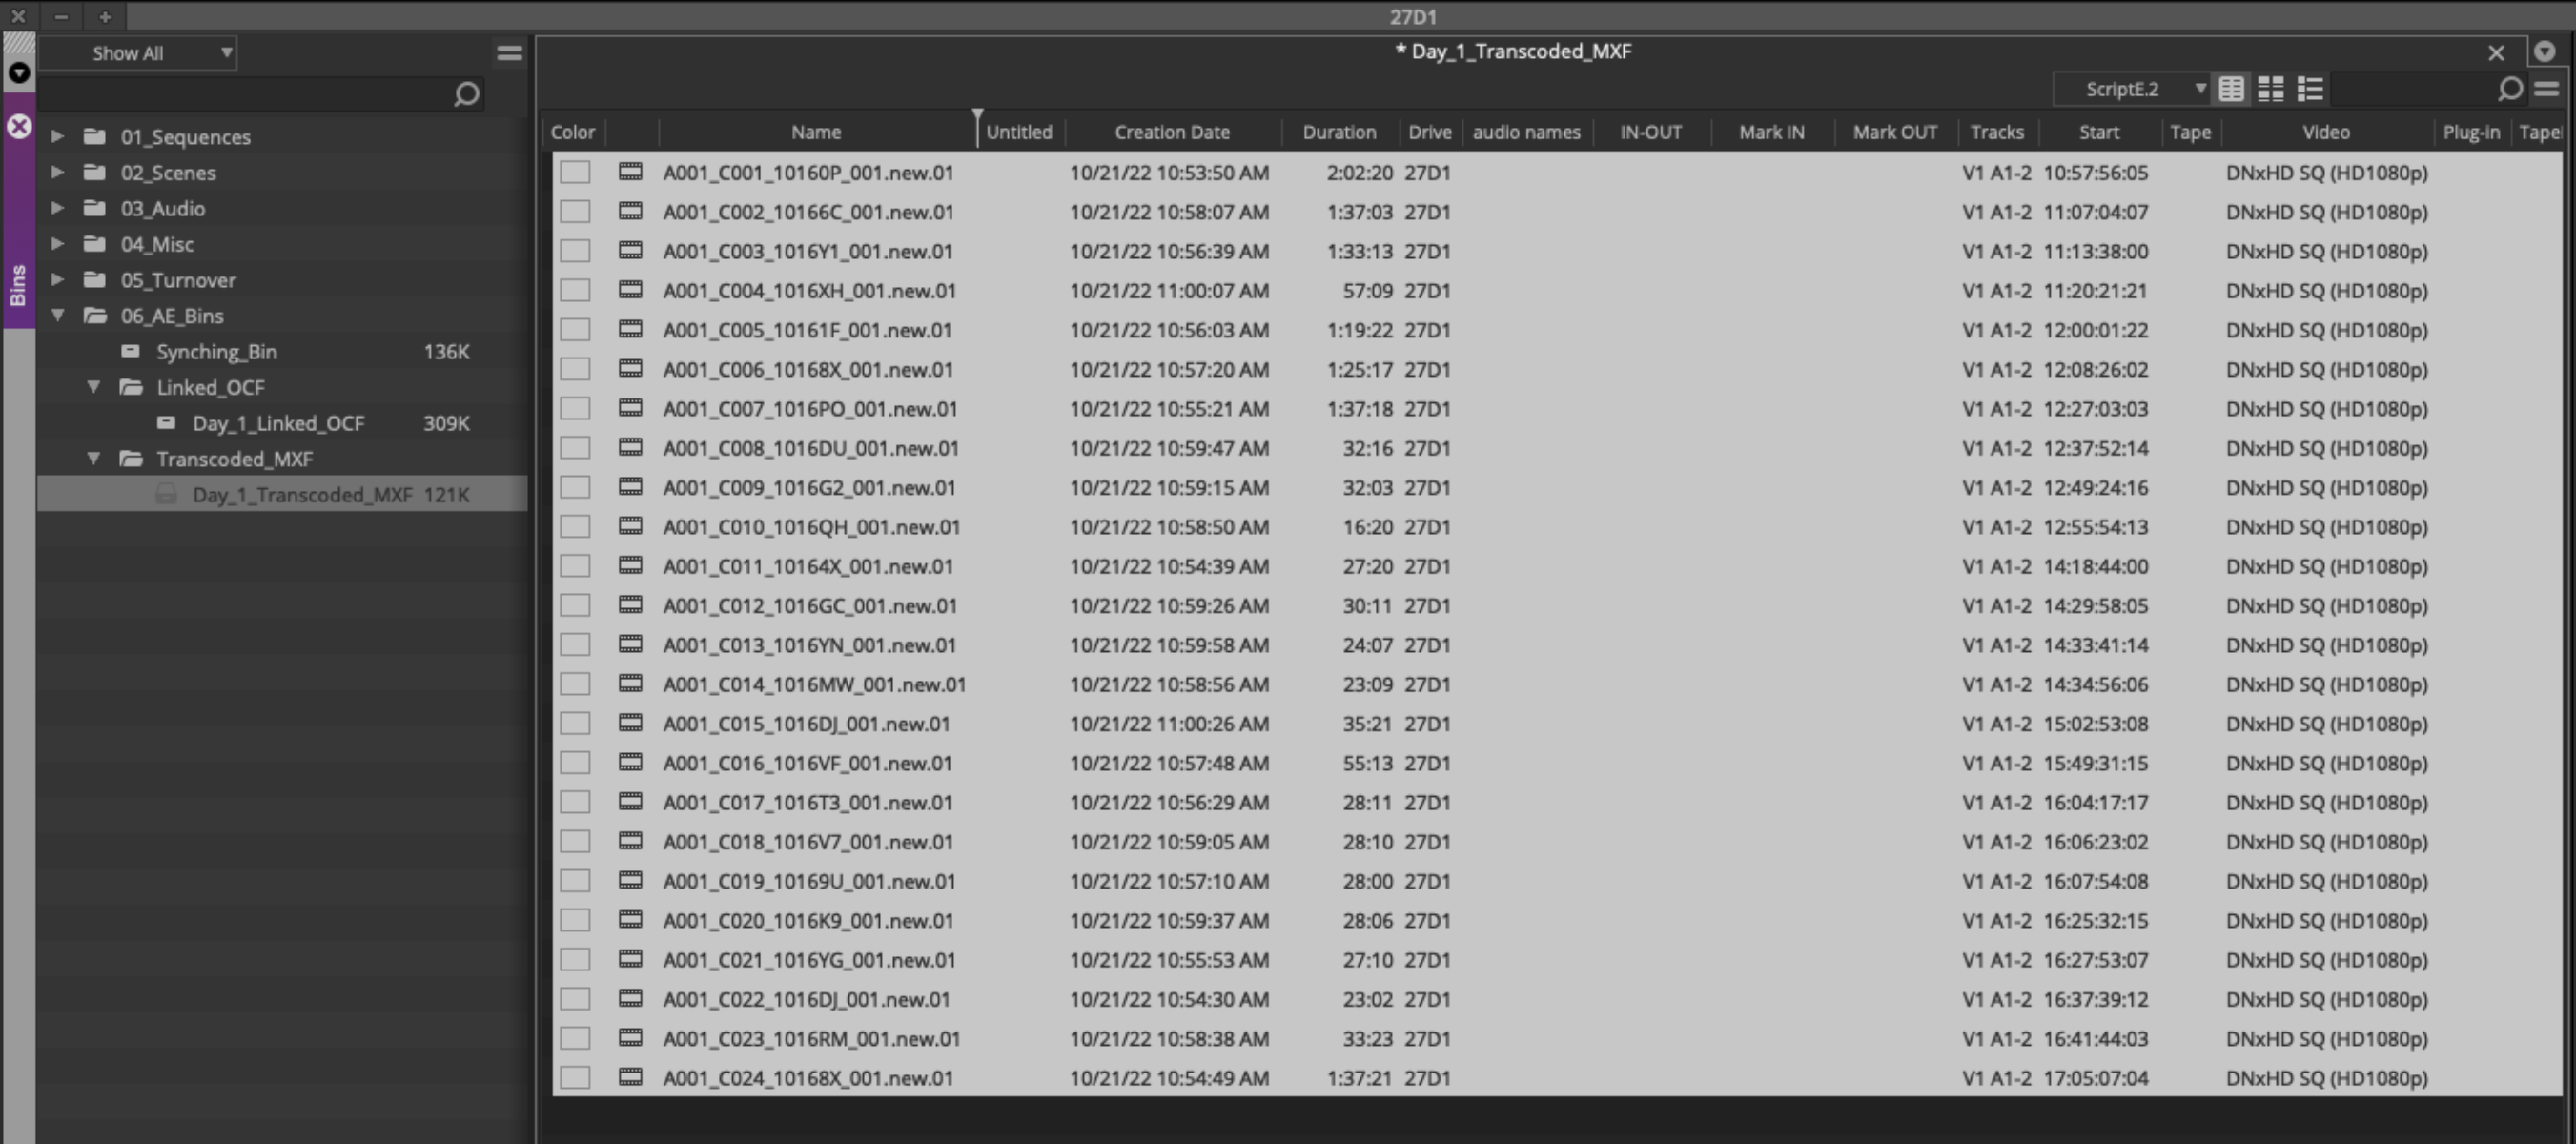
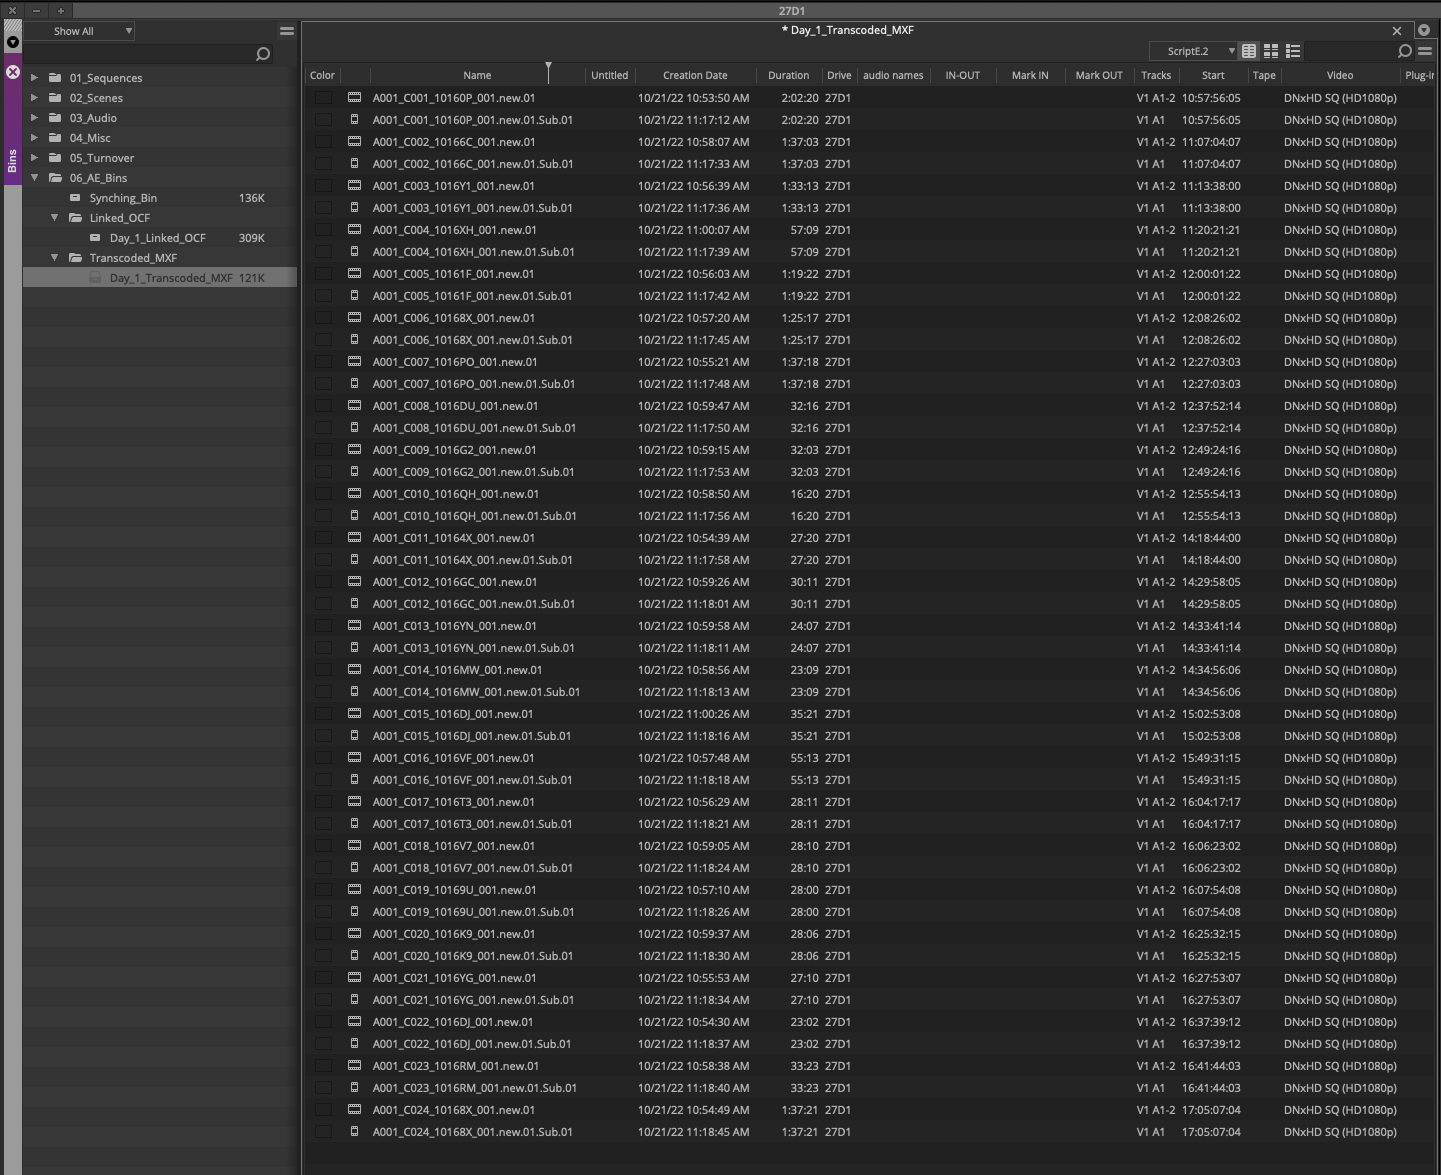
When the transcode is finished you will notice that now you have two versions of everything in your bin. One is a linked OCF and the other is Transcoded MXF Avid Media.
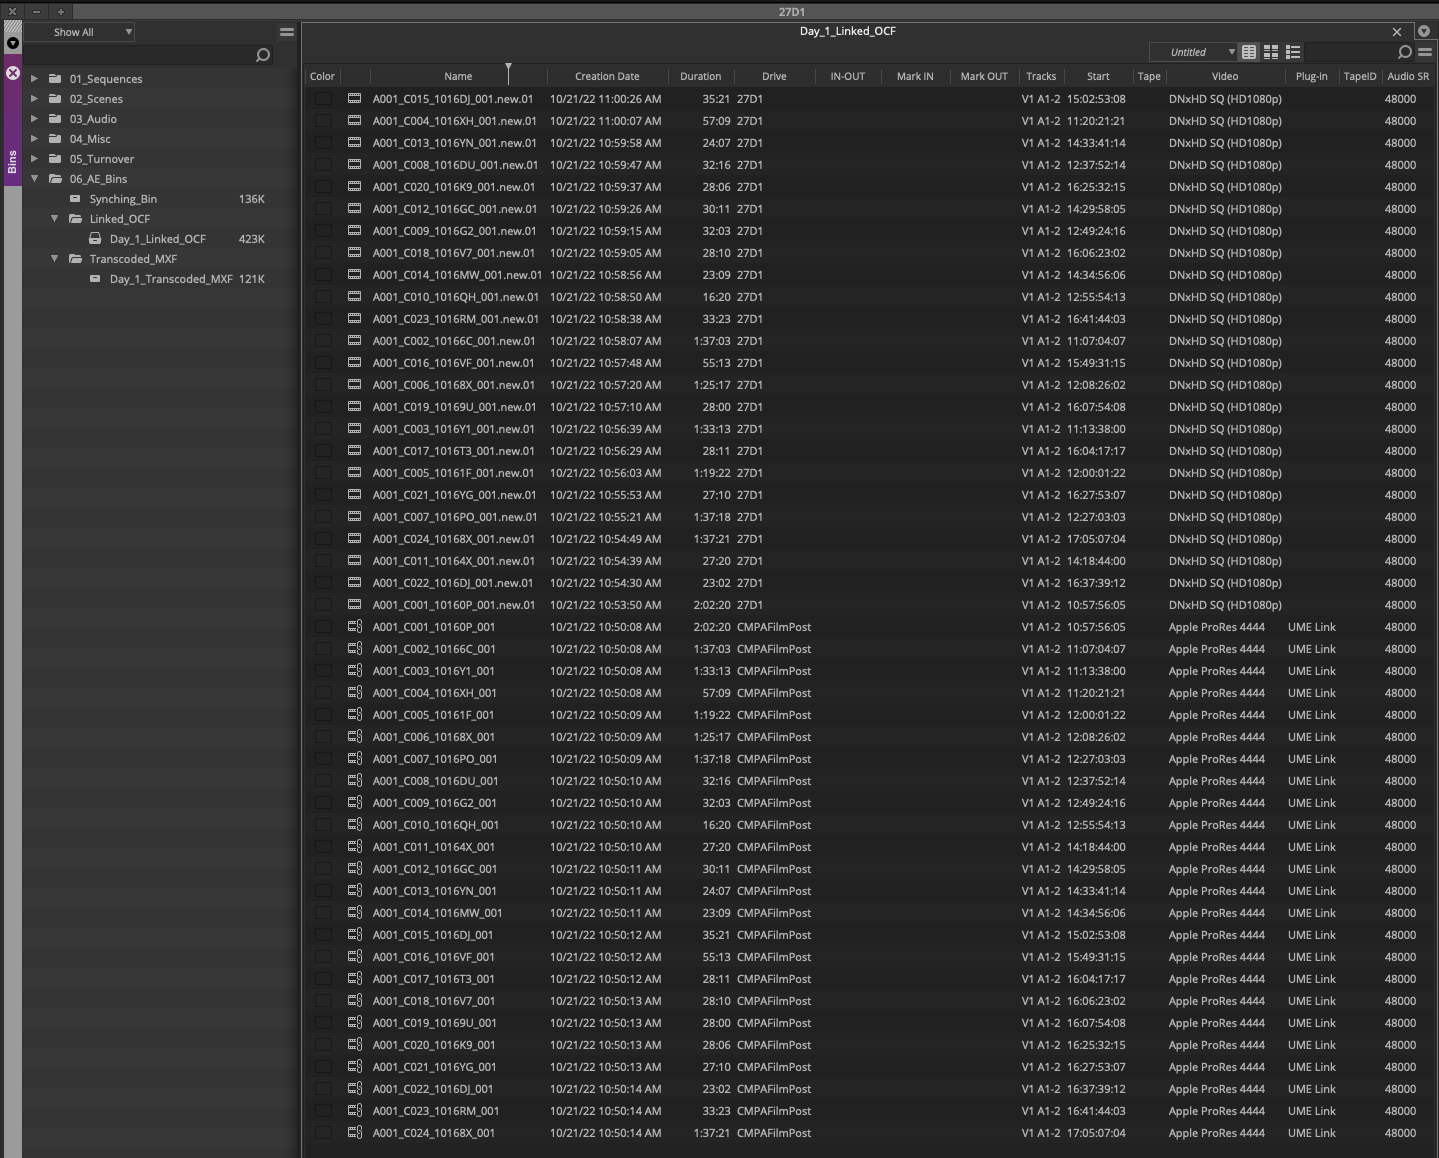
Move the Transcode MXF media to the proper bin.
Sound sub-clipping
On the D1 project you recorded single system sound. This means that the audio was recorded directly into the camera so your audio is already attached to your video and you will not need to sync anything.
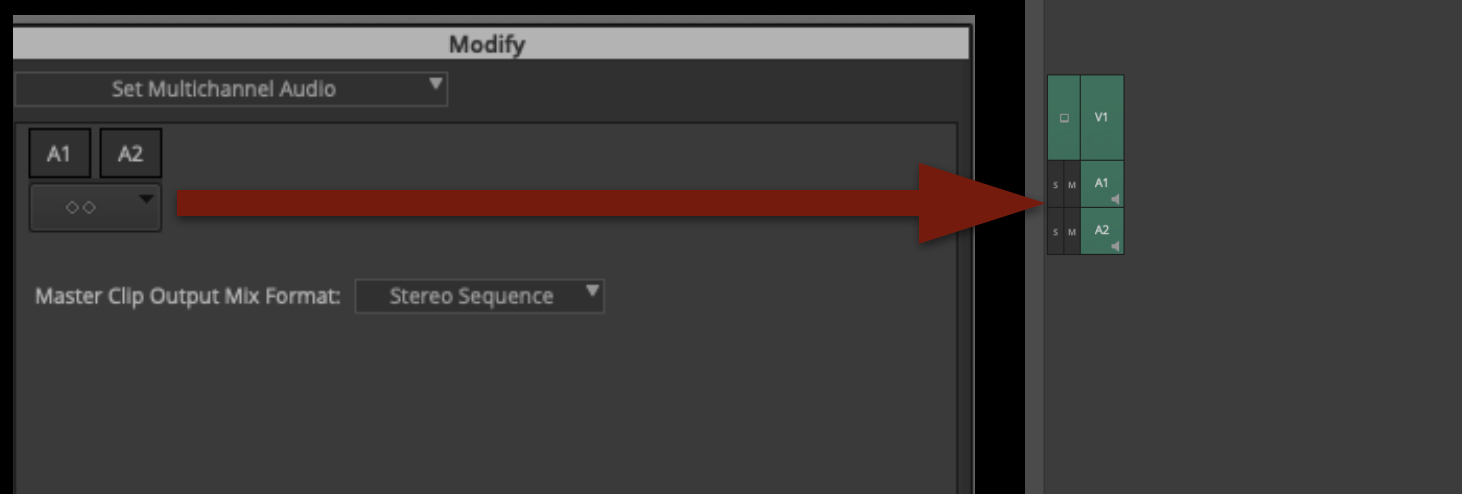
However you will need to prep these master files so that when you are editing you are only working with a single audio track. By default the audio will be interpreted as stereo with one side being empty of any sound recording. To fix this select all of the master clips.
Then right click and select “Modify Clips”
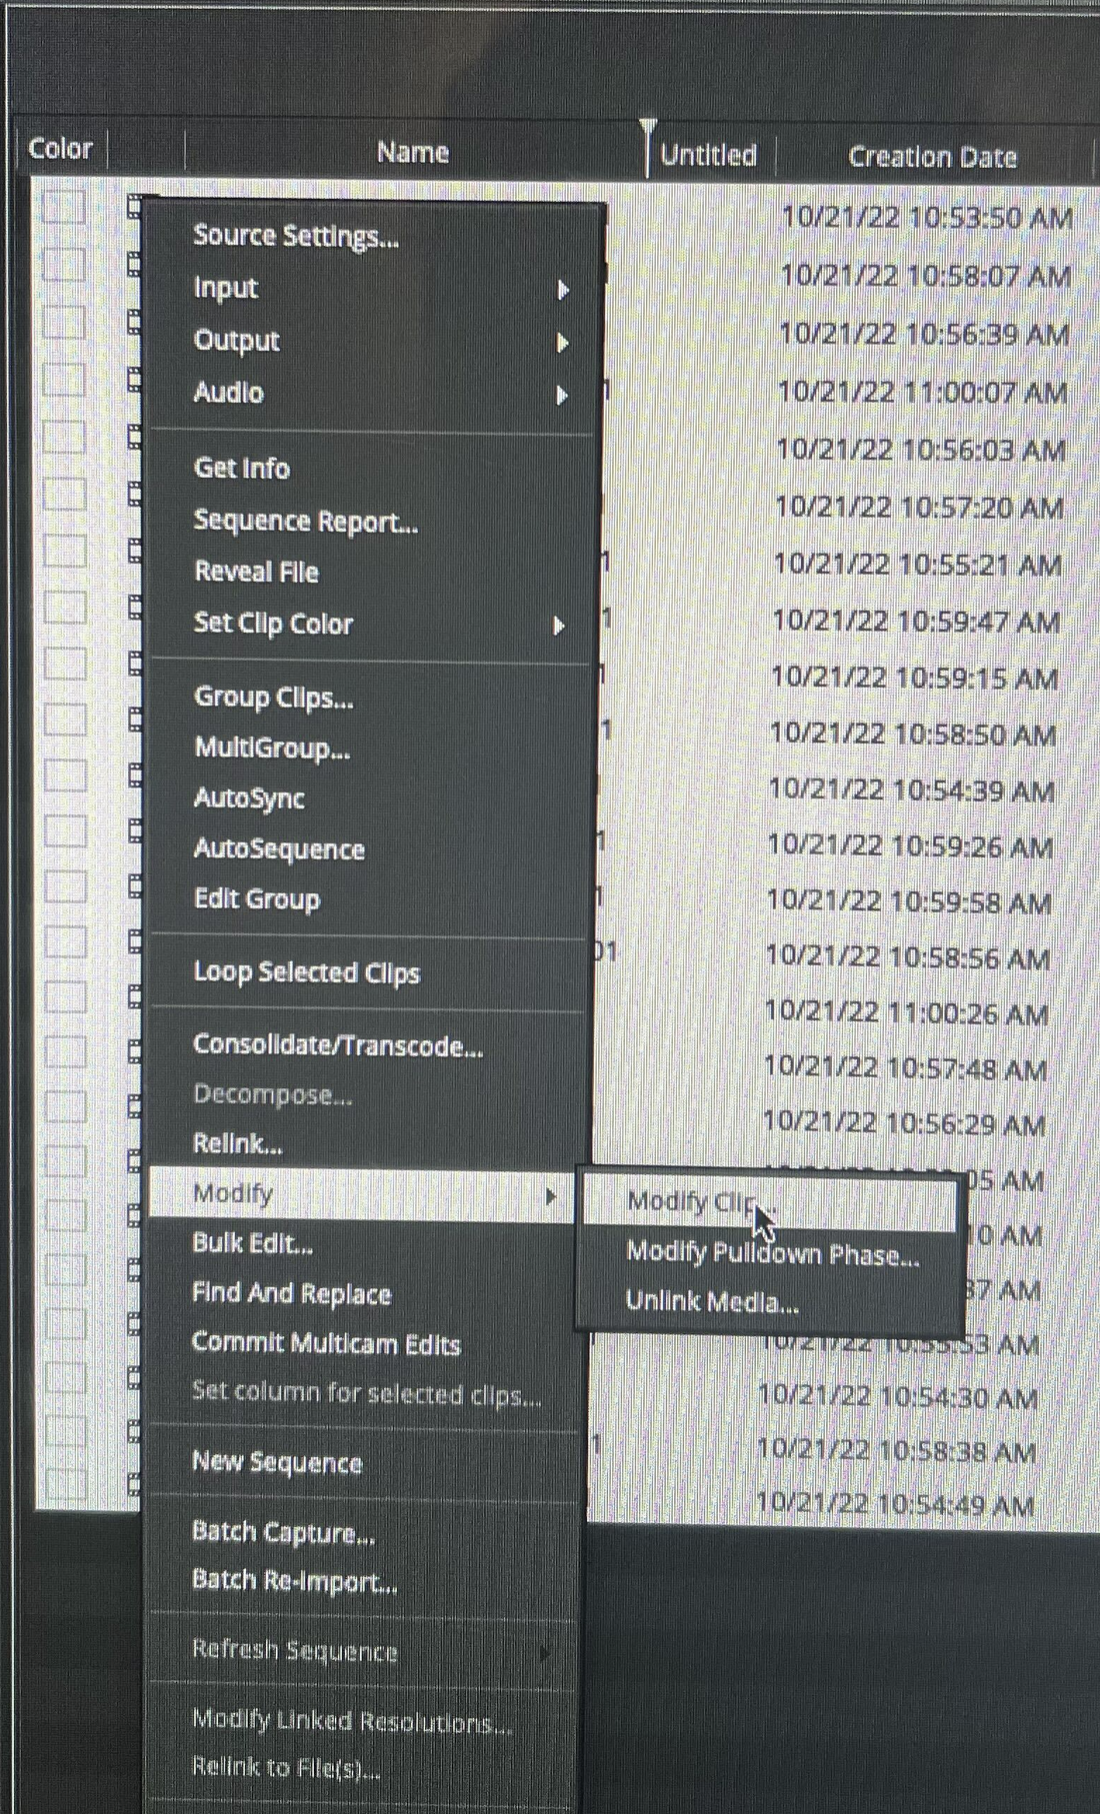
By default it will be set to “Stereo” as you can see by the example below.
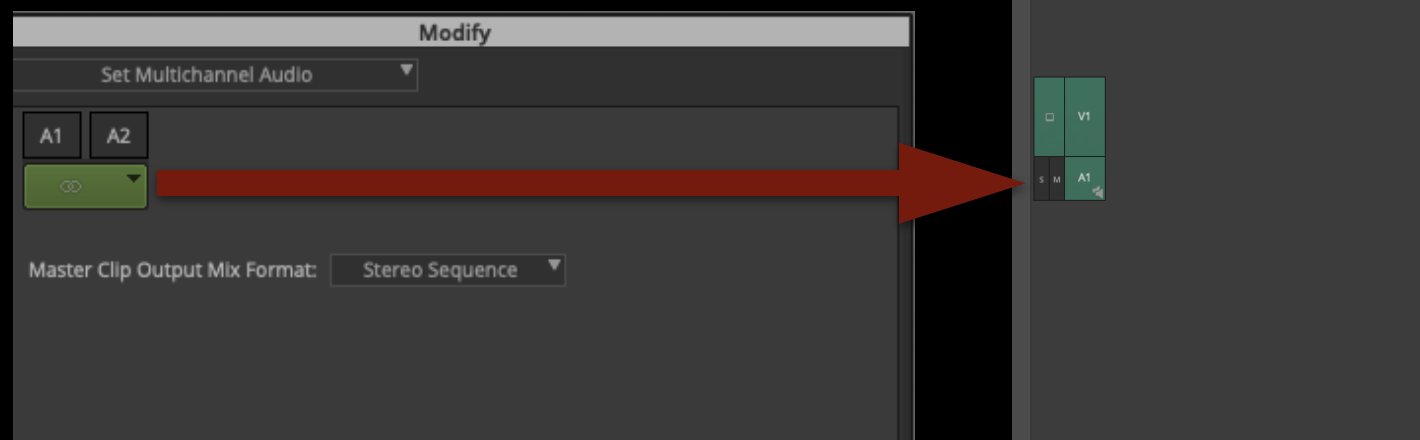
Switch them all to Dual Mono”so now the two audio tracks will be on separate tracks in the timeline.
The bottom audio track will be empty so you will need to make a subclip of all the master clips with only Audio Track 1.
To do this open each clip in the source browser, toggle the source/Record timeline view by hotting “Shift + Z” and deselecting A2.
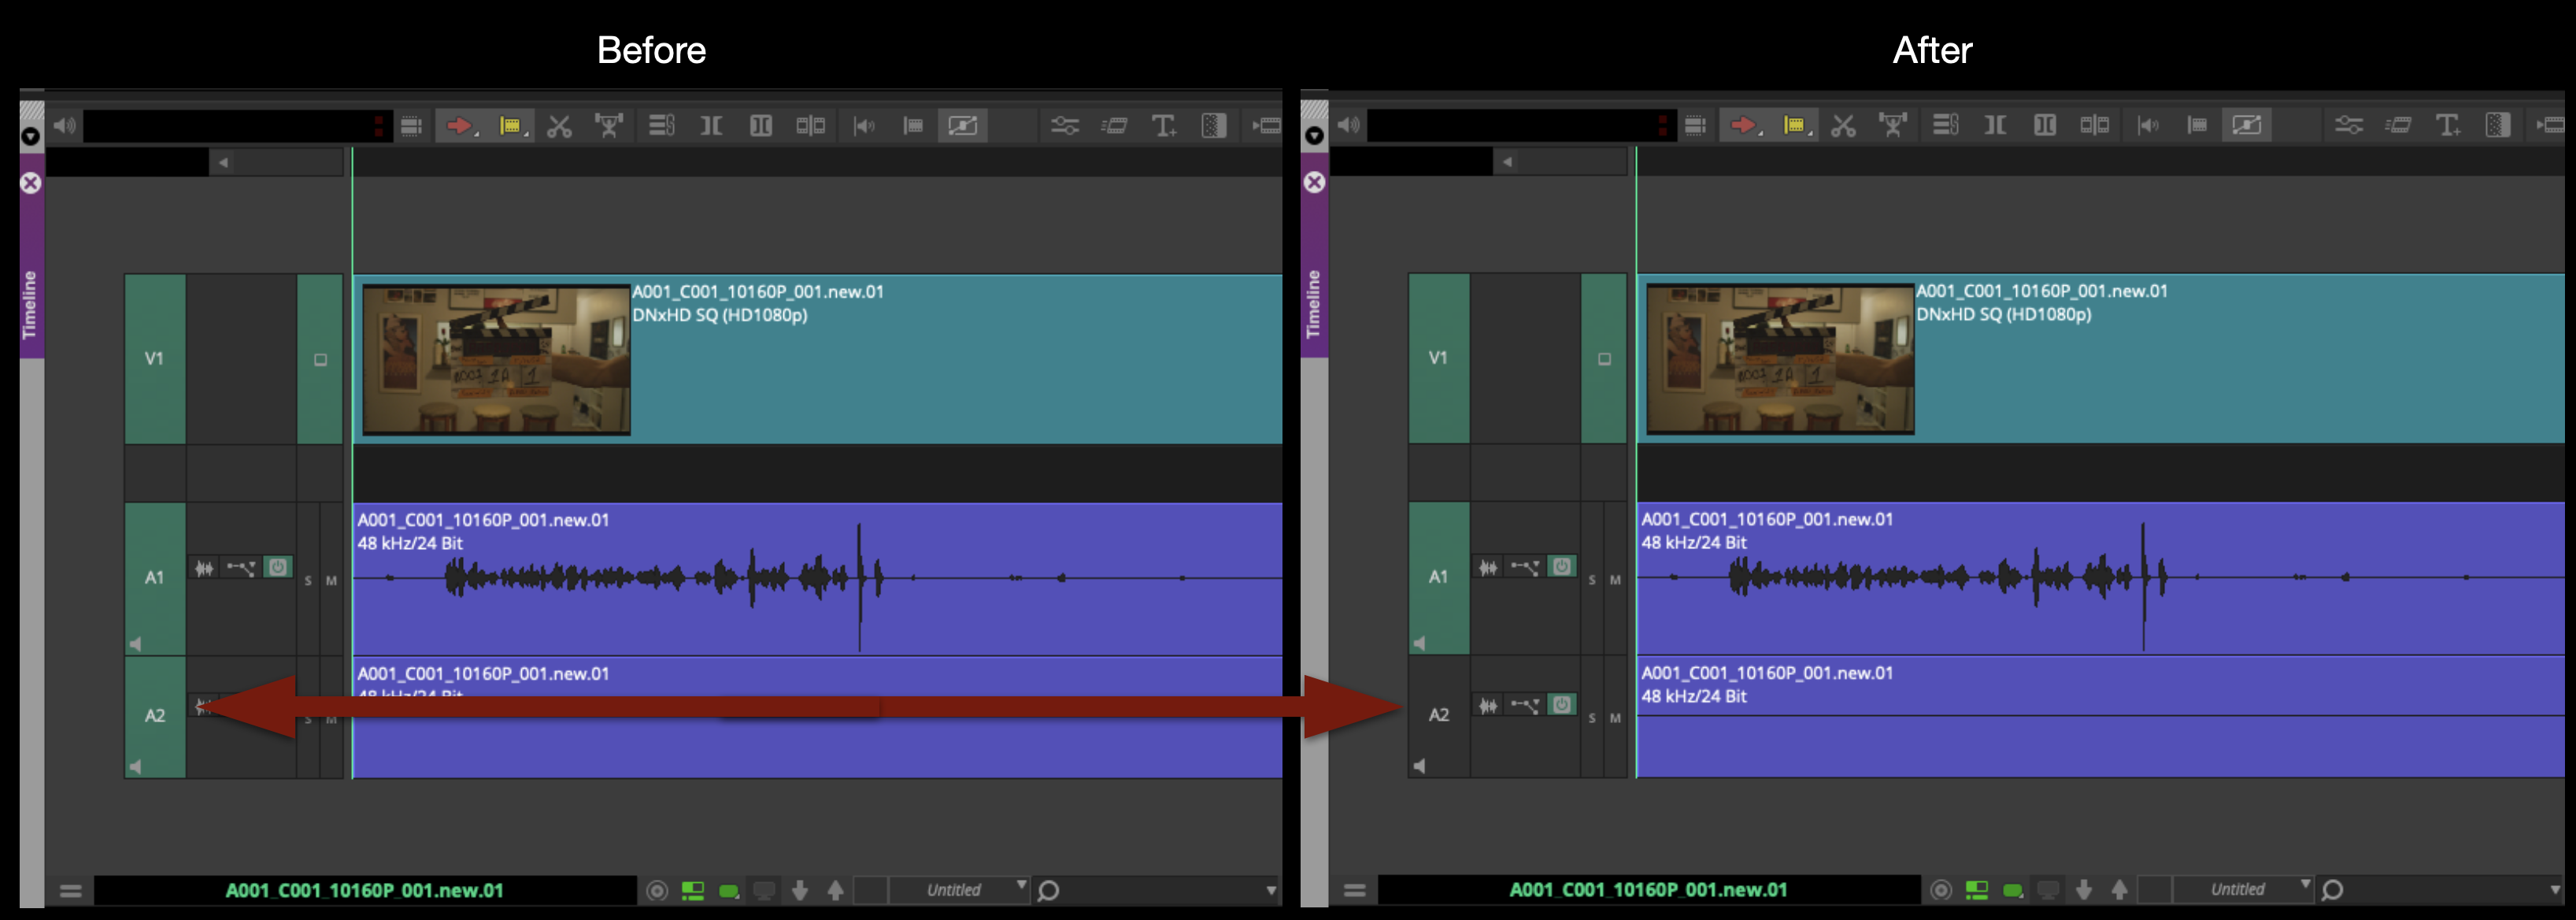
With A2 deselected you can make a subclip of the master clip by dragging from the source monitor back into the bin. Do this for every master clip until you have a new subclip for every master clip.
Note: If any of the Master clips are MOS then you can deselect both A1 and A2 so the subclip has only video.
Once you are done making subclips you can rename each subclip based on the slate. This is the stage where you can also include information about MOS material or bump takes.
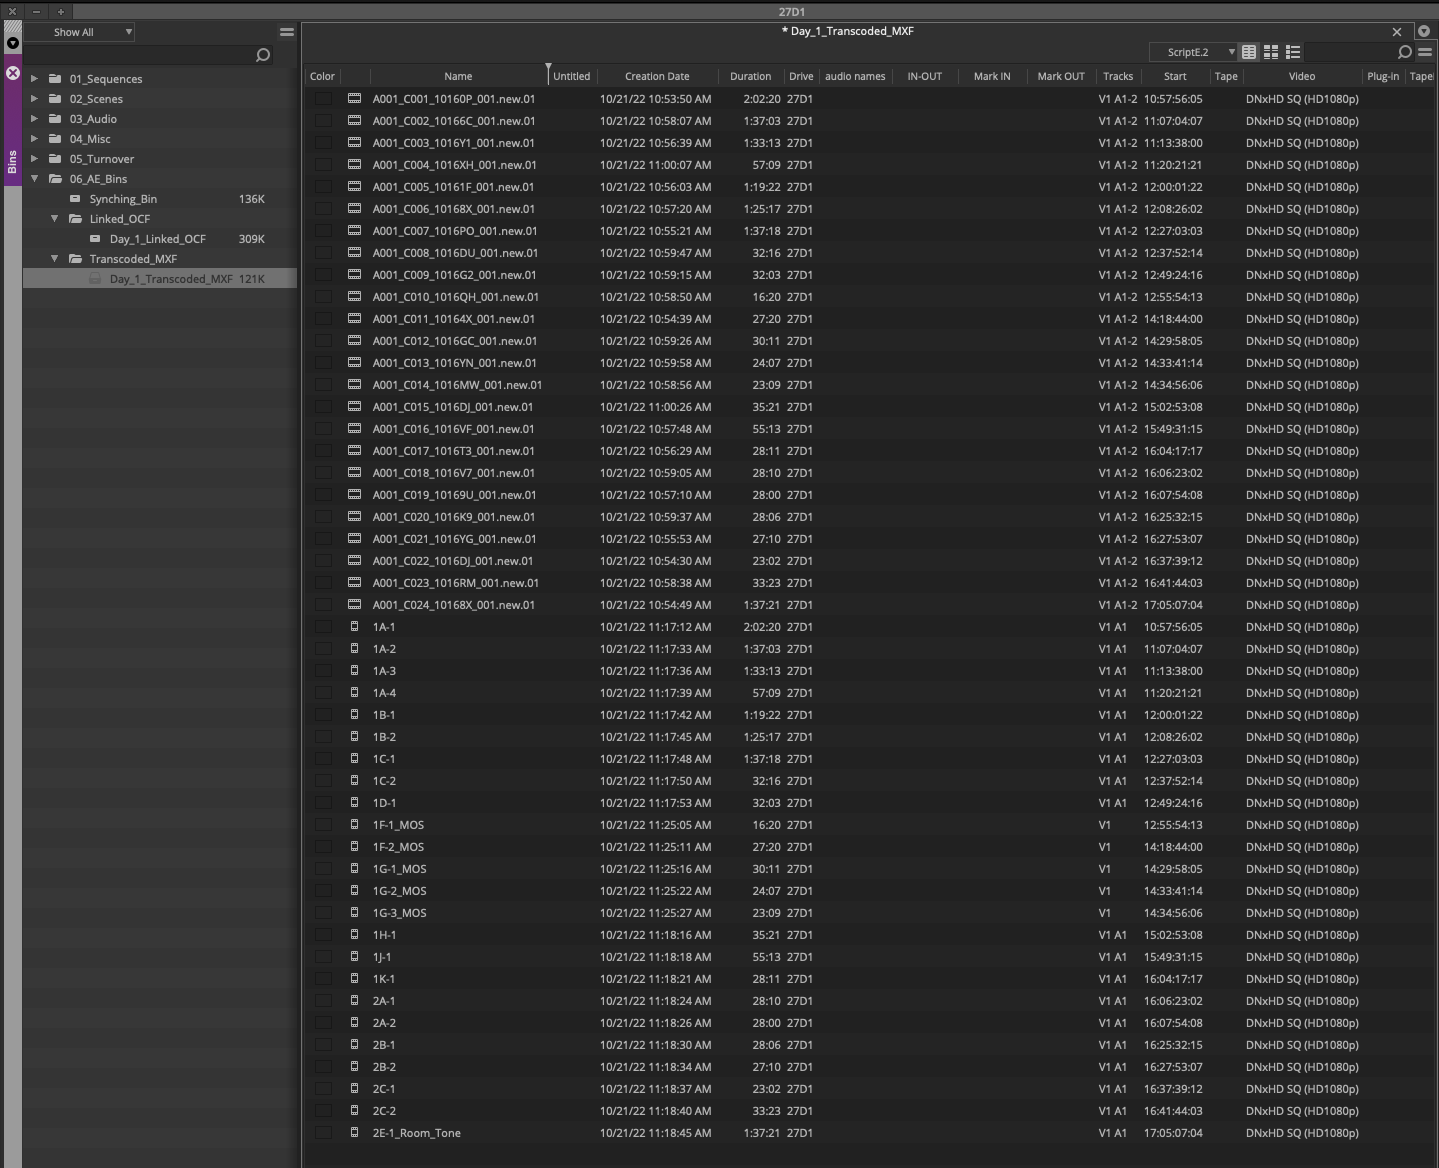
With everything labeled you can move the subclips into the proper scenes bins and close the Transcoded MXF bin.
Start and Stop Marker
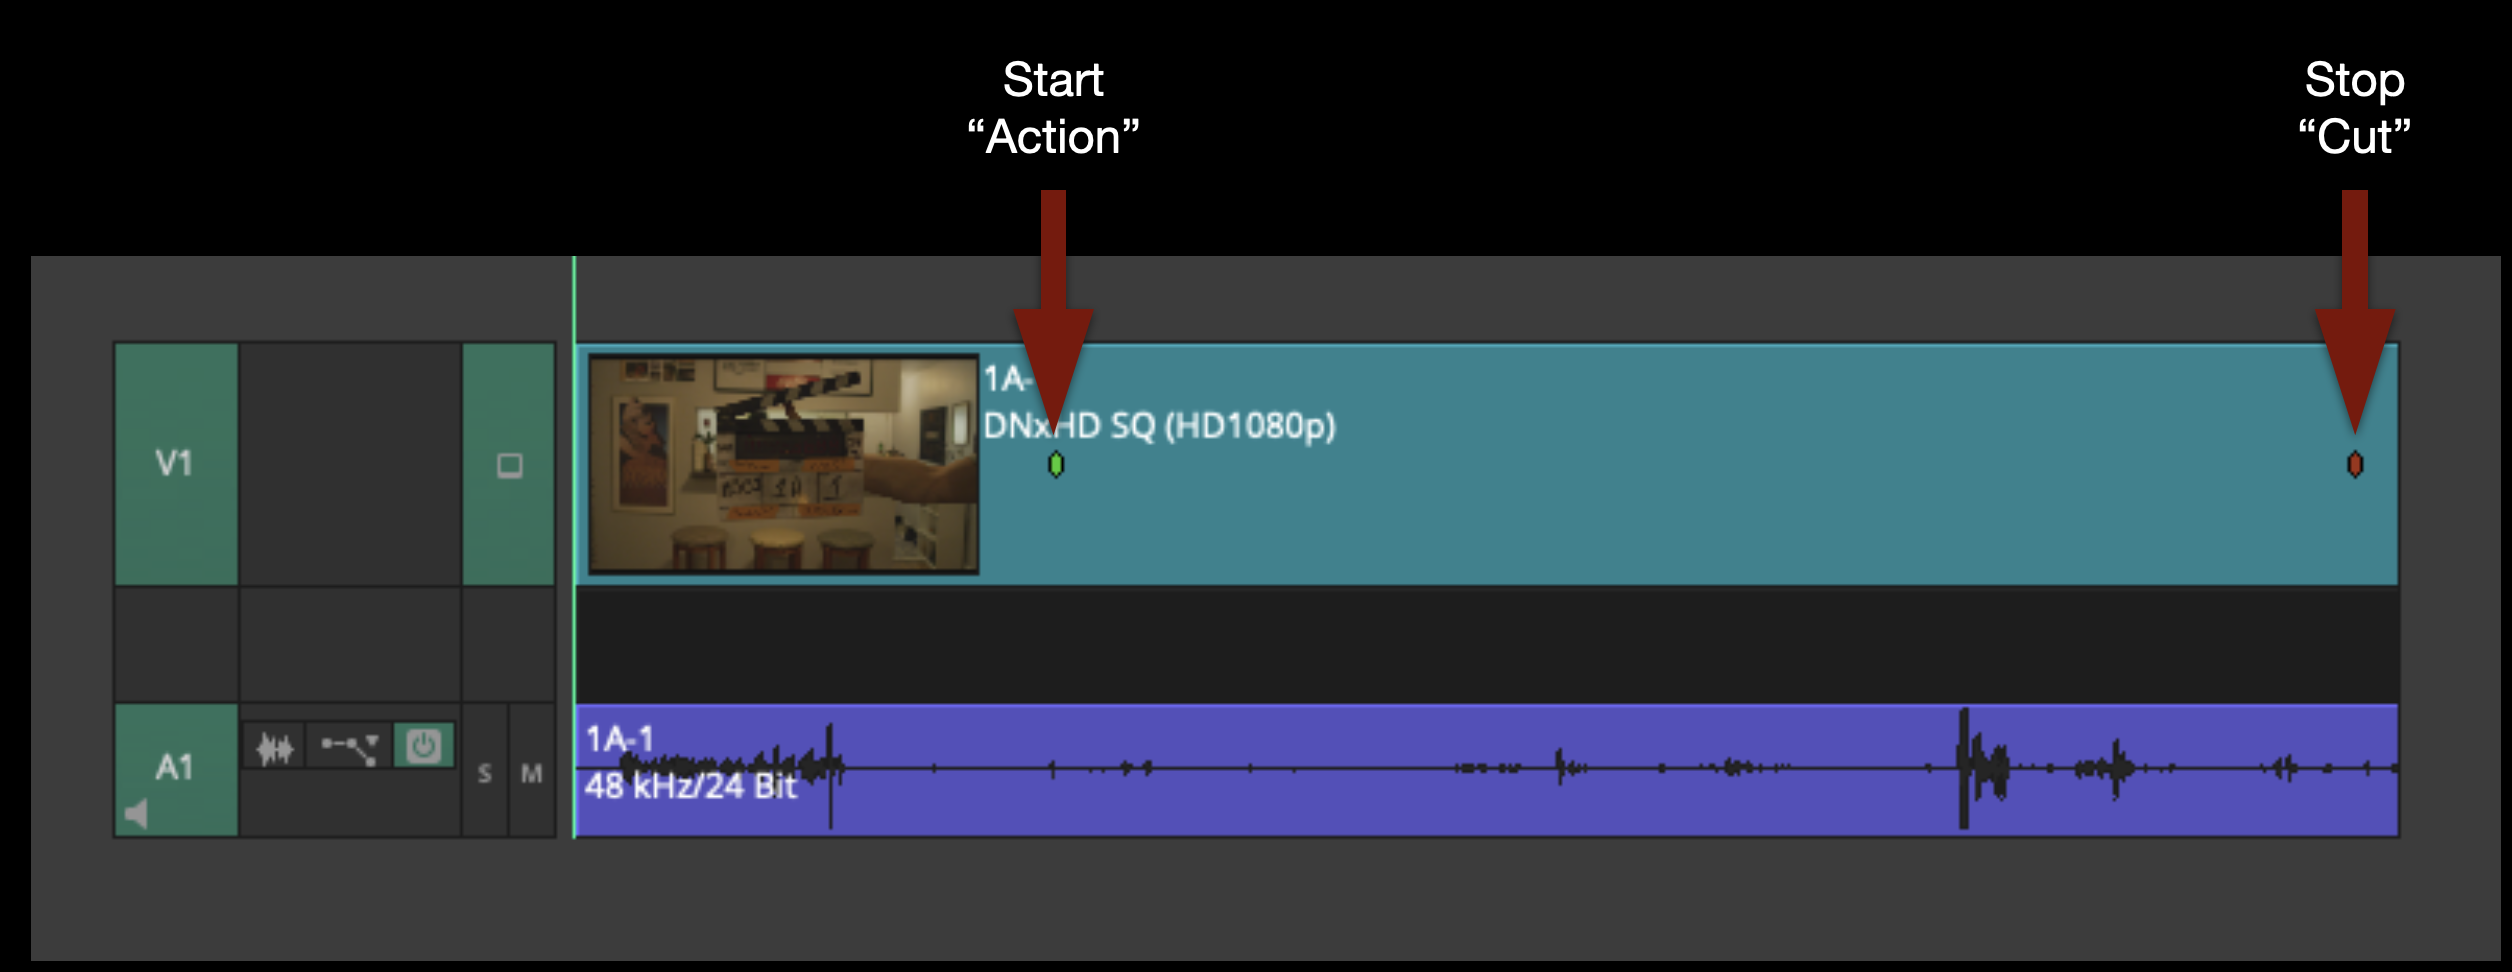
After all of the footage has been organized into the scenes bins you will need to set colored markers for when the director calls “action” and when they call “Cut”.
“1” on the keyboard places a green marker that denotes action.
“2” on the keyboard places a red marker and denotes cut.
Open each clip in in the source monitor and scrub through listening for “action” and “cut”. The first time you place a marker this dialogue box will open. To speed up the process select “Disable Edit Marker dialogue when adding”.
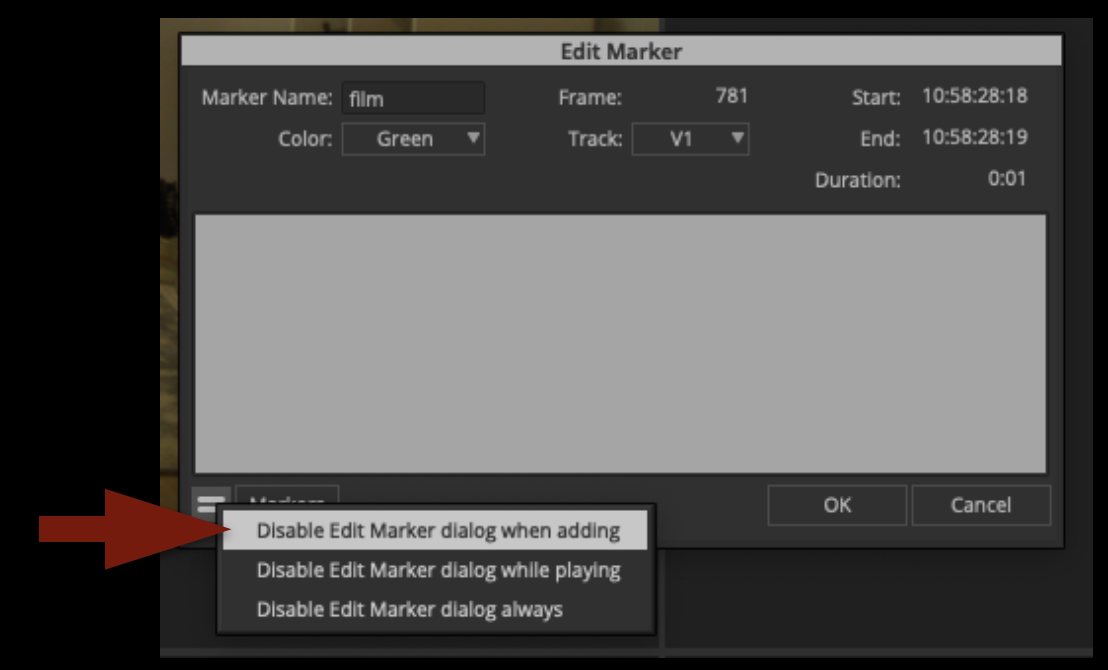
Below is an example of what it will look like for each clip. Set these markers for every clip.
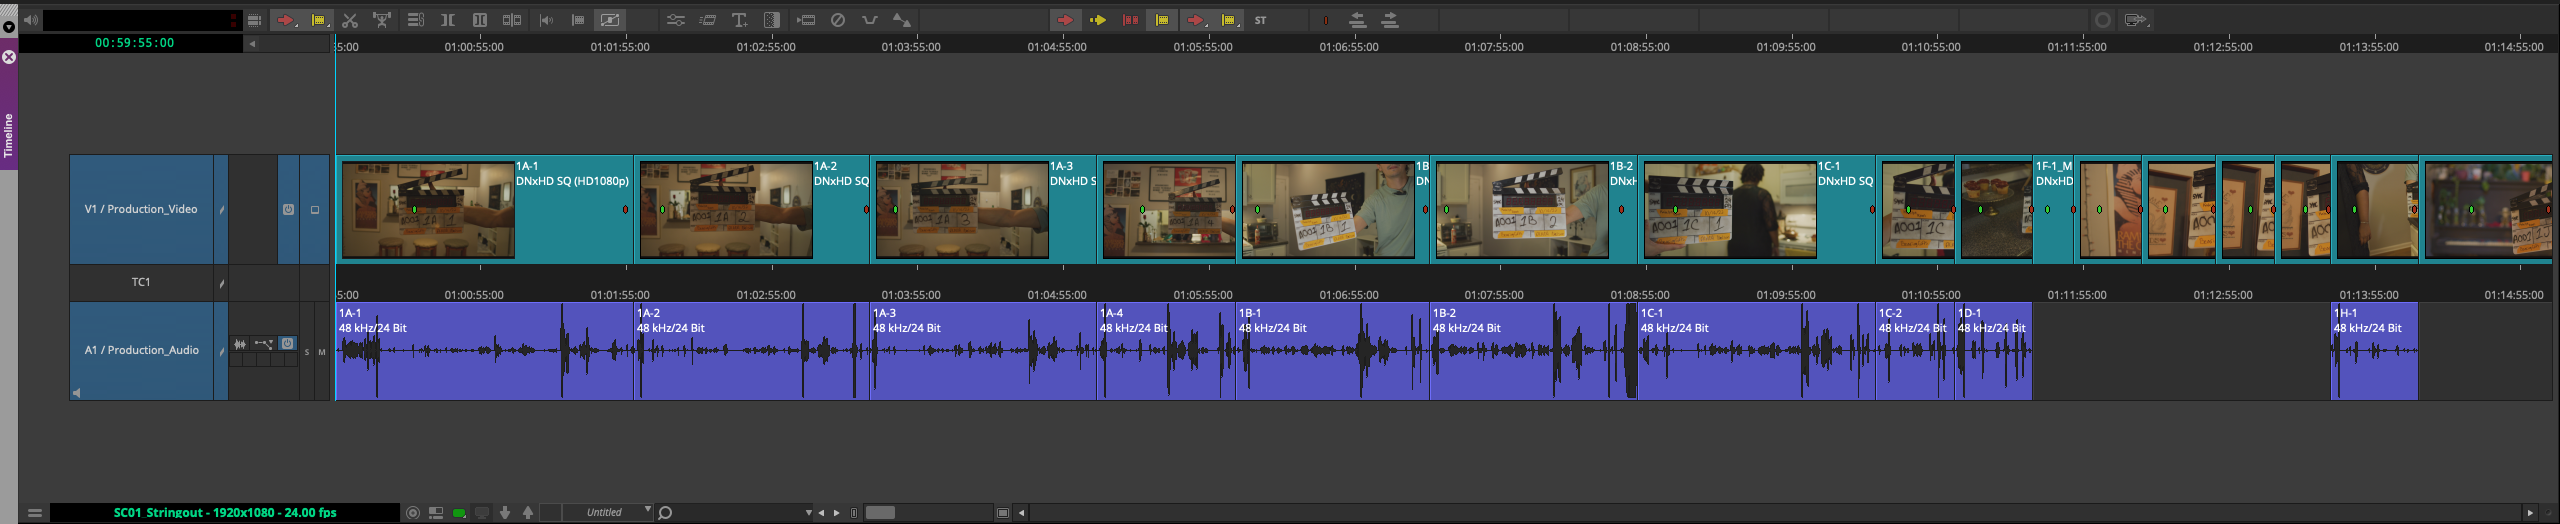
Scene String-outs
Once you have set Stop and Start markers for everything you can build scene string-outs. In every scene bin there is a sequence templet named “Scene String-out”. This sequence does not need to be exported. Rather it is a very helpful tool for the editor to use while the are cutting.
Open the Scene String-out sequence. Place all the footage from that scene into the timeline in Setup and take order.
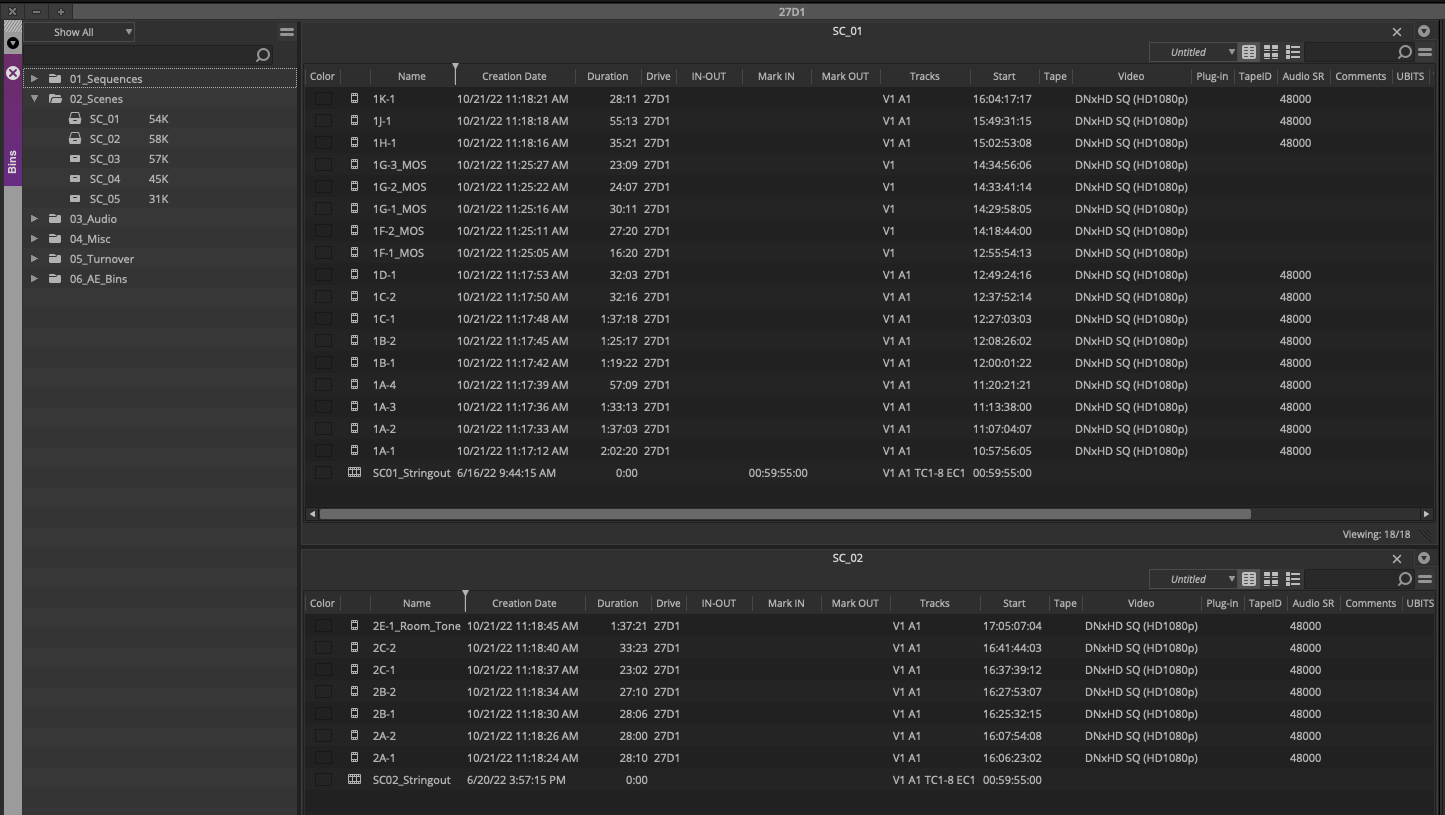
Organizing Footage in Bins
Switch the view in the scene bin to the thumbnail view.
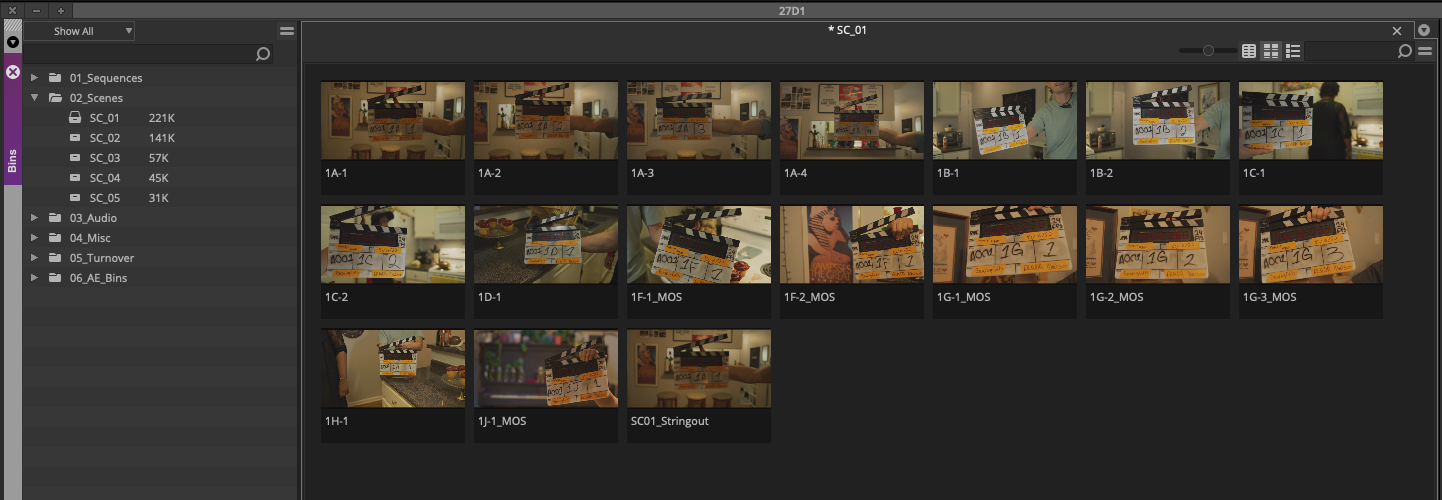
Then drag the thumbnail around and organize each scene bin into rows of setups and columns of takes.
To make everything line up nicer you can hit “Command + T” and all the thumbnails will snap into a grid.
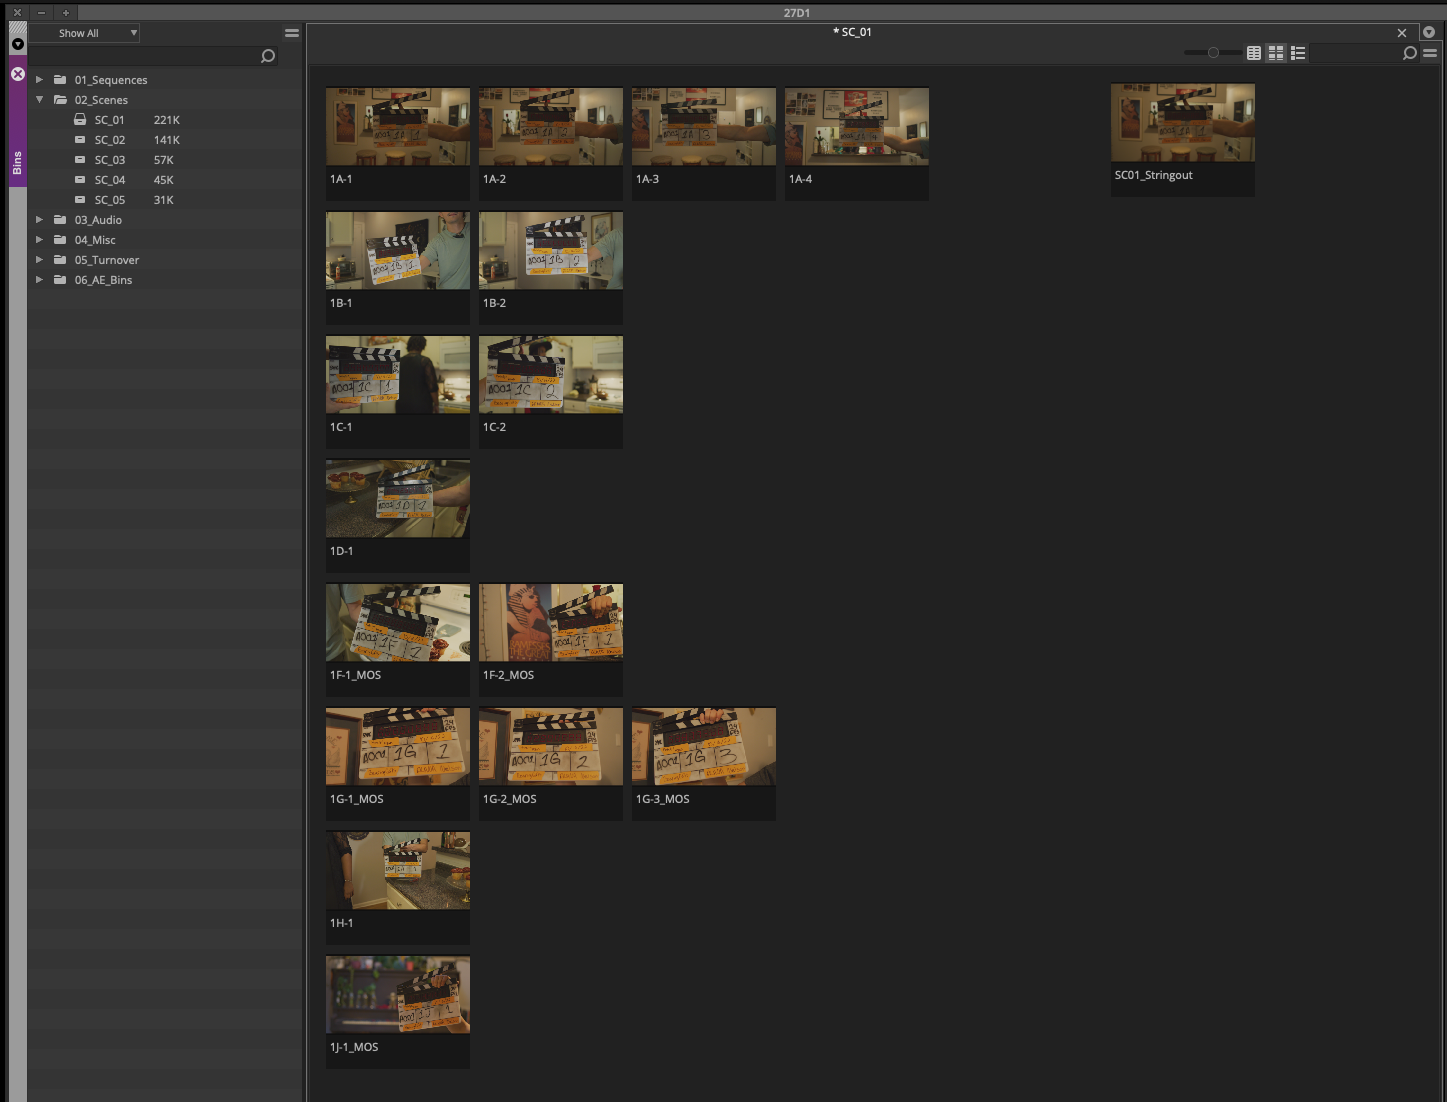
Next you will need to change the thumbnail for each one. By default the thumbnail is the first frame of video which is not helpful to an editor as its normally blocked by the slate. You can change the thumbnail by single clicking on the clip and then scrubbing with the JKL keys. Wherever you stop scrubbing that thumbnail will be saved.
If a setup has only one take set the thumbnail to what the majority of the shot represents. If a setup has multiple takes set the early takes to the beginning of the action and the last takes to the end of the action.
In this way the editor can see at a glance what the motion of the camera or changing of the blocking is by looking across the different takes.
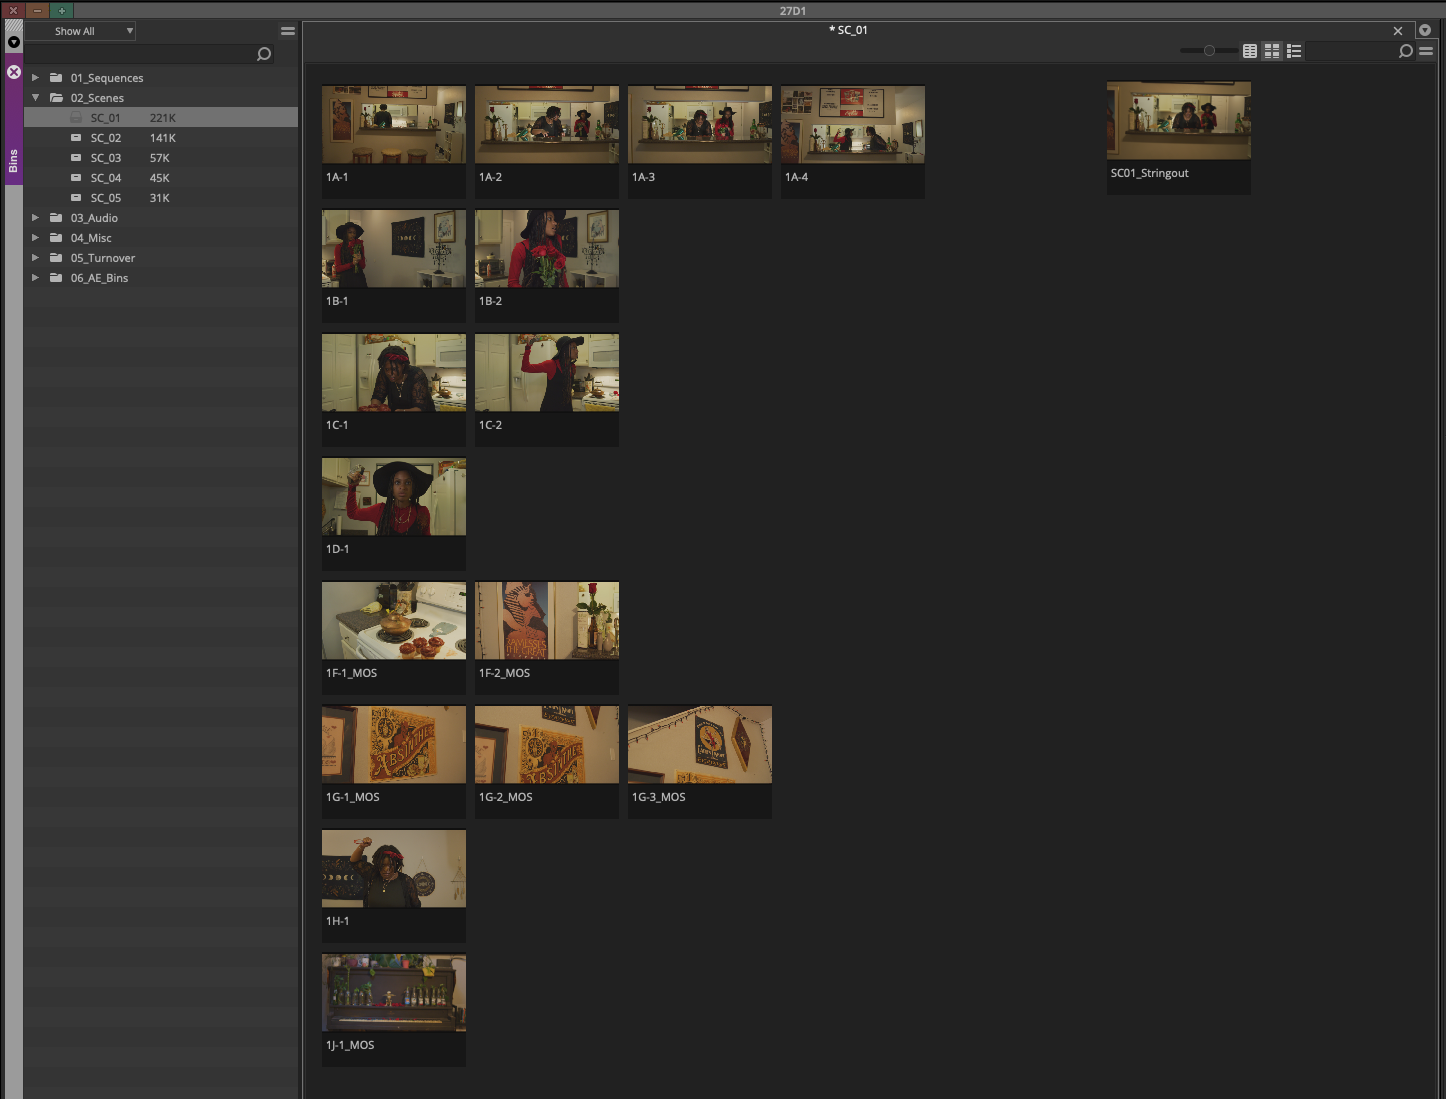
Do this for every scene.
Assemble Dailies String-out
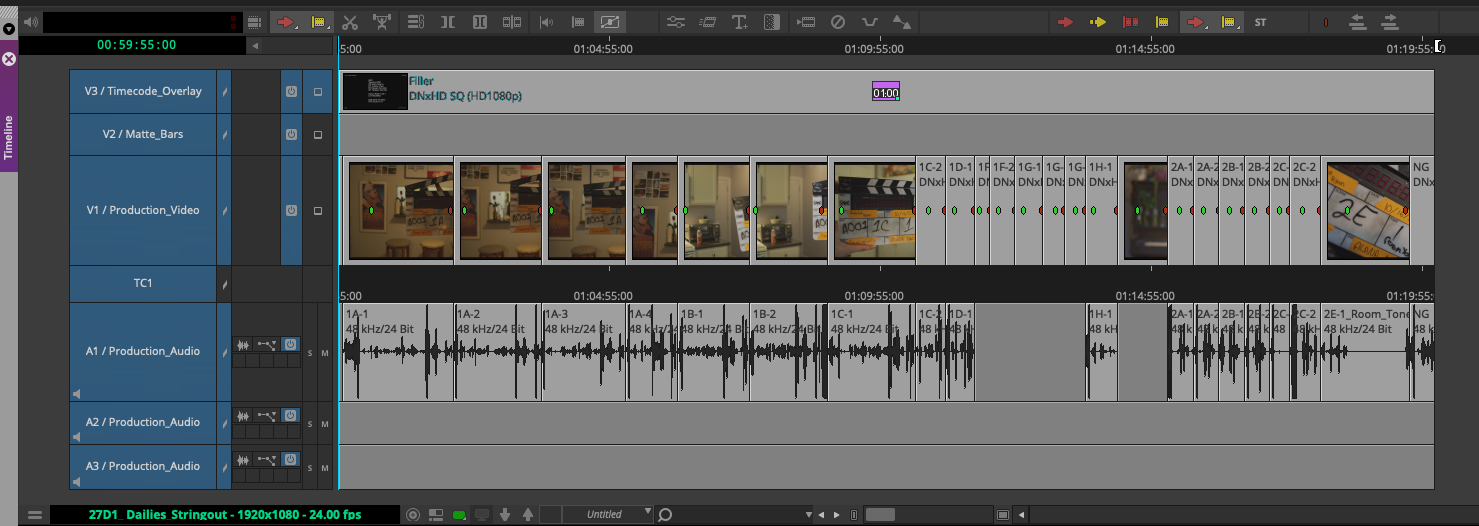
Open the dailies stringent sequence based from the dailies bin.

Assemble the days rushes into the dailies string out in scene, setup, take order.
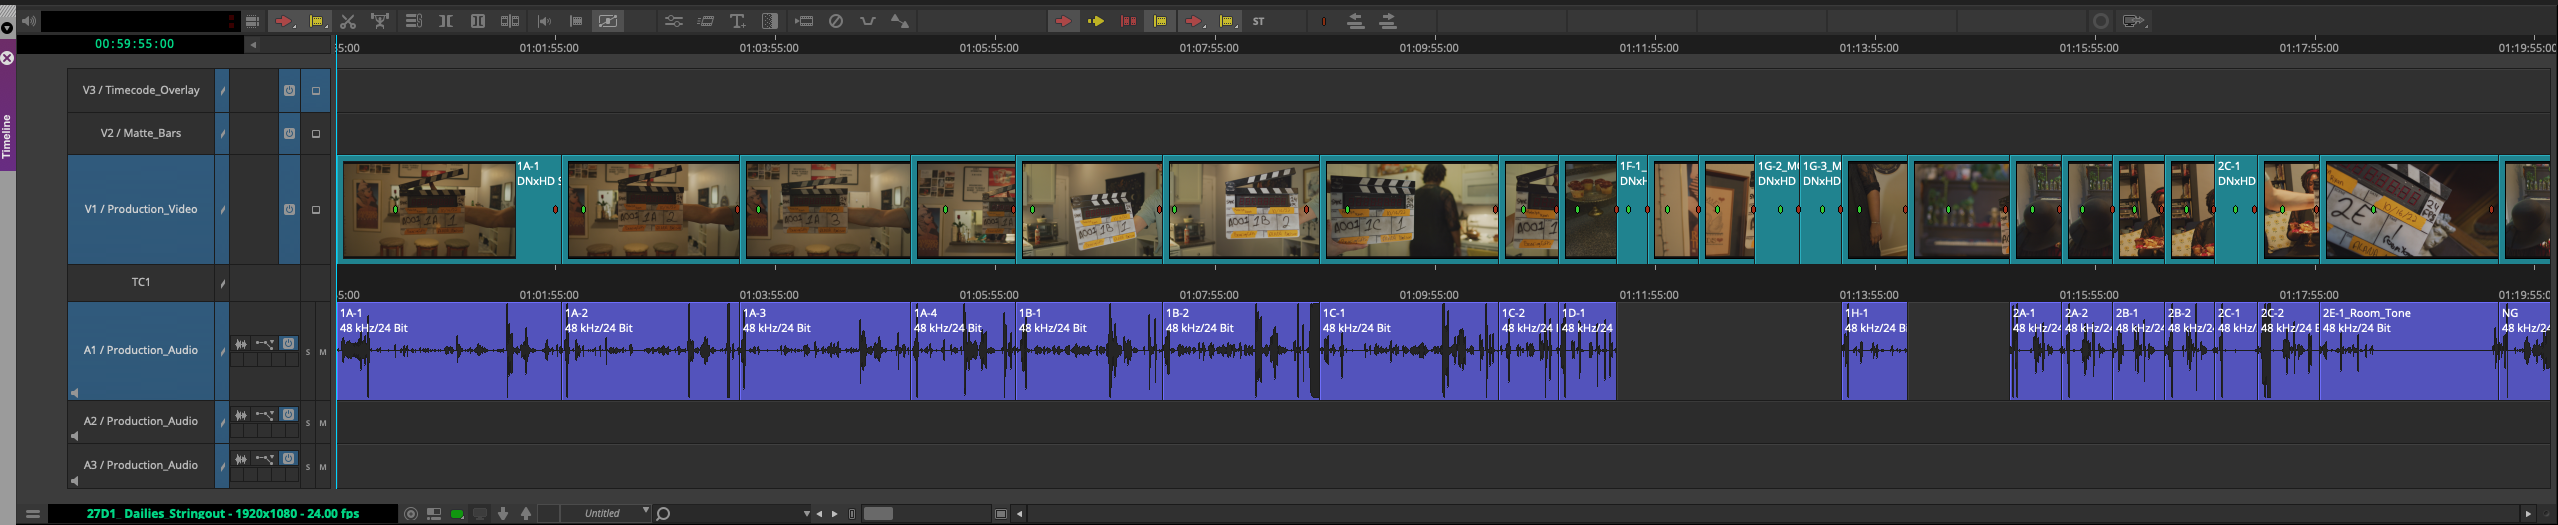
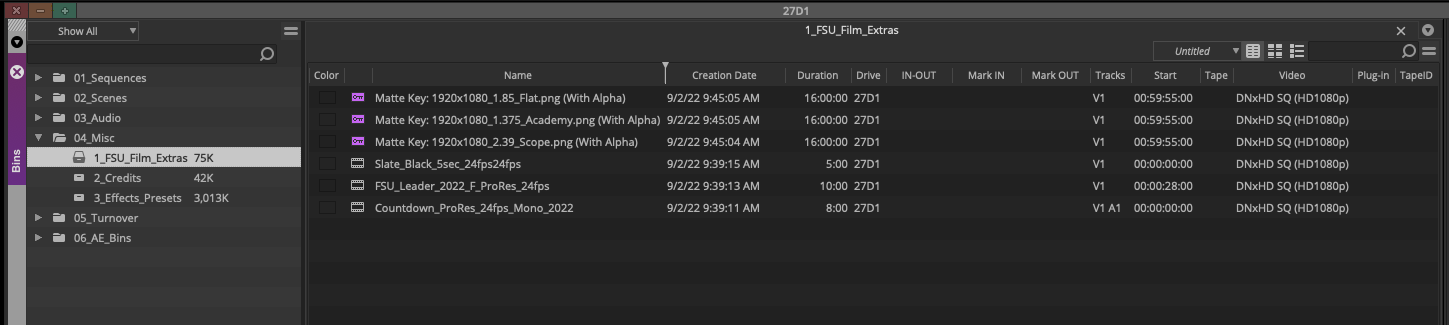
Insert the “Slate Black 5 sec” into to the beginning of the sequence that can be found in the FSU Film Extras bin.
Apply the “Dailies Slate” Title template to the 5 seconds of black.
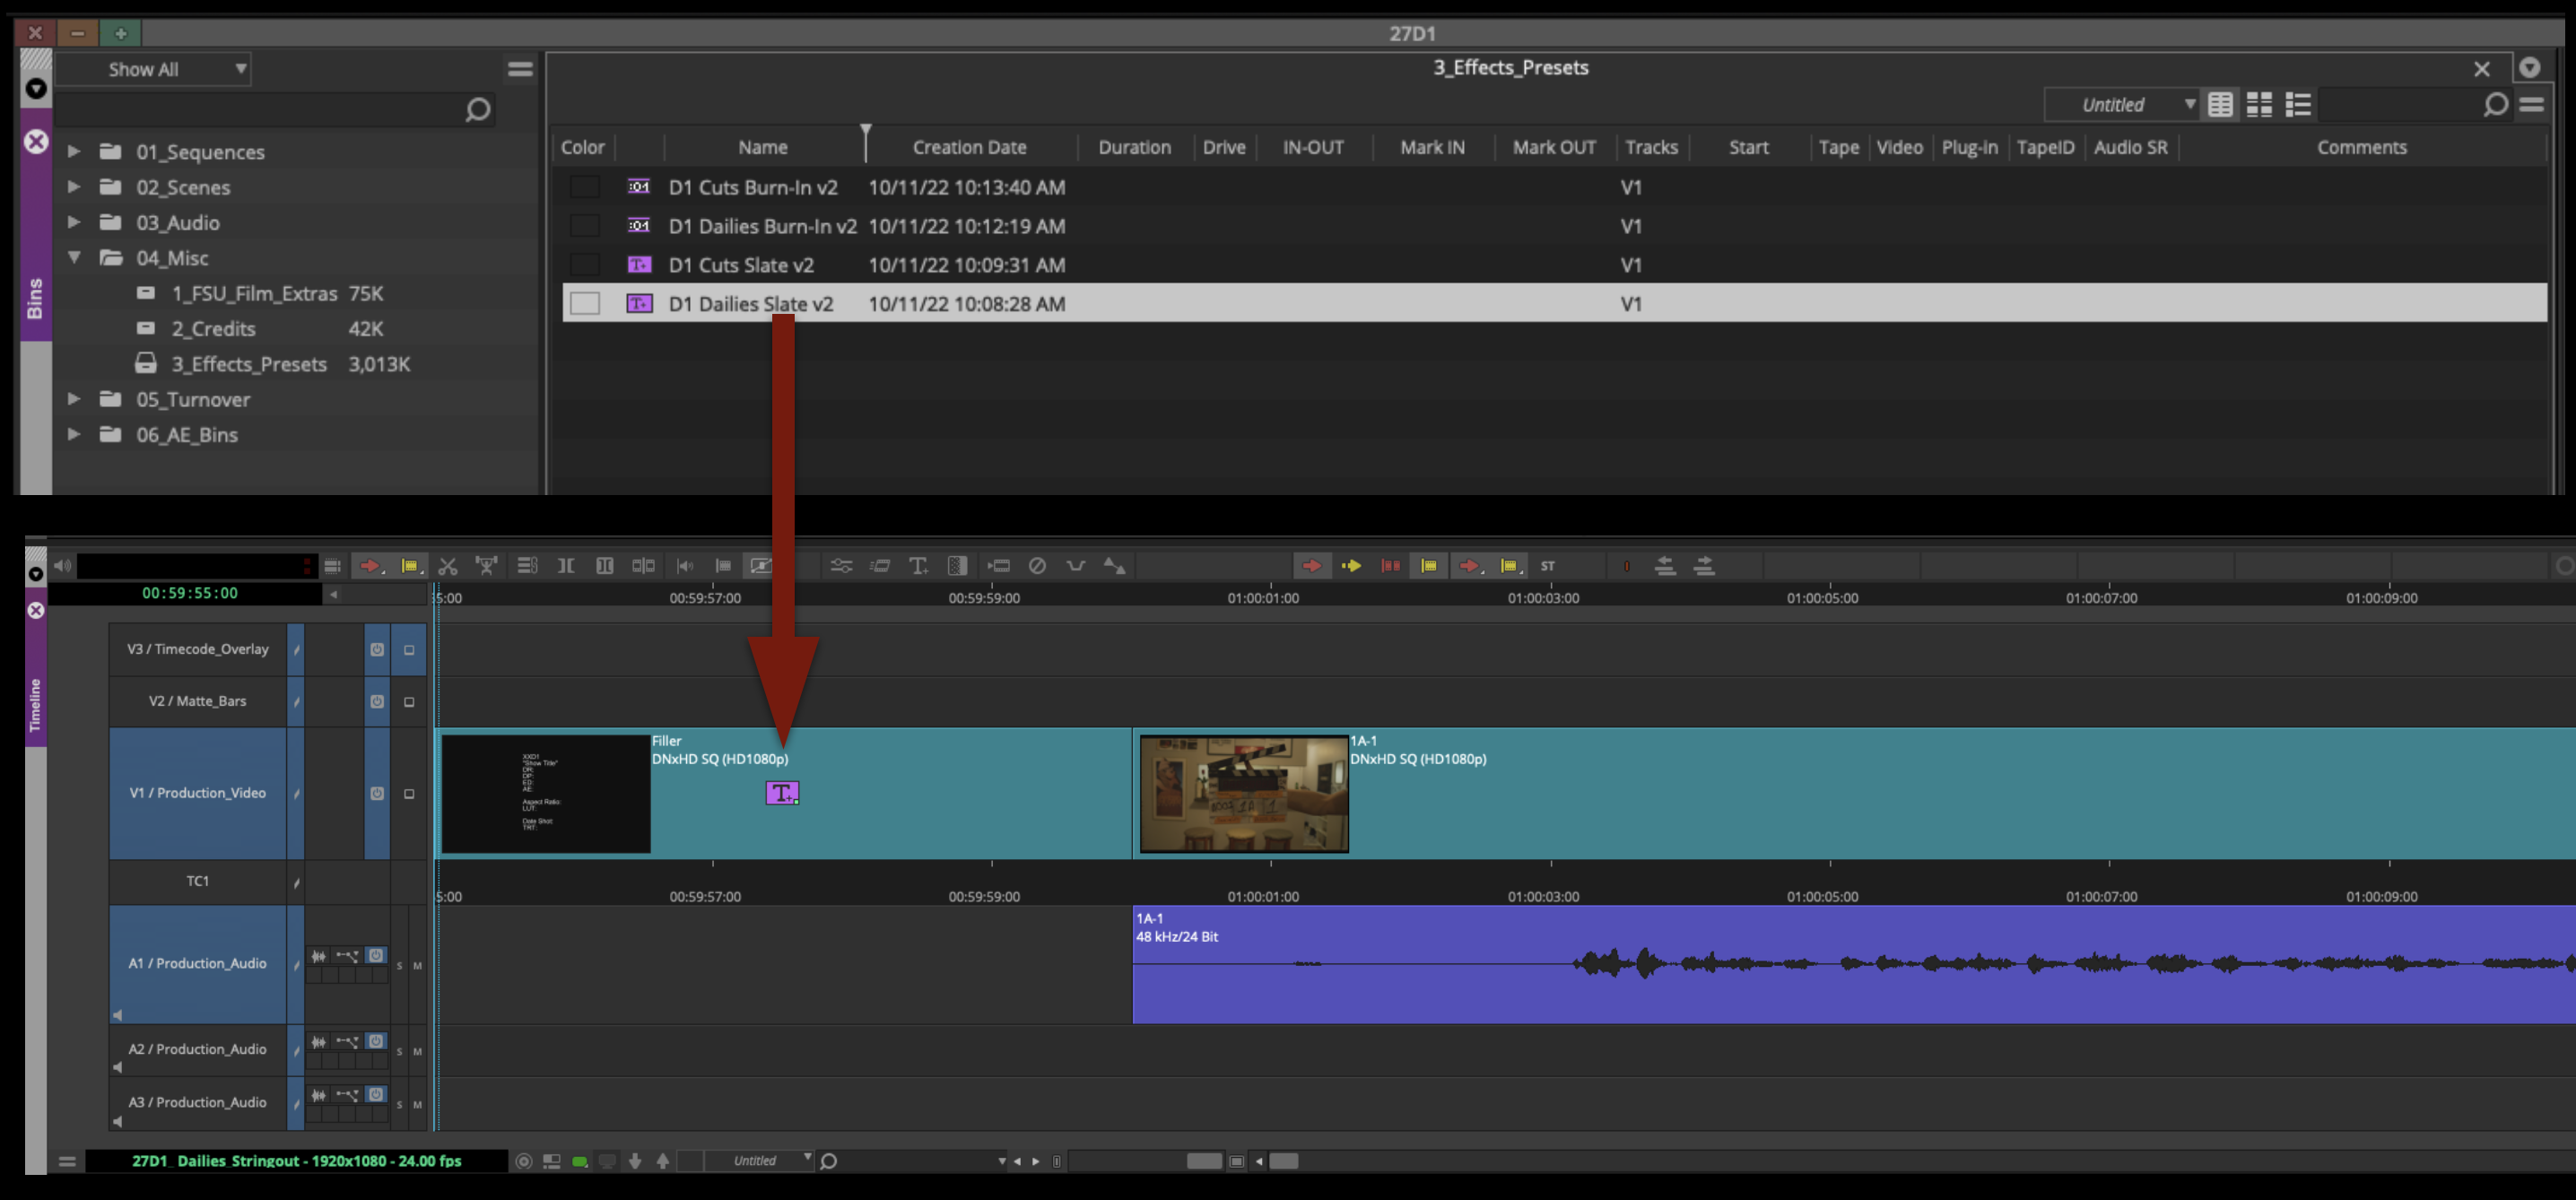
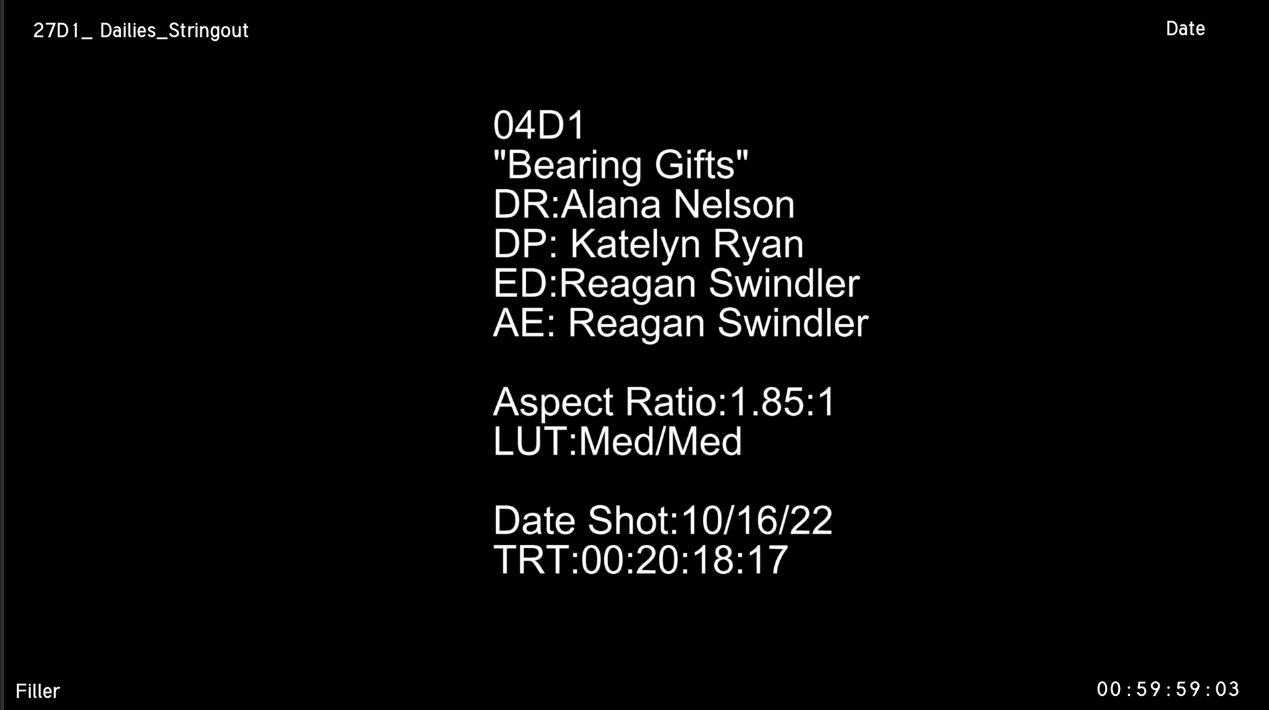
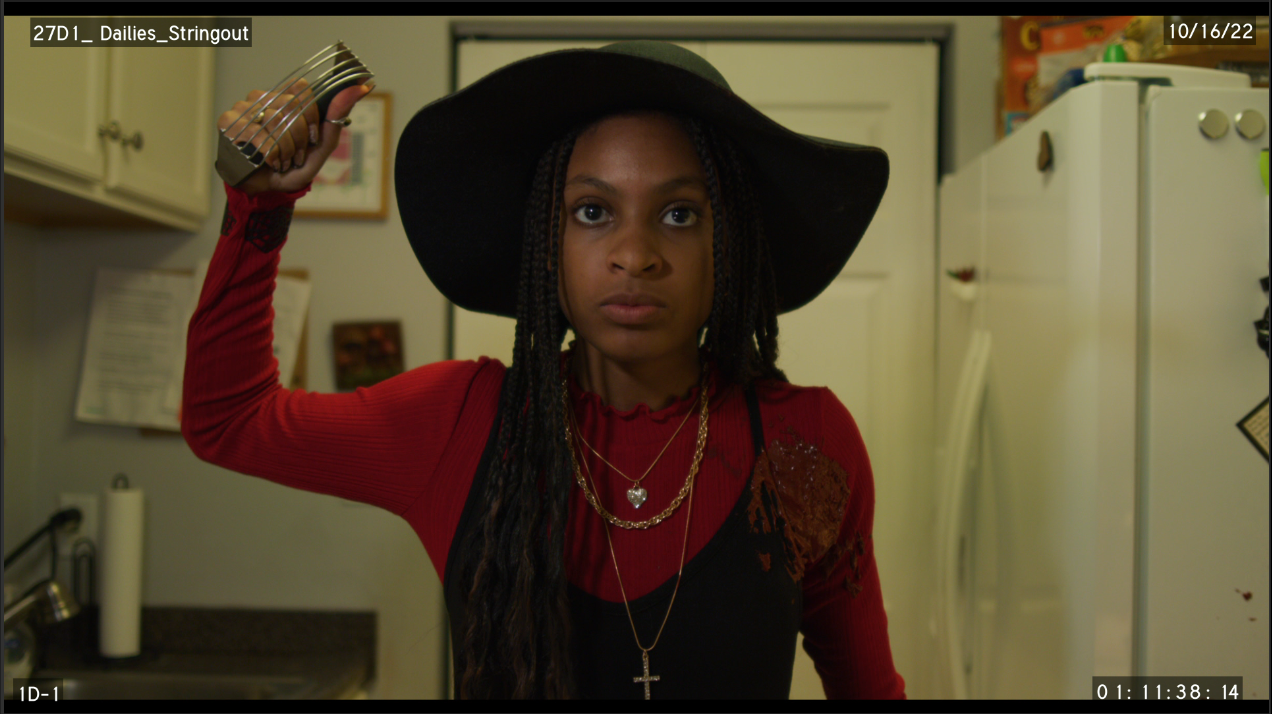
Fill in the slate like teh example shown below.
Apply the Dailies Burn in timecode effect to Video track 3.
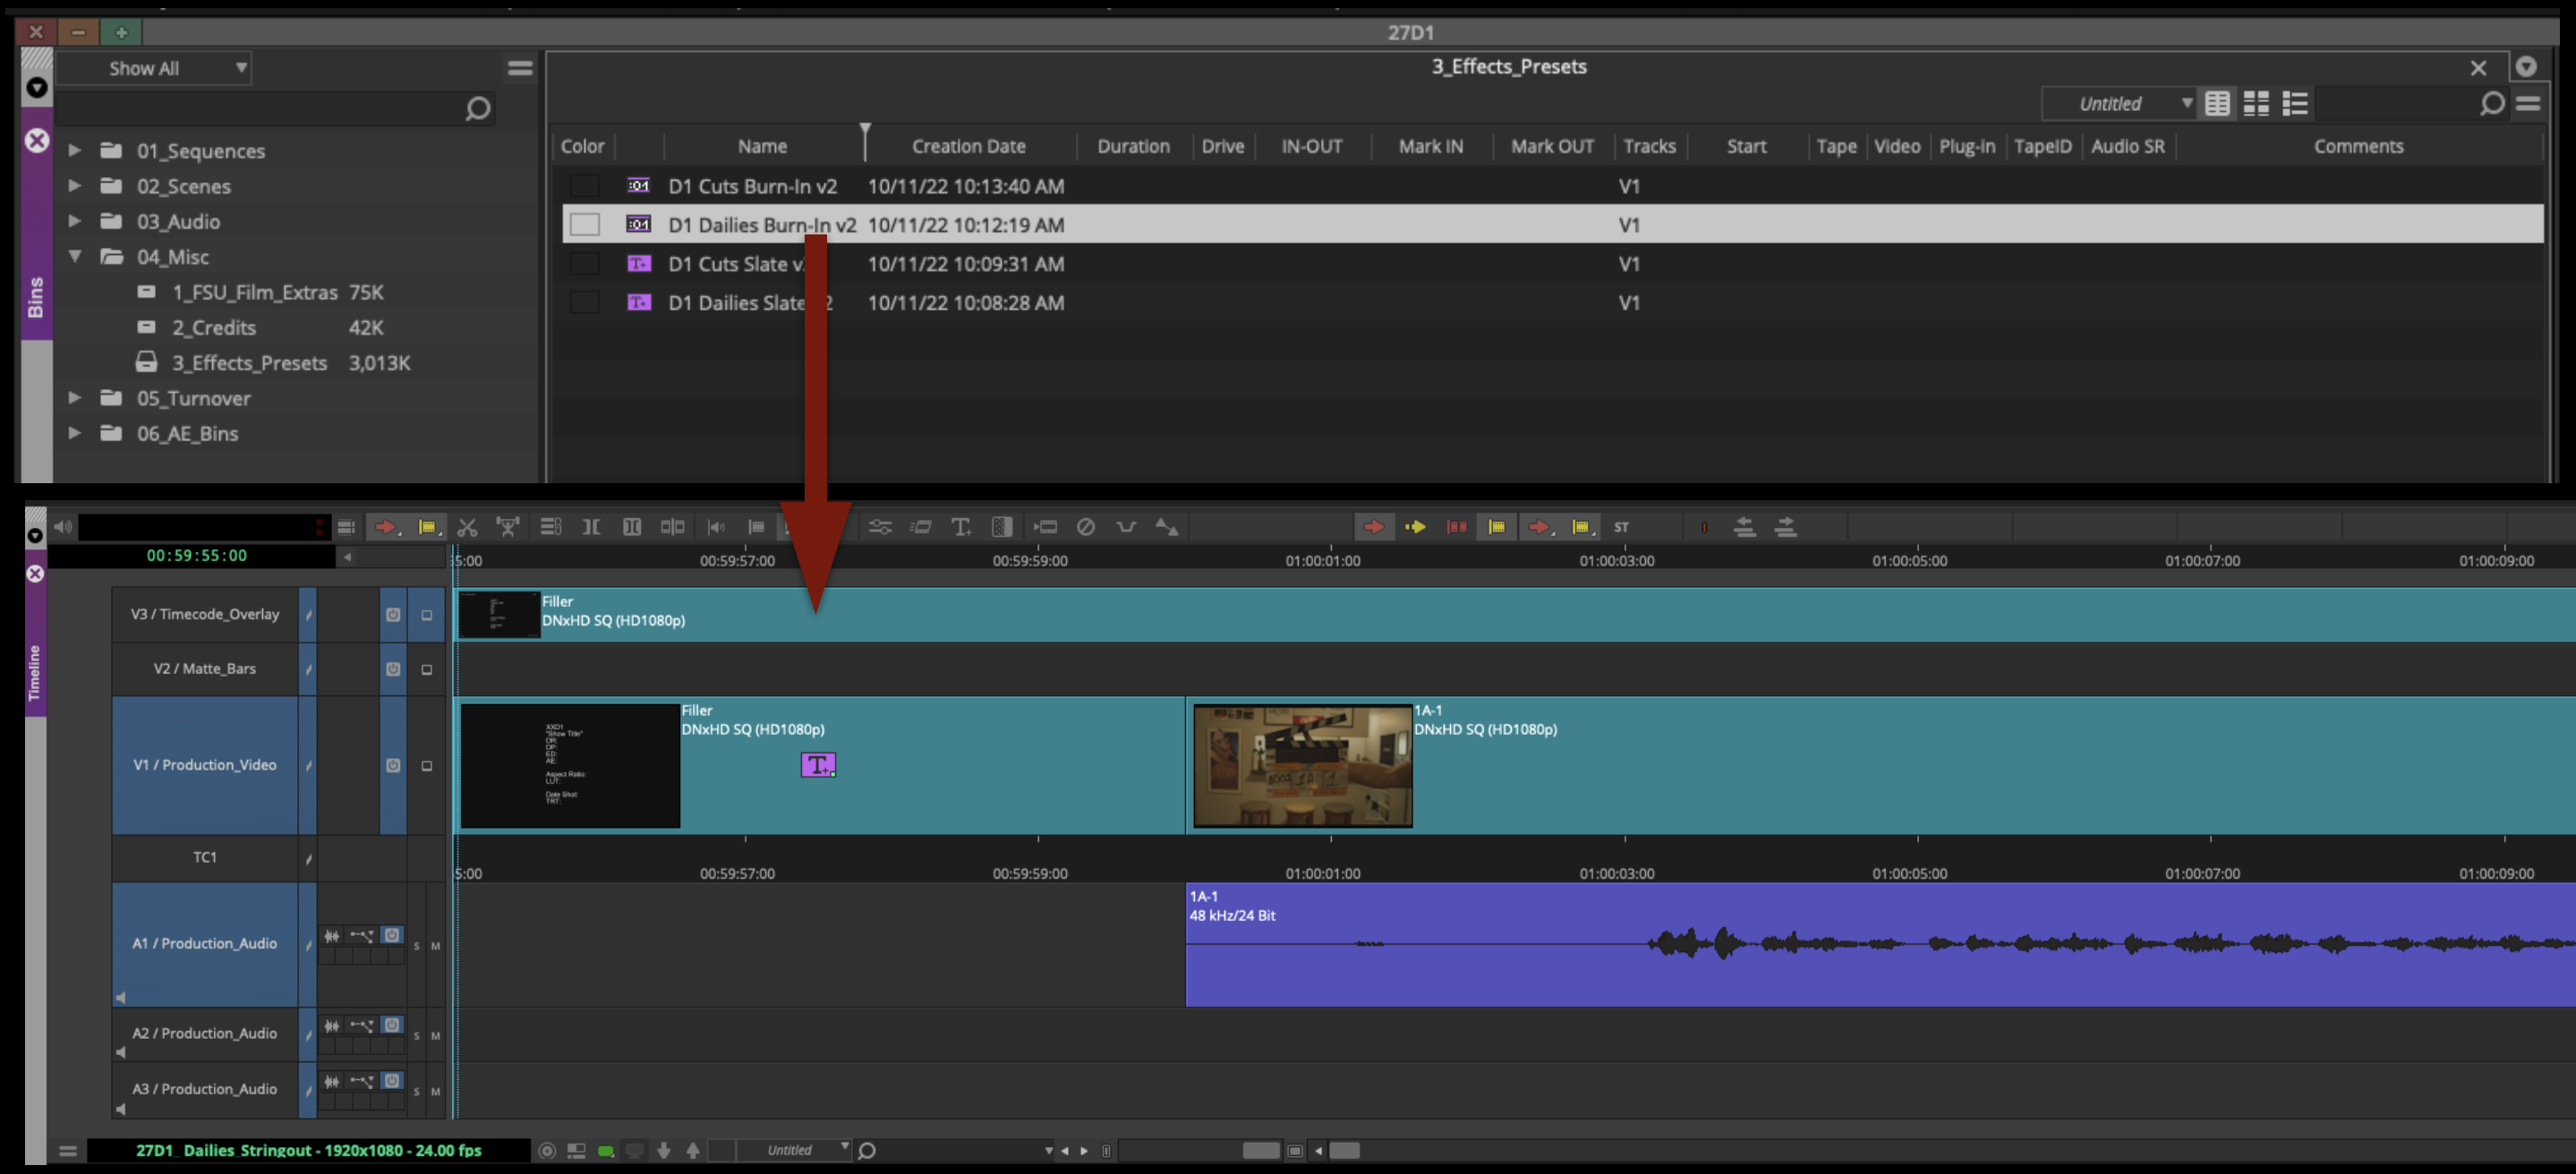
Fill in the burn in effect like the example shown below.
Export and Upload to Frame.io
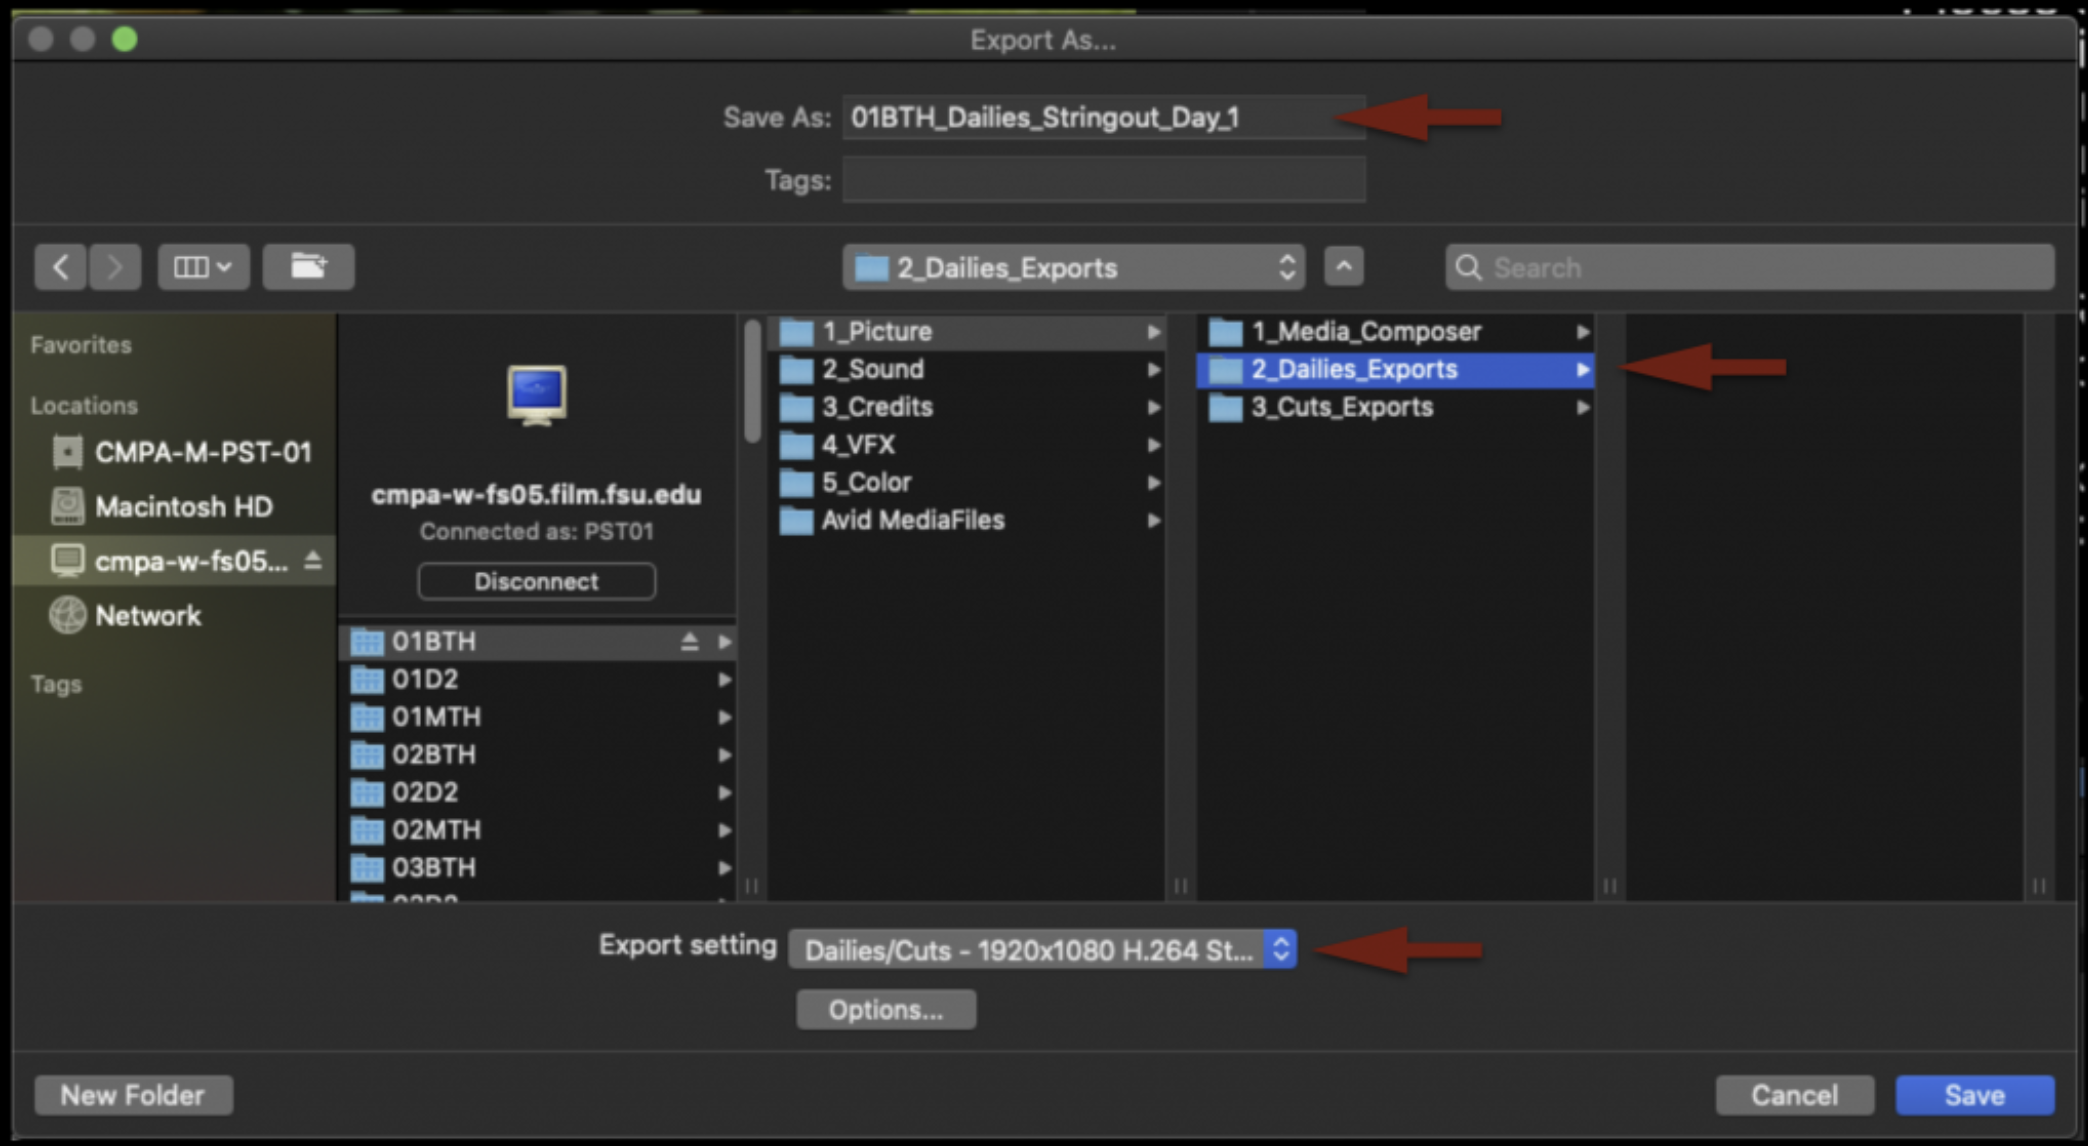
Mark in to out for the entire timeline and select all the video and audio tracks.
Right click in the program monitor and select export.
Check that the name of the file is correct, that its going the proper folder on your show volume, and that you are using the correct export setting.
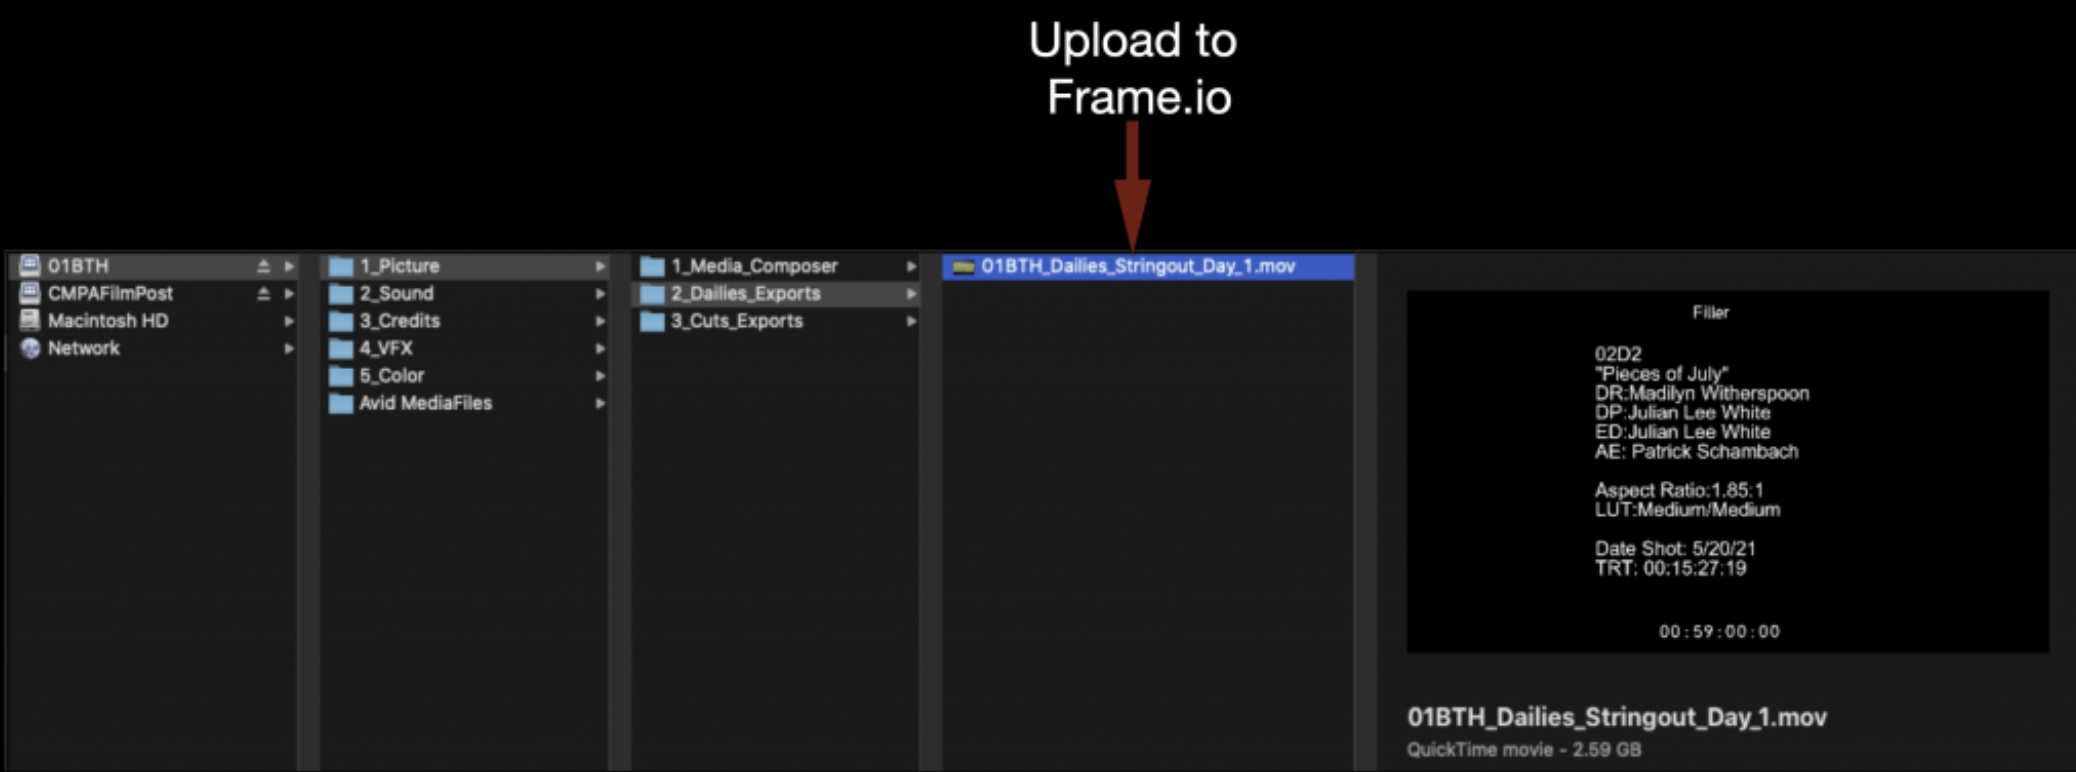
When the export is complete you should open it in quicktime player and check to make sure everything is correct. Then upload to the proper folder on frame.io.
When you are all done save your bins and close the project.