Overview
This post provides a step-by-step guide covering how to:
- Link and Transcode Media
- Organize Footage into Avid Bins
- Assemble the Dailies Stringout
- Export and Upload to Frame.io
- Review Footage
- Create Front Sequence and Mask
- Duplicate Sequences
- Import Credits
- Picture Lock
Note: On F1 projects, there will be no VFX work allowed outside Media Composer. Only your credits may be generated in After Effects and imported in as a DPX sequence.
Link and Transcode Media
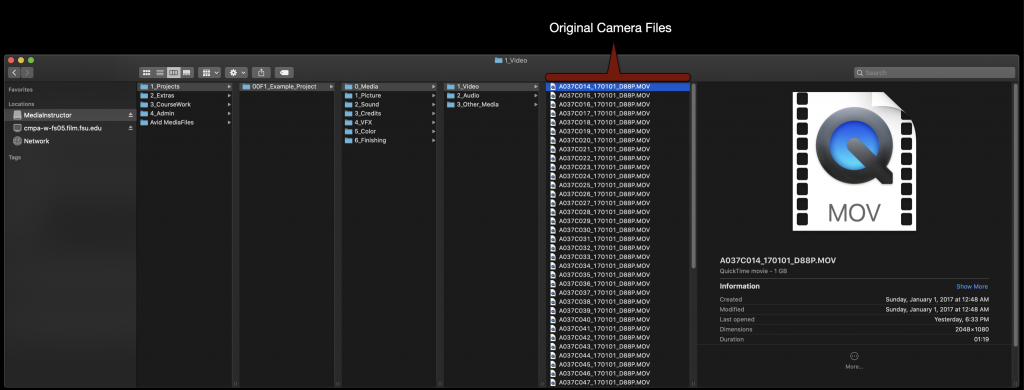
On the first day check the location of your OCF on the local drive of your assigned machine.
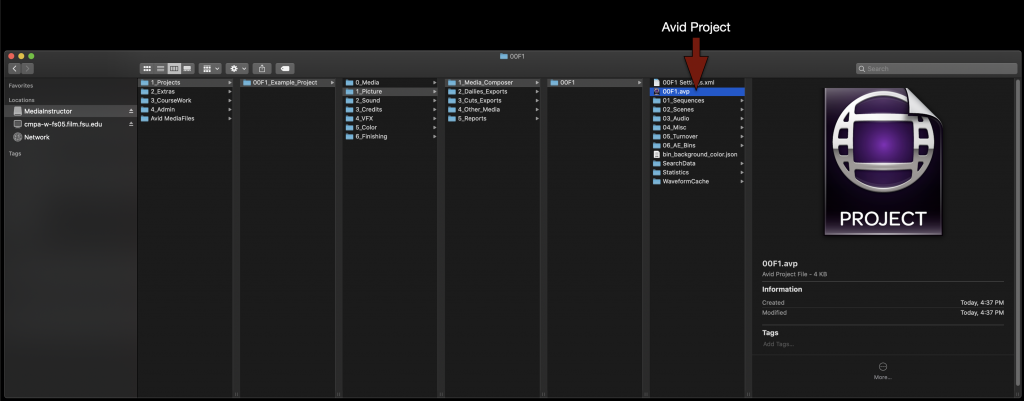
Next open your Media Composer project. It can be found at in the folder tree as shown in the example.
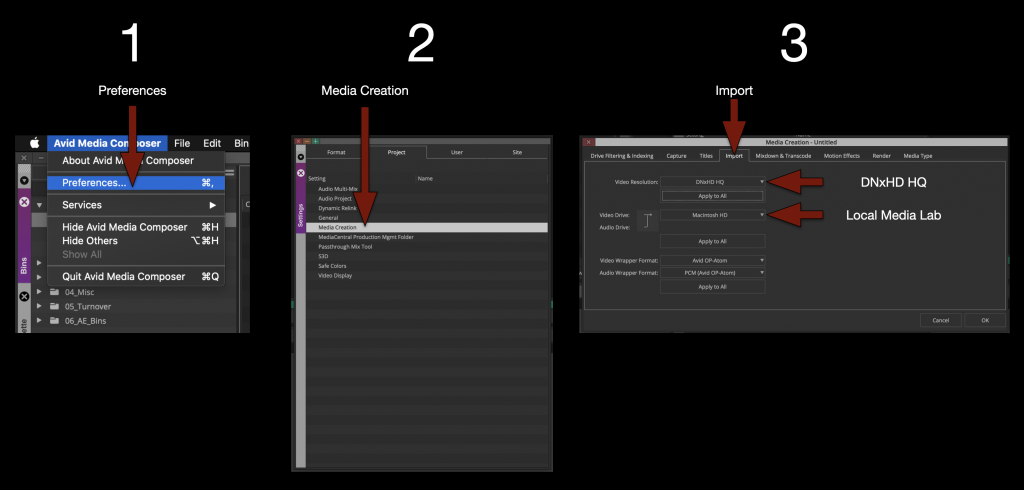
Once your project is open its a good idea to go ahead and set the “Media Creation” settings to the correct resolution and drive.
IMPORTANT! Remember to set your video resolution to “DNxHD HQ”.
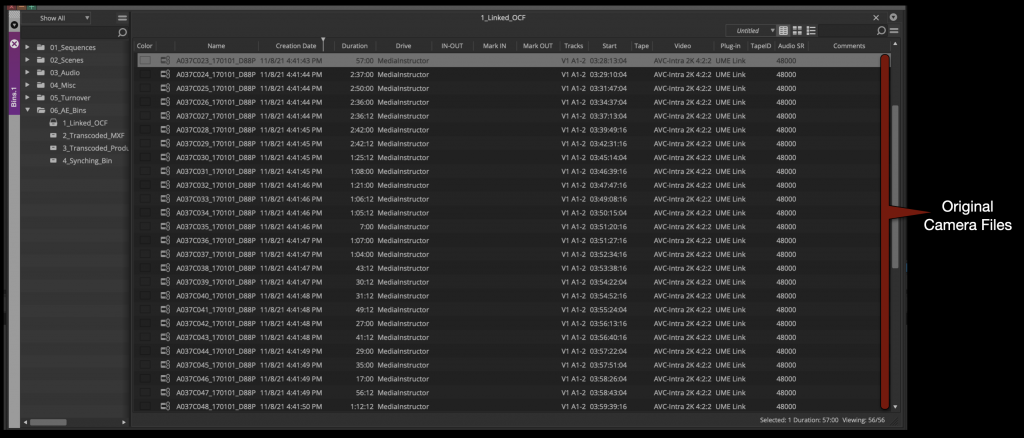
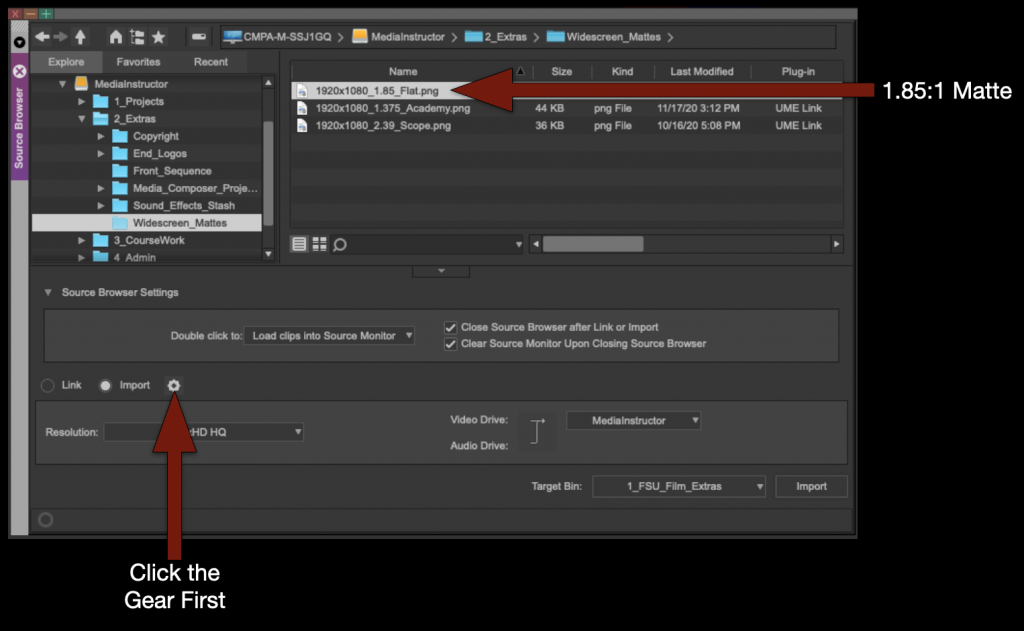
Now open the “Linked OCF” bin and open the “Source Browser”. Select all of the original camera files and link them into the bin.
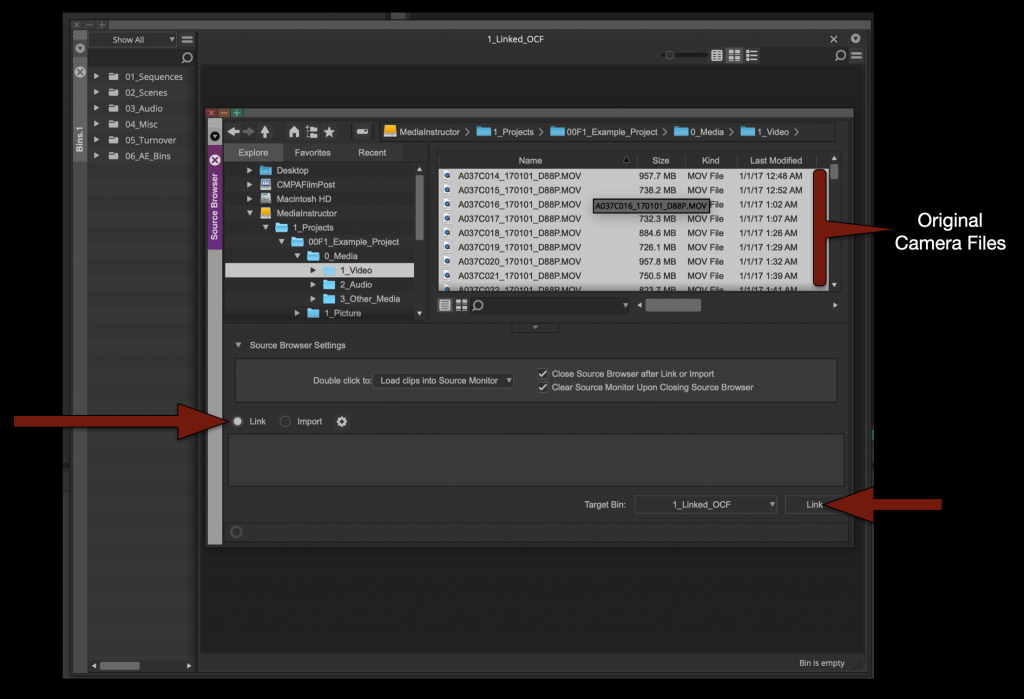
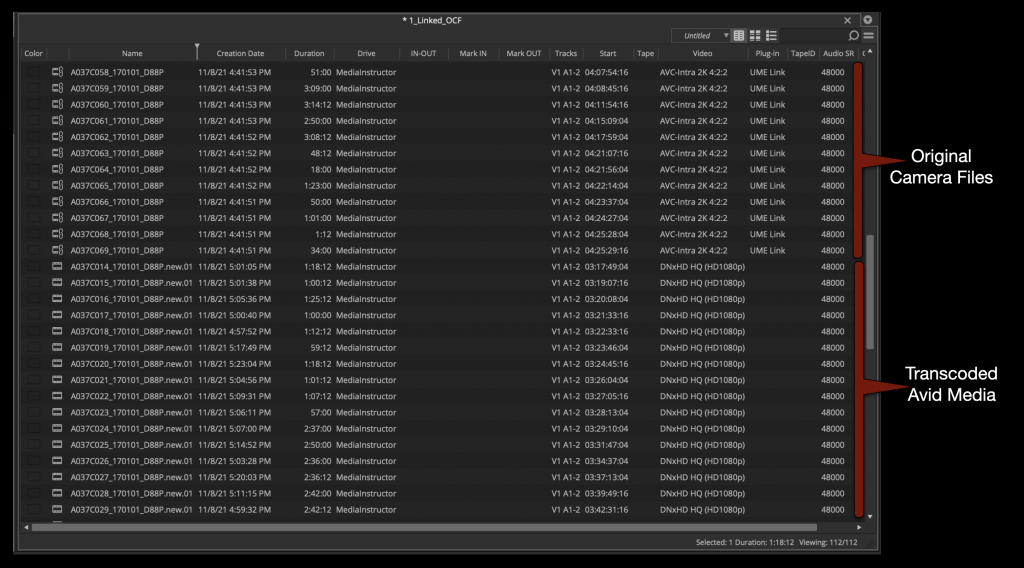
When everything is linked it it will look like the example below.
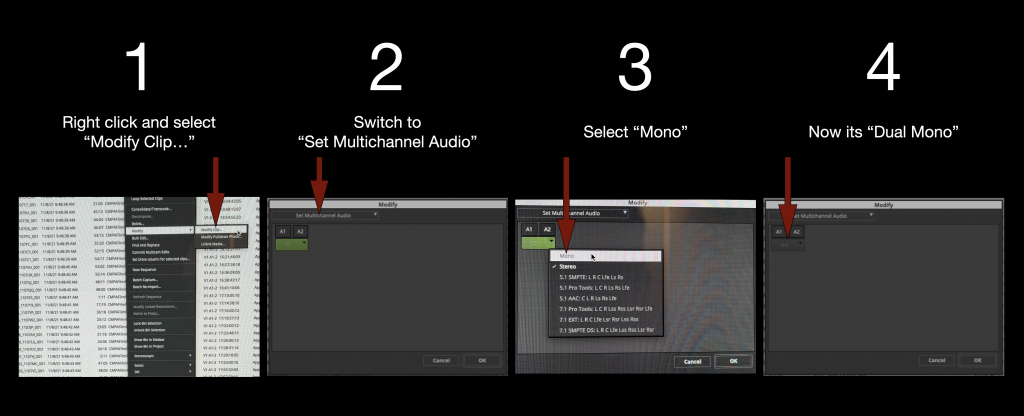
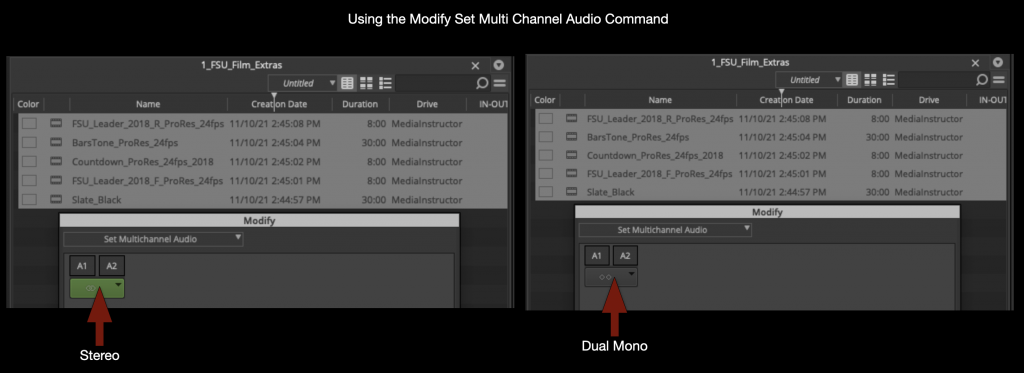
Select all the linked OCF in the bin and switch the audio from “Stereo” to “Dual Mono”.
Select all the linked OCF in the bin again and right click and select “Source Settings”. This will open the “Source Settings” window. You will use the FrameFlex tab to set the proper aspect ratio.
Only change the settings for Frame Aspect Ratio and Reformat. Changing anything else or not following these instructions can lead your transcoded footage being stretched or distorted.
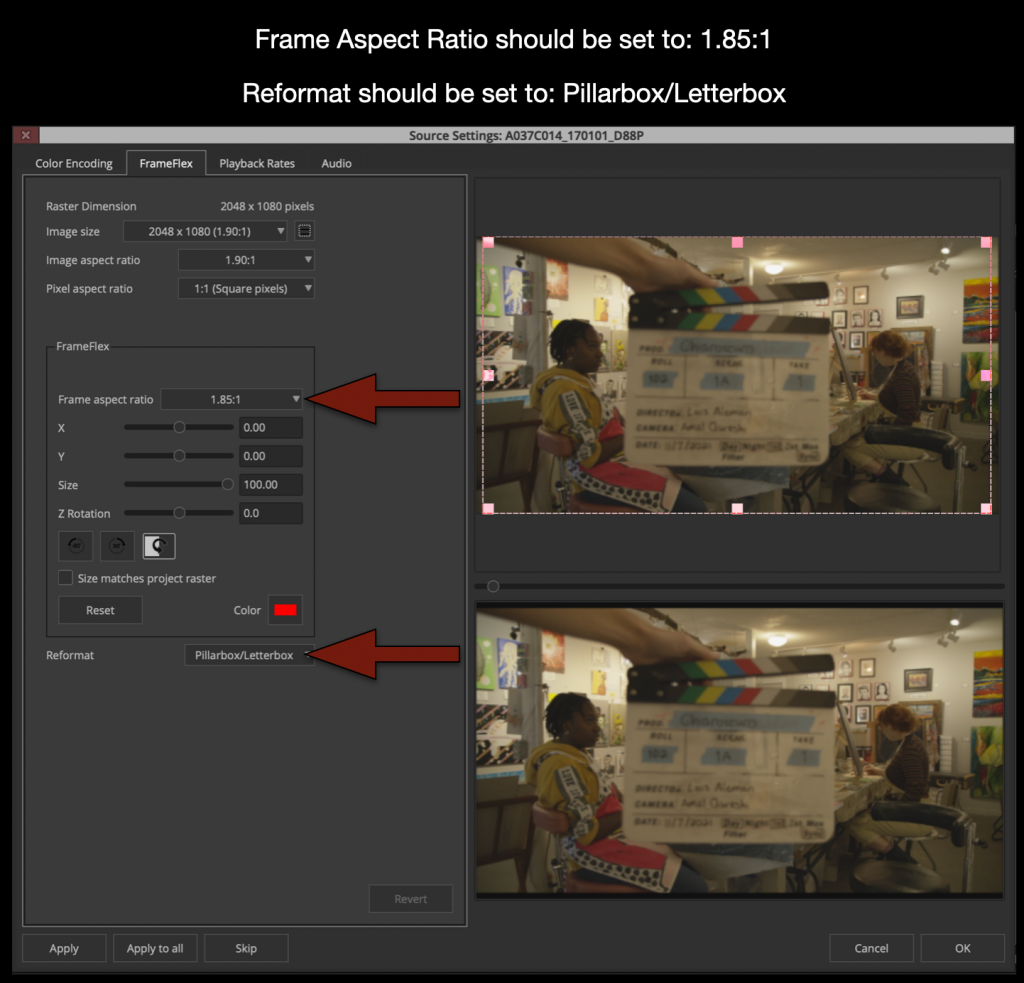
Changing these two parameters will ensure that when new Avid Media is created that is 1920×1080 it will have the correct aspect ratio burned in.
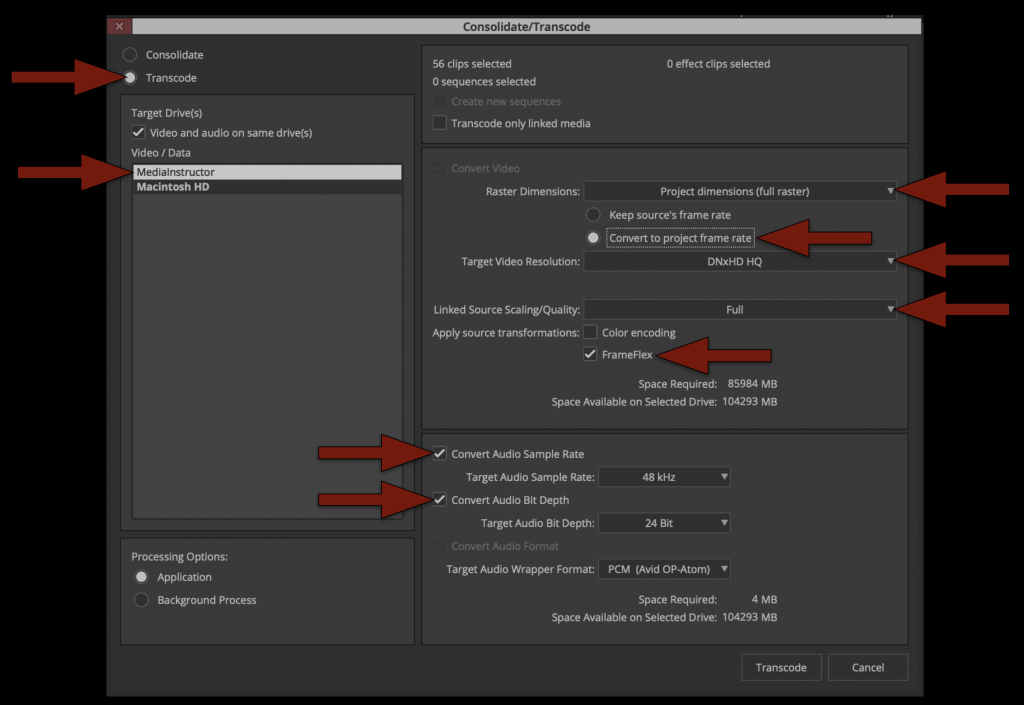
Now that all of your linked media has the proper framing and is set to dual mono its time to transcode to Avid Media. Highlight all of the linked files in the bin by hitting “Command + A”. Then right click on a clip and select “Consolidate/Transcode”.
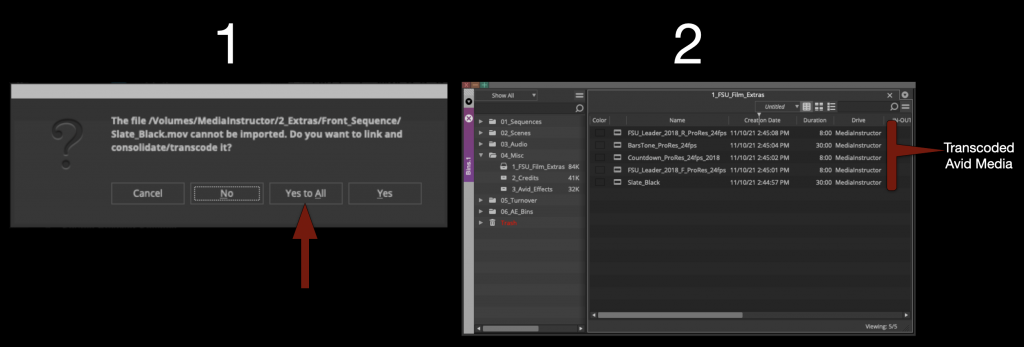
Study the options with the red arrows shown below. THIS IS VERY IMPORTANT as it determines the kind of media that will be transcoded and used for editing in Media Composer and coloring in Resolve.
The radial button in the top left should be set to “Transcode” Then double check all of the red arrows on the right.
– Target Drive should be local media drive
– Target Video Resolution should be DNxHD HQ
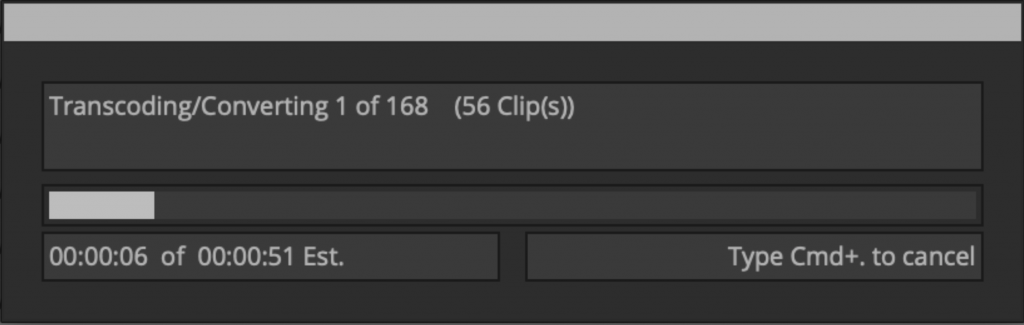
Once everything is set properly you can click “Transcode”. This process will take a few minutes as it generates new Avid Media so take a break and relax.
Organize Footage into Avid Bins
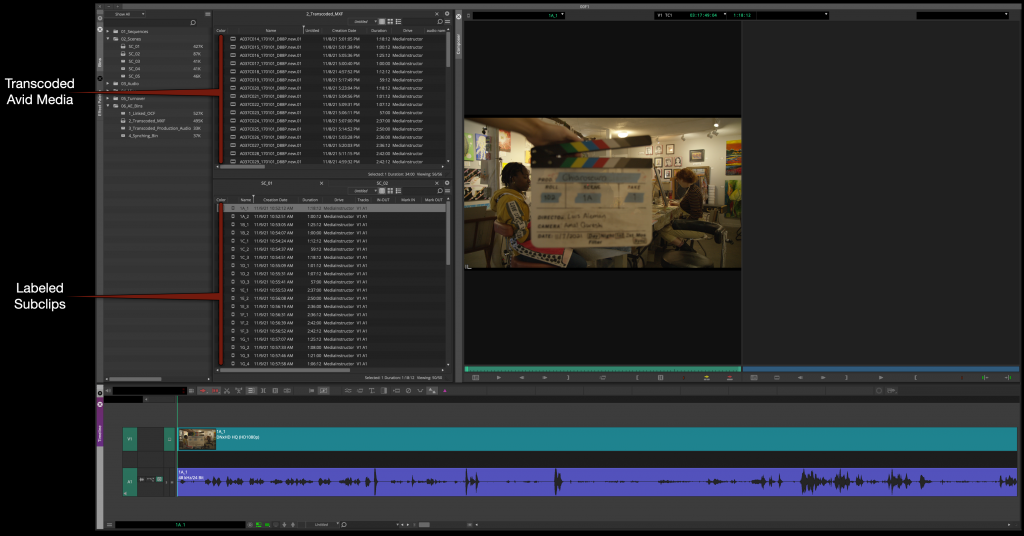
When the transcode is finished you will notice that now you have two versions of everything in your bin. One is the linked OCF and the other is Transcoded MXF Avid Media.
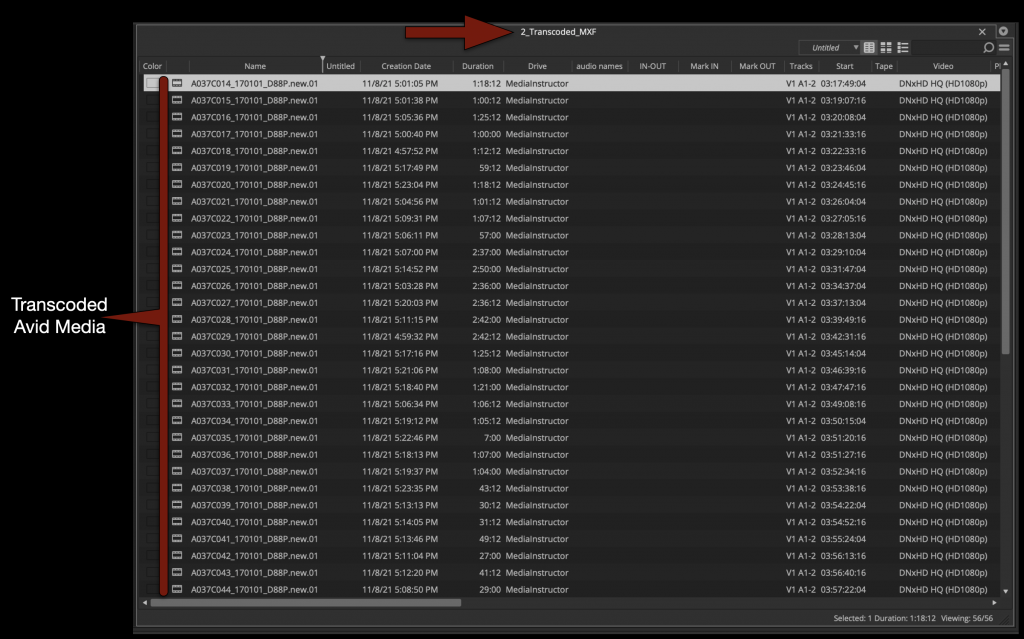
Move the newly transcoded Master Clips to the “Transcoded MXF Bin”. Close the “Linked Bin” you will no longer need it.
Next, make subclips of all of the Master Clips in the proper “Scene Bins”. This will accomplish three things.
1- It will organize your clips by scene
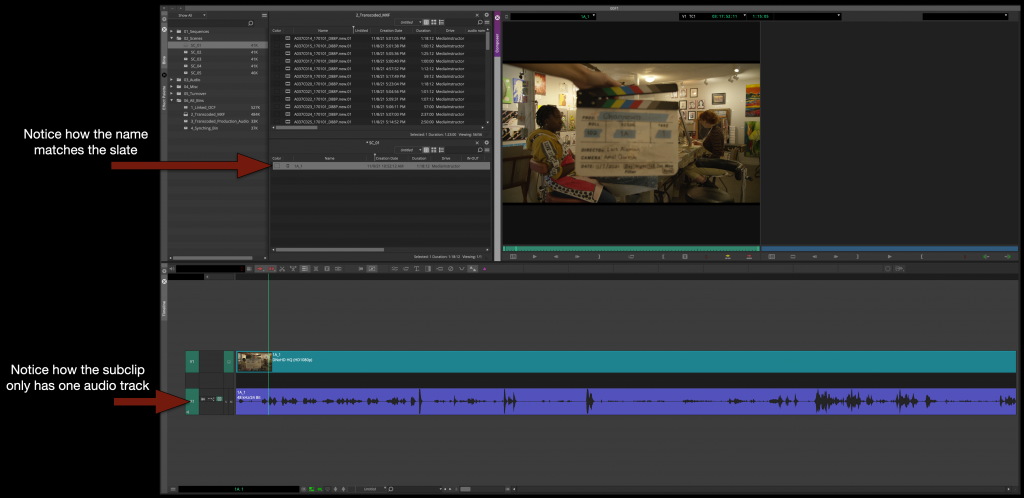
2- It will let you rename the subclips to match what is on the slate
3- It will let you “remove” the audio from the internal camera microphone
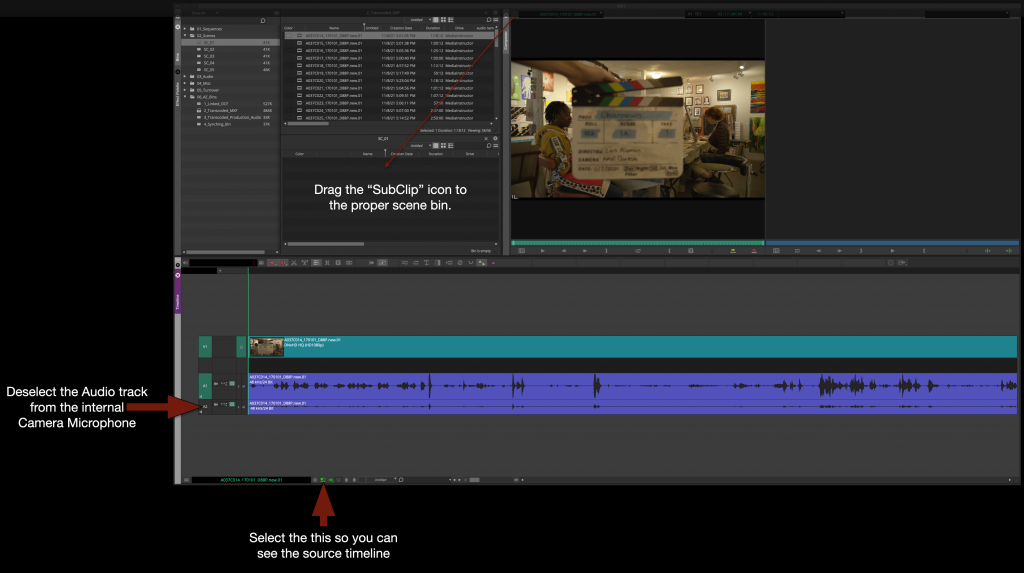
After you make a subclip in the proper scene bin with only the audio from the boom microphone you will be able to rename it based on the slate.
Repeat this for every Master Clip until all of your media is subcliped, labeled, and organized into the proper “Scene Bin”.
This would be the stage that if you have any “Bumped Takes”, “Wild Lines”, or “Room Tone” you would subclip, label and organize taht as well into the proper bin.
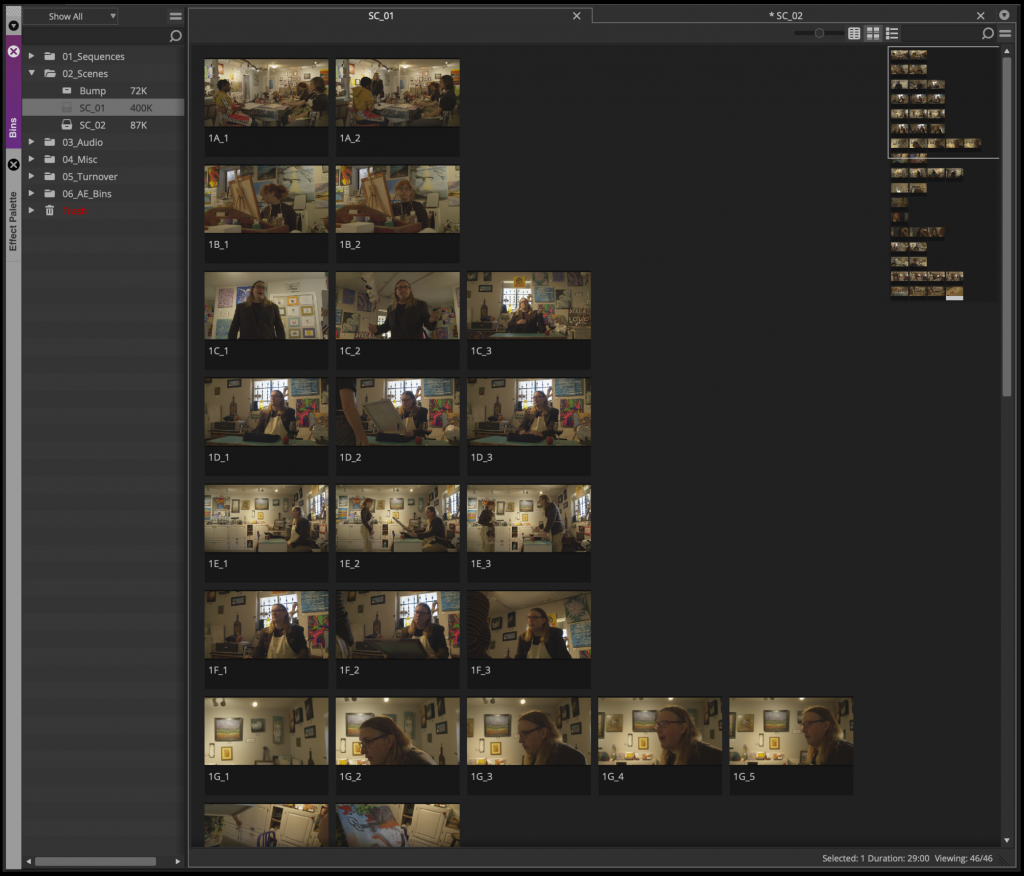
Now that al the subclips are in the right bin, switch your scene bins from “List View” to “Thumbnail View”.
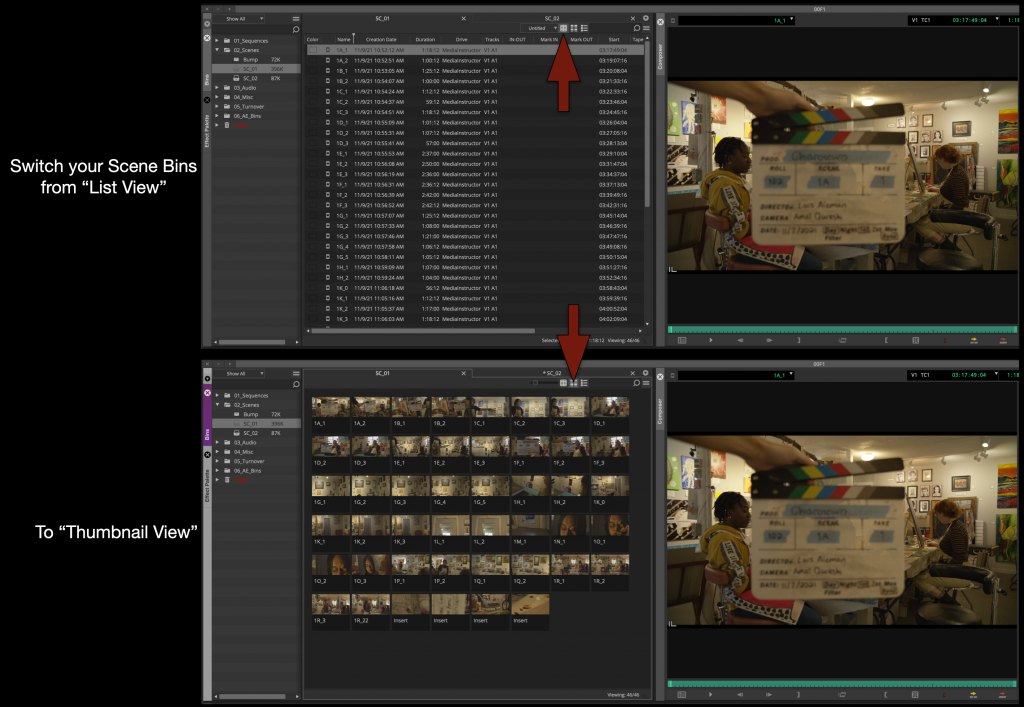
For each scene bin arrange the thumbnails so that the takes are displayed top to bottom and the takes are arranged left to right.
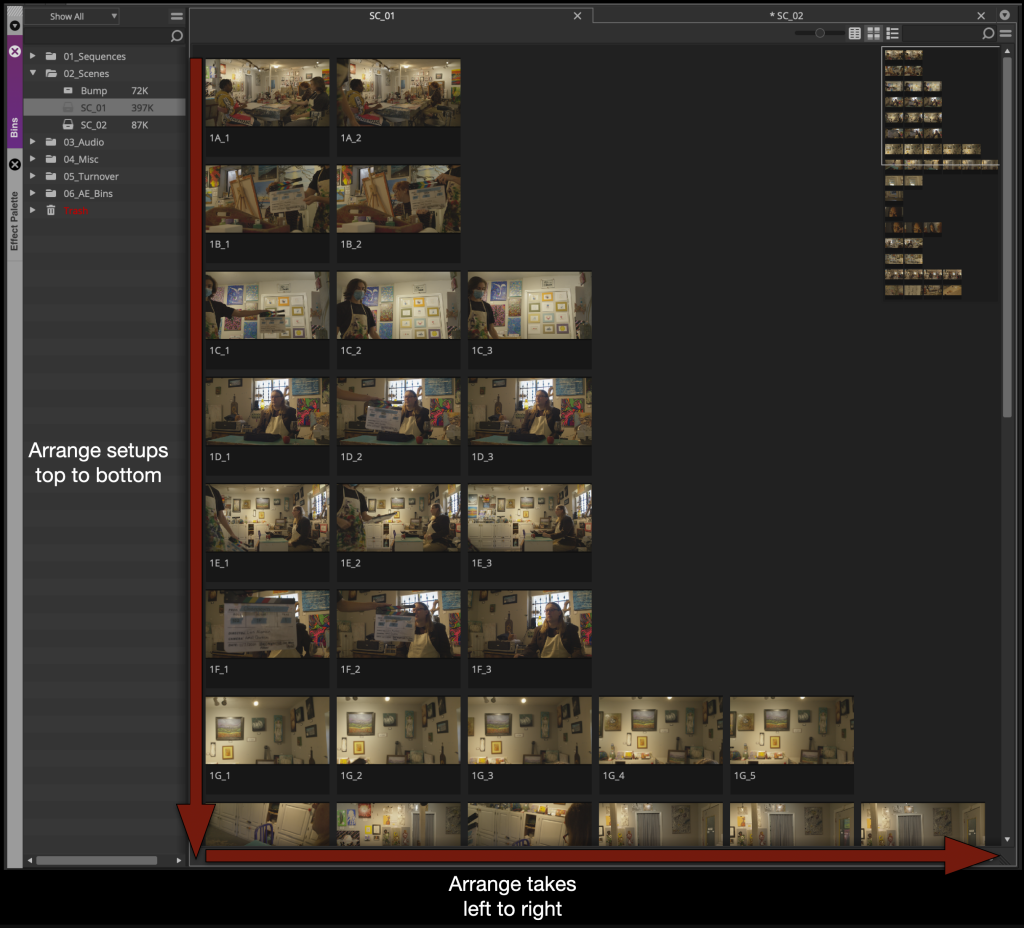
Then single click on each thumbnail and using the “JKL” key scrub and find a good thumbnail frame for each one.
Assemble the Dailies Stringout
Now you can assemble everything from each scene bin into a Dailies Stringout sequence. It can be found in the sequences folder inside the Dailies Stringout bin.
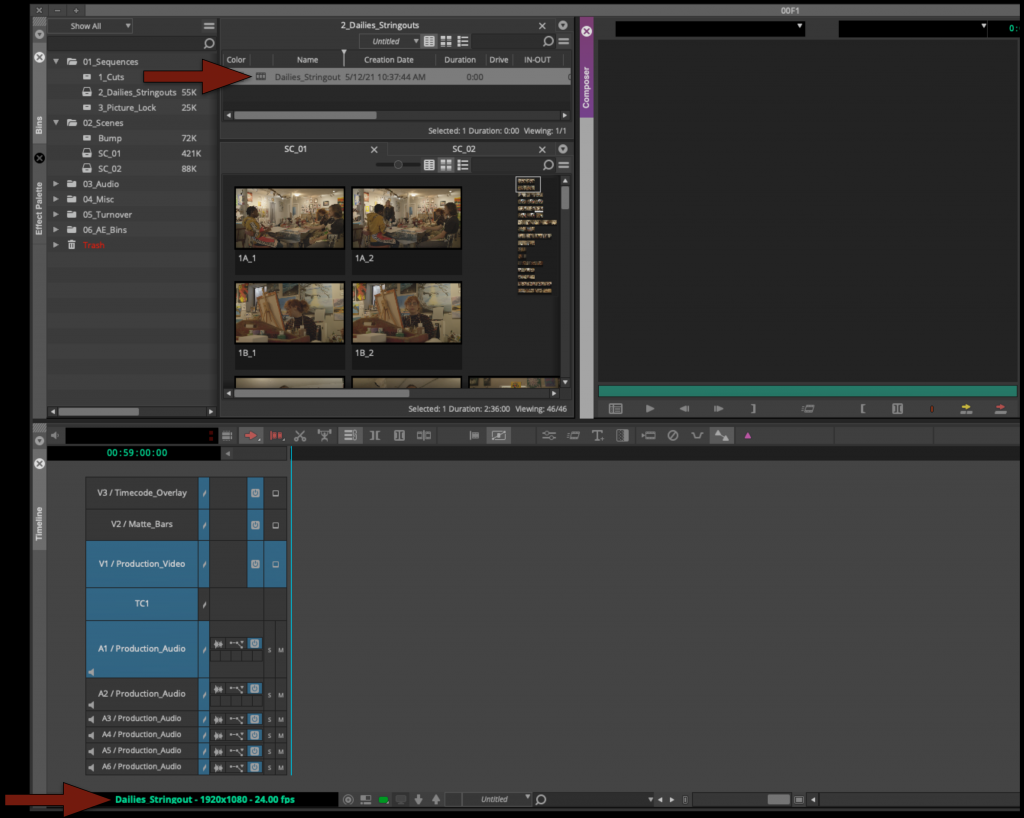
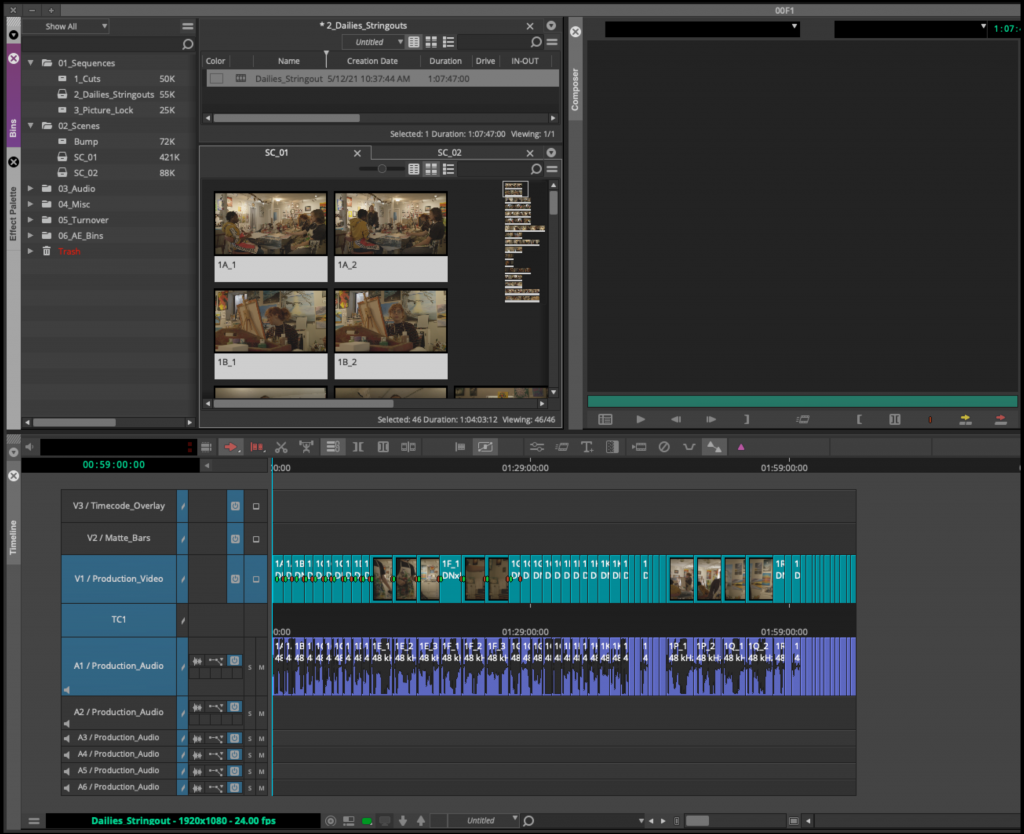
In scene order assemble all the takes from each scene bin.
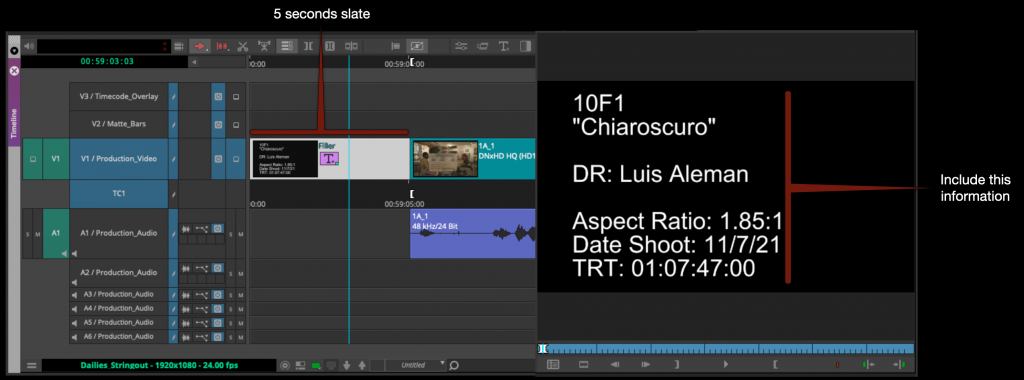
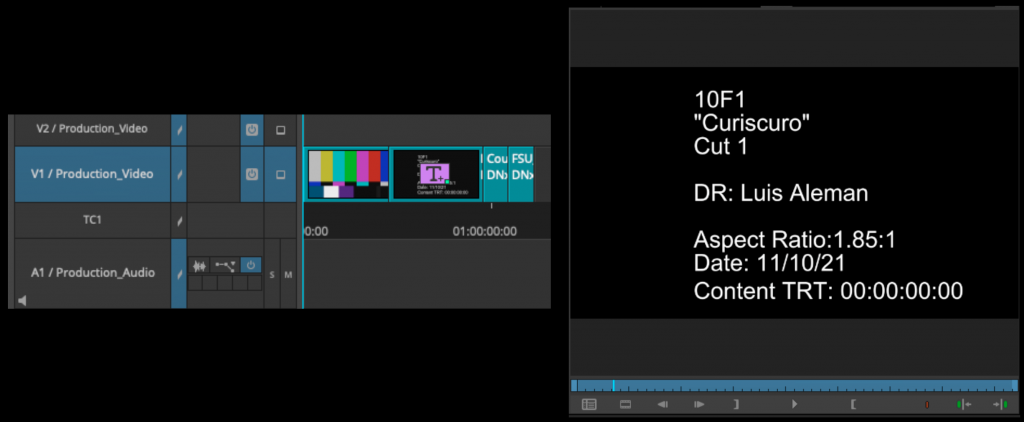
Insert a 5 second slate at the begin of the sequence and using the Avid Title tool fill in the slate with all the information shown in the example below.
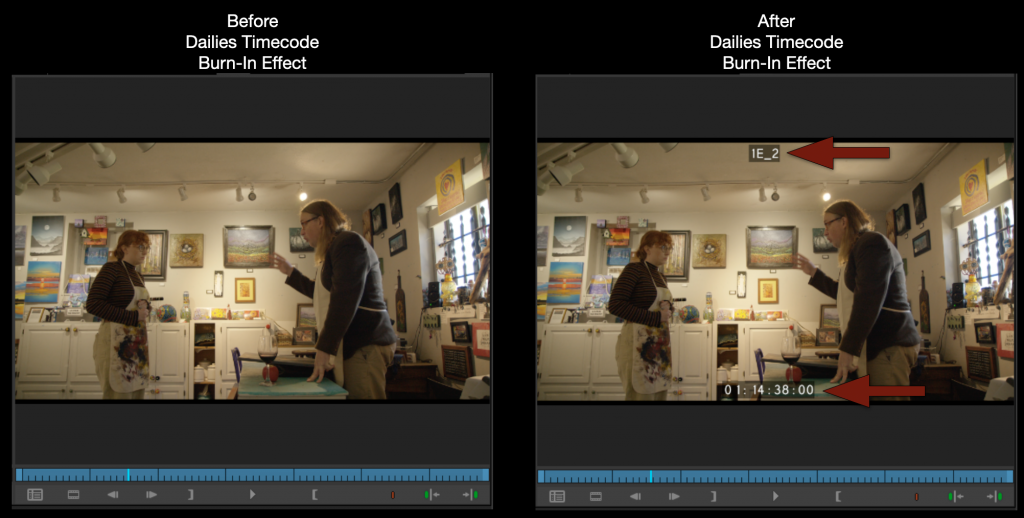
Inside the Avid Effects Bin you will find a Dailies Timecode Burn-In effect. Apply this effect to the fill in the labeled video track.
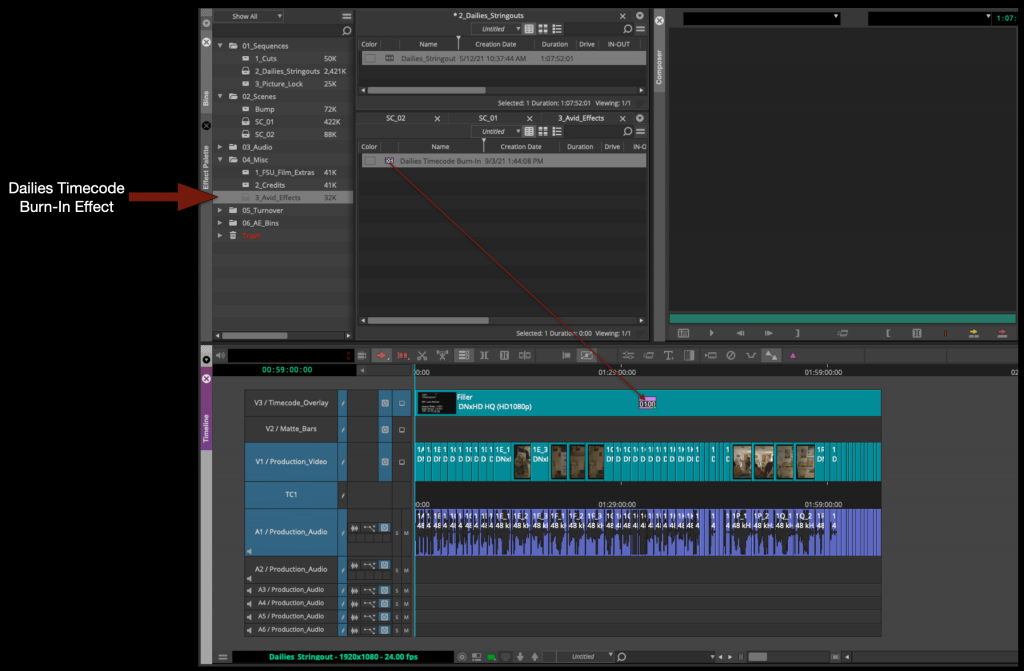
You will see in the Program Monitor that your Dailies string out now has timecode and shot names burned in.
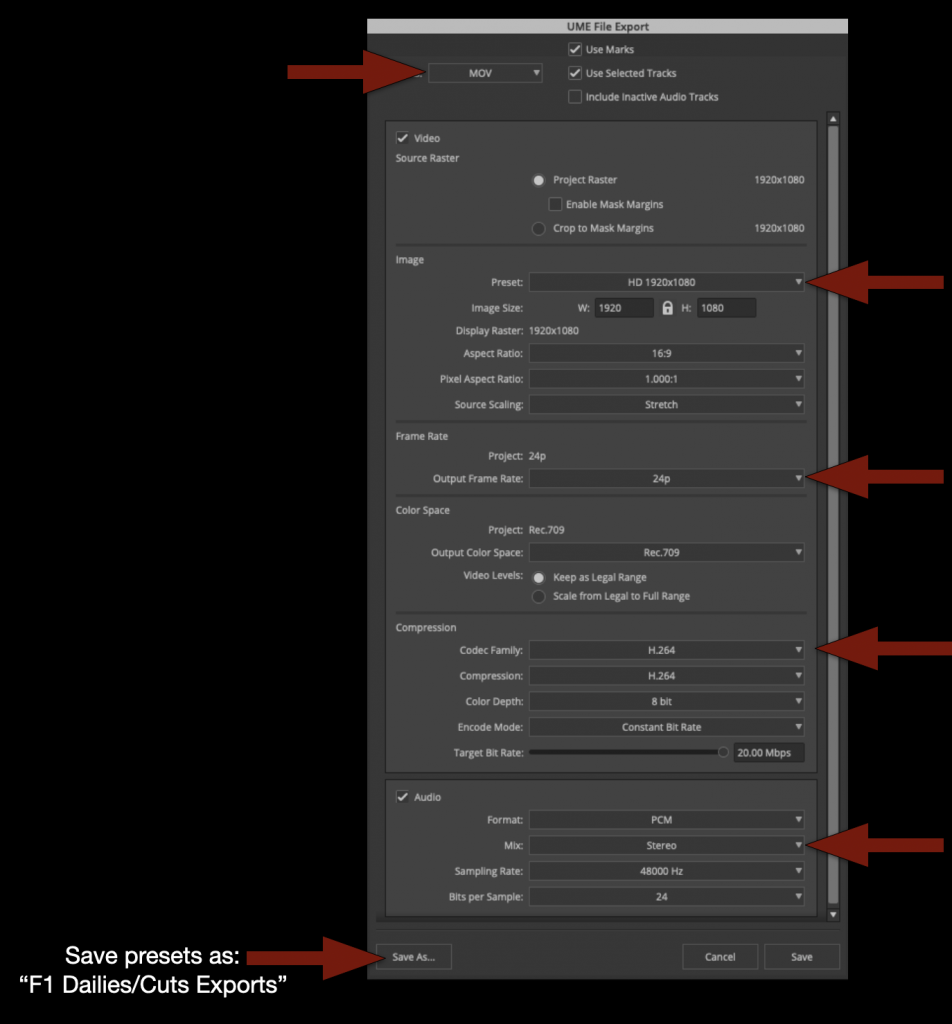
Export and Upload to Frame.io
Mark in to out for the entire timeline and select all the video and audio tracks.
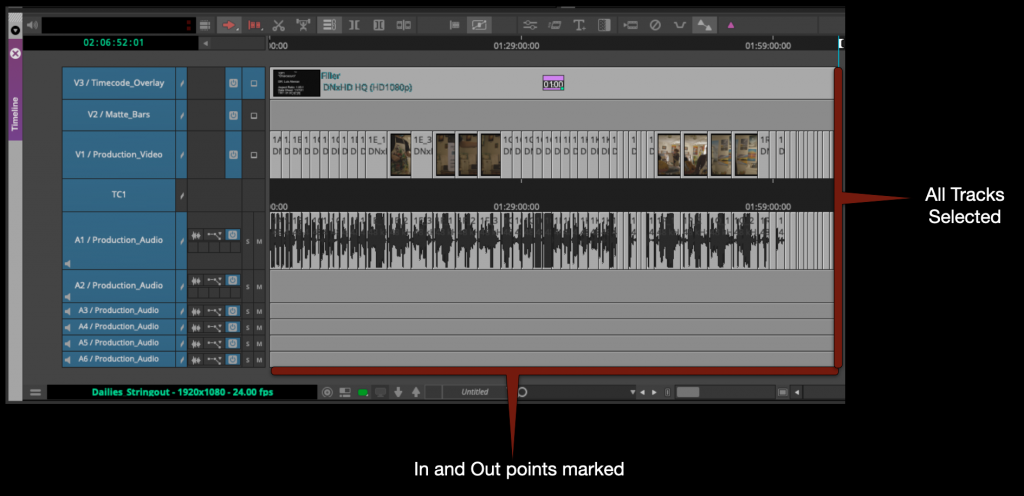
Right click in the program monitor and select export.
Check that the name of the file is correct, that its going the proper folder and that you are using the correct export setting.
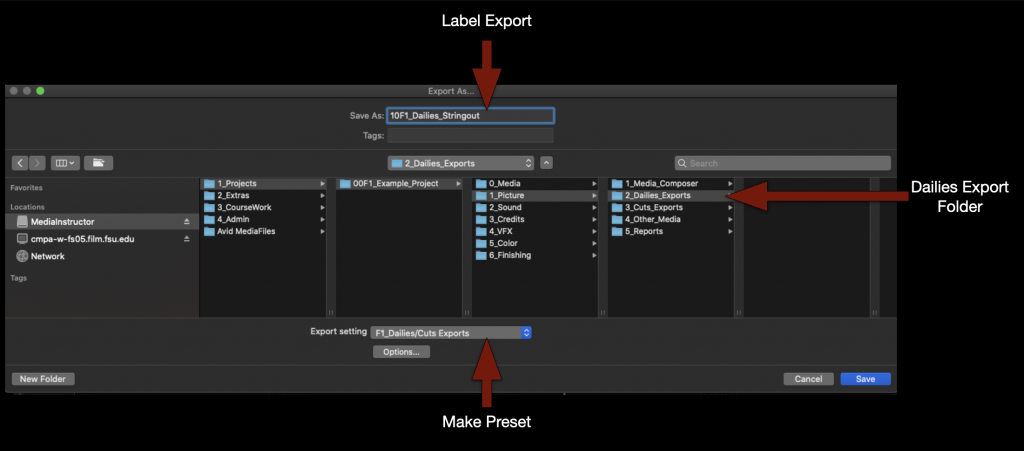
If you don’t yet have a “F1 Dailies/Cuts Export” preset make one using these settings.
When the export is complete you can check to make sure everything is correct and then upload to the proper folder on frame.io.
Review Footage
Now you are ready to review your dailies. Watch everything!
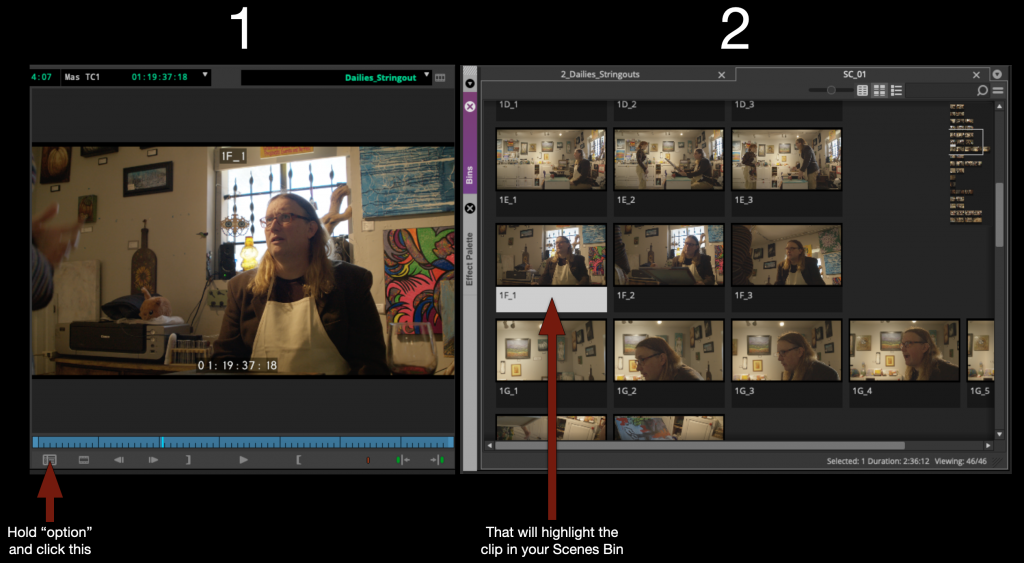
As you are watching the dailies string out sequence in Media Composer you may find that you would like to color code your clips or add written notes to yourself. This is easy to do by using the “Find Bin” button.
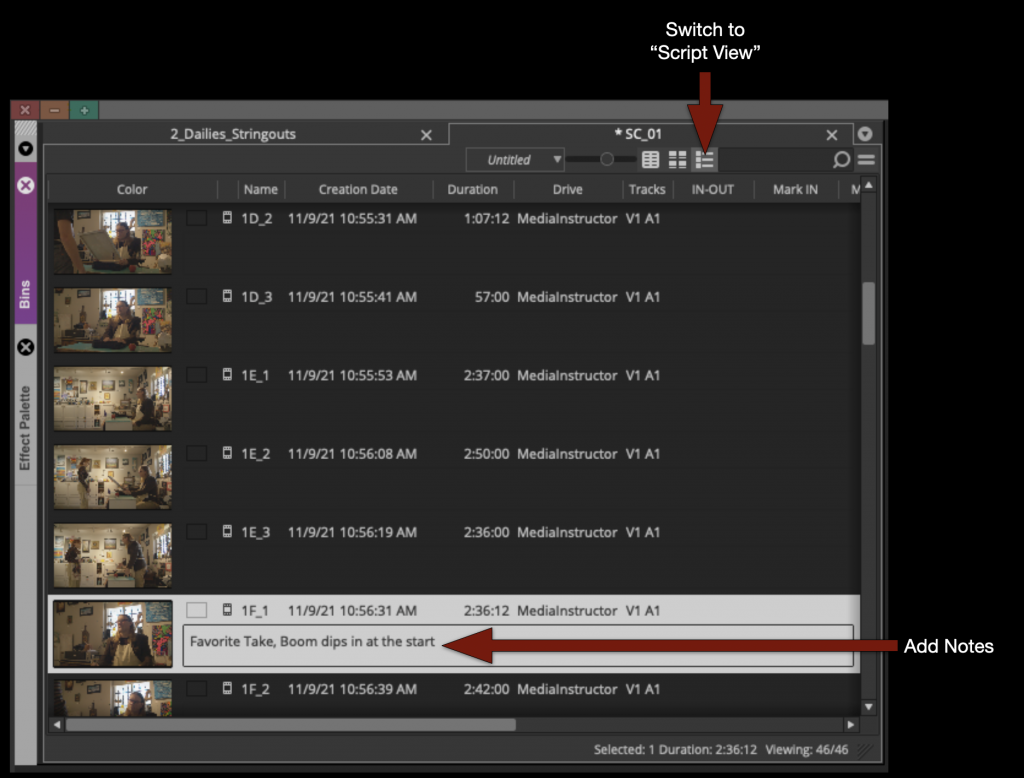
Once the clip is highlighted you an add notes by switching to “Script View” and typing in the comments section.
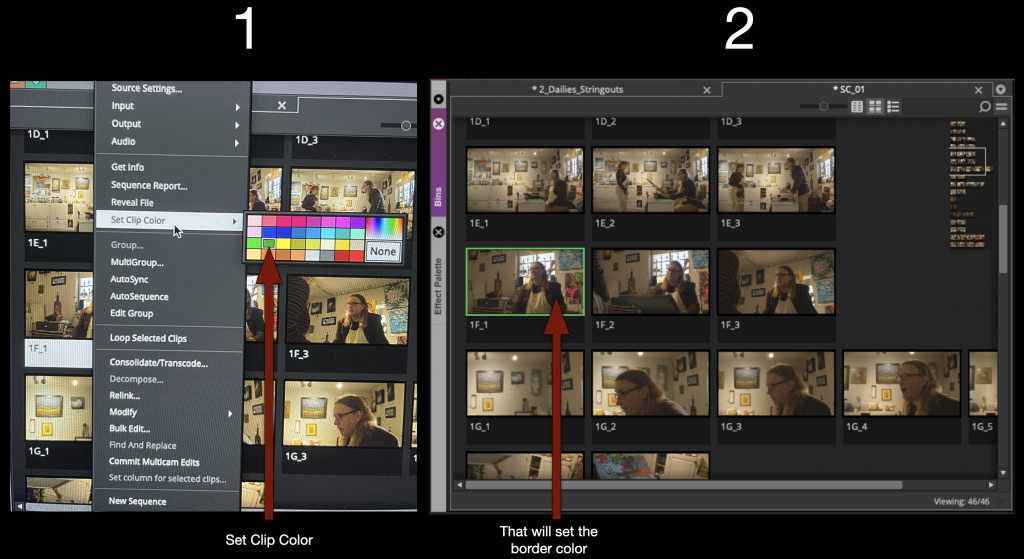
Or if you would like to color code them in “Frame View” you can do taht as well. But first you need to turn something on in the preferences.
Under Preferences – Bin – Check “Show Border Colors”
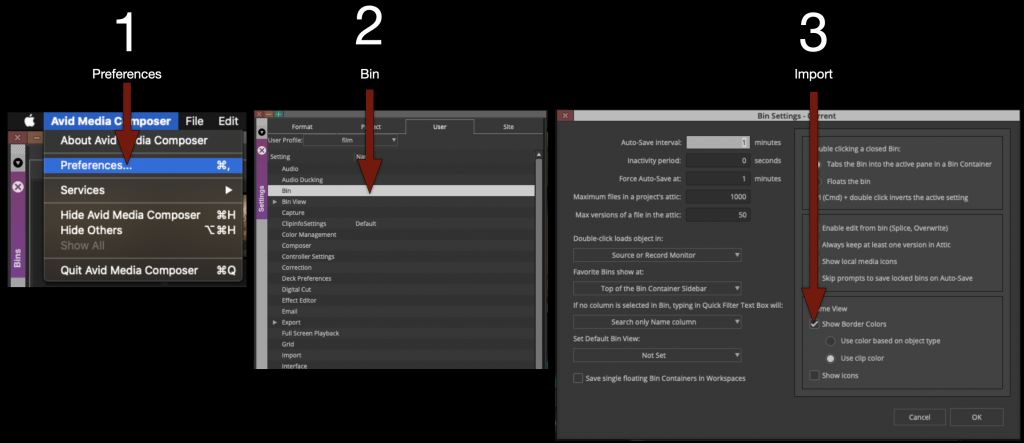
With that option on you can right click on any thumbnail and set the clip color and it will appear as a border. You can use this to create any kind of organizational system that you like.
Create Front Sequence and Mask
Now that you have reviewed all your footage you are almost ready to begin work on your first cut. But first you need to build the front sequence and apply the mask that you will work underneath.
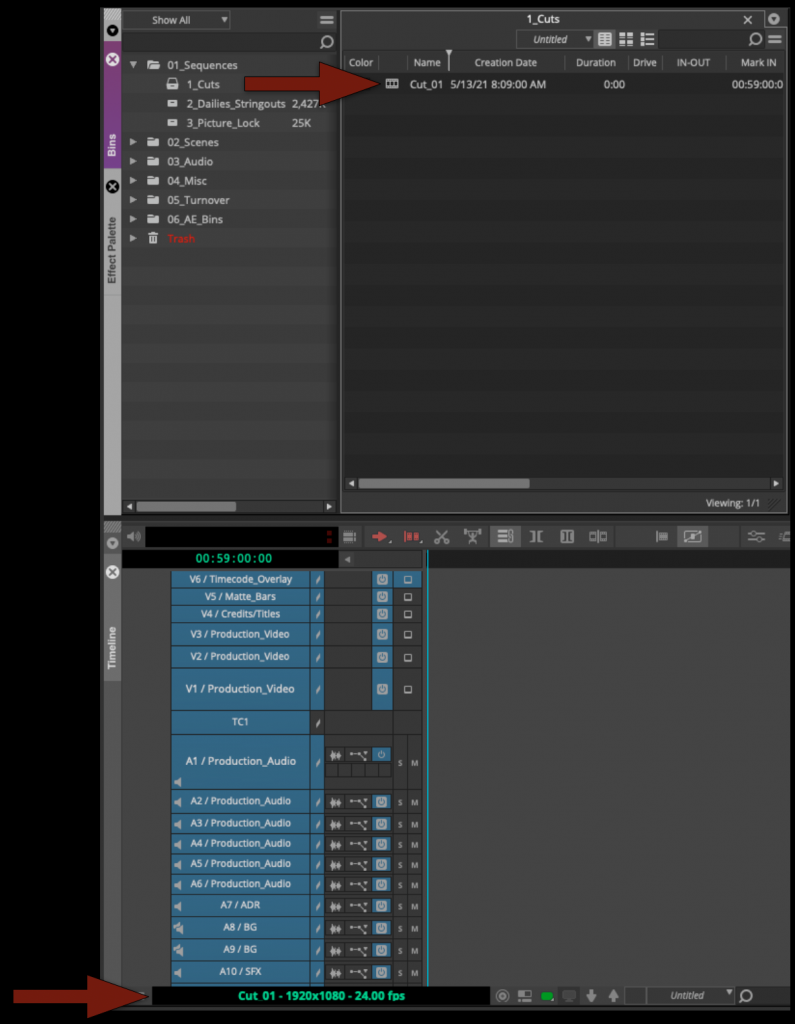
Open the Cut Sequence inside the Cuts Bin.
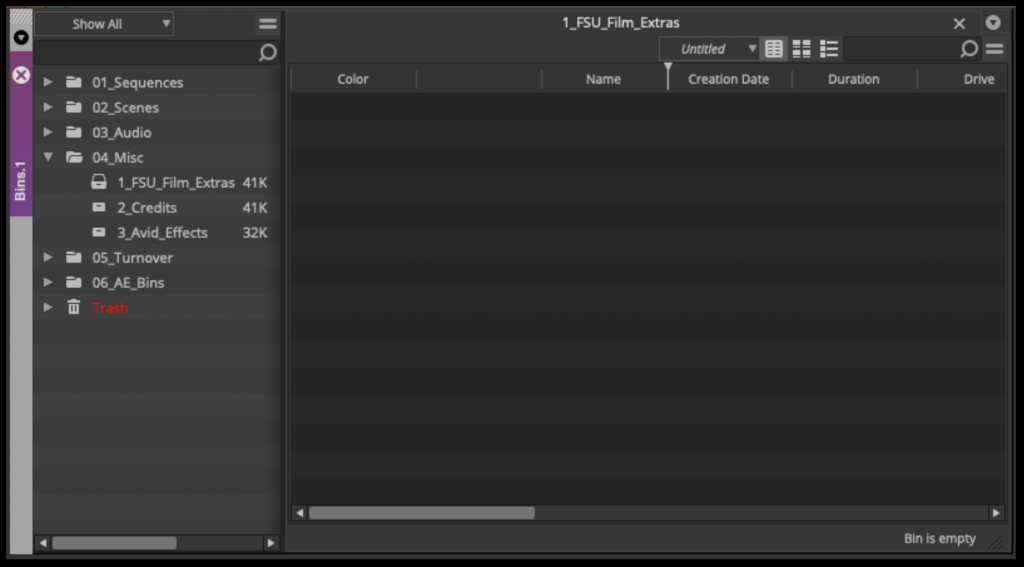
Open the “FSU_Film_Extras” bin.
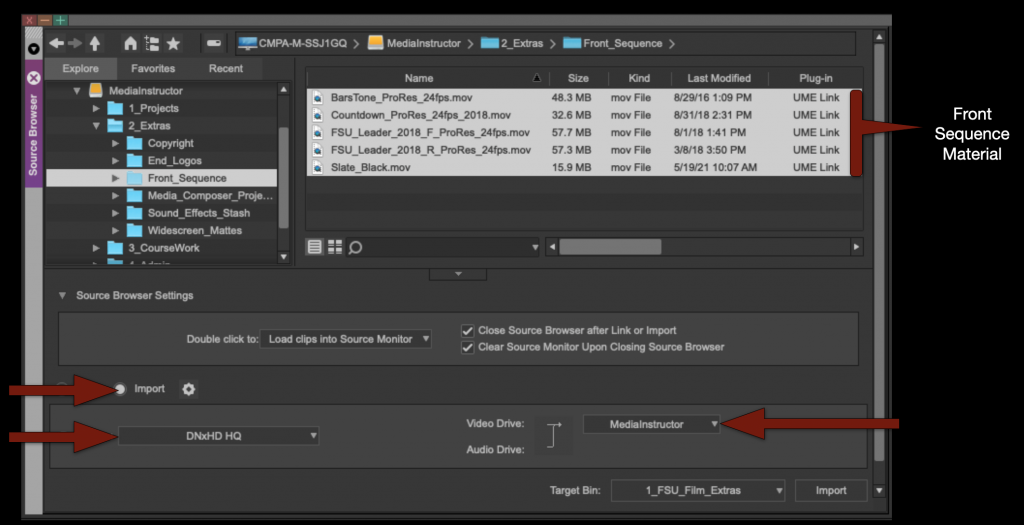
Then using the “Source Browser” import in the front sequence material.
Make sure your Resolution is still set to DNxHD HQ and your Target Drive is correct.
When you click “import” it will say that they will first need to be linked and then transcoded. Select “Yes to All”. It will transcode the media to Avid MXF media.
This new medias audio will need to be switched to “Dual Mono”. Select everything and right click to select “Modify”.
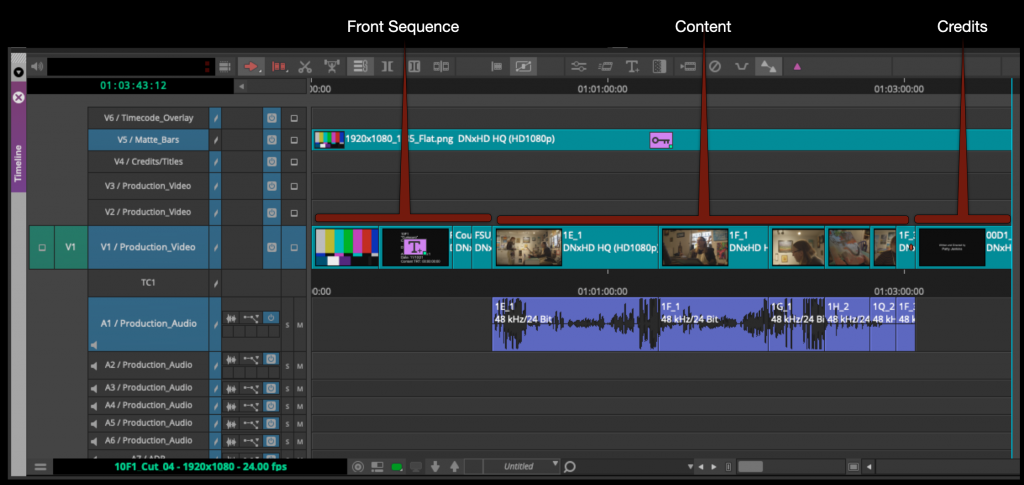
Cut the Front Sequence material into the sequence in the following order:
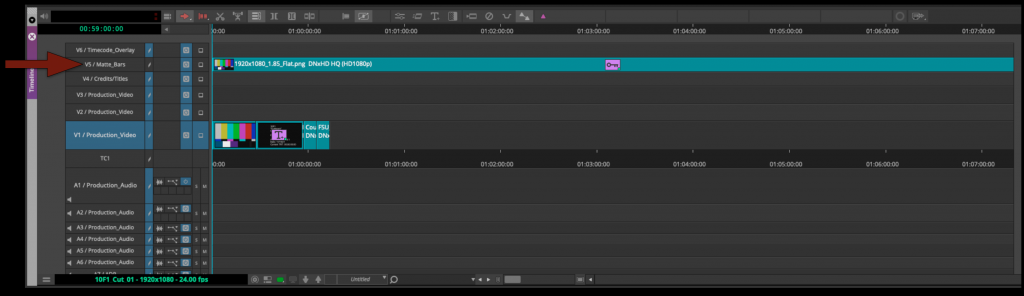
Your Front Sequence Should be arranged in the following order.
- Bars and Tone – 30 seconds – start at Timecode 00:59:00:00
- Slate – 30 seconds – start at Timecode 00:59:30:00
- Academy Countdown (SMPTE Leader) – 8 seconds – start at Timecode 01:00:00:00
- FSU Leader – 8 seconds – start at Timecode 01:00:08:00
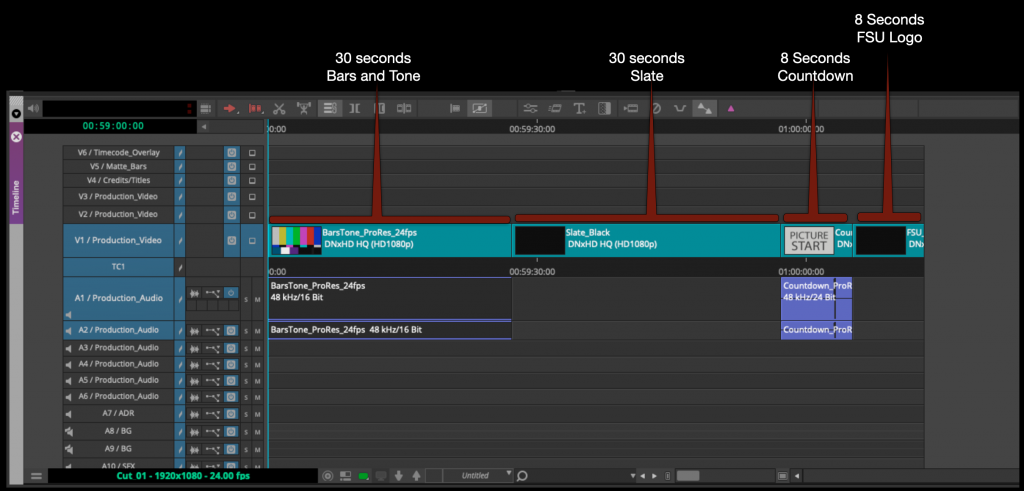
This means that the first frame of content will fall on 01:00:21:00. If everything is put together correctly the 2-pop (#2 on the Leader) will fall on 01:00:06:00 (This is very important!)
Apply the Avid Title Tool to the 30 second Slate and fill it in as shown in the example below.
Next to apply the proper masking to the sequence use the source browser to import the Mask into the FSU Film Extras bin.
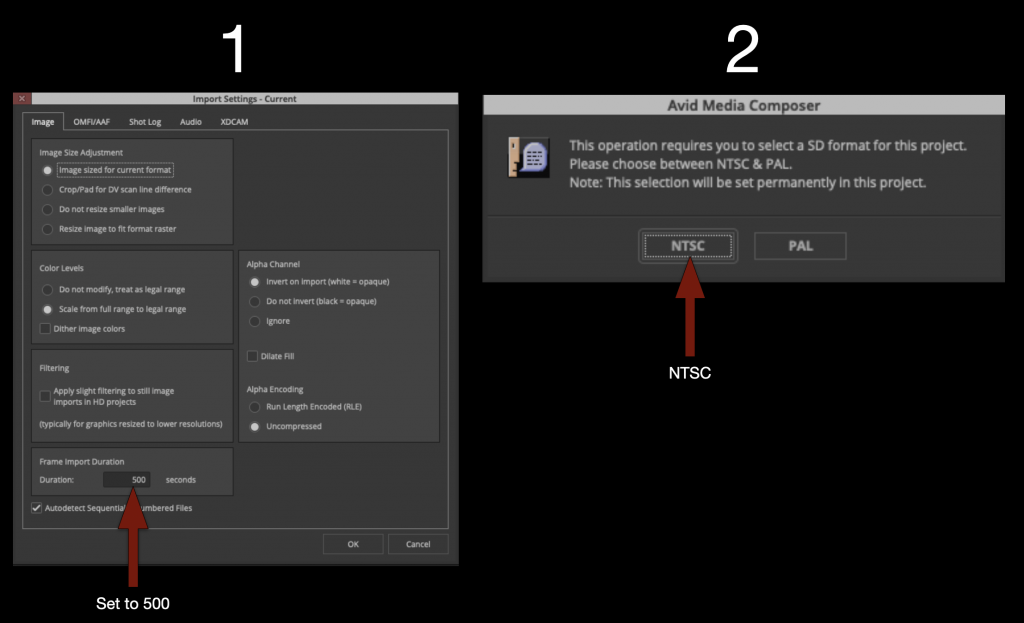
But since the Mask is a still frame you need to tell Media Composer how long to make the new transcoded file to be. In the Source Browser before clicking “Import” select the “Gear” icon.
Under “Import Settings” set the “Frame Import Duration” to 500. Then elect OK and import. It will ask if you prefer NTSC or PAL. Select NTSC.
Now that the Mask has been imported into the FSU Film Extras bin you can cut it into the proper track in your sequence.
Duplicate Sequences
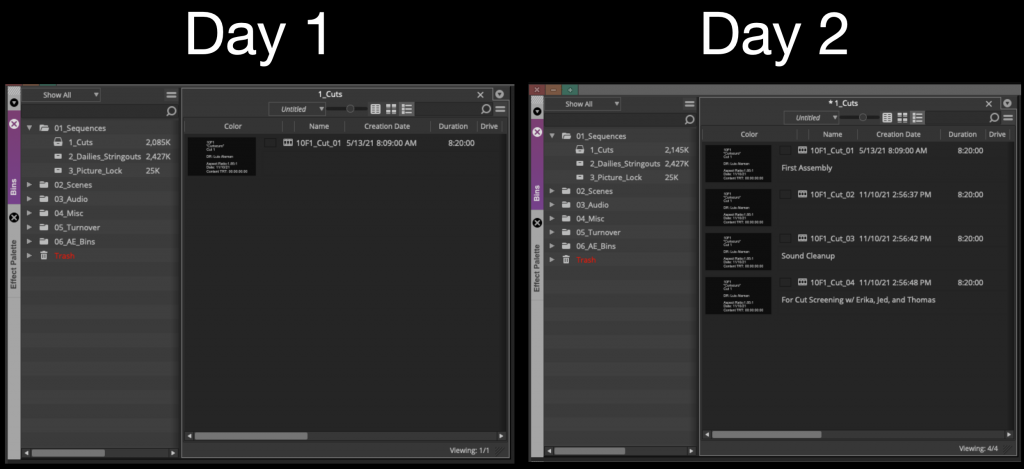
As you begin cutting picture you will find times when you will want to duplicate your sequence. Generally after you have received notes or tried something new. At the very least you should be duplicating your sequence and “versioning up” at least once a day.
Use the “Script View” to make notes about each cut so that you can keep track of the changes between cut.
Import Credits
Before you picture lock its required that your credits be completed using the After Effects Template and exported out as a properly labeled DPX image sequence and imported into Media Composer.
Below is an example of where they should be saved and how they should be named.
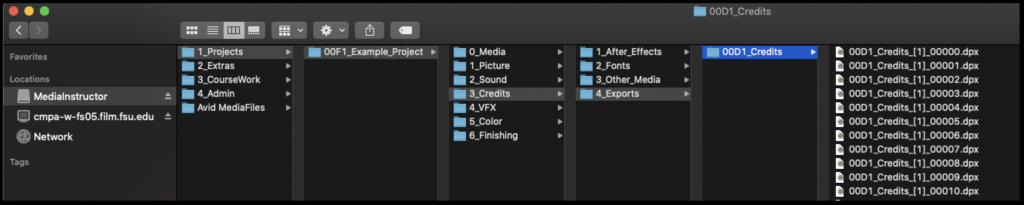
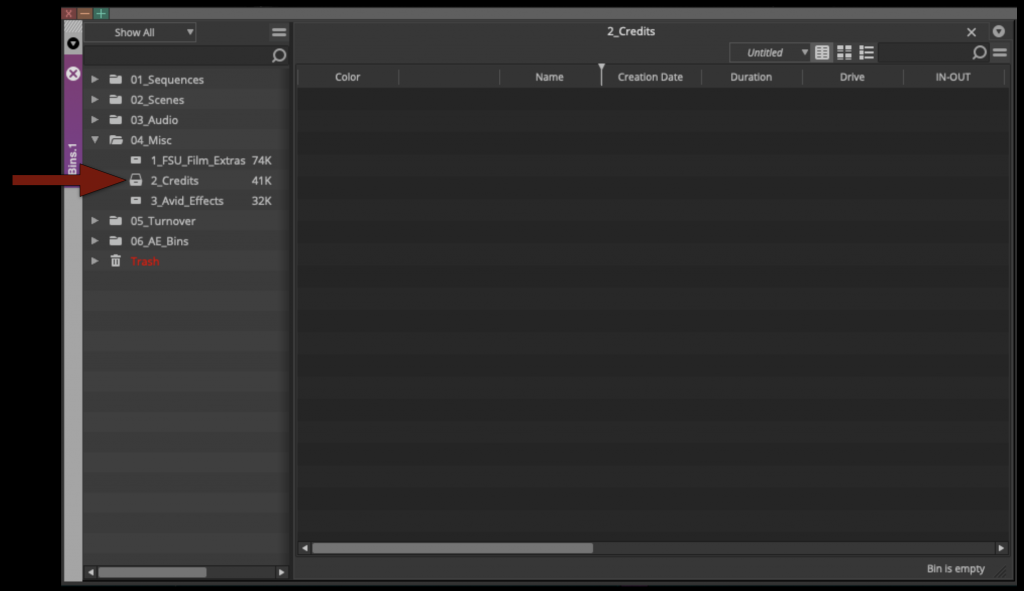
They should be imported into your Credits Bin inside Media Composer which can be found inside the Misc folder.
Use the Source Browser to import the credits into the Credits Bin. However since its a DPX image sequence and not a video file we need to tell Media Composer this before importing.
Click the “Gear” icon next to the import selection and then in the “Import Settings” box make sure “Auto detect Sequentially Numbered Files” is selected.
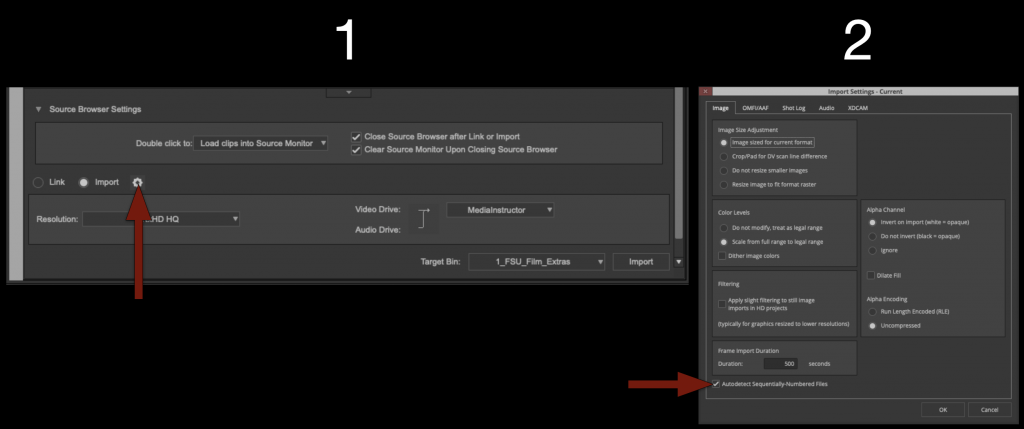
Then elect the first file in the image sequence and click “Import”.
A box will appear saying it needs to be “Linked and then Transcoded”, select yes and wait for it to transcode.

When it’s complete your credits should be in the “Credit Bin” as avid media.

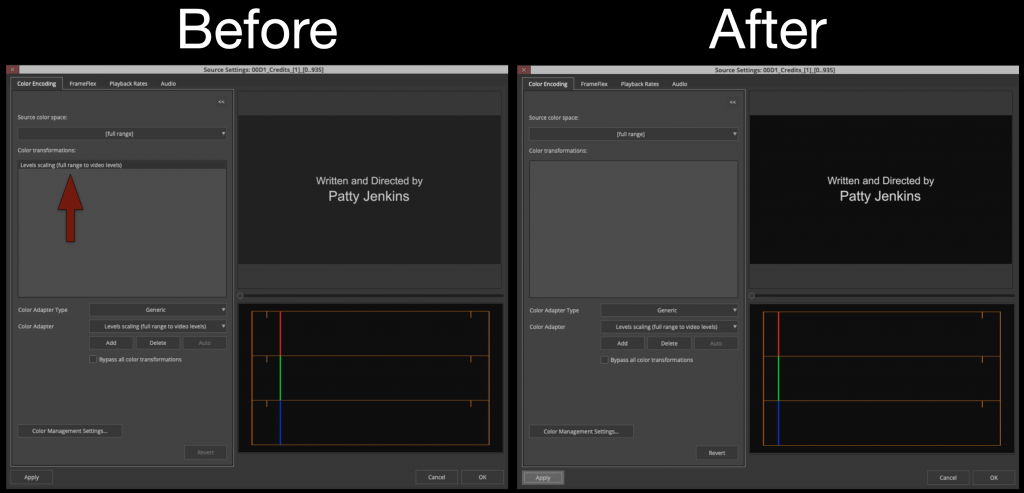
Your credits may look a bit washed out. This is because Avid is trying to compensate for the difference in “Video/Data” levels. Right click on the credits and select “Source Settings”
Under color encoding delete the “Levels Scaling” effect from the color transformations and the black level will then appear correct.
Cut your credits into the sequence after your content.
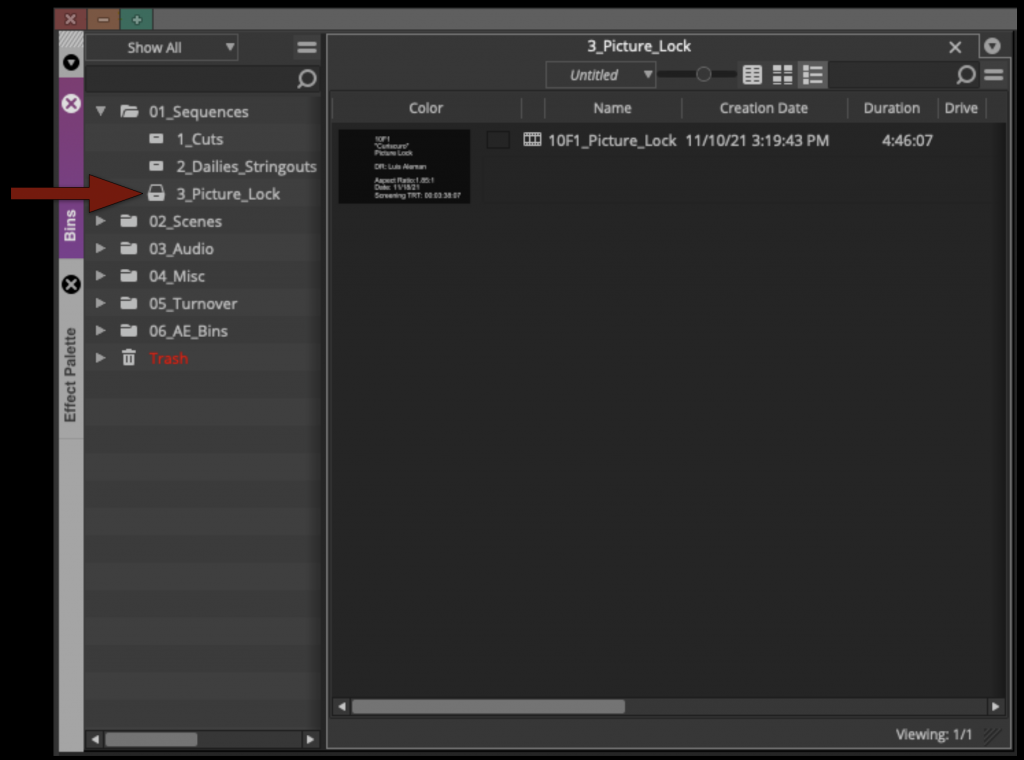
Picture Lock
Duplicate your sequence and rename it “XXF1_Picture_Lock” and move that sequence into the “Picture Lock Bin”.
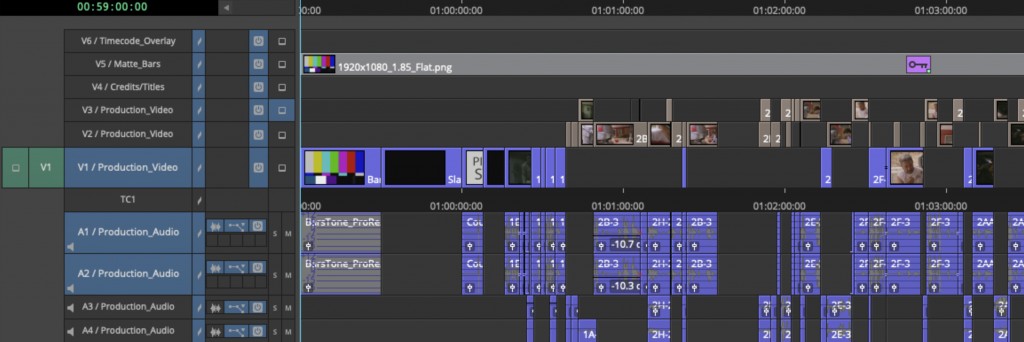
To prep your timeline for coloring your video needs to be condensed onto as few video tracks as possible. It’s understood that, due to the nature of how some video dissolves are built, more than one track is sometimes necessary. The idea is to reduce the amount of tracks and media as much as possible.
Your sequence would go from looking like the example below with video on tracks V1 – V3 that needs to be brought down.
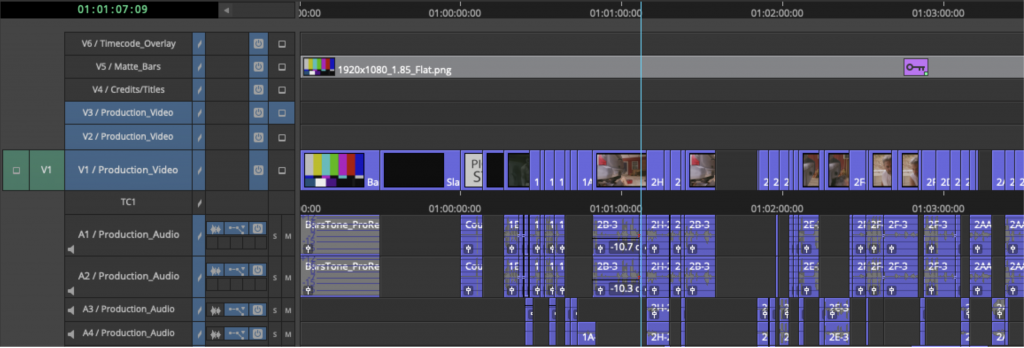
To your sequence looking like the example below with everything consolidated onto one track.
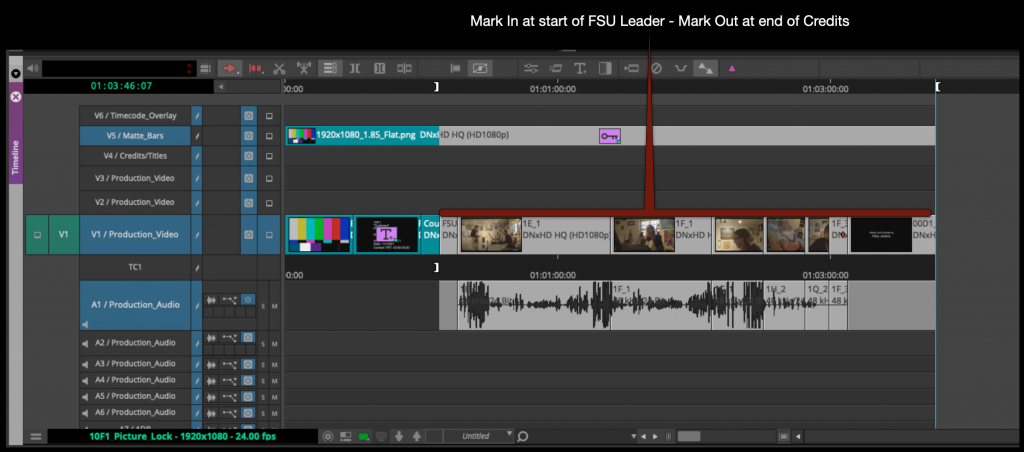
To find you’re Screening Total Run Time mark in at the start of the FSU Leader and then mark out at the end of the credits.
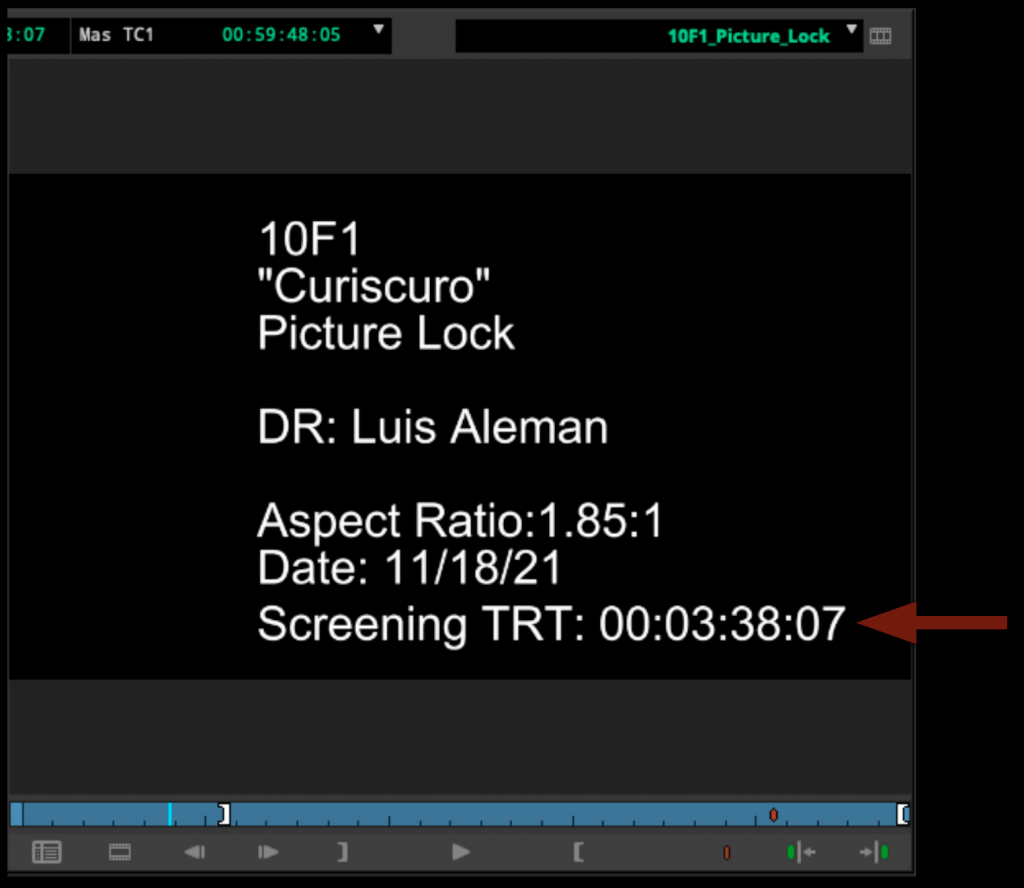
Update the slate in the front sequence with the Screening Total Run time and make sure it includes all the information in the example below.
Congratulations! Your F1 is now picture locked. Save your project and close Media Composer.