#sound

Soundly

Overview

Having access to a robust sound effects library is invaluable for filmmakers. While there are a lot of free websites where you can download sound effects, the quality of the files can vary and acquiring the correct licensing rights can be a time-consuming and frustrating endeavor. The College therefore pays an annual fee to license Soundly, which is an application for easy searching through the 6 Terabytes of media in our professional sound effects library. This allows you to have a vast array of high-quality, licensed effects at your fingertips, and it’s engineered to have frictionless integration with Media Composer and ProTools. You can then focus on what really matters: the creative work.

Additionally, Soundly has an AI feature called Voice Designer which allows for text-based voice generation. This is a very useful tool if you need to add, say, the voice of an unseen character or if you need to rough-in a voice during editorial that will later be replaced with ADR.

Soundly Layout and Search

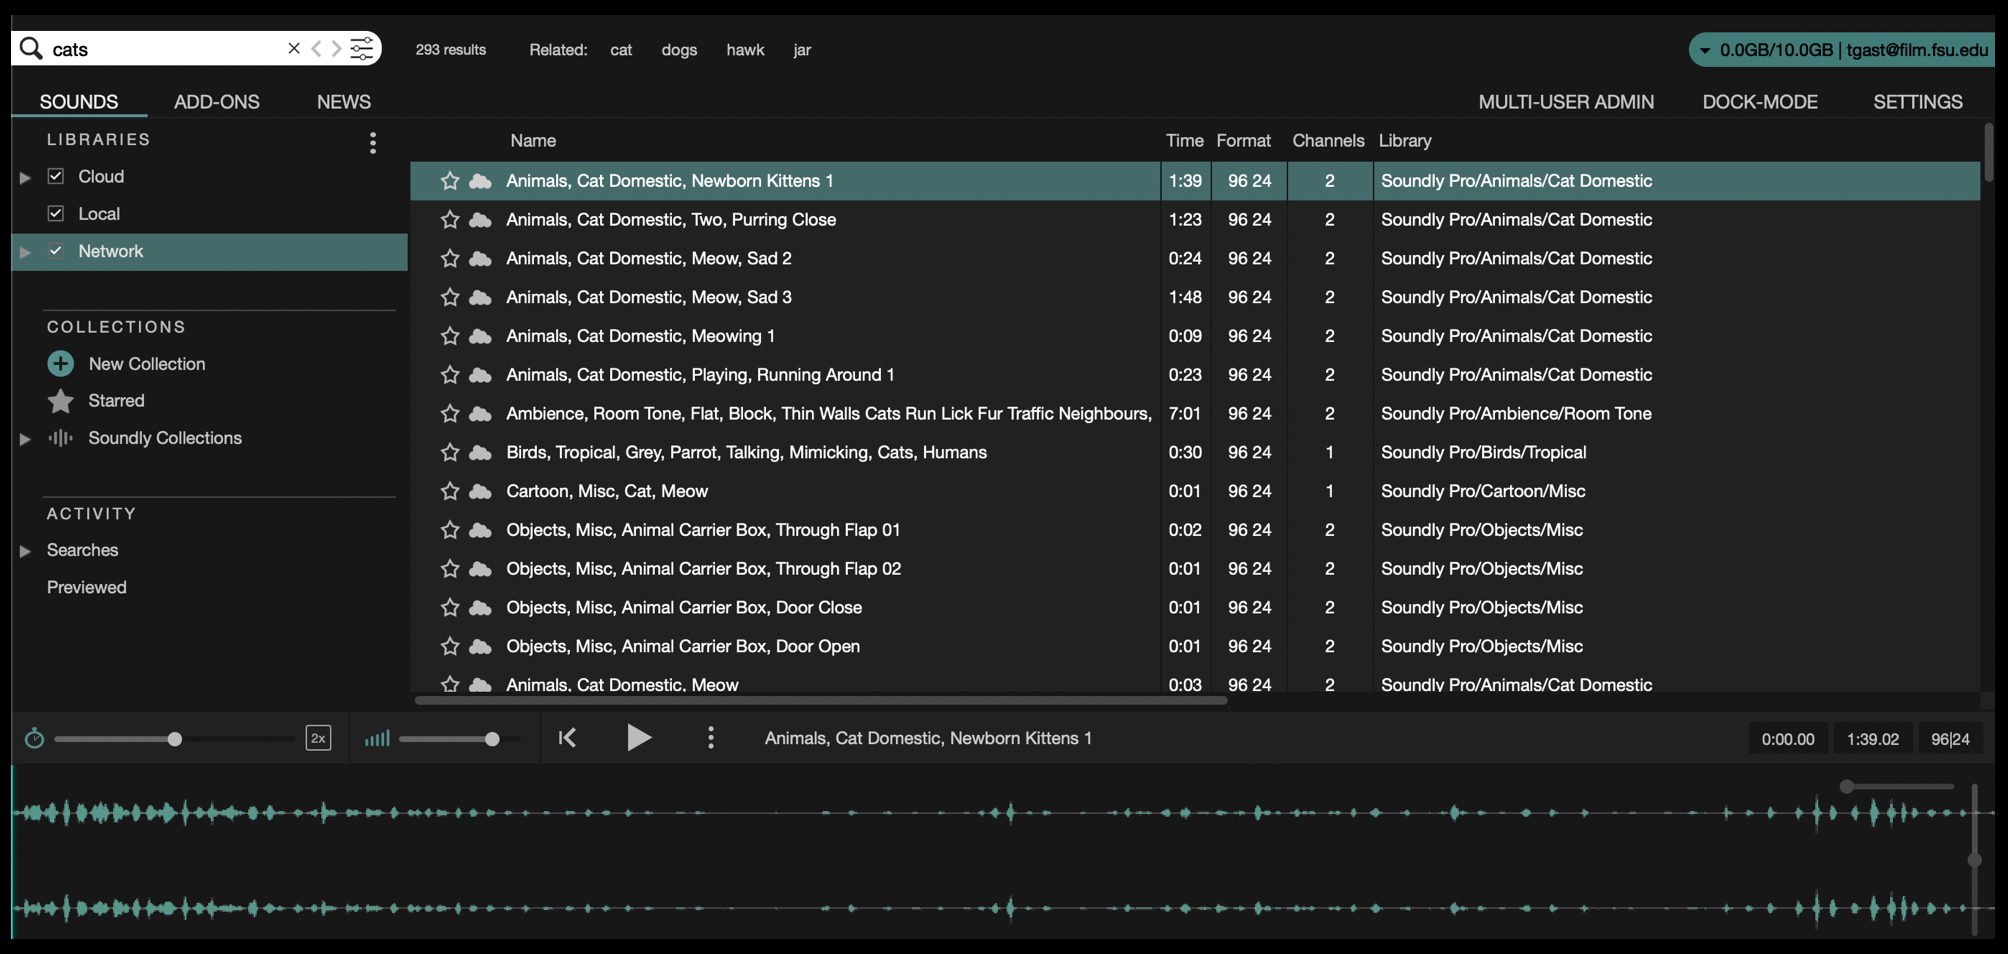
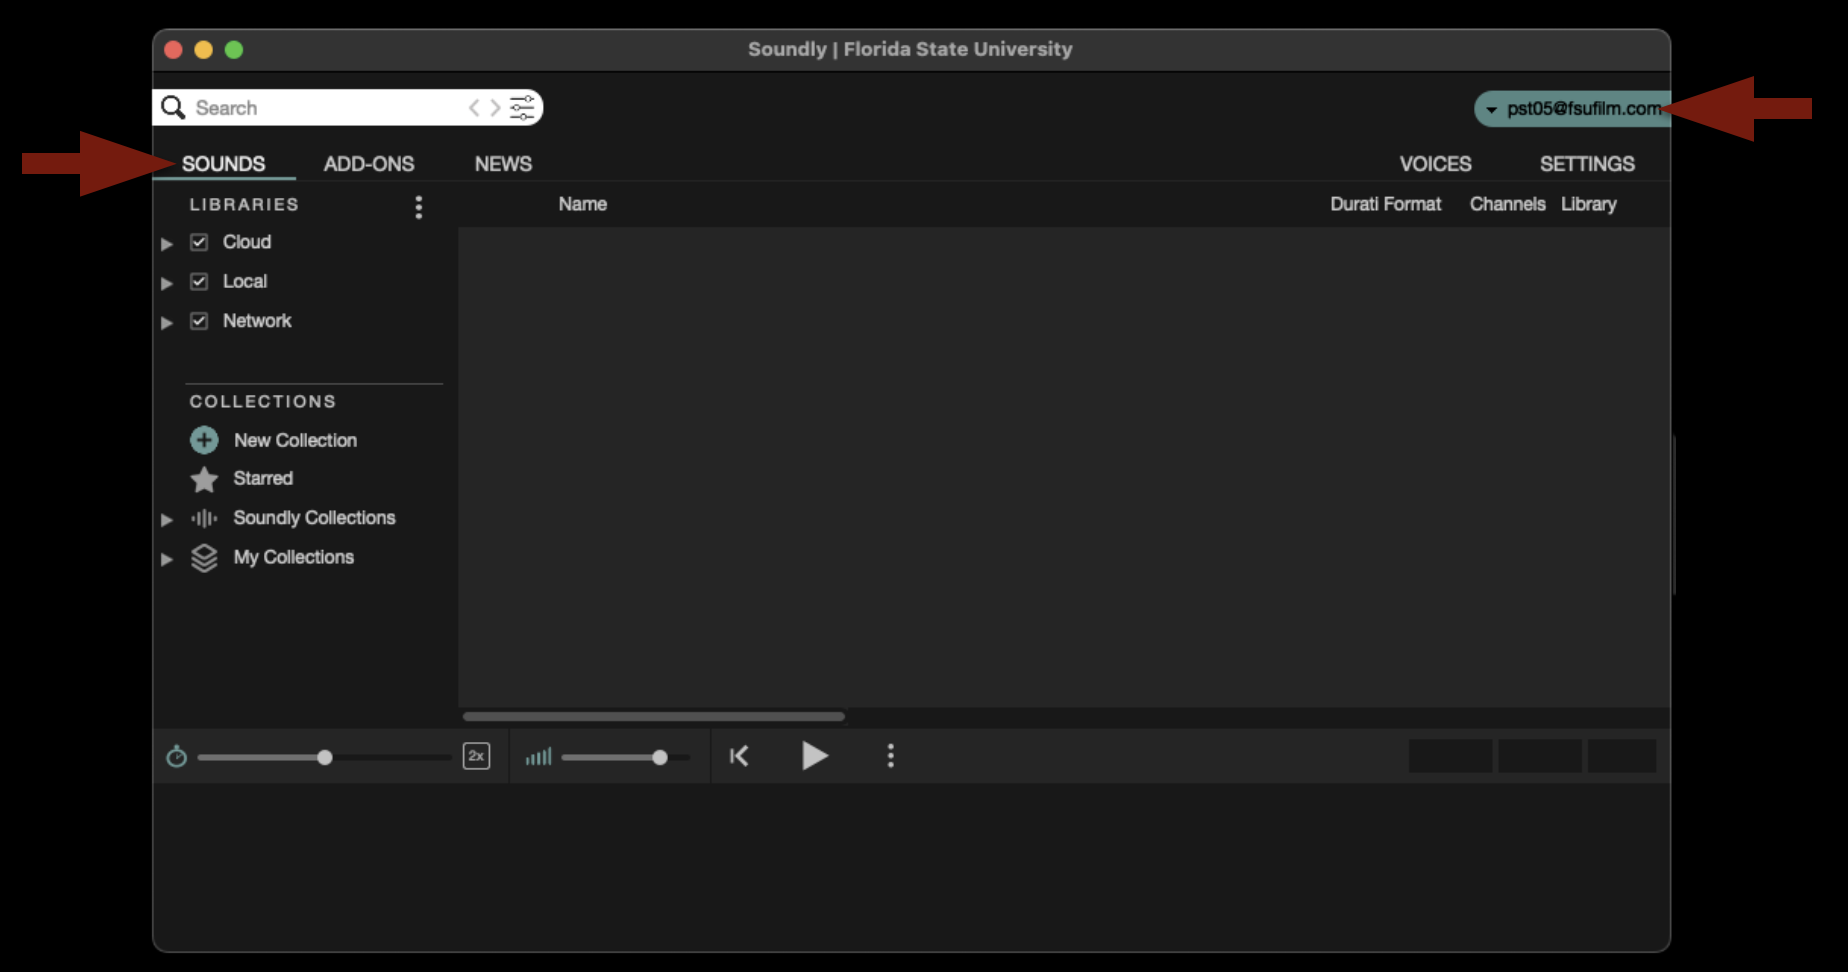
When first launched, the application will open as shown below. If it defaults to a different page, make sure it is set to the “Sounds” tab. Also check that it is signed in to our account as shown below. If it appears that the Soundly application is not signed in to our account correctly, please contact the Post Staff and they can get it fixed.

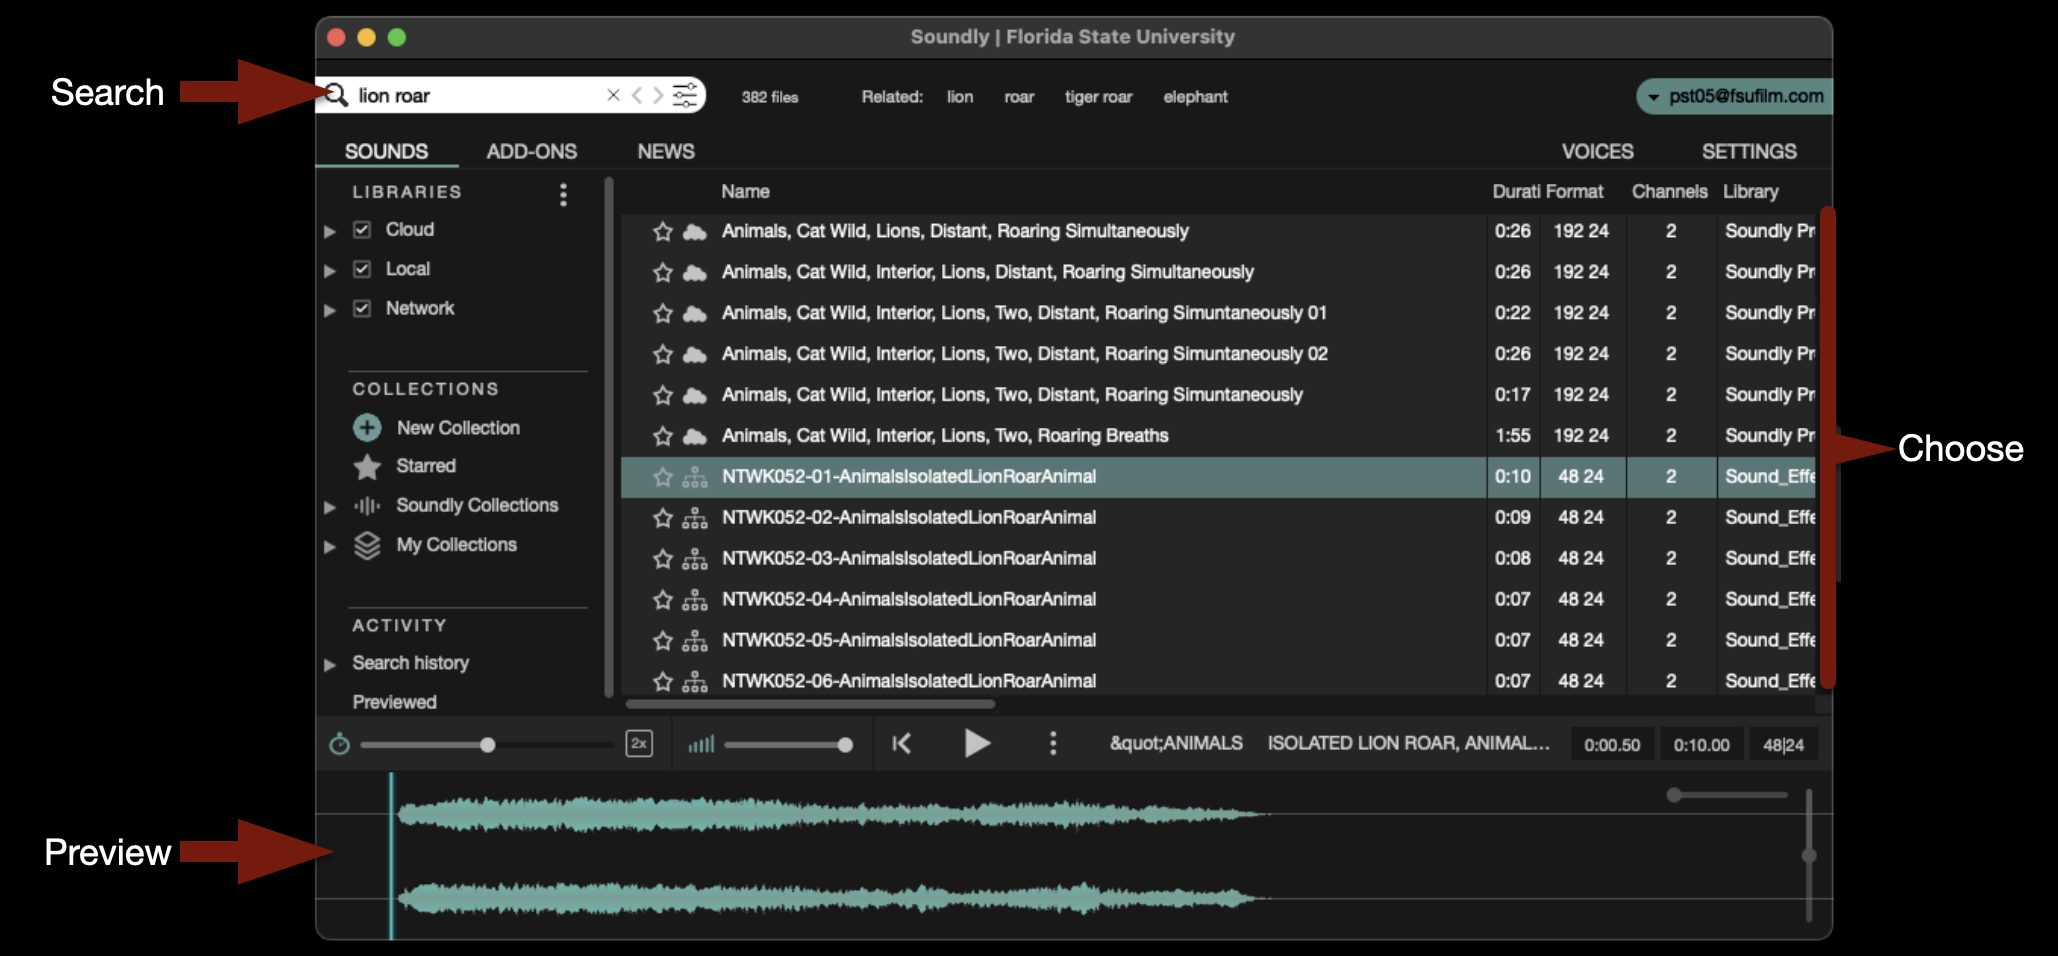
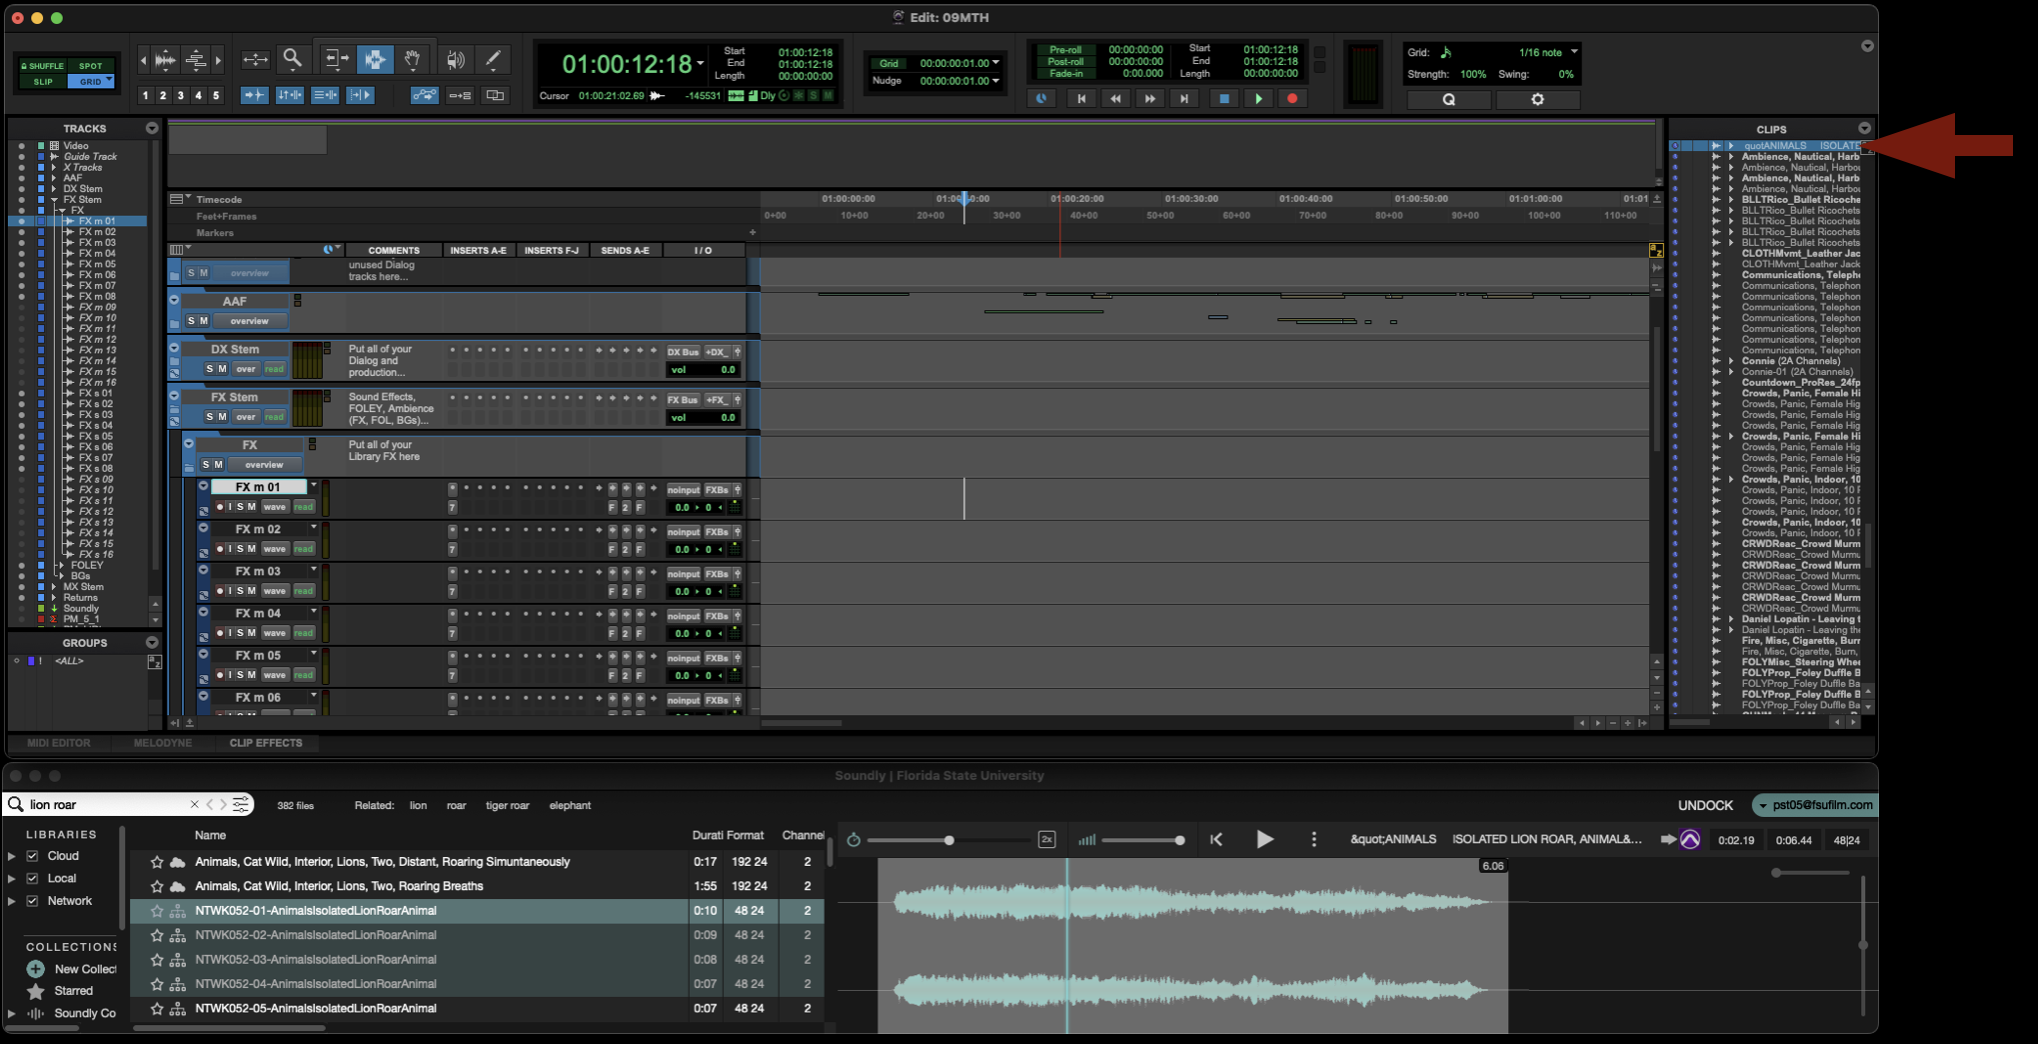
In the upper-left corner is a search field where you can type in keywords to help you find the what you are looking for. The library is vast and contains sound effects, backgrounds, Foley, and more. After you select one of the sound effects that your search revealed, you can preview it in the timeline at the bottom.

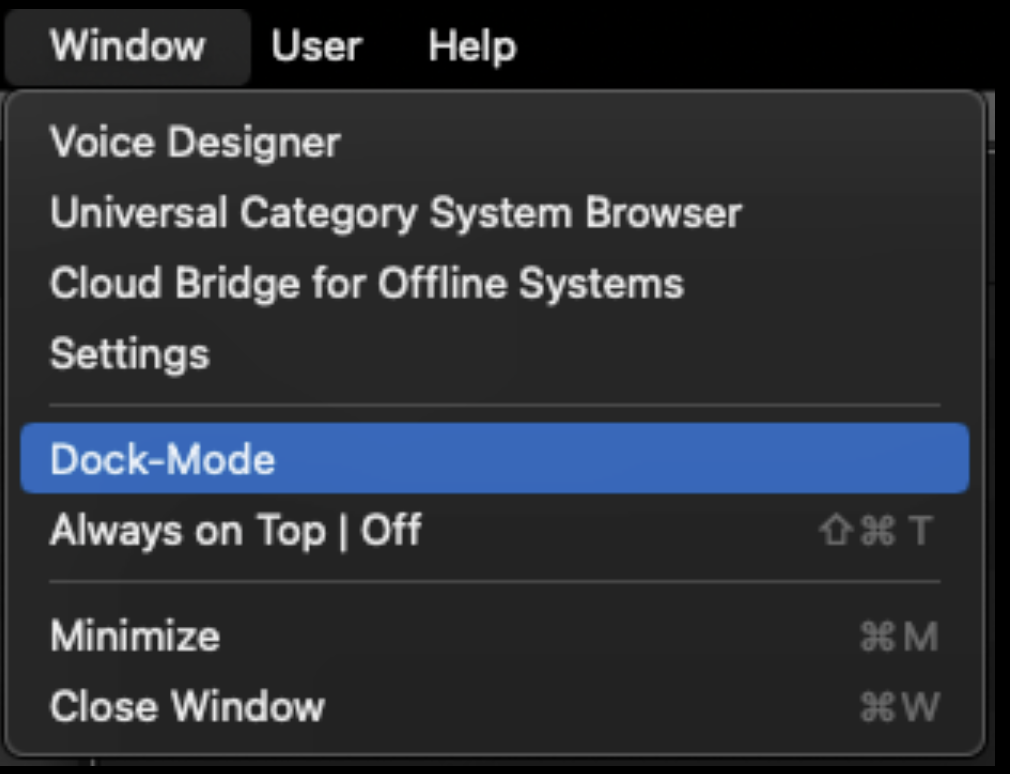
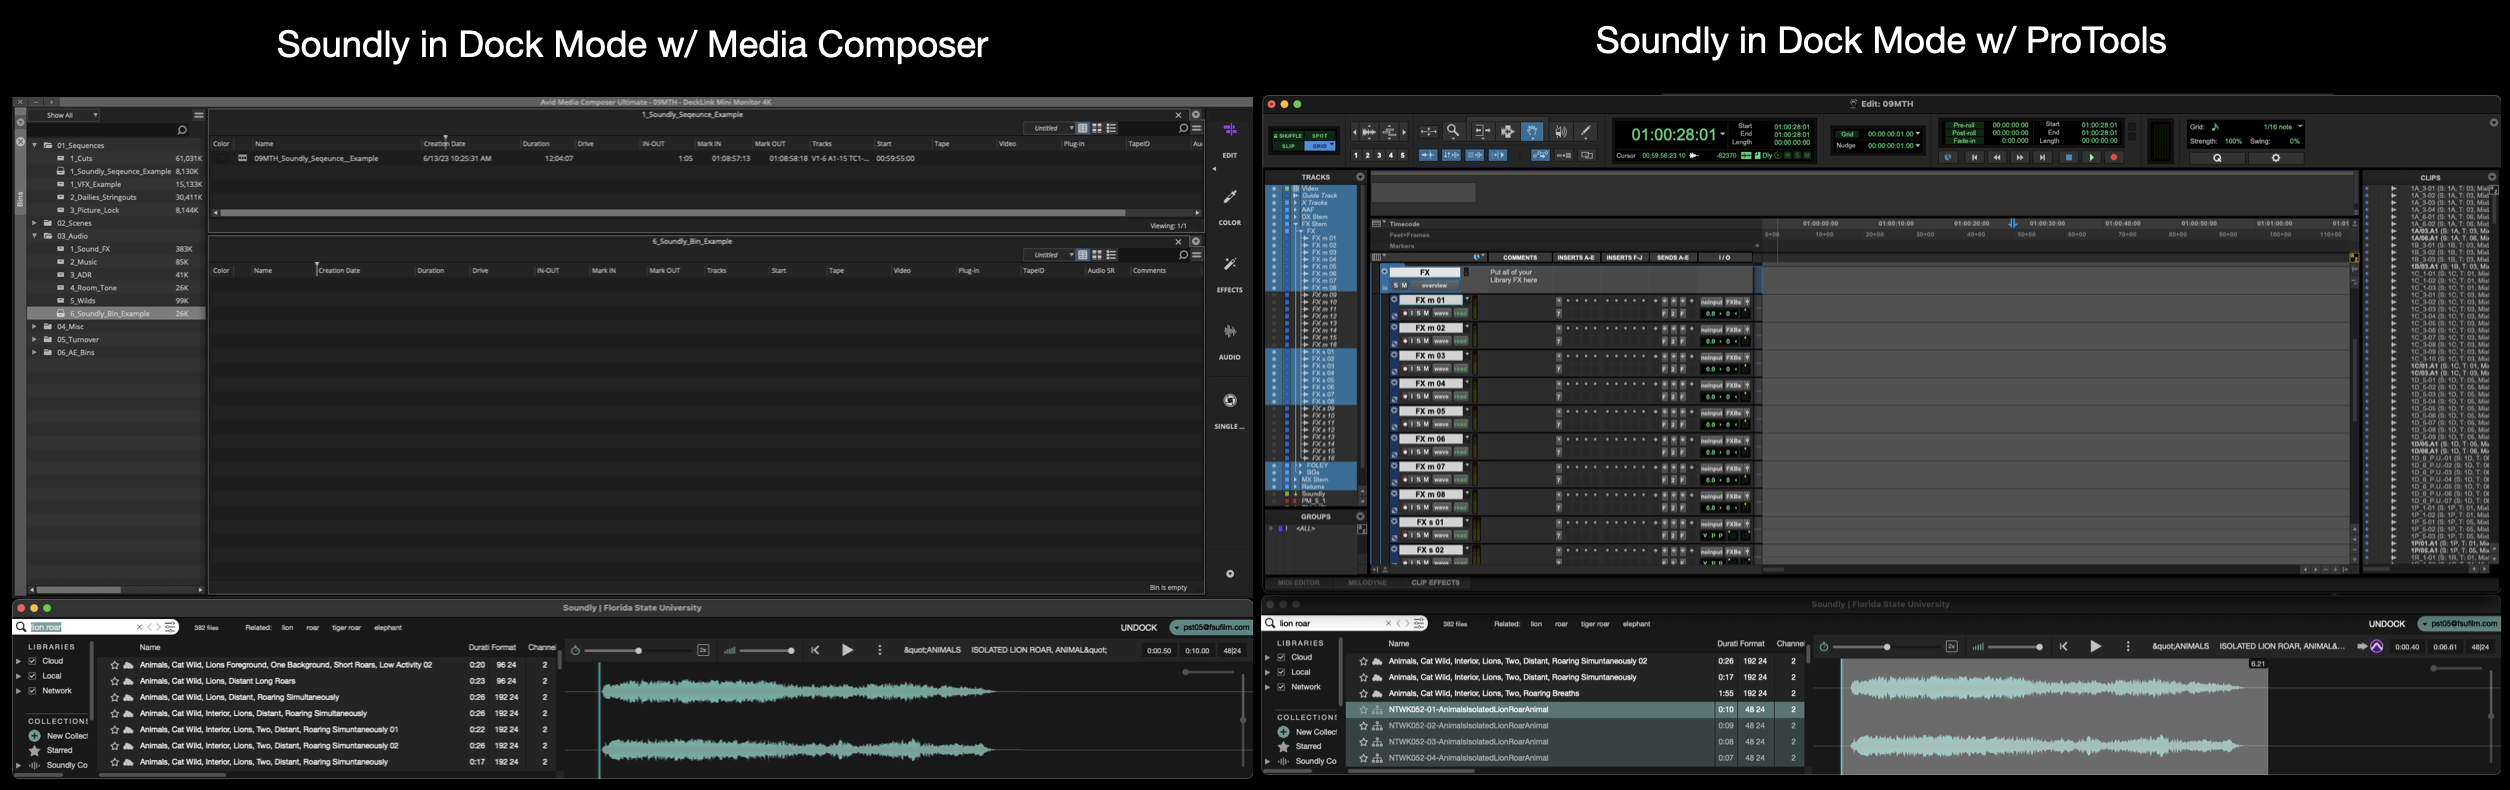
By default, Soundly opens in a big window that can be viewed fullscreen. Sometimes you may prefer to put it in “Dock Mode” which will squeeze the interface down to the bottom third of the screen. To enter “Dock Mode” navigate to the task bar and select Window > Dock Mode.

This can be helpful when you are also working in Media Composer or ProTools, as it will allow you to easily have both interfaces open while you work, as shown below.

Soundly with Media Composer

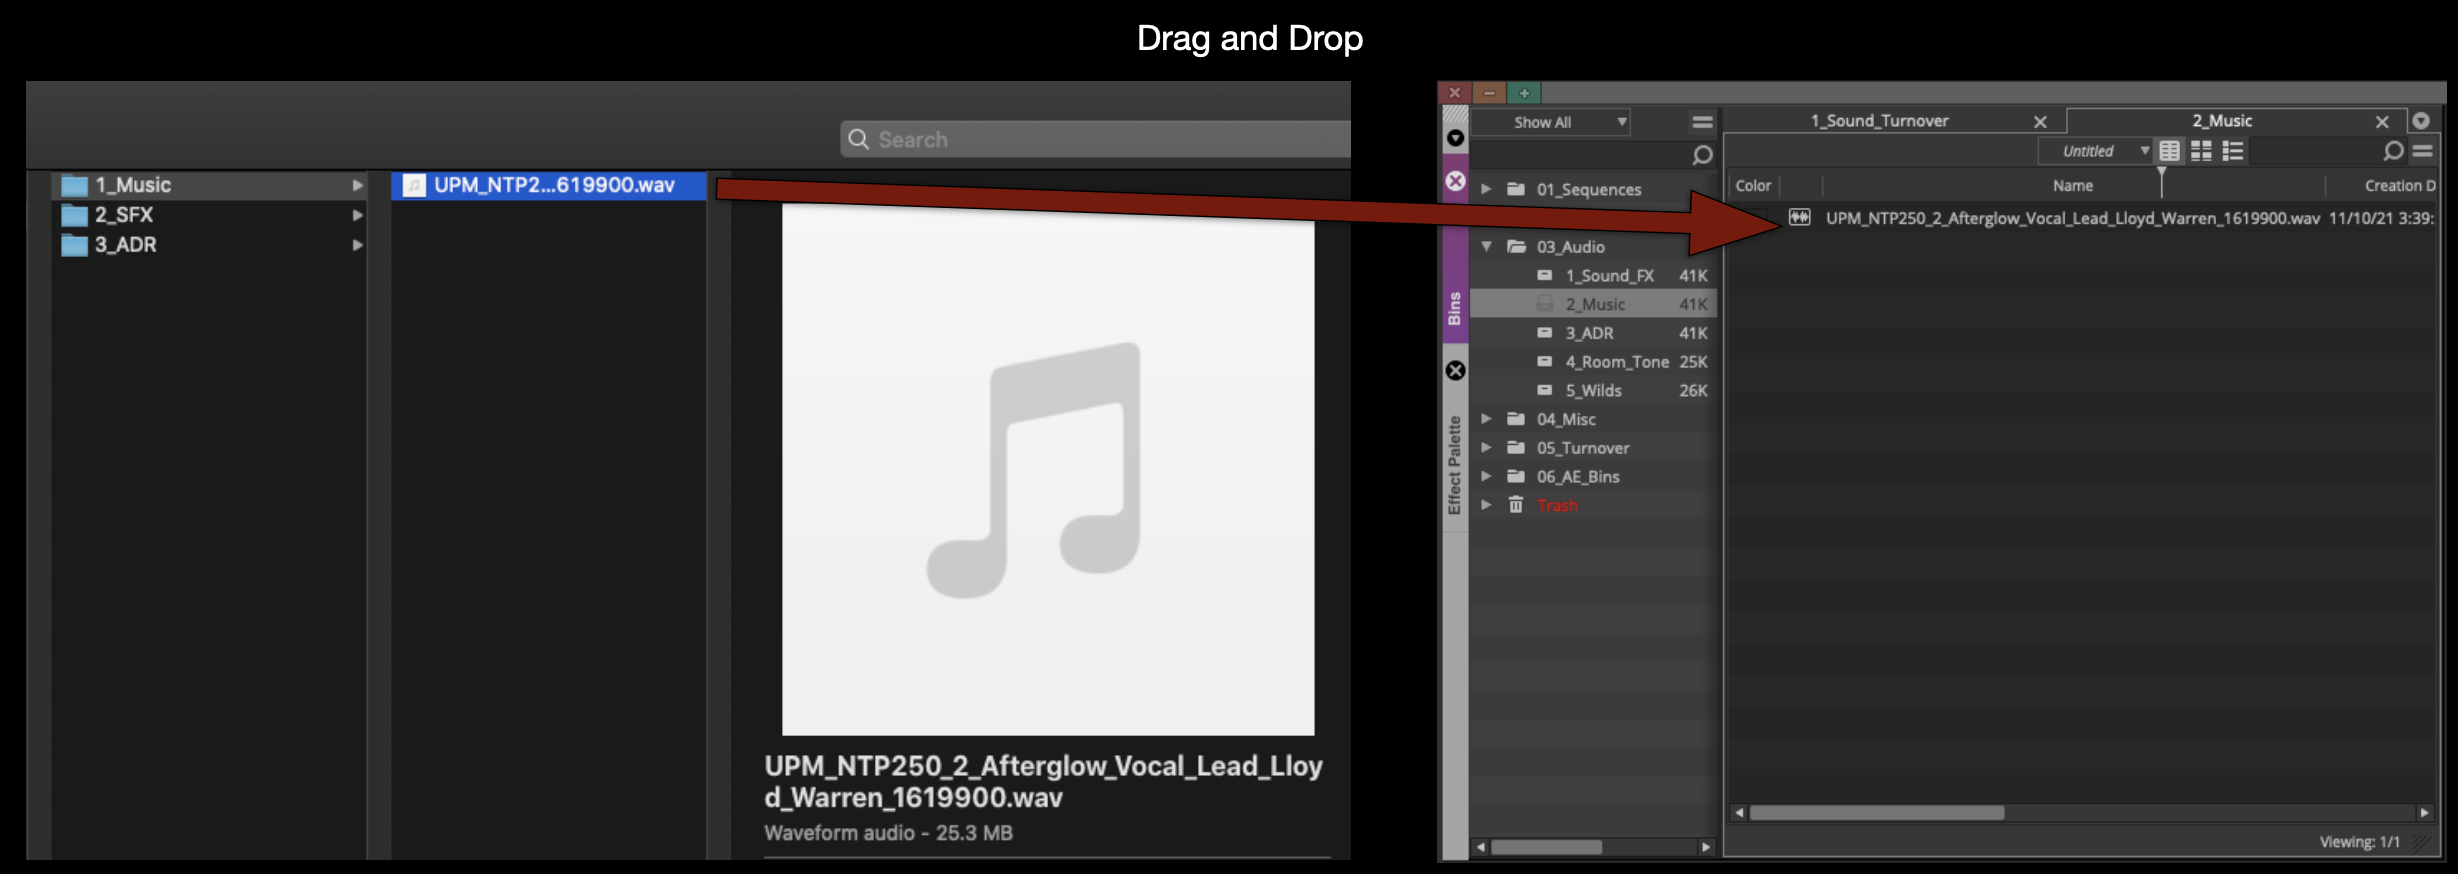
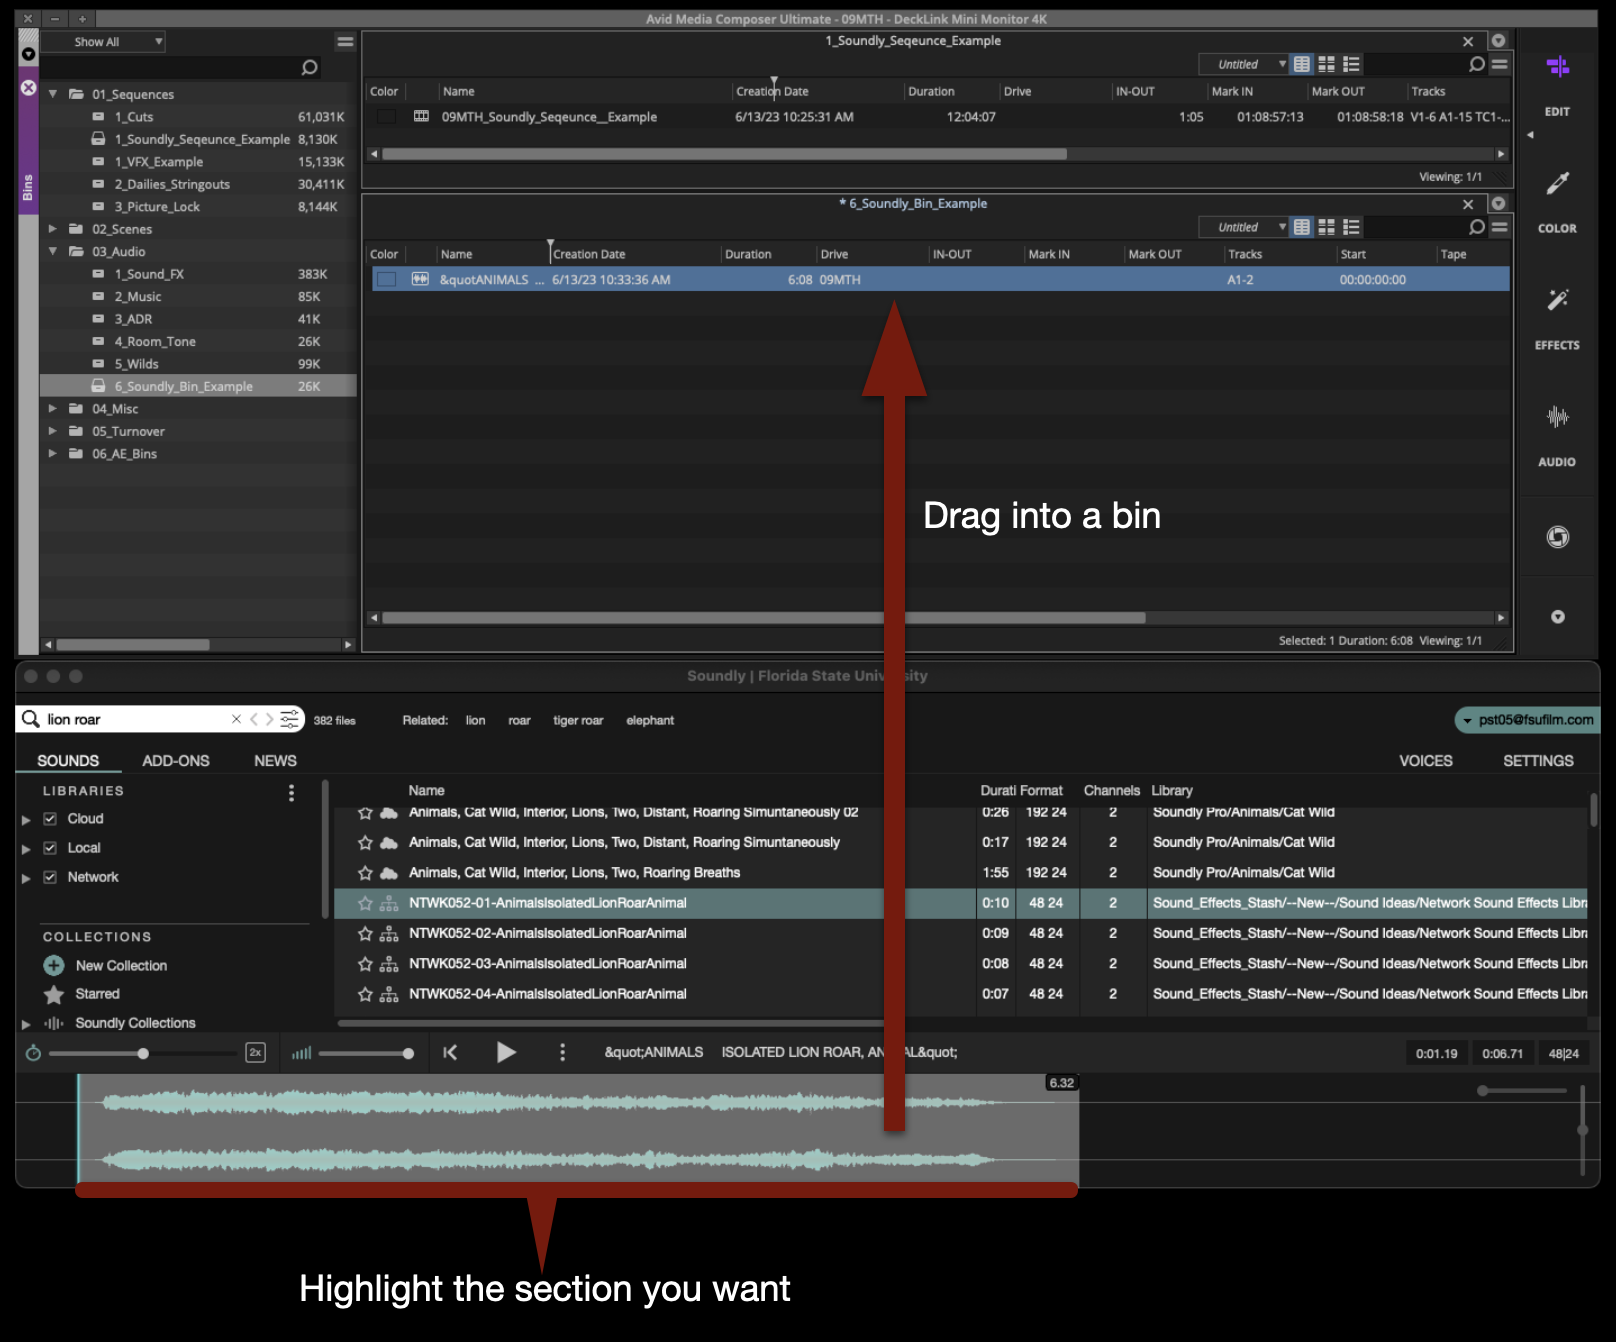
When using Soundly with Media Composer, it is simple to bring sounds from the library into a bin. After you have searched for and have found the sound that you want to bring into Media Composer, highlight the section of waveform you want and drag that into an open bin.

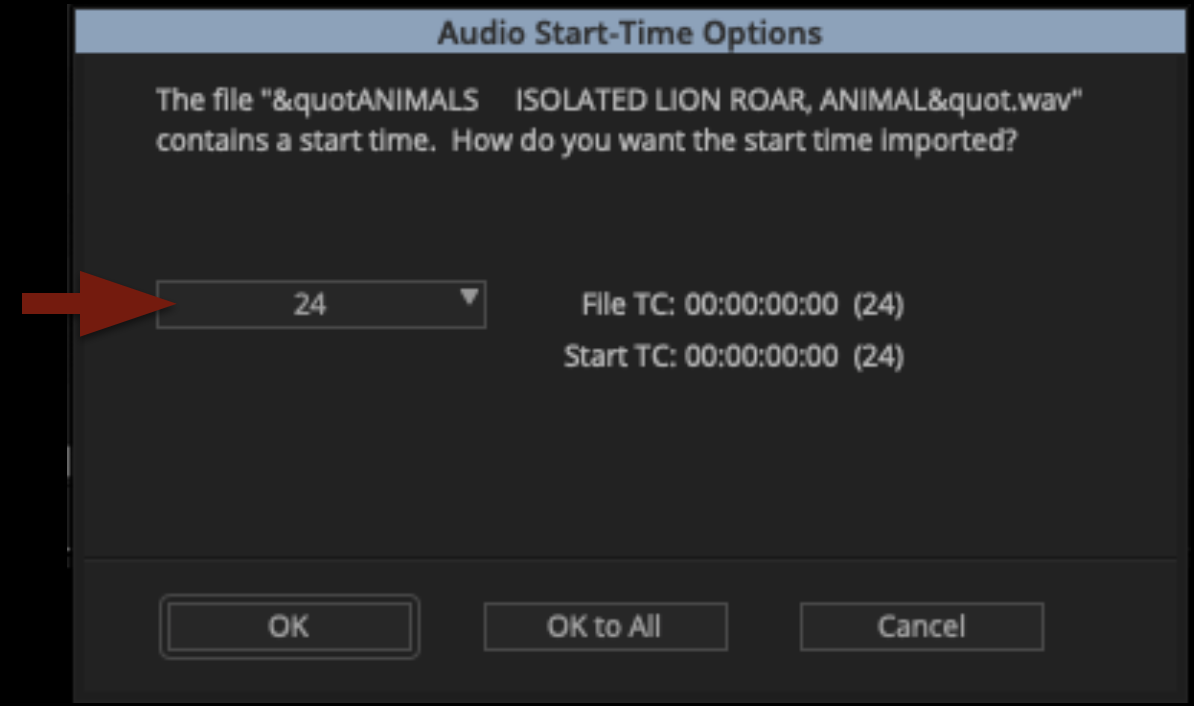
Media Composer will prompt you with a question about the audio start-time. Make sure it is set to 24 and then click “OK”.

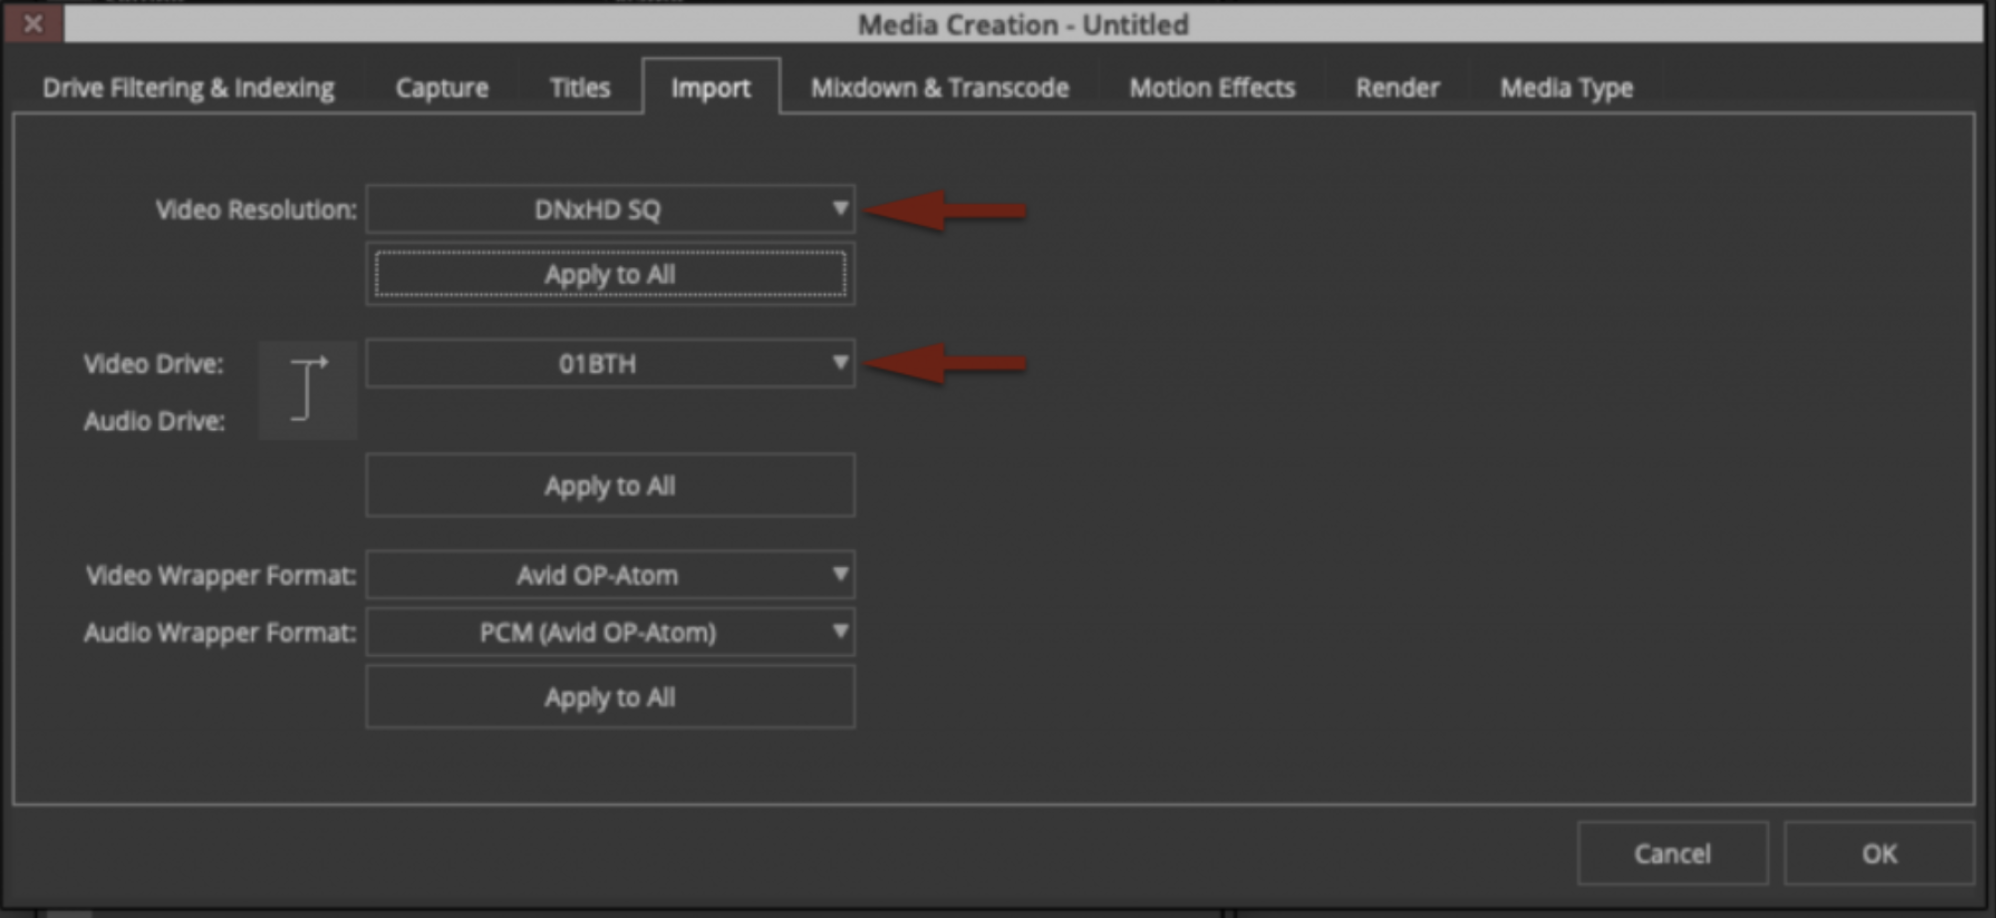
Assuming your media creation settings in Media Composer are set as shown in the example below, the sound will be transcoded into Avid Media and will appear in your bin, ready to work with.

Soundly with ProTools

When using Soundly with ProTools, you have two options for bringing sounds into the project. You can either bring the sound into the Clips Bin or spot the sound directly onto a track.

To send a desired sound effect to the Clips Bin, select the sound in Soundly and then press “B” on the keyboard. It will be imported directly to the Clips Bin in ProTools.

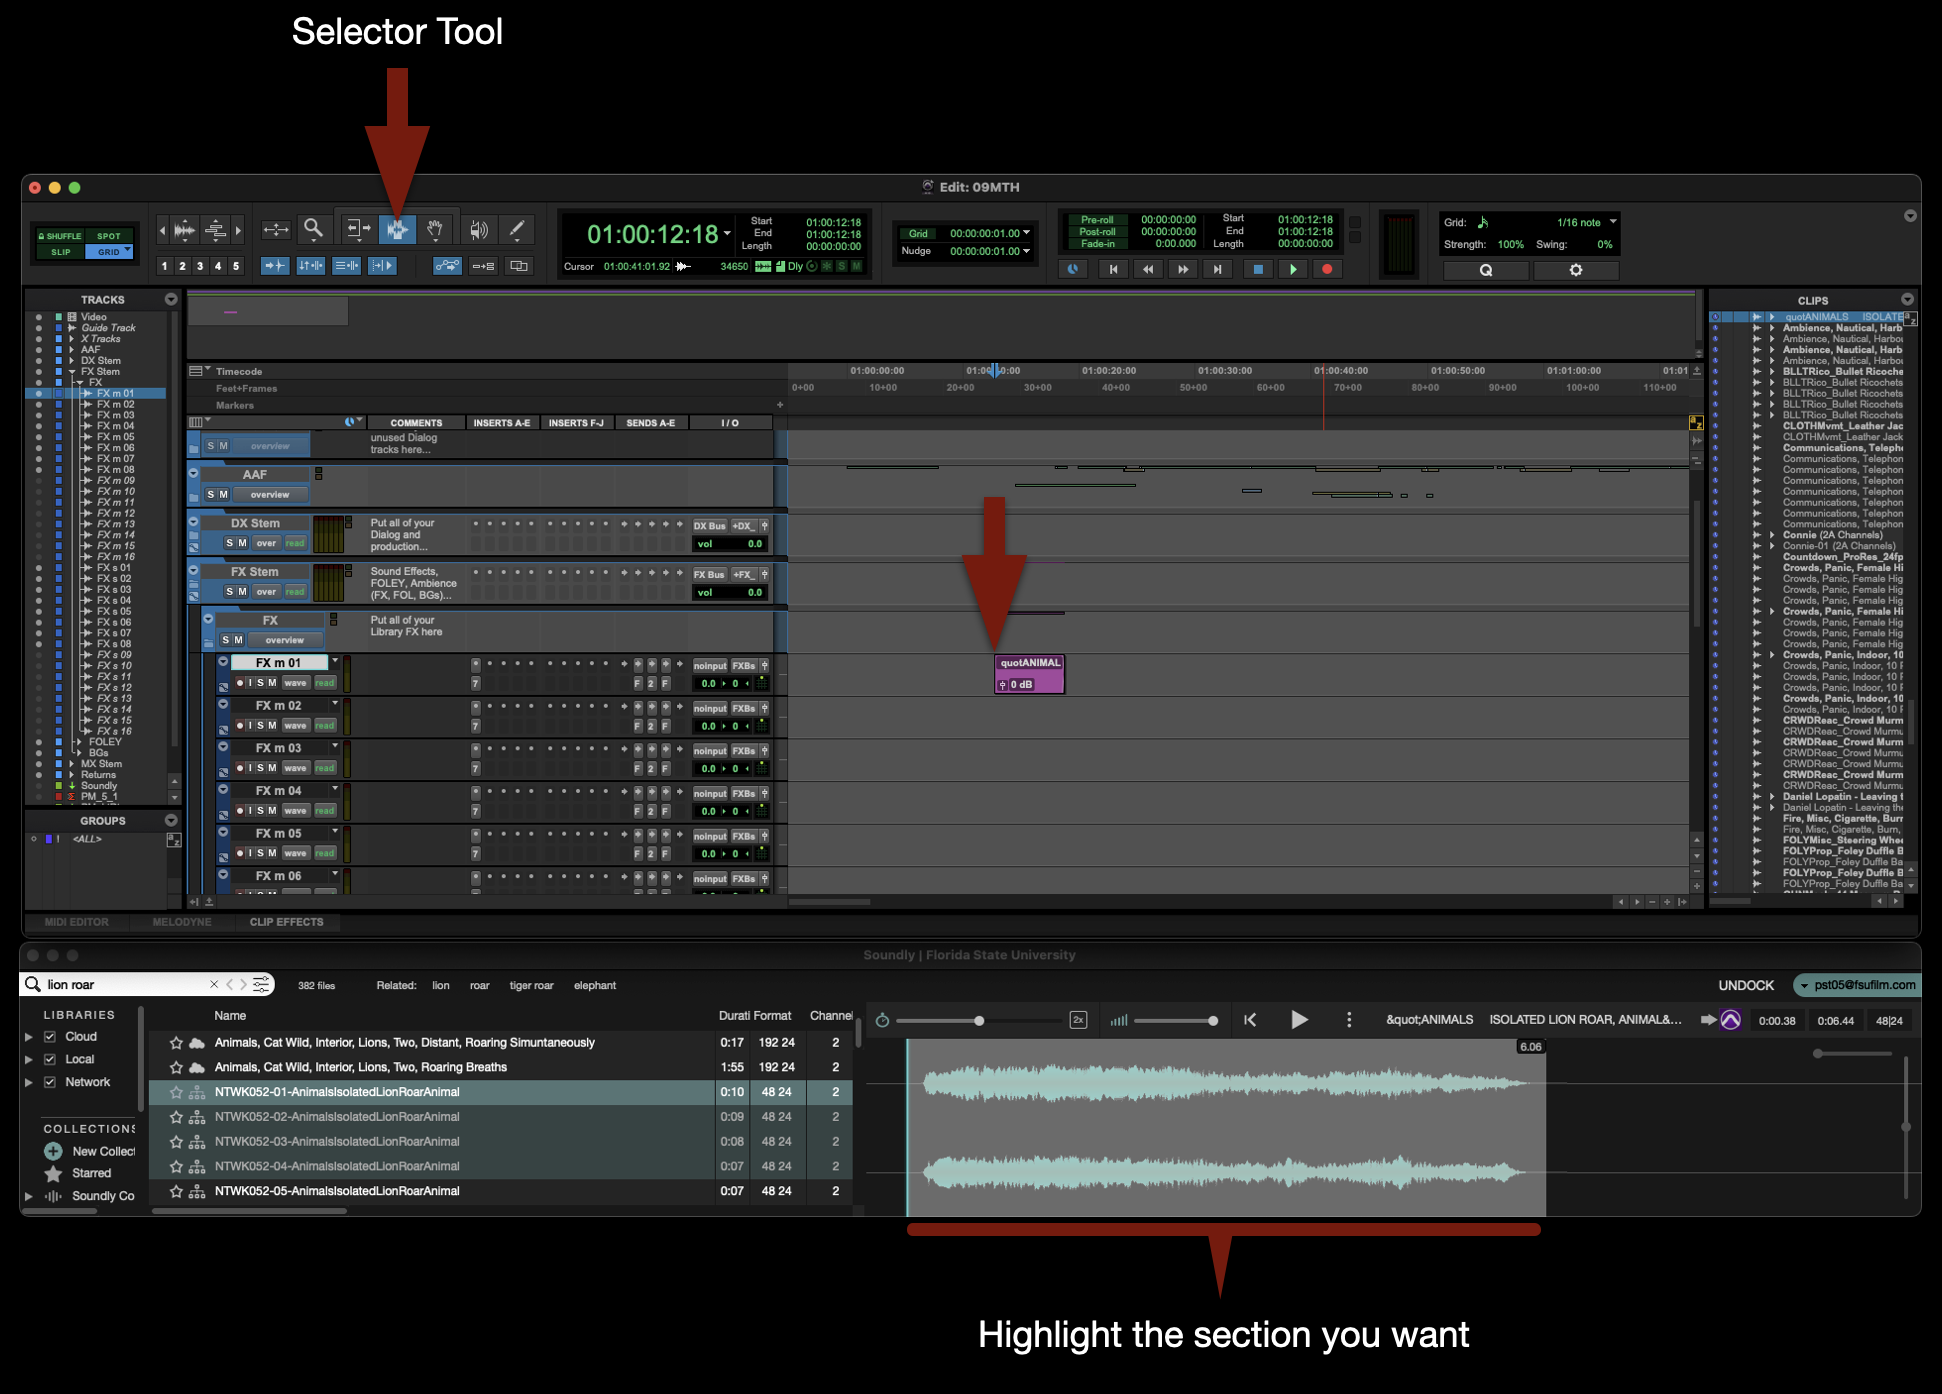
To spot a desired sound effect to a specific marked track, highlight the section of the sound effect you want, use the sector tool to mark a spot on an appropriate track, and then press “S” on the keyboard. It will be imported directly to the track that was marked.

Soundly Voice Designer

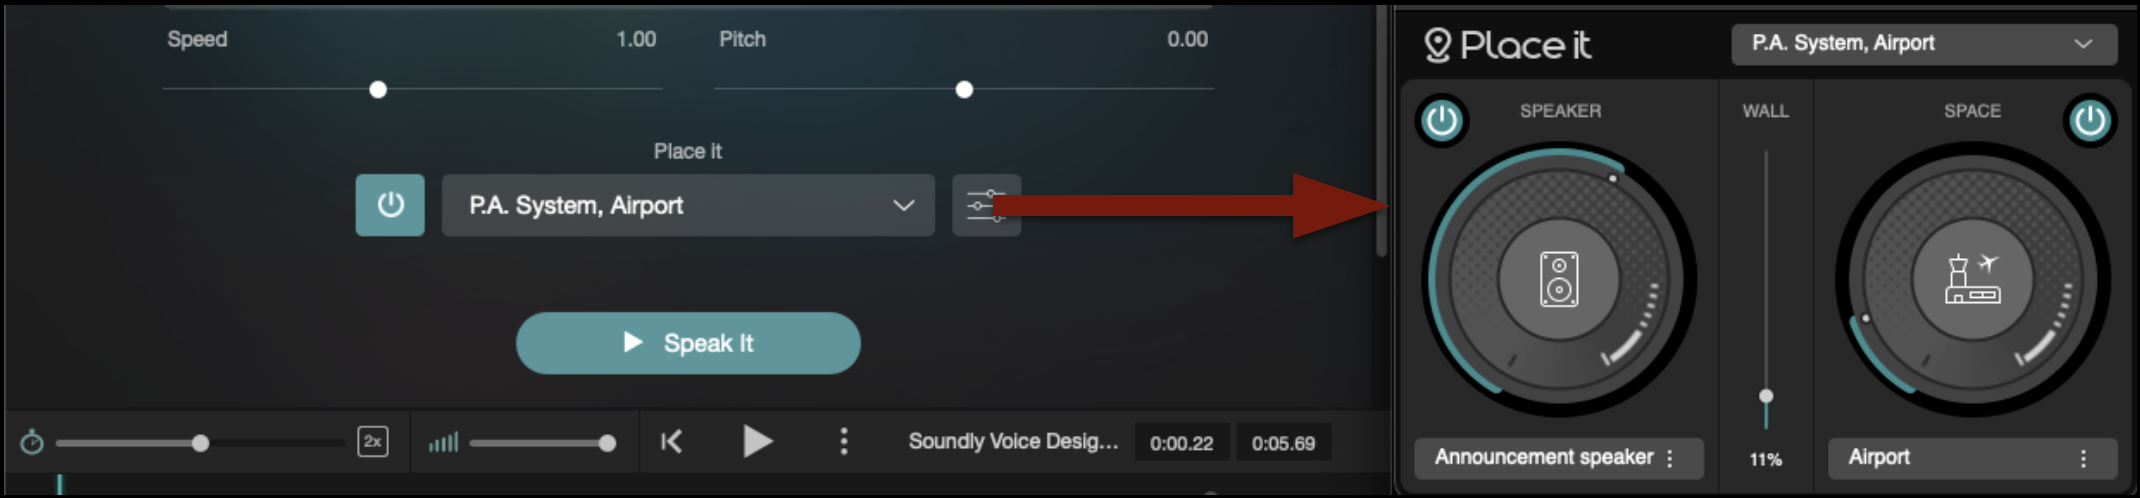
Soundly has a feature called Voice Designer, which uses AI to generate voices based on text input. Utilizing a plugin called “Place It”, it will make the generated voice sound as if it was in a particular place and/or coming out of a particular speaker.

Switch to the Voices tab and you will see the interface appear like the example below.

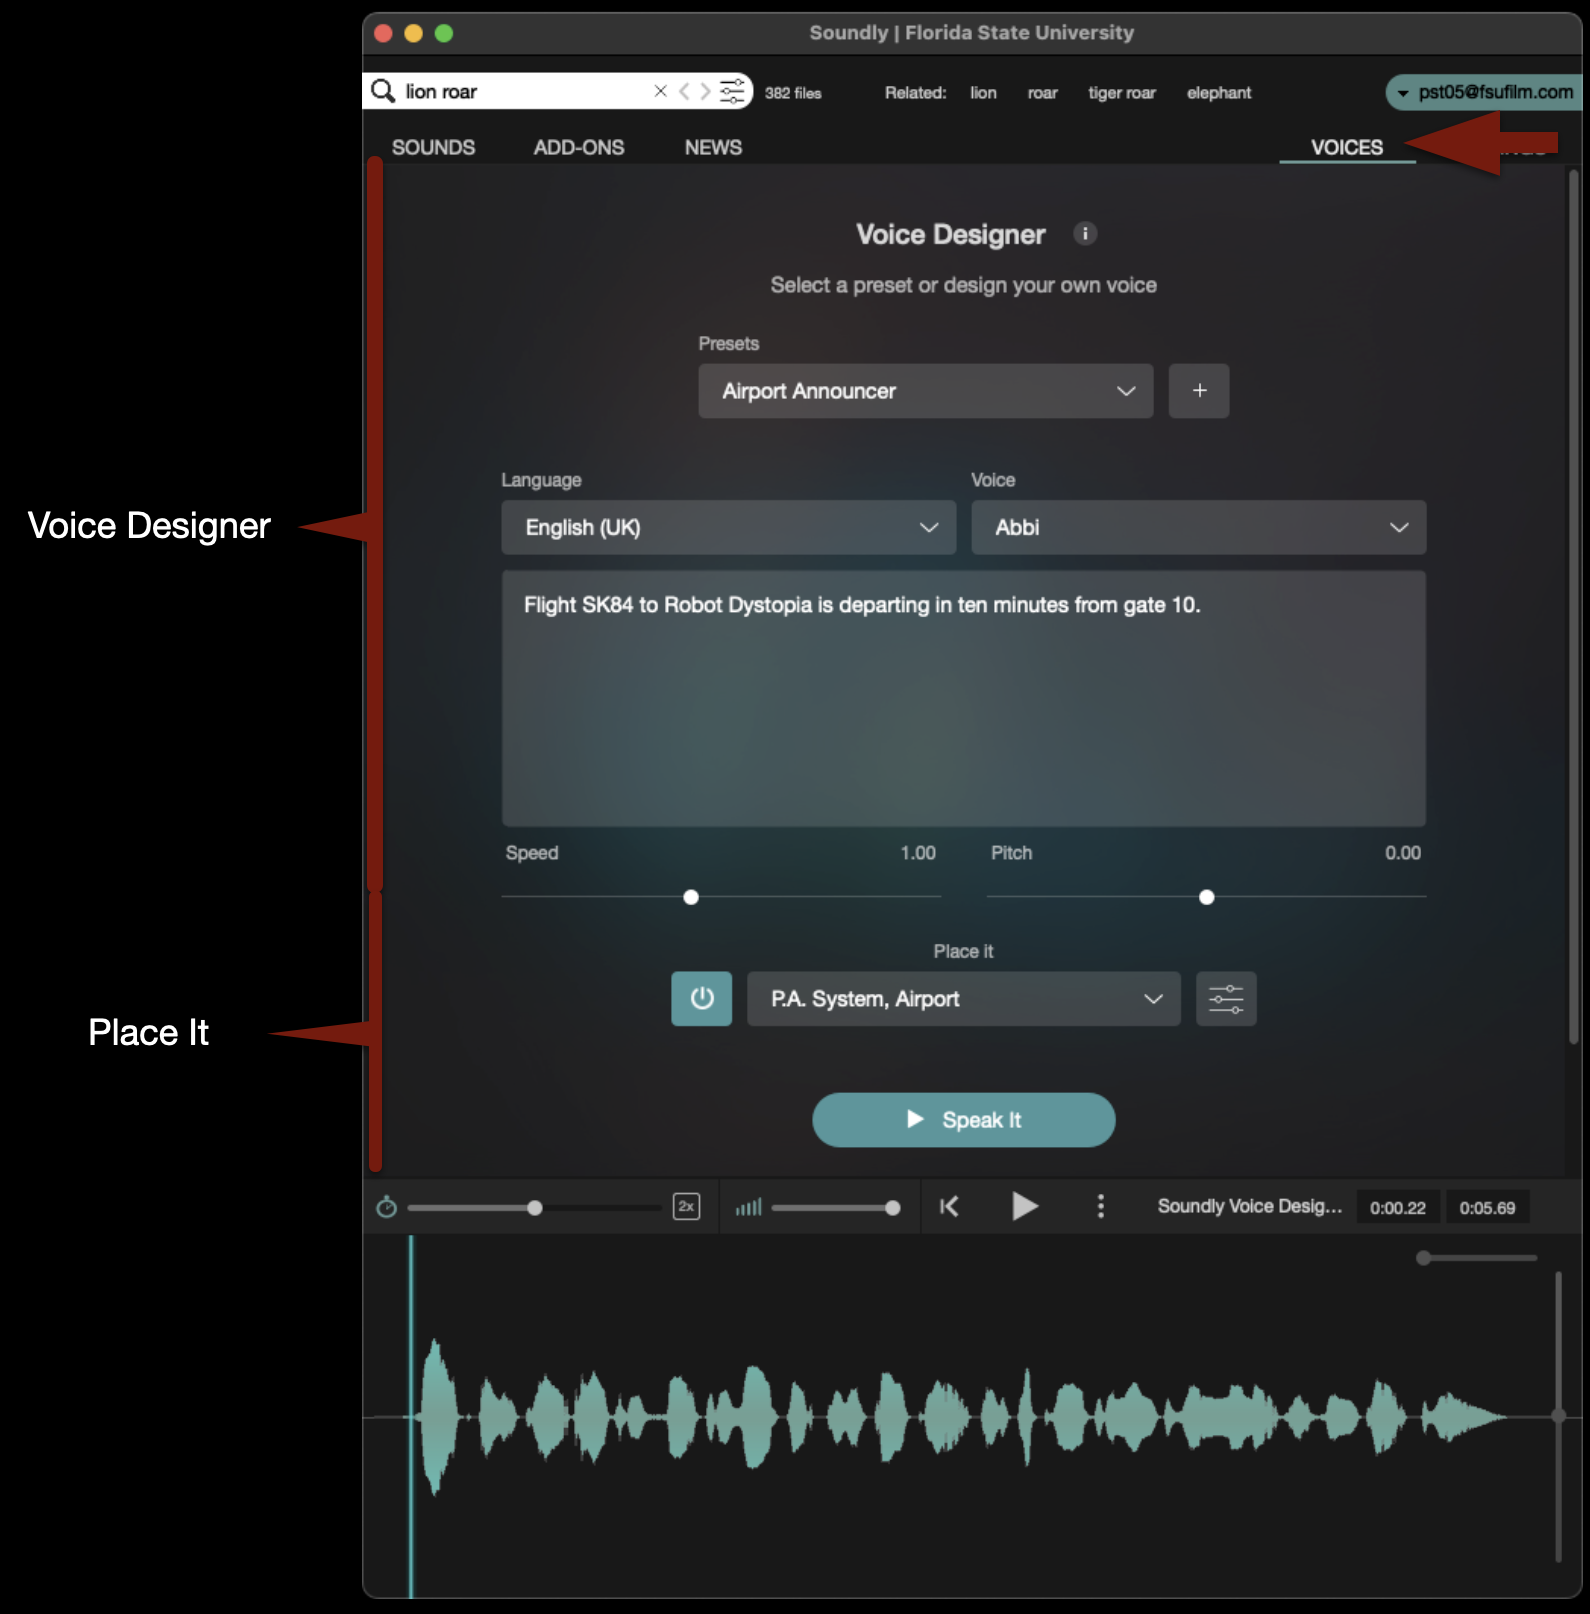
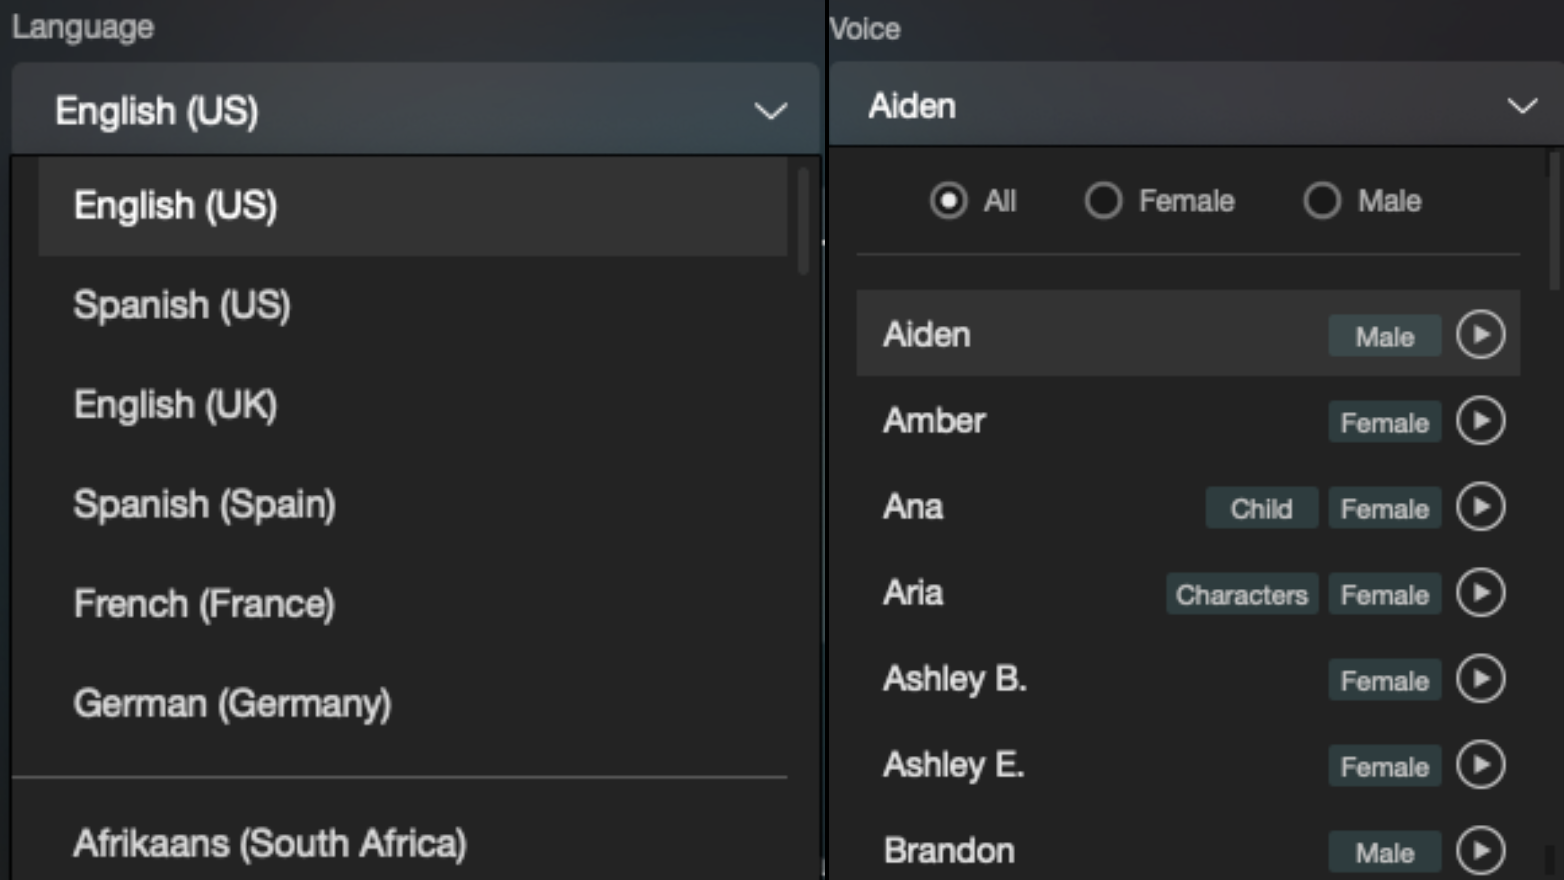
The top section will allow you to type in any dialogue that you need to generate. You will then have options to decide the language and the voice, and you can then generate the voice by clicking “Speak It”. You can also use one of the presets.

The bottom section will allow you to modify that voice. There are presets available or you can click the button shown below and you can choose you own “Speaker” and “Space”.

Importing the Voice Designer media into ProTools and Media Composer is exactly the same process as described above.

Turnover to ProTools

Overview

This is the process where the editorial department prepares and exports files so that the locked sequence in Media Composer can be turned over to ProTools for the sound department to work with. In the industry, an Assistant Editor would normally be responsible for exporting all the necessary elements to turn over to the sound department. Then the sound department uses those elements to conform the sequence in ProTools. In our workflow, the Editor is responsible for both exporting the necessary files out of Media Composer but importing those files into ProTools. This is to ensure that any issues during turnover can be caught immediately.

This step-by-step guide for sound turnover covers how to:

Export Reference Video from Media Composer

A reference video of the locked sequence will need to be exported so that the sound department has something to watch in ProTools during the sound design phase.

Mount your Show Volume and launch your Media Composer project. Open the Locked Sequences bin. Select your locked sequence and hit “Command+D” to duplicate the sequence.

Rename the new sequence Show#_Locked_Reference_Video and move it to the Sound Turnover bin.

Open the new sequence. Mark In and Out for the entire timeline and activate all tracks.

From the task menu select File > Output > Export to File

Point the export to the Sound > Reference Video folder on your Show Volume. Check that the name of the export will be correct. Select the “Reference Video” preset.

Before clicking “Save” to export, double-check the preset by clicking “Options” and make sure the settings are exactly as shown in the example below:

When the export is complete, navigate in the Finder to where it was exported and open it in QuickTime Player to make sure everything is okay.

Export AAF from Media Composer

Duplicate the sequence named “Locked Reference Video” and rename it show#Locked_Sound_Turnover as shown in the example below:

Open the new sequence. Mark In and Out for the entire timeline and activate all tracks.

From the task menu, select File > Output > Export to File…

Point the export to the Sound > AAF folder on your Show Volume. Check that the name of the export will be correct. Select the “Sound_Turnover – AAF to Protools” preset.

Before clicking “Save” to export, double-check the preset by clicking “Options” and make sure the settings are exactly as shown in the example below:

When the AAF is finished exporting, Media Composer will automatically import it back into the Sound Turnover bin as a sequence. If you open the sequence, you will see that the AAF only held information describing the audio tracks. That is all ProTools will need.

After you check that, you can close Media Composer.

Import AAF into ProTools

Navigate on your Show Volume to your ProTools project and open it.

When ProTools opens, select the folder labeled “AAF”:

From the task menu, select File > Import > Session Data…

Navigate in the Finder window to where you saved the AAF that was exported from Media Composer and click “Open”.

In the Import Session Data page make sure the select “Link to Source Media” under Audio Media Options. And check the box labeled “Import Rendered Audio Effects”. Then select “OK”.

The AAF folder will populate with all the audio tracks from your locked sequence. This may take a few minutes to finish. When it does, it will look like the example below.

If you get any kind of error while importing your AAF, it is likely because something was not done properly during the picture lock stage. Go back to the Media Composer project and double-check the steps in the handbook. If that doesn’t fix the error, ask the Post Staff for help.

Import Reference Video into ProTools

Next, you will need to import the reference video that was exported out of Media Composer into ProTools. Select the “Video” folder:

From the task menu, select File > Import > Video…

Navigate in the Finder window to where you saved the Reference Video that was exported from Media Composer and click “Open”.

In the Video Import Options page make sure to select “Main Video Track” as the Destination and check the box labeled “Import audio from file”. Then select “OK”.

It will ask you to choose a destination for the audio and will default to the correct “Audio Files” folder. Click “Open”.

The reference video will come in on the correct track, but the audio attached to it will need to be moved.

Move the audio down to the Guide Track.

Lock both the Video and Guide Track by selecting them and hitting “Command + L”.

Delete the empty track to clean up your project.

Congratulations, you are done! The ProTools project can now be saved and closed. It is ready for the sound design phase.

ADR & Foley Stage Operations

Overview

This post provides instructions on how to schedule and operate the ADR/Foley suite. This suite is a shared space for all students in the program. It is therefore very important to be considerate of others. Please only book the space for the amount of time you’ll need it, and please be willing to negotiate booking times with other students if the suite is in high demand. Please also leave the suite in the same or better condition as you found it. Any students who leave the suite in a disheveled state may be subject to professionalism probation.

Scheduling Sessions

To book time in either the ADR booth or Foley stage, click this link: ADR/Foley Pit Signup Schedule. This will take you to a Teamup calendar:

When the Teamup calendar opens, you will be able to see who else has booked the time in either the ADR booth or Foley stage. Select the date and time you would like to reserve by clicking in the calendar. When you do, a pop up will appear asking for you to enter more information about your reservation:

  • Enter your show number in the event title
  • Refine the start and end times
  • Select either “Control Room A – Foley” or “Control Room B – ADR”
  • List the names of who will be in the space

When you are done, it will look like the example below:

Please be considerate of your fellow filmmakers and only book the time that you need.

Recording ADR or Foley

Make sure that your ProTools session is closed in your suite on the Post Hall. Mount your show volume in either Control Room A or Control Room B. Navigate to your ProTools project and open it.

Once the project is open, navigate in the task bar to Options and then scroll down and select “Low Latency Monitoring”. Make sure there’s a checkmark after you have it selected.

Navigate to the ADR track you wish to record on and change the input from “no Input” to “ADR Mic”:

Record Enable the track and select Input Monitoring. Note: When you are finished recording, you’ll need to deselect both of these for playback.

Change the name of the track to whatever you want the clip name to be:

If wish, you can select Pre-roll time or Post-roll time:

To talk to talent during the session, press both DIM and TALK on the MBox Studio. Press both buttons again to disengage talkback before recording.

To start recording, select the red Record button in the transport window and then select the Play button (or hit the space bar). To stop recording, select the Stop button in the transport window (or hit the space bar).

That’s it! When you are done please save and close your ProTools project. Remember to clean up after yourself before you leave.

Sound Design (F1)

Set Up the Sequence

At the start of your Sound Design day duplicate your “Picture Lock” sequence. Rename the new sequence “XXF1_Picture_Lock_Sound” and move the sequence to the “Sound_Turnover” bin.

Production Audio

If you haven’t already been doing this during your picture editing time, now is when you would want to make sure your production audio tracks are checkerboarded and have cross fades on everything. This is also when you may need to cut in some room tone to fill any gaps.

If you need to turn the Clip Gain up or down the easiest way is to us the “Fast Menu” to give you access to the control on the clips in the timeline.

If you need finer control use the fast menu to switch to “Volume” and then you can use keyframes to automate any volume changes.

To make this go faster use the default keyboard shortcut for adding keyframes.

Also remember that “option” key is your friend for being able to lasso and manipulate the keyframes once they are created.

For reference a normal speaking voice should hit at about “-12dB”. To monitor this you can pull up the “Audio Tool”.

If a character is yelling it would be above that and if a character was whispering it would be below that.

Music

If you need music for your F1 remember that you have access to the Universal Production Music website.

You can ask for the login username and password, and your instructor can send it to you.

When you download tracks from the website by default they will be saved in your “Downloads Folder”. DO NOT leave them there. Instead move them to the appropriate music folder in your shows audio folder as shown in the example.

The to import any music into Media Composer, assuming you have your “Import Settings” set properly all you have to do is drag and drop it into the proper bin and it will import it.

By default most music comes in very loud so you may want to lower the volume of audio while its still in the bin before you cut it into your sequence. To do so, select all the files you want to effect, right click and select “Apply Gain”, then you can type in “+” or “-” how much you want to turn it up or down.

Your music will need to go into one of the “stereo” tracks in your timeline so make sure its set to stereo and then cut it.

Sound FX

For sound FX for your F1 you should use the Soundly app to search through the sound FX library.

Just like with music, as long as your import settings are set properly in preferences you can simply drag and drop the sound FX you want into the proper “Sound FX” bin in Media Composer.

Also, just like with music you need to pay attention to whether the audio is stereo or not. Make any adjustments necessary and then cut it into the proper track in your sequence.

Exporting Stereo Mix

At the end of your sound design day when you done working you will need to export a stereo .wav file that will be imported into Resolve and sunc up with picture.

Mark in at the very beginning of the sequence and out at the very end of the credits. IMPORTANT include the entire front sequence not just the content. Then select all of the audio tracks.

Right click in the program monitor and select export. 

Check that the name of the file is correct, that its going the proper folder and that you are using the correct export setting.

If you don’t yet have a “F1_Stereo_Audio_Export” preset make one using these settings.

When the export is complete you can listen to the .wav file to make sure it’s all there. If everything sounds good save your bins and close Media Composer.

Public Domain & Creative Commons Resources

The Internet is a wonderful place for finding videos, images, motion graphics, clip art, music, and sound effects that can be used in your films. Below is a list of resources to help with finding materials that are either in the public domain or have been licensed through Creative Commons.

Beware, however, that the Internet is also a terribly unreliable place and the burden of proof will fall on Producers to document that the production has the rights to use the materials, so that there’s a clear chain of title. For works in the public domain, this can sometimes take a fair amount of research, as licensing information can be unclear, unreliable, or hard to track down. Any works published 95 years ago or earlier are now in the public domain. Any works published in the past 95 years should be assumed to be under copyright, unless otherwise confirmed. Be aware that new versions of works in the public domain — e.g., a New York Symphony Orchestra’s recent recording of Beethoven’s 9th Symphony — are copyrighted. In other words, while you could perform the composition yourself and be alright, you couldn’t use the New York Symphony Orchestra’s recording without clearing it first.

For Creative Commons work, some license types (such as “NoDerivs” and “ShareAlike”) are not compatible with the work we do. Productions are only permitted to use work licensed as “Attribution” or “Attribution-NonCommercial”.

Videos

PexelsFree videos that can be used and modified without attribution.
PixabayFree videos that can be used and modified without attribution.
Prelinger ArchivesFree public domain films that can be used and modified without attribution.
NASAFree videos that can be used and modified, if compliant with NASA’s usage guidelines.
WikimediaFree videos issued under various licenses; be sure to read the usage guidelines.
VidevoFree videos issued under various licenses; be sure to read the usage guidelines.

Images

PexelsFree photos that can be used and modified without attribution.
PixabayFree photos that can be used and modified without attribution.
Library of CongressFree photos to use and modify; each collection has its own rights statement on usage.
Icons 8Designers, download the design stuff for free — icons, photos, UX illustrations, and music for your videos.
Biodiversity Heritage LibraryFree botanical and animal images from the largest open-access digital archive dedicated life on Earth.
Burst (by Shopify)Free stock images that can be used and modified without attribution.
FreerangeFree photos and illustrations that can be used and modified without attribution the under the Creative Commons Zero license.
freestocks.orgFree stock photos that can be used and modified without attribution under the under the Creative Commons Zero license.
Foodies FeedFree images of food that can be used and modified without attribution under the under the Creative Commons Zero license.
GratisographyFree “whimsical” photos that can be used and modified without attribution (see usage guidelines).
ISO RepublicFree photos that can be used and modified without attribution the under the Creative Commons Zero license.
Jay MantriFree photos that can be used and modified without attribution the under the Creative Commons Zero license.
Kaboom PicsFree stock photography and color palettes that can be used and modified without attribution.
Life of PixFree high-resolution photos, no copyright restrictions for personal and commercial use.
Little VisualsFree, high resolution images. Use them anyway you want – free for commercial use.
MorguefileRoyalty Free Stock Photos and Images
Over 400,000 free stock photos for commercial use.
New Old StockVintage photos from the public archives.
PicographyHigh-Resolution, Royalty-Free, Stock Photos that you can use however you like with a free license.
PikwizardLibrary of over 1 million stock images and videos. Royalty-free and safe for commercial use, with no attribution required.
RawpixelDiscover original artworks from a library of public domain books and chromolithographs. Art prints scanned and digitally enhanced into high resolution, available to download under the CC0 license.
ReshotFree Icons & Illustrations. Design freely with instant downloads and commercial licenses.
SkitterphotoA place to find, show and share public domain photos.
Stocksnap.ioNew CC0 stock photos added daily, free from copyright restrictions.
StockvaultFree stock images. New photos, textures, and illustrations added daily.
Styled StockFree stock photos. Beautiful FEMININE styled images for your projects.
UnsplashThe internet’s source for visuals. Powered by creators everywhere.
Vintage Stock PhotosVintage Stock Photos. Free.

Motion Graphics

Pond 5Free stock videos, photos, and music.
VidevoFree motion graphics issued under various licenses; read the usage guidelines.

Clip art

artvex.comOver 10,000 original free clipart images.
ClipArt ETCEducational clipart,
ClipartOfFree clip art.
clker.comFree clip art.
WebweaverClipart, vectors and animations.
VecteezyFree vector images. Find the best royalty free vectors and illustrations for your design, with thousands of new images added every day. Download free backgrounds, graphics, clipart, drawings, icons, logos and more that are safe for commercial use.

Music

Muse OpenClassical music.
Free Music Archiveinteractive library of high-quality, legal audio downloads directed by WFMU, the most renowned freeform radio station in America.
Free music public domainRoyalty free music for home videos, Youtube videos, film & movie scores, commercial background music or personal use.
Freesounda collaborative database of Creative Commons Licensed sounds.
Anthony KozarComposer and open-source programmer.
AudionautixThe music on this site is the creation of Jason Shaw.
Bensound.comDownload royalty free stock music for YouTube and your multimedia projects.
Brett Van Donselprovides affordable music options for filmmakers, YouTubers, gamers, podcasters, advertisers and more. Most of the music is royalty free. 
Filmmusic.ioOver 600 tracks, free even for commercial use, primarily with cinematic music by Sascha Ende.
Gravity SoundFree Music and Sound Effects for Personal and Commercial Use.
IncompetechRoyalty free music by Kevin MacLeod.
Josh WoodwardAcoustic indie rock singer/songwriter. Creative Commons Music.
King JamesRoyalty free music.
Kongano.comThis site contains royalty-free mp3s for you to listen, download and do whatever you want with.
Silverman Sound StudiosBackground music for YouTube, videos, games, films, adverts, podcasts, anything! All totally free to download!
TechnoAXERoyalty Free Music for your commercial/non-commercial videos or projects. This website has Techno, Dubstep, Metal, Rock or Soundtrack.
Tim BeekMusic for media.
Twin MusicomInnovative audio production.
VidevoFree music issued under various licenses; be sure to read the usage guidelines.
WOWAFree music.

Sound effects

FreesoundFind any sound you like in a collaborative collection of 648,846 free sounds.
VidevoFree sound effects issued under various licenses; read the usage guidelines.
ZapSplatDownload over 46,000 free professional sounds.

Universal Production Music

The College of Motion Picture Arts pays an annual fee to Universal Production Music—the worlds largest music catalog—for the licenses to the library music they provide on their site.

No releases need to be signed for the use of this music, so long as you remain in accordance with the licensing agreement.

Contact the post-production staff if you need the login credentials.

Music Rights

Unfortunately, one of the most important aspects of making a film, the music, is often neglected until the very end of post-production. This is a mistake and could come back to haunt you. Therefore, it is in your best interest to start thinking about the music in your film during pre-production.

Acquiring music rights is often a more difficult and time-consuming process than one might realize. For this reason, all F1 and M1 projects are only permitted to use music from the Universal Production Music library, since the school has already licensed that music. Producers on all other production cycles may use the other methods of acquiring music that are described below, but they should start the process of clearing rights as early as possible.

A show will not be permitted to mix with a piece of music if the music rights have not been 100% cleared. If rights haven’t been cleared by the second-to-last day of the sound design period, an alternate track from the Universal Production Music library should be prepared as a back-up, in case rights on the preferred track are not cleared by the time the show mixes.

Working with a Composer

If you want your film scored, then you will want to contact several composers during pre-production. Explain to them what your story is about and ask them to send a demo reel. If you like their work, then ask them to produce a temp track based on the ideas expressed in the script. If you like the temp track, hire them to score the film. You should have them sign the School’s Composer Contract at the moment of hiring before they begin any work.

Provide them with copies of early cuts as well as the final cut of your film. The composer will then compose the score and submit it to you.

Licensed Music

If you want to use pre-existing music, then you will need to obtain the proper licenses in order to use the music in your film. You must get each license for at least:

  • Two-years
  • Film festival
  • Non-commercial
  • World rights

Getting the music rights could be as simple as sending letters to the publisher and record label, having them sign and return them. However, you may be required to complete their licensing agreements instead. If this is the case, make sure you have the Head of Production review the agreement before you sign it, to ensure we have the proper releases.

There are typically two different types of licenses that you will need to acquire:

Synchronization License

This is the right to reproduce a specific musical composition in your film. It must be obtained from the copyright owner of the composition, which is usually the publisher. You can find out who the publisher is by searching by song title at either www.ascap.com or www.bmi.com.

Almost every song is represented by one of these two companies. Songs that are not represented by ASCAP or BMI might be found at the National Music Publishers’ Association “Songfile” website (www.nmpa.org). You will be provided with a contact at the publisher’s Business Affairs or Licensing Department.

Note that you will need to get a synchronization license from the publisher, even if you are making your own sound recording of that song. For example, if you have your actor sing or recite lyrics, whistle or hum the tune, play the song on a musical instrument, or in any way make your own sound recording of the song, you will need to get the synchronization license from the publisher.

Master Use License

This is the right to synchronize a sound recording with your visual image. You clear this right with the record label who owns the sound recording you would like to use. Check the liner notes of the recording to find out which company this is. Alternatively, you can get contact information for record labels by contacting either ASCAP or BMI (see above). You will be provided with a contact at the record label’s Business Affairs Department.

Library Music

The school pays an annual fee to Universal Production Music for licenses to their library music. You are free to use any and all of the music in that library and no releases need to be signed. You will need to credit the song title and composer in the finished film for each piece of music that you use. Here’s an example:

Public Domain Music

If you want to use a piece of music currently in the public domain, be careful. Know for sure that the piece of music is actually in the public domain. This can sometimes take a fair amount of research, as there is often unclear and unreliable information circulating about works that are supposedly in the public domain. All songs and musical works published in 1925 or earlier are in the public domain; anything published after 1925 should be assumed to be under copyright, unless otherwise stated. If the piece of music is in the public domain, then you can use it.

However, be aware that just because a musical composition may be in the public domain, that does not necessarily mean the sound recording of that composition is in the public domain. For example, the musical composition of Beethoven’s 9th Symphony is in the public domain, but the New York Symphony Orchestra’s recent recording of it is not. If you would like to use that particular recording in your film, you will need to get a license from the publishing company that holds the rights to that specific recording. You could, however, hire your own musicians to perform the 9th Symphony without needing to acquire a license to use the composition.

Creative Commons

Creative Commons is a community that offers an alternative copyright model for authors of creative works who would like others to be able to share, remix, sample, or build upon their work. Creative Commons provides a range of licenses that authors can attach to their creative works, giving other people greater or lesser degrees of permission to share or modify the work.

You may use Creative Commons work in your film if the original work has been licensed with one of the following license types, so long as you provide attribution in your film’s end credits:

Attribution
Attribution • Non-Commercial

Some of the Creative Commons licenses, however, do not play nicely with how we make movies. If you see licenses on works that include either of the following terms, you will most likely not be permitted to use those works:

  • NoDerivs. This license does not permit derivative works and requires that the original work is passed along unchanged and in whole, which is unlikely to happen in the context of our films.
  • ShareAlike. This license requires you to also license your work with a ShareAlike license. However, since the College owns the copyright on all student films, students are not permitted to license their films with a Creative Commons license, which makes it impossible for you to honor the original Creative Commons license.

Note, however, that many authors who’ve opted for a NoDerivs or ShareAlike license may be open to giving you permission to use their work if you contact them directly. If they are willing, you’ll need to follow the College’s usual process of acquiring a licensing agreement for a copyrighted work.

Lab Policies

Computer labs and Post Hall editing suites are work spaces. They are not spaces for hanging out and socializing, as this can be distracting to other students who are trying to work. They are also spaces with a lot of technology that needs to remain well-maintained and correctly configured. Each student is expected to leave a workstation in the same condition they found it, so that the next user doesn’t run into problems. For these reasons, we have the following lab policies, and violations of these policies may result in disciplinary action.

Lab access

The labs and the Post Hall are for student-use only. This is to keep our facilities secure and to minimize potential distractions that guests may cause for other students who are trying to focus on their work. If you wish to bring a guest to a lab or the Post Hall, you must seek prior approval from FSU faculty.

Food and drink

Food is never permitted in the computer labs or editing suites. Beverages are only permitted if in a BOTTLE WITH A SPORTS CAP. Beverages must be kept in your backpack or bag when you’re not drinking. The container must never be left on the desk or on the floor near the workstations. If you cause damage to any equipment, you will be held responsible for the full replacement costs.

Noise and cell phones

Keep your voice volume down so as not to disrupt or disturb others working in the space. Keep phones on silent/vibrate mode at all times. If you need to take/make a call, step out of the lab.

Workstations

Keep your work area reasonably clean and neat at all times. Always restore your work area to a pristine condition when you leave. Unless rendering, log out of your workstation if you plan to step away from your computer for more than 15 minutes.

Accessories

All students are responsible for proper care of the equipment. If you lose or break any equipment, you will be held responsible for the full replacement costs. Tablets, mice, and external monitors must not be removed from a workstation under any circumstances. Chairs must also not be removed from the lab.

Storyboard panels and walls

You may hang project-based materials on the “storyboard” panels if you wish. Do not post inappropriate or potentially offensive materials to the storyboard panels. Keep it professional. Do not tape or pin anything to bare walls or computer monitors.

Clean up

Please assist with the general upkeep of the labs. It’s a team effort. If you notice that a lab is getting messy, assist by cleaning up some of the mess, even if you weren’t responsible for it.

Rendering

Assume all projects will be rendered locally on your assigned workstation. Contact faculty if you feel you cannot complete your show’s rendering on your local workstation. If you set-up renders overnight or over lunch, leave a piece of paper on the desk to indicate that the workstation is busy rendering.

Internet

The downloading of illegal or potentially harmful files on the lab computers is absolutely forbidden. In particular, the FSU network or computers must never be used to download or store pirated movies, music, software, plug-ins, or any other material.