Category: M2

  • Font Usage

    Overview

    Student productions are expected to follow the program’s typography and font usage guidelines when creating titles, credits, posters, graphics, promotional materials, and other official production-related design assets. This includes using approved fonts where required and maintaining professional formatting standards across deliverables.

    Consistent font usage helps create clearer, more professional presentation materials while supporting a more unified visual identity across the program. Typography is an important part of visual communication, and following established standards helps students develop stronger design habits while ensuring that production materials remain clean, legible, and appropriate for exhibition and distribution contexts.

    Limitations on Usage

    Fonts, like music and images, are protected by intellectual property law. Their use is governed by licensing agreements, and improper usage can lead to legal complications and limit a film’s ability to be distributed. To model professional industry standards and ensure that student work respects the rights of font creators, all fonts used in student productions must be properly licensed and accompanied by a verifiable chain-of-title.

    Researching and clearing font licenses requires time from both students and faculty. On early production cycles, which operate on short post schedules, this time is better spent on core filmmaking tasks. These projects are therefore limited to vetted font sources with clear, institutionally-approved licensing. Greater flexibility is granted on capstone cycles, where students have more time and are expected to take responsibility for securing proper font rights.

    F1 • F2 • F3 • M1 • M2 • M3

    Students may only use fonts from the following sources:

    No other font sources are permitted on these projects.

    FC • MC

    Students may use fonts from any source, provided they can meet the following documentation requirements:

    • A copy of the font file(s) used.
    • A license document or purchase receipt that clearly states the usage rights and confirms permission to use the font in the film.

    All font files and documentation must be submitted with final deliverables.

  • Email Templates for Weapons Notifications

    Overview

    Productions involving prop firearms or other weapons require clear and proactive communication with faculty, staff, campus officials, property owners, law enforcement, and other relevant parties. These email templates are designed to help productions provide consistent, professional notifications when weapons-related elements are being used during filming.

    Weapons-related communication protocols exist to prioritize safety, reduce misunderstandings, and help productions operate responsibly within both university and public environments. Even clearly fictional or non-functioning prop weapons can create concern if their use is not communicated properly in advance. Standardized notification procedures help productions meet safety expectations while reinforcing the professional responsibility filmmakers have when working with sensitive production elements.

    Public Locations

    To: Local Jurisdiction Police or Sheriff’s office

    CC: ejacob@fsu.edu (FSUPD Lieutenant Edwin Jacobs) 
    CC: jstone@fsu.edu or tciarlariello@admin.fsu.edu (Head of Production)

    Subject: FSU Film School: Prop Weapon Use Acknowledgement (Public Property)

    Hello, my name is [#########]; I am a film student here at the FSU College of Motion Picture Arts. I’m producing a student short film that will be filmed on [Date] & [Dates], which will include the filming of a non-fireable prop weapon [describe weapon, and how many]. We will have an assigned student armorer managing the weapon(s) at all times, except when the actors prepare for the scene, at which point the armorer will announce and transfer the weapon to the actor. When the actor completes the scene, they will transfer the weapon back to the armorer, who will then announce that they are in possession.

    We’ll be filming at the [insert information on location and address], which is open to the public and/or visible from the outside. We will be posting signs alerting the public that filming is in progress.

    The 1st Assistant Director will make safety announcements involving the weapon at the start of the day and when the scene is being set up for filming.

    The Producer will contact local jurisdiction dispatch and/or Consolidated Dispatch, and FSU dispatch when the scene is within 30 minutes from being filmed.

    As per university requirements, I am attaching our Prop Weapon Authorization Request to inform your department(s) about our project and use case. It is for acknowledgement purposes for local law enforcement. It highlights the address, the filming dates, the armorer on set, and how the prop weapon will be used during filming.

    Thank you for supporting the Film School, and please let us know if you have any questions whatsoever. We appreciate your time.

    Best,

    [Name]
    Producer, [Show Number & TItle]
    [Contact Number]
    [Contact Email]
    Private Location

    To: Local Jurisdiction Police or Sheriffs office

    CC: ejacob@fsu.edu (FSUPD Lieutenant Edwin Jacobs) 
    CC: jstone@fsu.edu or tciarlariello@admin.fsu.edu (Head of Production)

    Subject: FSU Film School: Prop Weapon Use Acknowledgement (Private Property)

    Hello, my name is [#########]; I am a film student here at the FSU College of Motion Picture Arts. I’m producing a student short film that will be filmed on [Date] & [Dates], which will include the filming of a non-fireable prop weapon [describe weapon, and how many]. We will have an assigned student armorer managing the weapon(s) at all times, except when the actors prepare for the scene, at which point the armorer will announce and transfer the weapon to the actor. When the actor completes the scene, they will transfer the weapon back to the armorer, who will then announce that they are in possession.

    The 1st AD will make safety announcements involving the weapon at the start of the day and when the scene is being set up for filming.

    We’ll be filming at the (insert information on location and address), which is on private property and not visible to the public. (Update this If visible to the public.)

    The Producer will contact local jurisdiction dispatch and/or Consolidated Dispatch, and FSU dispatch when the scene is within 30 minutes from being filmed.

    As per university requirements, I am attaching our Prop Weapon Authorization Request to inform your department(s) about our project and use case. It is for acknowledgement purposes for local law enforcement. It highlights the address, the filming dates, the armorer on set, and how the prop weapon will be used during filming.

    Thank you for supporting the Film School, and please let us know if you have any questions whatsoever. We appreciate your time.

    Best,

    [Name]
    Producer, [Show Number & TItle]
    [Contact Number]
    [Contact Email]
  • Thumbnail Images

    Overview

    Thumbnail images are often the first point of contact audiences have with a film online, making them an important part of a project’s overall presentation and discoverability. This post provides standardized thumbnail templates to help maintain visual consistency across school-related promotional materials and online showcases.

    The use of templates ensures that projects meet technical specifications while encouraging students to think strategically about visual communication and audience engagement. Effective thumbnails should clearly represent the tone and identity of the project while remaining legible and visually compelling across a range of screen sizes and platforms. Developing an understanding of these presentation standards is increasingly important in contemporary distribution environments.

    Instructions

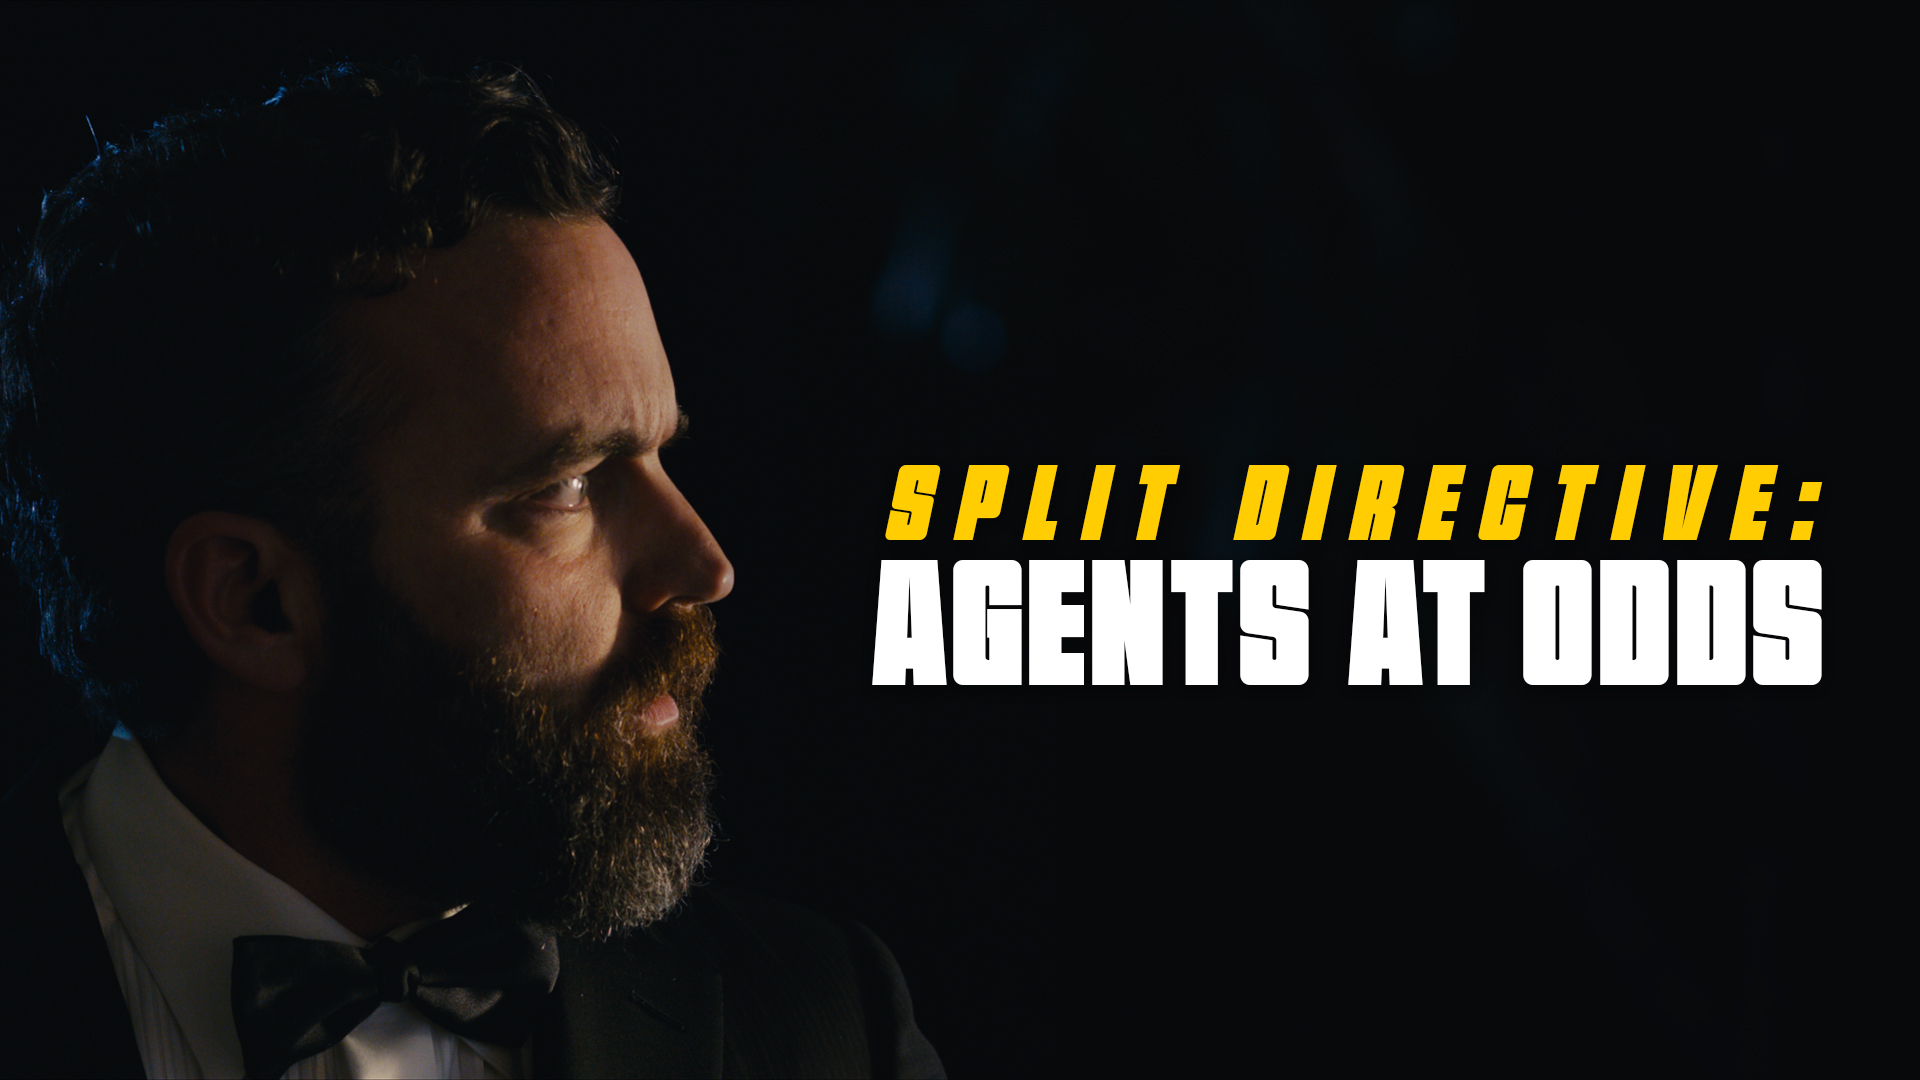
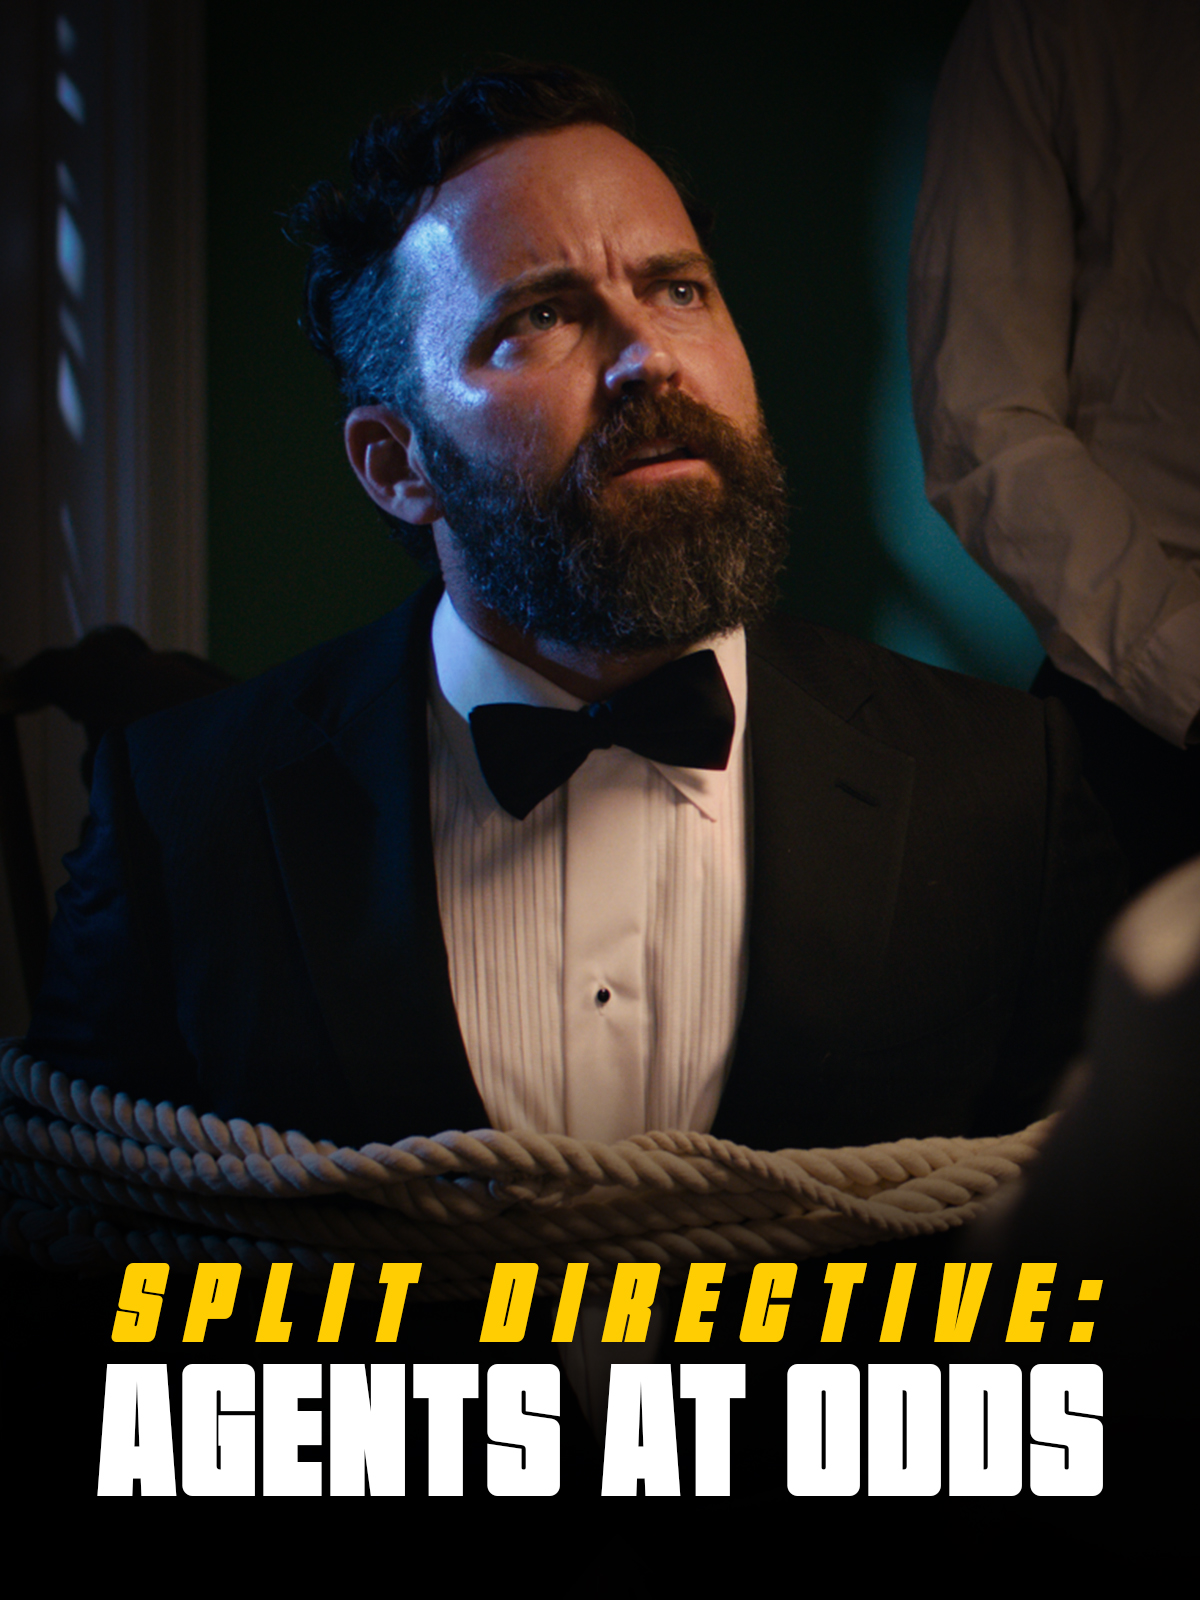
    Use these templates to create your thumbnails. To ensure your film is properly represented across a range of platforms, you must create both a horizontal and a vertical thumbnail.

    Each thumbnail should contain two elements:

    1. A carefully selected image that fills the entire frame (i.e., no letterboxing or black bars). This image is typically derived from either the poster or one of the production stills.
    2. The title of the film. Ideally, for consistency of branding, this should match the font design of the title on the poster. No other text should appear in the thumbnail.

    Examples:

    Example of a horizontal thumbnail
    Horizontal (1920x1080px)
    Example of a vertical thumbnail
    Vertical (1200x1600px)

    Delivery:

    Deliver the finished files for each in two formats:

    • A layered PSD file (include any custom fonts used)
    • A flattened JPG file (max file size: 2MB)

    Horizontal Thumbnail Specs

    Dimensions1920 x 1080 pixels
    File naming conventions01m2-HorizontalThumbnail.psd
    01m2-HorizontalThumbnail.jpg
    Content guidelinesNo nudity or sexual imagery
    No hate speech
    No depictions of violence
    No harmful or dangerous content

    Vertical Thumbnail

    Dimensions1200 x 1600 pixels
    File naming conventions01m2-VerticalThumbnail.psd
    01m2-VerticalThumbnail.jpg
    Content guidelinesNo nudity or sexual imagery
    No hate speech
    No depictions of violence
    No harmful or dangerous content
  • Location List

    Overview

    The location list serves as part of the project’s final delivery materials, providing a comprehensive record of all filming locations used during production. In addition to serving as an archival and administrative document, the report helps productions verify that all location-related materials and required paperwork have been properly completed and submitted during the delivery process.

    Maintaining accurate location records is important both for redundancy and long-term project documentation. The report provides the school with a centralized reference point in case materials submitted elsewhere become incomplete, missing, or incorrectly labeled. It also encourages productions to carefully review their delivery materials and confirm that all locations, agreements, permits, and related documentation have been properly accounted for before final submission.

    Export Instructions

    • Navigate to the Location Database board in FSU Greenlight.
    • Select the “My Shows” view at the top.
    • Batch-select all the items for the show.
    • Select “Export” from the menu at the bottom.

    Delivery Instructions

    • Locate the exported Excel file on your local drive.
    • Rename the Excel file, using the following naming convention:
      01m2-LocationList.xlsx
    • Deliver the renamed Excel file here.
  • Cast List

    Overview

    The cast list is submitted as part of the project’s final delivery materials and provides a complete record of all performers involved in the production. In addition to serving as an archival and administrative document, the report helps productions verify that all cast-related materials and required paperwork have been properly completed and submitted during the delivery process.

    Maintaining accurate cast records is important both for redundancy and long-term project documentation. The report provides the school with a centralized reference point in case materials submitted elsewhere become incomplete, missing, or incorrectly labeled. It also encourages productions to carefully review their delivery materials and confirm that all performer credits, agreements, releases, and related materials have been fully accounted for before final delivery is approved.

    Export Instructions

    • Navigate to the Cast Database board in FSU Greenlight.
    • Select the “My Shows” view at the top.
    • Batch-select all the items for the show.
    • Select “Export” from the menu at the bottom.

    Delivery Instructions

    • Locate the exported Excel file on your local drive.
    • Rename the Excel file, using the following naming convention:
      01m2-CastList.xlsx
    • Deliver the renamed Excel file here.
  • Credit Sequencing

    Overview

    Credits sequencing establishes the standardized order and formatting conventions used for on-screen titles and end credits within student productions. These guidelines help ensure that cast, crew, departments, acknowledgments, and institutional requirements are presented consistently and professionally across projects.

    Credit order carries both professional and practical significance within film production. In professional filmmaking environments, credit placement and sequencing are often governed by contractual obligations negotiated through unions, guilds, and individual talent agreements. Standardized sequencing helps ensure that contributors are recognized appropriately, prevents omissions or inconsistencies, and creates a cleaner delivery workflow during finishing and final export. Learning industry-standard crediting practices also helps students better understand both the collaborative structure of film production and the professional conventions that govern screen credit attribution.

    The Overall Sequence

    While every production’s titles and credits are slightly different, the general order goes:

    1. FSUFILM Leader
    2. Lead Titles
    3. Content (Story)
    4. End Credits
    5. Logos
    6. Copyright

    A production can choose whether or not to include any Lead Titles at the start of the film. That decision will impact the order of the end credits, as outlined below.

    Sequencing for Lead Titles

    If lead titles appear at the head of the film, they must appear in this order:

    • FSUFILM Leader
    • Above-Title Cast
    • Title
    • Supporting Cast
    • Original Score by
    • Production Designer
    • Sound Designer
    • Editor
    • Director of Photography
    • Producer
    • Writer
    • Director

    Sequencing for End Credits

    The order for end credits, if not shown in the lead titles, are:

    • Director
    • Writer
    • Producer
    • Director of Photography
    • Editor
    • Sound Designer
    • Production Designer
    • Original Score by

    The remaining end credits appear in the following order:

    • Cast
    • Stunt Performers
    • UPM
    • First Assistant Director
    • Second Assistant Director
    • 2nd Second Assistant Director
    • Second Unit Director
    • Set Decorator
    • Art Director
    • Art PA
    • Camera Operator
    • First Assistant Camera
    • Second Assistant Camera
    • Loaders
    • Still Photographer
    • Sound Mixer
    • Boom Operator
    • Cableman
    • Gaffer
    • Best Boy Electric
    • Third Electric
    • Key Grip
    • Best Boy Grip
    • Grips
    • Dolly Grip
    • Script Supervisor
    • Production Coordinator
    • Location Managers
    • Local Casting
    • Casting Associates
    • Assistants to Actors/Producers/Directors
    • Production Assistants
    • Publicist
    • Make-up Artist
    • Hair Stylist
    • Costume Designer
    • Property Master
    • Assistant Property
    • Set Design
    • Leadmen
    • Special Effects Supervisor
    • Special Effects Assistants
    • Construction Coordinator
    • Construction Foreman
    • Painters
    • Craft Service
    • First Aid
    • Transportation Coordinators
    • Transportation Captains
    • Drivers
    • Assistant Editors
    • Sound Editors
    • ADR Editor
    • Music Editor
    • Re-Recording mixer
    • Visual Effects Producer
    • Visual Effects Supervisor
    • Visual Effects Coordinators
    • Modeling Artists
    • Rigging Artists
    • Texturing Artists
    • Animators
    • Layout Artists
    • Lighting Artists
    • Simulation Artists
    • Matchmove Artists
    • Compositors
    • Rotoscope Artists
    • Technical Support
    • Virtual Production Supervisor
    • Virtual Production VAD
    • Virtual Production Operators
    • Title Designer
    • Colorist
    • Music Rights
    • Special Thanks
    • Cameras By
    • Color By
    • Dolby
    • Disclaimer
    • FSU Copyright
  • Titles & Credits Delivery

    Overview

    Final title and credit materials must be delivered in a format that allows editorial, finishing, and archival workflows to proceed cleanly and consistently. This includes the submission of properly formatted title cards, end credits, associated project files, and any other required assets needed for final mastering and delivery.

    Careful preparation of titles and credits is important because even small formatting errors, missing names, spelling mistakes, or incompatible files can create significant problems late in post-production. The delivery process is designed both to maintain technical consistency across projects and to encourage students to carefully verify the accuracy and completeness of all credited information before final submission.

    Delivery Specs

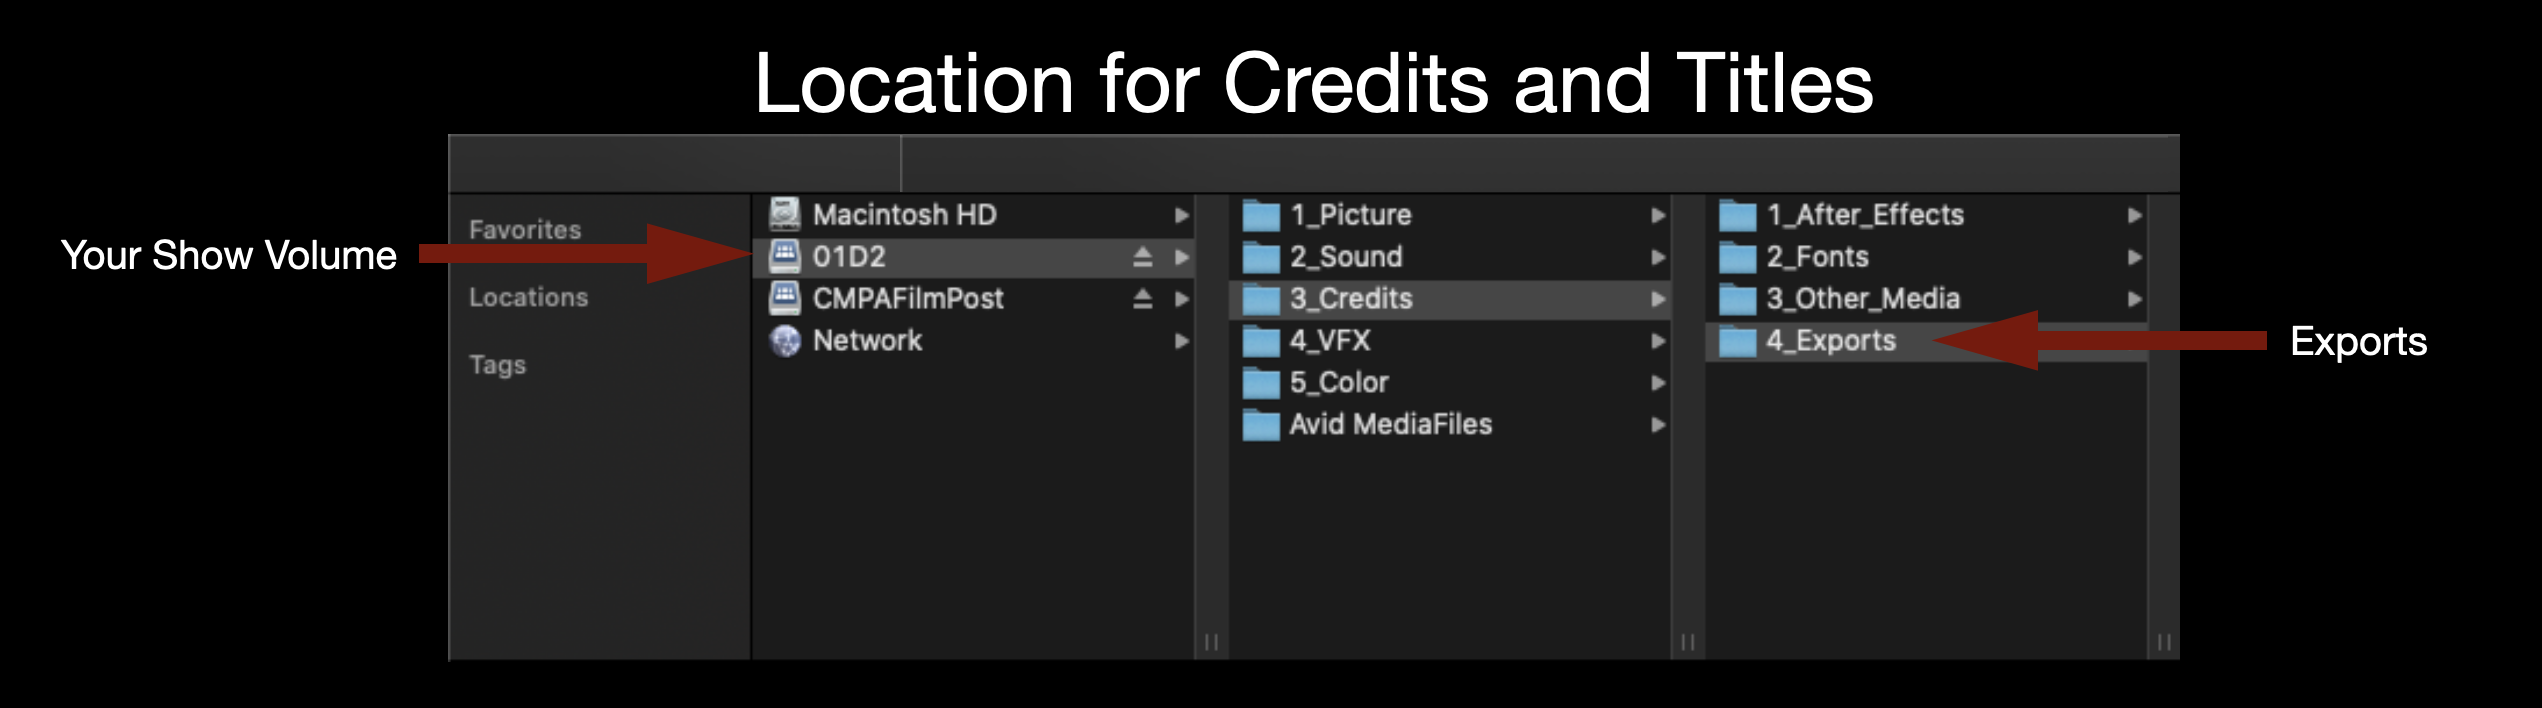
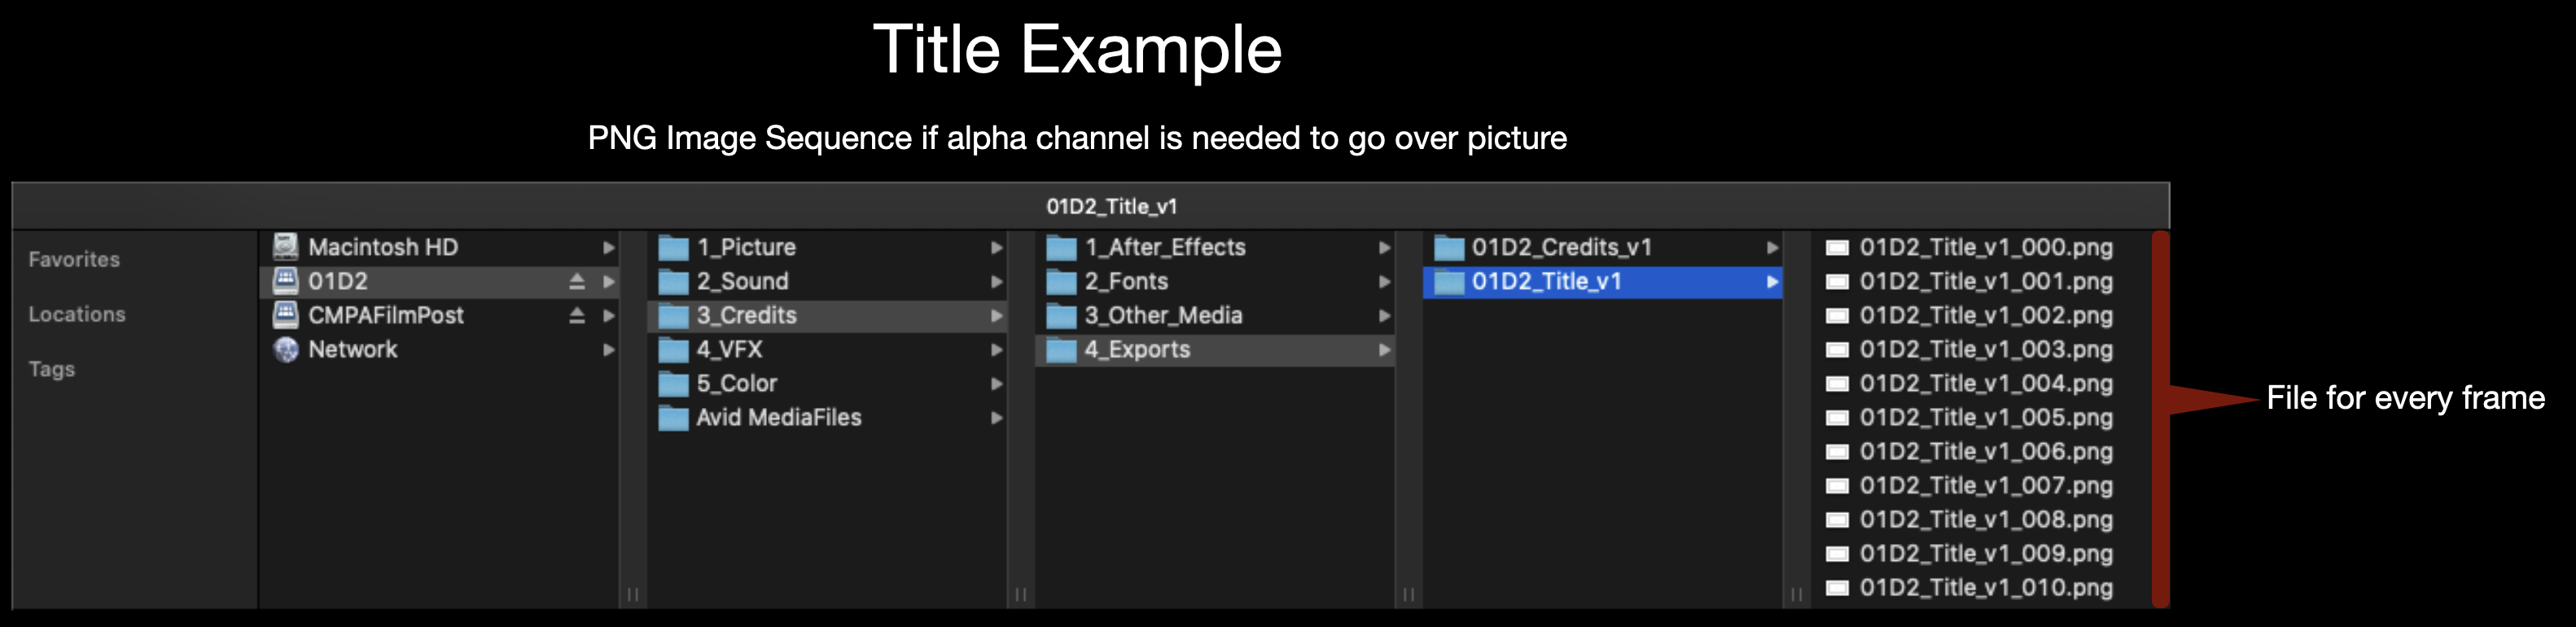
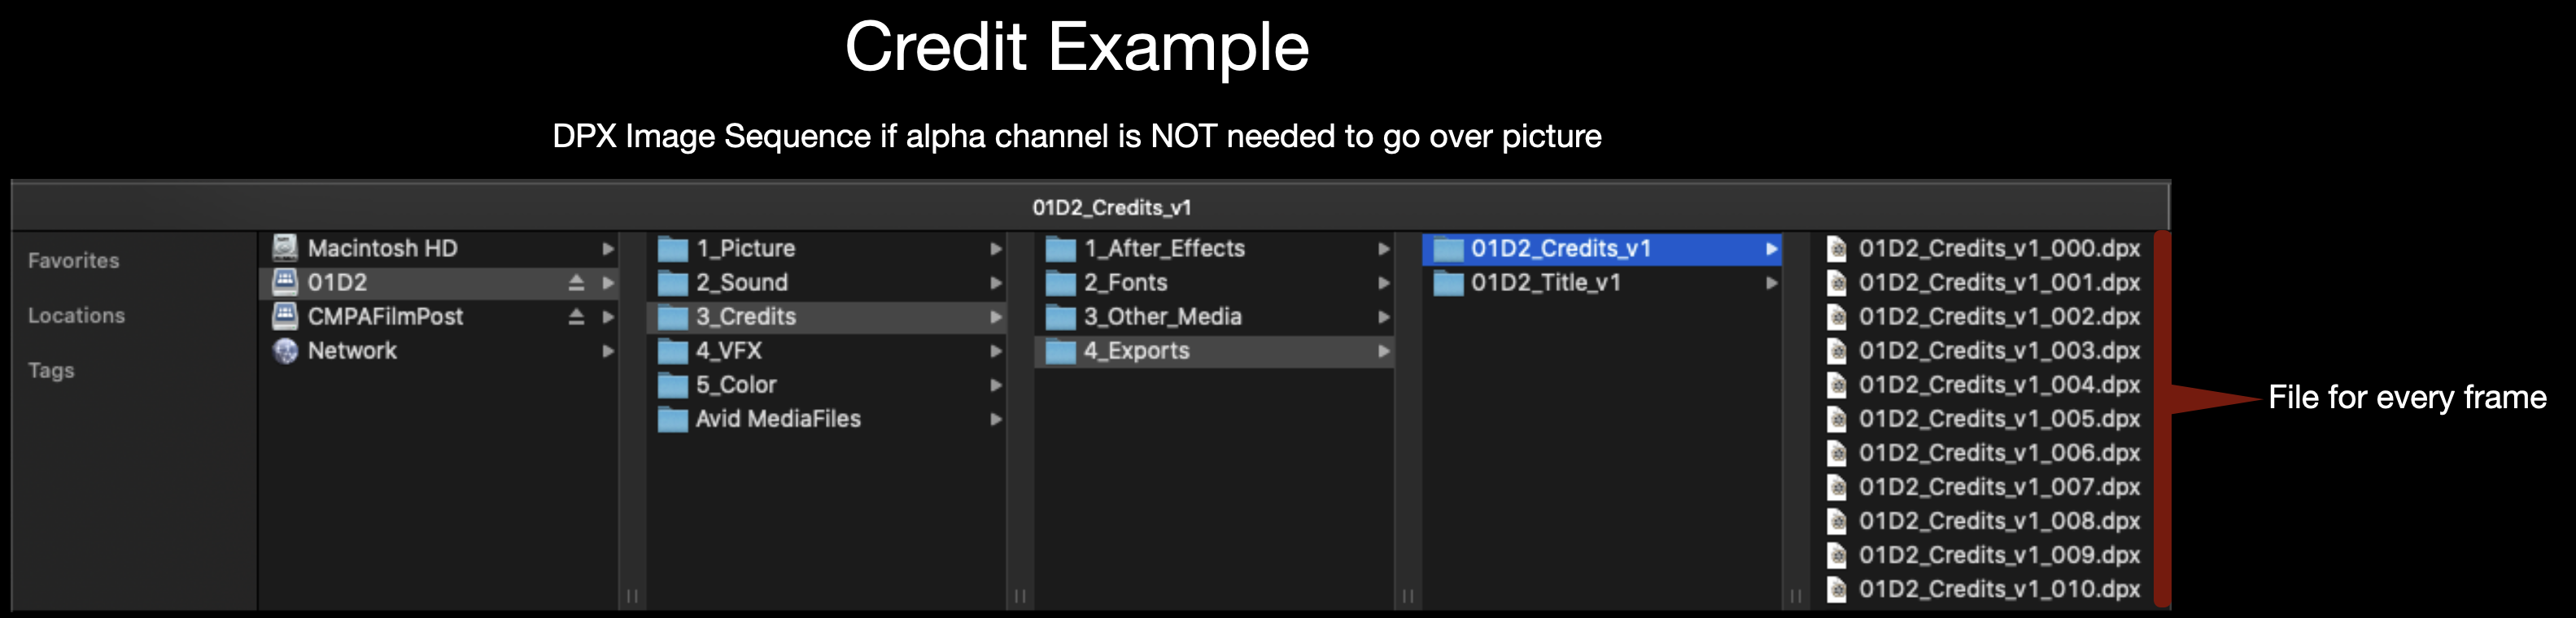
    All Credits and Titles should be made in After Effects and delivered as either a DPX sequence or a PNG sequence. A DPX sequence should be used if the titles are going over black and a PNG sequence should be used if the titles need to go over picture since it holds an alpha channel. Either image sequence should be exported for 1920×1080 at 24fps. Make sure to name the image sequence appropriately (Example: 01M2_Credits_v1).

    Folder location for credits and titles
    Location to Deliver Credits and Titles
    Title example
    Naming convention for Titles
    Credit example
    Naming convention for Credits
  • Cadence (Dual-System Sound)

    Overview

    Dual-system sound workflows record audio separately from the camera using dedicated sound recording equipment, requiring synchronization between picture and sound during post-production. This post outlines the cadence procedures, file management expectations, and synchronization practices used to maintain organized dual-system workflows throughout production and editorial.

    Because dual-system recording involves managing multiple sources of media simultaneously, consistency and organization are critical to avoiding sync issues, missing files, or editorial confusion later in post-production. These procedures help students develop professional habits related to sound workflow management, metadata organization, and cross-department coordination within more advanced production environments.

    Cadence

    This is the correct cadence for productions using dual-system sound. What the 1st AD says is highlighted and said over walkie. It is important that all 1st ADs adhere to this cadence. This enables consistency from show to show, which facilitates clear communication and efficiency on set.

    “PICTURE’S UP!”

    • When you’re ready to go for picture.

    “LAST LOOKS!”

    • “Last Looks” is only for Hair & Makeup and Costumes to do any final touches.

    “LET’S LOCK IT UP! WE’RE GOING FOR PICTURE!”

    • “Lock it up” is to notify everyone to be quiet.

    “ROLL SOUND!”

    • 2nd AD/PAs call “Rolling!”
    • Sound voice-slates into the sound recorder and then calls “Sound Speeds”. This is usually called by Boom Ops if they are in communication with the Sound Mixer. If not in communication, the Sound Mixer makes the call.
    • 1st AC speeds the camera and (if necessary) signals to 2nd AC that it’s speeding.
    • 2nd AC calls “Mark” ( A-Camera Mark, B-Camera Mark, etc.) and slates.
      • If tail-slating, call “Tail-Slating” at this point. After “Cut” is called, slate will enter frame upside down. Call “Mark” and clack the sticks, then turn the slate so it’s readable before the camera is cut.
    • Operator calls “Set” when they are framed up, in focus, and ready to go.
    • Director or AD will call “Action”/”Background” and Directors only will call “Cut” and/or “Setting”, with ADs echoing this.

    After each “Cut,” the 1st AD checks with camera and sound to see how it was for them, then they check with Director to see if they want to go again.

    “WE’RE GOING AGAIN!”

    • Make sure everyone is ready. Then call the Roll once more.

    “PICTURE’S UP! LOCK IT UP! ROLL SOUND!”

    • Call goes as above until the Director calls “Cut”. AD repeats the “Cut” and PAs follow after AD on walkie.
    • AD continues to ask “Going again?” until they are told “Got that”.
    • Once 1st AD hears “Got that” they then call:

    “GOT THAT! MOVING ON! THANK YOU.”

    • Moving on…

    “NEW DEAL! CAMERAS MOVE! WE’RE GOING TIGHTER!”

    • “New Deal” means the camera(s) are moving to their next setup position.
    • “We’re going tighter” references that the set is moving on to a tighter frame. This is because we typically shoot scenes starting with the widest frame and then working towards the tightest frames.
    • If you’re moving on to the next scene then call:

    “GOT THAT SCENE! MOVING ON TO SCENE ‘X’. LET’S CLEAR THE CREW AND BRING IN FIRST TEAM (OR CAST) TO REHEARSE.”

    • Moving on…
  • Production Manager Responsibilities

    Overview

    The Production Manager oversees the logistical and operational planning of the production, with primary responsibility for scheduling coordination, resource allocation, transportation planning, paperwork oversight, and the broader infrastructure needed to support the production successfully. Working closely with producers and assistant directors, the role focuses on building and maintaining the systems that allow production to function efficiently.

    Unlike a 1st AD, who manages the execution of the shooting day on set, a Unit Production Manager focuses primarily on the larger logistical framework surrounding the production before and during filming. Strong production management helps filmmakers anticipate problems proactively, balance creative goals against available resources, and maintain realistic operational planning across departments. The role provides students with practical experience in one of the key organizational leadership positions within professional film production.

    Pre-Production

    • Assist the Producer with any and all logistical needs to prepare for principal photography.
    • Coordinate with department heads to update the Daily Prep Schedule. Then distribute to the crew by 6pm each day of pre-pro.
    • Prepare Crew Deal Memos for everyone at the production meeting.
    • Assist Producer in securing lunches, craft services, volunteers, and extras for all days of shooting.
    • Assist Producer in obtaining craft services the night before production.
    • Assist the Producer in casting by scheduling and participating in auditions if necessary.
    • Prepare and make copies of all the paperwork needed on set. Give to 2nd AD to distribute and collect.
    • Oversee the 2nd AD in the creation of the Call Sheet. Once the Production Manager and the 1st AD approve the Call Sheet, map and set diagram, have 2nd AD distribute copies.
    • Communicate any changes to the schedule to the 2nd AD to disseminate to the cast and crew.
    • Check the weather periodically to monitor adverse conditions. Have a back-up plan.
    • Double check every logistical piece of information and make sure nothing has been forgotten.

    Production days

    Start of day

    • Arrive at set FIRST, at least 30 minutes before call time.
    • Open and establish contact with location. Record the state and location of things, ground rules.
    • Deliver the craft services to the 2nd AD and assist them in setting up the craft service table.
    • Give the 2nd AD all the paperwork you prepared ahead of time for them to have completed throughout the day.
    • When trucks arrive, verify they are parking in the correct place.

    Throughout the day

    • Make sure everything is going as planned throughout the day, and troubleshoot logistics as needed.

    Meals

    • Double check with the caterer or restaurant that lunch will be ready on time.
    • Pick up lunch and bring it back to set with enough time for the 2nd AD to set it up prior to releasing for lunch.
    • During lunch, review the next day’s Call Sheet with the 2nd AD.

    End of day

    • Collect all the Daily Production Paperwork and media cards from the 2nd AD. Double check for accuracy & completion.
    • With 2nd AD, clean and secure location. Be the LAST TO LEAVE (except perhaps Art Dept). Leave the location better than when you arrived.
    • Approve the Daily Production Report and have 2nd AD distribute copies within 2 hours after company wrap.

    Post-Production

    • Organize and scan all the of the Daily Production Paperwork for the Producer and deliver in both hard copy and electronic form.
  • 2nd AD Responsibilities

    Overview

    The 2nd Assistant Director focuses primarily on communication, paperwork management, and logistical coordination in support of the broader assistant directing team. Responsibilities typically include preparing call sheets, distributing production information, coordinating cast movement and crew communication, tracking schedules, and helping ensure that departments remain informed and organized throughout production.

    While the 1st AD concentrates on running the set and managing the shooting day on the floor, the 2nd AD supports that process by handling much of the operational coordination that happens off the floor. Strong 2nd AD work helps productions stay organized, reduces communication breakdowns, and allows the production team to operate more efficiently under demanding schedules. The role also provides important experience in the organizational and administrative systems that support professional film production.

    Pre-production

    • Assist the Production Manager and Producer with any pre-production tasks needed.
    • Assist 1st AD coordinate the Tech Scout (Directors Prep). Establish where the restrooms, parking, staging, base camp and set will be.
    • Attend the Team Meeting, Crew Drill, Equipment Check Out/In, and Production Meeting, and sign the crew in and out using the FSUFilm Greenlight timesheet form.
    • Get Crew Deal Memos signed by everyone at the production meeting.
    • Create the Call Sheet, including map and set diagram. Have Production Manager and 1st AD approve it. Then send it no later than 12 hours before the next day’s call time.
    • Communicate any changes to the schedule to the entire cast and crew.
    • During Equipment Check-out, check out the walkies.
    • Check the weather periodically to monitor adverse conditions. Have a back-up plan.
    • Double check every logistical piece of information and make sure nothing has been forgotten.

    Production days

    Start of day

    • Arrive at set FIRST, at least 30 minutes before call time.
    • Establish Base Camp.
      • Set up Checkpoint with Walkies where crew will check in when they arrive.
      • Get the snacks and drinks from the Production Manager, and set up the craft service table.
    • As crew members arrive, check them in using the FSUFilm Greenlight timesheet form and hand them a walkie.

    Throughout the day

    • Maintain the craft service table throughout the day to make sure it is stocked.
    • Stay at base camp and handle the phones, paperwork and actors. Know where everything and everyone is.
    • Remain in or near the Green Room with the Actors, except to escort them to/from set at 1st AD’s request.

    Meals

    • When the Production Manager arrives with lunch, help set up the lunch table.
    • At lunch make sure everyone signs the Meal Sign-In Sheet.
    • During lunch, review the next day’s Call Sheet with the Production Manager and 1st AD.
    • Make periodic announcements on time remaining on lunch.
    • Make sure lunch does not exceed one hour.

    End of day

    • Complete the Performers Time Report, and have the actors sign it before they are dismissed for the day.
    • Make sure 2nd AC, Script Supe, and Sound Mixer meet at end of day to verify reports. Collect all reports.
    • Collect the camera card from the 2nd AC, and the sound card from the Sound Mixer, and deliver to Production Manager.
    • Have crew members sign out using the FSUFilm Greenlight timesheet form and collect their walkie.
    • Organize all the of the Daily Production Paperwork for the Production Manager and deliver in a folder.
    • Help clean and secure location. Be the LAST TO LEAVE (except perhaps Art Dept). Leave the location better than when you arrived.
    • Complete the Daily Production Report and have it approved by the Production Manager and 1st AD. Then distribute within 2 hours after wrap.

    Post-Production

    • Assist in wrapping production paperwork if necessary.
    • During Equipment Check-in, check in the walkies.