BTH

Cadence (Dual-System Sound)

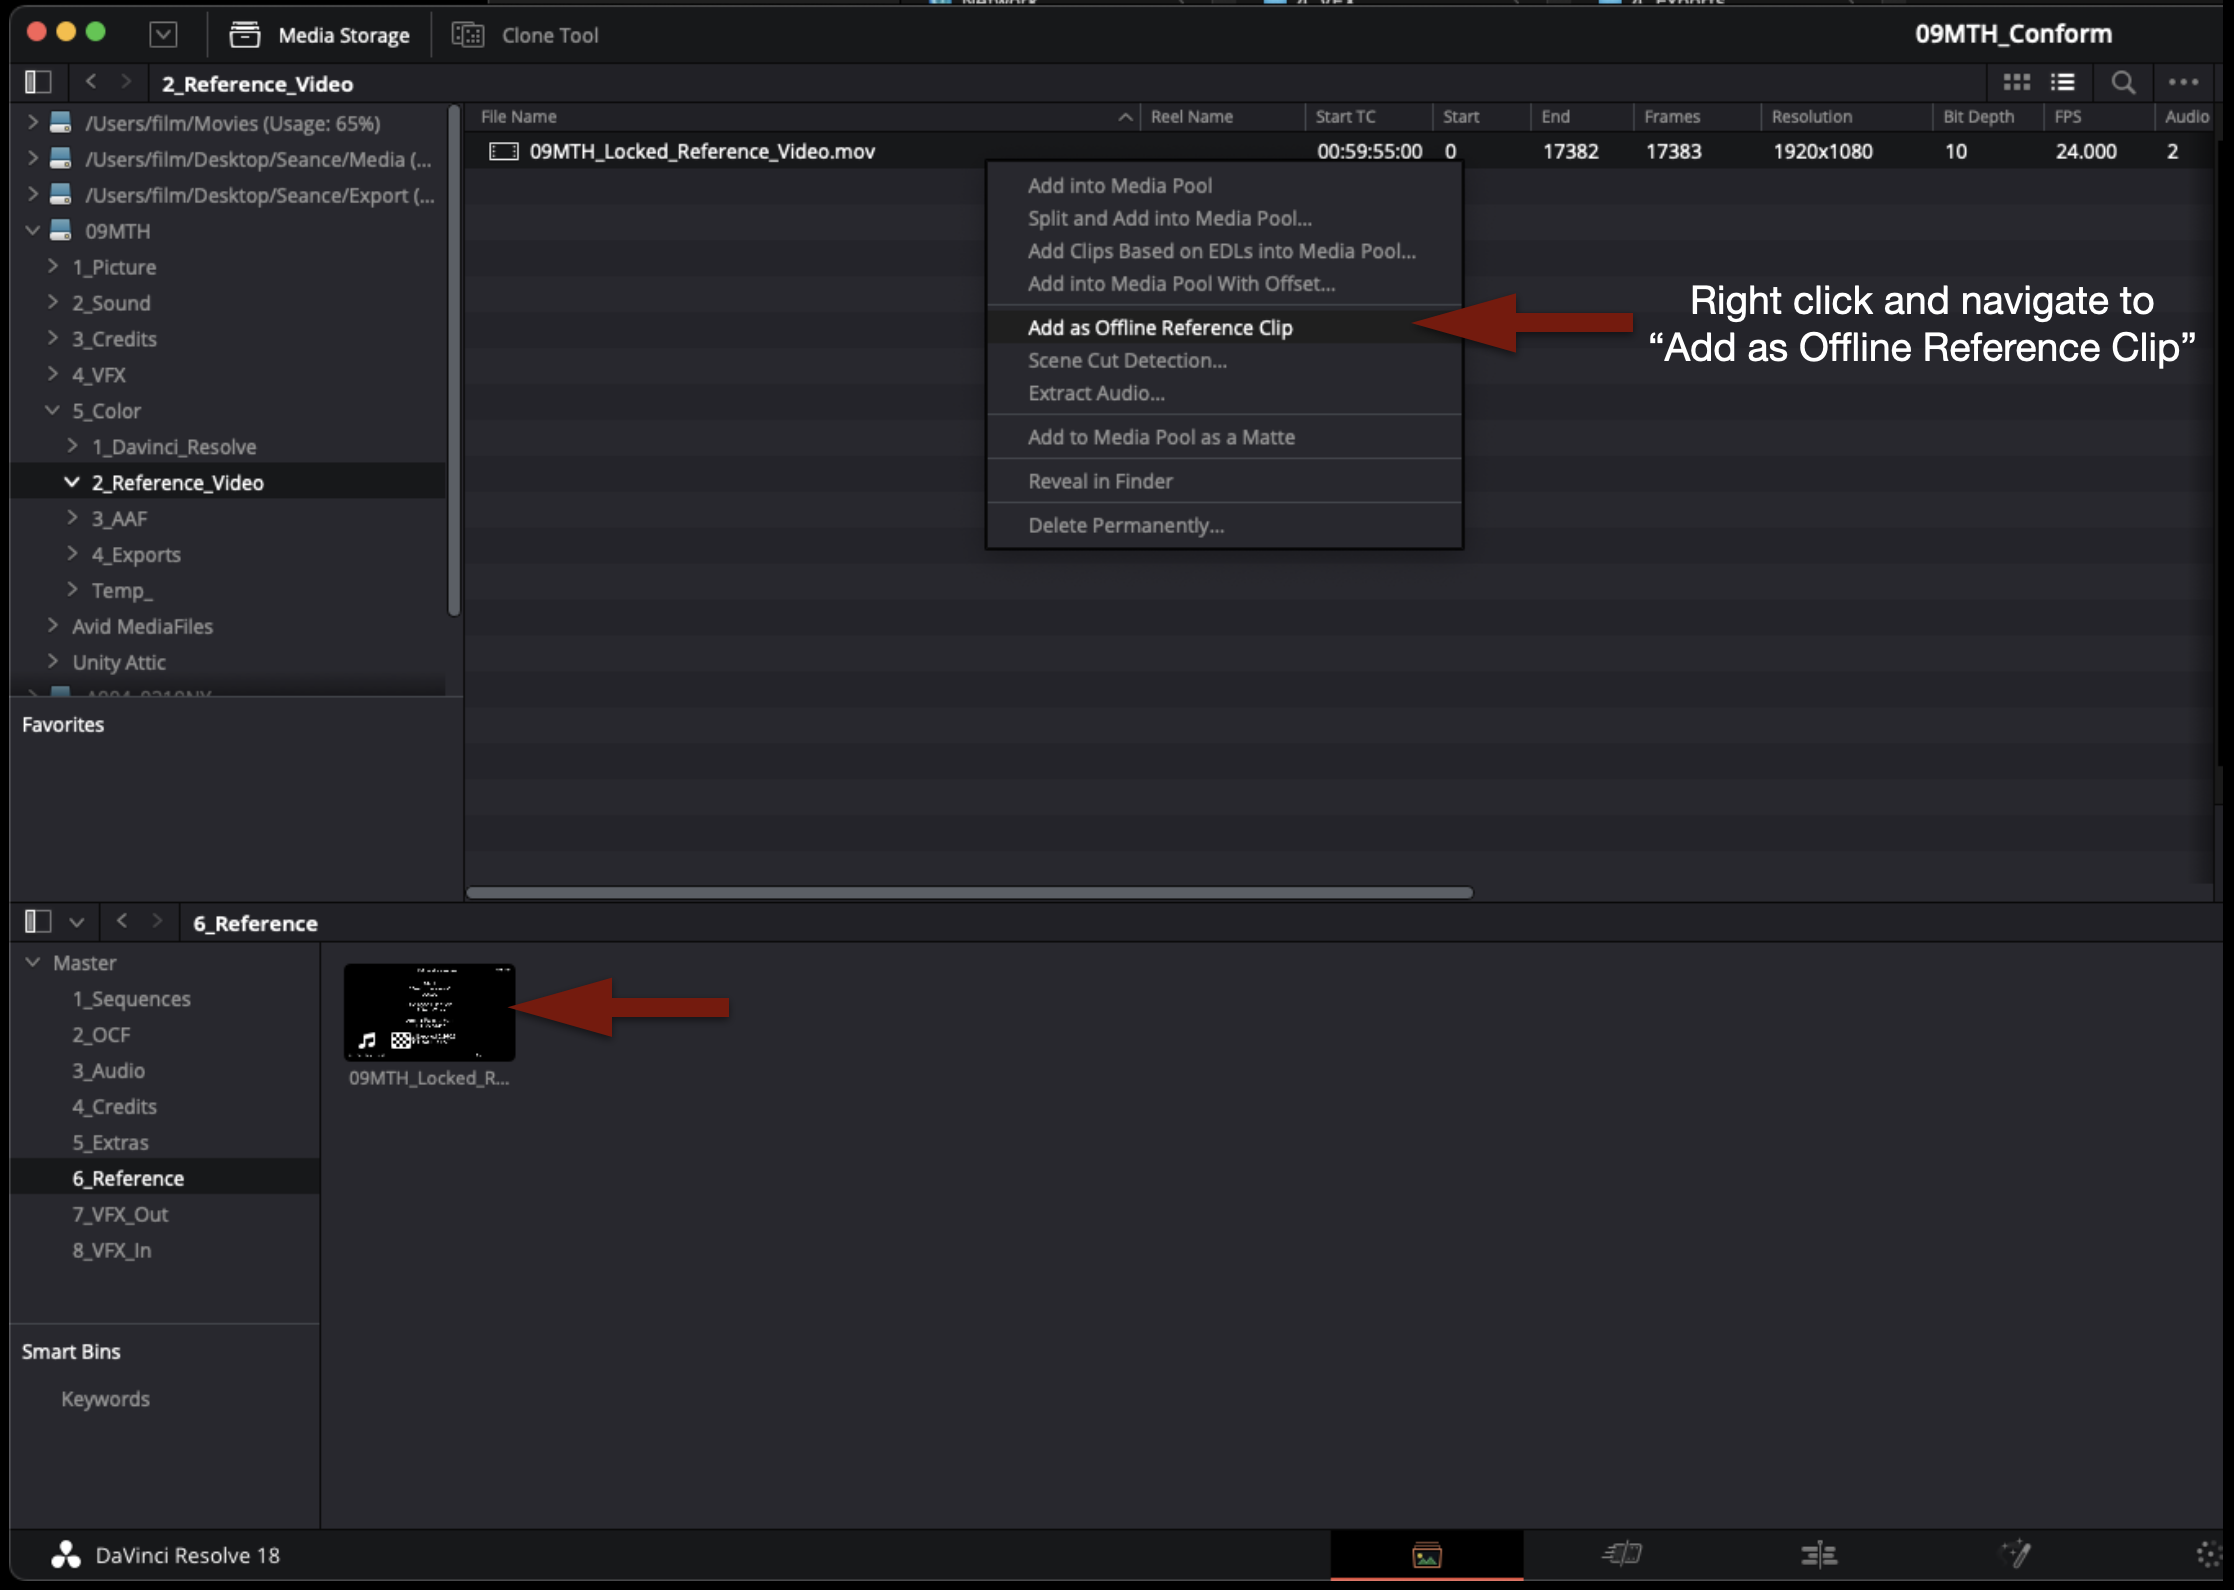
This is the correct cadence for productions using dual-system sound. What the 1st AD says is highlighted and said over walkie. It is important that all 1st ADs adhere to this cadence. This enables consistency from show to show, which facilitates clear communication and efficiency on set.

“PICTURE’S UP!”

“LAST LOOKS!”

  • “Last Looks” is only for Hair & Makeup and Costumes to do any final touches.

“LET’S LOCK IT UP! WE’RE GOING FOR PICTURE!”

  • “Lock it up” is to notify everyone to be quiet.

“ROLL SOUND!”

  1. 2nd AD/PAs call “Rolling!”
  2. Sound voice-slates into the sound recorder and then calls “Sound Speeds”. This is usually called by Boom Ops if they are in communication with the Sound Mixer. If not in communication, the Sound Mixer makes the call.
  3. 1st AC speeds the camera and (if necessary) signals to 2nd AC that it’s speeding.
  4. 2nd AC calls “Mark” ( A-Camera Mark, B-Camera Mark, etc.) and slates.
    • If tail-slating, call “Tail-Slating” at this point. After “Cut” is called, slate will enter frame upside down. Call “Mark” and clack the sticks, then turn the slate so it’s readable before the camera is cut.
  5. Operator calls “Set” when they are framed up, in focus, and ready to go.
  6. Director or AD will call “Action”/”Background” and Directors only will call “Cut” and/or “Setting”, with ADs echoing this.

After each “Cut,” the 1st AD checks with camera and sound to see how it was for them, then they check with Director to see if they want to go again.

“WE’RE GOING AGAIN!”

  • Make sure everyone is ready. Then call the Roll once more.

“PICTURE’S UP! LOCK IT UP! ROLL SOUND!”

  1. Call goes as above until the Director calls “Cut”. AD repeats the “Cut” and PAs follow after AD on walkie.
  2. AD continues to ask “Going again?” until they are told “Got that”.
  3. Once 1st AD hears “Got that” they then call:

“GOT THAT! MOVING ON! THANK YOU.”

“NEW DEAL! CAMERAS MOVE! WE’RE GOING TIGHTER!”

  • “New Deal” means the camera(s) are moving to their next setup position.
  • “We’re going tighter” references that the set is moving on to a tighter frame. This is because we typically shoot scenes starting with the widest frame and then working towards the tightest frames.
  • If you’re moving on to the next scene then call:

“GOT THAT SCENE! MOVING ON TO SCENE ‘X’. LET’S CLEAR THE CREW AND BRING IN FIRST TEAM (OR CAST) TO REHEARSE.”

1st AD Protocol

The role of the 1st AD is an important and multi-faceted one, involving organization, anticipation, communication, problem-solving, leadership, support, morale-building, time-budgeting, and resource allocation. It is a role that is critical in planning and scheduling a film during prep, and one that is vital for smooth set operation during production. A few key things to remember:

  • The 1st AD always remains on set. If the show has a basecamp away from set, the 1st AD should communicate with the 2nd AD by radio.
  • The 1st AD tracks time but doesn’t harass people about it. Good ADs never raise their voice because they have not allowed things to reach that point.
  • It is the responsibility of the 1st AD to know where everyone is. Crew must inform the AD department if they briefly leave set (e.g., “I’m 10-1”).
  • Above all else, it is the 1st AD’s job to watch, facilitate, and anticipate problems for the betterment of the film, not simply to “make the day.”

It is vitally important that all 1st ADs at the school adhere to the same core protocols and cadence. This enables consistency from show to show, which facilitates clear communication and more efficiency on set. Below are some “cheat sheets” to help remember the 1st AD’s daily flow and cadence.

1st AD Daily Flow

Cadence for Dual System Sound

Cadence for Single System Sound

VFX Delivery to Editorial

Overview

This guide is only necessary if your show has approved VFX shots.

In the industry, after a VFX vendor has finalized a shot and received the director’s approval, the shot is sent back to editorial to be cut back into the film. This handoff is between a VFX Coordinator on the vendor side and a VFX Editor or Assistant Editor on the picture editing side. When the VFX shots are received by editorial they are checked to make sure they meet the delivery specifications and the agreed upon frame count. In the industry, VFX shots are often finalized at different times by different vendors and sent to editorial to be cut into the film throughout the editorial process.

In our workflow, all VFX shots approved by the director during VFX will be turned back over to editorial all at once. Since the original editor of the show may now be working on another project, it is the primary responsibility of the director to do the work described in this guide. (If the editor is available during this time, they are encouraged to be present.)

Receiving VFX Delivery

The VFX shots should already be delivered to your show volume in the VFX In folder. The only files in this folder should be the final version of each shot. They should be labeled show_shot#_comp_version. If the files are labeled in any other way or if you have more than one version of each shot in the VFX In folder, contact the person who completed the VFX shots so that they can fix anything necessary before proceeding.

Cut in VFX

Open the show’s Resolve project. In the Media page, inside the Sequences bin, duplicate the sequence named “show#_VFX_Turnover” and rename the new sequence show#_VFX as shown in the example below.

In the Media page, navigate through your media storage to your VFX shots and drag them into the Media Pool to import them.

To denote that they are VFX shots, these clips should be changed inside of Resolve so that the clip color is yellow. In the Media Pool, you can highlight them all, right-click, and select clip color.

Check that the VFX shots have been delivered to the correct specifications. They should be 1920×1080 AppleProRes4444 QuickTimes at 24fps with no sound channels.

Also check the frame counts of each shot against the the VFX Turnover Sheet to make sure they match.

In the Edit page, cut in each VFX shot to Video Track 3.

You should see the progression of the shot as shown in the example below.

Using the Offline Reference, you should be able to see how the finished VFX shot compares to the locked picture edit.

Repeat for the remaining shots.

Export Reference Video from Resolve

A new reference video will need to be exported for sound design and sound mixing reference.

Before exporting, you will want to replicate the Timecode Burn-In Effect from Media Composer to match all the Burn-Ins on the original Reference Video. In Resolve, this is done using the Data Burn-In effect. It can be found under Workspace > Data Burn-in.

When the effect opens, you will see it is laid out in roughly two sections. On the left, you can choose what metadata you want to select to be burned in. On the right, you can select how and where you want that to be displayed. Select the four boxes shown in the example below and choose the same font and font size. You will need to address the position of each burn-in manually.

In the example below, you can see what the result of the Data Burn-in effect should look like.

In the Deliver page, make sure you are marked In to Out around the entire sequence.

Change the filename to match the export name that you burned in. This name should be one version number up from any previous reference video.

Point the export to the Sound > Reference Video folder on your Show Volume.

Below are the Render Settings for all reference videos exported from Resolve. Double-check the settings carefully before exporting.

When the export is complete, navigate in the Finder to where it was exported and open it in QuickTime Player to make sure everything is okay.

Wrap Up

Save the project by hitting “Command+S”. Then go to the task bar and select Export Project… Make sure the project is named accordingly and place it in the proper folder on your show volume.

After you confirm that the .drp file is in the correct place, you can quit Resolve.

Congratulations, you are done!

Turnover to VFX

Overview

This guide is only necessary for shows with approved VFX shots.

In the industry, VFX are rarely completed in the NLE that the editor is using to cut picture. It is common practice for editors or assistant editors to create rough versions of VFX shots inside the NLE as a proof of concept while editing; these are sometimes called “slap comps” and are useful to evaluate how the VFX shot will work in the context of the edit. For the final shots, though, VFX vendors are contracted to do the work. This is for four primary reasons:

  • The editor is cutting with “offline” quality footage which is of lesser quality
  • The picture editing application is rarely the best tool to accomplish the required visual effect
  • The editor is not normally the person with the expertise to accomplish the required visual effect
  • The editor’s time is more valuably spent on the storytelling aspect of editing

The editorial department coordinates with the VFX vendor to send them all the high quality elements, references, and notes required to create the final shots. It is this process of creating and packaging everything that the VFX vendor needs that is referred to as a “VFX Turnover”. This would normally be done by an assistant editor or VFX editor in the editorial department in coordination with the lab that is storing all the original camera files, and there may be several turnovers during the editorial process for different VFX vendors. In our workflow this responsibility rests on the editor at picture lock. The turnover is completed in DaVinci Resolve after the steps outlined in the Turnover to Color page.

Locked Reference Video

The editor will assemble the “turnover packet” that will be sent to the VFX department in the show volume inside the VFX Out folder. The VFX Out folder should already have the VFX Turnover Sheet that was made at picture lock and outlined in the Picture Lock – VFX Prep guide. The next thing that needs to be added to this folder is a copy of the Locked Reference Video. This is the same reference video that was used in the color and sound turnover.

Copy the Locked Reference Video (don’t move it) from the Color folder to the VFX Out folder.

Resolve Project Setup

Only proceed with these steps after you have completed everything in the Turnover to Color page.

In the Media page inside the Sequences bin, duplicate the sequence named “Conform” and rename the new sequence VFX_Turnover as shown in the example below.

You will notice that the yellow VFX markers that you made in Media Composer to label and track the VFX shots have carried over into your Resolve sequence. In Resolve you can jump between markers quickly by using the keyboard shortcut “Shift + Up-or-Down Arrow”.

If you select one of the markers, you will see that all of the information that was logged into the marker in Media Composer and is in your VFX Turnover Sheet is present in the Resolve markers.

In the Media page comparing the online reference video and the Resolve sequence, you should notice that the VFX info burnt into the reference media matches the Resolve markers’ information.

To make the following steps easier, you will need to change the VFX shots in the timeline to a different color. Right-click on each of the VFX shots and then select Clip Color > Yellow.

After you have changed the clip color to yellow for all of your VFX shots, your sequence should look similar to the example below.

By default, the Clips Thumbnail Timeline in the Color page displays every clip in the sequence. But now that your VFX shots are tagged with a different color, you can sort by that color. Select clips as shown in the arrow bellow.

In the dropdown menu, select sort by Clip Color > Yellow.

As you can see in the example below, only the VFX clips are now shown in the Clips Thumbnail Timeline.

Exporting VFX Elements

After that prep work is done, you are ready to begin exporting out the elements that will be sent to the VFX department. In our workflow these elements are the exact length as the shot that appears in the locked cut. Under certain circumstances the VFX Faculty may request that these elements get exported with “handles” (i.e., a number of extra frames on either side). However, the default turnover is “no handles”.

NOTE! This guide details how to turnover simple VFX shots requiring only one element or “plate”. This is why in the example shown there is only one “VFX element” per “VFX shot”. More complex VFX shots requiring the compositing of multiple live action elements captured during production are done the same way using the same naming logic. However, if your show has more complex VFX shots like this, please check with VFX Faculty and Post Staff before proceeding for more guidance.

In the Delivery page, you can easily navigate to your VFX shots by selecting them in the Clips Thumbnail Timeline. Once selected, you can hit “I” and “O” on the keyboard to mark in and out around the selected clip. It is important in this step that you have marked around the entire clip and no additional frames on either side. You do not want to turn over elements with extra frames.

Under Render Setting on the Delivery page, you will need to label each element that you are going to export. The naming convention follows from the “names” or “shot code” that were assigned when the VFX shots were labeled in Media Composer (see the VFX Prep page). This naming convention MUST be followed.

Each element will be named with the assigned VFX name followed by “_plt”. In the example below the VFX shot is named “09mth_vfx030”. The element that is being turned over to the VFX department is a “plate” and thus should be labeled 09mth_vfx030_plt.

Select Browse to choose where to export. These plates should be exported to your show volume in the VFX > VFX Out > Shots folder. You will need to create the Shots folder and then a separate folder for each VFX shot, based on the VFX shot name.

Below are the Render Settings for all VFX Turnovers. Double-check the settings carefully before exporting.

If you have more than one VFX shot or element to export, you can add each export job to the render queue and then render them all at once.

Once all of your renders are complete, it should look something like the example below. Notice how each VFX shot has its own labeled folder and inside that folder are the labeled VFX elements.

Check VFX Renders

To check that the exports you made of each VFX element are correct, you will need to import them back into the Resolve project. On the Media page, navigate through your media storage to your VFX shots and drag them into the Media Pool to import them.

These clips should also be changed so that that the clip color is yellow inside of Resolve, to denote that they are VFX shots. In the Media Pool, you can highlight them all, right-click, and select clip color.

In the Edit page, carefully cut each turned-over VFX element back into the sequence on Video Track 2. This will ensure that you did not miss any VFX shots and that you exported out everything that needed to be turned over.

While the elements are on Video Track 2, you need to double-check two things. First, make sure that the export has the exact same number of frames as the clip below it. It should match exactly. Second, you can toggle Video Track 2 on and off to make sure that both layers are visually identical. You want to ensure that the elements turned over to the VFX department are identical to the Camera Original Files.

Wrap Up

Once you have checked each of the VFX elements that were exported, you should be left with a folder tree in the VFX Out folder that looks like the example below.

The VFX Turnover package, which consists of a Locked Reference Video, VFX Turnover Sheet, and all the VFX Plates are now ready for the VFX Department. In the industry, this package would typically be sent to the VFX Vendor over a secure, cloud-based application or loaded onto a hard drive and shipped. In our workflow, everything can stay in the VFX Out folder on the show volume. When the VFX cycle begins, the VFX artist will copy this folder to the VFX server and begin working from there.

Save the project by hitting “Command+S”. Then go to the task bar and select Export Project… Make sure the project is named accordingly and place it in the proper folder on your show volume:

After you confirm that the .drp file is in the correct place, you can quit Resolve.

Congratulations, you are done!

Picture Lock – VFX Prep

Overview

This guide is only necessary if your show has approved VFX shots.

In the industry, the process of keeping track of VFX shots in editorial is normally the responsibility of an assistant editor or VFX editor in the editorial department. In our workflow, this responsibility rests on the editor. This guide lays out the steps necessary to properly label VFX shots in Media Composer so that they can be tracked during editorial and then turned over after picture lock. It also shows how to create a VFX Turnover Sheet at picture lock to make the VFX Turnover process easier.

Adding Markers

Every approved VFX shot in your edit needs to be marked and labeled in the order that they appear in the edit. Markers are helpful because you can easily navigate between them by hitting “A” and “S” on your keyboard. They are also very helpful later on when it comes to turning over your VFX elements because they translate over to Resolve.

These markers are how you will assign “names” or “shot codes” to your individual VFX shots. It is important that the naming convention is clear, consistent, and never repeats. This is the naming convention for VFX shots that must be followed:

  • show#_vfxshot# (example: 09mc_vfx010)

If 09MC had five VFX shots they would be labeled as follows:

  • 09mc_vfx010
  • 09mc_vfx020
  • 09mc_vfx030
  • 09mc_vfx040
  • 09mc_vfx050

Notice that everything is in lowercase. There are no spaces, only underscores. The first shot is labeled “010” instead of “001”. VFX shots should be labeled in “tens”. This is in case a VFX shot is approved and added later; if it comes between two shots, the naming convention will still sort properly.

In the example below is a highlighted clip that has been approved to have a sign digitally removed. You will need to add a yellow marker to the first frame of the shot.

Place the playhead at the first frame of the VFX shot. Make sure only the track with the VFX shot is highlighted and hit “T” on the keyboard. This will add IN and OUT markers around the clip. After the IN and OUT markers are added, you can look at the time code readout above the composer window. The center box will always display the time between IN and OUT markers. If it is displaying in timecode, click it once and it will switch to displaying frames. Once that is done you have the information you need to add the yellow marker.

Hit “3” on the keyboard to add the yellow marker to the first frame of the clip. The “Edit Marker” box will appear and you will need to fill it out as shown bellow.

  • Marker Name: show#_shot#
  • Color: Yellow
  • Description: Write a brief description of the effect / the frame count

Click “OK”.

After clicking “OK”, you will see that a small yellow marker has been added to the first frame of the VFX shot. If your playhead is directly on top of that marker, the marker color and description will appear below the record monitor.

Repeat this process for all other VFX shots in your sequence in order.

Adding Timeline Clip Notes

After you have finished adding markers to all the VFX shots, you will want to label them another way as well. Your VFX shots need to have “burn-ins” using the Timecode Overlay Effect as described in the Picture Lock document. Using Timeline Clip Notes is the best way to do this.

Navigate to each of your VFX shots, right-click on it, and from the dropdown menu choose Add Timeline Clip Note…

A box will appear that you will need to fill in with the same information that you added to the marker. If your playhead is directly on the marker, it will be easier to do this because the description and frame count will be visible. Format your clip notes exactly as below.

After you click “okay”, if you have the correct Timecode Overlay effect applied, your Clip Note will appear in the upper left corner in yellow as shown in the example below.

VFX Turnover Sheet

At picture lock, if your show has approved VFX shots you will need to double-check all of your VFX markers and Clip Notes to make sure they are up-to-date in your Locked Sequence. After you have done that, you can export a VFX Turnover Sheet. From the task bar, select Tools > Markers.

With the Markers tab, open you will see all of your markers laid out in a bin view with several columns across the top. These columns can be sorted and hidden like a normal bin. If you have other Markers displayed here you will need to delete them. For the VFX Turnover Sheet to be accurate, you need to make sure the only markers in your Locked sequence are yellow VFX markers.

Arrange the columns as shown below. Hide all of the other columns leaving only Marker Name, Frame, TC, and Description (in that order). Sort by the Marker Name column so that your VFX shots are in numerical order.

Right-click and select “Print Markers”

In the Print menu, ignore all the printing options and select “PDF” in the lower-left corner.

A Finder window will appear so that you can give your PDF a name and location. Label the PDF show#_VFX_Turnover_Sheet and save it in the VFX > VFX Out folder on your show volume.

When you click “Save”, a window will appear asking about Print Scale. The default is 100%. Leave it like that and click “OK”. The PDF that you made should be saved in the folder shown below and when you open it in Preview should appear formatted like the example.

Continue with the instructions for Picture Lock.

Soundly

Overview

Having access to a robust sound effects library is invaluable for filmmakers. While there are a lot of free websites where you can download sound effects, the quality of the files can vary and acquiring the correct licensing rights can be a time-consuming and frustrating endeavor. The College therefore pays an annual fee to license Soundly, which is an application for easy searching through the 6 Terabytes of media in our professional sound effects library. This allows you to have a vast array of high-quality, licensed effects at your fingertips, and it’s engineered to have frictionless integration with Media Composer and ProTools. You can then focus on what really matters: the creative work.

Additionally, Soundly has an AI feature called Voice Designer which allows for text-based voice generation. This is a very useful tool if you need to add, say, the voice of an unseen character or if you need to rough-in a voice during editorial that will later be replaced with ADR.

Soundly Layout and Search

When first launched, the application will open as shown below. If it defaults to a different page, make sure it is set to the “Sounds” tab. Also check that it is signed in to our account as shown below. If it appears that the Soundly application is not signed in to our account correctly, please contact the Post Staff and they can get it fixed.

In the upper-left corner is a search field where you can type in keywords to help you find the what you are looking for. The library is vast and contains sound effects, backgrounds, Foley, and more. After you select one of the sound effects that your search revealed, you can preview it in the timeline at the bottom.

By default, Soundly opens in a big window that can be viewed fullscreen. Sometimes you may prefer to put it in “Dock Mode” which will squeeze the interface down to the bottom third of the screen. To enter “Dock Mode” navigate to the task bar and select Window > Dock Mode.

This can be helpful when you are also working in Media Composer or ProTools, as it will allow you to easily have both interfaces open while you work, as shown below.

Soundly with Media Composer

When using Soundly with Media Composer, it is simple to bring sounds from the library into a bin. After you have searched for and have found the sound that you want to bring into Media Composer, highlight the section of waveform you want and drag that into an open bin.

Media Composer will prompt you with a question about the audio start-time. Make sure it is set to 24 and then click “OK”.

Assuming your media creation settings in Media Composer are set as shown in the example below, the sound will be transcoded into Avid Media and will appear in your bin, ready to work with.

Soundly with ProTools

When using Soundly with ProTools, you have two options for bringing sounds into the project. You can either bring the sound into the Clips Bin or spot the sound directly onto a track.

To send a desired sound effect to the Clips Bin, select the sound in Soundly and then press “B” on the keyboard. It will be imported directly to the Clips Bin in ProTools.

To spot a desired sound effect to a specific marked track, highlight the section of the sound effect you want, use the sector tool to mark a spot on an appropriate track, and then press “S” on the keyboard. It will be imported directly to the track that was marked.

Soundly Voice Designer

Soundly has a feature called Voice Designer, which uses AI to generate voices based on text input. Utilizing a plugin called “Place It”, it will make the generated voice sound as if it was in a particular place and/or coming out of a particular speaker.

Switch to the Voices tab and you will see the interface appear like the example below.

The top section will allow you to type in any dialogue that you need to generate. You will then have options to decide the language and the voice, and you can then generate the voice by clicking “Speak It”. You can also use one of the presets.

The bottom section will allow you to modify that voice. There are presets available or you can click the button shown below and you can choose you own “Speaker” and “Space”.

Importing the Voice Designer media into ProTools and Media Composer is exactly the same process as described above.

Turnover to Resolve

Overview

In the industry, this process is referred to as “Onlining” or “Conforming” because this is where the picture edits made with the lower quality offline media in Media Composer are remade with the highest quality media. An Assistant Editor would normally be responsible for exporting all the necessary elements out of Media Composer. Those elements would then be sent to the facility that handles color grading and finishing. In our workflow, the Editor is responsible for both exporting the necessary files out of Media Composer and conforming to the highest quality media in DaVinci Resolve. This is to ensure that any issues during turnover can be caught immediately and the Resolve project is left ready for color grading.

This step-by-step guide for color turnover covers how to:

Export Reference Video From Media Composer

A reference video of the locked sequence will need to be exported so that it can be used in Resolve as an offline reference video to check the conformed sequence against.

Mount your Show Volume and launch your Media Composer project. Open the Locked Sequences bin. Select your locked sequence and hit “Command+D” to duplicate the sequence.

Rename the new sequence Show#_Locked_Reference_Video and move it to the Color Turnover bin.

Open the new sequence. Mark In and Out for the entire timeline and activate all tracks.

From the task menu select File > Output > Export to File

Point the export to the Color > Reference Video folder on your Show Volume. Check that the name of the export will be correct. Select the “Reference Video” preset.

Before clicking “Save” to export, double-check the preset by clicking “Options” and make sure the settings are exactly as shown in the example below:

When the export is complete, navigate in the Finder to where it was exported and open it in QuickTime Player to make sure everything is okay.

Export AAF From Media Composer

Duplicate the sequence named “Locked Reference Video” and rename it show#Locked_Color_Turnover as shown in the example below:

Open the new sequence. Mark In and Out for the entire timeline and activate all tracks.

From the task menu, select File > Output > Export to File…

Point the export to the Color > AAF folder on your Show Volume. Check that the name of the export will be correct. Select the “Color_Turnover – AAF to Resolve” preset.

Before clicking “Save” to export, double-check the preset by clicking “Options” and make sure the settings are exactly as shown in the example below:

When the AAF is finished exporting, Media Composer will automatically import it back into the Color Turnover bin as a sequence. If you open the sequence, you will see that the AAF only held information describing the video tracks. That is all Resolve will need.

After you check that, you can close Media Composer.

Open Resolve and Import Media

Navigate on your Show Volume to the DaVinci Resolve folder. Inside should be a project template.

After you open the project template, you will need to rename the project so that it is specific to your show. From the task bar navigate to File > Save Project As…

Label your project as show#_Conform as shown in the example below.

Your project should already have several folders made and labeled inside the Media Pool.

The only folder in the Media Pool that will already have media in it is the Extras folder, which contains the media that is necessary for the online front sequence.

To import the online quality media into Resolve, navigate to your show’s OCF folder in the Finder and then select the OCF folder in the Media pPool.

To import the media, drag the entire folder into the open folder in the Media Pool.

Next, you will need to do the same process for your show’s credits and titles. Navigate to your show’s Credits folder in the Finder and then select the Credits folder in the Media Pool.

To import the credits and titles, drag them into the open folder in the Media Pool.

Finally, you will need to import the reference video you exported out of Media Composer. Navigate to your show’s Reference Video folder in the Finder and then select the Reference Video folder in the Media Pool.

DO NOT drag the reference video into the open folder in the Media Pool. It needs to be imported in a specific way so that Resolve can use it as an offline reference clip. Right-click on the video reference file and then select “Add as Offline Reference Clip”.

Import AAF into Resolve

In the Media Pool, right-click inside the Sequences folder. Then navigate to Timelines > Import > AAF

Navigate in the Finder window to where you saved the AAF that was exported from Media Composer and click “Open”.

Inside the Import AAF window, you will need to make some adjustments before clicking “Ok”:

  • Change the Timeline Name to Show#_Locked_Conform
  • Change the start timecode to 00:59:55:00
  • Check “Automatically set project settings”
  • Check “Link to source camera files”
  • Check “Use sizing information”

Since you did not select “Automatically import source clips into media pool,” it will prompt you to choose which folders in the Media Pool already contain the online media. Select the folders as shown in the example below and then click “Ok”.

Do not be surprised if you get alerts that look like this in the Log after the AAF imports. This is a list of everything that was written into the AAF from Media Composer that cannot be reproduced in Resolve. In most cases this is limited to any use of the Avid Titler+ effect, the timecode burn in effect, or any stabilization that was done.

You should see that your sequence from Media Composer is now imported into the Sequences folder in Resolve.

Prep the Conform Sequence

The locked sequence is now connected to the online media. Before you can check it against the offline reference video, you will need to do some prep work. In Media Composer, Video Track 5 held the aspect ratio matte. Most likely it has come over into Resolve, but often it has become connected to another piece of media. Since Resolve has its own way of handling aspect ratio mattes, you can delete the matte from Video Track 5. The Credits can also be brought down from Video Track 4 to Video Track 2. When you have done this your sequence should look like the example below.

Since you deleted the aspect ratio matte from Video Track 5 you will need to reapply it. Go the task bar and select Timeline > Output Blanking > Your Aspect Ratio Matte. In the example below the 2.39:1 matte is being applied.

Right-click on one of the empty video tracks over on the left and select “Delete Empty Tracks” to clean up the sequence.

Right-click on the 2.0 audio track and select Change Track Type To > 5.1 > 5.1. This will prepare the sequence for eventually accepting the 5.1 audio mix.

Once you have done all of the above, your timeline should look similar to the example below.

Check the Conform Sequence

Now that your sequence is prepped and cleaned up it is time to check it against the offline reference video to ensure it matches your picture lock sequence from Media Composer.

Right-click on your sequence and then navigate to Timeline > Link Offline Reference Clip > Your Reference Video. This will link the reference video and your sequence together.

To take advantage of the link, you will need to switch the source monitor to “offline” mode. When set to “offline” mode, the monitor on the left will no lower behave as a source monitor but instead it will display your reference video. In this mode, the left monitor will play the reference while simultaneously the right monitor will display your Resolve sequence.

Before you check the Resolve sequence against the offline reference video, there is one last bit of prep. In Media Composer, your slate was created using the Avid Titler+ effect. Since that effect does not translate over into Resolve, you will need to apply the Text effect to the slate so that you can recreate the same text in Resolve.

In the example below, you can see the reference video on the left with the text that was created in Media Composer and on the screen on the right the same text that has been recreated in Resolve.

To make the step of checking the Resolve sequence against the reference video easier, you will want to first apply the default node tree to every clip. The default node tree has the LUT inside one of its nodes. By applying this, it will make the Resolve sequence match closer to the Reference Video.

Switch over to the Color page. By default, each clip has an empty node graph and the image will appear in Log like the example below.

Apply the default node template to every shot so that the image will appear in Rec. 709 like the example below.

Switch back to the Edit page. You are ready to begin checking your Resolve sequence against your reference video. If you right-click inside the right screen, you will see different options for Wipes and Overlays. With “No Wipe” applied, both screens should look very similar. However, it would be difficult to tell if they matched perfectly.

To make this easier switch the right screen to “Difference” mode. This will lay the reference video on top of the Resolve sequence on the right. Any pixels where the two line up perfectly will appear black. Play through the entire film this way and make sure that in Difference mode the right screen stays black. If it does then you know that the sequence in Resolve matches the reference video perfectly.

It’s possible that the sequence in Resolve and the reference video won’t match perfectly. This could happen for many reasons: e.g., reframing in Media Composer, speed changes in Media Composer, or other effects. This is not a problem, but it does mean you will need to correct it.

Below is an example of what it may look like if a reframe from Media Composer didn’t translate over perfectly. As you can see from the example, the fix is a simple manual adjustment in Resolve so that they match up.

Another common reason why the Resolve sequence may not match the reference video is if a speed change has been applied. This may need to be tweaked in Resolve to allow it to match.

If you cannot get any shot to match perfectly, mark that shot with a blue marker and name it with a brief description of the problem. After you have made it through the entire film, reach out to the Post Staff and they can help you with any shots marked in blue.

Saving and Exporting Project

Once you have finished checking your Resolve sequence against the reference video and they match perfectly, the project is ready for color grading. Save the project by hitting “Command+S”. Then go to the task bar and select Export Project…

Make sure the project will be named accordingly and place it in the proper folder on your Show Volume:

After you confirm that the .drp file is in the correct place you can quit Resolve.

Congratulations, you are done!

Turnover to ProTools

Overview

This is the process where the editorial department prepares and exports files so that the locked sequence in Media Composer can be turned over to ProTools for the sound department to work with. In the industry, an Assistant Editor would normally be responsible for exporting all the necessary elements to turn over to the sound department. Then the sound department uses those elements to conform the sequence in ProTools. In our workflow, the Editor is responsible for both exporting the necessary files out of Media Composer but importing those files into ProTools. This is to ensure that any issues during turnover can be caught immediately.

This step-by-step guide for sound turnover covers how to:

Export Reference Video from Media Composer

A reference video of the locked sequence will need to be exported so that the sound department has something to watch in ProTools during the sound design phase.

Mount your Show Volume and launch your Media Composer project. Open the Locked Sequences bin. Select your locked sequence and hit “Command+D” to duplicate the sequence.

Rename the new sequence Show#_Locked_Reference_Video and move it to the Sound Turnover bin.

Open the new sequence. Mark In and Out for the entire timeline and activate all tracks.

From the task menu select File > Output > Export to File

Point the export to the Sound > Reference Video folder on your Show Volume. Check that the name of the export will be correct. Select the “Reference Video” preset.

Before clicking “Save” to export, double-check the preset by clicking “Options” and make sure the settings are exactly as shown in the example below:

When the export is complete, navigate in the Finder to where it was exported and open it in QuickTime Player to make sure everything is okay.

Export AAF from Media Composer

Duplicate the sequence named “Locked Reference Video” and rename it show#Locked_Sound_Turnover as shown in the example below:

Open the new sequence. Mark In and Out for the entire timeline and activate all tracks.

From the task menu, select File > Output > Export to File…

Point the export to the Sound > AAF folder on your Show Volume. Check that the name of the export will be correct. Select the “Sound_Turnover – AAF to Protools” preset.

Before clicking “Save” to export, double-check the preset by clicking “Options” and make sure the settings are exactly as shown in the example below:

When the AAF is finished exporting, Media Composer will automatically import it back into the Sound Turnover bin as a sequence. If you open the sequence, you will see that the AAF only held information describing the audio tracks. That is all ProTools will need.

After you check that, you can close Media Composer.

Import AAF into ProTools

Navigate on your Show Volume to your ProTools project and open it.

When ProTools opens, select the folder labeled “AAF”:

From the task menu, select File > Import > Session Data…

Navigate in the Finder window to where you saved the AAF that was exported from Media Composer and click “Open”.

In the Import Session Data page make sure the select “Link to Source Media” under Audio Media Options. And check the box labeled “Import Rendered Audio Effects”. Then select “OK”.

The AAF folder will populate with all the audio tracks from your locked sequence. This may take a few minutes to finish. When it does, it will look like the example below.

If you get any kind of error while importing your AAF, it is likely because something was not done properly during the picture lock stage. Go back to the Media Composer project and double-check the steps in the handbook. If that doesn’t fix the error, ask the Post Staff for help.

Import Reference Video into ProTools

Next, you will need to import the reference video that was exported out of Media Composer into ProTools. Select the “Video” folder:

From the task menu, select File > Import > Video…

Navigate in the Finder window to where you saved the Reference Video that was exported from Media Composer and click “Open”.

In the Video Import Options page make sure to select “Main Video Track” as the Destination and check the box labeled “Import audio from file”. Then select “OK”.

It will ask you to choose a destination for the audio and will default to the correct “Audio Files” folder. Click “Open”.

The reference video will come in on the correct track, but the audio attached to it will need to be moved.

Move the audio down to the Guide Track.

Lock both the Video and Guide Track by selecting them and hitting “Command + L”.

Delete the empty track to clean up your project.

Congratulations, you are done! The ProTools project can now be saved and closed. It is ready for the sound design phase.

ADR & Foley Stage Operations

Overview

This post provides instructions on how to schedule and operate the ADR/Foley suite. This suite is a shared space for all students in the program. It is therefore very important to be considerate of others. Please only book the space for the amount of time you’ll need it, and please be willing to negotiate booking times with other students if the suite is in high demand. Please also leave the suite in the same or better condition as you found it. Any students who leave the suite in a disheveled state may be subject to professionalism probation.

Scheduling Sessions

To book time in either the ADR booth or Foley stage, click this link: ADR/Foley Pit Signup Schedule. This will take you to a Teamup calendar:

When the Teamup calendar opens, you will be able to see who else has booked the time in either the ADR booth or Foley stage. Select the date and time you would like to reserve by clicking in the calendar. When you do, a pop up will appear asking for you to enter more information about your reservation:

  • Enter your show number in the event title
  • Refine the start and end times
  • Select either “Control Room A – Foley” or “Control Room B – ADR”
  • List the names of who will be in the space

When you are done, it will look like the example below:

Please be considerate of your fellow filmmakers and only book the time that you need.

Recording ADR or Foley

Make sure that your ProTools session is closed in your suite on the Post Hall. Mount your show volume in either Control Room A or Control Room B. Navigate to your ProTools project and open it.

Once the project is open, navigate in the task bar to Options and then scroll down and select “Low Latency Monitoring”. Make sure there’s a checkmark after you have it selected.

Navigate to the ADR track you wish to record on and change the input from “no Input” to “ADR Mic”:

Record Enable the track and select Input Monitoring. Note: When you are finished recording, you’ll need to deselect both of these for playback.

Change the name of the track to whatever you want the clip name to be:

If wish, you can select Pre-roll time or Post-roll time:

To talk to talent during the session, press both DIM and TALK on the MBox Studio. Press both buttons again to disengage talkback before recording.

To start recording, select the red Record button in the transport window and then select the Play button (or hit the space bar). To stop recording, select the Stop button in the transport window (or hit the space bar).

That’s it! When you are done please save and close your ProTools project. Remember to clean up after yourself before you leave.

Upscaling Images for Posters

Posters are designed and printed at 8250 × 12150px, so it is often necessary to upscale film stills to a higher resolution than they were originally captured in. To do this you can use a software called Topaz Gigapixel AI.

Instructions

Topaz Gigapixel AI is a standalone application that is installed on all three ingest machines on the post hall. Open the the application by selecting its icon from the dock:

When the application opens, drag a still into the drop zone:

On the right of the interface, you will find the settings options. Configure them as shown in the example below. If you do end up needing to make any tweaks to these settings, do not go over 10% on the Face Recovery Strength.

Save your new still as a PNG, as shown in the example below:

Congratulations, you are done!