Student productions are expected to follow the program’s typography and font usage guidelines when creating titles, credits, posters, graphics, promotional materials, and other official production-related design assets. This includes using approved fonts where required and maintaining professional formatting standards across deliverables.
Consistent font usage helps create clearer, more professional presentation materials while supporting a more unified visual identity across the program. Typography is an important part of visual communication, and following established standards helps students develop stronger design habits while ensuring that production materials remain clean, legible, and appropriate for exhibition and distribution contexts.
Limitations on Usage
Fonts, like music and images, are protected by intellectual property law. Their use is governed by licensing agreements, and improper usage can lead to legal complications and limit a film’s ability to be distributed. To model professional industry standards and ensure that student work respects the rights of font creators, all fonts used in student productions must be properly licensed and accompanied by a verifiable chain-of-title.
Researching and clearing font licenses requires time from both students and faculty. On early production cycles, which operate on short post schedules, this time is better spent on core filmmaking tasks. These projects are therefore limited to vetted font sources with clear, institutionally-approved licensing. Greater flexibility is granted on capstone cycles, where students have more time and are expected to take responsibility for securing proper font rights.
F1 • F2 • F3 • M1 • M2 • M3
Students may only use fonts from the following sources:
This template provides a standardized framework for creating posters for animation projects, helping ensure that all films are presented in a professional and visually cohesive manner across festivals, showcases, screenings, and promotional platforms. While students are encouraged to develop artwork that reflects the unique identity of their film, the template establishes baseline expectations for formatting, credits, resolution, and required information.
The goal is not to limit creativity, but to prepare students for the practical realities of professional film marketing and distribution. Poster design is often a key part of a project’s public identity, shaping first impressions for audiences, festival programmers, and industry professionals. Learning to balance artistic expression with technical specifications and marketing clarity is an important component of presenting work professionally.
This is the official poster template to be used in the creation of marketing materials for FSUFILM productions. Use it as your foundation for making something beautiful and compelling!
Do:
Make sure to install the Steel Tongs font on your computer before starting work on the poster. This is the font for the credit block. Note: Steel Tongs does not contain shortcuts for all the credits needed for animated films, so some of the credits in the billing block have been hand-crafted.
Keep all of your layers inside the appropriate folders, so that everything remains well-organized when you deliver the final Photoshop file. Make sure all of your layers have appropriate names, so that someone else could make sense of what each layer is.
Take your artwork all the way to the edge of the frame, but keep any essential elements at least a quarter-inch from the edge, in case they are trimmed during printing.
Adjust the color of the credits, logos, and copyright to best fit the aesthetic of your poster concept. Be particularly mindful of the legibility of the credit block, as it can quickly become hard to read if the background is busy or if there’s not enough tonal separation between the credits and the background.
Don’t:
Do not adjust the dimensions or resolution of the file. It’s set up to meet the specs needed for printing.
Do not reposition or resize the logos or copyright.
Thumbnail images are often the first point of contact audiences have with a film online, making them an important part of a project’s overall presentation and discoverability. This post provides standardized thumbnail templates to help maintain visual consistency across school-related promotional materials and online showcases.
The use of templates ensures that projects meet technical specifications while encouraging students to think strategically about visual communication and audience engagement. Effective thumbnails should clearly represent the tone and identity of the project while remaining legible and visually compelling across a range of screen sizes and platforms. Developing an understanding of these presentation standards is increasingly important in contemporary distribution environments.
Instructions
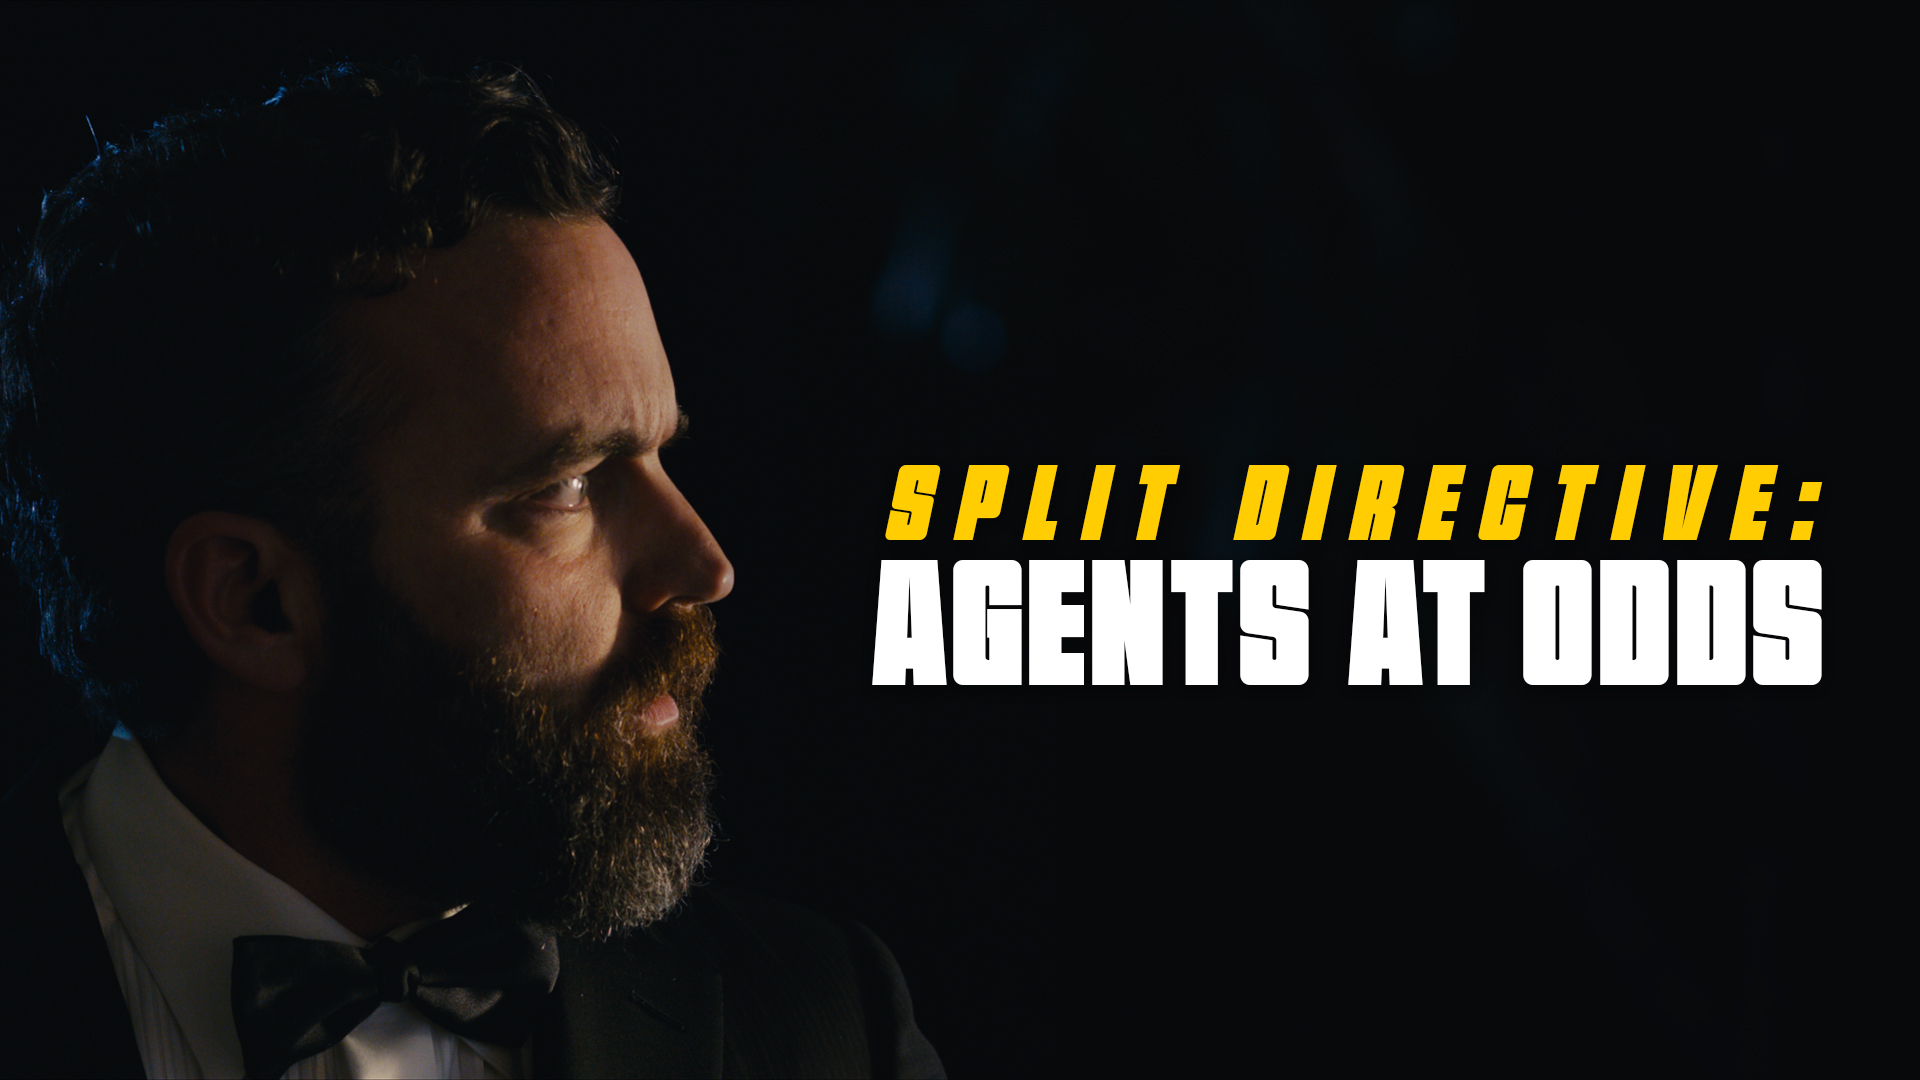
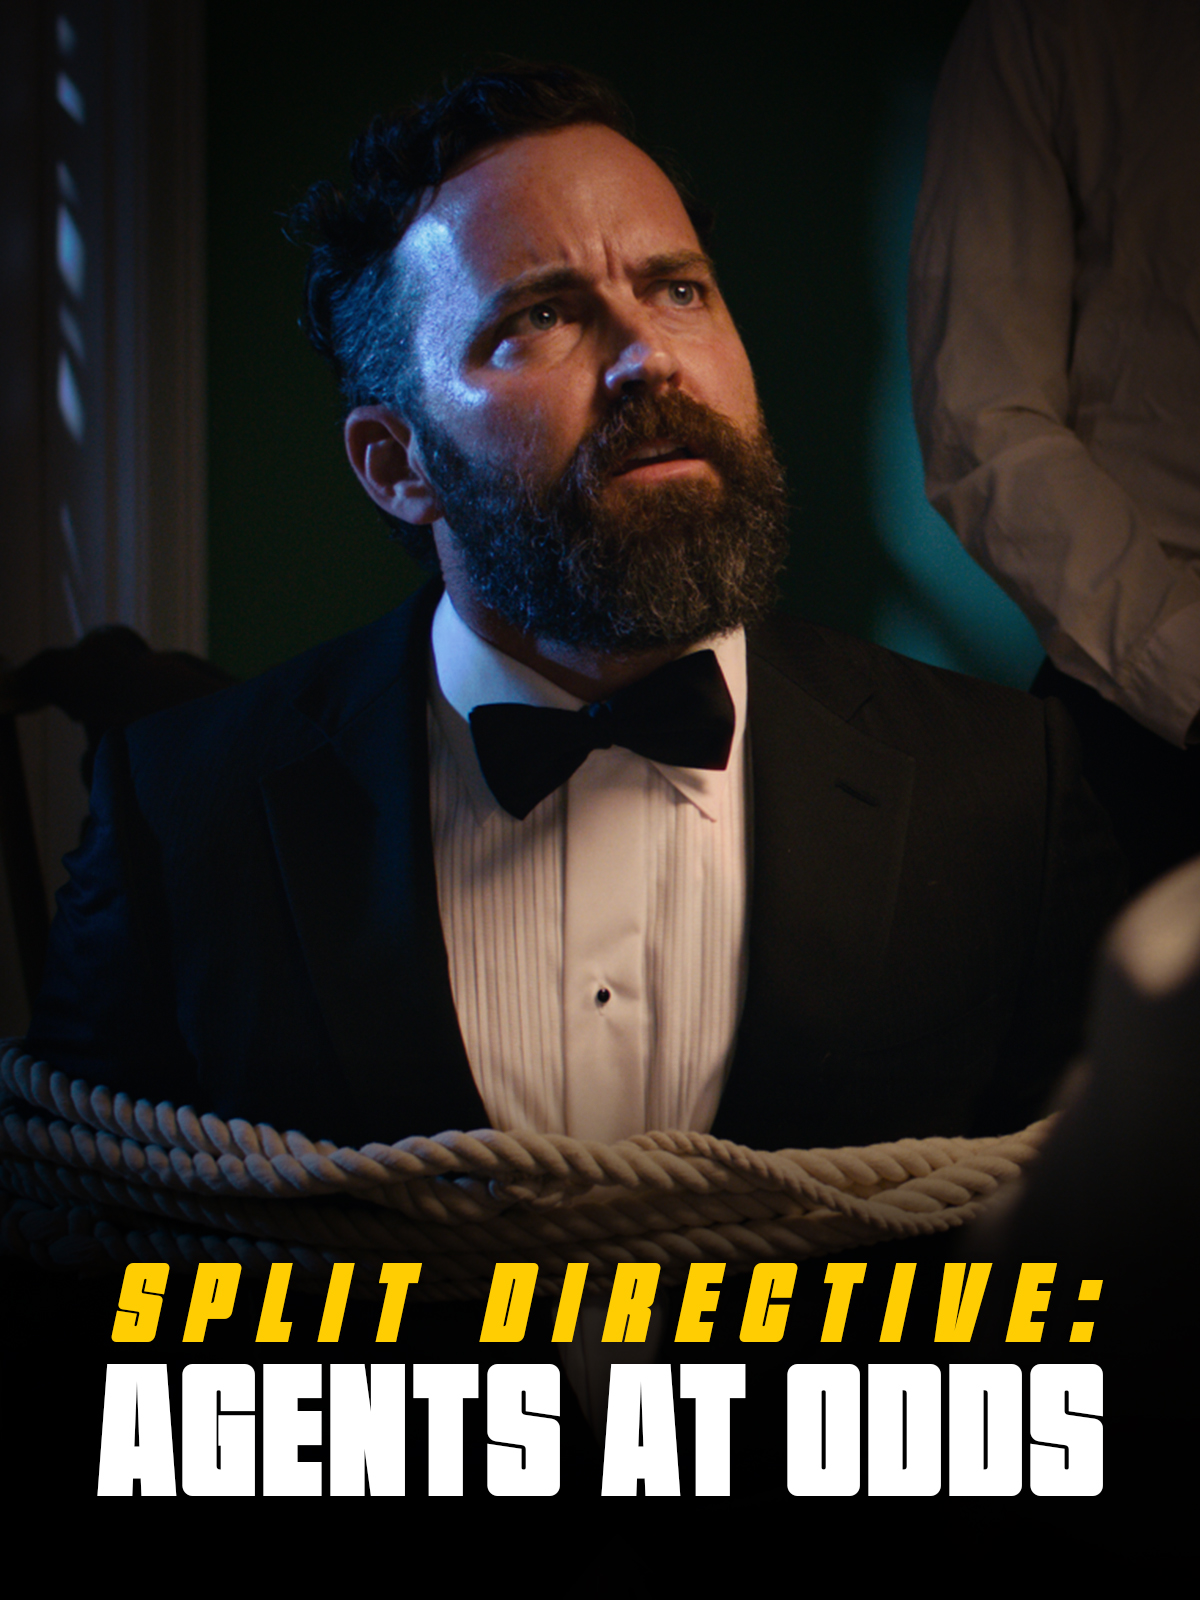
Use these templates to create your thumbnails. To ensure your film is properly represented across a range of platforms, you must create both a horizontal and a vertical thumbnail.
Each thumbnail should contain two elements:
A carefully selected image that fills the entire frame (i.e., no letterboxing or black bars). This image is typically derived from either the poster or one of the production stills.
The title of the film. Ideally, for consistency of branding, this should match the font design of the title on the poster. No other text should appear in the thumbnail.
Examples:
Horizontal (1920x1080px)Vertical (1200x1600px)
Delivery:
Deliver the finished files for each in two formats:
A layered PSD file (include any custom fonts used)
The cast list is submitted as part of the project’s final delivery materials and provides a complete record of all performers involved in the production. In addition to serving as an archival and administrative document, the report helps productions verify that all cast-related materials and required paperwork have been properly completed and submitted during the delivery process.
Maintaining accurate cast records is important both for redundancy and long-term project documentation. The report provides the school with a centralized reference point in case materials submitted elsewhere become incomplete, missing, or incorrectly labeled. It also encourages productions to carefully review their delivery materials and confirm that all performer credits, agreements, releases, and related materials have been fully accounted for before final delivery is approved.
Export Instructions
Navigate to the Cast Database board in FSU Greenlight.
Select the “My Shows” view at the top.
Batch-select all the items for the show.
Select “Export” from the menu at the bottom.
Delivery Instructions
Locate the exported Excel file on your local drive.
Rename the Excel file, using the following naming convention: 01m2-CastList.xlsx
Credits sequencing establishes the standardized order and formatting conventions used for on-screen titles and end credits within student productions. These guidelines help ensure that cast, crew, departments, acknowledgments, and institutional requirements are presented consistently and professionally across projects.
Credit order carries both professional and practical significance within film production. In professional filmmaking environments, credit placement and sequencing are often governed by contractual obligations negotiated through unions, guilds, and individual talent agreements. Standardized sequencing helps ensure that contributors are recognized appropriately, prevents omissions or inconsistencies, and creates a cleaner delivery workflow during finishing and final export. Learning industry-standard crediting practices also helps students better understand both the collaborative structure of film production and the professional conventions that govern screen credit attribution.
The Overall Sequence
While every production’s titles and credits are slightly different, the general order goes:
FSUFILM Leader
Lead Titles
Content (Story)
End Credits
Logos
Copyright
A production can choose whether or not to include any Lead Titles at the start of the film. That decision will impact the order of the end credits, as outlined below.
Sequencing for Lead Titles
If lead titles appear at the head of the film, they must appear in this order:
FSUFILM Leader
Above-Title Cast
Title
Supporting Cast
Original Score by
Production Designer
Sound Designer
Editor
Director of Photography
Producer
Writer
Director
Sequencing for End Credits
The order for end credits, if not shown in the lead titles, are:
Director
Writer
Producer
Director of Photography
Editor
Sound Designer
Production Designer
Original Score by
The remaining end credits appear in the following order:
Final title and credit materials must be delivered in a format that allows editorial, finishing, and archival workflows to proceed cleanly and consistently. This includes the submission of properly formatted title cards, end credits, associated project files, and any other required assets needed for final mastering and delivery.
Careful preparation of titles and credits is important because even small formatting errors, missing names, spelling mistakes, or incompatible files can create significant problems late in post-production. The delivery process is designed both to maintain technical consistency across projects and to encourage students to carefully verify the accuracy and completeness of all credited information before final submission.
Delivery Specs
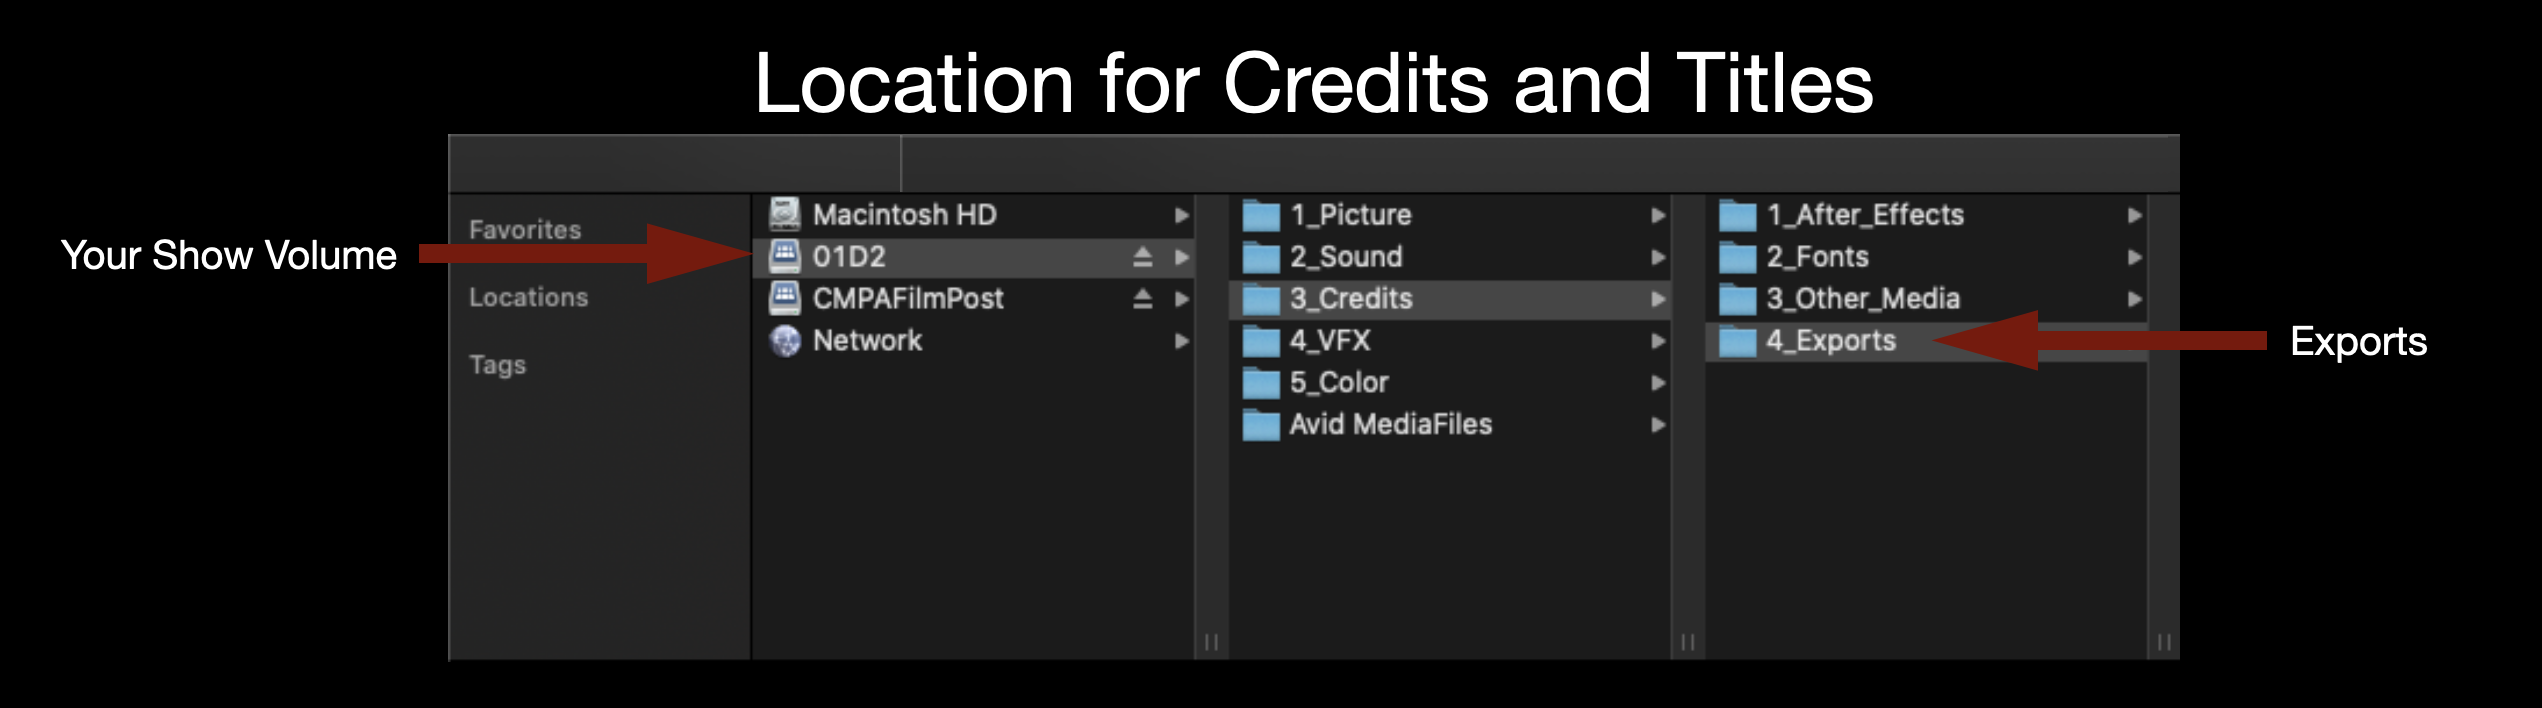
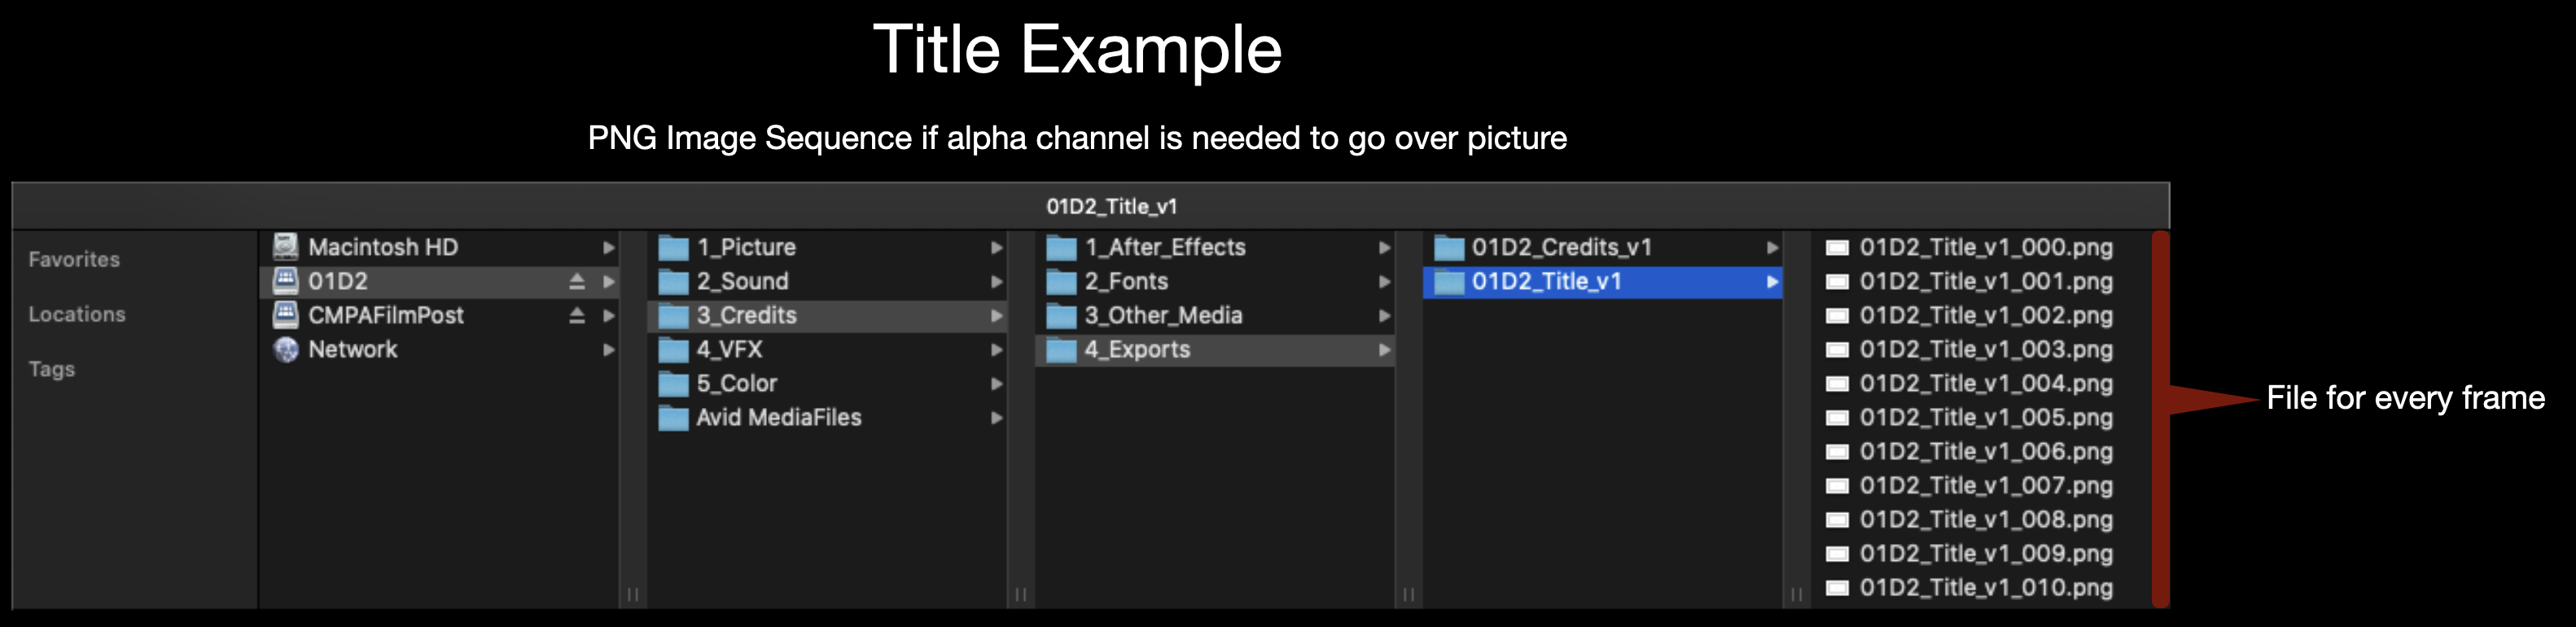
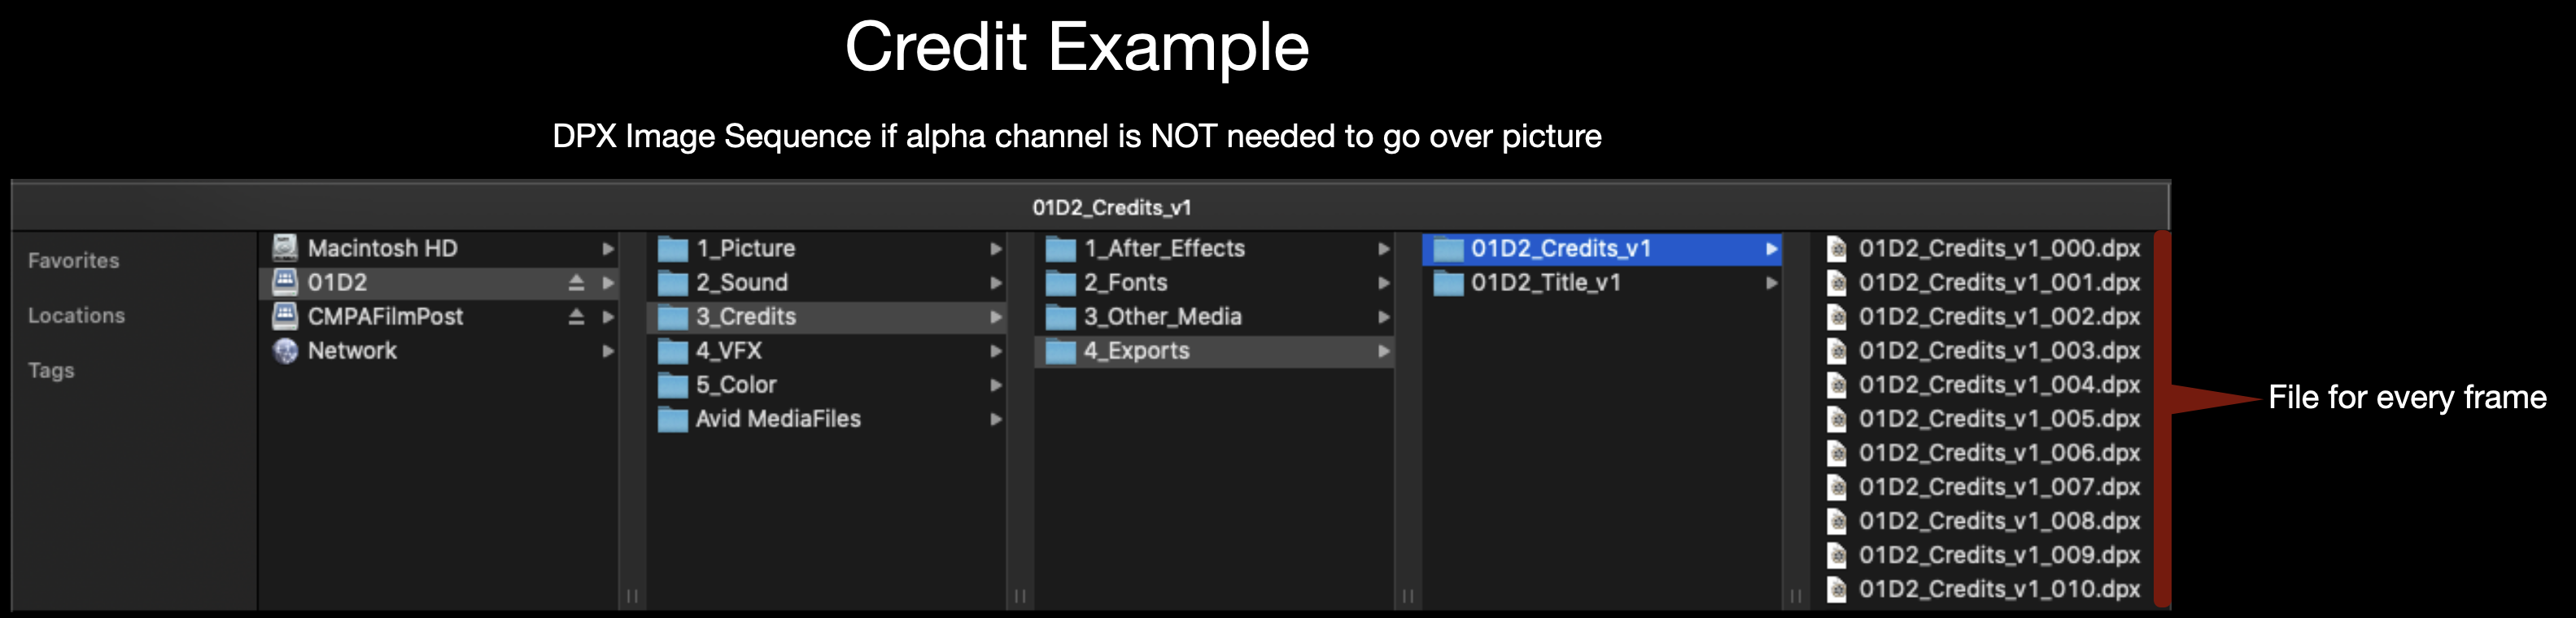
All Credits and Titles should be made in After Effects and delivered as either a DPX sequence or a PNG sequence. A DPX sequence should be used if the titles are going over black and a PNG sequence should be used if the titles need to go over picture since it holds an alpha channel. Either image sequence should be exported for 1920×1080 at 24fps. Make sure to name the image sequence appropriately (Example: 01M2_Credits_v1).
Location to Deliver Credits and TitlesNaming convention for TitlesNaming convention for Credits
Final delivery for F3 Animation projects includes the submission of completed media, project files, documentation, and other required materials necessary for archiving, exhibition, festival submission, and long-term program recordkeeping. The items listed below are delivered to the Head of Production through the FSUFILM Greenlight system, which is used to track required materials and verify that projects have completed all delivery requirements in a consistent and organized manner.
Careful delivery practices are an essential part of professional animation and post-production workflows because incomplete or improperly prepared materials can create major problems for distribution, preservation, revisions, or future access to the project. The delivery process also reinforces the importance of organization, version control, and technical precision as productions move from active creation into exhibition and archival stages.
Due Dates
Pre-Production Delivery To be completed by the Director by 6:00pm on TBD
Production & Post-Production Delivery To be completed by the Director by 6:00pm on TBD
Marketing Delivery To be completed by the Director by 6:00pm on TBD
After all cast information has been delivered for the show, navigate to the “My Shows” view of the Cast board in FSUFILM Greenlight, select all the items for the show, and click Export. Then, deliver the exported Excel file of the Cast List. (instructions)
Submit a separate form for each asset that was utilized in the production—including assets made from scratch, purchased assets, and modified versions of pre-existing assets.
Submit a separate form for each notable resource that was utilized by the production. This may include equipment rentals, unusual vehicles, unique props, distinctive costumes, or hired services offered by vendors such as animal wranglers, graphic designers, security firms, or portable toilet providers. Think of things that might help future students track down resources for their films.
No need to re-enter information that is submitted in other forms—e.g., Anim/VFX Assets need only be documented using the Anim/VFX Assets form.
Include PDFs of all noteworthy correspondence about the production. This doesn’t need to include run-of-the-mill messages between cast and crew, but should include any documented messages with third-parties like vendors, composers, illustrators, or contracted services. Think of it as “cover your ass” correspondence—so that, when the other party forgets what they had agreed to, there’s a record of what was discussed.
Complete a form to deliver the following information about the show: total running time, tagline, logline, 25-word synopsis, 50-word synopsis, keywords, genre, content warnings, rating, aspect ratio, spoken languages, and subtitles.
Create a PDF using the Dialogue List form. Include all spoken dialogue and written text in the final film. This is to assist subtitling in foreign-language markets.
Enter a separate form for each piece of music used in the film, listing the timecode stamps and documenting the music rights.
If there are no music cues, use this form instead.
MUSIC LIST [su_button url=”https://wkf.ms/40sziFd” target=”blank” style=”flat” background=”#7da21f” color=”#000000″ size=”1″ radius=”20″ class=”deliver-button”]Deliver[/su_button]
After all music cues and releases have been delivered for the show, navigate to the “My Shows” view of the Music board in FSUFILM Greenlight, select all the items for the show, and click Export. Then, deliver the exported Excel file of the Music List.
A list of all credits and title cards as they appear on screen. This should be a typed list—not screenshots of the credits from the film. Double-check for accuracy!
Marketing Delivery
Film Festival Strategy [su_button url=”https://wkf.ms/4l9HxhO” target=”blank” style=”flat” background=”#7da21f” color=”#000000″ size=”1″ radius=”20″ class=”deliver-button”]Deliver[/su_button]
A PDF documenting the festival strategy for the film.
Soundly is a sound effects library and audio workflow tool used to search, organize, preview, and integrate sound assets into post-production workflows. This page outlines expectations and procedures for accessing and using the software within the program’s sound design and editorial environments.
Efficient sound asset management is an important part of professional post-production because sound teams often work with large libraries of effects, ambiences, and design elements across multiple projects. Learning organized search, tagging, preview, and workflow practices helps students build stronger sound design pipelines while developing familiarity with industry-standard audio post-production tools.
About Soundly
Having access to a robust sound effects library is invaluable for filmmakers. While there are a lot of free websites where you can download sound effects, the quality of the files can vary and acquiring the correct licensing rights can be a time-consuming and frustrating endeavor. The College therefore pays an annual fee to license Soundly, which is an application for easy searching through the 6 Terabytes of media in our professional sound effects library. This allows you to have a vast array of high-quality, licensed effects at your fingertips, and it’s engineered to have frictionless integration with Media Composer and ProTools. You can then focus on what really matters: the creative work.
Additionally, Soundly has an AI feature called Voice Designer which allows for text-based voice generation. This is a very useful tool if you need to add, say, the voice of an unseen character or if you need to rough-in a voice during editorial that will later be replaced with ADR.
Soundly Layout and Search
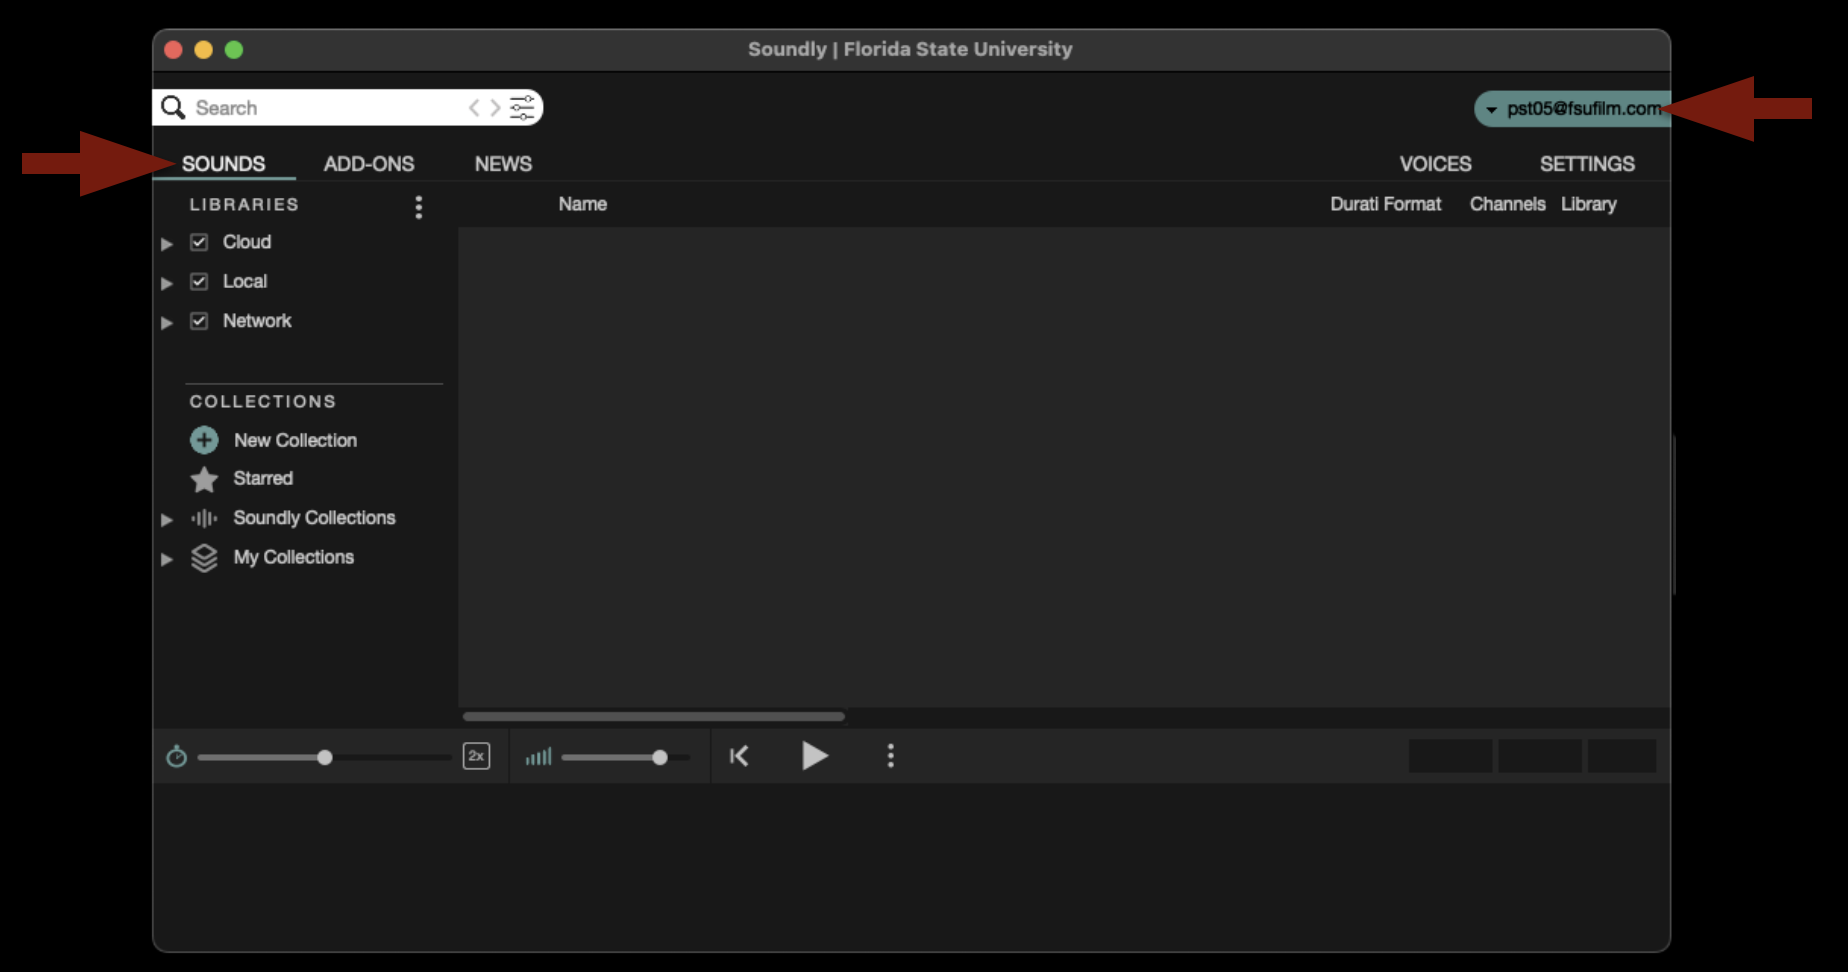
When first launched, the application will open as shown below. If it defaults to a different page, make sure it is set to the “Sounds” tab. Also check that it is signed in to our account as shown below. If it appears that the Soundly application is not signed in to our account correctly, please contact the Post Staff and they can get it fixed.
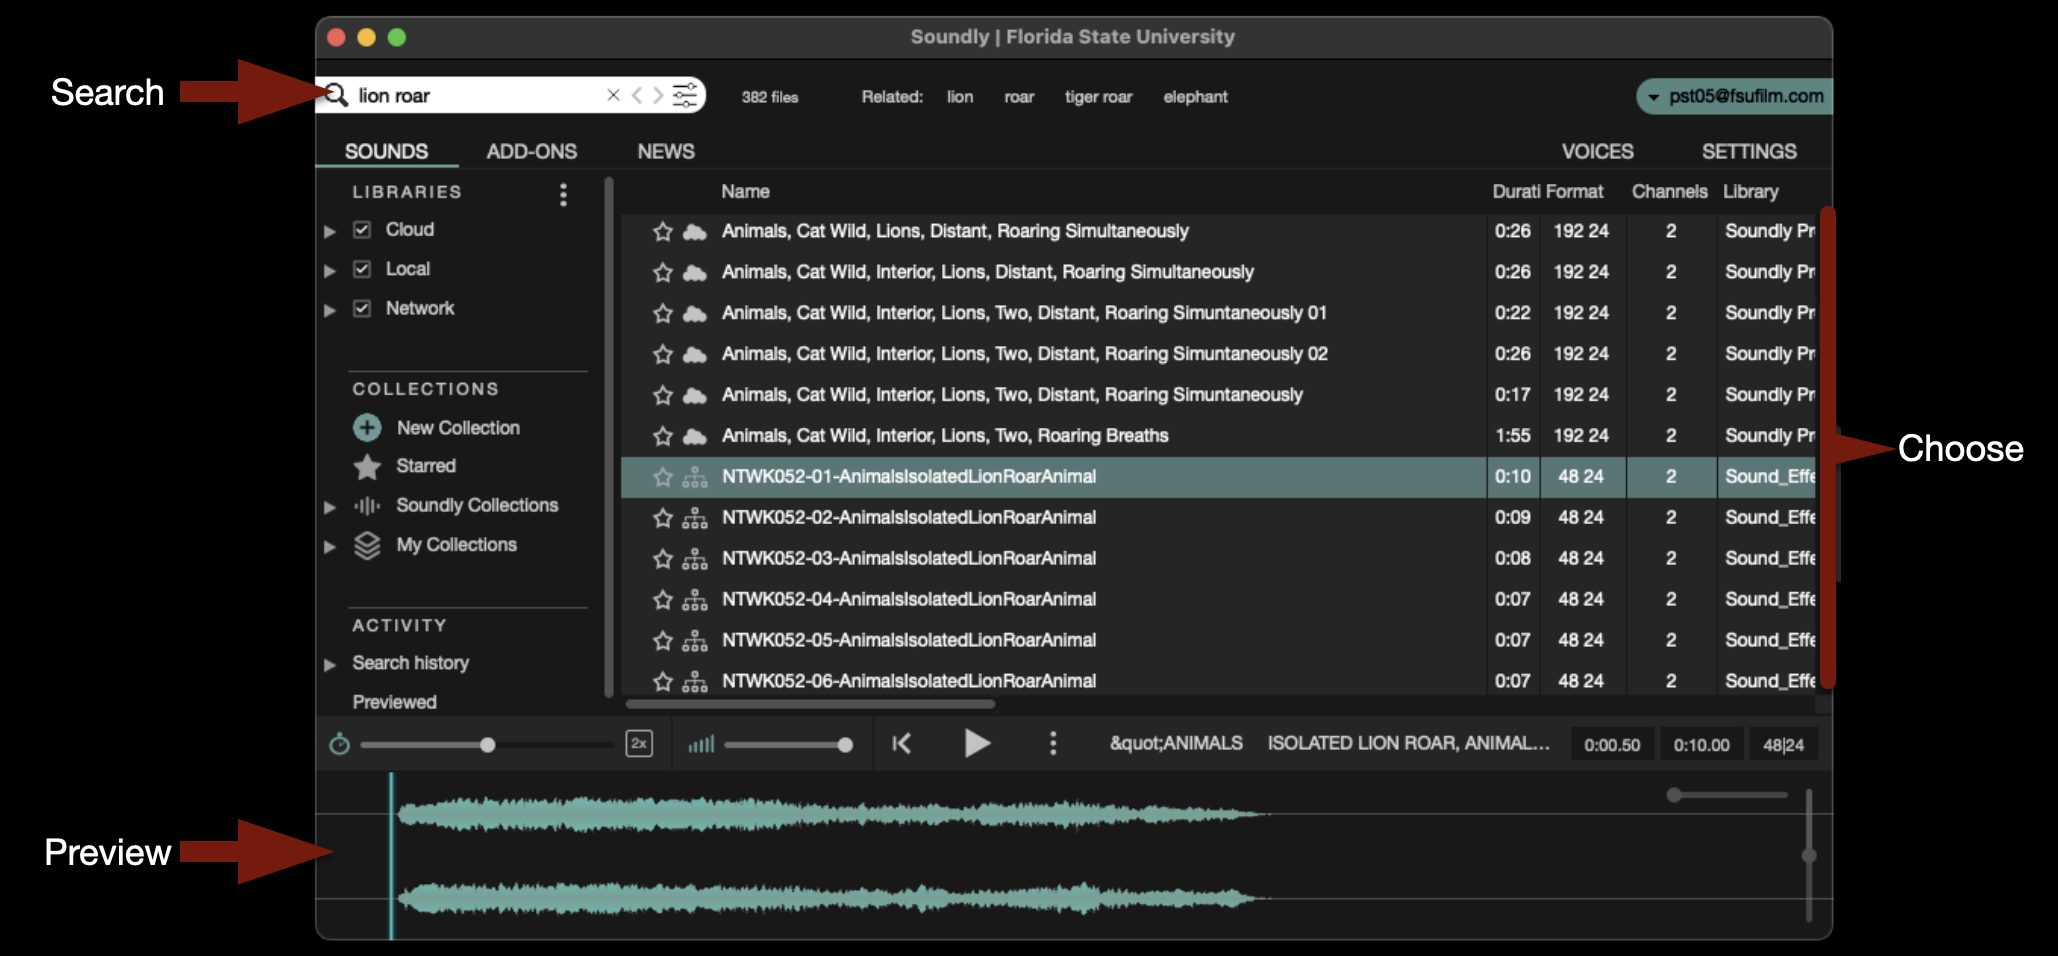
In the upper-left corner is a search field where you can type in keywords to help you find the what you are looking for. The library is vast and contains sound effects, backgrounds, Foley, and more. After you select one of the sound effects that your search revealed, you can preview it in the timeline at the bottom.
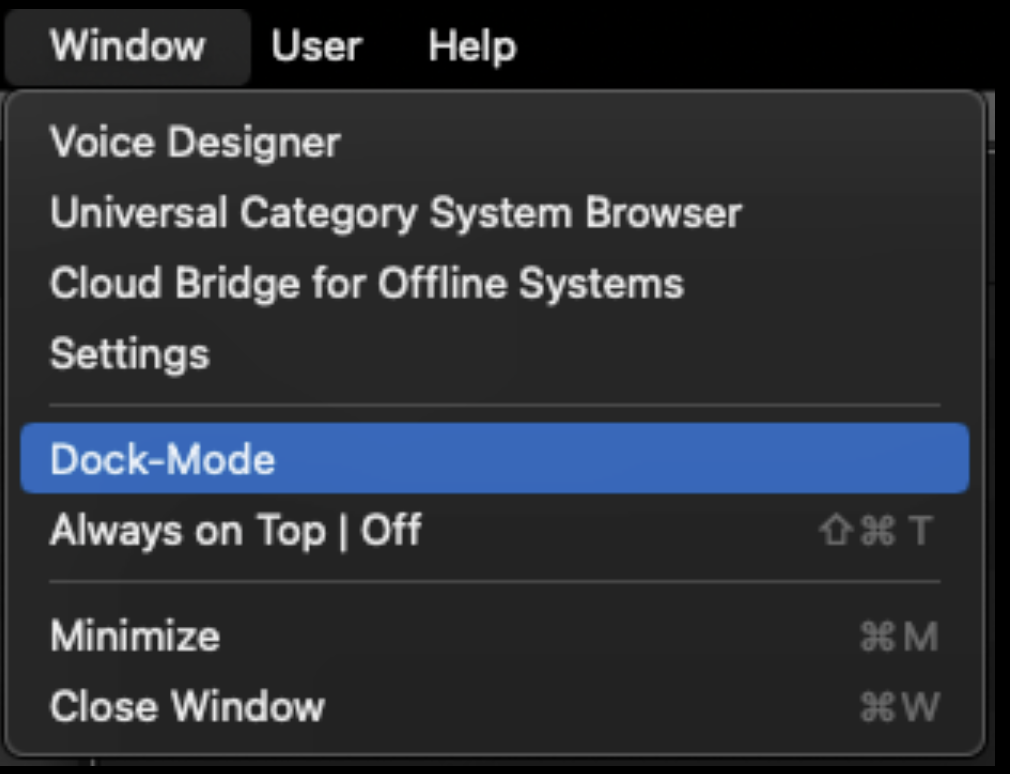
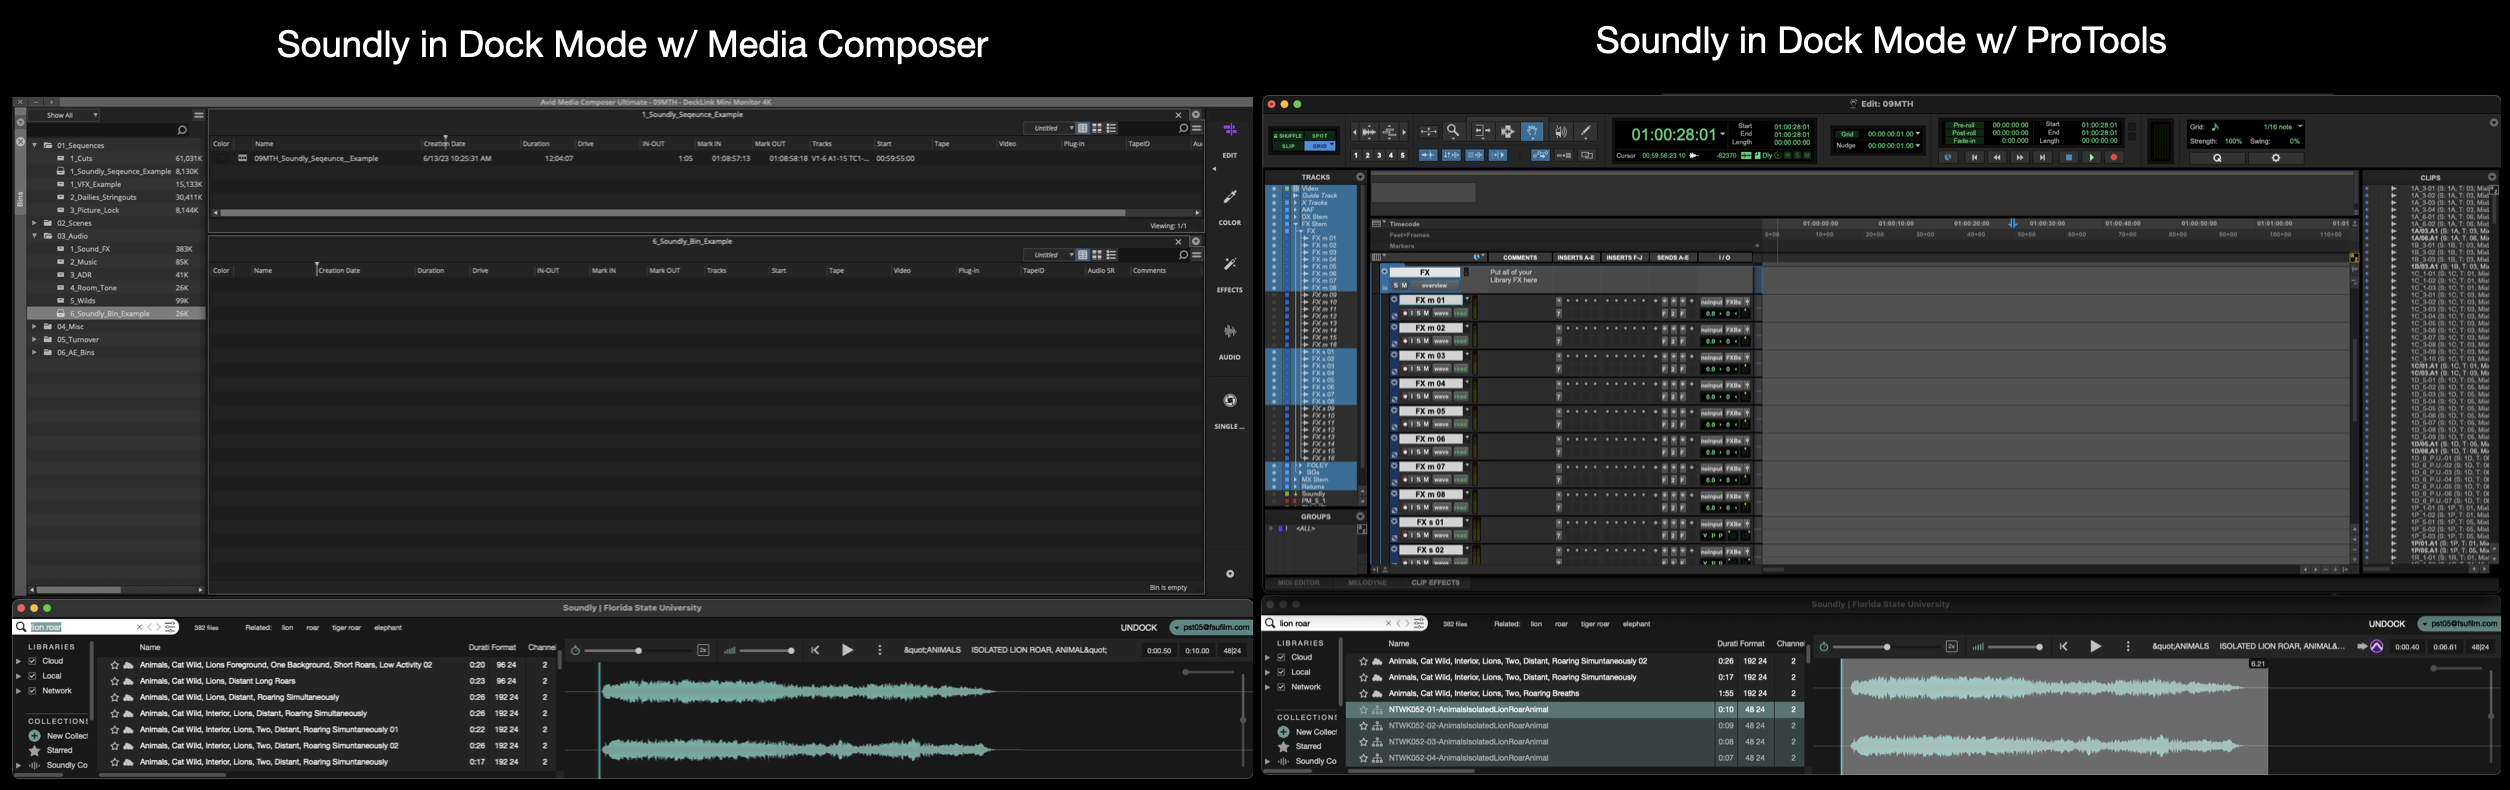
By default, Soundly opens in a big window that can be viewed fullscreen. Sometimes you may prefer to put it in “Dock Mode” which will squeeze the interface down to the bottom third of the screen. To enter “Dock Mode” navigate to the task bar and select Window > Dock Mode.
This can be helpful when you are also working in Media Composer or ProTools, as it will allow you to easily have both interfaces open while you work, as shown below.
Soundly with Media Composer
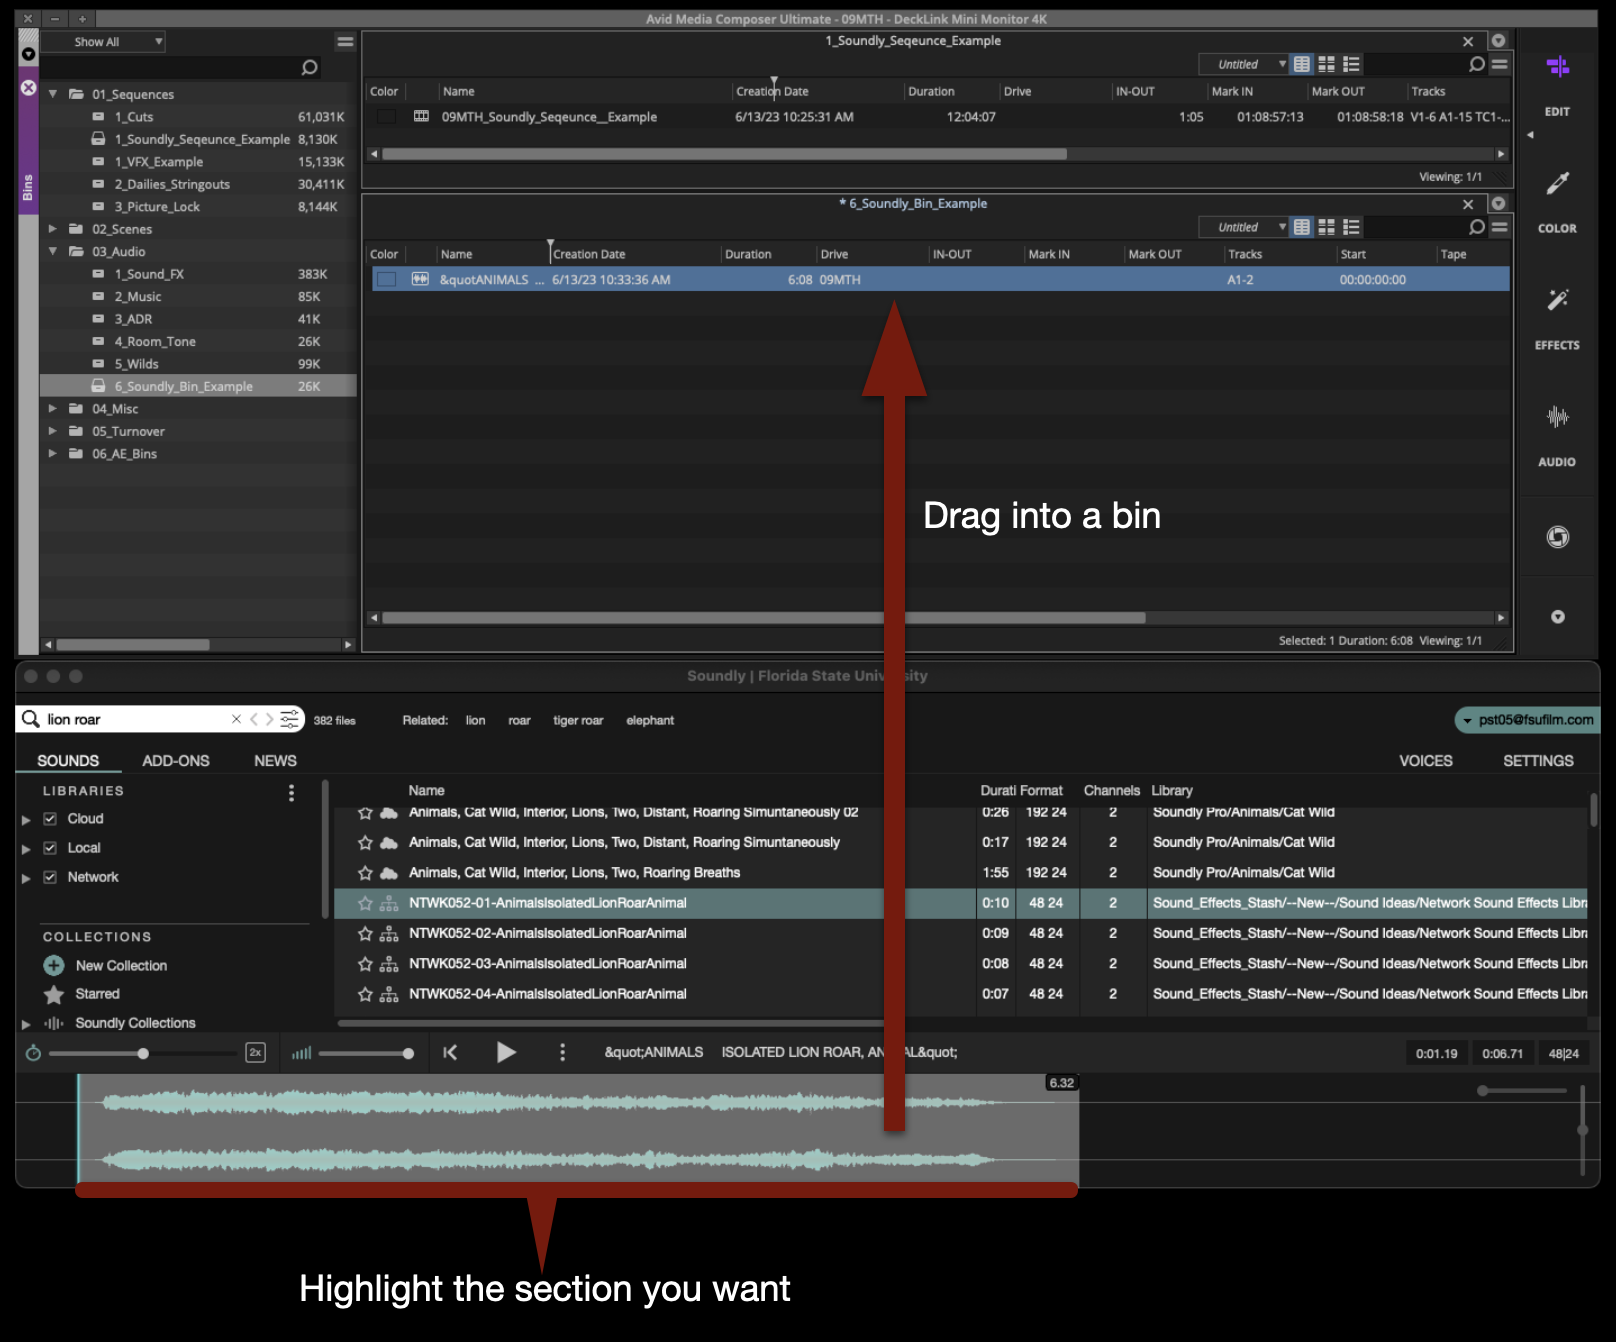
When using Soundly with Media Composer, it is simple to bring sounds from the library into a bin. After you have searched for and have found the sound that you want to bring into Media Composer, highlight the section of waveform you want and drag that into an open bin.
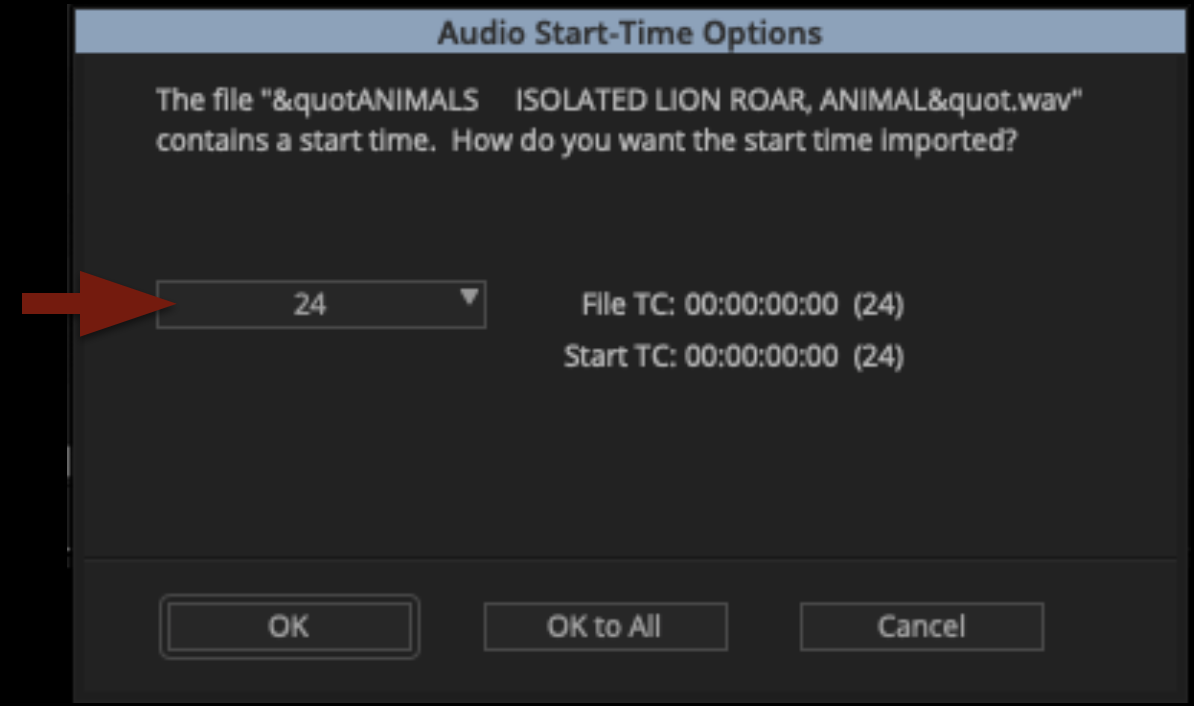
Media Composer will prompt you with a question about the audio start-time. Make sure it is set to 24 and then click “OK”.
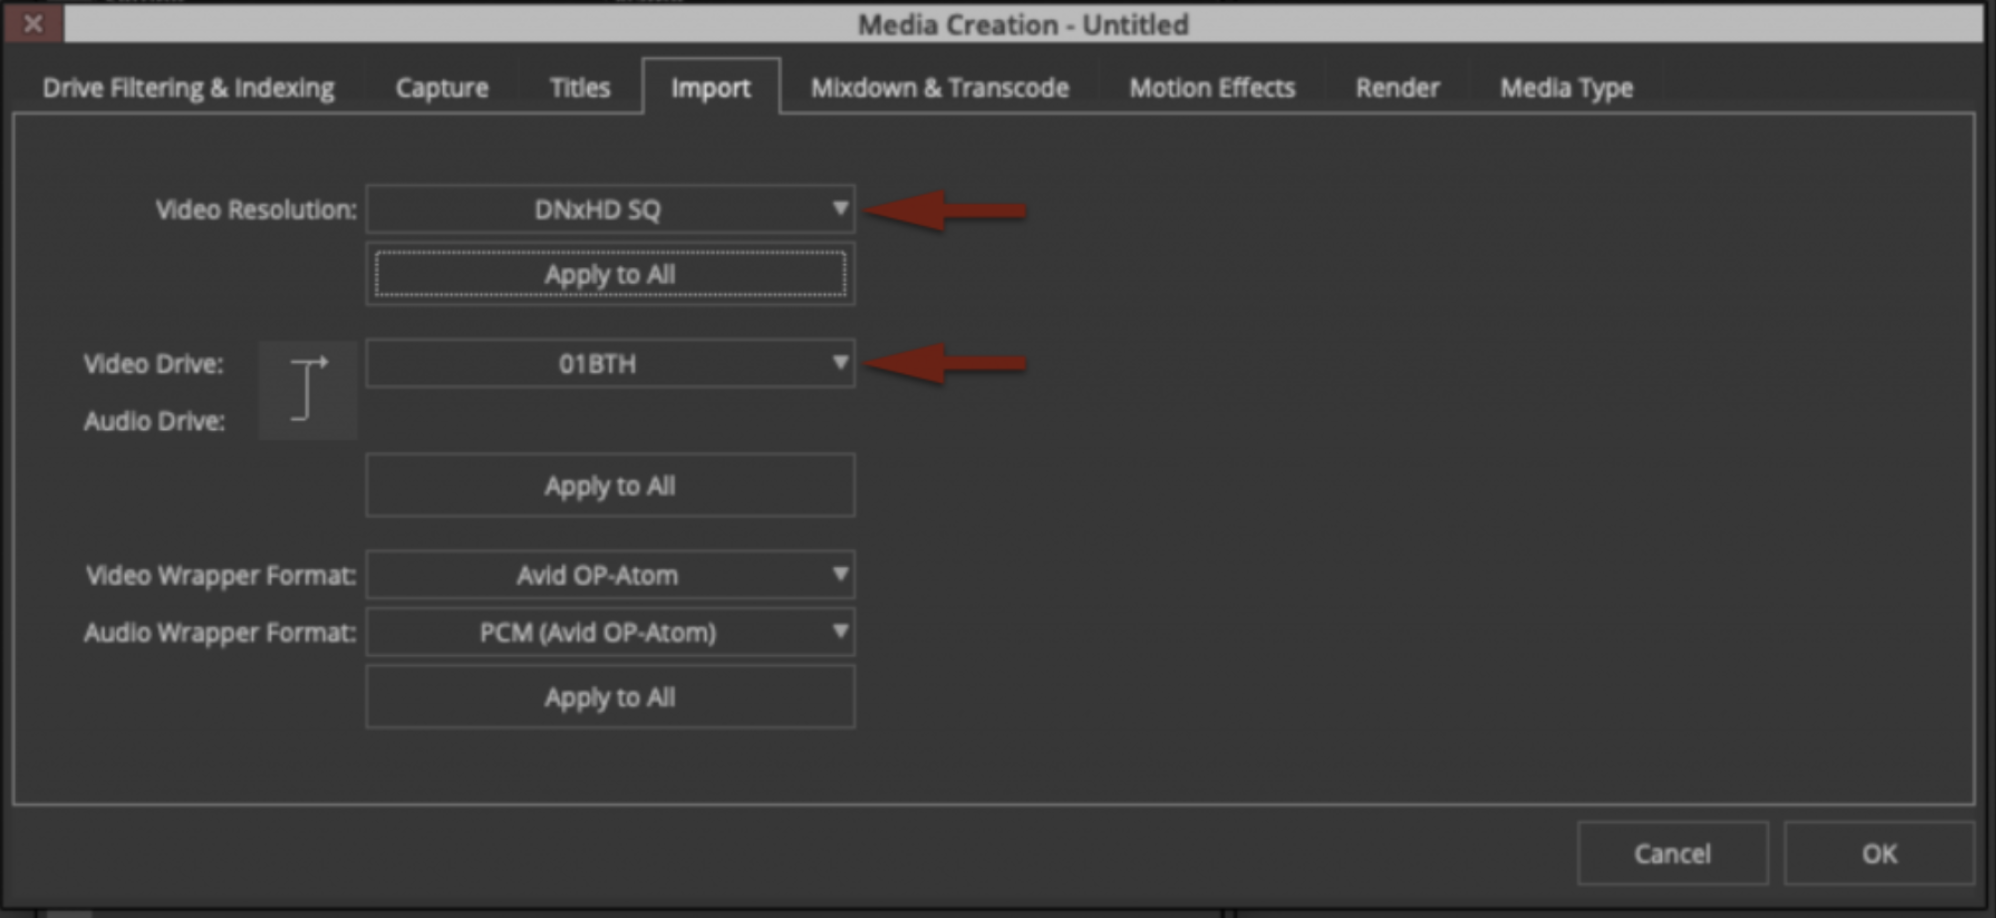
Assuming your media creation settings in Media Composer are set as shown in the example below, the sound will be transcoded into Avid Media and will appear in your bin, ready to work with.
Soundly with ProTools
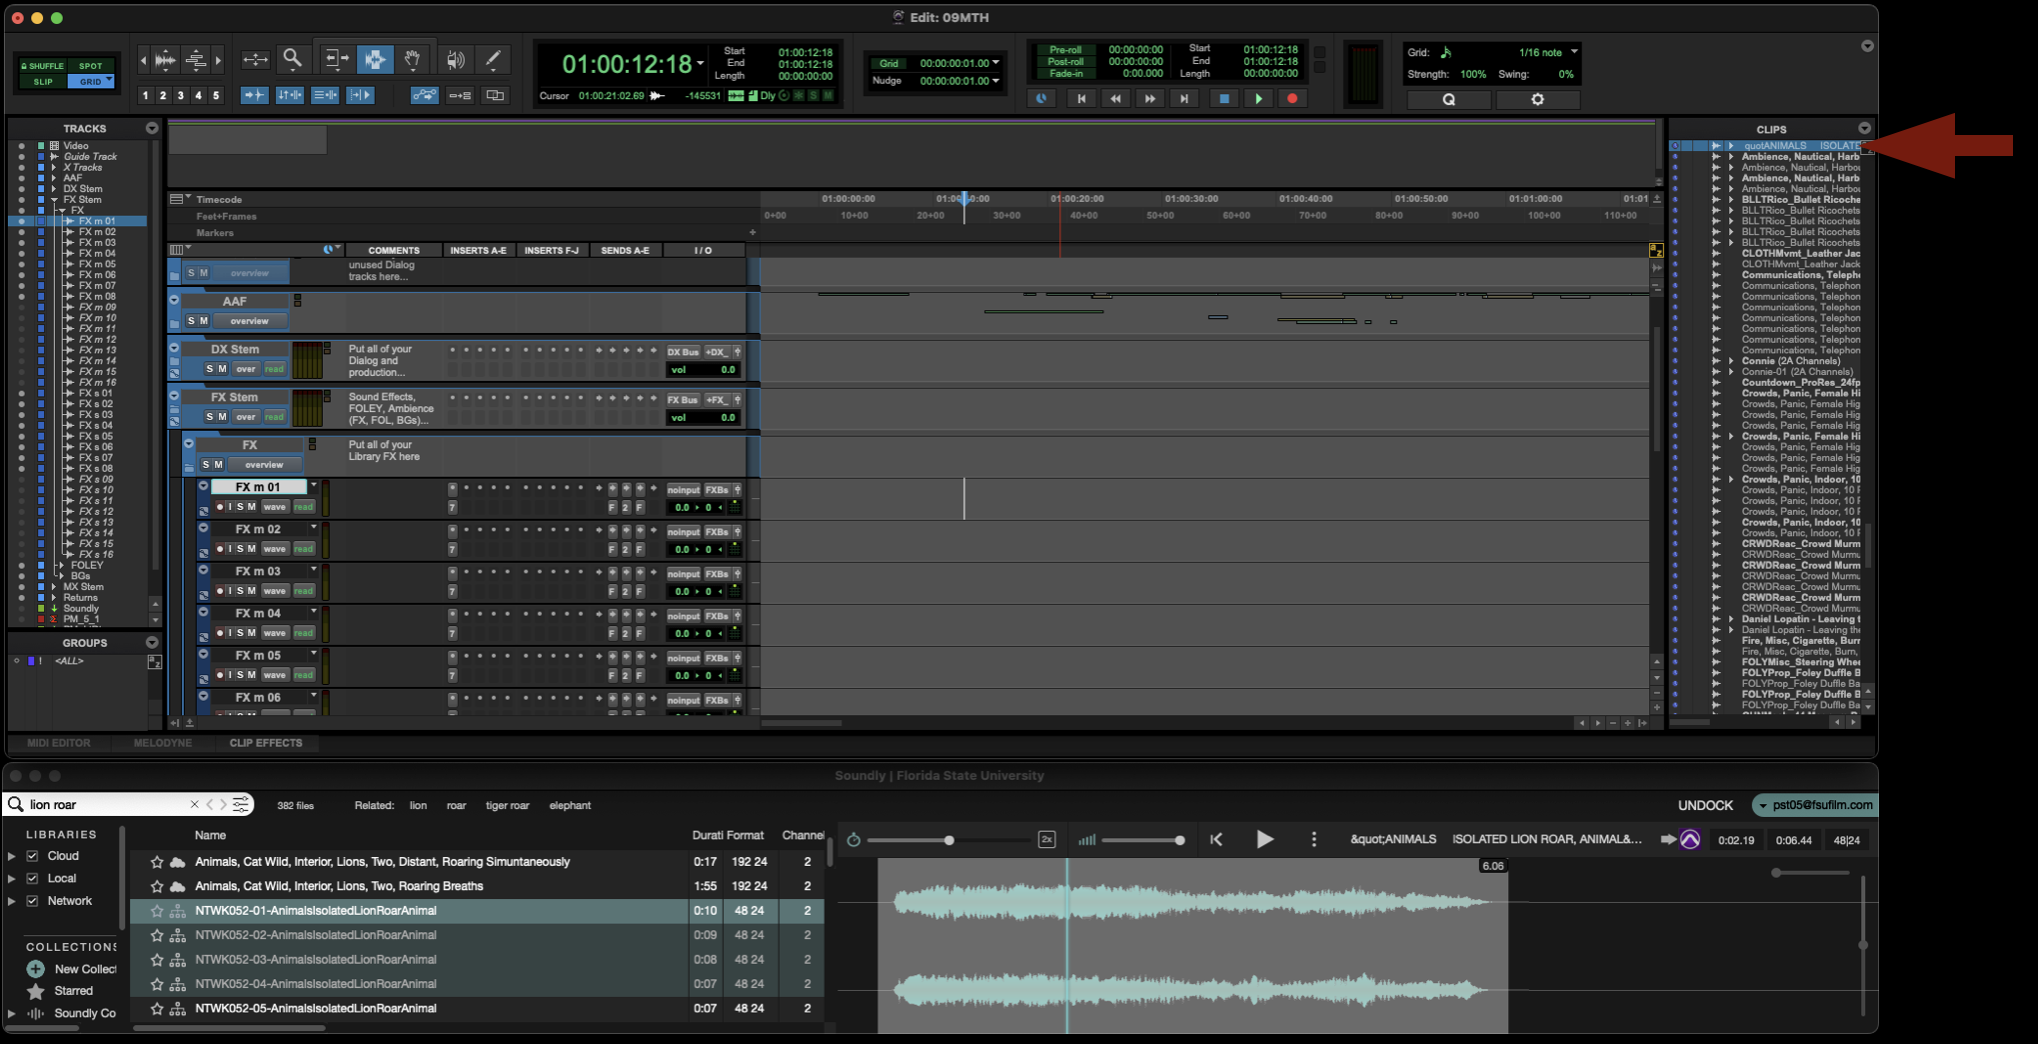
When using Soundly with ProTools, you have two options for bringing sounds into the project. You can either bring the sound into the Clips Bin or spot the sound directly onto a track.
To send a desired sound effect to the Clips Bin, select the sound in Soundly and then press “B” on the keyboard. It will be imported directly to the Clips Bin in ProTools.
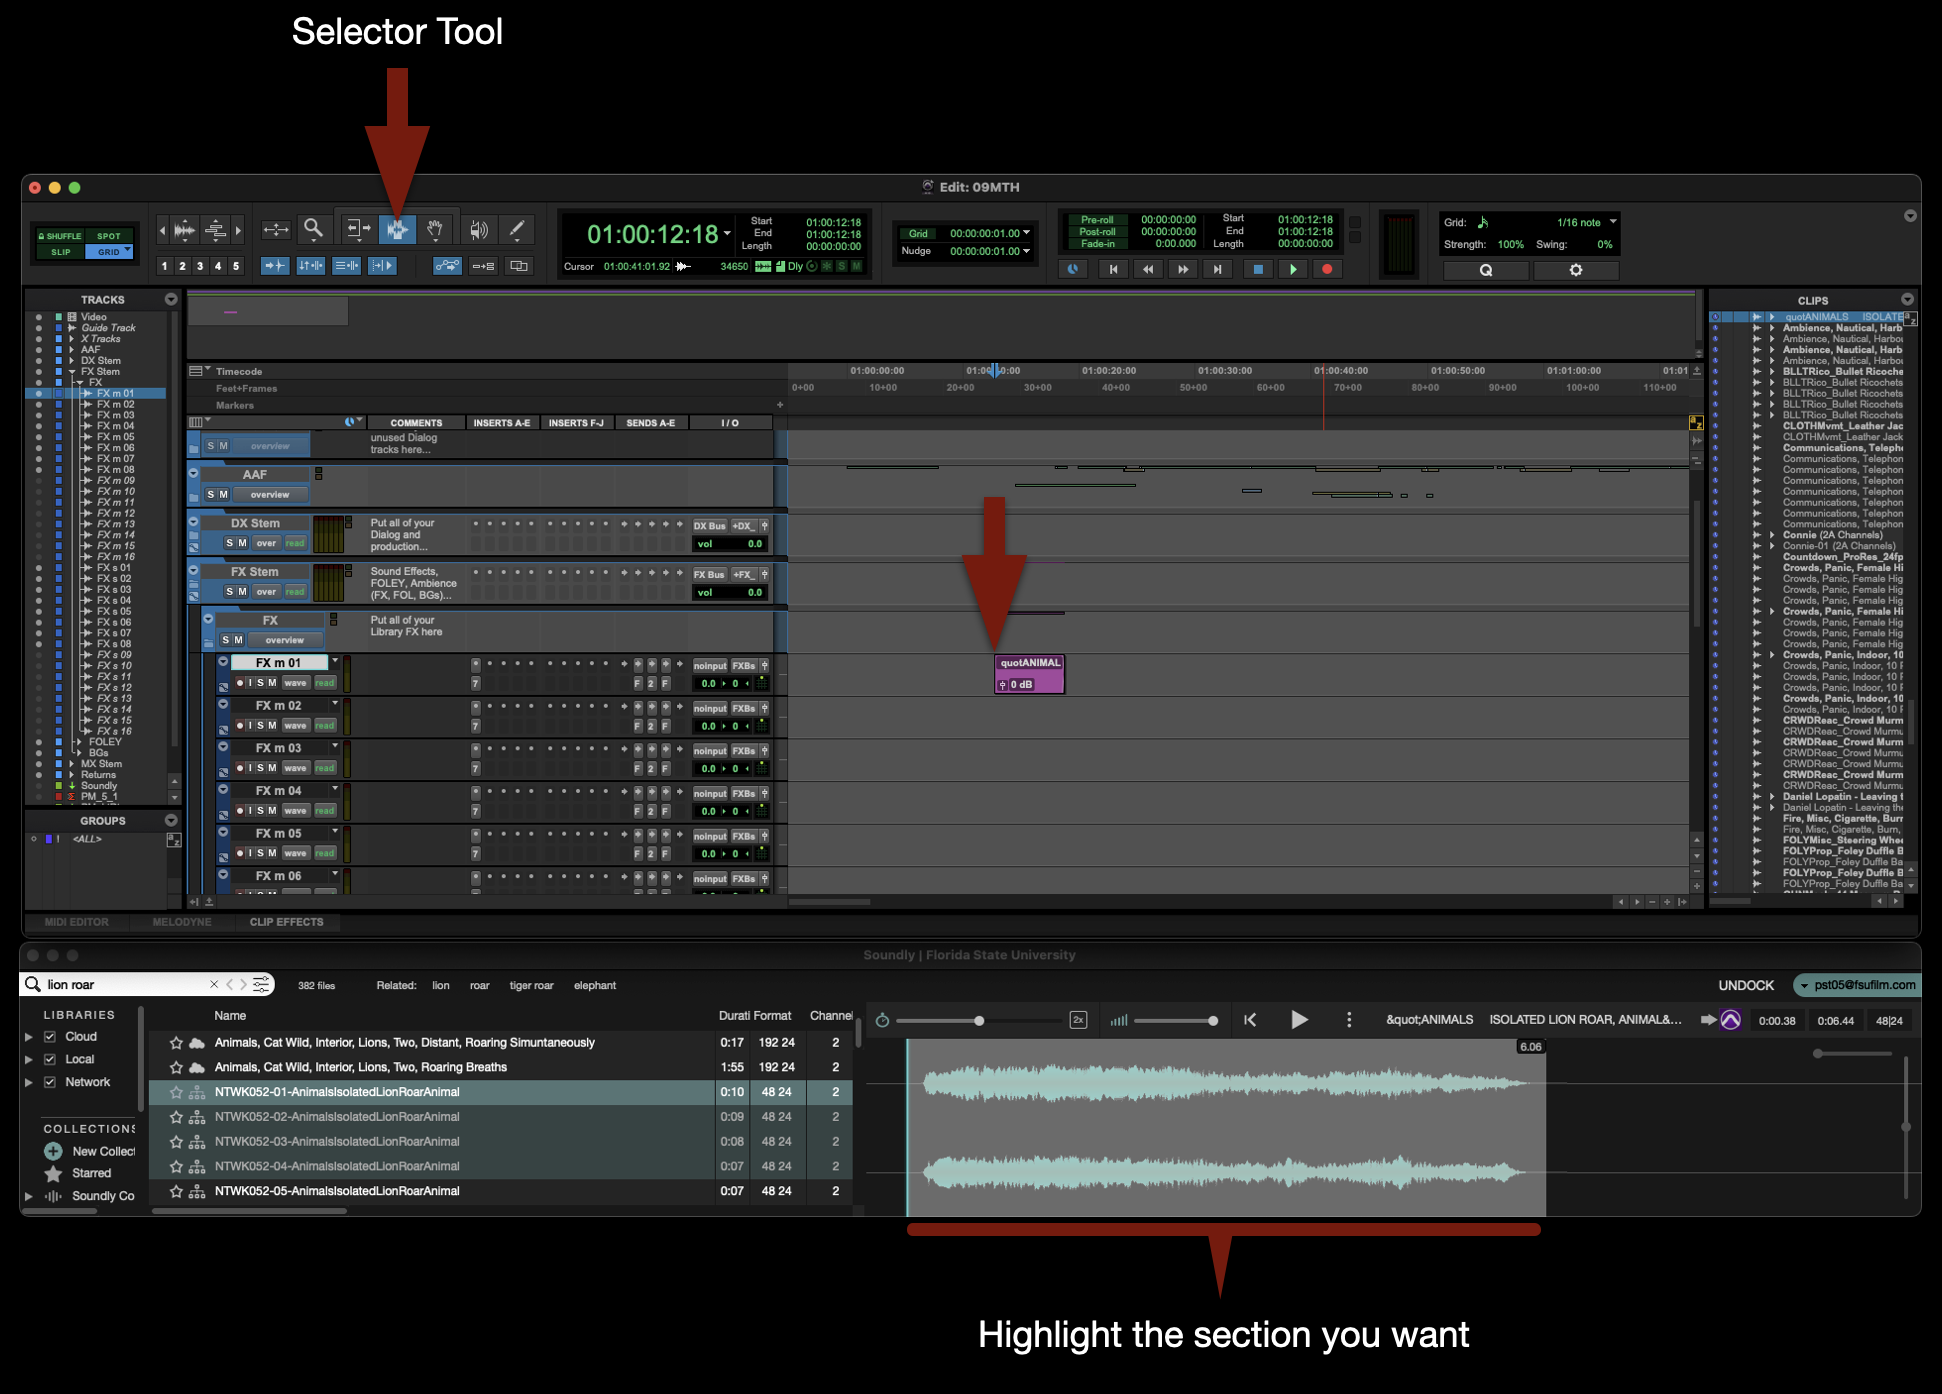
To spot a desired sound effect to a specific marked track, highlight the section of the sound effect you want, use the sector tool to mark a spot on an appropriate track, and then press “S” on the keyboard. It will be imported directly to the track that was marked.
Soundly Voice Designer
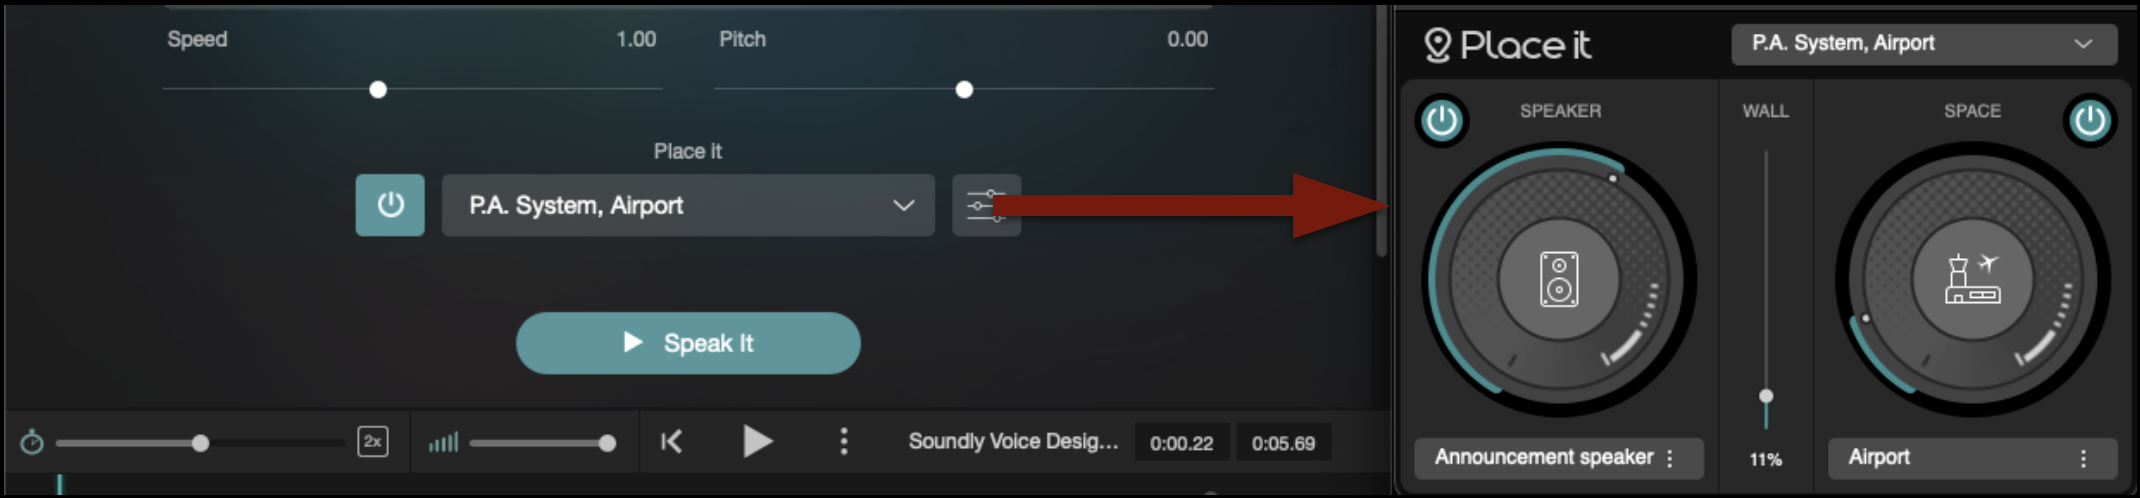
Soundly has a feature called Voice Designer, which uses AI to generate voices based on text input. Utilizing a plugin called “Place It”, it will make the generated voice sound as if it was in a particular place and/or coming out of a particular speaker.
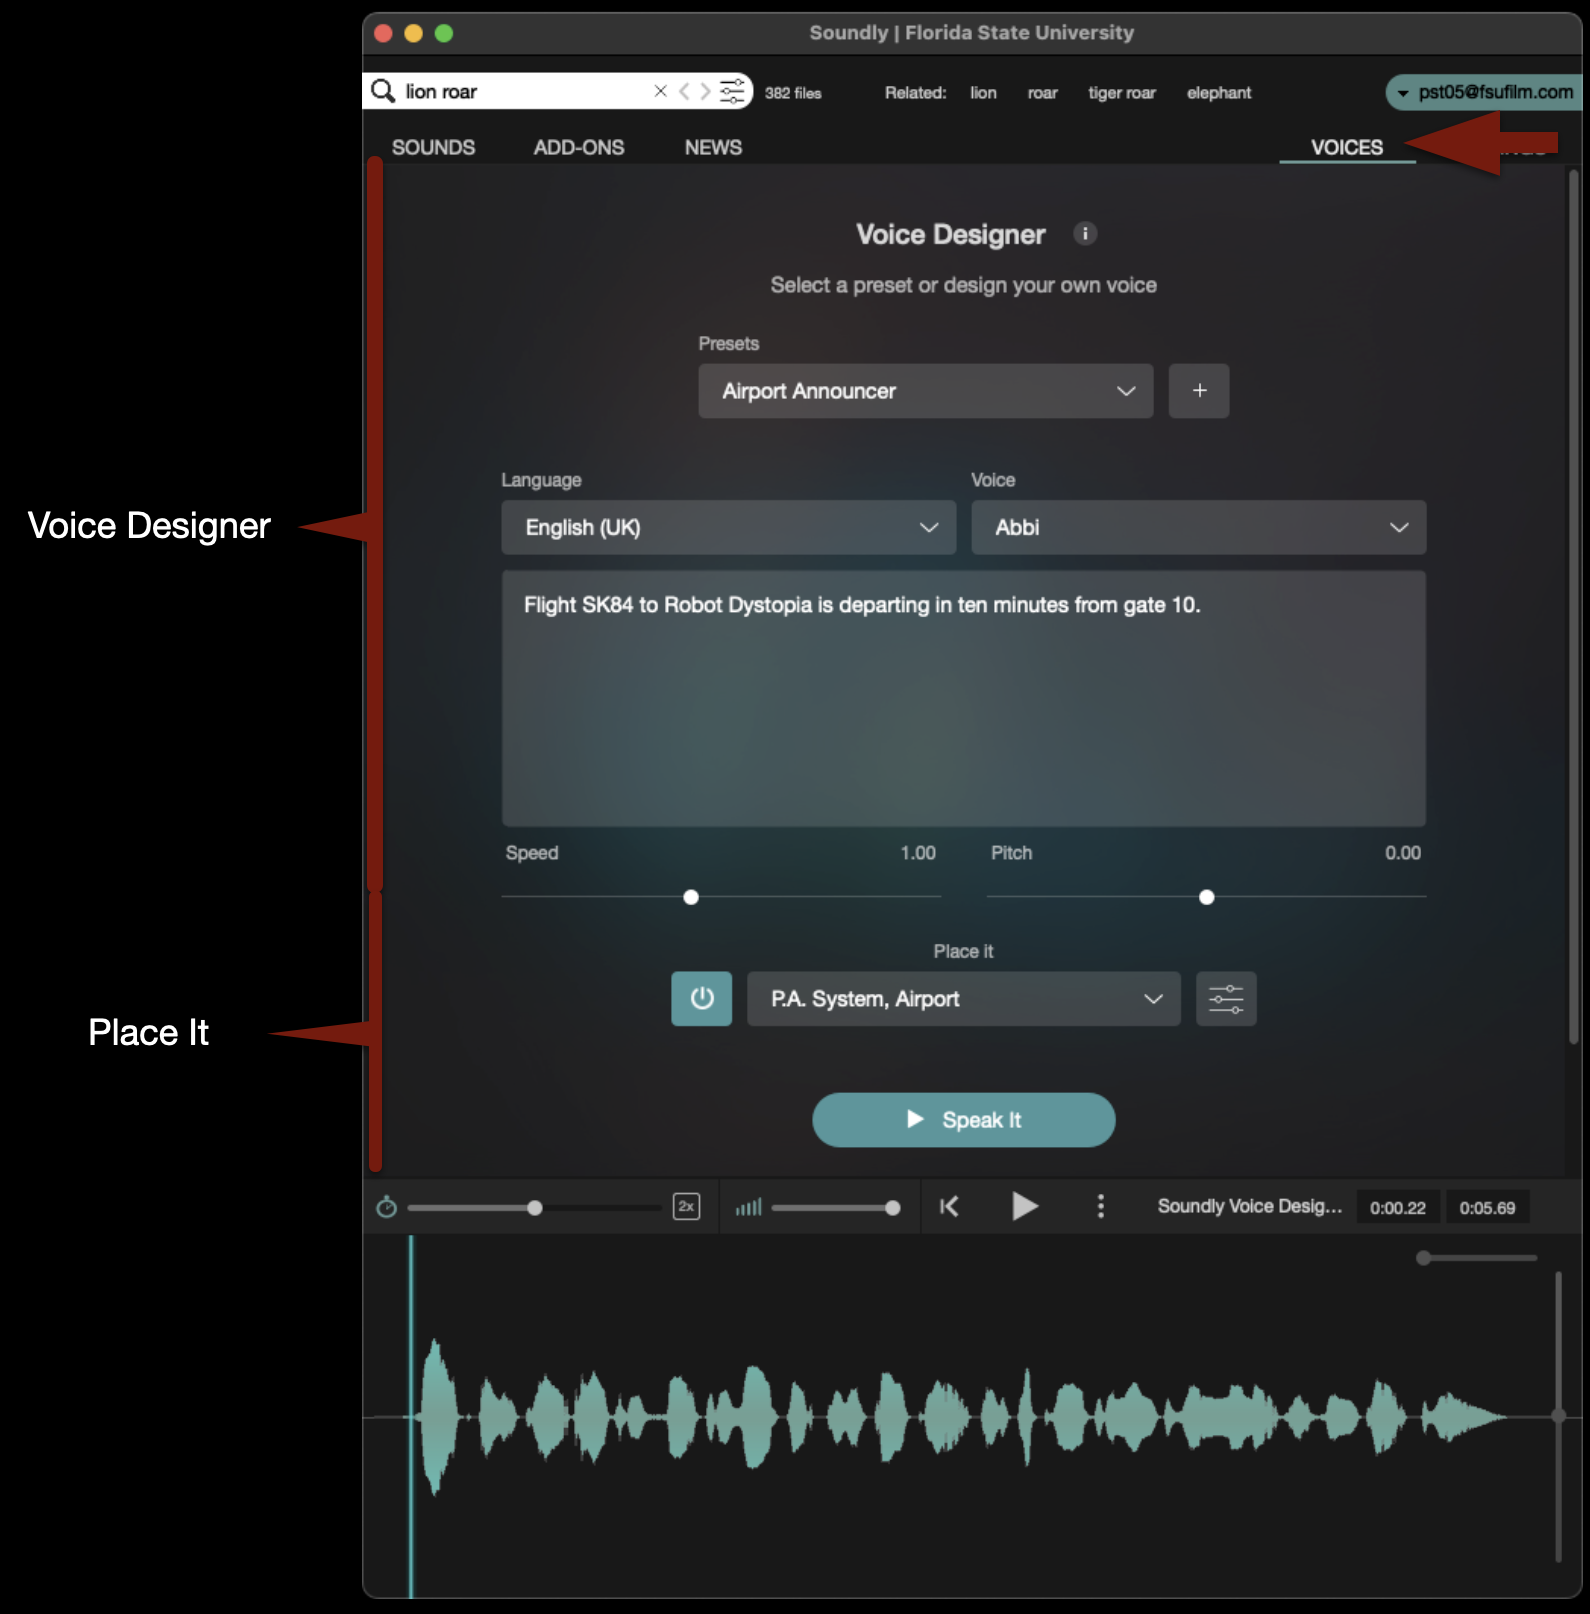
Switch to the Voices tab and you will see the interface appear like the example below.
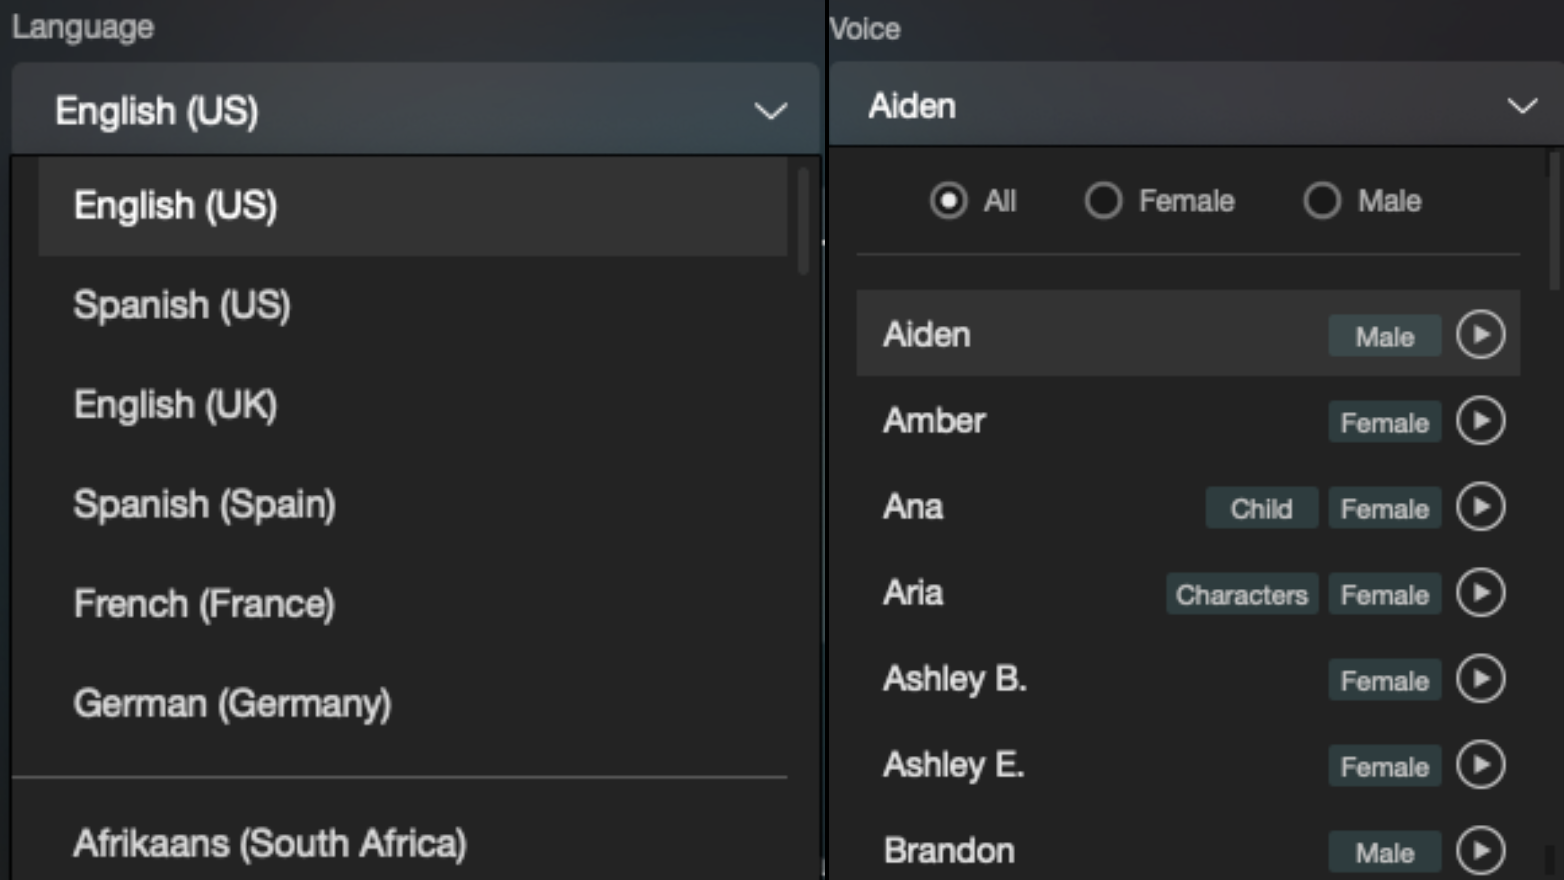
The top section will allow you to type in any dialogue that you need to generate. You will then have options to decide the language and the voice, and you can then generate the voice by clicking “Speak It”. You can also use one of the presets.
The bottom section will allow you to modify that voice. There are presets available or you can click the button shown below and you can choose you own “Speaker” and “Space”.
Importing the Voice Designer media into ProTools and Media Composer is exactly the same process as described above.
Turnover to DaVinci Resolve involves preparing and transferring the editorial materials needed for color correction, online finishing, and final mastering. This typically includes timelines, reference exports, media organization, metadata verification, and other supporting materials required to rebuild the project accurately within the finishing workflow.
Careful turnover procedures are essential because missing media, incorrect timelines, naming inconsistencies, or organizational errors can create significant delays and technical problems during color and finishing. Standardized workflows help ensure smoother collaboration between editorial and finishing teams while reinforcing professional habits related to media management, version control, and post-production pipeline organization.
How it Works
In the industry, this process is referred to as “Onlining” or “Conforming” because this is where the picture edits made with the lower quality offline media in Media Composer are remade with the highest quality media. An Assistant Editor would normally be responsible for exporting all the necessary elements out of Media Composer. Those elements would then be sent to the facility that handles color grading and finishing. In our workflow, the Editor is responsible for both exporting the necessary files out of Media Composer and conforming to the highest quality media in DaVinci Resolve. This is to ensure that any issues during turnover can be caught immediately and the Resolve project is left ready for color grading.
This step-by-step guide for color turnover covers how to:
A reference video of the locked sequence will need to be exported so that it can be used in Resolve as an offline reference video to check the conformed sequence against.
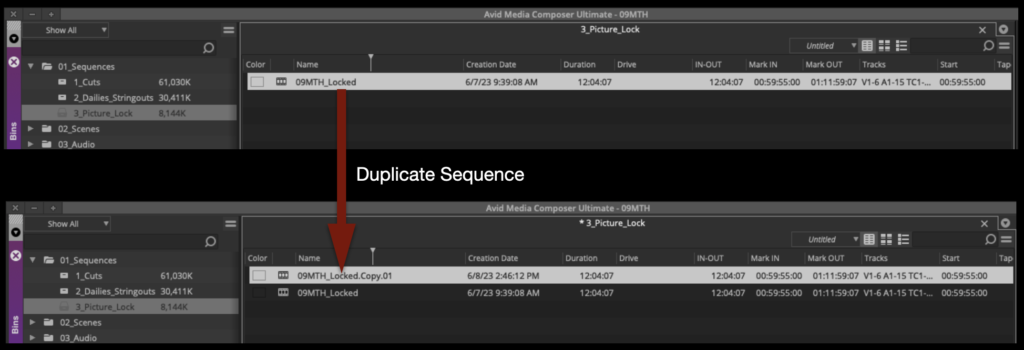
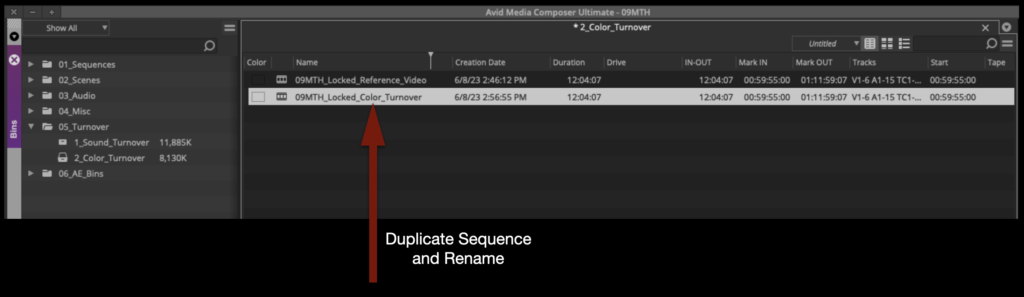
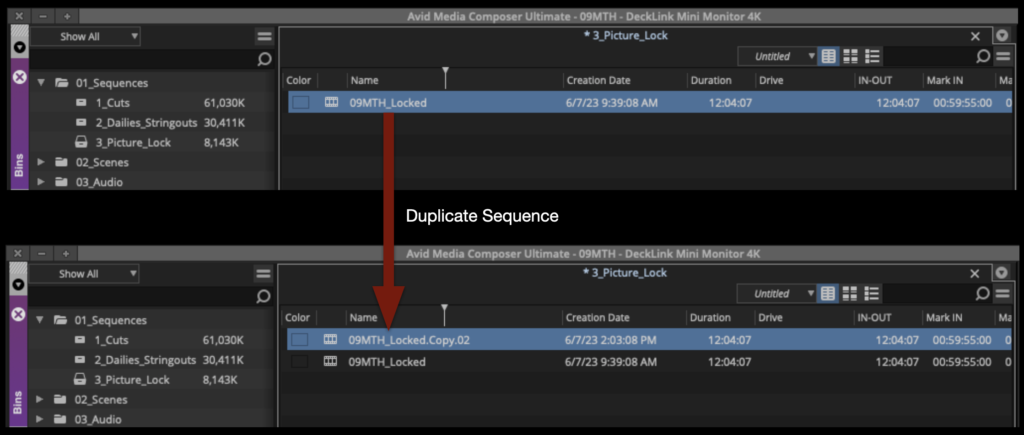
Mount your Show Volume and launch your Media Composer project. Open the Locked Sequences bin. Select your locked sequence and hit “Command+D” to duplicate the sequence.
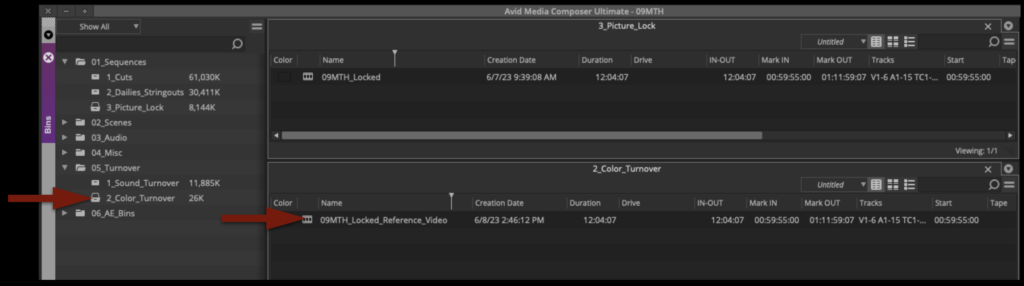
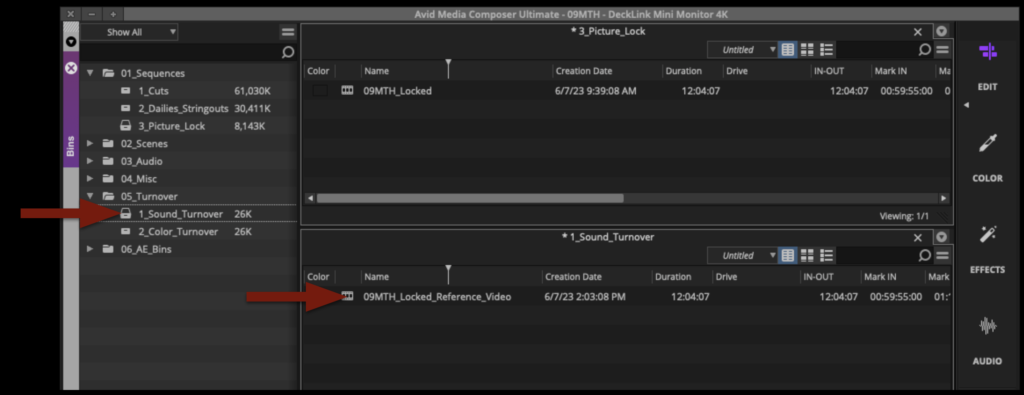
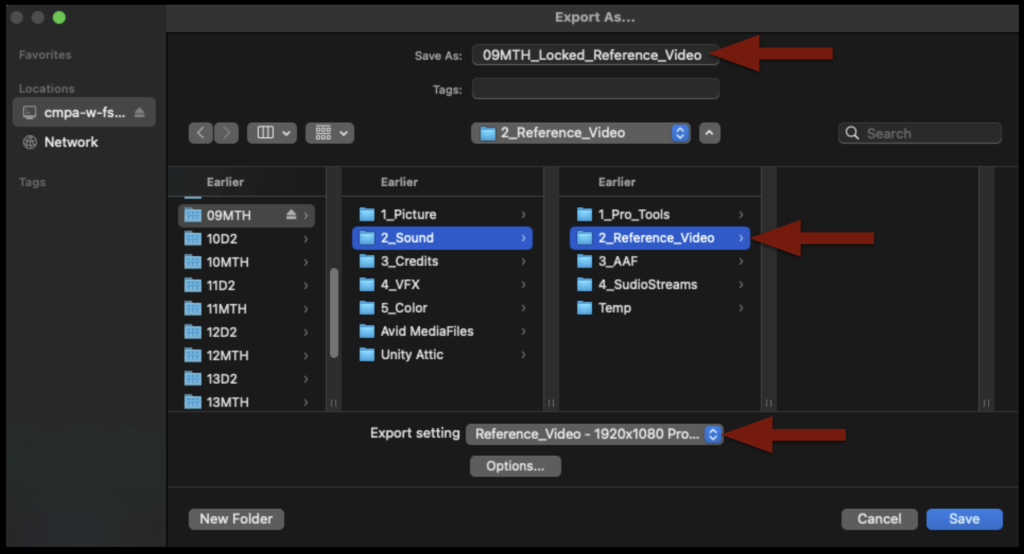
Rename the new sequence Show#_Locked_Reference_Video and move it to the Color Turnover bin.
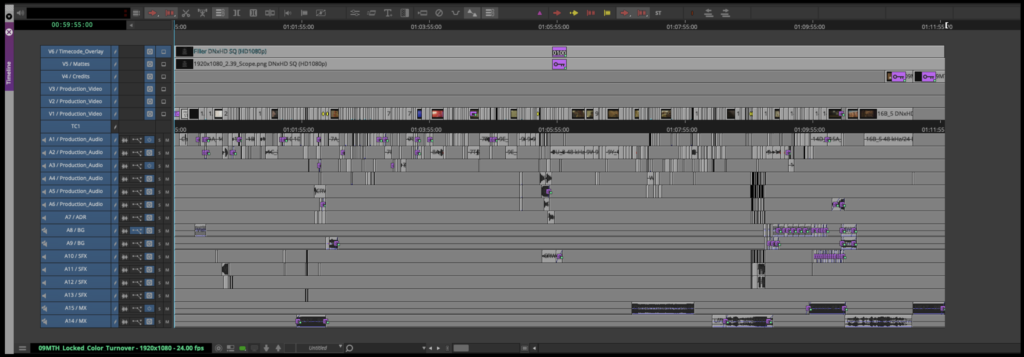
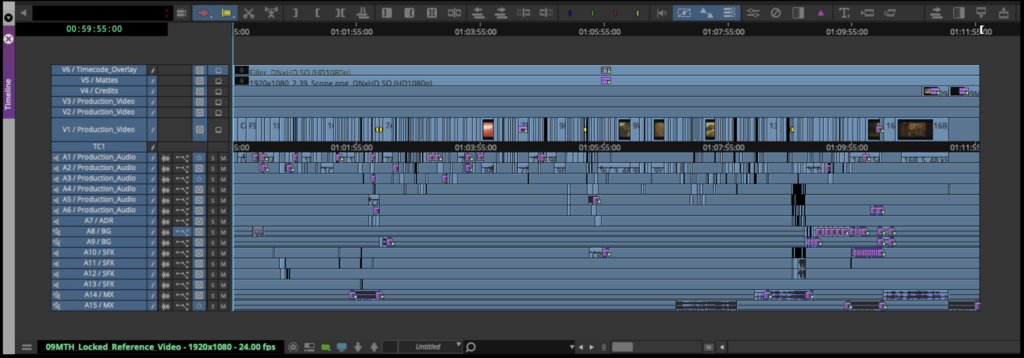
Open the new sequence. Mark In and Out for the entire timeline and activate all tracks.
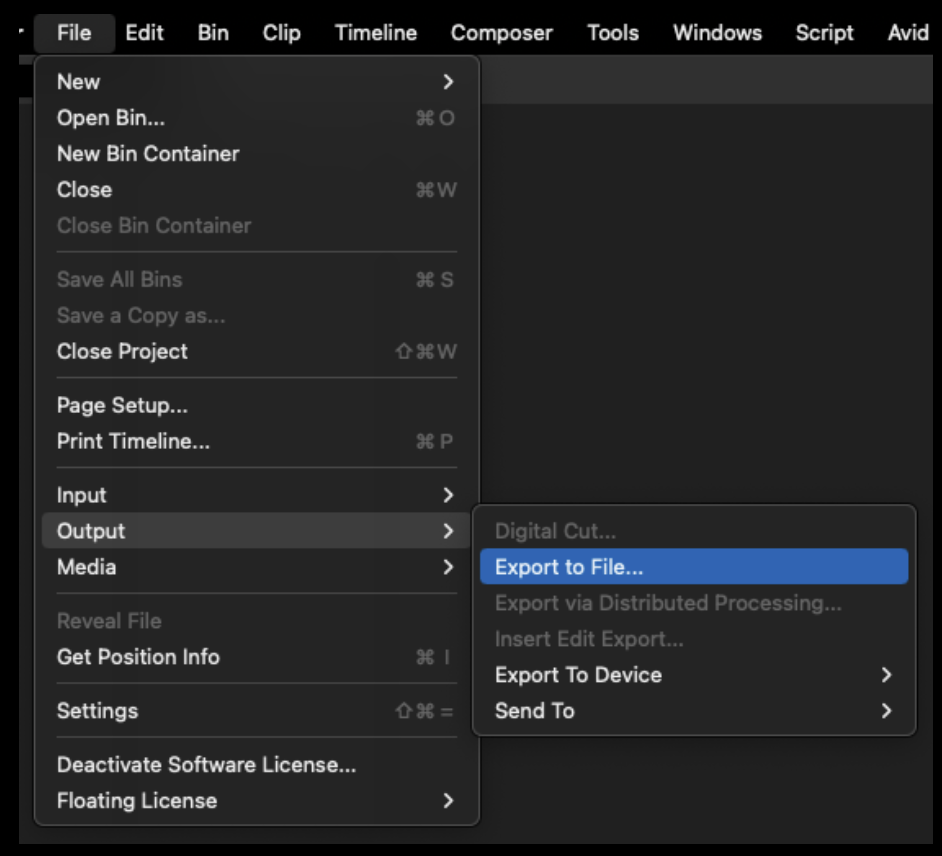
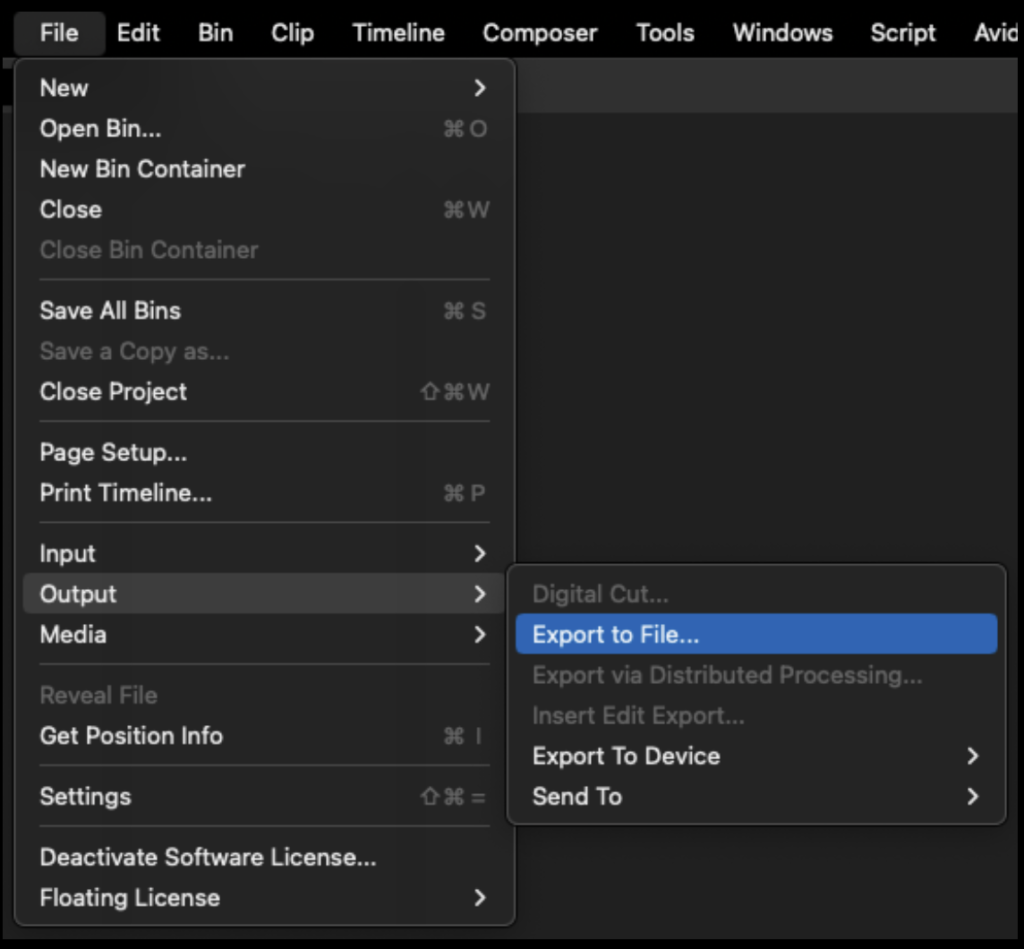
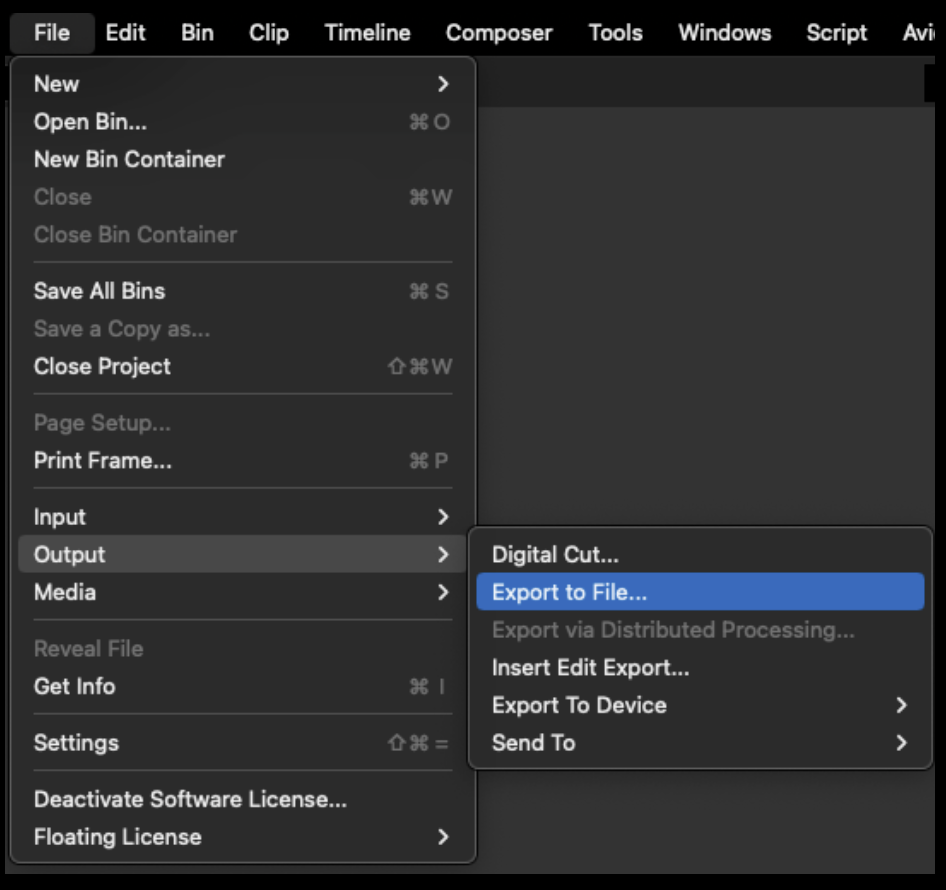
From the task menu select File > Output > Export to File…
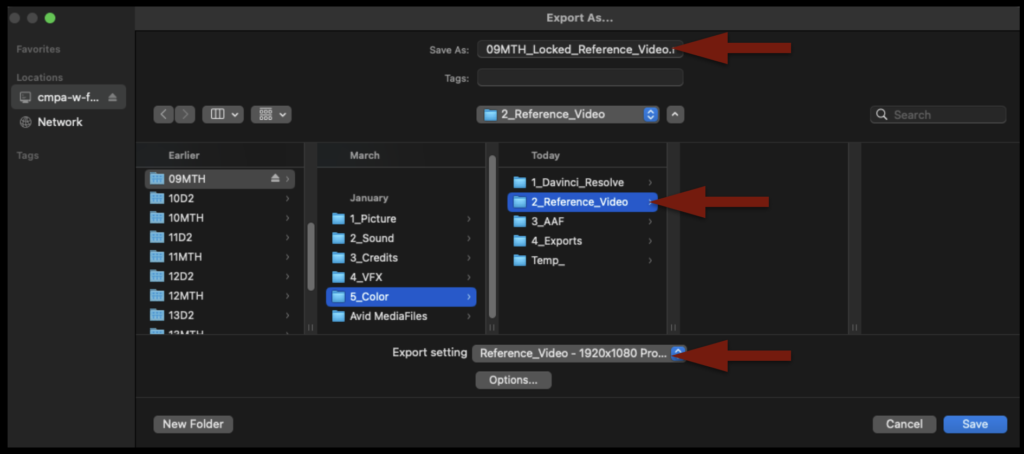
Point the export to the Color > Reference Video folder on your Show Volume. Check that the name of the export will be correct. Select the “Reference Video” preset.
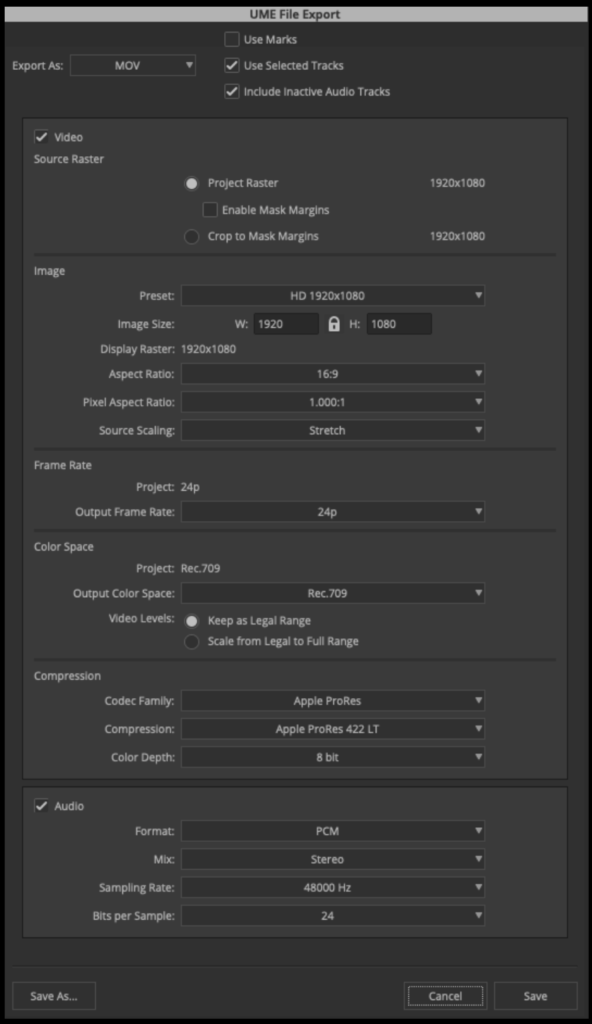
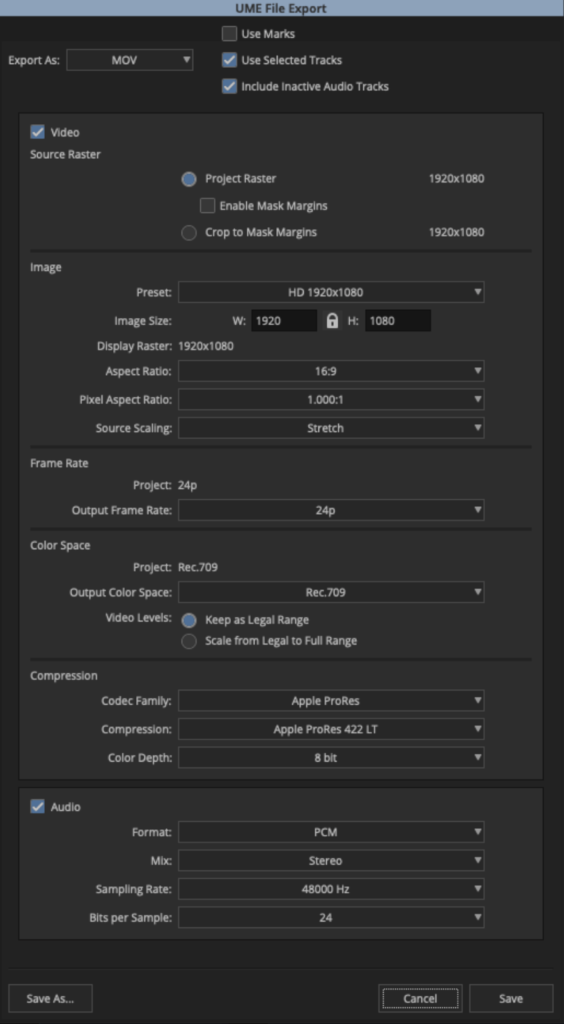
Before clicking “Save” to export, double-check the preset by clicking “Options” and make sure the settings are exactly as shown in the example below:
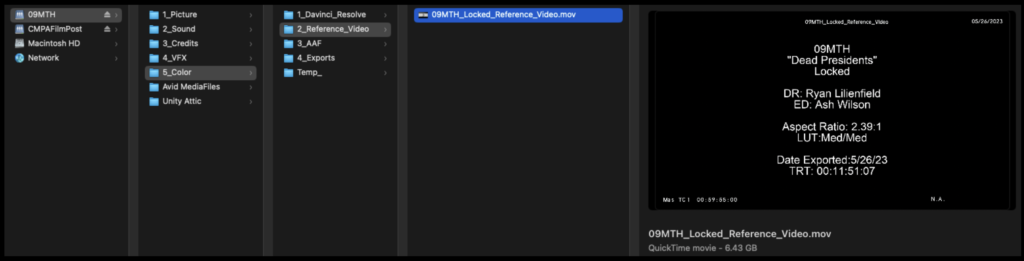
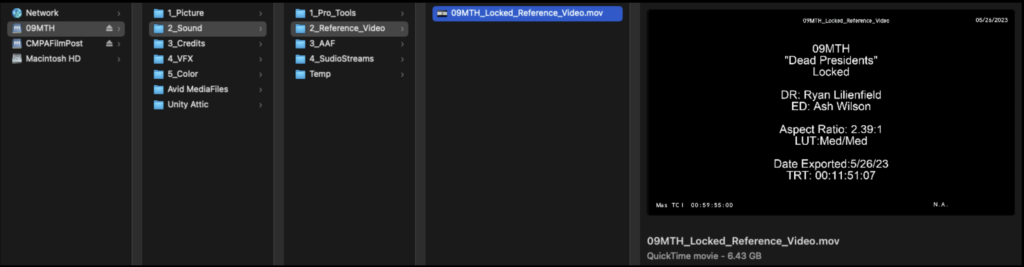
When the export is complete, navigate in the Finder to where it was exported and open it in QuickTime Player to make sure everything is okay.
Export AAF From Media Composer
Duplicate the sequence named “Locked Reference Video” and rename it show#Locked_Color_Turnover as shown in the example below:
Open the new sequence. Mark In and Out for the entire timeline and activate all tracks.
From the task menu, select File > Output > Export to File…
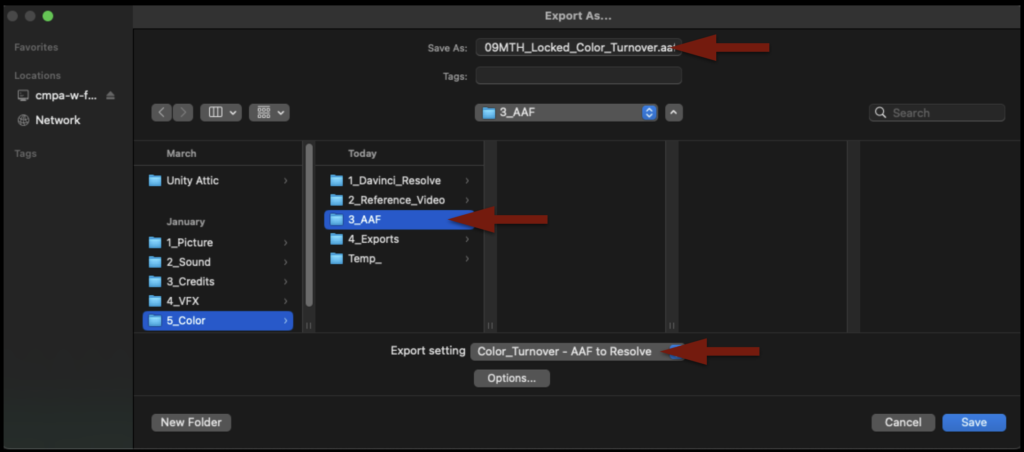
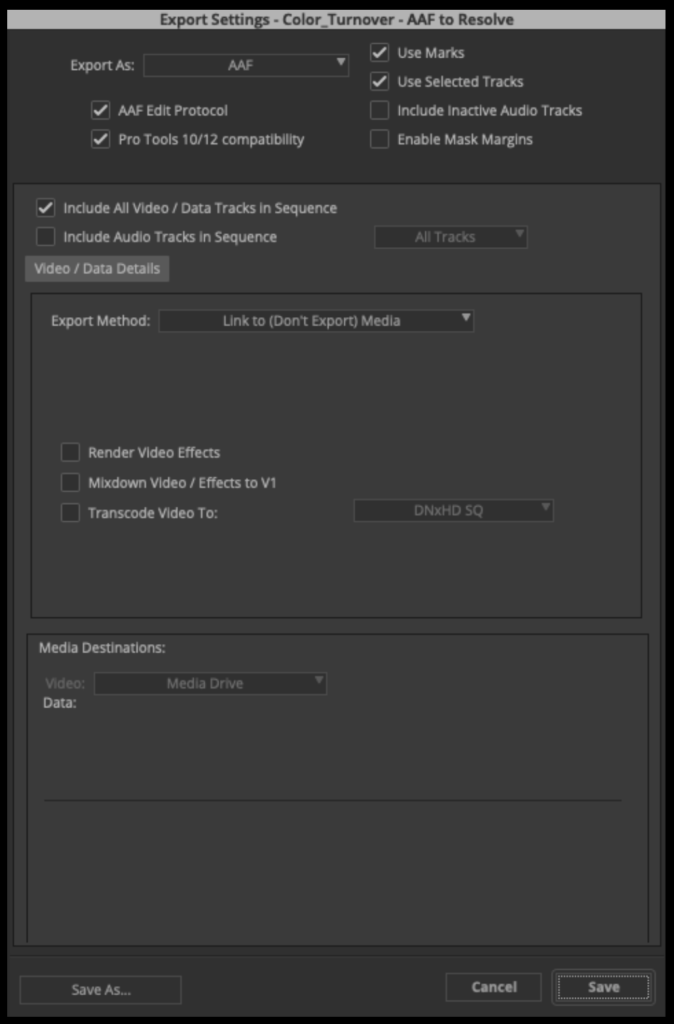
Point the export to the Color > AAF folder on your Show Volume. Check that the name of the export will be correct. Select the “Color_Turnover – AAF to Resolve” preset.
Before clicking “Save” to export, double-check the preset by clicking “Options” and make sure the settings are exactly as shown in the example below:
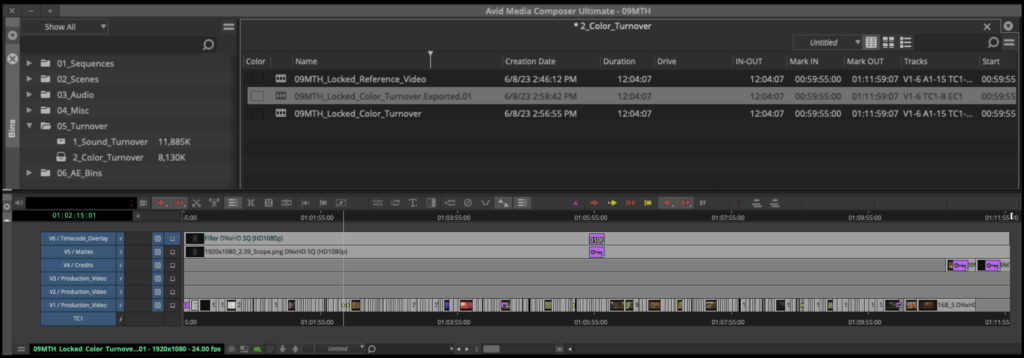
When the AAF is finished exporting, Media Composer will automatically import it back into the Color Turnover bin as a sequence. If you open the sequence, you will see that the AAF only held information describing the video tracks. That is all Resolve will need.
After you check that, you can close Media Composer.
Open Resolve Project
Launch Resolve from the dock.
You will be using the same Resolve project that your assistant editor used to make rushes when they sung dailies. So you need to open that same project. Navigate to the “Projects” folder, your “Cycle” folder, and then open your “Shows” project.
Your project should already have several folders made and labeled inside the Media Pool.
Some of the folders will already have media in them. The “extras” folder contains the media that is necessary for the online front sequence.
All of the OCF will already be in the project from when the assistant editor last used it.
Next, you will need to import any credits or titles. Navigate to your show’s Credits folder in the Finder and then select the Credits folder in the Media Pool.
To import the credits and titles, drag them into the open folder in the Media Pool.
Finally, you will need to import the reference video you exported out of Media Composer. Navigate to your show’s Reference Video folder in the Finder and then select the Reference Video folder in the Media Pool.
DO NOT drag the reference video into the open folder in the Media Pool. It needs to be imported in a specific way so that Resolve can use it as an offline reference clip. Right-click on the video reference file and then select “Add as Offline Reference Clip”.
Import AAF into Resolve
In the Media Pool, right-click inside the Sequences folder. Then navigate to Timelines > Import > AAF
Navigate in the Finder window to where you saved the AAF that was exported from Media Composer and click “Open”.
Inside the Import AAF window, you will need to make some adjustments before clicking “Ok”:
Change the Timeline Name to Show#_Locked_Conform
Check “Automatically set project settings”
Check “Link to source camera files”
Check “Use sizing information”
Since you did not select “Automatically import source clips into media pool,” it will prompt you to choose which folders in the Media Pool already contain the online media. Select the folders as shown in the example below and then click “Ok”.
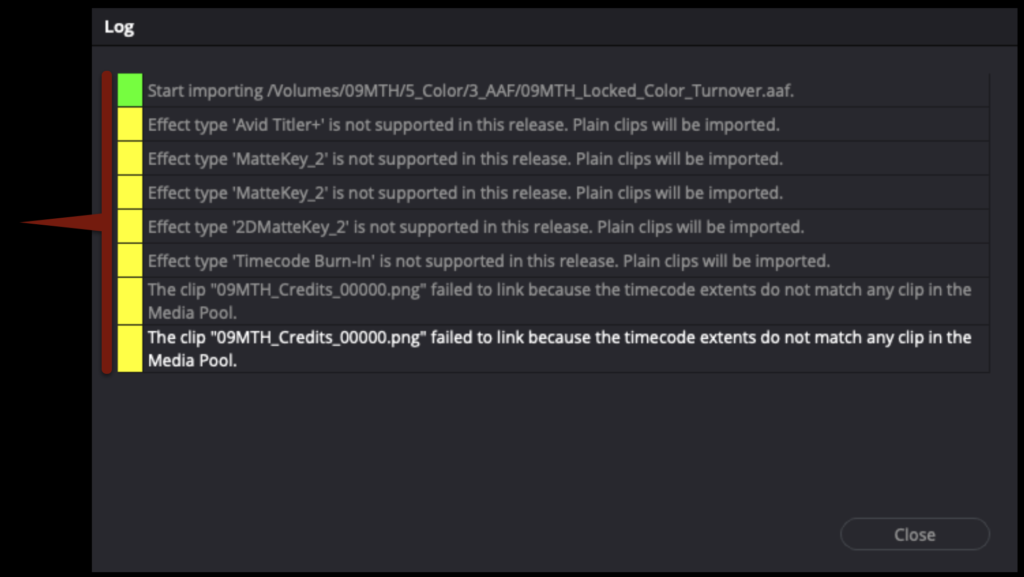
Do not be surprised if you get alerts that look like this in the Log after the AAF imports. This is a list of everything that was written into the AAF from Media Composer that cannot be reproduced in Resolve. In most cases this is limited to any use of the Avid Titler+ effect, the timecode burn in effect, or any stabilization that was done.
You should see that your sequence from Media Composer is now imported into the Sequences folder in Resolve.
Prep the Conform Sequence
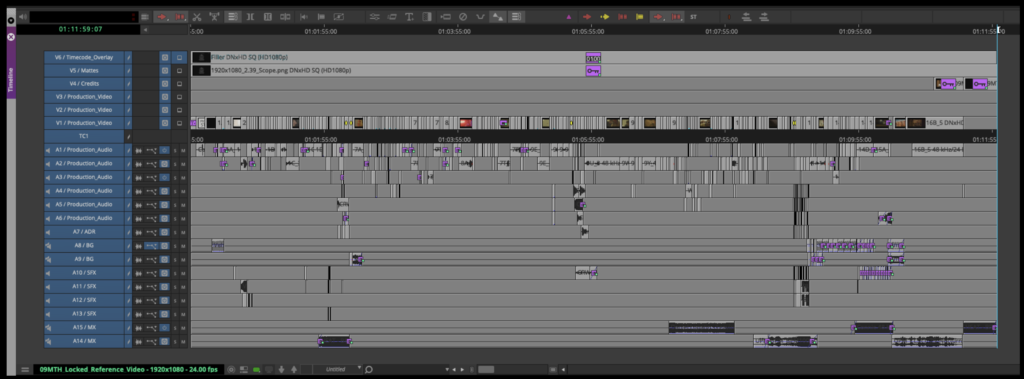
The locked sequence is now connected to the online media. Before you can check it against the offline reference video, you will need to do some prep work. In Media Composer, Video Track 5 held the aspect ratio matte. Most likely it has come over into Resolve, but often it has become connected to another piece of media or appears as offline. Since Resolve has its own way of handling aspect ratio mattes, you can delete the matte from Video Track 5. The Credits can also be brought down from Video Track 4 to Video Track 2. When you have done this your sequence should look like the example below.
Since you deleted the aspect ratio matte from Video Track 5 you will need to reapply it. Go the task bar and select Timeline > Output Blanking > Your Aspect Ratio Matte. In the example below the 1.66:1 matte is being applied.
Right-click on one of the empty video tracks over on the left and select “Delete Empty Tracks” to clean up the sequence.
Right-click on the 2.0 audio track and select Change Track Type To > 5.1 > 5.1. This will prepare the sequence for eventually accepting the 5.1 audio mix.
Once you have done all of the above, your timeline should look similar to the example below.
Check the Conform Sequence
Now that your sequence is prepped and cleaned up it is time to check it against the offline reference video to ensure it matches your picture lock sequence from Media Composer.
Right-click on your sequence and then navigate to Timeline > Link Offline Reference Clip > Your Reference Video. This will link the reference video and your sequence together.
To take advantage of the link, you will need to switch the source monitor to “offline” mode. When set to “offline” mode, the monitor on the left will no lower behave as a source monitor but instead it will display your reference video. In this mode, the left monitor will play the reference while simultaneously the right monitor will display your Resolve sequence.
Before you check the Resolve sequence against the offline reference video, there is one last bit of prep. In Media Composer, your slate was created using the Avid Titler+ effect. Since that effect does not translate over into Resolve, you will need to apply the Text effect on th track above the SMPTE Countdown so that you can recreate the same text in Resolve. Make sure to extend the text effect so that it runs until the 2-pop.
In the example below, you can see the reference video on the left with the text that was created in Media Composer and on the screen on the right the same text that has been recreated in Resolve.
You are ready to begin checking your Resolve sequence against your reference video. If you right-click inside the right screen, you will see different options for Wipes and Overlays. With “No Wipe” applied, both screens should look very similar. However, it would be difficult to tell if they matched perfectly.
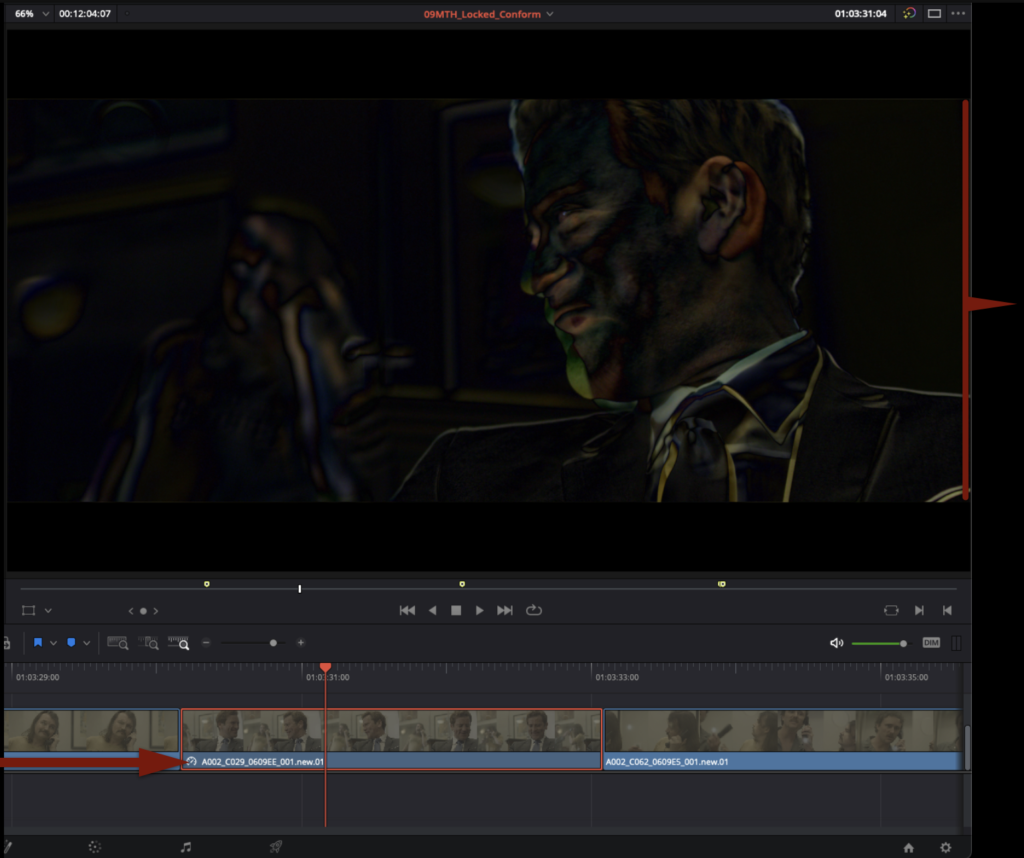
To make this easier switch the right screen to “Difference” mode. This will lay the reference video on top of the Resolve sequence on the right. Any pixels where the two line up perfectly will appear black. Play through the entire film this way and make sure that in Difference mode the right screen stays black. If it does then you know that the sequence in Resolve matches the reference video perfectly.
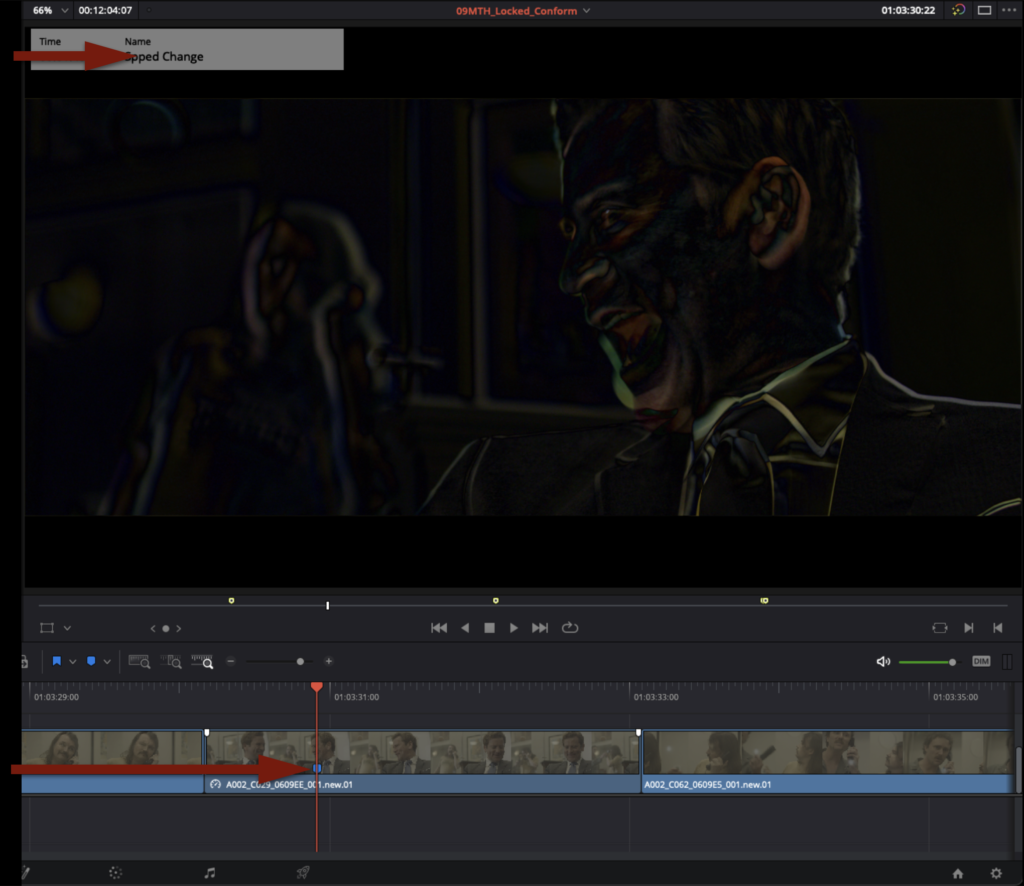
It’s possible that the sequence in Resolve and the reference video won’t match perfectly. This could happen for many reasons: e.g., reframing in Media Composer, speed changes in Media Composer, or other effects. This is not a problem, but it does mean you will need to correct it.
Below is an example of what it may look like if a reframe from Media Composer didn’t translate over perfectly. As you can see from the example, the fix is a simple manual adjustment in Resolve so that they match up.
Another common reason why the Resolve sequence may not match the reference video is if a speed change has been applied. This may need to be tweaked in Resolve to allow it to match.
If you cannot get any shot to match perfectly, mark that shot with a blue marker and name it with a brief description of the problem. After you have made it through the entire film, reach out to the Post Staff and they can help you with any shots marked in blue.
Saving and Exporting Project
Once you have finished checking your Resolve sequence against the reference video and they match perfectly, the project is ready for color grading. Save the project by hitting “Command+S”. Then type “Command+Q” to quit the project.
Turnover to Pro Tools involves preparing and transferring the editorial materials needed for dialogue editing, sound design, ADR, Foley, mixing, and other audio post-production work. This process typically includes organizing timelines, exporting reference materials, preparing audio tracks, and verifying that project materials are properly structured for sound workflows.
Because sound post-production depends heavily on clean organization and accurate media preparation, even small editorial errors can create major downstream issues for dialogue sync, track organization, or mix preparation. Standardized turnover practices help maintain consistency between editorial and sound departments while teaching students the importance of technical precision and workflow discipline in collaborative post-production environments.
How it Works
This is the process where the editorial department prepares and exports files so that the locked sequence in Media Composer can be turned over to ProTools for the sound department to work with. In the industry, an Assistant Editor would normally be responsible for exporting all the necessary elements to turn over to the sound department. Then the sound department uses those elements to conform the sequence in ProTools. In our workflow, the Editor is responsible for both exporting the necessary files out of Media Composer but importing those files into ProTools. This is to ensure that any issues during turnover can be caught immediately.
This step-by-step guide for sound turnover covers how to:
A reference video of the locked sequence will need to be exported so that the sound department has something to watch in ProTools during the sound design phase.
Mount your Show Volume and launch your Media Composer project. Open the Locked Sequences bin. Select your locked sequence and hit “Command+D” to duplicate the sequence.
Rename the new sequence Show#_Locked_Reference_Video and move it to the Sound Turnover bin.
Open the new sequence. Mark In and Out for the entire timeline and activate all tracks.
From the task menu select File > Output > Export to File…
Point the export to the Sound > Reference Video folder on your Show Volume. Check that the name of the export will be correct. Select the “Reference Video” preset.
Before clicking “Save” to export, double-check the preset by clicking “Options” and make sure the settings are exactly as shown in the example below:
When the export is complete, navigate in the Finder to where it was exported and open it in QuickTime Player to make sure everything is okay.
Export AAF from Media Composer
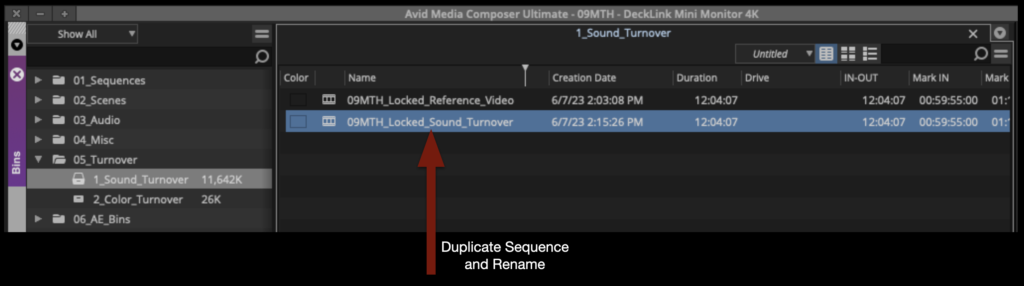
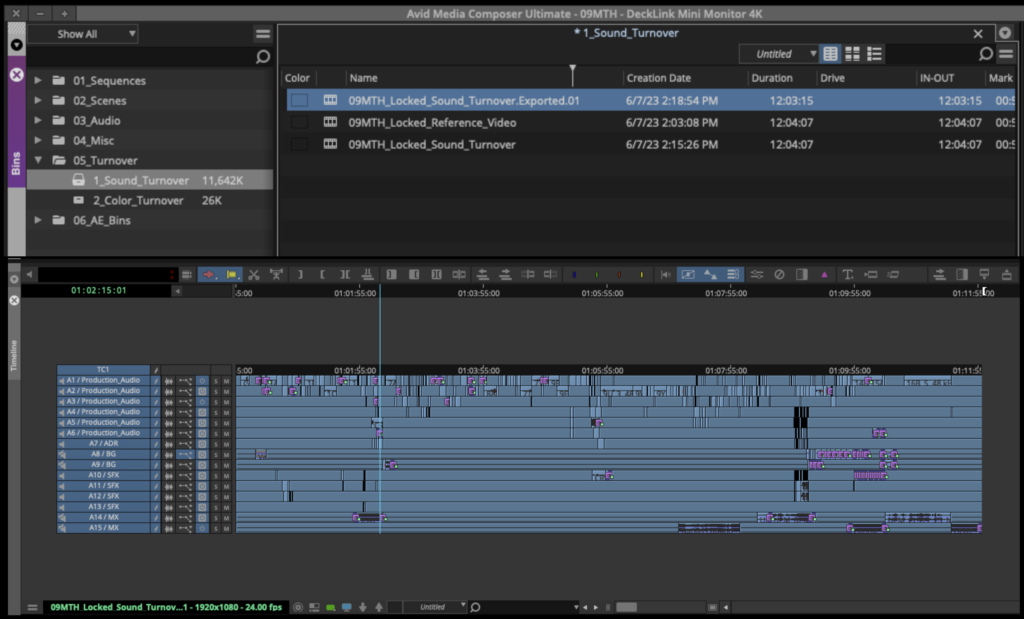
Duplicate the sequence named “Locked Reference Video” and rename it show#Locked_Sound_Turnover as shown in the example below:
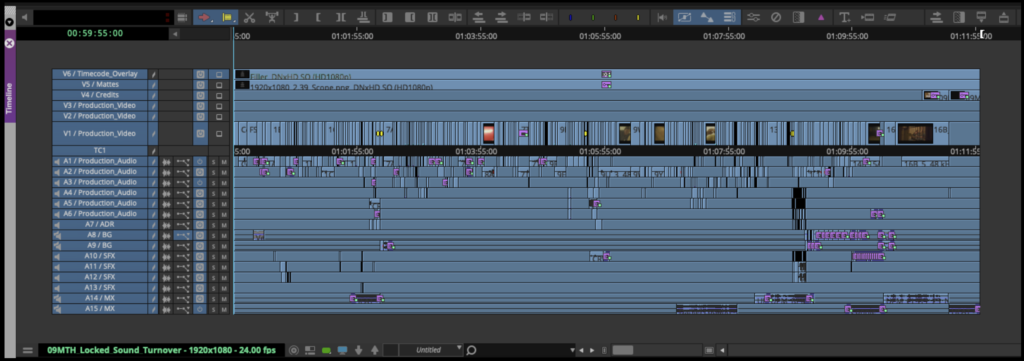
Open the new sequence. Mark In and Out for the entire timeline and activate all tracks.
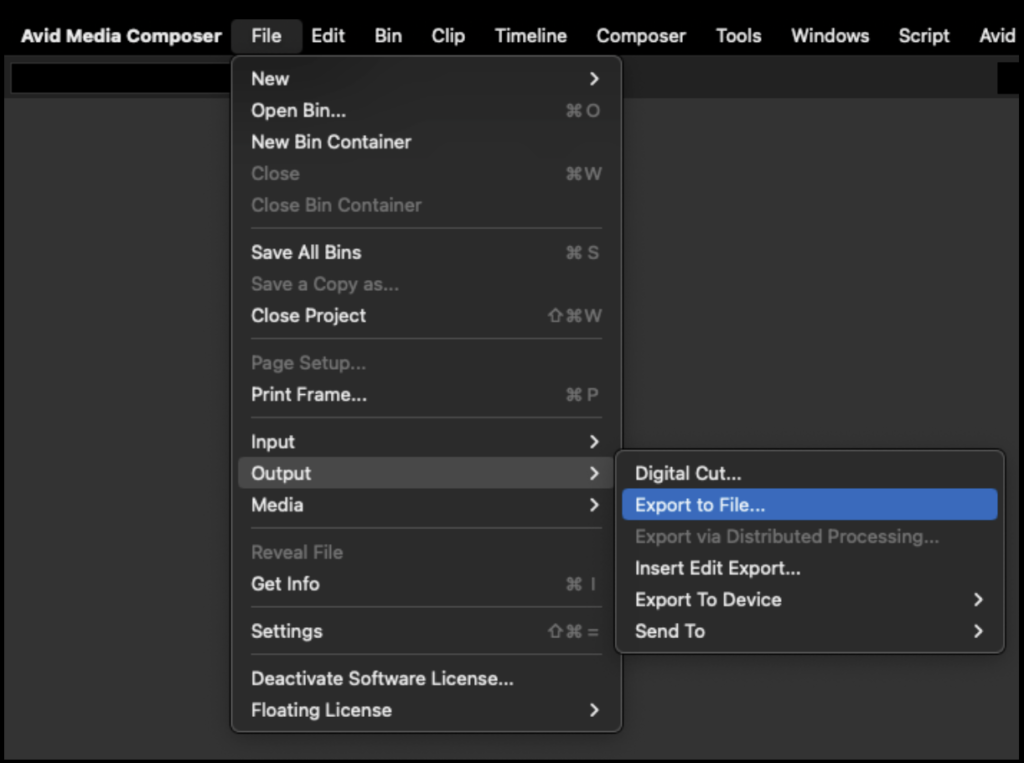
From the task menu, select File > Output > Export to File…
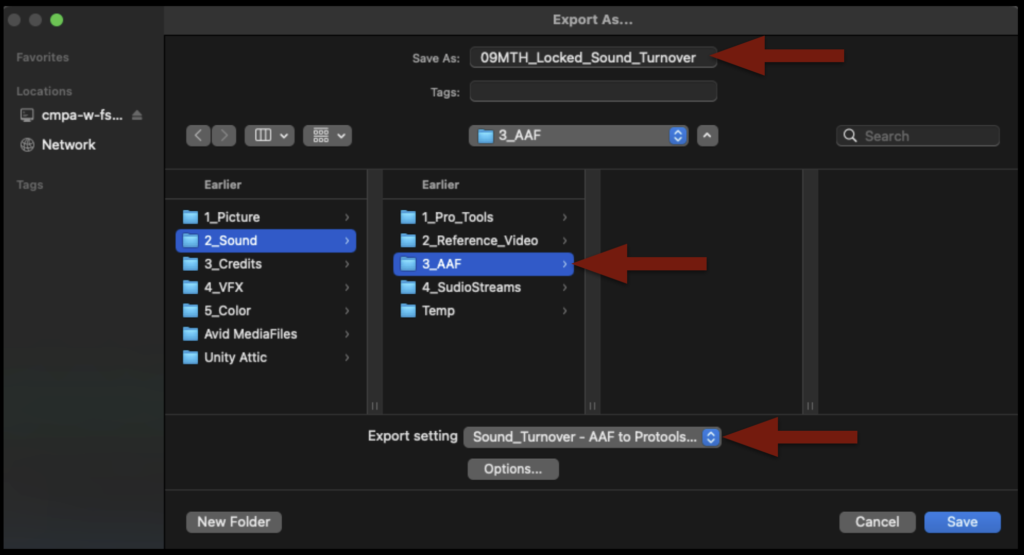
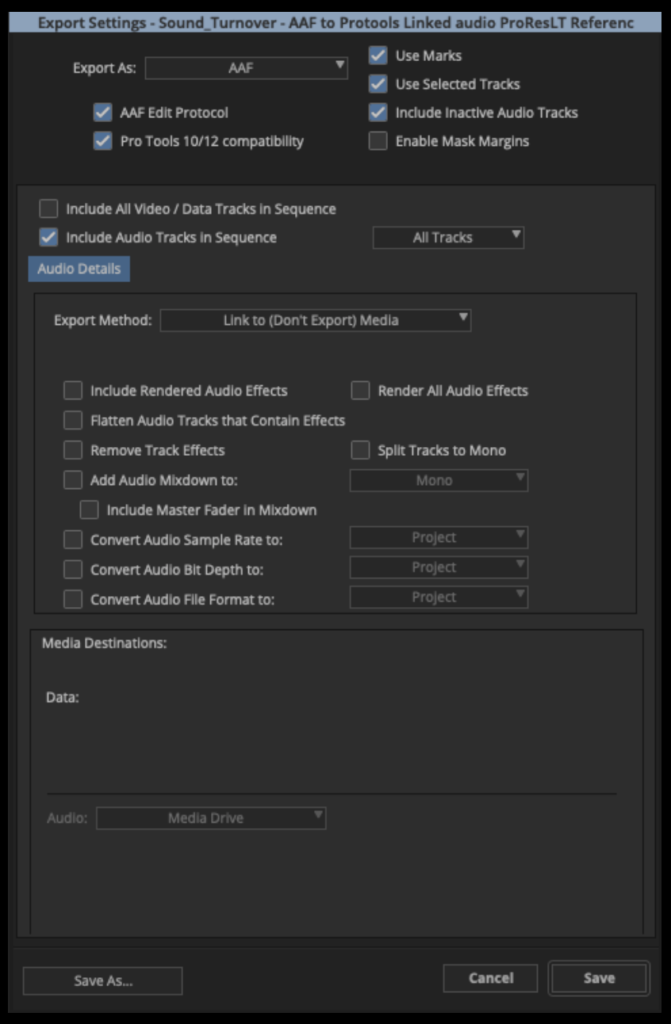
Point the export to the Sound > AAF folder on your Show Volume. Check that the name of the export will be correct. Select the “Sound_Turnover – AAF to Protools” preset.
Before clicking “Save” to export, double-check the preset by clicking “Options” and make sure the settings are exactly as shown in the example below:
When the AAF is finished exporting, Media Composer will automatically import it back into the Sound Turnover bin as a sequence. If you open the sequence, you will see that the AAF only held information describing the audio tracks. That is all ProTools will need.
After you check that, you can close Media Composer.
Import AAF into ProTools
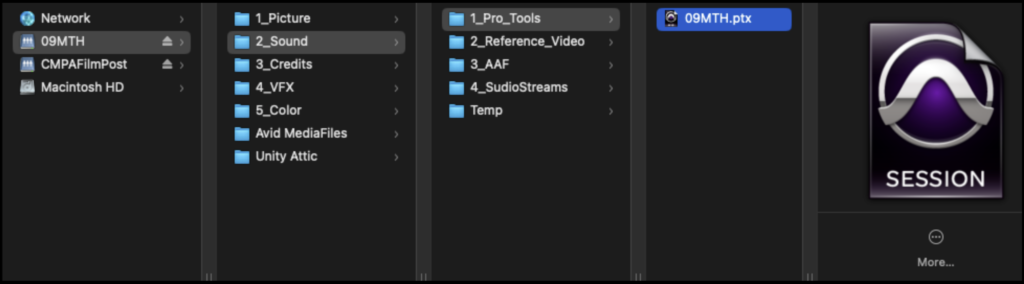
Navigate on your Show Volume to your ProTools project and open it.
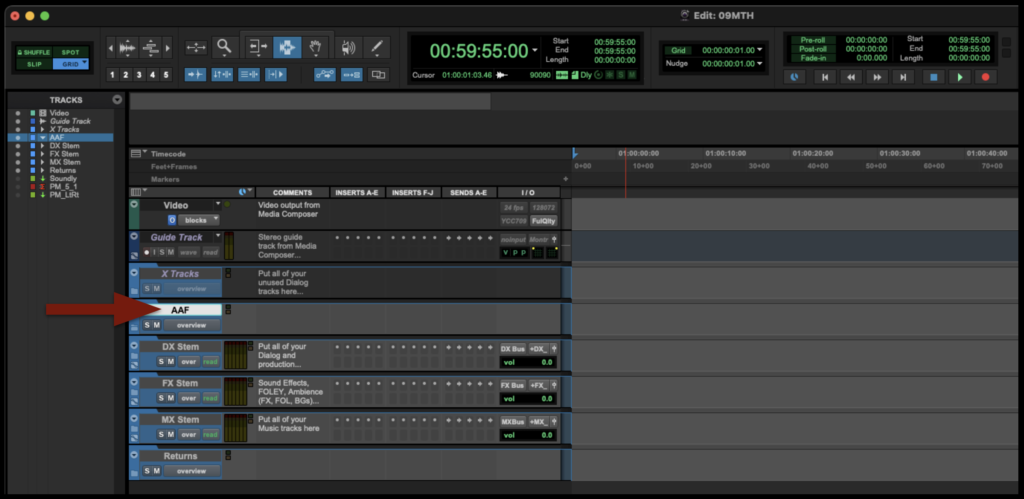
When ProTools opens, select the folder labeled “AAF”:
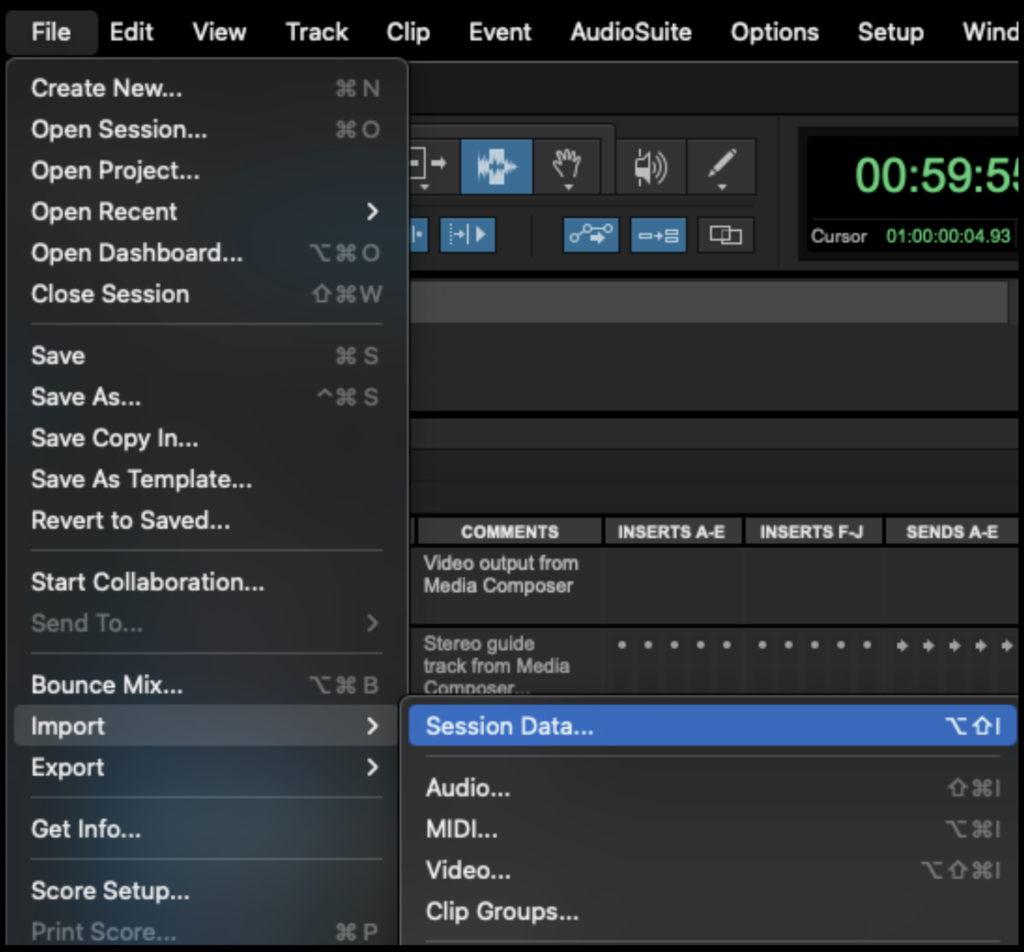
From the task menu, select File > Import > Session Data…
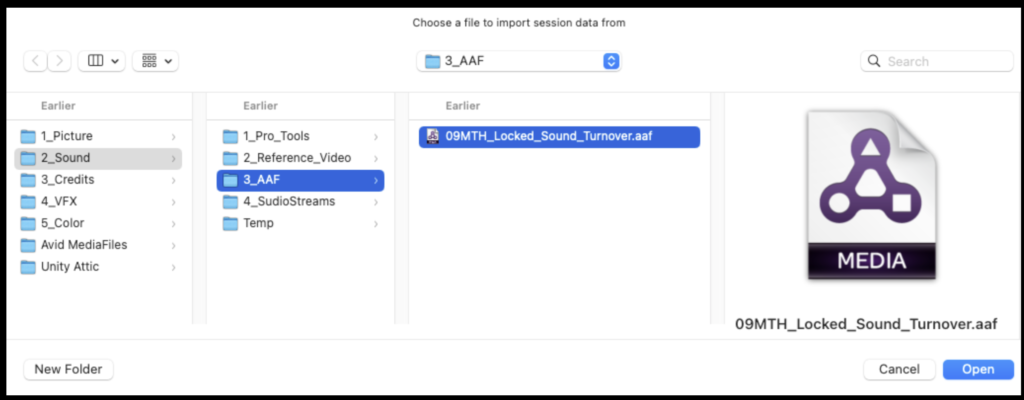
Navigate in the Finder window to where you saved the AAF that was exported from Media Composer and click “Open”.
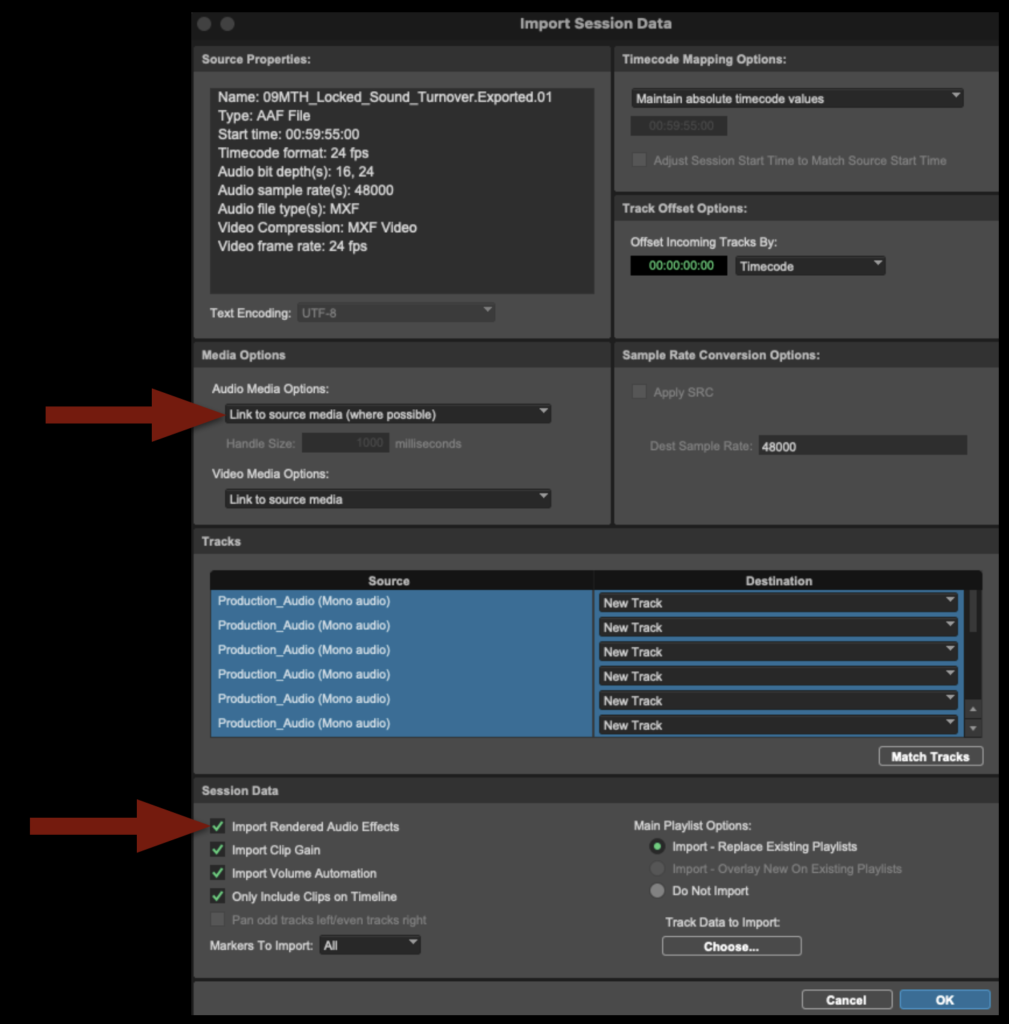
In the Import Session Data page make sure the select “Link to Source Media” under Audio Media Options. And check the box labeled “Import Rendered Audio Effects”. Then select “OK”.
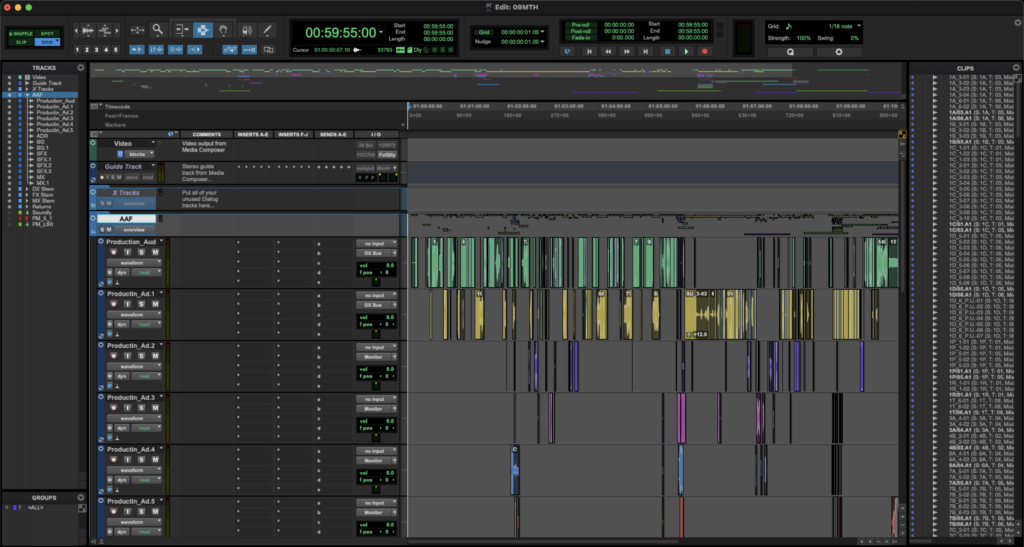
The AAF folder will populate with all the audio tracks from your locked sequence. This may take a few minutes to finish. When it does, it will look like the example below.
If you get any kind of error while importing your AAF, it is likely because something was not done properly during the picture lock stage. Go back to the Media Composer project and double-check the steps in the handbook. If that doesn’t fix the error, ask the Post Staff for help.
Import Reference Video into ProTools
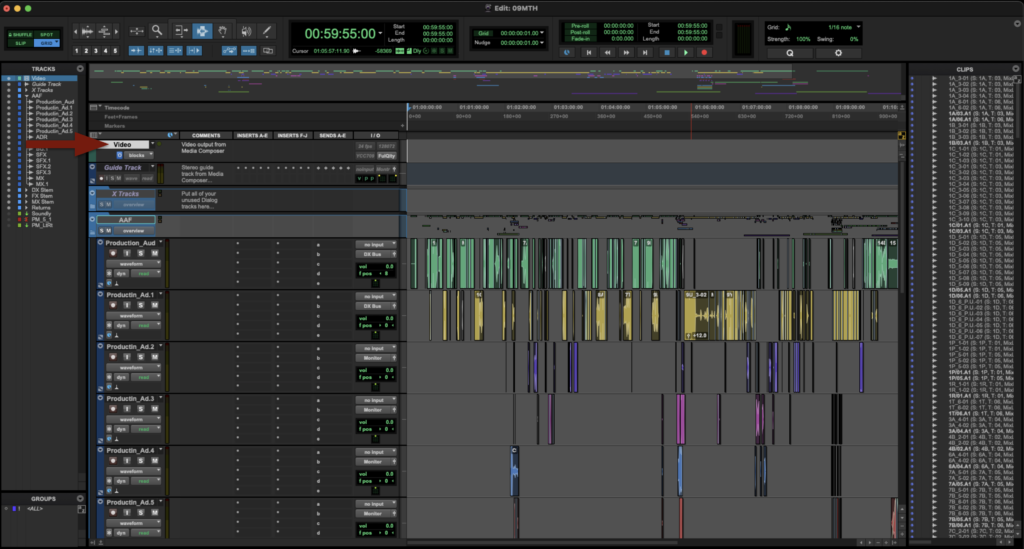
Next, you will need to import the reference video that was exported out of Media Composer into ProTools. Select the “Video” folder:
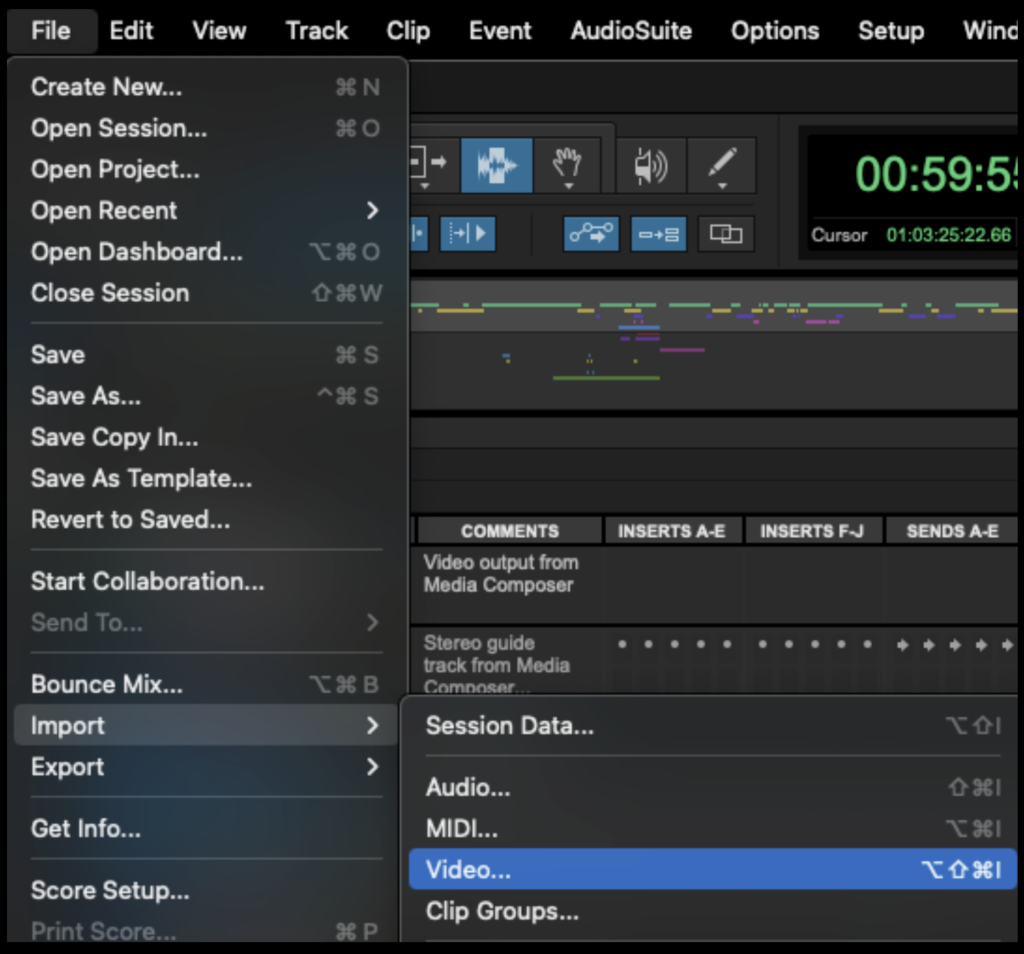
From the task menu, select File > Import > Video…
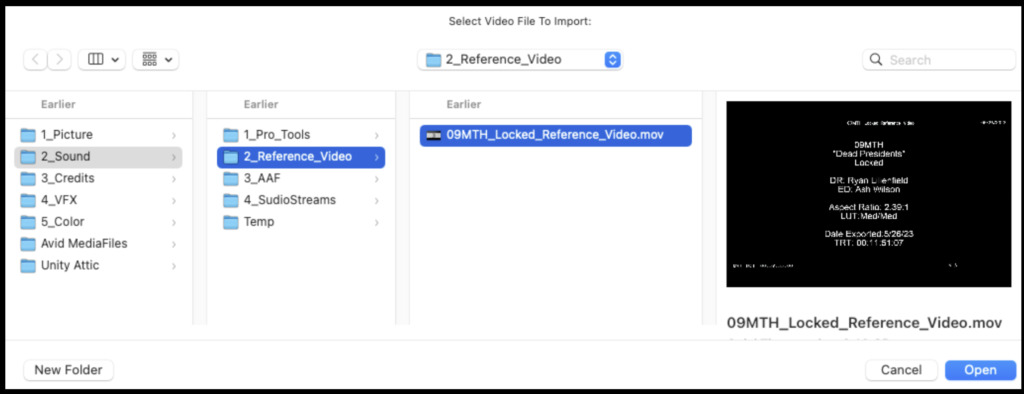
Navigate in the Finder window to where you saved the Reference Video that was exported from Media Composer and click “Open”.
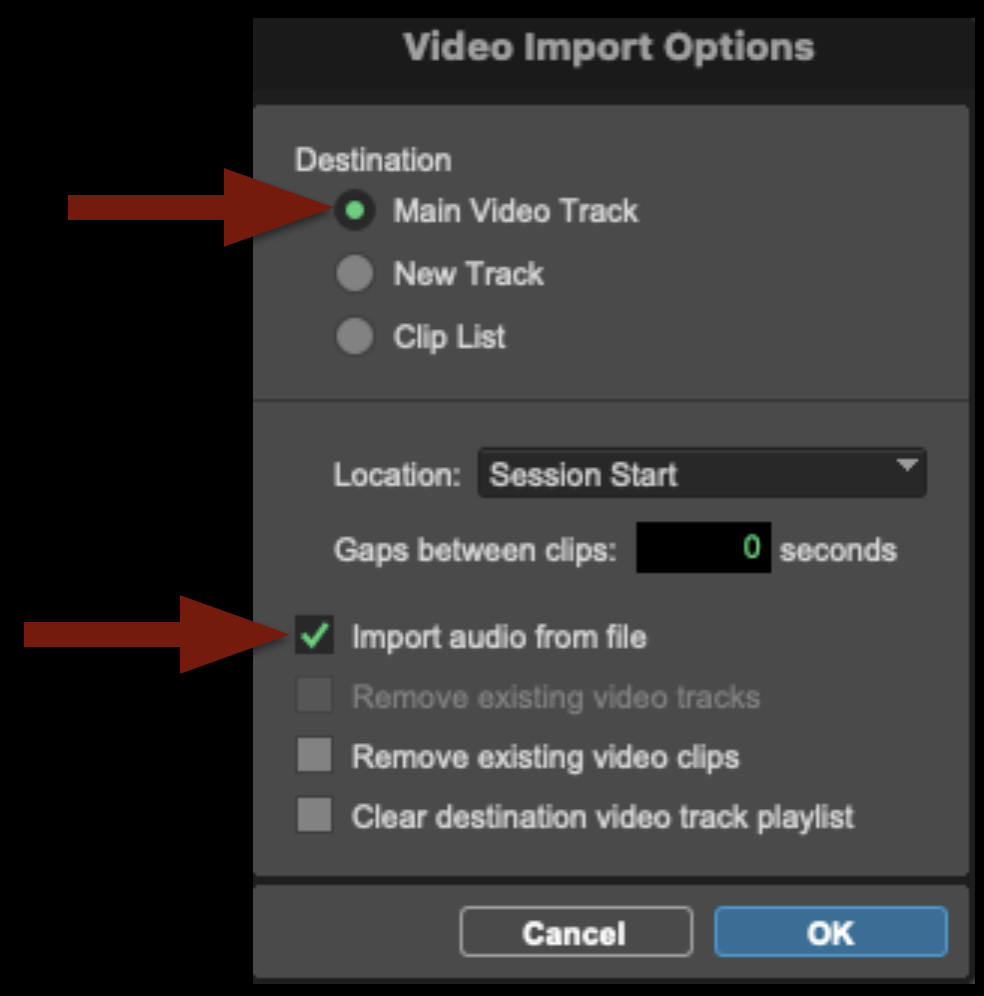
In the Video Import Options page make sure to select “Main Video Track” as the Destination and check the box labeled “Import audio from file”. Then select “OK”.
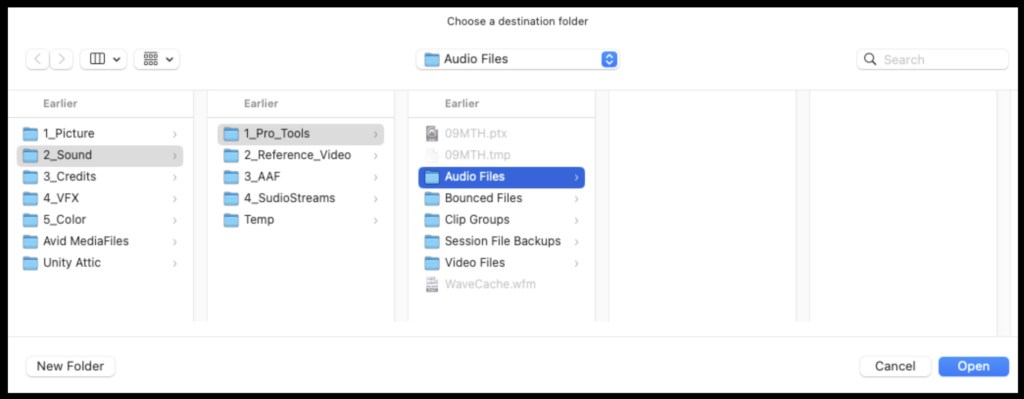
It will ask you to choose a destination for the audio and will default to the correct “Audio Files” folder. Click “Open”.
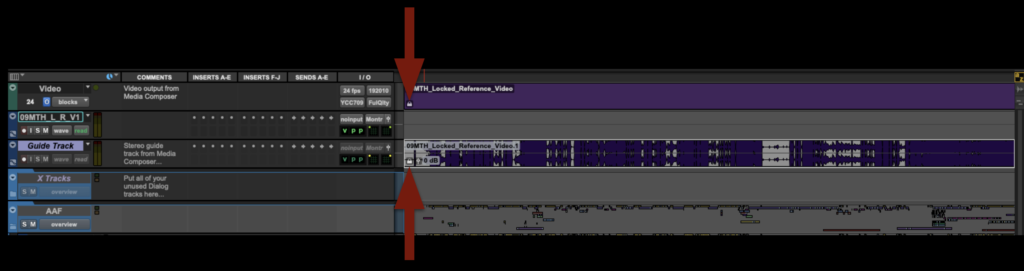
The reference video will come in on the correct track, but the audio attached to it will need to be moved.
Move the audio down to the Guide Track.
Lock both the Video and Guide Track by selecting them and hitting “Command + L”.
Delete the empty track to clean up your project.
Congratulations, you are done! The ProTools project can now be saved and closed. It is ready for the sound design phase.