ADR and Foley stage operations involve the procedures, scheduling practices, technical workflows, and studio protocols associated with recording replacement dialogue, Foley performance, and other synchronized sound elements during post-production.
These workflows are important because ADR and Foley recording require careful coordination between performers, editors, mixers, and playback systems. Learning proper stage operations helps students develop professional studio etiquette, technical recording practices, and collaborative communication skills within controlled post-production sound environments.
Scheduling Sessions
This suite is a shared space for all students in the program. It is therefore very important to be considerate of others. Please only book the space for the amount of time you’ll need it, and please be willing to negotiate booking times with other students if the suite is in high demand. Please also leave the suite in the same or better condition as you found it. Any students who leave the suite in a disheveled state may be subject to professionalism probation.
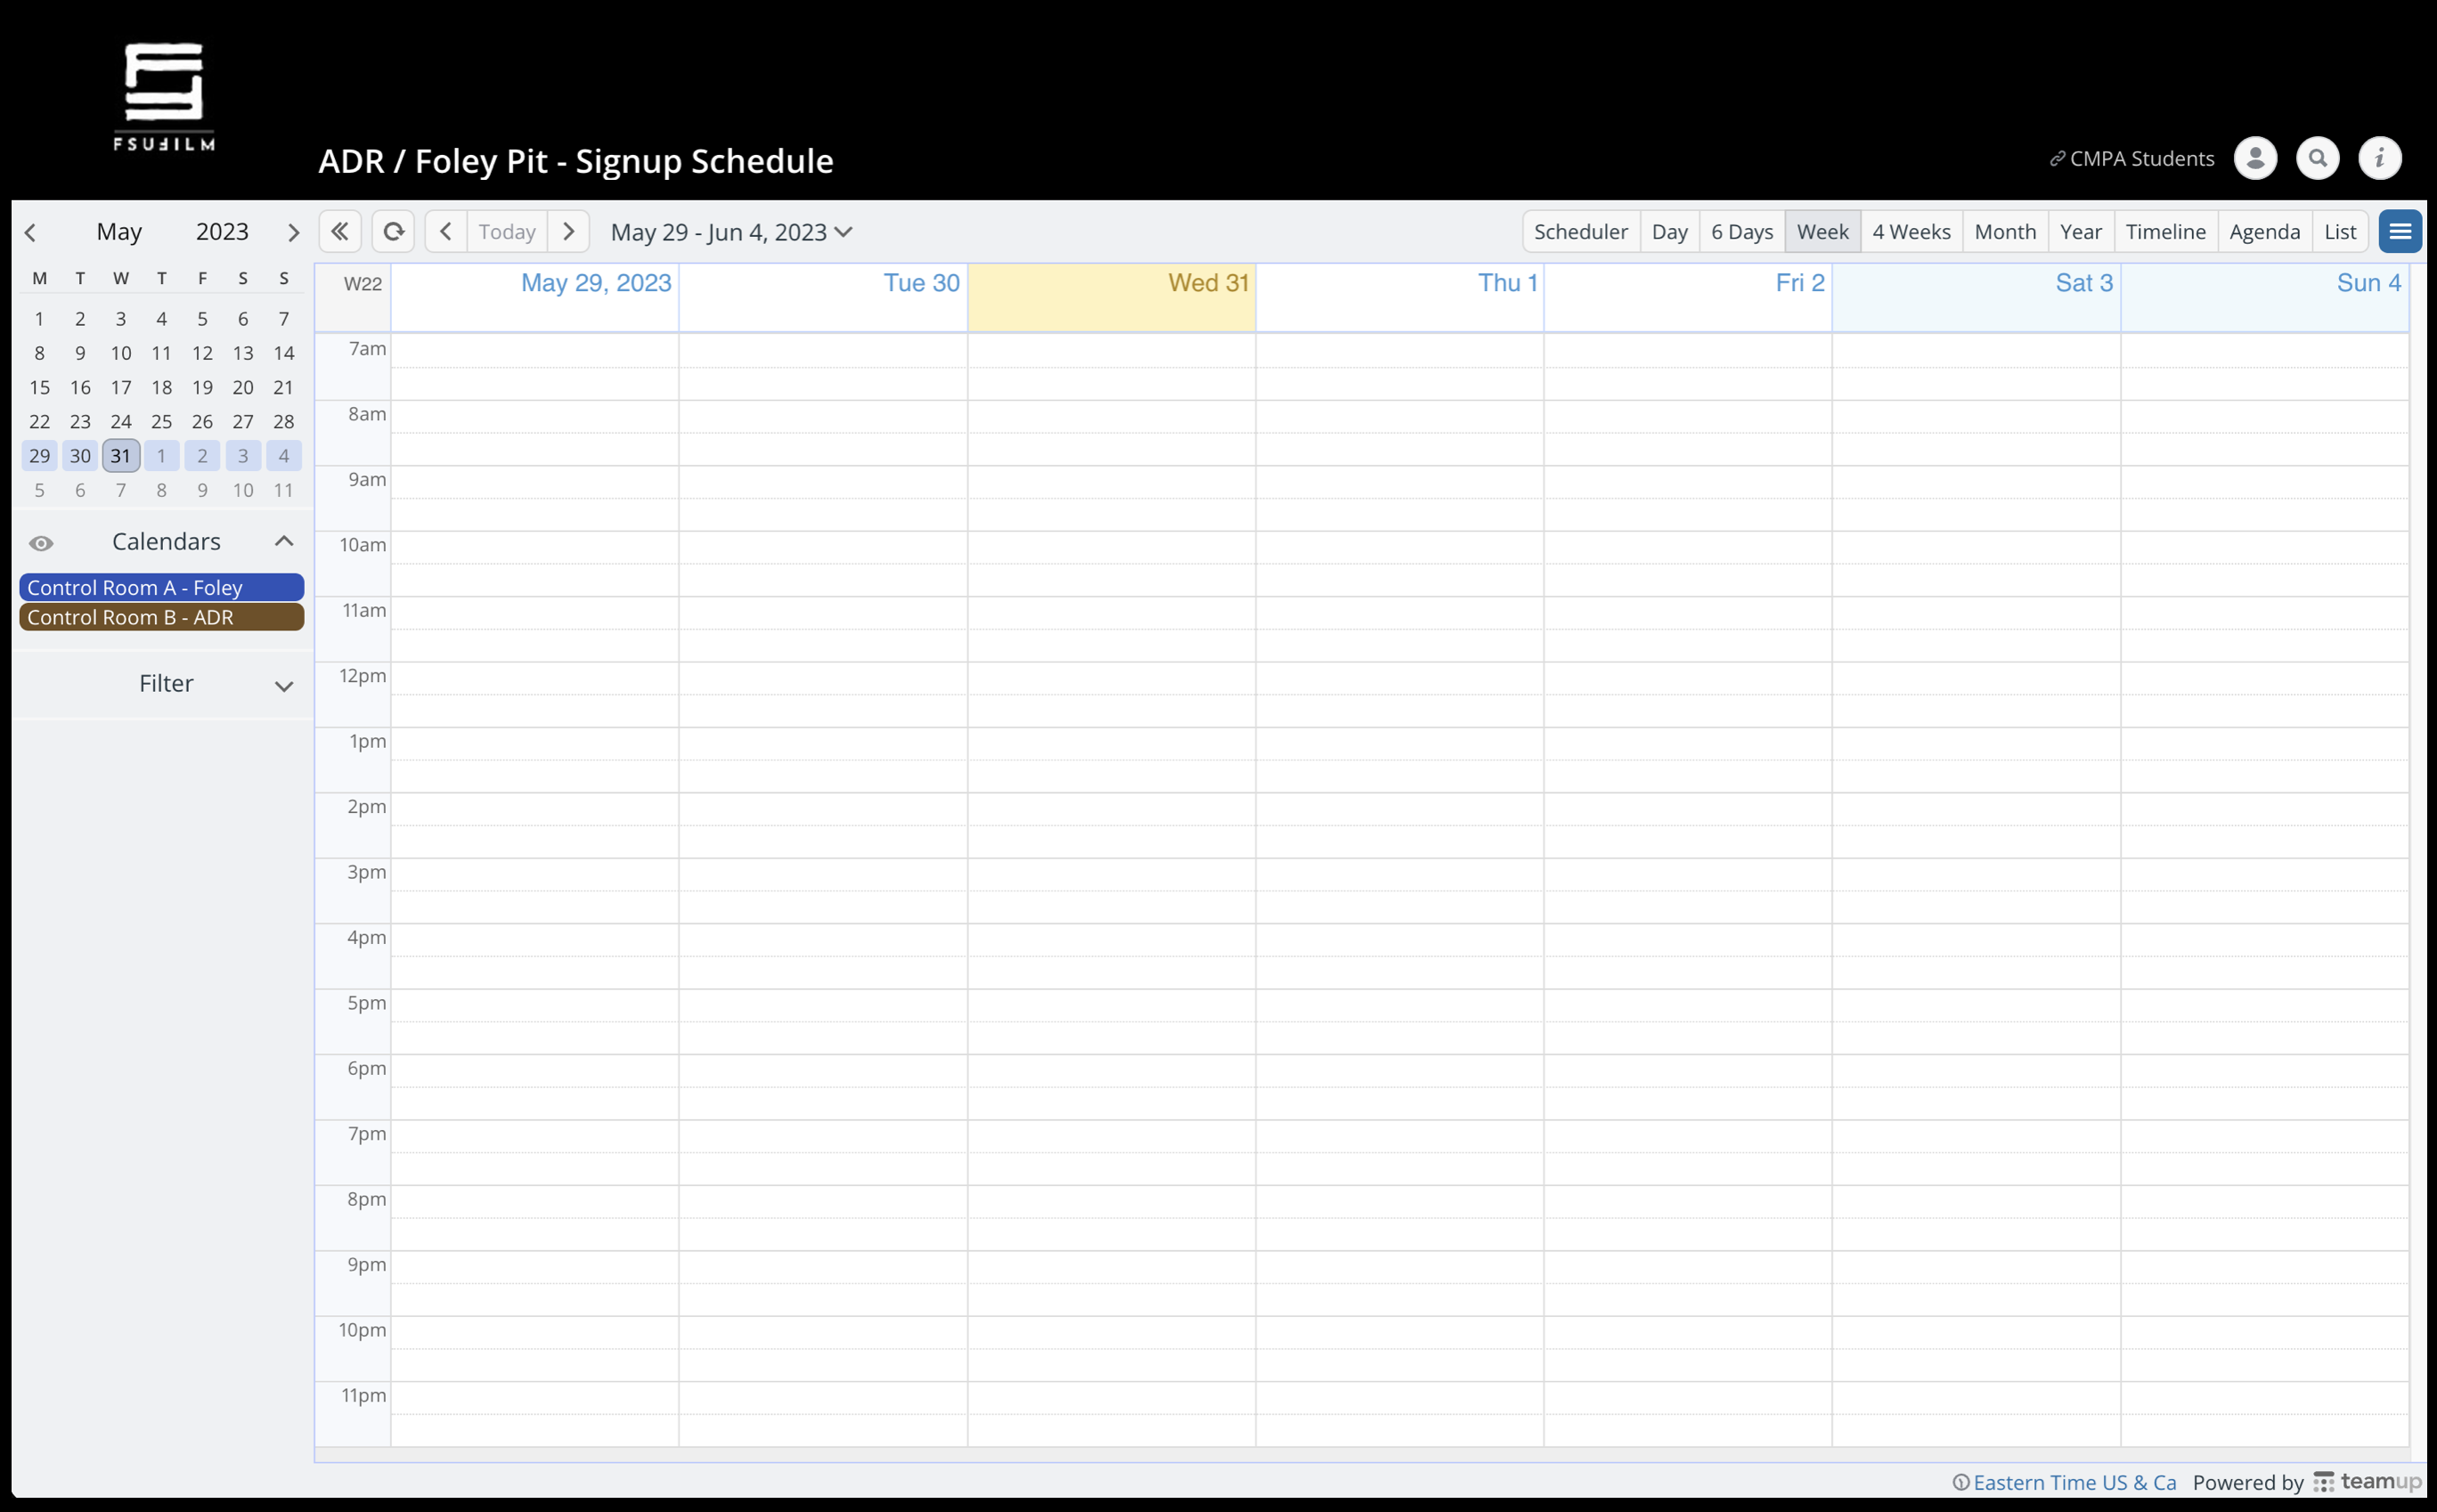
To book time in either the ADR booth or Foley stage, click this link: ADR/Foley Pit Signup Schedule. This will take you to a Teamup calendar:
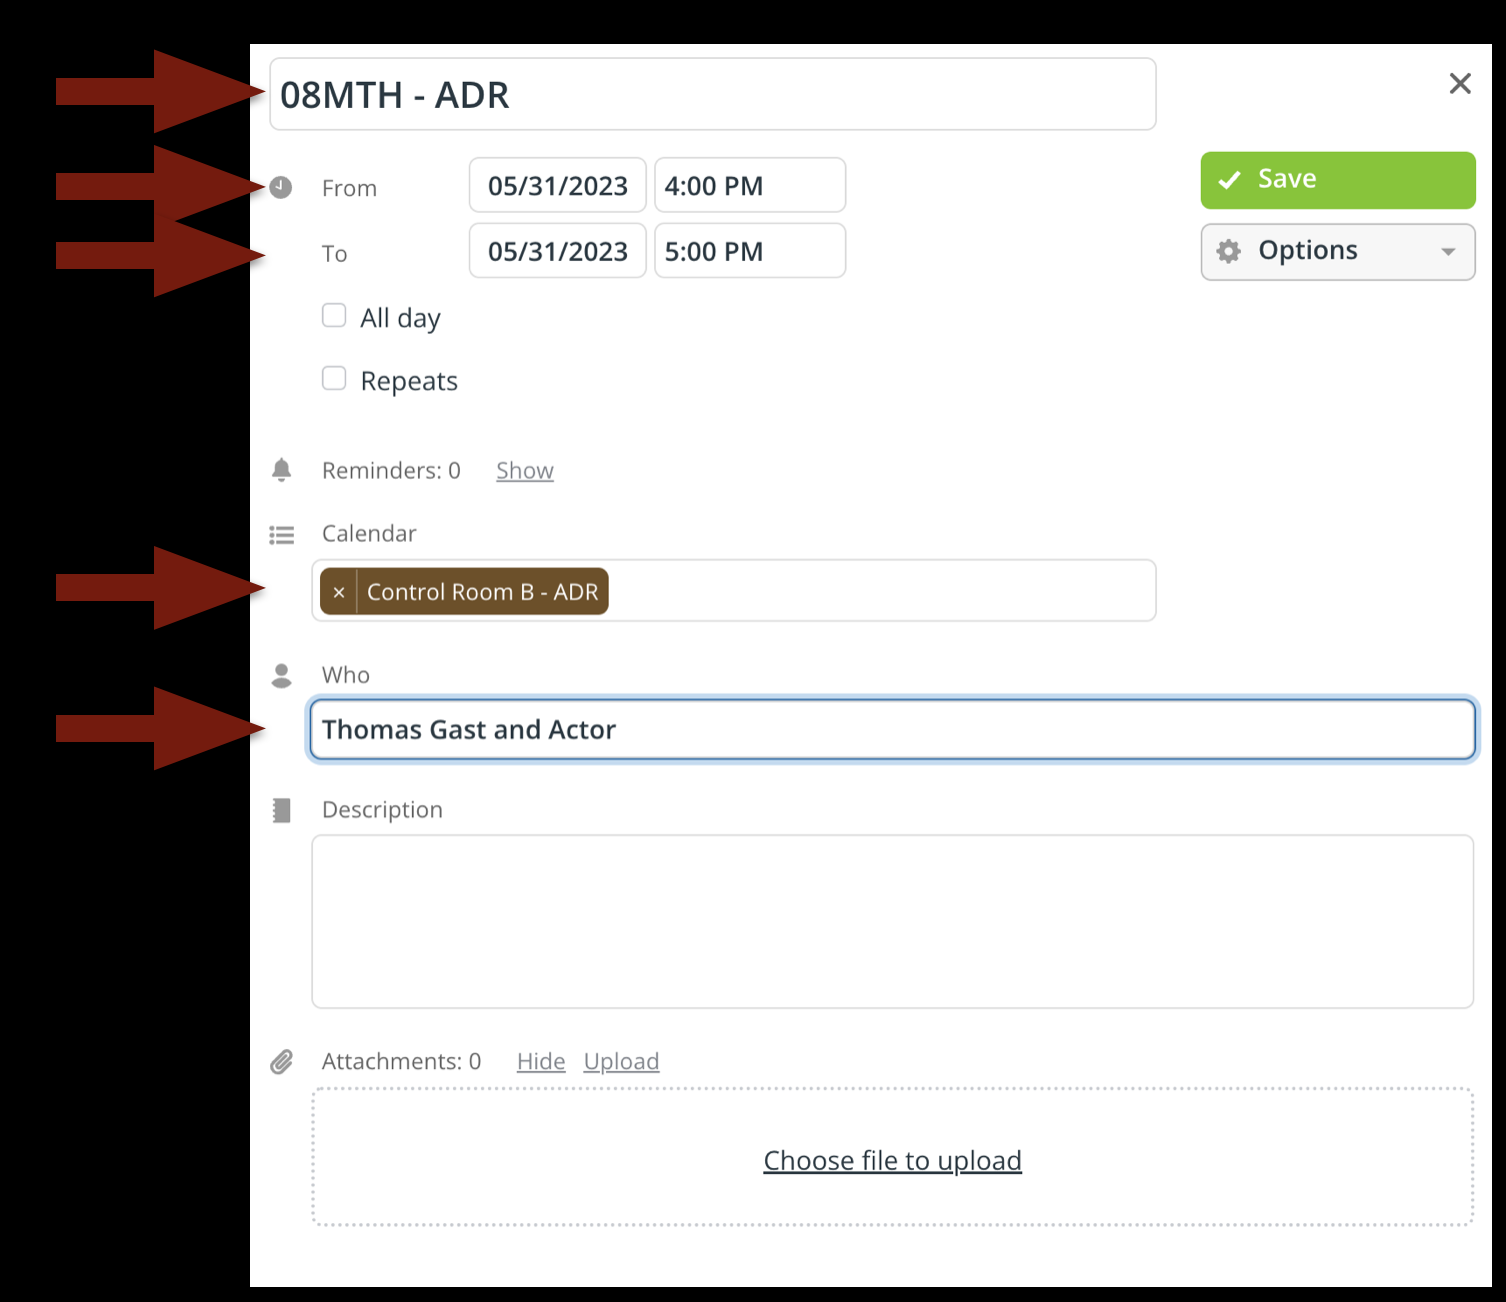
When the Teamup calendar opens, you will be able to see who else has booked the time in either the ADR booth or Foley stage. Select the date and time you would like to reserve by clicking in the calendar. When you do, a pop up will appear asking for you to enter more information about your reservation:
Enter your show number in the event title
Refine the start and end times
Select either “Control Room A – Foley” or “Control Room B – ADR”
List the names of who will be in the space
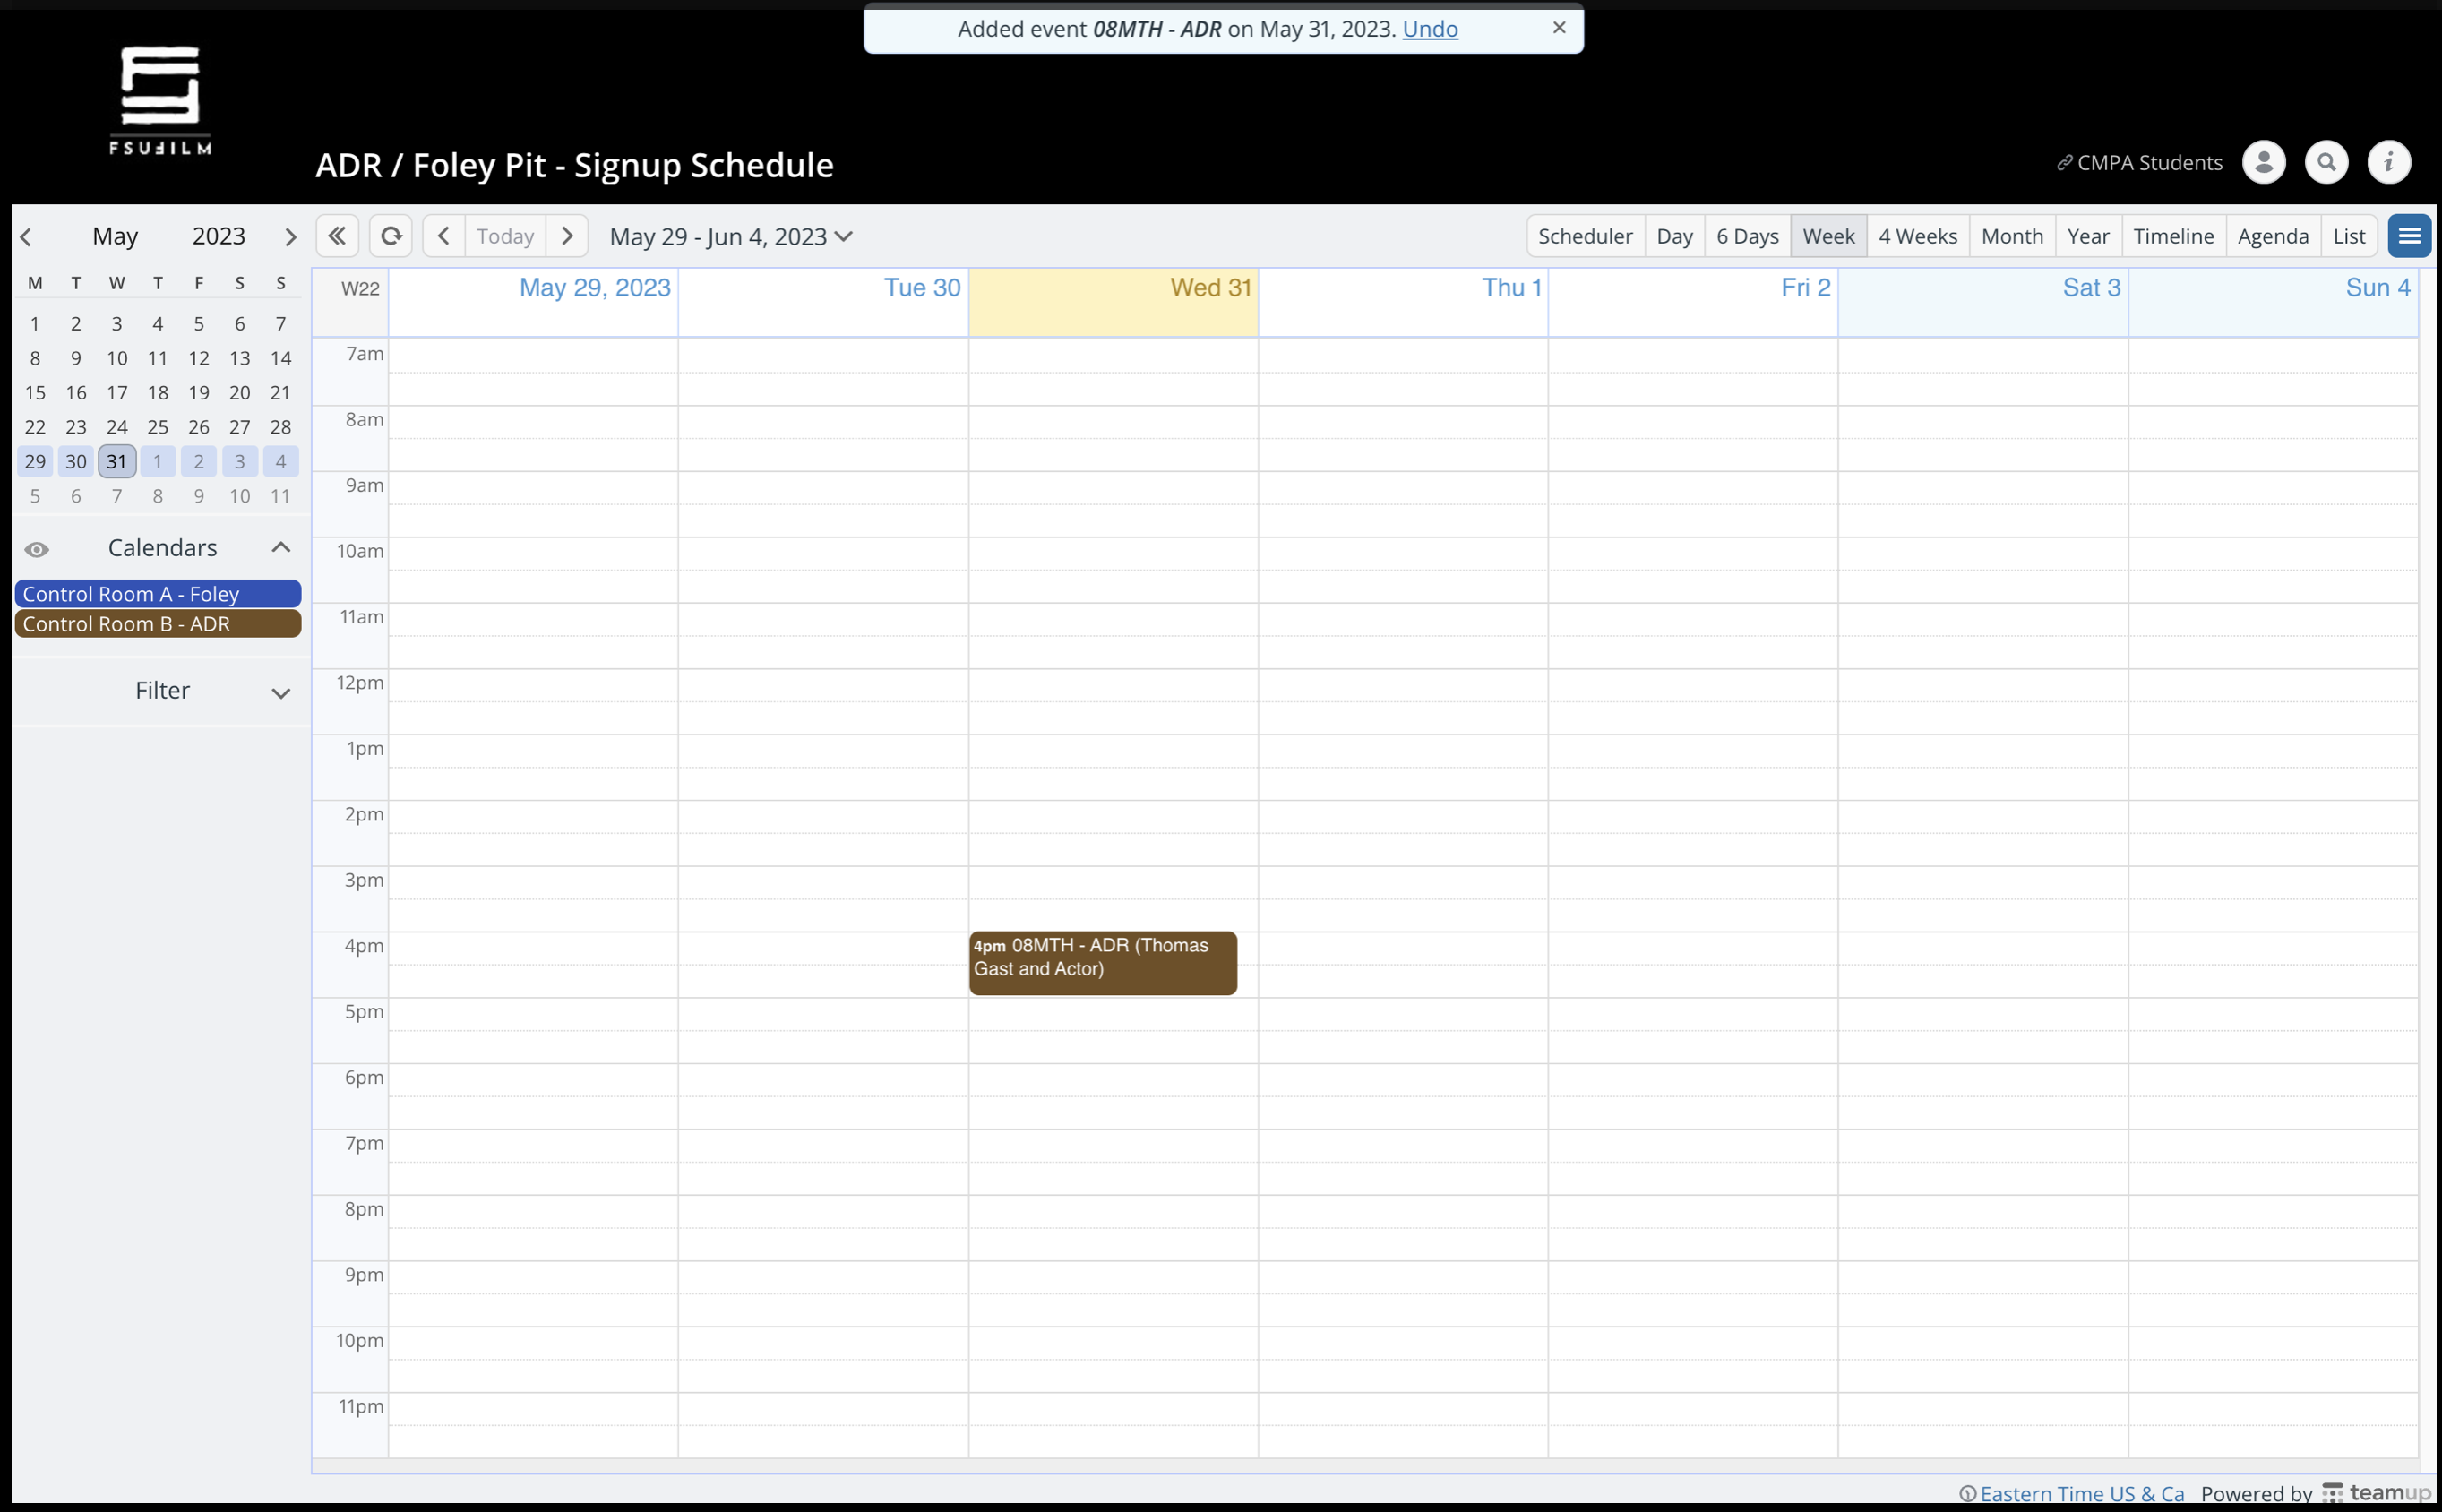
When you are done, it will look like the example below:
Please be considerate of your fellow filmmakers and only book the time that you need.
Recording ADR or Foley
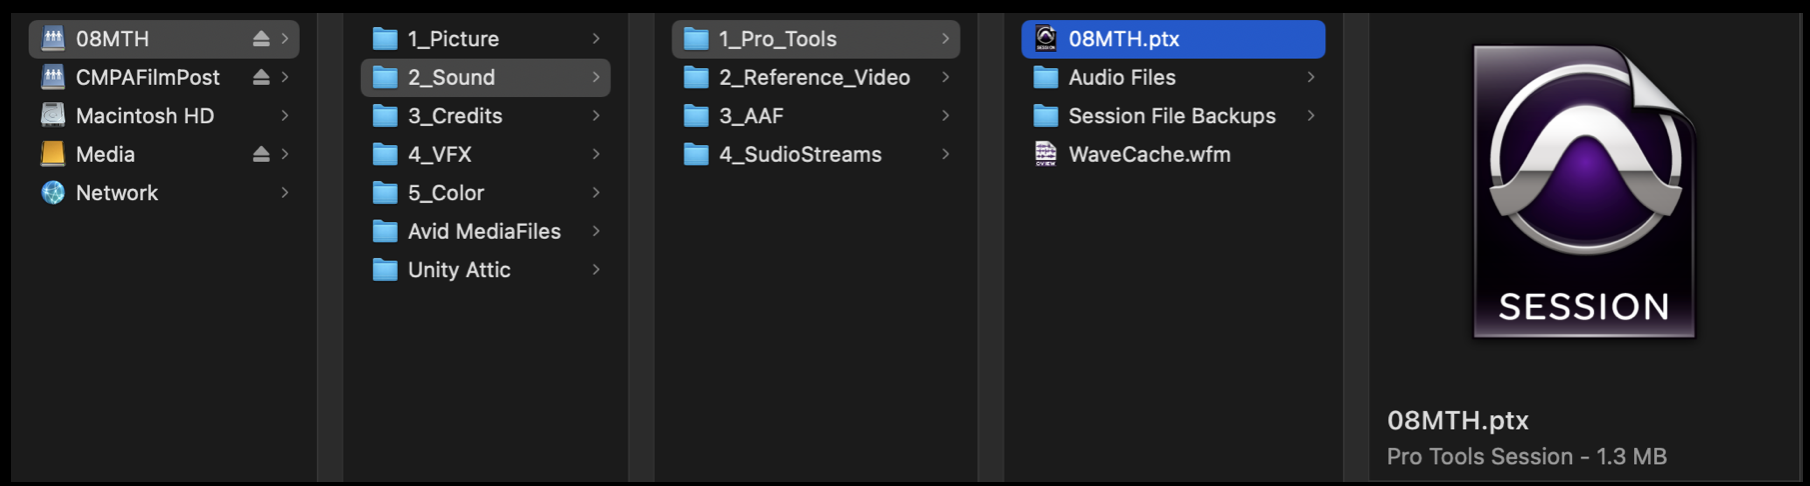
Make sure that your ProTools session is closed in your suite on the Post Hall. Mount your show volume in either Control Room A or Control Room B. Navigate to your ProTools project and open it.
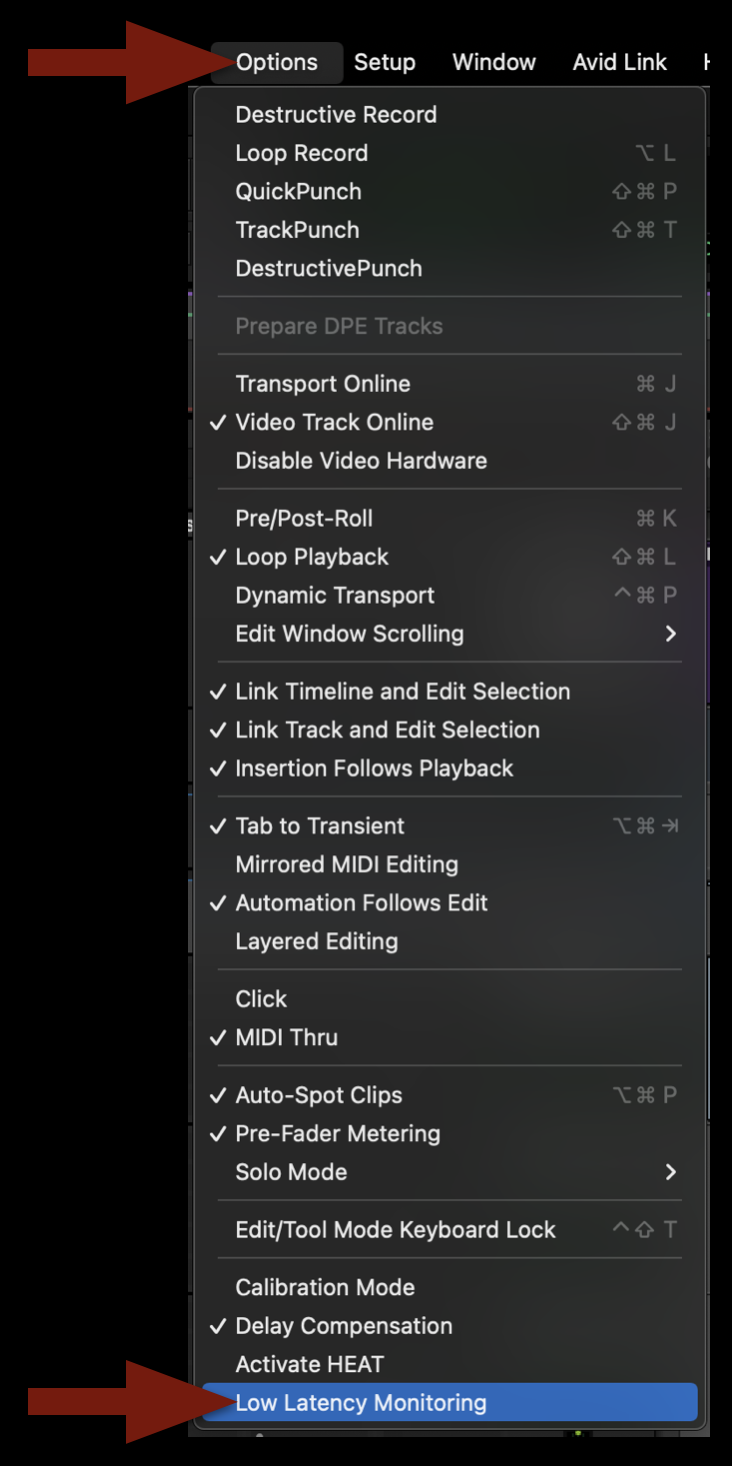
Once the project is open, navigate in the task bar to Options and then scroll down and select “Low Latency Monitoring”. Make sure there’s a checkmark after you have it selected.
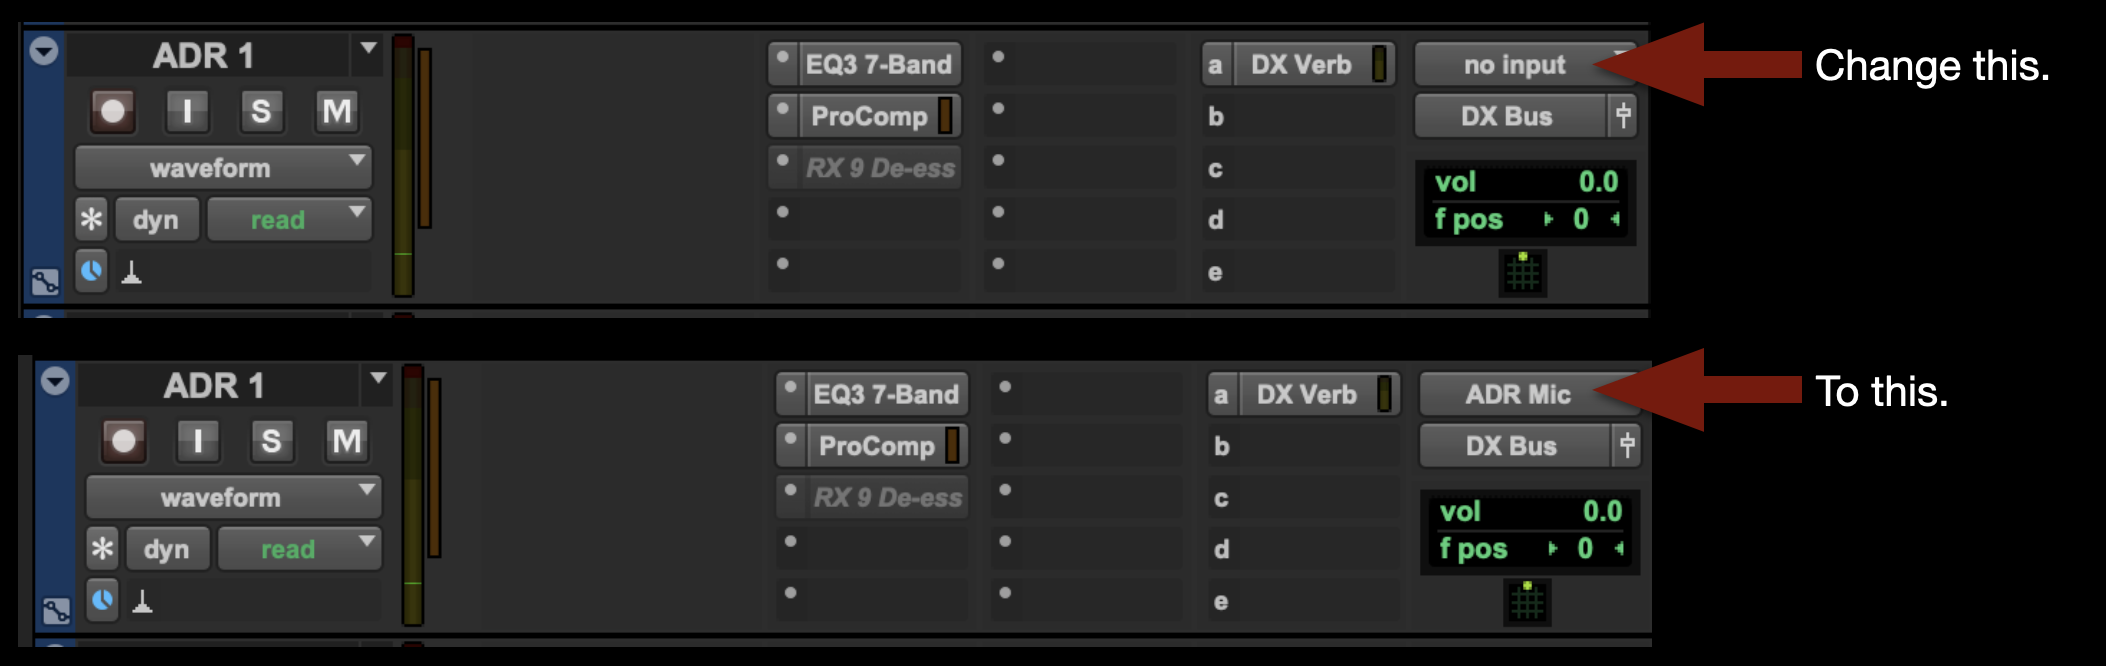
Navigate to the ADR track you wish to record on and change the input from “no Input” to “ADR Mic”:
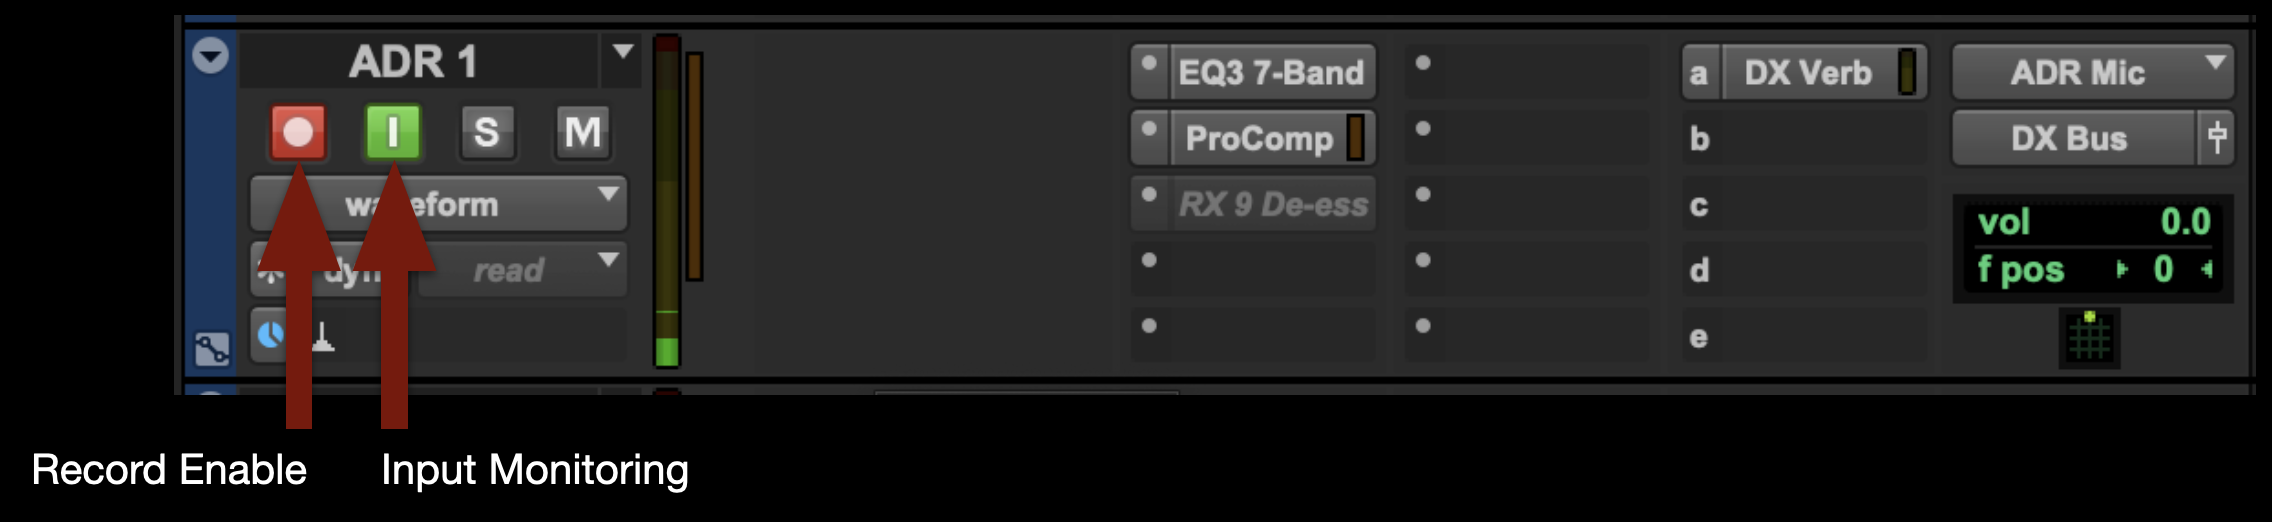
Record Enable the track and select Input Monitoring. Note: When you are finished recording, you’ll need to deselect both of these for playback.
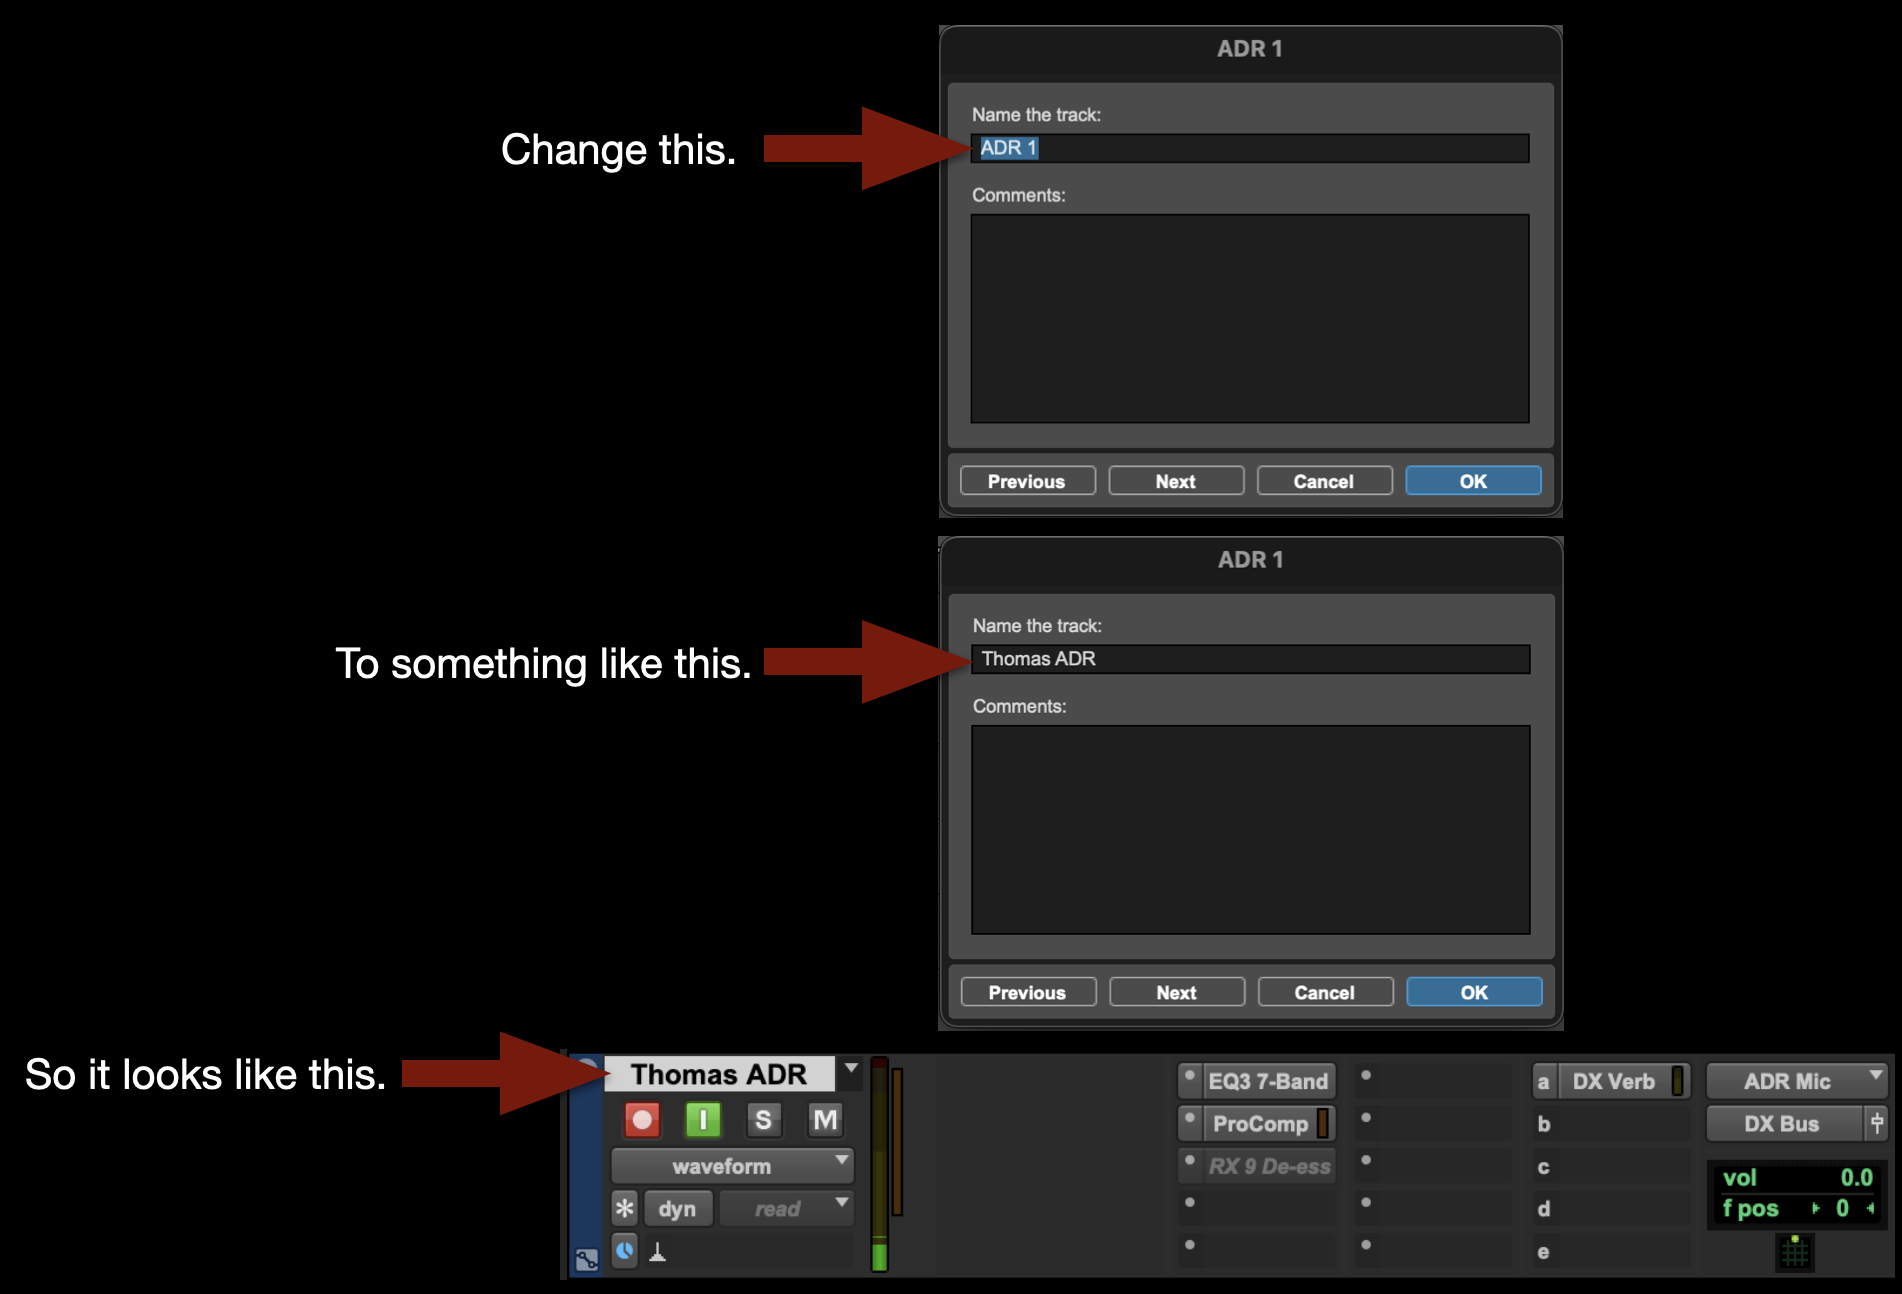
Change the name of the track to whatever you want the clip name to be:
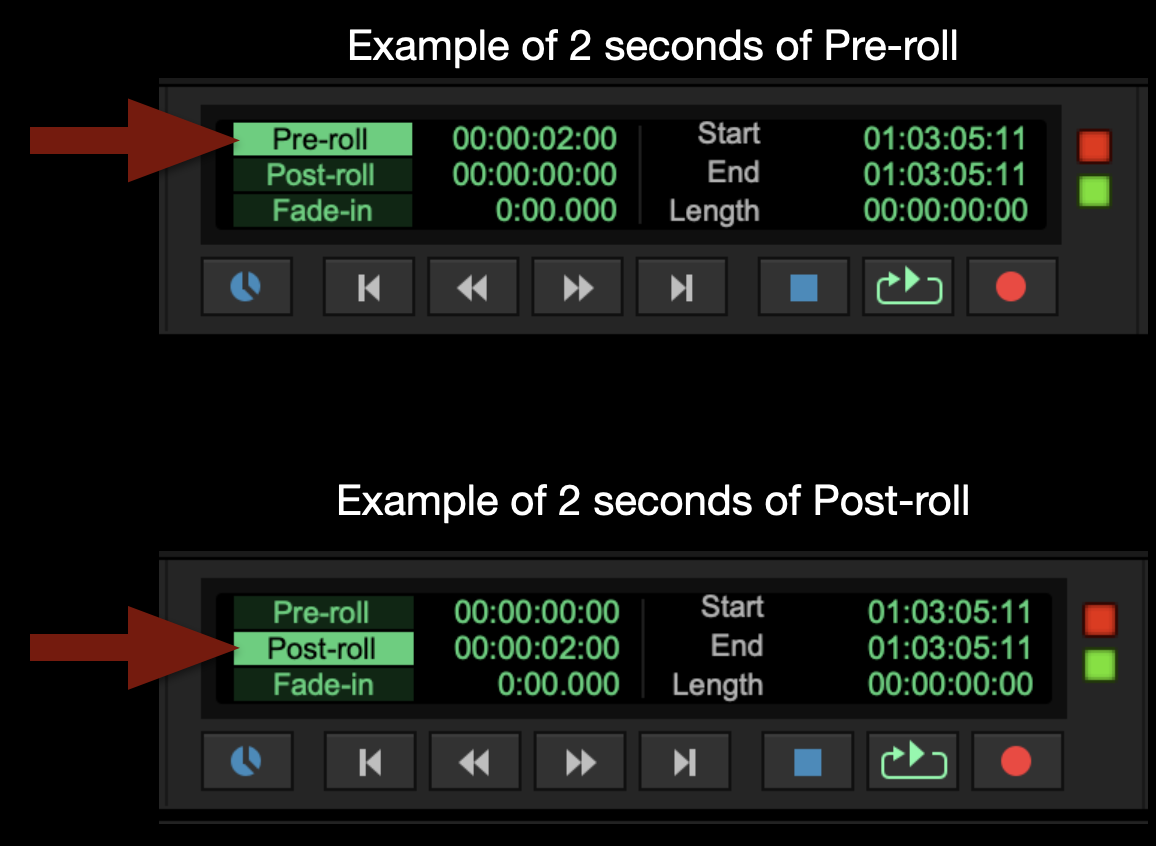
If wish, you can select Pre-roll time or Post-roll time:
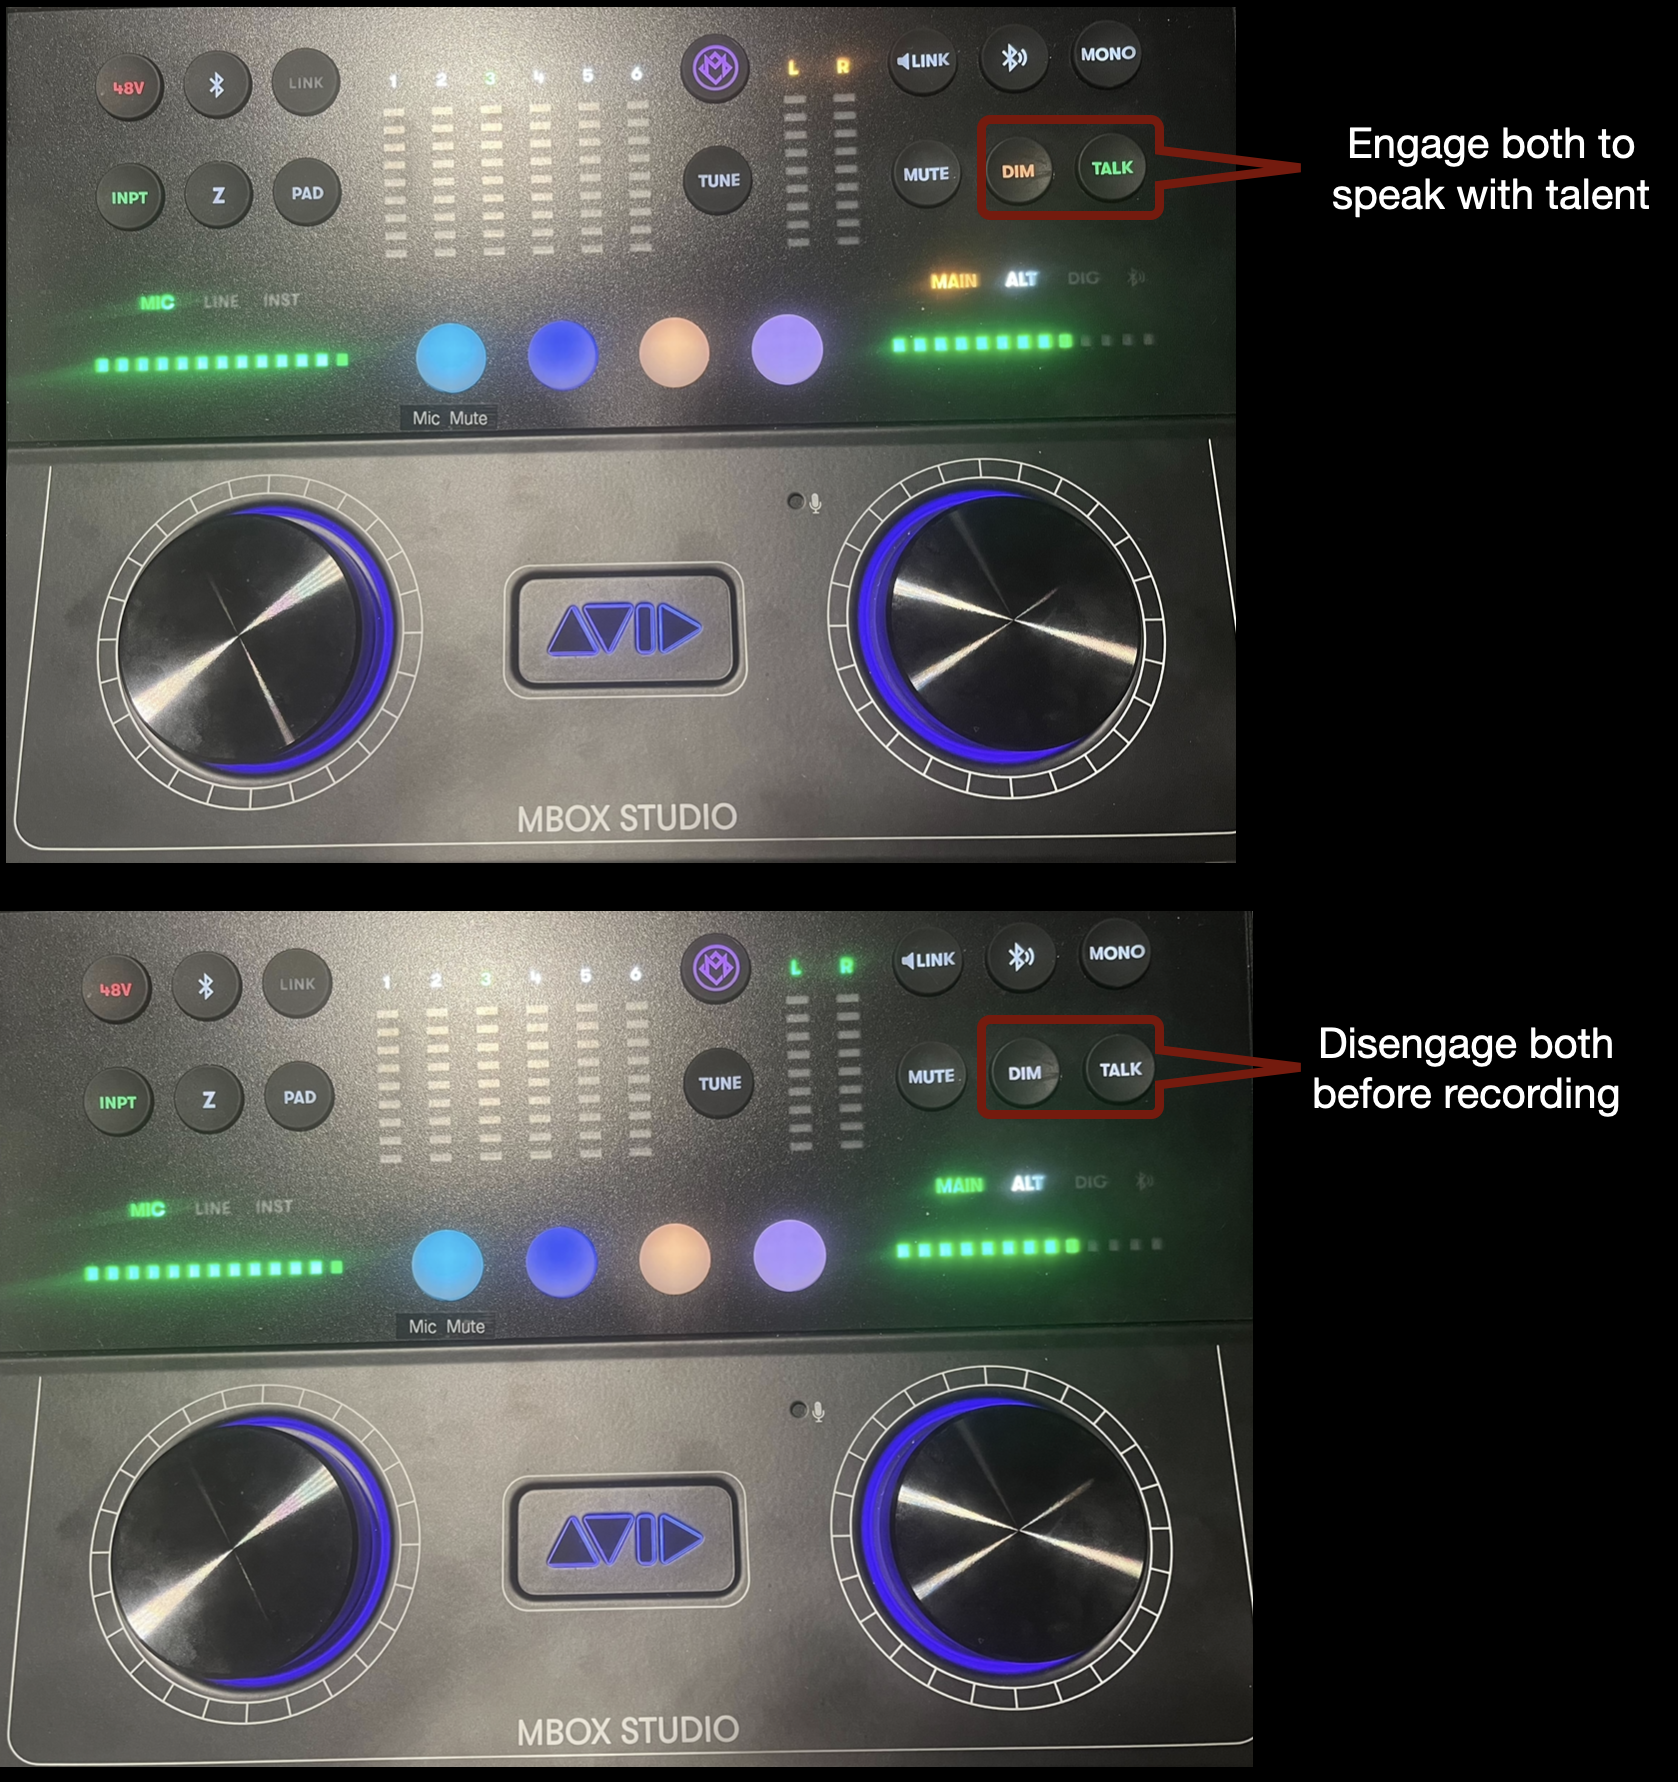
To talk to talent during the session, press both DIM and TALK on the MBox Studio. Press both buttons again to disengage talkback before recording.
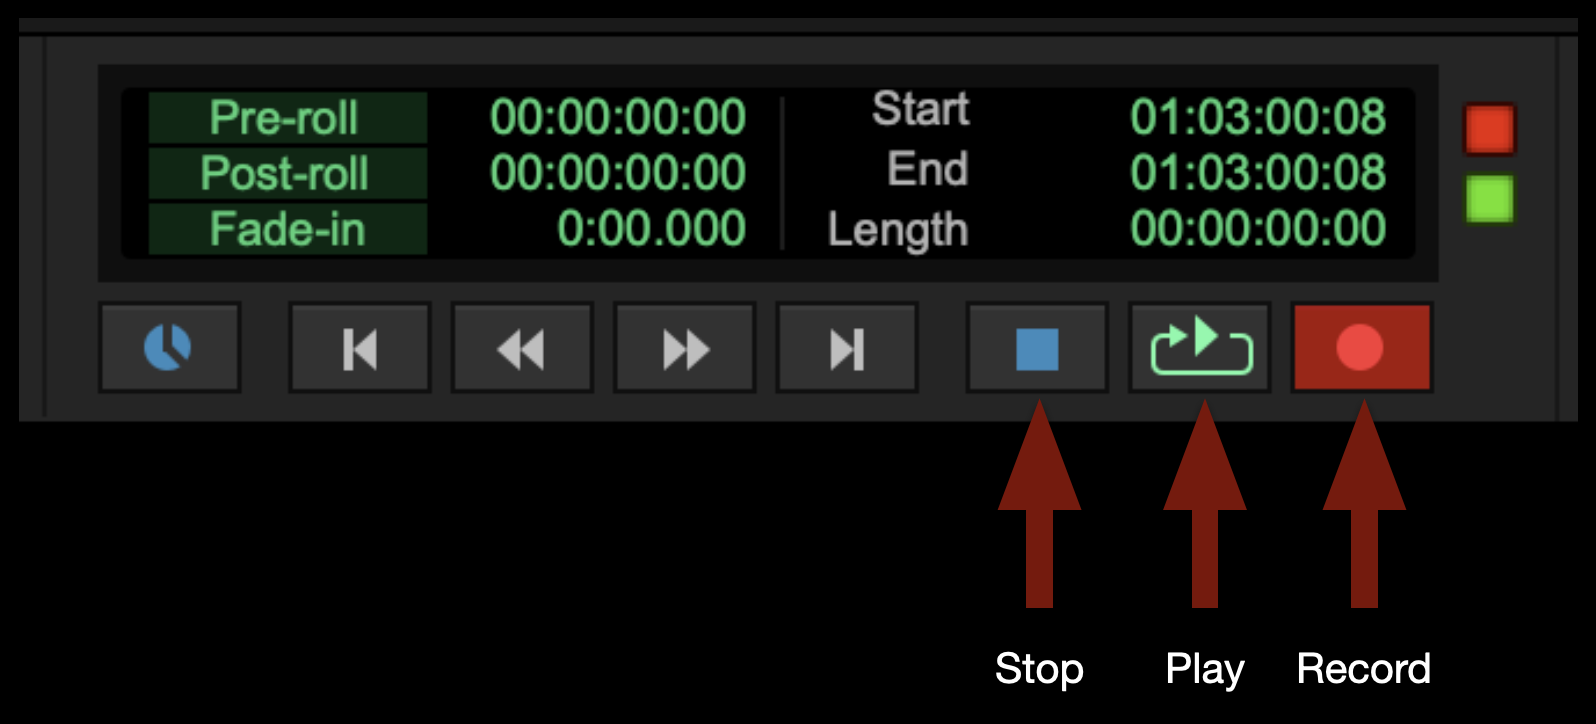
To start recording, select the red Record button in the transport window and then select the Play button (or hit the space bar). To stop recording, select the Stop button in the transport window (or hit the space bar).
That’s it! When you are done please save and close your ProTools project. Remember to clean up after yourself before you leave.
Poster artwork and promotional materials often require images to be enlarged beyond their original resolution in order to meet print specifications for large-format exhibition, festival display, or marketing use. This page outlines workflows and best practices for upscaling images while preserving clarity, detail, and overall image quality.
Proper upscaling techniques are important because low-resolution or improperly enlarged images can appear soft, distorted, or visibly degraded when printed at poster size. Understanding how to prepare high-quality promotional assets helps students present their films more professionally while developing practical skills related to marketing deliverables, print workflows, and digital image preparation.
Instructions
Posters are designed and printed at 8250 × 12150px, so it is often necessary to upscale film stills to a higher resolution than they were originally captured in. To do this you can use a software called Topaz Gigapixel AI.
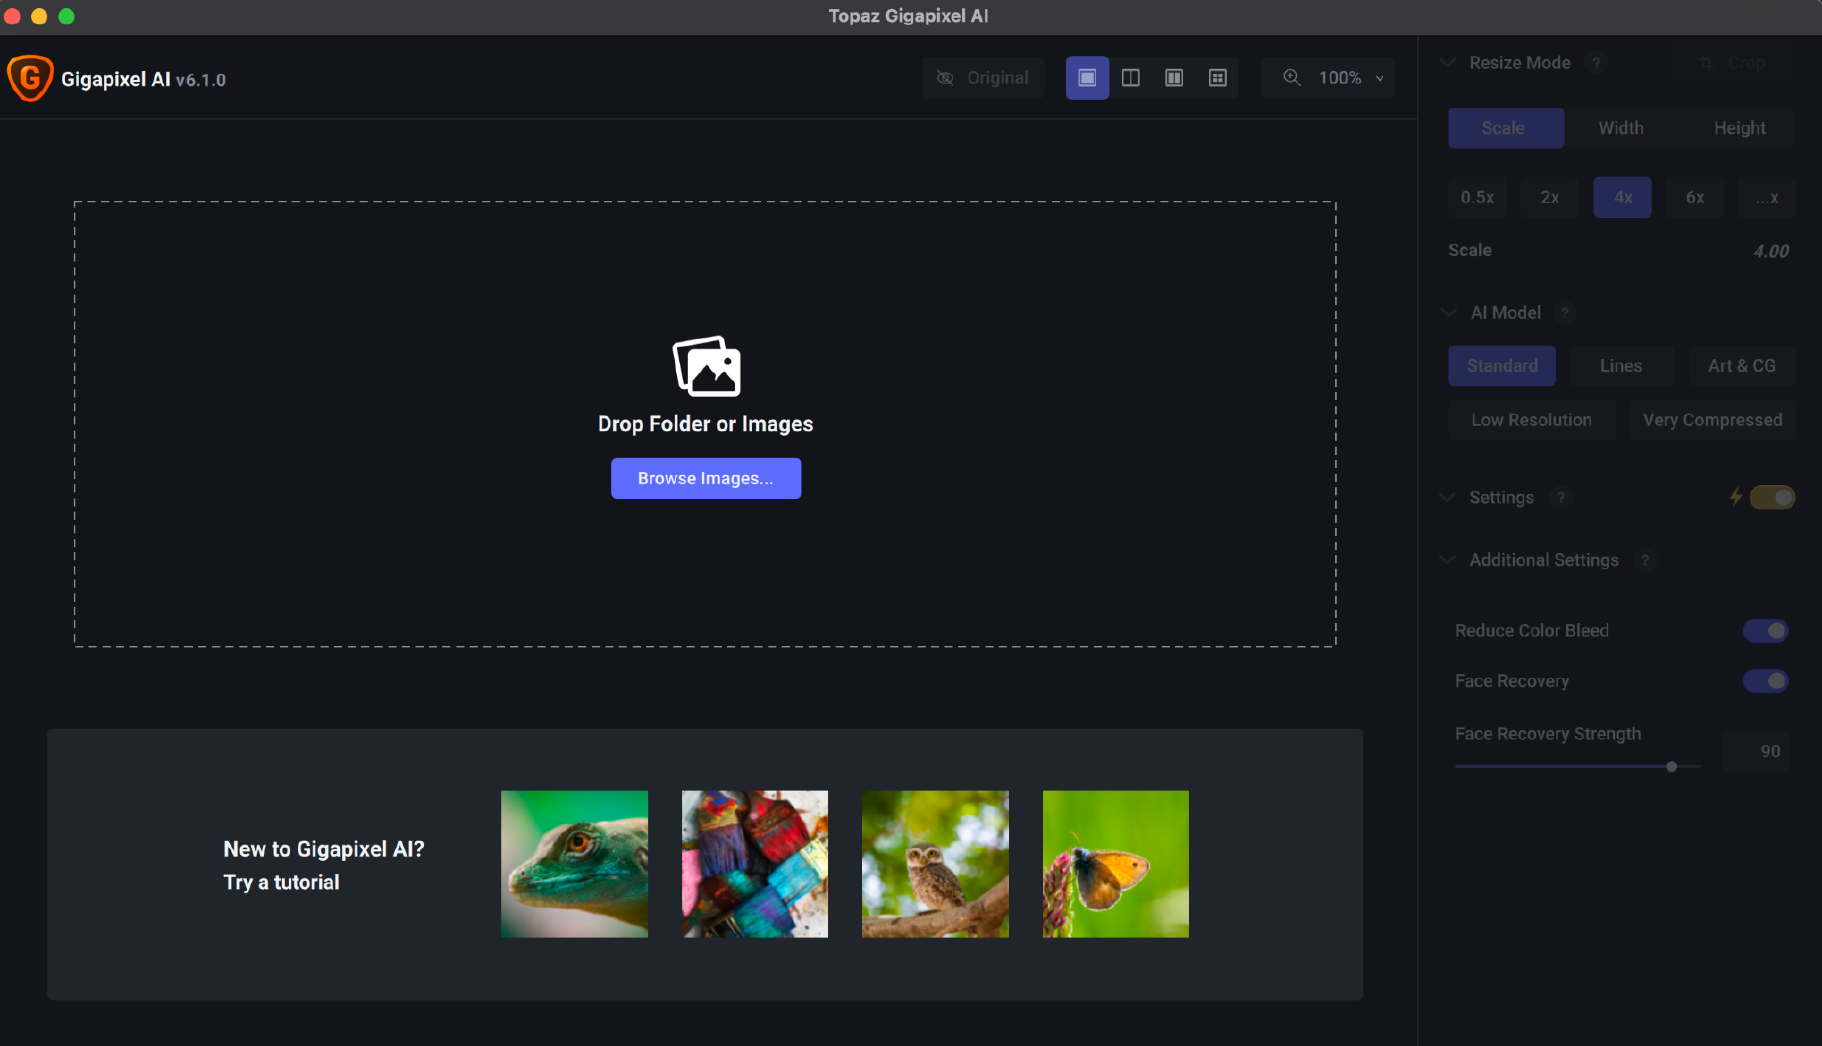
Topaz Gigapixel AI is a standalone application that is installed on all three ingest machines on the post hall. Open the the application by selecting its icon from the dock:
When the application opens, drag a still into the drop zone:
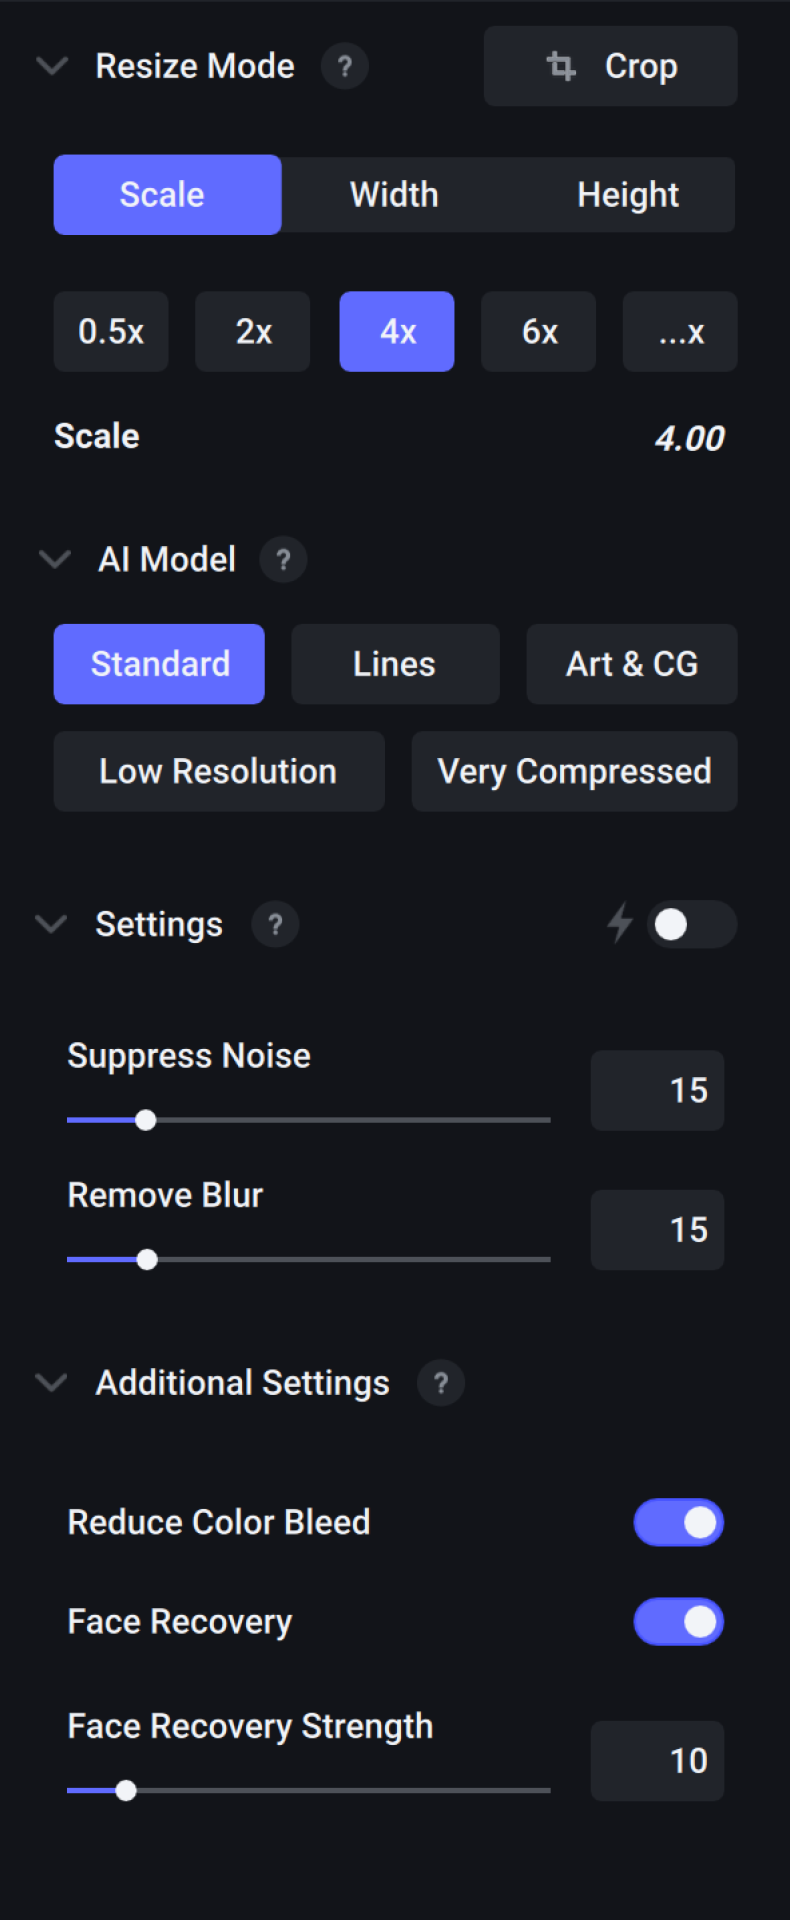
On the right of the interface, you will find the settings options. Configure them as shown in the example below. If you do end up needing to make any tweaks to these settings, do not go over 10% on the Face Recovery Strength.
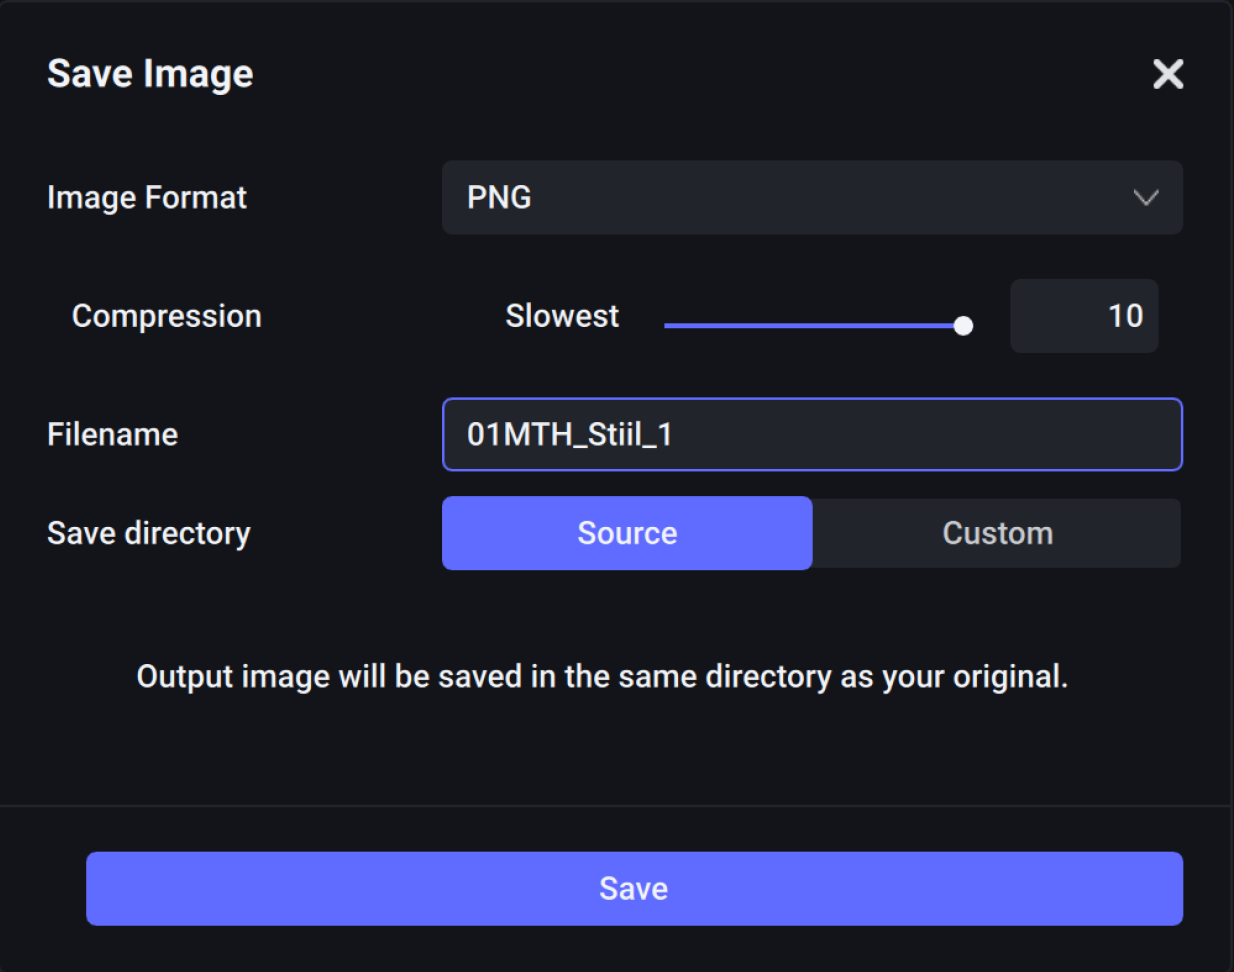
Save your new still as a PNG, as shown in the example below:
Frame.io review links are used to distribute cuts, gather feedback, track revisions, and facilitate communication throughout editorial and post-production workflows. This page outlines expectations for organizing, sharing, and managing review links during the feedback and approval process.
Consistent review workflows help productions avoid confusion around versions, notes, and approvals while making collaboration more efficient across faculty, students, and post-production teams. Structured review practices also help students develop professional habits related to client communication, revision tracking, and collaborative editorial workflows.
CREATE A REVIEW LINK
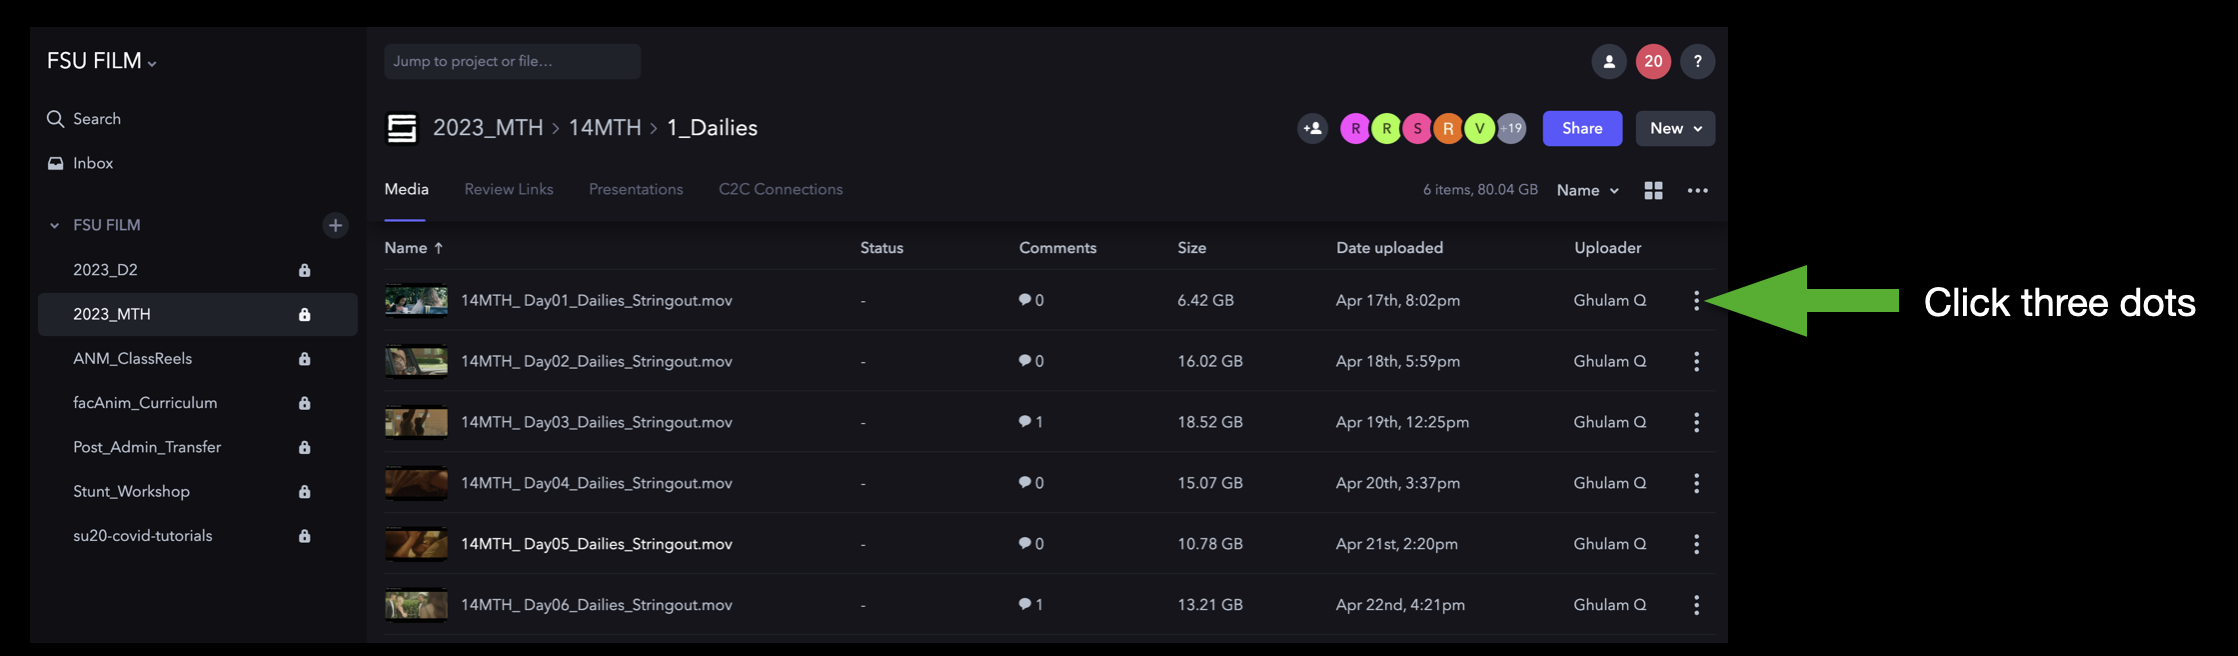
Navigate to the video on Frame.io that you want to share. Then, click the three dots to the right of the video:
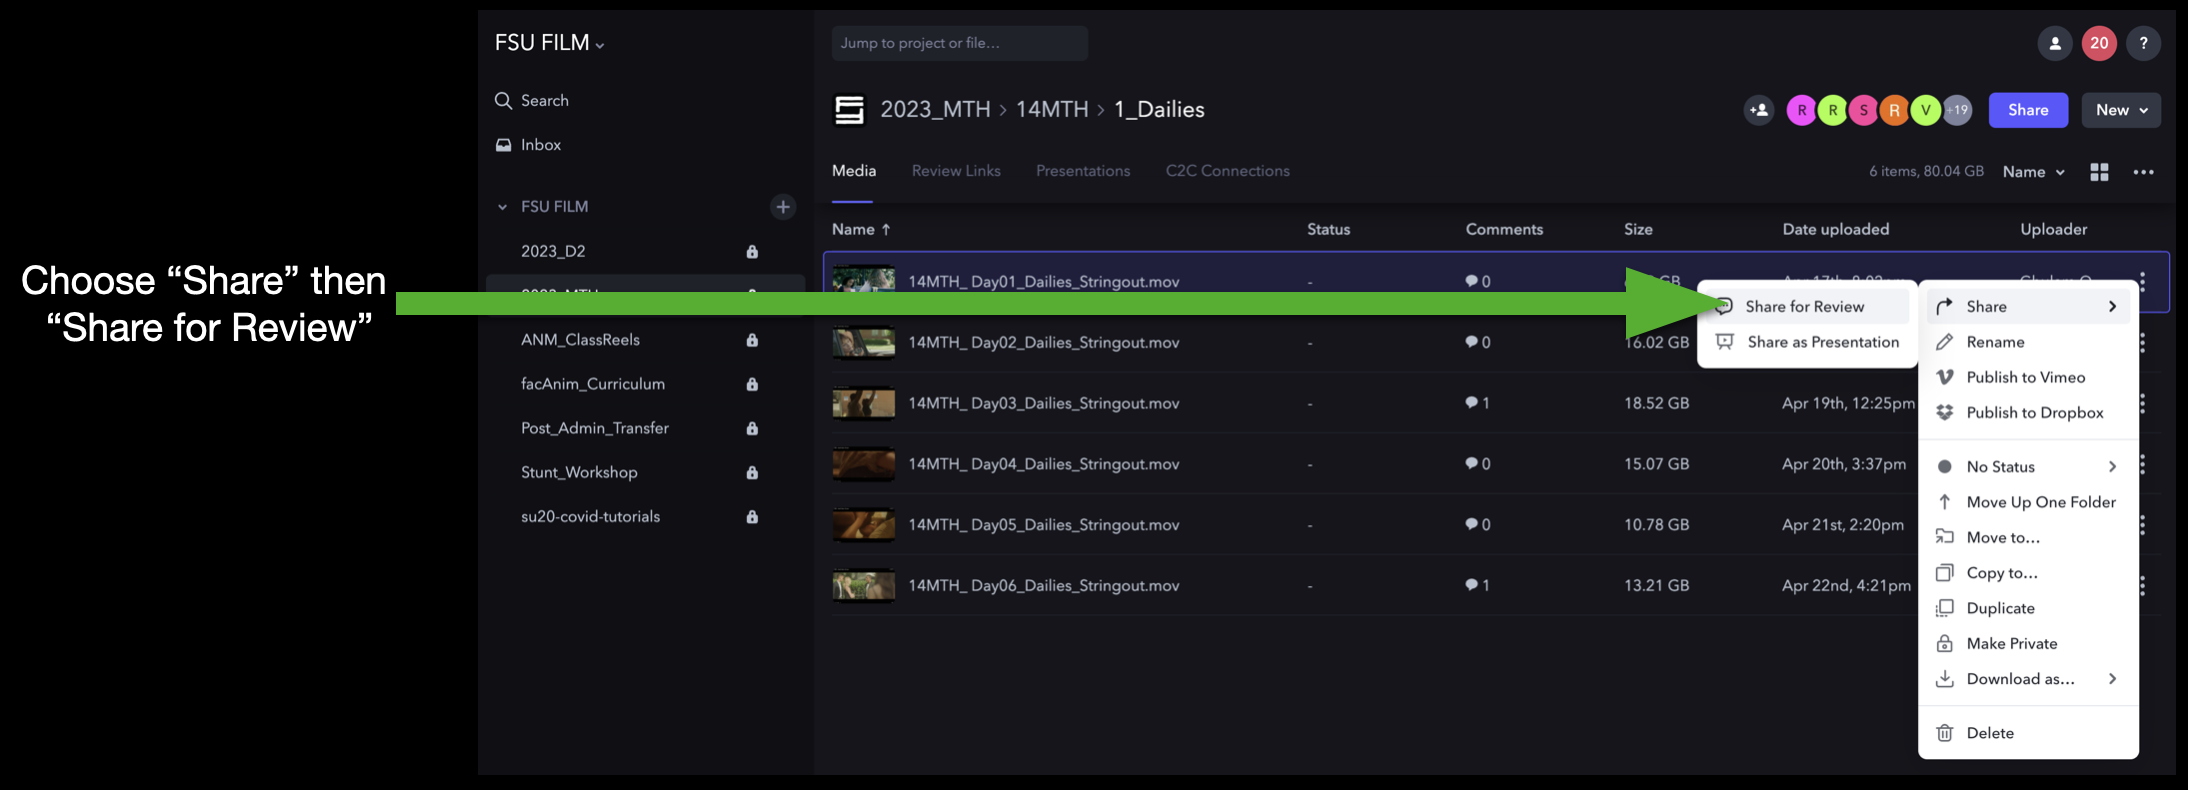
This will open a dropdown menu that you can navigate through. Select “Share” and then “Share for Review”:
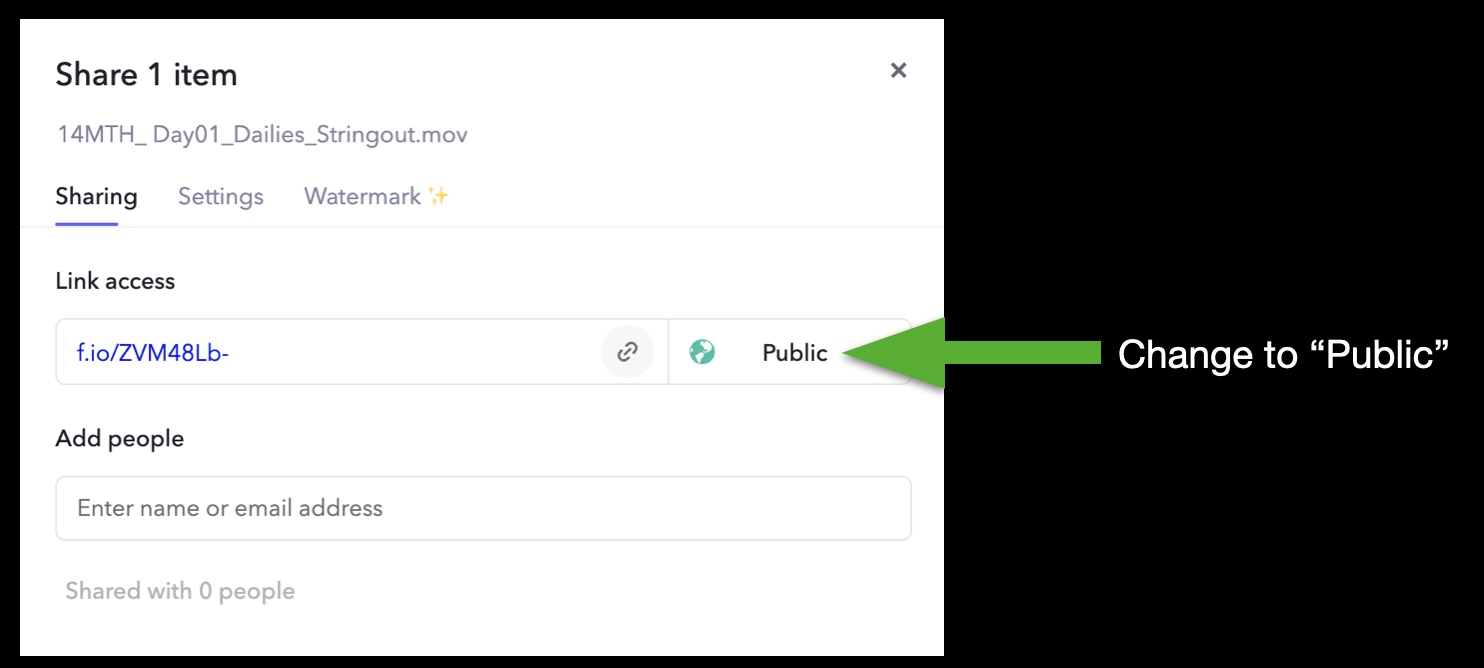
A window will open prompting you to choose what kind of link you want to create. To be able to send the link to someone who’s not already a member of the Frame.io project, you will need to change it to “Public”:
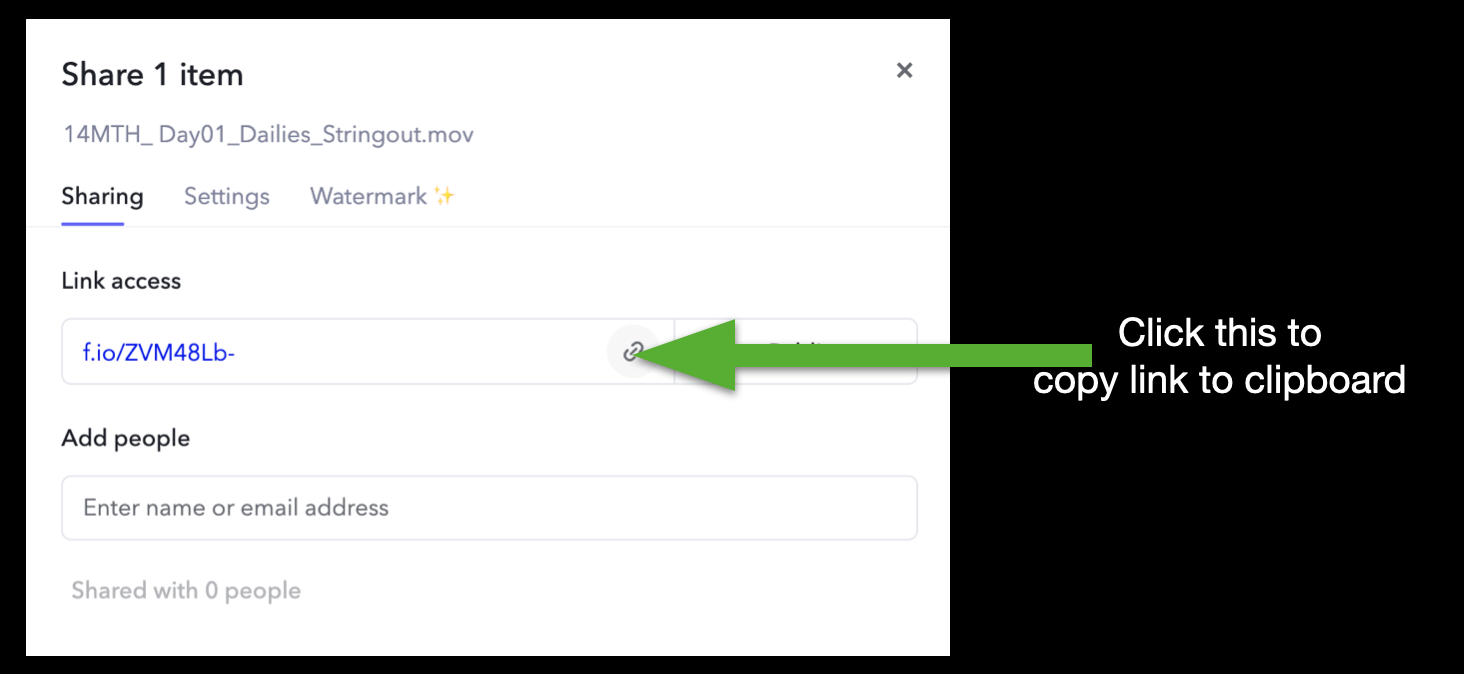
Then, click the icon to copy the link to your clipboard:
Now you can paste this link anywhere, such as in a Teams message or an email, and send it to whomever needs to see it. Please be careful when sharing review links, though; anyone with the link, regardless of who they are, will have access to the linked content on frame.io and will be able to leave comments.
Manage Review Links
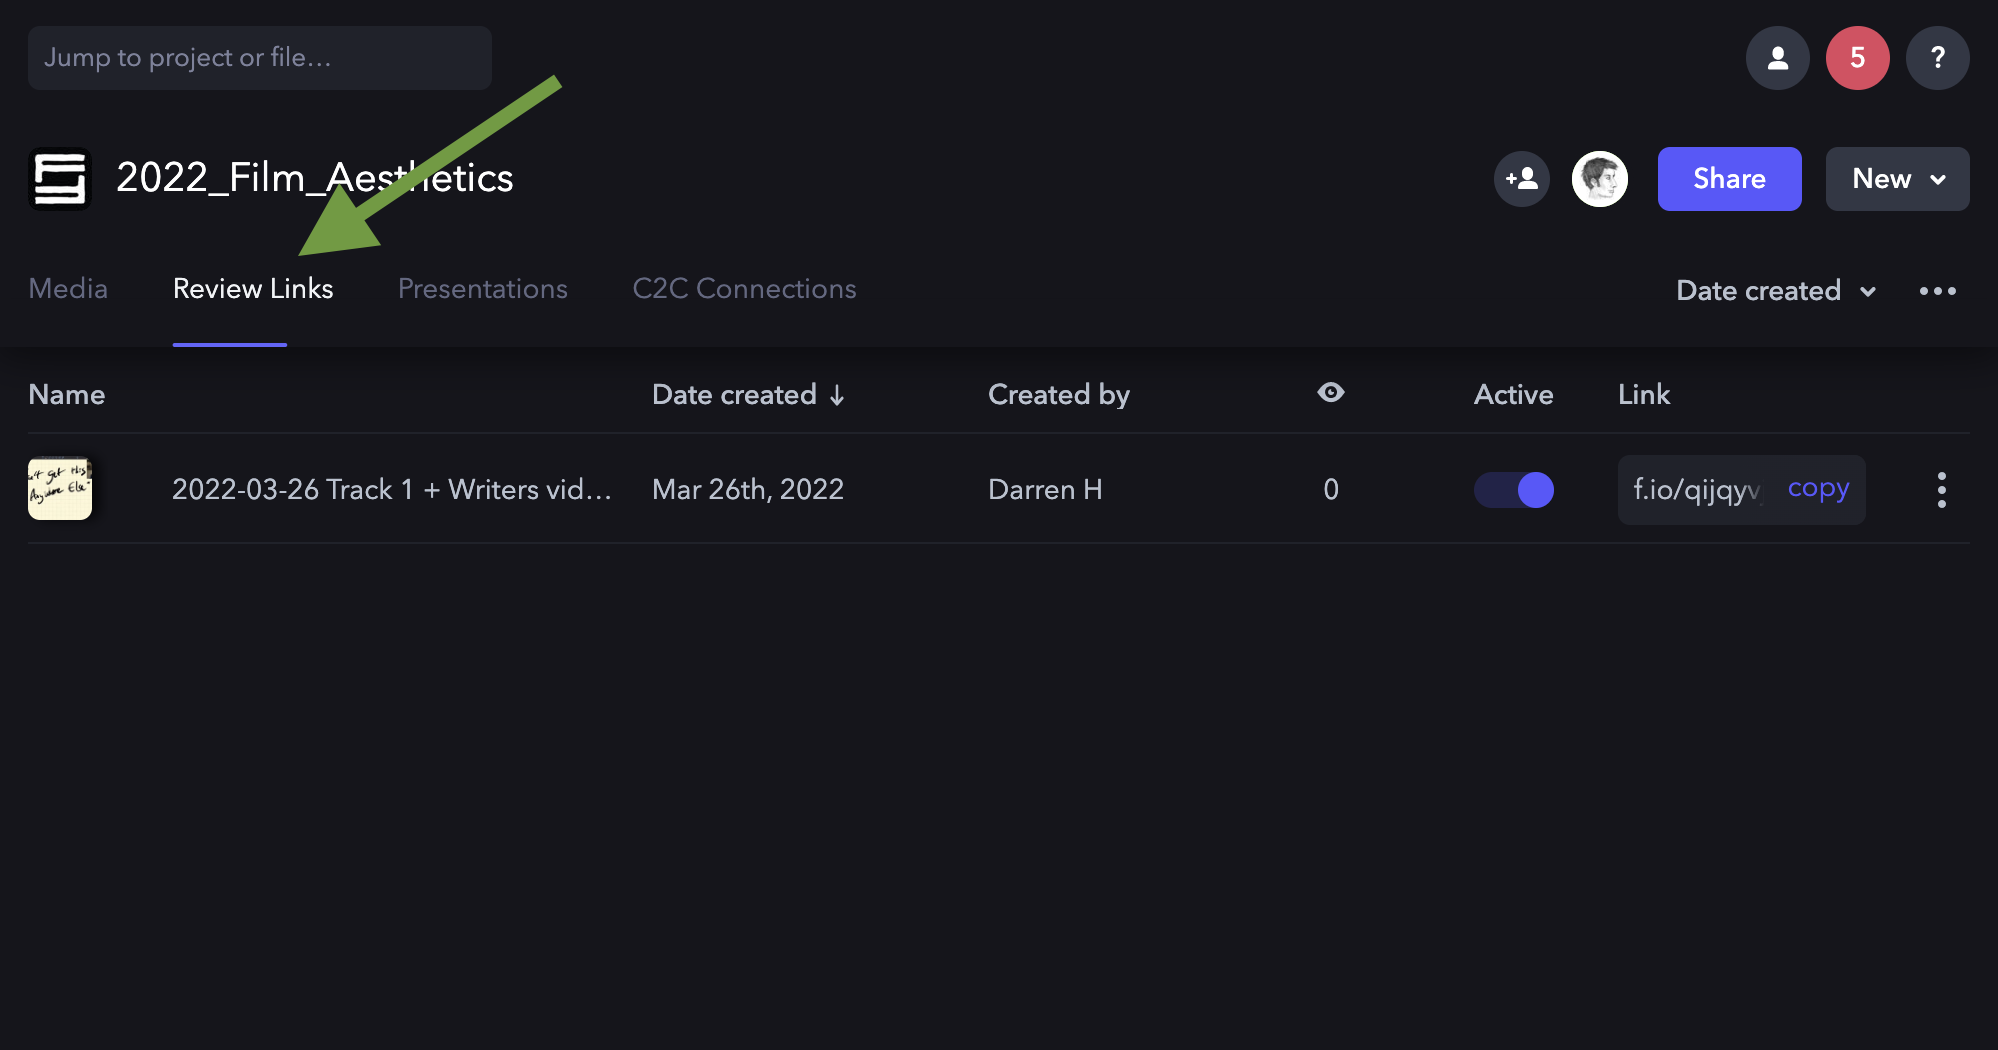
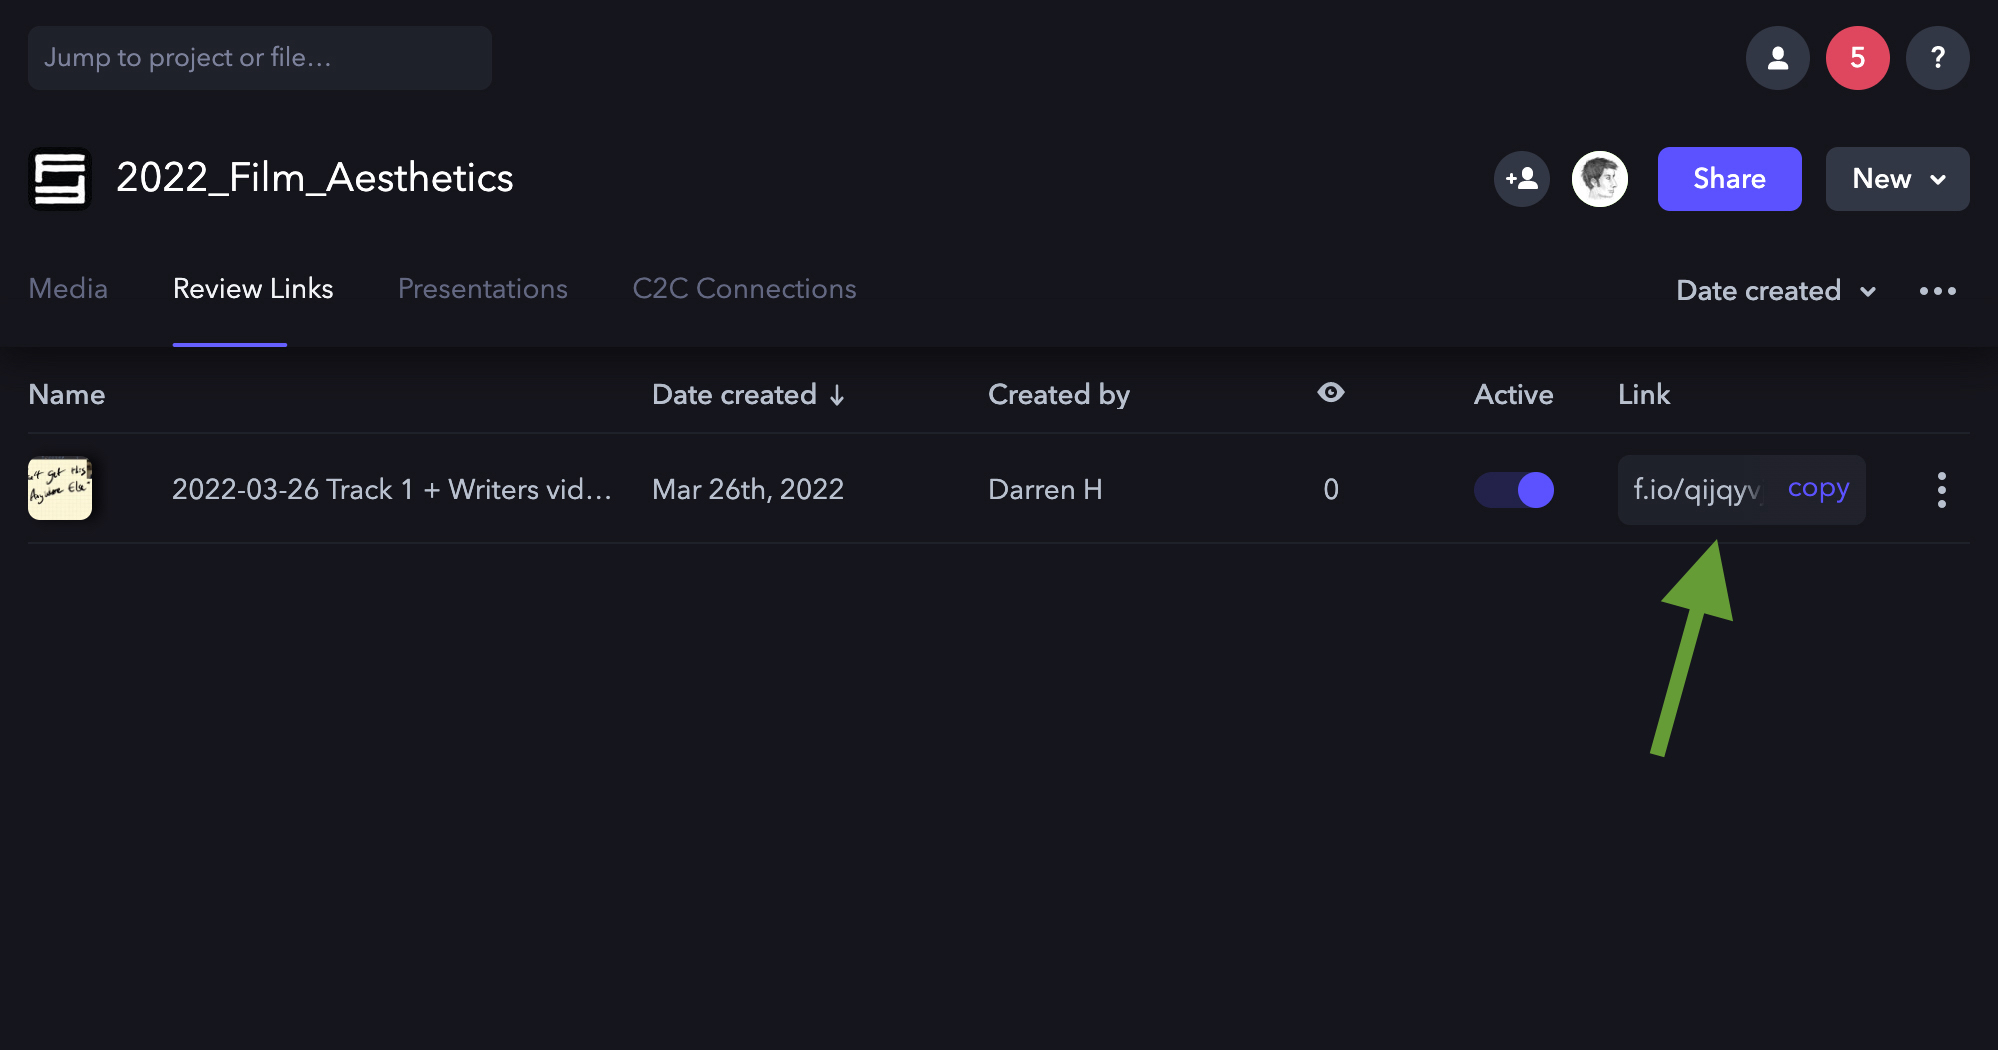
If you need to go back and manage the review links you’ve created, navigate to the main page for project and click on the Review Links tab:
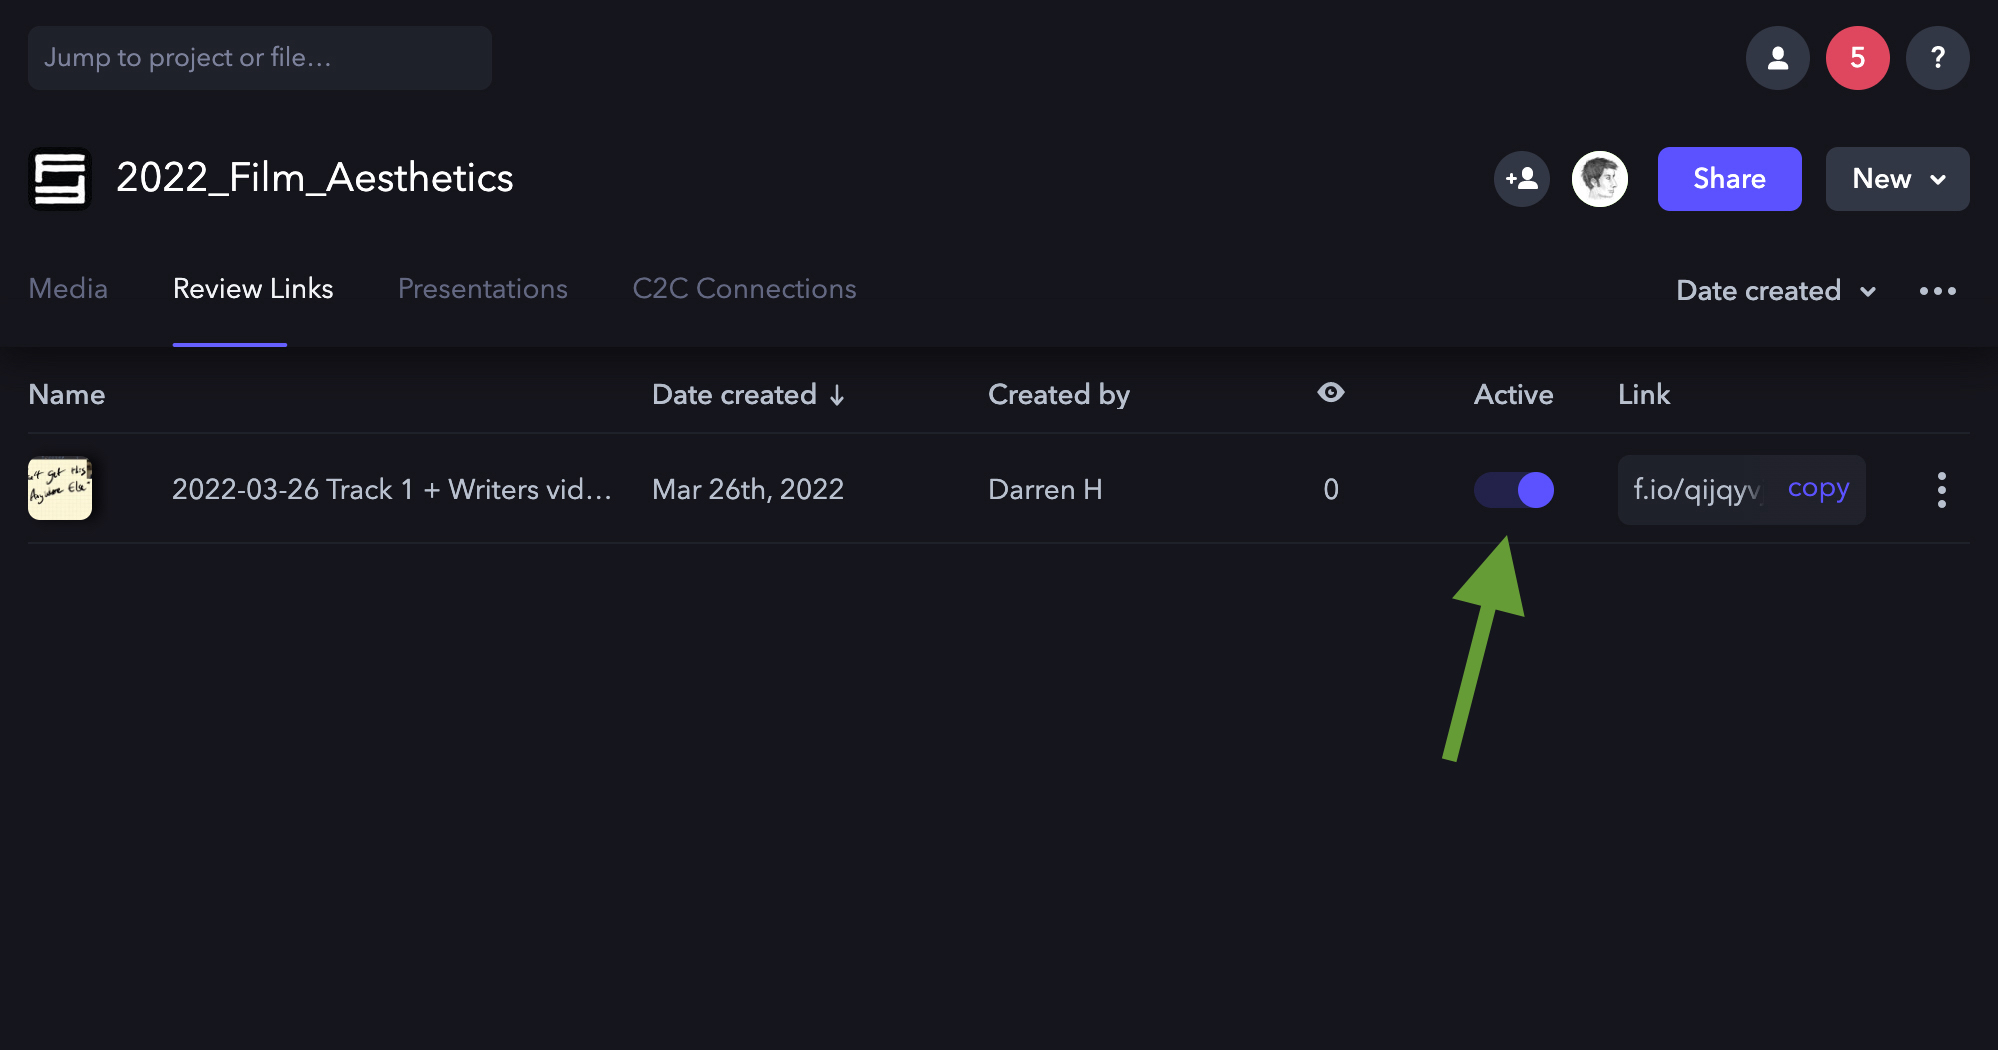
This will display all the links that have been created for that project. If you wish to activate or deactivate a review link, toggle the “Active” button:
If you need to re-copy the review link, you can do so here:
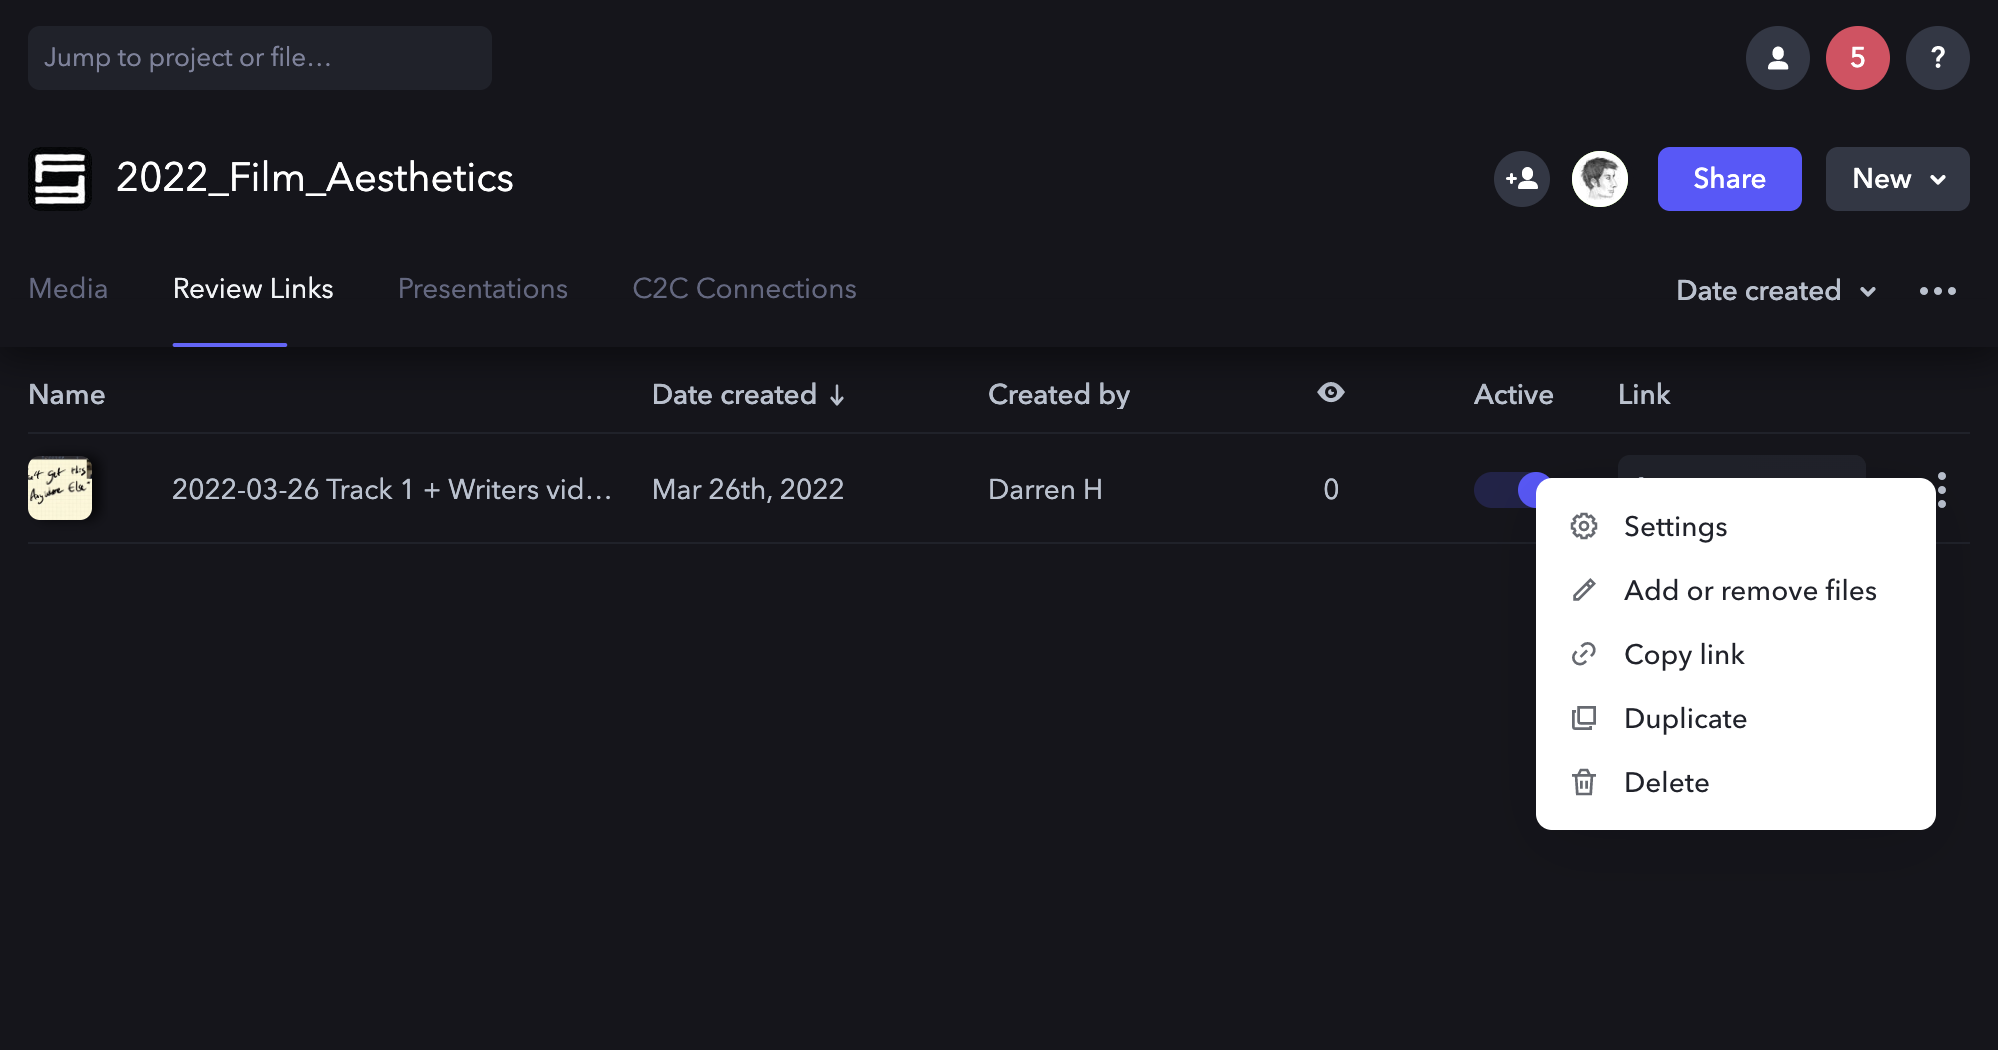
If you need to adjust settings, add or remove files, or duplicate or delete a review link, click on the three dots and a dropdown menu will appear:
Picture lock marks the point at which the edit is considered creatively and structurally finalized before projects move fully into downstream post-production stages such as sound, color, visual effects, mastering, and delivery. Once picture lock is established, further editorial changes are expected to stop except under exceptional circumstances.
A disciplined picture lock process is essential because editorial changes made after turnover can create major disruptions across multiple departments, requiring unnecessary rework and creating delays throughout post-production. Establishing clear lock procedures helps productions maintain stable workflows while reinforcing the importance of planning, communication, and coordination between editorial and finishing teams.
How It Works
At the end of the picture edit cycle, the Editor and Director will be assigned a time to formally lock picture. This means that the Lock Sequence must be completed by that time and any relevant forms must be filled out in FSUFILM Greenlight. Your editing instructor will be the person who deems your show “Locked” after checking the running time and making sure all notes have been addressed.
Once picture locking is complete and all the parameters laid out in this guide are met, the Editor and Director will work with the Post Staff to prep the film for the next phases of the post-production chain, which includes turnover for sound design and color correction.
Create the Locked sequence
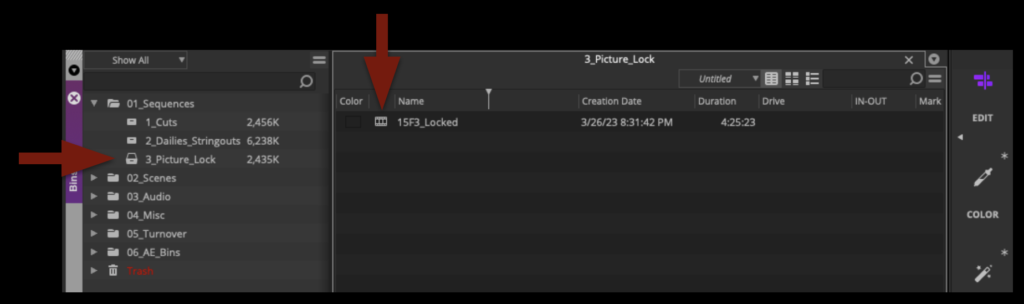
In Media Composer, correctly identify your locked sequence and save it in the Picture Lock bin as Show#_Locked:
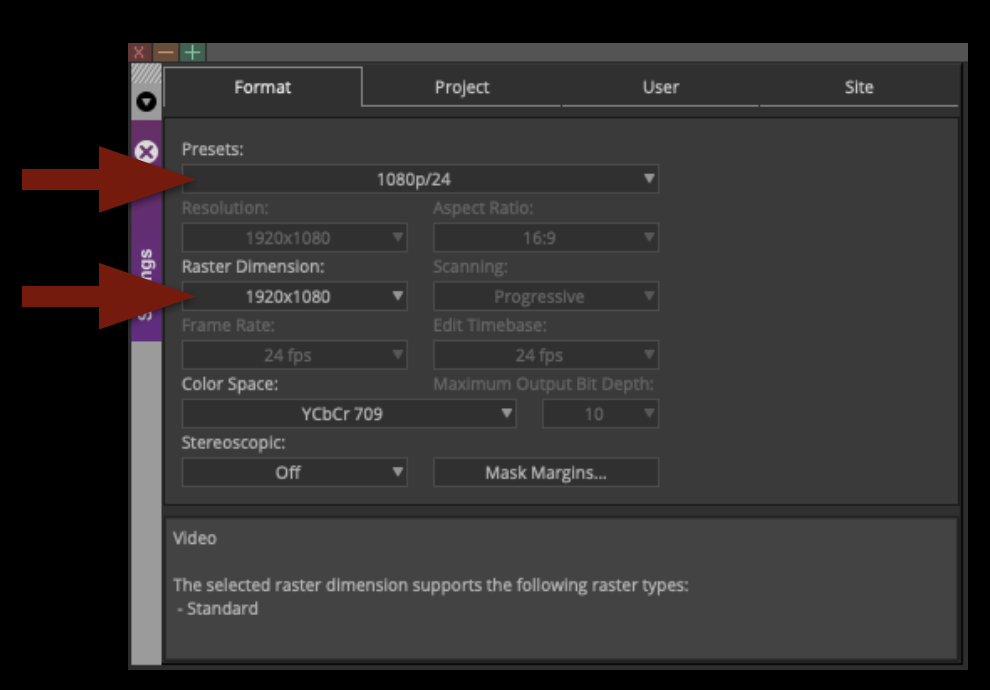
Double-check the project settings by going to Preferences. In the Format tab, the settings should be as follows:
Check the Front Sequence
All locked sequences must have a “front sequence” at the start of the timeline, which must be formatted to SMPTE standards. This involves setting the sequence timecode to begin at 01:00:00:00 and building a front sequence that includes the SMPTE Countdown Leader with the slate information filled in and the FSU Film leader.
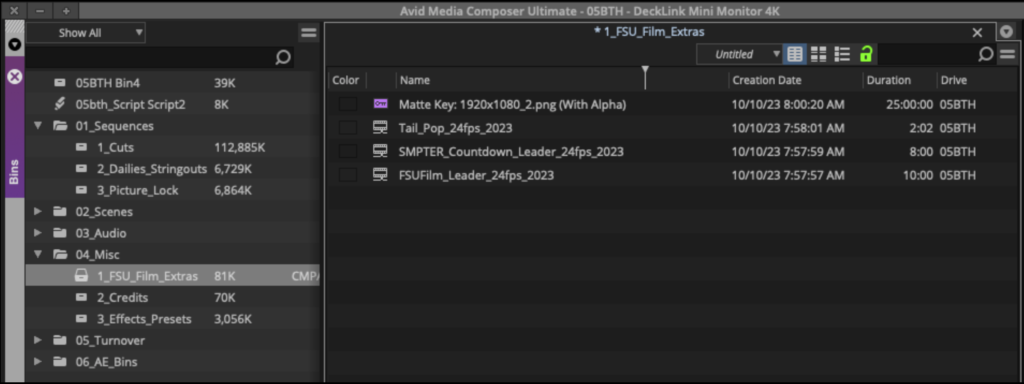
The correct front sequence should have already been set for you in the standard project template. If for some reason it’s no longer there, all the media for the front sequence can be found in the FSU_Film_Extras bin inside the 04_Misc folder.
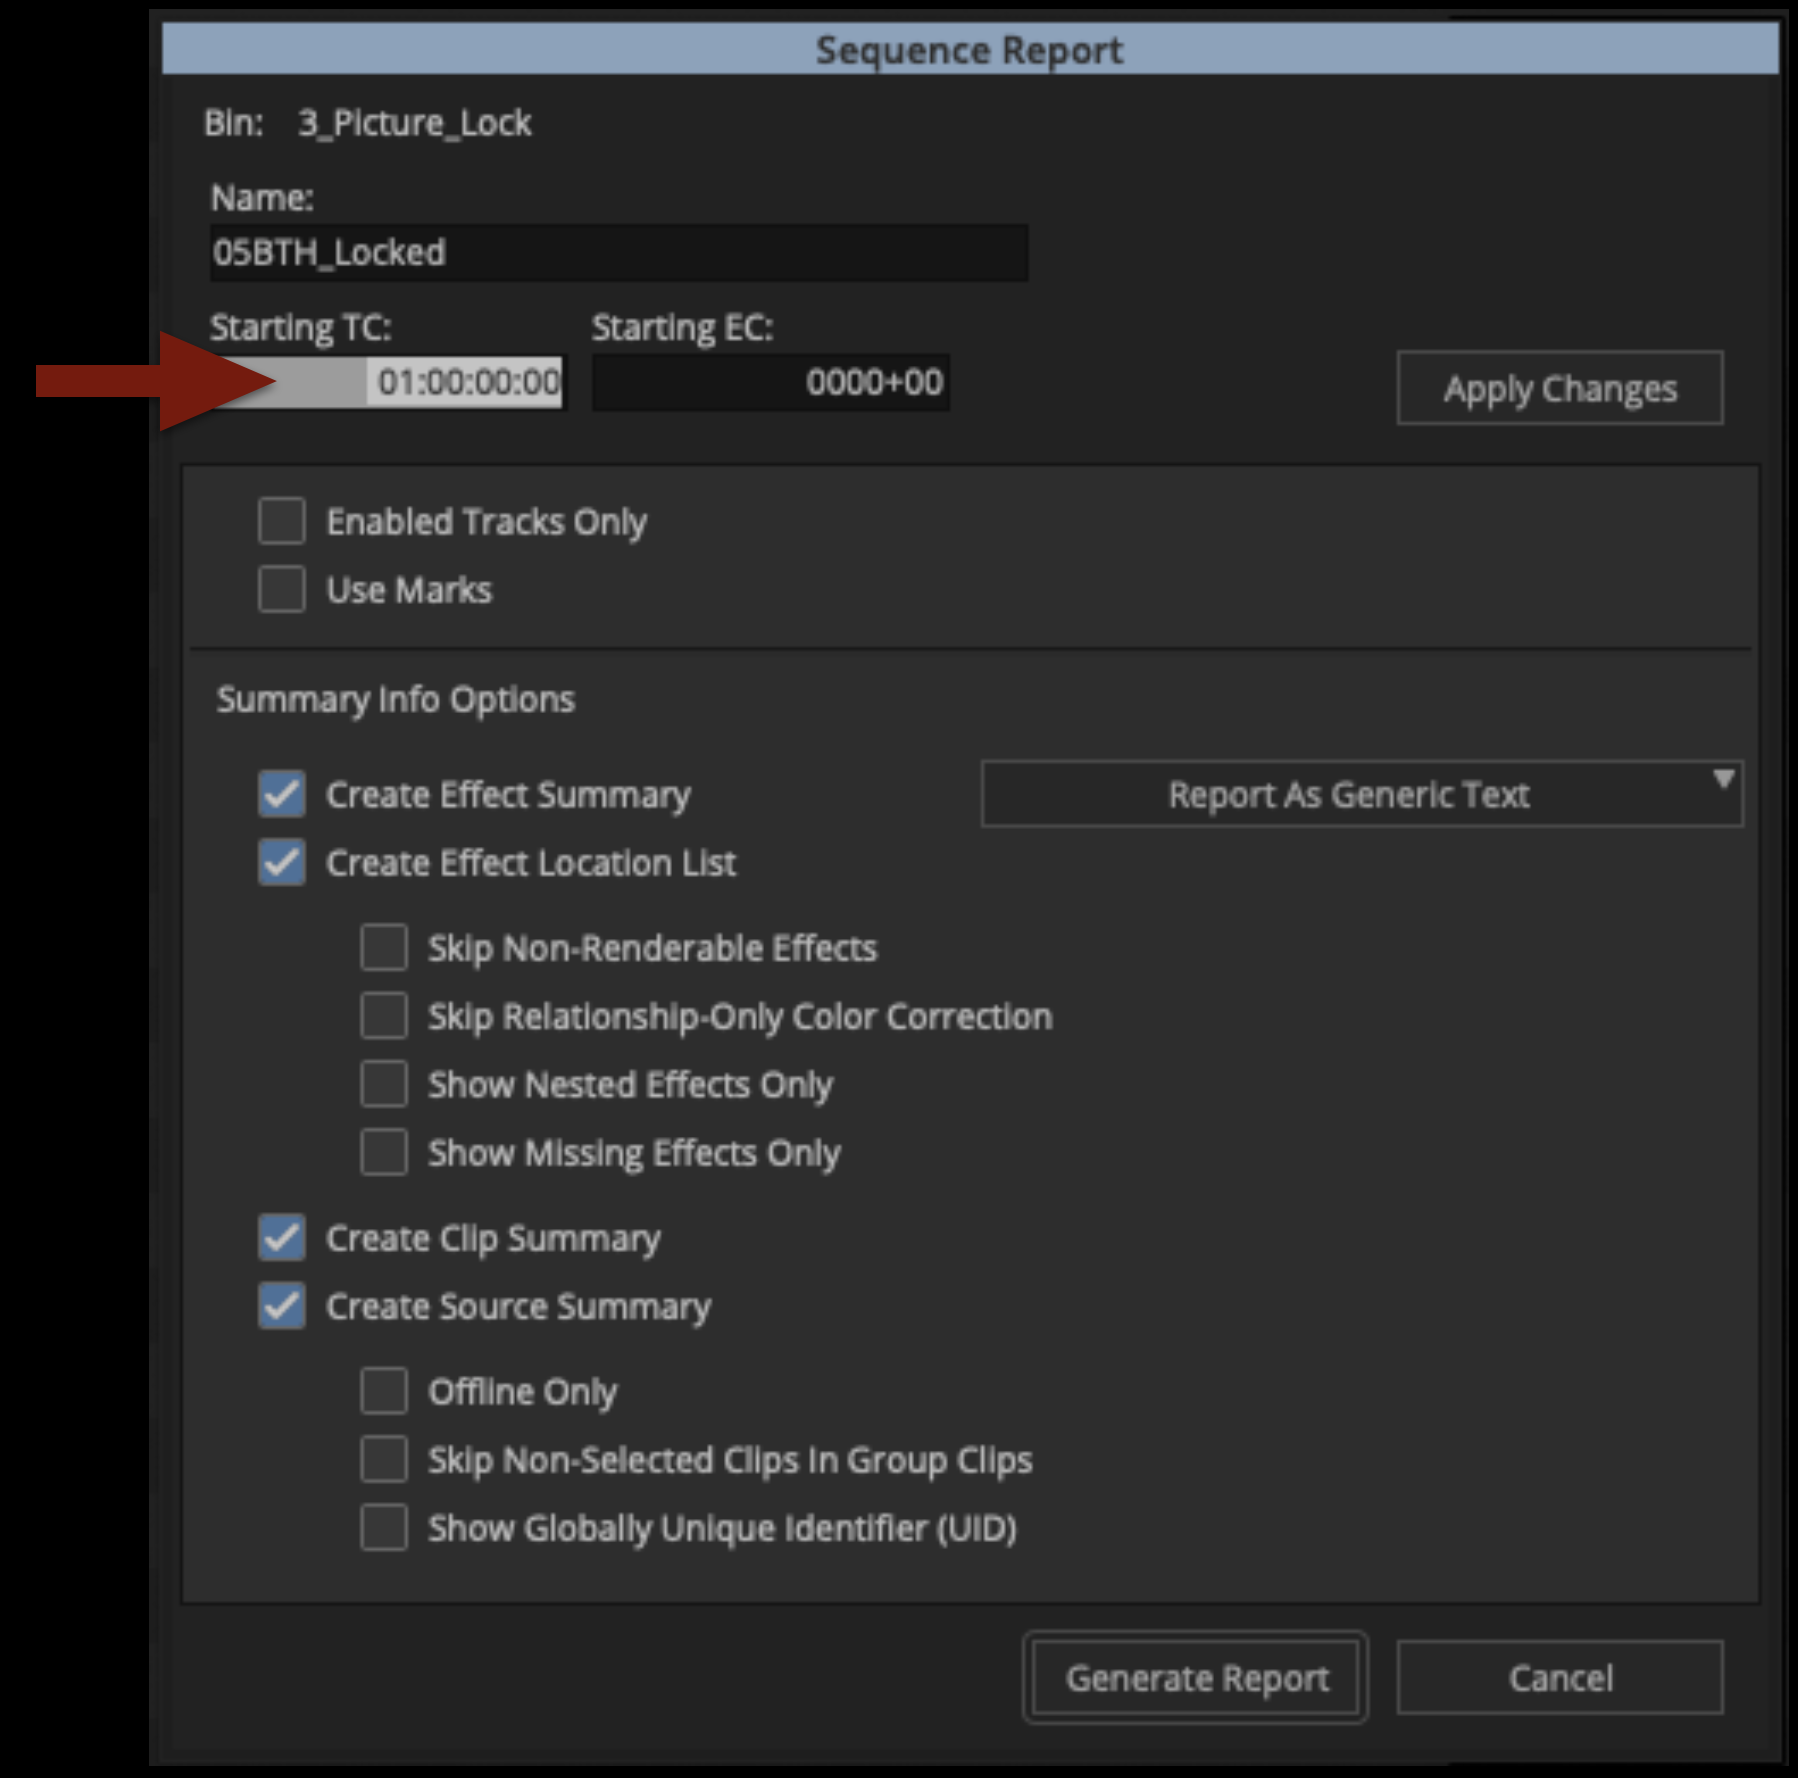
Your sequence should be set to start at timecode 01:00:00:00. If for some reason your sequence no longer starts at this timecode you can change it now. To do this, click in the Record Monitor and select “Sequence Report”. This will allow you to modify the Starting TC:
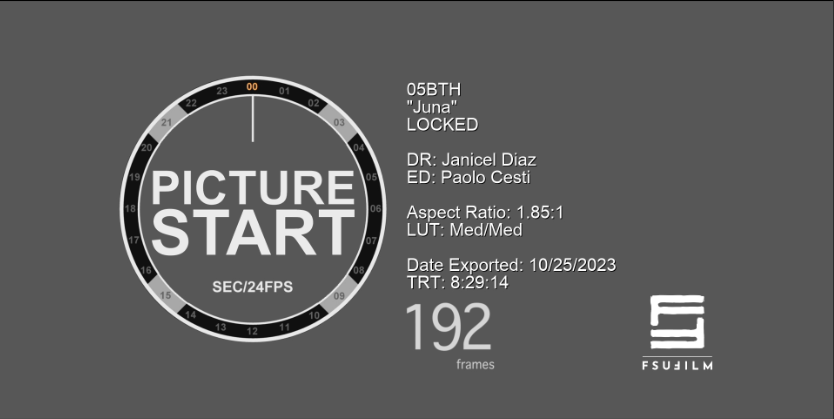
The slate should already have a template laid out for all the information you need to provide. Using the Titler+ tool in Media Composer, fill out the slate with all the information shown below. Keep this slate professional.
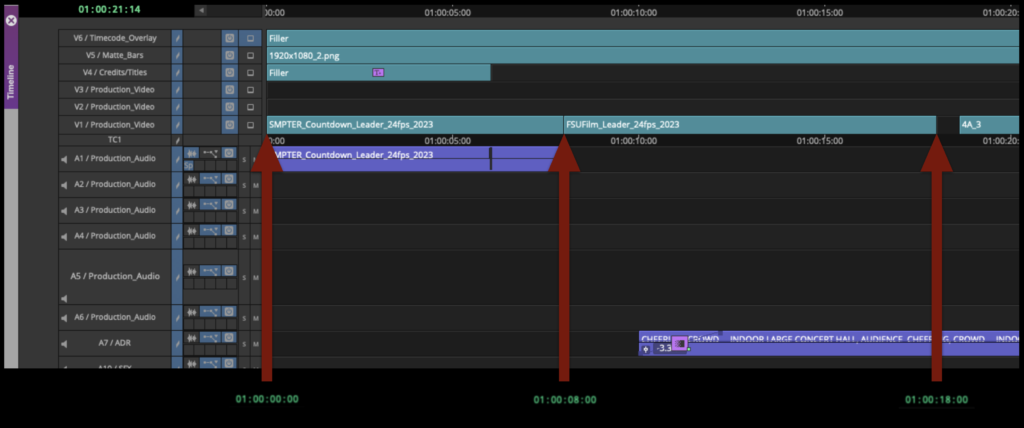
Double-check the the timing of the front sequence:
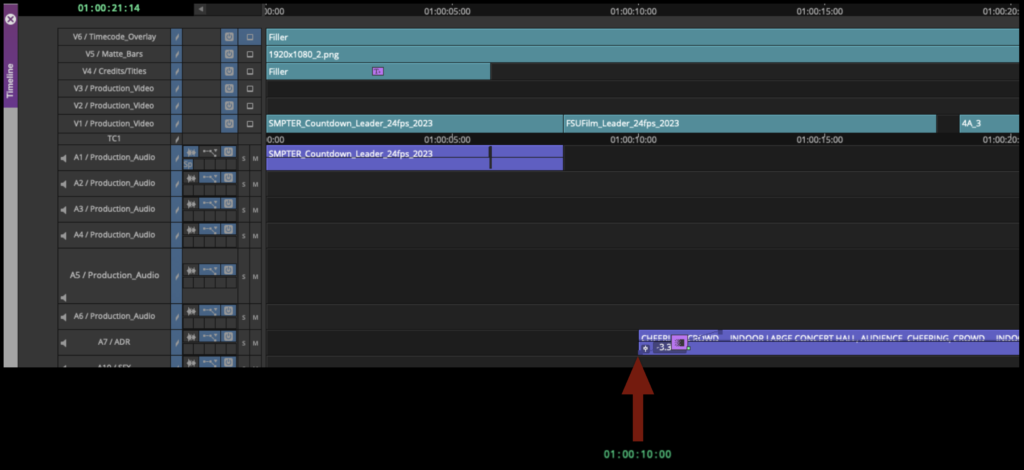
SMPTE Countdown begins at 01:00:00:00. If everything is put together correctly, the “two-pop” on the countdown leader will fall exactly on 01:00:06:00. (This is very important!)
FSU Film Leader begins at 01:00:08:00
First frame of picture content begins at 01:00:18:00
Your front sequence should match the example below:
While checking the correct timing of your front sequence, also make sure to check that NO sound from your film starts before 01:00:10:00. There should be exactly 2 seconds of silence after the Countdown has finished.
Add Titles and Credits
The College has strict requirements for how titles and credits need to be formatted. Before building your titles, read the requirements here.
The finished titles and credits must be in at picture lock, cut into the correct video track. The credit sequence should be one continuous image sequence, properly labeled. Do not cut up your credit sequence inside Media Composer. The export from After Effects needs to be correct, so that no further adjustments are required inside Media Composer.
Condense Video Tracks
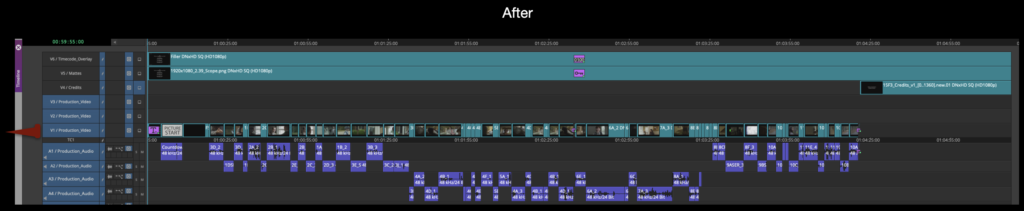
To prep your timeline for coloring, your video tracks (not your audio tracks) need to be condensed onto as few video tracks as possible. It’s understood that, due to the nature of how some video dissolves are built, more than one video track is sometimes necessary. The idea is to reduce the amount of tracks and media as much as possible.
Your sequence would go from looking like the example below with video on tracks V1 – V3 that needs to be brought down…
…to your sequence looking like the example below with everything consolidated onto one track:
Apply Masking
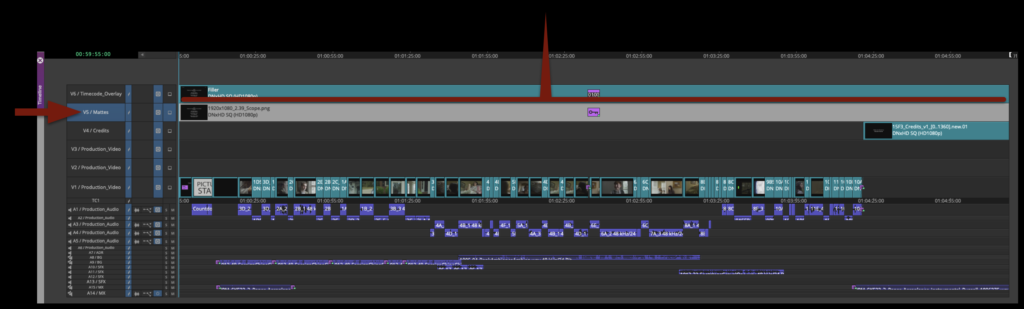
Video Track 5 should have the proper aspect ratio matte (which was chosen during production and notated on the camera reports) applied over top of the entire film (including the credits).
Check Sound Organization
During picture editing, a great deal of sound work should have been accomplished. It may not be the exact music and effects that will be in the finished mix, but the Editor should have taken a good polish to the locked sequence. To make sure all the Editor’s sound work will translate over to ProTools when the locked sequence is turned over, check all the sound media that may be in your locked sequence.
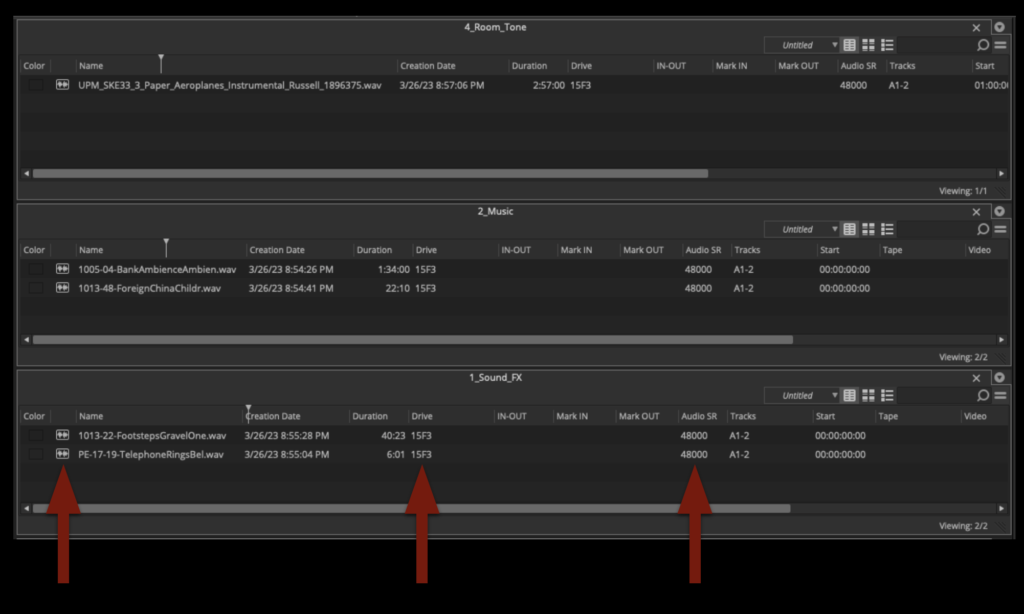
Everything must be transcoded (nothing should be linked)
The Audio Sample Rate for all Music, Backgrounds, and SFX should match at 48000
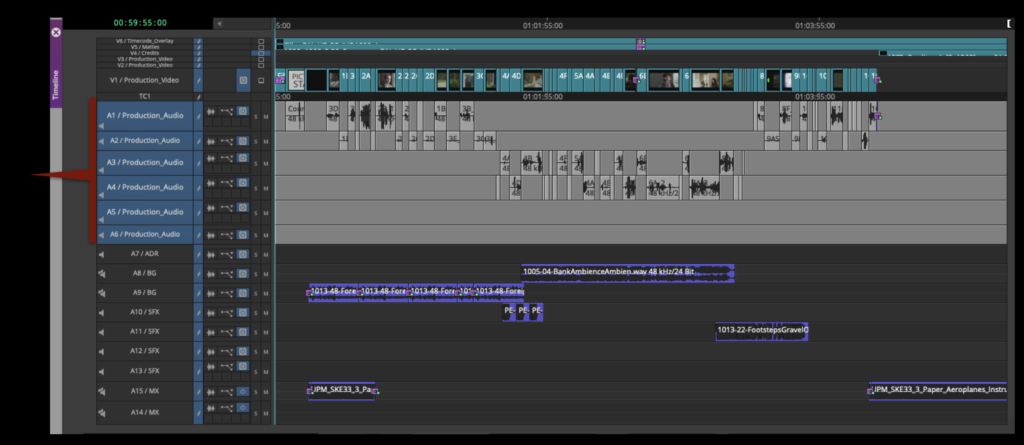
The Production Audio should all be in the Audio Tracks (A1-A6):
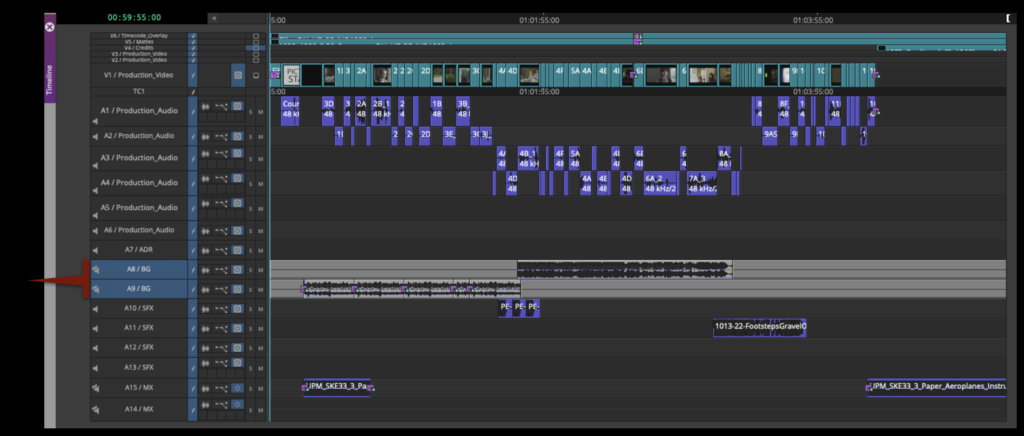
The Backgrounds should be in Audio Tracks (A8-A9). This should be stereo media in stereo tracks:
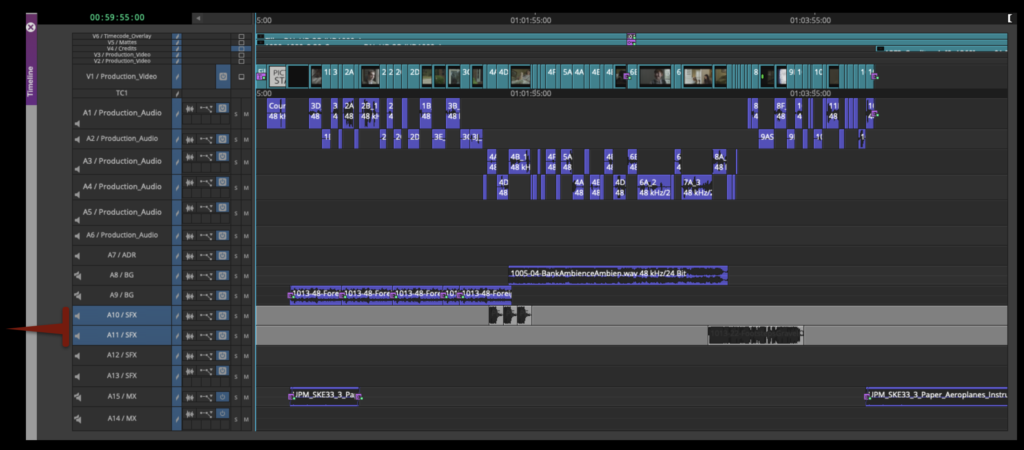
The SFX should be in Audio Tracks (A10-A13):
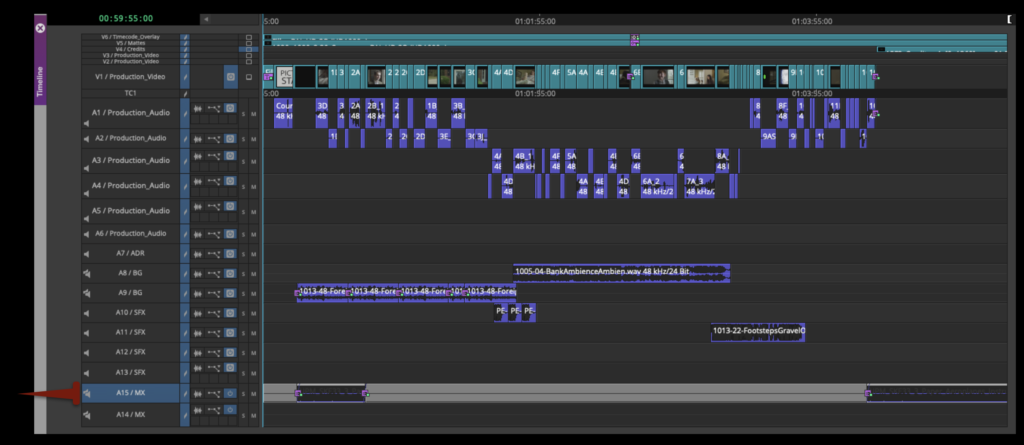
The music should be in Audio Tracks (A14-A15). This should be stereo media in stereo tracks:
Apply Timecode Overlay
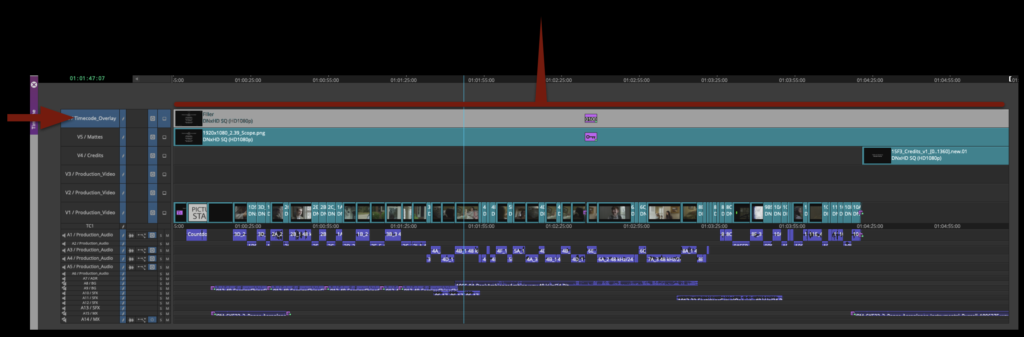
The Timecode Burn-In Effect should be applied to Video Track 6 and cut over top of the entire sequence:
The default Timecode Burn-In Effect in the template may need to be modified slightly.
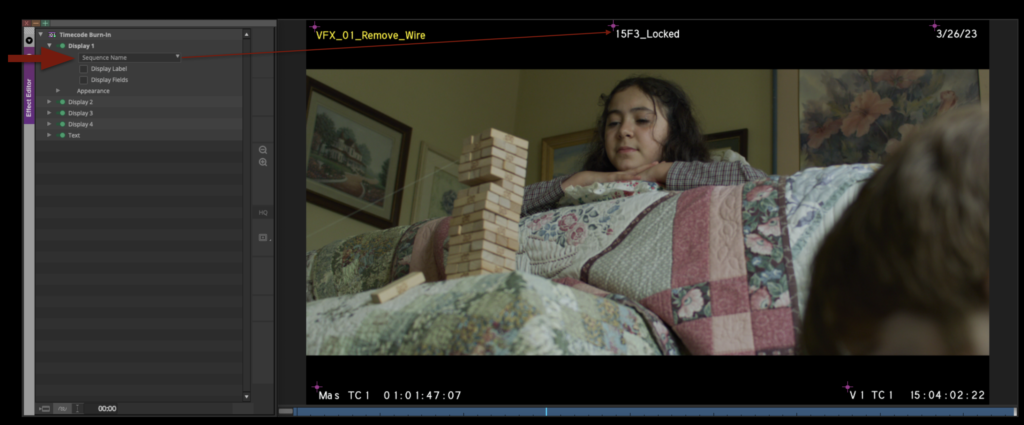
Display 1 should be set to “Sequence Name”. This should be placed in the top-center so that it displays as shown in the example below. This is so that, when it is exported as a video file, it is easy to identify which show it is and that it is locked.
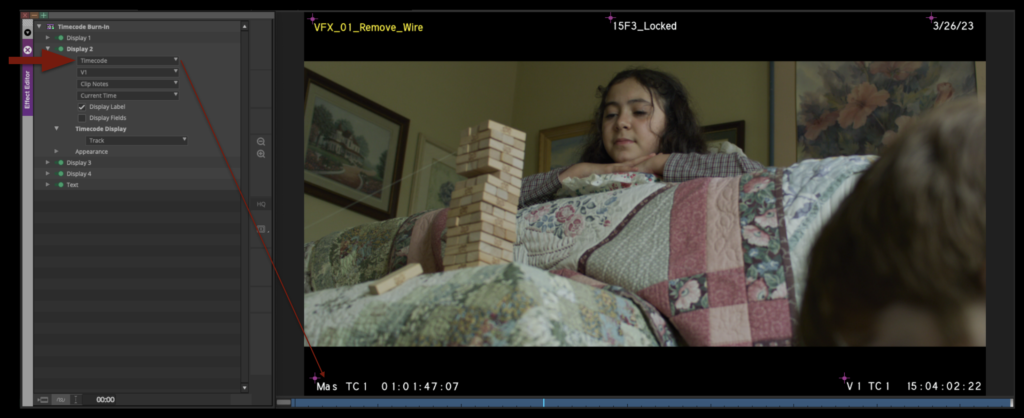
Display 2 should be set to “Timecode” and “V1”. This should be placed in the bottom-left corner so that it displays as shown in the example below. This timecode matches the locked sequence.
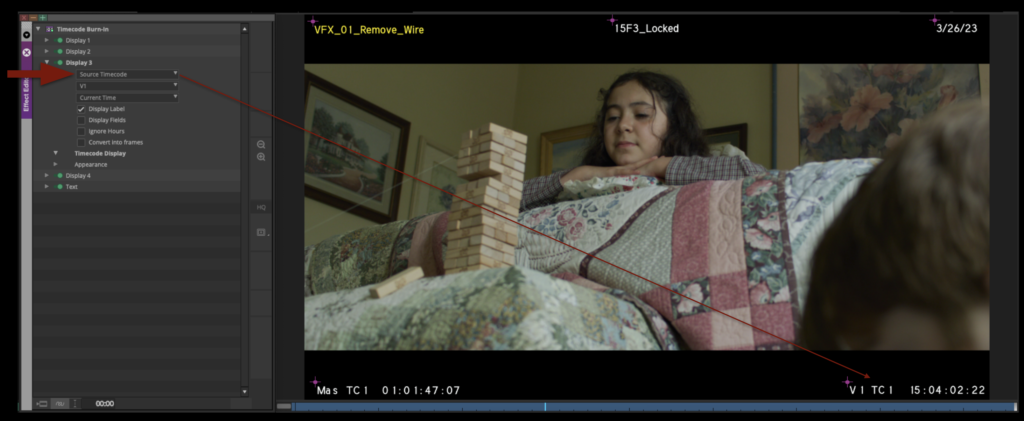
Display 3 should be set to “Source Timecode” and “V1”. This should be placed in the bottom-right corner so that it displays as shown in the example below. This timecode matches the media in the locked sequence.
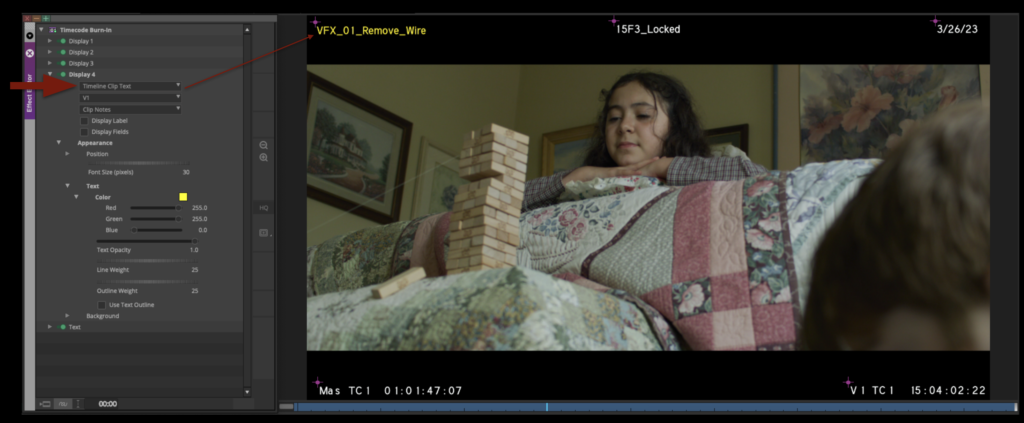
Display 4 should be set to “Timeline Clip Text” and “V1”. The color of the text should be modified to be yellow and be placed in the top-left corner so that it displays as shown in the example below. These burn-ins are helpful for keeping track of which shots are VFX shots.
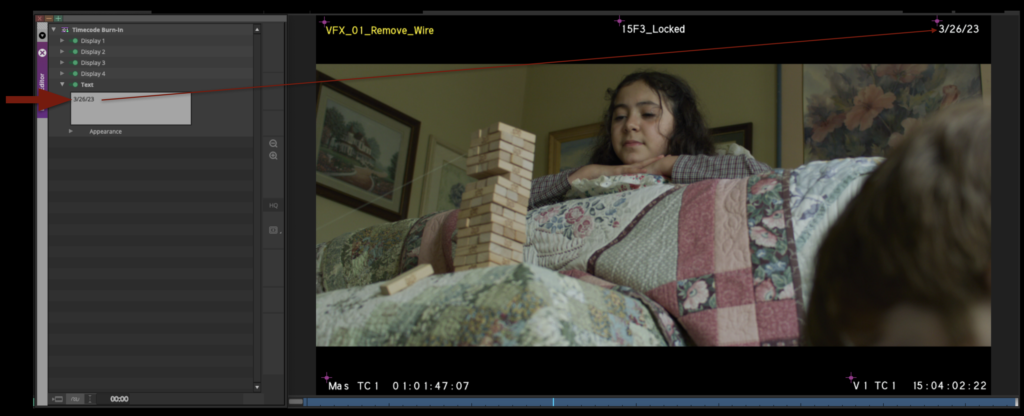
Display 5 should have the date of picture lock typed in. This should be placed in the top-right corner so that it displays as shown in the example below. This is helpful for keeping track of when the show locked.
QC the locked sequence
The Director and Editor should watch the film one last time, looking for black frames or any other problems. This is your last chance to make any changes. Once your picture is locked, it is locked!
Save the project
Finally, once you are confident that your locked sequence is formatted correctly, make sure to save your Picture Lock bin.
Students may collaborate on the writing of FC, M2, M3, and MC projects. Writing collaborations involve the shared development of scripts, story ideas, revisions, and creative feedback between multiple writers or collaborators working on a project together. This page outlines expectations surrounding communication, attribution, workflow organization, and collaborative creative development within the writing process.
Collaborative writing can strengthen projects by introducing multiple perspectives, ideas, and problem-solving approaches, but it also requires clear communication, mutual respect, and well-defined expectations regarding creative contributions and decision-making. Learning how to navigate collaborative writing relationships is an important professional skill, particularly within industries where rewriting, writers’ rooms, development teams, and collaborative revision processes are common.
Deal Memos
At the start of the collaboration process, the director (or producer) must have the additional writer(s) complete a standard Crew Deal Memo. This includes a space to decide upon how the additional writer(s) will be credited in the finished film.
It is recommended that all parties draft a scope-of-work agreement for the tasks at hand. This could include a description of what work the additional writer(s) will contribute, how many drafts, and due dates. Defining what constitutes final delivery for the additional writer(s) is advised. This document can be a helpful way for making sure everyone’s on the same page before the work commences.
Credit Definitions
Writing credits for motion pictures, as defined by the Writers Guild of America, are determined within a very specific set of definitions. Each type of credit has a distinct meaning and purpose, as described below:
STORY BY The term “story” means all writing representing a contribution “distinct from screenplay and consisting of basic narrative, idea, theme or outline indicating character development and action.” “Distinct from screenplay” means that the contributions considered for story should not be applied to screenplay credit, nor should contributions considered for screenplay credit be applied to story credit. A story may be written in story form or may be contained within other literary material, such as a treatment or a screenplay, for purposes of receiving “Story by” credit.
SCREENPLAY BY A screenplay consists of individual scenes and full dialogue, together with such prior treatment, basic adaptation, continuity, scenario, and dialogue as shall be used in, and represent substantial contributions to the final script. A “Screenplay by” credit is appropriate when there is source material of a story nature or when the writer(s) entitled to “Story by” credit is different from the writer(s) entitled to “Screenplay by” credit.
WRITTEN BY The credit “Written by” is used when the writer(s) is entitled to both the “Story by” credit and the “Screenplay by” credit. This credit shall not be granted where there is source material of a story nature. However, biographical, newspaper, and other factual sources may not necessarily deprive the writer of such credit.
& Writers working closely together as a writing team are credited using an ampersand: e.g., “Written by Ben Mekler & Chris Amick”.
AND Writers working independently on drafts are listed in the credits with an “and” between them to signify that they worked separately: e.g., “Screenplay by Joe Eszterhas and Julianna Baggott”.
Determining credits
Determining of final credits is entirely at the discretion of the faculty. If there’s a dispute over how much a student contributed or whether a credit is deserved, faculty will arbitrate by reviewing the writing materials and deciding the final credits.
If a writer contributes in a manner that fits the above definitions, they are eligible for receiving the applicable writing credit(s) in the finished film.
If a writer’s contributions don’t pass the threshold for one of the above credits — e.g., they give notes on a script or help with kicking around ideas, but don’t contribute significantly to the mapping out the story or the writing of the script — a writing credit will not be awarded. Instead, a mention in the “SPECIAL THANKS” section of the credits can be used to acknowledge their support.
Sample scenarios
Brock and Chest conceive the story and write the screenplay together as a writing team. Credits would read: Written by Brock Landers & Chest Rockwell
Kar-leung comes up with the story, Hsing-Hsiu writes the screenplay. Credits would read: Story by Lau Kar-leung Screenplay by Huang Hsing-Hsiu
Marlene comes up with the story, and then works as a writing team with Bill on the writing of the script. Credits would read: Story by Marlene Clark Screenplay by Marlene Clark&Bill Gunn
Emilio comes up with the story and writes a draft of the script, then María takes over to do a rewrite of the script. Credits would read: Story by Emilio Fernández Screenplay by Emilio Fernández and María Félix
Mario gives notes on Daria’s script. Credits would read: Written by Daria Nicolodi Special Thanks to Mario Bava (at end of crawl)
Baz develops a story for a movie about Elvis. Baz forms a writing partnership with Sam to write the screenplay. Baz then forms a new writing partnership with Craig to rewrite the screenplay. Jeremy then reworks part of the story and rewrites the screenplay. Credits read: Story by Baz Luhrmann and Jeremy Doner Screenplay by Baz Luhrmann & Sam Bromell and Baz Luhrmann & Craig Pearce and Jeremy Doner
This post explains the process for mounting production servers and accessing designated show volumes used for storing, organizing, and sharing project media. Maintaining a consistent workflow for server access is essential for collaboration across editorial, sound, color, VFX, and other post-production departments.
The procedures outlined here are intended to reduce confusion, prevent file management errors, and ensure that all collaborators are working from the correct media and project structures. Consistent server practices help maintain version control, protect shared assets, and support efficient collaboration across large teams. Developing disciplined organizational habits in post-production environments is a critical professional skill, particularly on projects involving multiple editors, assistants, and departments.
Mounting CMPAFilmPost
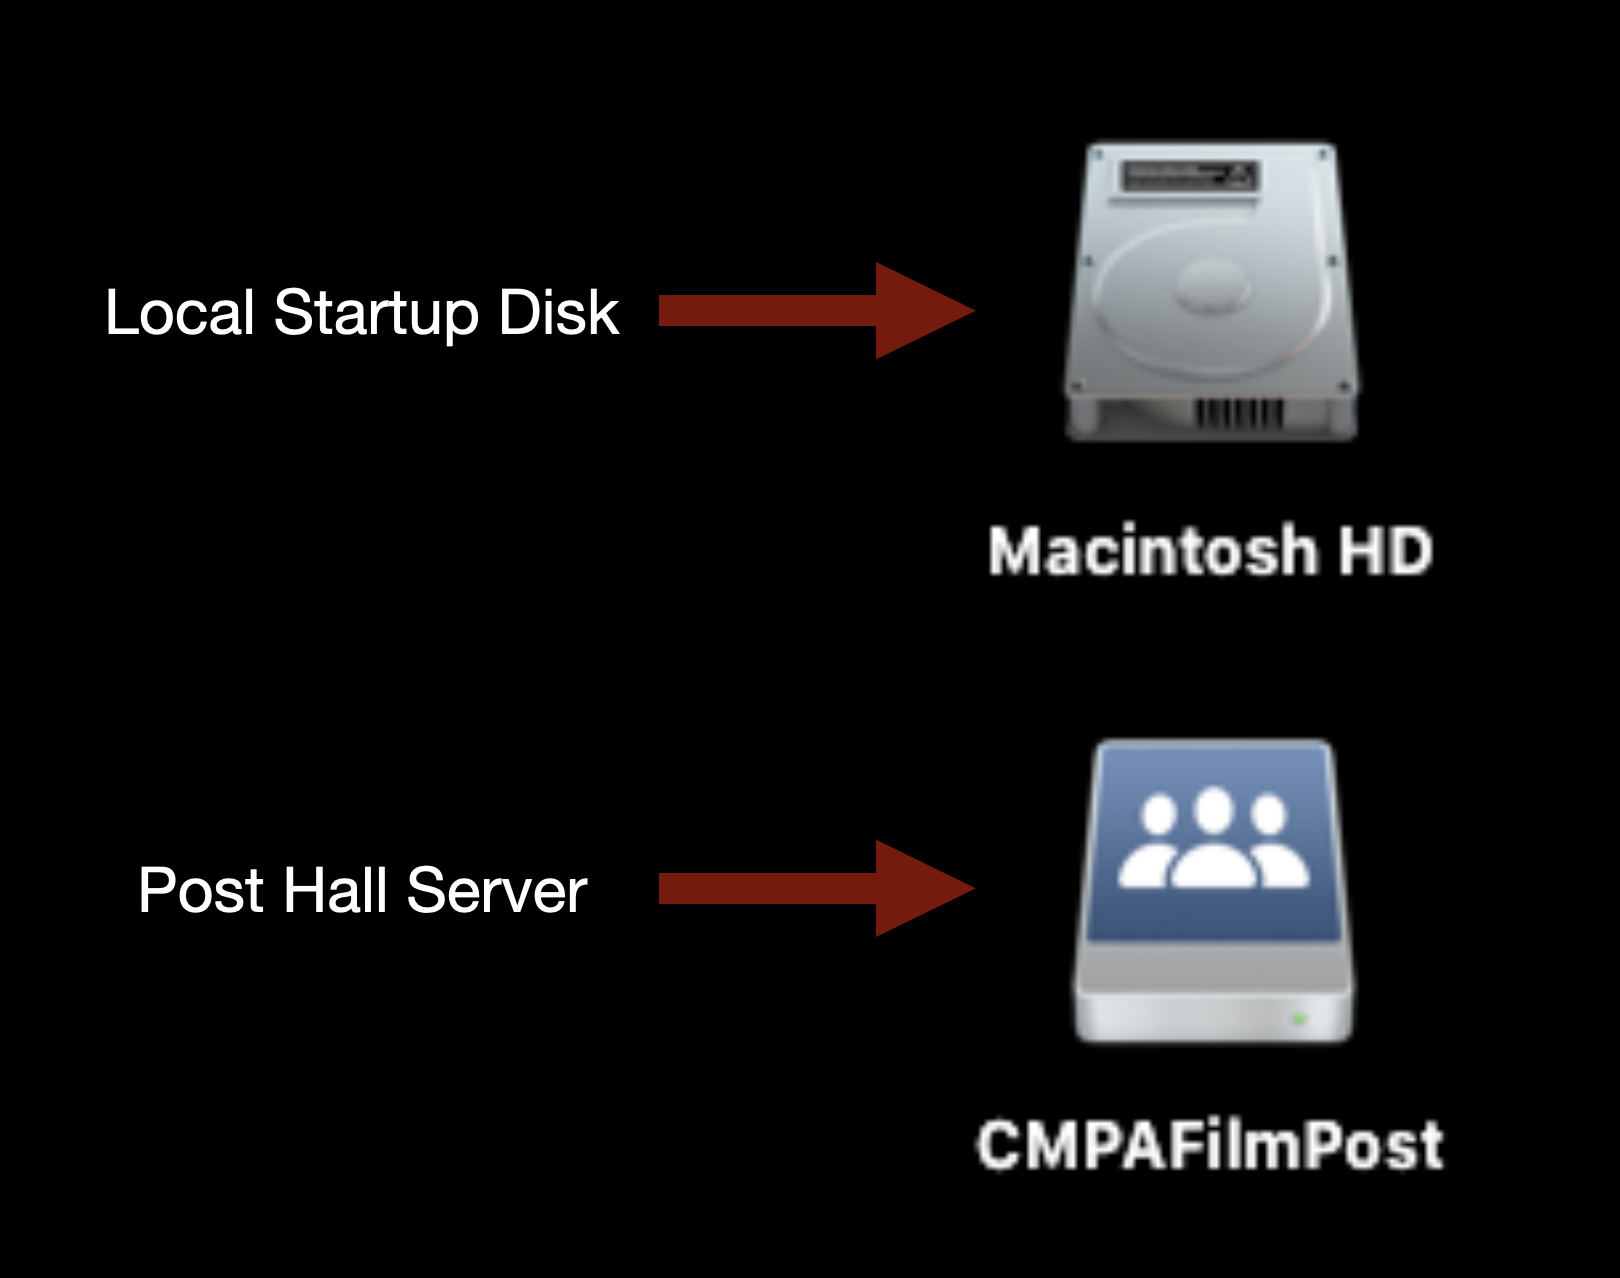
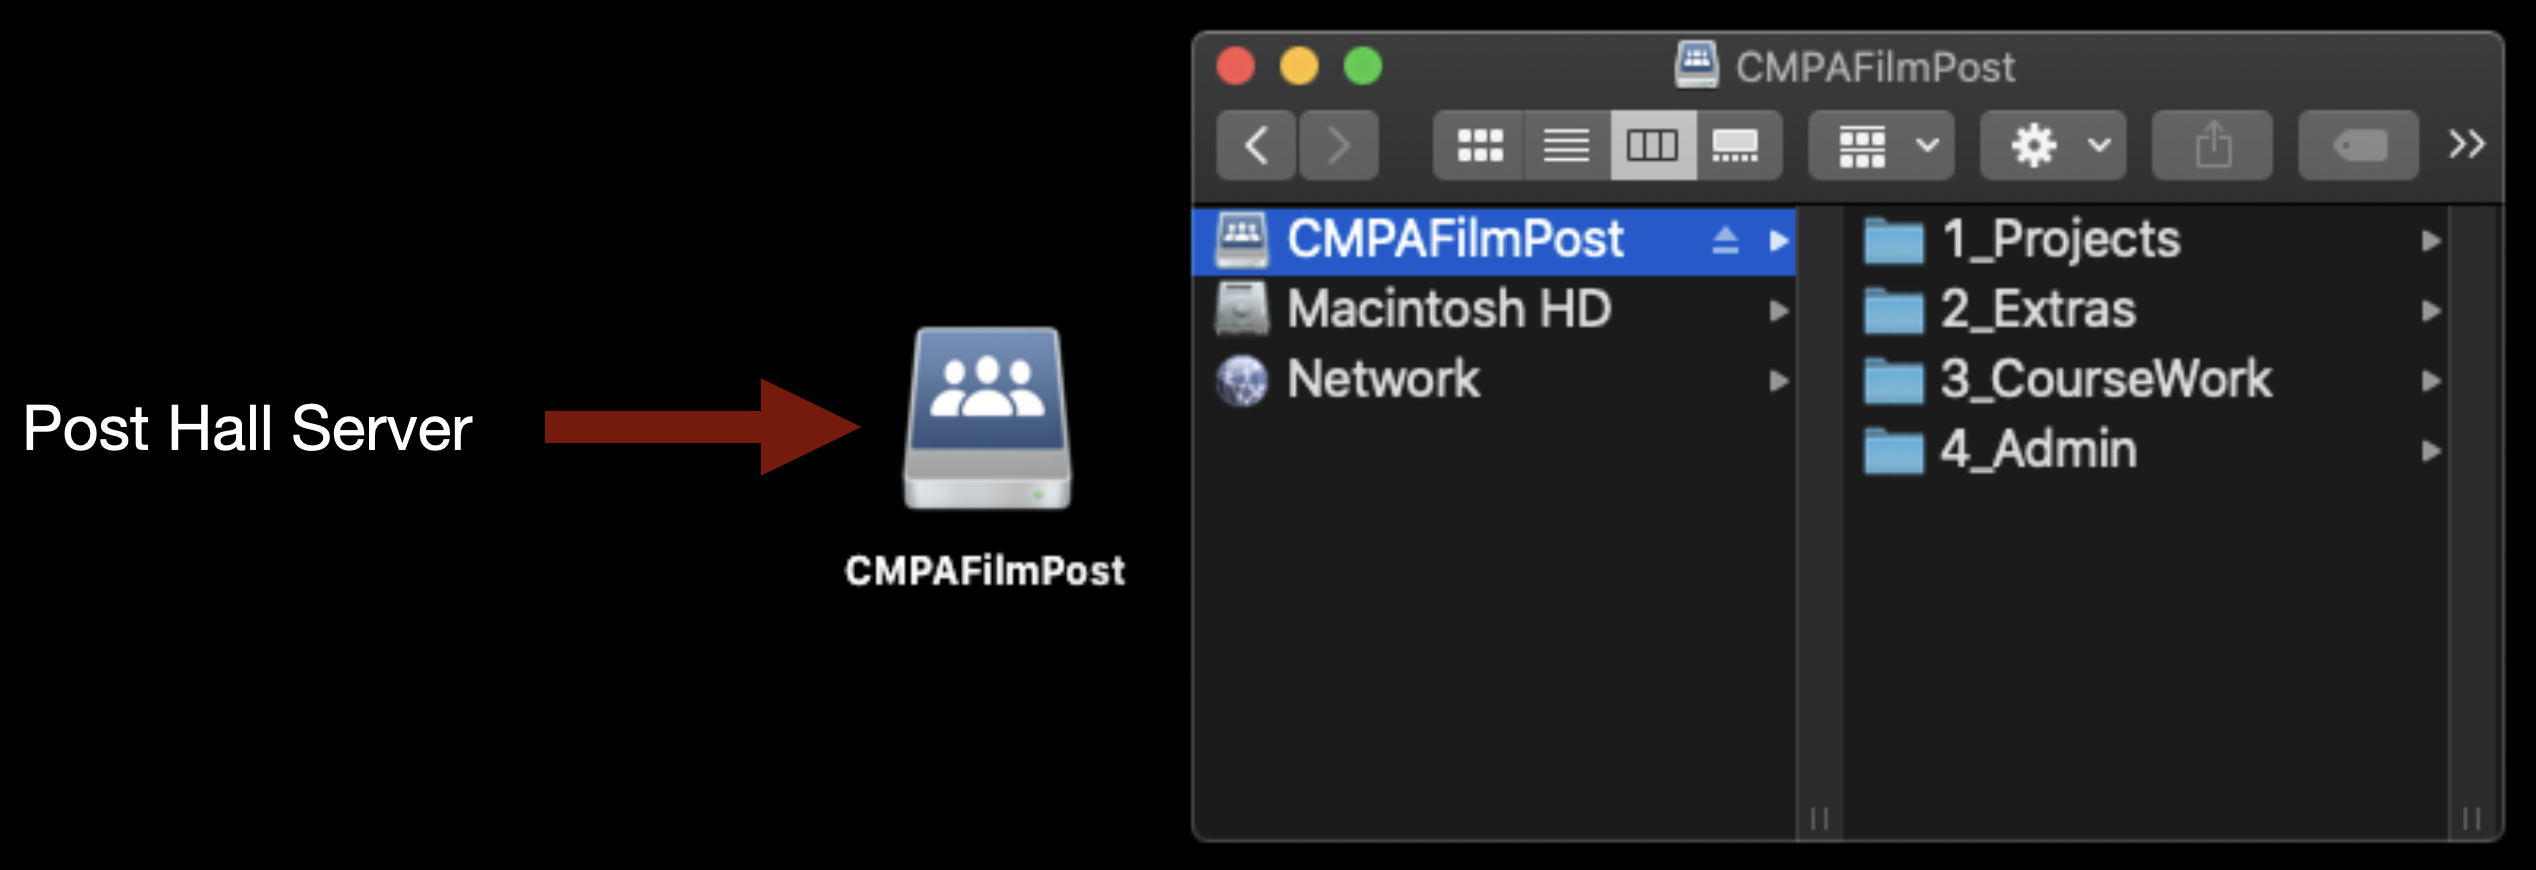
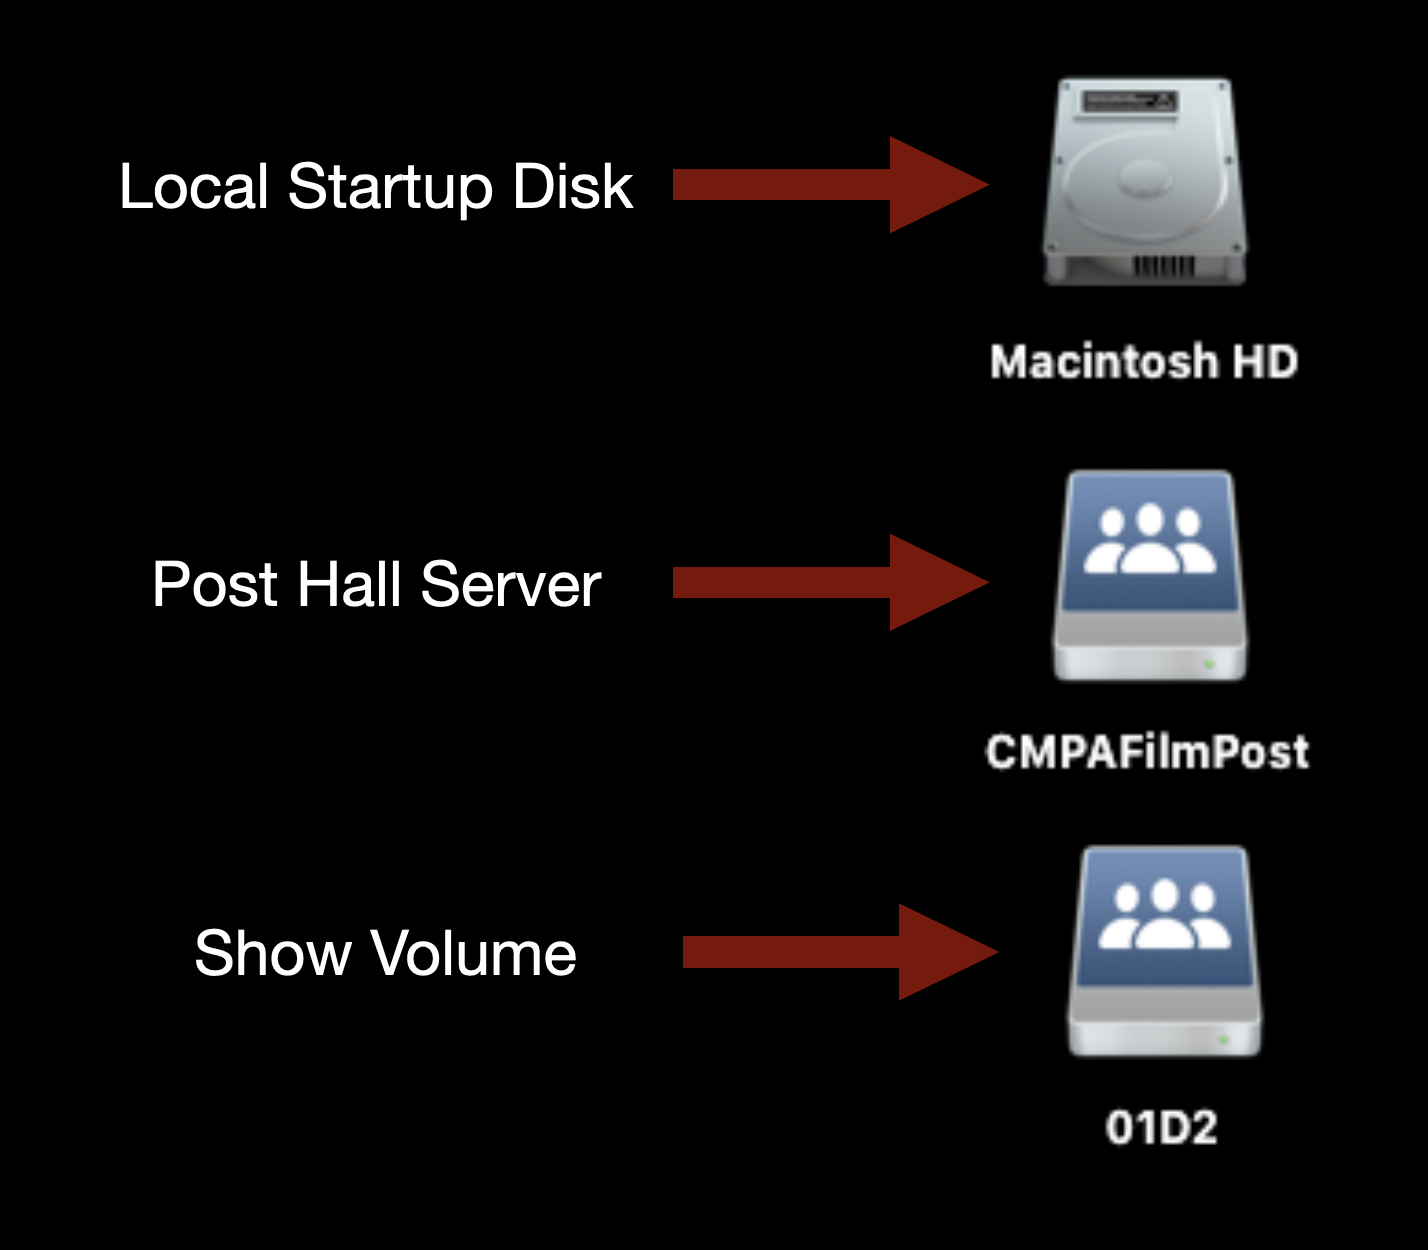
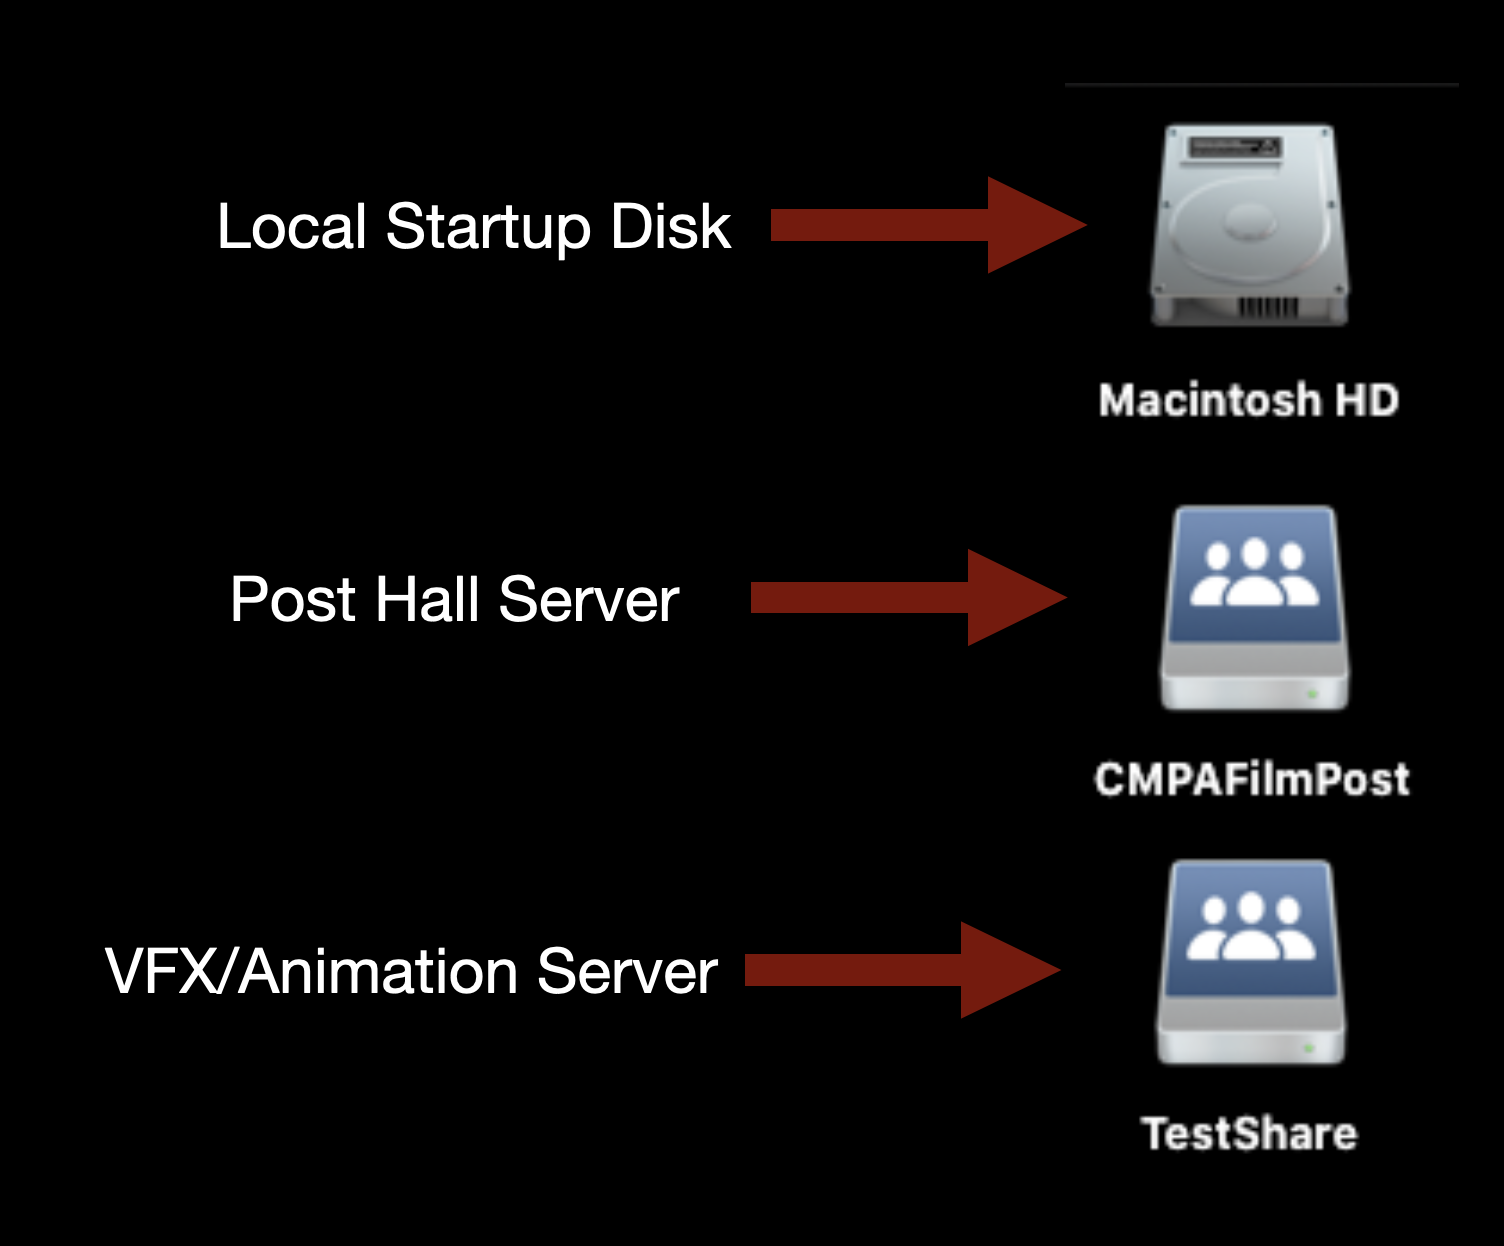
CMPAFilmPost or “the post hall server” should always be mounted on the desktop of your machine and will look like the example below.
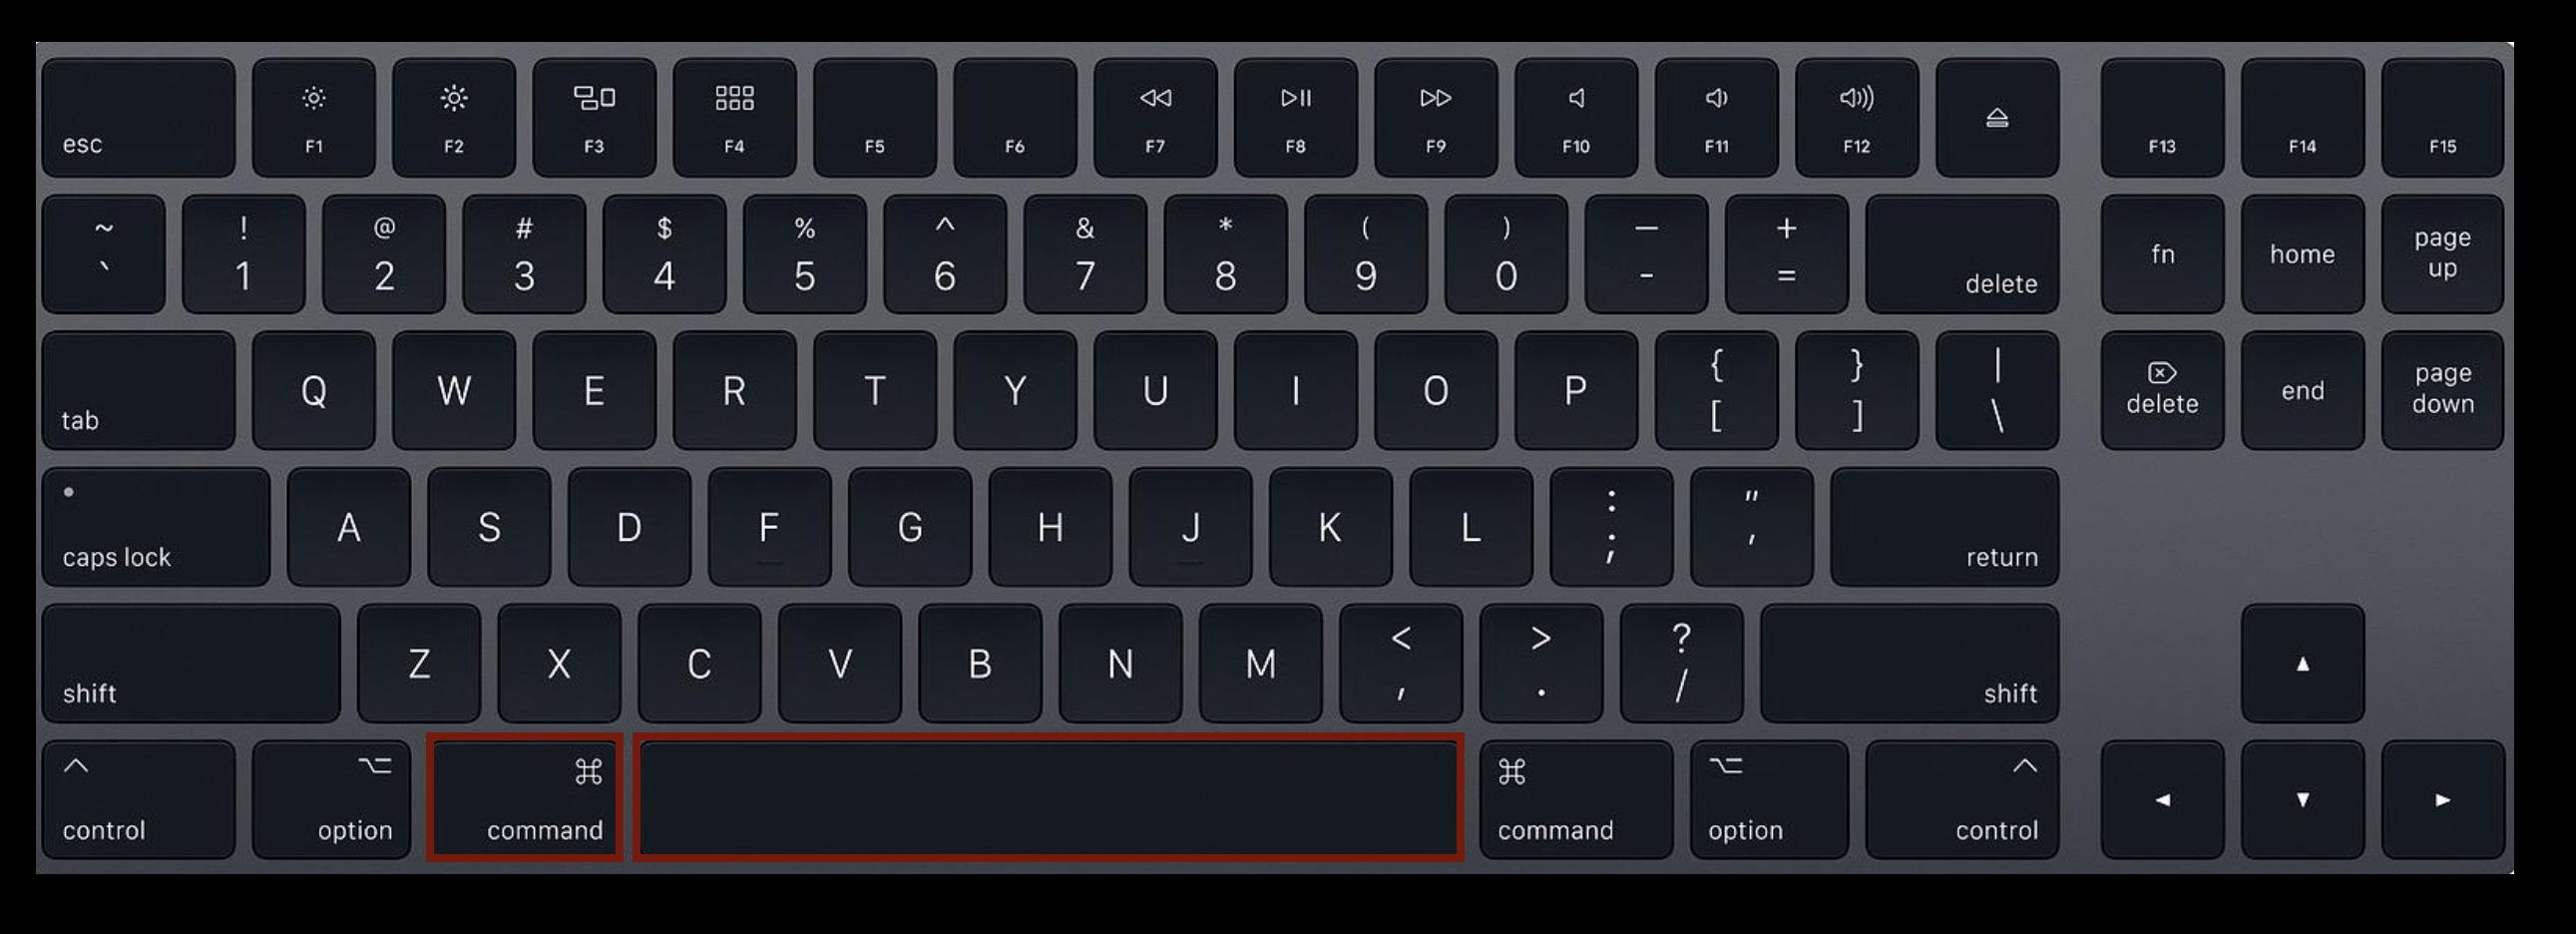
If for some reason it is not mounted type “Command” + “Spacebar” on the keyboard.
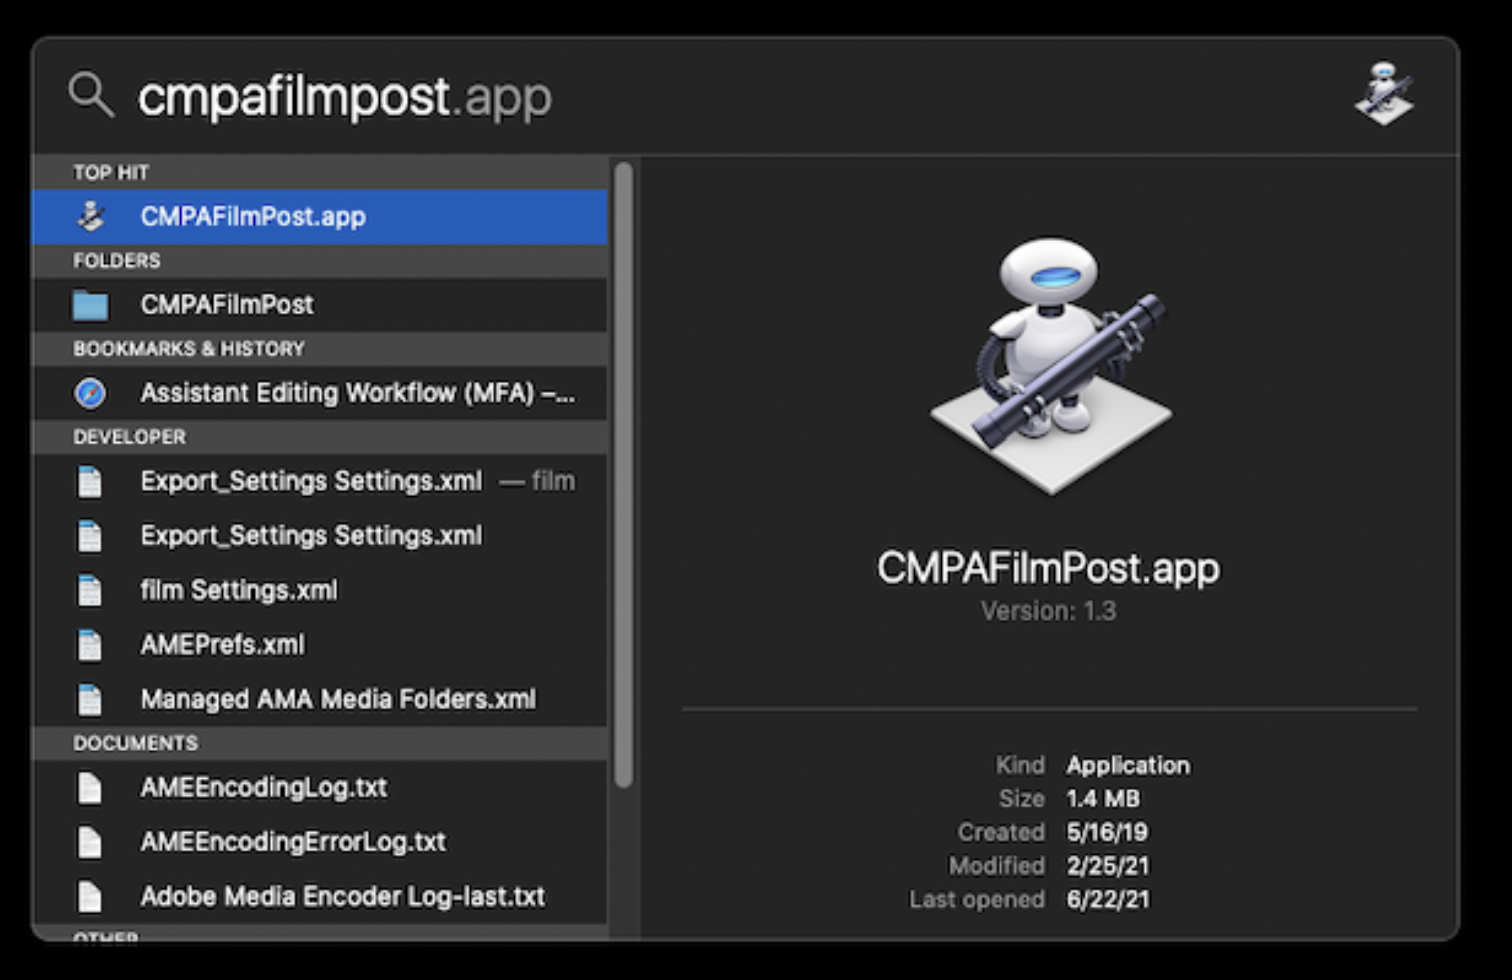
This will bring up the Spotlight Search function.
Type in “cmpafilmpost”. This will find an app that will mount the server. Hit “Enter” and it mount and you will see it on the desktop.
This is the main post hall server. This is where your Original Camera files and Production Audio will live.
Mounting Show Volume
Each film will have its own individual “Show Volume”. This is where your Media Composer Project and ProTools Project will live. You will need to mount the volume specific to the film you are working on.
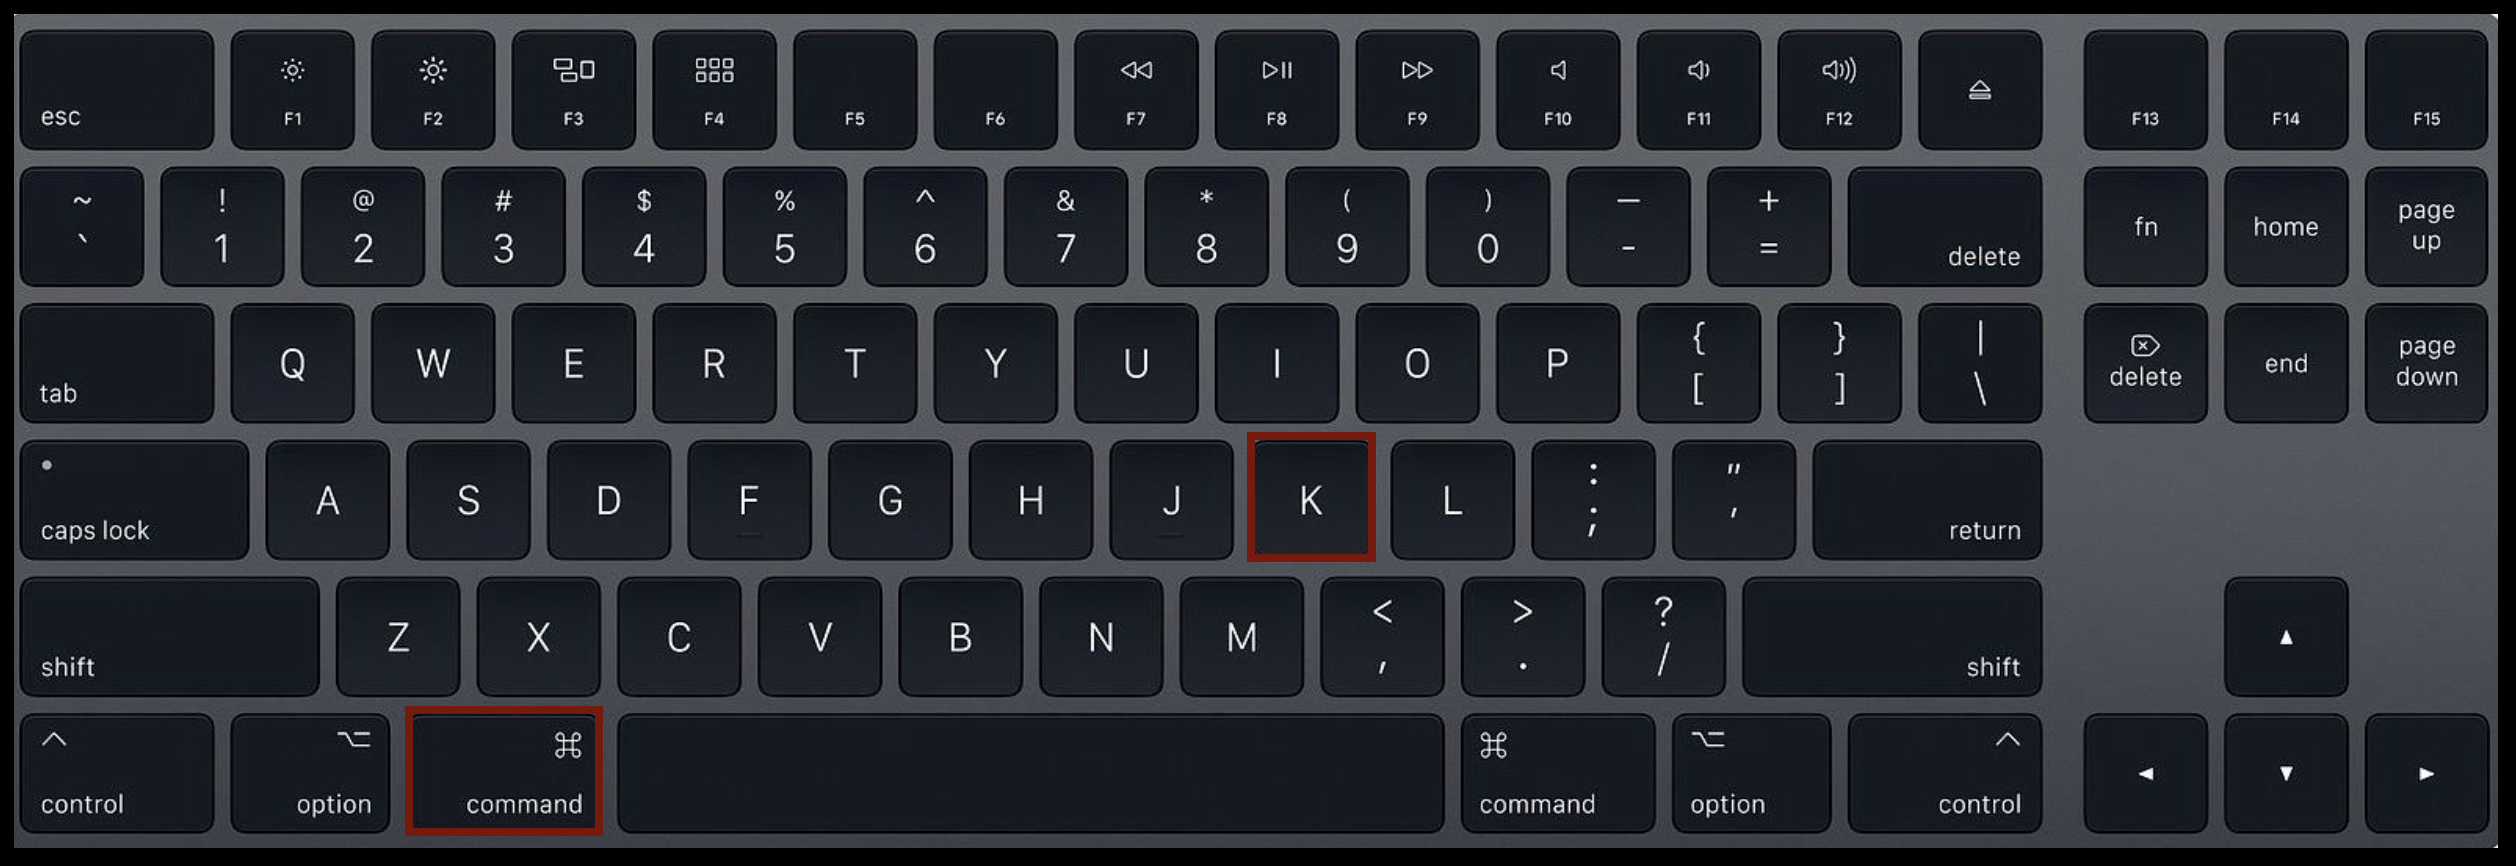
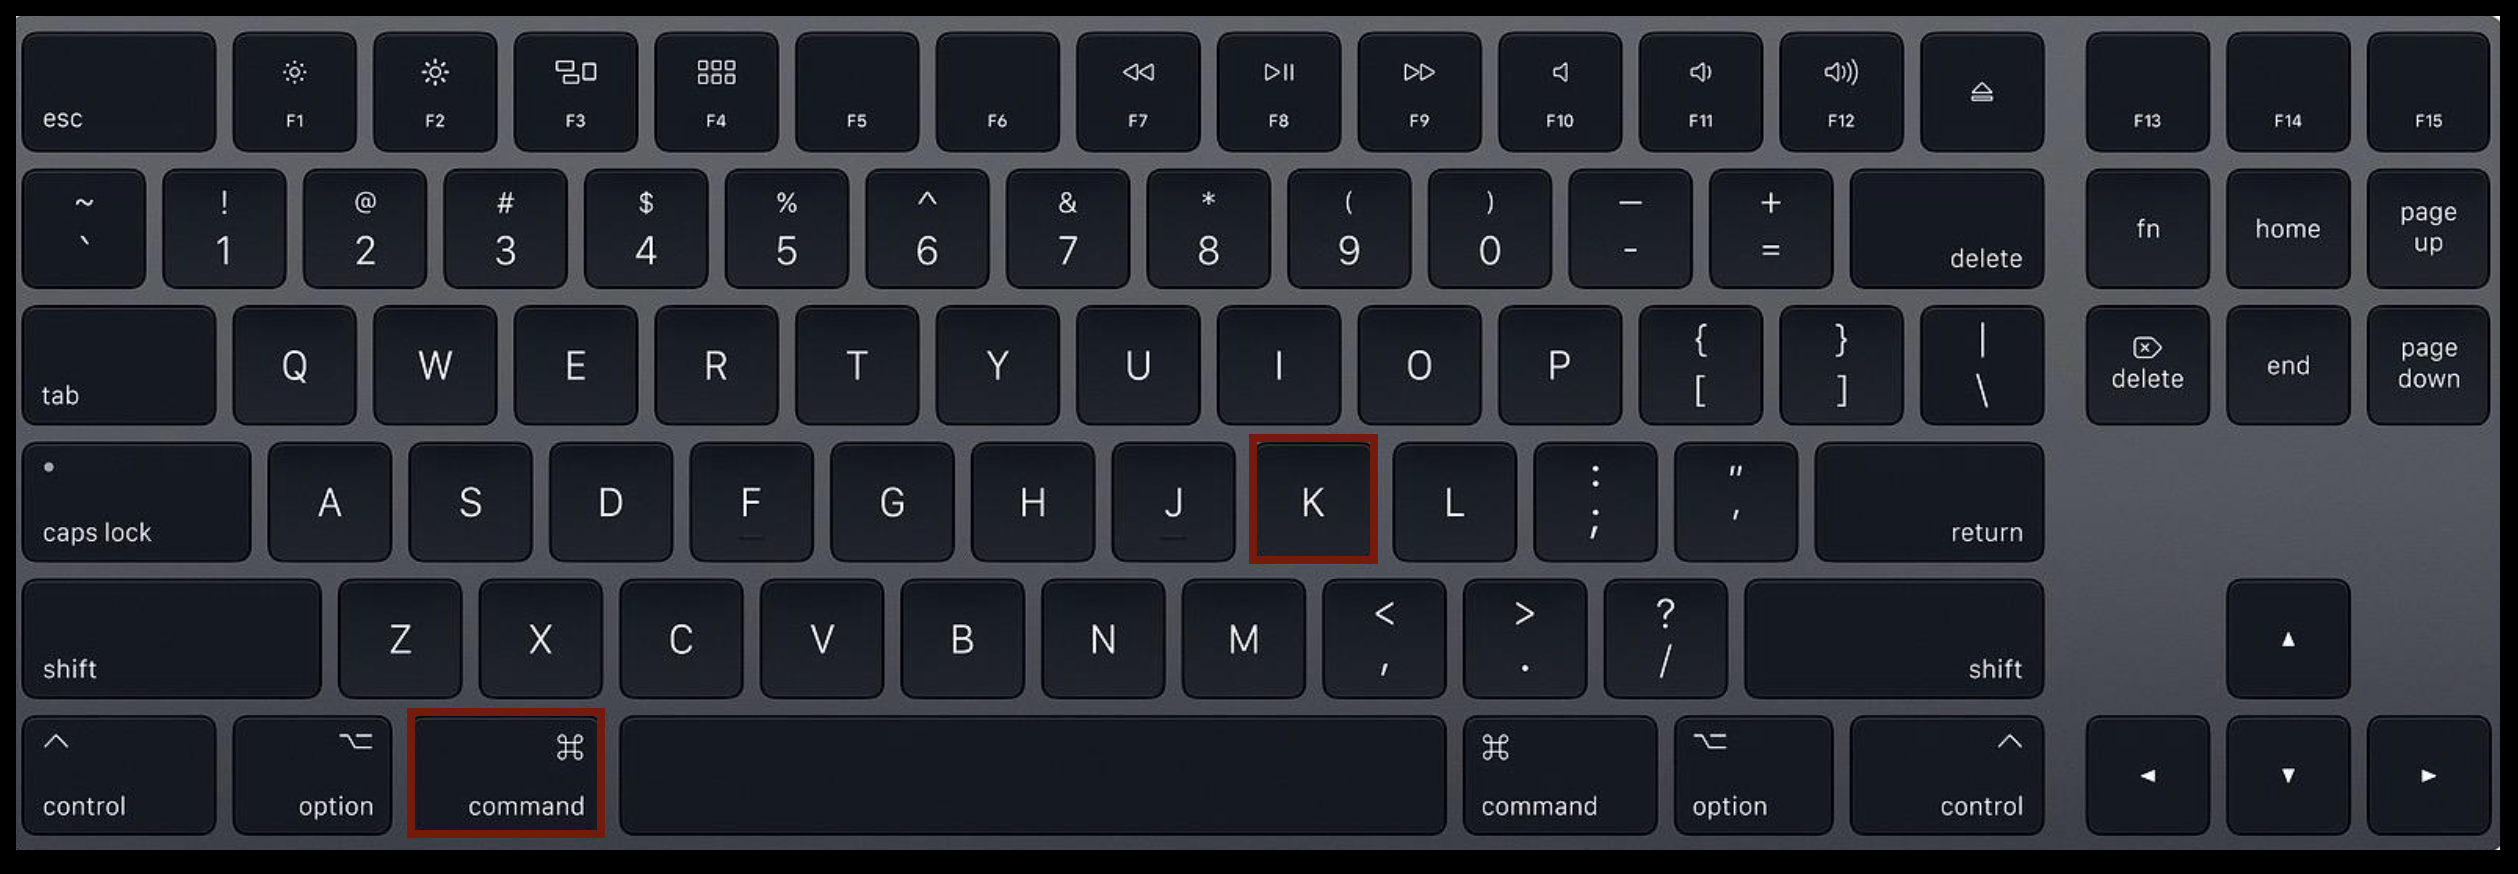
To do so type “Command” + “K” on the keyboard.
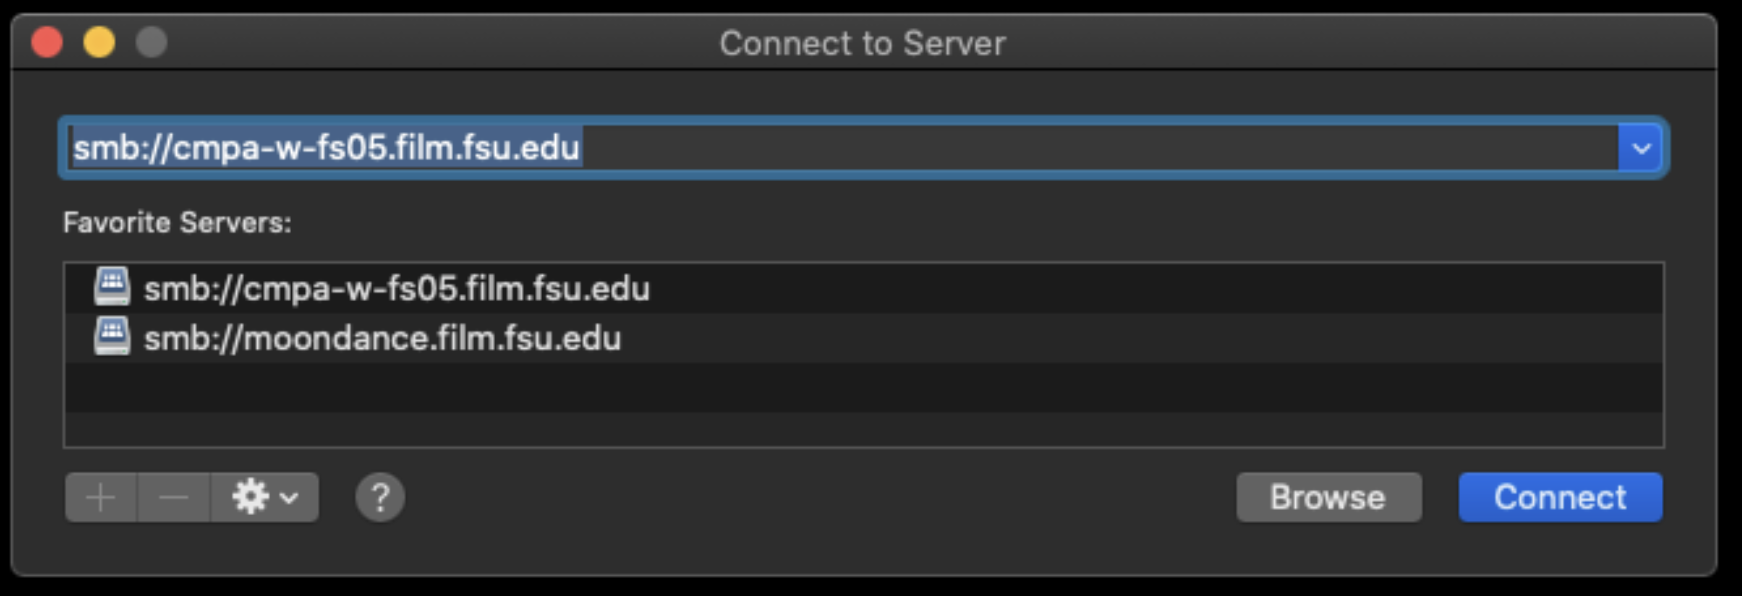
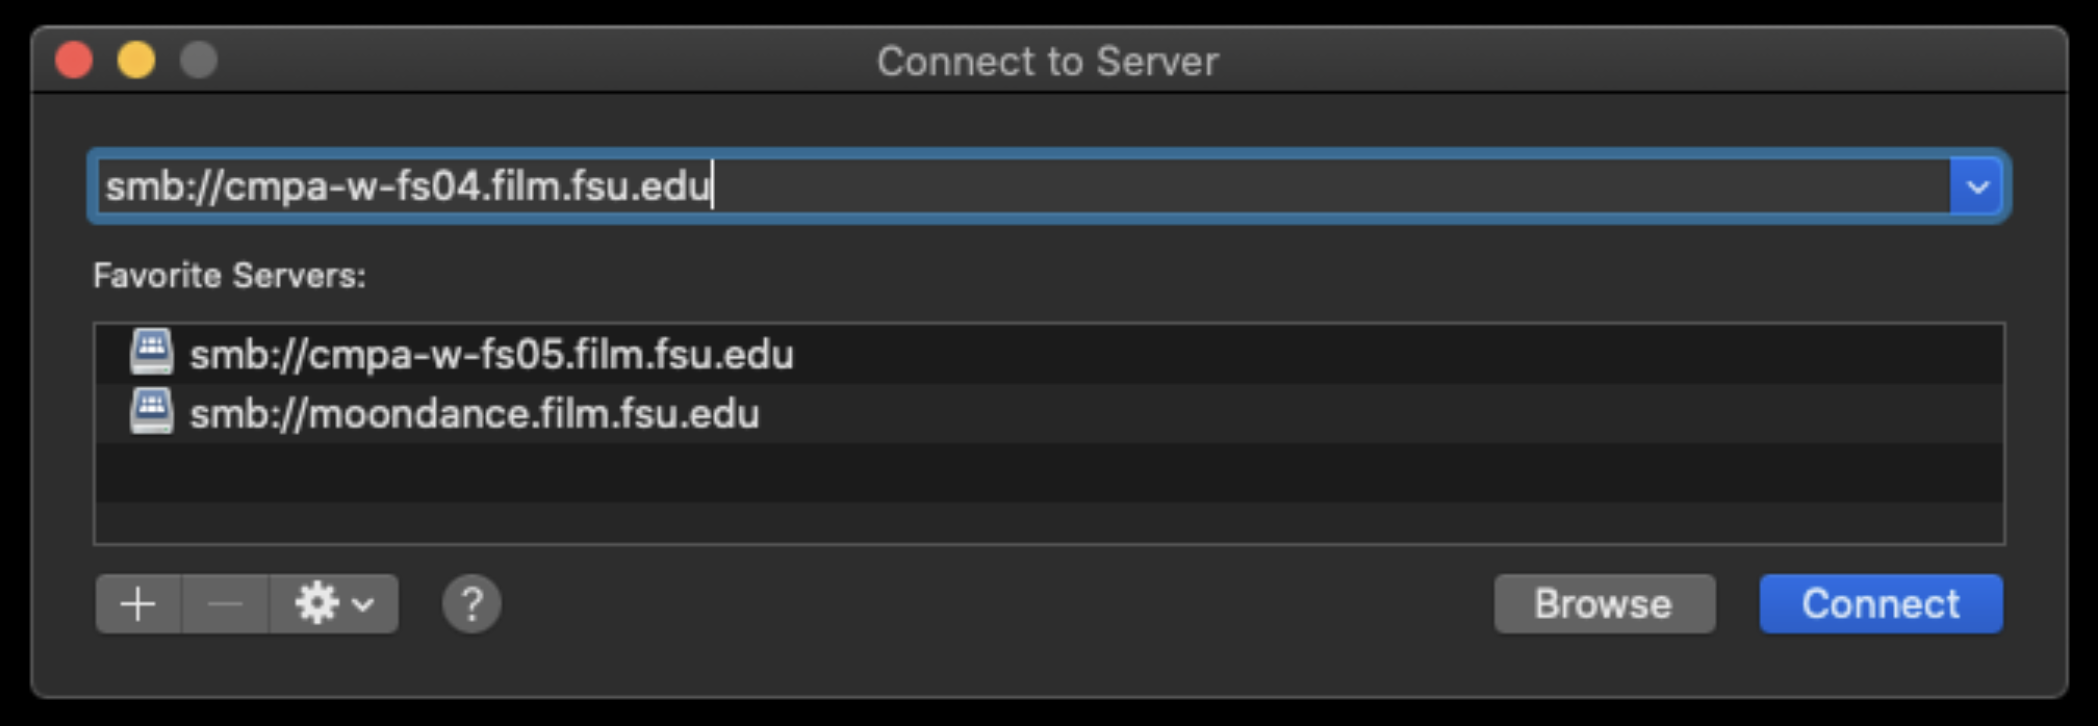
This will bring up the “Connect to Server” prompt. Type in the address: smb://cmpa-w-fs05.film.fsu.edu
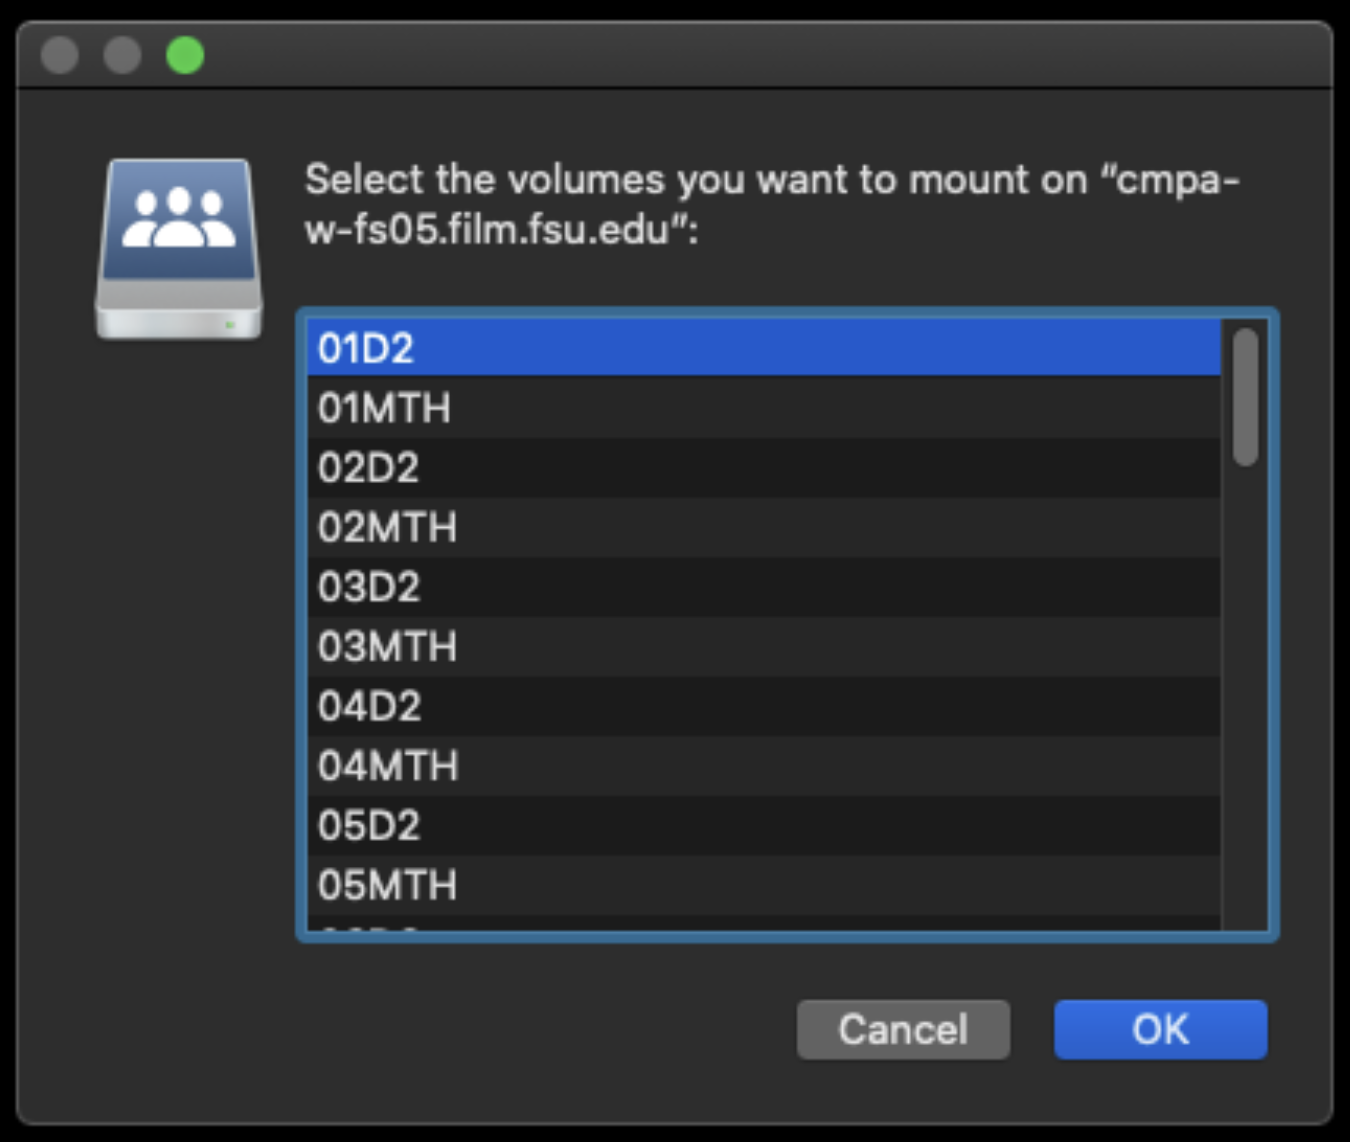
This will show all the possible show volumes that are available to choose from. Select your show number and then hit OK.
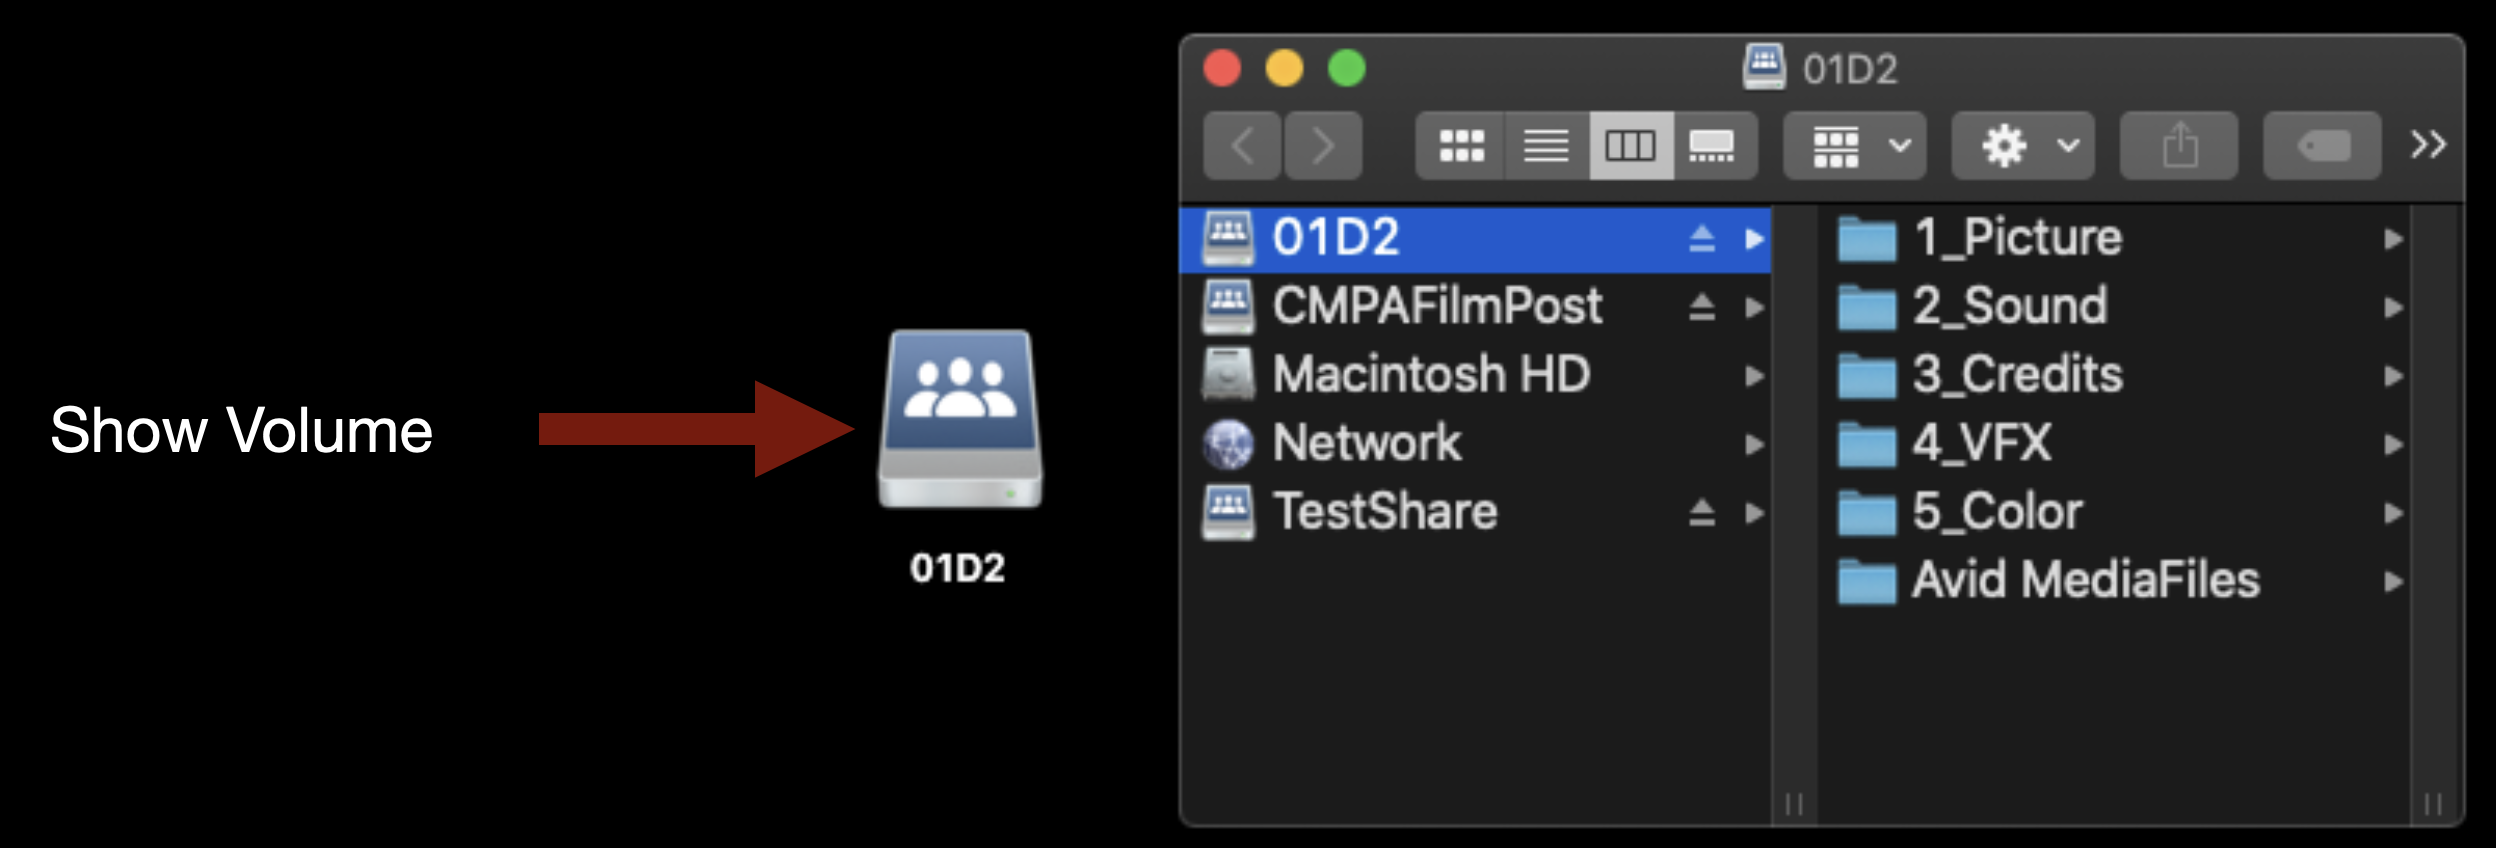
It will mount on the desktop and will look like the example below.
This is the folder structure inside.
Mounting TestShare
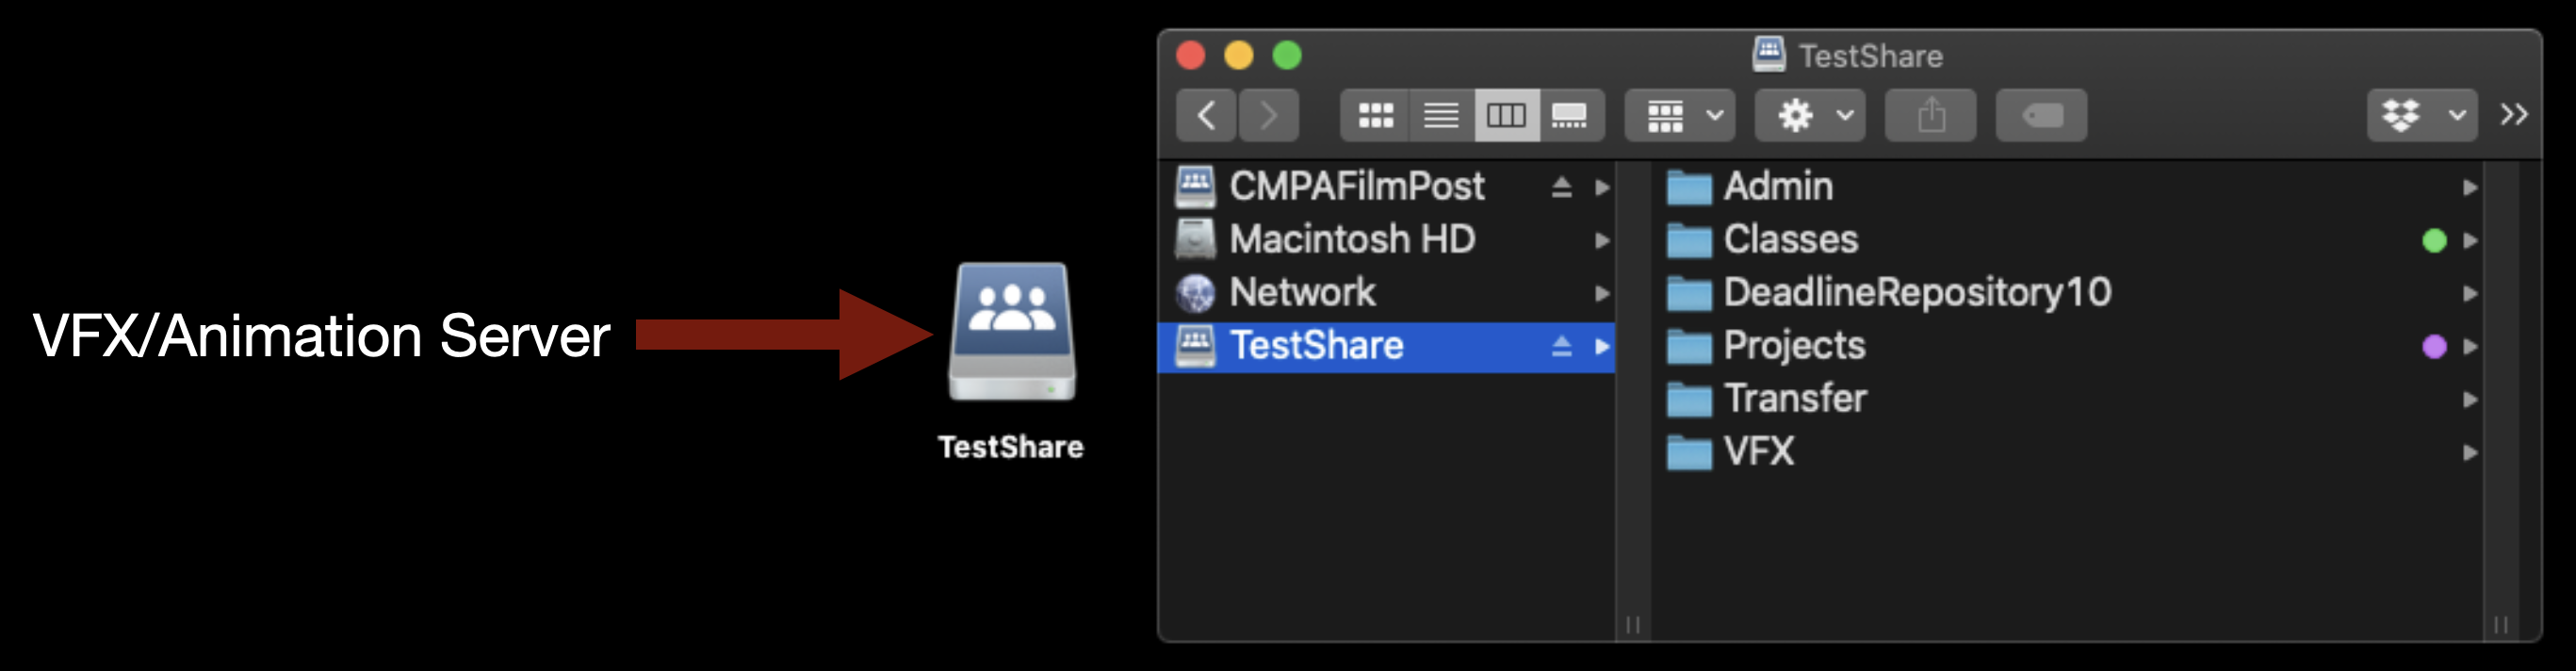
TestShare or “the Z Drive” is the server used for VFX and Animation work. If you need to mount it type “Command” +”K”.
This will bring up the “Connect to Server” prompt. Type in the address: smb://cmpa-w-fs04.film.fsu.edu
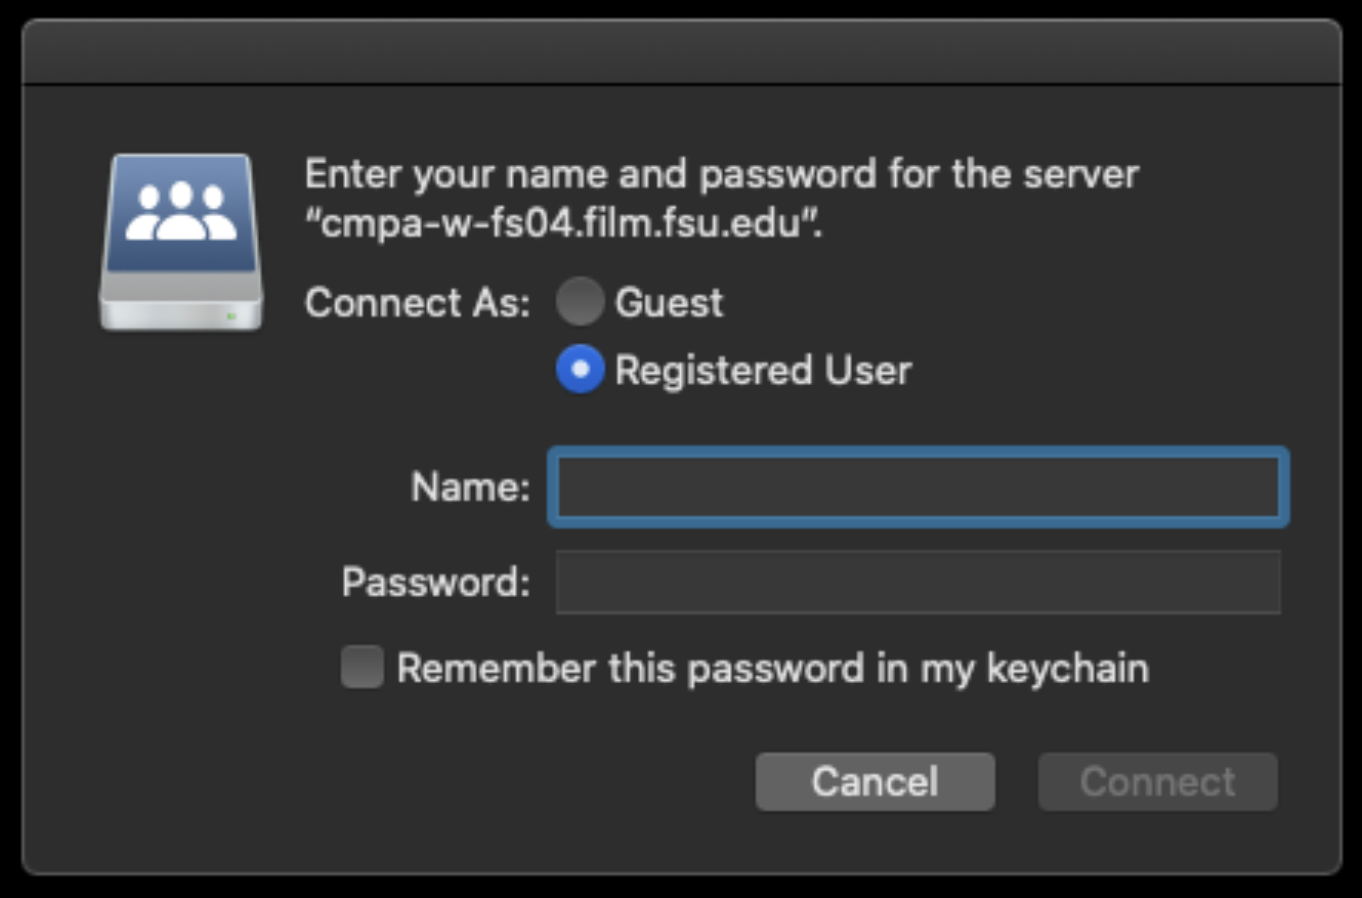
You will need to enter your FSU ID and Password.
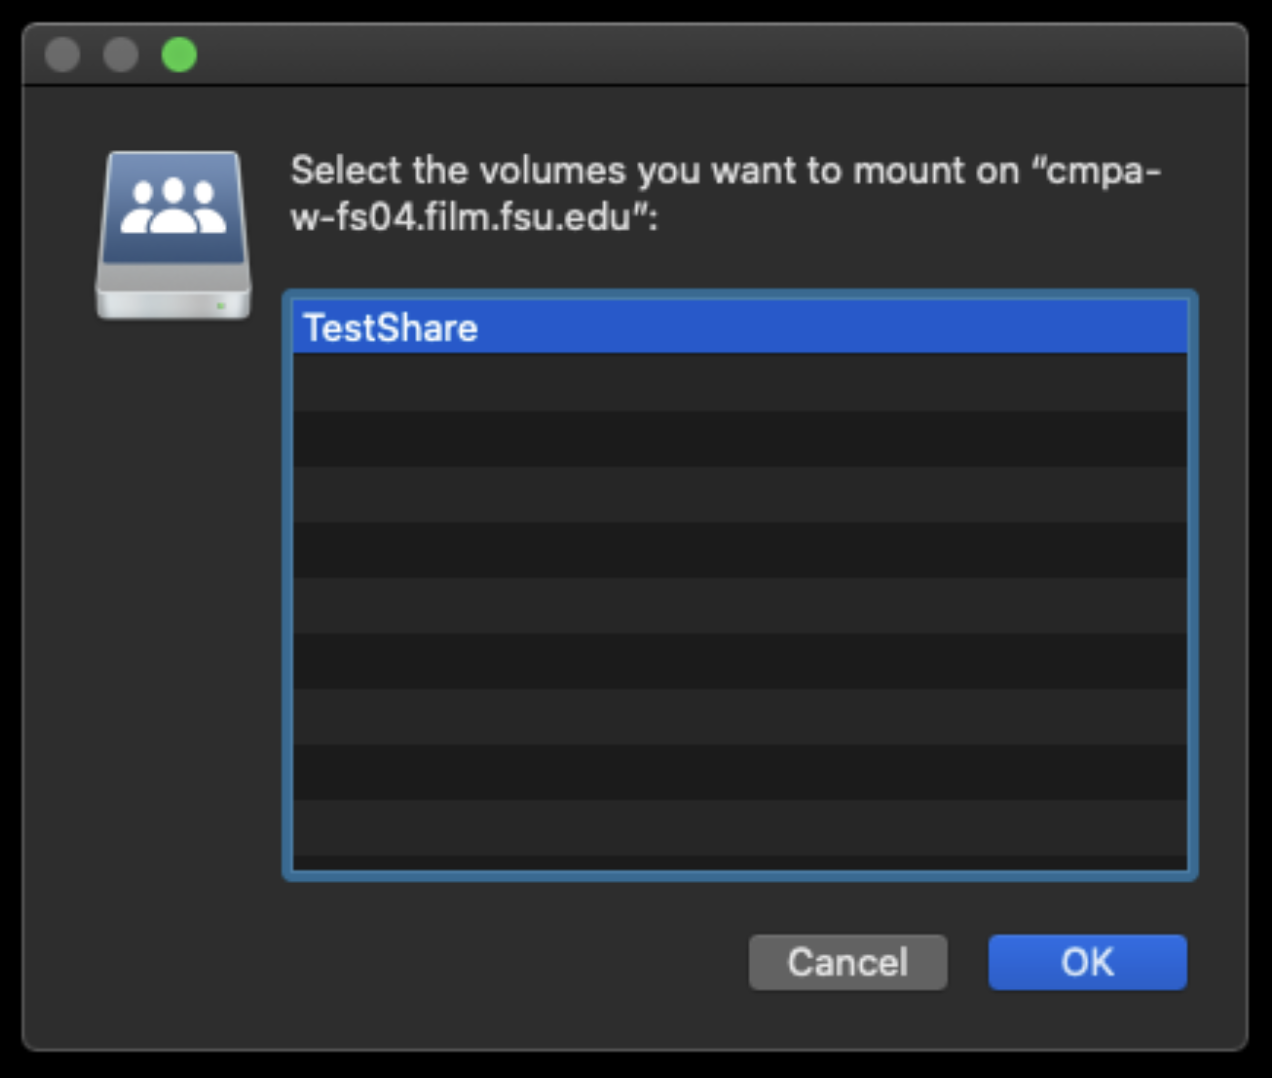
After that it will let you choose “TestShare”. Click OK to mount it.
It will mount on the desktop and will look like the example below.
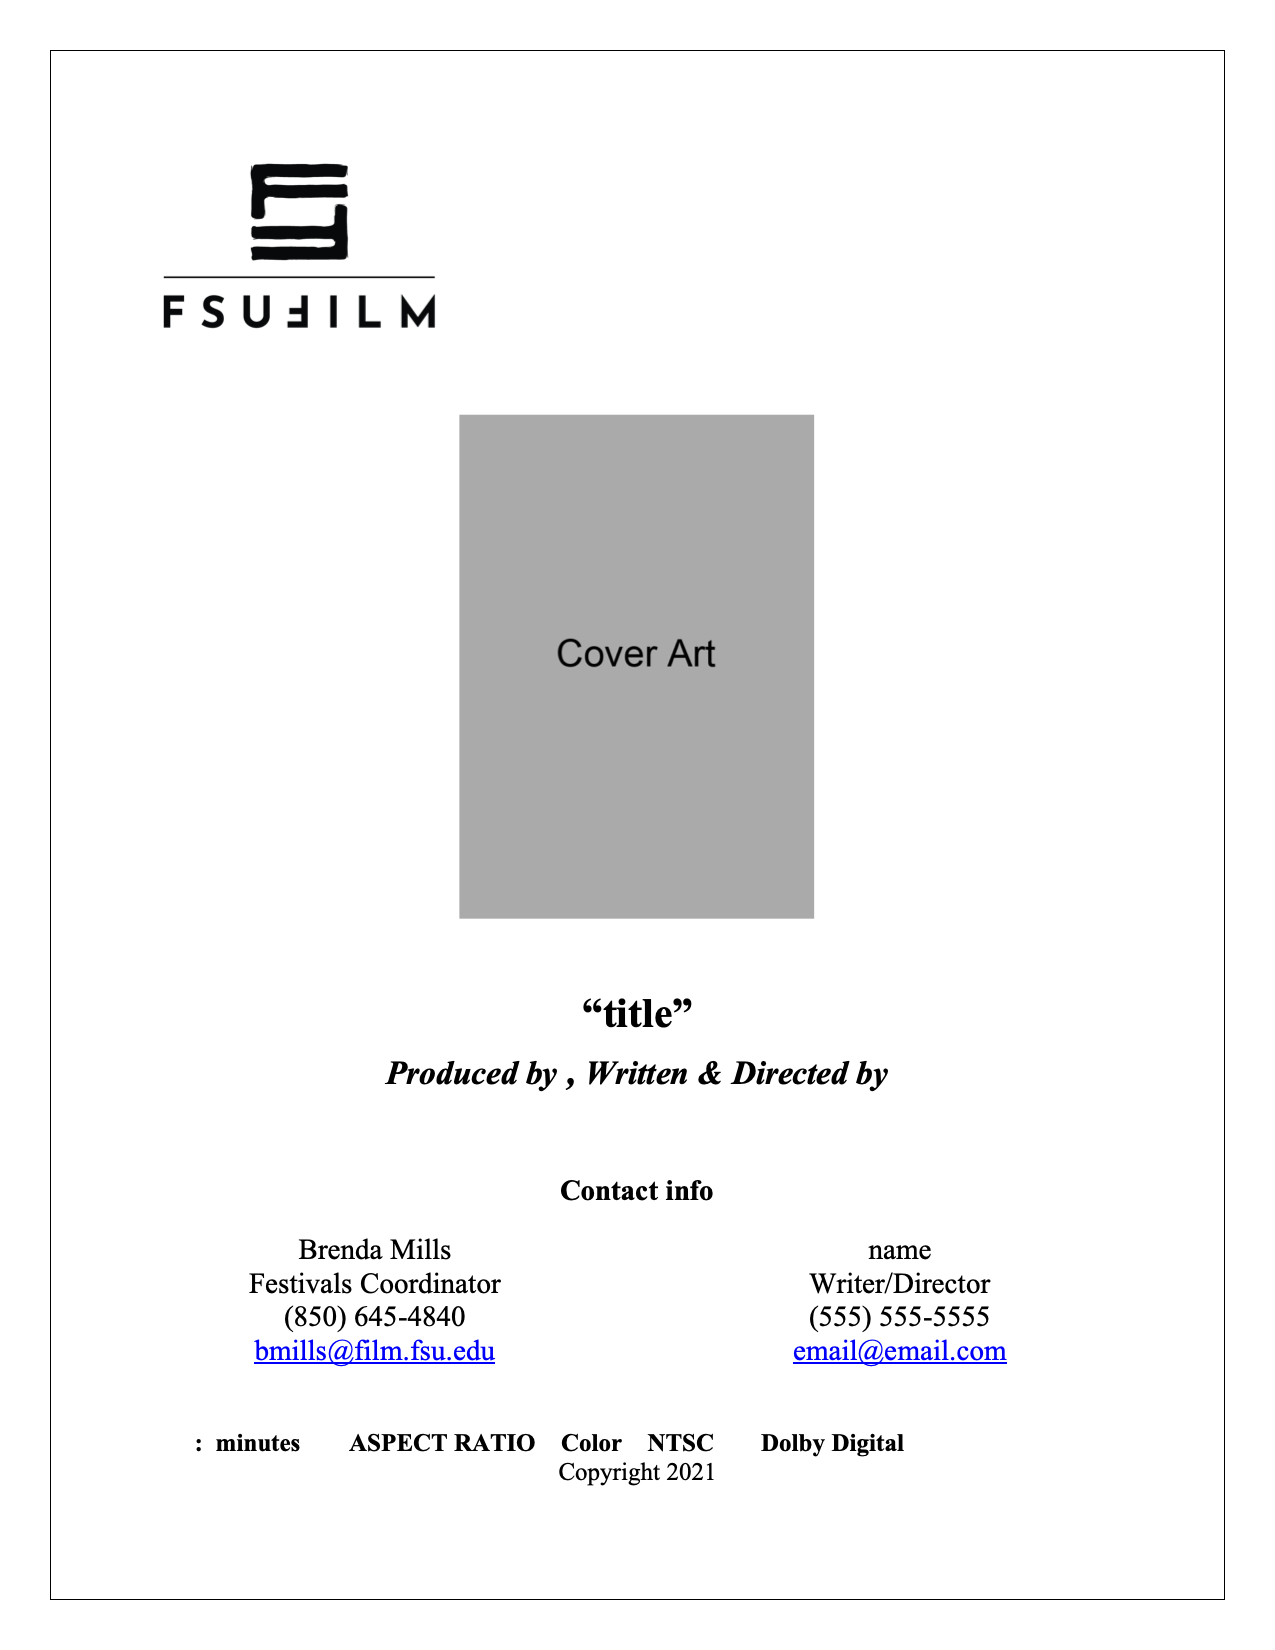
A press kit serves as a production’s professional public-facing package, providing press outlets, distributors, collaborators, festivals, and audiences with essential information about the film. This template is designed to help students organize and present materials in a clear, polished, and industry-standard format, including items such as synopses, credits, bios, stills, contact information, and director statements.
Beyond simple promotion, the press kit helps define how a project is positioned and understood externally. A thoughtful, cohesive press kit can significantly strengthen a film’s festival presence and professional presentation. Learning how to prepare these materials is an important part of understanding the broader lifecycle of a film beyond production itself, including marketing, exhibition, and audience engagement.
Thumbnail images are often the first point of contact audiences have with a film online, making them an important part of a project’s overall presentation and discoverability. This post provides standardized thumbnail templates to help maintain visual consistency across school-related promotional materials and online showcases.
The use of templates ensures that projects meet technical specifications while encouraging students to think strategically about visual communication and audience engagement. Effective thumbnails should clearly represent the tone and identity of the project while remaining legible and visually compelling across a range of screen sizes and platforms. Developing an understanding of these presentation standards is increasingly important in contemporary distribution environments.
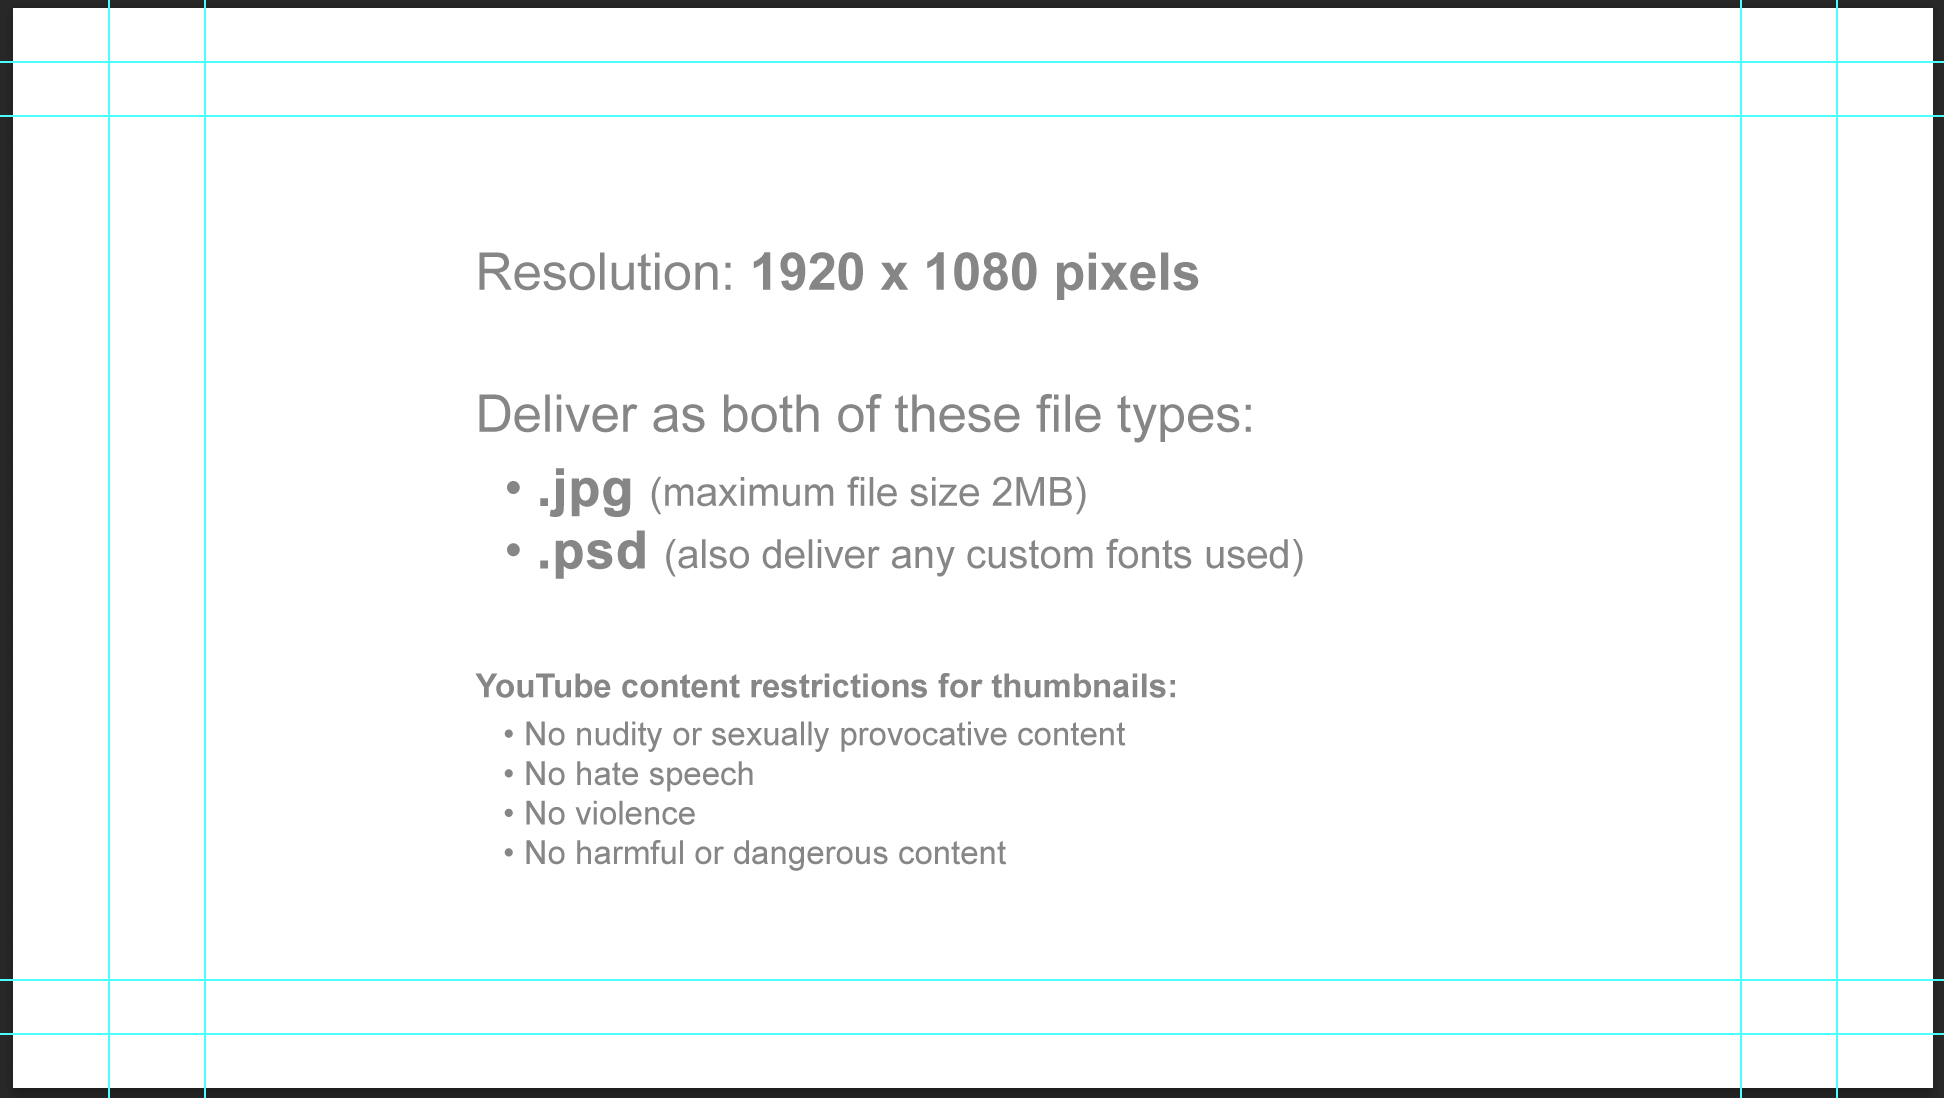
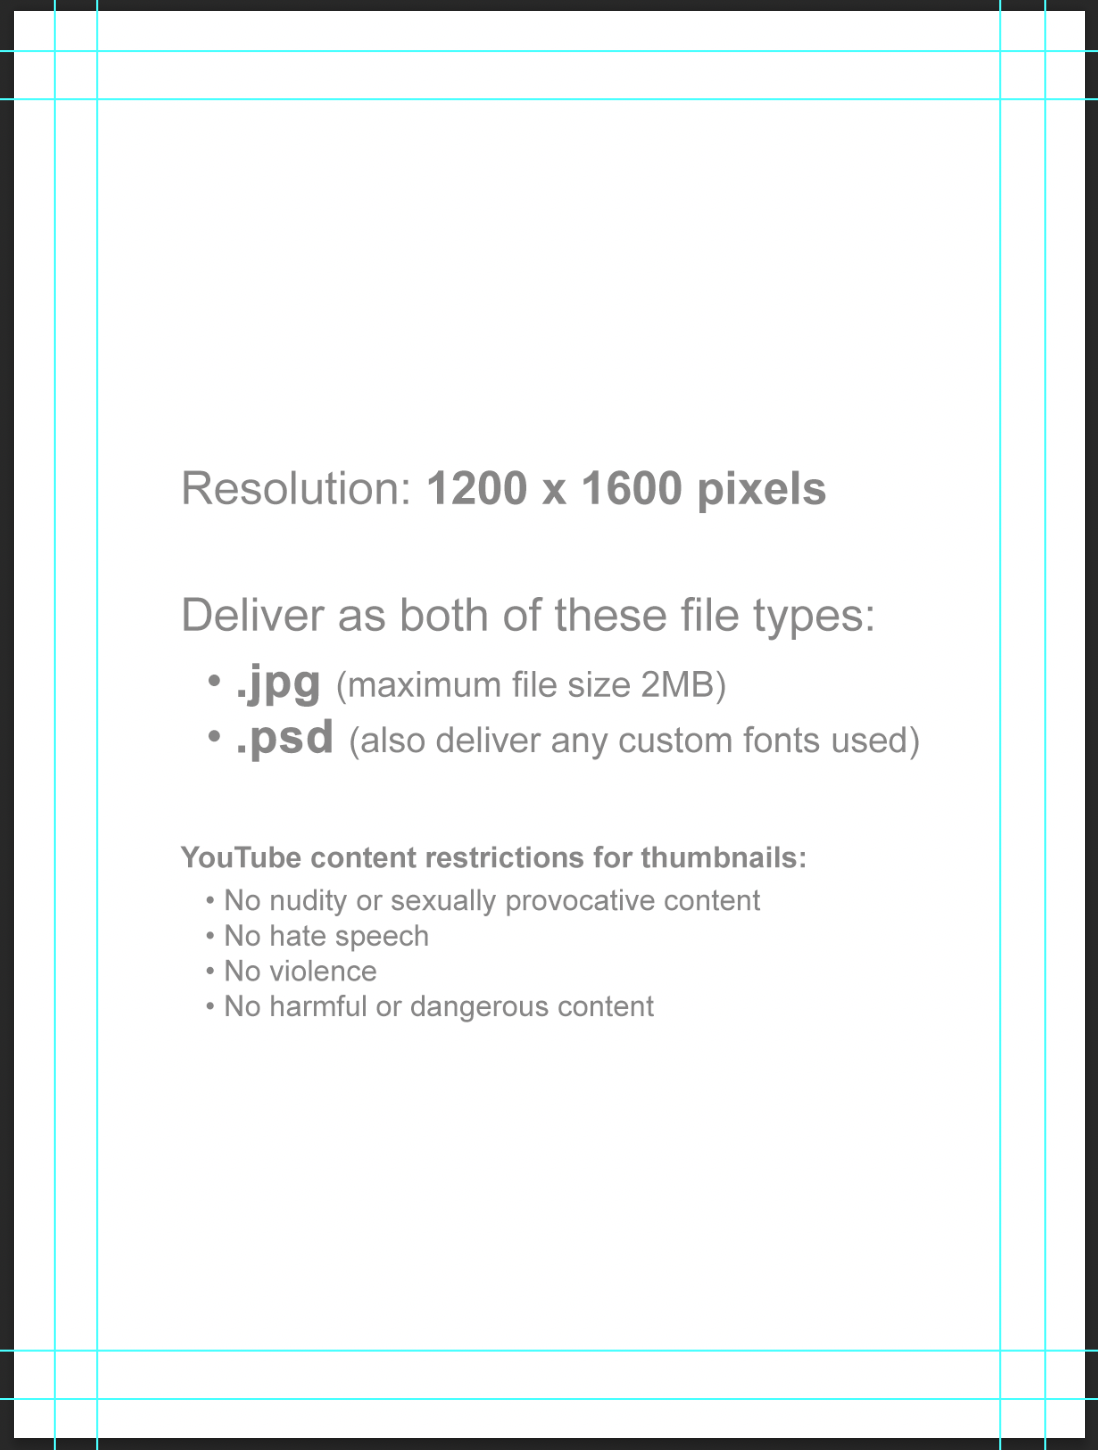
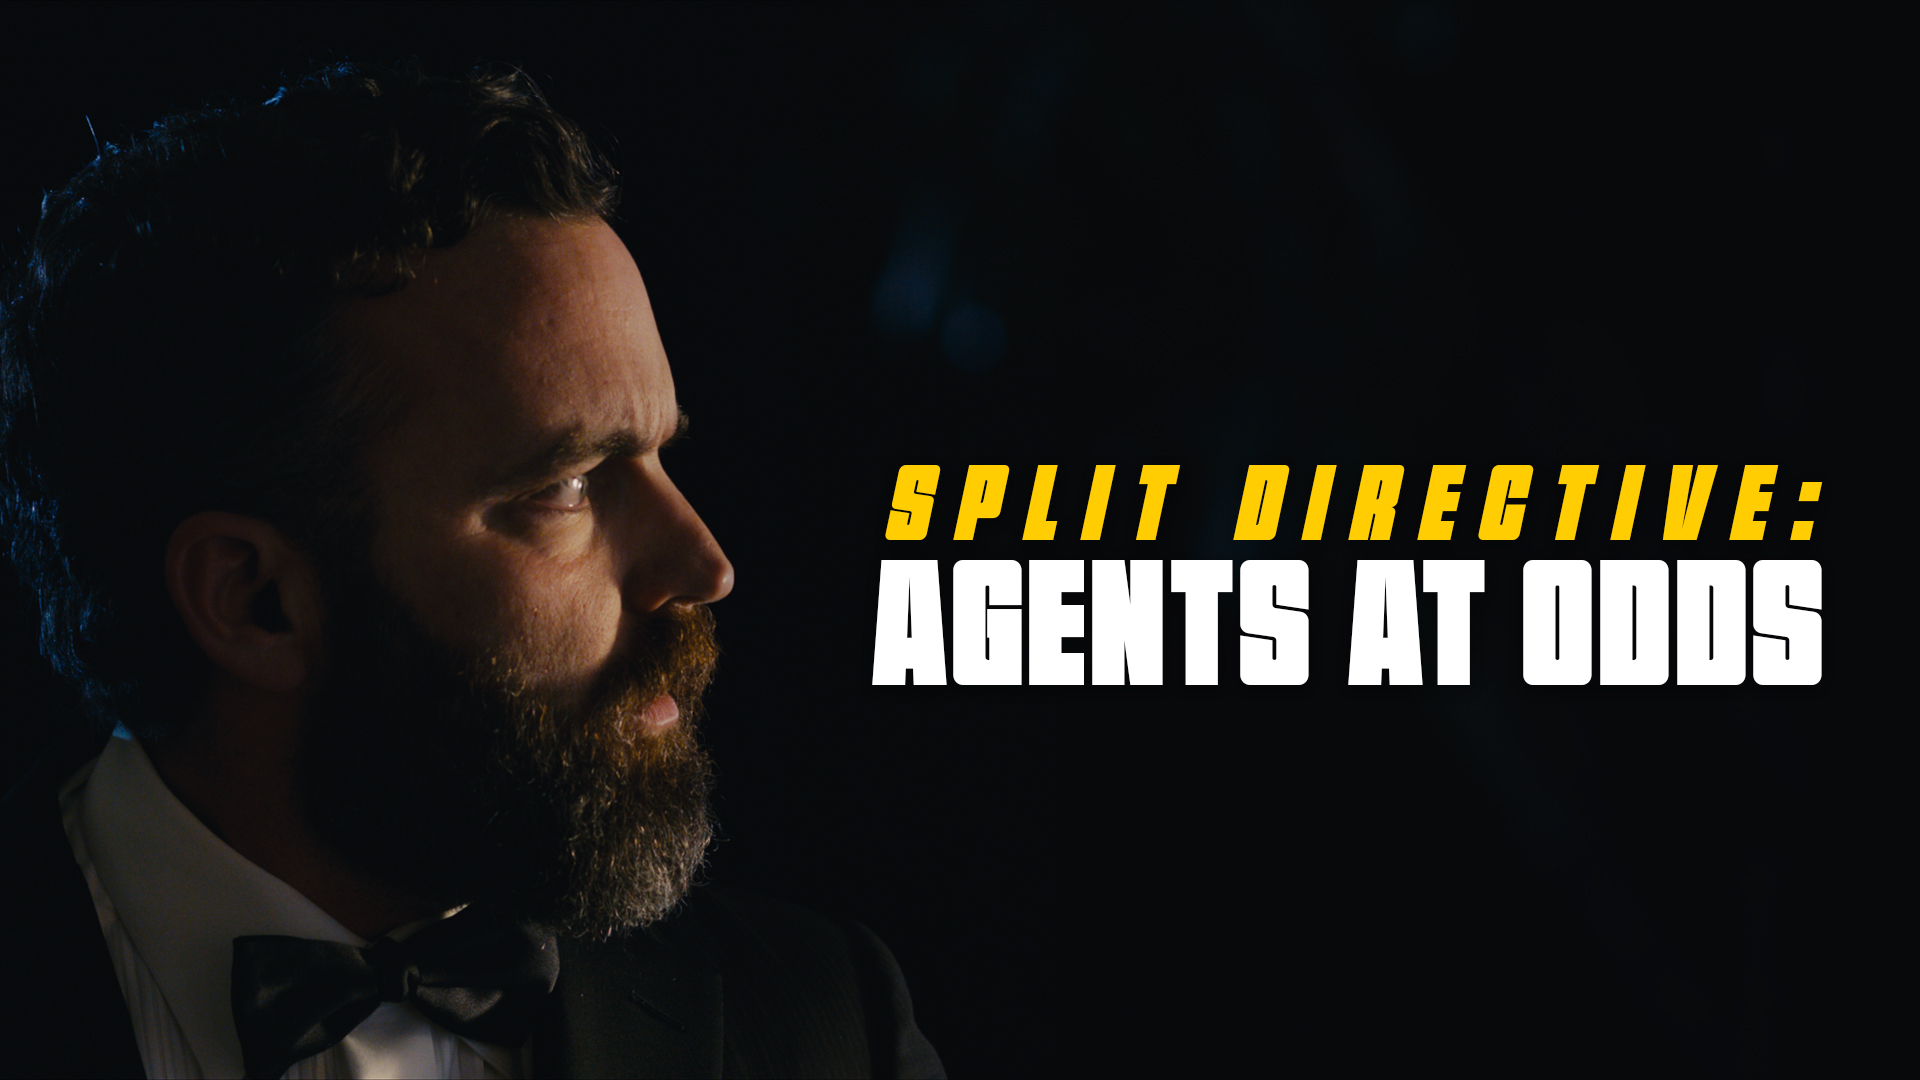
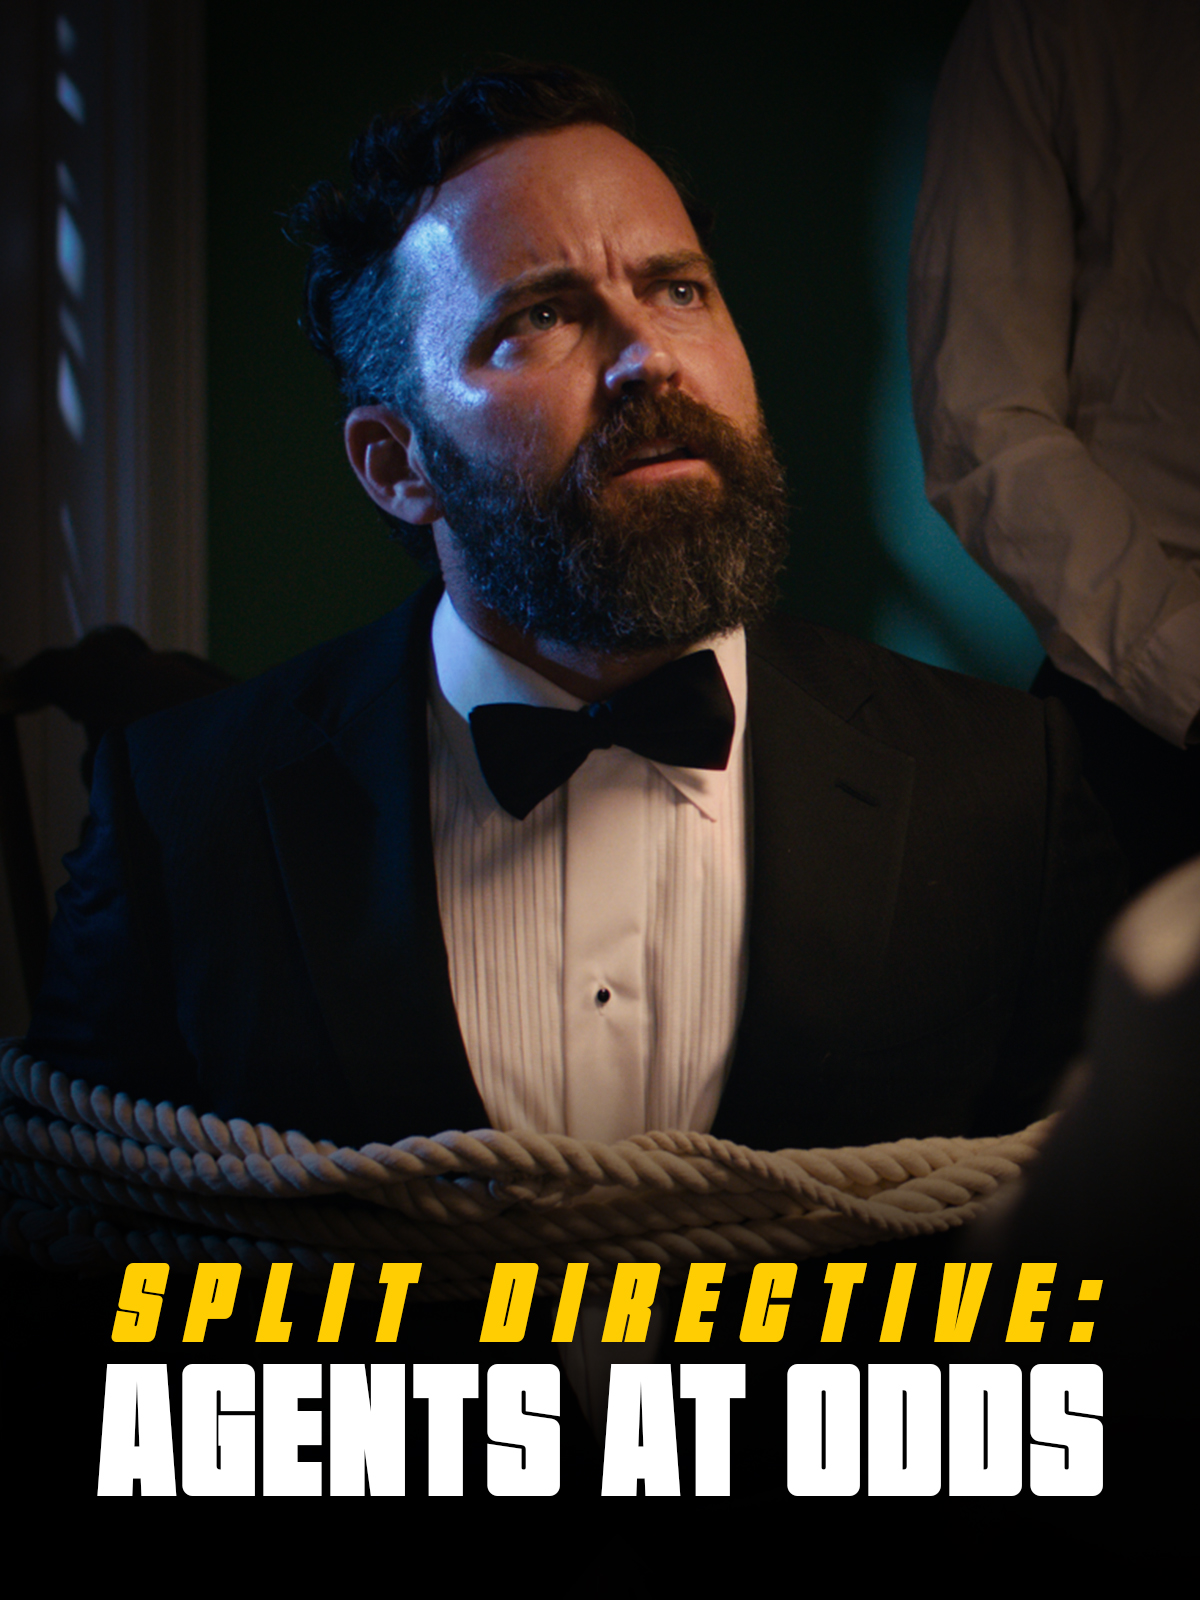
Thumbnail images will be used in displays online (Vimeo, YouTube, etc). Since some websites use horizontal thumbnails (1920×1080) and some use vertical thumbnails (1200×1600), you will deliver one of each.
Each thumbnail should contain two elements:
A carefully selected image that fills the entire frame (i.e., no letterboxing or black bars). This image is typically derived from either the poster or one of the production stills.
The title of the film. Ideally, for consistency of branding, this should match the font design of the title on the poster. No other text should appear in the thumbnail.
Examples:
Horizontal (1920x1080px)Vertical (1200x1600px)
Do:
Save a flattened JPG file (maximum file size 2MB) and a layered PSD file (also deliver any custom fonts used).
Keep all of your layers inside the appropriate folders, so that everything remains well-organized when you deliver the final Photoshop file. Make sure all of your layers have appropriate names, so that someone else could make sense of what each layer is.
Do Not:
Do not adjust the dimensions or resolution of the file. It’s set up to meet the specs needed for online viewing.
Note these online content restrictions for the thumbnails:
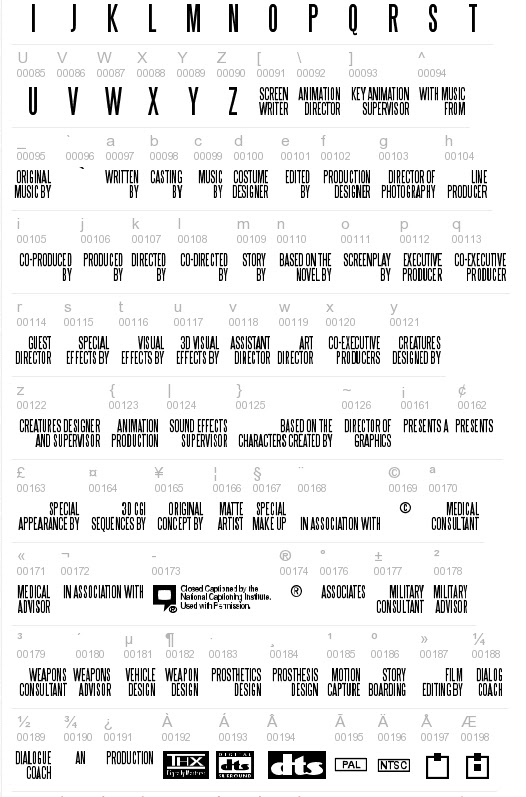
The Steel Tongs font is provided as an approved typography resource for building the billing block at the bottom of a film poster. Steel Tongs uses custom keystrokes for commonly used crew positions on the film production, which are describe below.
Maintaining consistent typography across official materials helps create a stronger and more unified visual identity for productions and program branding. Standardized font usage also helps students better understand the role that graphic design, typography, and visual consistency play within professional film marketing and presentation workflows.
Steel Tongs is the font to be used for the credit block on FSUFILM marketing materials. You’ll need to download the zip file (above) and install the font on your computer before starting work, otherwise the credit block will not display correctly.
Steel Tongs works by displaying certain keystrokes as credit titles or logos.
Lowercase letters, many punctuation symbols, and ALT key codes are translated into different graphical elements of a credit block. See below for a complete list of these.
All uppercase letters, numerals, and basic punctuation symbols (periods, commas, quotes, dashes, ampersands) will display as normal. This can be helpful if a needed credit for a poster is not one of the presets, as you can type it out manually.
Lowercase
a
WRITTEN BY
b
CASTING BY
c
MUSIC BY
d
COSTUME DESIGNER
e
EDITED BY
f
PRODUCTION DESIGNER
g
DIRECTOR OF PHOTOGRAPHY
h
LINE PRODUCER
i
CO-PRODUCED BY
j
PRODUCED BY
k
DIRECTED BY
l
CO-DIRECTED BY
m
STORY BY
n
BASED ON THE NOVEL BY
o
SCREENPLAY BY
p
EXECUTIVE PRODUCER
q
CO-EXECUTIVE PRODUCER
r
GUEST DIRECTOR
s
SPECIAL EFFECTS BY
t
VISUAL EFFECTS BY
u
3D VISUAL EFFECTS
v
ASSISTANT DIRECTOR
w
ART DIRECTOR
x
CO-EXECUTIVE PRODUCER(S)
y
CREATURES DESIGNED BY
z
CREATURES DESIGNER AND SUPERVISOR
Symbols
{
ANIMATION PRODUCTION
|
SOUND EFFECTS SUPERVISOR
}
BASED ON THE CHARACTERS CREATED BY
~
DIRECTOR OF GRAPHICS
\
ANIMATION DIRECTOR
^
WITH MUSIC FROM
_
ORIGINAL MUSIC BY
£
SPECIAL APPEARANCE BY
#
MAKE UP ARTIST
$
STUNT/FIGHT COORDINATOR
%
A*
*
A FILM BY*
+
IN ASSOCIATION WITH
[
SCREENWRITER
]
KEY ANIMATION SUPERVISOR
<
TECHNICAL ADVISOR
>
TECHNICAL SUPERVISOR
?
ASSISTANT TO CHIEF ANIMATOR
@
CINEMATOGRAPHY BY
!
CUSTOM LAYOUT BY
(
WRITTEN AND DIRECTED BY
)
ASSOCIATE PRODUCER
:
PRESENTS*
;
PRESENTS A*
/
AND*
=
PRESENTS AN*
ALT key codes
The following characters need to be accessed by holding down the ALT key while typing the character code number — e.g., hold the ALTkey and type 0131, then let the ALT key go and “MECHANICAL DESIGN” will appear.
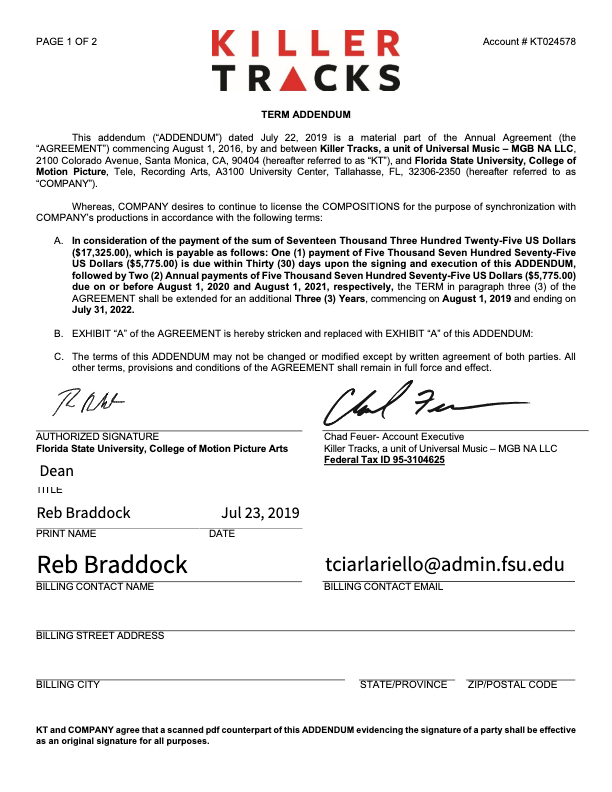
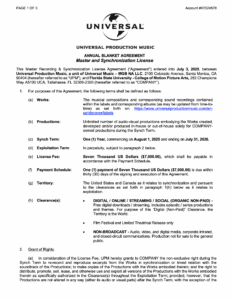
Universal Production Music provides licensed music resources that students may use within approved productions under the program’s educational licensing agreement. If a production features Universal Production Music on the soundtrack, the license below covers the work.
Music licensing is an important part of professional filmmaking because productions must ensure that all music used within a project is legally cleared for exhibition and distribution. Understanding how licensed production music libraries operate helps students develop stronger professional practices related to copyright, music supervision, rights management, and legal compliance within post-production and delivery workflows.
The College of Motion Picture Arts pays an annual fee to Universal Production Music for the licenses to the library music they provide on their site. No additional releases need to be signed for the use of this music, as long as you remain in accordance with this licensing agreement.