Frame.io review links are used to distribute cuts, gather feedback, track revisions, and facilitate communication throughout editorial and post-production workflows. This page outlines expectations for organizing, sharing, and managing review links during the feedback and approval process.
Consistent review workflows help productions avoid confusion around versions, notes, and approvals while making collaboration more efficient across faculty, students, and post-production teams. Structured review practices also help students develop professional habits related to client communication, revision tracking, and collaborative editorial workflows.
CREATE A REVIEW LINK
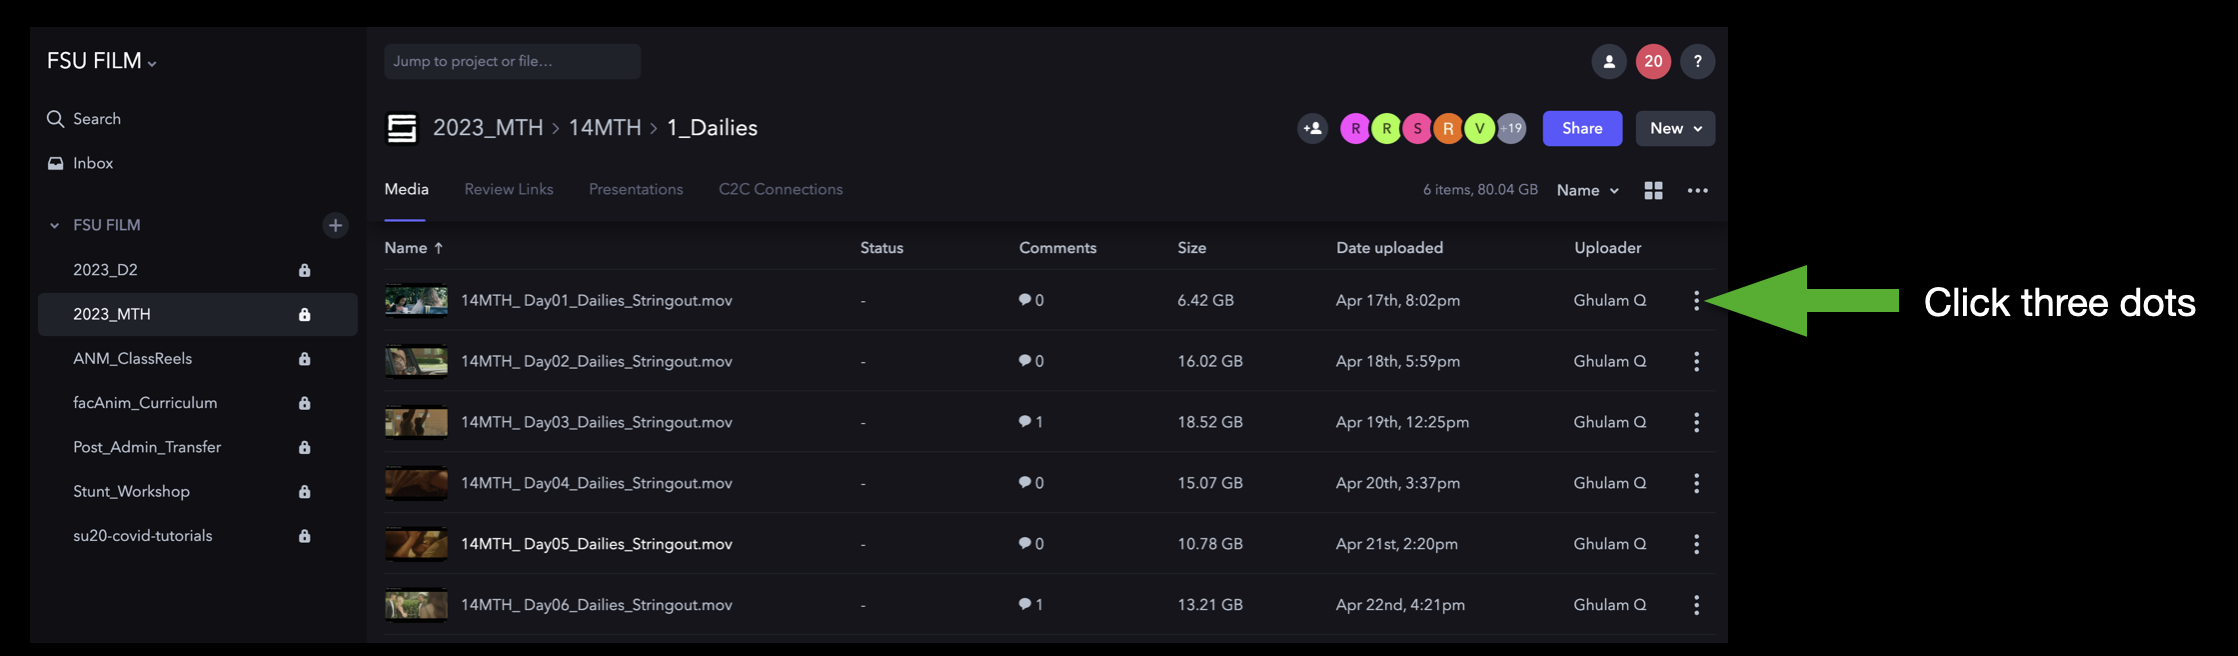
Navigate to the video on Frame.io that you want to share. Then, click the three dots to the right of the video:
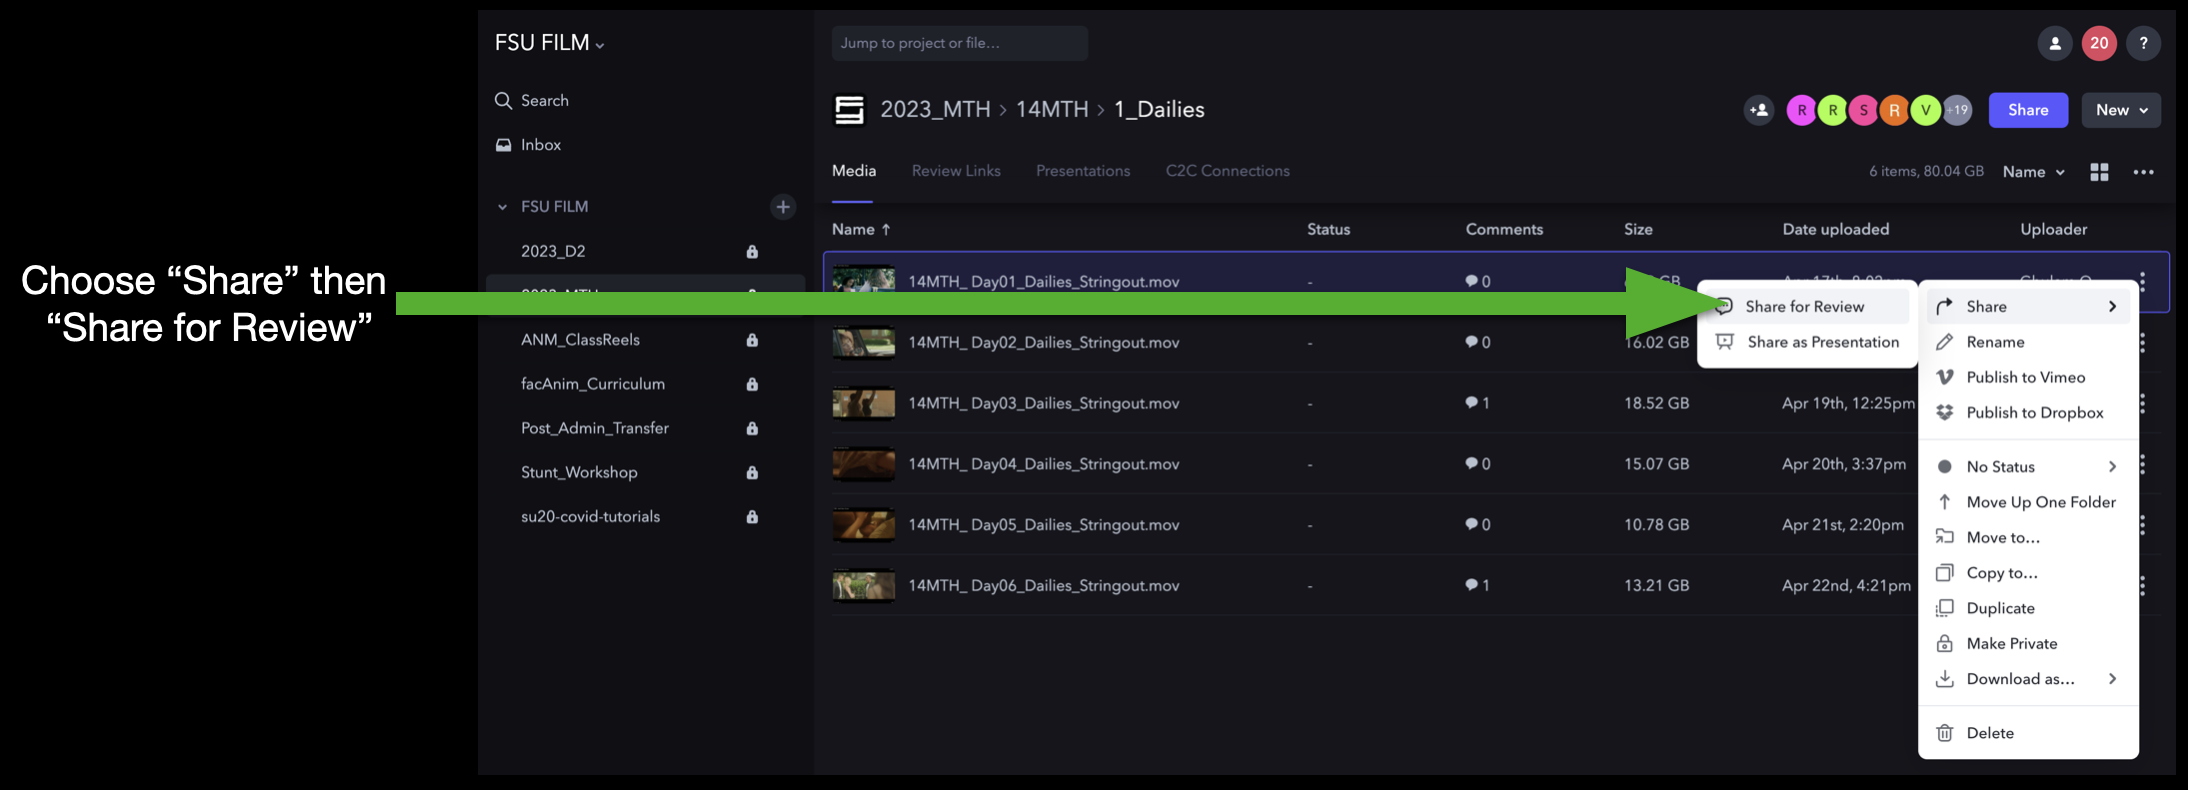
This will open a dropdown menu that you can navigate through. Select “Share” and then “Share for Review”:
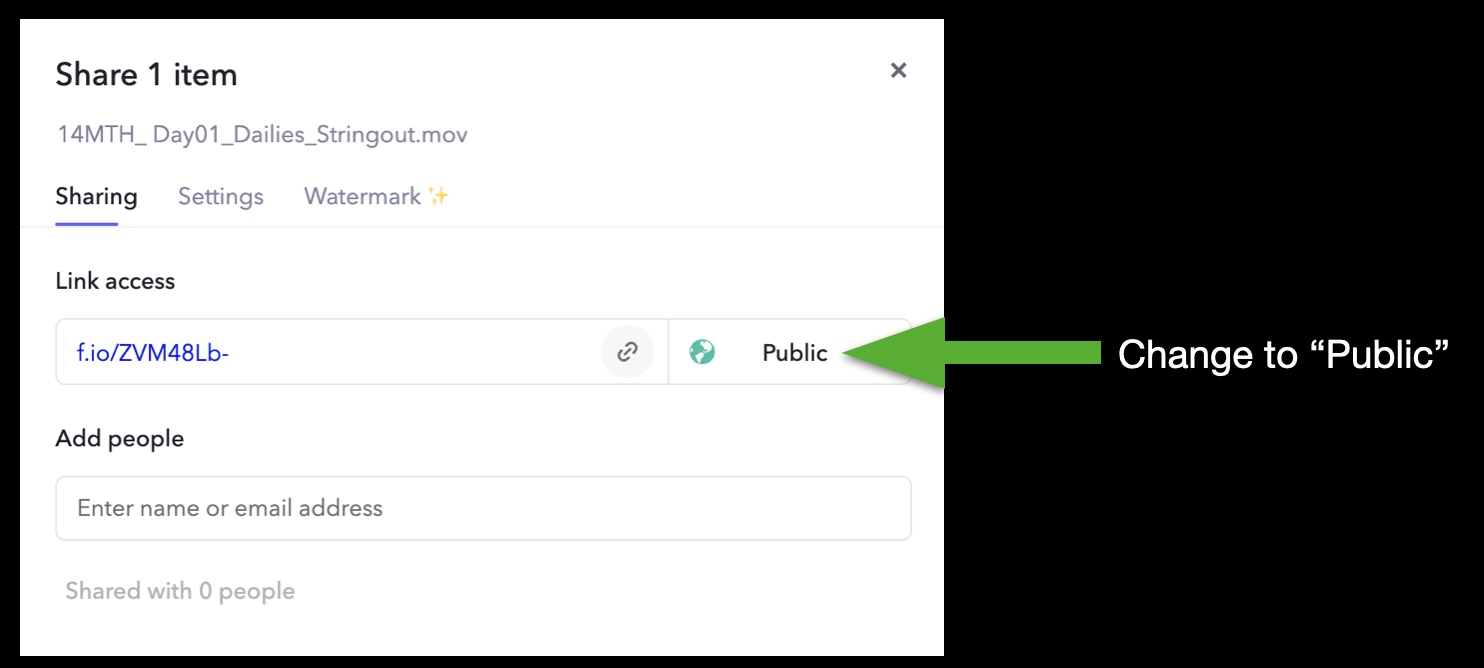
A window will open prompting you to choose what kind of link you want to create. To be able to send the link to someone who’s not already a member of the Frame.io project, you will need to change it to “Public”:
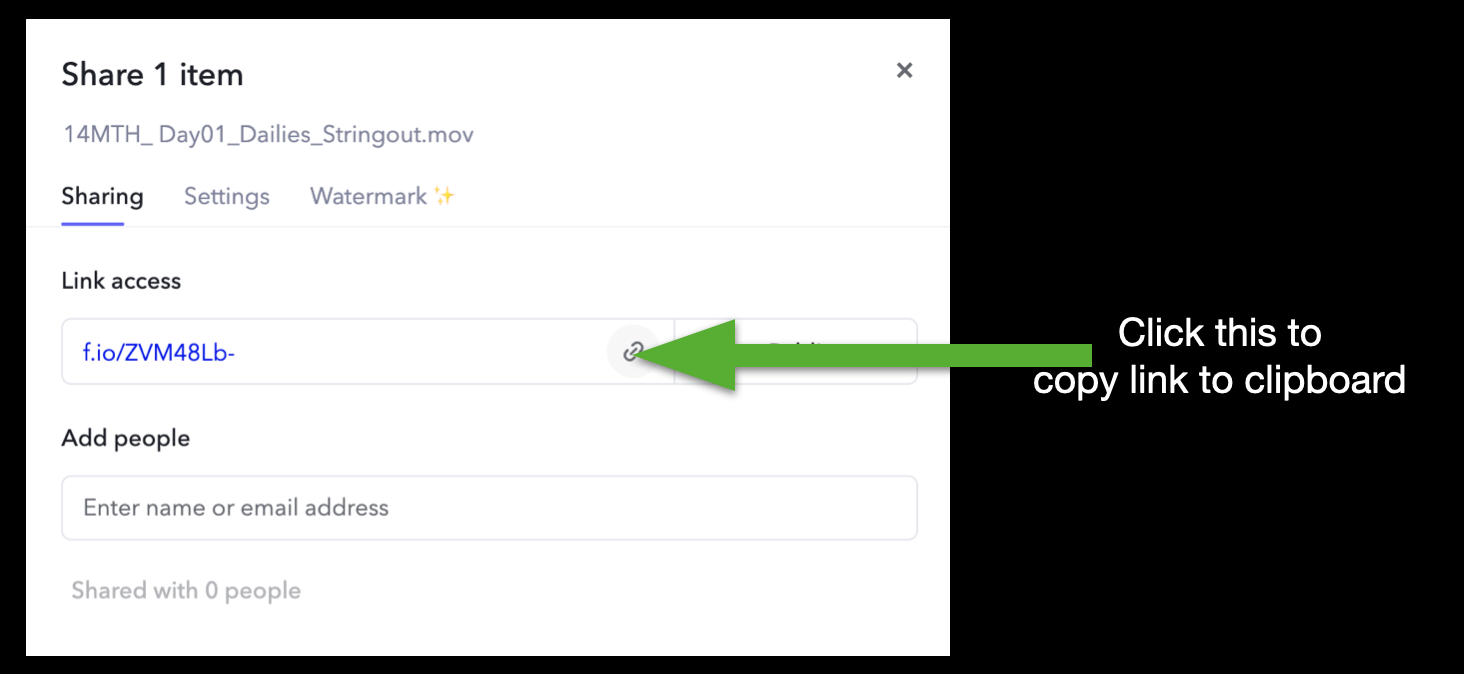
Then, click the icon to copy the link to your clipboard:
Now you can paste this link anywhere, such as in a Teams message or an email, and send it to whomever needs to see it. Please be careful when sharing review links, though; anyone with the link, regardless of who they are, will have access to the linked content on frame.io and will be able to leave comments.
Manage Review Links
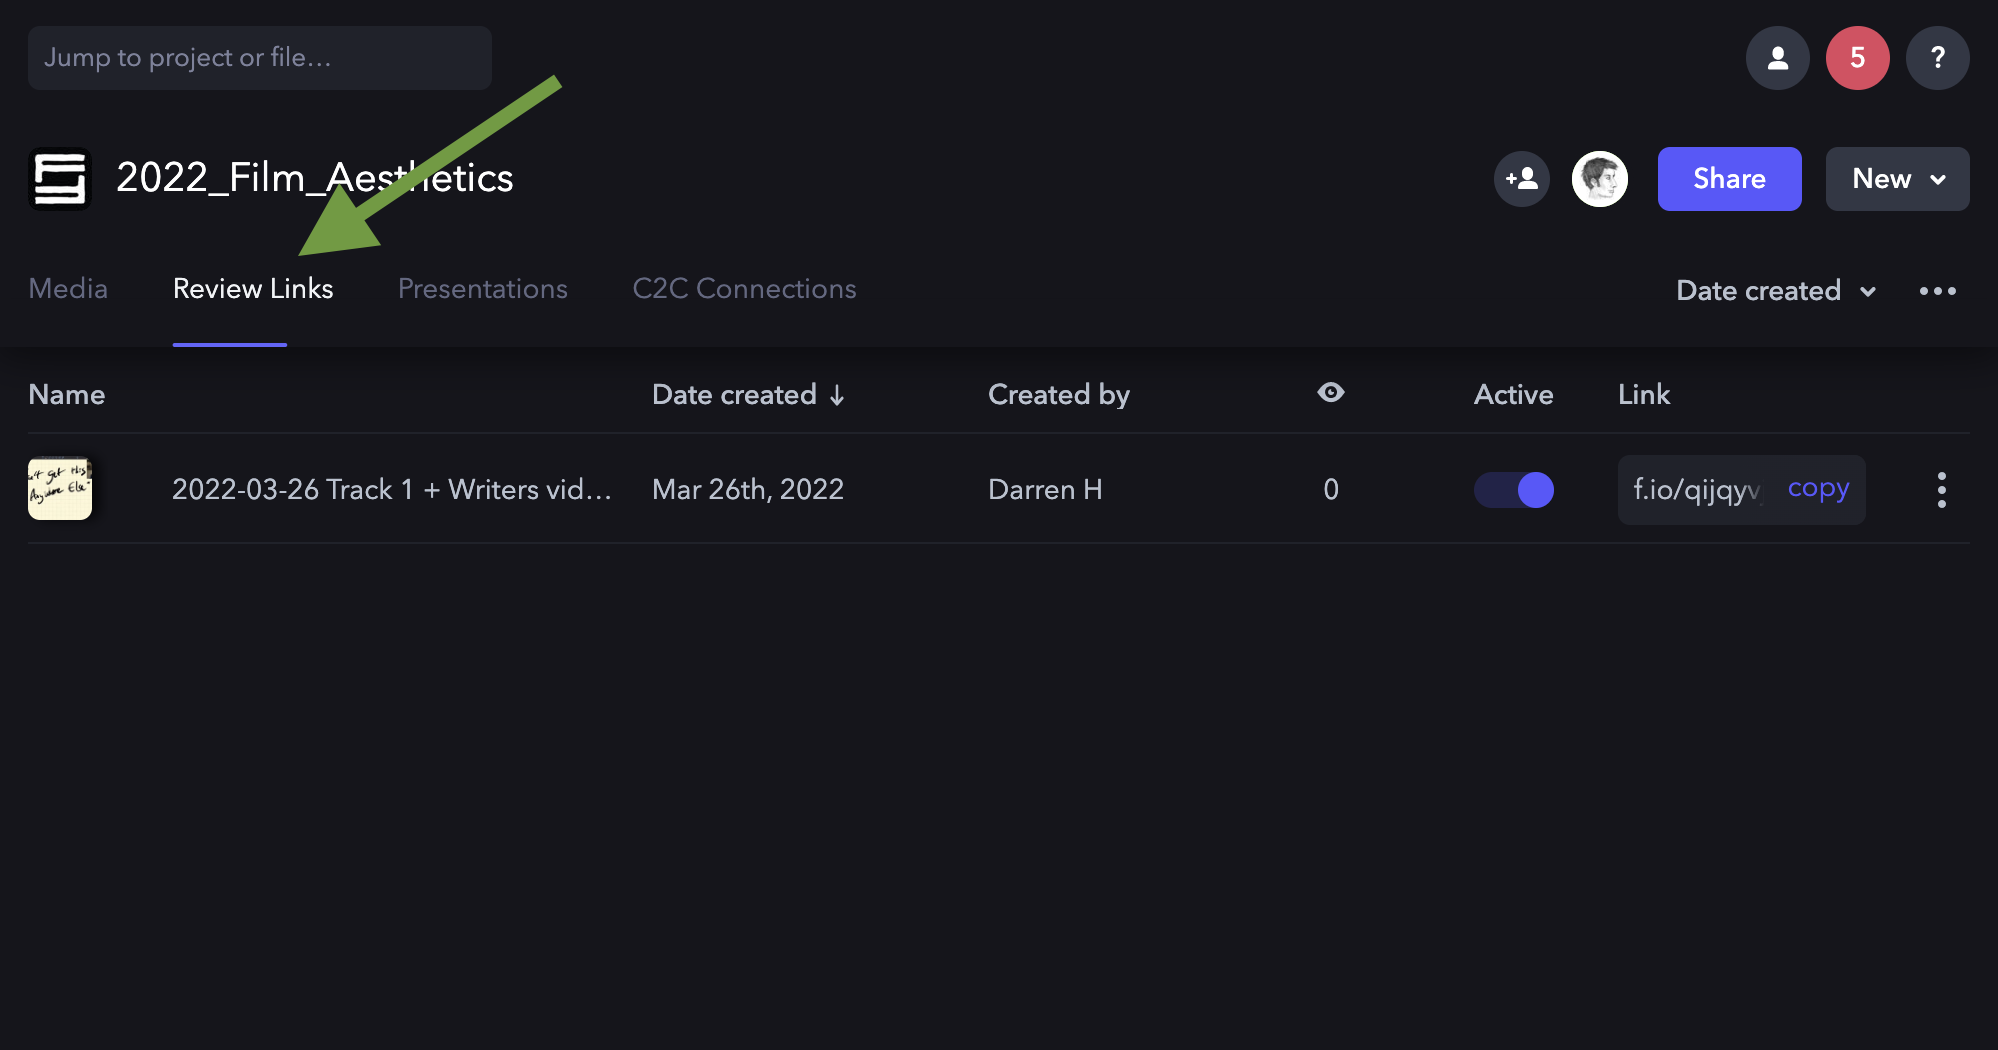
If you need to go back and manage the review links you’ve created, navigate to the main page for project and click on the Review Links tab:
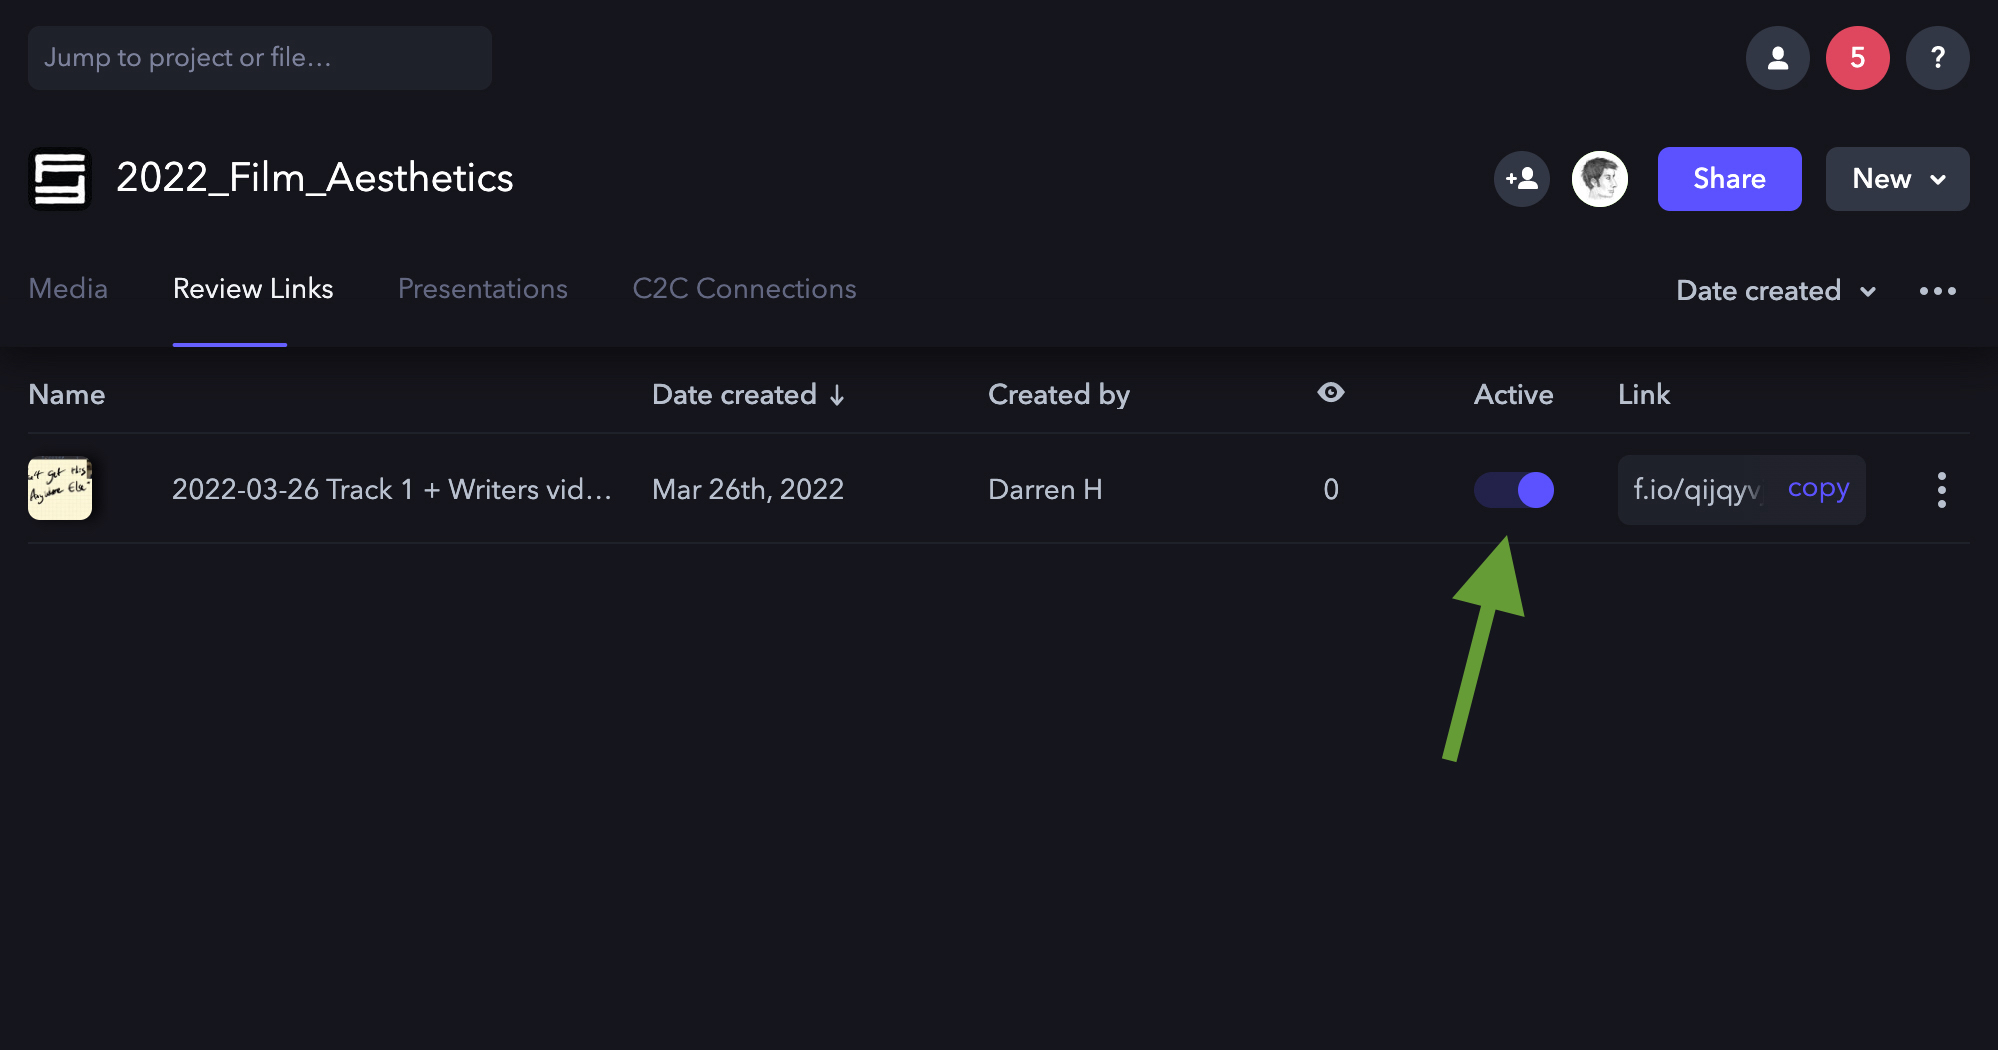
This will display all the links that have been created for that project. If you wish to activate or deactivate a review link, toggle the “Active” button:
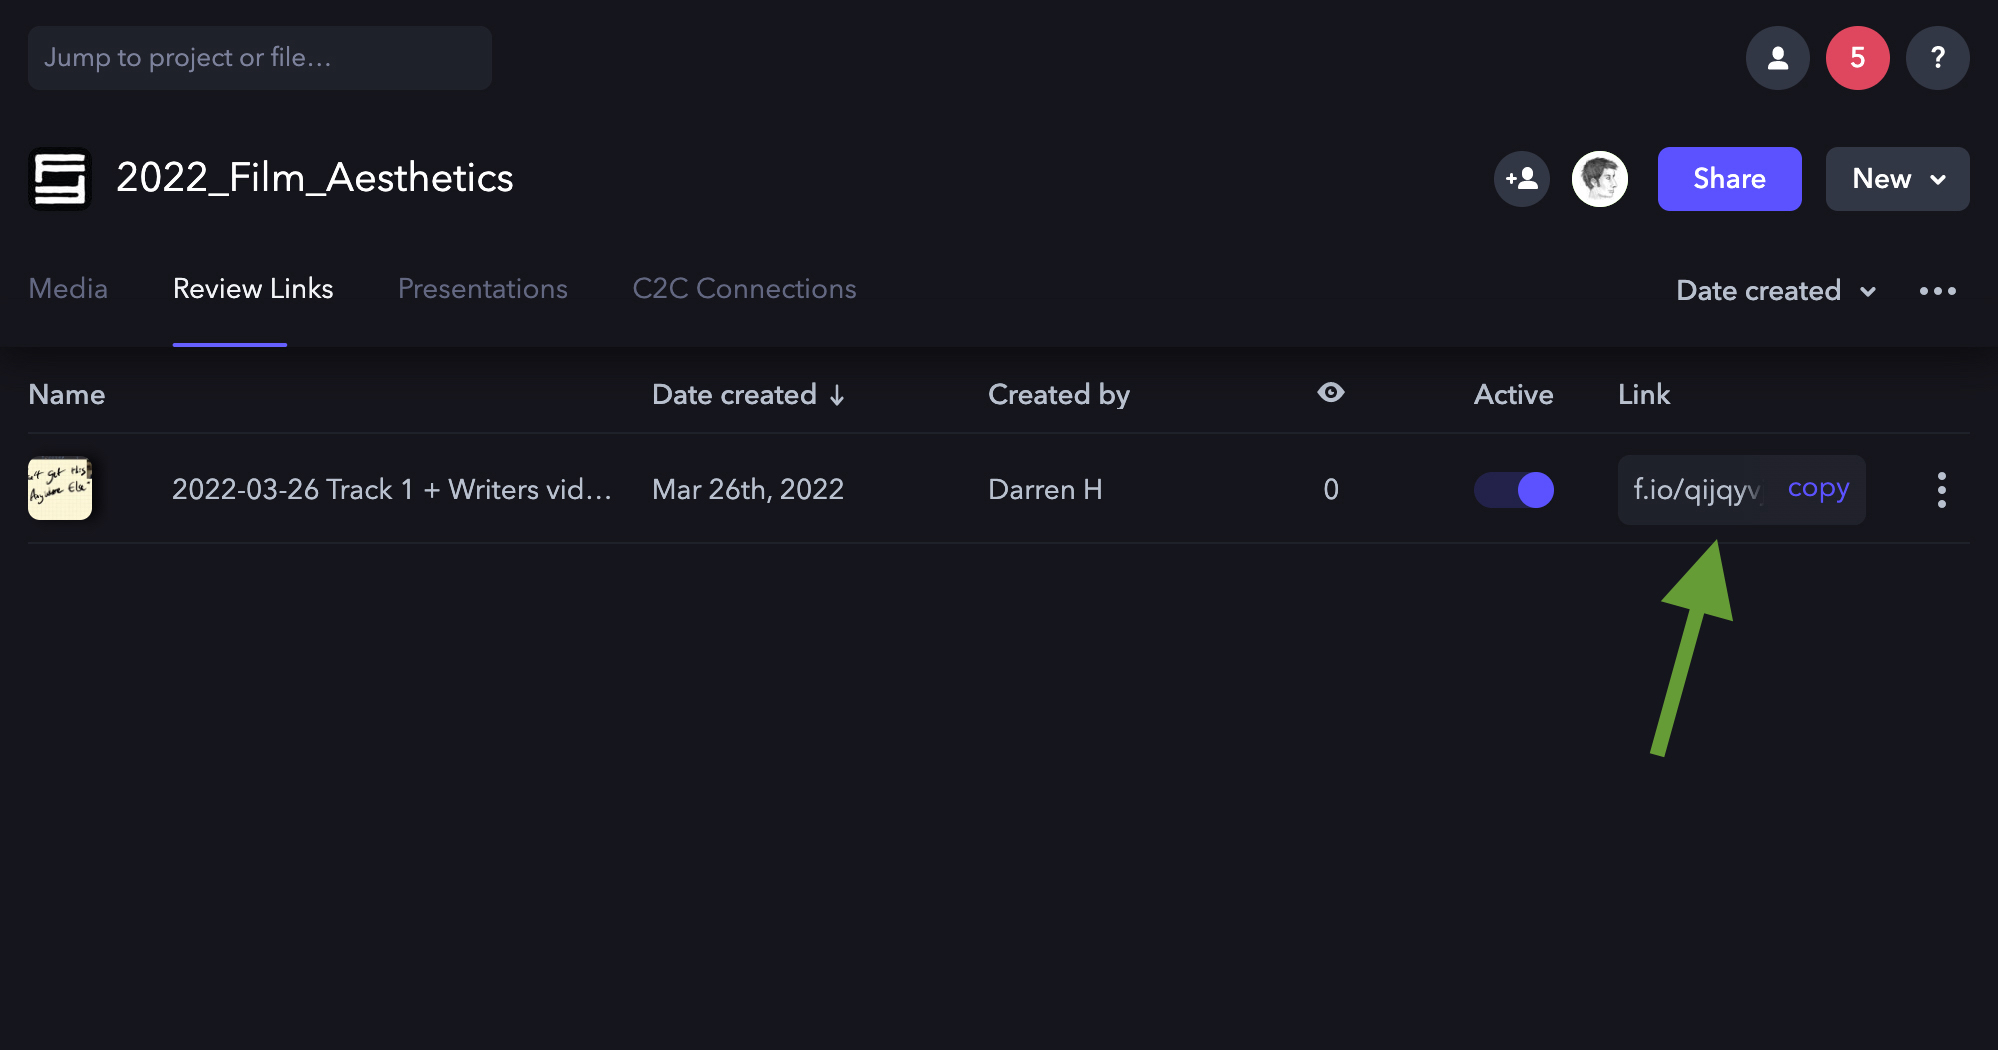
If you need to re-copy the review link, you can do so here:
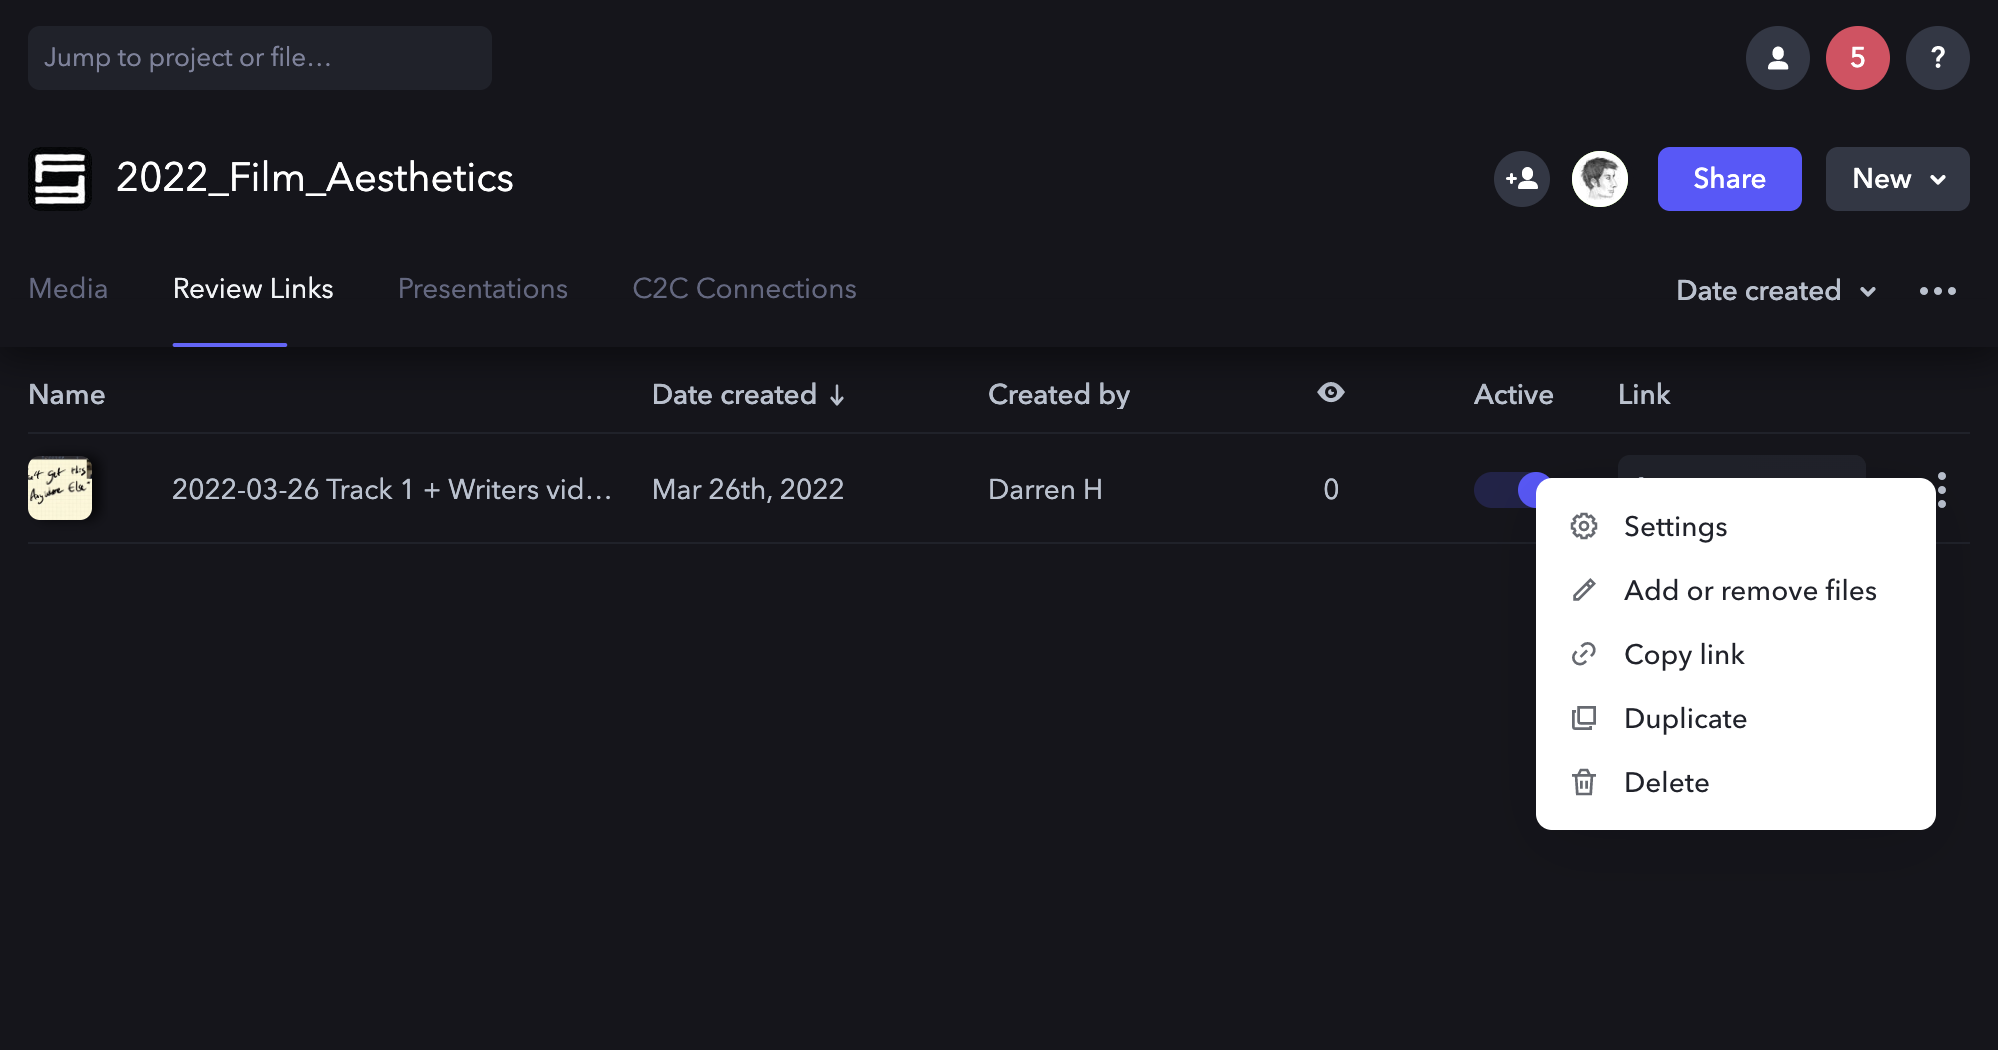
If you need to adjust settings, add or remove files, or duplicate or delete a review link, click on the three dots and a dropdown menu will appear:
Stock footage refers to pre-existing video materials licensed for use within a production, including archival footage, environmental plates, specialty imagery, or other externally sourced visual assets. This page outlines the policies, approval considerations, licensing expectations, and workflow requirements associated with incorporating stock footage into student projects.
Because stock footage involves both creative and legal considerations, productions must ensure that outside materials are used appropriately, documented properly, and integrated thoughtfully into the project. Learning how to evaluate licensing restrictions, visual consistency, and workflow compatibility helps students better understand the professional standards surrounding third-party media usage in film and post-production environments.
Limitations on Use of Stock Footage
As a school, our primary focus is on the creation of original work. The emphasis is therefore on students creating all the imagery for their films themselves, rather than relying on stock footage libraries. Educationally, this helps students learn the process of creating original imagery, and the labor and resources that are needed to accomplish that. This helps students better understand the value of intellectual property, as their focus is more on creating intellectual property from scratch than on “borrowing” work created by others.
The process of clearing the rights for stock footage also informs the school’s policies. Many stock footage resources have inaccurate or misleading copyright information. For example, sites may claim that footage is in the public domain when it is not. To work through all the potential copyright and licensing issues with stock footage can be a lengthy and laborious process for both students and faculty. On many of our production cycles, there either isn’t sufficient time to do this or the time could be better spent focusing on other aspects of the production.
For these reasons, stock footage use is limited to F2, FC, and MC projects. Stock footage is not allowed on F1, F3, M1, M2, or M3 projects.
F2 • FC • MC
Stock footage is allowed.
All stock footage needs to be cleared by the Head of Production, to ensure that we have the proper rights to use the footage.
If stock footage is going to appear on camera during production — e.g., imagery on a television within a scene — the footage needs to be cleared before the start of principal photography. If stock footage is added during post-production, the footage needs to be clear before picture lock.
Stock footage can only be purchased with CMPA funds. Students are not permitted to purchase stock footage with personal funds.
Stock footage that is already owned by the CMPA, such as media that was originally shot for another FSU film, may be utilized. Please allow two weeks of turnaround on any such requests, in case the media files need to be pulled from the archive.
F1 • F3 • M1 • M2 • M3
Stock footage is NOT allowed.
All footage appearing on screen during the running time of these projects needs to be created by students during the assigned production days. This includes any content that needs to appear on screens within shots — e.g., a news broadcast that appears on a television within the scene. Producers will need to build time into the production schedule to create this embedded content during the assigned production days.
Picture lock marks the point at which the edit is considered creatively and structurally finalized before projects move fully into downstream post-production stages such as sound, color, visual effects, mastering, and delivery. Once picture lock is established, further editorial changes are expected to stop except under exceptional circumstances.
A disciplined picture lock process is essential because editorial changes made after turnover can create major disruptions across multiple departments, requiring unnecessary rework and creating delays throughout post-production. Establishing clear lock procedures helps productions maintain stable workflows while reinforcing the importance of planning, communication, and coordination between editorial and finishing teams.
How It Works
At the end of the picture edit cycle, the Editor and Director will be assigned a time to formally lock picture. This means that the Lock Sequence must be completed by that time and any relevant forms must be filled out in FSUFILM Greenlight. Your editing instructor will be the person who deems your show “Locked” after checking the running time and making sure all notes have been addressed.
Once picture locking is complete and all the parameters laid out in this guide are met, the Editor and Director will work with the Post Staff to prep the film for the next phases of the post-production chain, which includes turnover for sound design and color correction.
Create the Locked sequence
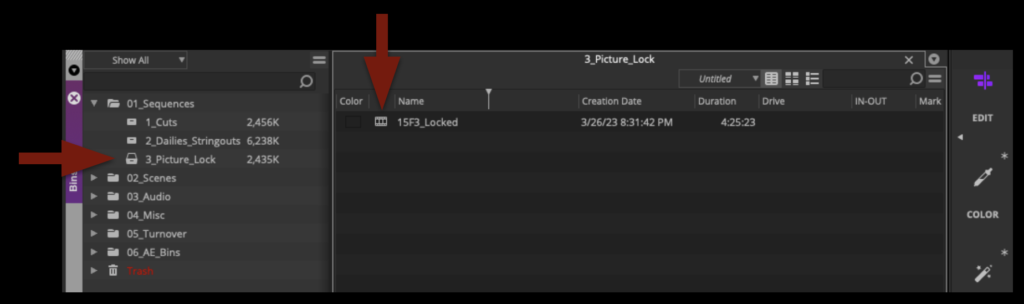
In Media Composer, correctly identify your locked sequence and save it in the Picture Lock bin as Show#_Locked:
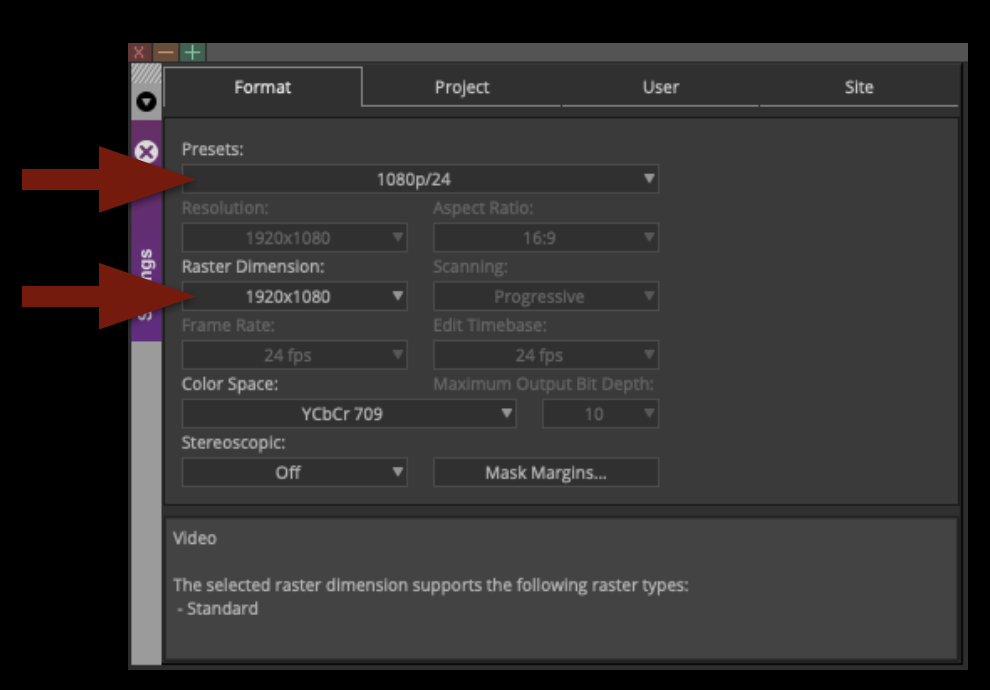
Double-check the project settings by going to Preferences. In the Format tab, the settings should be as follows:
Check the Front Sequence
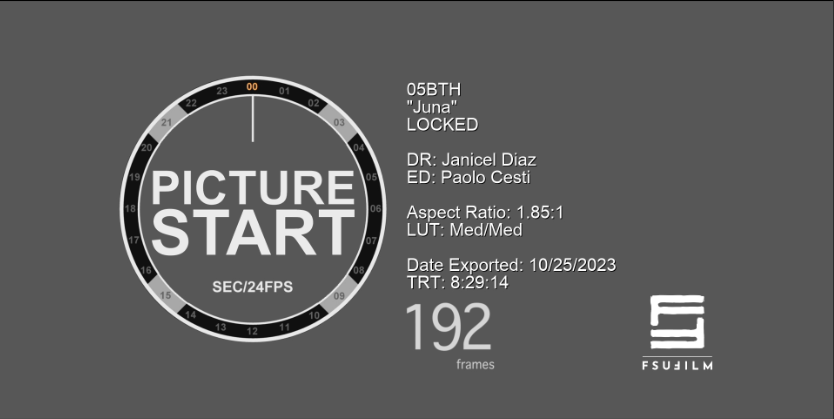
All locked sequences must have a “front sequence” at the start of the timeline, which must be formatted to SMPTE standards. This involves setting the sequence timecode to begin at 01:00:00:00 and building a front sequence that includes the SMPTE Countdown Leader with the slate information filled in and the FSU Film leader.
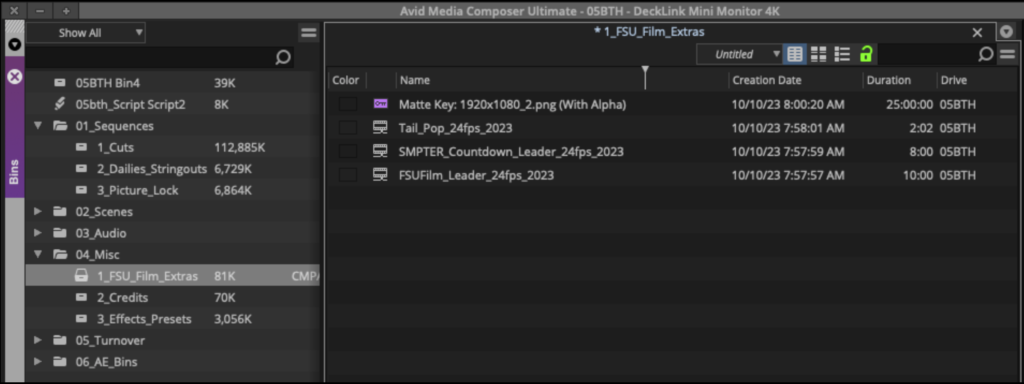
The correct front sequence should have already been set for you in the standard project template. If for some reason it’s no longer there, all the media for the front sequence can be found in the FSU_Film_Extras bin inside the 04_Misc folder.
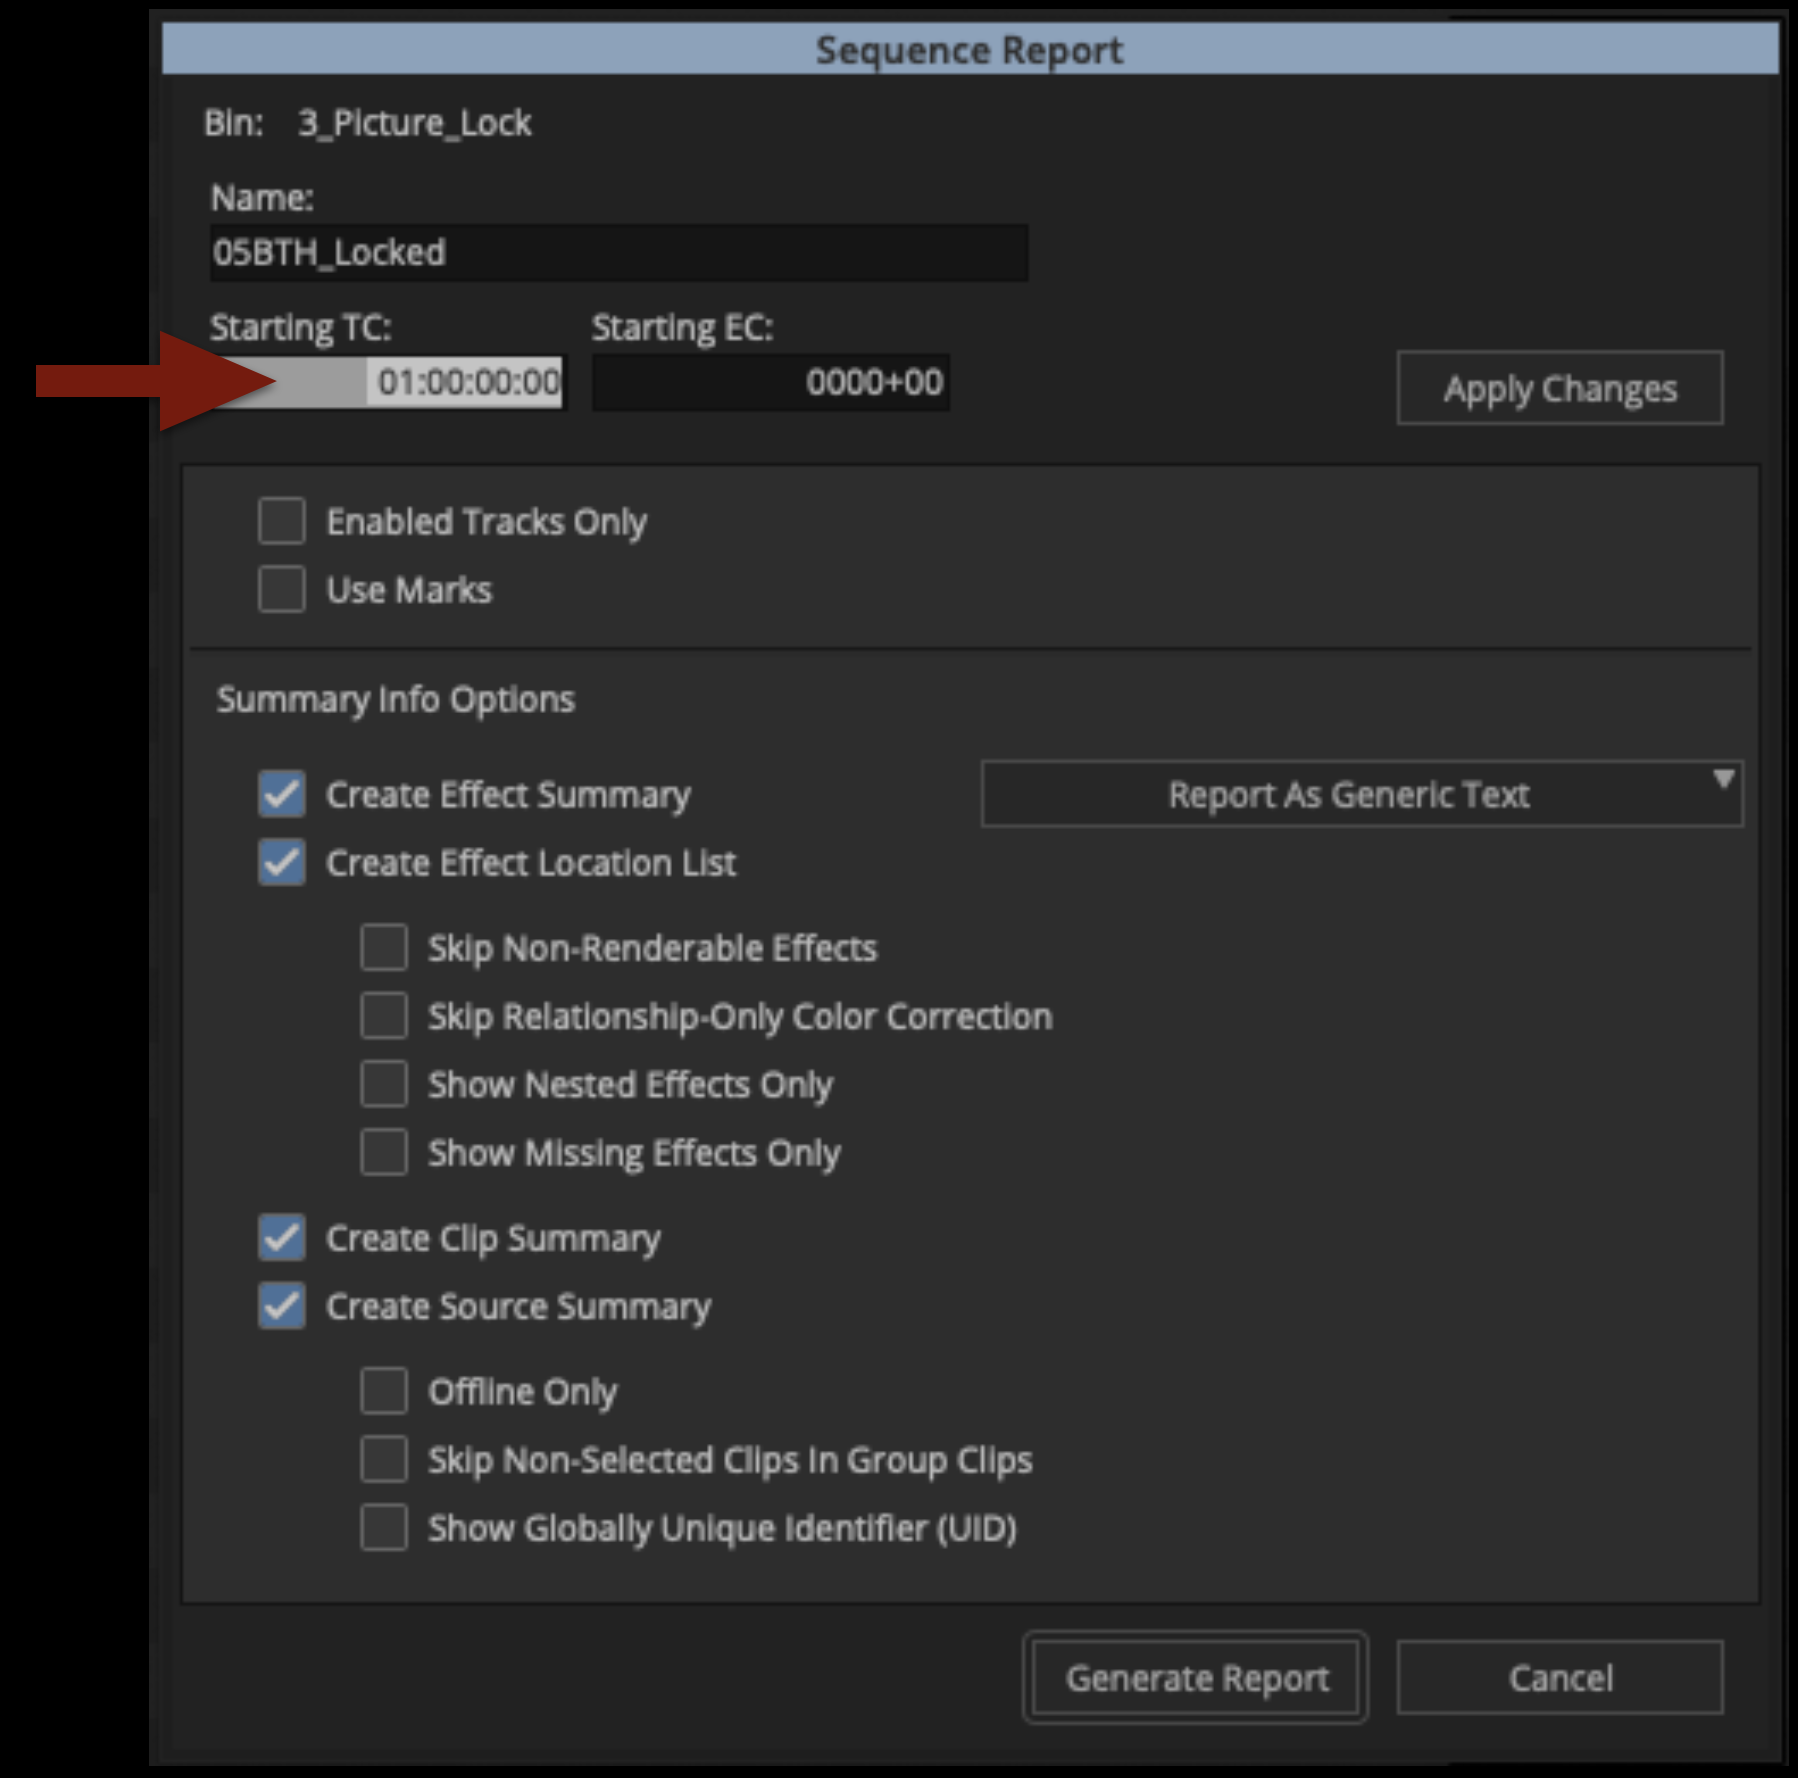
Your sequence should be set to start at timecode 01:00:00:00. If for some reason your sequence no longer starts at this timecode you can change it now. To do this, click in the Record Monitor and select “Sequence Report”. This will allow you to modify the Starting TC:
The slate should already have a template laid out for all the information you need to provide. Using the Titler+ tool in Media Composer, fill out the slate with all the information shown below. Keep this slate professional.
Double-check the the timing of the front sequence:
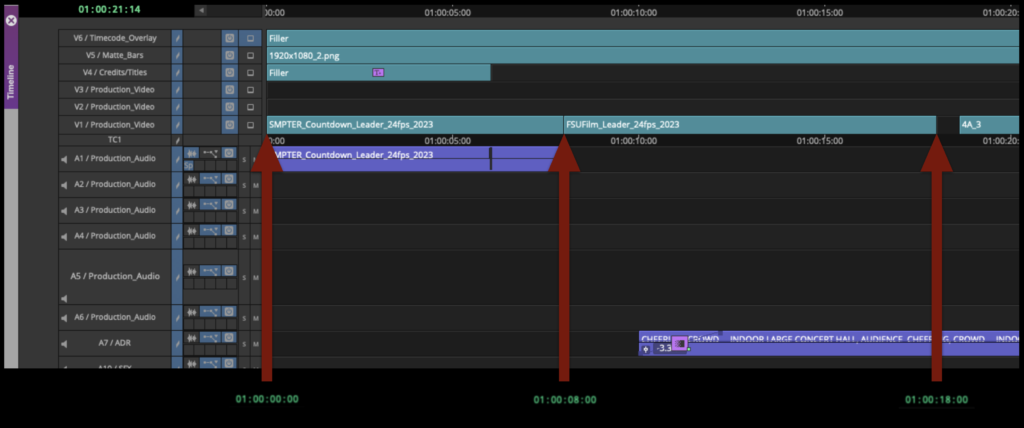
SMPTE Countdown begins at 01:00:00:00. If everything is put together correctly, the “two-pop” on the countdown leader will fall exactly on 01:00:06:00. (This is very important!)
FSU Film Leader begins at 01:00:08:00
First frame of picture content begins at 01:00:18:00
Your front sequence should match the example below:
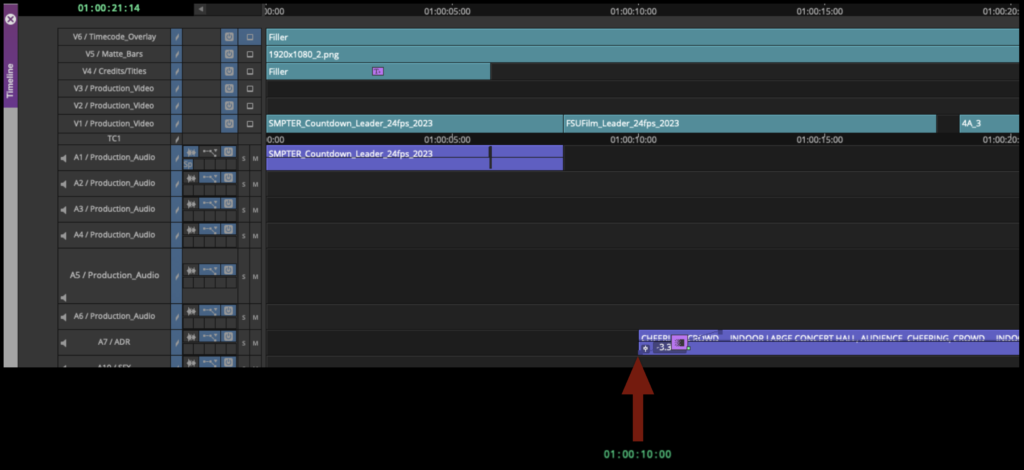
While checking the correct timing of your front sequence, also make sure to check that NO sound from your film starts before 01:00:10:00. There should be exactly 2 seconds of silence after the Countdown has finished.
Add Titles and Credits
The College has strict requirements for how titles and credits need to be formatted. Before building your titles, read the requirements here.
The finished titles and credits must be in at picture lock, cut into the correct video track. The credit sequence should be one continuous image sequence, properly labeled. Do not cut up your credit sequence inside Media Composer. The export from After Effects needs to be correct, so that no further adjustments are required inside Media Composer.
Condense Video Tracks
To prep your timeline for coloring, your video tracks (not your audio tracks) need to be condensed onto as few video tracks as possible. It’s understood that, due to the nature of how some video dissolves are built, more than one video track is sometimes necessary. The idea is to reduce the amount of tracks and media as much as possible.
Your sequence would go from looking like the example below with video on tracks V1 – V3 that needs to be brought down…
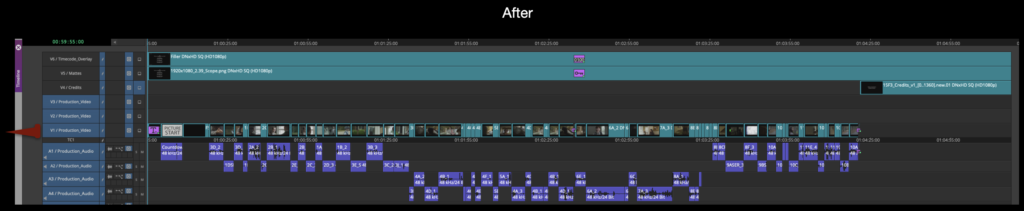
…to your sequence looking like the example below with everything consolidated onto one track:
Apply Masking
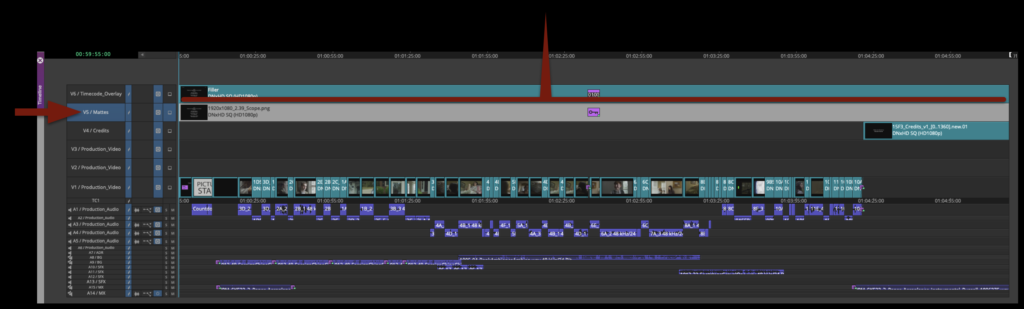
Video Track 5 should have the proper aspect ratio matte (which was chosen during production and notated on the camera reports) applied over top of the entire film (including the credits).
Check Sound Organization
During picture editing, a great deal of sound work should have been accomplished. It may not be the exact music and effects that will be in the finished mix, but the Editor should have taken a good polish to the locked sequence. To make sure all the Editor’s sound work will translate over to ProTools when the locked sequence is turned over, check all the sound media that may be in your locked sequence.
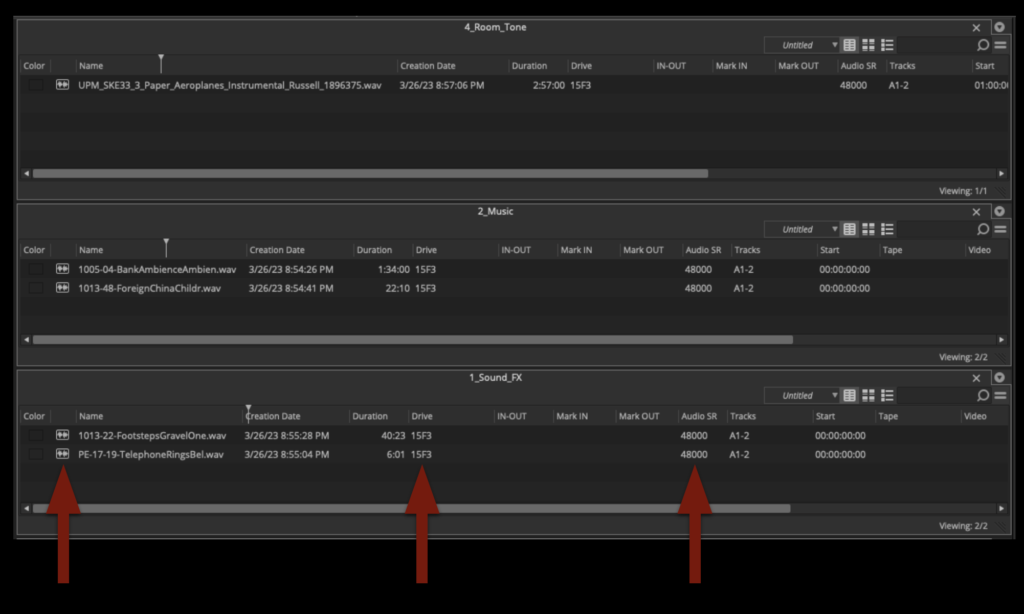
Everything must be transcoded (nothing should be linked)
The Audio Sample Rate for all Music, Backgrounds, and SFX should match at 48000
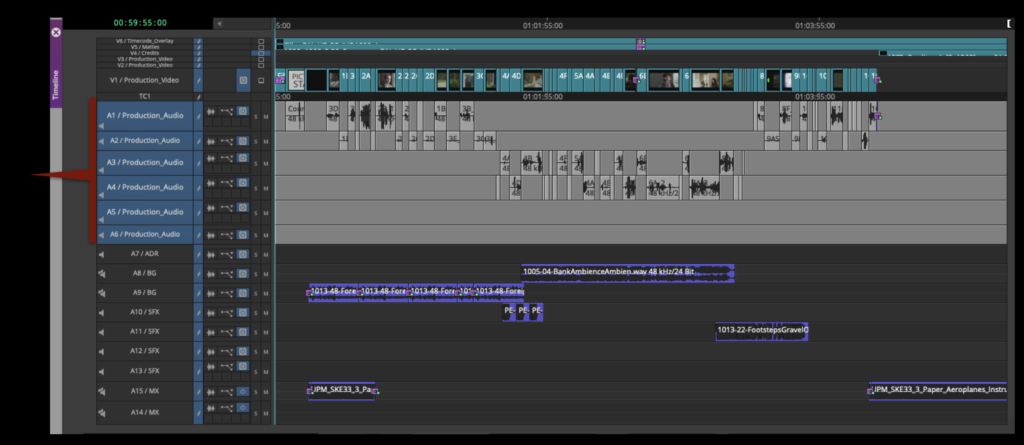
The Production Audio should all be in the Audio Tracks (A1-A6):
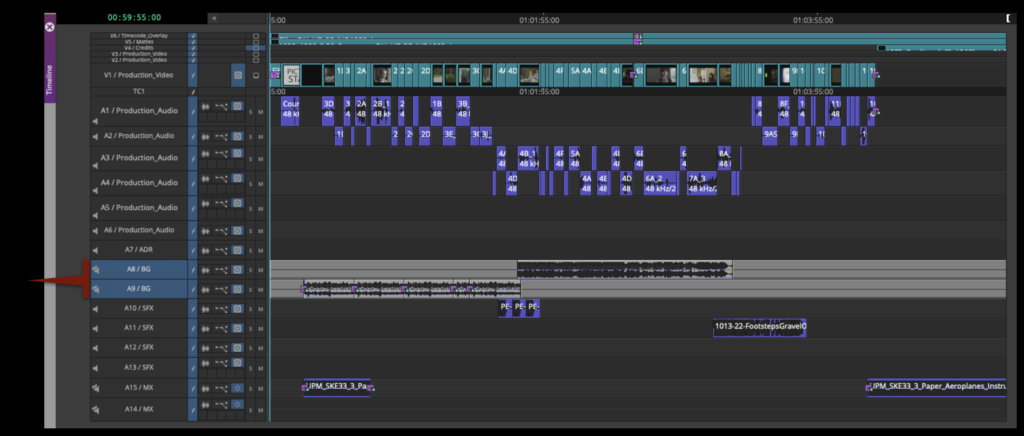
The Backgrounds should be in Audio Tracks (A8-A9). This should be stereo media in stereo tracks:
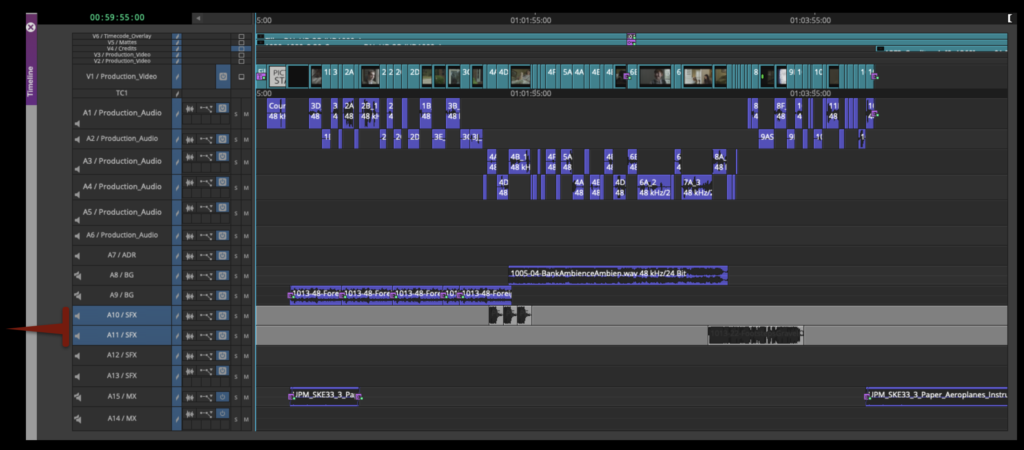
The SFX should be in Audio Tracks (A10-A13):
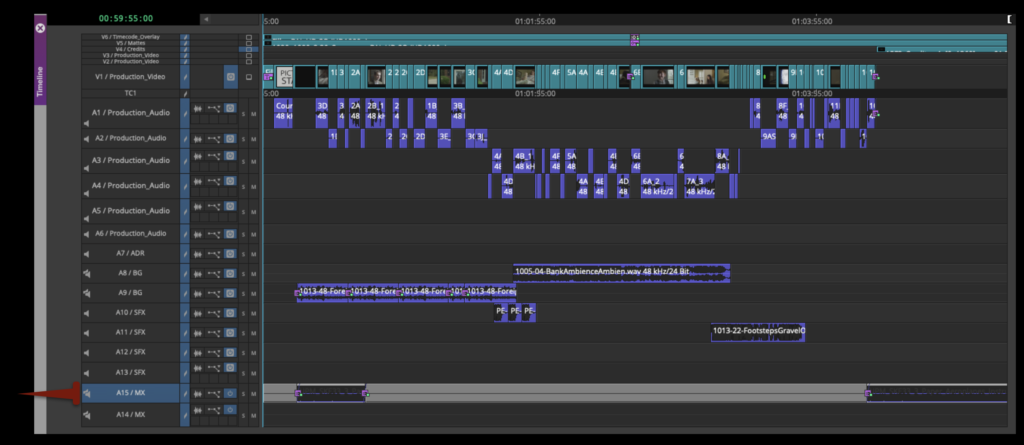
The music should be in Audio Tracks (A14-A15). This should be stereo media in stereo tracks:
Apply Timecode Overlay
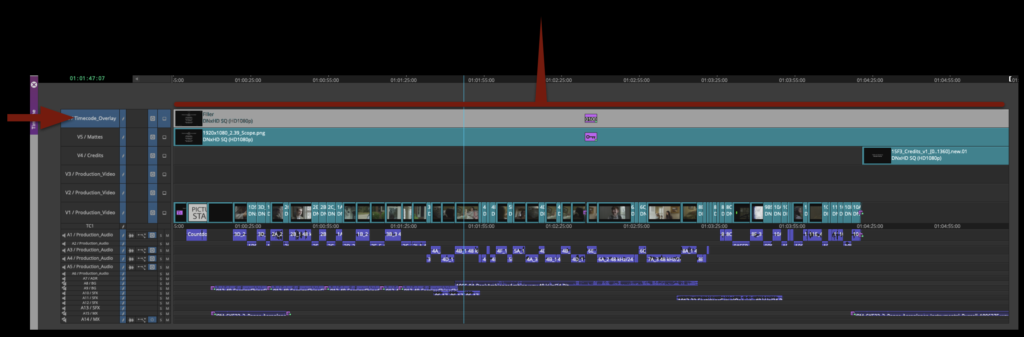
The Timecode Burn-In Effect should be applied to Video Track 6 and cut over top of the entire sequence:
The default Timecode Burn-In Effect in the template may need to be modified slightly.
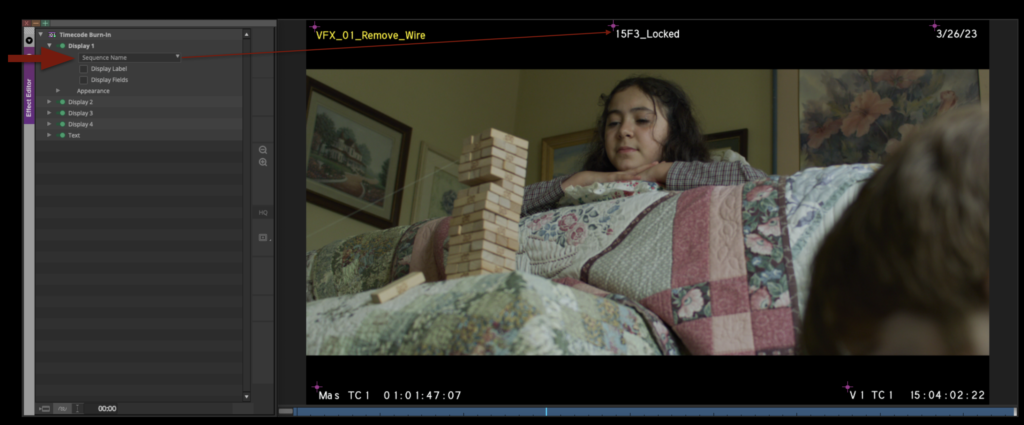
Display 1 should be set to “Sequence Name”. This should be placed in the top-center so that it displays as shown in the example below. This is so that, when it is exported as a video file, it is easy to identify which show it is and that it is locked.
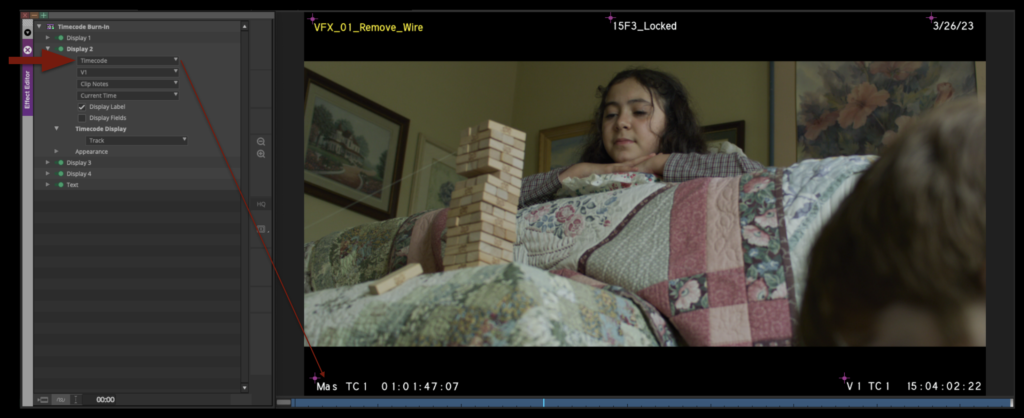
Display 2 should be set to “Timecode” and “V1”. This should be placed in the bottom-left corner so that it displays as shown in the example below. This timecode matches the locked sequence.
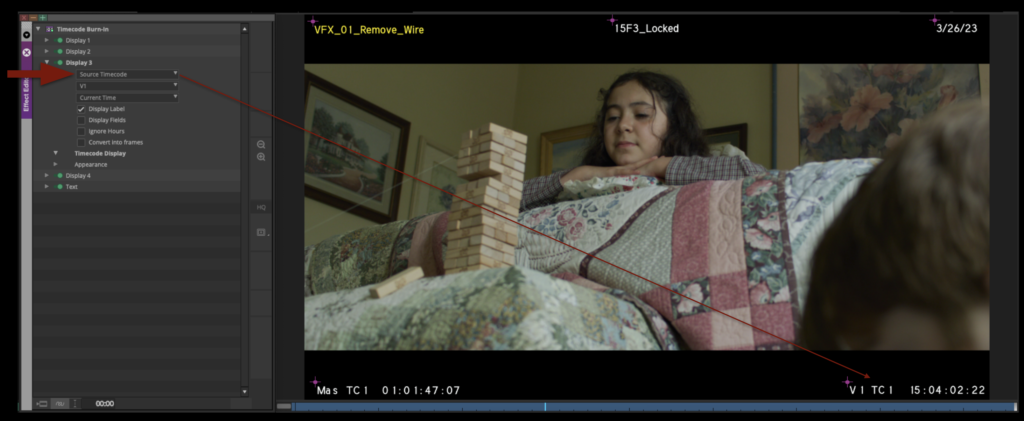
Display 3 should be set to “Source Timecode” and “V1”. This should be placed in the bottom-right corner so that it displays as shown in the example below. This timecode matches the media in the locked sequence.
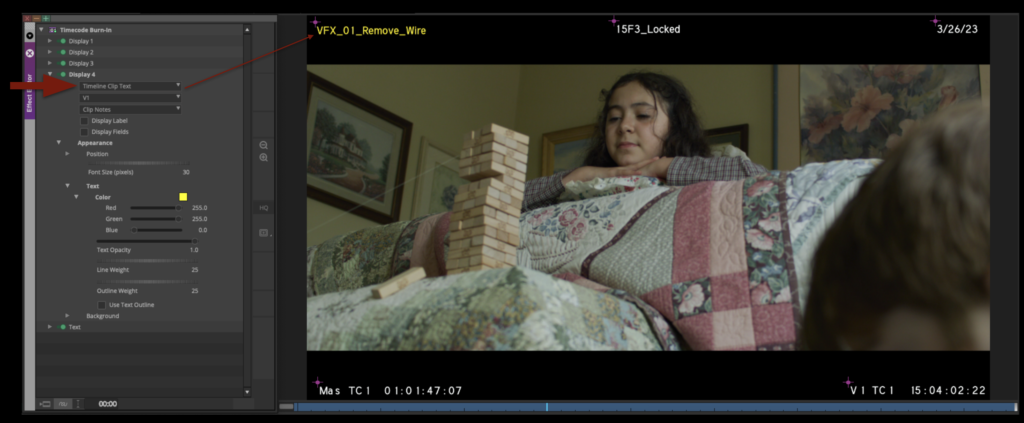
Display 4 should be set to “Timeline Clip Text” and “V1”. The color of the text should be modified to be yellow and be placed in the top-left corner so that it displays as shown in the example below. These burn-ins are helpful for keeping track of which shots are VFX shots.
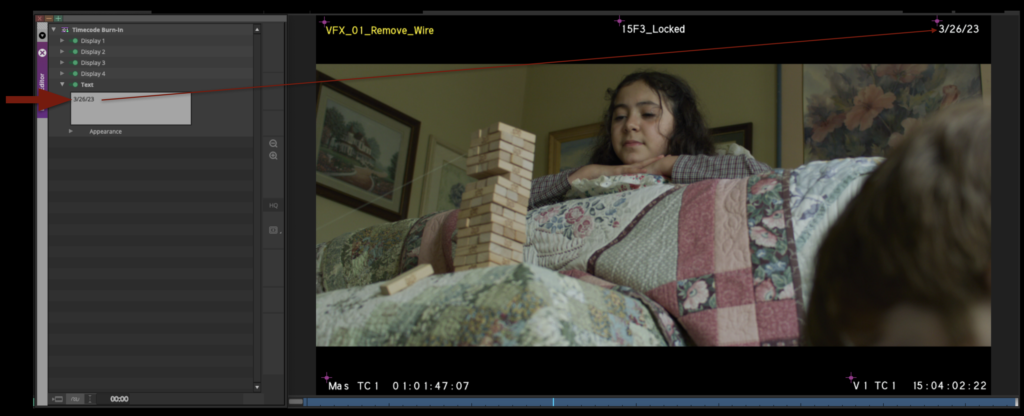
Display 5 should have the date of picture lock typed in. This should be placed in the top-right corner so that it displays as shown in the example below. This is helpful for keeping track of when the show locked.
QC the locked sequence
The Director and Editor should watch the film one last time, looking for black frames or any other problems. This is your last chance to make any changes. Once your picture is locked, it is locked!
Save the project
Finally, once you are confident that your locked sequence is formatted correctly, make sure to save your Picture Lock bin.
Assistant editing workflows involve the organizational, technical, and media-management responsibilities that support the editorial process throughout production and post-production. This includes tasks such as project organization, syncing and grouping media, tracking versions, organizing exports, and maintaining clean editorial structures as projects evolve.
Strong assistant editing practices are critical because editorial workflows depend heavily on consistency, organization, and reliable media management across large amounts of footage and project data. Developing disciplined workflow habits helps reduce errors, improve collaboration between departments, and prepare students for the highly structured pipeline expectations common within professional post-production environments.
How It Works
This page is a step-by-step guide to the Assistant Editing workflow for Media Composer, covering how to:
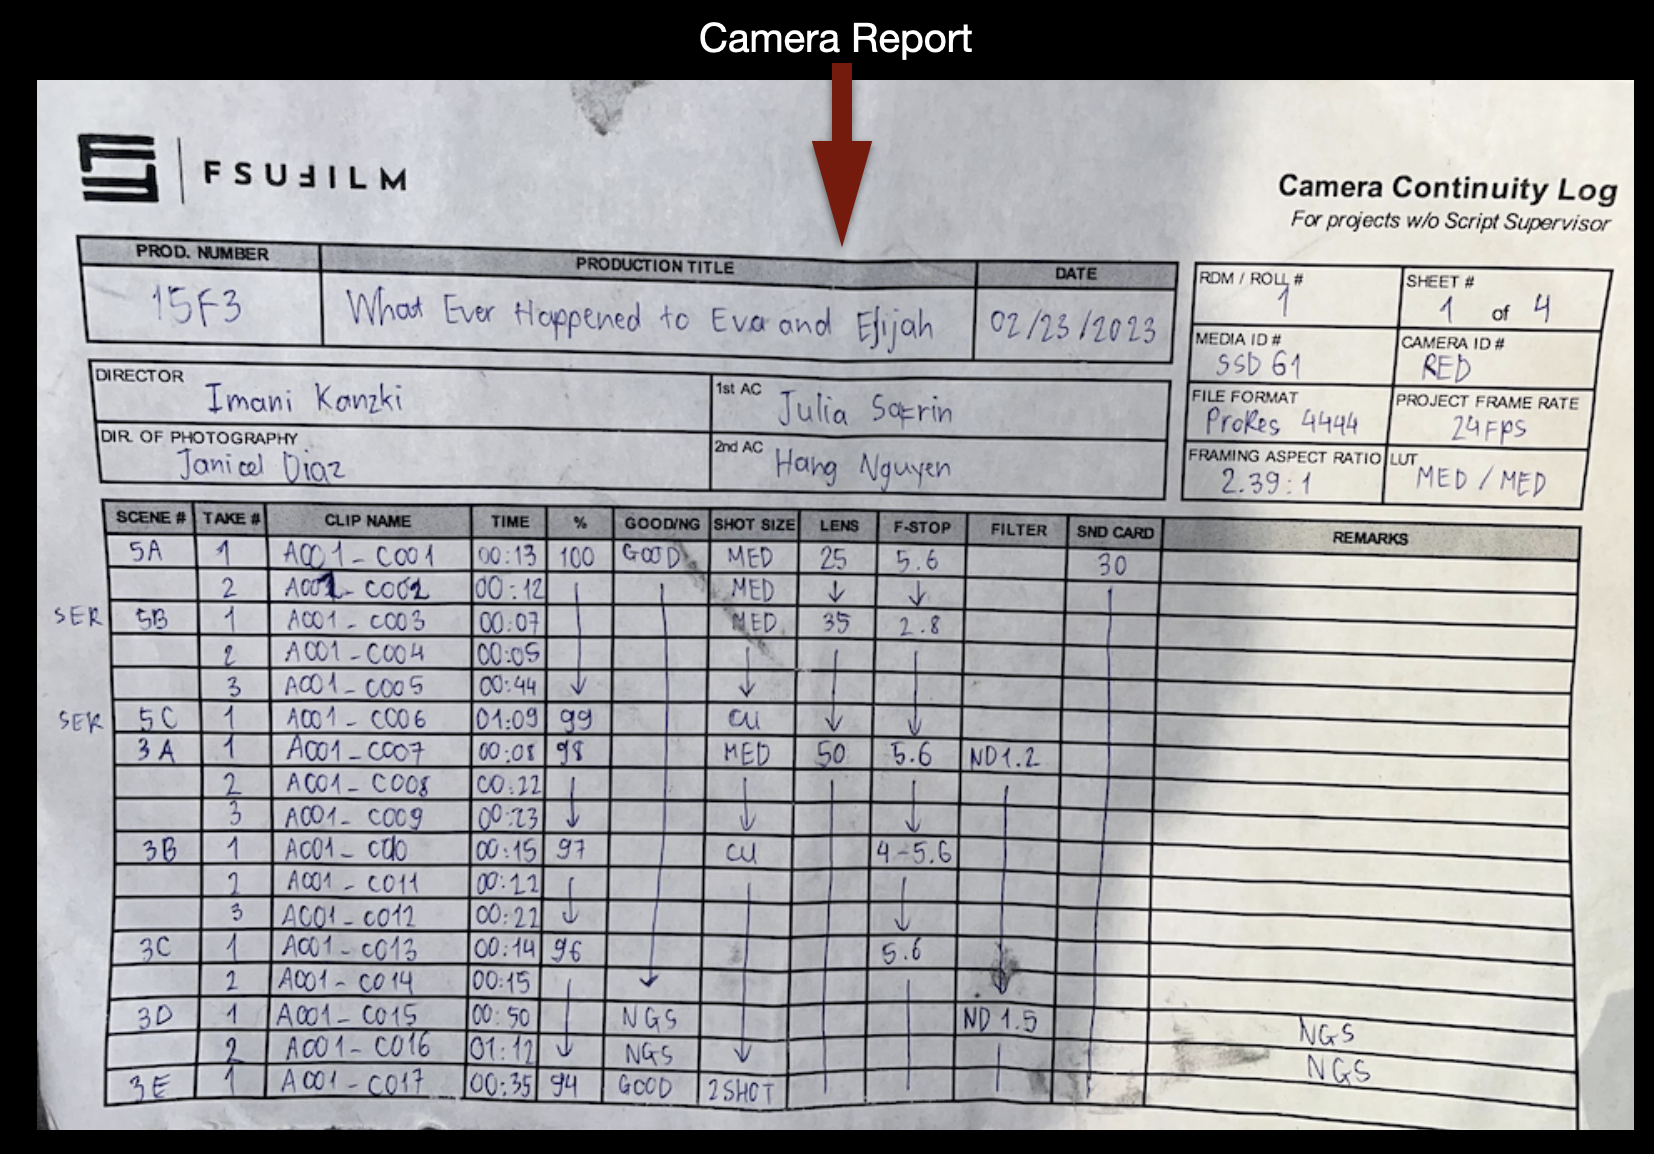
The first job of the Assistant Editor is to organize by day any Camera Reports, Sound Reports, ShotPut Pro Offload Reports, and (if applicable) Script Supervisor Reports.
Most of these reports have already been made and you will only need to copy-and-paste them into the correct folder on the server to consolidate them together. The Camera Reports are analog so you will need to take clear pictures of them and to make a digital version.
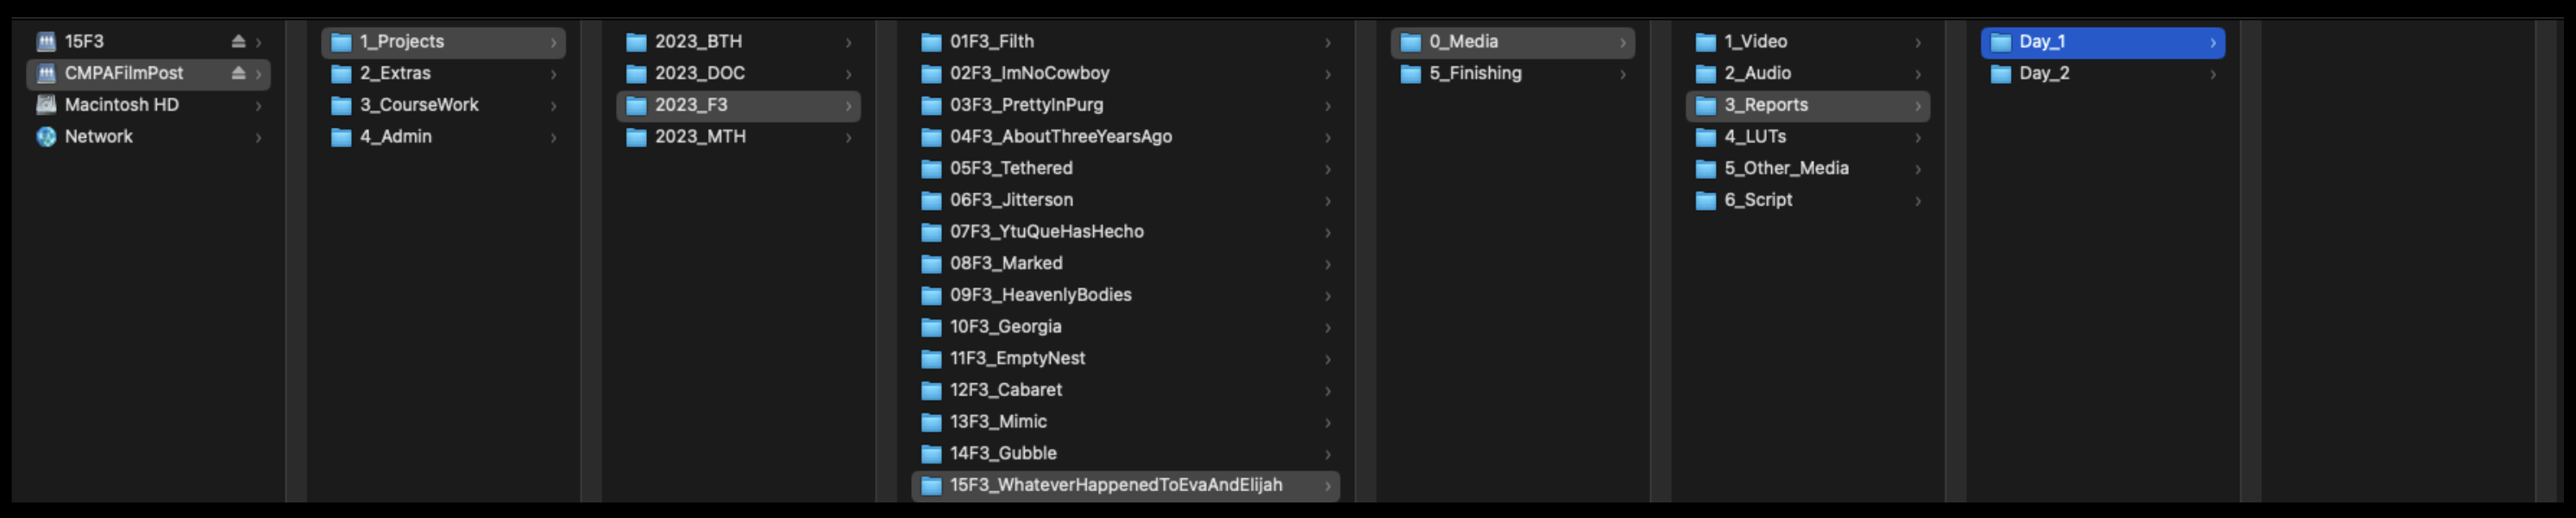
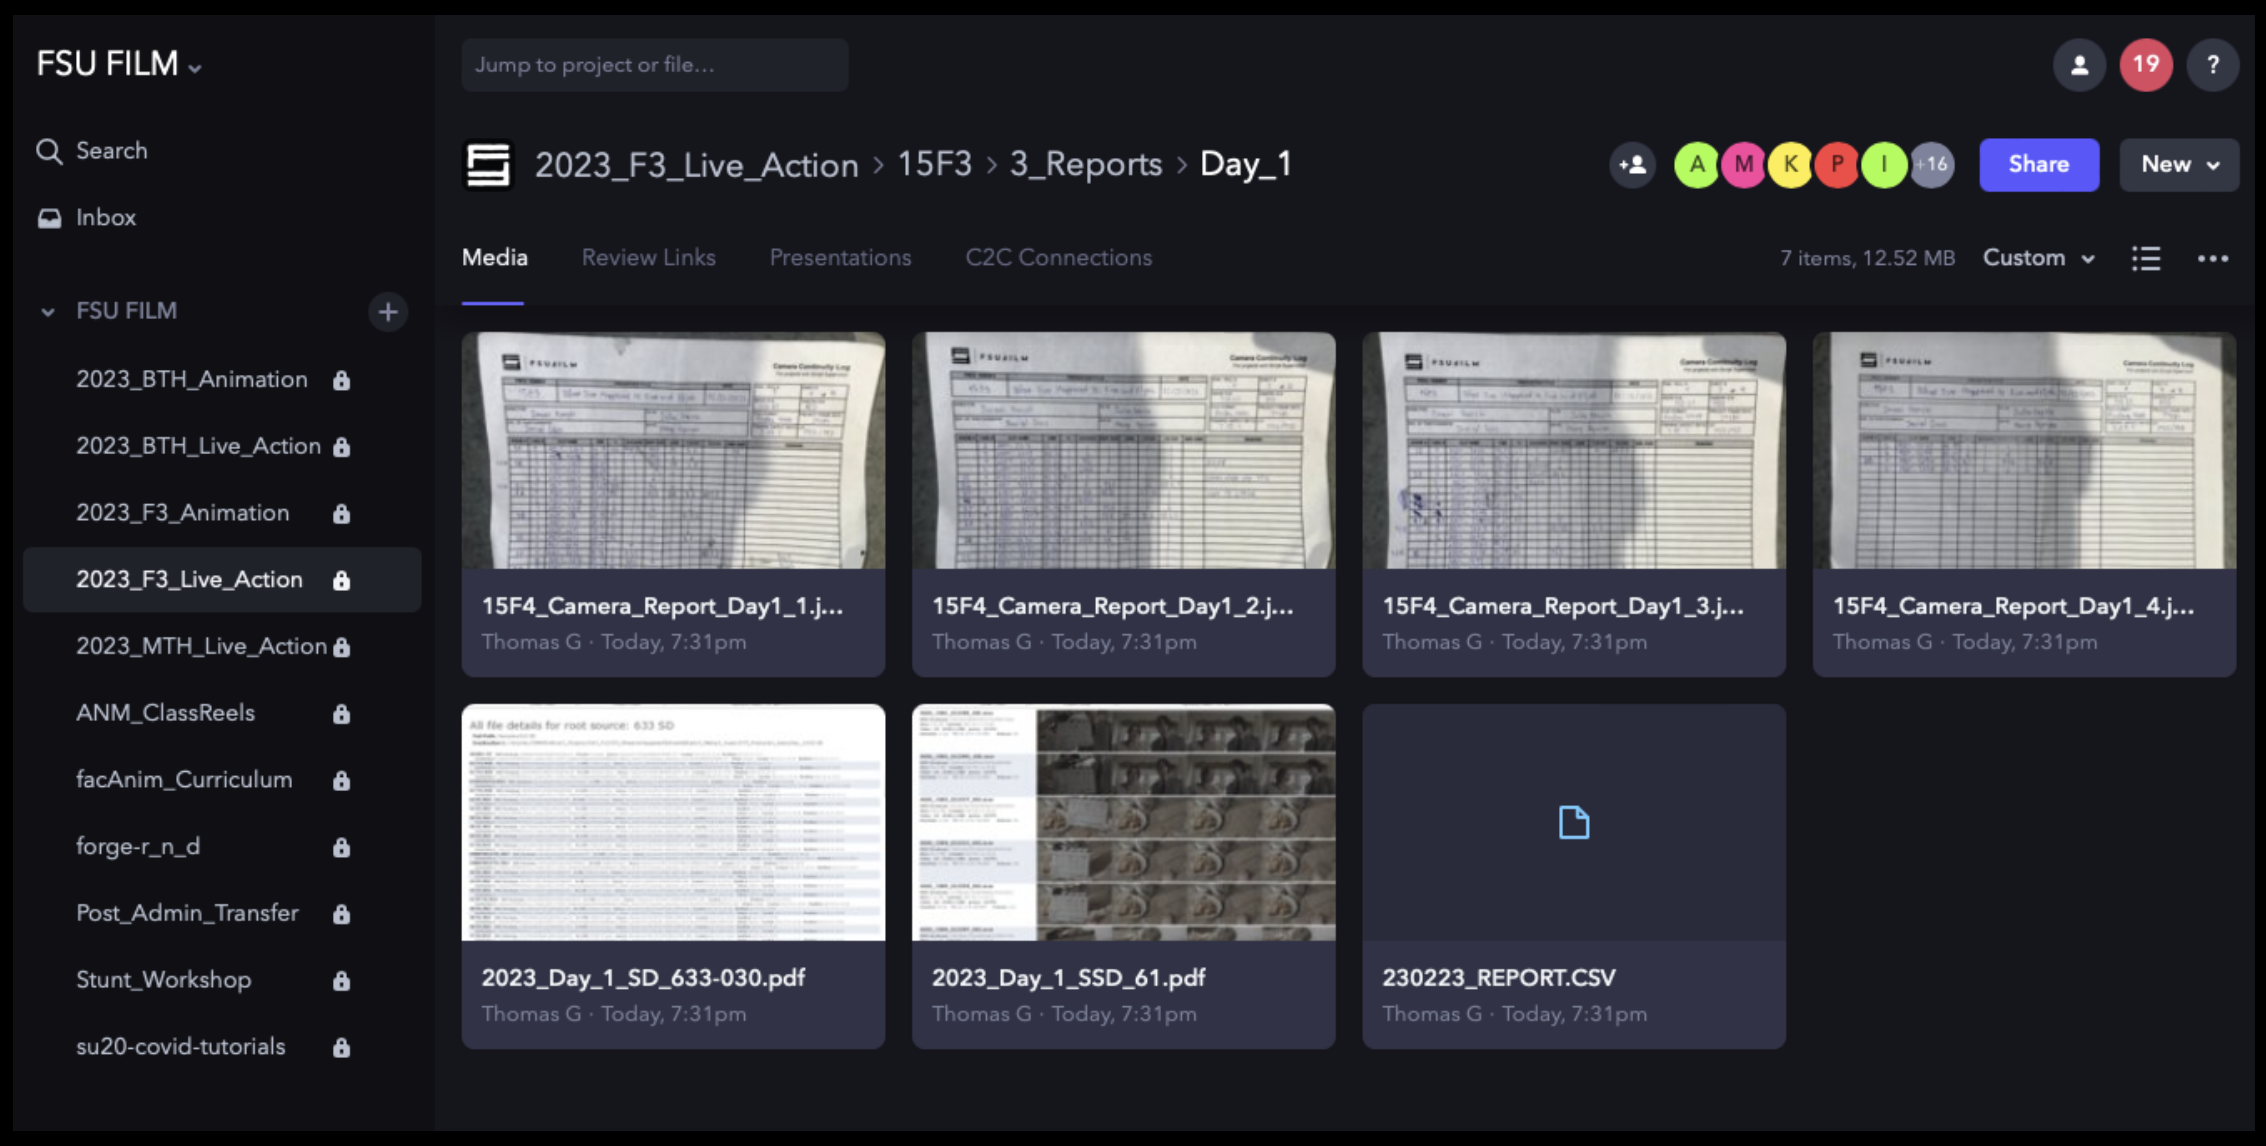
There should be a folder for each day’s report on the server:
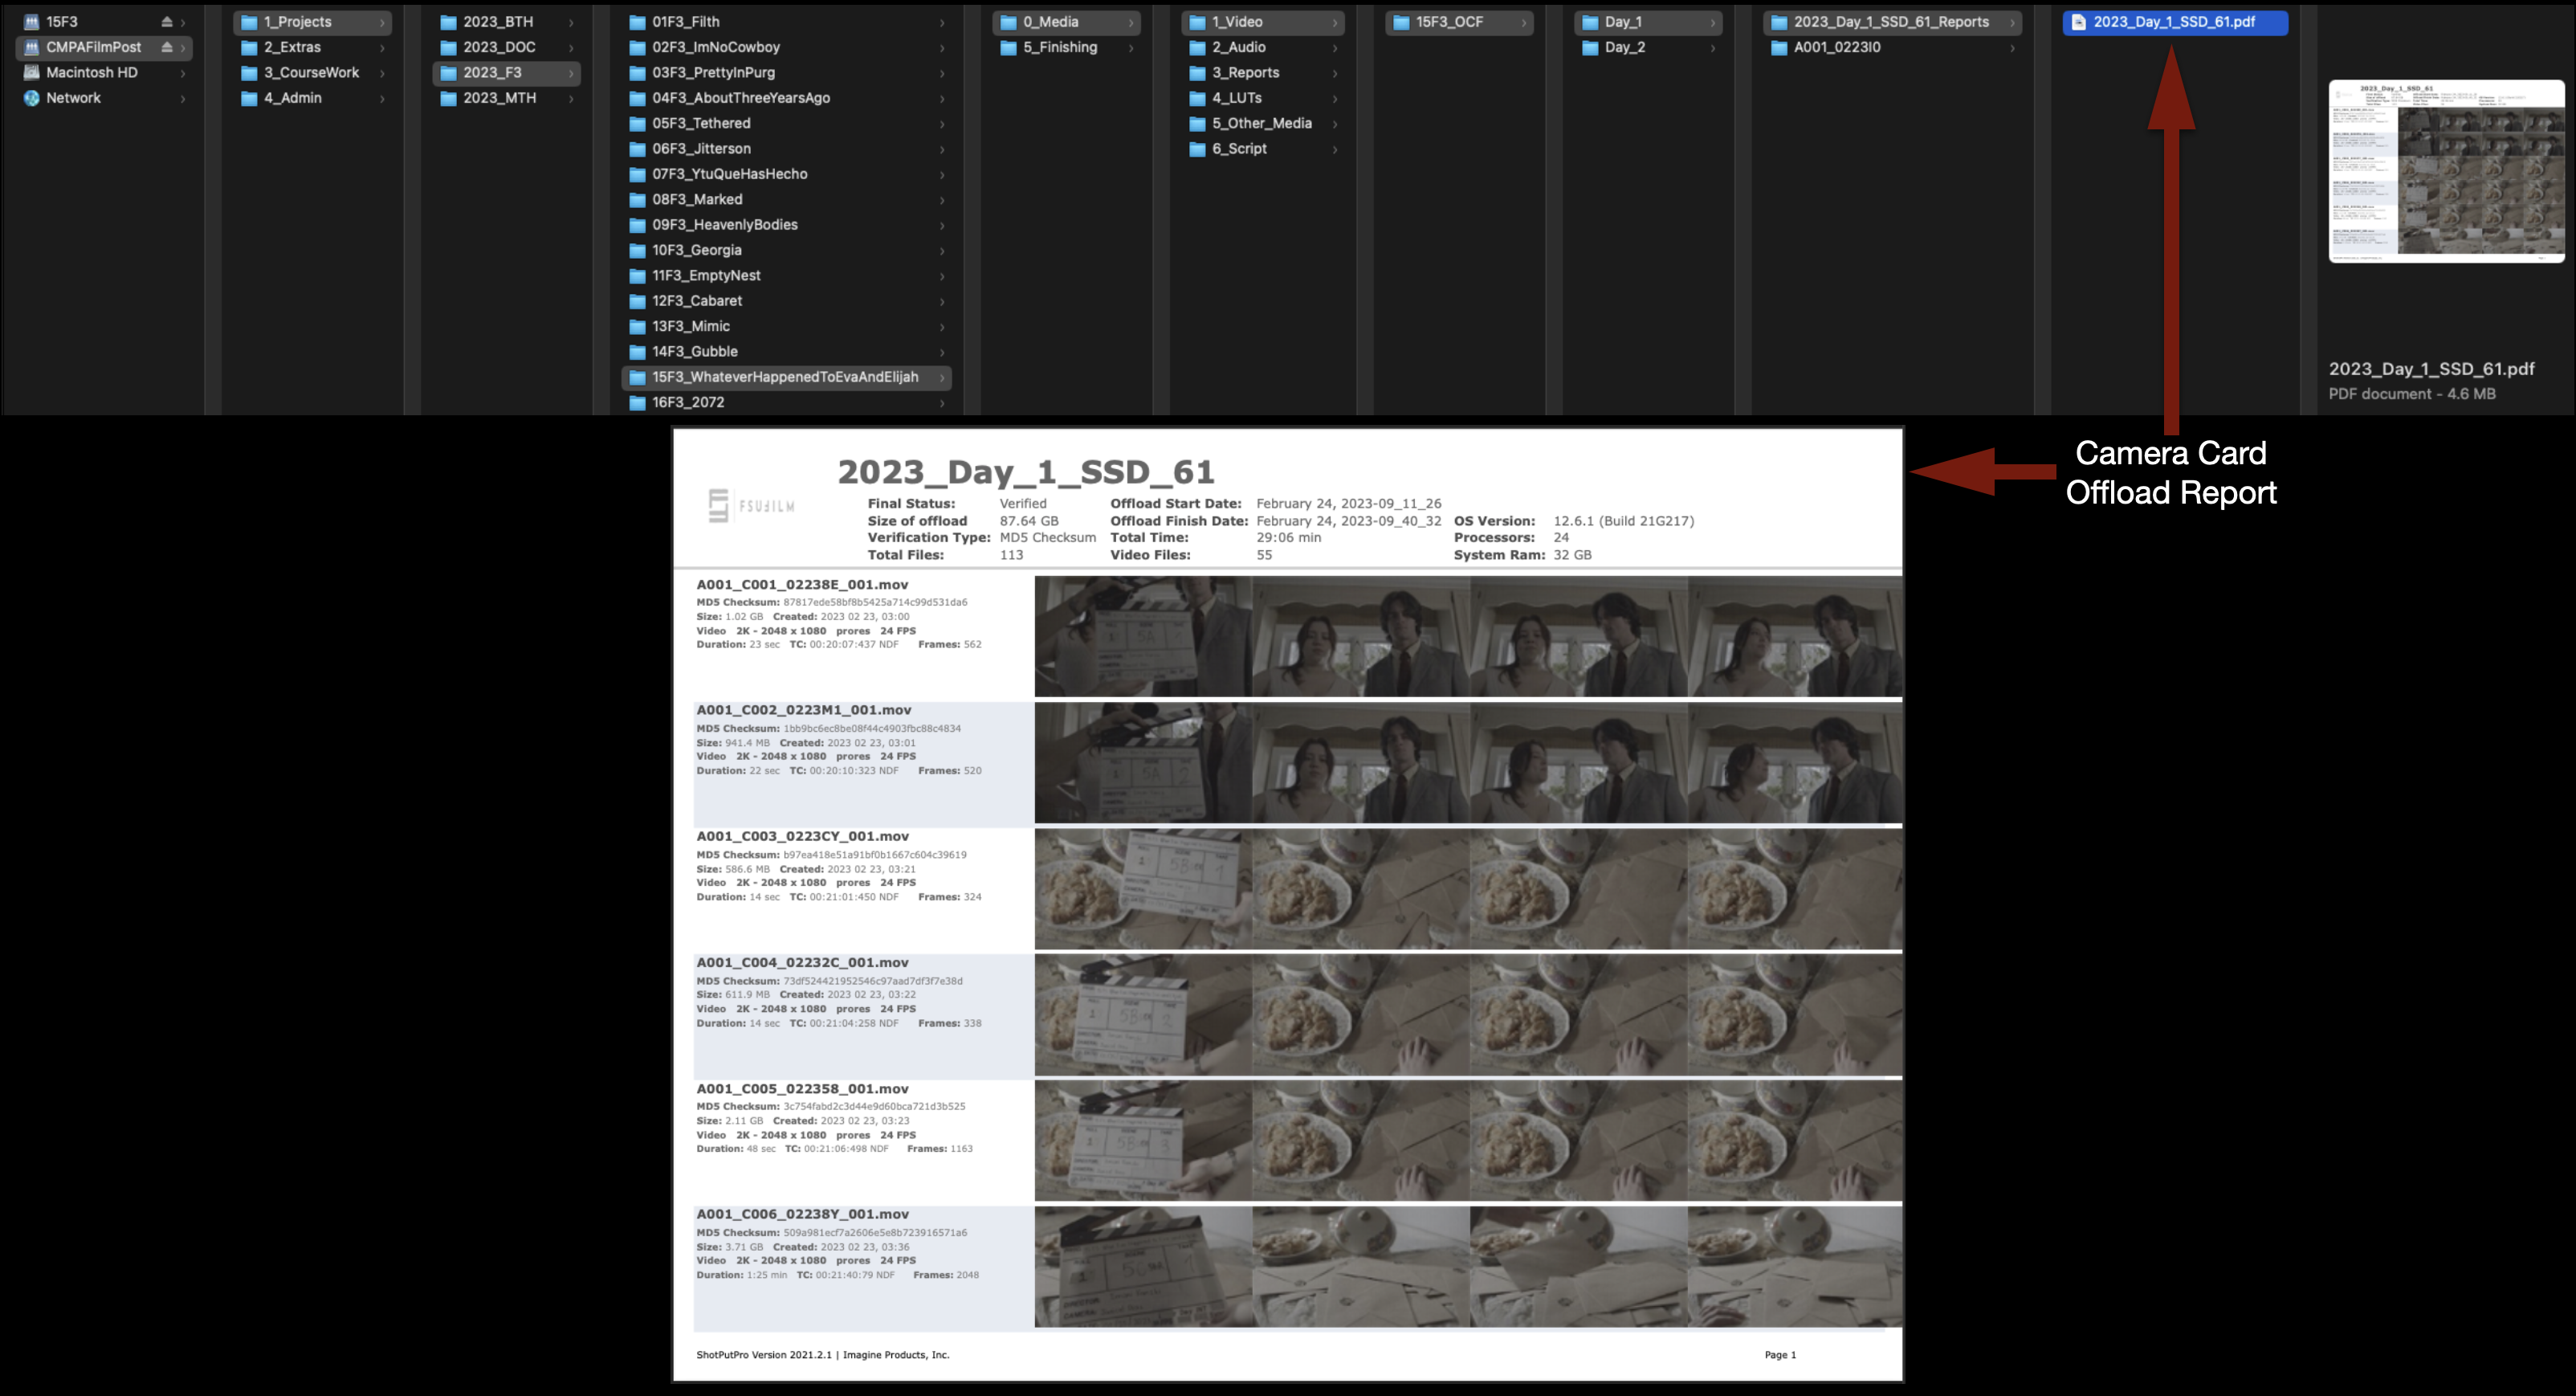
This is where you will find the Camera Card Offload Report:
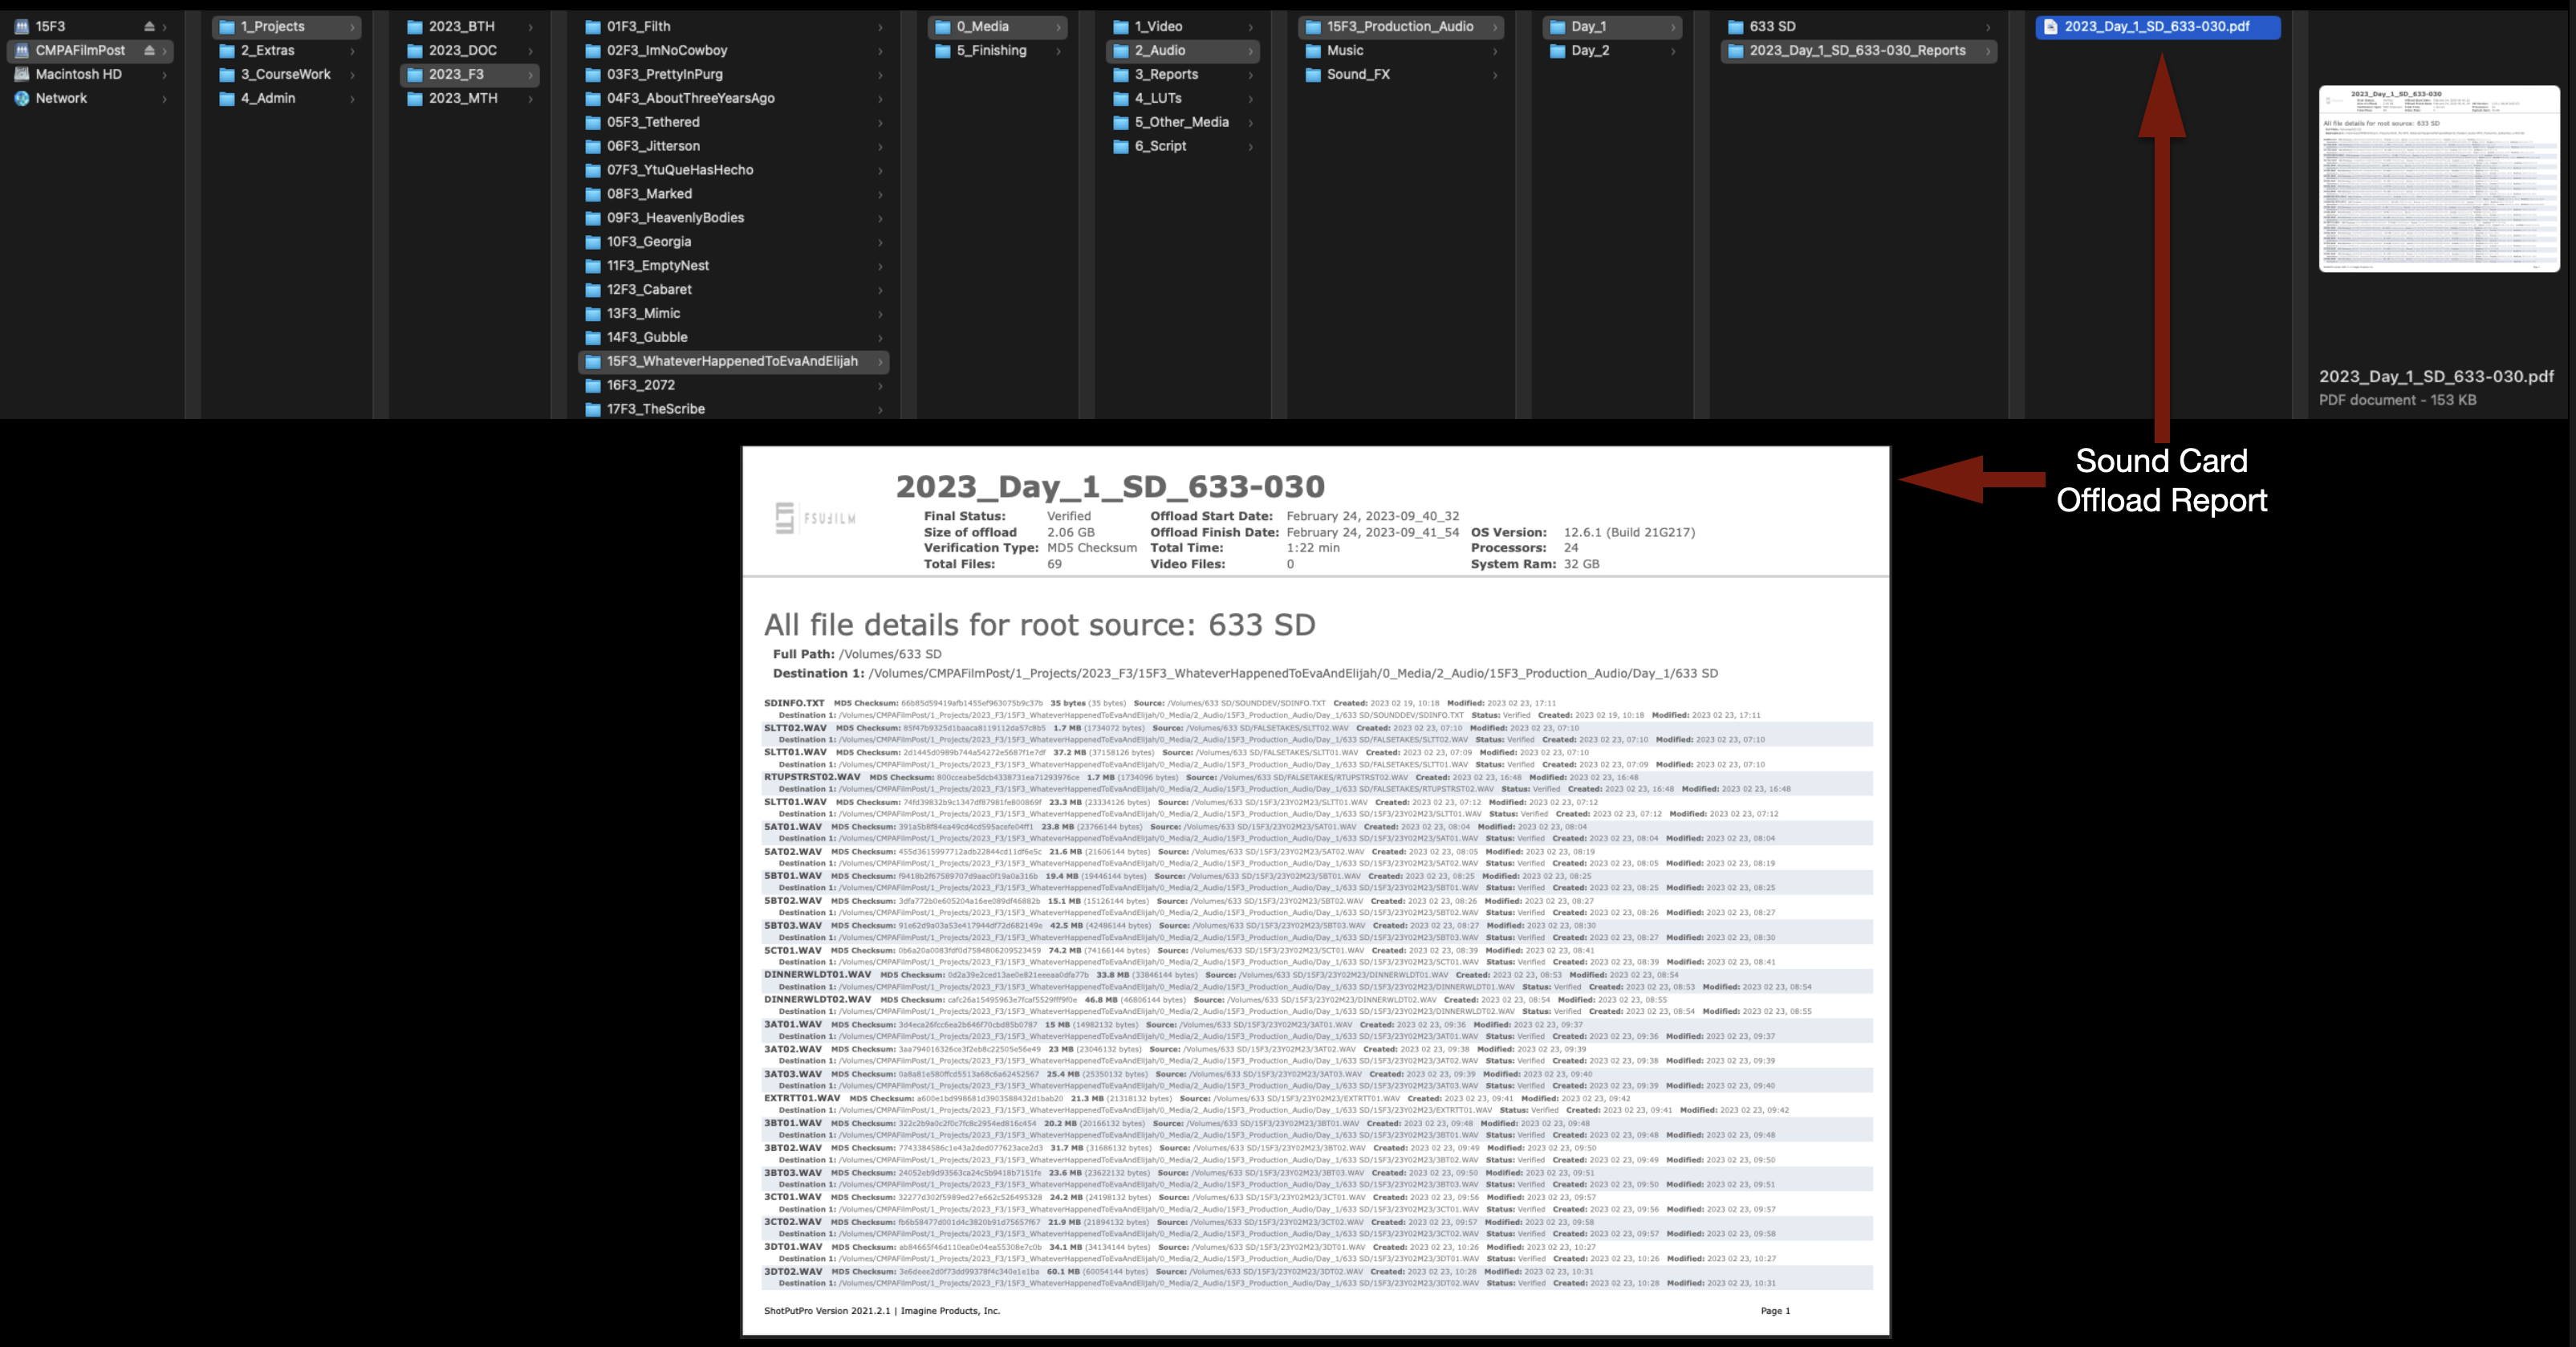
This is where you will find the Sound Card Offload Report:
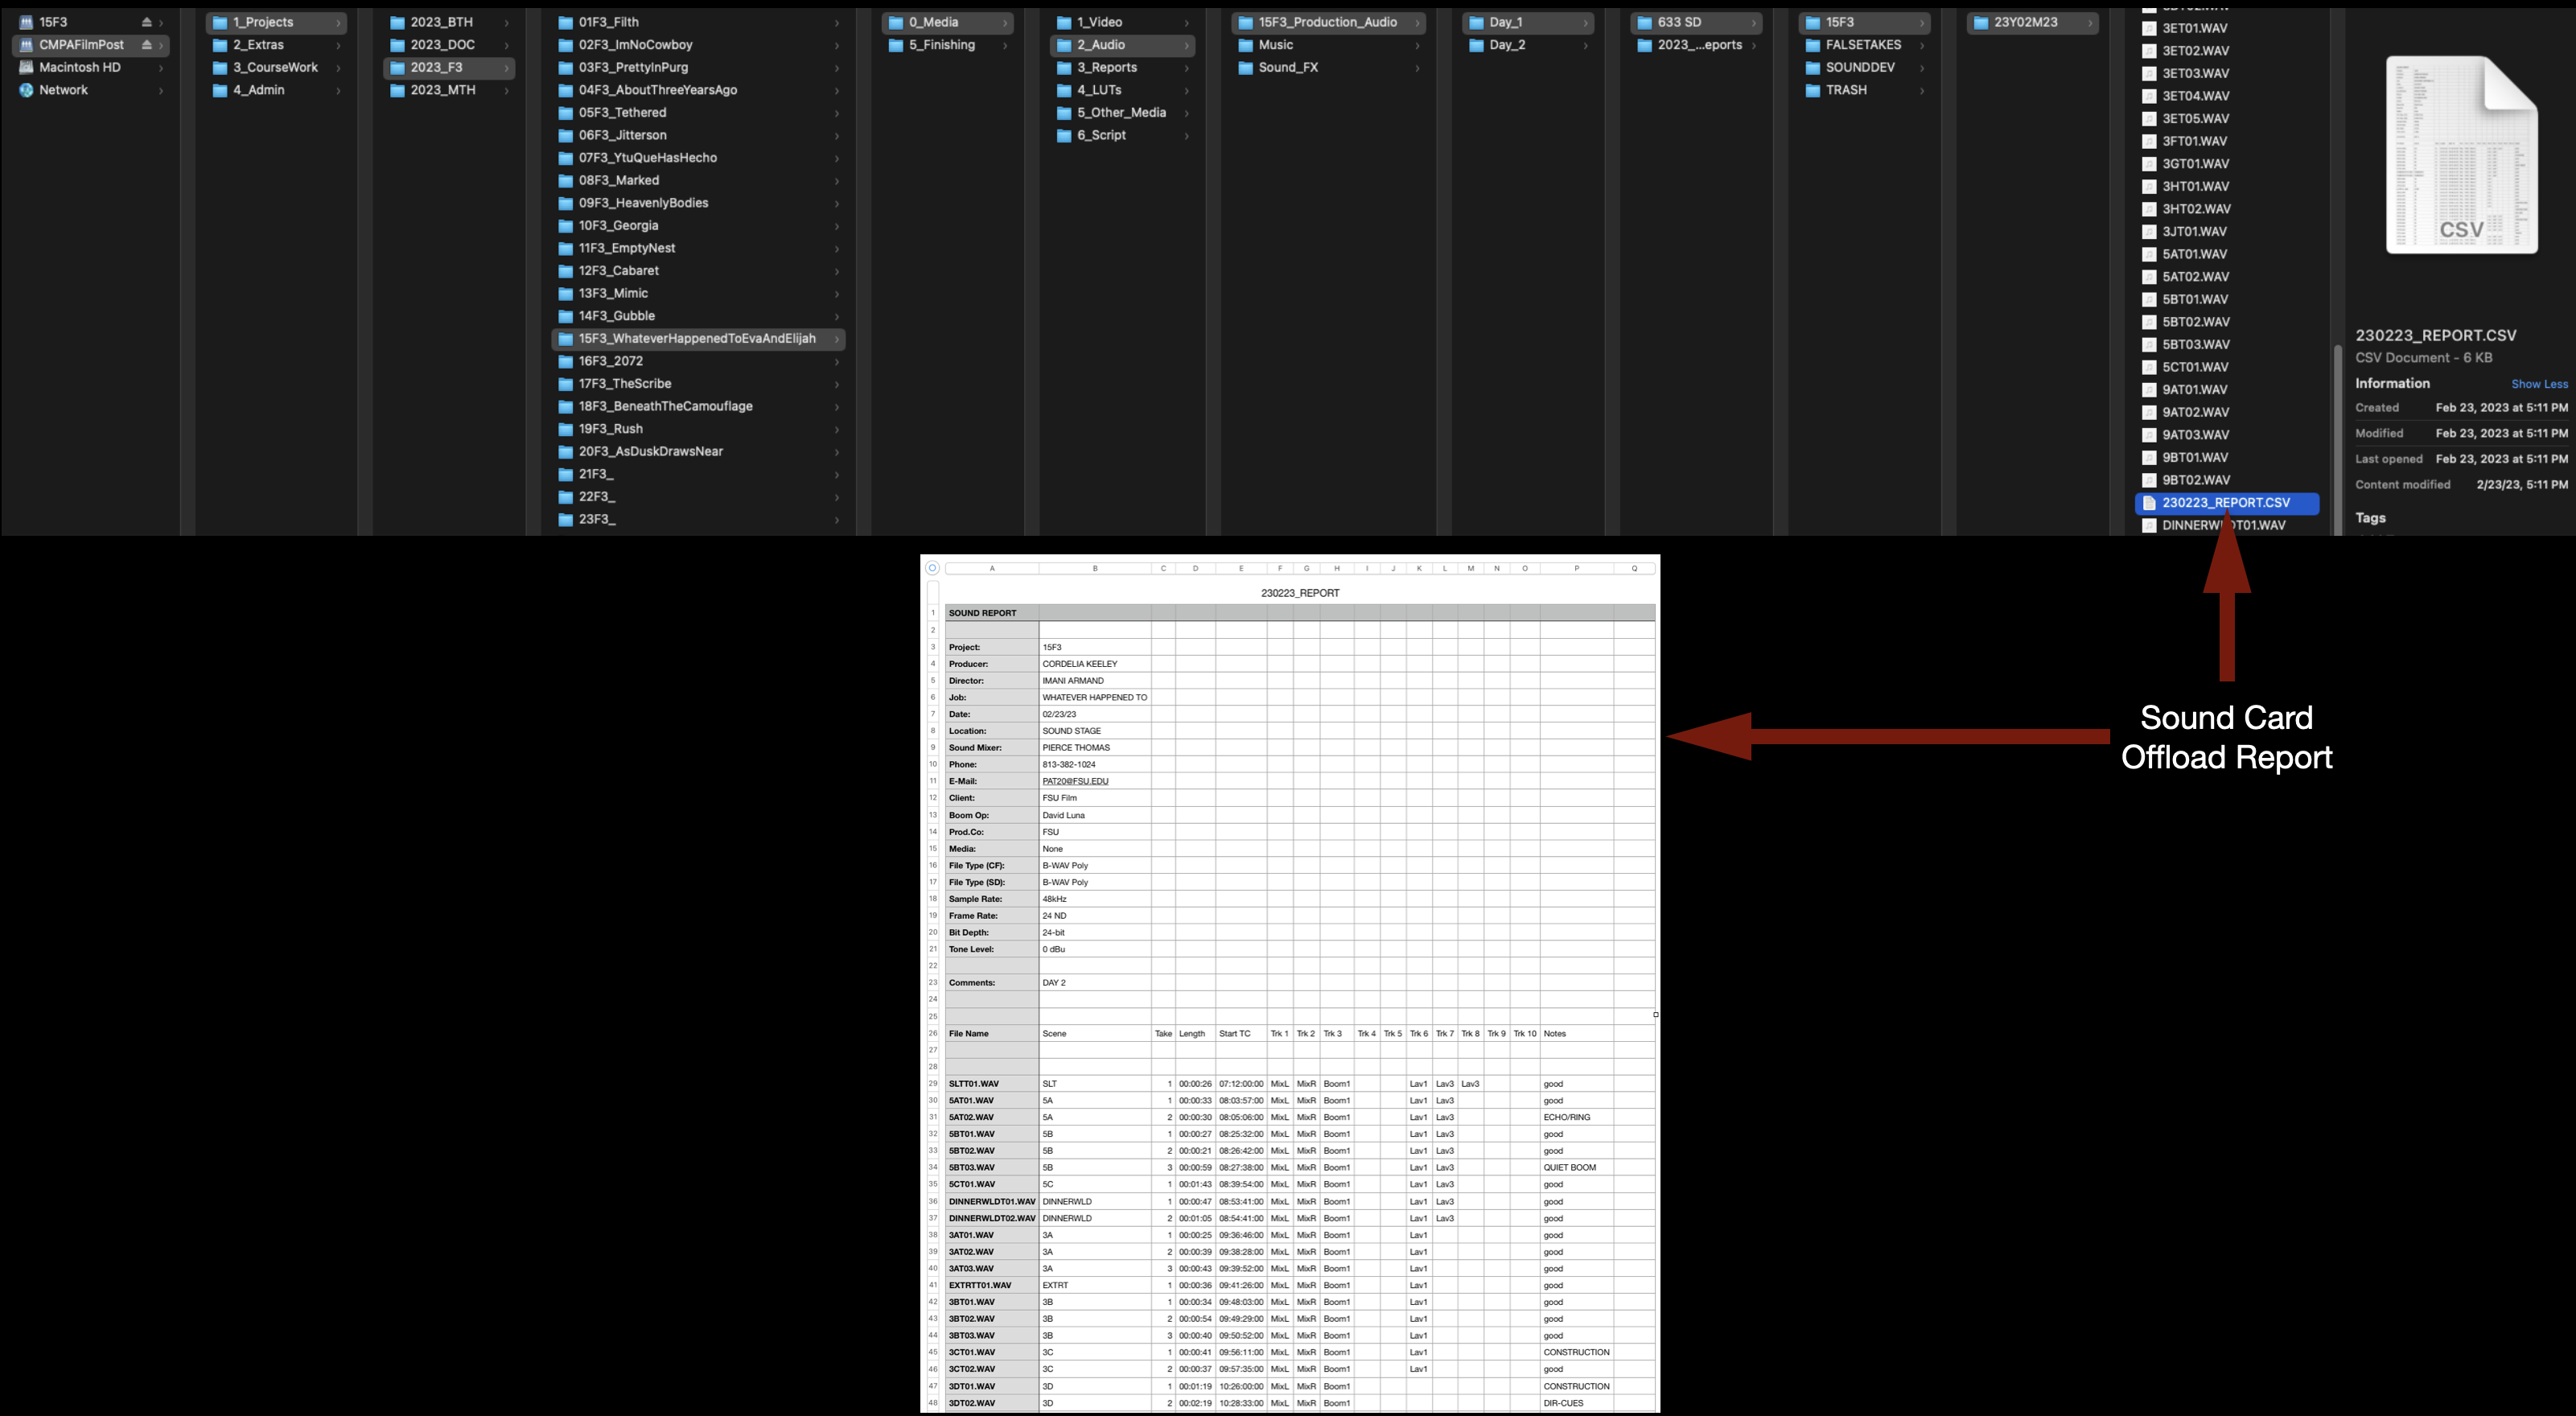
This is where you will find the Sound Report:
For the Camera Report, take a good picture of it to make a digital copy:
Copy-and-paste all of them into the Reports folder:
Then, upload each day’s folder to the corresponding folder on frame.io:
Prep the Script
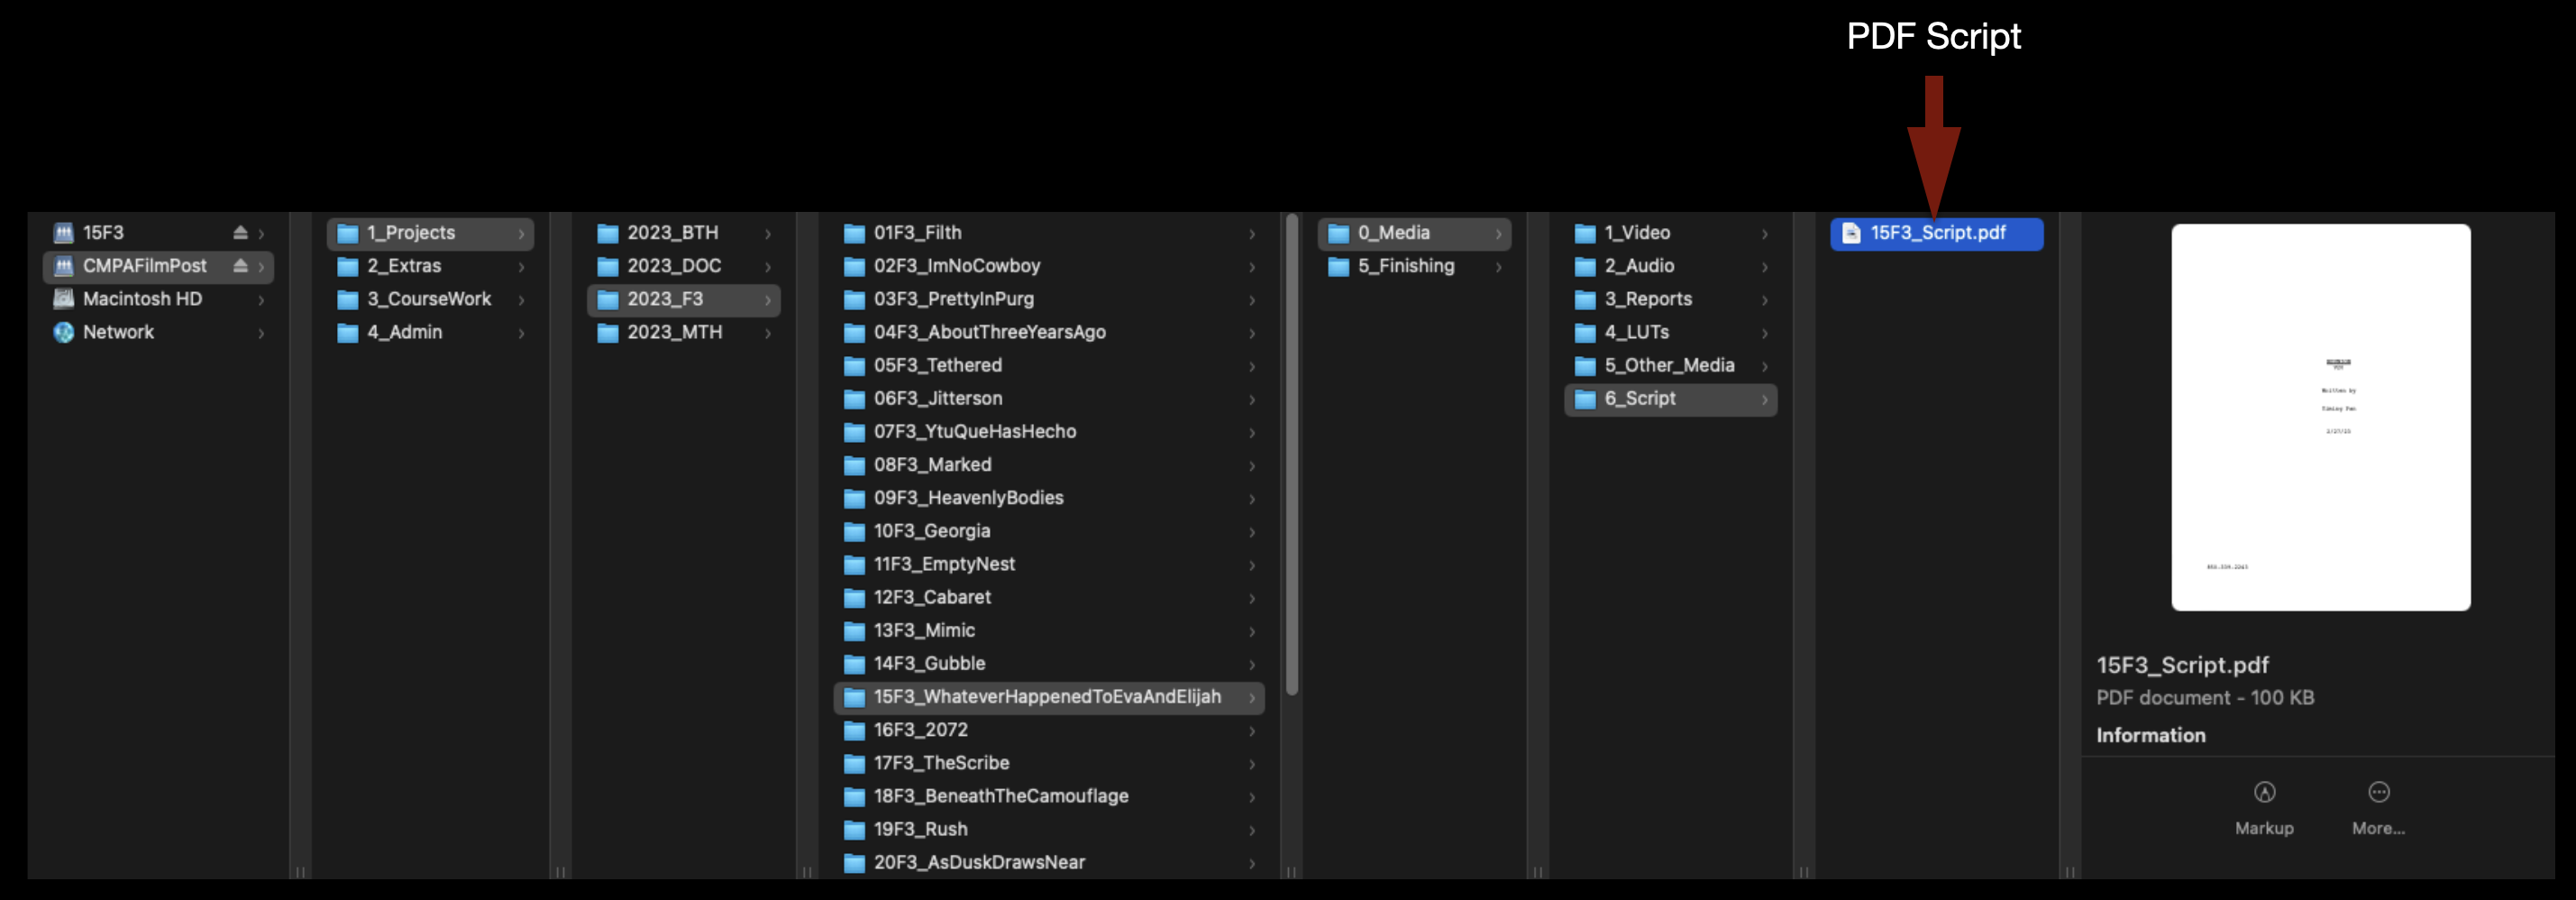
The Director of the film should have already supplied you with a PDF of the shooting script. The .pdf file can be saved in the folder shown below:
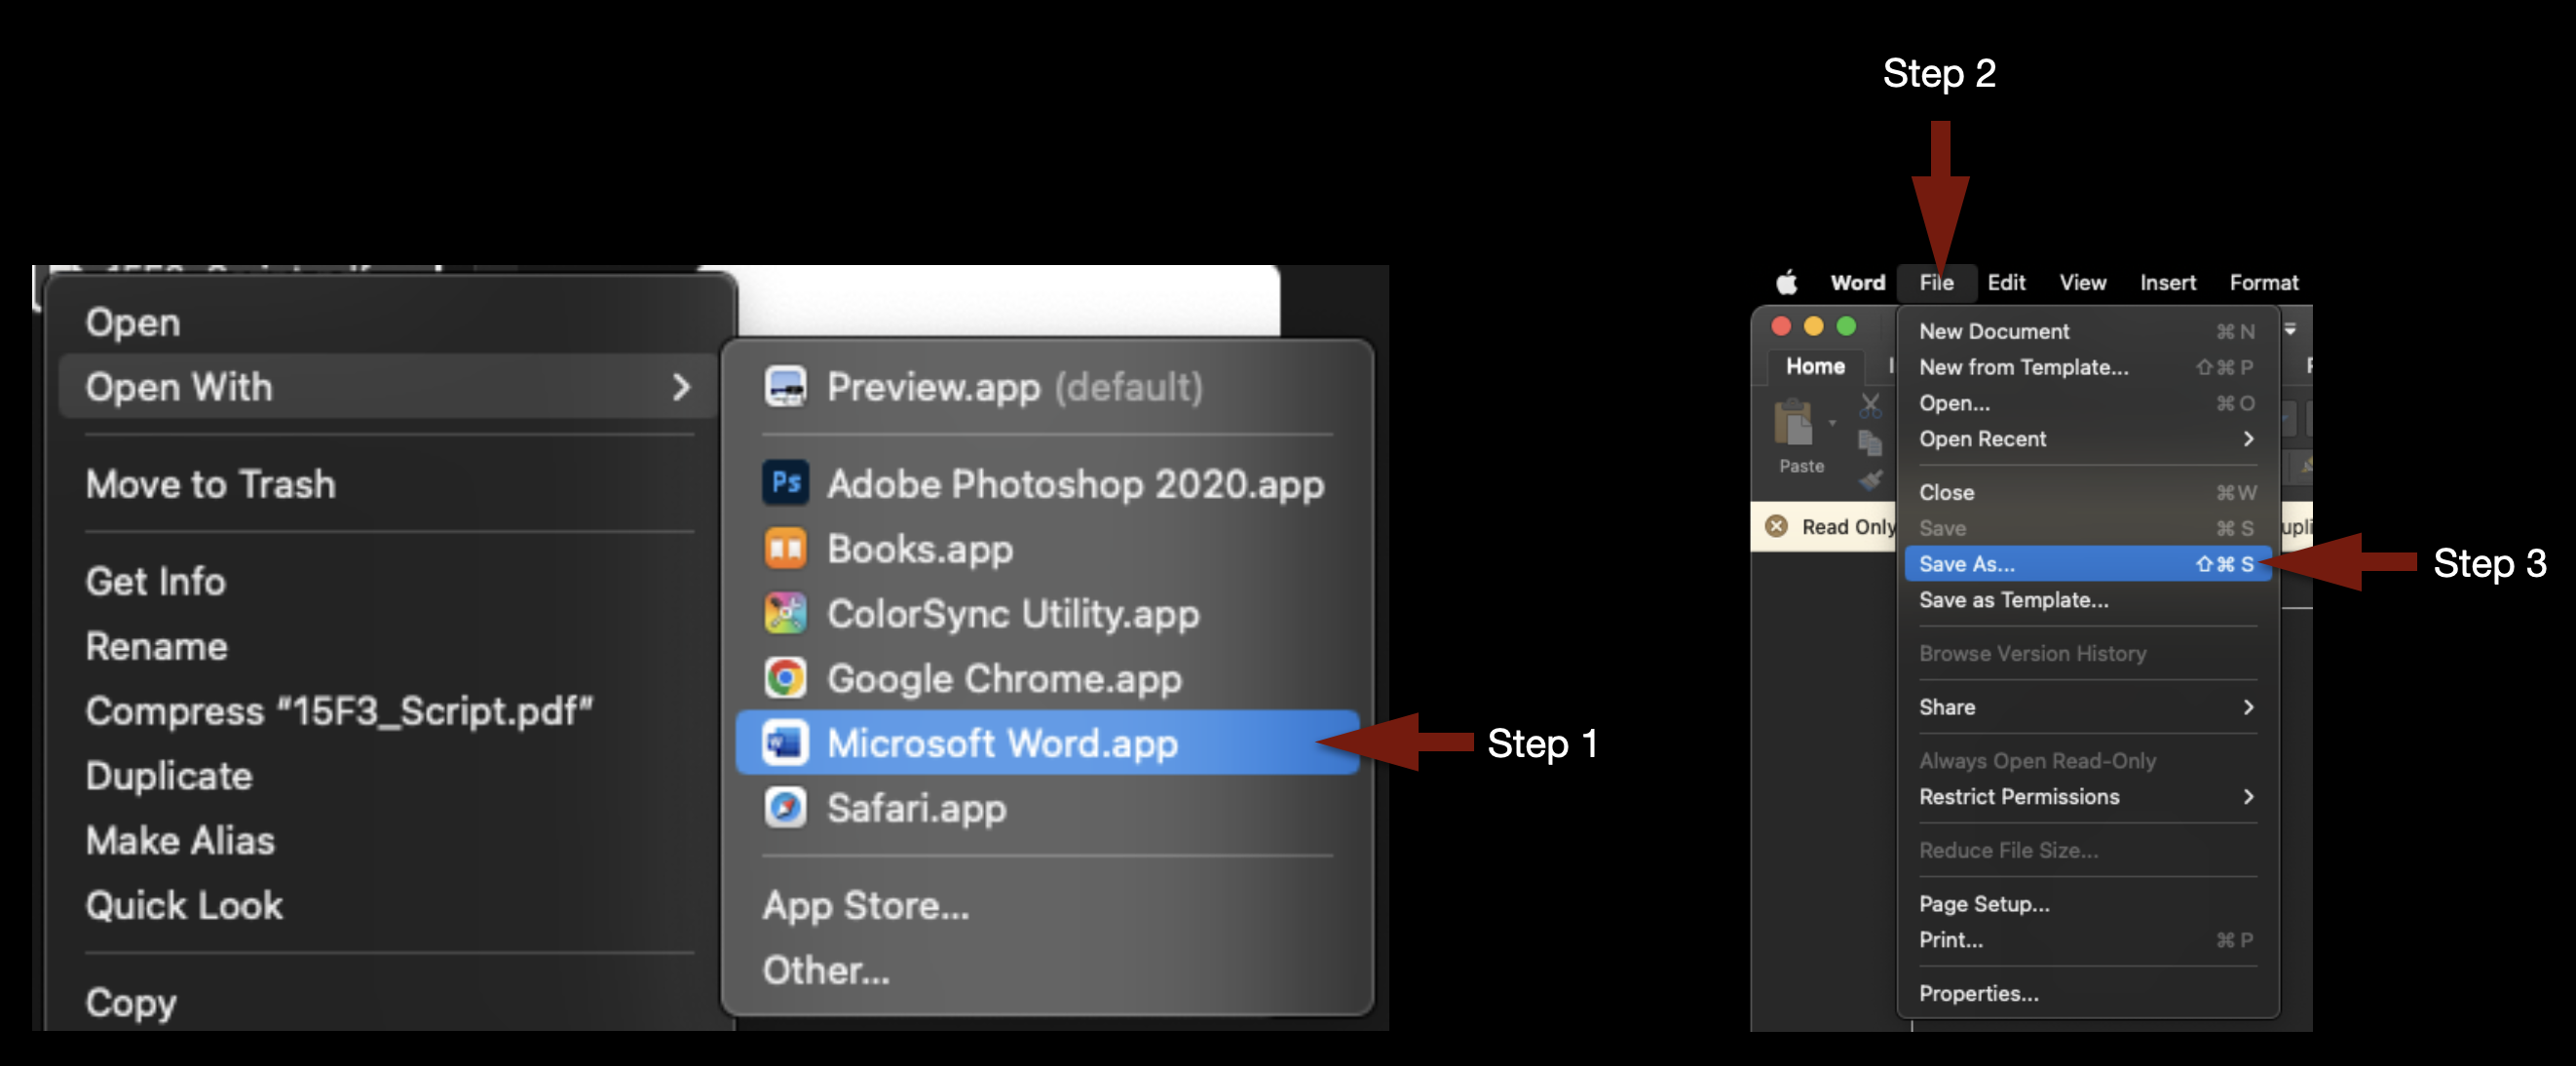
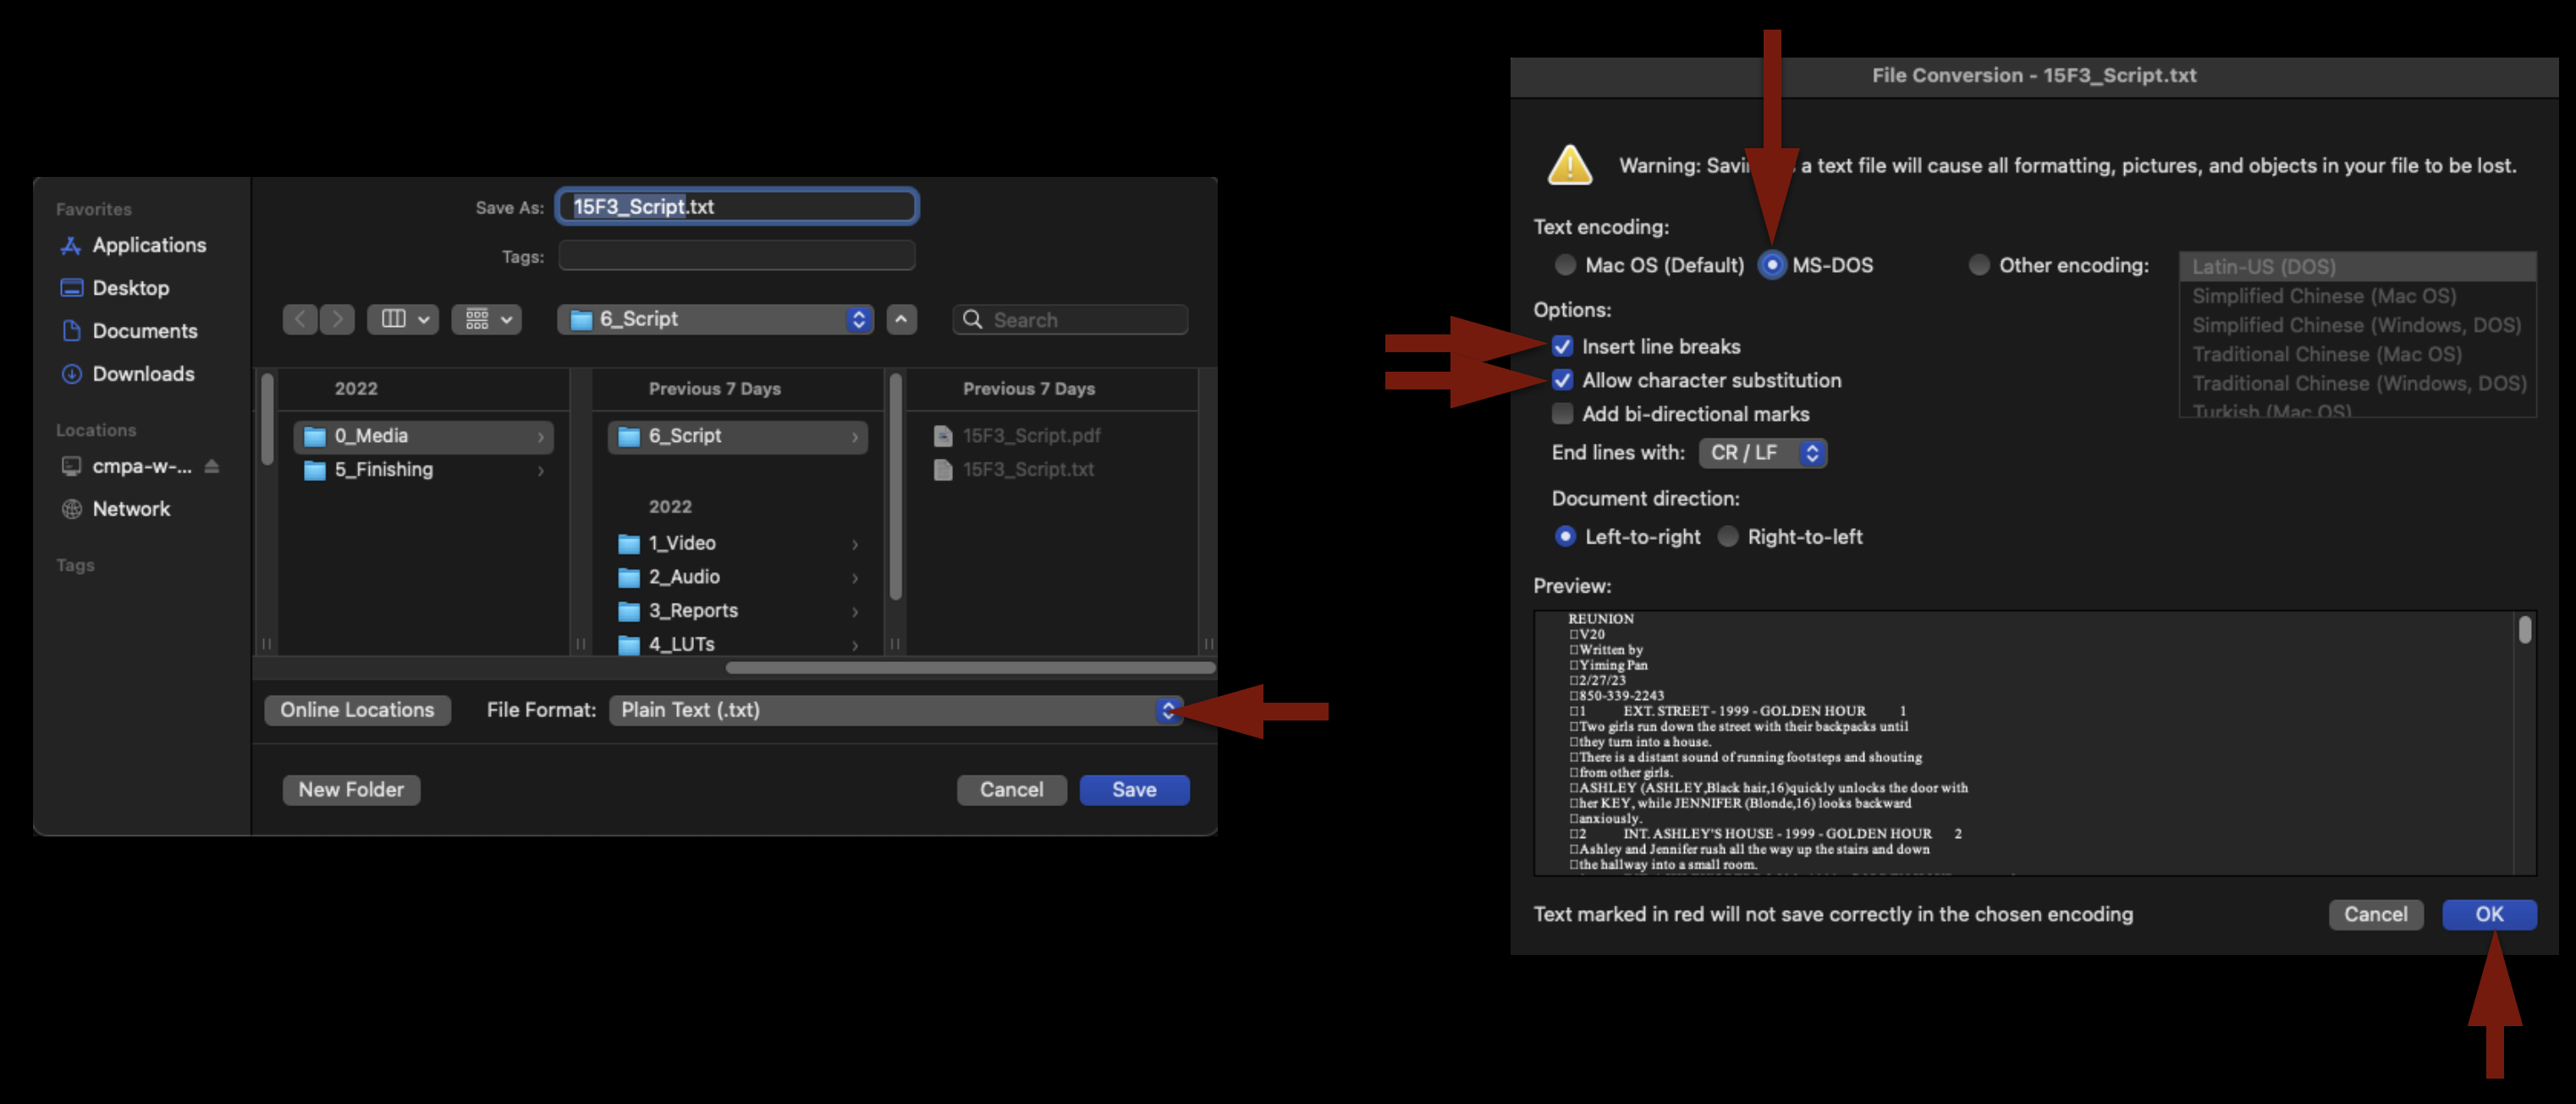
To import the script into the Media Composer project, it must first be converted from a .pdf file into a .txt file. In Finder, right-click on the .pdf file and select Open With > Microsoft Word. Once it opens in Microsoft Word, go to the File menu and select Save As…
Under File Format change the type to “Plain Text (.txt)” and click “Save”. When the File Conversion screen appears, check the boxes as shown in the example below, then click “OK”.
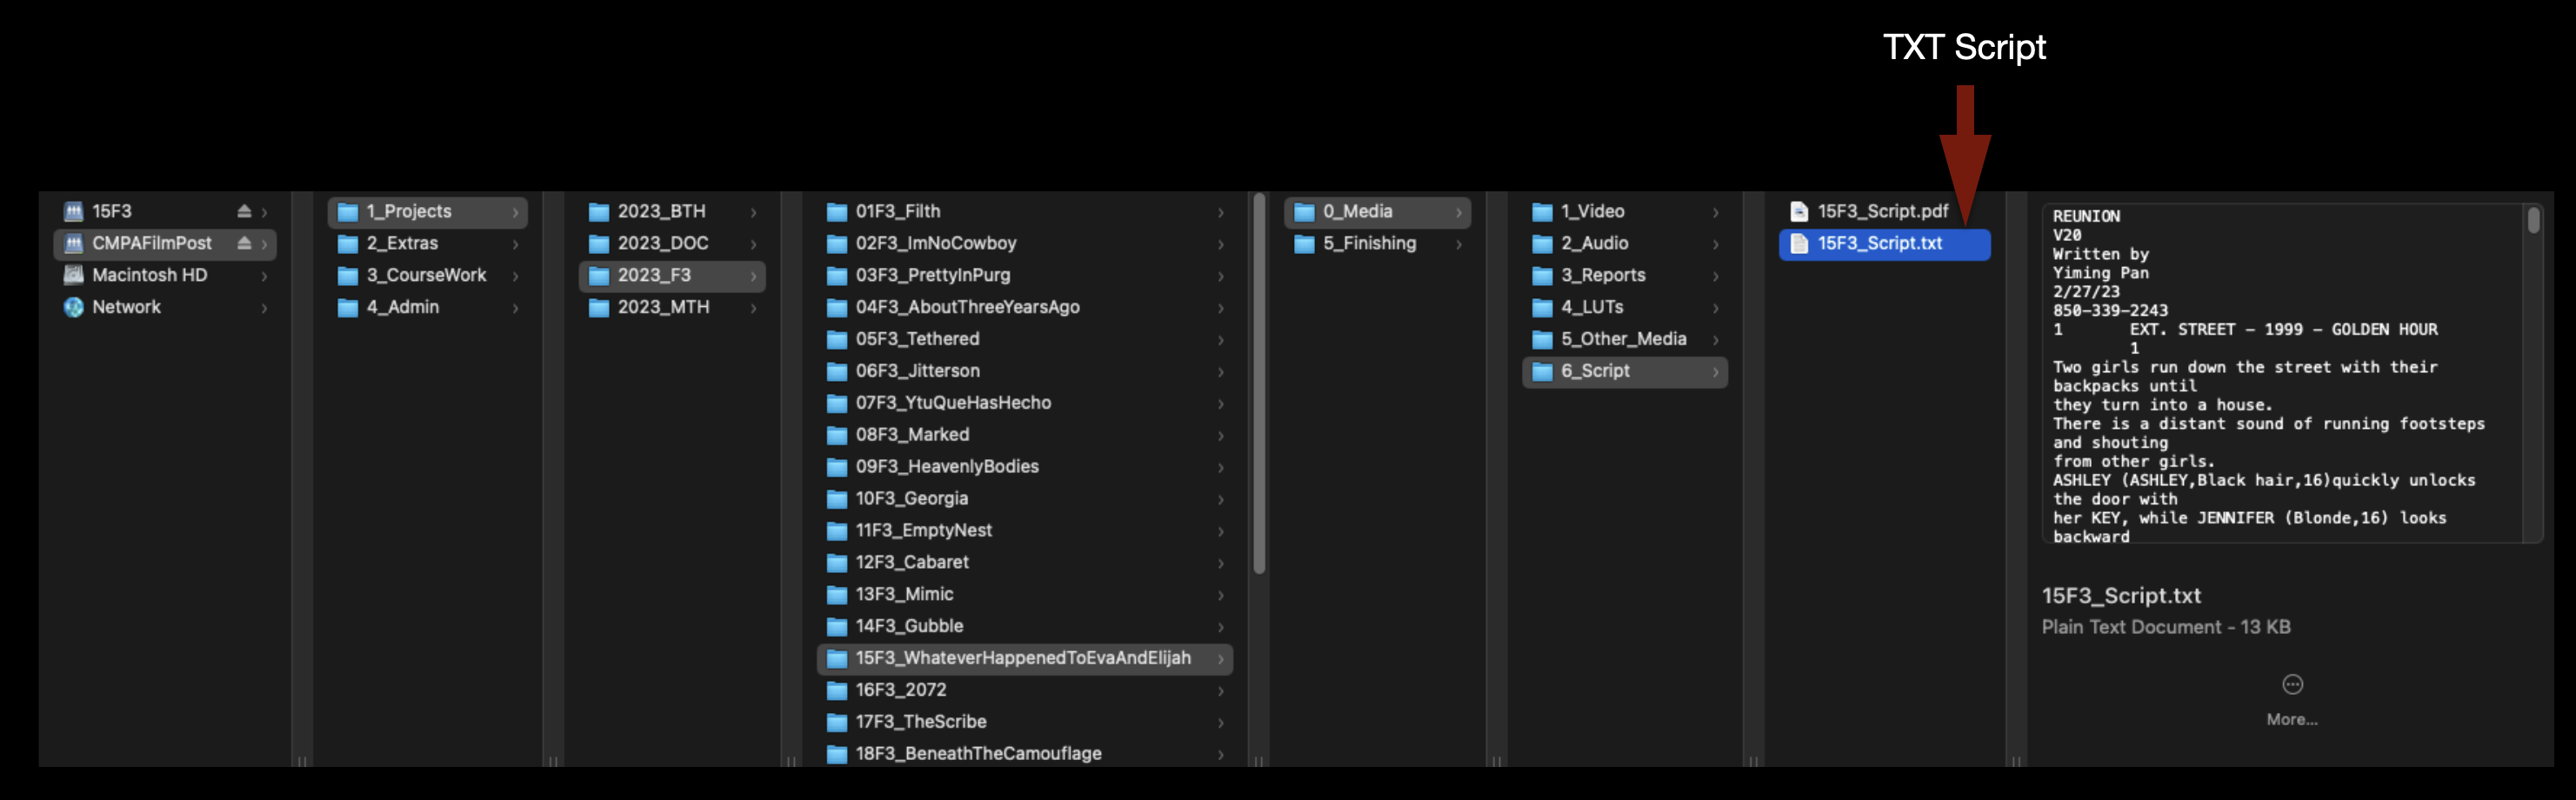
This will save the file as a .txt file, in the same folder:
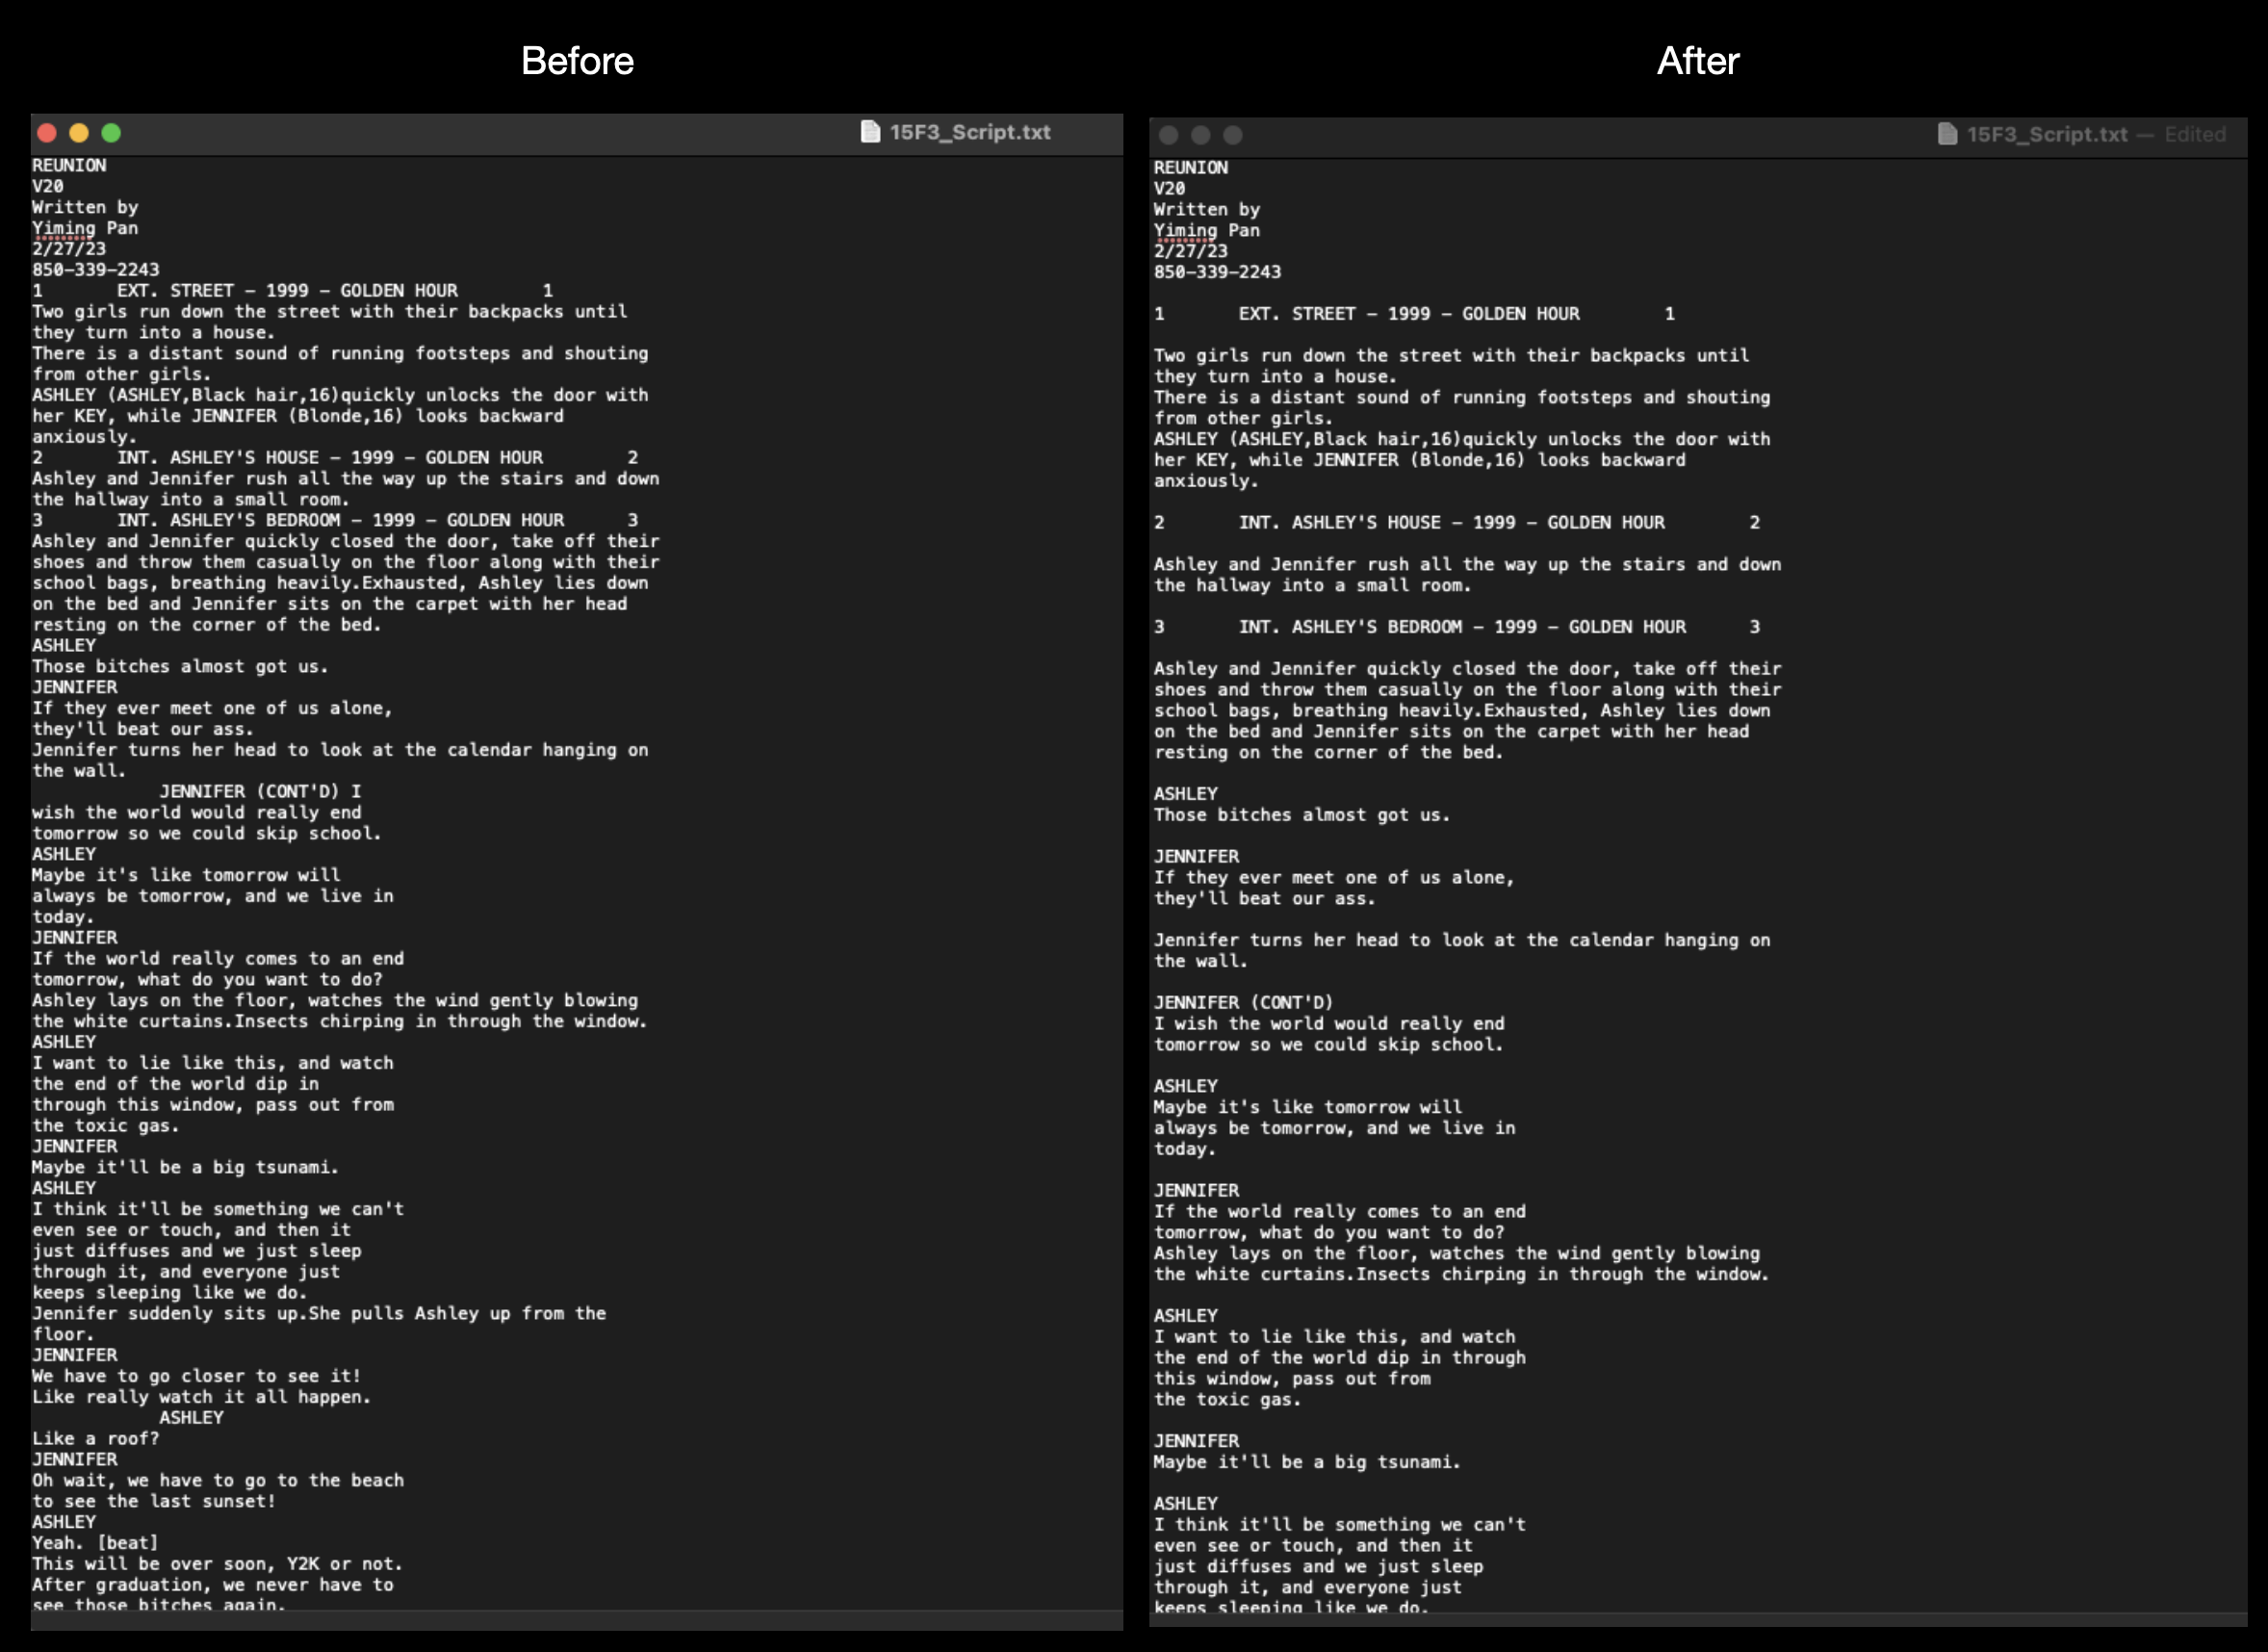
Open the script in the Text Edit app. Depending on how the script was originally formatted, you may notice that not all of the spacing has translated over. Use the return key to add the proper line spacing, as shown in the example below:
Configure the Media Composer Project
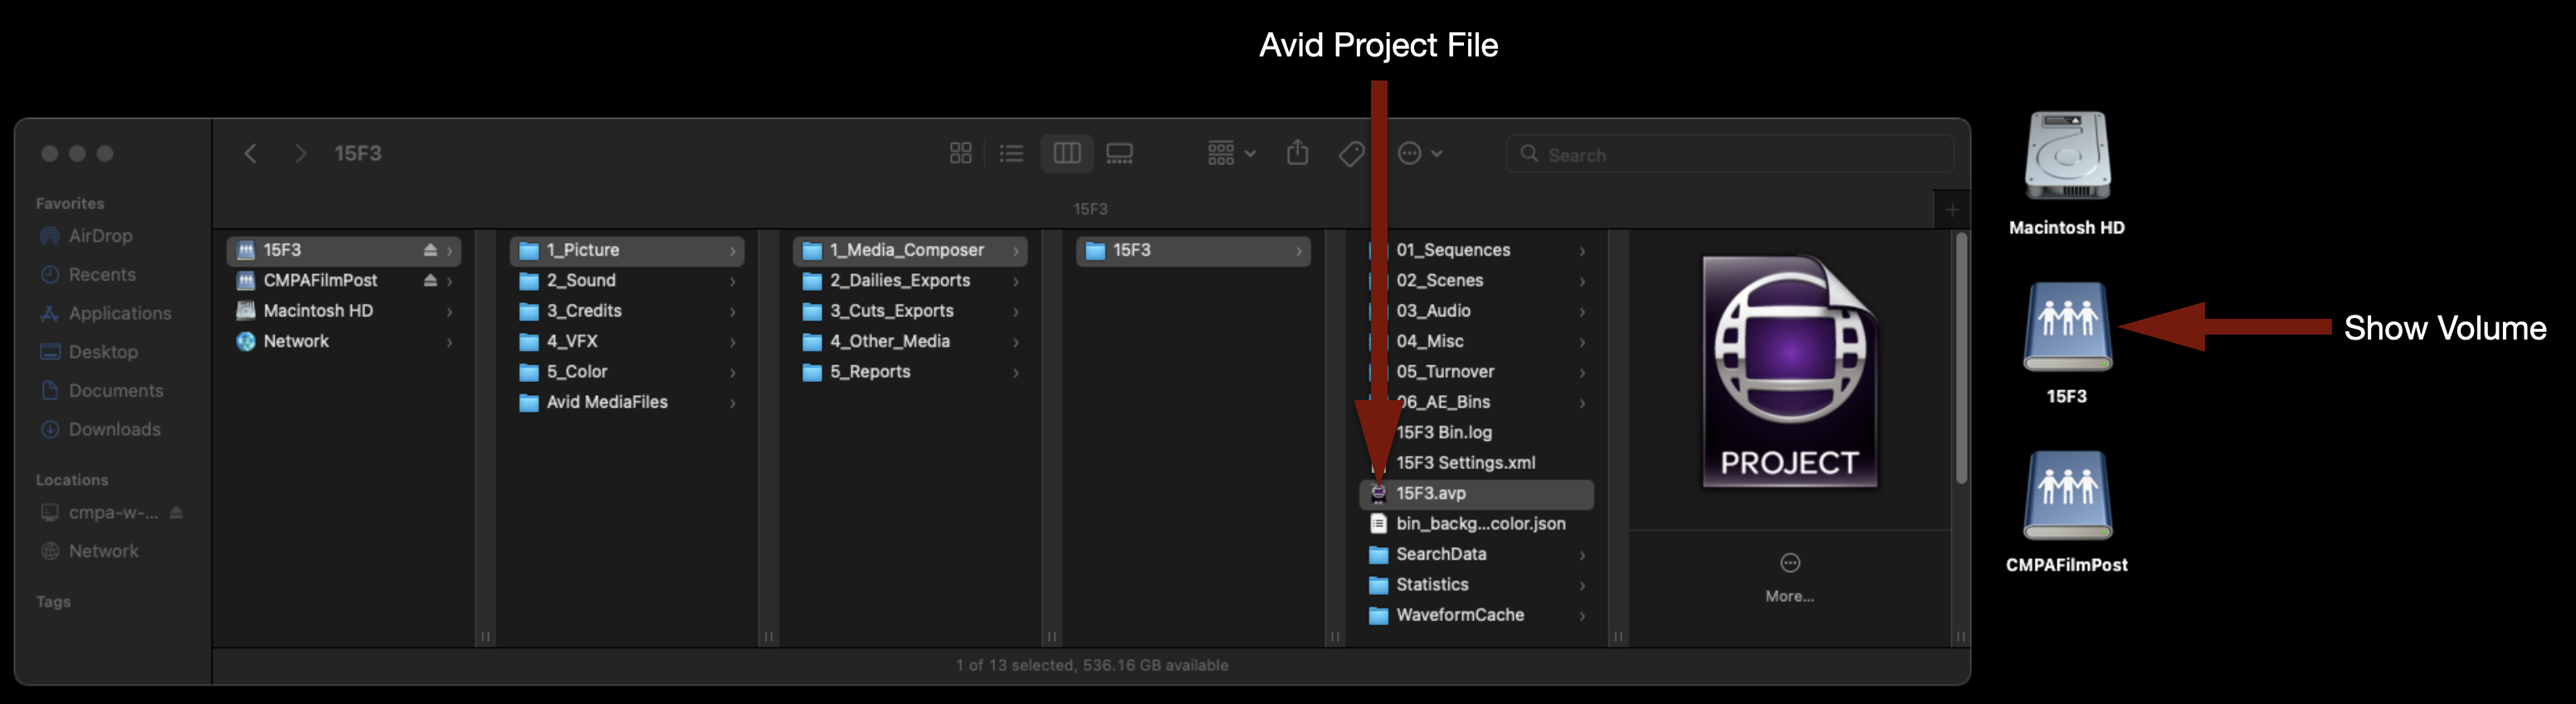
Make sure your Show Volume is mounted. Navigate to your show folder and launch the Media Composer project:
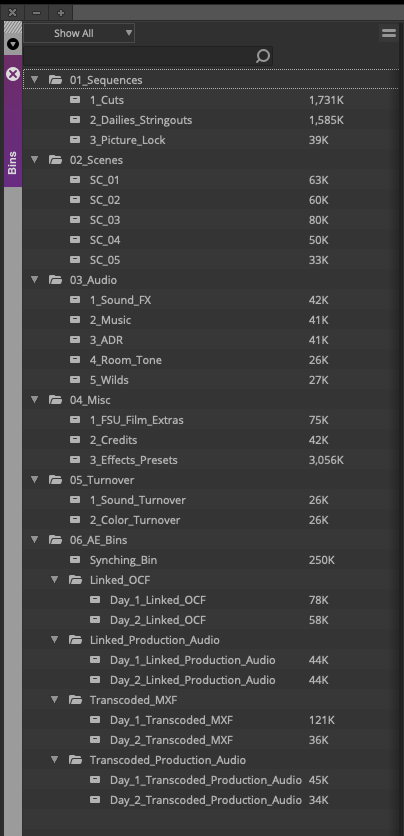
When it opens you will see the project template. These folders and bins must be maintained and kept organized.
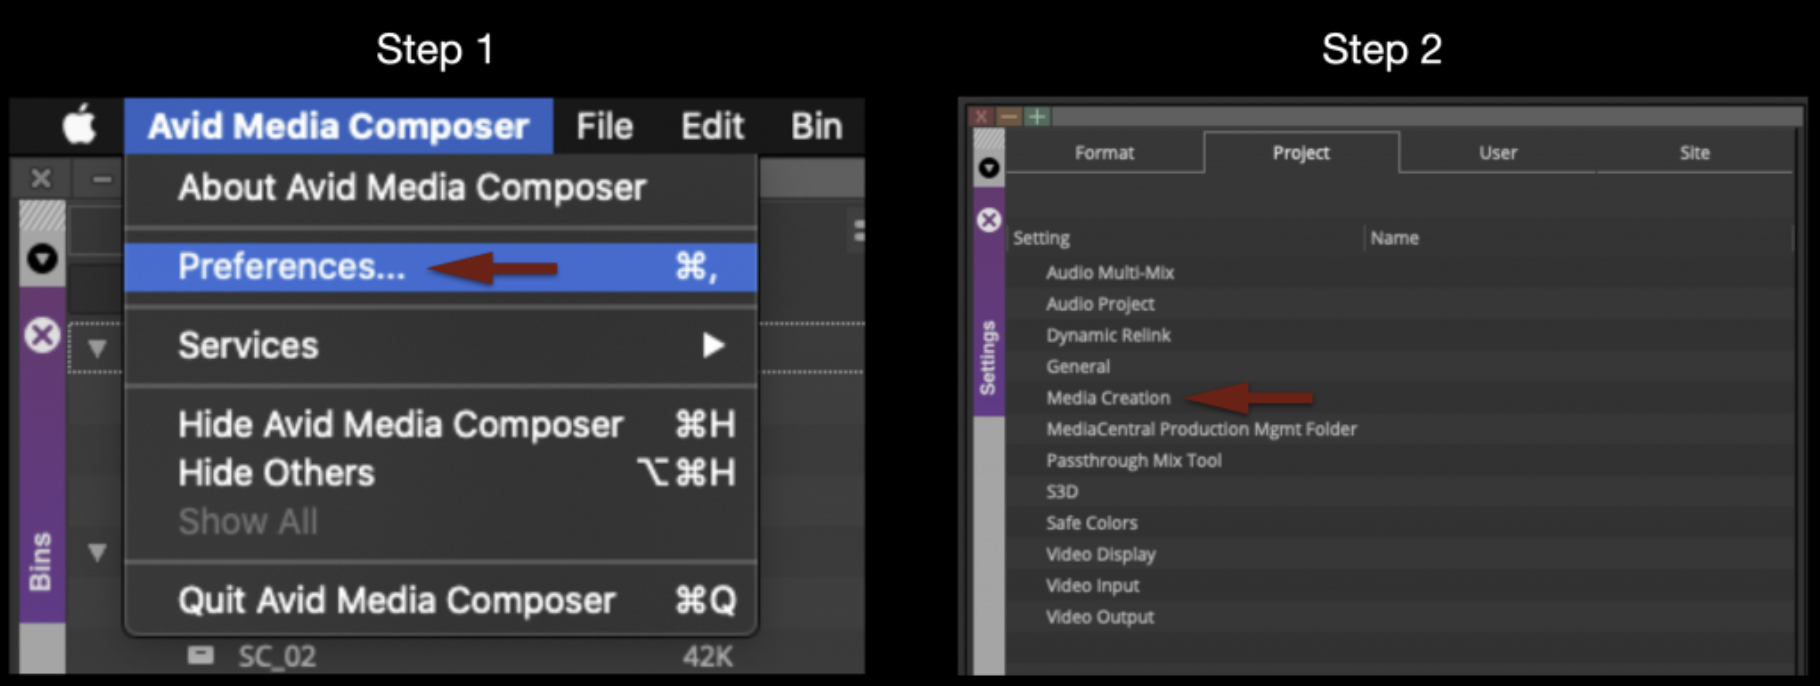
Before you begin, double-check the Media Creation settings. Go to the Avid Media Composer menu and select Preferences. Navigate to the Project tab, then click “Media Creation”.
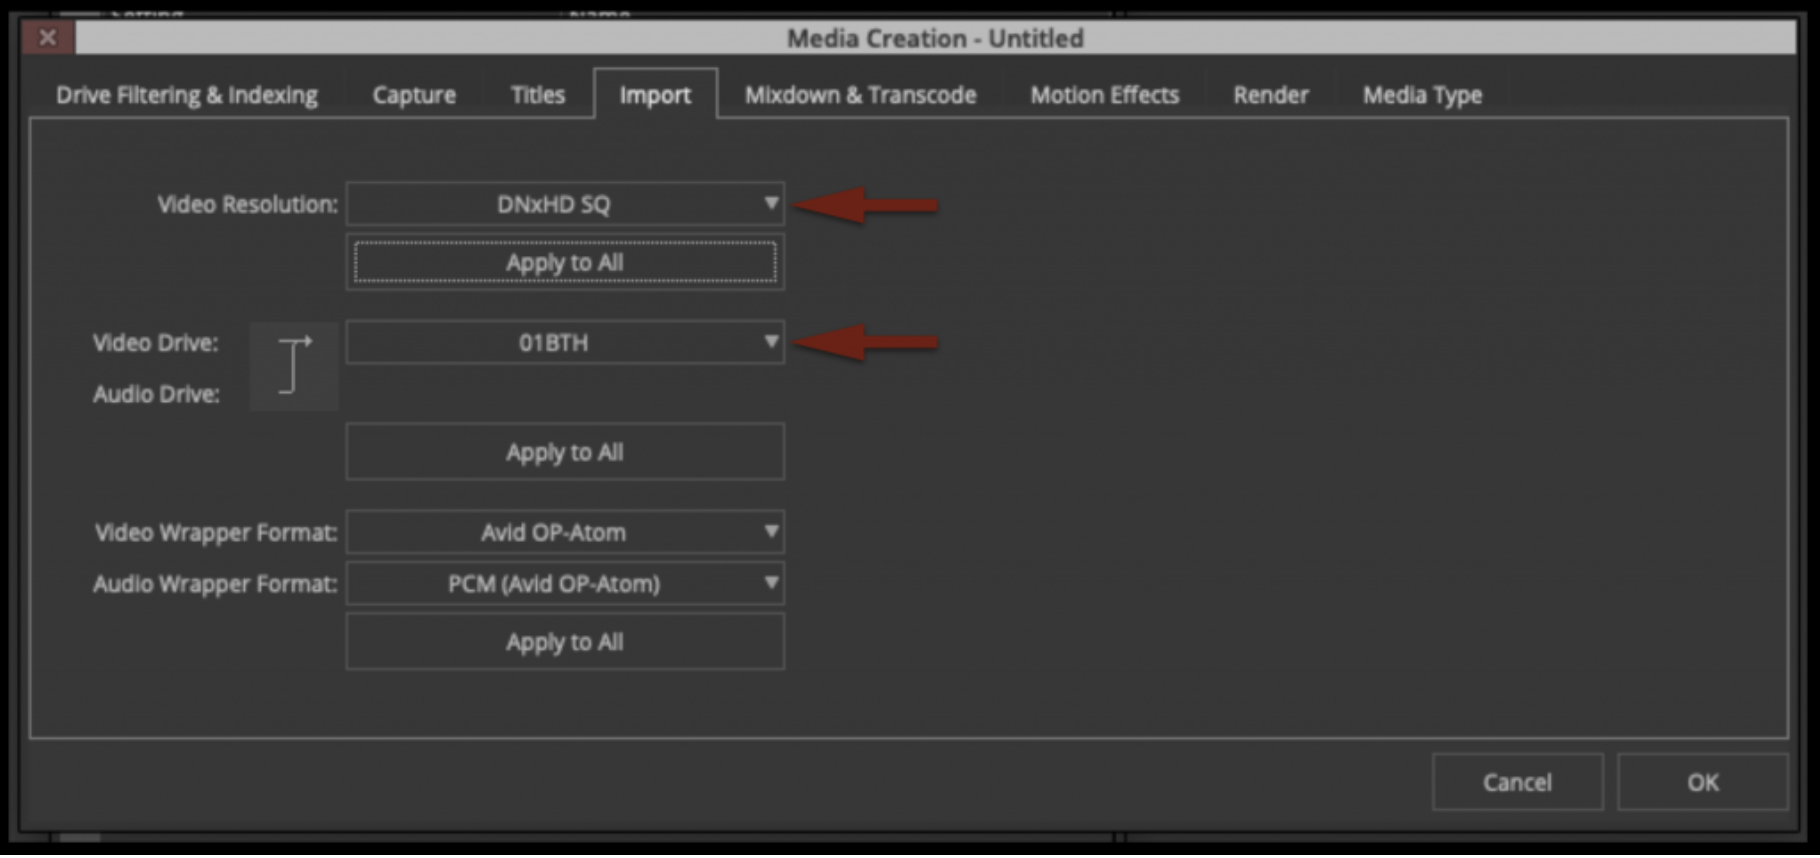
In the Media Creation window, make sure you select:
Video Resolution: DNxHD SQ
Video & Audio Drives: Your Show Volume
Select “Apply to All” for everything, then click “OK”.
Import the Script
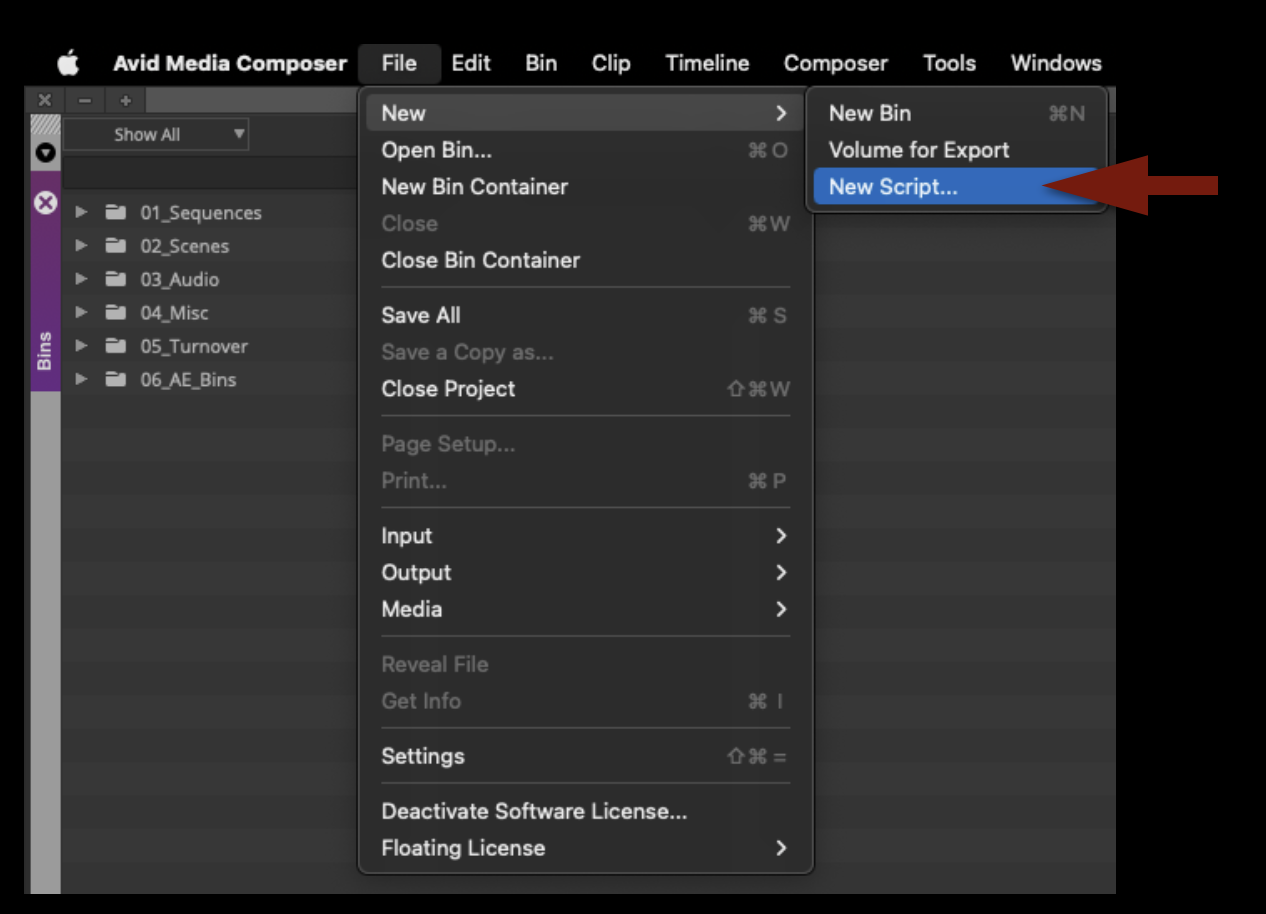
Go to the File menu and select New Script…
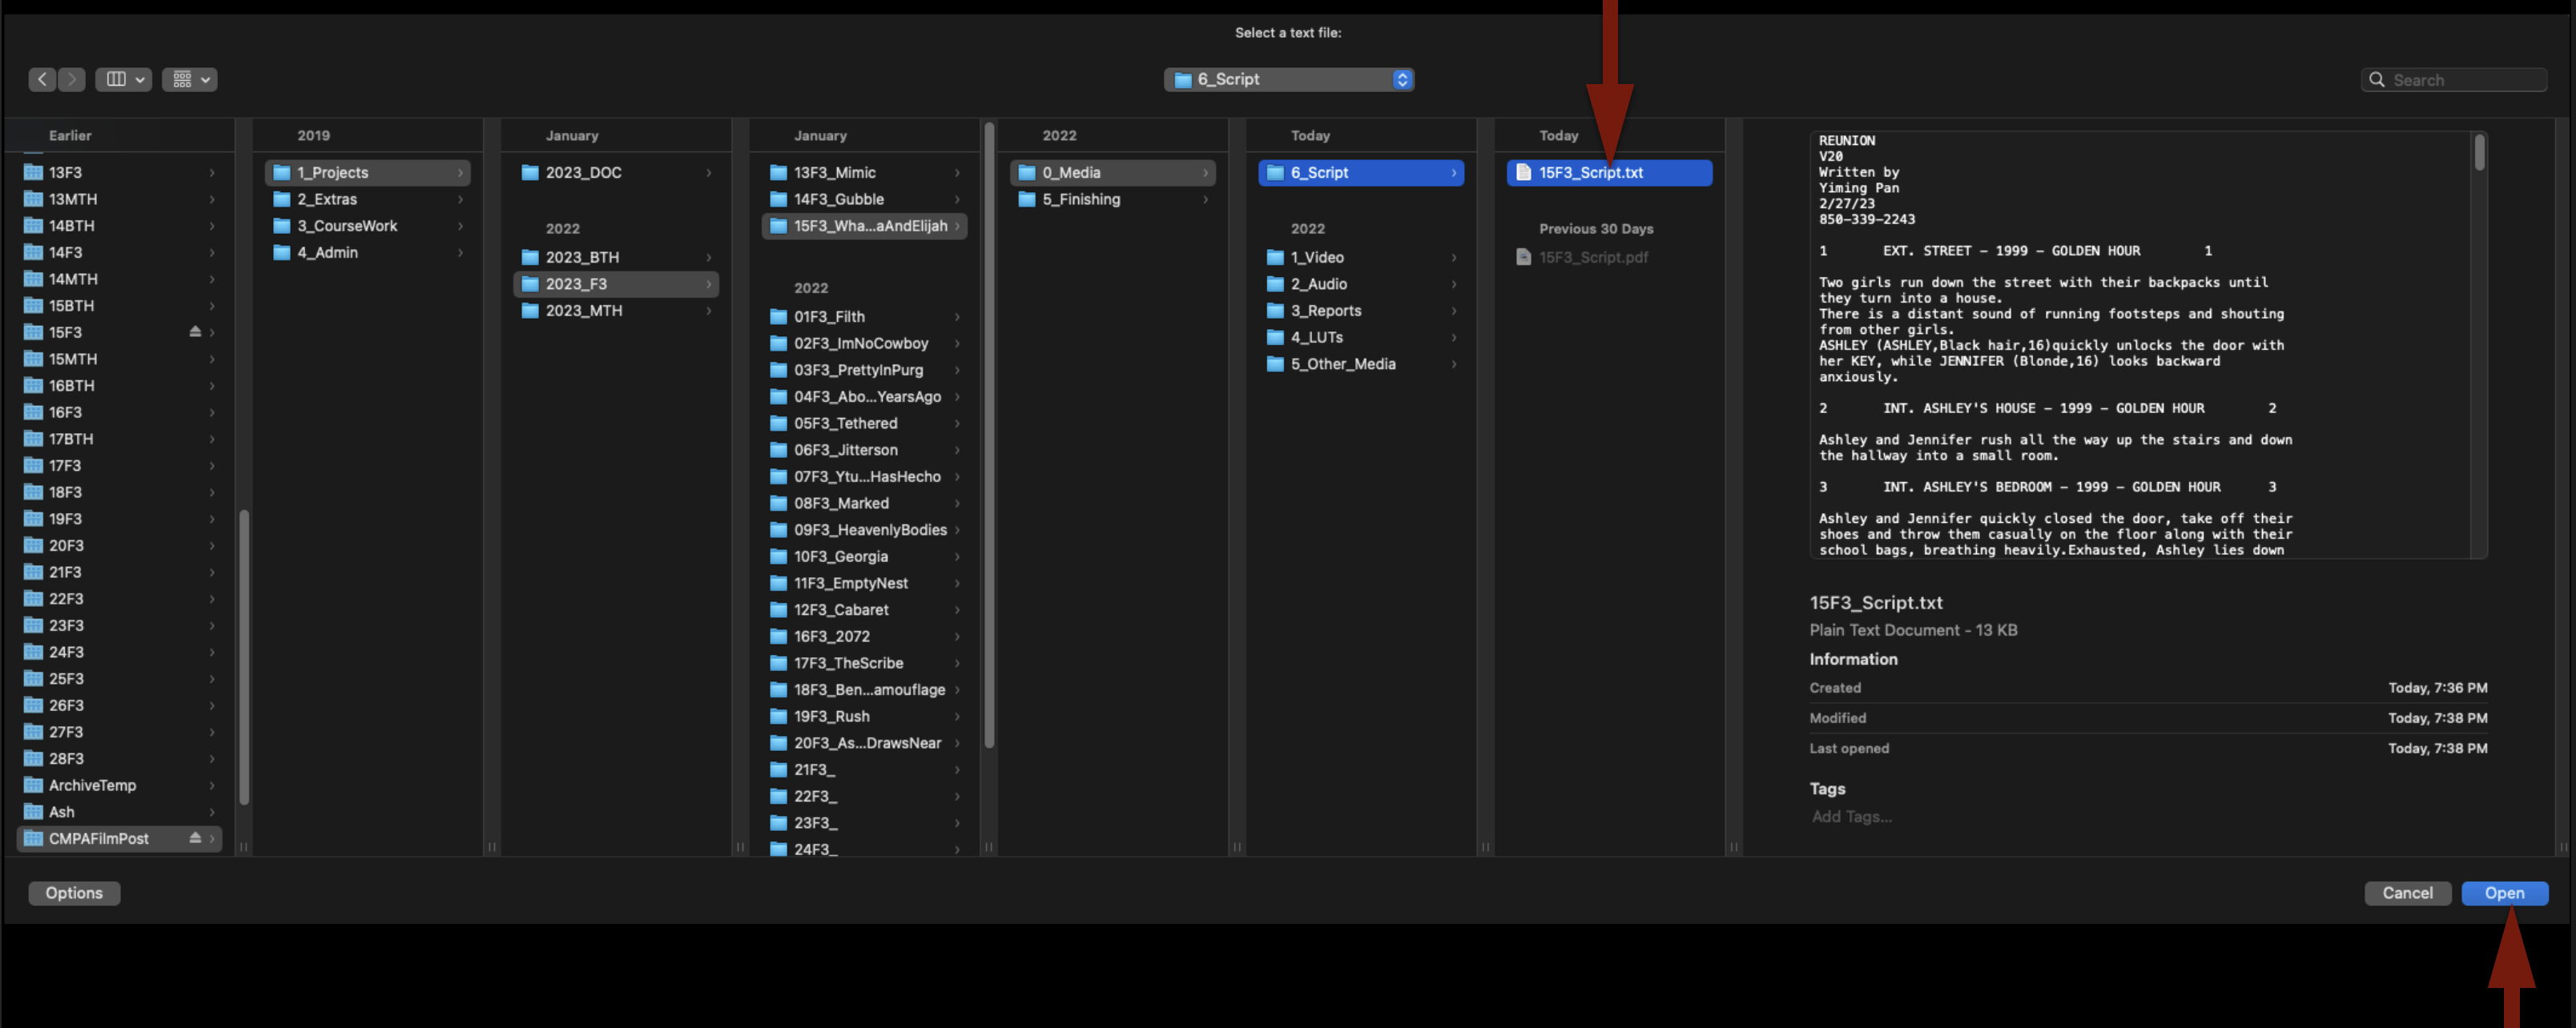
Navigate to where you saved the .txt version of the script and click “Open”:
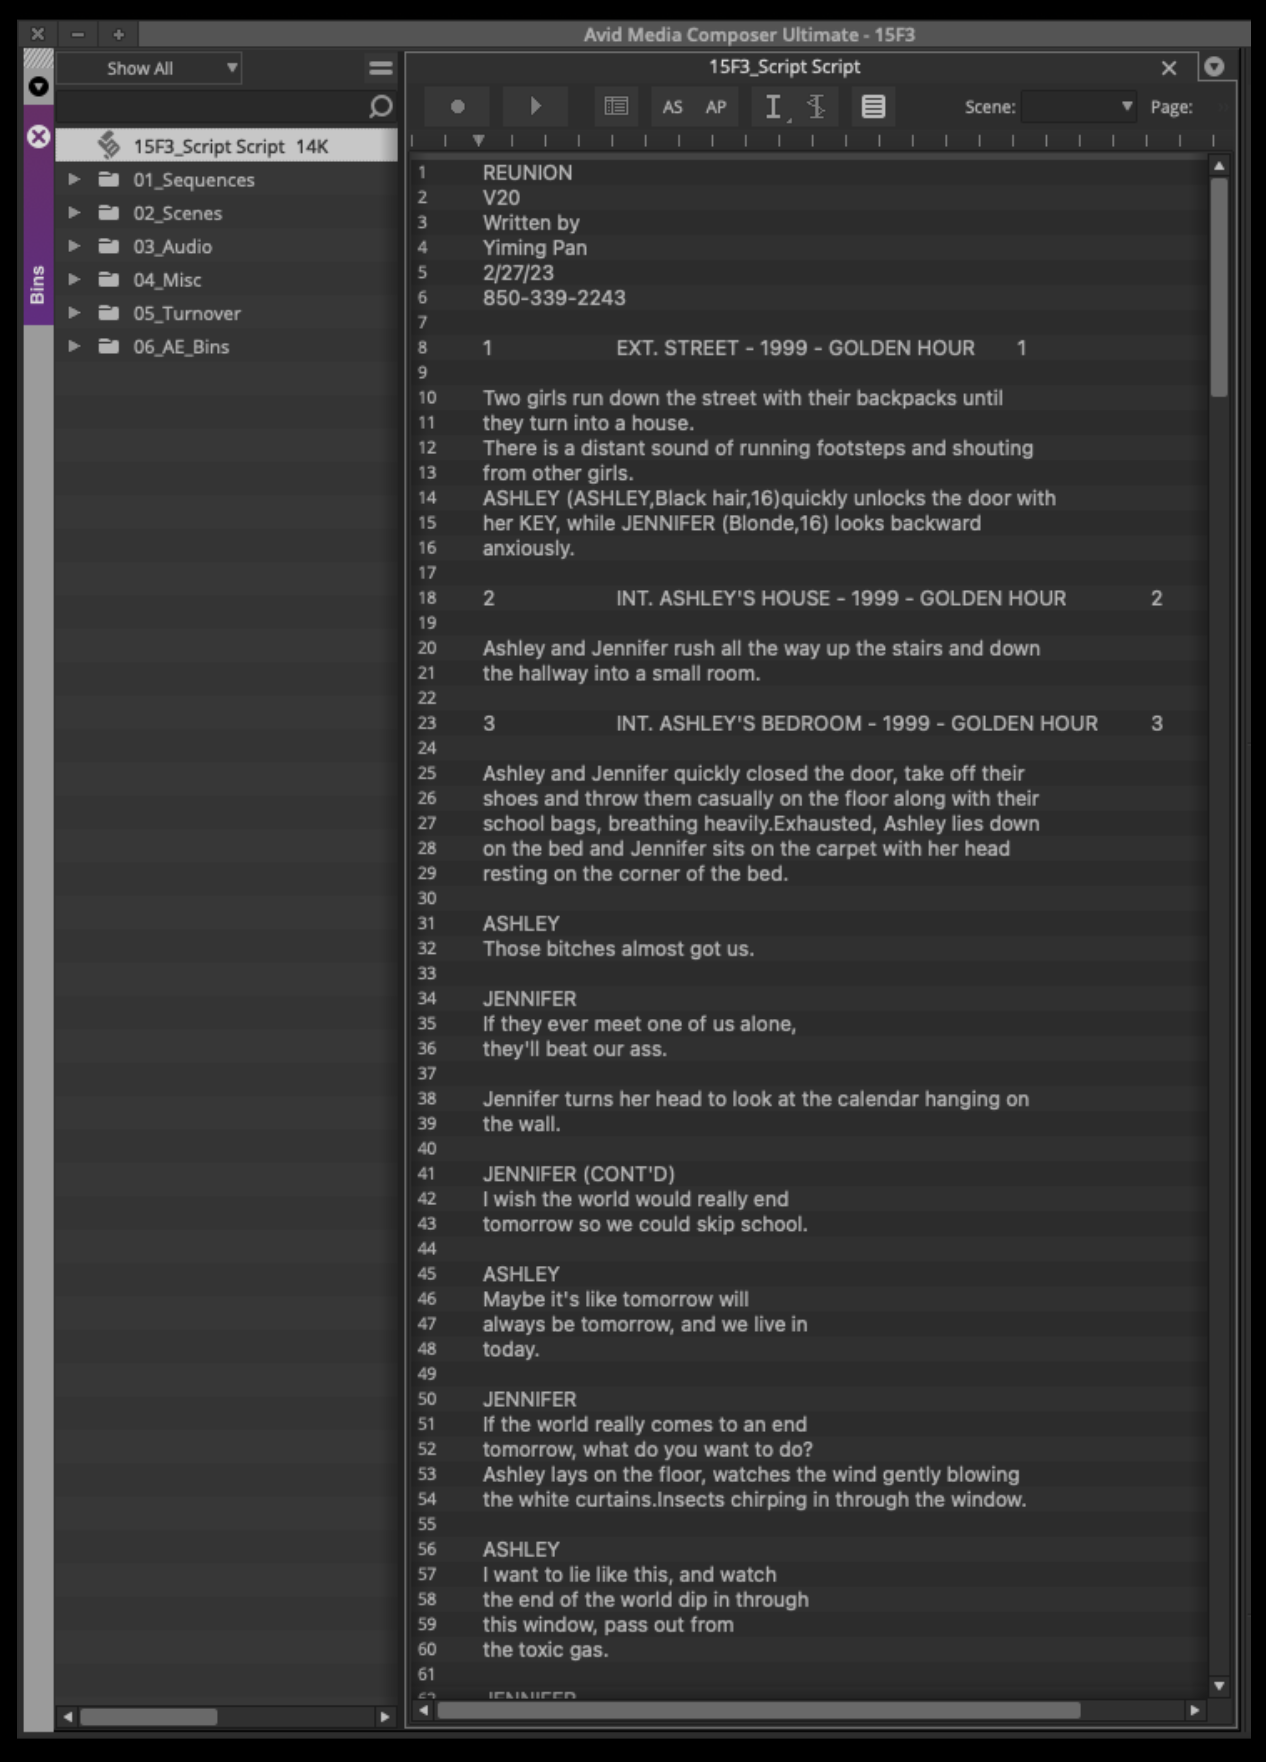
This will import the script into your Media Composer project:
Transcode Footage Using Davinci Resolve
While it is possible to transcode your original camera files into Avid Media MXF files using Media Composer it is much quicker to use Davinci Resolve if you have to transcode more than a few clips.
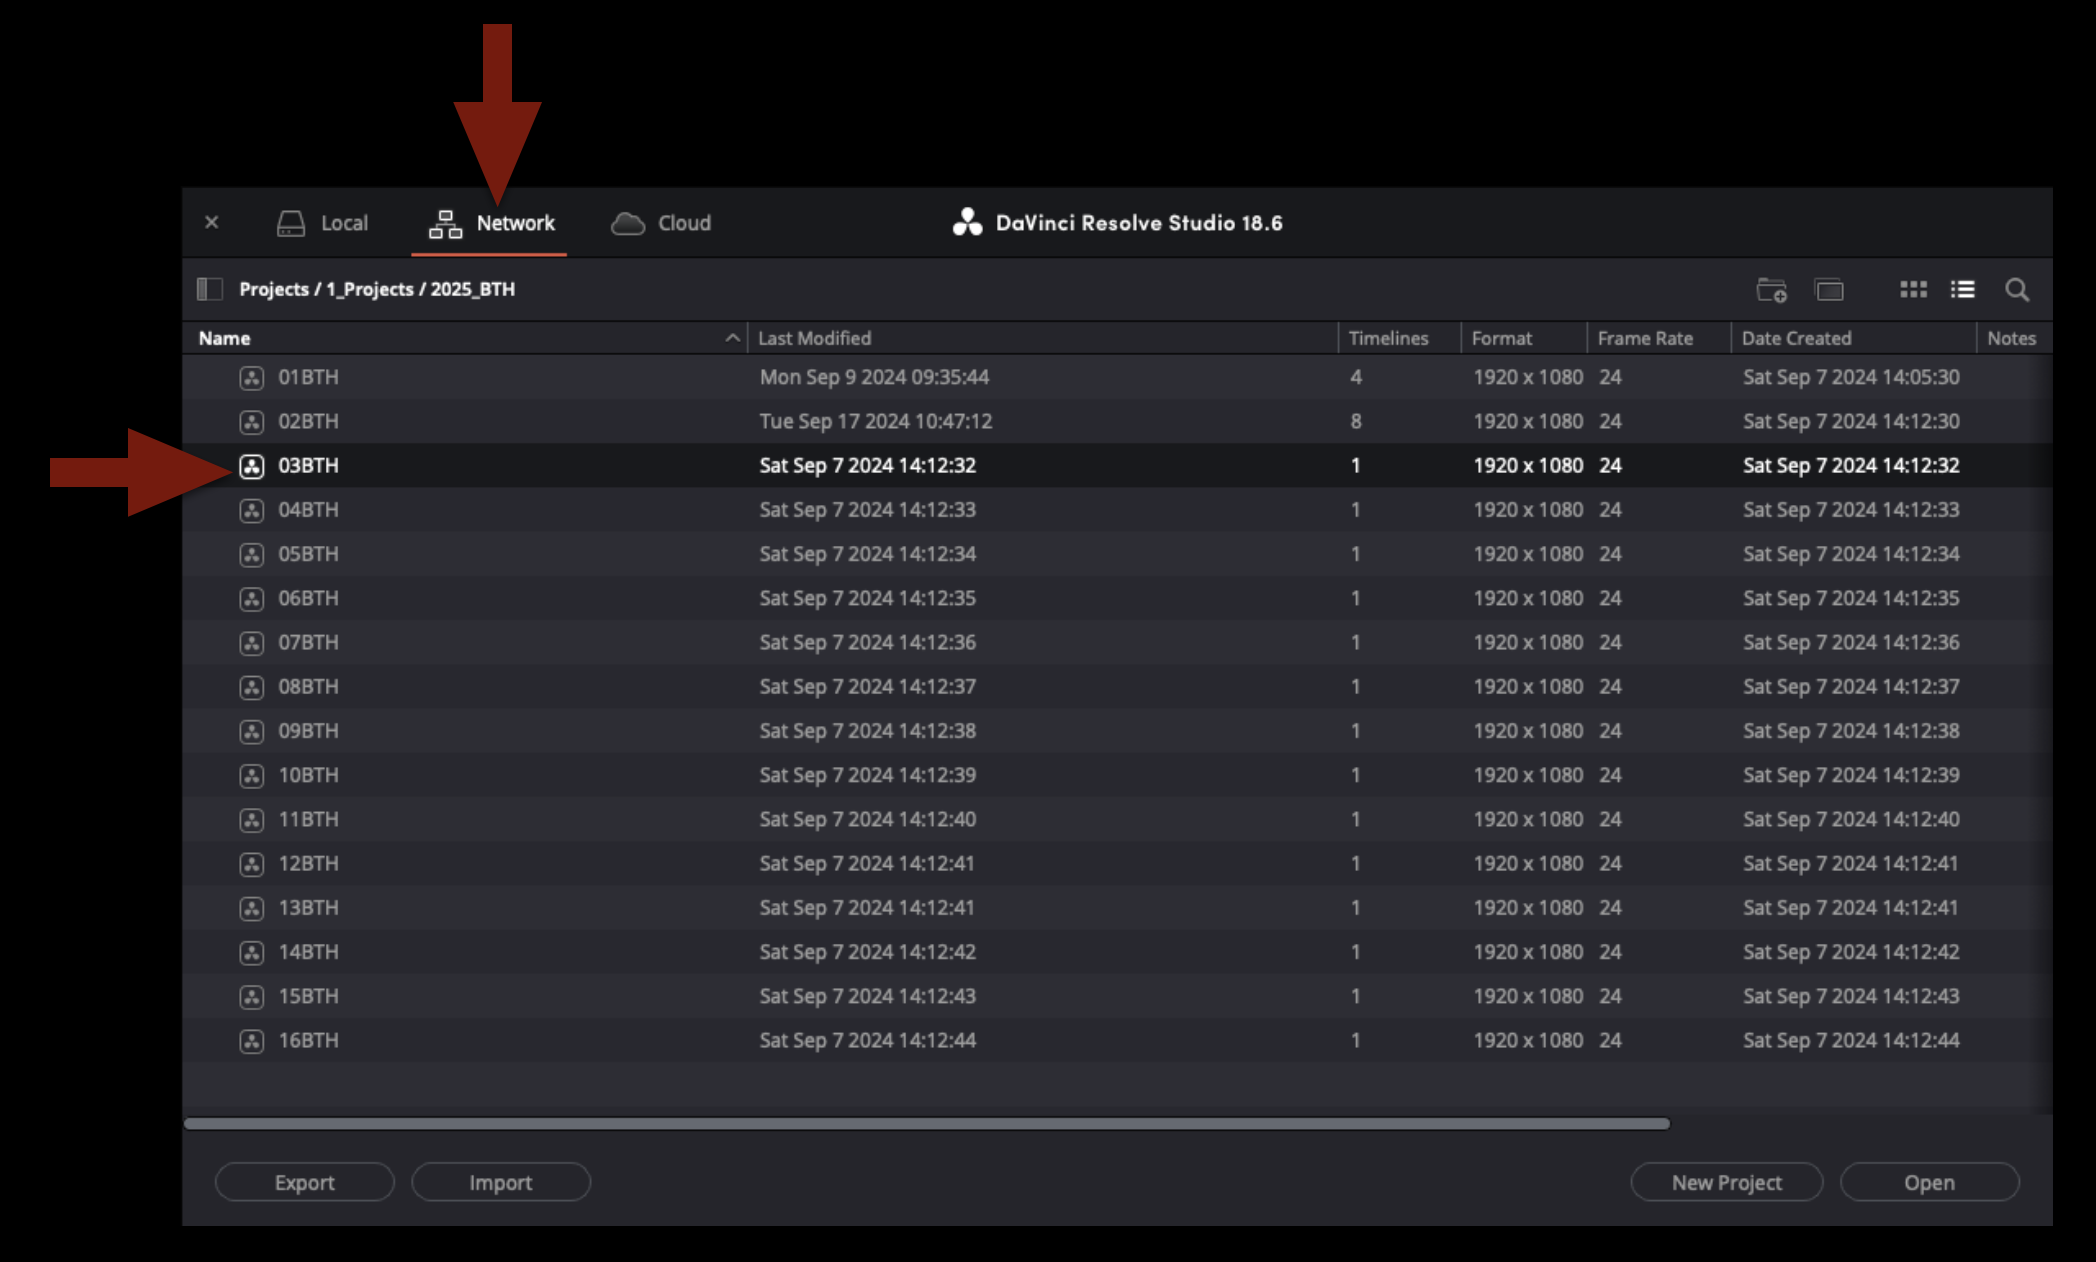
First close Media Composer and then open Davinci Resolve and make sure you are looking a the project window under “Network”. Then find your shows project under the proper folder path.
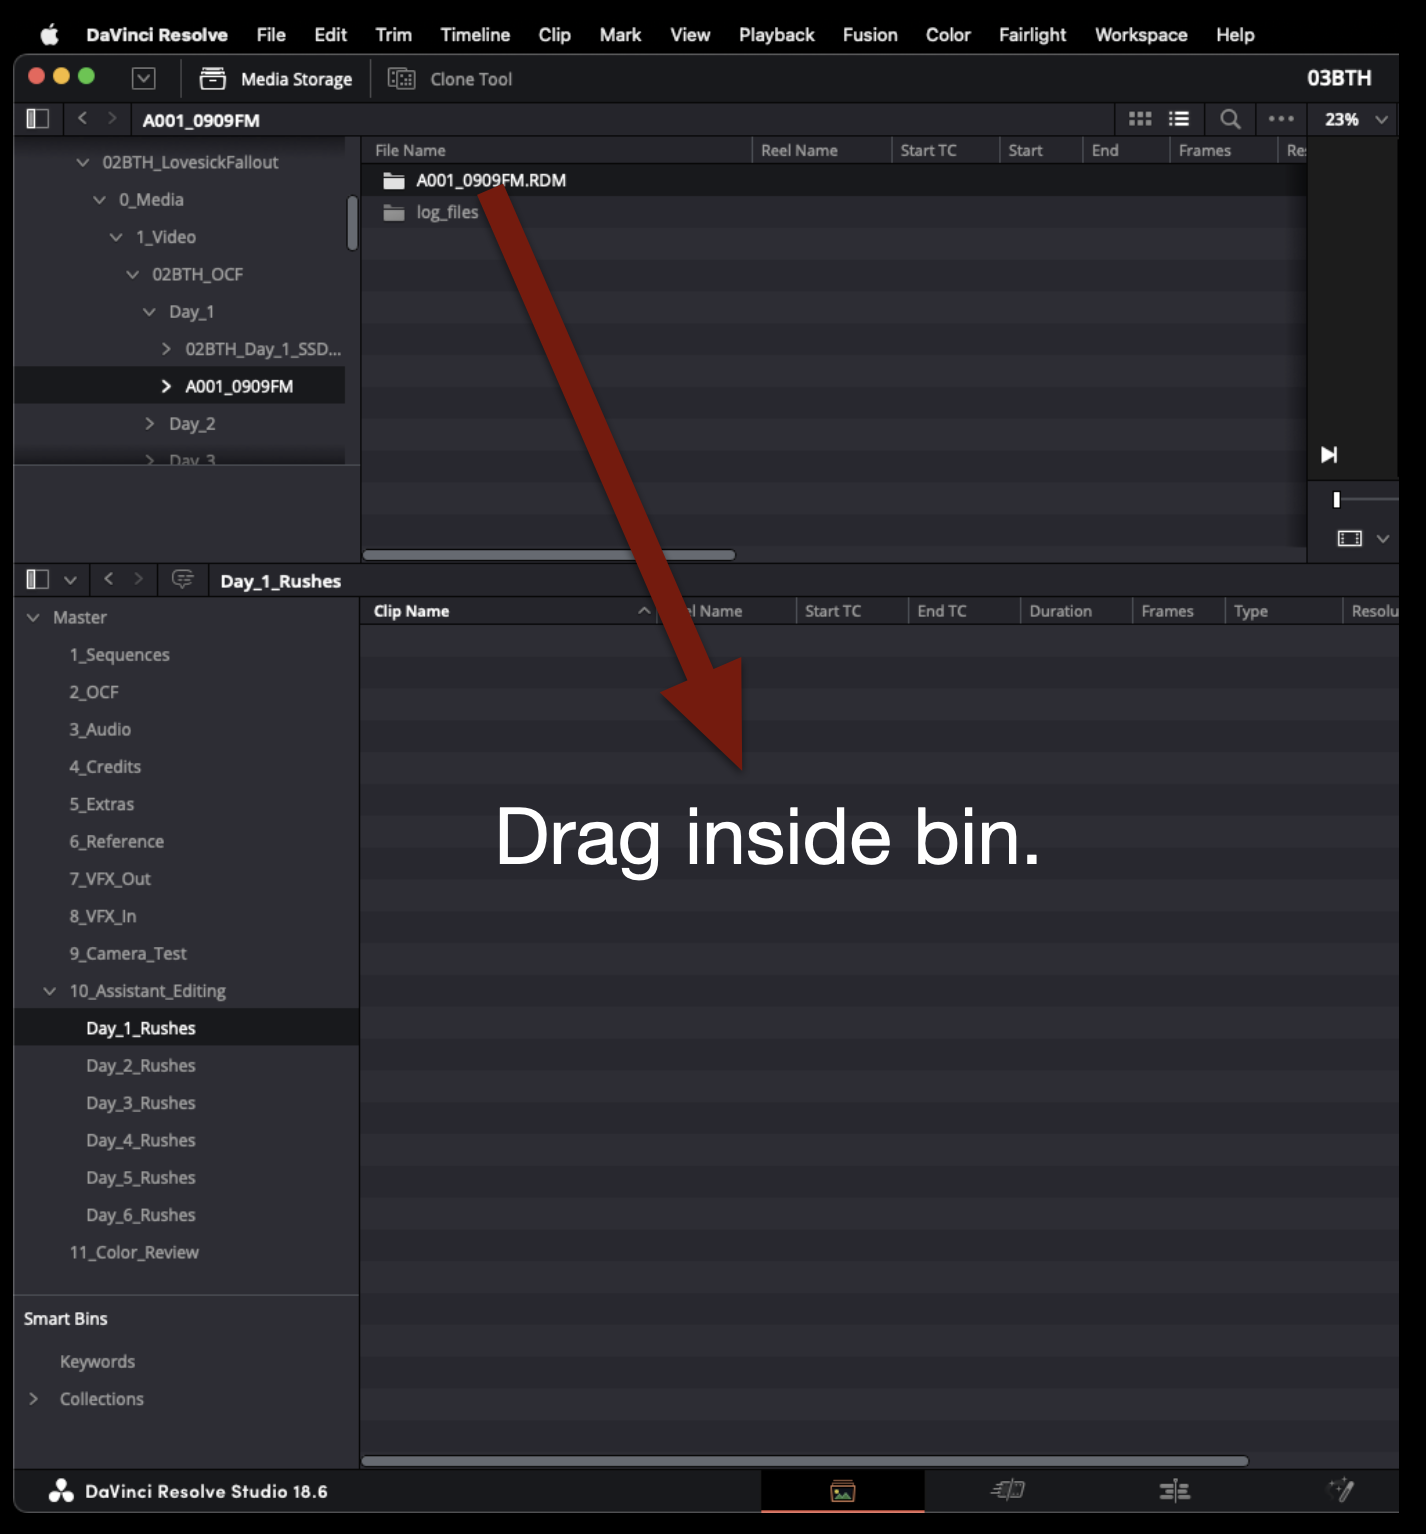
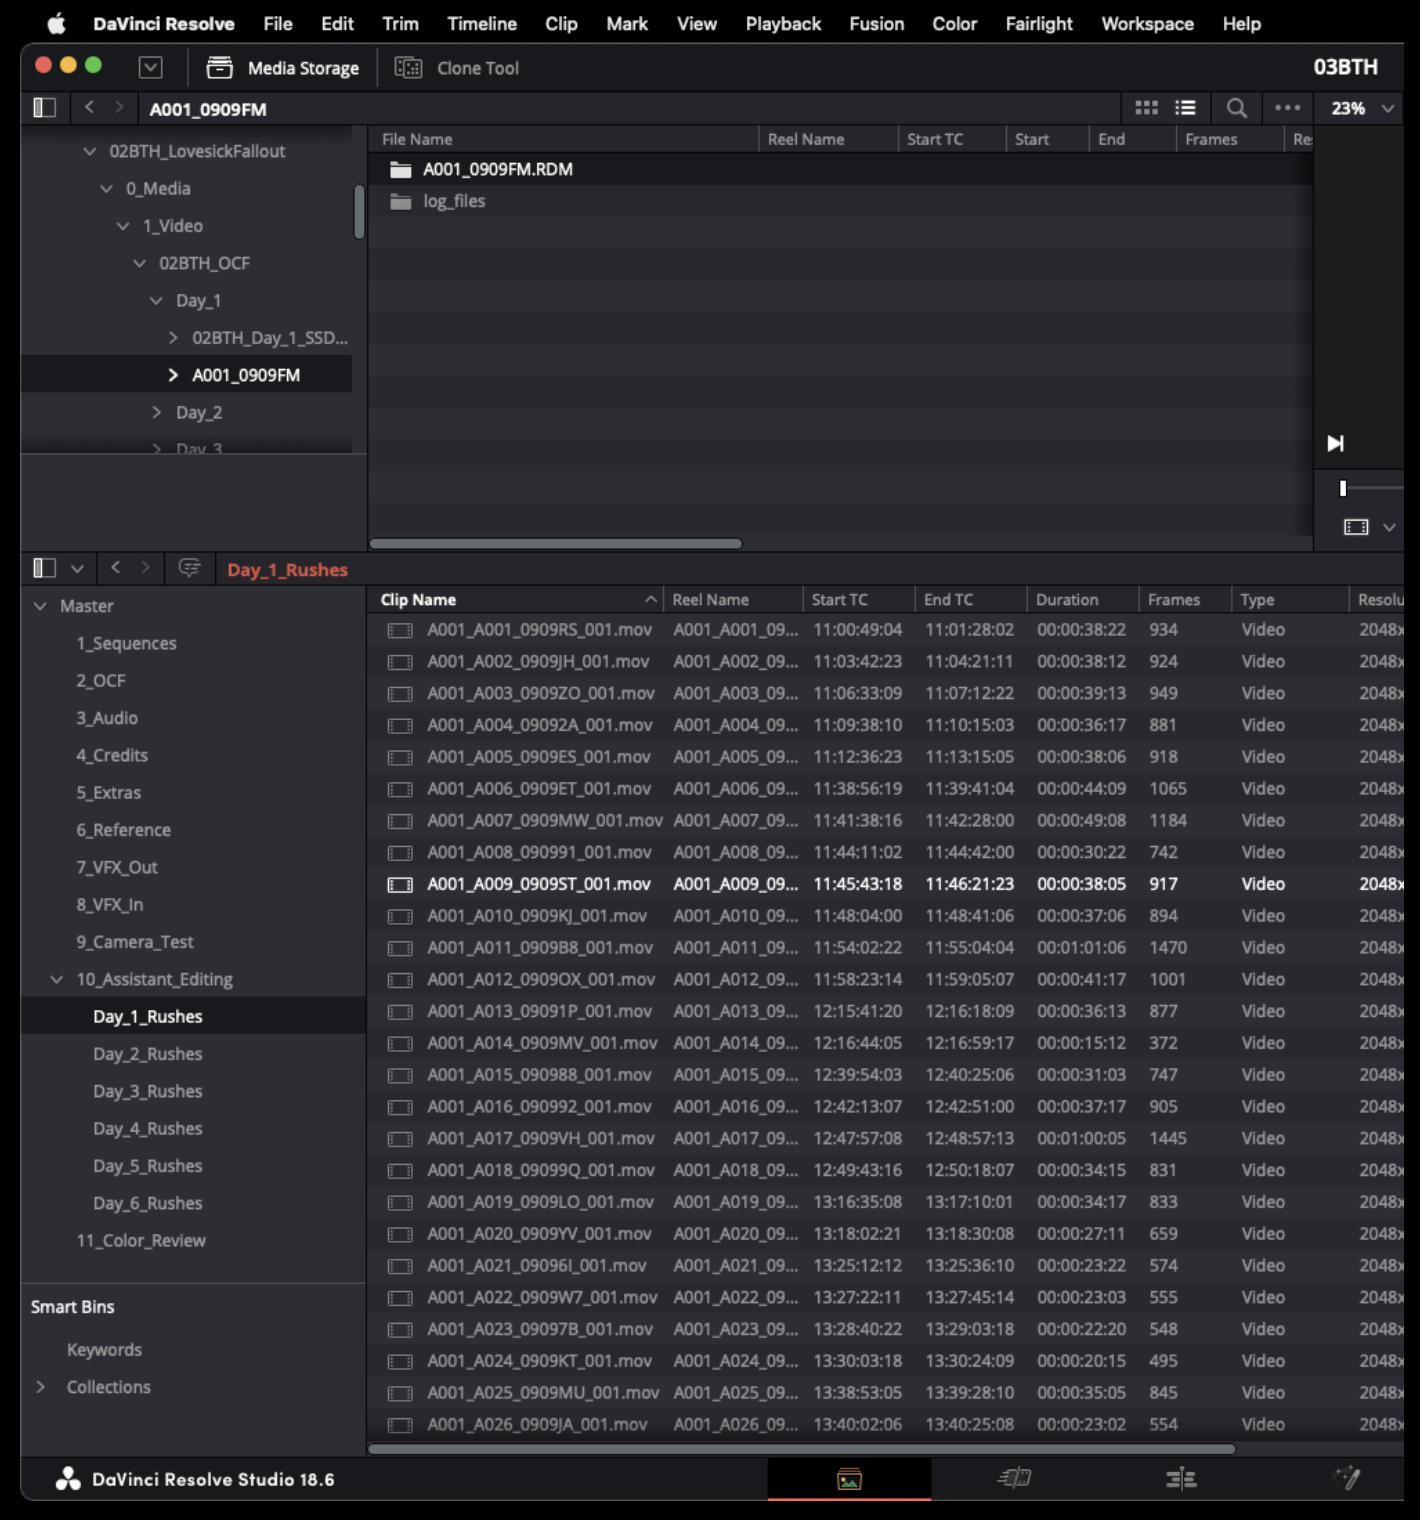
Once your project is open navigate to the “Media” page. The bottom portion of the screen will display the “Media Pool” where the project will be organized into bins. Find the bin that is labeled with the proper shot day of the footage you are going to transcode. Then in the top portion of the screen navigate to the location of your original camera files on the server. When you locate the folder containing all of the video files you wish to transcode, drag the entire folder into the bin.
This will import the entire contents of the folder into the bin.
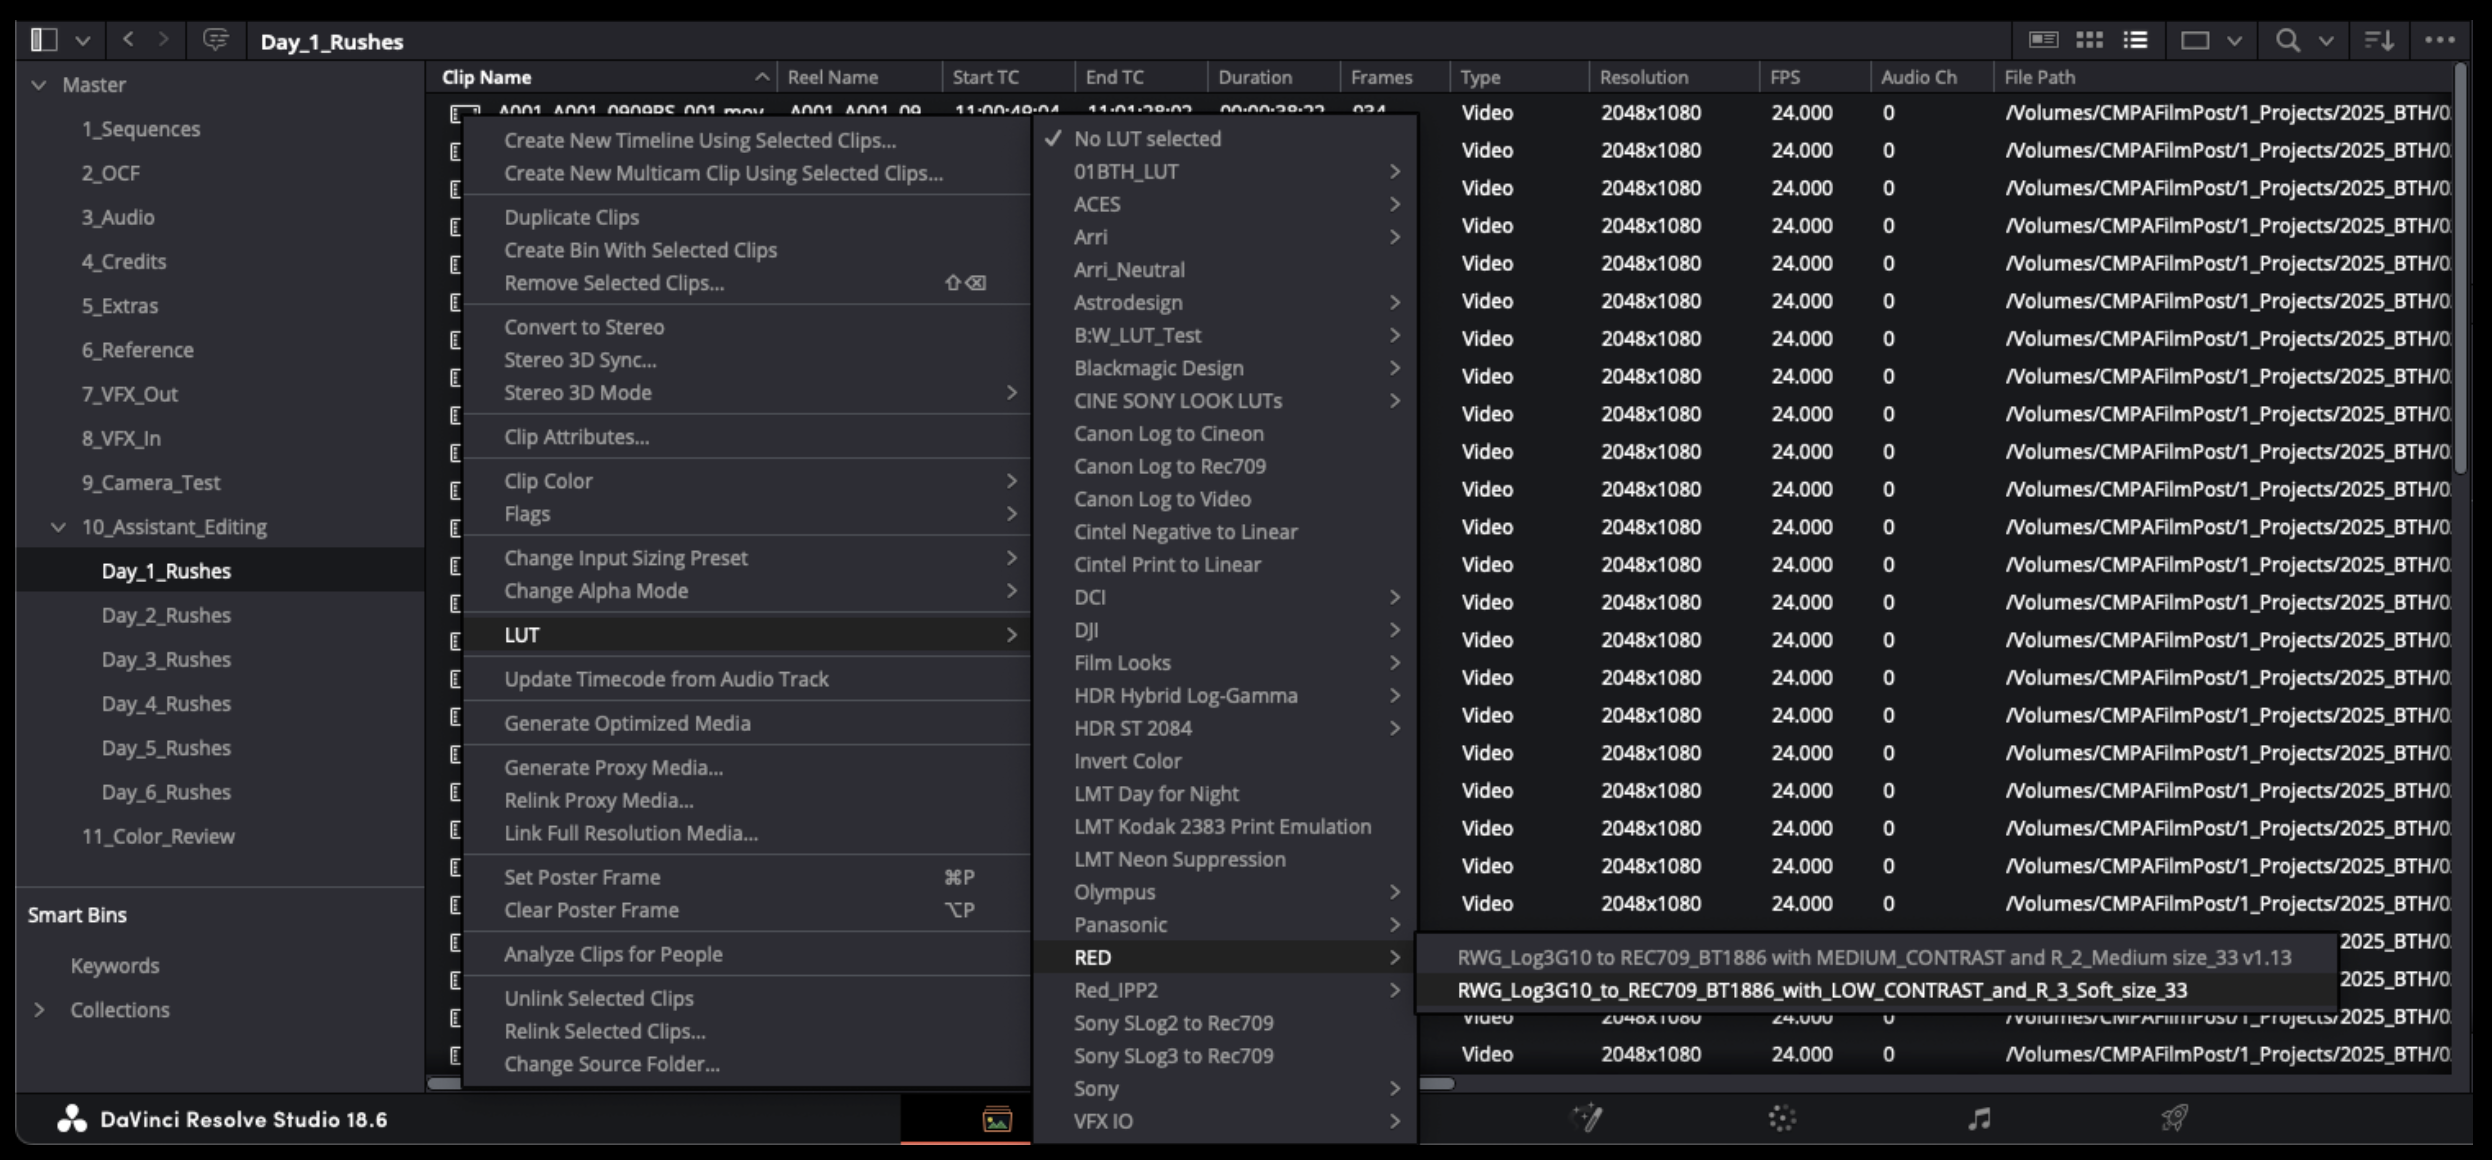
If your OCF were recorded in LOG then you will need to apply a LUT. Highlight all of the clips in the bin and right click on one of them. This will open a long drop down menu. Select LUT and then follow the options until you find the proper LUT to apply. You can find the name of the proper LUT by looking at the camera report
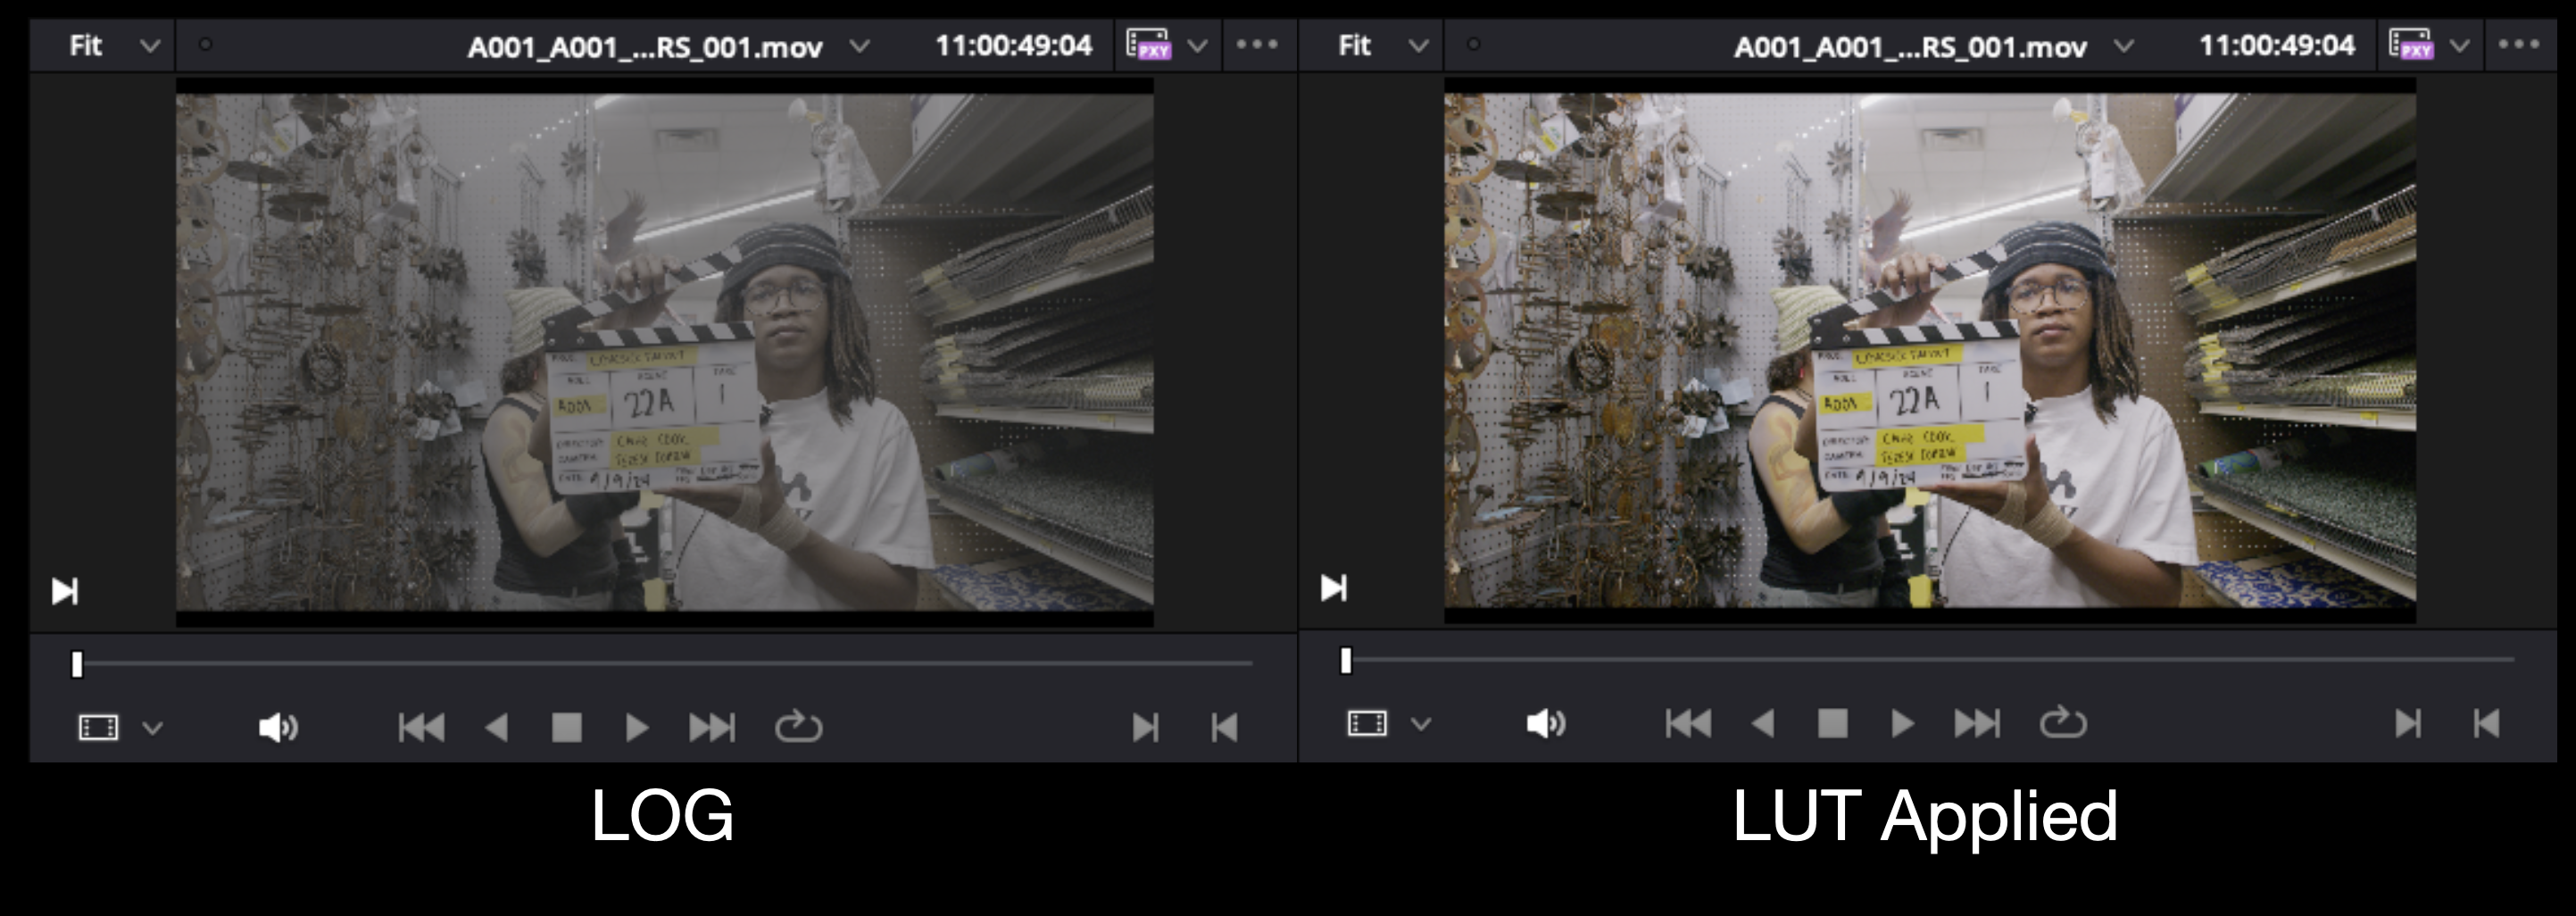
Once you have applied to LUT to all of the clips they should no longer appear in LOG as shown in the example below.
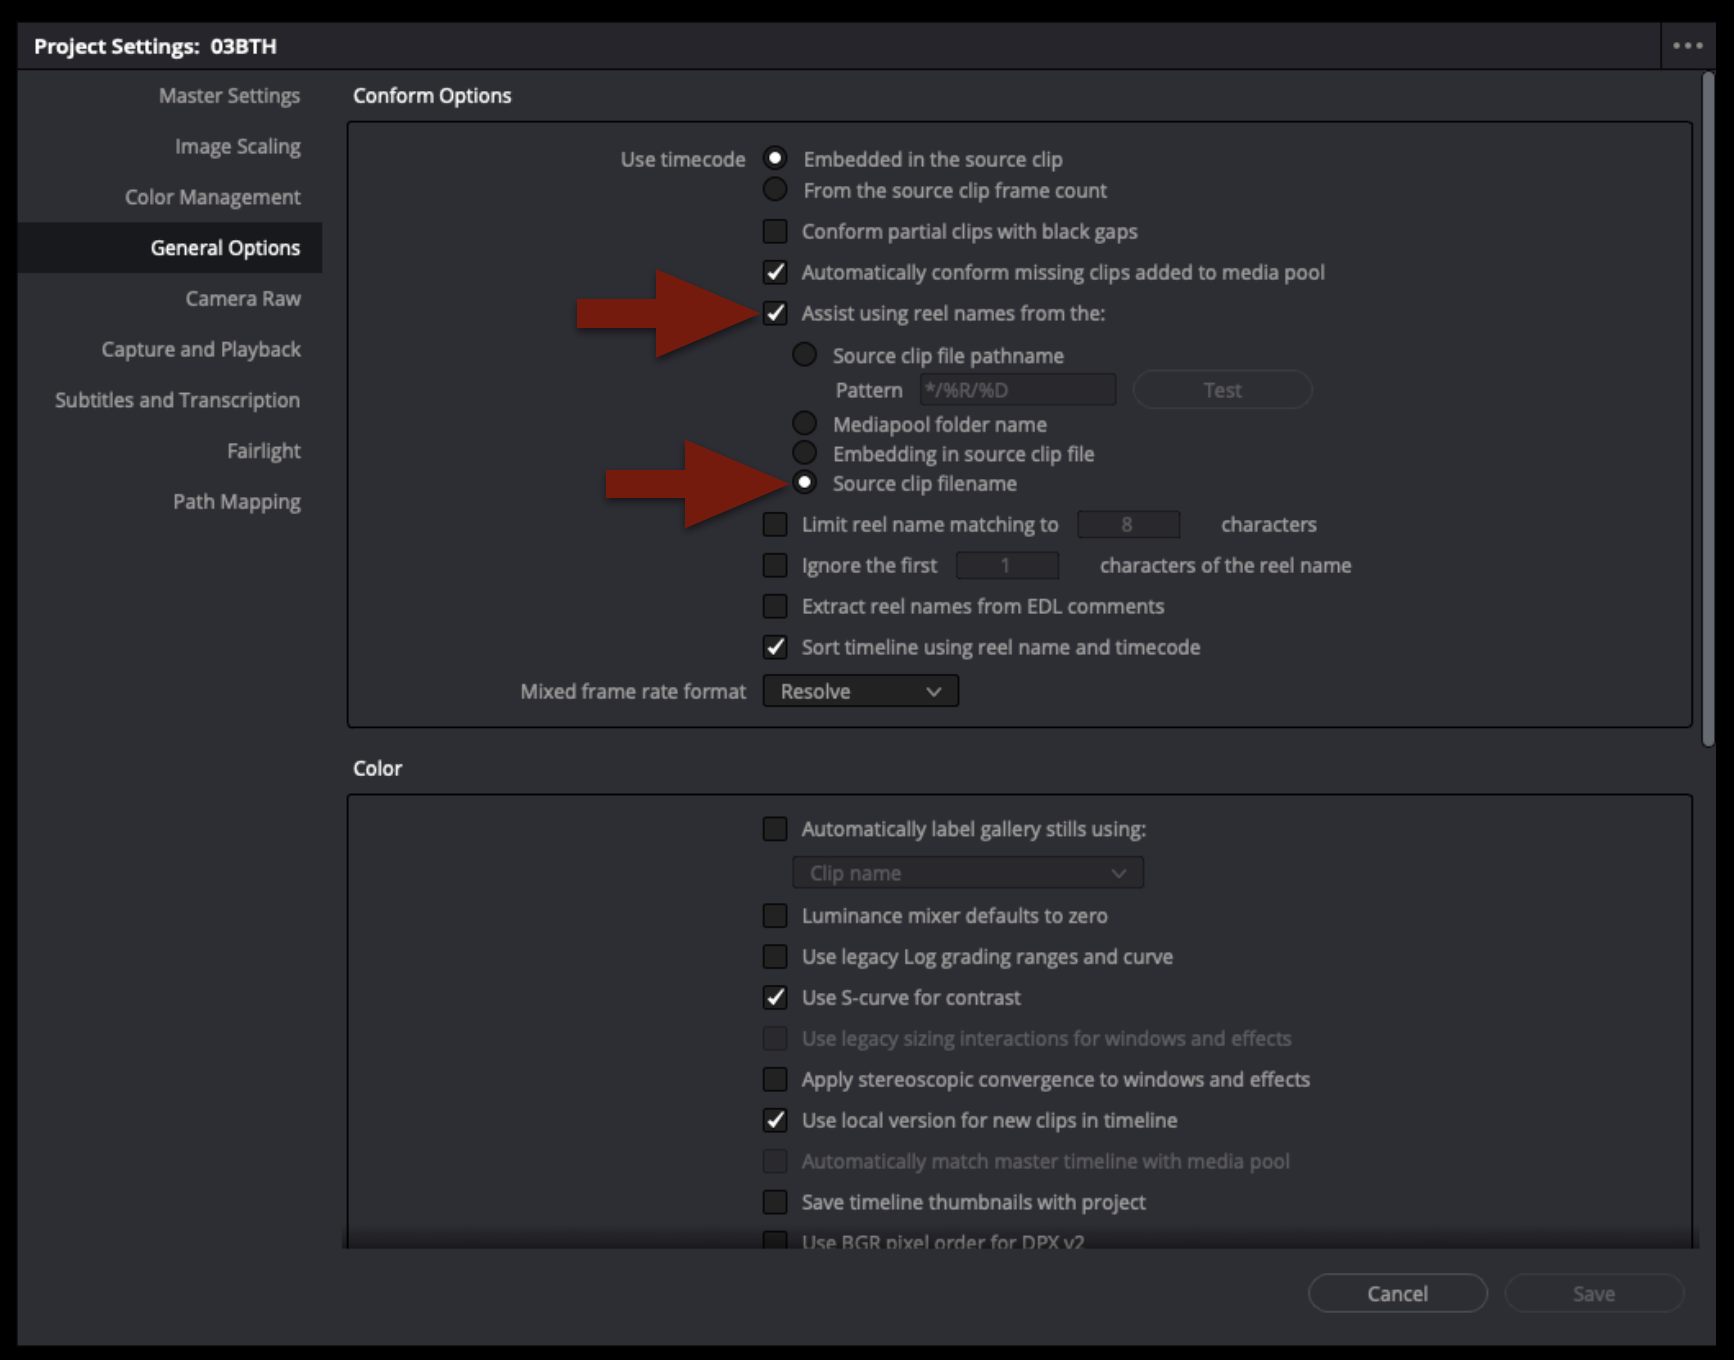
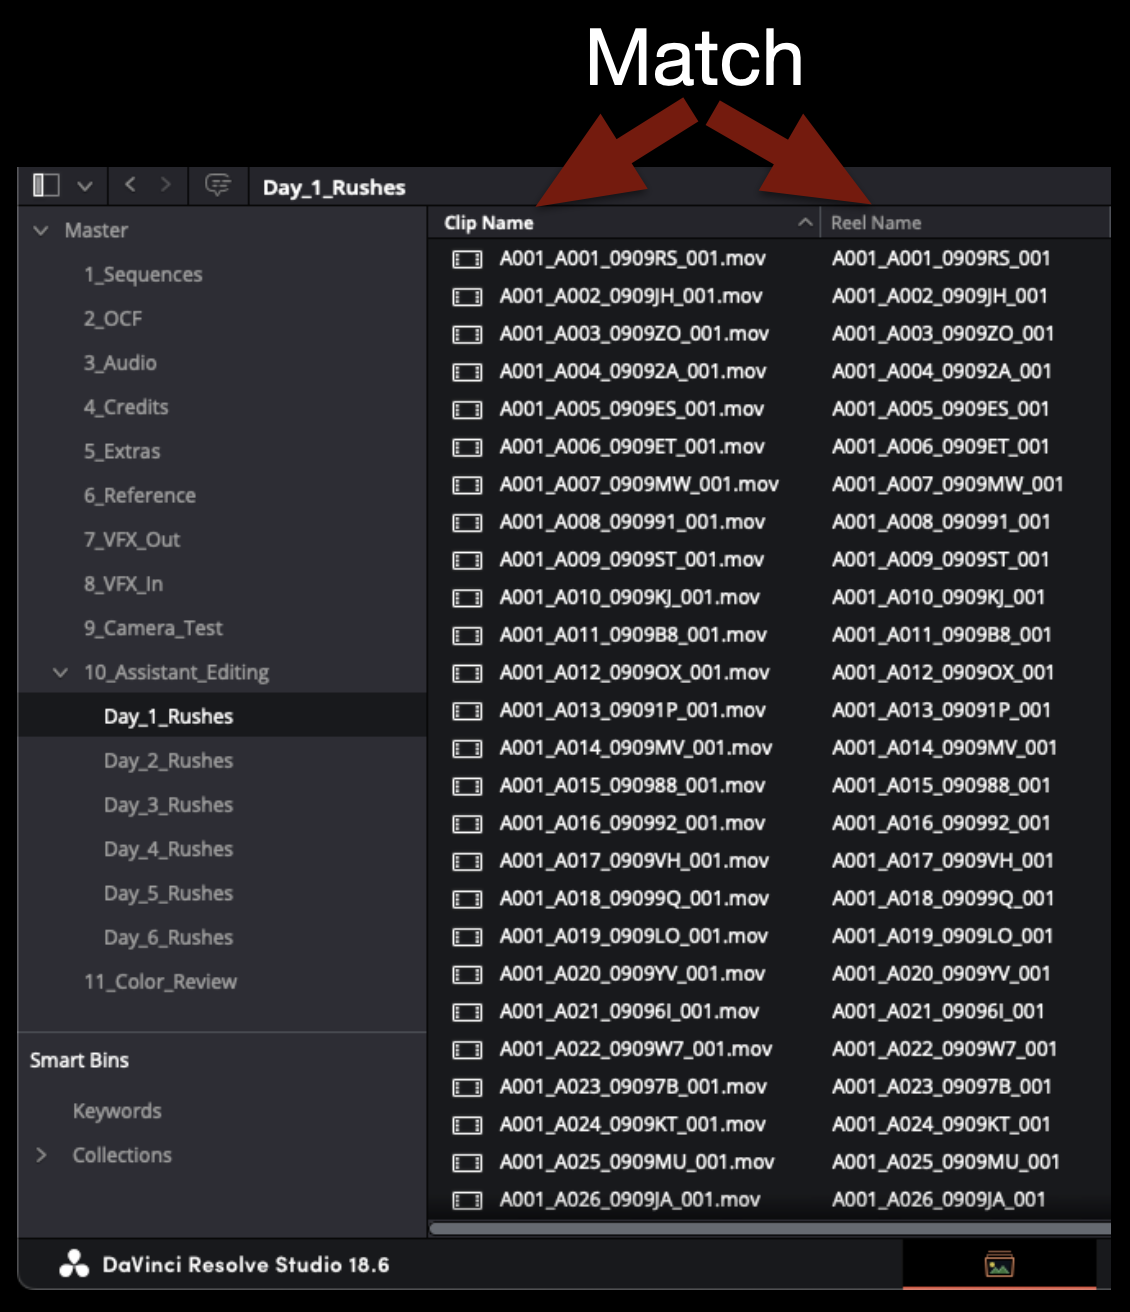
The next step is to check that the proper settings in the “Conform Options” are set. Open the project settings and then navigate under “General Options”. Ensure that “Assist using reel names from the source clip filename” is selected.
If the “Conform Options” are set correctly you will see that the columns for “Clip Names” and “Reel Names” will match.
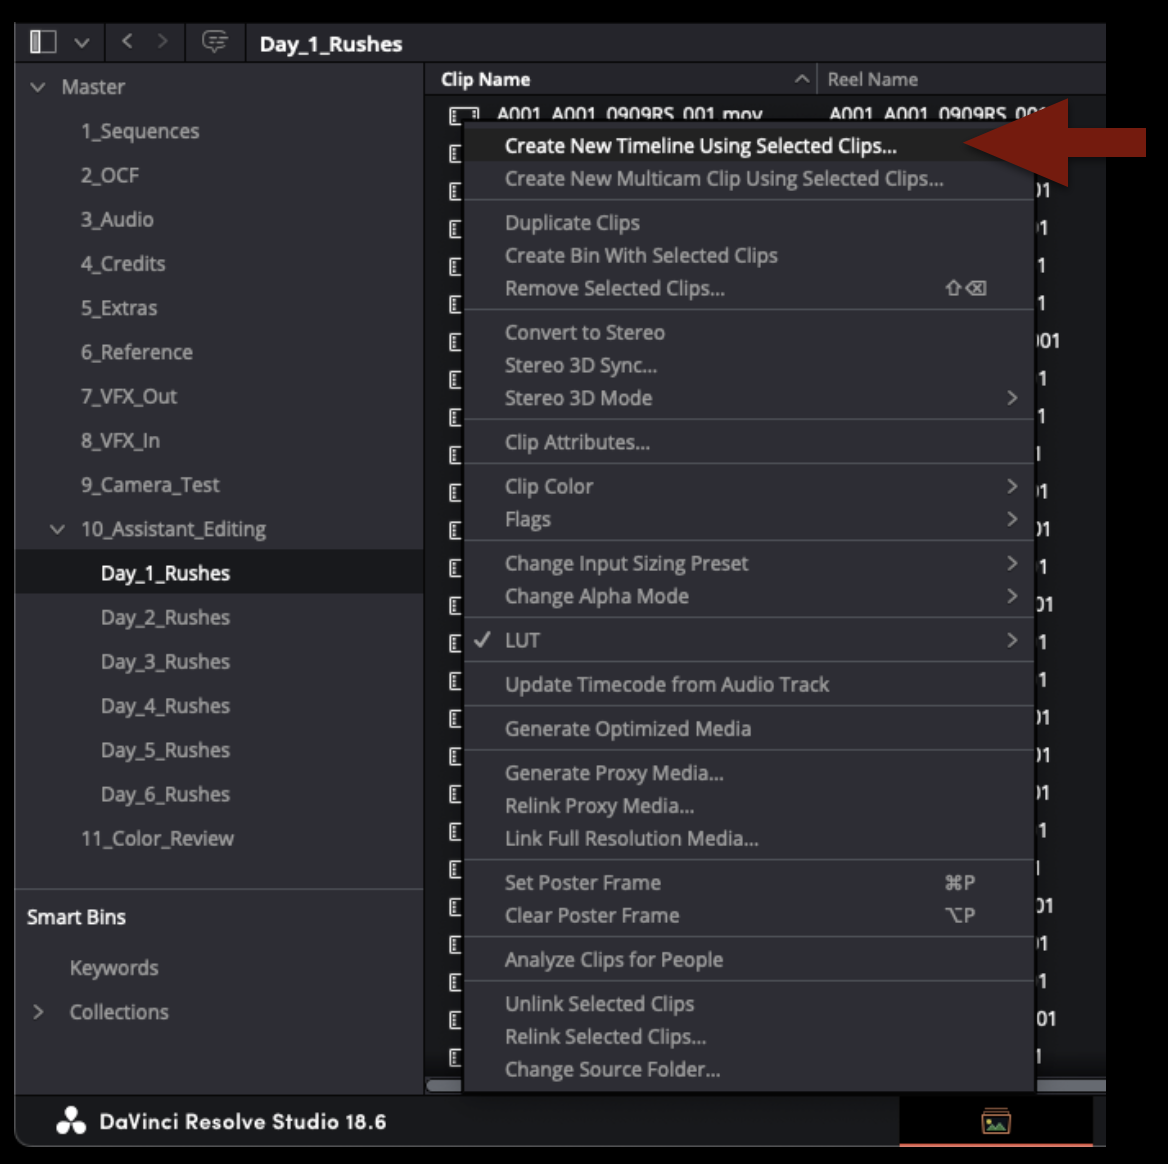
Next select all of the footage in the bin and right click to reveal a long drop down menu. Select the top option to create a new timeline using the selected clips.
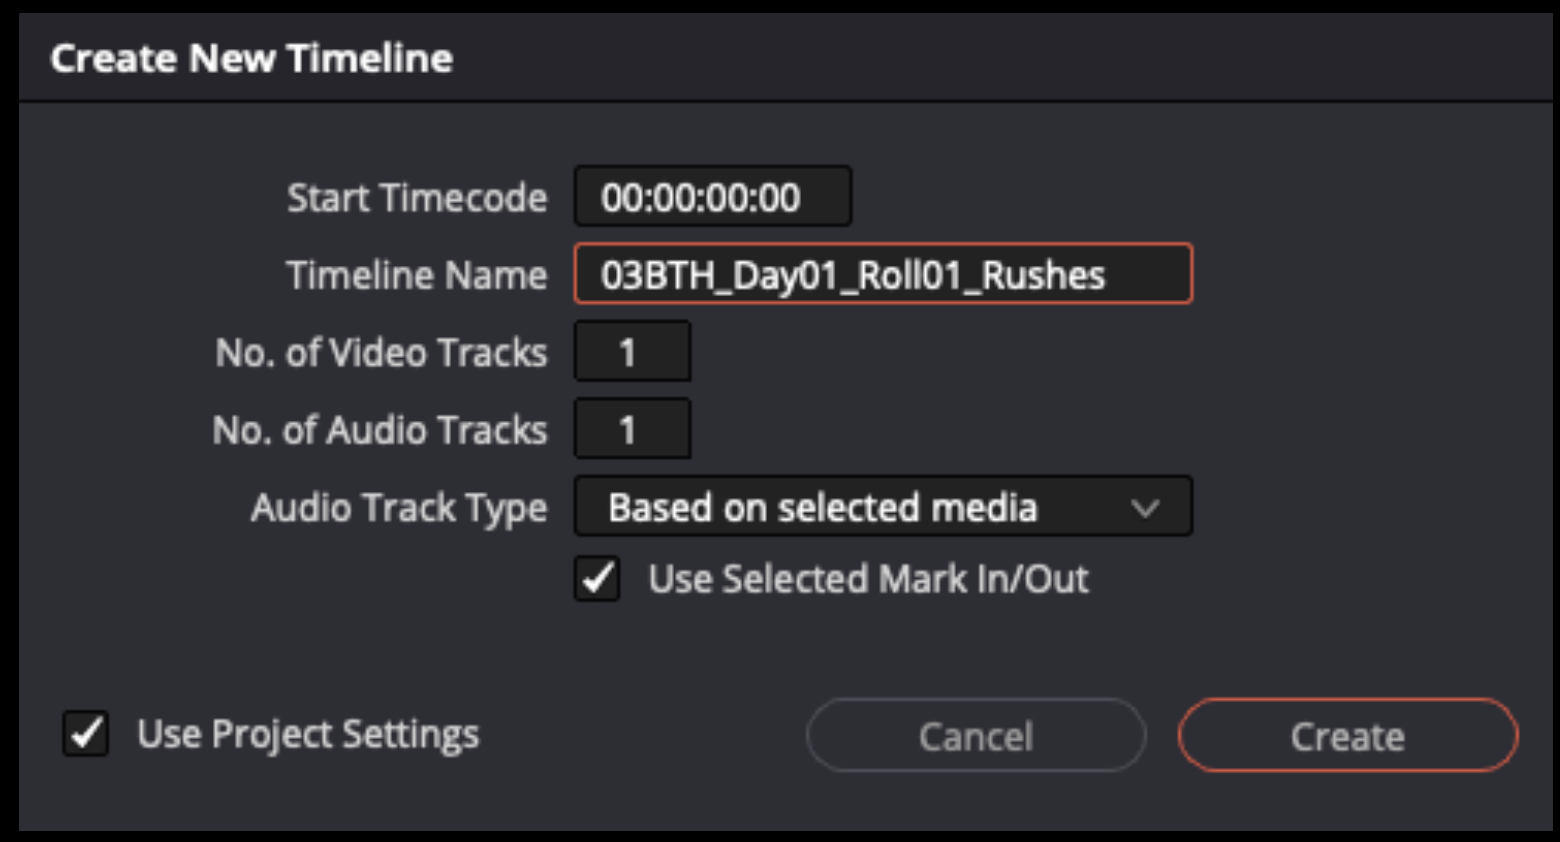
It will ask you to name this new time line. Label it with “Show#”, “Day#”, and “Roll#” as shown in the example below.
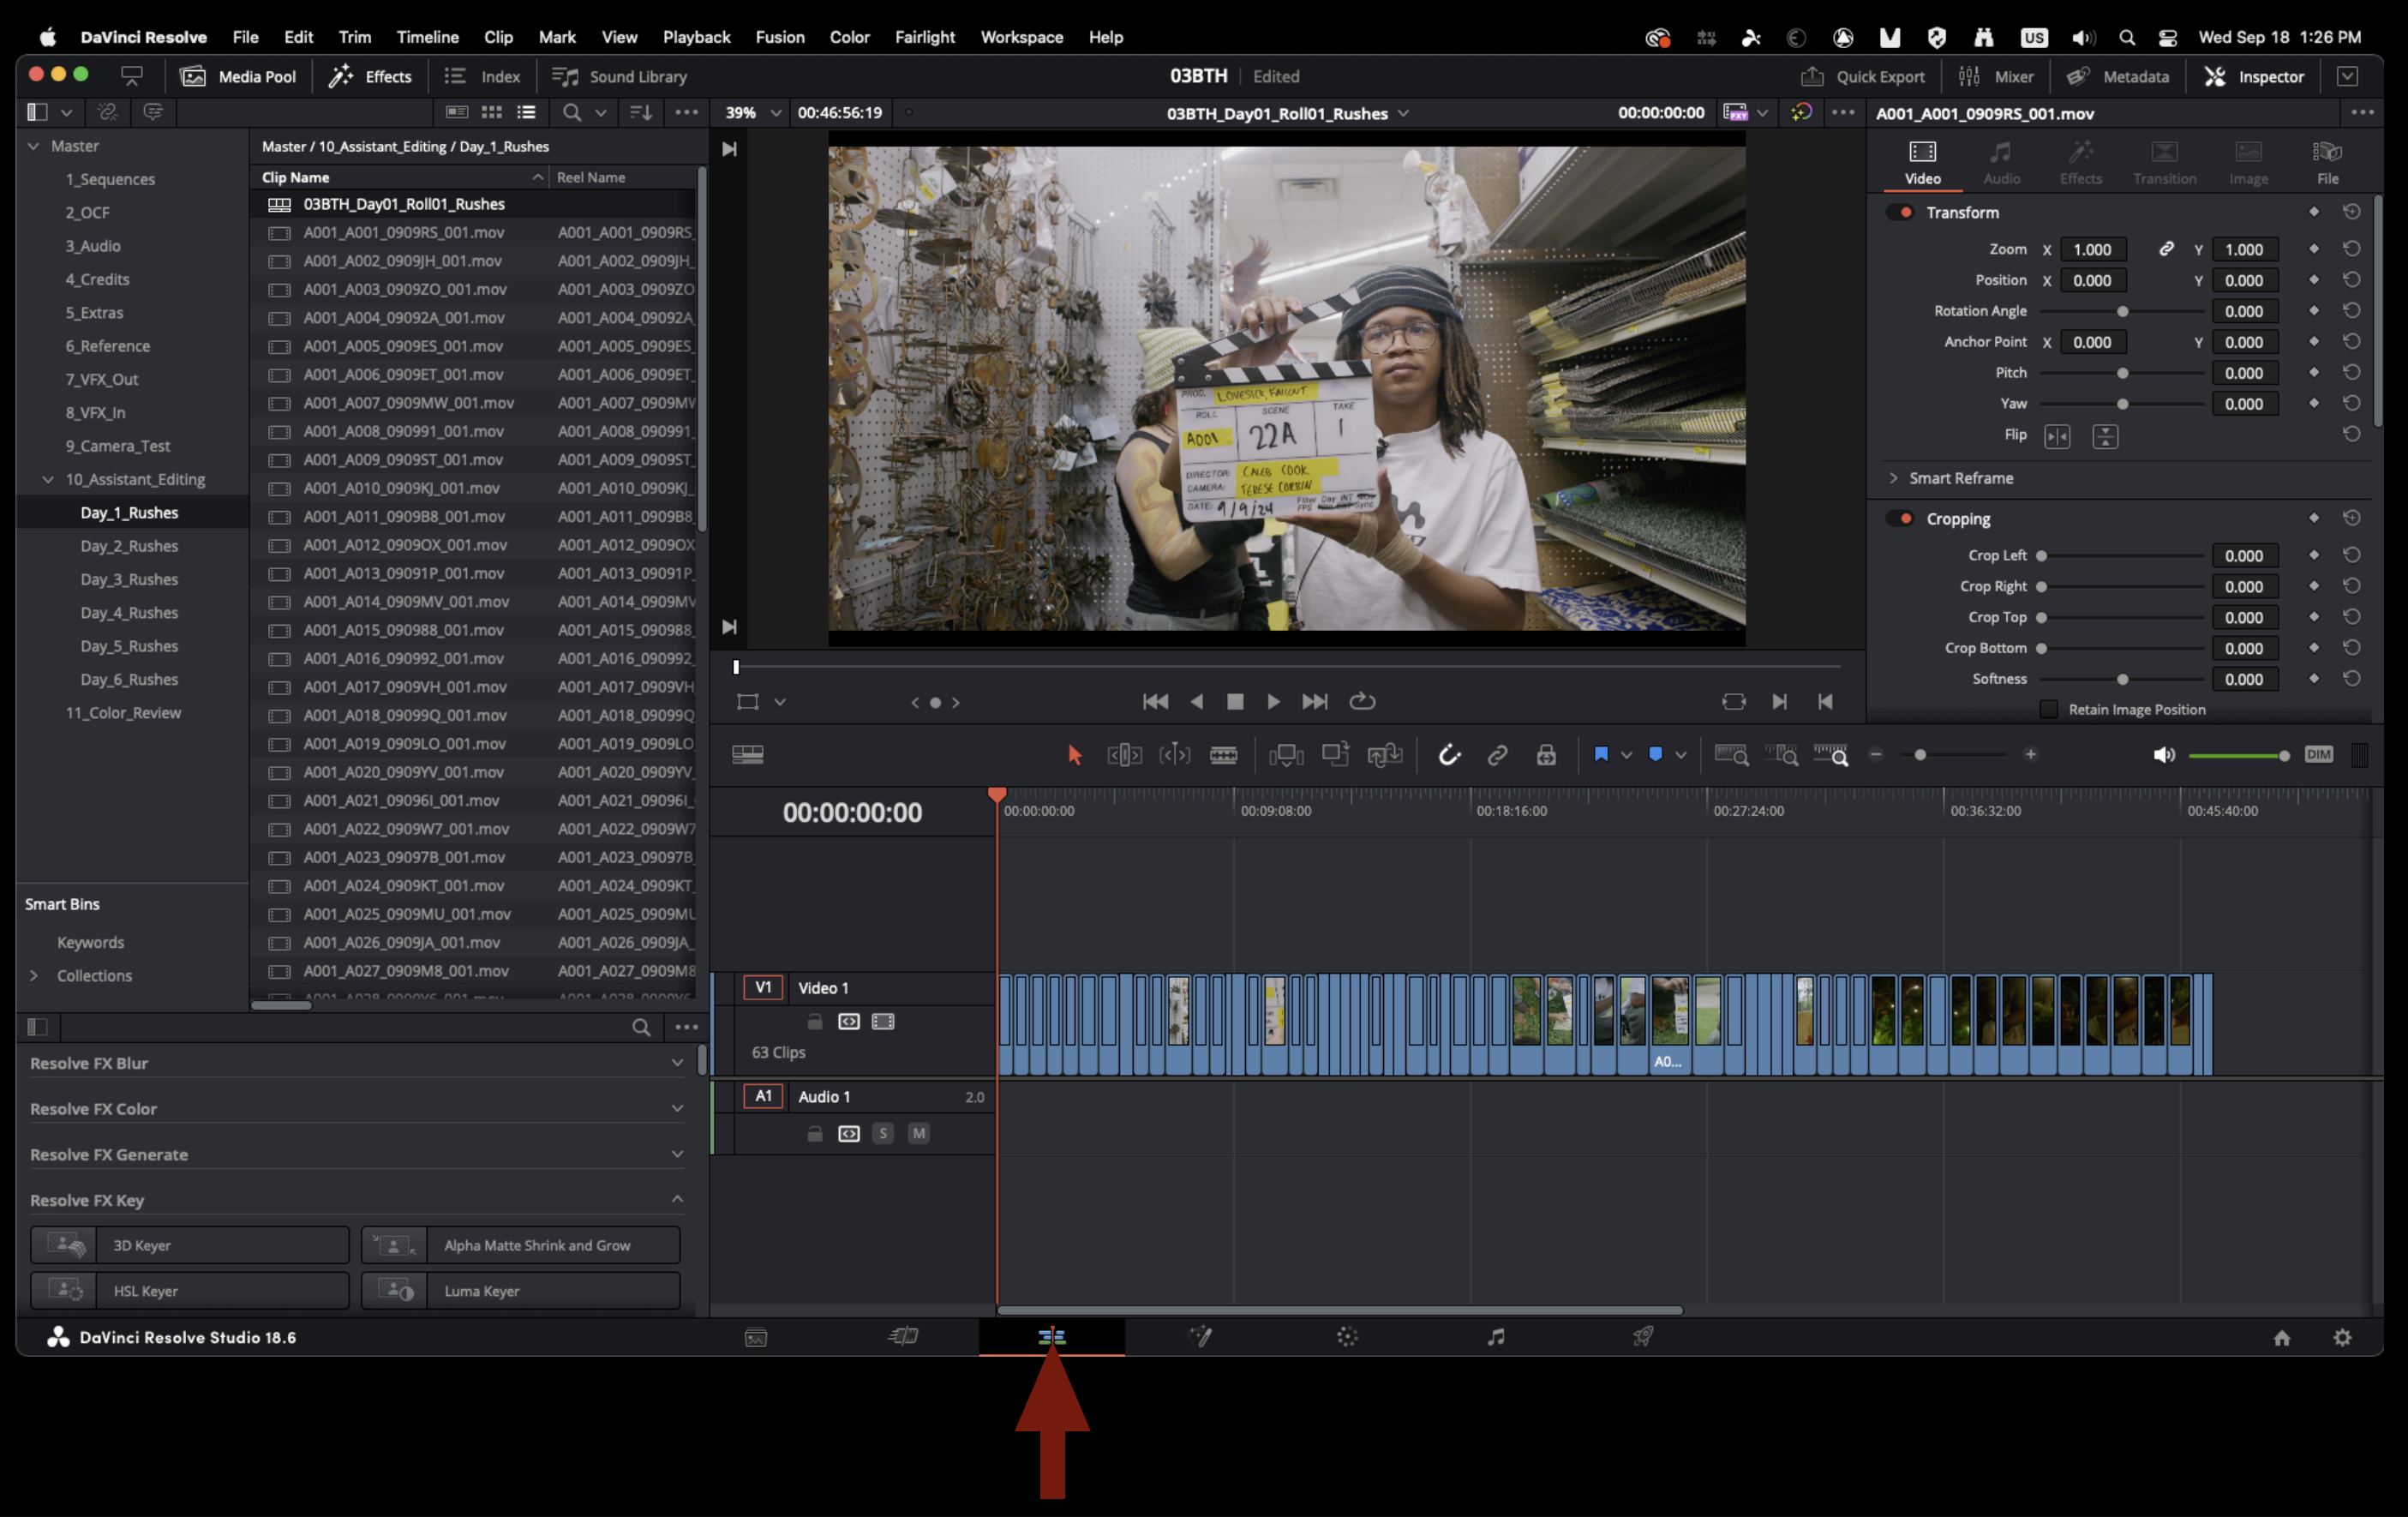
Navigate to the “Edit” page to see all of your footage strung together in the timeline you just created.
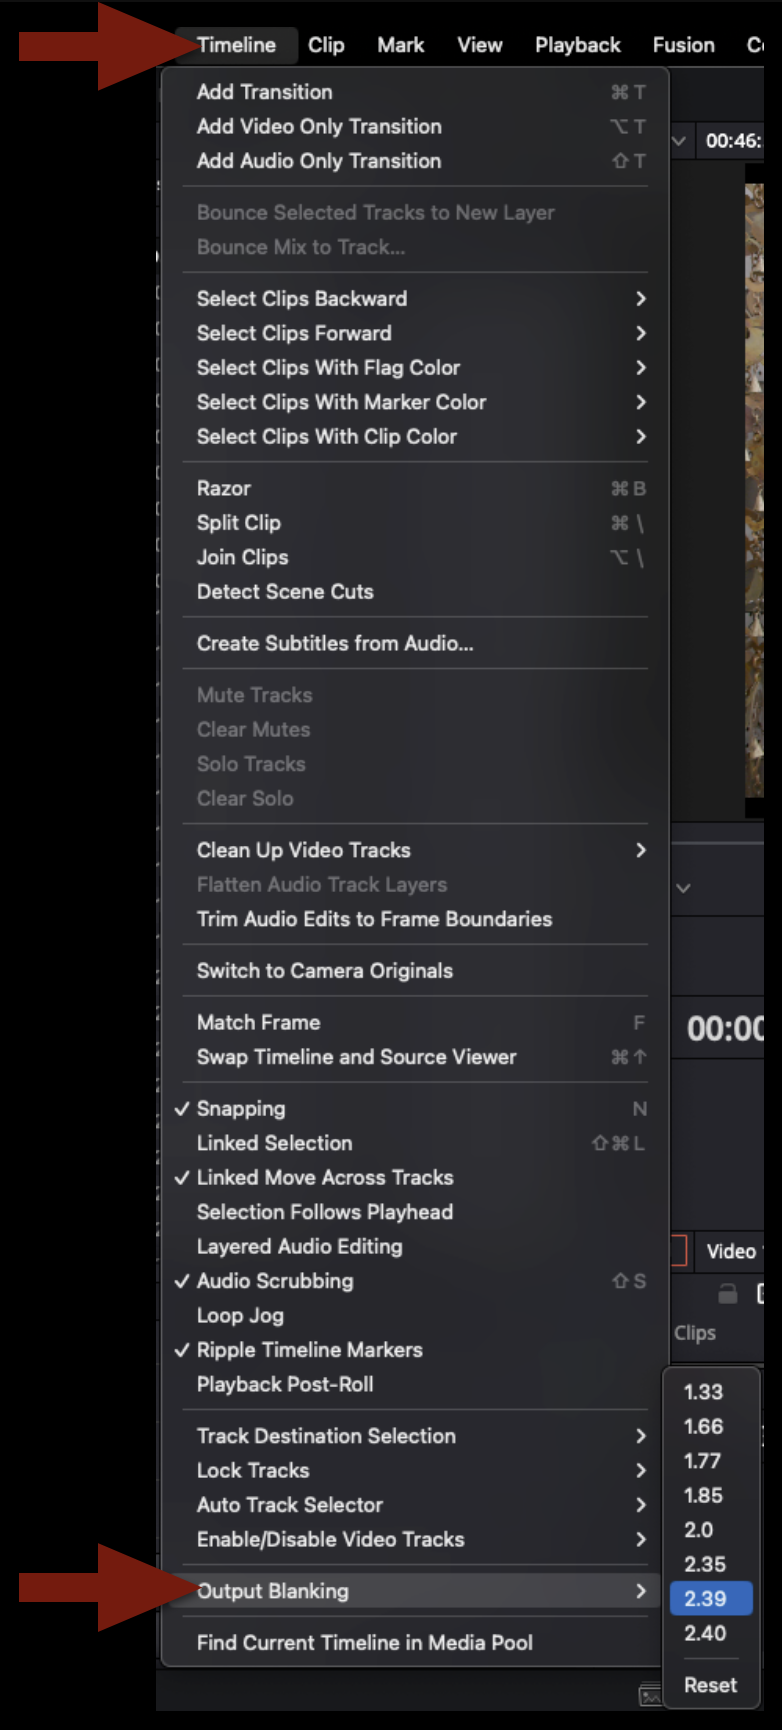
Next you will need to apply the proper masking to the timeline. Check the camera report to see what aspect ratio the footage was framed for. In resolve this can be applied by select “Timeline” rom teh top of the screen and applying the correct “output blanking.
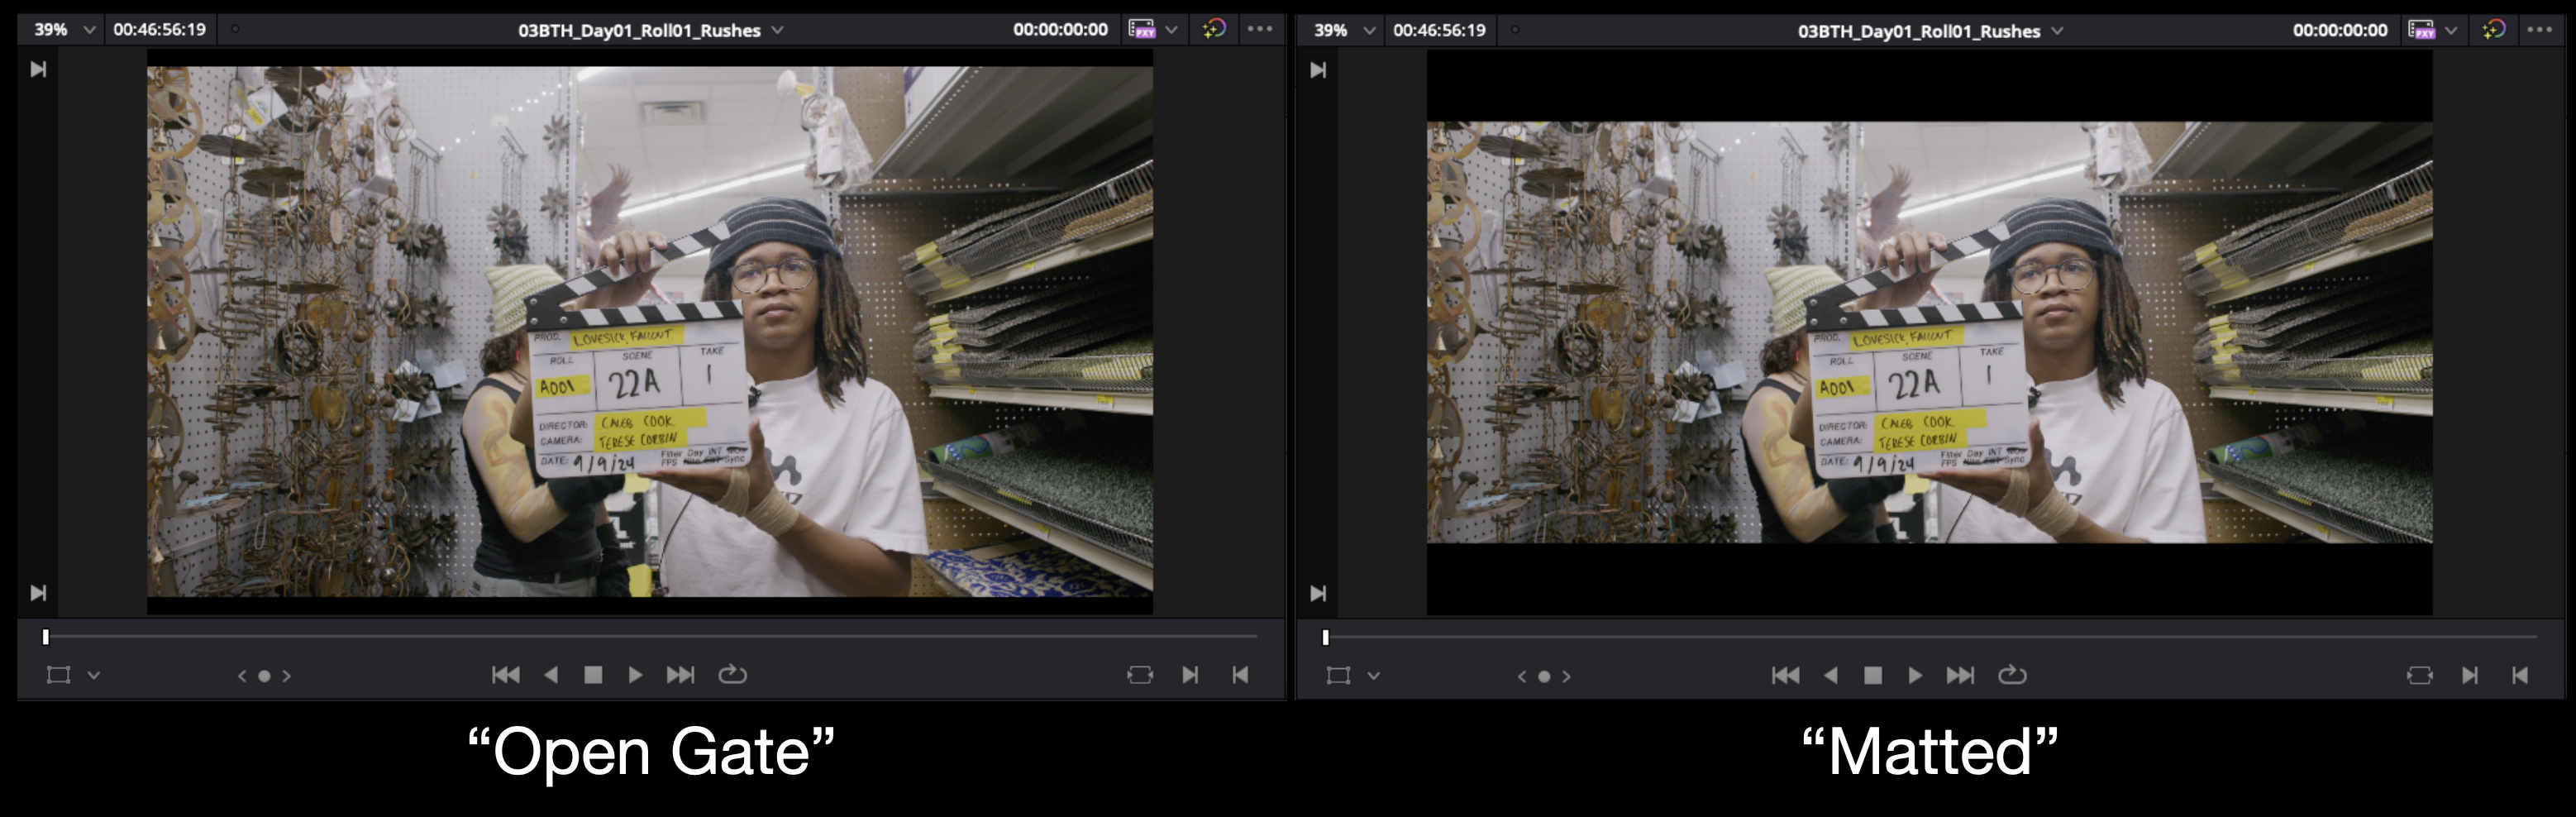
In the example below you will see an example after applying a 2.39:1 output blanking. If the camera report calls for an aspect ratio like 1.85:1 you may not notice any difference after applying that output blanking. You will need to scale the image a certain amount to get it to “fit” inside that output blanking. Consult the post staff for help if needed.
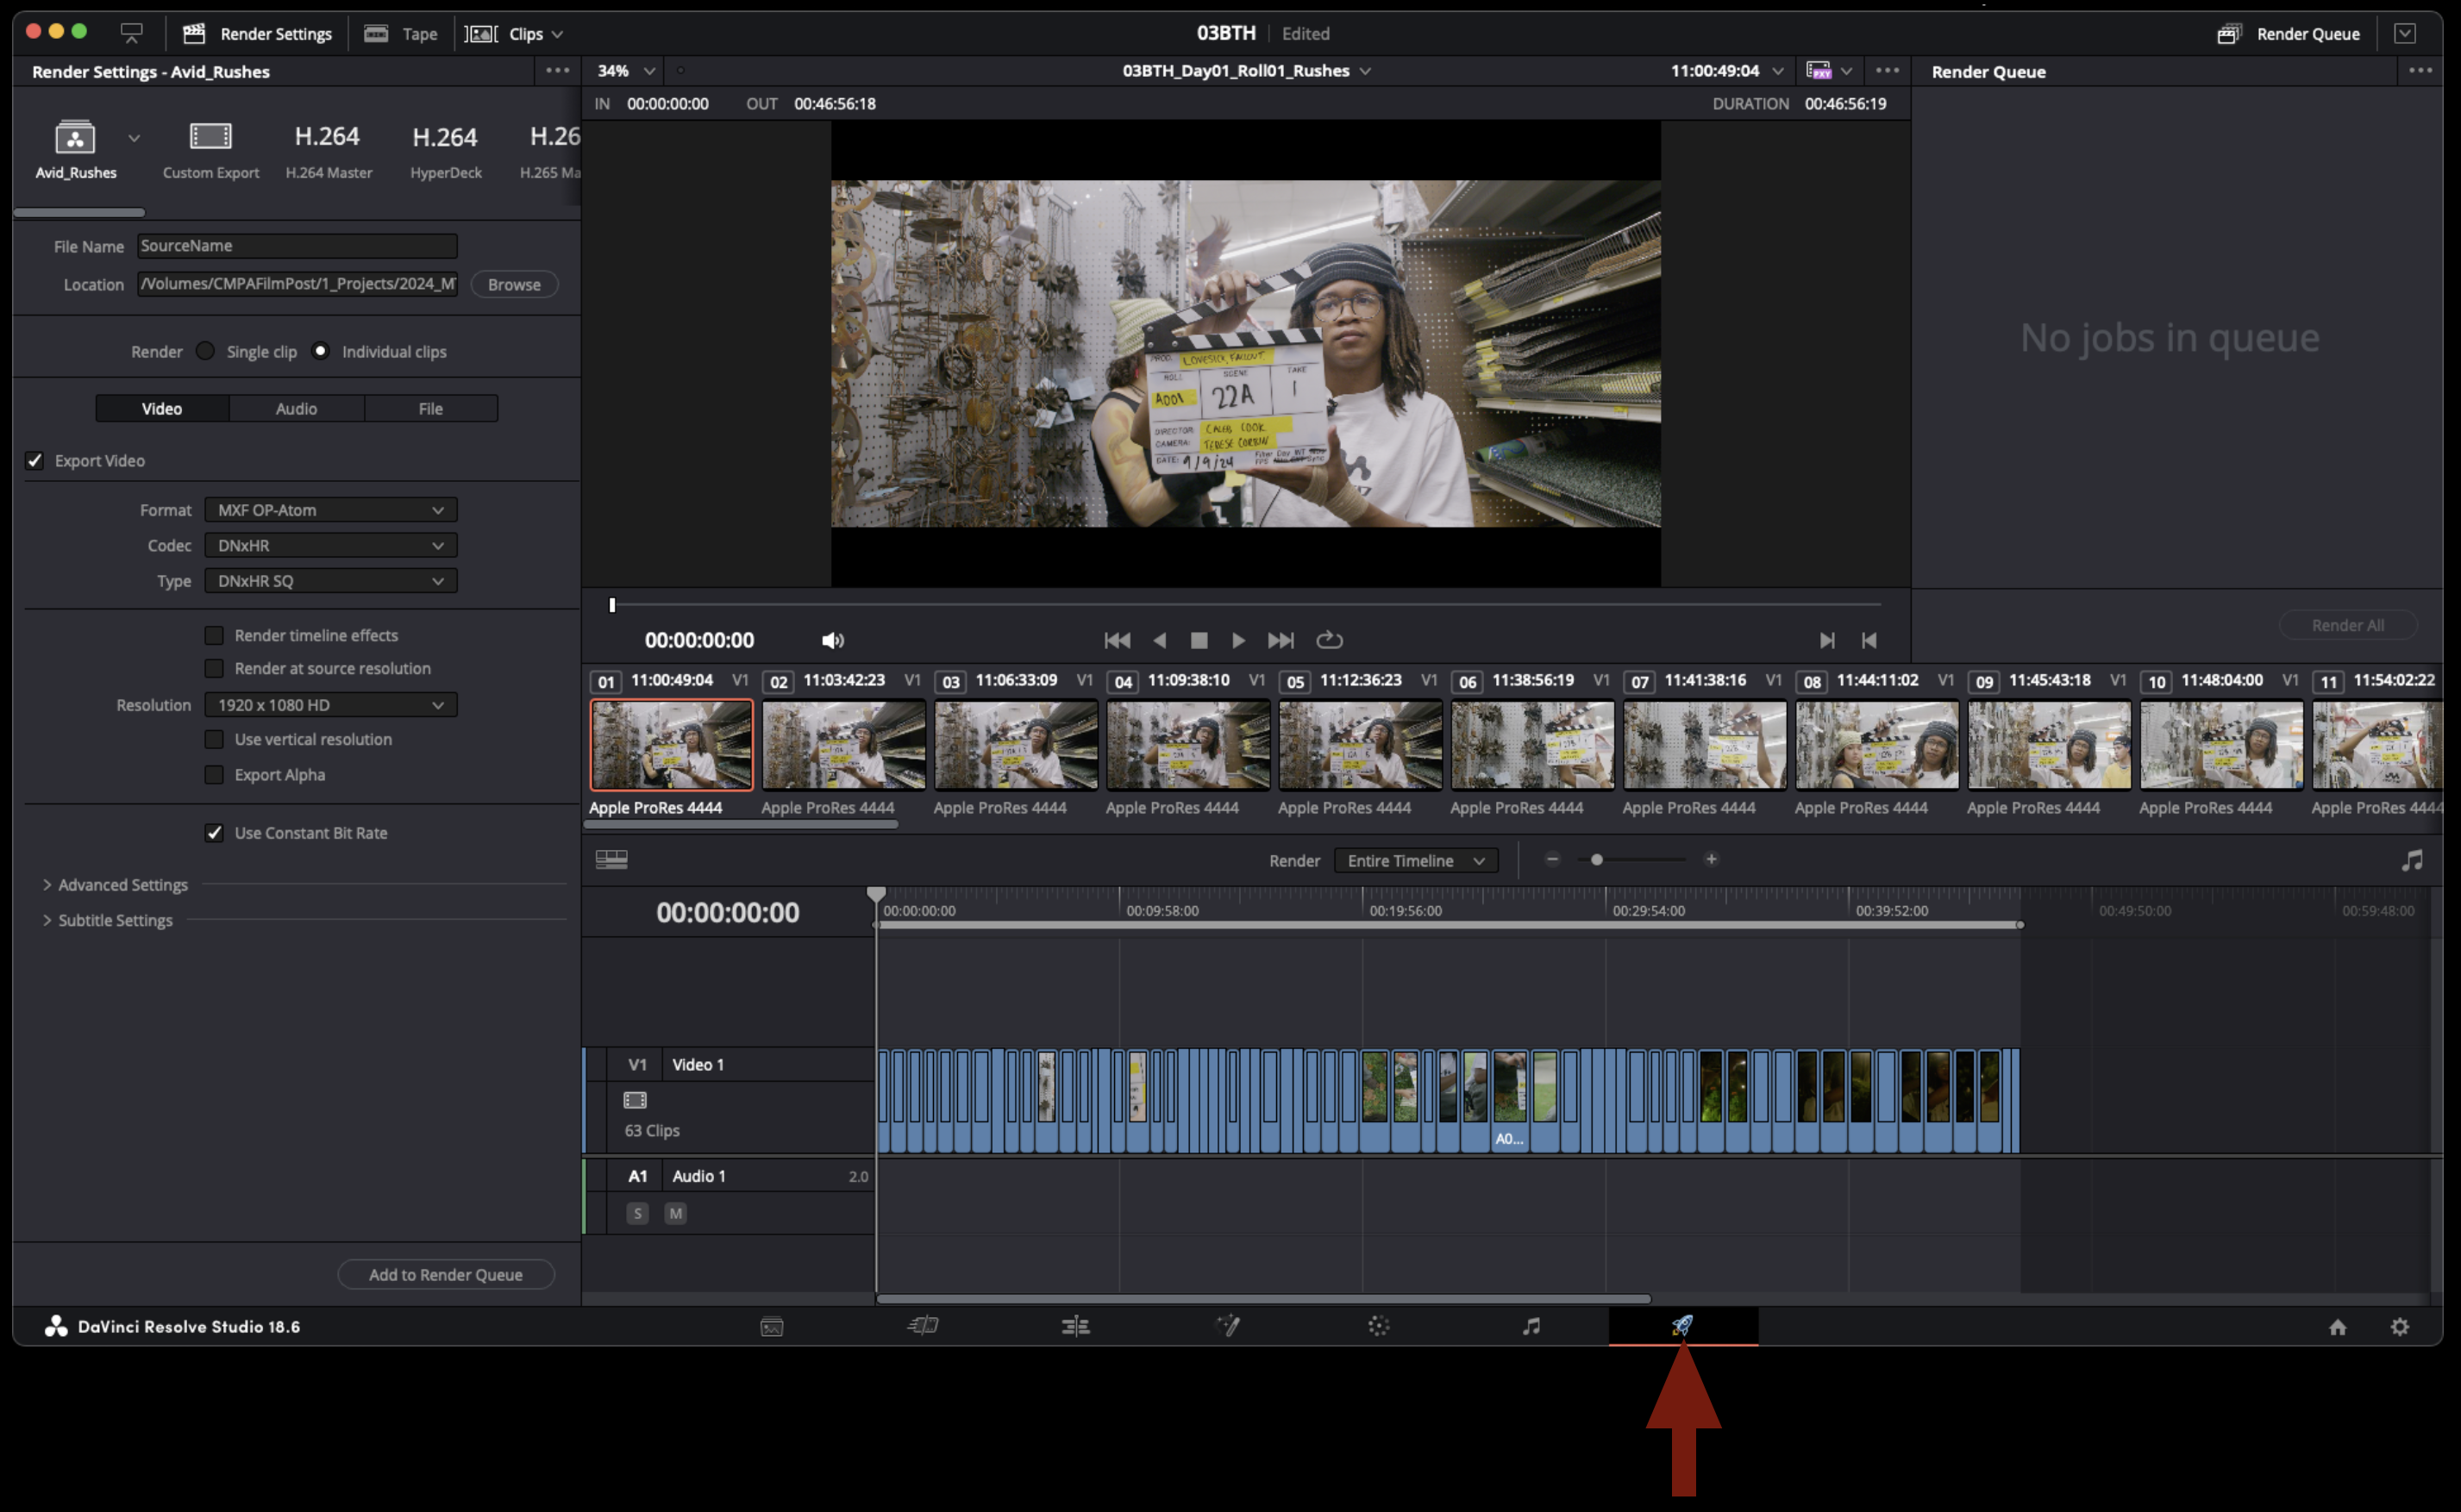
Navigate to the delivery page to begin exporting.
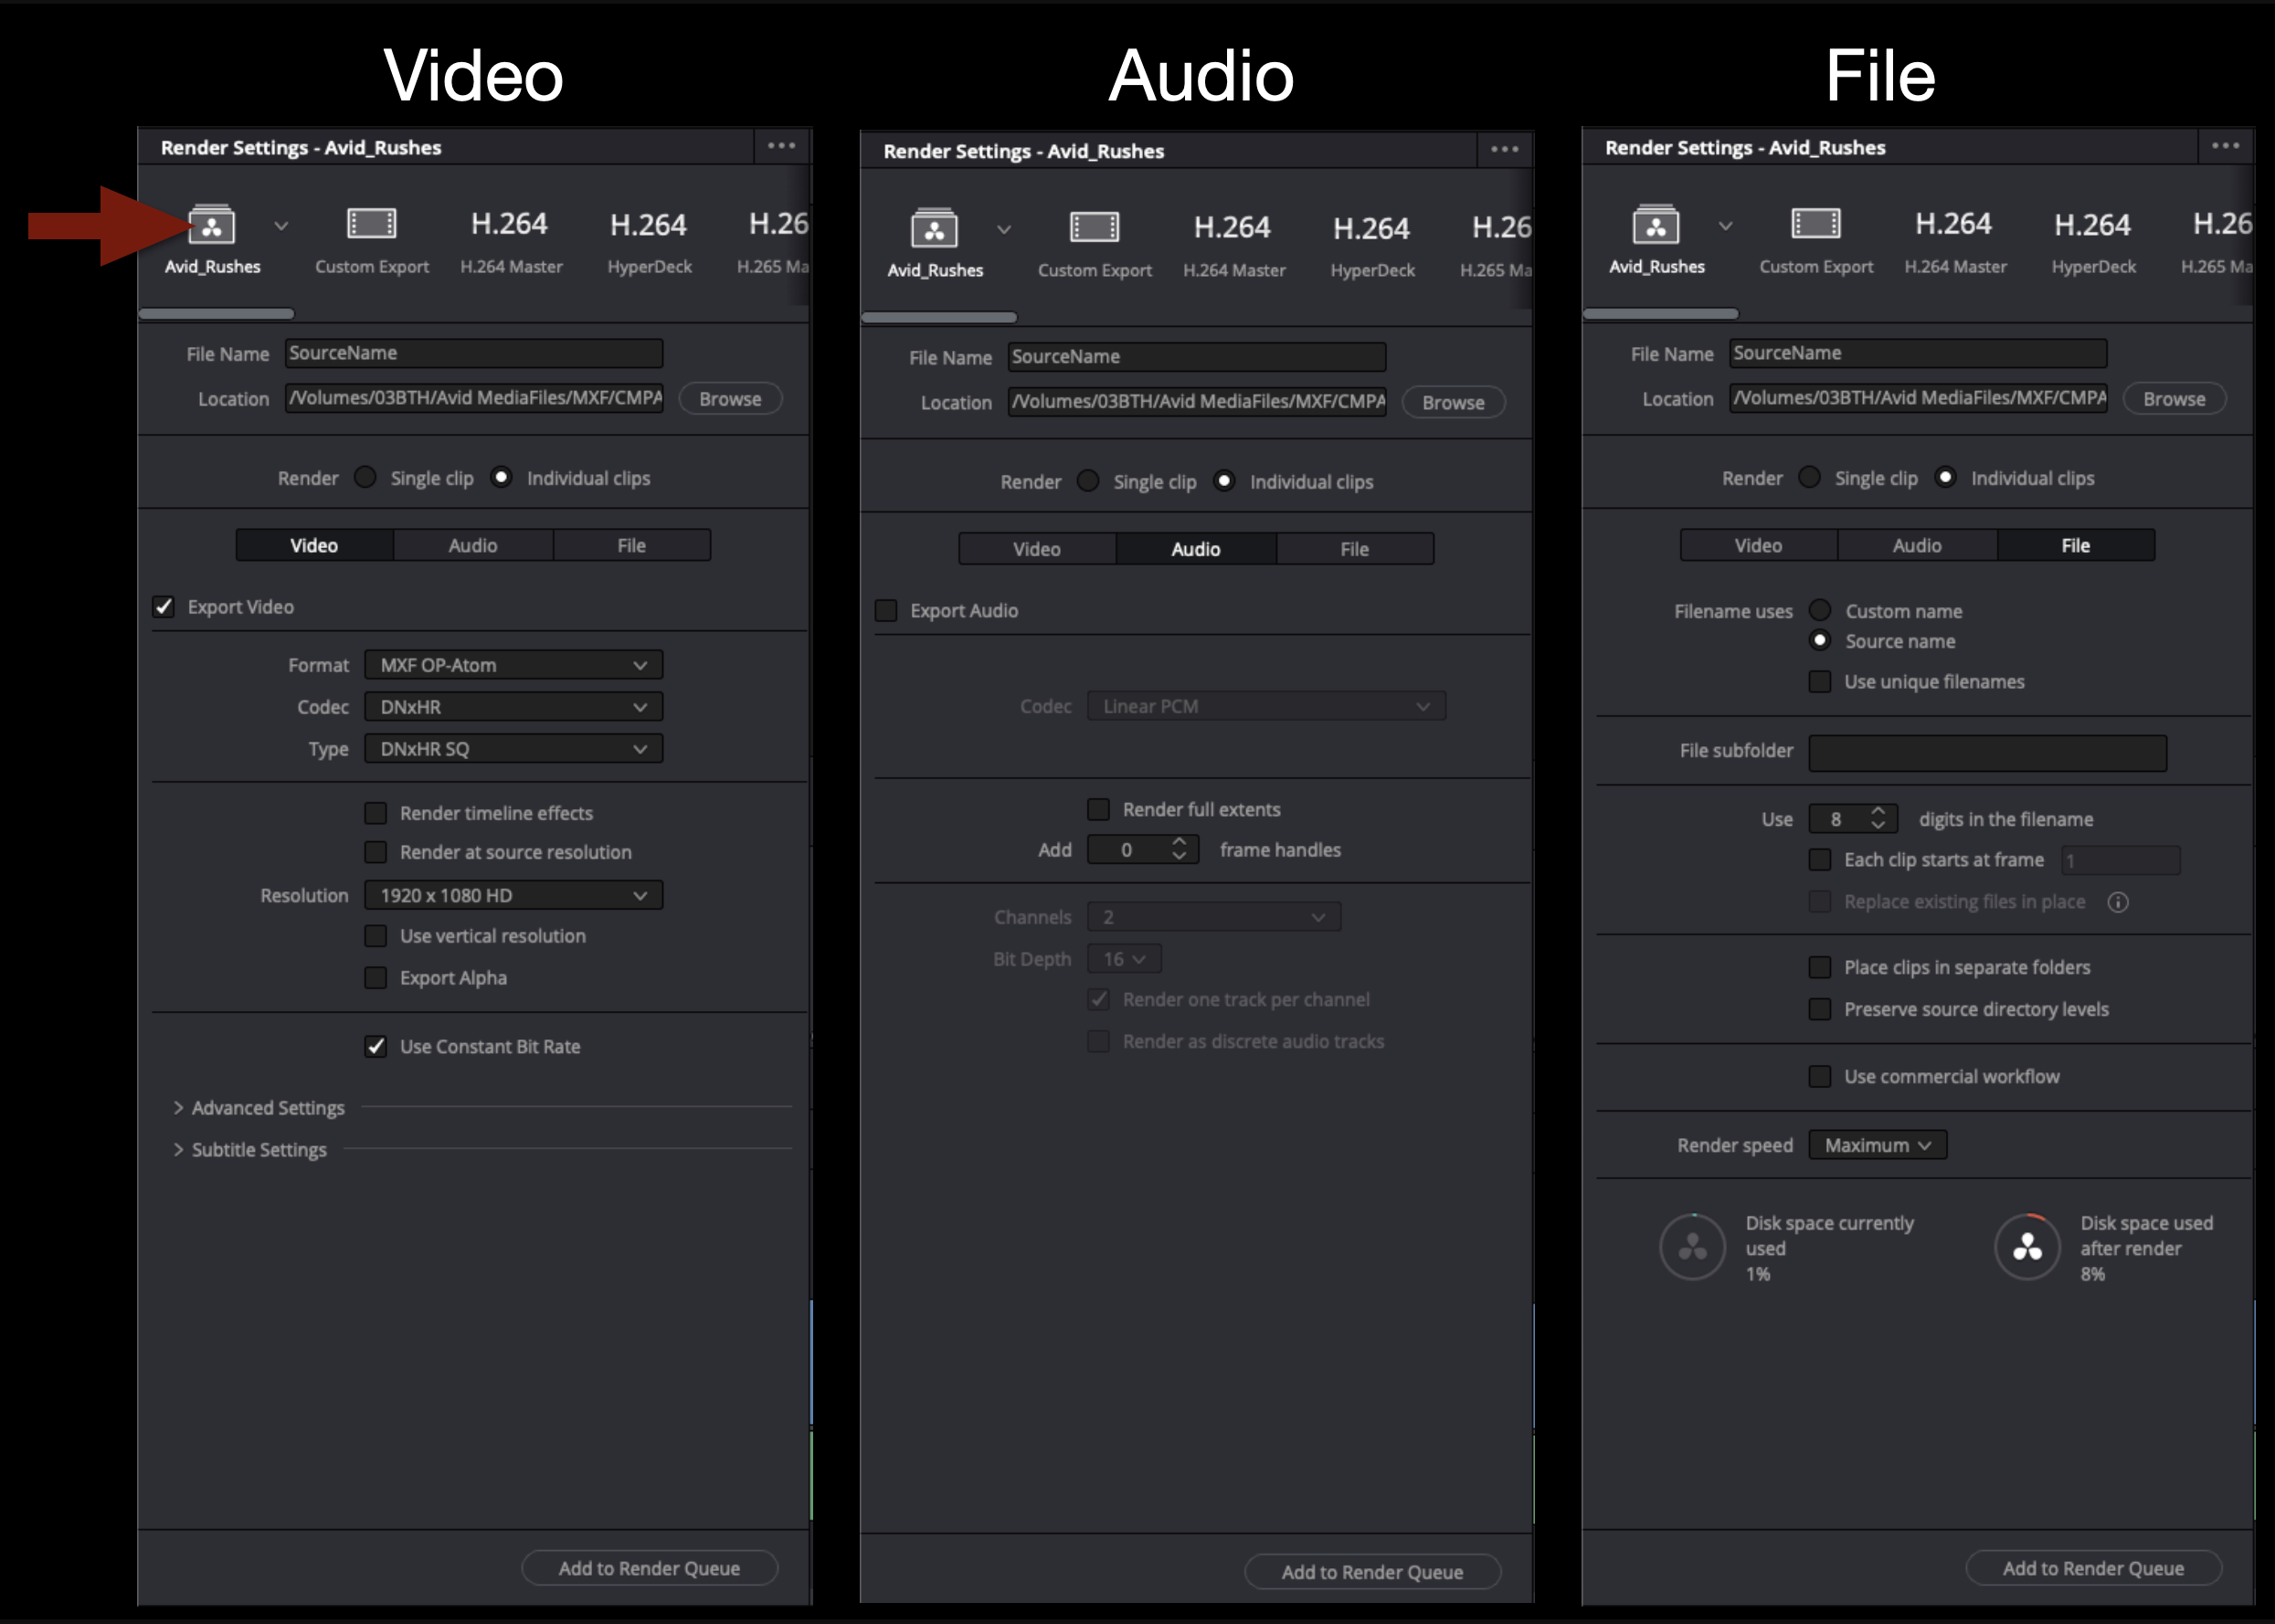
In the upper left hand corner you will find a preset labeled “Avid “Rushes”. Use this preset for exporting avid media mxf files. Check that the settings are as shown below.
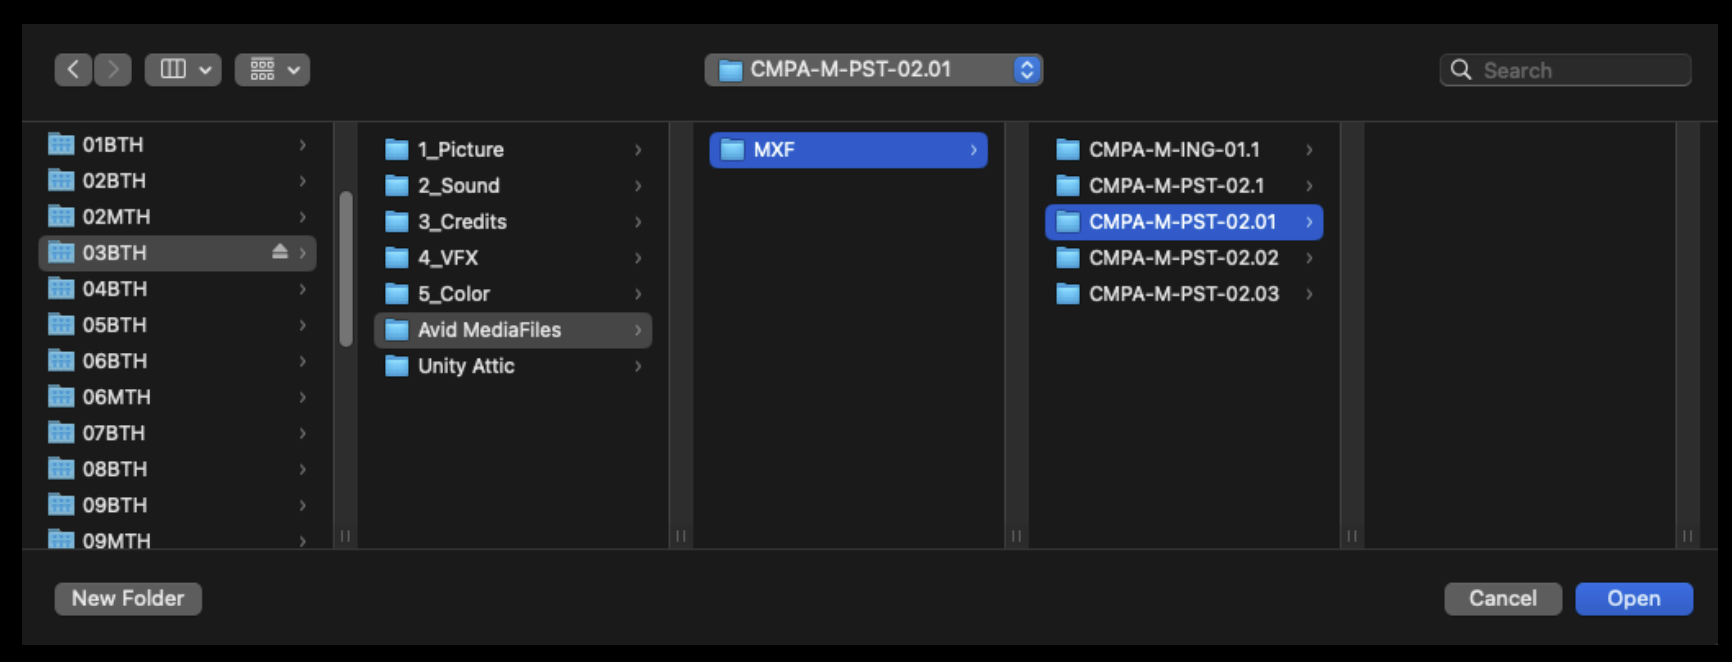
Select “Browse” to set the destination for this export. You will want to find or make a folder in the proper “Avid MediaFiles” folder for your show. This folder will need to reflect either the date the footage was shot or the day of shooting.
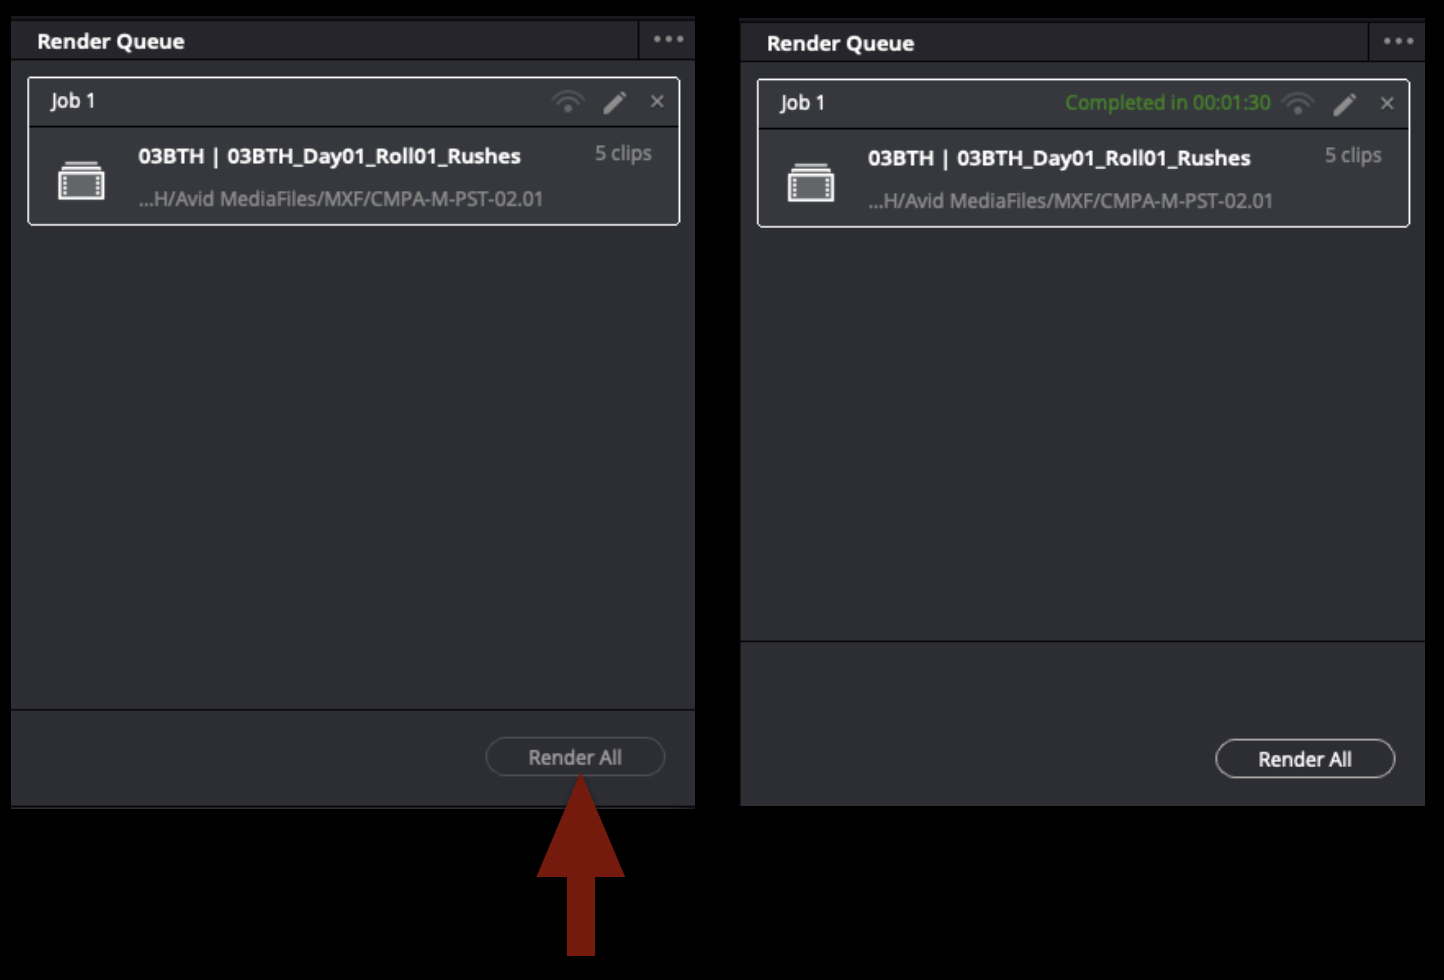
Once all of taht is set you can add the job to the render cue and render all. When the job is complete it will look like the example below. When this step is done you can save and quit Davinci Resolve.
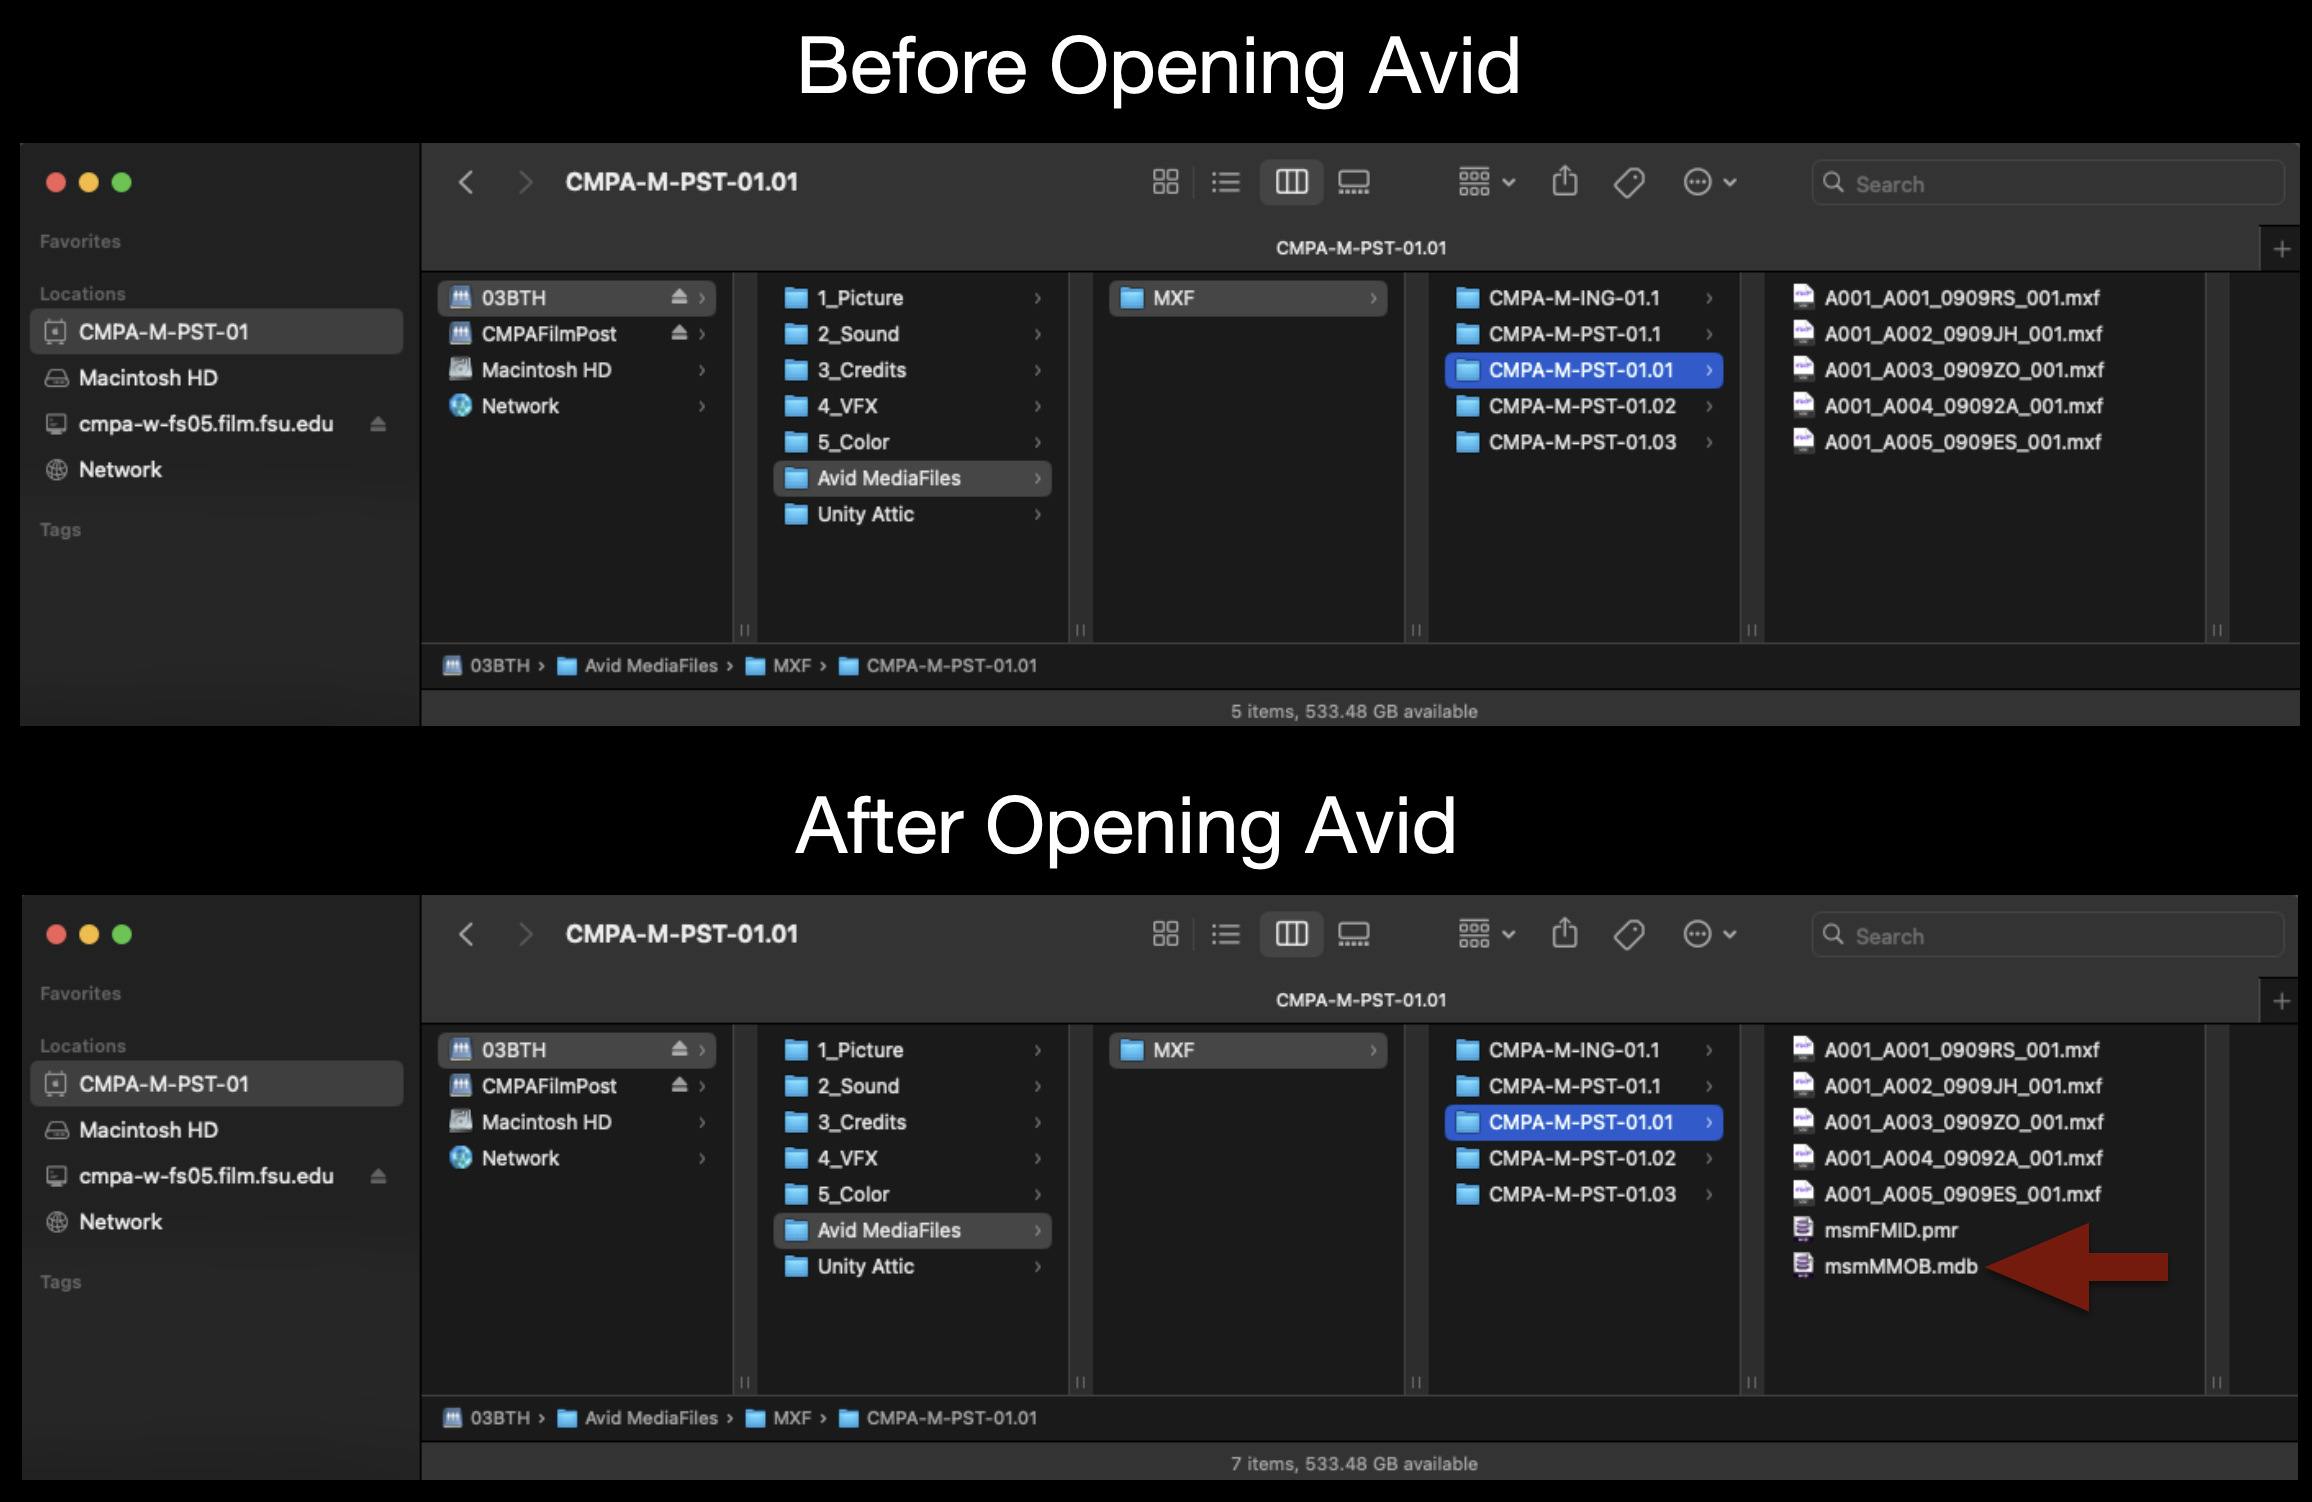
If you navigate in the finder to where the target destination of teh export was set you will find that an .mxf files has been made for every clip. However Davinci Resolve does not generate the avid database files. These files get generated the next time Avid is opened and it will scan the Avid MediaFiles folders looking for new media. When it finds the new folder it will index taht media and generate the necessary database files.
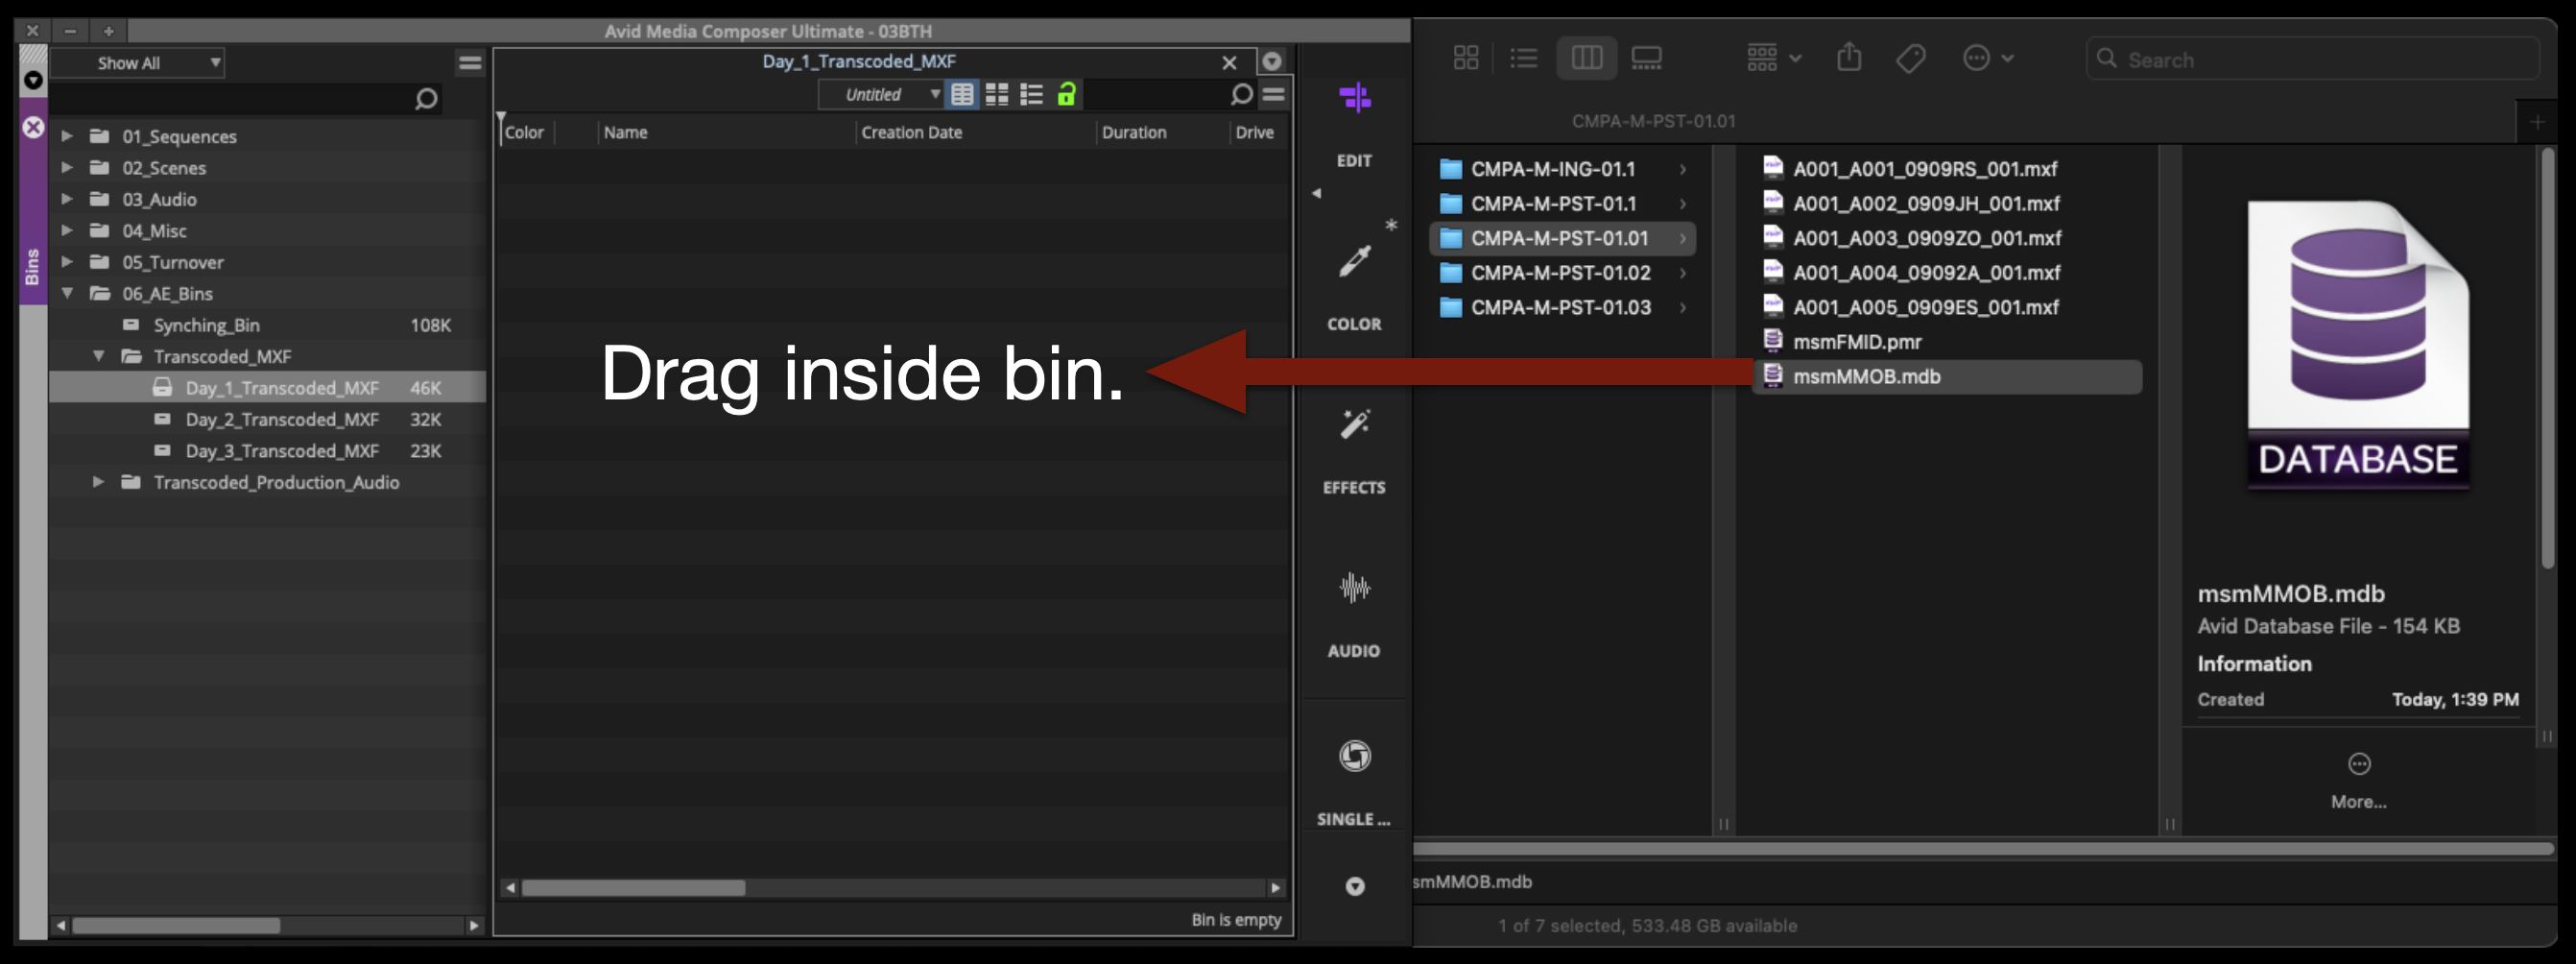
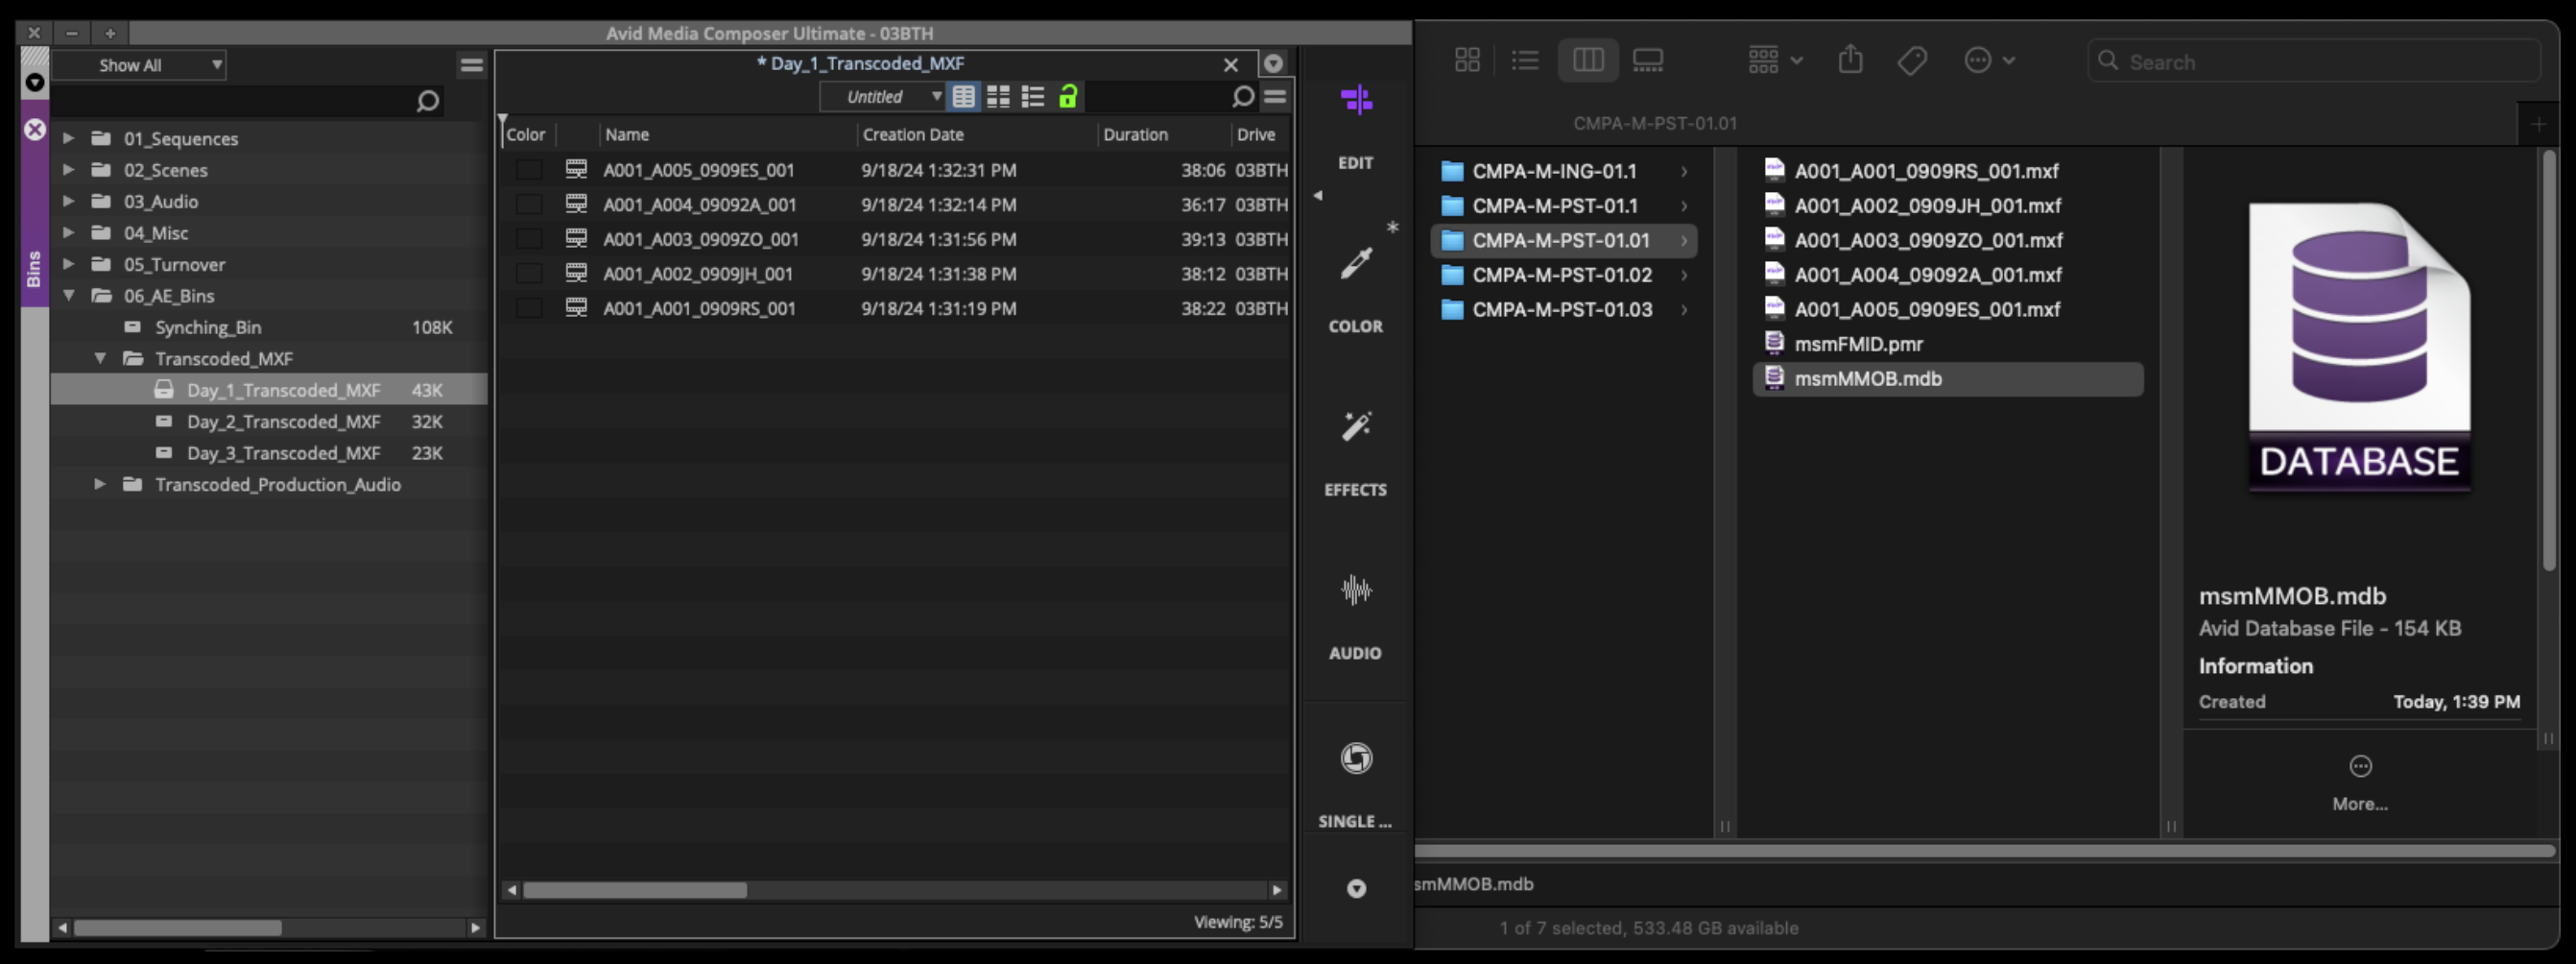
With your Media Composer project now open again to can bring this transcoded footage into the correct bin by dragging the “.mdb” database file into the bin.
If everything was done properly the master clips will appear inside the avid bin.
Link and Transcode Audio
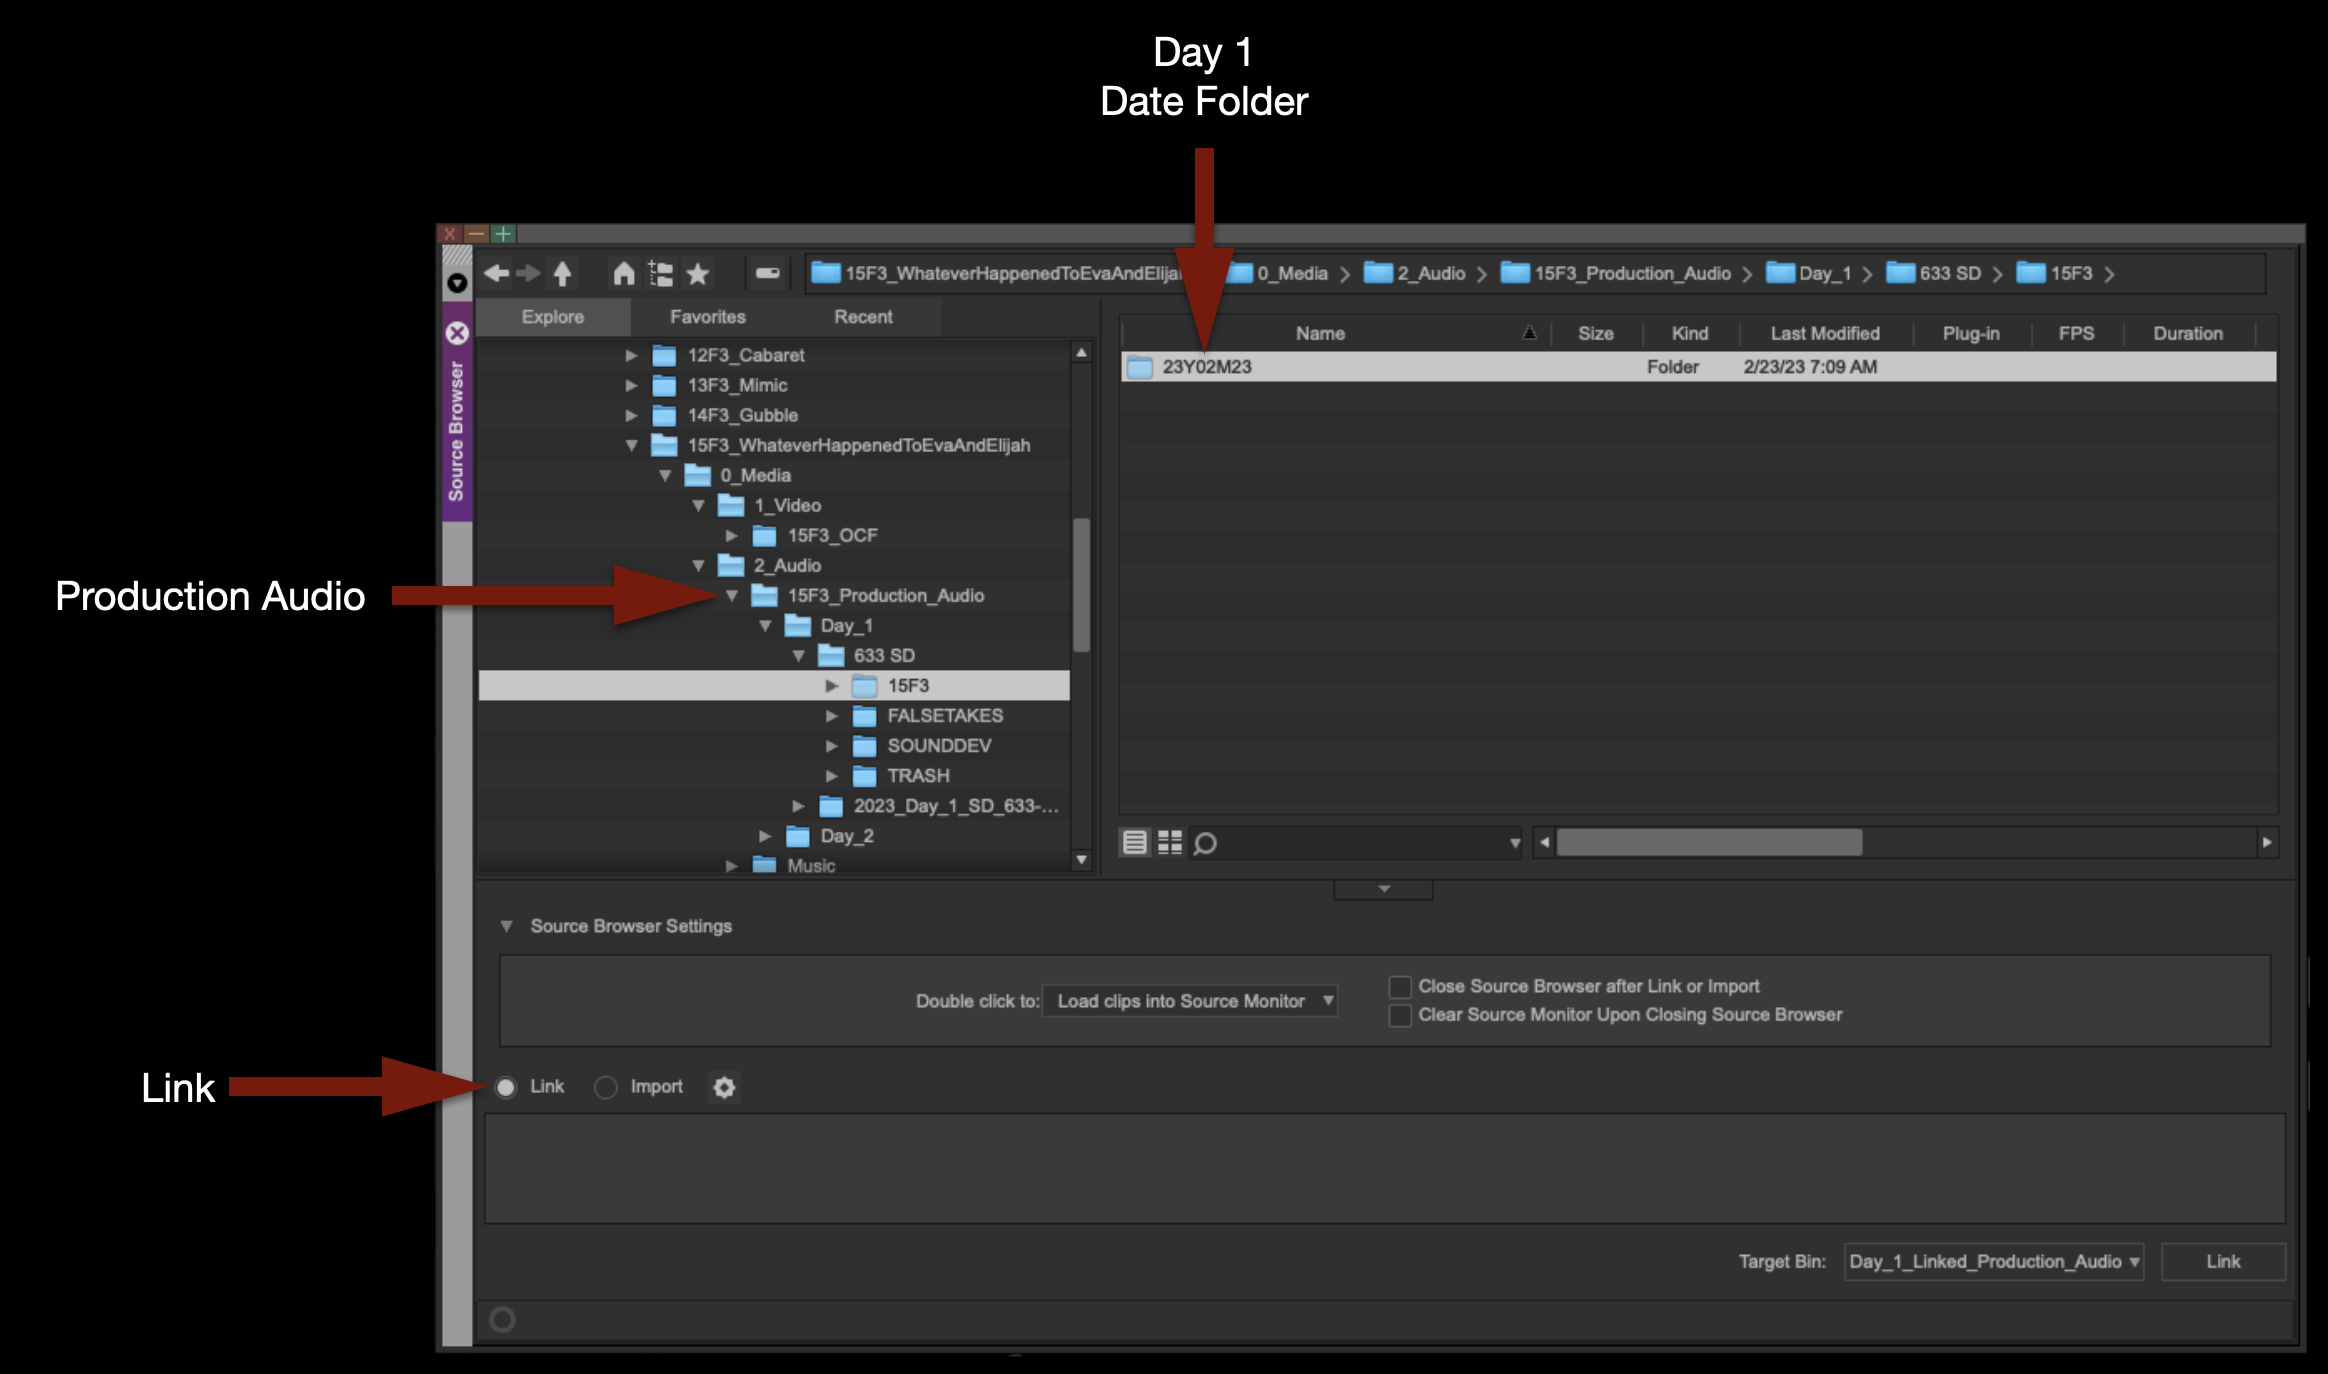
Open the Linked Production Audio bin for the proper day:
Right-click inside the bin and select “Import > Source Browser”.
Inside the Source Browser, navigate to a day’s worth of Production Audio. Make sure the Link icon is selected, and then click “Link”.
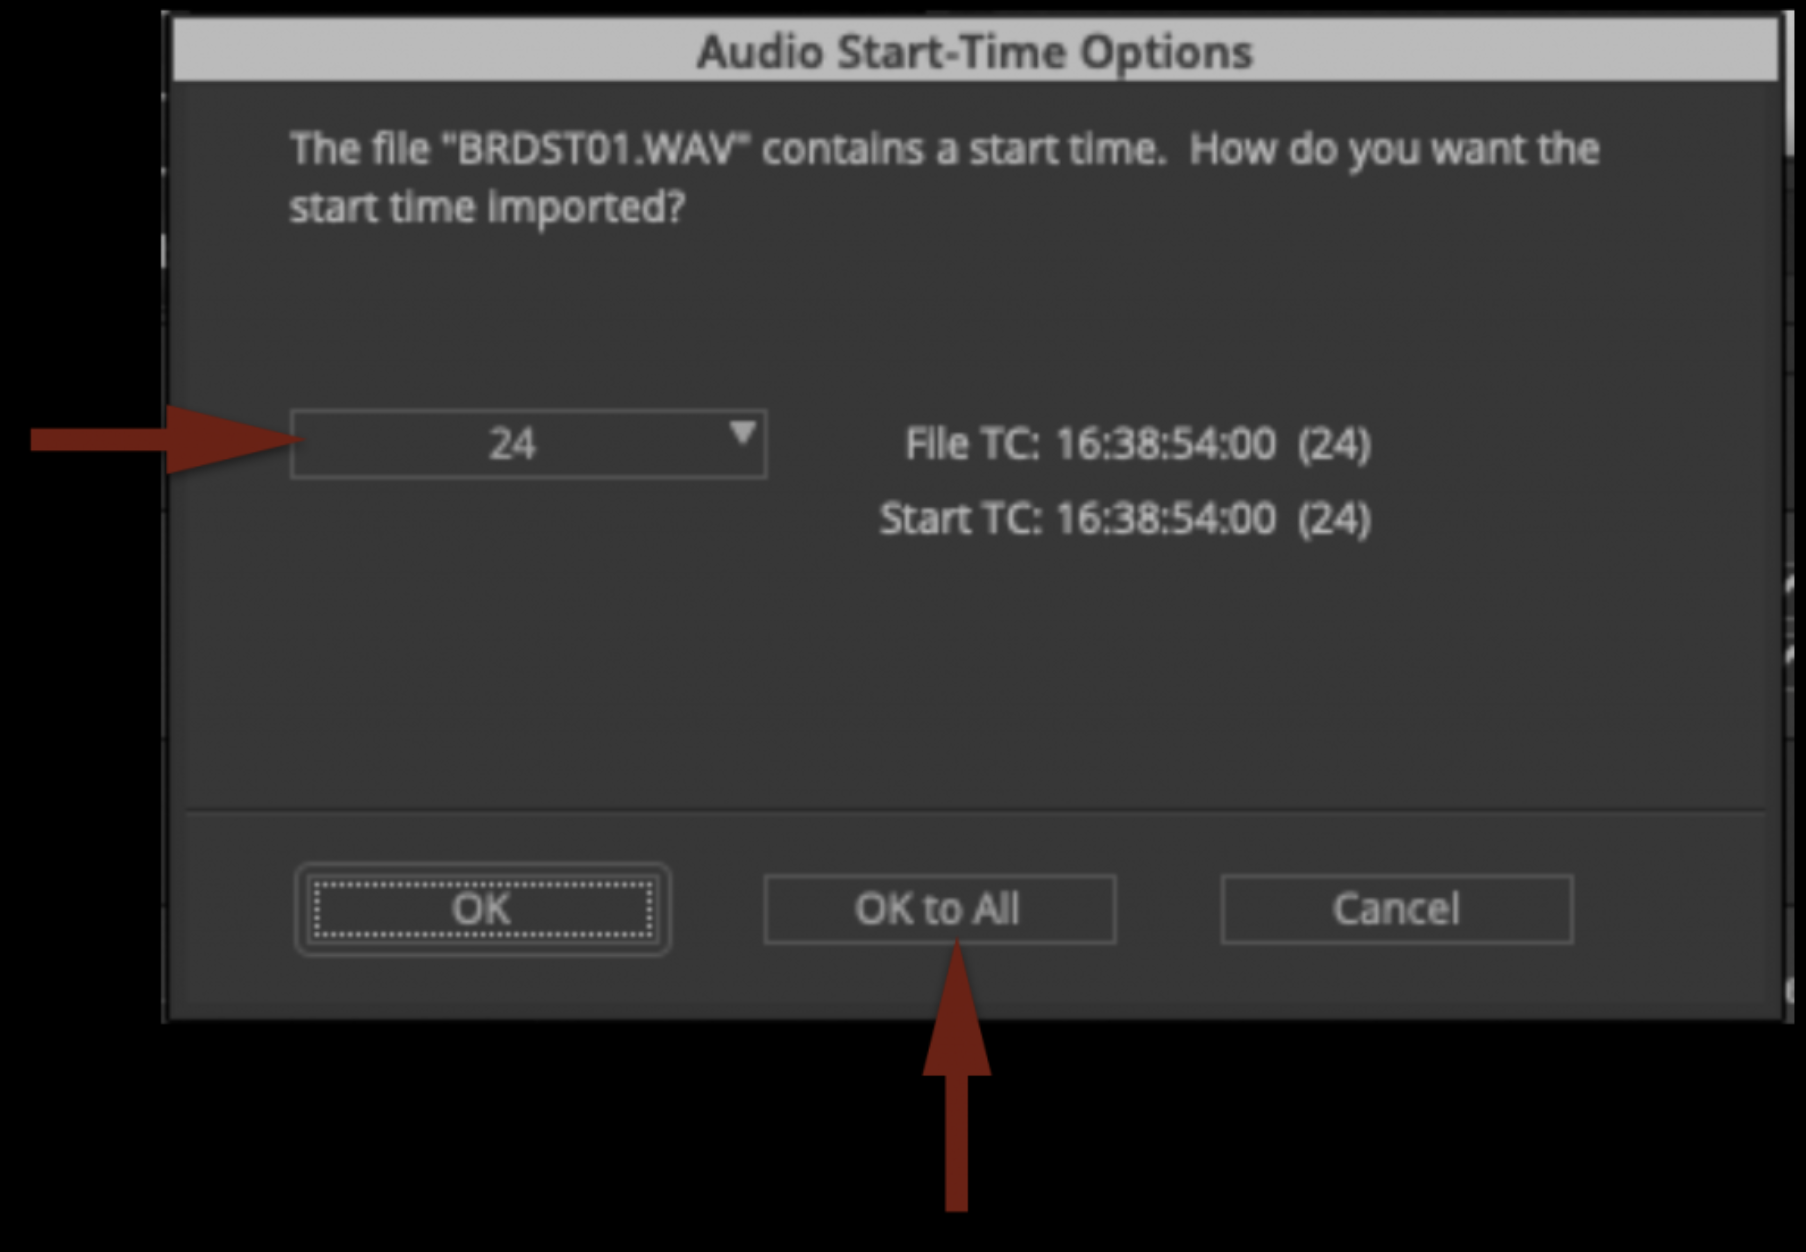
Before it links the media, it will ask you about Audio Start-Time Options. Make sure it is set to “24” and click “OK to All”.
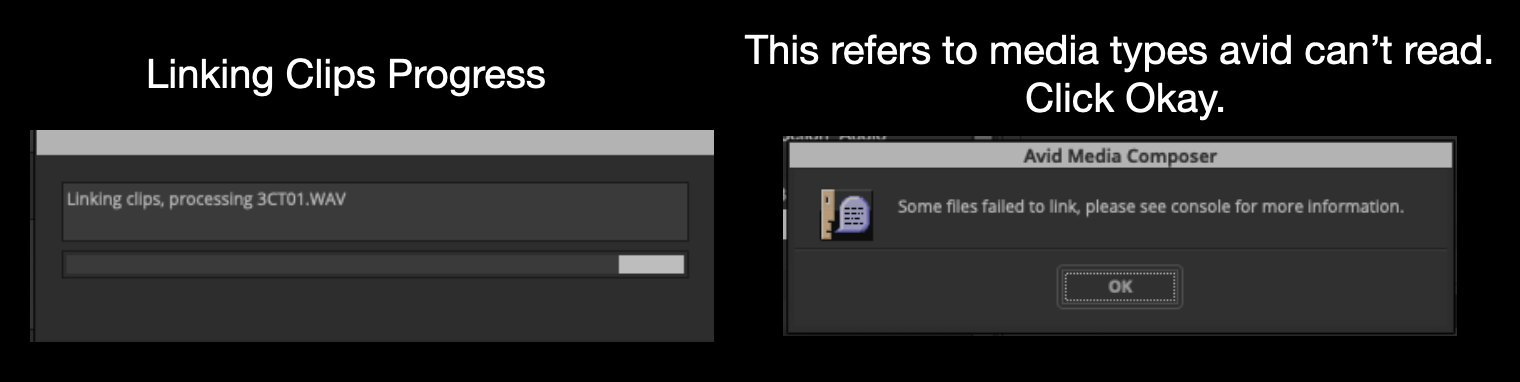
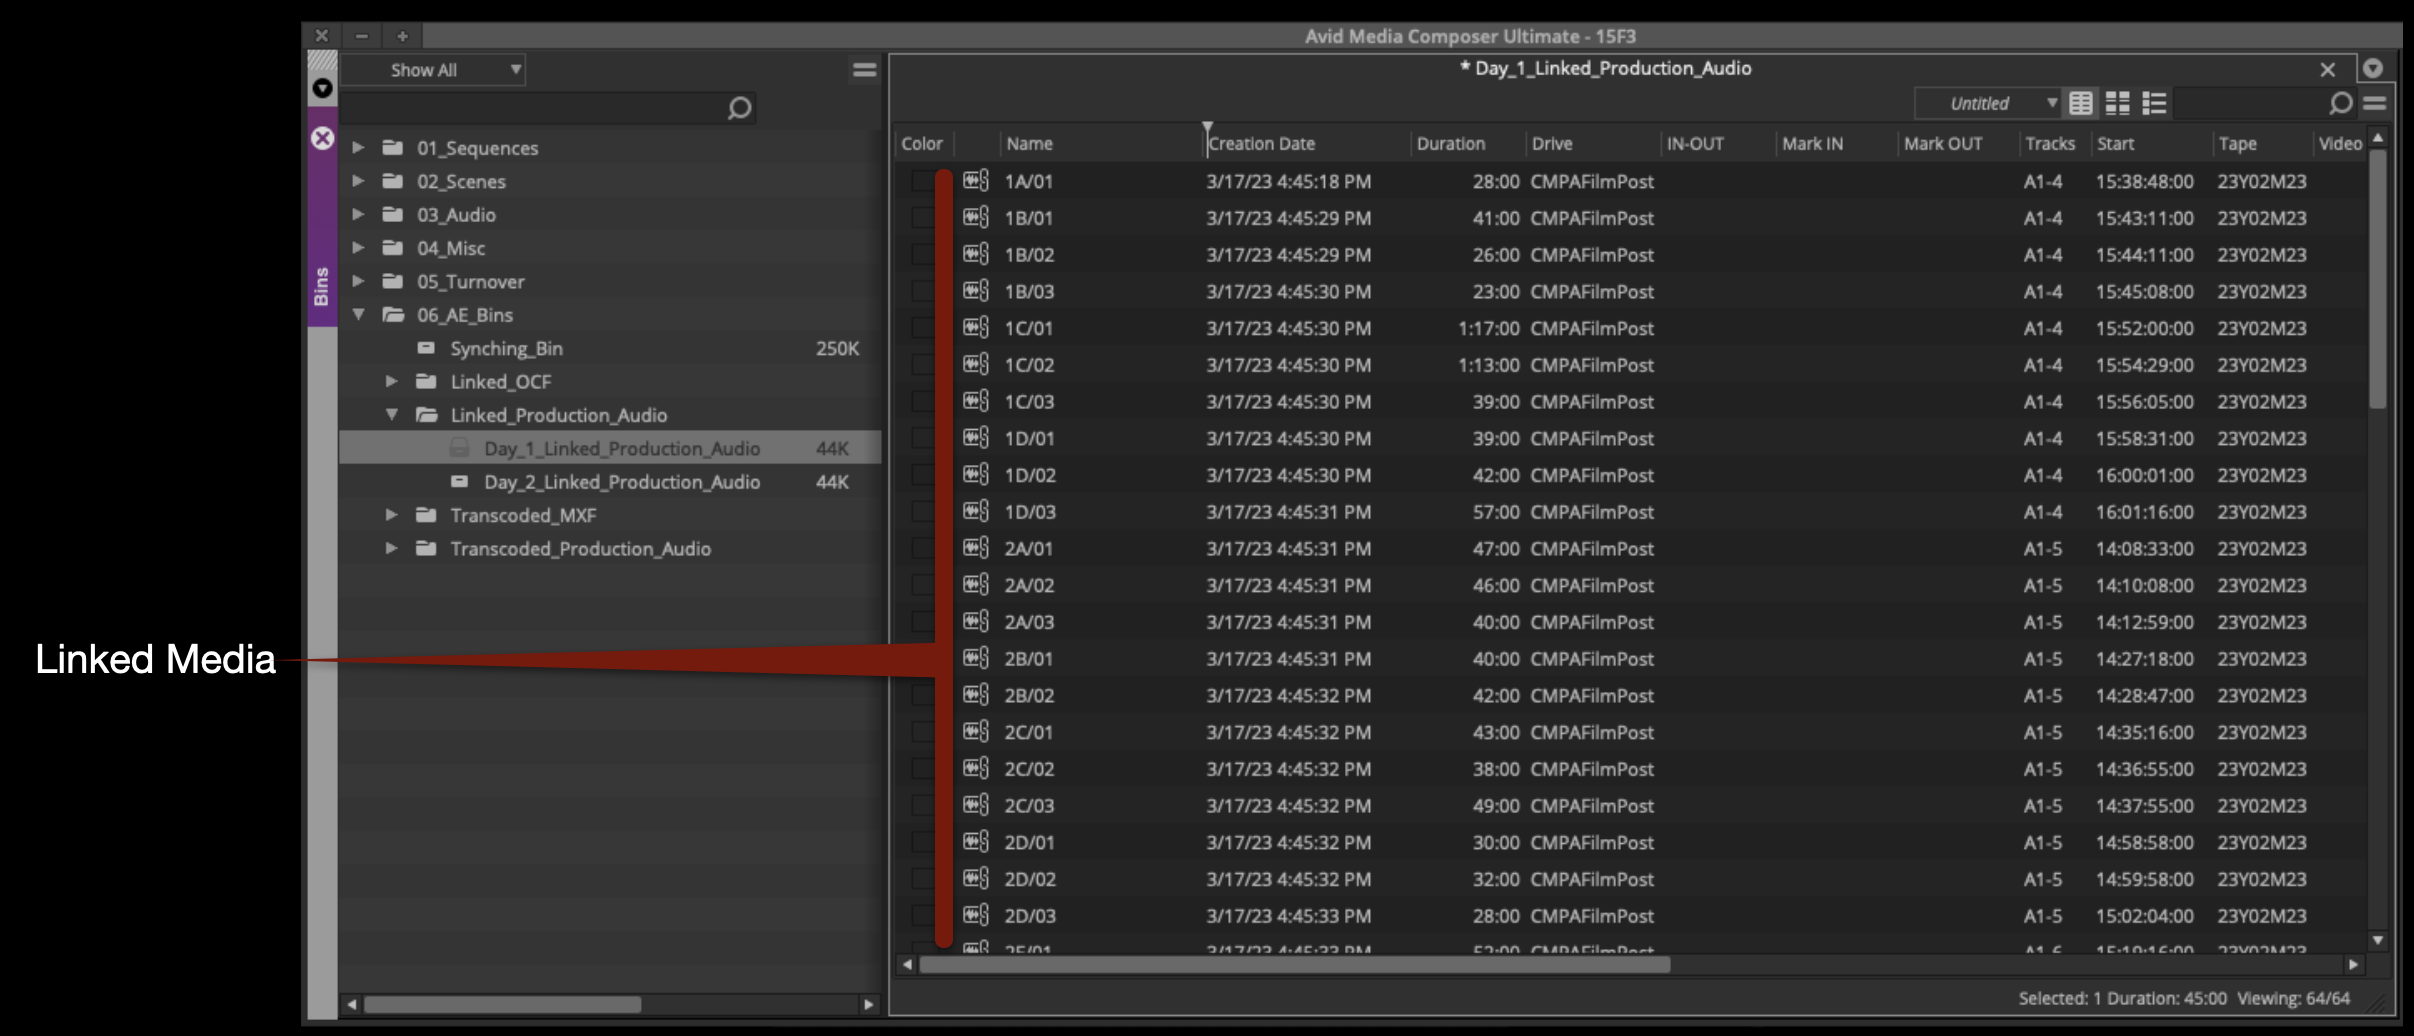
The selected clips will begin linking:
Notice that the icons have linked-chain symbols. This is to let you know that this is not Avid Media yet; it’s only linked to the original media on the CMPAFilmPost Server.
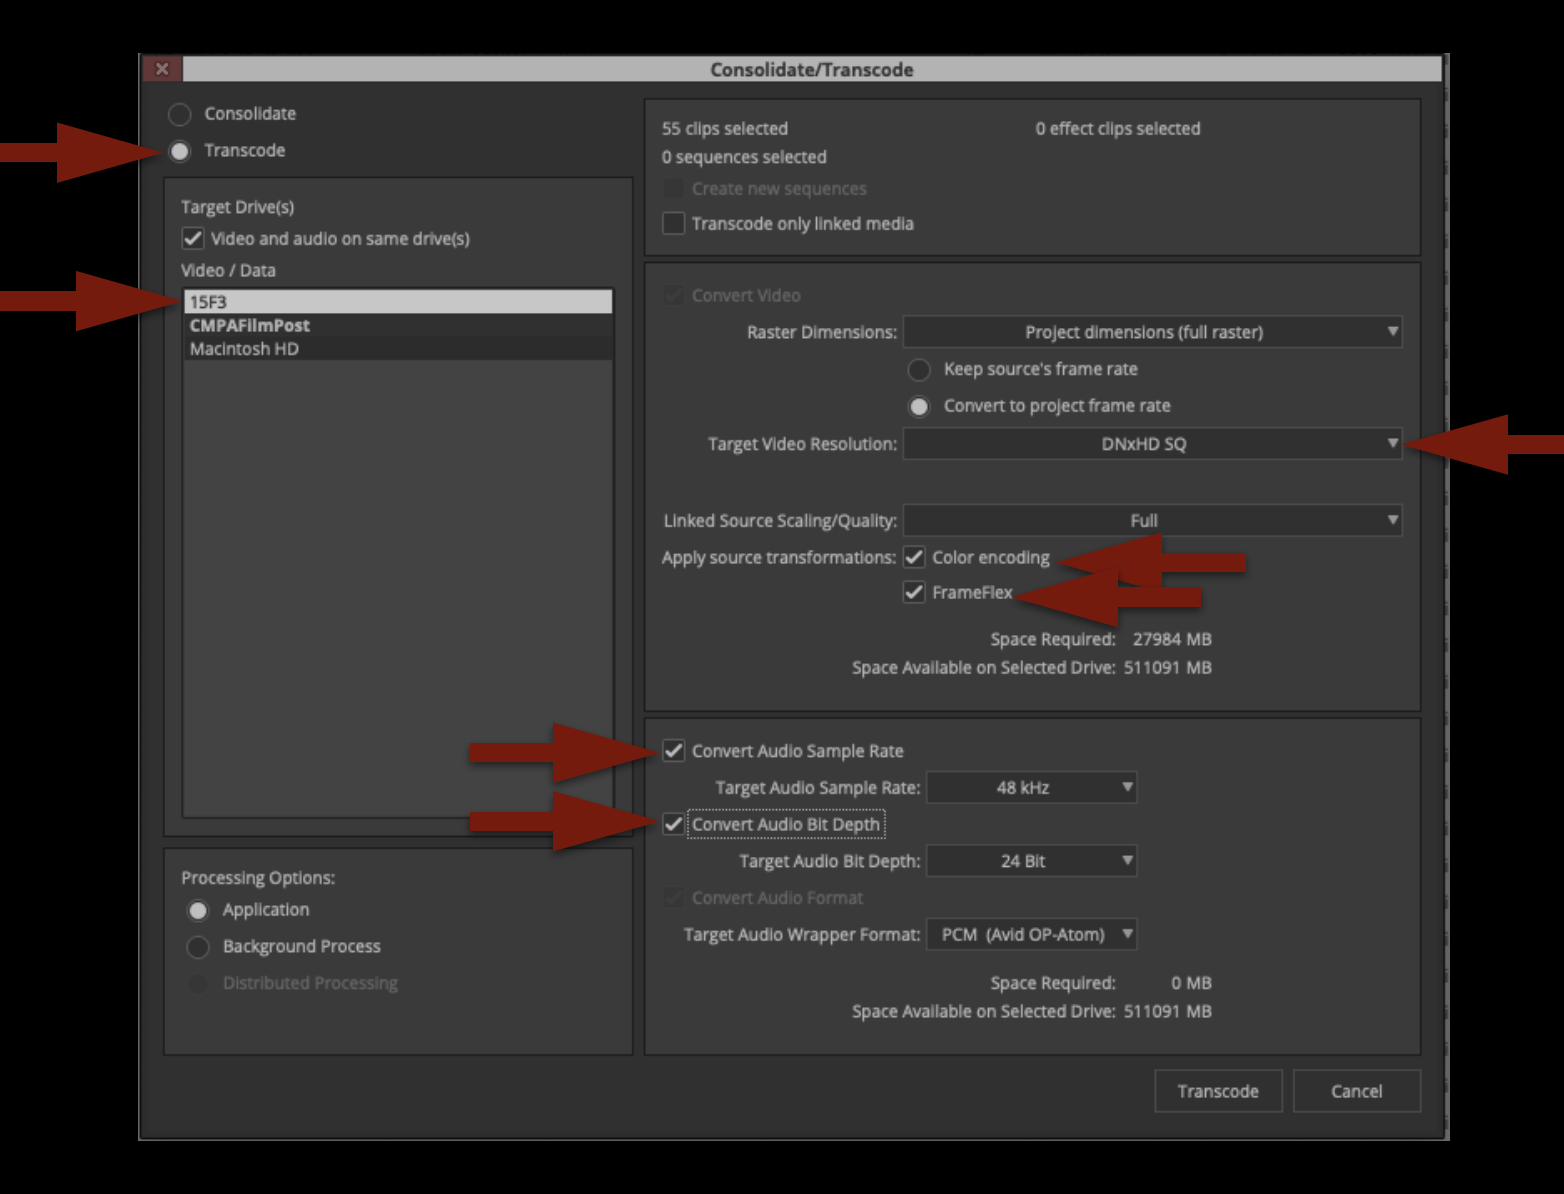
Highlight all of the linked files in the bin by hitting “Command + A”. Right-click on a clip and select “Consolidate/Transcode”. This will open the Consolidate/Transcode window.
THIS IS VERY IMPORTANT: Study all the options highlighted by the red arrows shown below. These settings determine how the media will be transcoded and used for editing in Media Composer. The radial button in the top left should be set to “Transcode”. Under the Target Drive, you should select your Show Volume. Do not select CMPAFilmPost. Then, double-check all of the red arrows on the right.
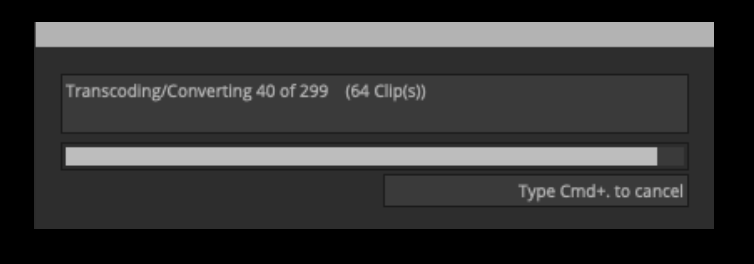
Once everything is set properly you can click “Transcode”. Since this is audio media, it will not take long at all to transcode. Don’t go anywhere!
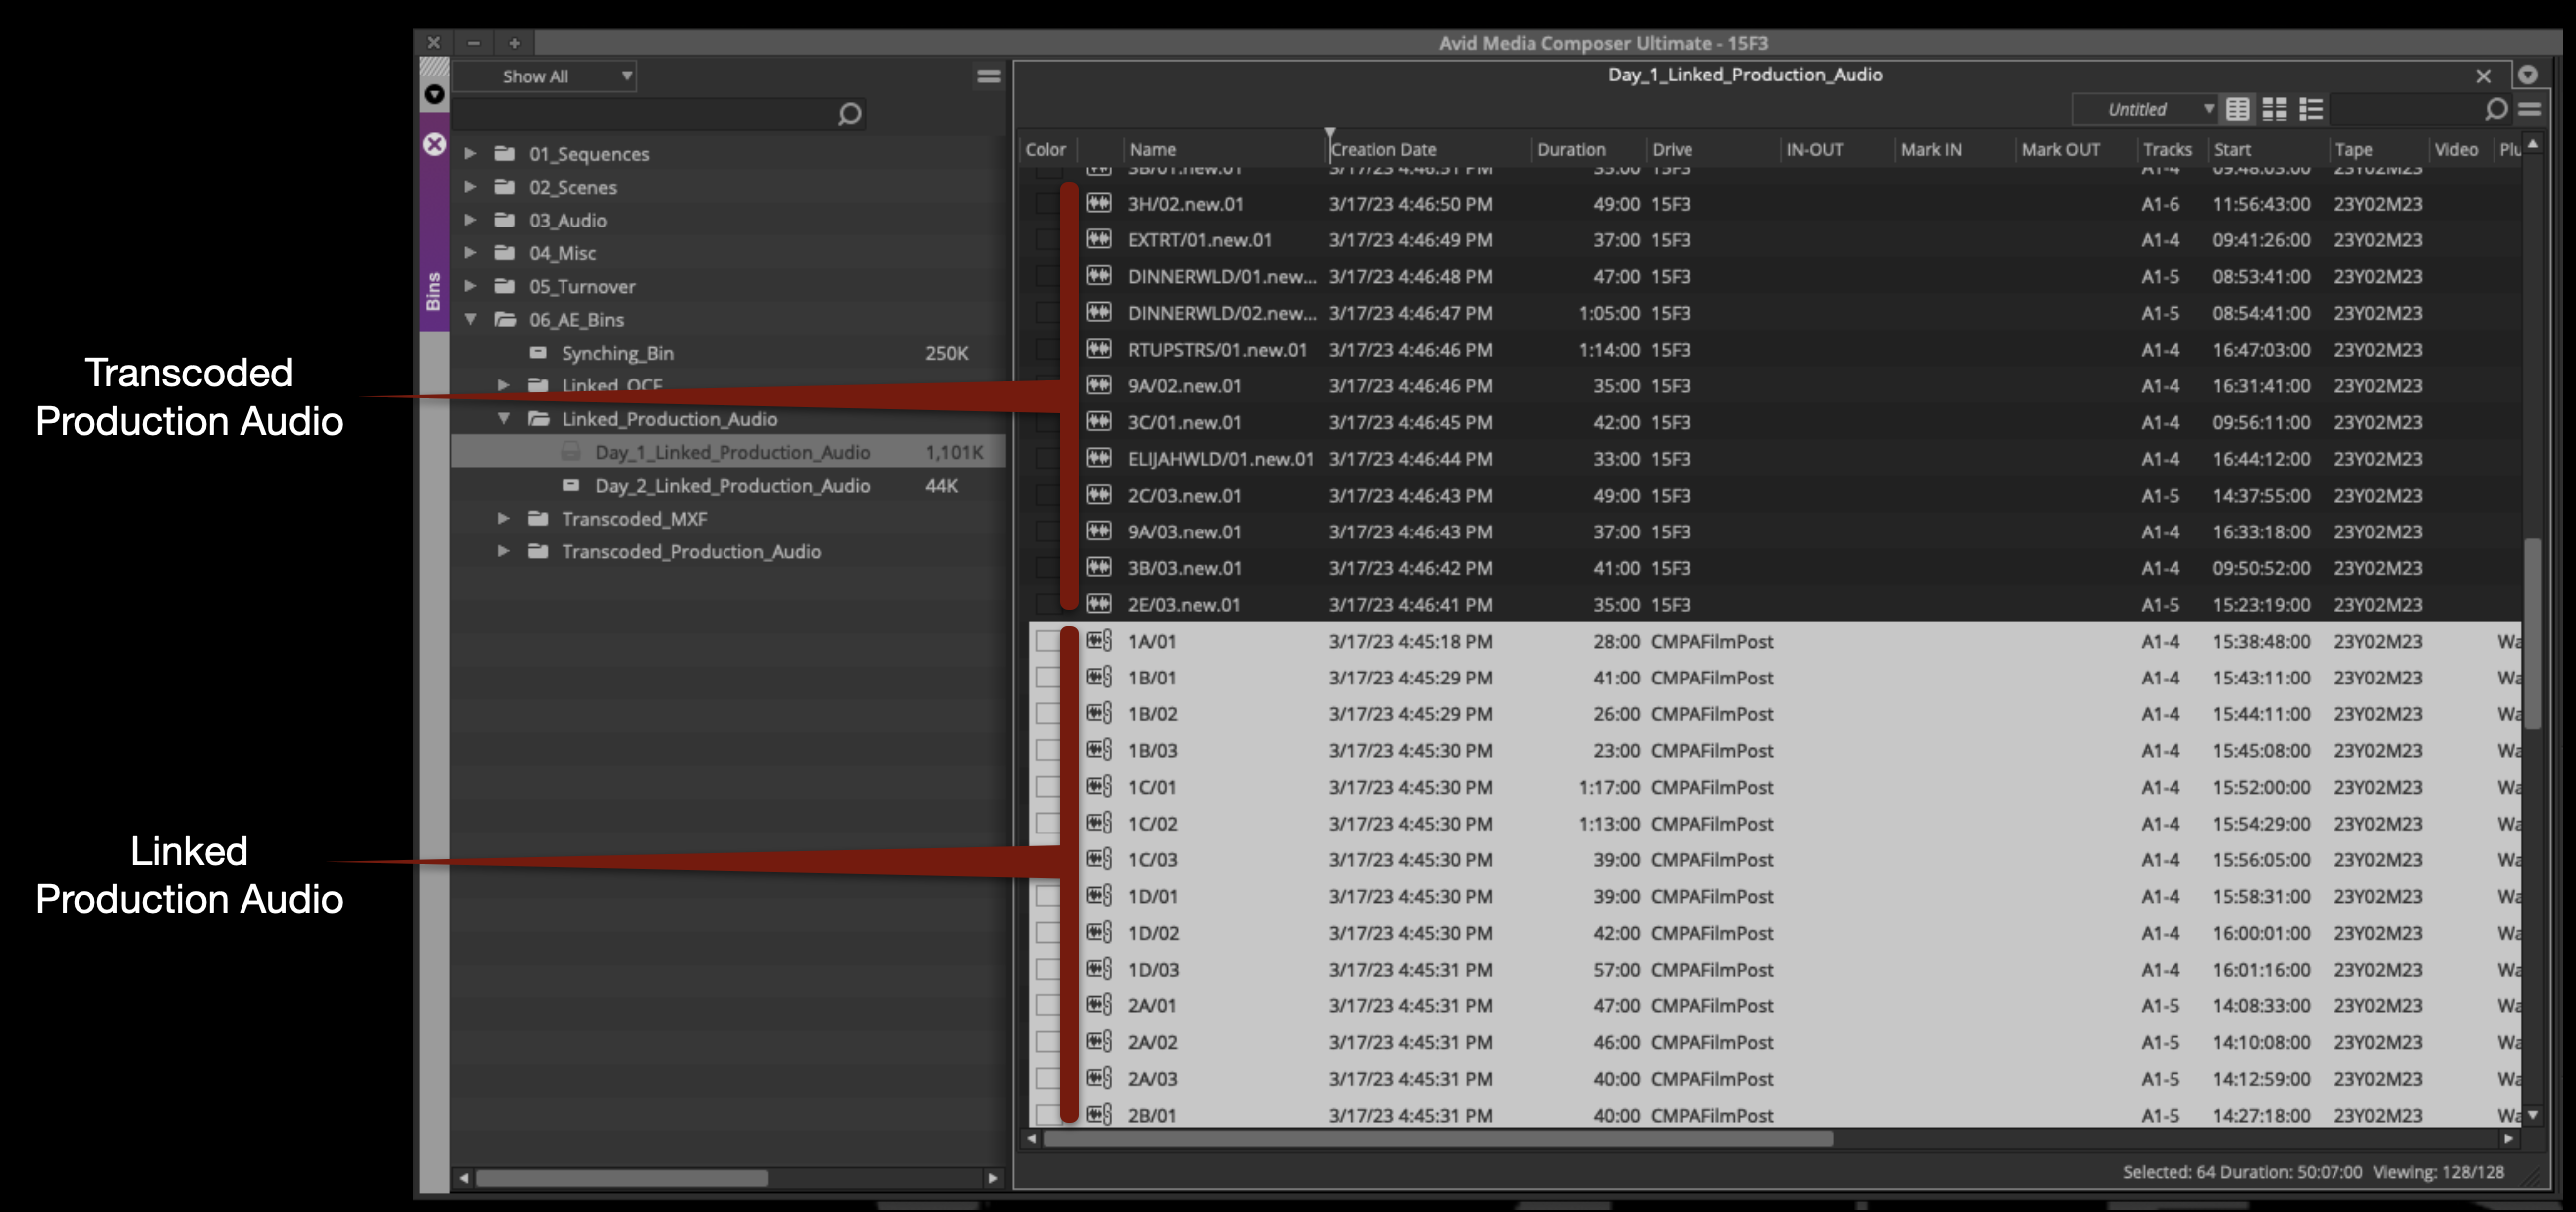
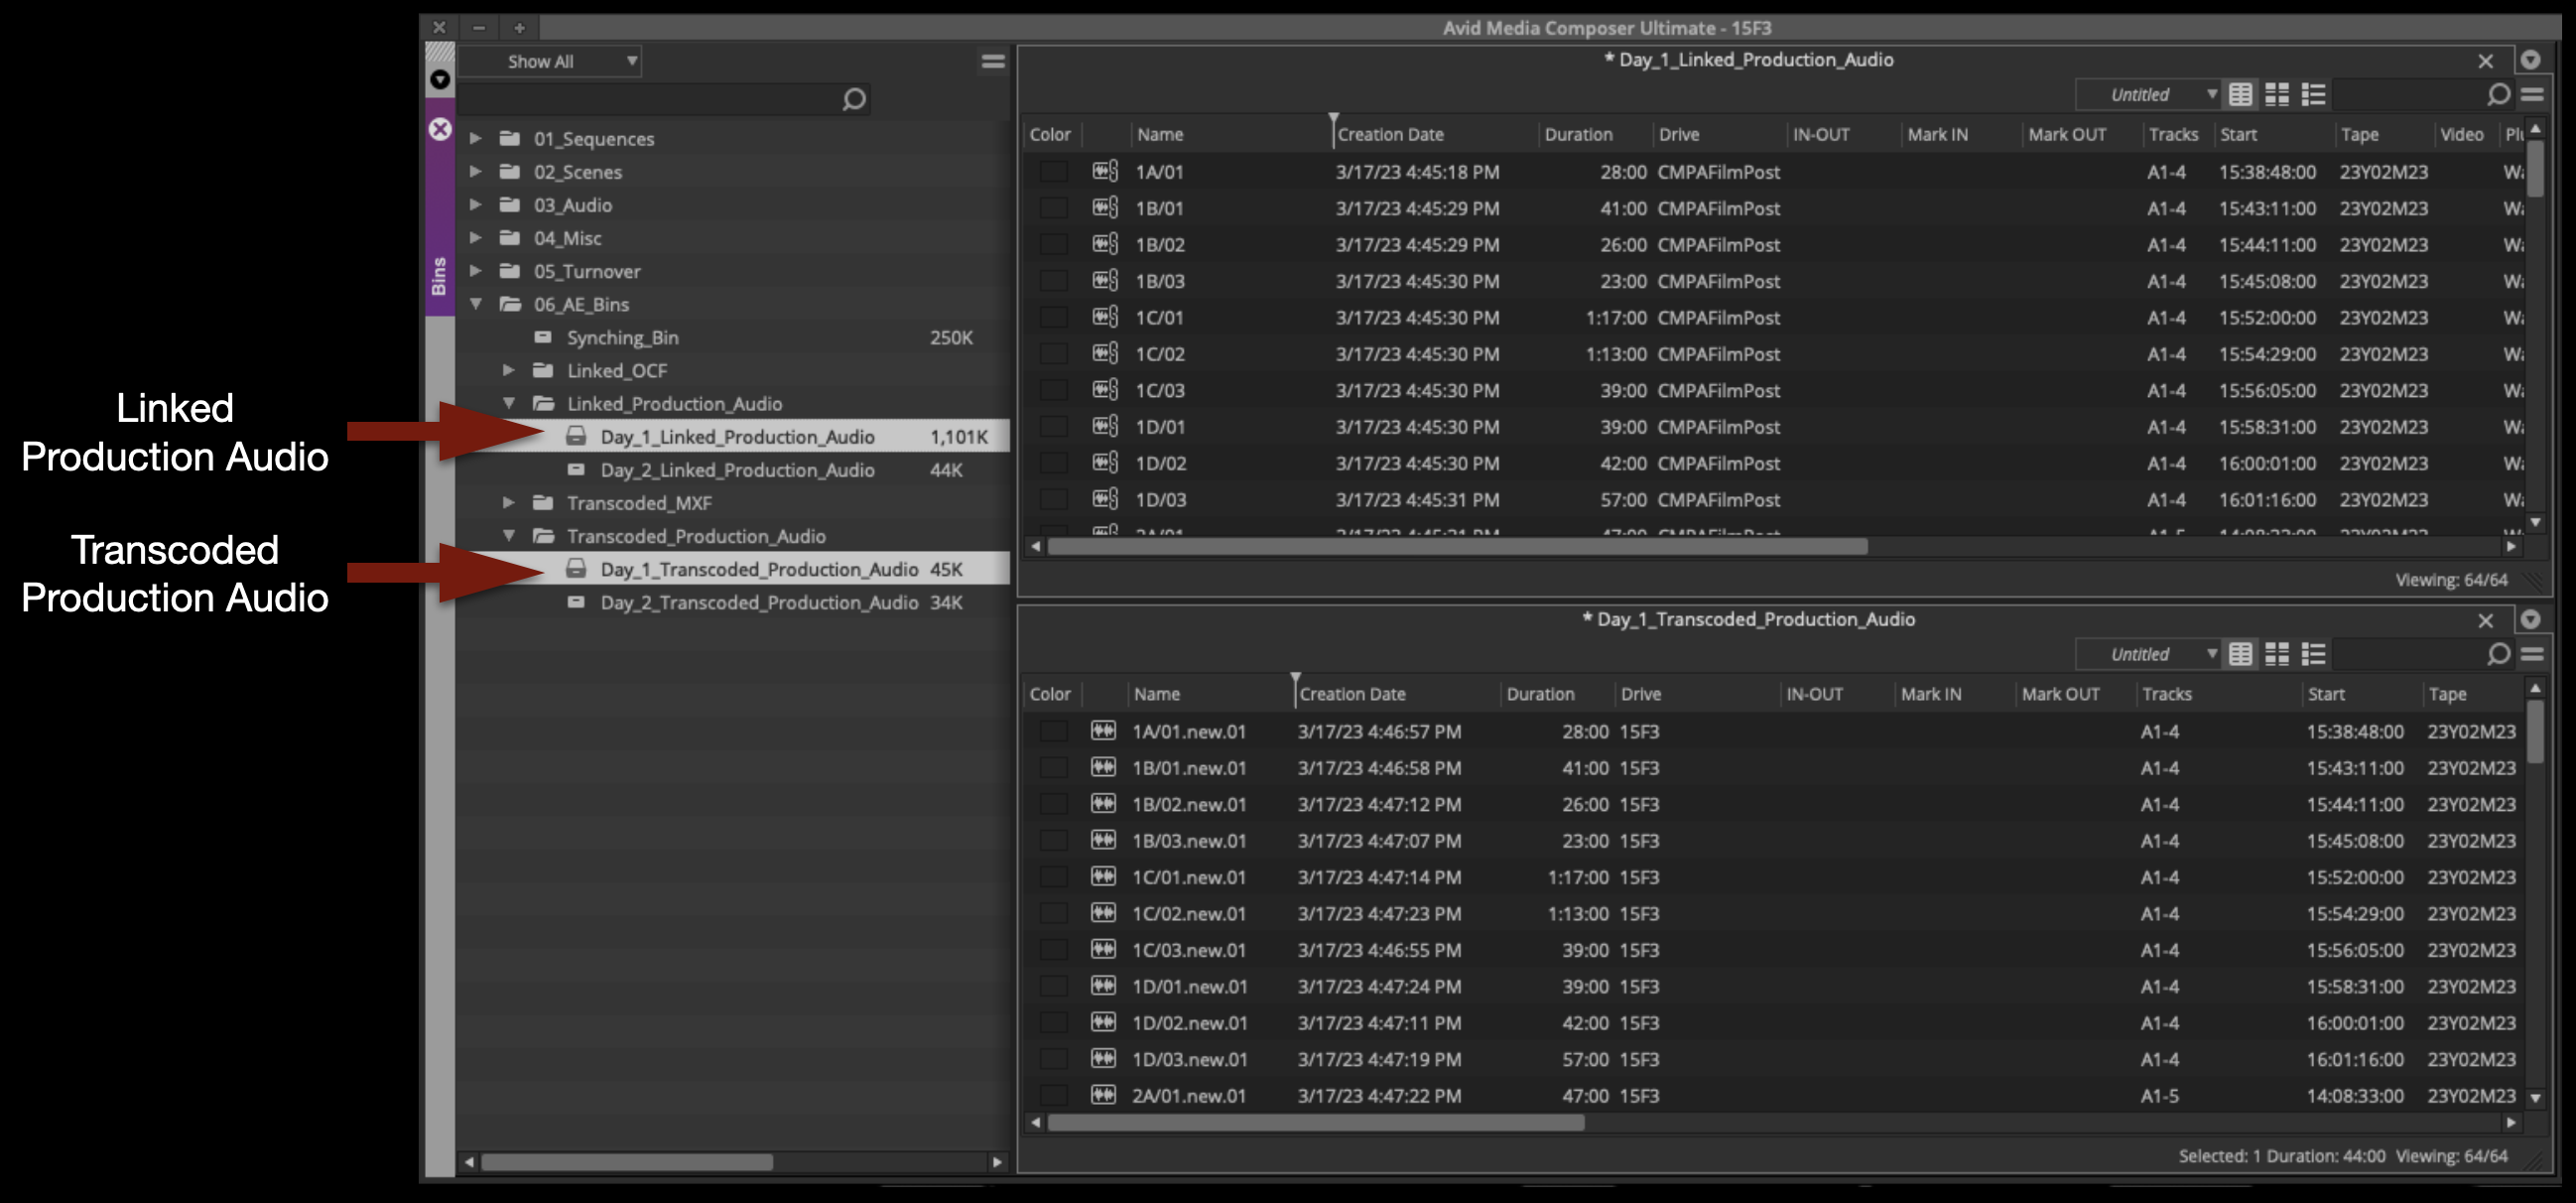
When the transcode is finished, you will notice that now you have two versions of everything in your bin. One is linked Production Audio and the other is Transcoded Production Audio:
Move the Transcode Production Audio media to the proper bin:
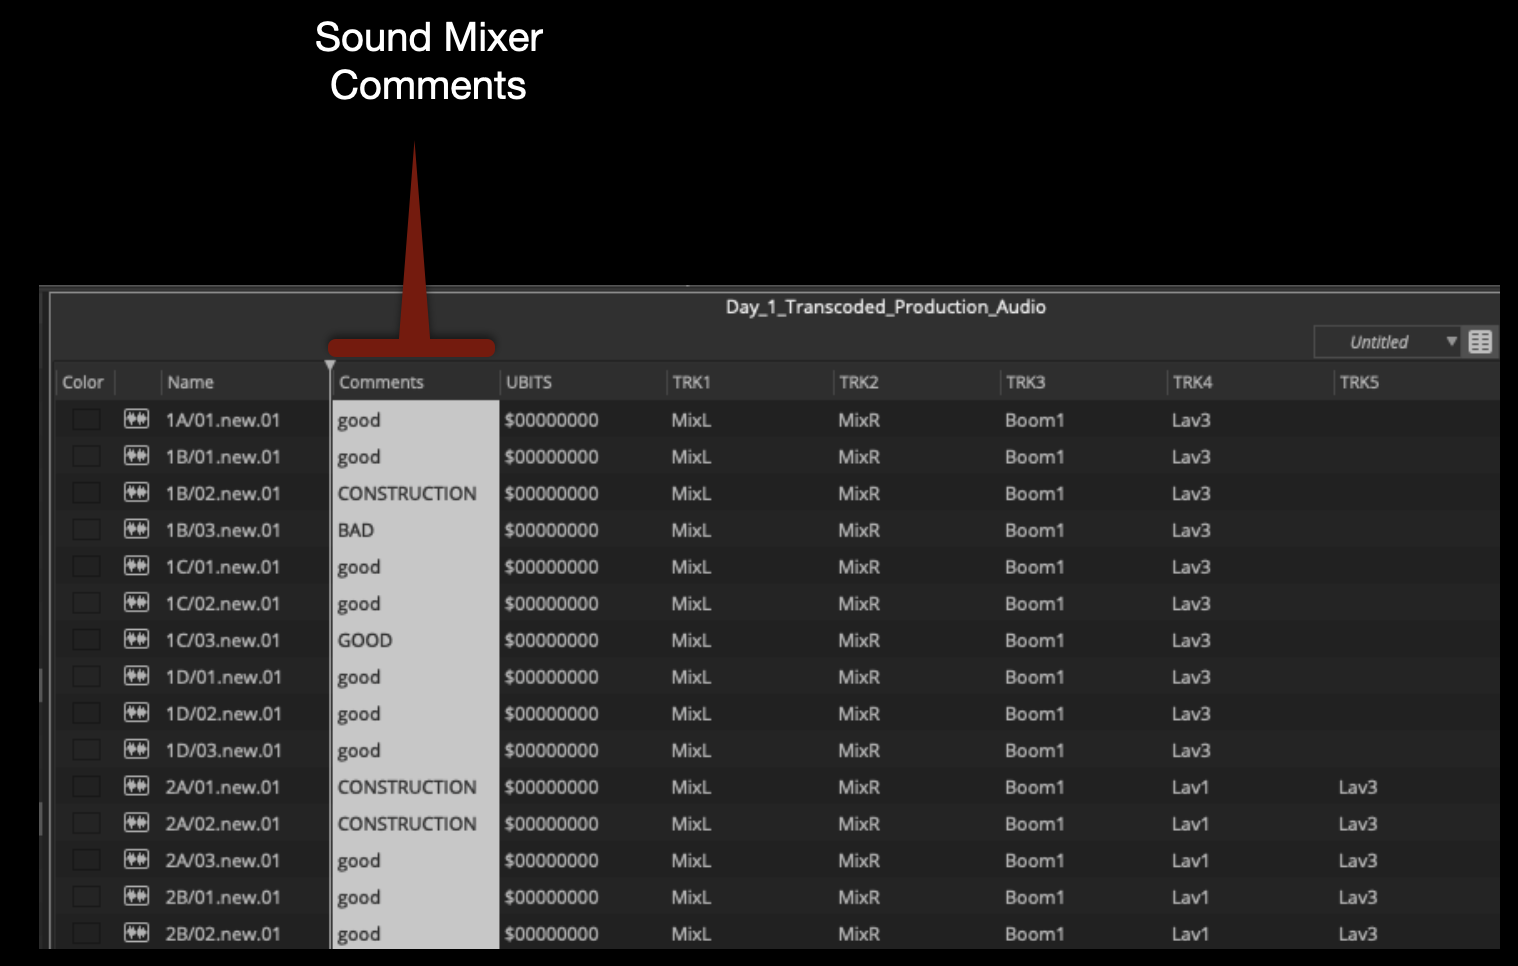
In the Transcoded Production Audio bin, take notice of a few things.
The Sound Mixer has most likely taken notes that will be useful later. These are in the Comments column:
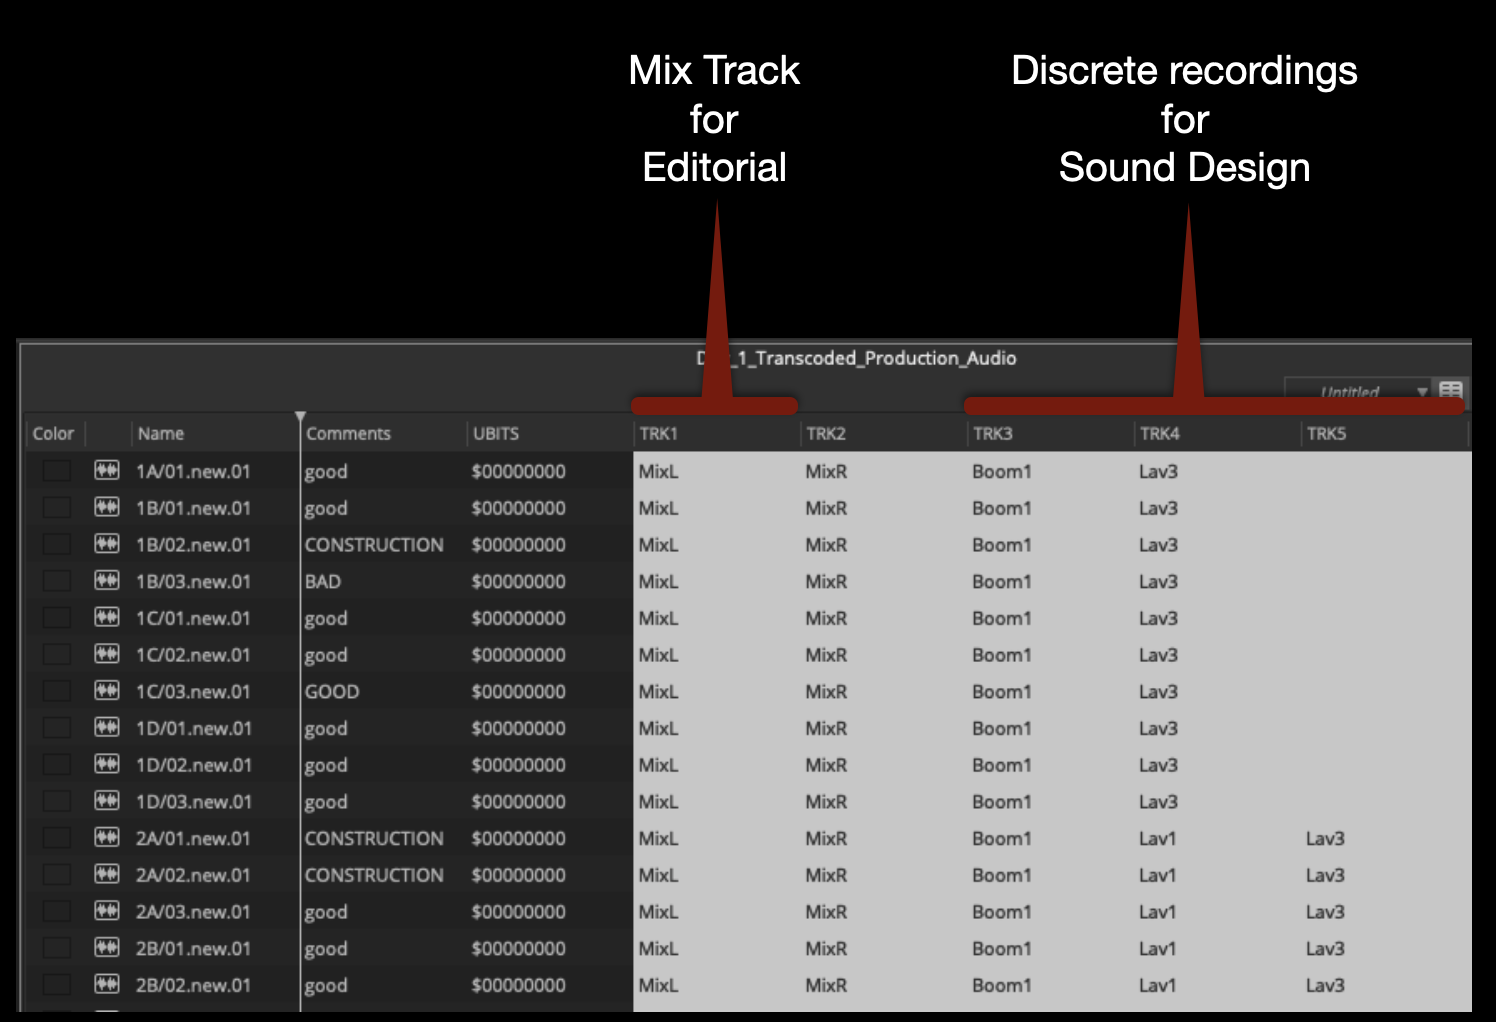
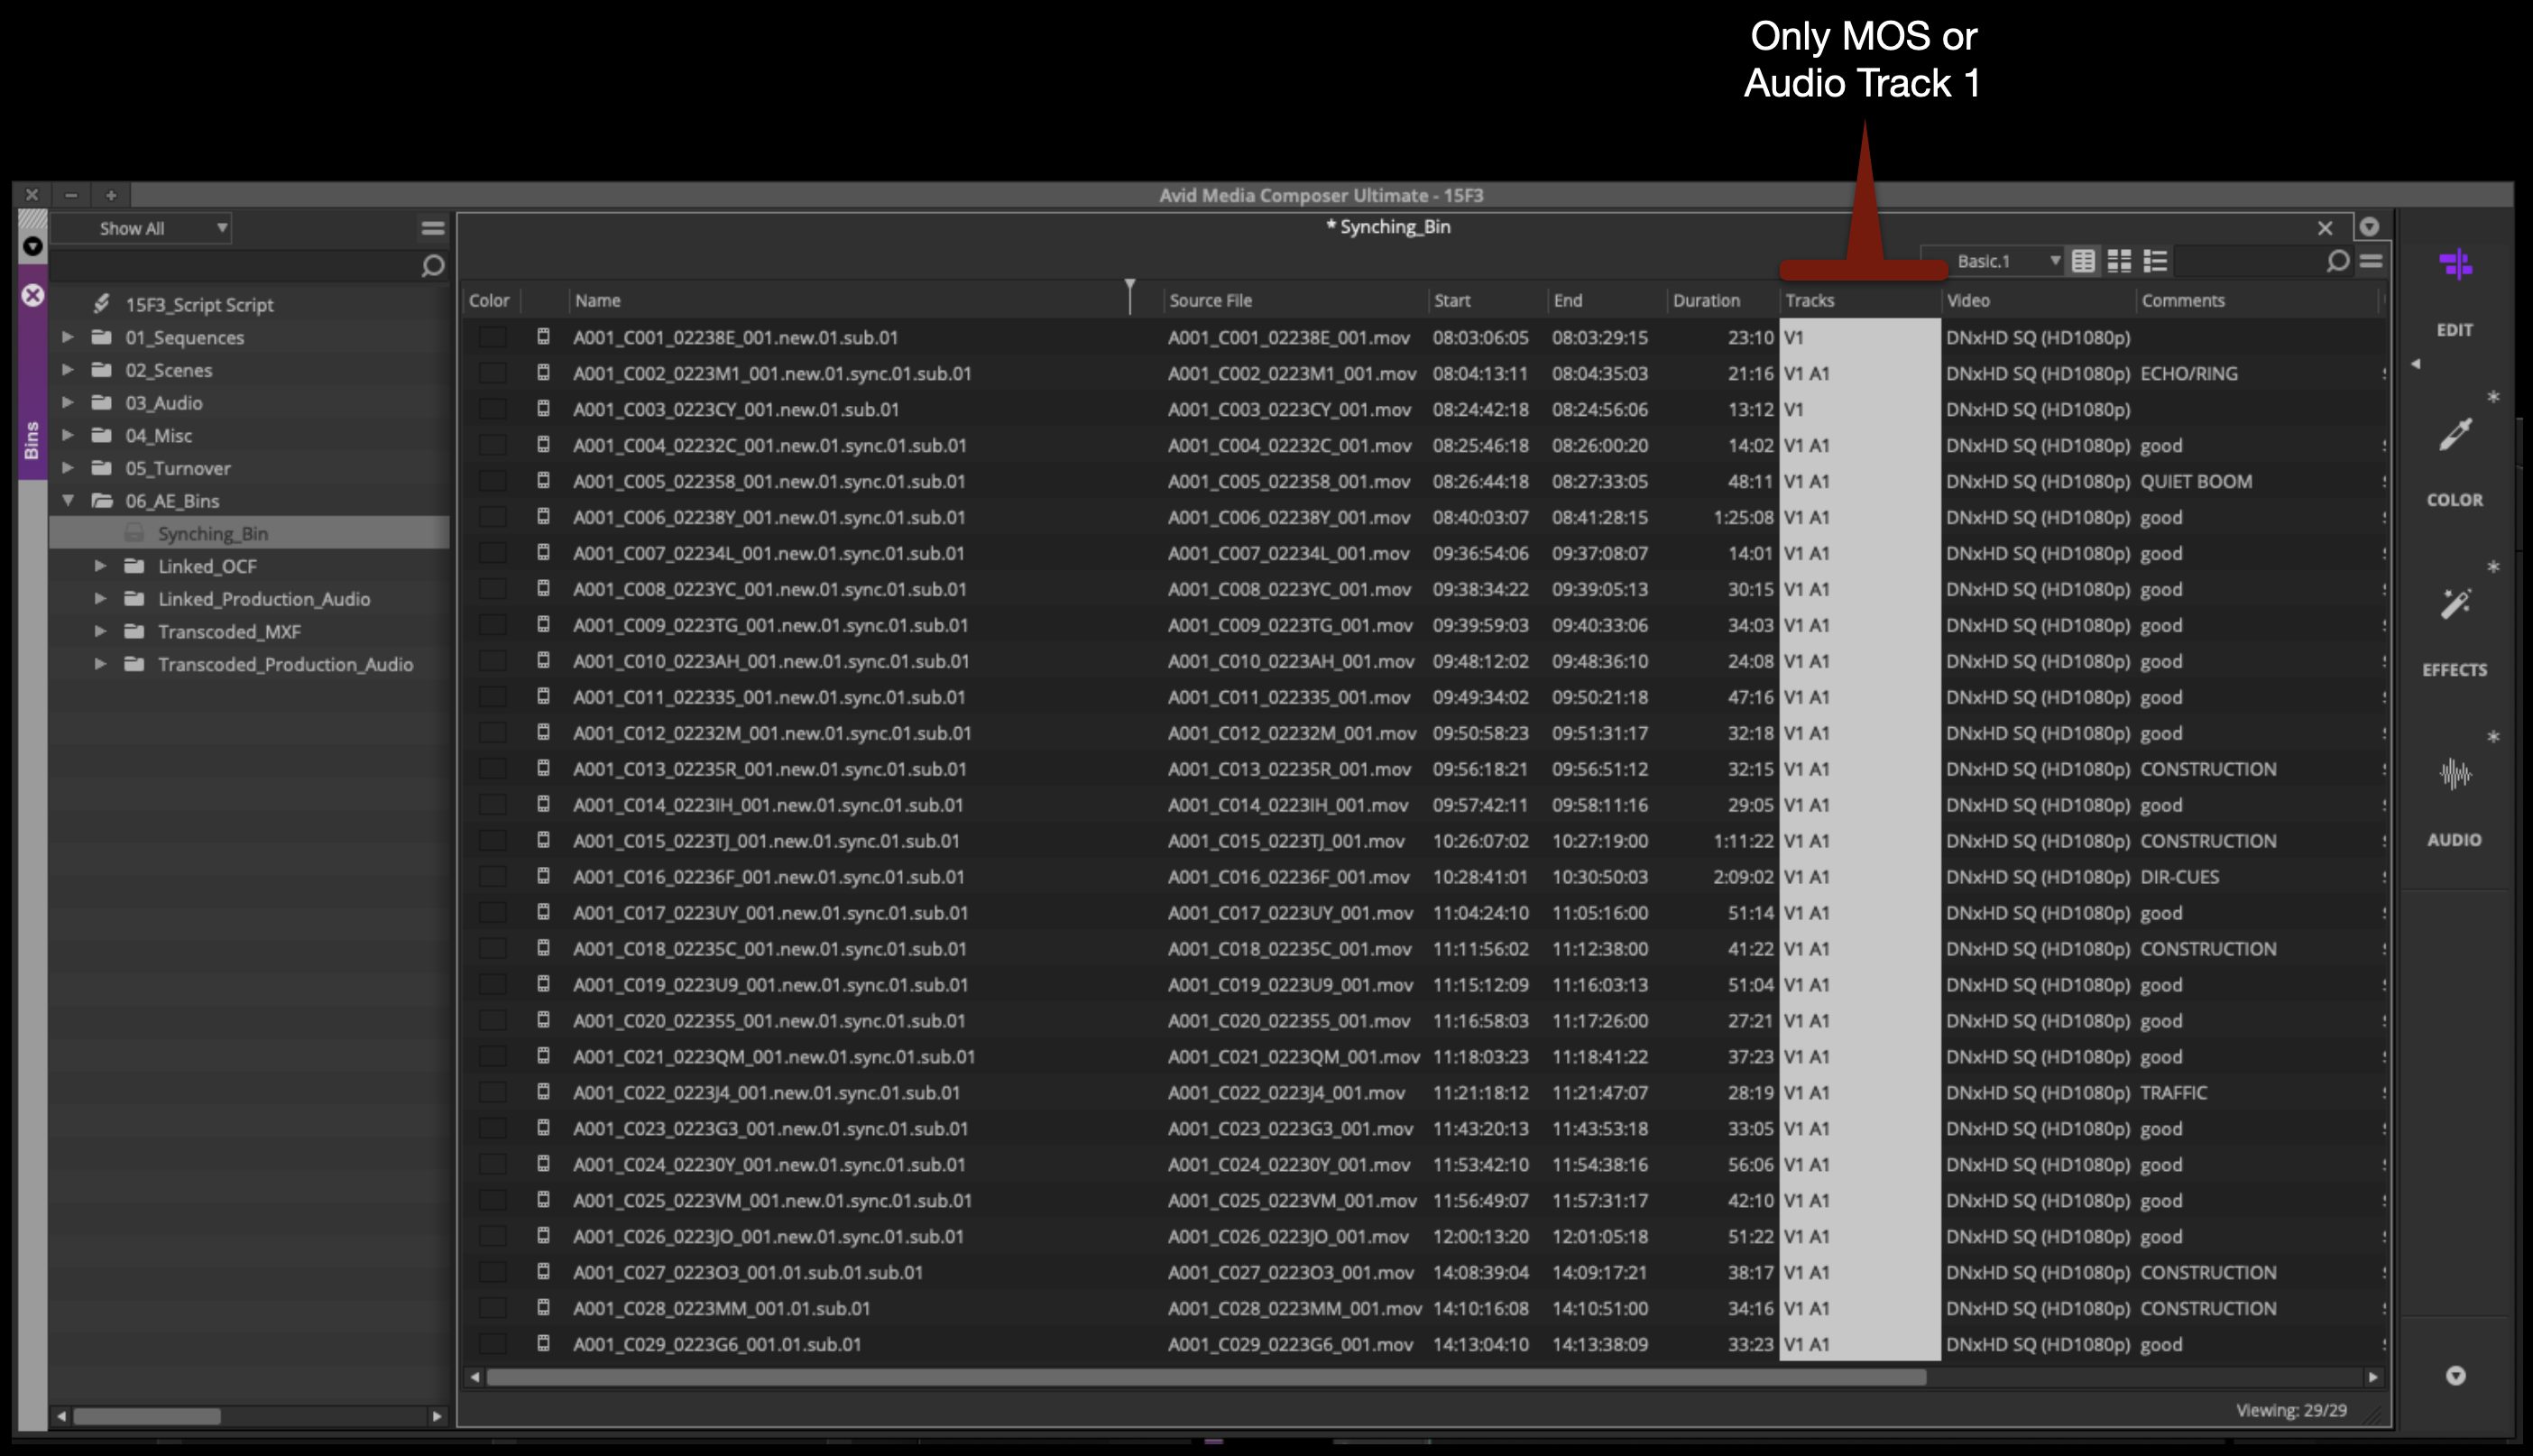
Also, you will see in the TRK columns that Track 1 and 2 are Mix tracks. These Mix tracks are a combination or “mix” of all of the booms and radio mics that were used during production. Later in the process you will make subclips with only Track 1 or “MixL” attached, for use during picture editing. Tracks 3 through 8 are discrete recordings that can be used individually when you get to sound design.
Synchronize Audio and Video
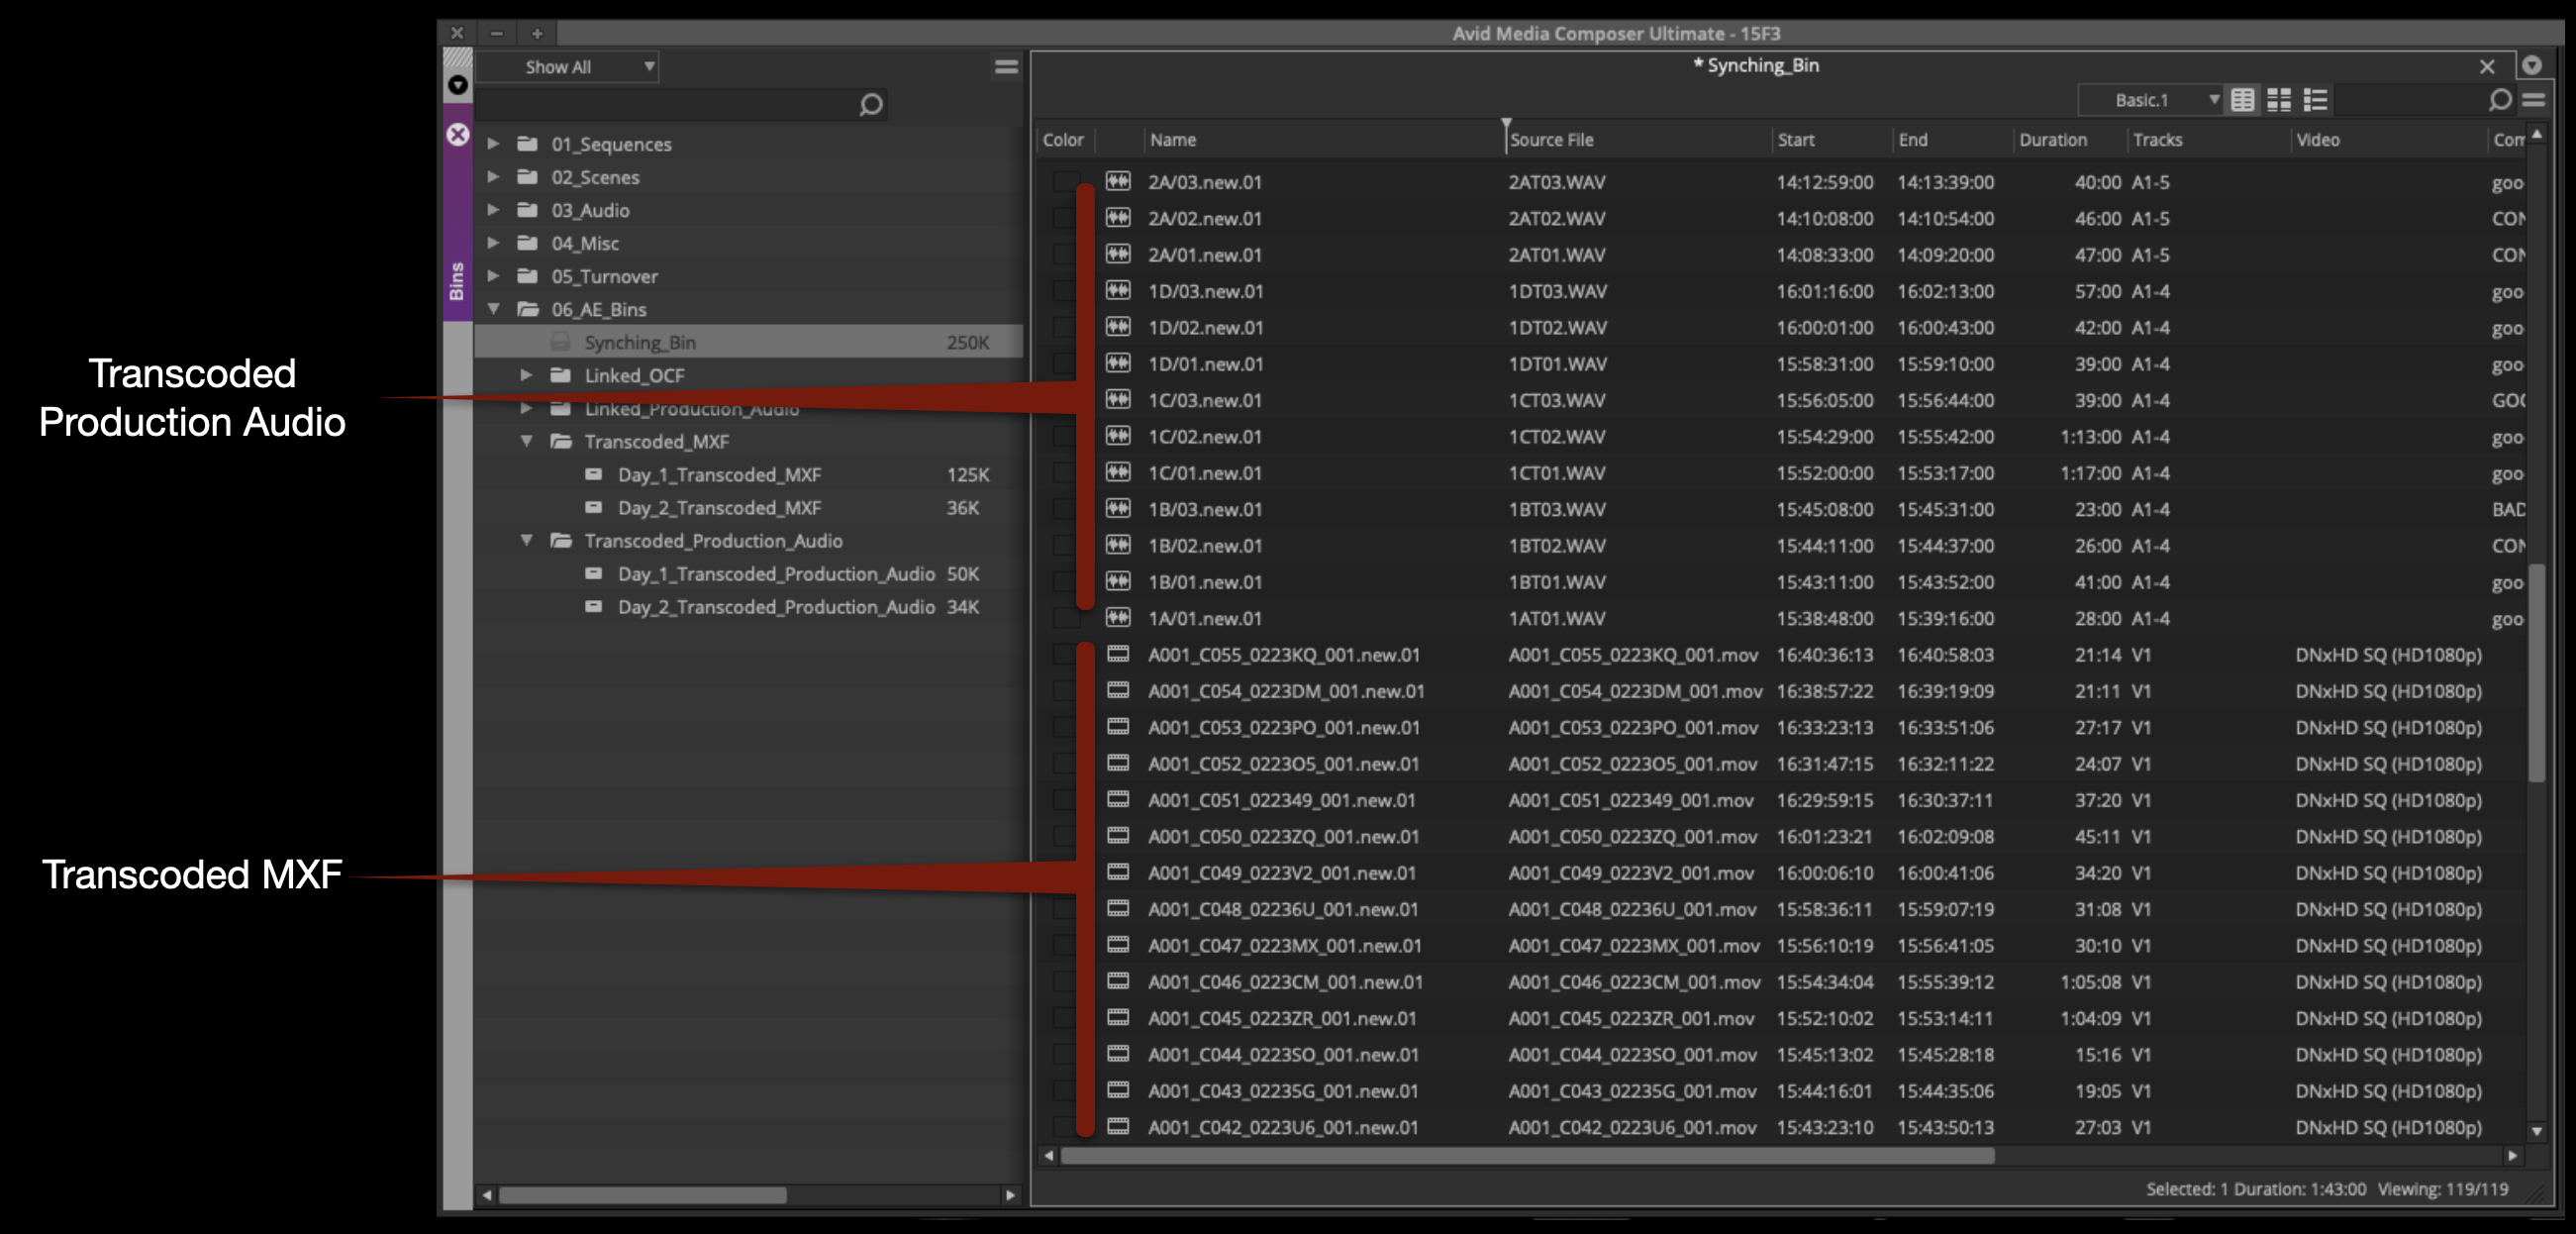
To synchronize master audio clips and master video clips, they need to be placed in the same bin. Move the day’s worth of audio and video together into the Synching Bin.
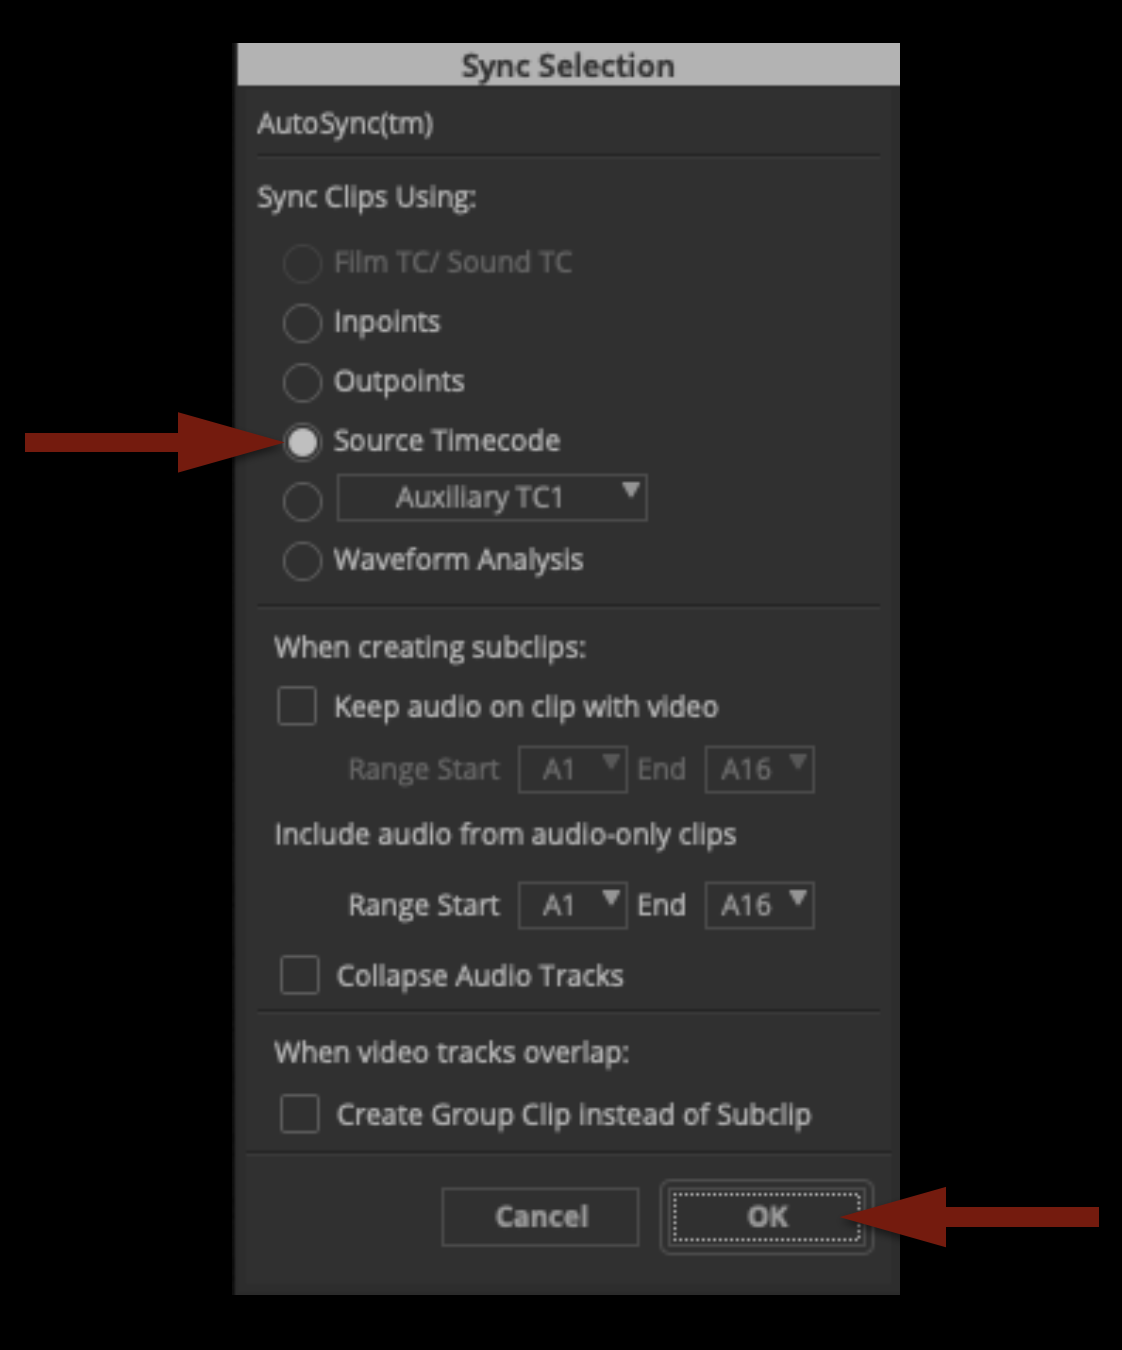
Select all the audio and video clips in the Syncing Bin. Right-click and select “AutoSync” from the contextual menu. The Sync Selection window will open. Make sure “Source Timecode” is selected and click “OK”.
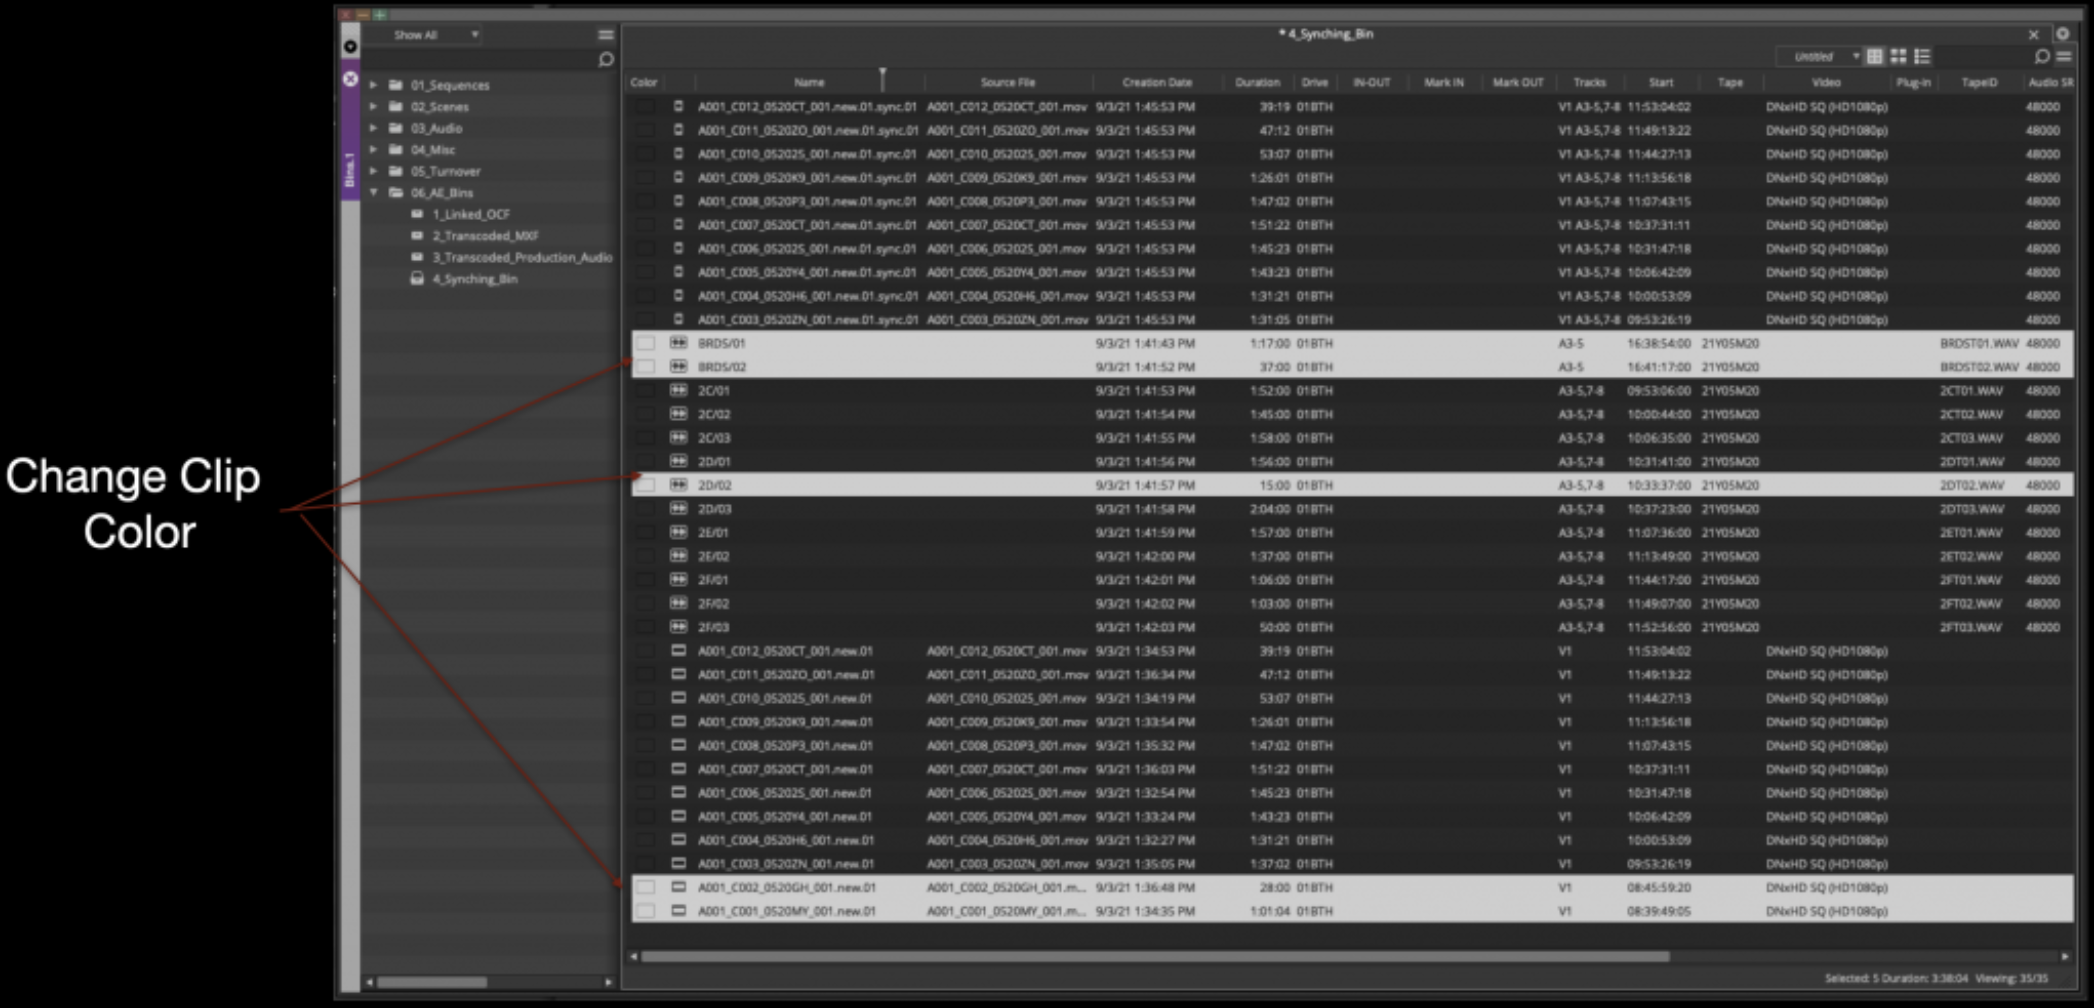
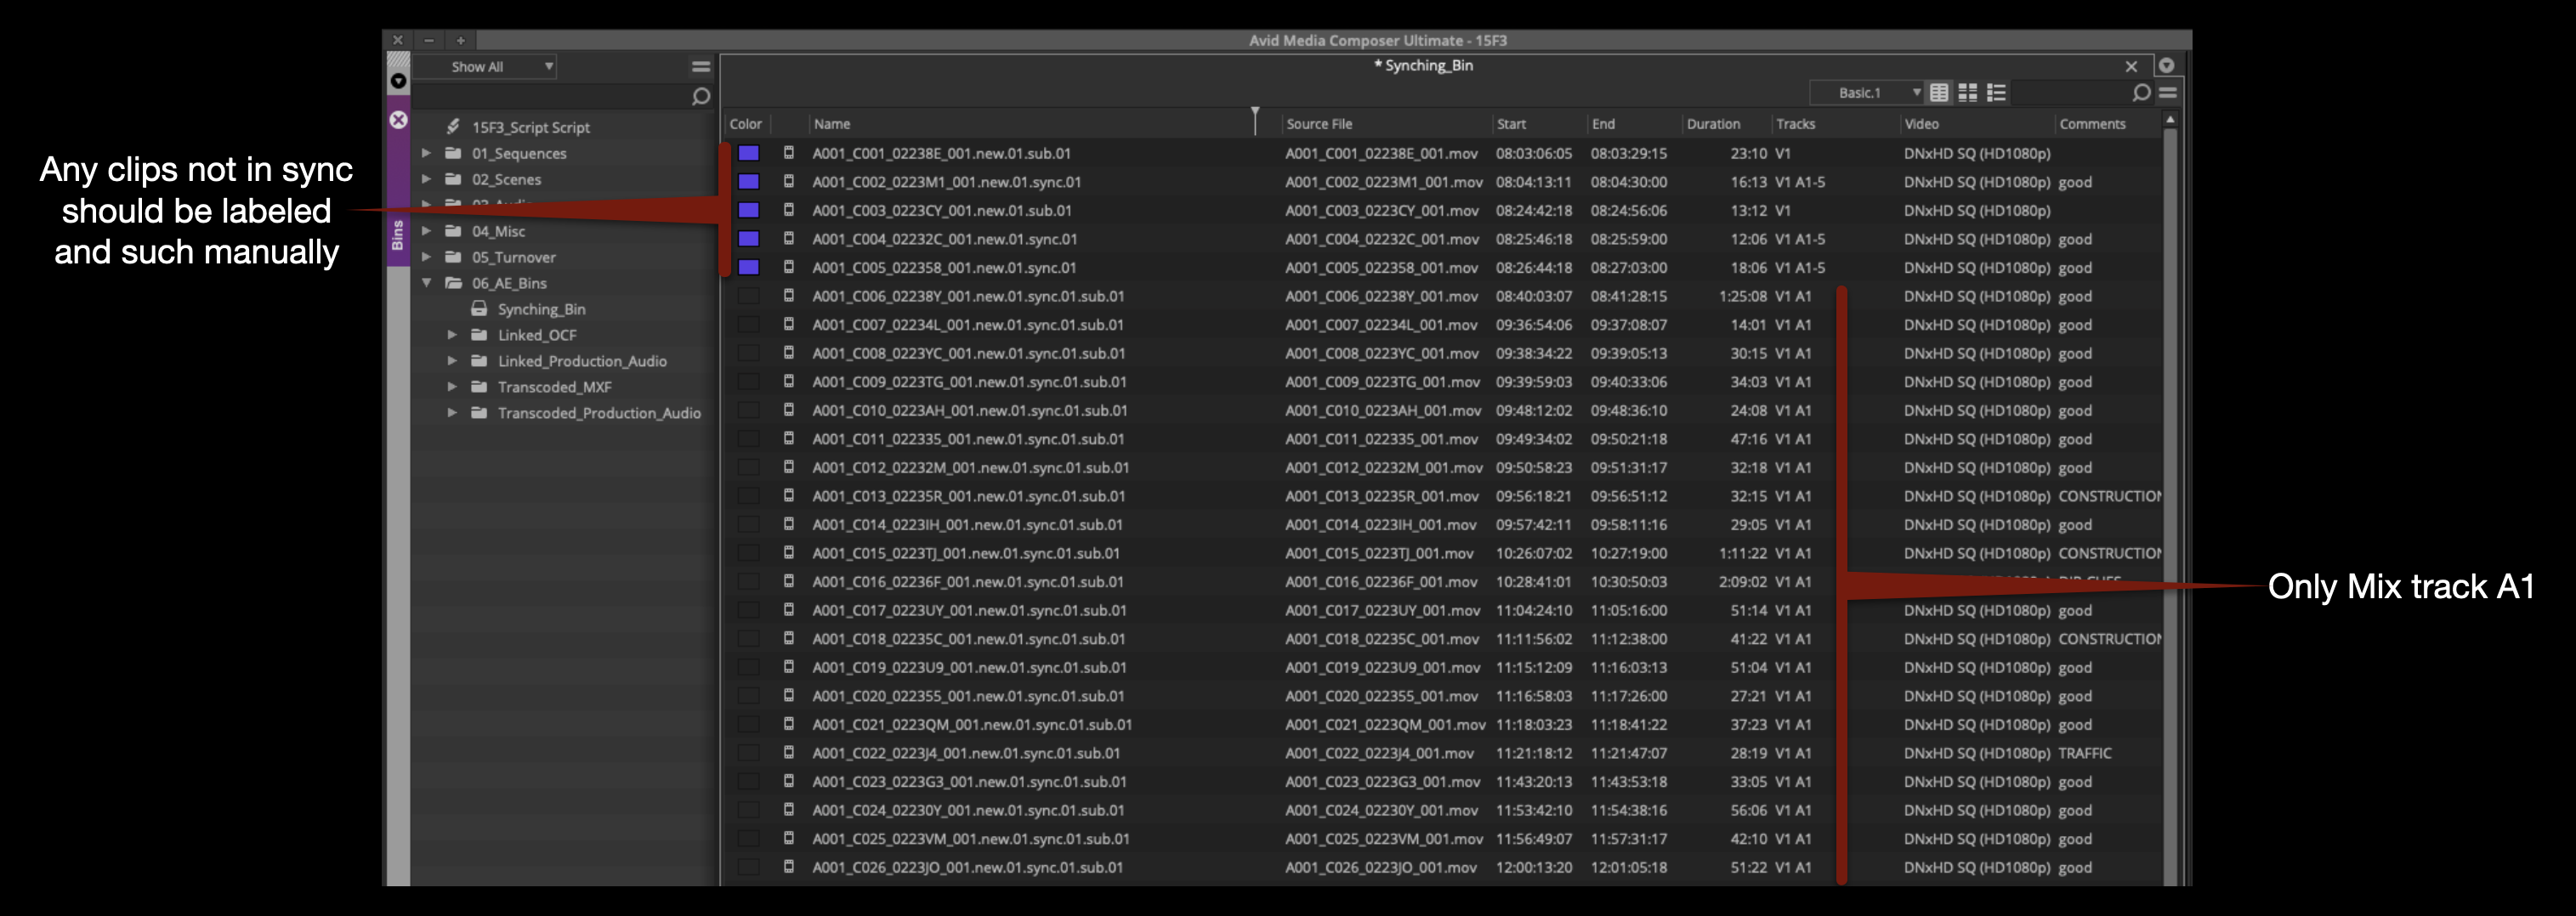
This makes a subclip out of every audio and video clip that has matching timecode. Anything that did not sync (because it couldn’t find a pair with matching timecode) will be left highlighted. Change the clip color of these to make it easier to keep track of them.
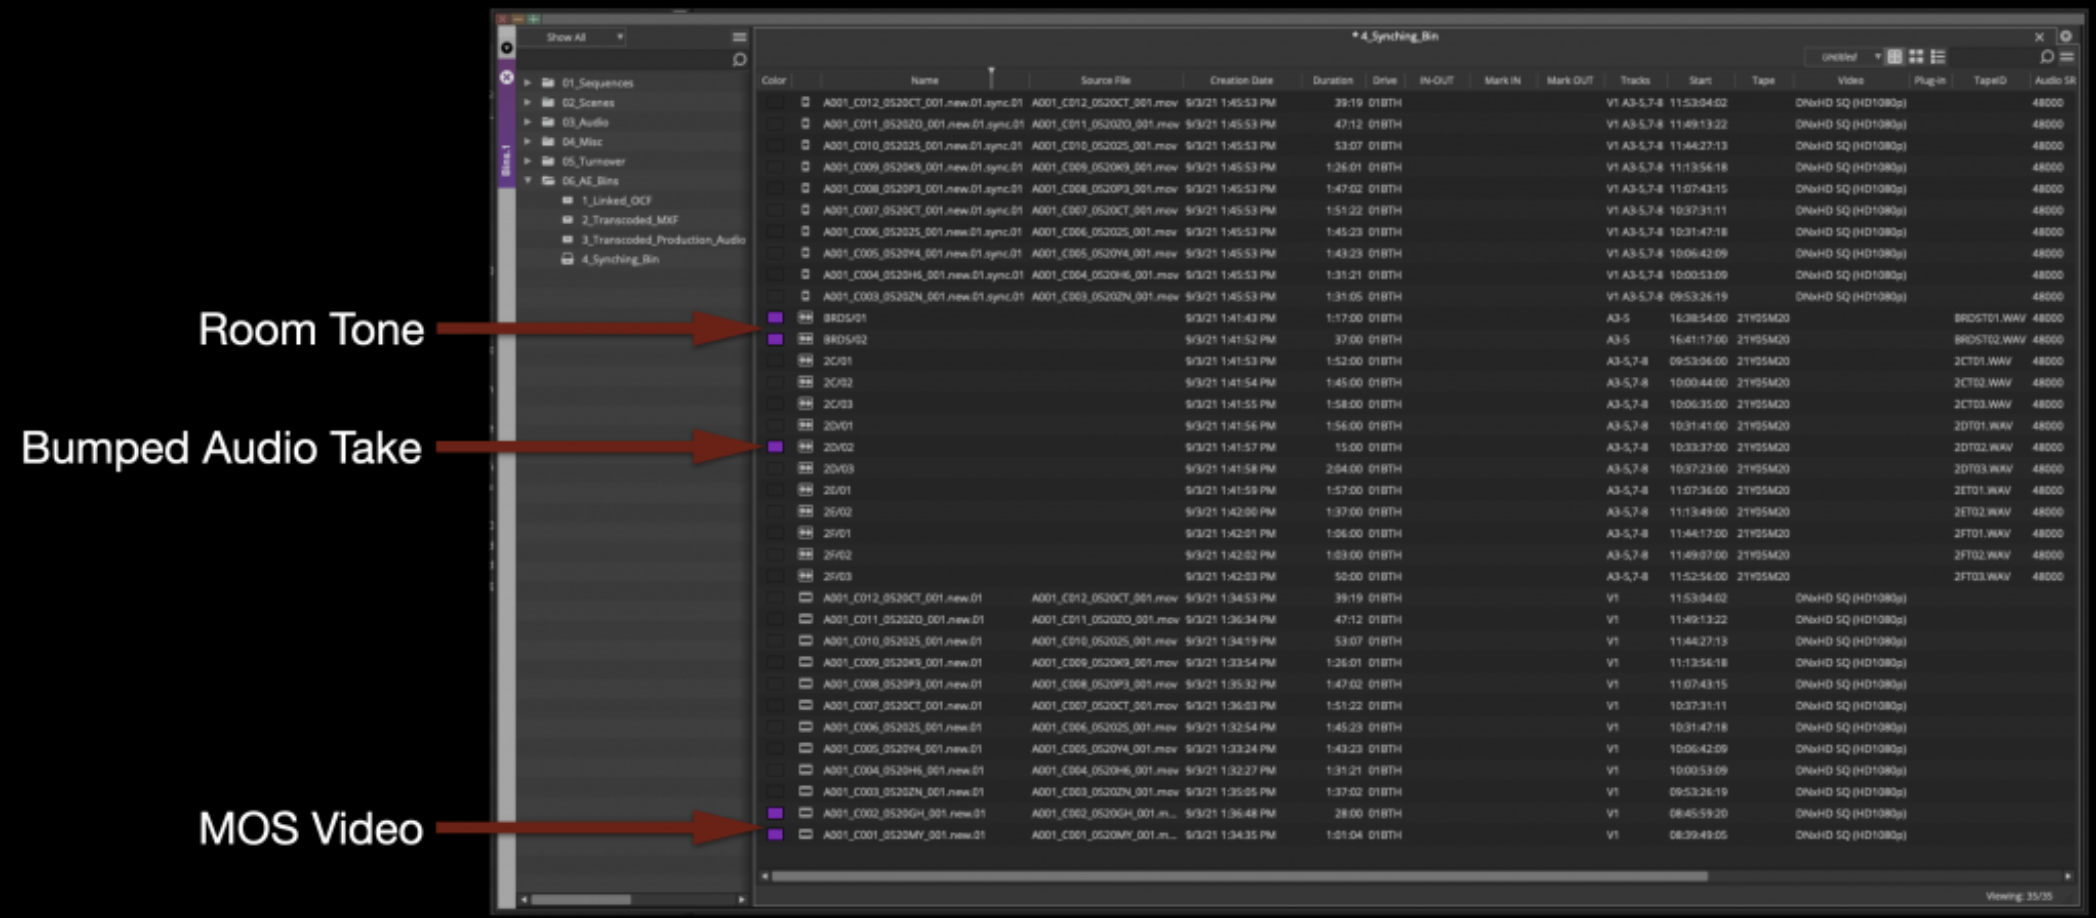
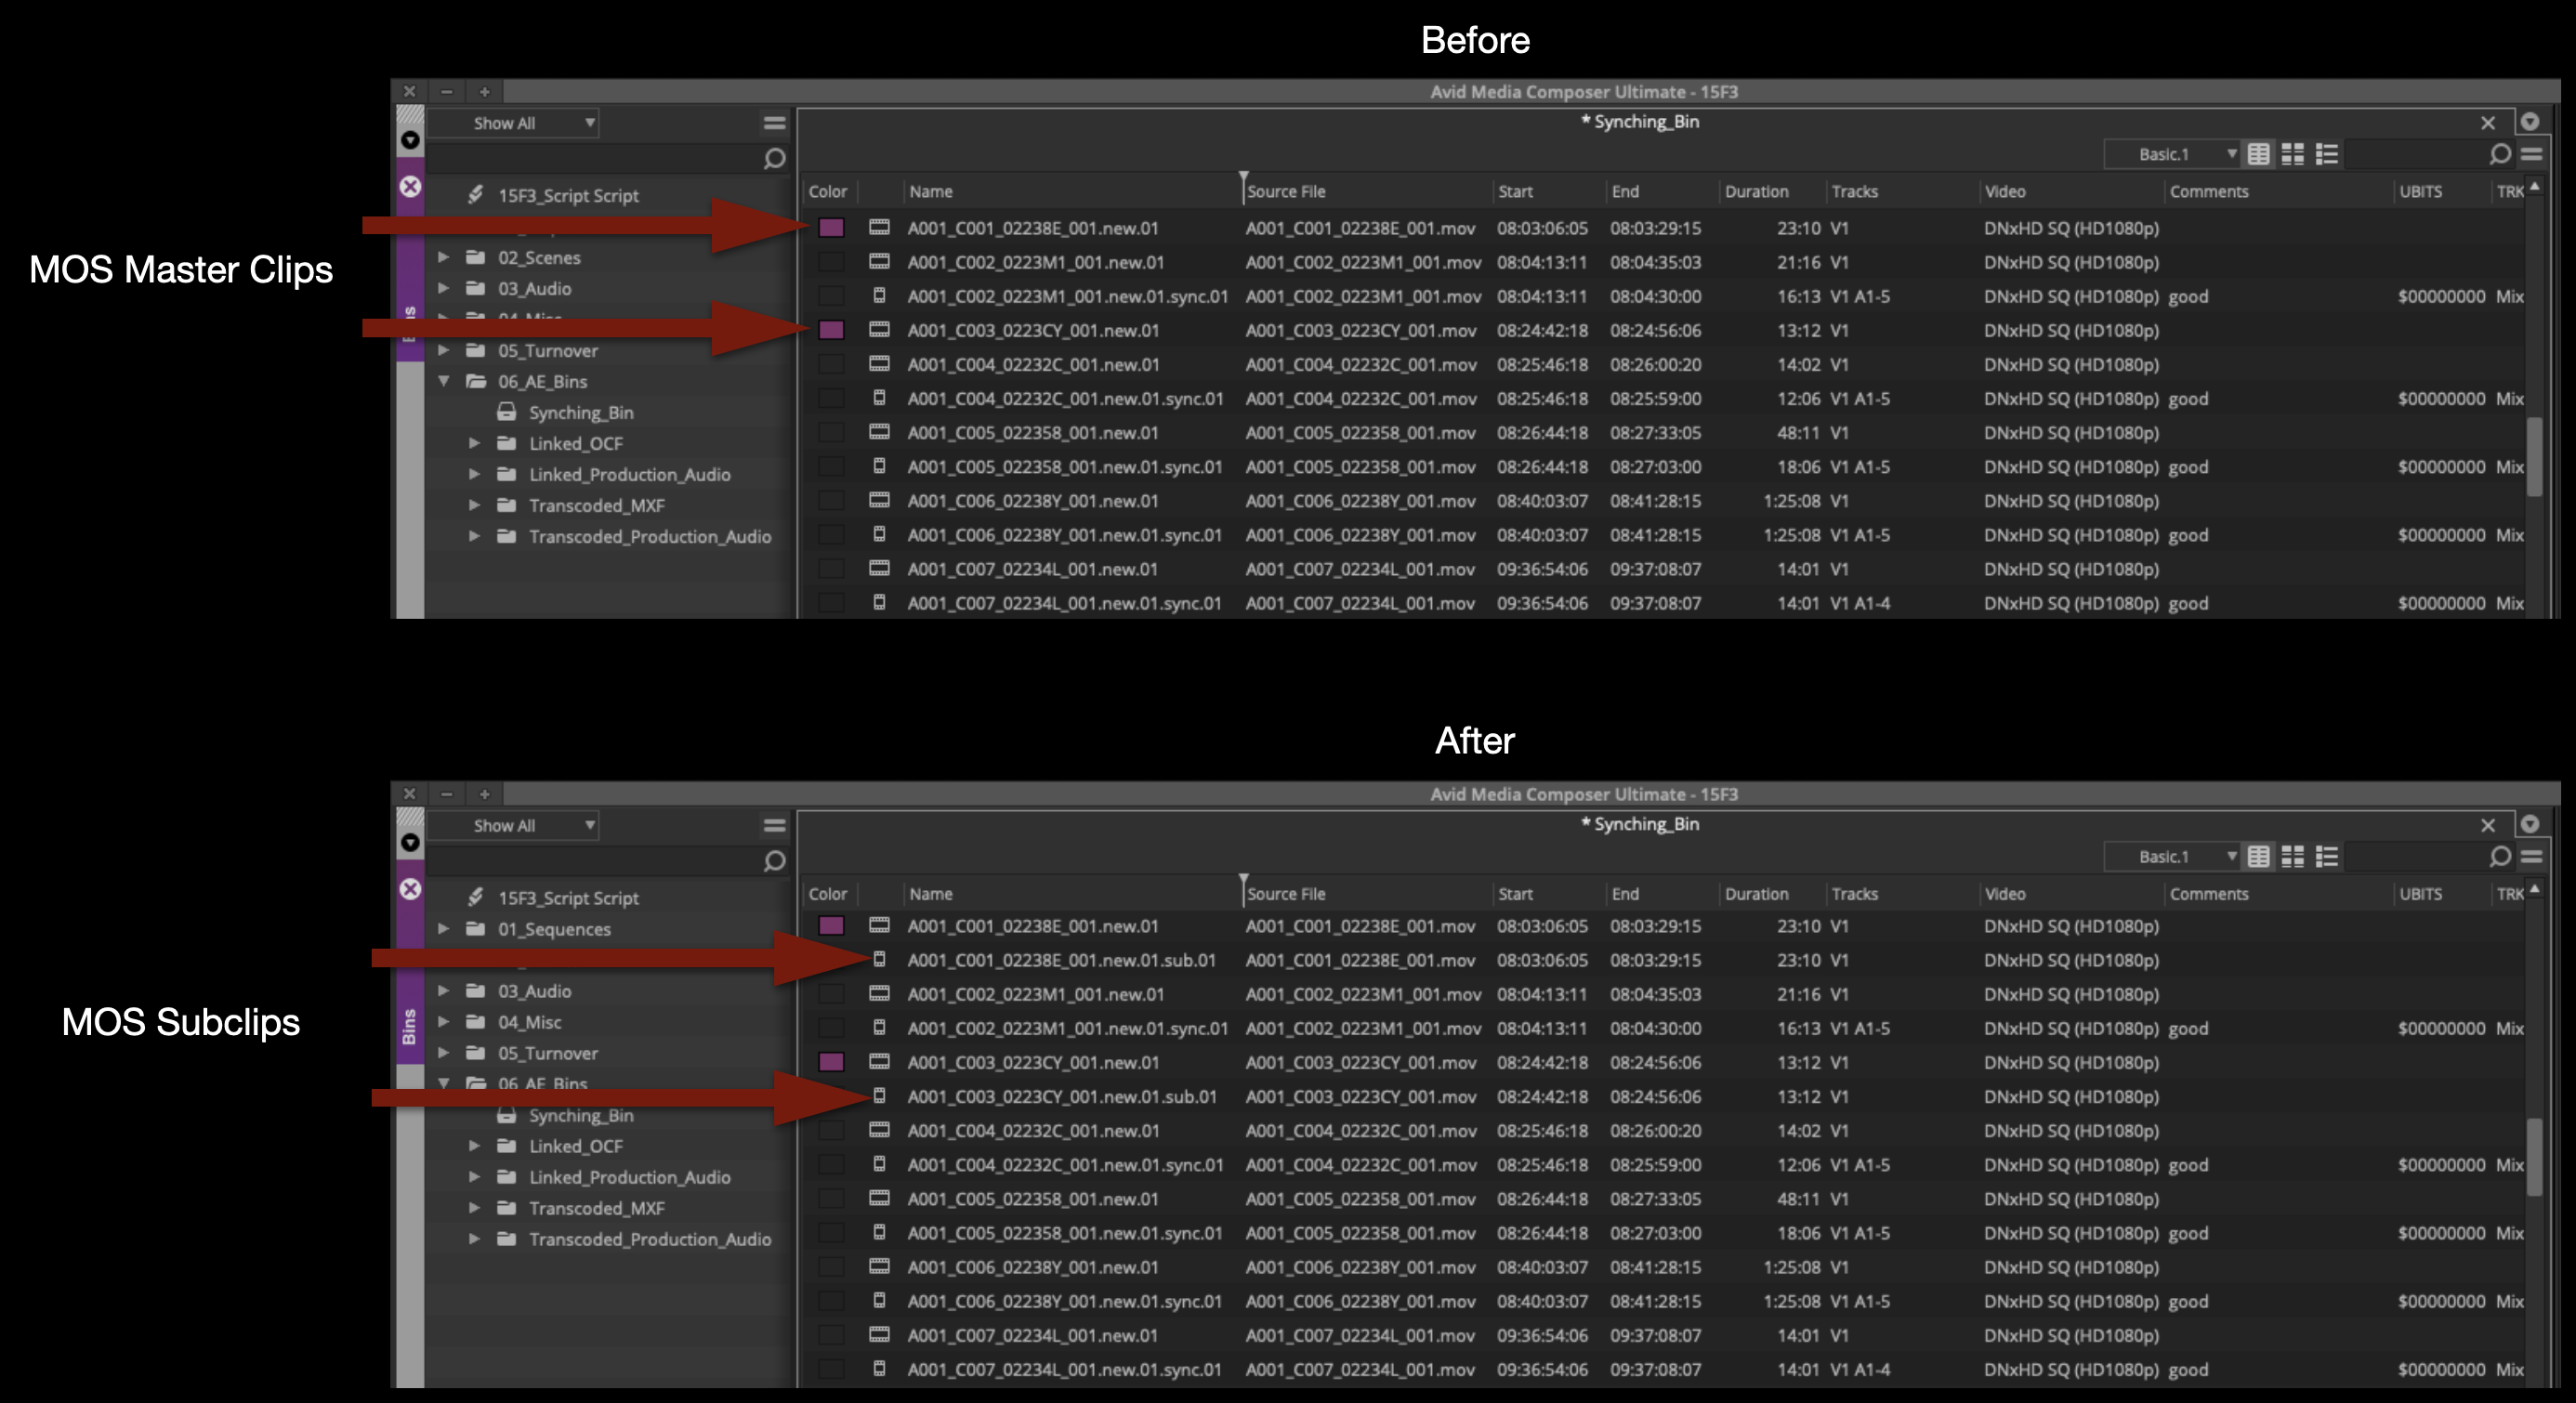
Below are some common examples of thing that won’t sync. Two audio master clips didn’t sync to anything because they are Room Tone. One audio master clip didn’t sync to anything because it was a bump take. Two video master clips didn’t sync to anything because they are MOS.
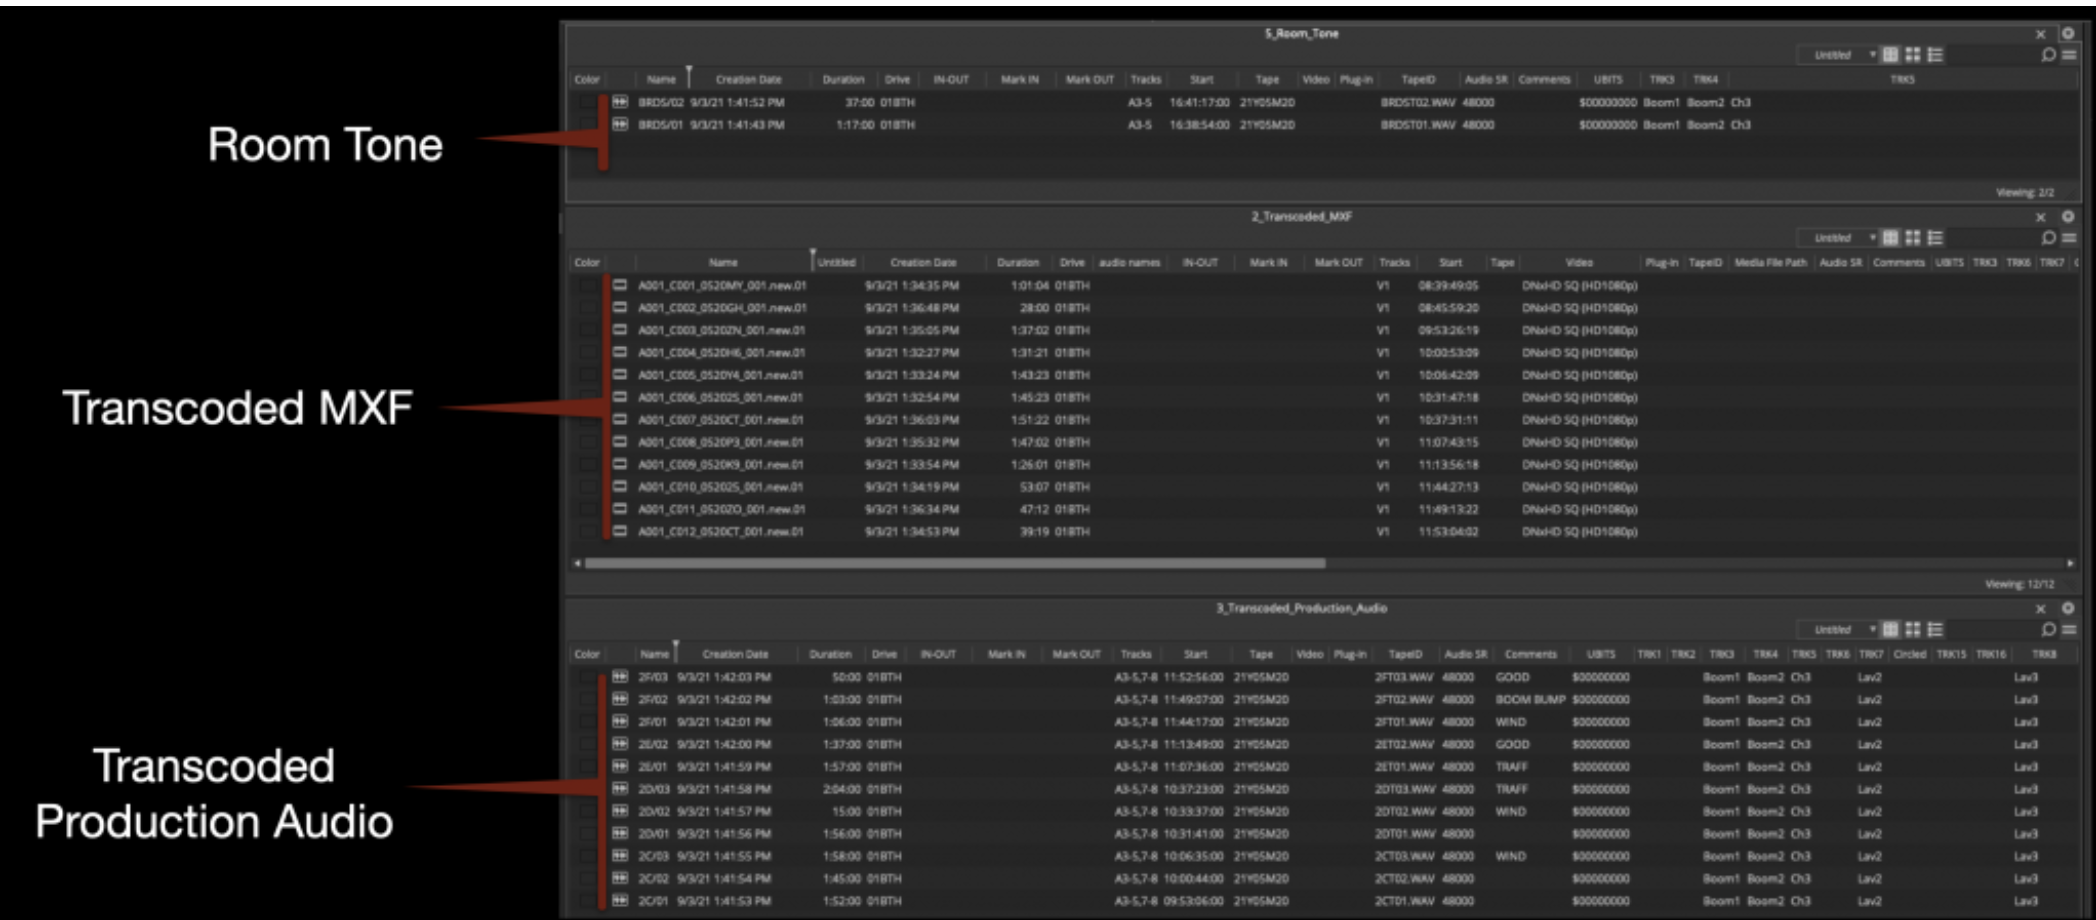
Move the master clips out of the Synching Bin and into their proper bins:
This will leave only the synched subclips in the Synching Bin. If you did have any MOS master clips, you will need to make subclips of them. The easiest way to make a subclip is to use the keyboard shortcut “Shift + C”. If this keyboard shortcut is not mapped in your suite, ask the Post Hall staff and they can show you how to map it.
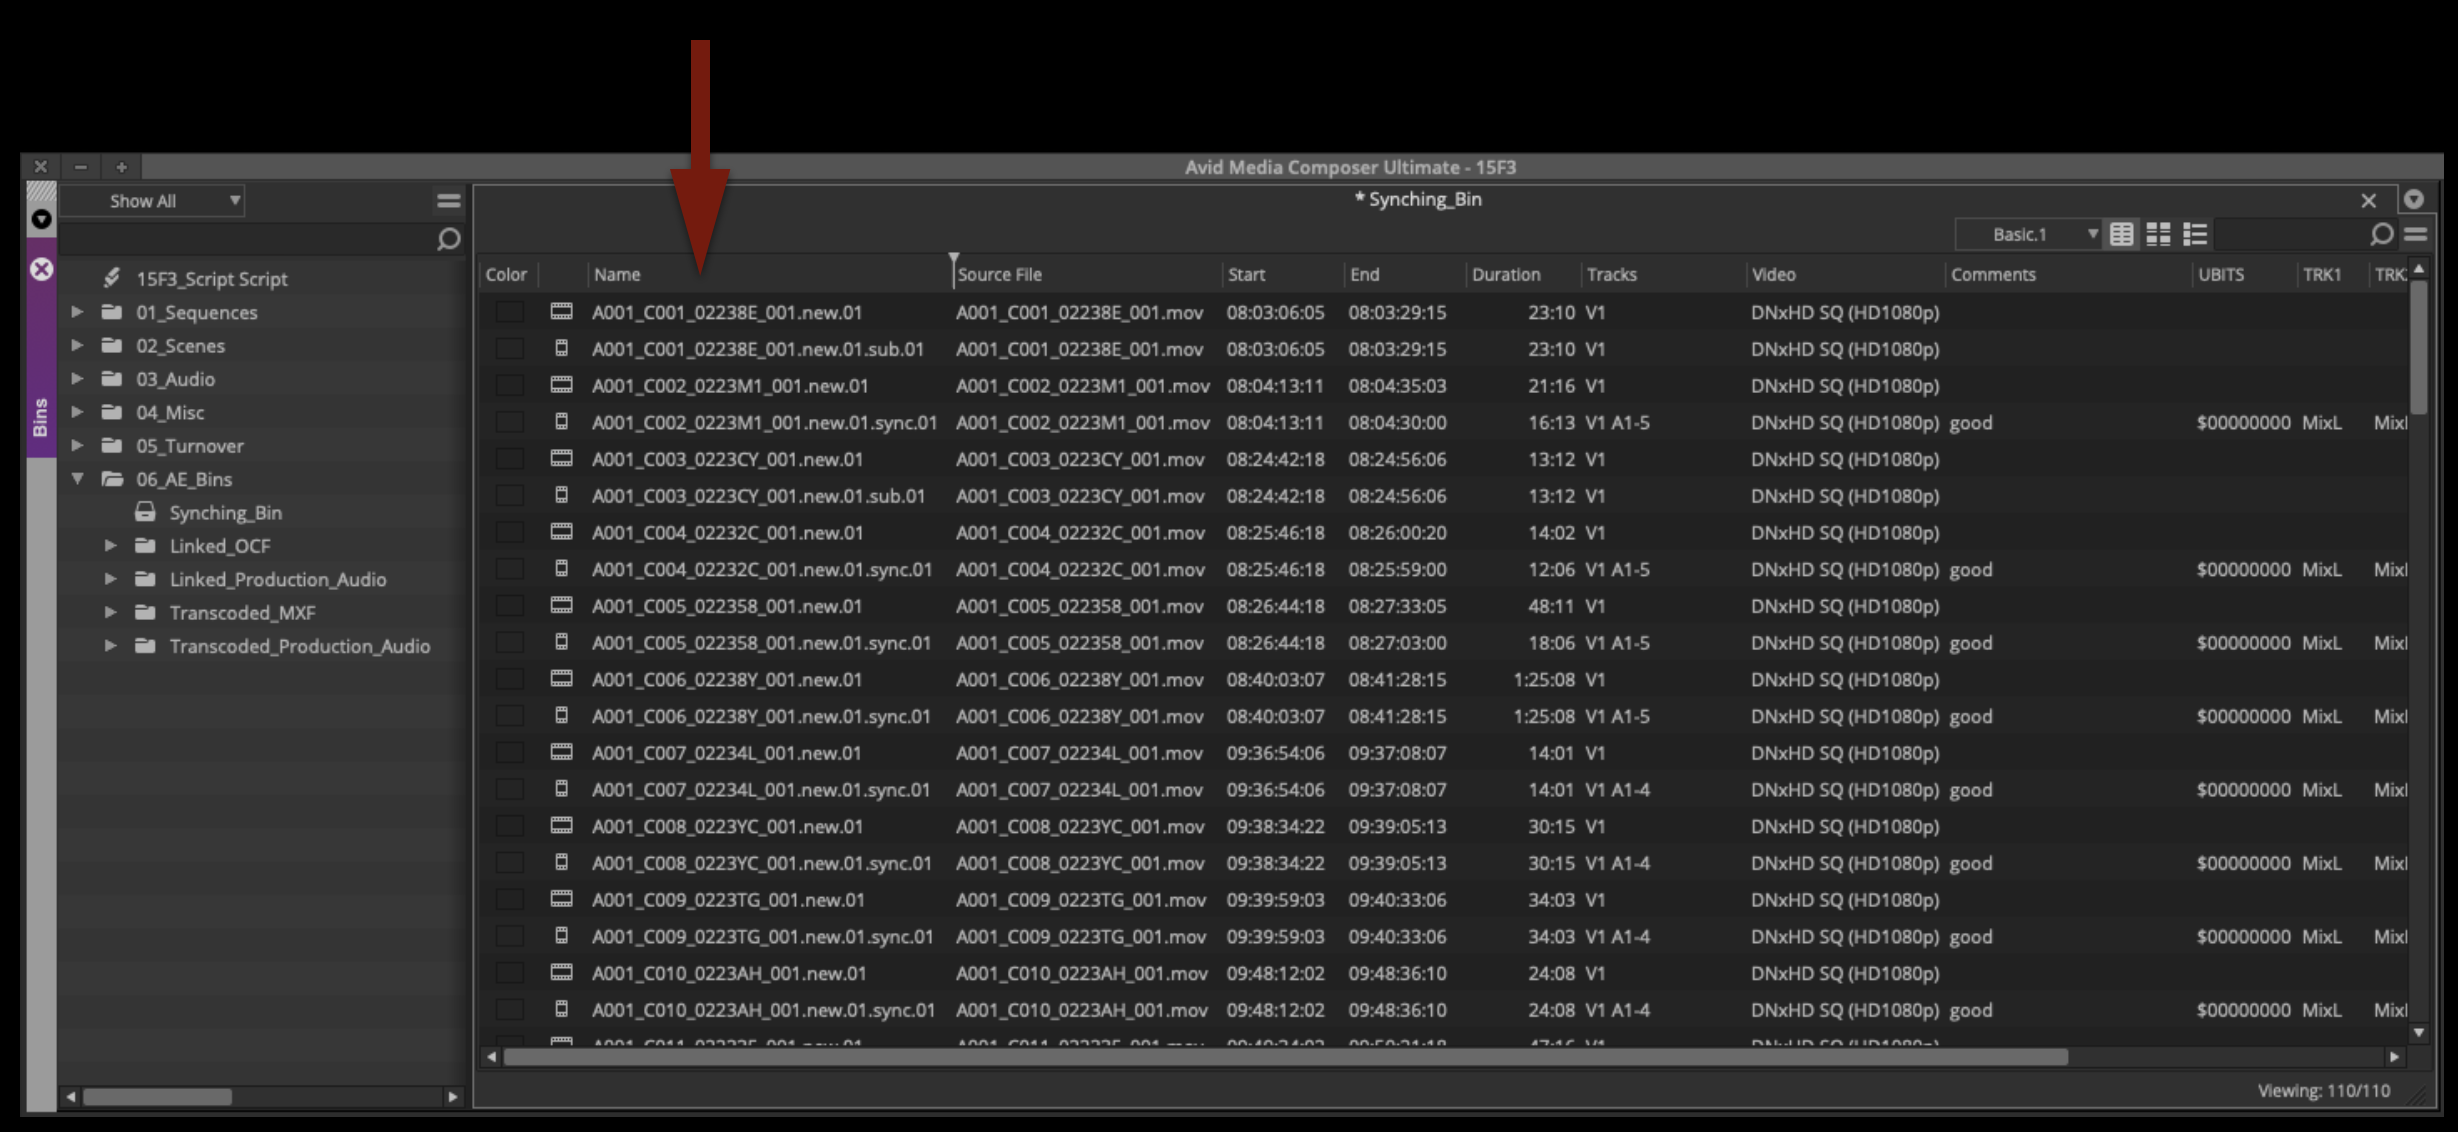
Double-click on the Name column to sort the contents of the Synching Bin alphanumerically. You should see a subclip for every master clip.
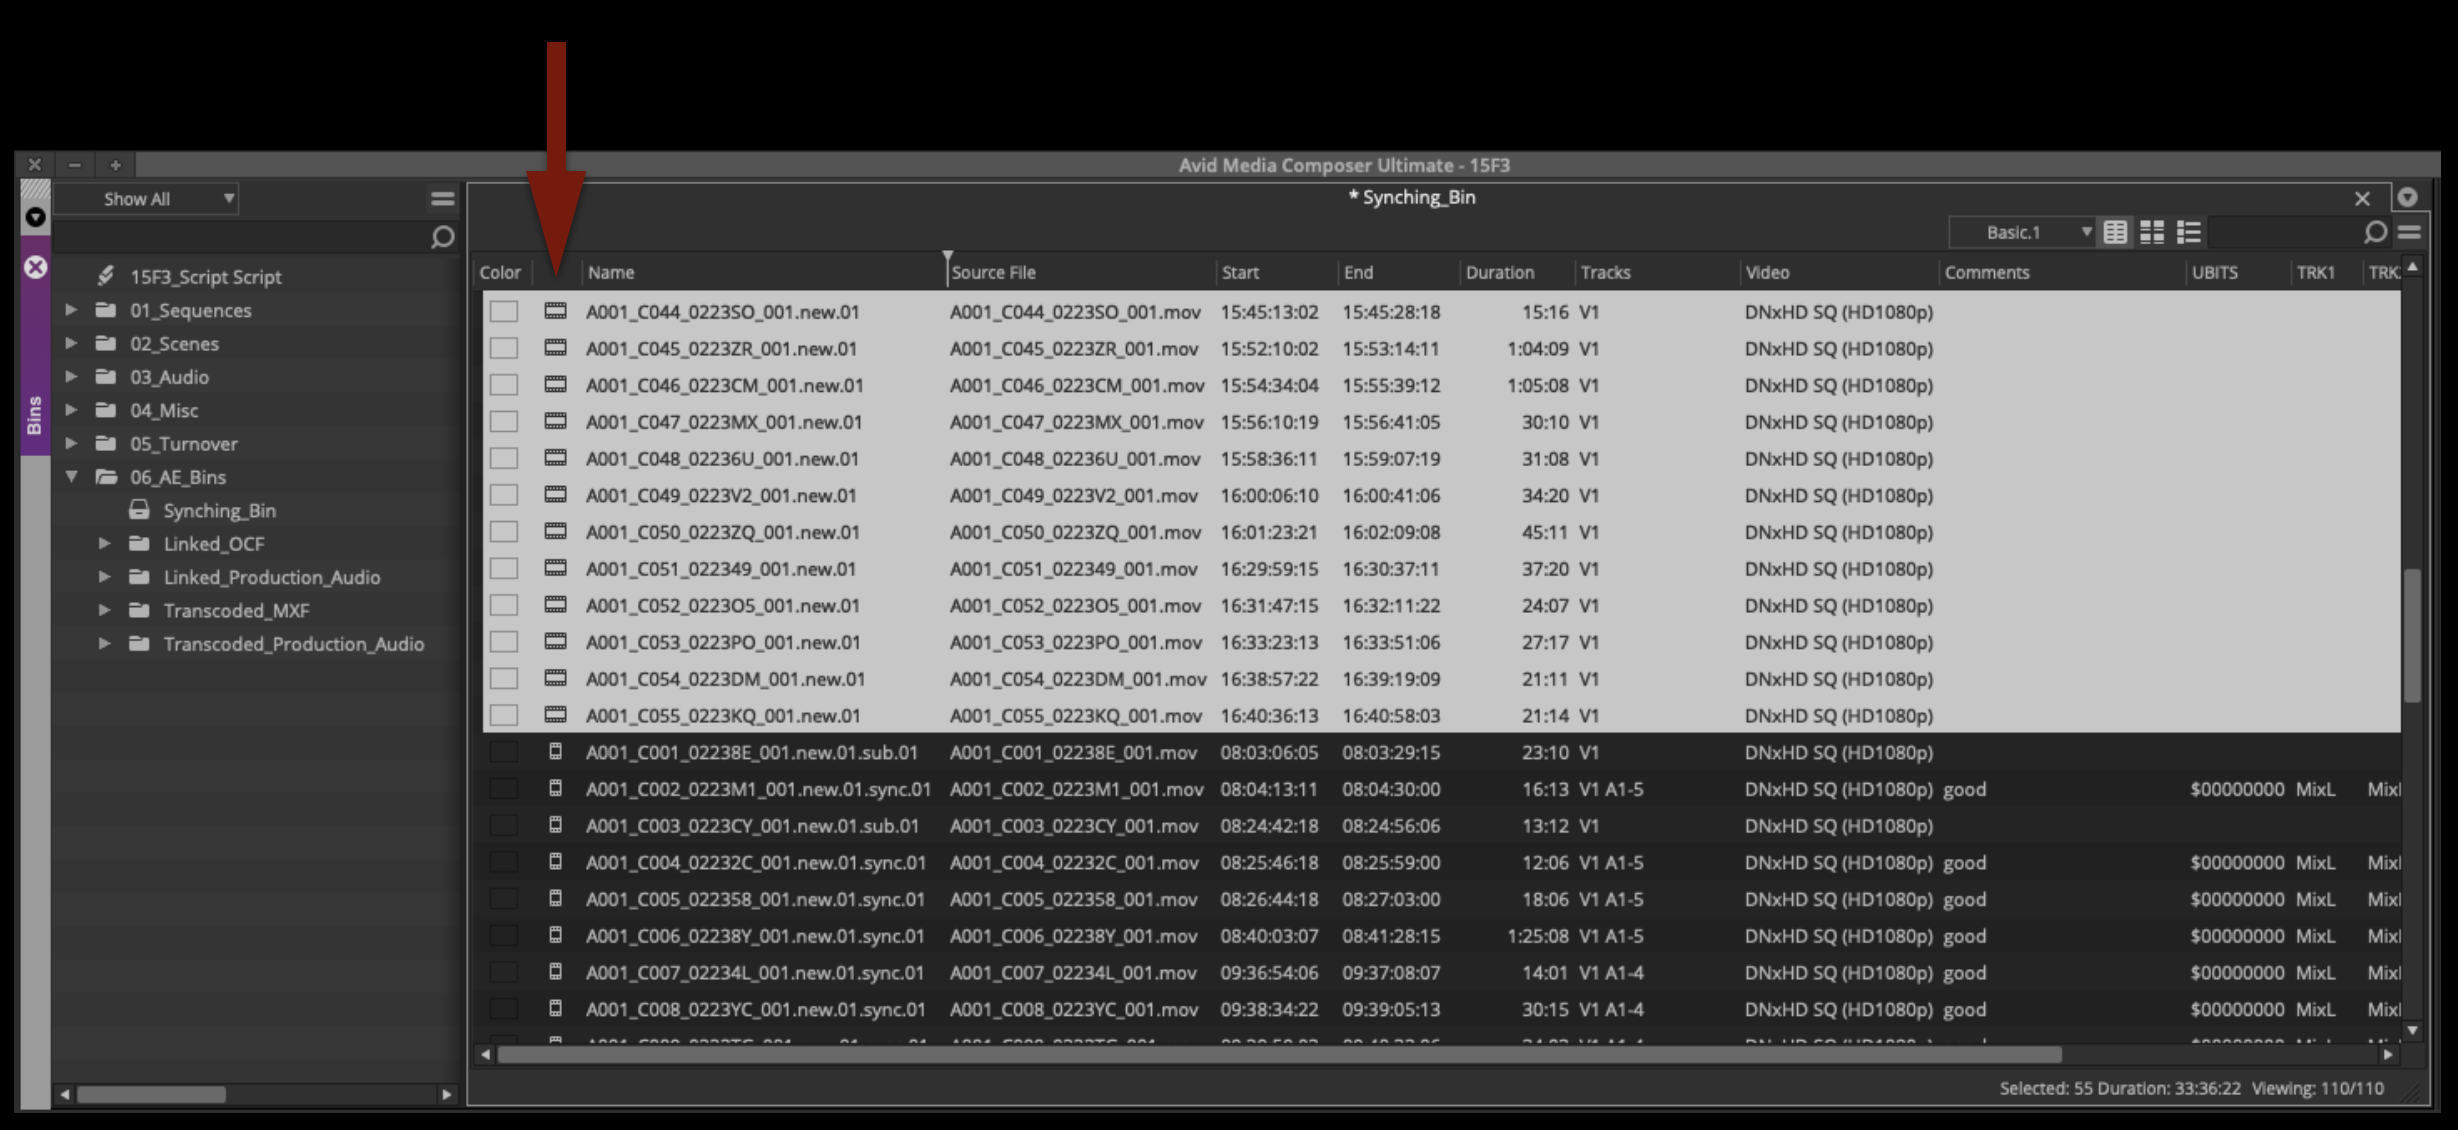
Double-click on the Type column to sort the contents of the Synching Bin by type. This will let you easily select all of the master clips and move them back to the Transcoded MXF Day Folder.
At this point you should have one subclip for every take in the synching bin.
Make Mix-Only Subclips
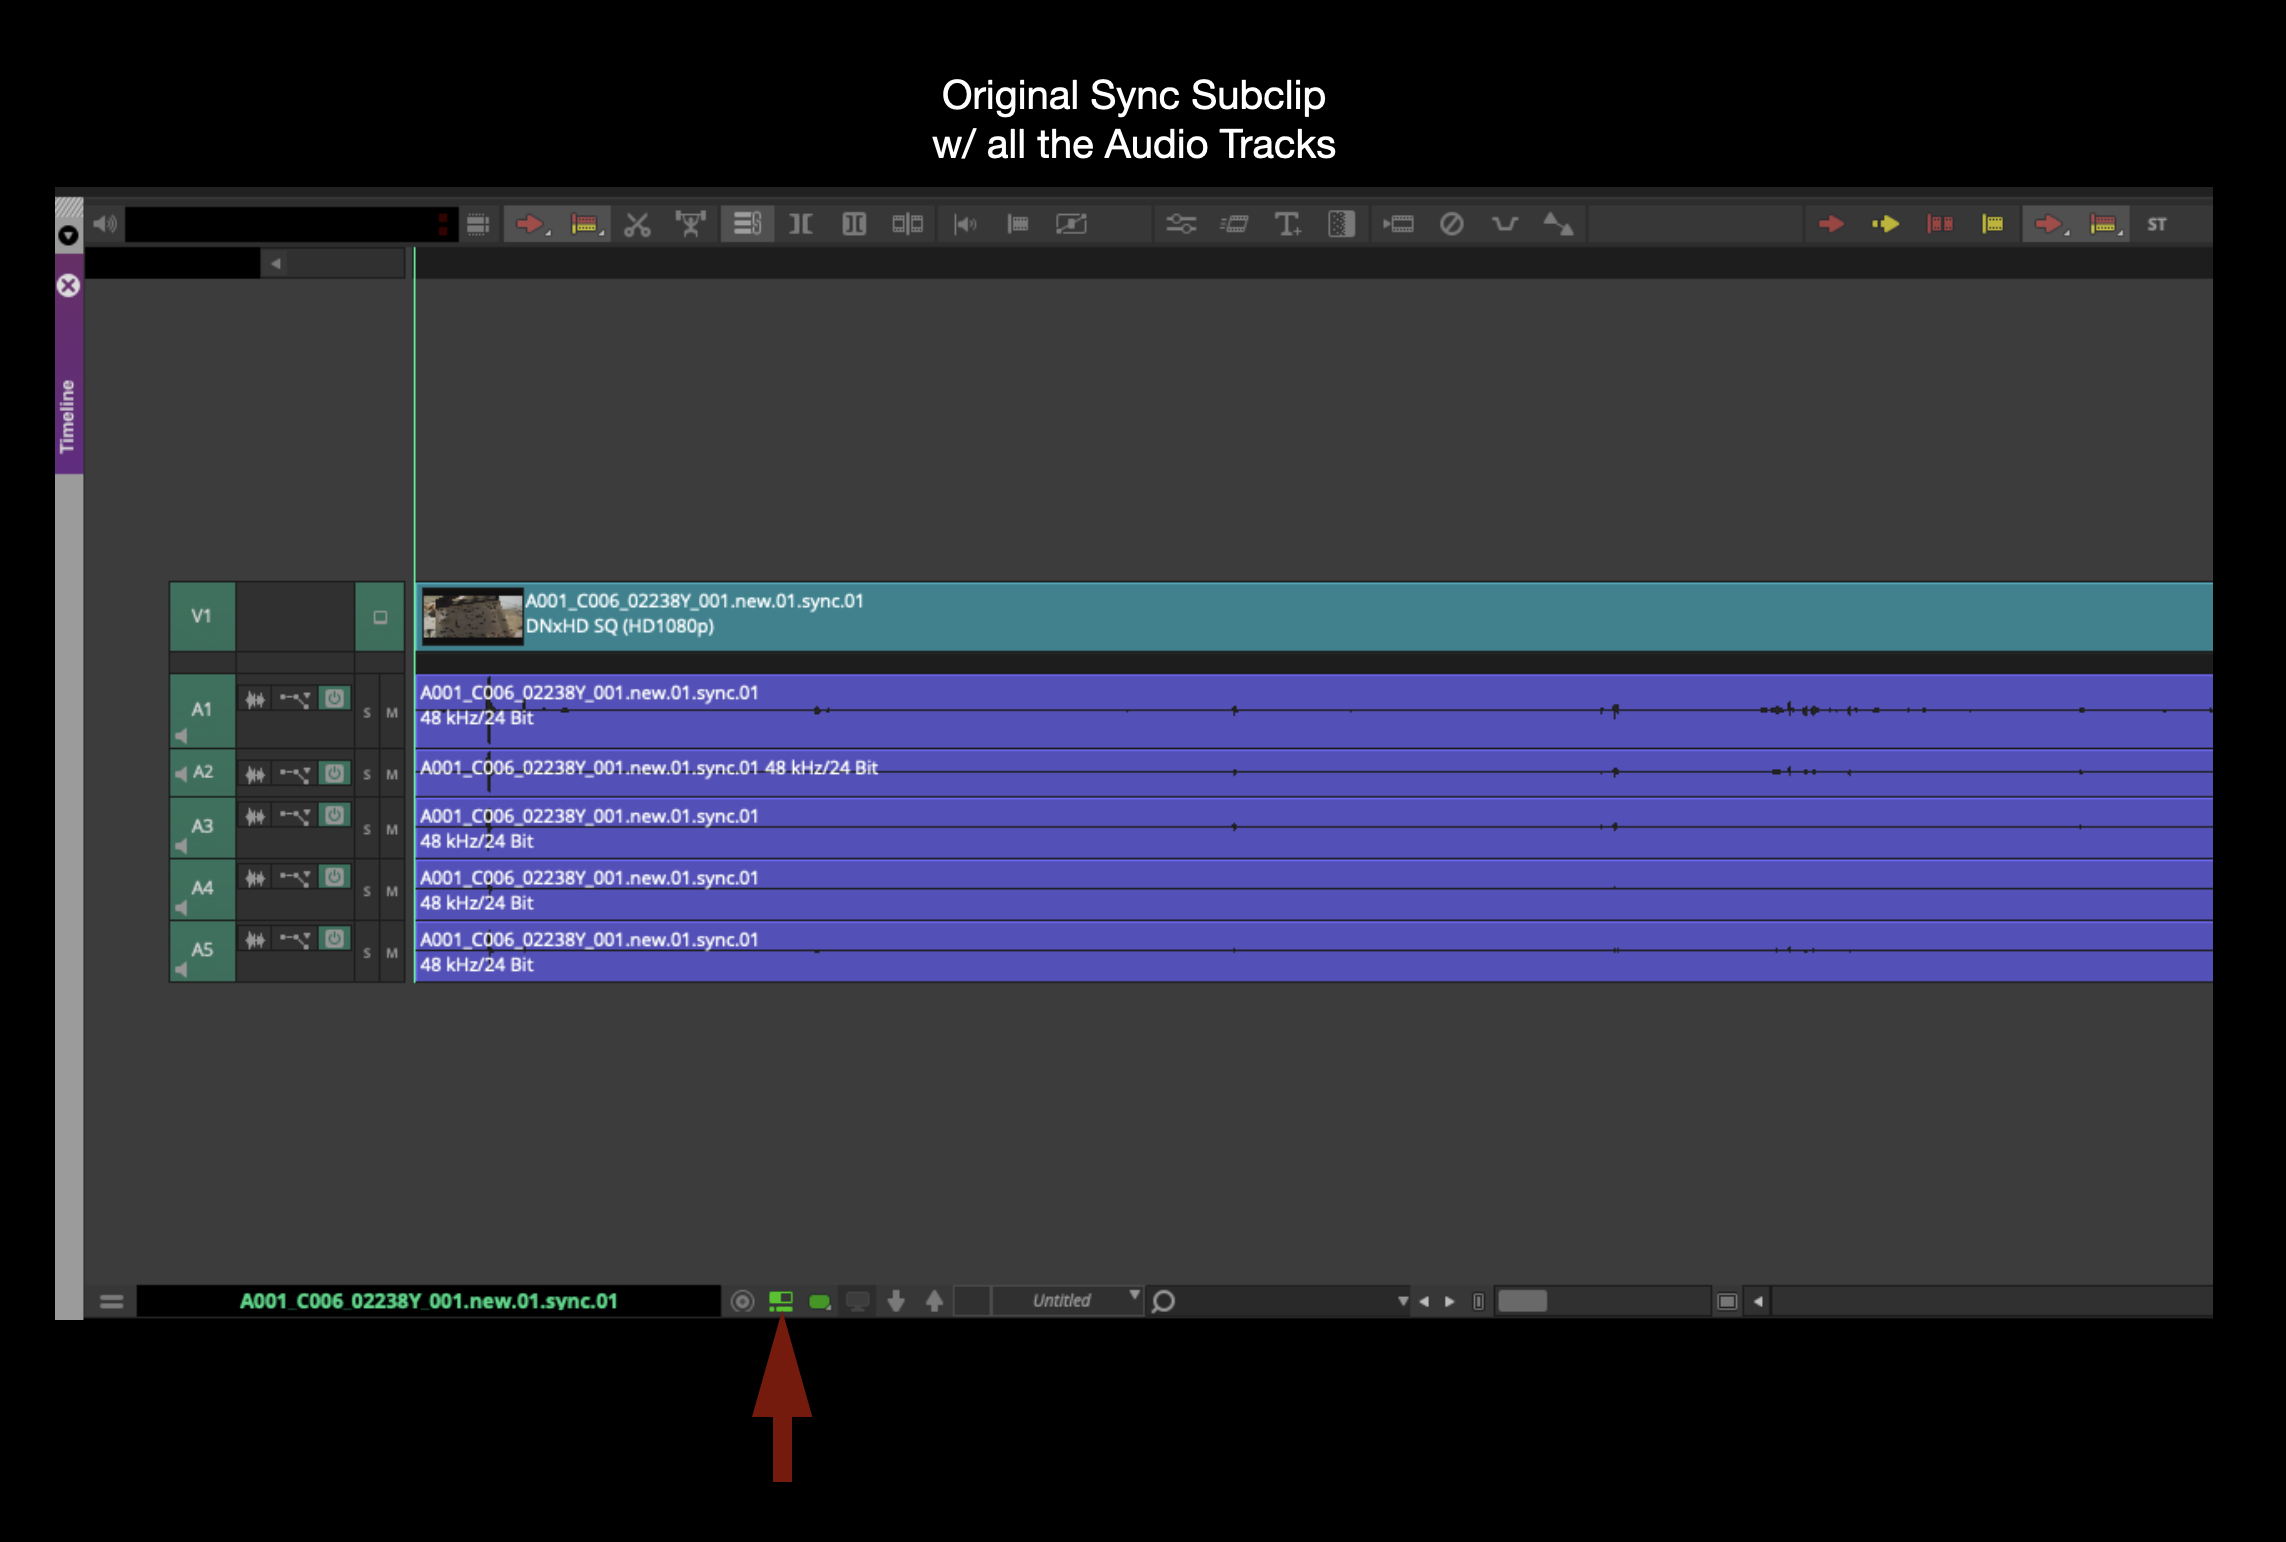
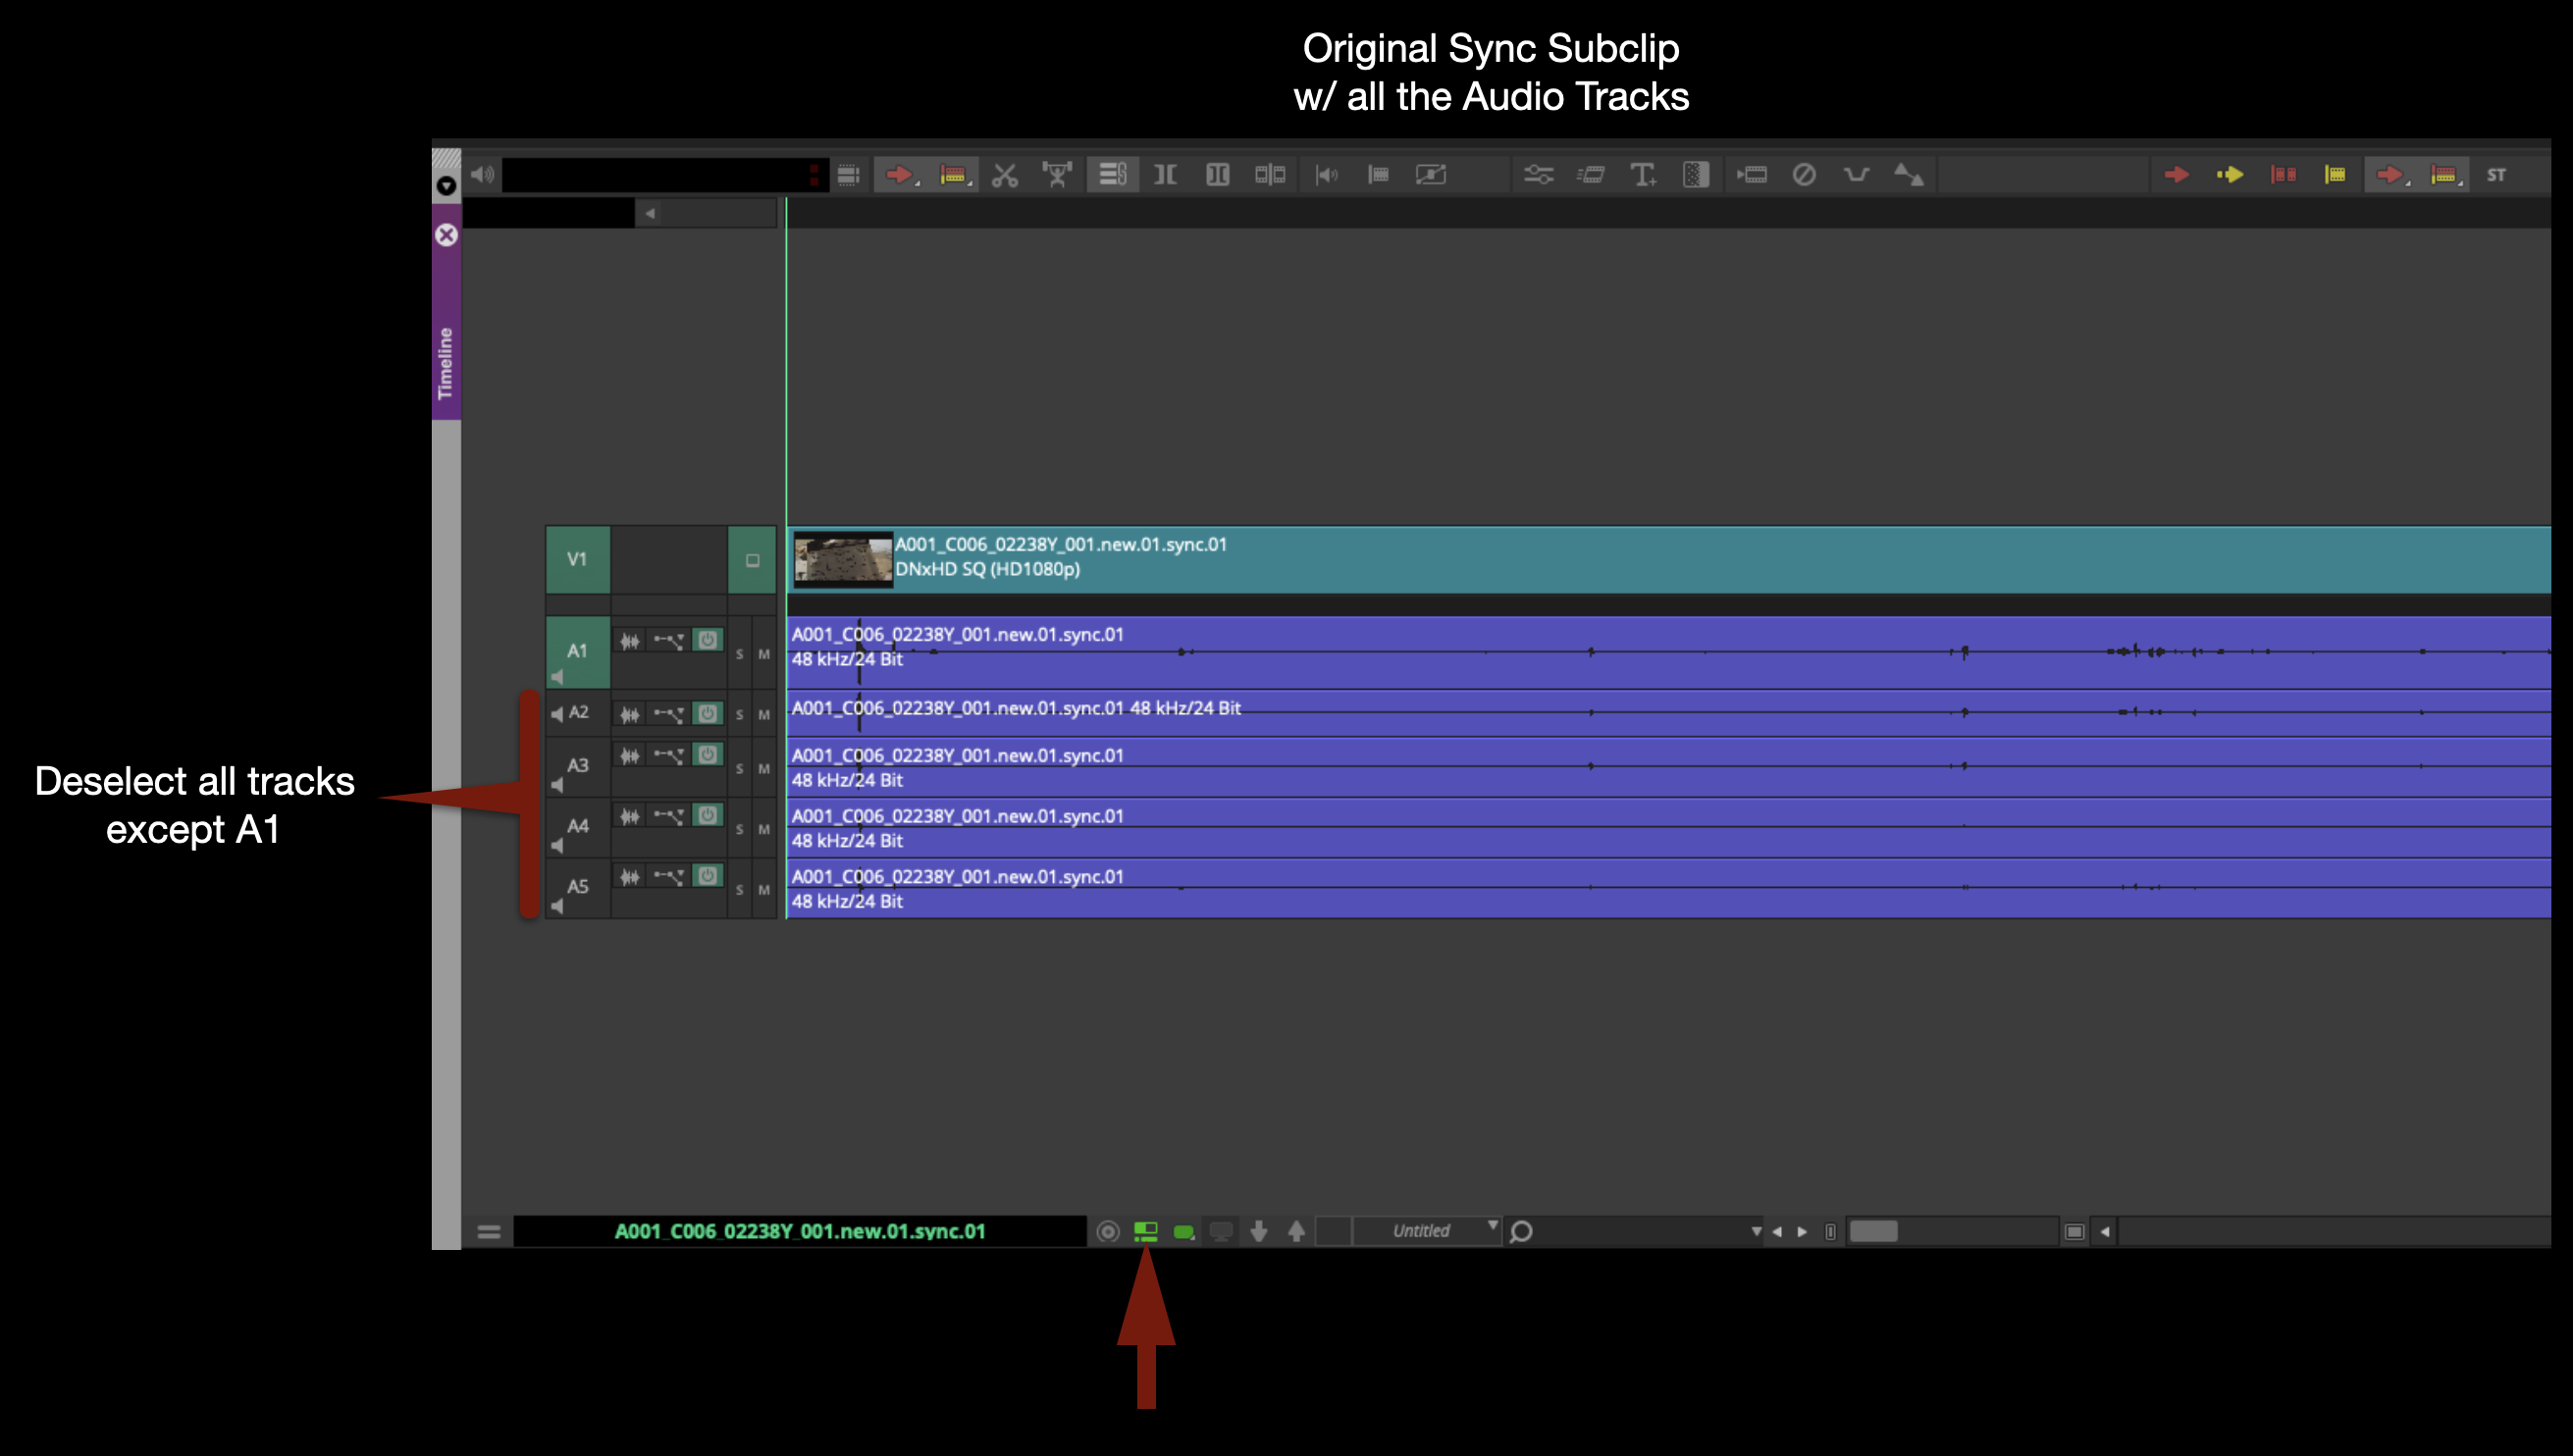
Now is the time to check the sync of each clip by listening to the clapper. But as you do, you will also need to make a new subclip of each current subclip. The reason is that the subclips currently in the Synching Bin have all the audio tracks attached to them and this is not a good way to edit. It will be much easier if the clips are prepped to include only the Mix track.
Starting from the top in the Synching Bin, double-click on each clip to open it in the Source window. Select “Toggle Timeline Source/Record” to see the audio waveforms of each track in the Timeline window.
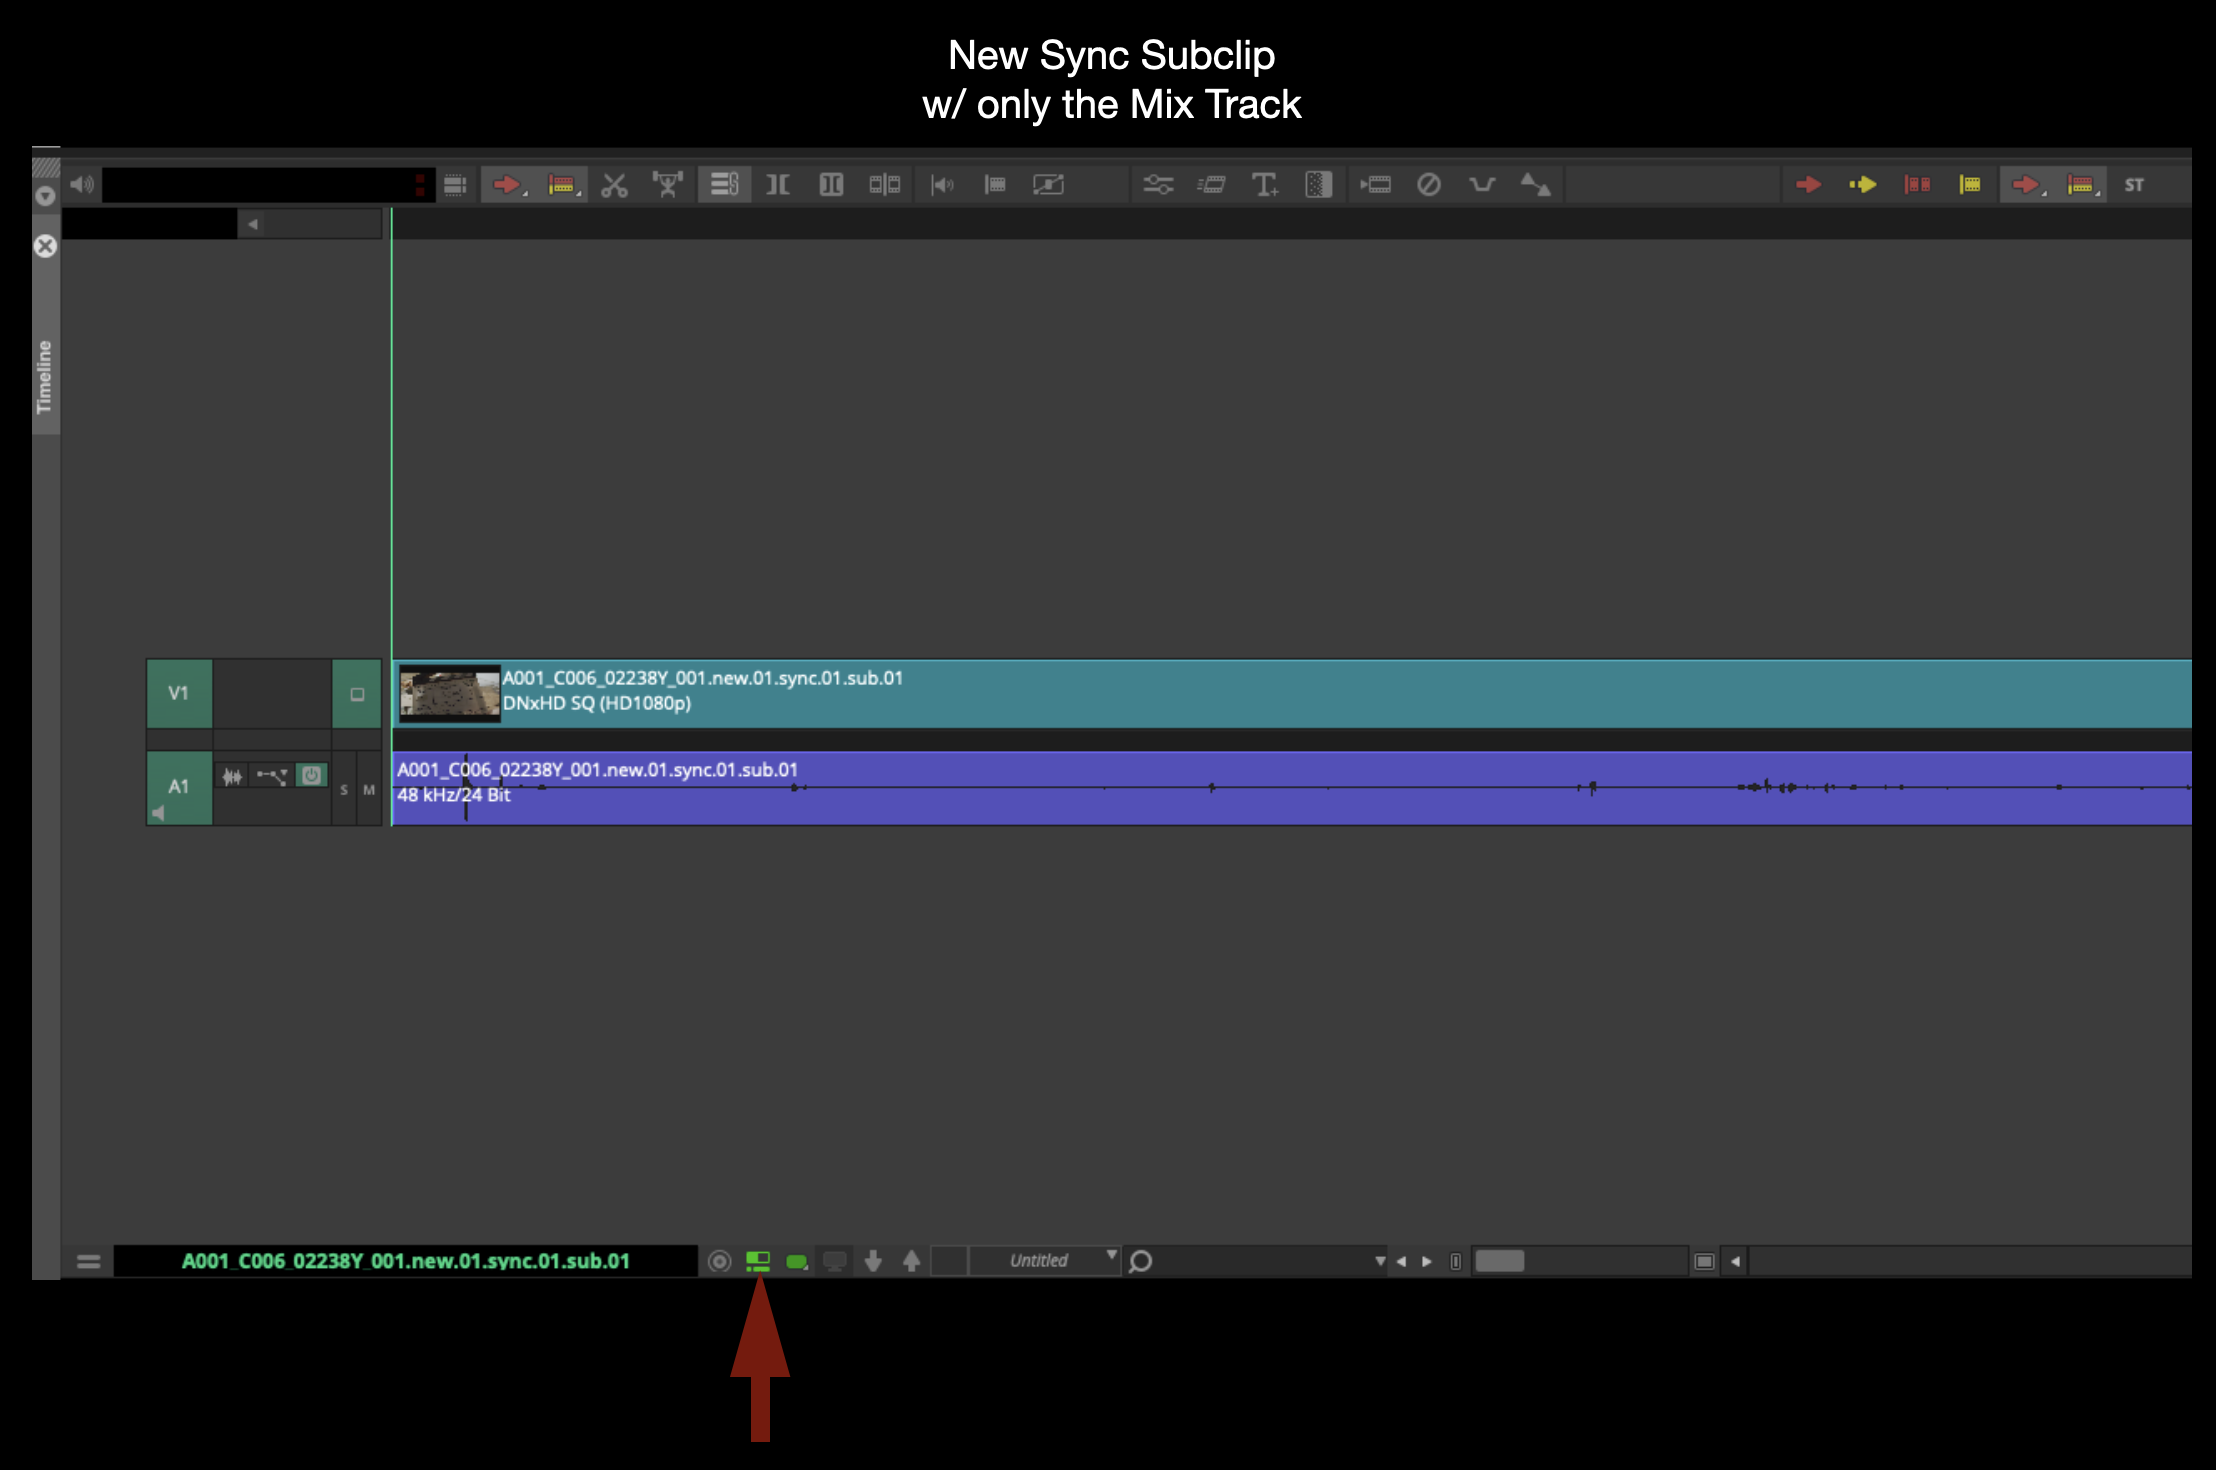
Hold down the “Shift” key and click-and-drag to deselect all the audio tracks except A1. Remember A1 is the Mix track. With only V1 and A1 selected, make a new subclip by hitting “Shift + C”. If this keyboard shortcut doesn’t work on your suite, ask the post staff to show you how to map it.
Check the new subclip by opening it in the Source Monitor. It should only have one Video track and one Audio track.
Do this for every subclip, checking for correct sync on the clapper as you go. If you find a clip that is out-of-sync, highlight it in a different color so you will remember when you come back to it.
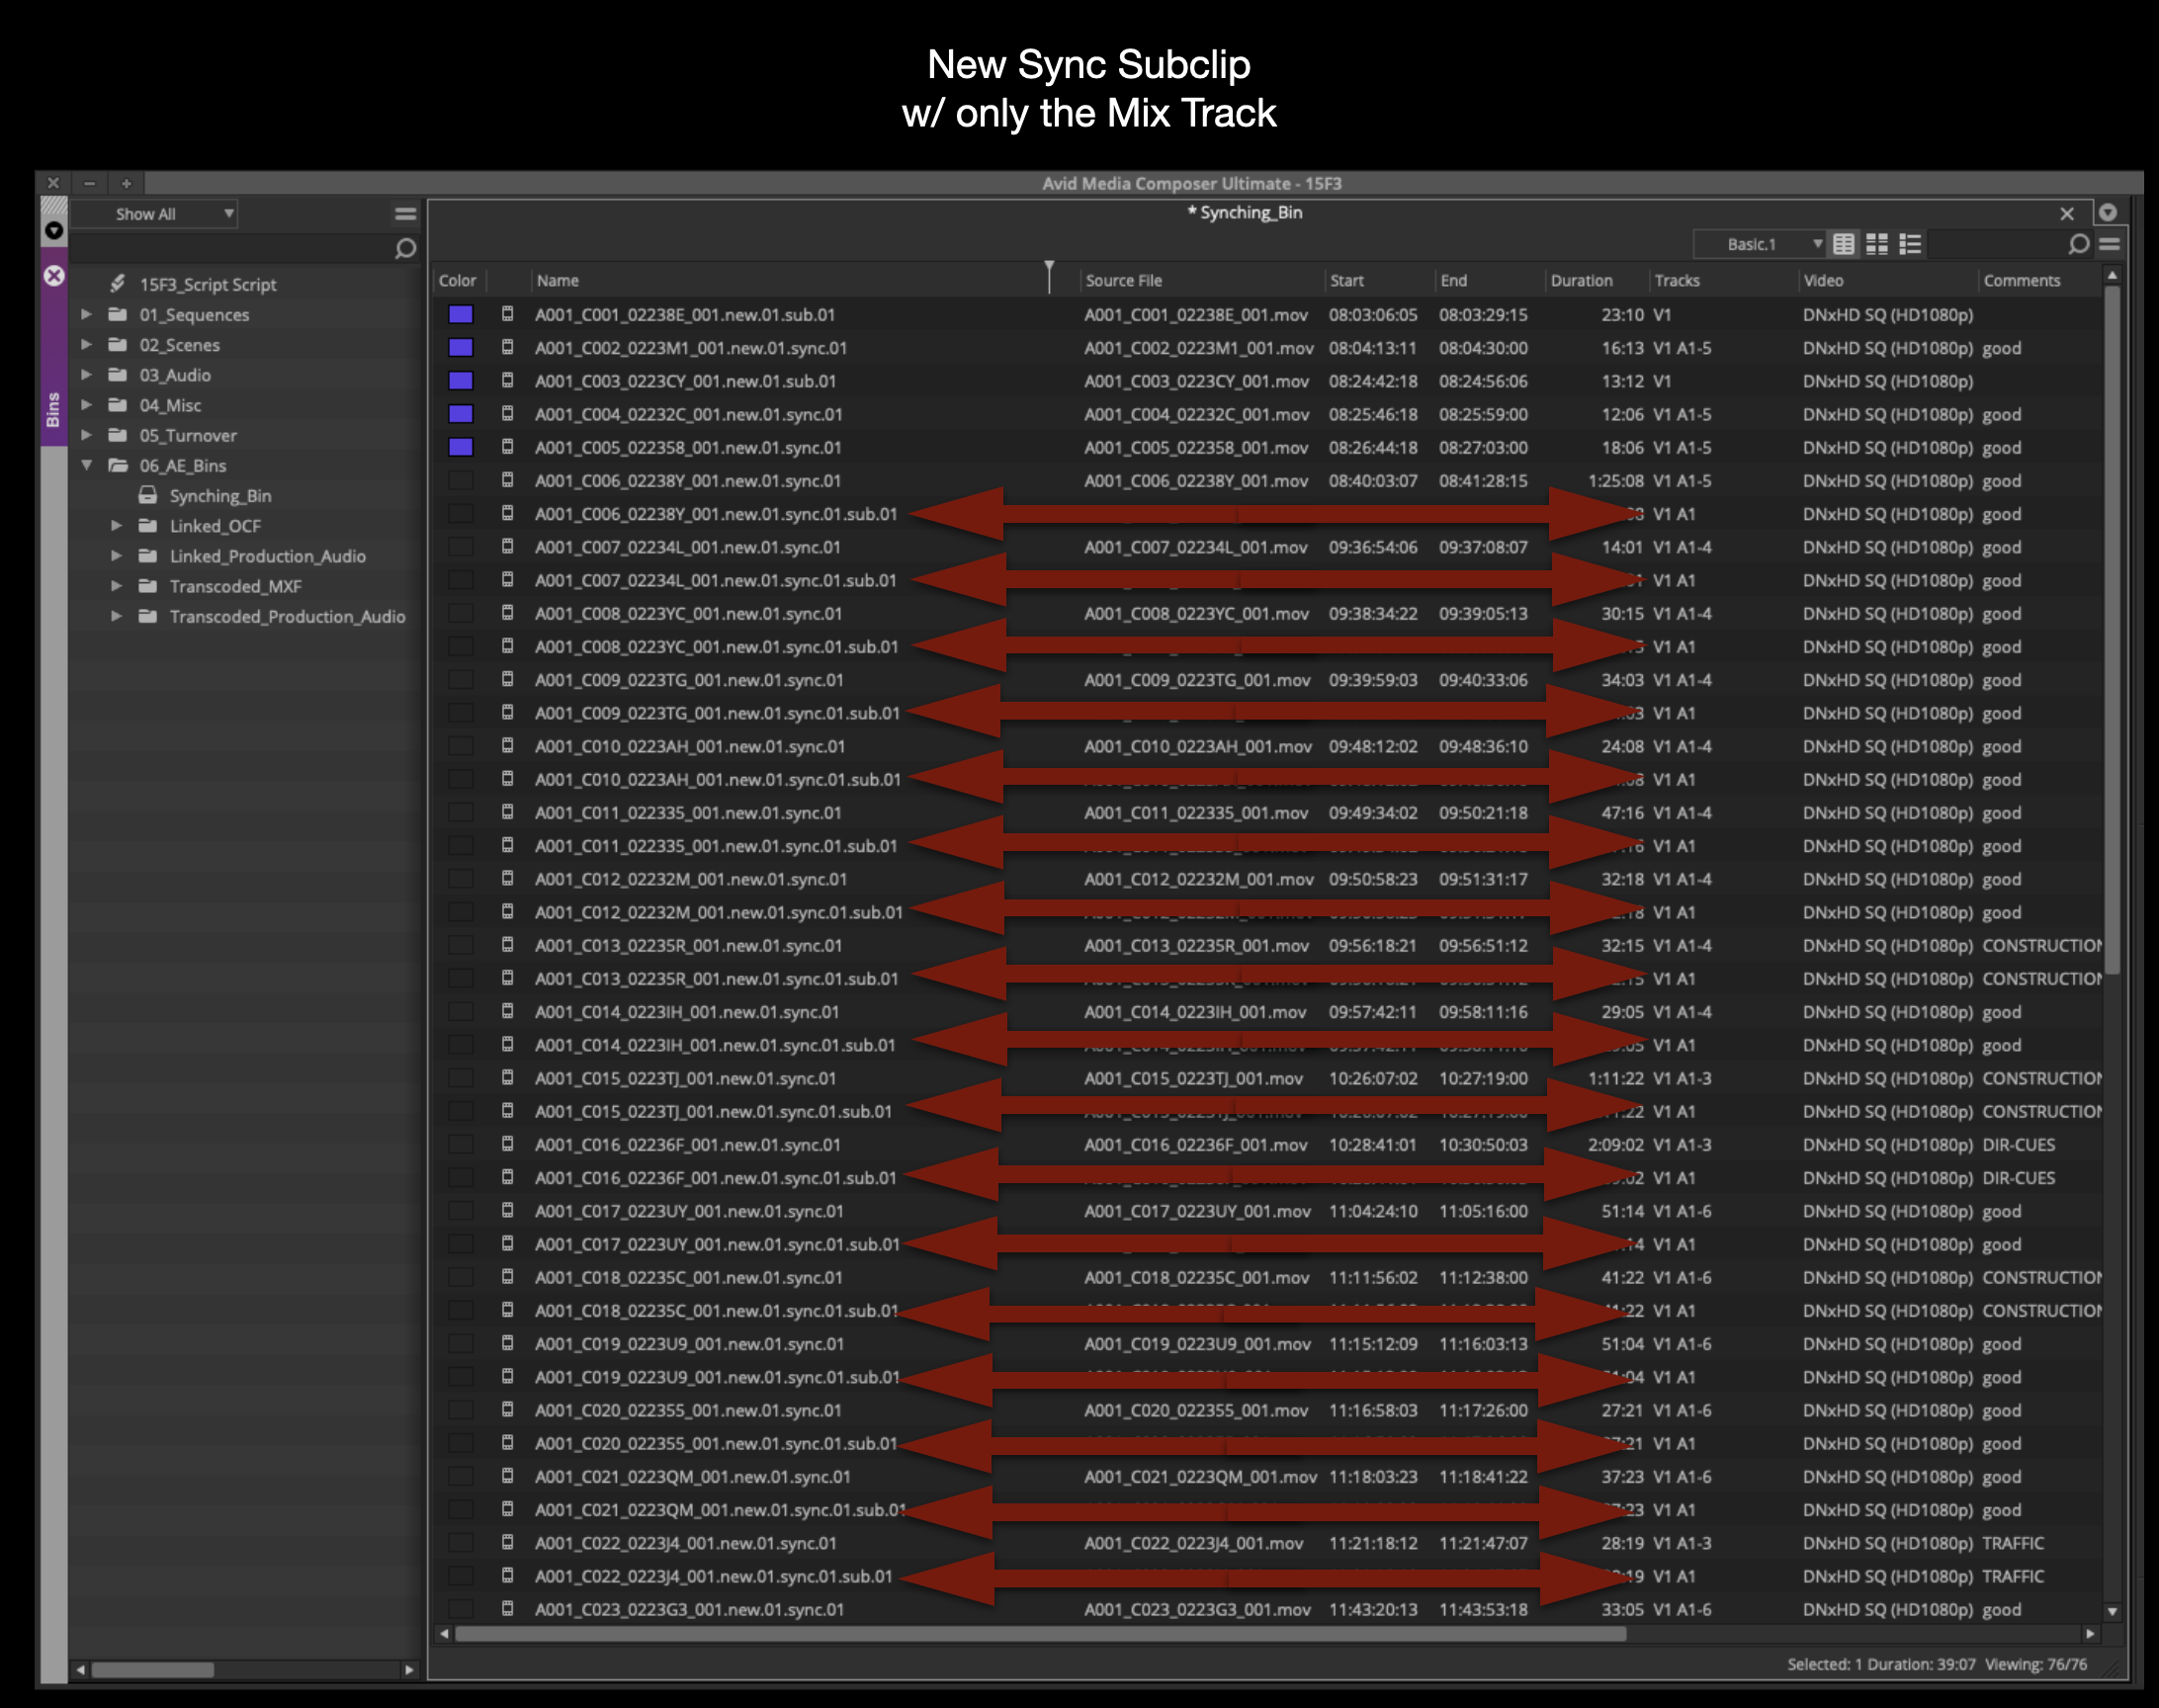
When you finish doing this for every clip, you should have a new subclip for each clip with only one audio track.
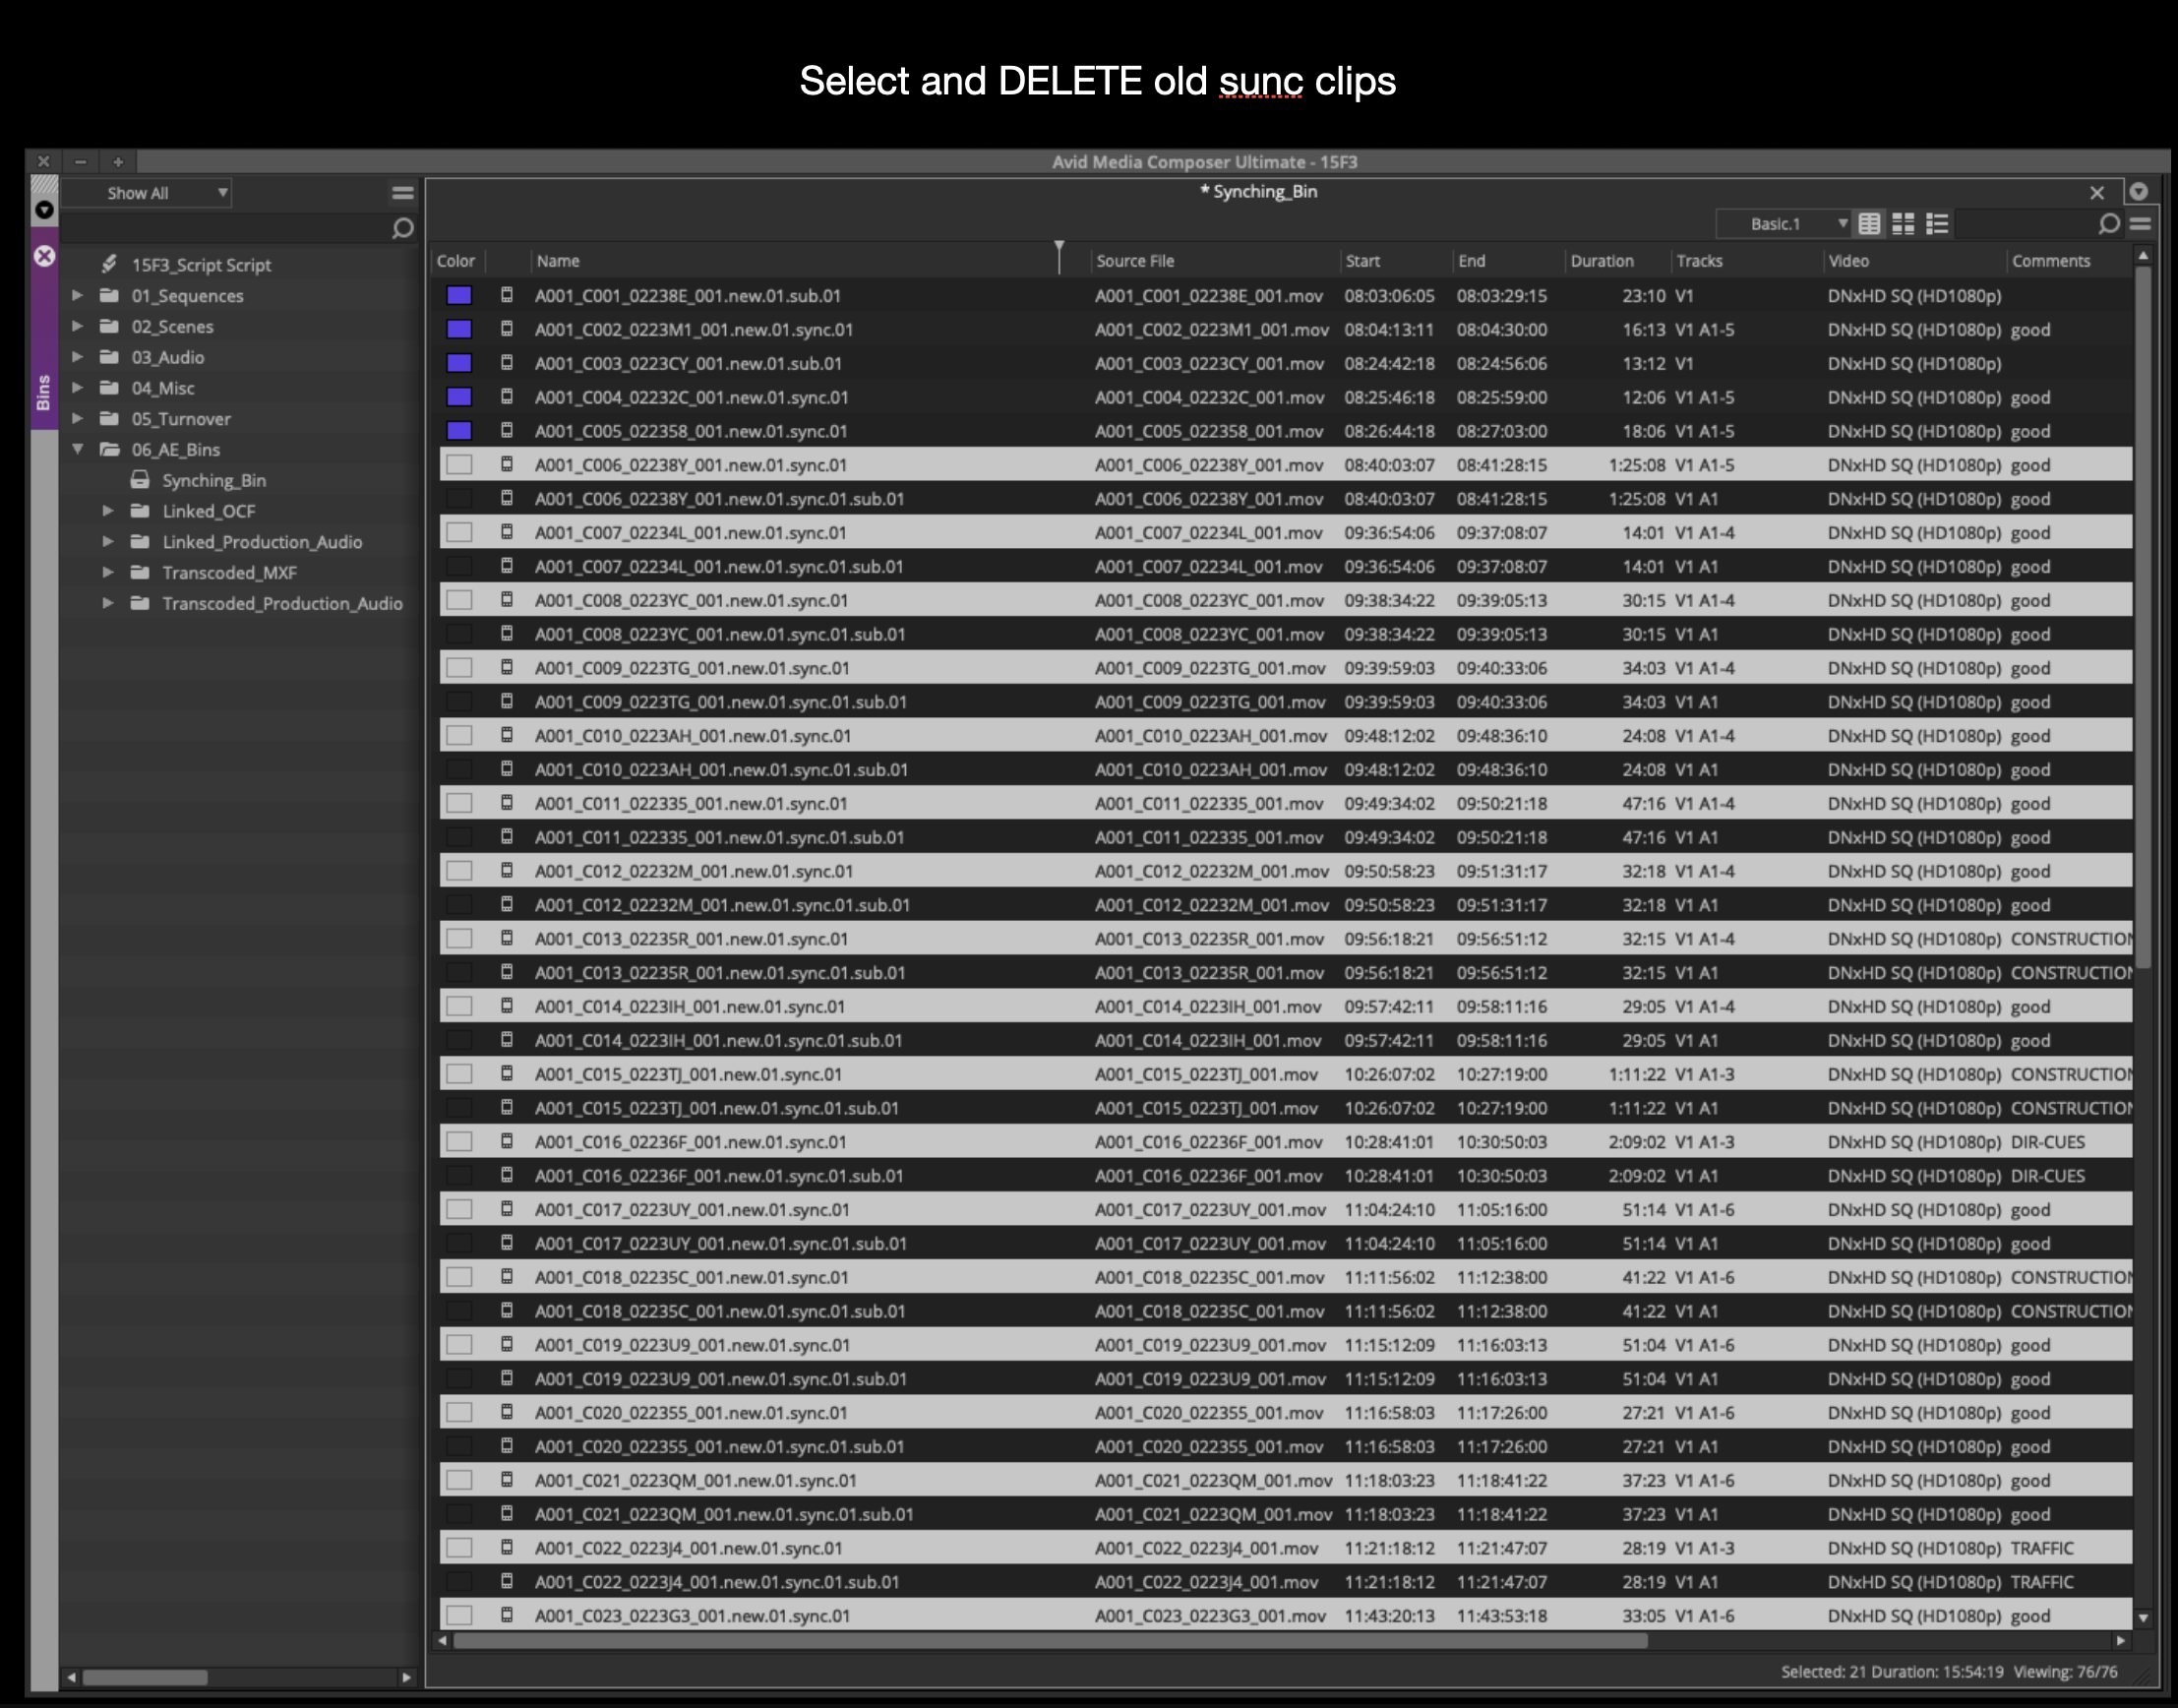
Select all the old subclips and delete them:
This should leave the Synching Bin with subclips that are either MOS or only have Audio Track A1 attached.
If you have any clips that are out-of-sync, they will need to be synched manually. Contact the post staff and they can show you how to do this.
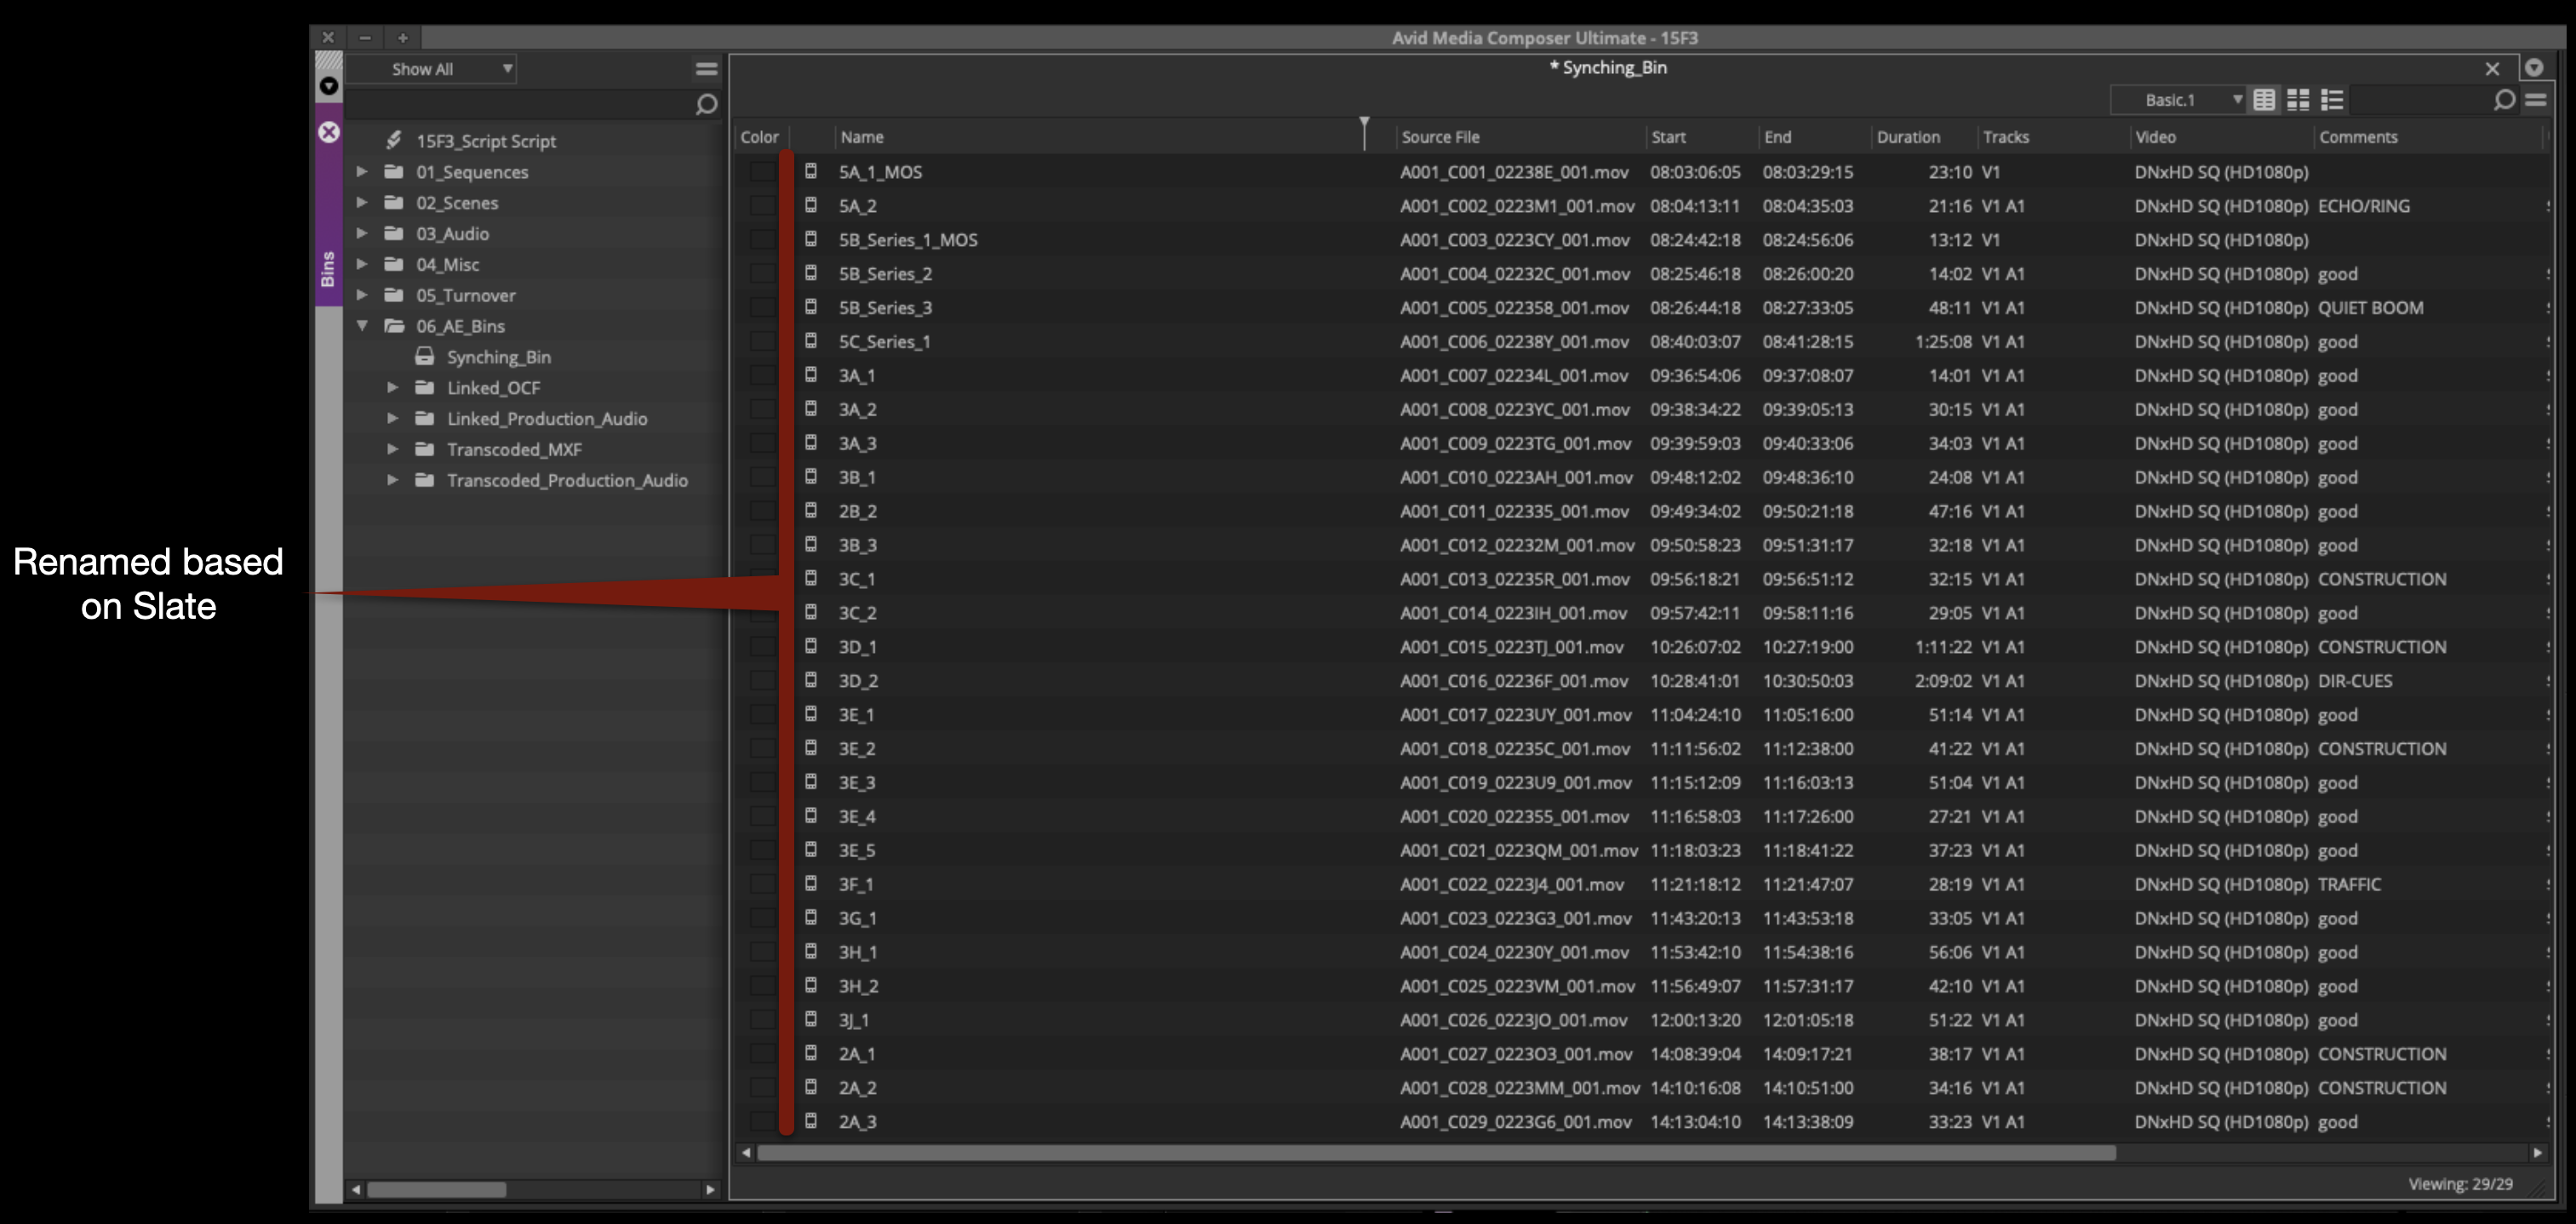
Rename Subclips
Go through each subclip and rename it based on what the slate is labeled:
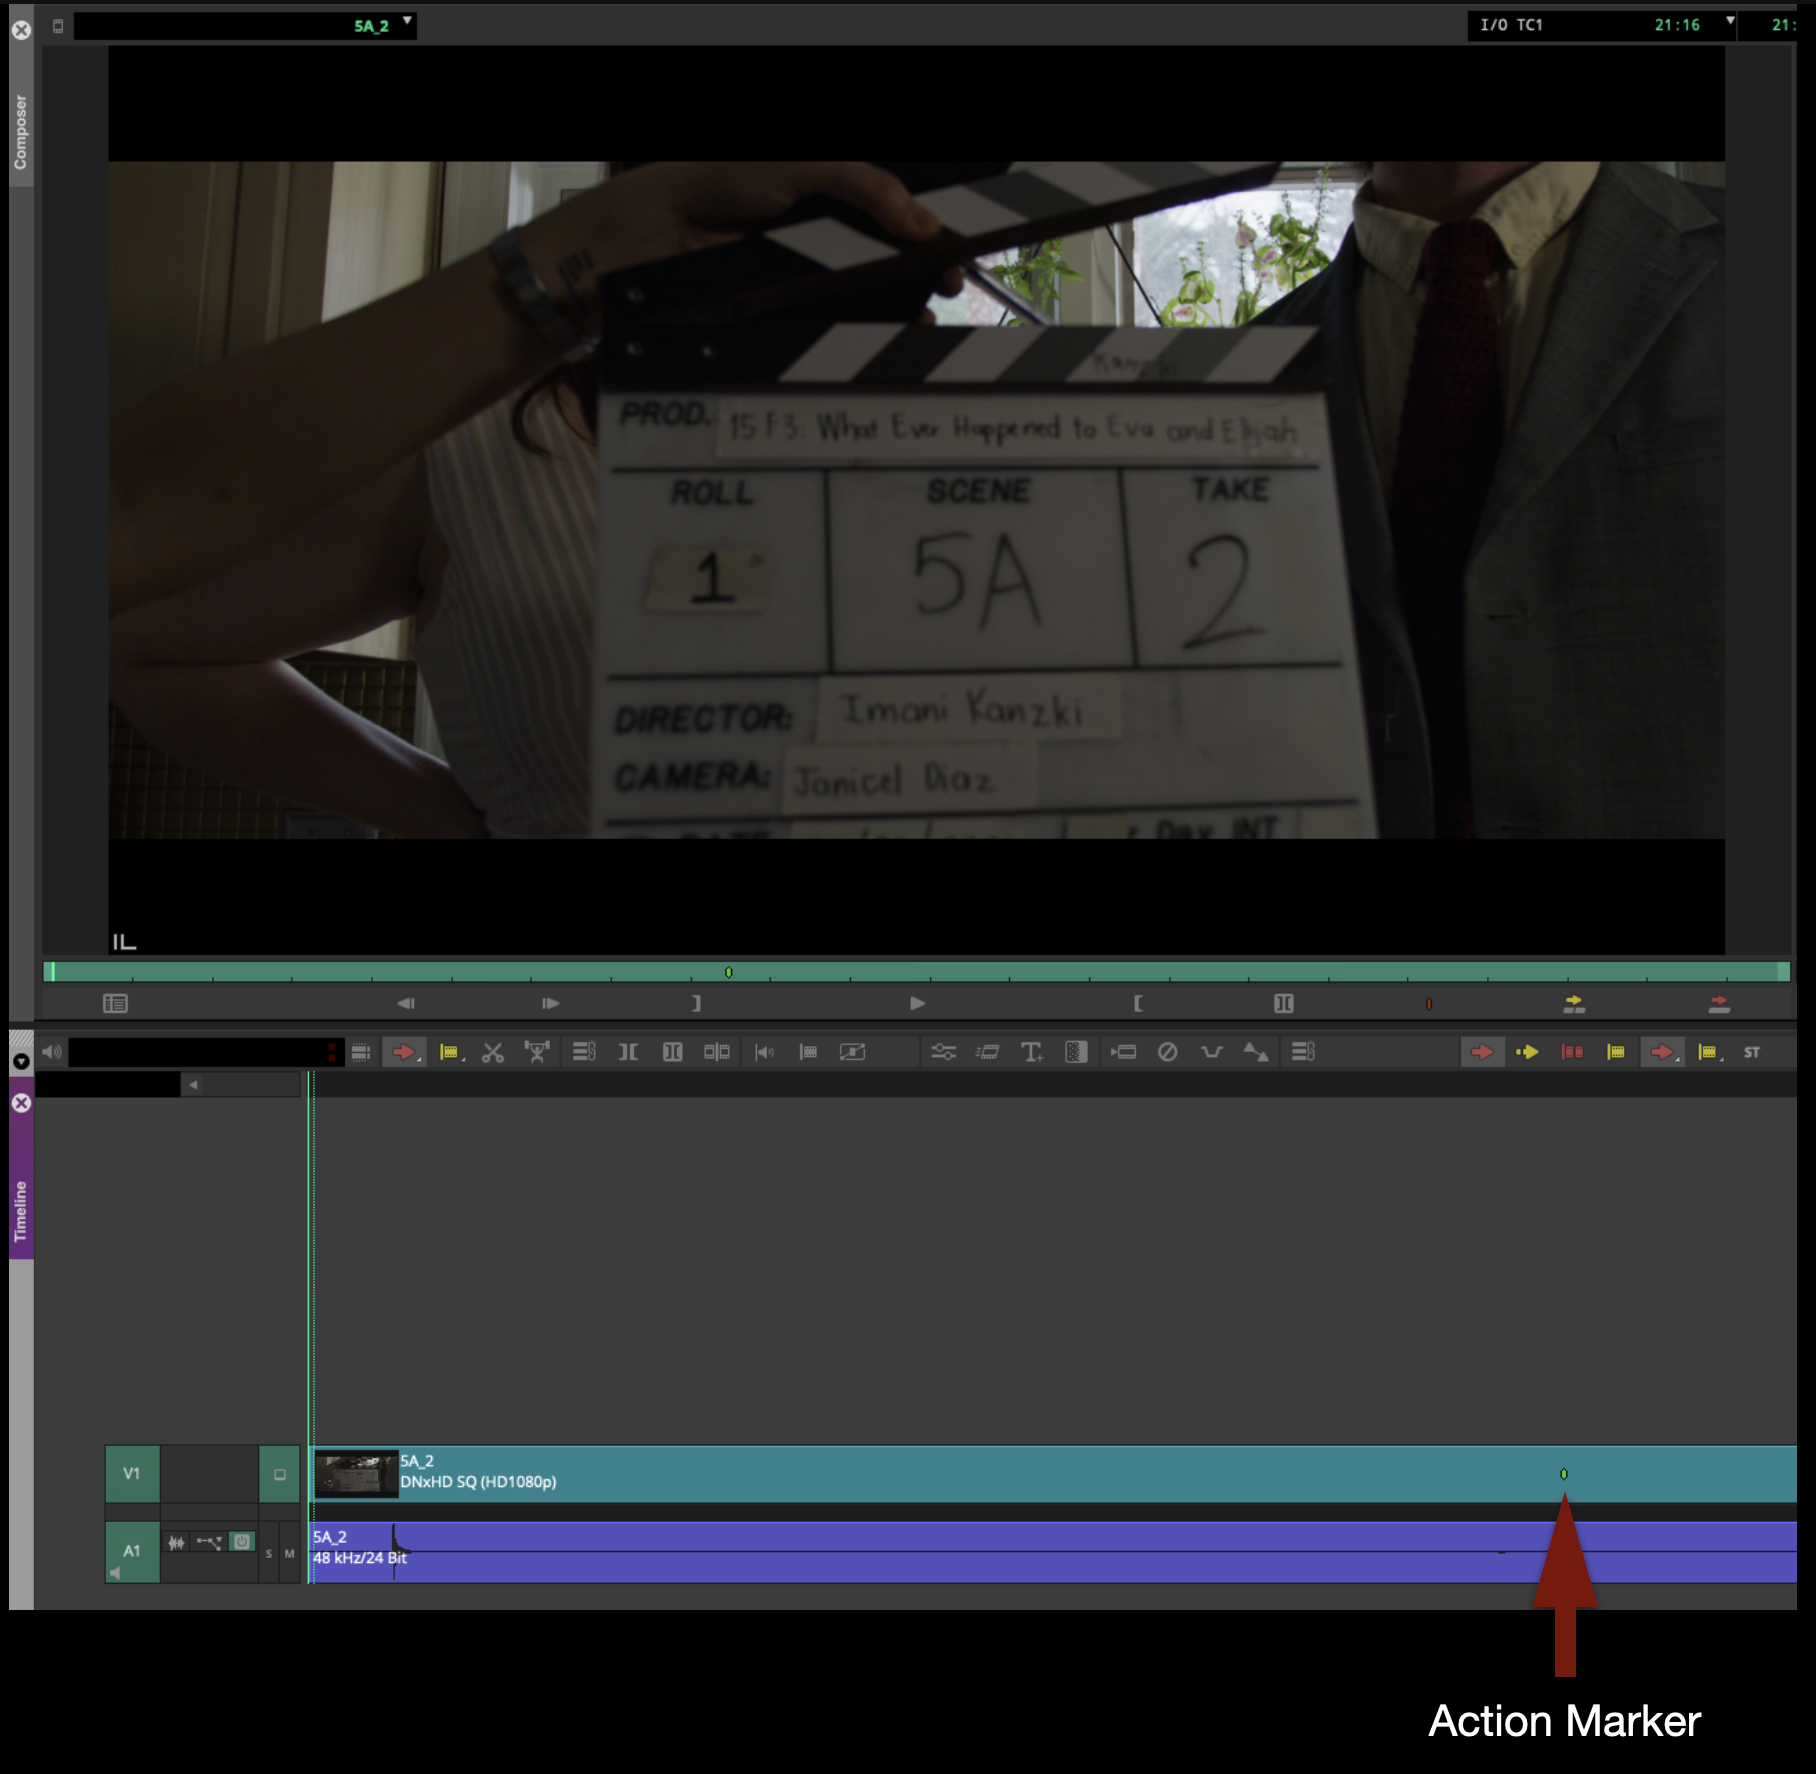
Set Green Action Markers
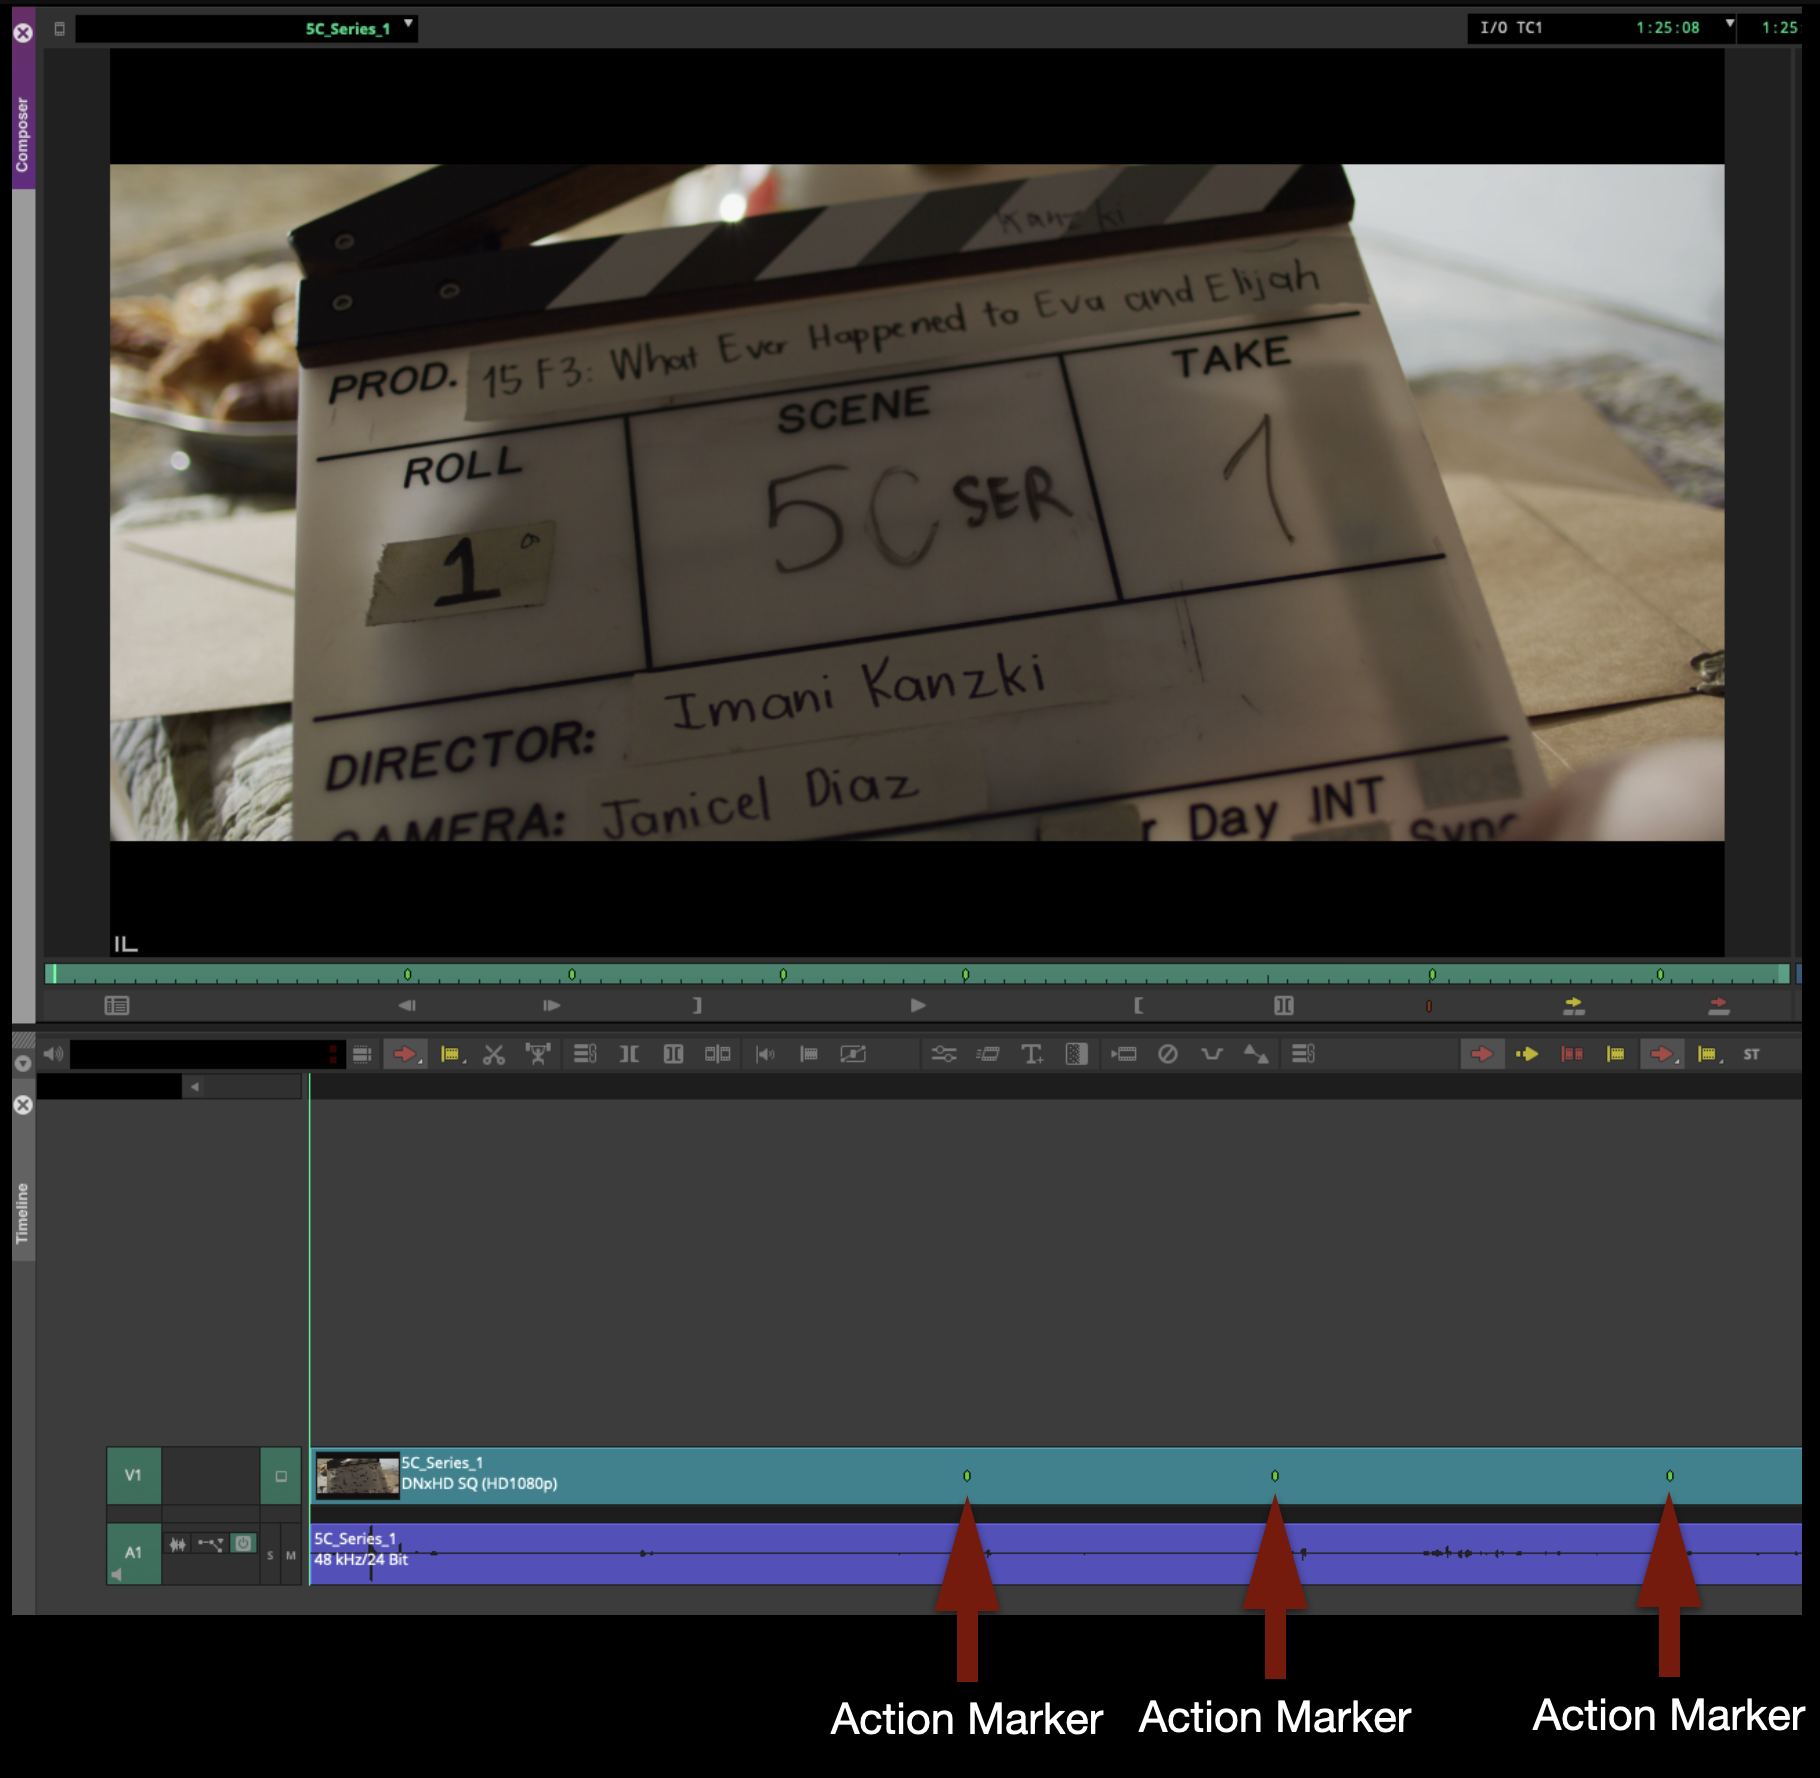
Once everything is renamed, mark the beginning of action for every clip. To do this, listen for when the Director calls “Action” on every clip and immediately hit the “1” key to attach a green marker to that timecode. This will allow the Editor to jump to the beginning of the action for each clip by hitting the “A” and “S” keys to jump between markers.
Normally there will only be one green marker on each clip:
For series takes, multiple green markers may be needed for reset actions:
Organize Footage in Bins
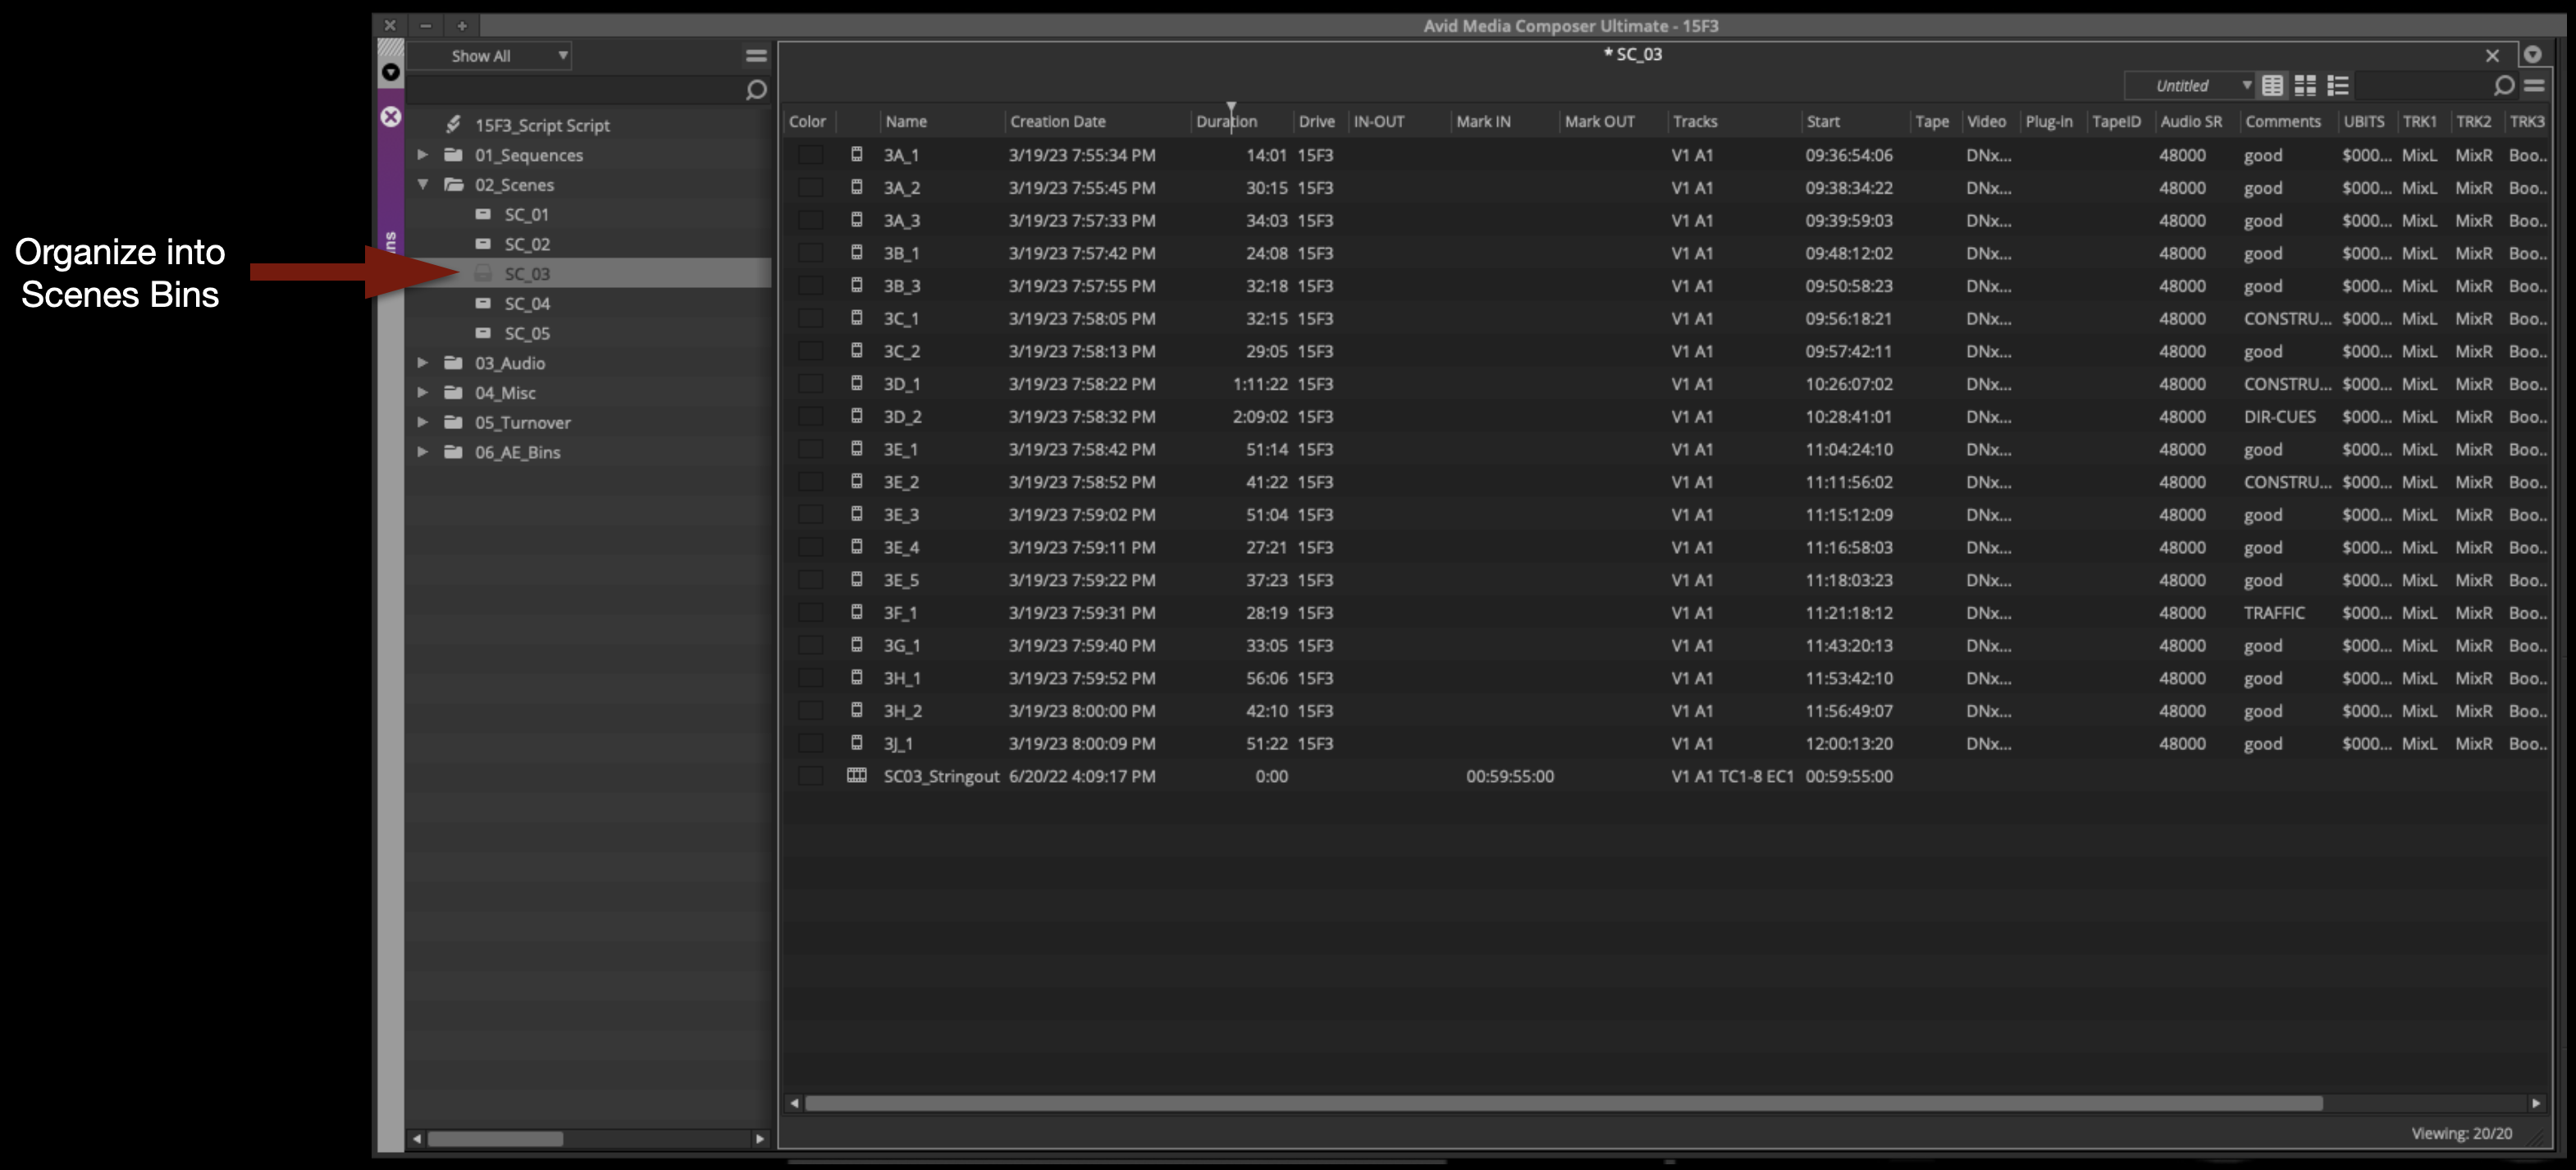
Once all the green action markers have been set, you can move the subclips out of the Synching Bin and into the appropriate scene bins.
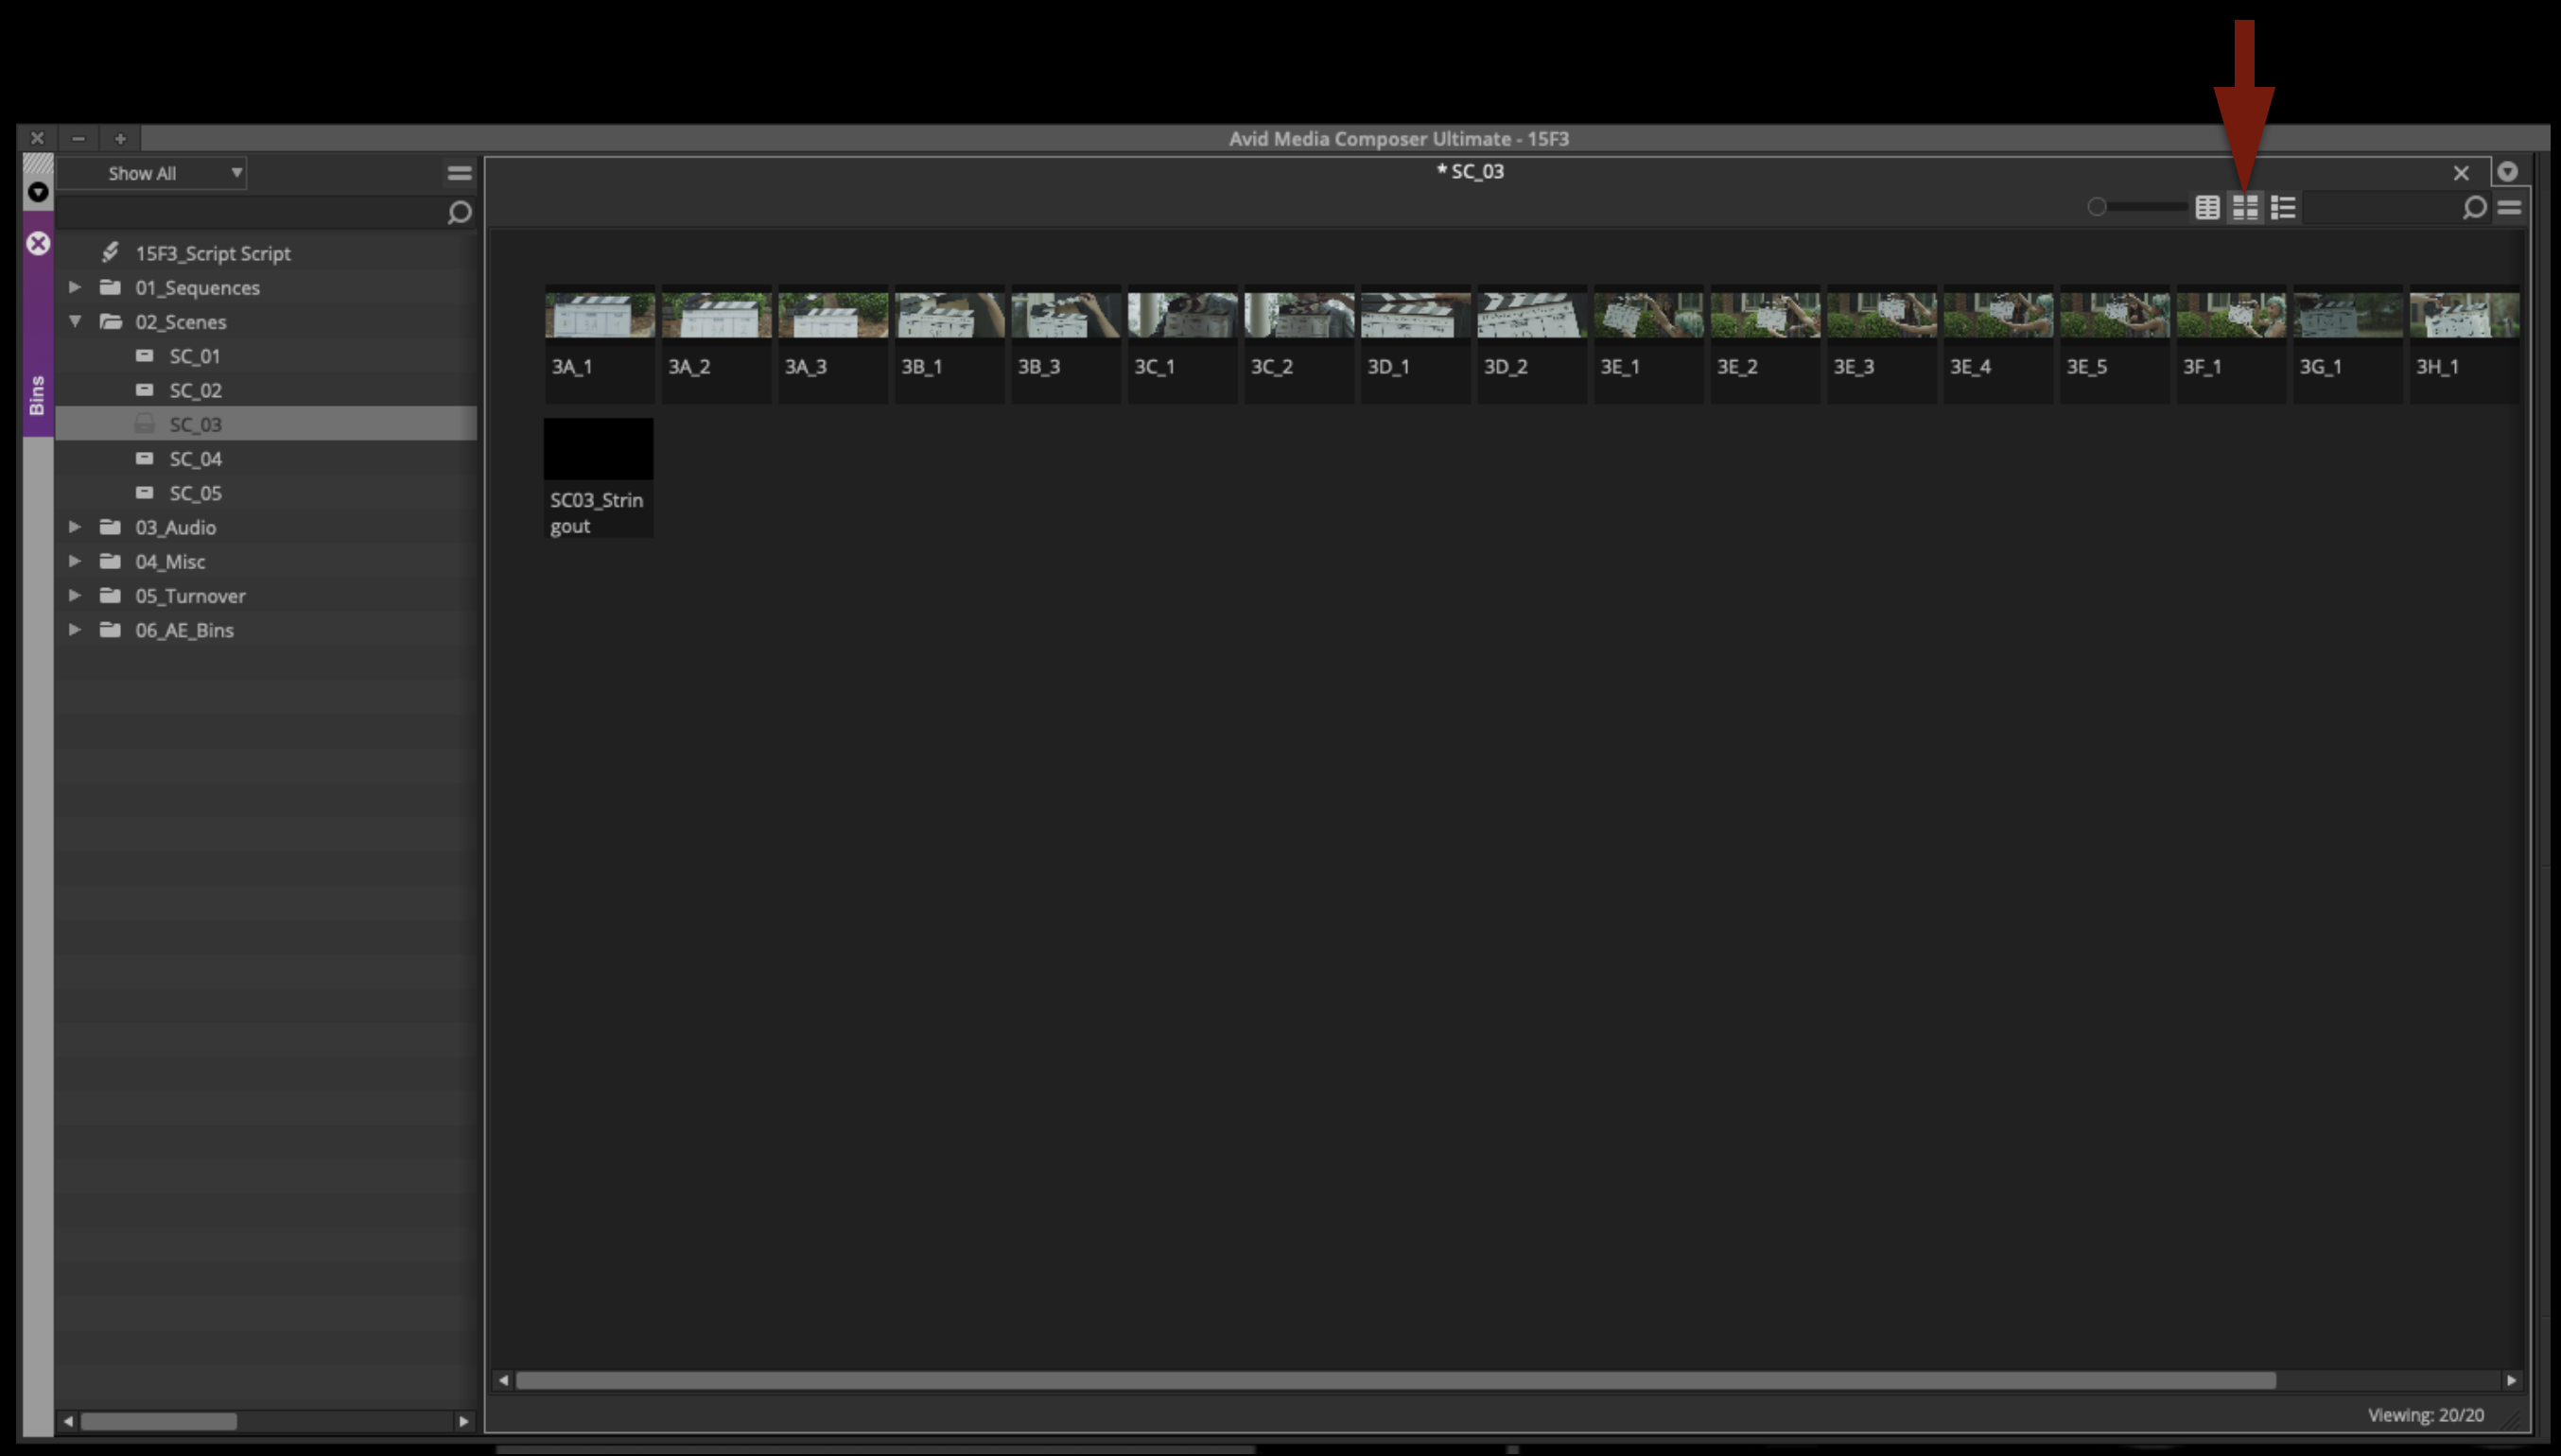
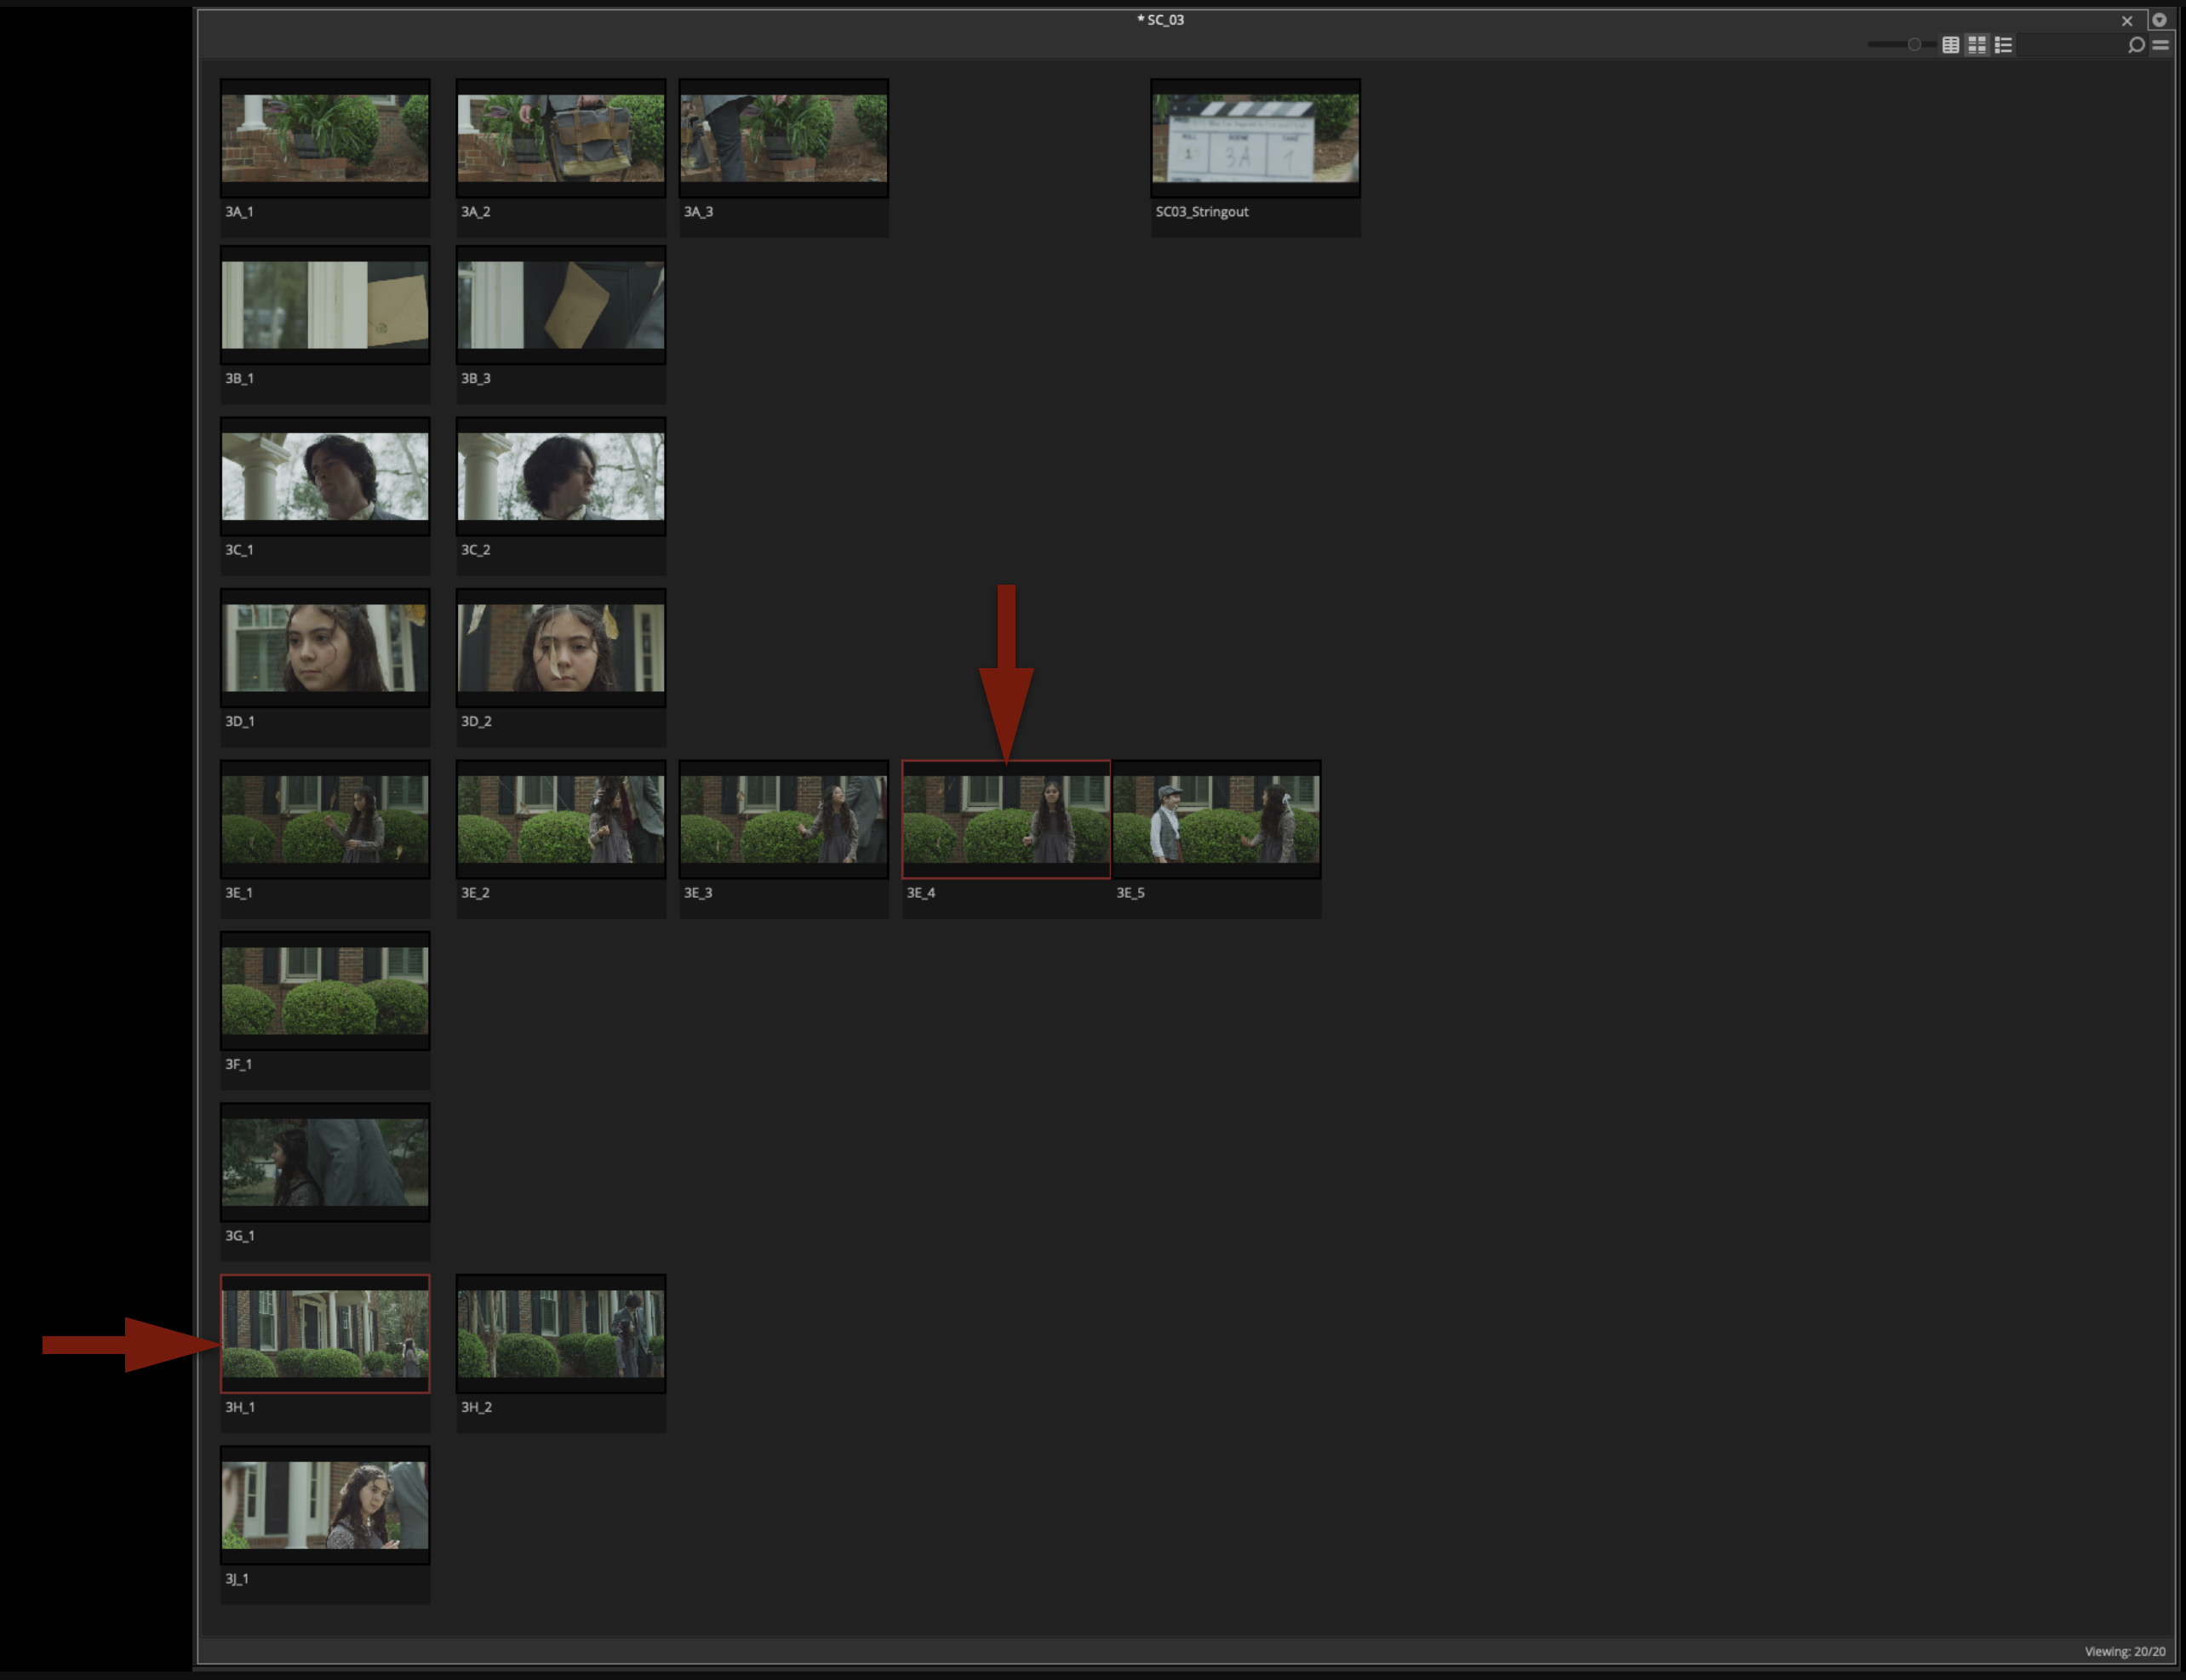
Switch the view in the scene bin to the thumbnail view:
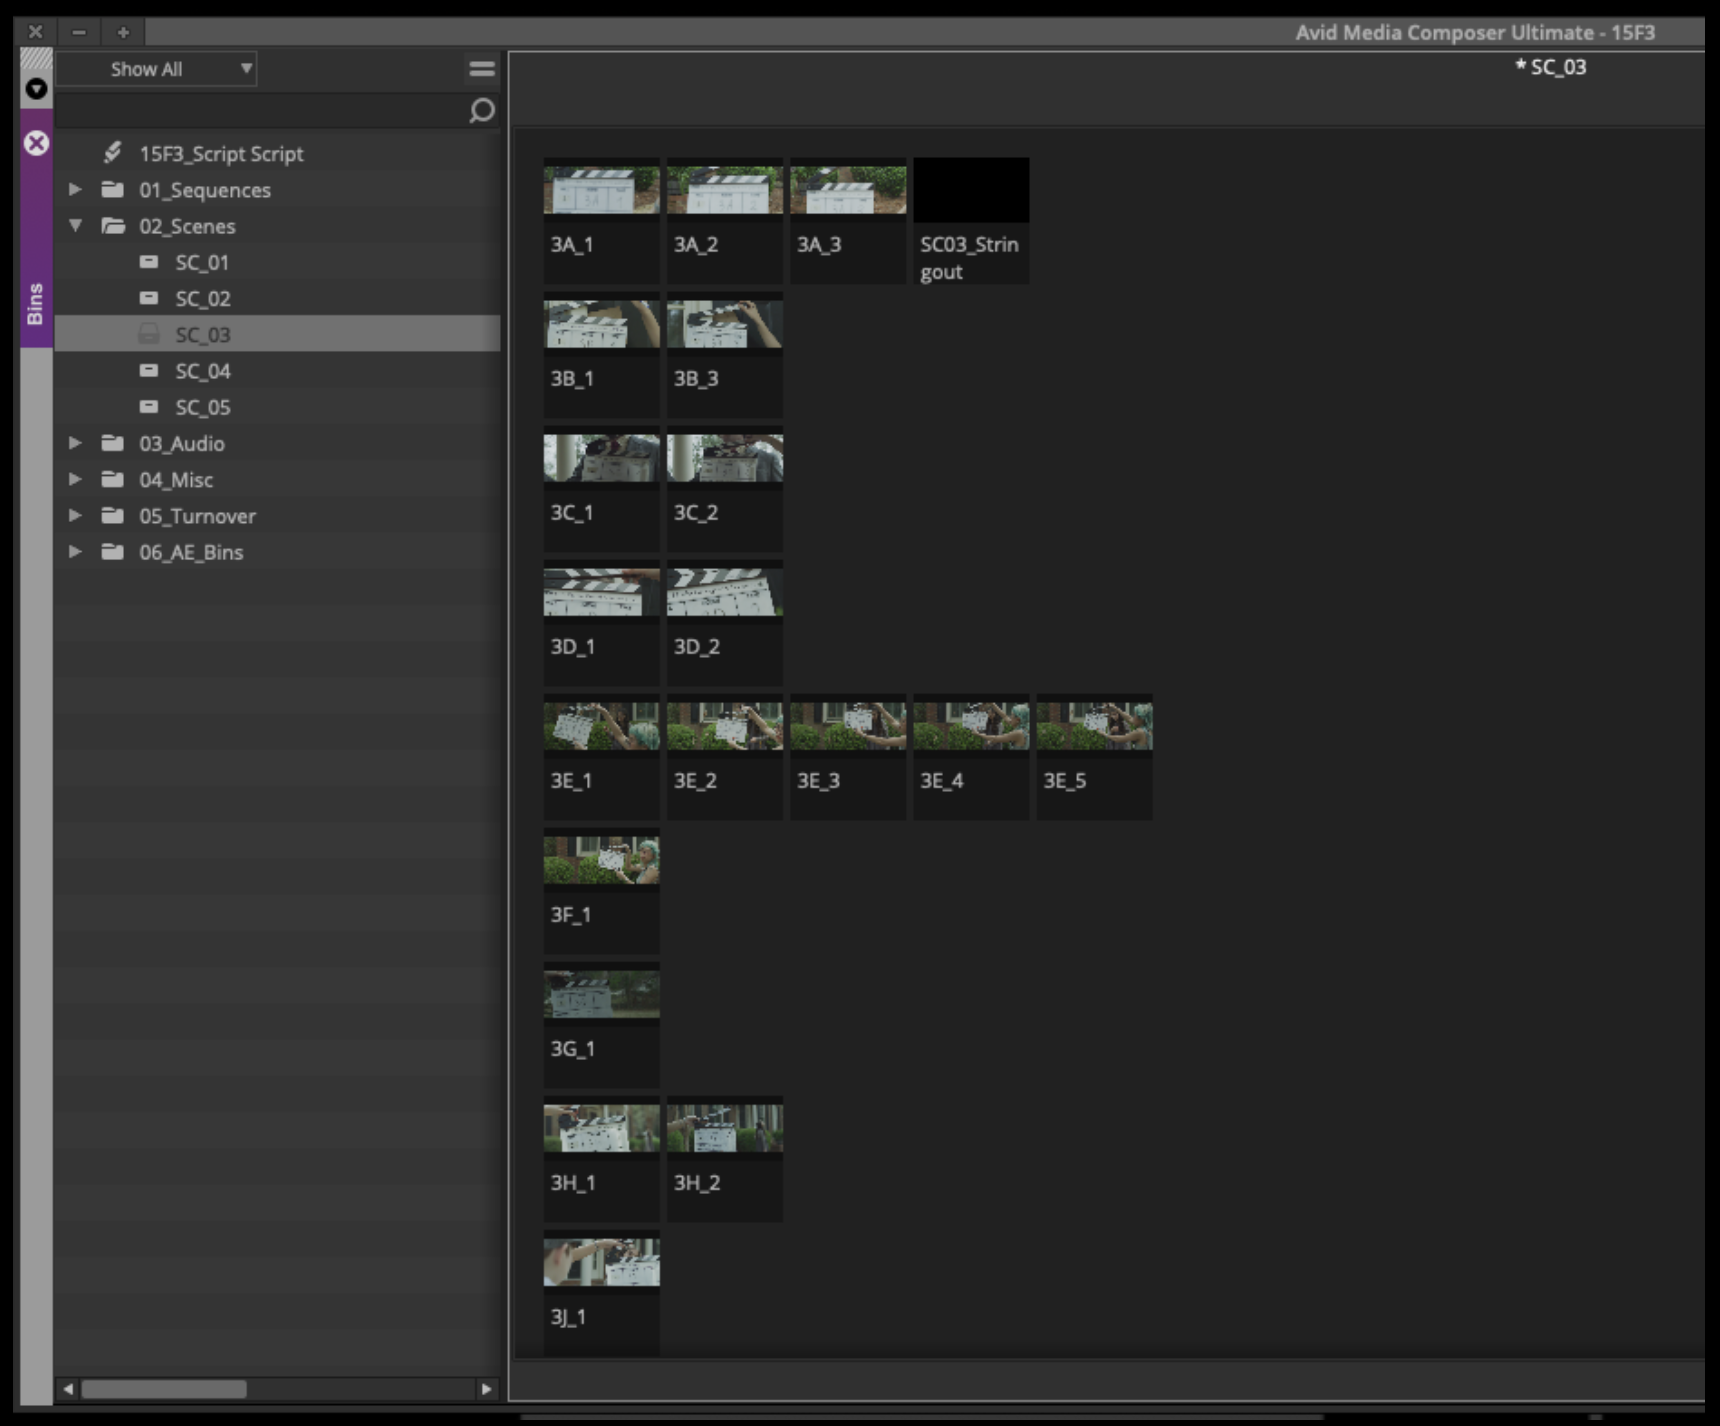
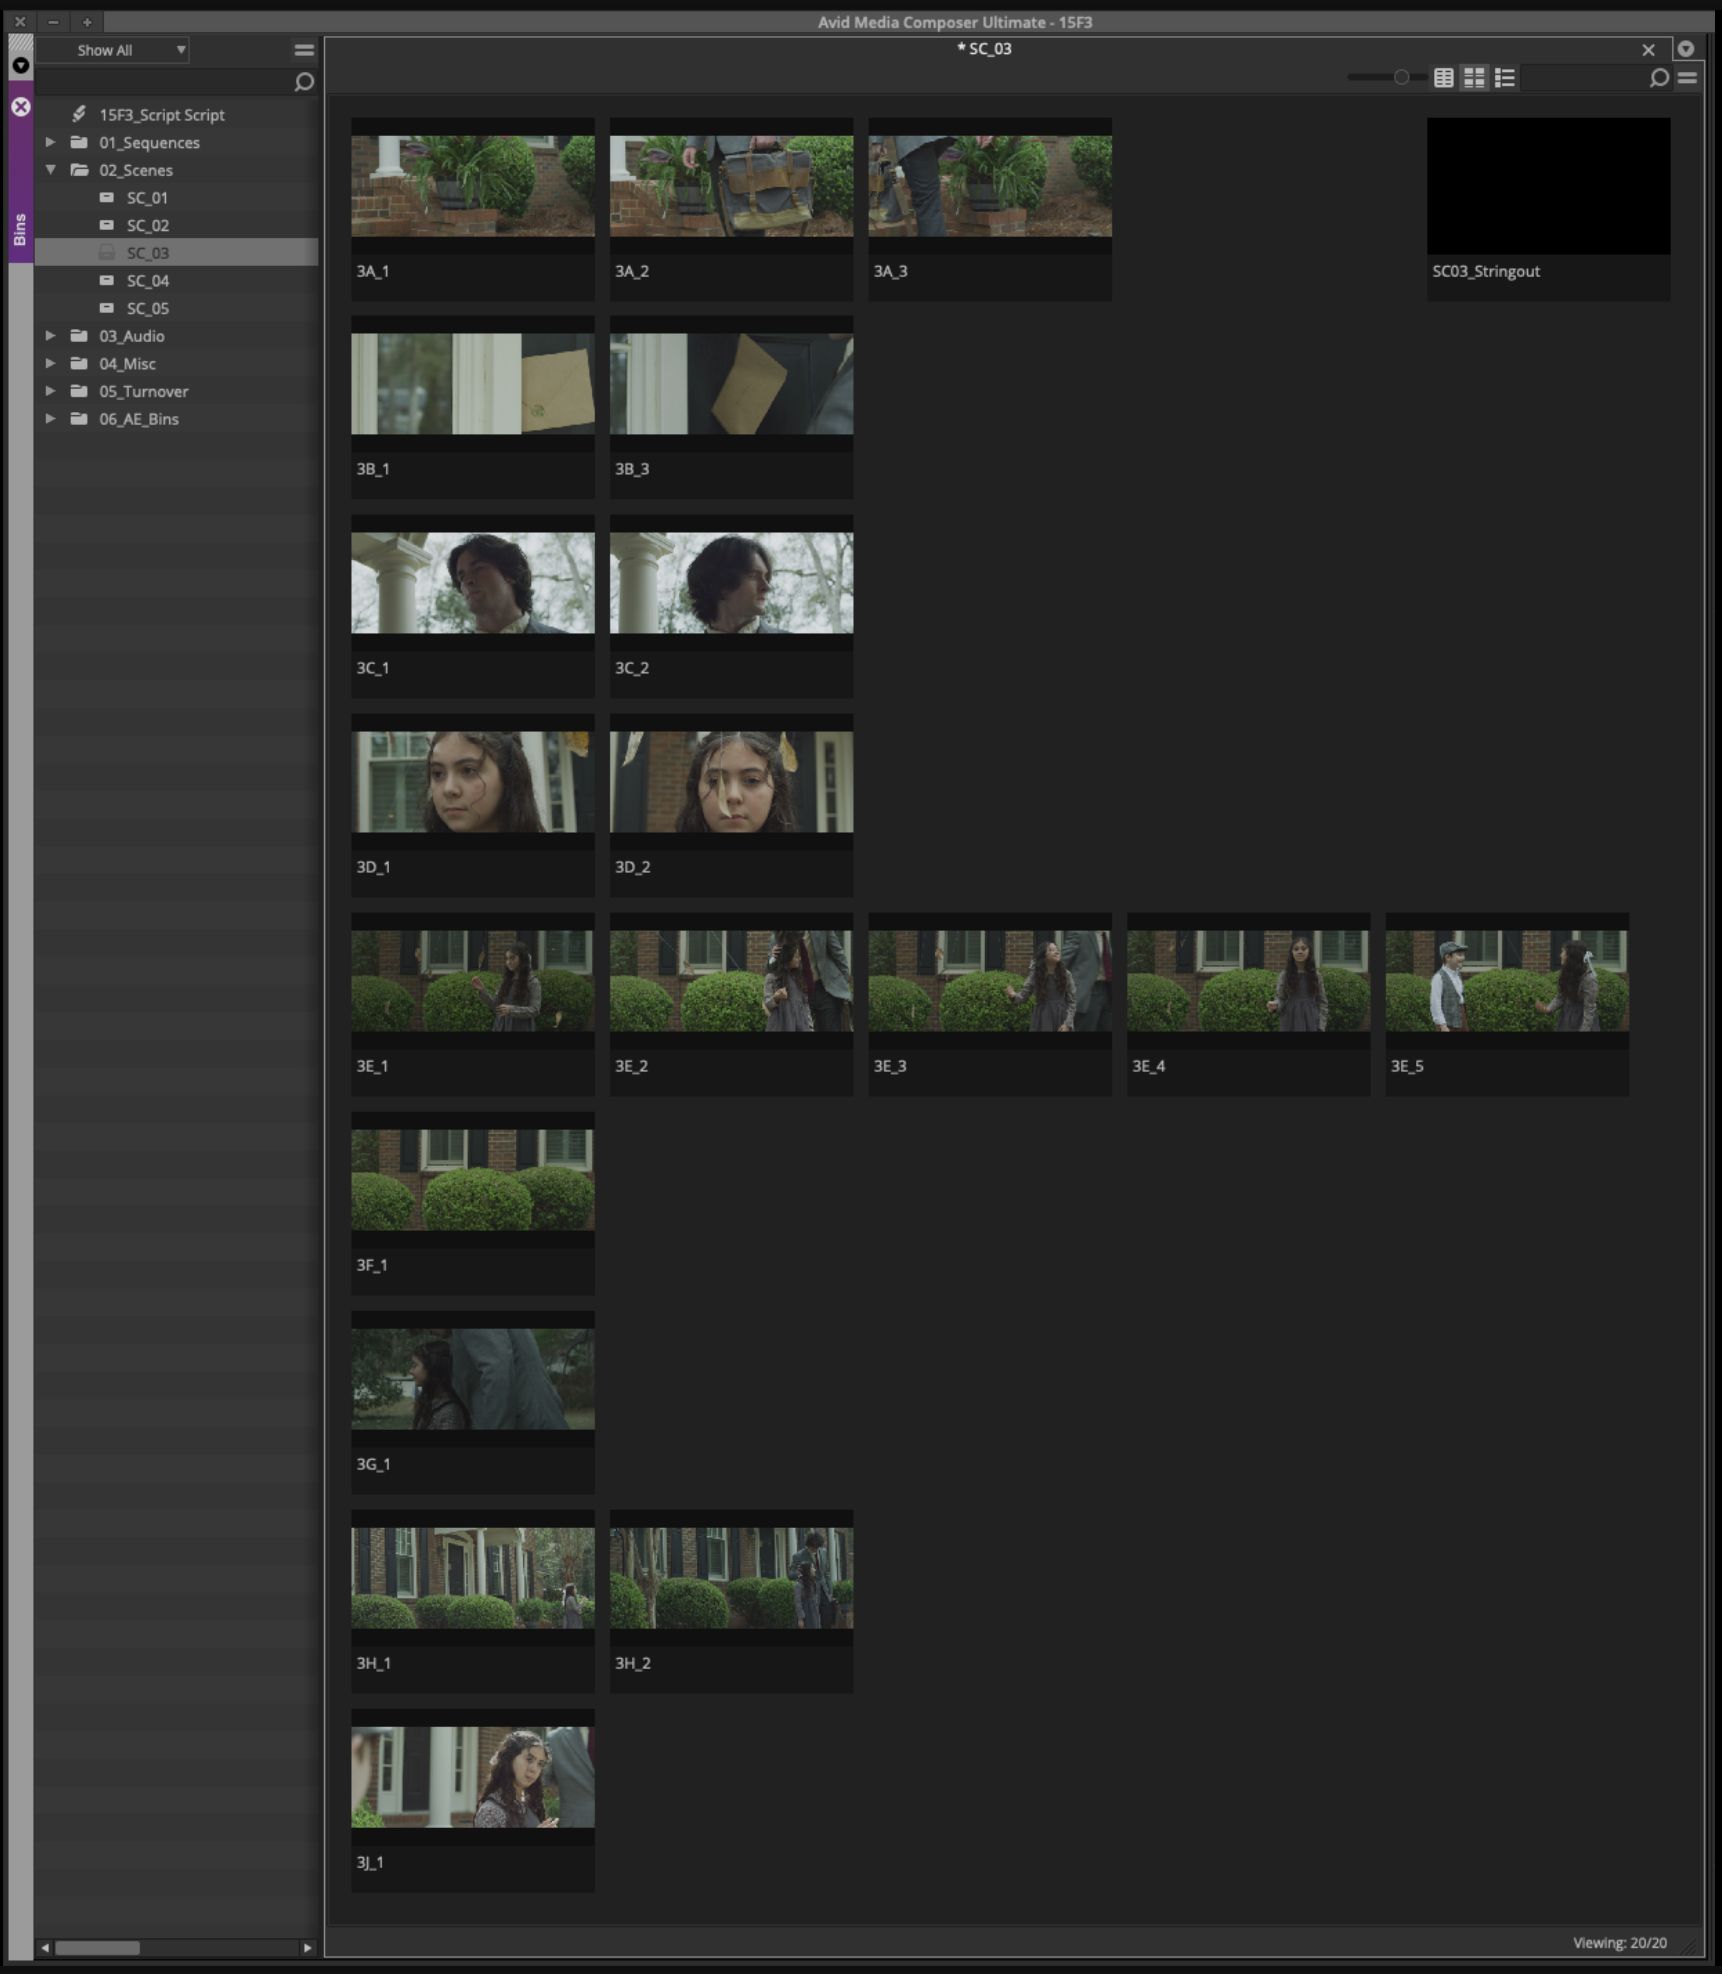
Drag the thumbnails around and organize each scene bin into rows of setups and columns of takes. Hit “Command + T” to snap the thumbnails to a grid to making organizing easier.
Next, change the thumbnail for each one. By default the thumbnail is the first frame of video, which is not helpful to an Editor as it usually only shows the slate. You can change the thumbnail by single-clicking on the clip and scrubbing with the JKL keys. Wherever you stop scrubbing, that thumbnail will be saved.
If a setup has only one take, set the thumbnail to what the majority of the shot represents. If a setup has multiple takes, set the early takes to the beginning of the action and the last takes to the end of the action. This way, the Editor can see at a glance what the motion of the camera or the changing of the blocking is, simply by looking across the different takes.
Transcribe Notes and Label “NG”
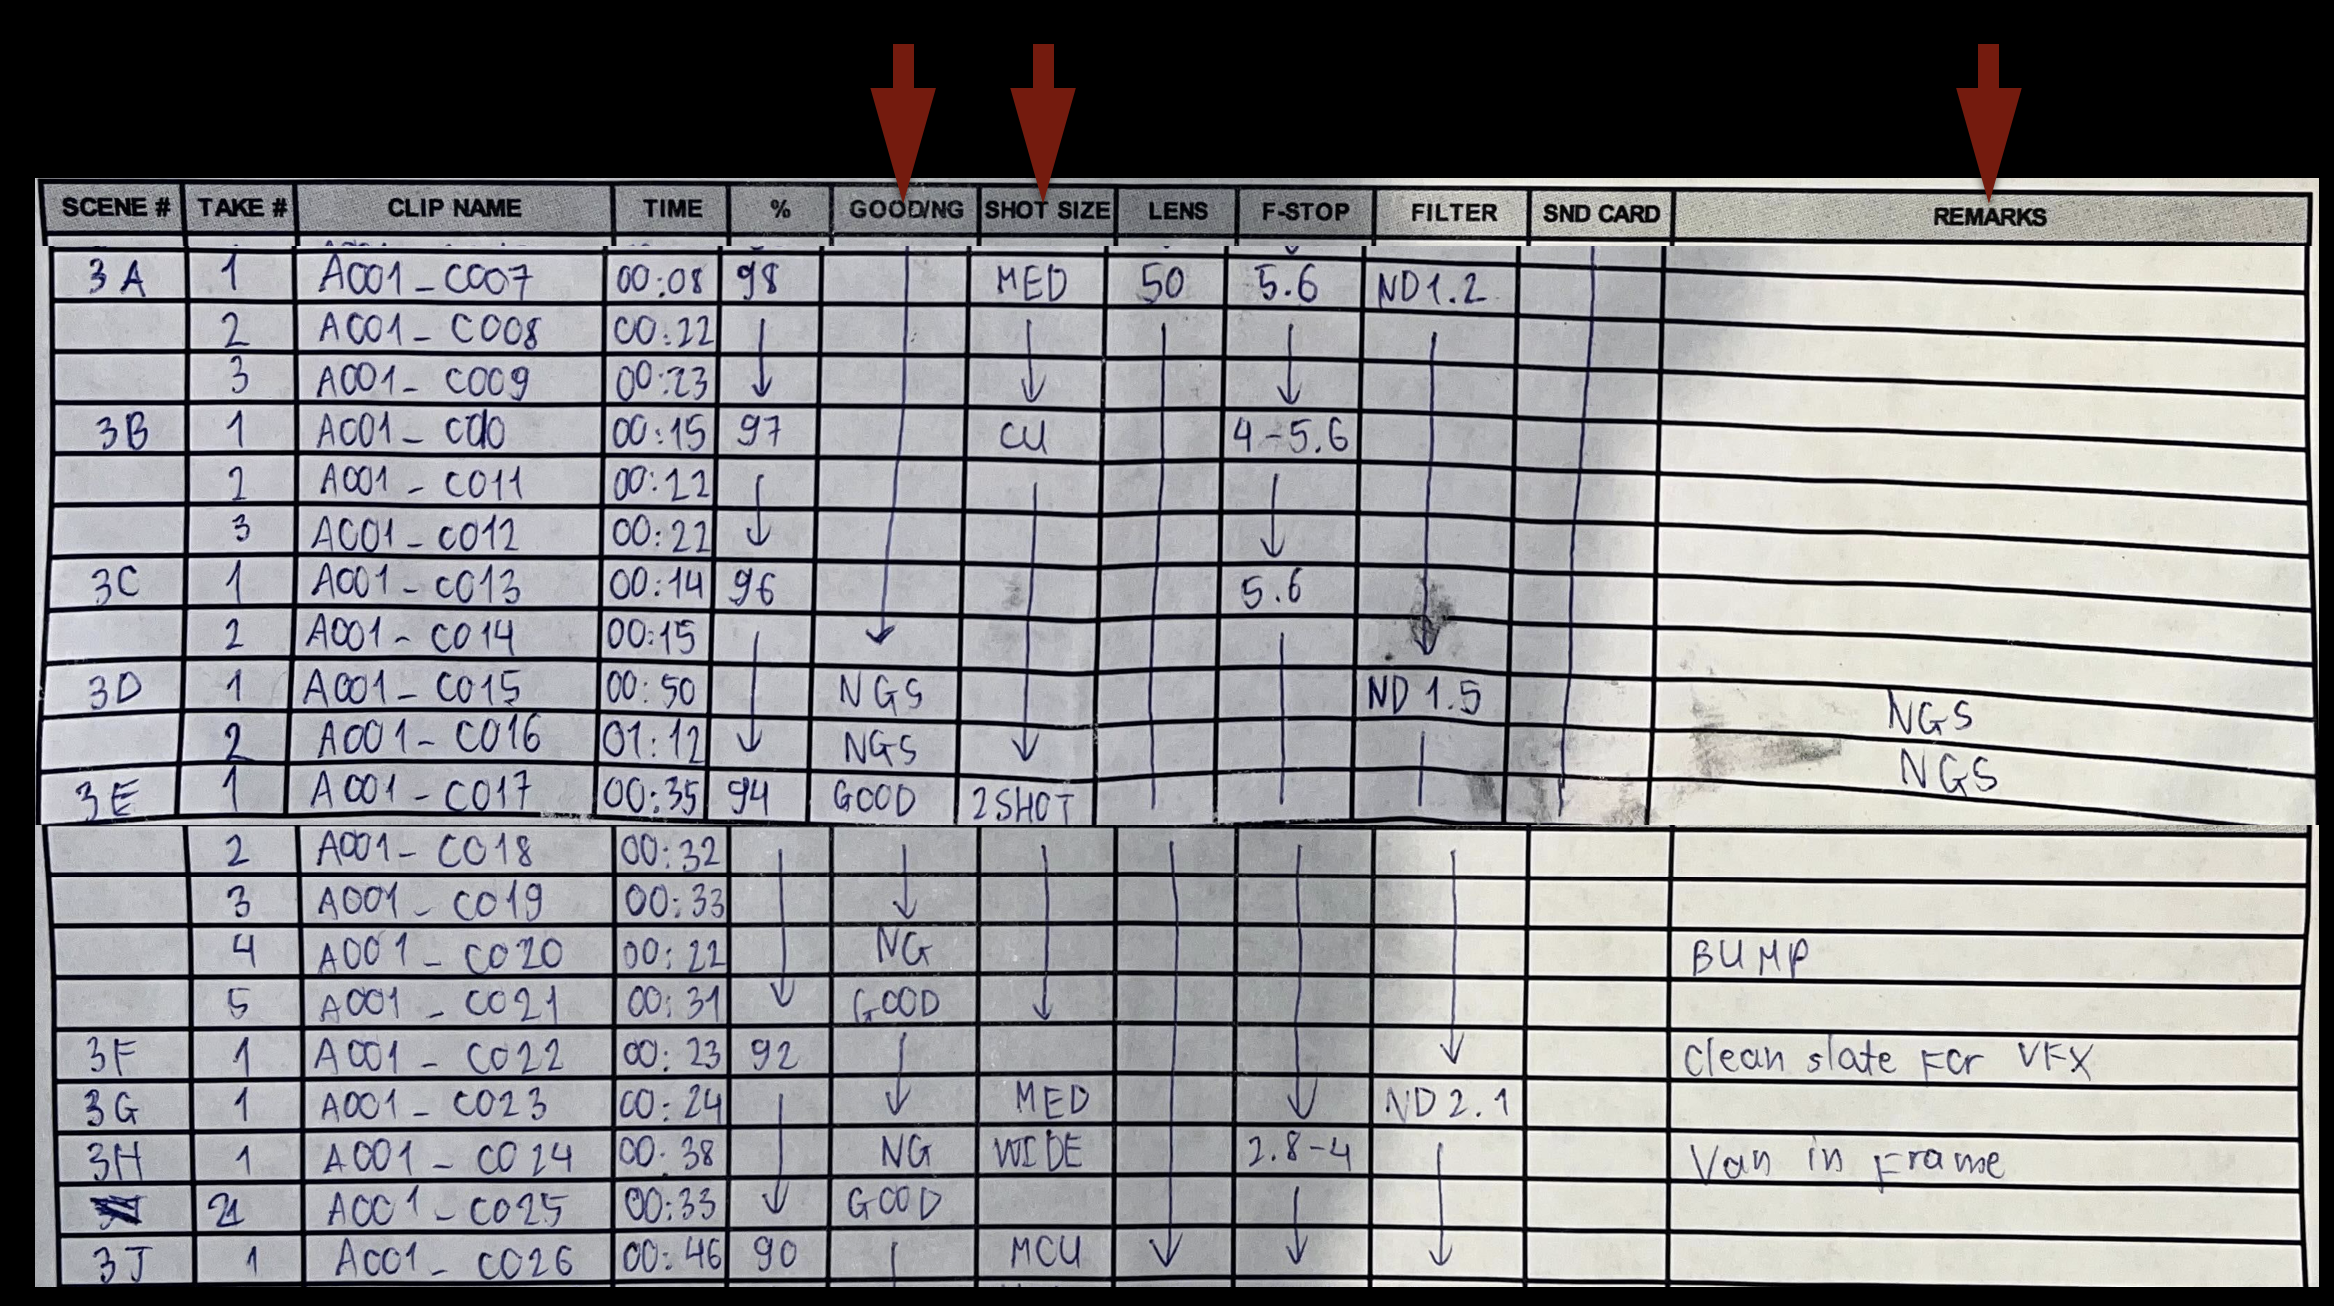
The Camera Report has notes for Good/NG, Shot Size, and Remarks:
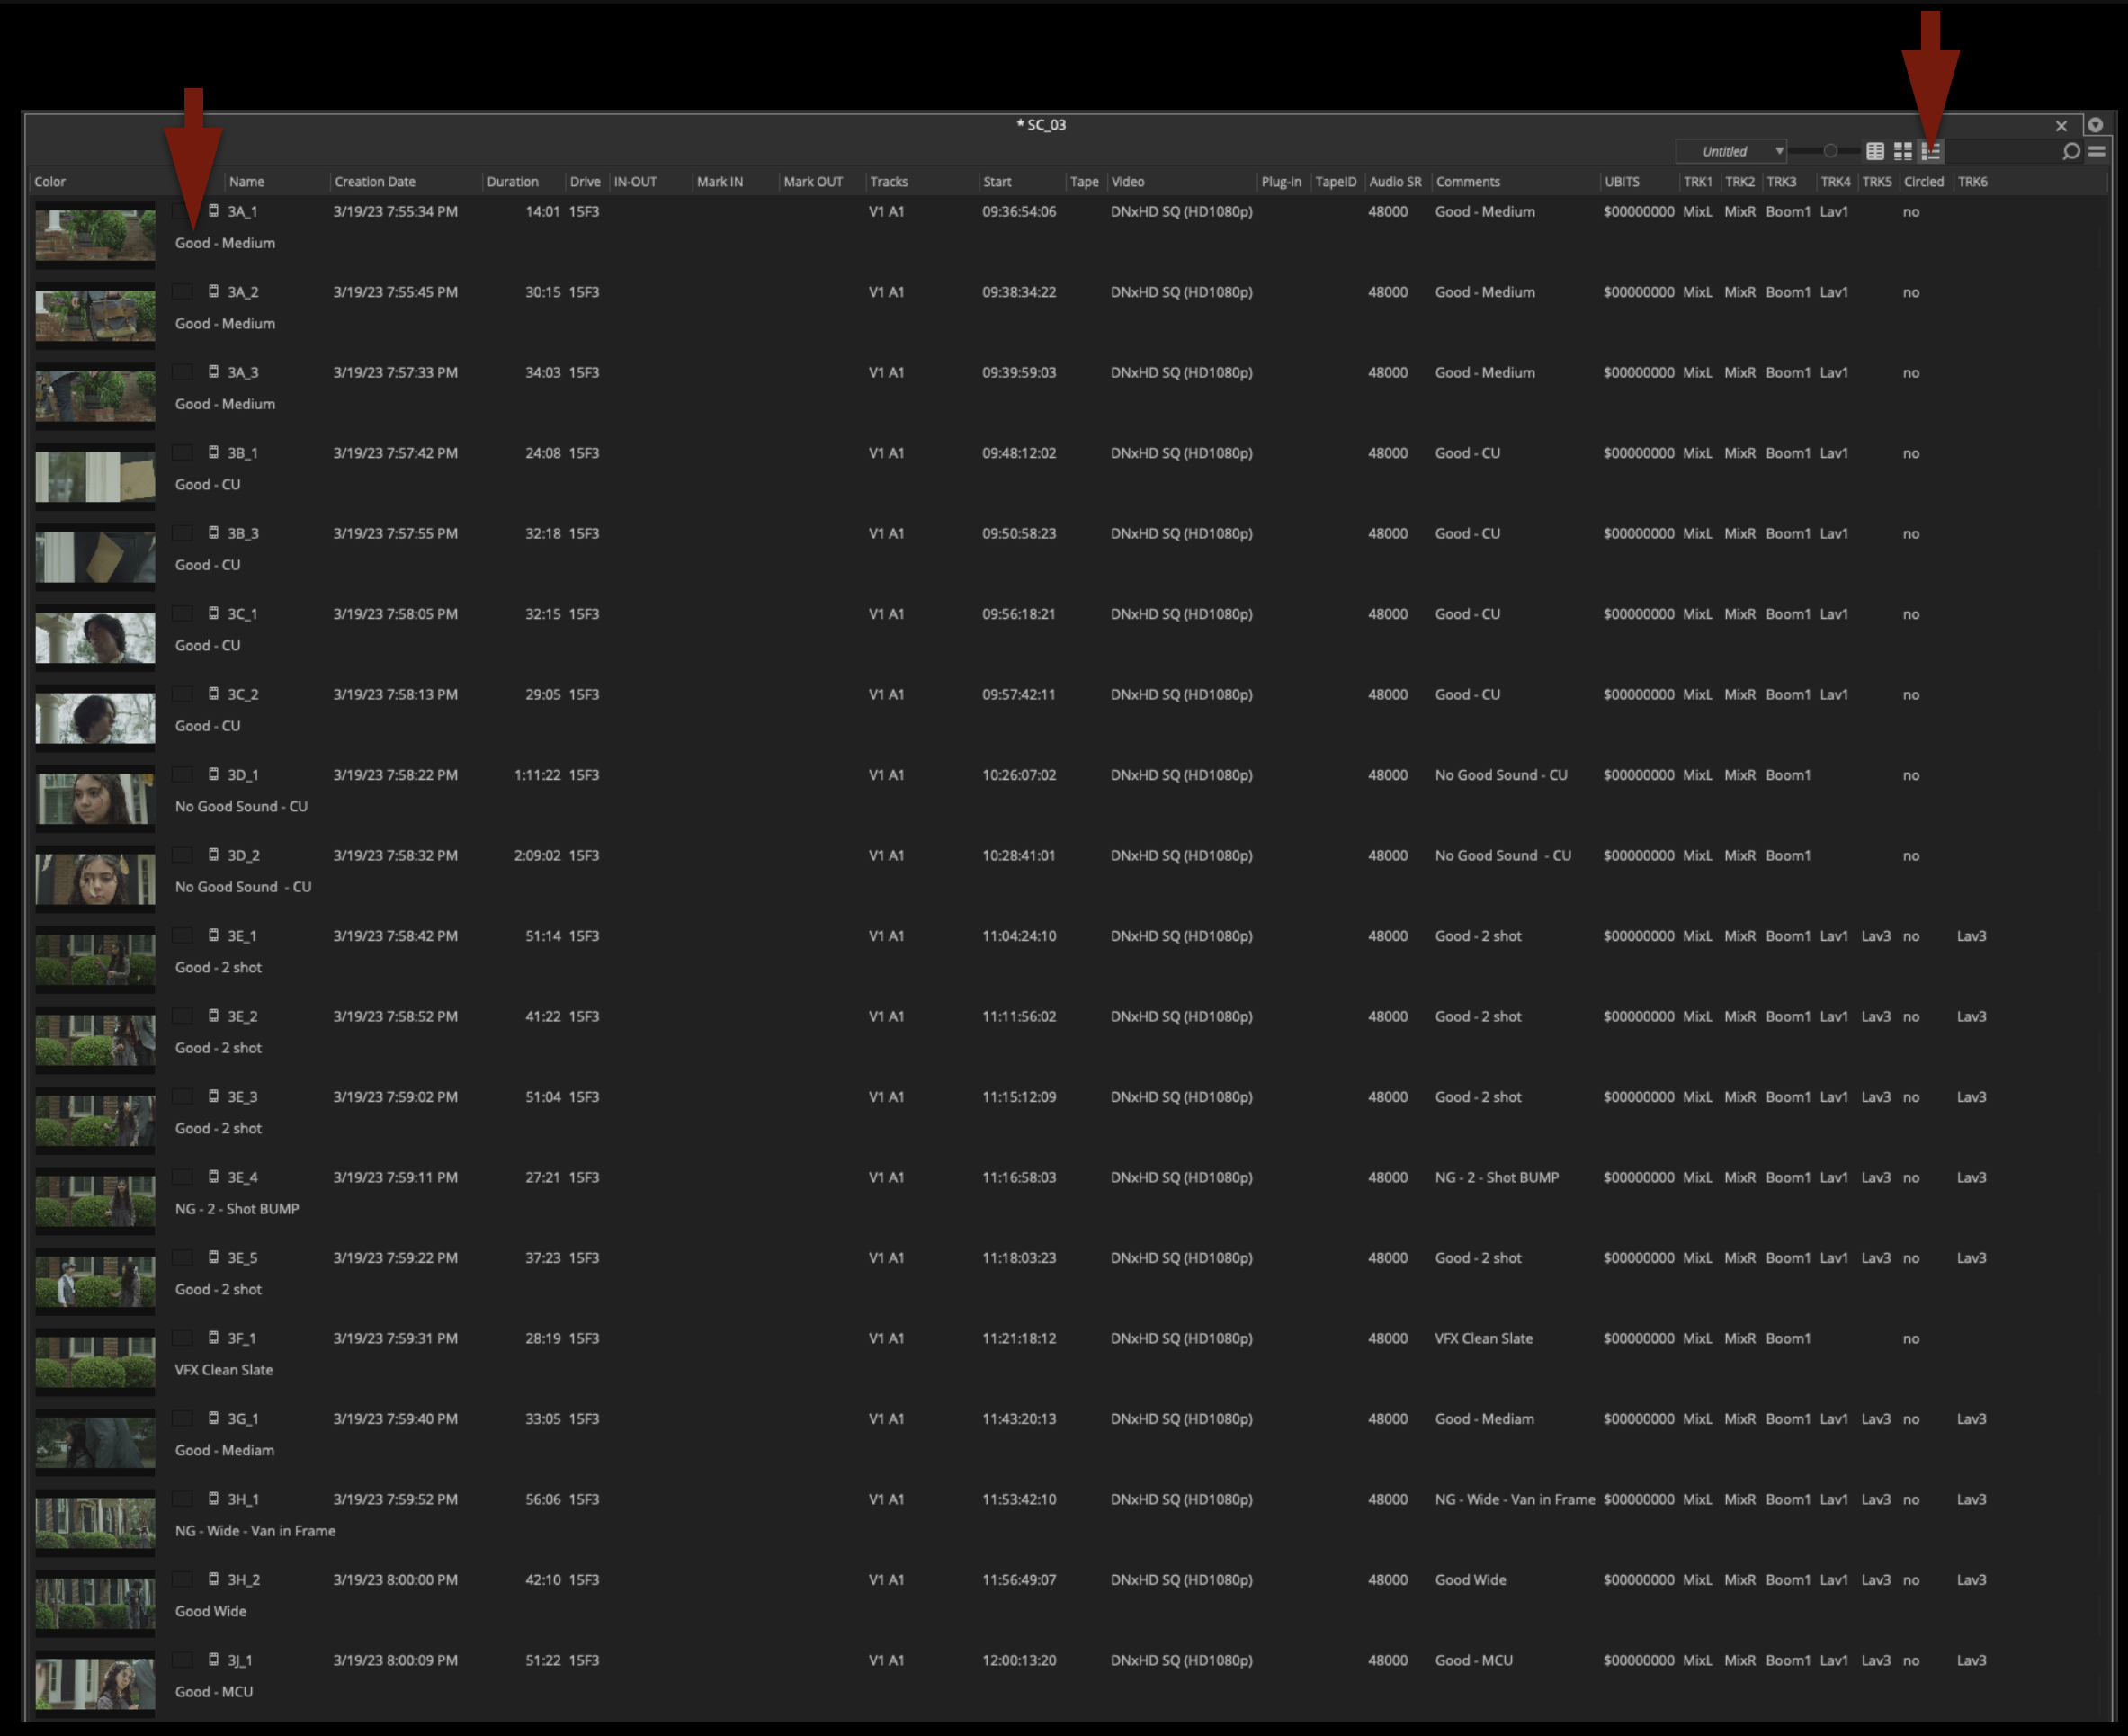
Select Script View, and transcribe all of these notes from the Camera Report onto the corresponding clips in the Comments section.
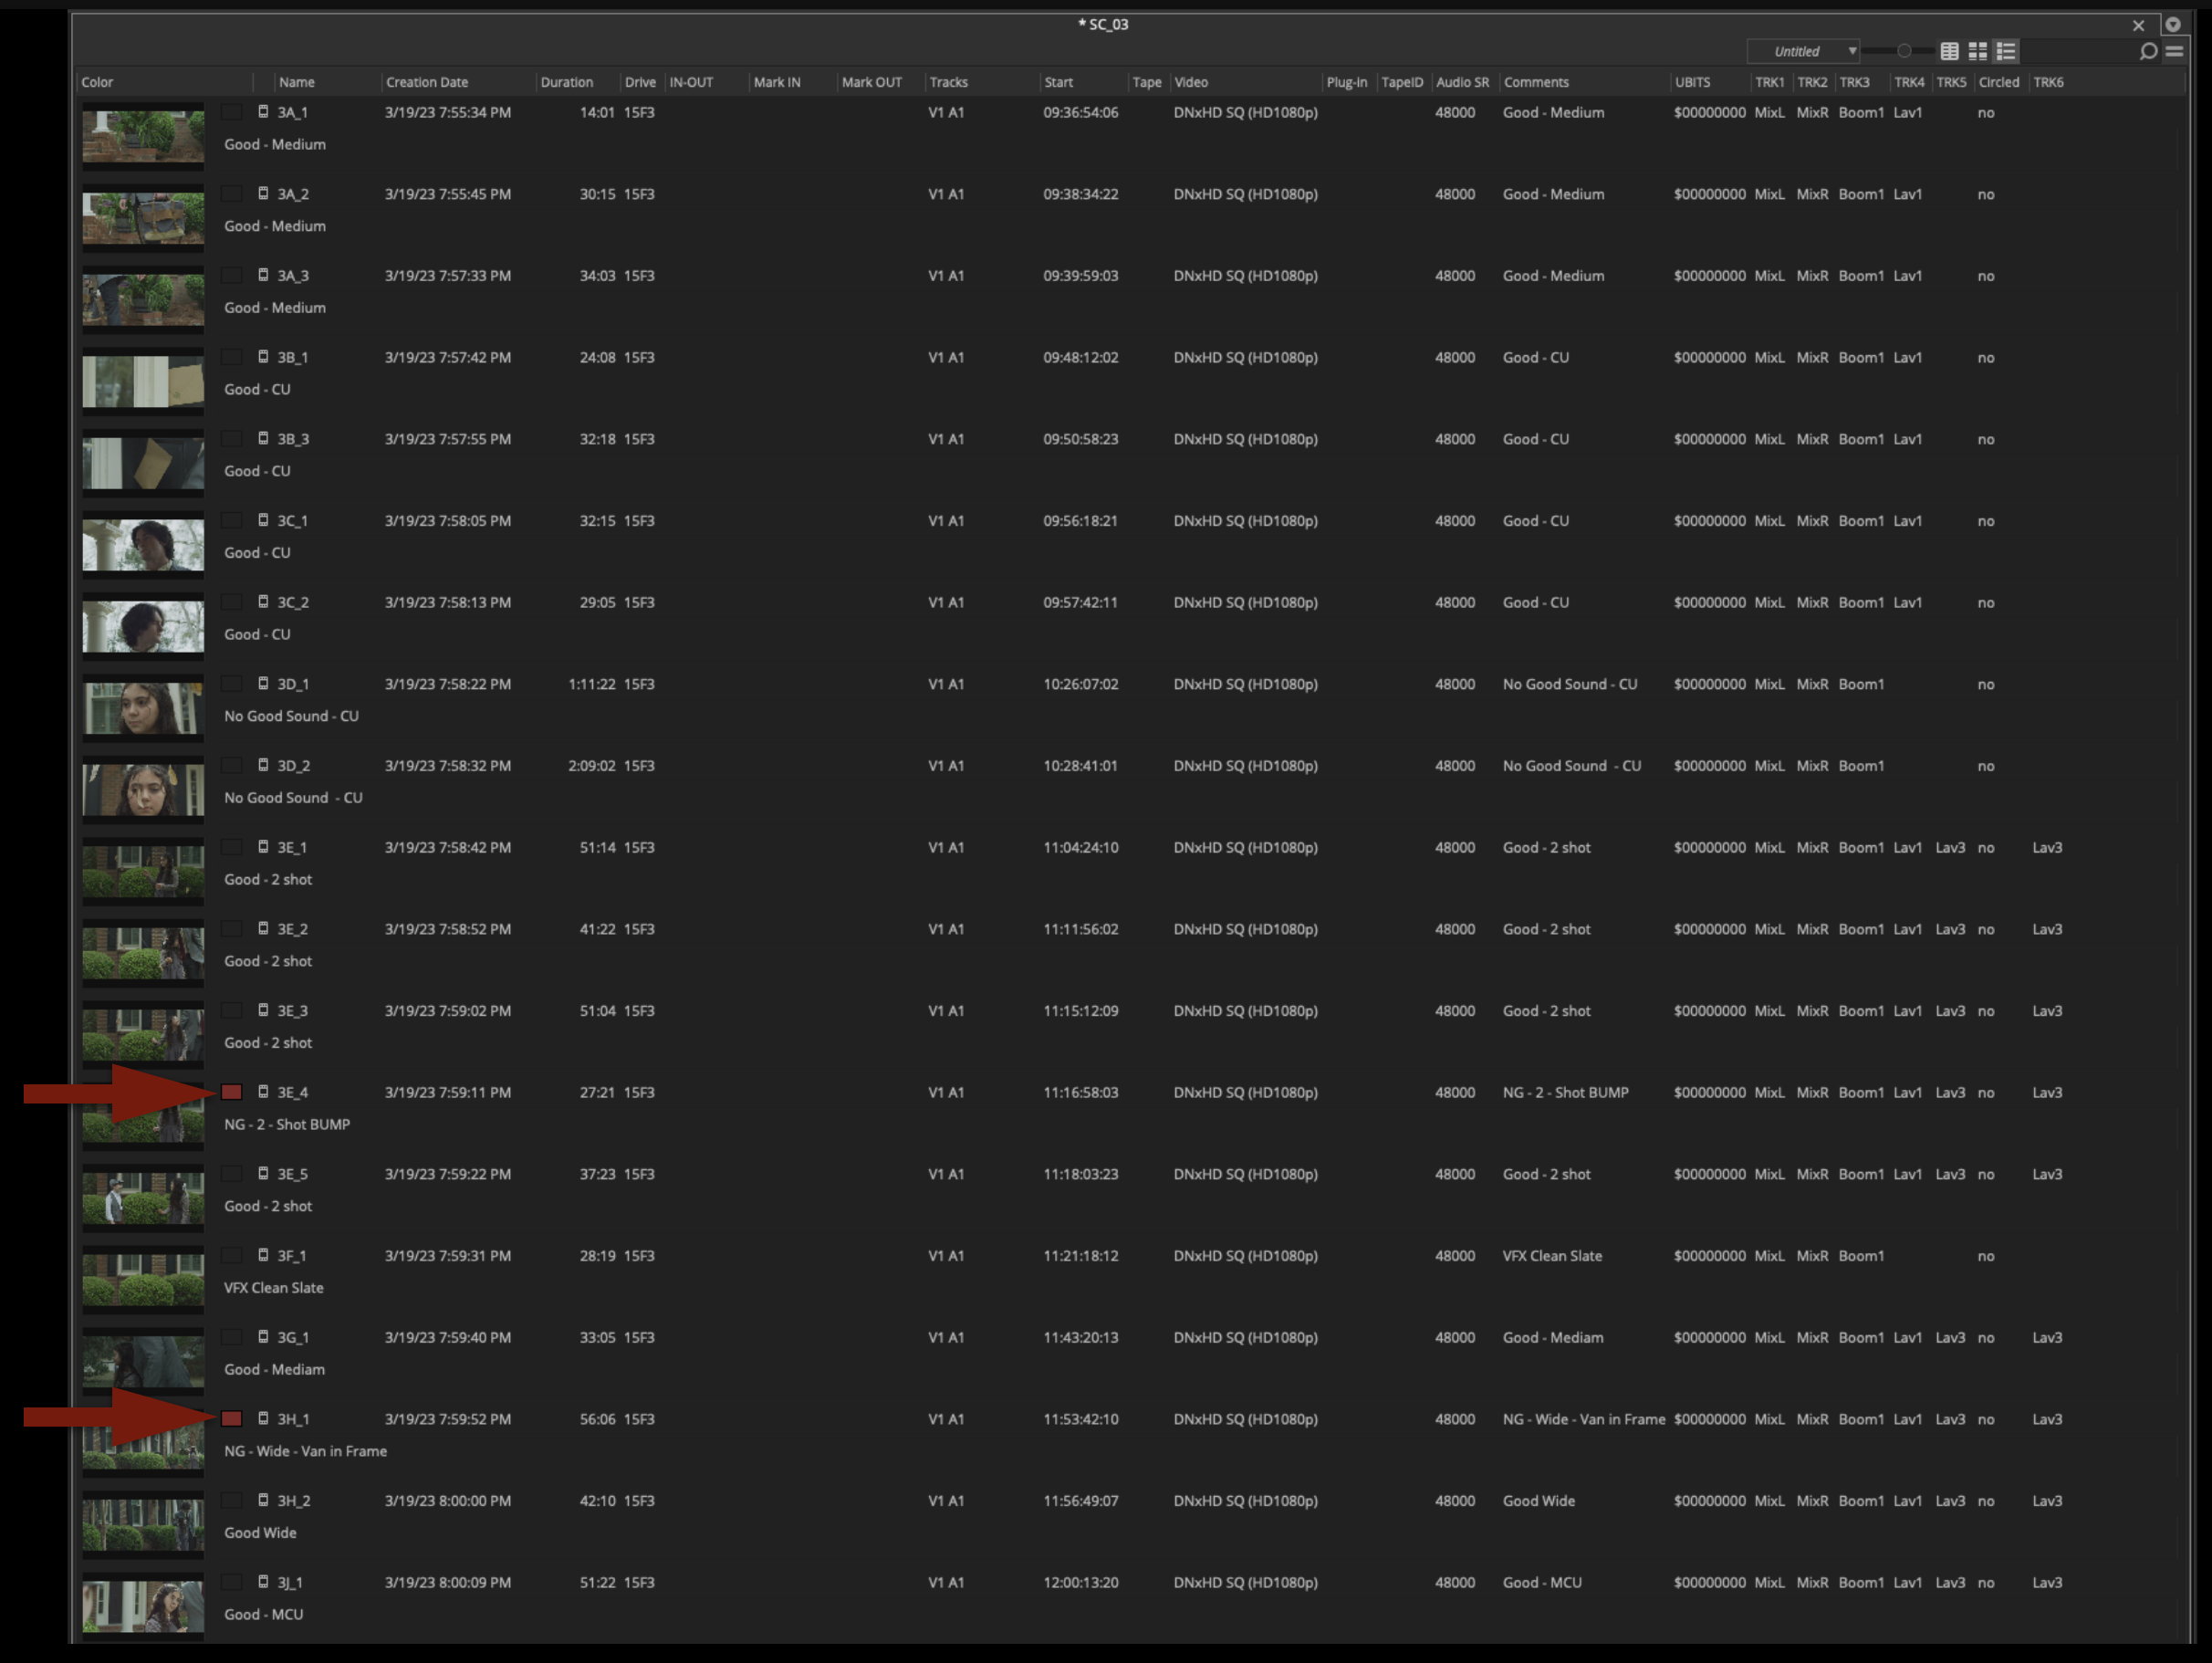
Any clips marked as “NG” or “No Good” should be labeled in red:
This color-coding should translate to the thumbnail view, so the Editor will easily be able to tell which takes are No Good.
Assemble Scene Stringouts
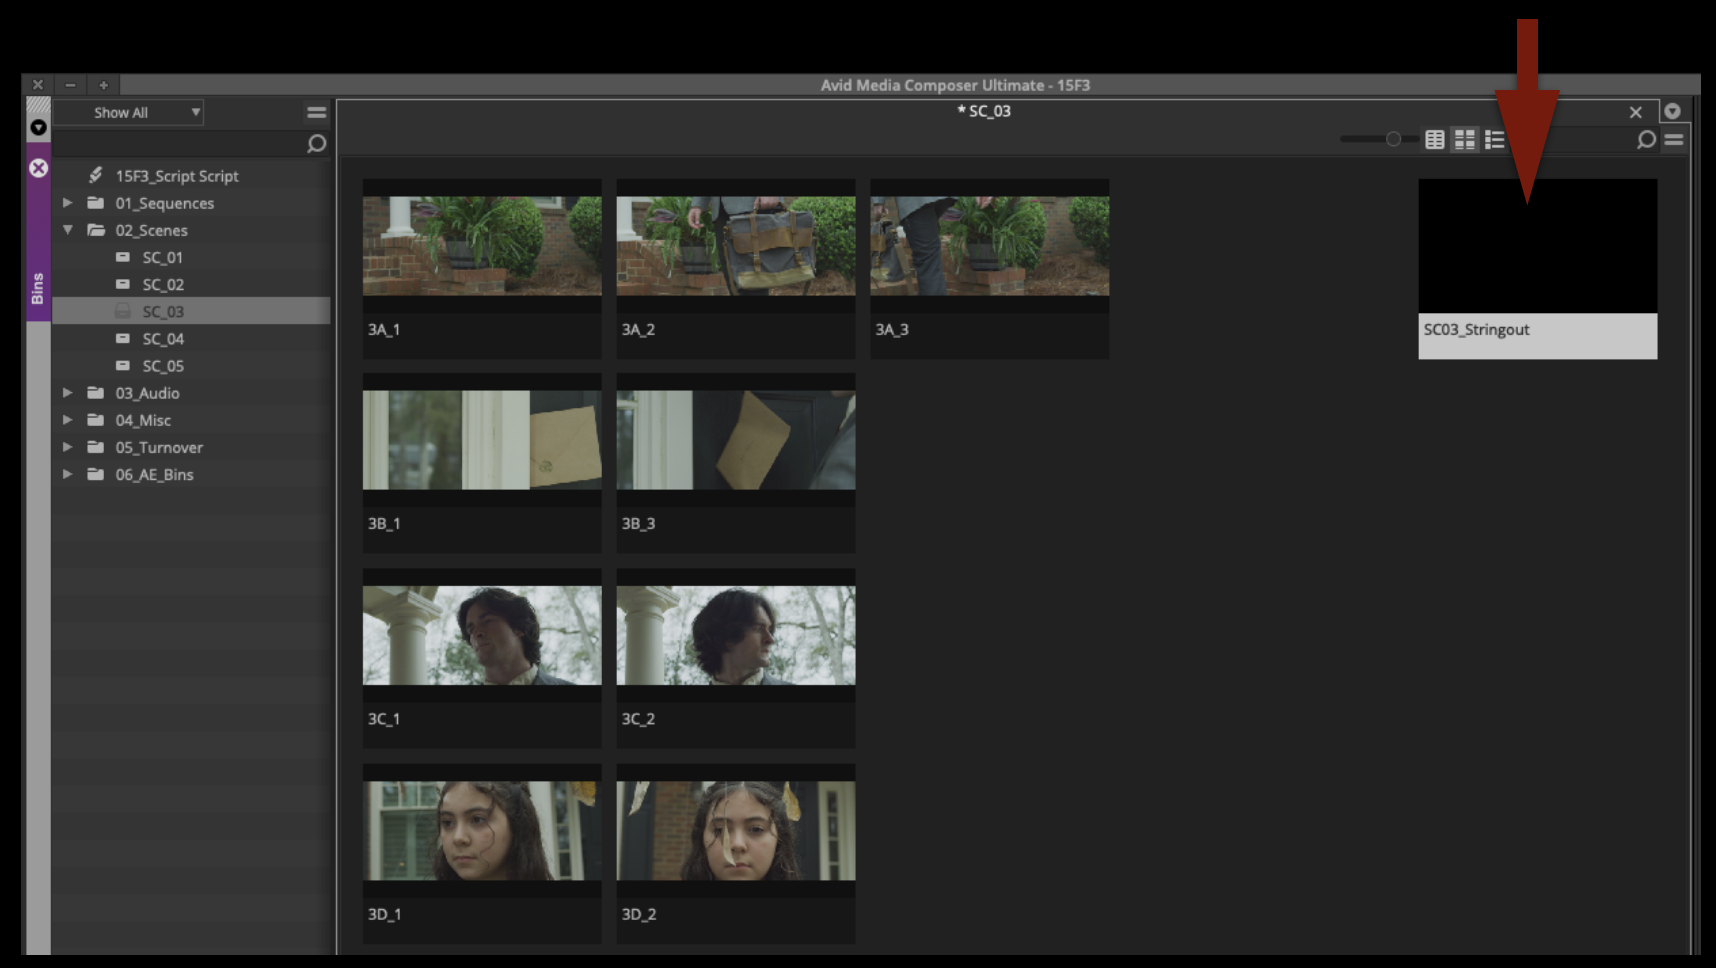
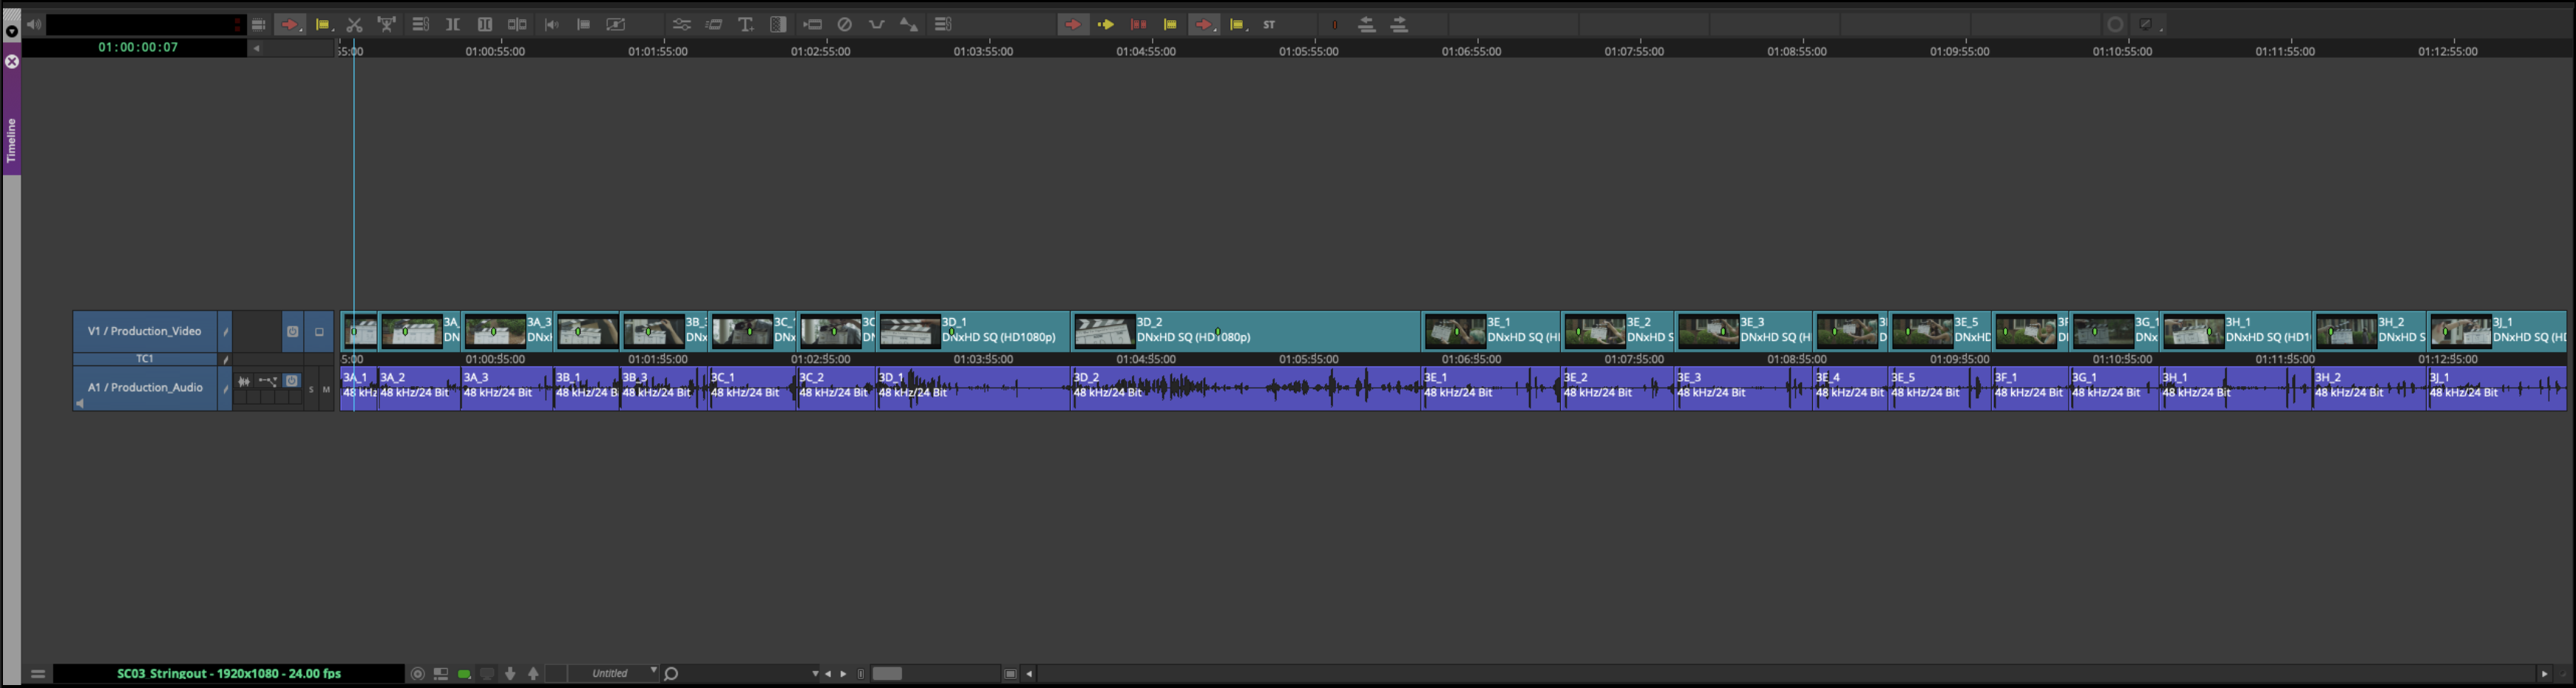
Inside every scene bin, there’s a sequence labeled as a “Scene Stringout” that’s already been made. A scene stringout is not the same thing as a dailies sequence. A dailies sequences is normally organized in shooting order by day, and exported out for the production to see the progress of the film as it is shot. Scene stringouts are organized by scene and are not exported. They are made by the Assistant Editor for the Editor to review all the options available while working on a particular scene.
To assemble the scene stringout, open the sequence and the cut all the shots into the sequence in shot order.
Assemble a Dailies Stringout
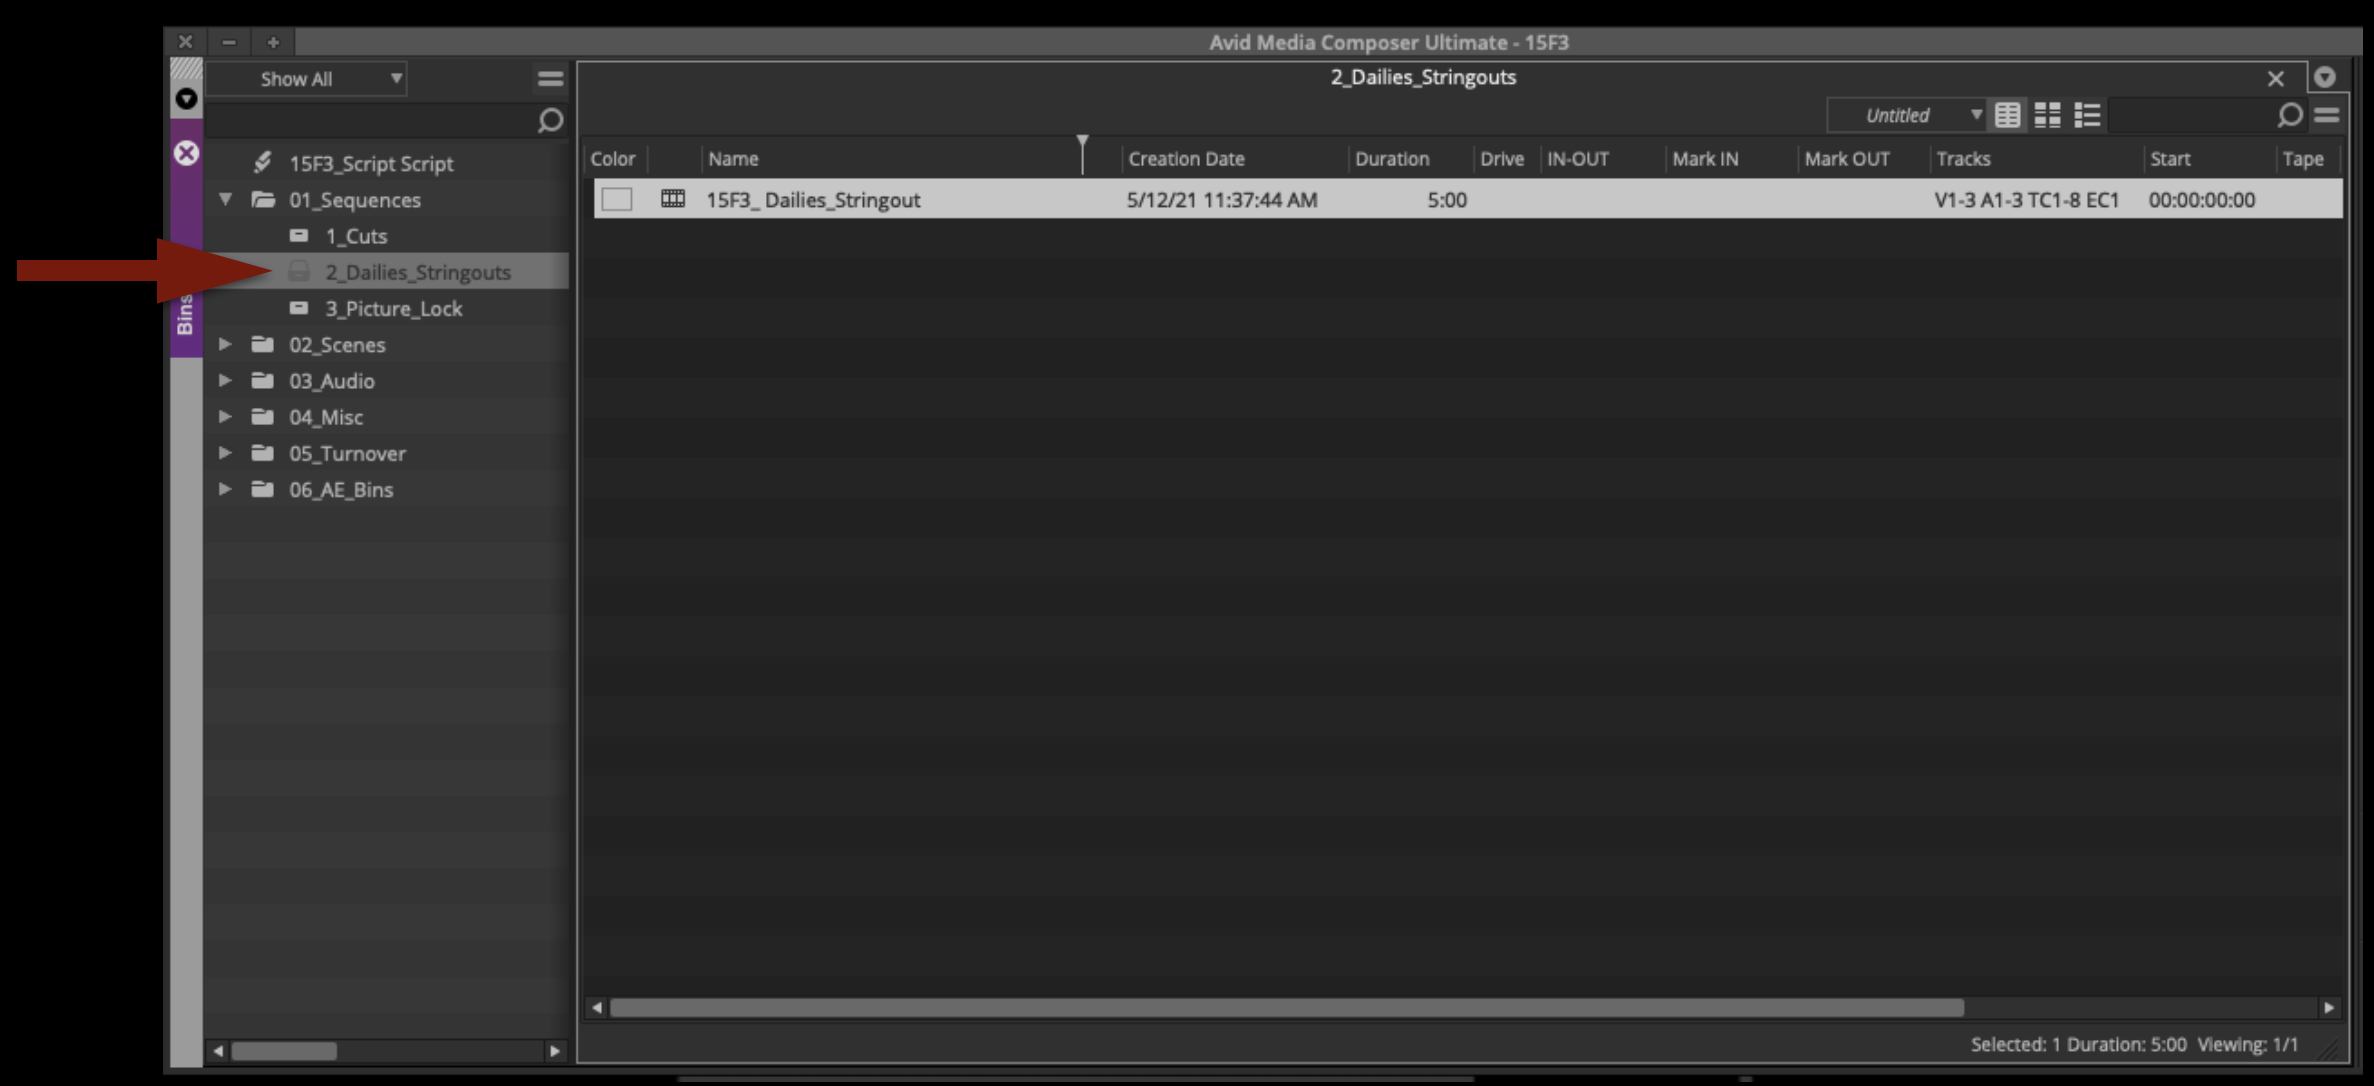
Open the Dailies Stringout sequence from the Dailies Stringout bin:
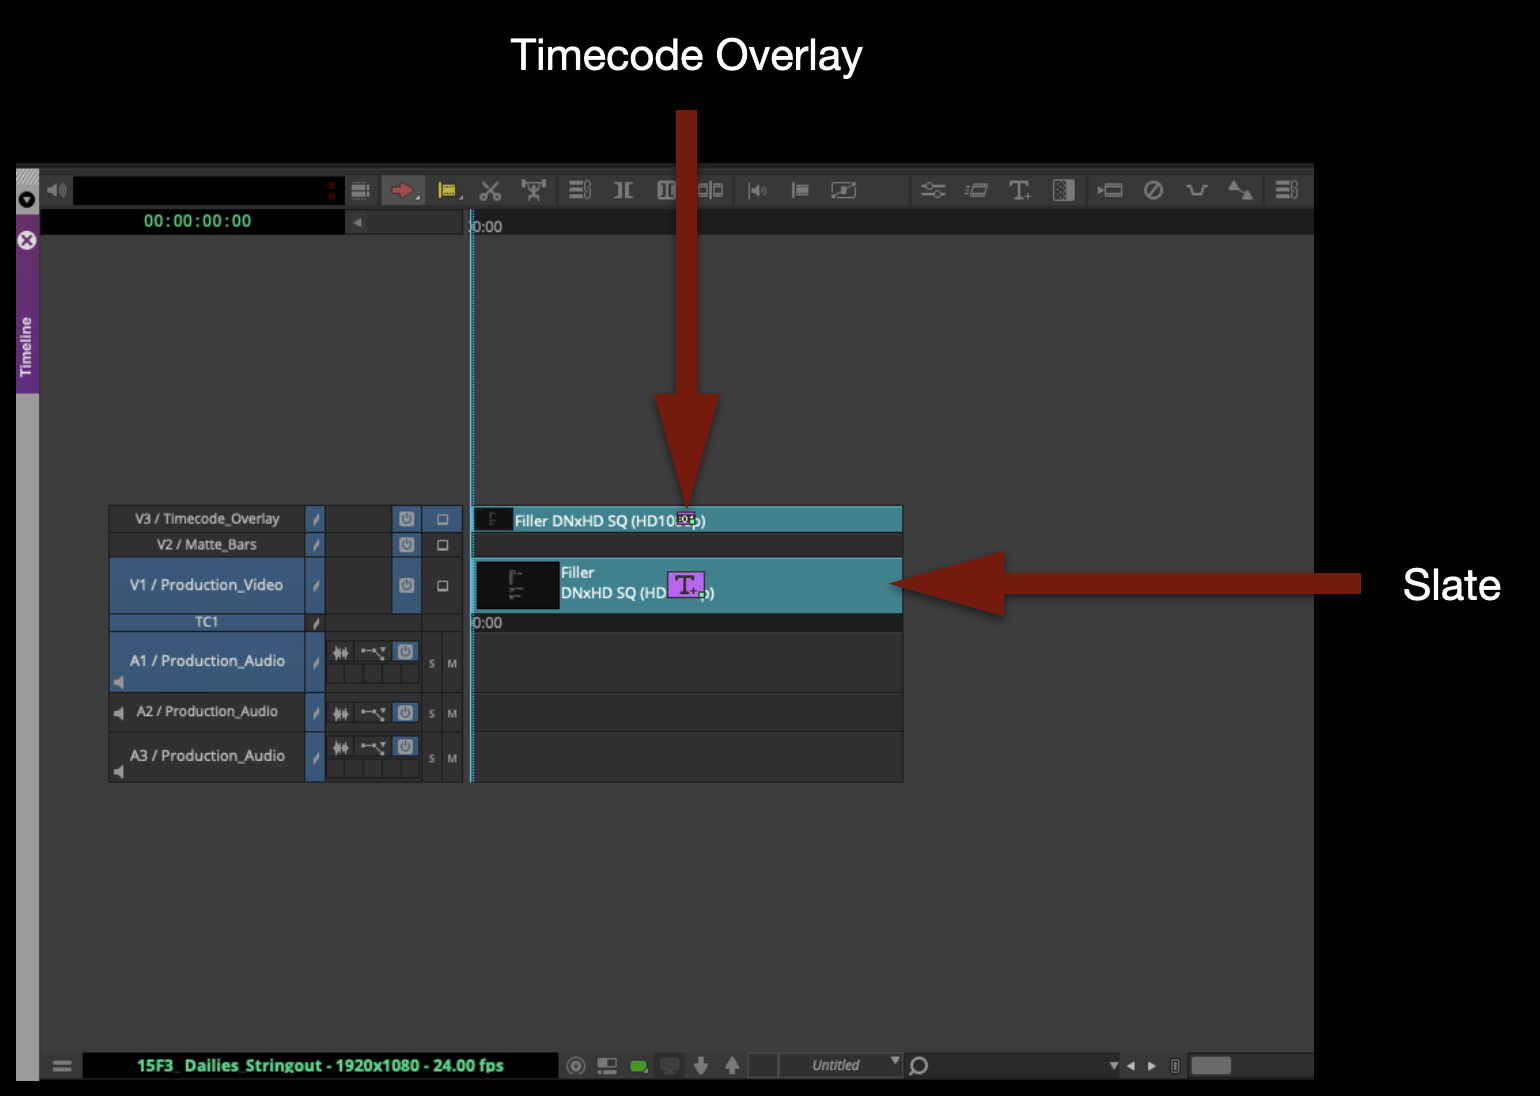
The sequence should already have a slate and Timecode Effect Burn-In:
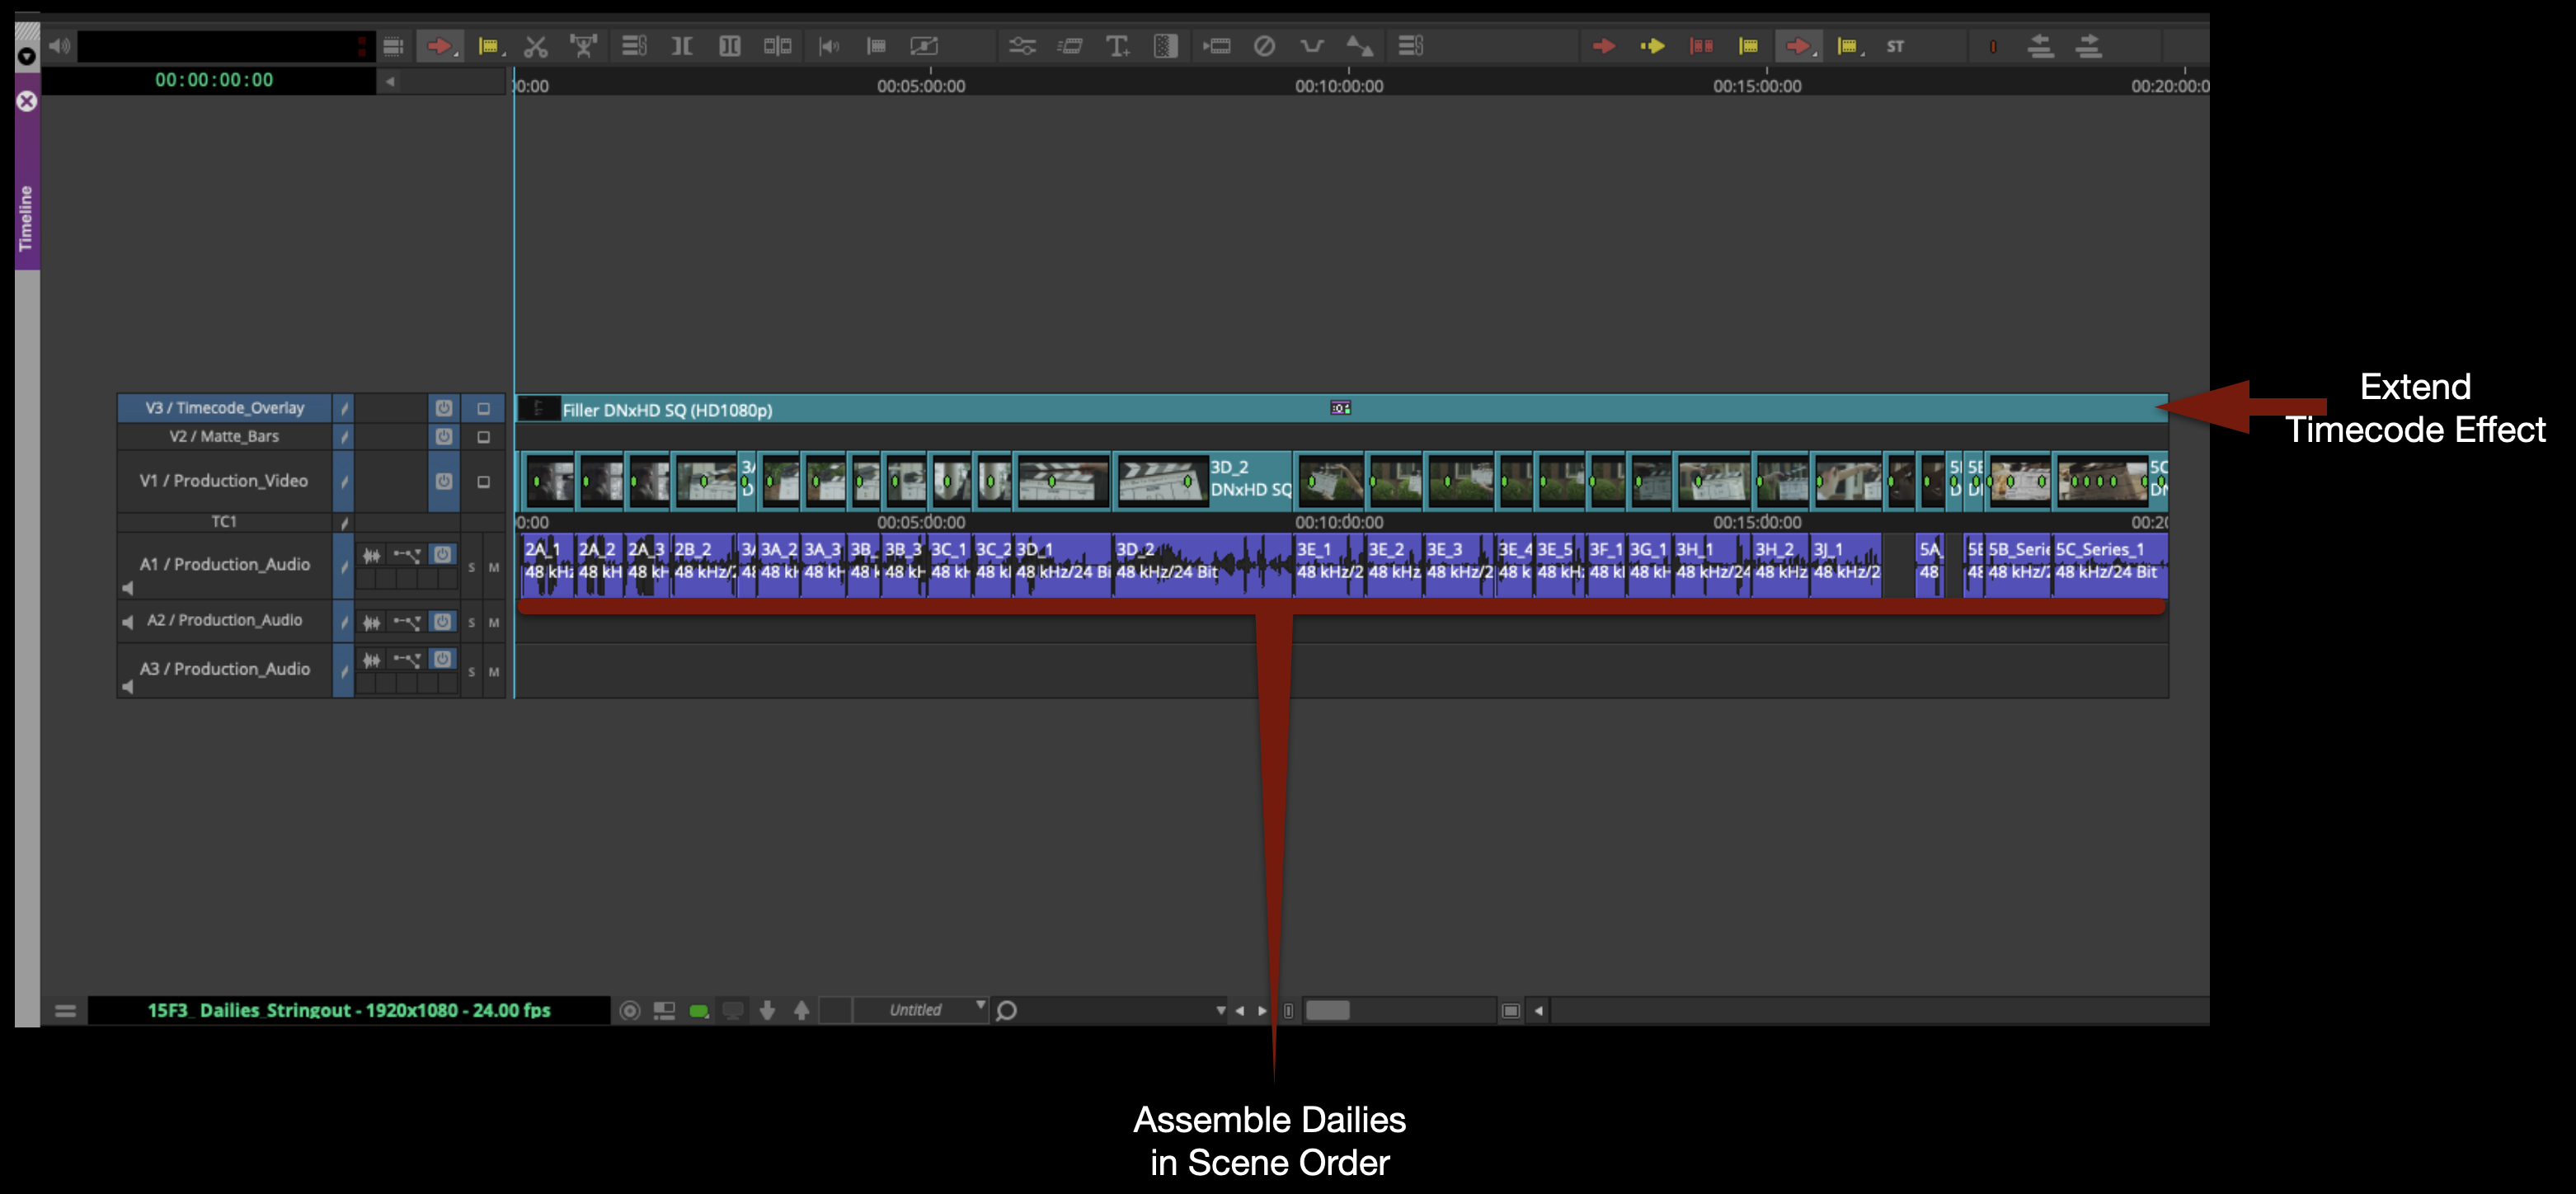
Assemble all the footage in scene order. Then, extend the Timecode Effect so that it covers everything on Video Track 1.
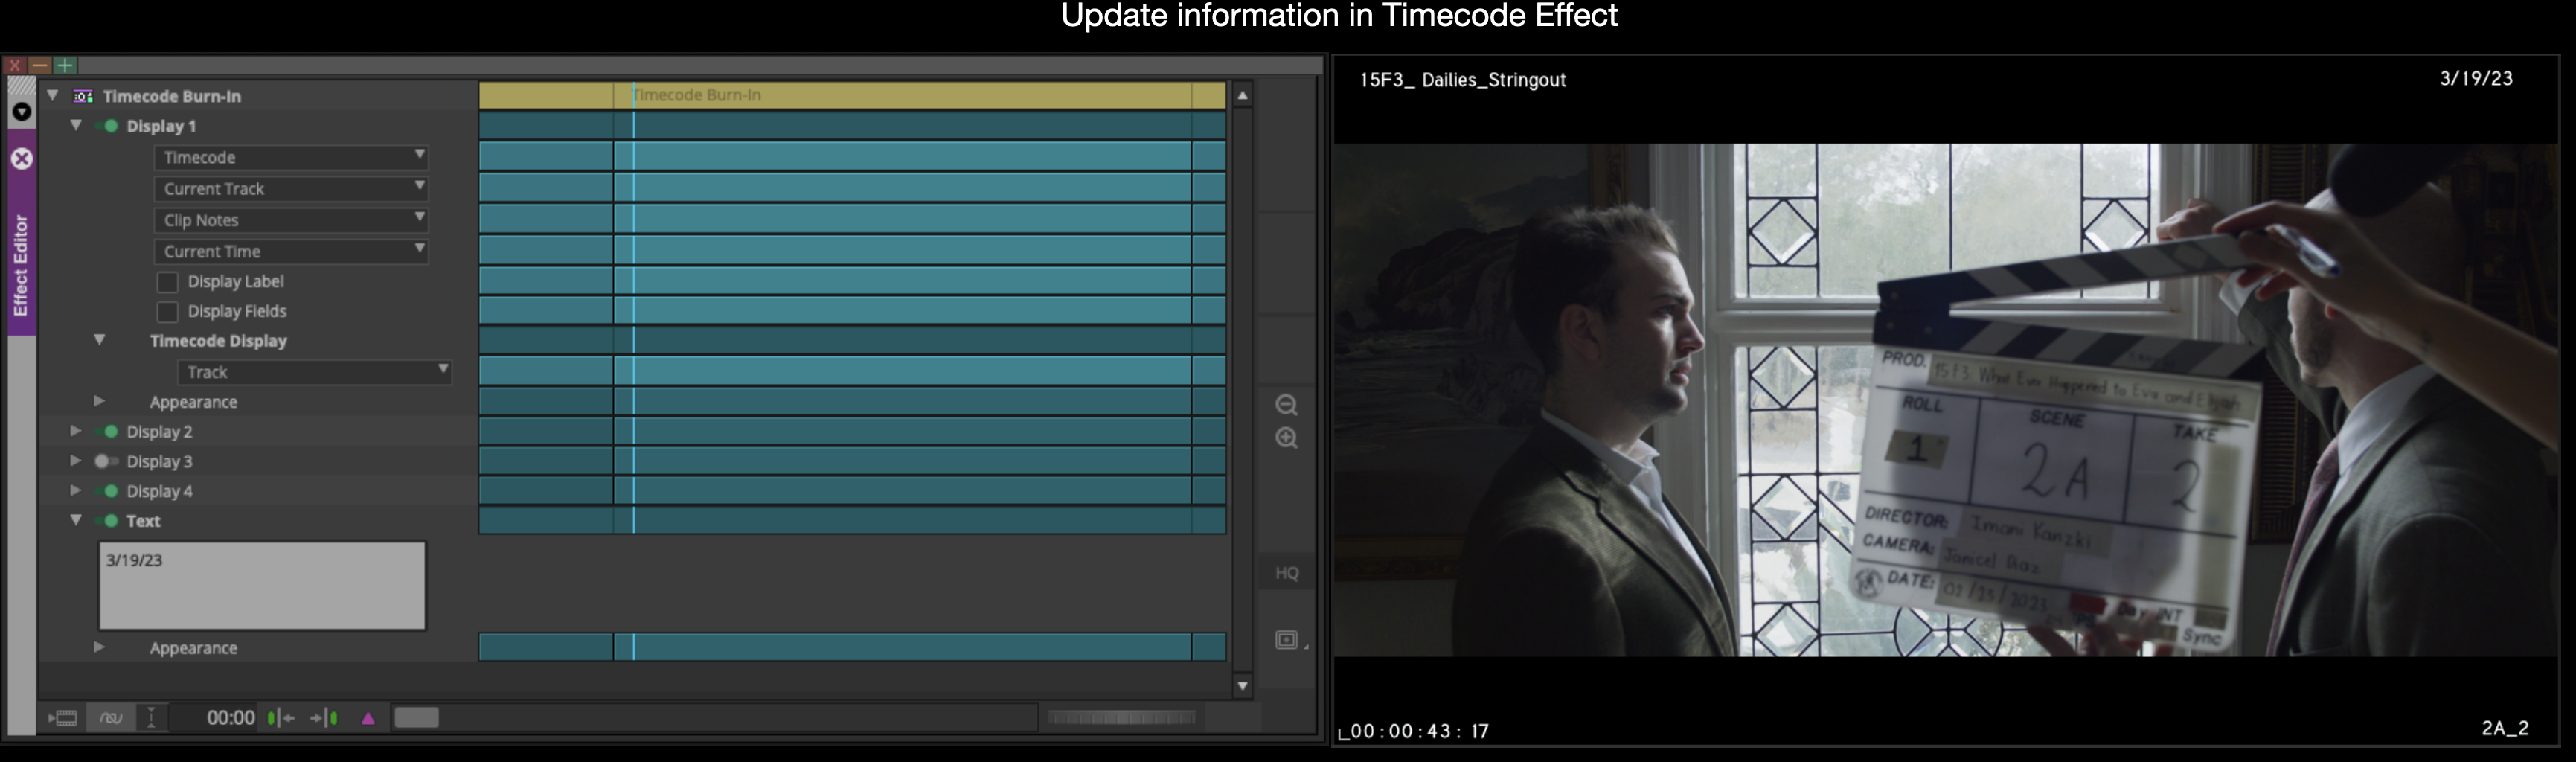
Most everything in the Timecode Effect should update automatically based on the metadata of the clips in the sequence and the sequence itself. But check that the date is correct in the”Text” option:
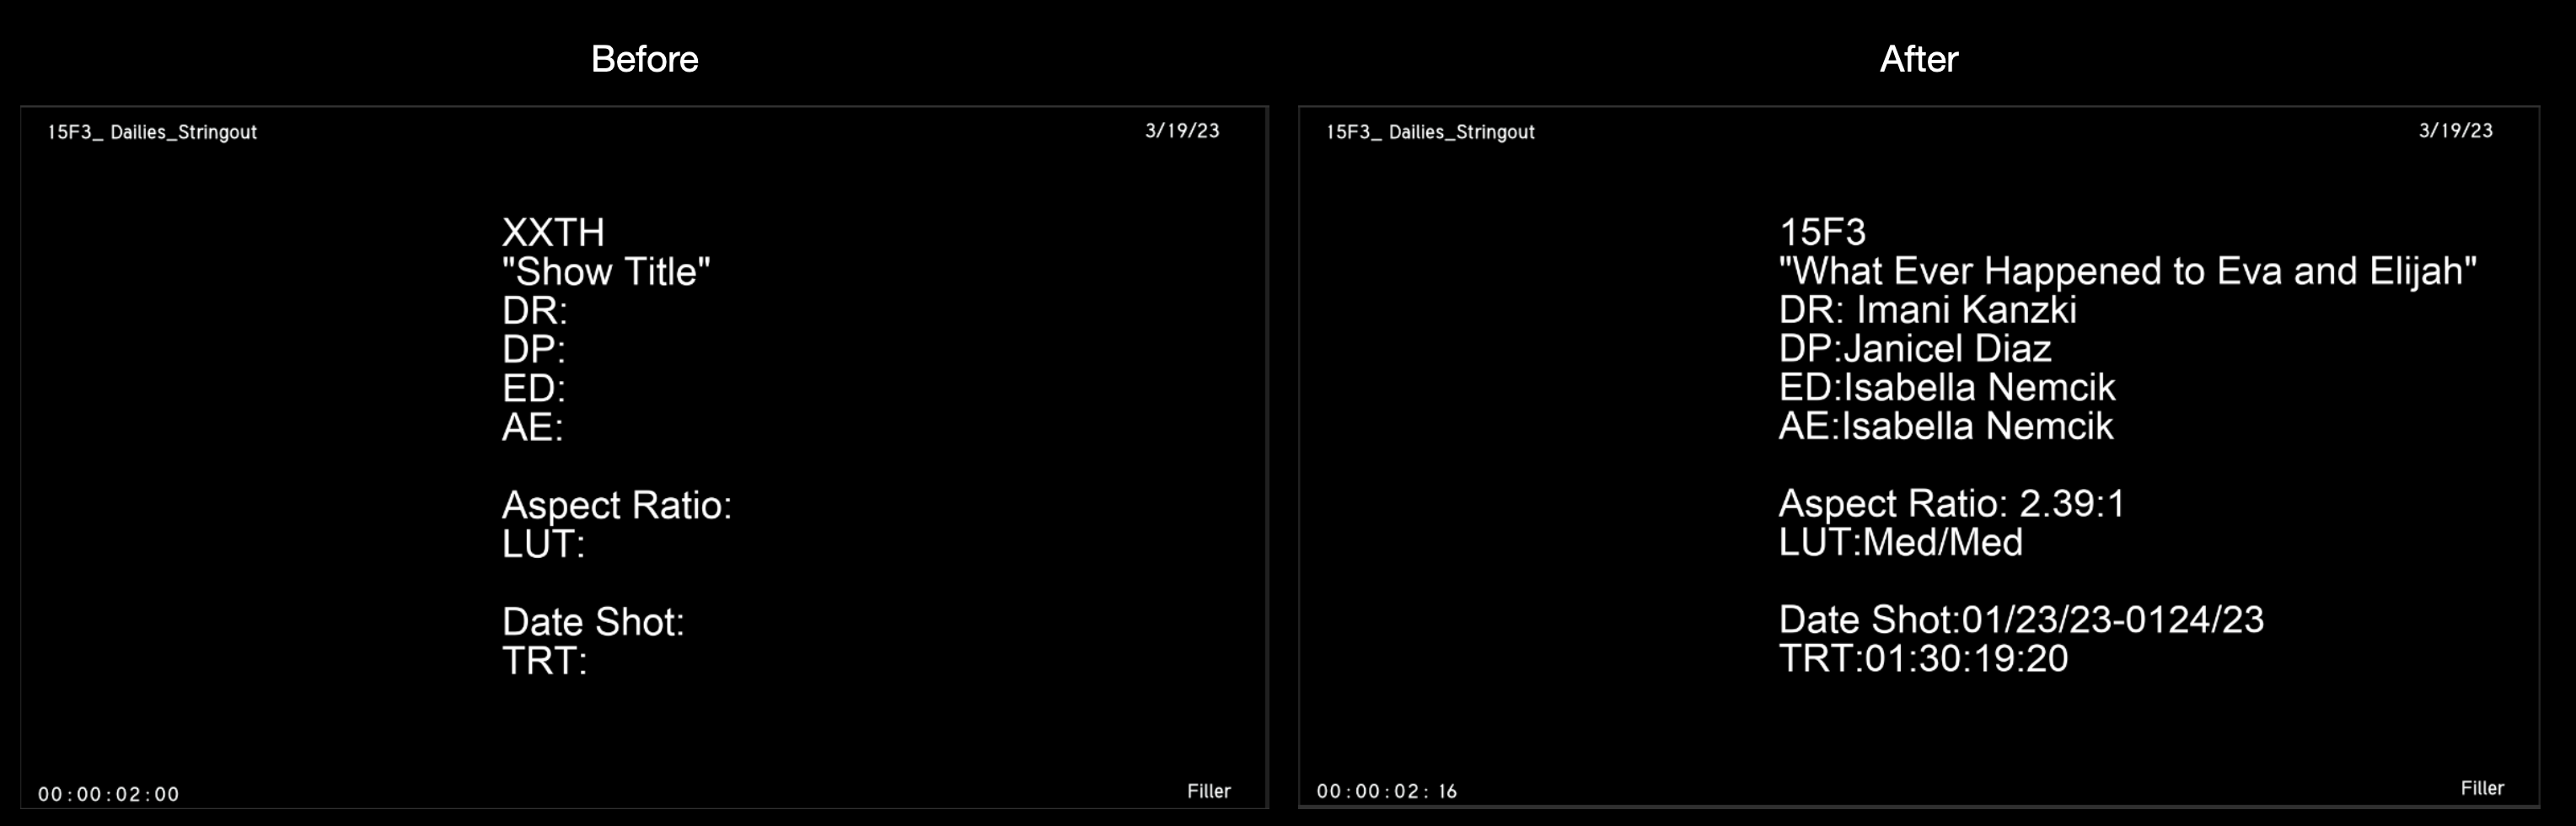
Enter the slate information:
Export and Upload Dailies to Frame.io
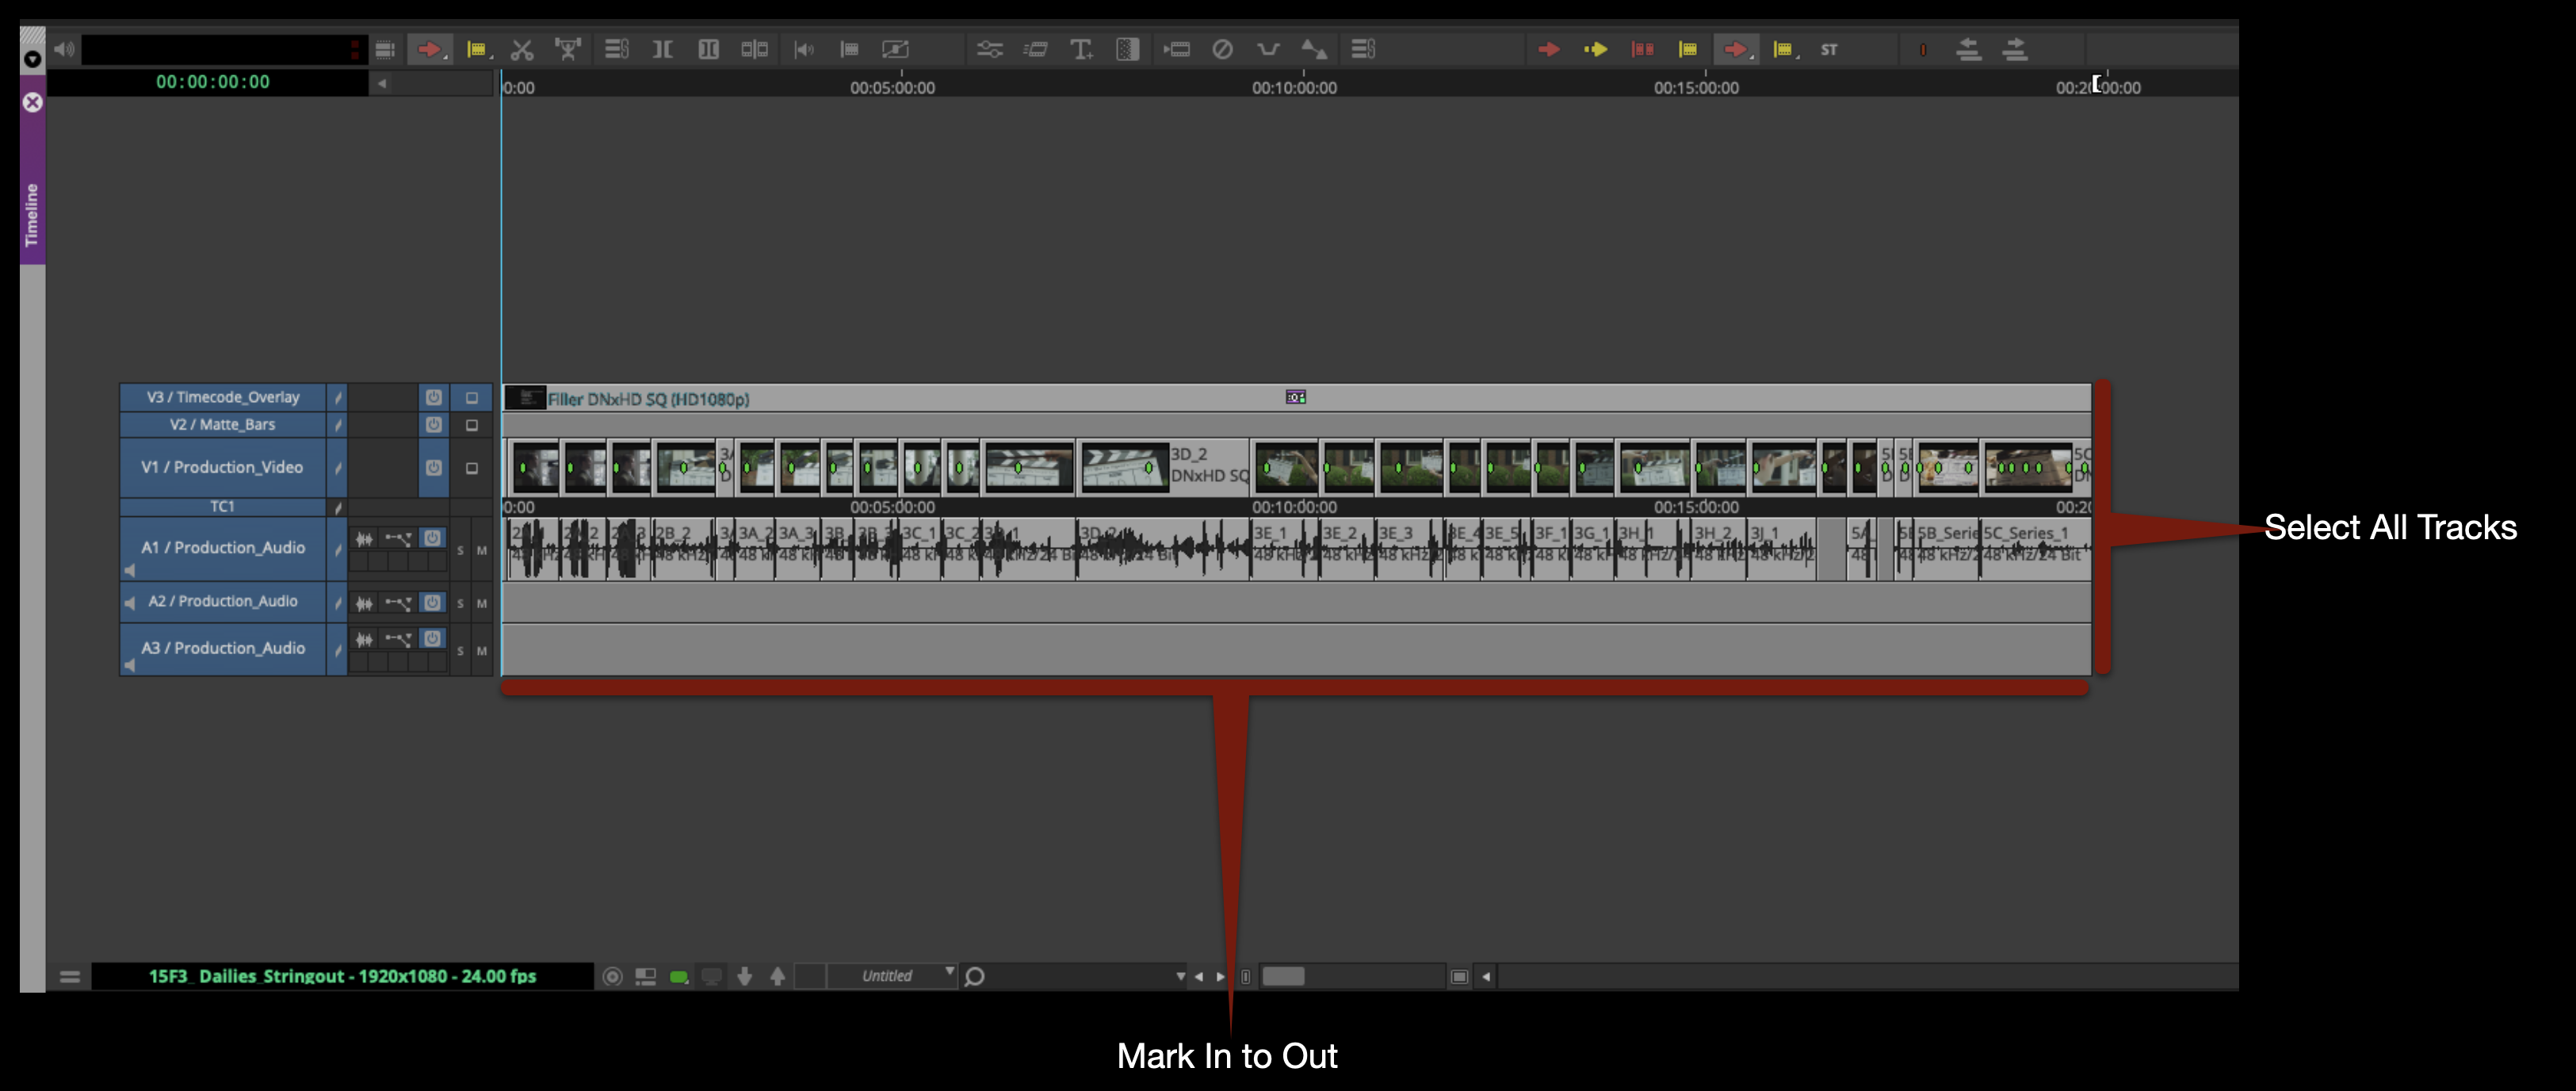
Mark In/Out for the entire timeline and select all video and audio tracks:
Right-click in the Program Monitor and select “Export”.
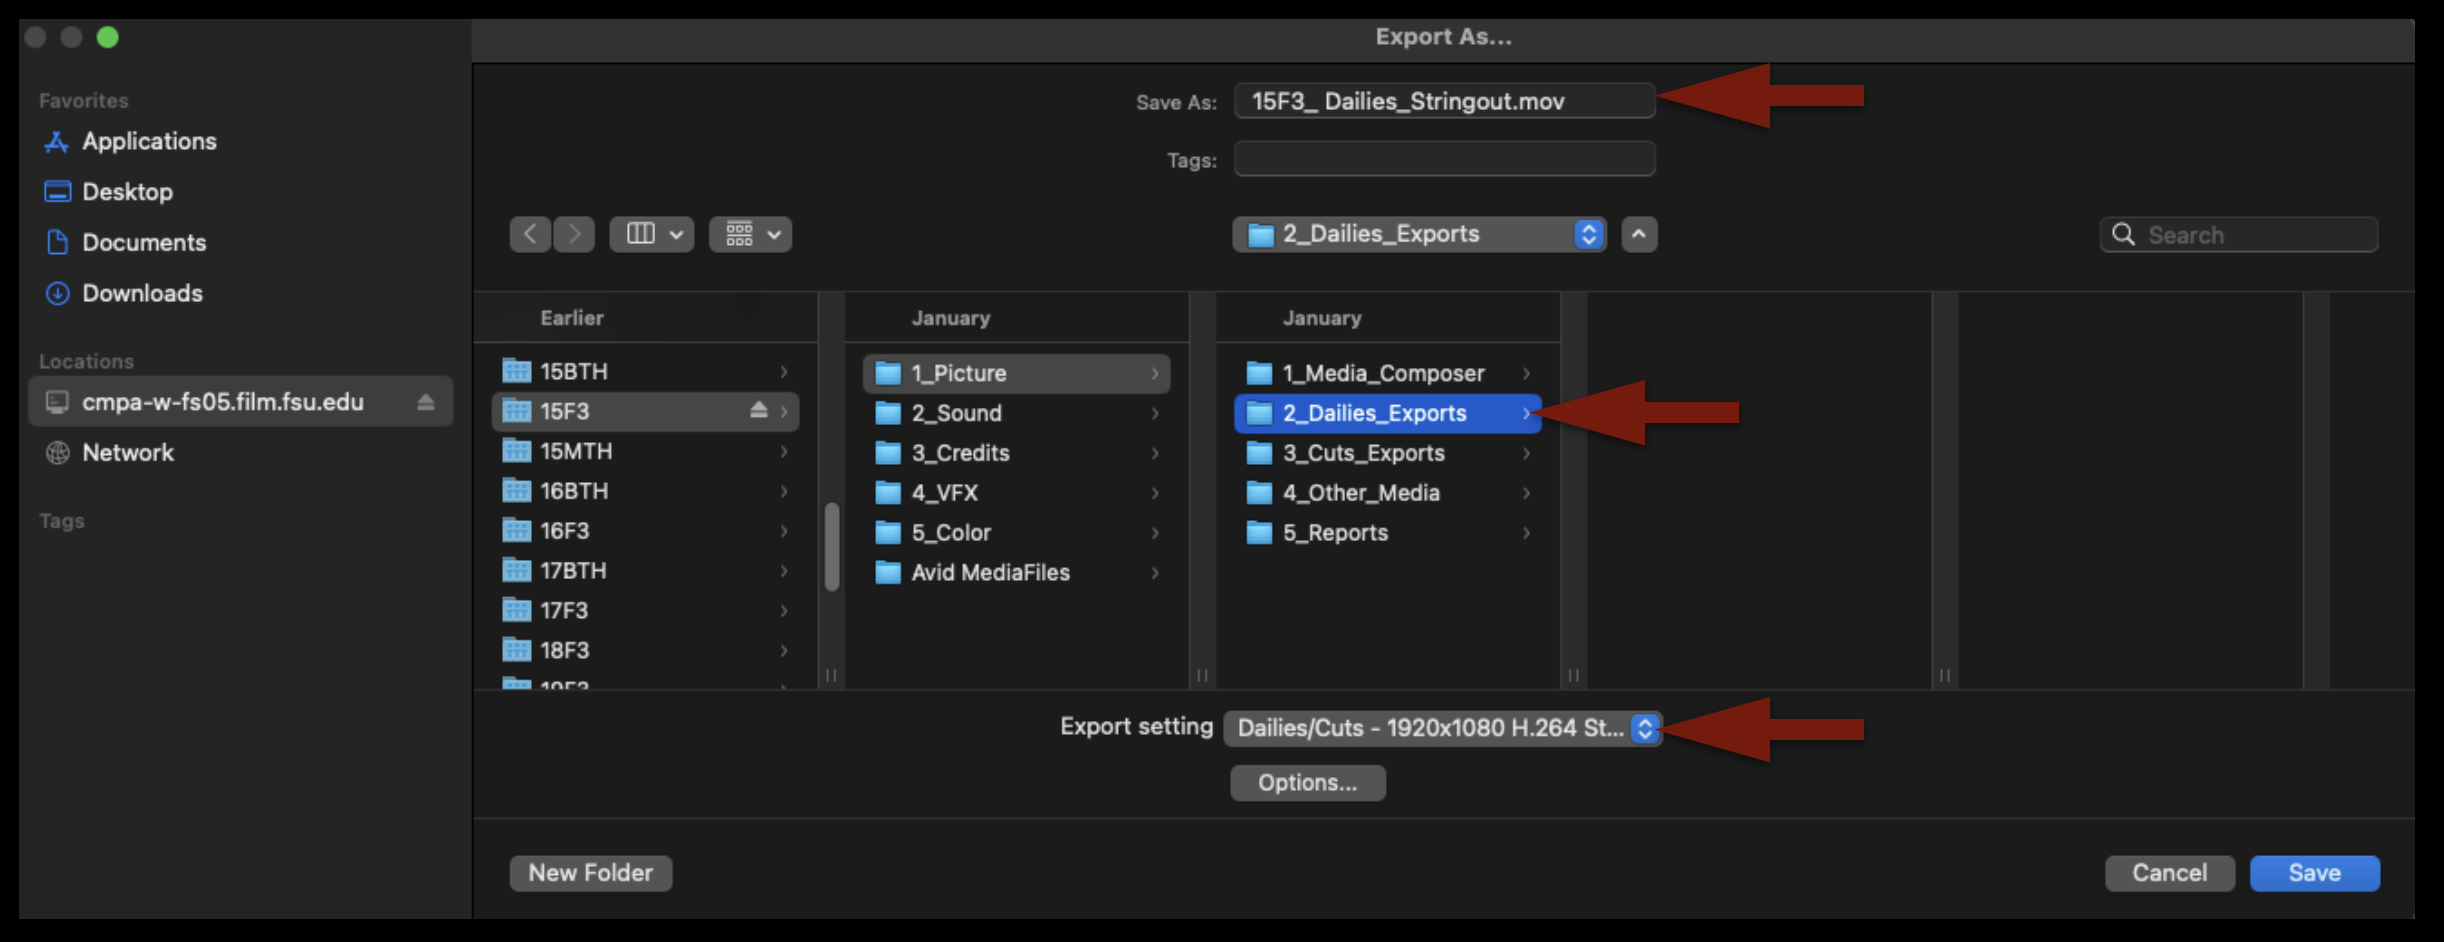
Check that the name of the file is correct, that it’s going the proper folder on your show volume, and that you are using the correct export setting:
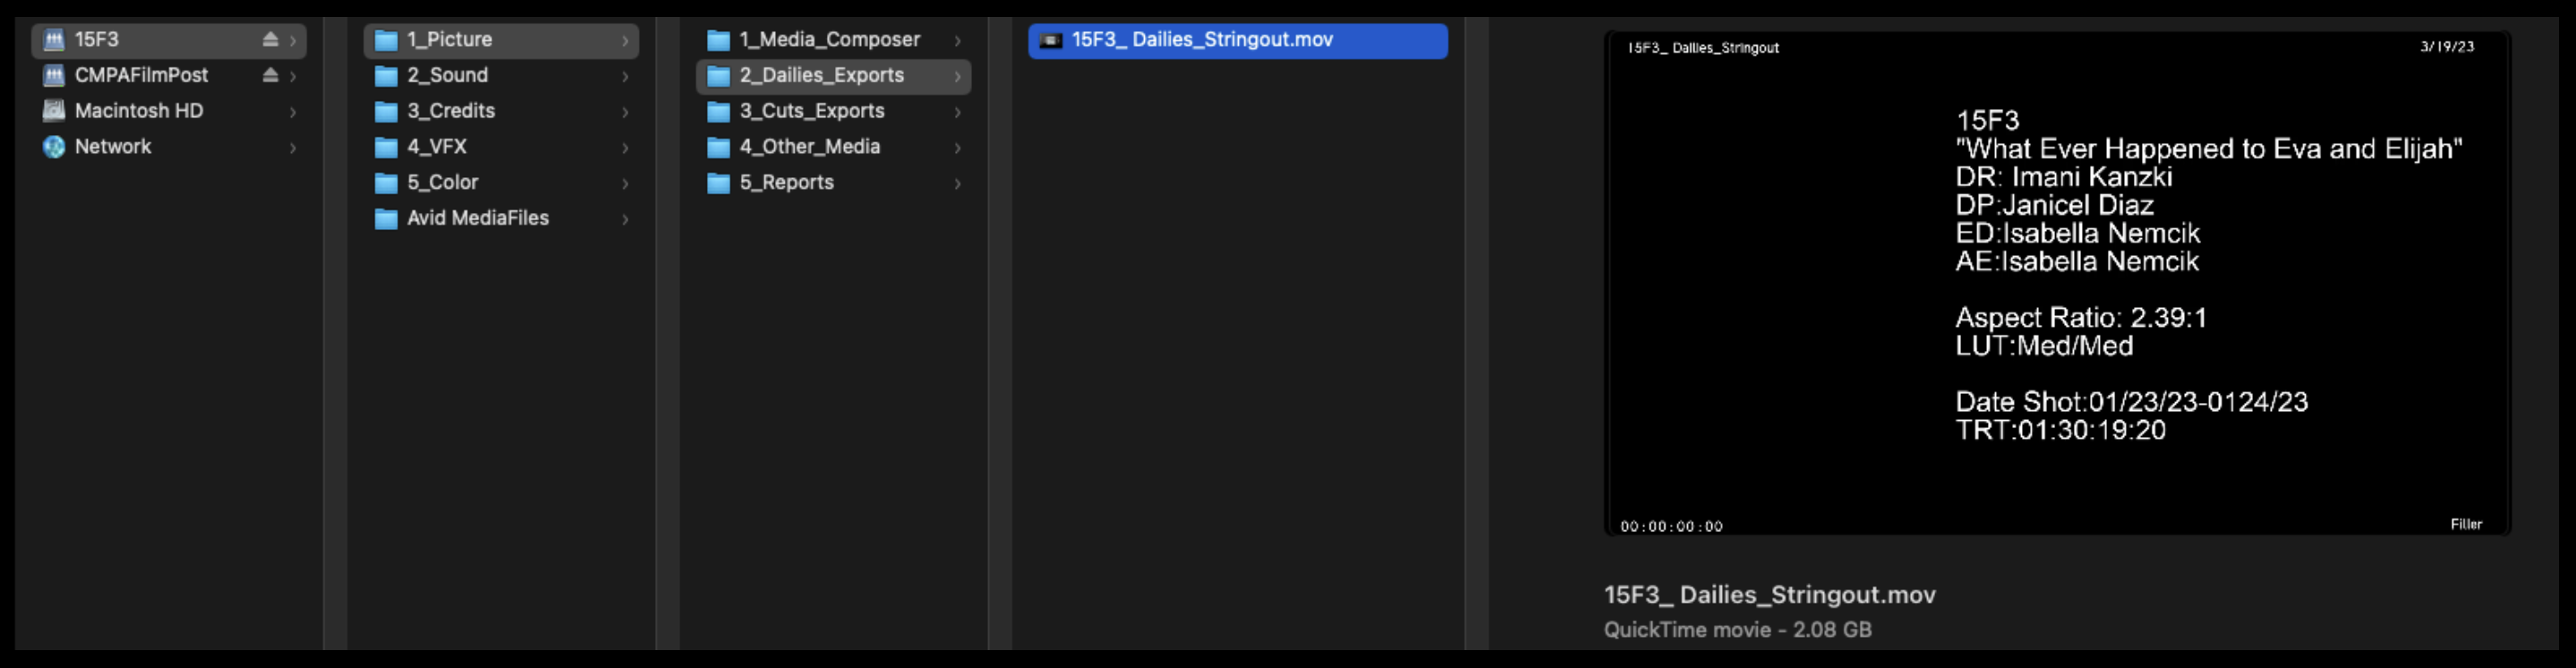
When the export is complete, open it in QuickTime Player and check that everything is correct. Then, upload to the proper folder on frame.io.
If you have need to send out a review link to the dailies stringout – e.g., so that a faculty member or another crew member can look at it — it’s simple to do. Follow the instructions here: Frame.io Review Links.
When you are finished, save your bins and close the project. Congratulations! Your work here is done!
Students may collaborate on the writing of FC, M2, M3, and MC projects. Writing collaborations involve the shared development of scripts, story ideas, revisions, and creative feedback between multiple writers or collaborators working on a project together. This page outlines expectations surrounding communication, attribution, workflow organization, and collaborative creative development within the writing process.
Collaborative writing can strengthen projects by introducing multiple perspectives, ideas, and problem-solving approaches, but it also requires clear communication, mutual respect, and well-defined expectations regarding creative contributions and decision-making. Learning how to navigate collaborative writing relationships is an important professional skill, particularly within industries where rewriting, writers’ rooms, development teams, and collaborative revision processes are common.
Deal Memos
At the start of the collaboration process, the director (or producer) must have the additional writer(s) complete a standard Crew Deal Memo. This includes a space to decide upon how the additional writer(s) will be credited in the finished film.
It is recommended that all parties draft a scope-of-work agreement for the tasks at hand. This could include a description of what work the additional writer(s) will contribute, how many drafts, and due dates. Defining what constitutes final delivery for the additional writer(s) is advised. This document can be a helpful way for making sure everyone’s on the same page before the work commences.
Credit Definitions
Writing credits for motion pictures, as defined by the Writers Guild of America, are determined within a very specific set of definitions. Each type of credit has a distinct meaning and purpose, as described below:
STORY BY The term “story” means all writing representing a contribution “distinct from screenplay and consisting of basic narrative, idea, theme or outline indicating character development and action.” “Distinct from screenplay” means that the contributions considered for story should not be applied to screenplay credit, nor should contributions considered for screenplay credit be applied to story credit. A story may be written in story form or may be contained within other literary material, such as a treatment or a screenplay, for purposes of receiving “Story by” credit.
SCREENPLAY BY A screenplay consists of individual scenes and full dialogue, together with such prior treatment, basic adaptation, continuity, scenario, and dialogue as shall be used in, and represent substantial contributions to the final script. A “Screenplay by” credit is appropriate when there is source material of a story nature or when the writer(s) entitled to “Story by” credit is different from the writer(s) entitled to “Screenplay by” credit.
WRITTEN BY The credit “Written by” is used when the writer(s) is entitled to both the “Story by” credit and the “Screenplay by” credit. This credit shall not be granted where there is source material of a story nature. However, biographical, newspaper, and other factual sources may not necessarily deprive the writer of such credit.
& Writers working closely together as a writing team are credited using an ampersand: e.g., “Written by Ben Mekler & Chris Amick”.
AND Writers working independently on drafts are listed in the credits with an “and” between them to signify that they worked separately: e.g., “Screenplay by Joe Eszterhas and Julianna Baggott”.
Determining credits
Determining of final credits is entirely at the discretion of the faculty. If there’s a dispute over how much a student contributed or whether a credit is deserved, faculty will arbitrate by reviewing the writing materials and deciding the final credits.
If a writer contributes in a manner that fits the above definitions, they are eligible for receiving the applicable writing credit(s) in the finished film.
If a writer’s contributions don’t pass the threshold for one of the above credits — e.g., they give notes on a script or help with kicking around ideas, but don’t contribute significantly to the mapping out the story or the writing of the script — a writing credit will not be awarded. Instead, a mention in the “SPECIAL THANKS” section of the credits can be used to acknowledge their support.
Sample scenarios
Brock and Chest conceive the story and write the screenplay together as a writing team. Credits would read: Written by Brock Landers & Chest Rockwell
Kar-leung comes up with the story, Hsing-Hsiu writes the screenplay. Credits would read: Story by Lau Kar-leung Screenplay by Huang Hsing-Hsiu
Marlene comes up with the story, and then works as a writing team with Bill on the writing of the script. Credits would read: Story by Marlene Clark Screenplay by Marlene Clark&Bill Gunn
Emilio comes up with the story and writes a draft of the script, then María takes over to do a rewrite of the script. Credits would read: Story by Emilio Fernández Screenplay by Emilio Fernández and María Félix
Mario gives notes on Daria’s script. Credits would read: Written by Daria Nicolodi Special Thanks to Mario Bava (at end of crawl)
Baz develops a story for a movie about Elvis. Baz forms a writing partnership with Sam to write the screenplay. Baz then forms a new writing partnership with Craig to rewrite the screenplay. Jeremy then reworks part of the story and rewrites the screenplay. Credits read: Story by Baz Luhrmann and Jeremy Doner Screenplay by Baz Luhrmann & Sam Bromell and Baz Luhrmann & Craig Pearce and Jeremy Doner
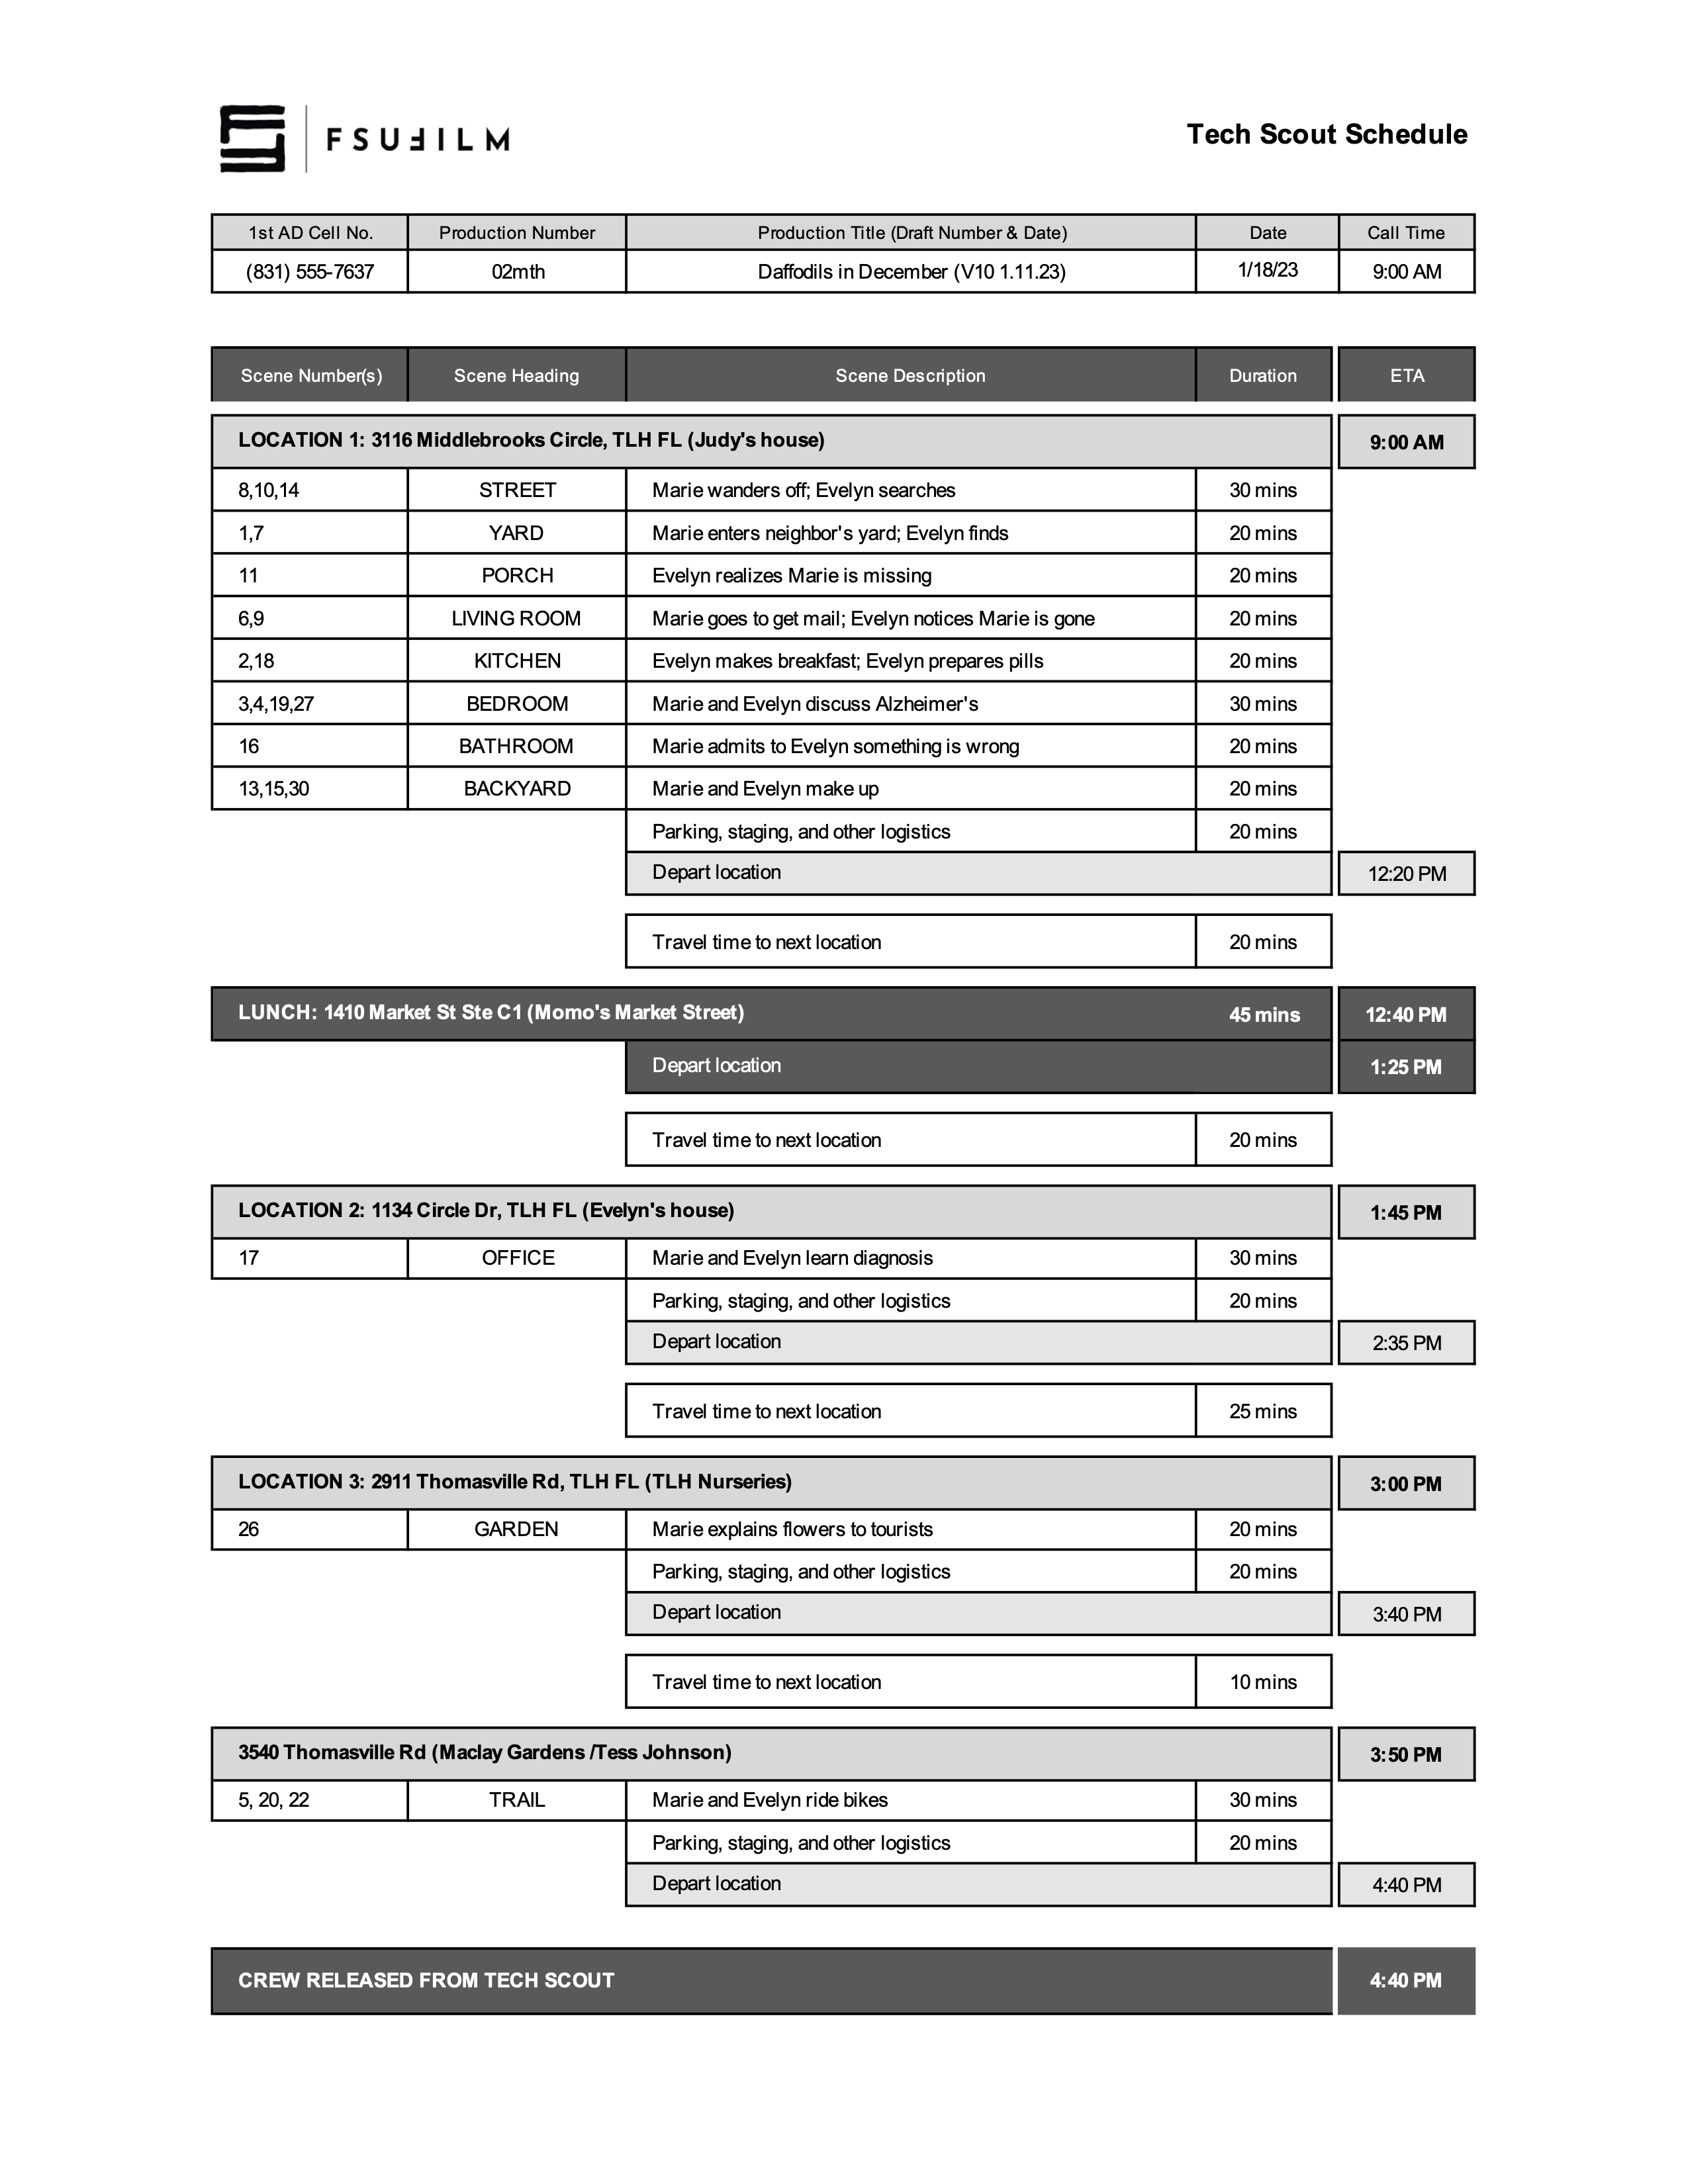
The tech scout schedule outlines the structure and timing of technical scouting activities on a given day. This is to ensure that department heads and faculty mentors have adequate time to evaluate locations together, identify logistical or safety concerns, coordinate technical requirements, and ensure that all departments are aligned before shooting begins.
Tech scouts are a critical part of pre-production because they help productions solve problems proactively rather than reactively on set. Reviewing locations in advance allows crews to assess factors such as power access, sound conditions, staging limitations, equipment needs, transportation logistics, weather concerns, and safety risks. Developing thorough scouting practices helps students build the collaborative planning and communication skills necessary for efficient professional production workflows.
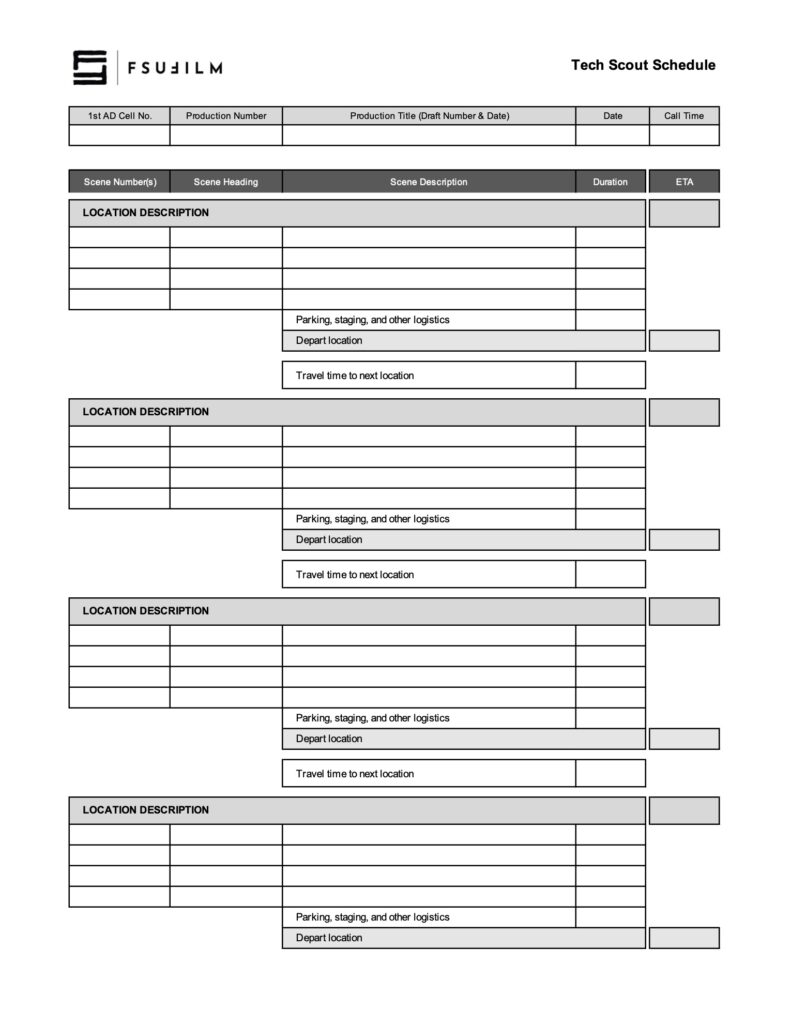
This worksheet is designed for production teams to schedule out their tech scout day, to ensure there’s a sufficient amount of time for each scene and for any travel and/or lunch that’s needed. Be sure to review the directions and the sample schedule below before filling out the form.
For each location
On the light-gray header row, enter the location’s address and a brief description of the location’s function in the story. Also enter the ETA for the start time at that location.
On the rows below the location header, enter the Scene Numbers, Scene Heading, and Scene Description for each set. In other words, if you have three scenes that use the same physical setting at the location (e.g., scenes 8, 10, and 14 at the STREET in the sample schedule above), group them together on the same row.
Then enter the estimated duration needed to review all those scenes. Note: you don’t need to type “mins”; type the number and Excel will automatically add “mins” as a suffix.
You can add rows if needed, or delete any unused rows.
After you’ve entered all the scenes for a location, enter an estimated amount of time for reviewing other logistics at the location, such as parking, staging, base camp, safety, etc.
Note: To assist with scheduling, the spreadsheet is set up to auto-calculate the Depart Location ETA for each location — so you don’t need to manually enter that cell.
For travel
Enter the estimated travel time to the next location.
Include at least 10 mins for people getting to and from vehicles.
In Google Maps also be sure to: (a) Calculate the travel time for the actual time of day you’ll be making the move, as travel times can vary throughout the day; and (b) Add 10% to whatever Google tells you the travel time is.
For lunch
Lunch is locked at 45 minutes.
Sample Schedule
Here’s a sample of what the form should look like:
Tech scouts bring together key department heads and production personnel to evaluate locations prior to filming, allowing teams to assess technical needs, logistical challenges, safety considerations, equipment requirements, and departmental coordination before production begins.
Careful tech scouting helps productions identify and solve problems proactively rather than reacting to them on set under time pressure. The process improves communication across departments, supports more realistic production planning, and helps ensure that locations can safely and effectively support the creative and technical demands of the shoot.
How It Works
The 1st AD organizes and schedules the Tech Scout. This is so that the real-world, practical dimensions of shooting the film can be addressed in as concrete a manner as possible.
Required to attend: PR, DR, PD, DP, 1D, PM, GF, SM, AR Optional attendance if available/necessary/applicable: VS, KY, AA
In advance of the prep, to get everyone oriented to the show, department heads will post materials to the show’s Teams channel no later than noon on the day before the Tech Scout.
Tech Scout Schedule, with directions to the location(s) and parking information;
Latest version of the script (with locked scene numbers), including marked revisions from previous draft
Preliminary Set-up Schedule, including estimated times for each set-up
Look Books for both DP and PD
Storyboards are optional, but helpful. You may also consider bringing a physical board to the location.
Faculty may require additional documentation depending on the needs of the show (e.g. reference images for VFX, a detailed storyboard for stunts or intimacy, etc).
PREPARING FOR THE DAY
COURTESY
When showing up en masse at a location, behave quietly and respectfully. Location owners don’t always understand the number of people and vehicles a production entails. Remembering that you are a guest helps ensure that a location agreement won’t be rescinded by prior to shooting.
The 1st AD should organize mandatory carpools by department, reducing the vehicle footprint and allowing for ideas and work to flow during transit. You can check out from the ER a large car magnet with the FSU logo and “Location Scouting Vehicle” that you can put on your car door.
DOCUMENTS
The 1st AD will post the Tech Scout Schedule document to the production’s Teams channel. This document lets students and faculty know the travel schedule for the day and which scenes will be done at which location, as well as the approximate amount of time it will take at each location for all departments to adequately plan for production. Ideally one starts with the most distant location from the Film School and then works backward geographically closer to the school.
For the day of the Tech Scout, the Producer should provide paper copies of the latest production draft of the script (with locked scene numbers) as well as a copy of the One-Line Schedule. These paper documents allow crew members to take notes and ask relevant questions about production requirements for each scene, as well as which day of shooting and which time of day specific scenes will occur.
Up-to-date documents should also be posted to the production’s Teams channel by the night before the Tech Scout.
TIME FOR TRAVEL AND LUNCH
M2 Tech Scouts are mornings-only, so there’s no need to make lunch plans.
For MC Tech Scouts, lunch is not provided. It is a good idea to list one or more inexpensive lunch options that are closest between two locations, and account for drive and wait times. A minimum of 45 minutes (not including travel) should be allocated for lunch.
If running ahead, move up the next location on the schedule to avoid lunches more than 90 minutes. Whenever possible, the crew should lunch together to discuss what they have learned so far and make any changes to the schedule for the rest of the day.
MANAGING THE DAY
CREW RESPONSIBILITIES
Upon arriving at the location, the Production Manager will clock the crew in using the FSUFilm Greenlight timesheet form.
During the prep, it is the Producer’s responsibility to proactively be in contact with the next location (if applicable) and anticipate any changes to the schedule throughout the day. Location owners must be made aware in advance that a window of time is needed rather than a specific time, as preps can run ahead or behind schedule. The Producer must have telephone numbers for all location owners for this purpose.
During the Tech Scout it is the responsibility of the 1st AD and Production Manager to take notes on behalf of the Director regarding any questions from faculty and department heads about items that will need to be addressed after the Tech Scout.
The crew must read the script prior to the Tech Scout, and will attend in order to proactively plan for their respective departments’ needs.
SCENE-BY-SCENE DETAIL
For each and every scene number, the 1st AD’s responsibility is to, in an orderly and organized fashion, physically walk the crew to the exact location for each scene heading. After detailing which scenes will be done there, how many pages will be covered, and on which day of shooting, the 1st AD turns to the Director for the Action Overview (explaining the action to be covered) and then manages the necessary time needed for Departmental Exploration (technical considerations to execute).
ACTION OVERVIEW
For each scene number, the Director describes and stages the proposed action of the scene (using stand-ins), while the DP and the crew watch from the position of the master shot (or dominant angle of the scene). The 1st AD fields any questions from any departments regarding the scene, which are generally answered by the Director or Director of Photography. When there are no more questions, the 1st AD describes the next scene number at that location (usually in story chronology) and the Director repeats the same process until the action of all scenes in that particular area have been described.
DEPARTMENTAL EXPLORATION
When all the Action in an area has been described, before moving on to the next area the 1st AD allows time (usually 10 minutes) for departments to explore and manage any technical considerations and challenges. The 1st AD watches department heads and faculty problem-solve and explore, and makes sure all departments have time, even if some have already finished. When all departments are satisfied, the 1st AD walks the crew to the next area and repeats this entire process (see Scene-by-Scene Detail, above). This process is repeated for all scene numbers no matter how small the size (bathrooms, etc.) or short the scene (establishing shots, etc.).
DEPARTMENTAL NOTES
While the 1st AD takes general notes on questions from faculty, it is important for all crew members to take notes on their script, detailing specific departmental necessities of each scene. Examples of what to note include:
details from the script relevant to the department
changes to the script based on discoveries at the location
production limitations and rules (location of staging areas, greenroom, craft services, parking, etc.)
LOCATION OVERVIEW
When all scenes have been described, Departments should have a final chance to go outside and review any larger technical considerations related to the overall location (crew parking, truck parking, etc.) prior to departing and travel to the next location.
RELEASING FOR TRANSIT
At the end of a location overview, or at the end of the day, the 1st AD should gather the crew and offer all Department Heads a chance for any final observations or questions before releasing the crew to drive to the next location, lunch, or home for the day.
At the end of the day, the Production Manager will clock the crew out using the FSUFilm Greenlight timesheet form.
Location scouting involves identifying, evaluating, photographing, and researching potential filming locations that support the creative and logistical needs of the production. This process includes assessing factors such as visual suitability, accessibility, sound conditions, power availability, safety concerns, permitting requirements, parking, staging space, and overall production feasibility.
Effective location scouting is essential because the realities of a location can significantly affect scheduling, equipment needs, crew workflow, safety, and the overall success of a production. Strong scouting practices help productions anticipate challenges early, communicate more clearly across departments, and make more informed creative and logistical decisions before filming begins.
Safety
When showing up at someone’s home, be sure to take safety precautions. Not everyone appreciates having strangers show up at their front door.
Always carry your student ID for identification.
Check out a magnetic “Location Scouting Vehicle” sign from the ER to display on your vehicle.
Whenever possible, scout in pairs.
Evaluate safety risks at each location—consider hazards, neighborhood security, and any factors that may pose risks to your cast and crew.
Finding Locations
On FSUFILM productions, this task is typically led by the Producer, Director, and Production Designer, though any crew member may initiate contact with a property owner. However, only the Producer is authorized to finalize agreements and handle all official paperwork.
Start your search virtually with Google Maps and Street View. To identify property owners, use the Leon County Property Appraiser website. From there, you may need additional online research to find their contact information.
You can also scout in person by driving around and visiting locations directly. Be mindful of appropriate times—avoid early mornings, late evenings, or peak business hours when visiting homes or establishments.
Communication
Always approach property owners with professionalism and respect. Key discussion points include:
The production schedule, including prep days (tech scout, set dressing, photoboarding, etc.).
The areas you wish to use (filming spaces, staging areas, green rooms, craft services, parking, etc.).
The script content, especially if it includes sensitive material.
Any location rental fees or requirements for on-site personnel.
Location Rental fees
Most locations are generously provided free of charge. However, exceptions may include commercial venues (e.g., hotels) or businesses requiring a staff presence during filming. If fees are involved, confirm the exact cost upfront.
Documentation
When you find a location you plan to use, be sure to complete the following:
Location Shooting Plan Agreement – personally ask the property owner the listed questions and fill out the form. Do not hand them a blank copy. After completion, have them sign Page 2 and provide them with a copy.
Location Agreement – finalize by having the property owner sign this document as well.
Proper media offloading procedures are essential to protecting the integrity and security of a production’s footage. This post outlines the required workflow for transferring, verifying, organizing, and backing up media cards so that no footage is lost, corrupted, or misplaced during production or post-production.
These procedures are designed to mirror professional industry practices, where careful data management is considered just as important as capturing the footage itself. A single mistake during the offloading process can jeopardize days of work and create costly delays for the entire production. By following a consistent workflow, students develop habits that prioritize redundancy, organization, and accountability—skills that are foundational to contemporary digital filmmaking.
The Basic Process
The CMPAFilmPost Server is where you will offload all of the Original Camera Files (OCF) and Production Audio. Every computer the Post Hall has ShotPut Pro installed as well as a Red Mini Mag reader and a multi card reader attached.
ShotPut Pro is a software which not only copies video and audio files but will also verify the copies afterwards and make reports documenting that the offload was successful. These reports will be uploaded to Frame.io so that the production can keep track of when the media was offloaded and verify that the offload was successful .Every media card used on a production must use ShotPut Pro for offloading to the proper folder tree on CMPAFilmPost to assure the productions video and audio assets are safe.
Mounting Media Cards
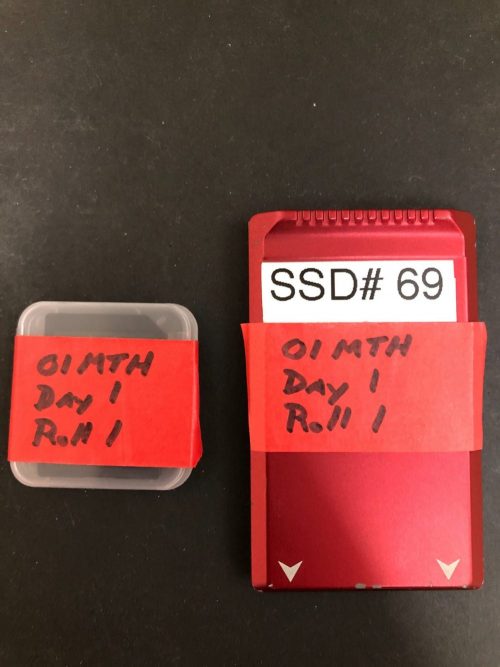
The Assistant Editor (AE) will retrieve the Red Mini Mag (containing the video), the SD card (containing the audio), and the camera reports from the ingest room cubby and bring them back to their assigned suite on the post hall for offloading. Production should have applied red tape to show live media was on them and labeled them as shown.
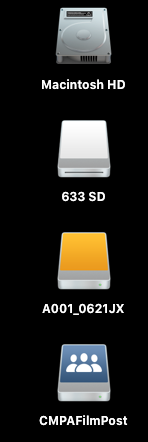
Remove the tape and insert the cards into the corresponding readers, they will mount like an external hard drive and appear on the desktop.
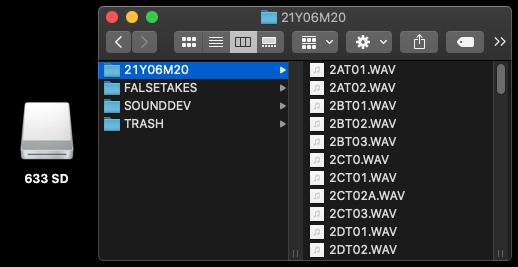
DesktopRED MINI MAG CONTAINING VIDEOSD CARD CONTAINING SOUND
Offloading Media with ShotPut Pro
After both media cards are mounted launch ShotPut Pro from the dock.
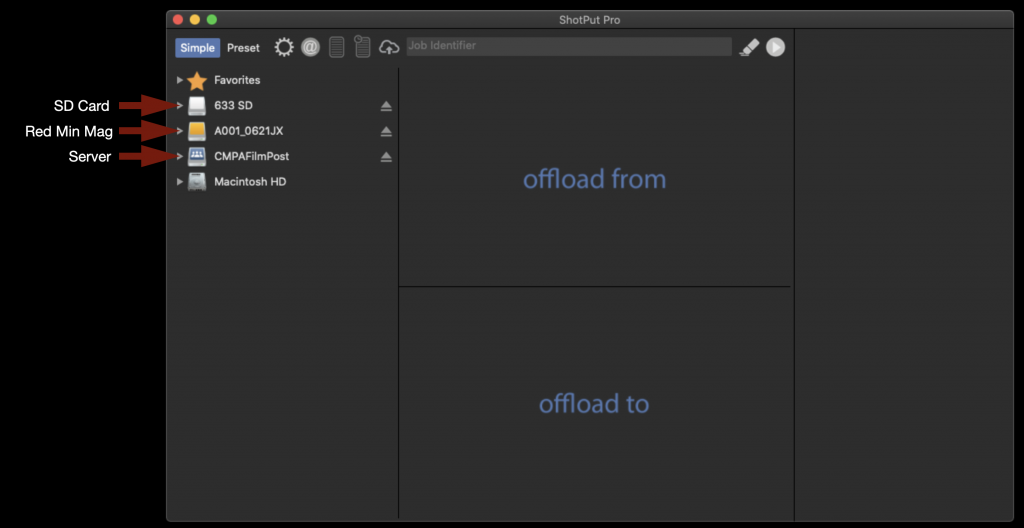
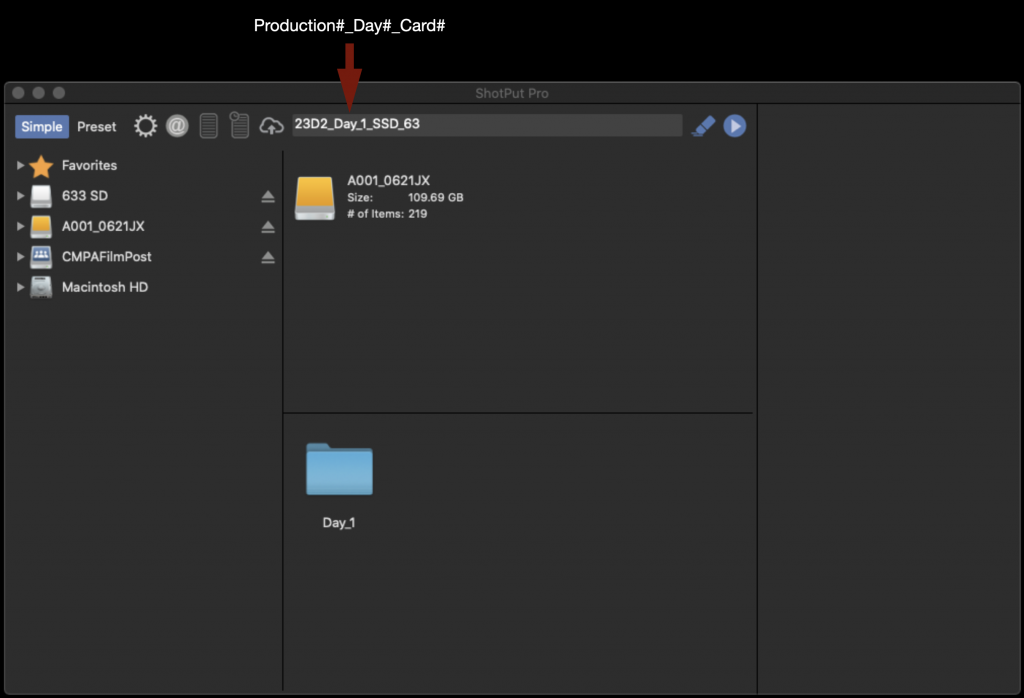
When it opens it will appear as shown below. Notice how the media cards and the Server are shown on the left of the screen.
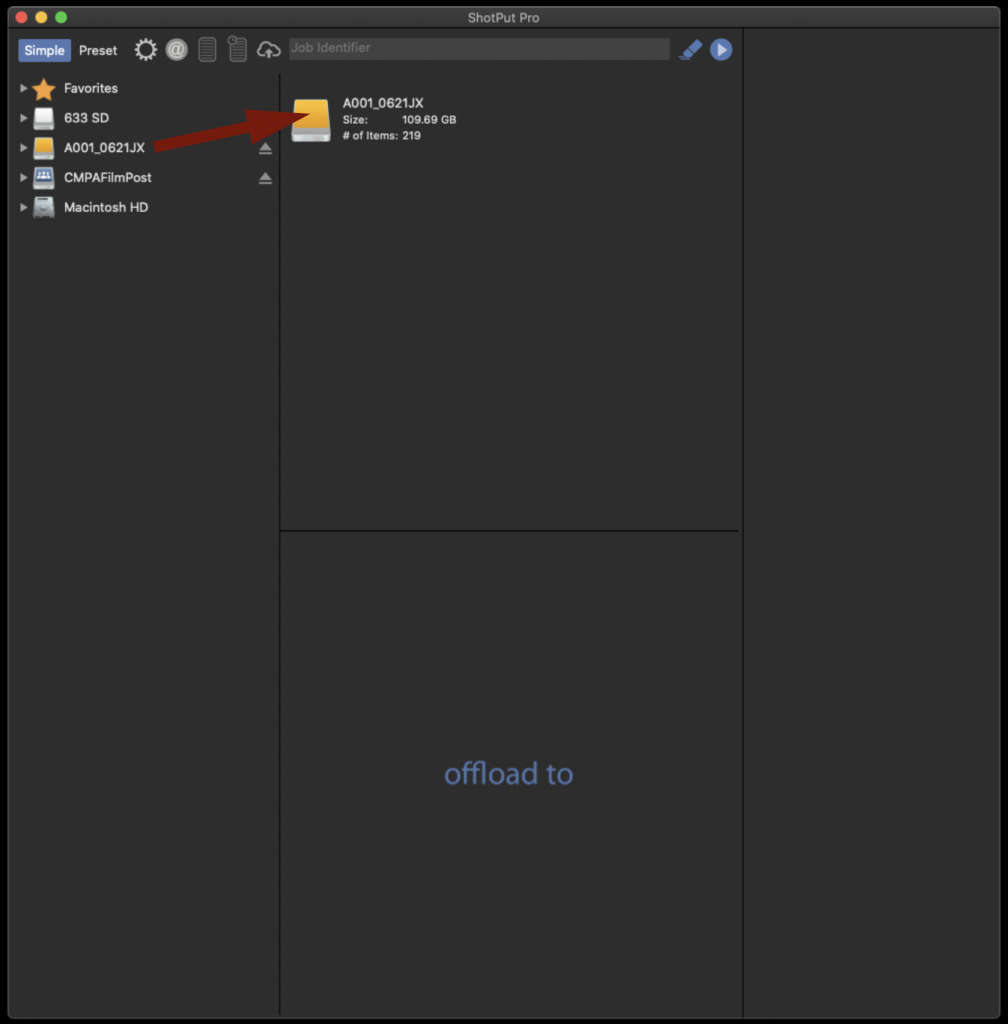
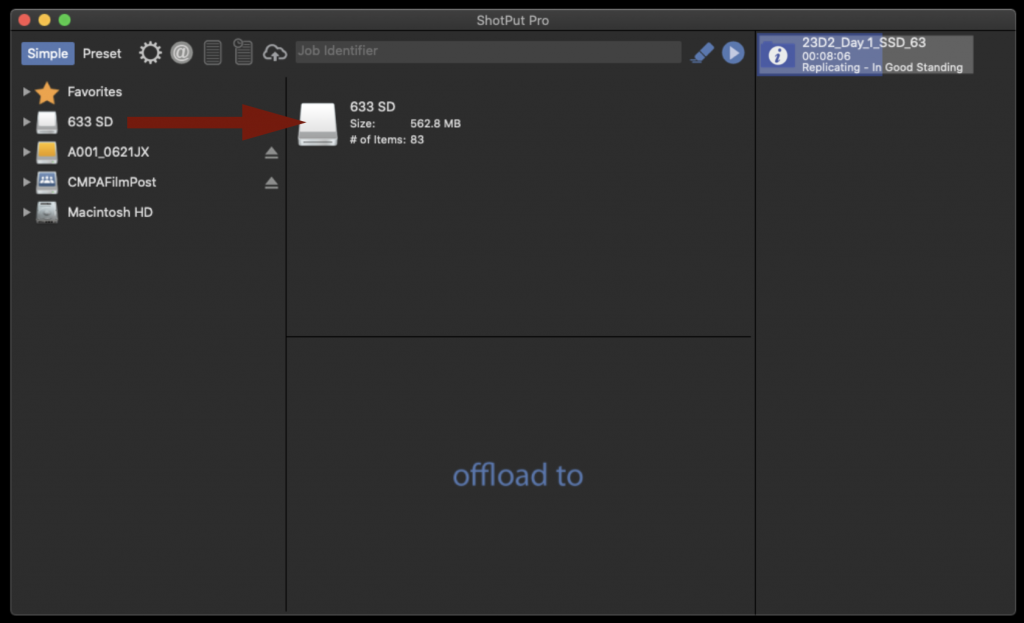
To offload the entire contents of the Red Mini Mag drag the disk icon and drop it in the box labeled “offload from”.
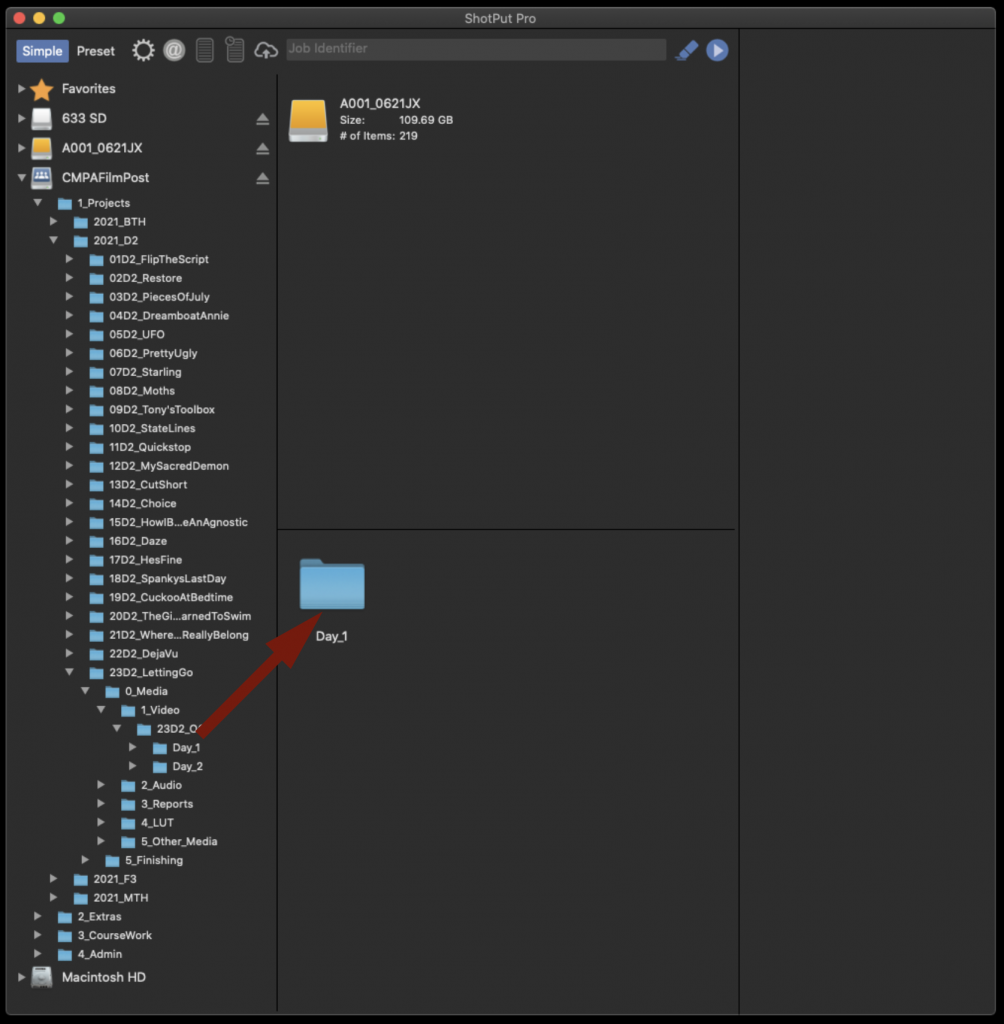
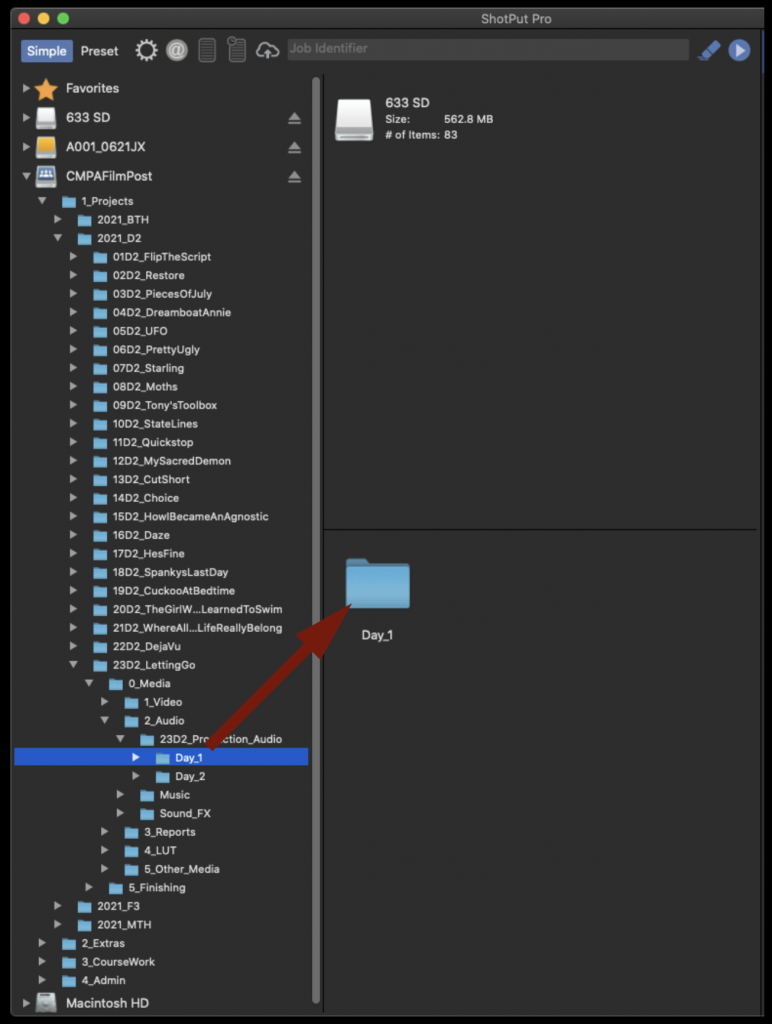
Next you will need to tell ShotPut in what folder on the CPMAFilmPost Server you would like to offload to. Navigate down into the folder tree on the left hand side until you find the proper Show and Day folder for your production. Then drag the folder icon and drop it in the box labeled “offload to”.
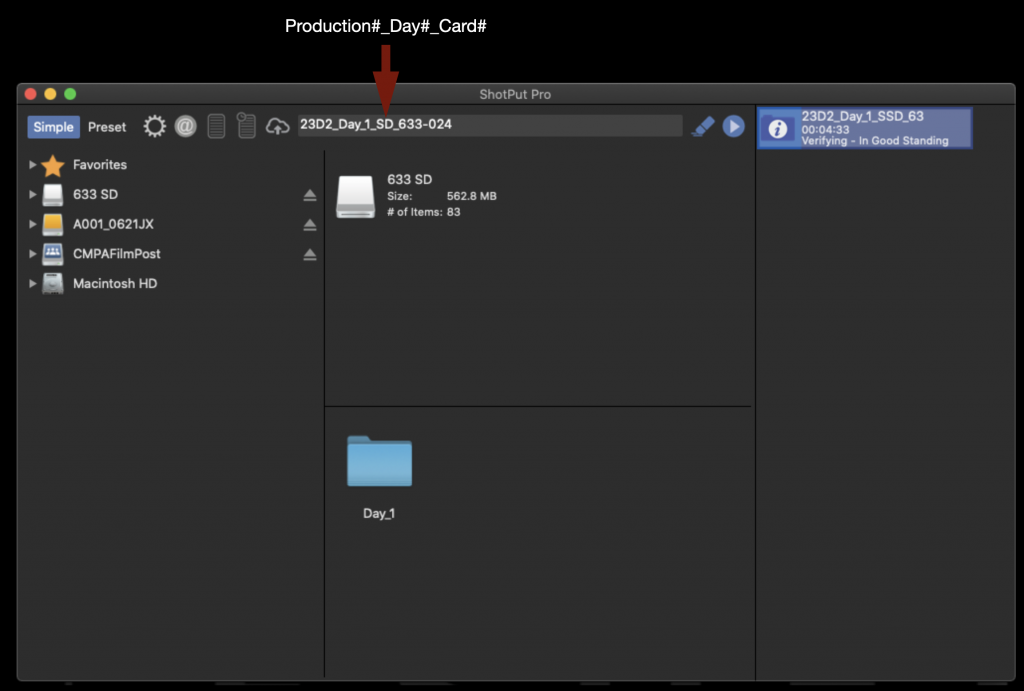
In the field labeled “Job Identifier” fill in the information for this offload in the following format: Production#_Day#_Card#.
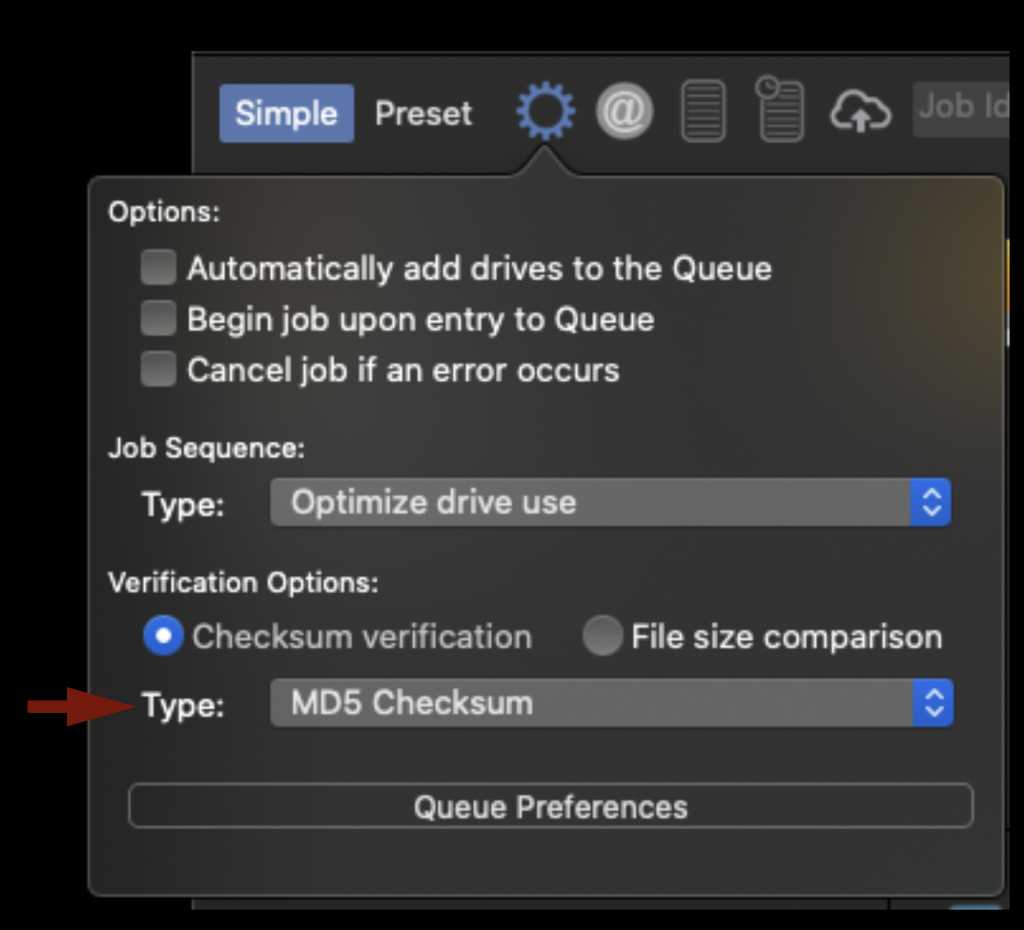
Before starting the offload you will need to check a few settings. First under “Verification Options” make sure the type is set to “MD5 Checksum”. This is a good balance of speed and security.
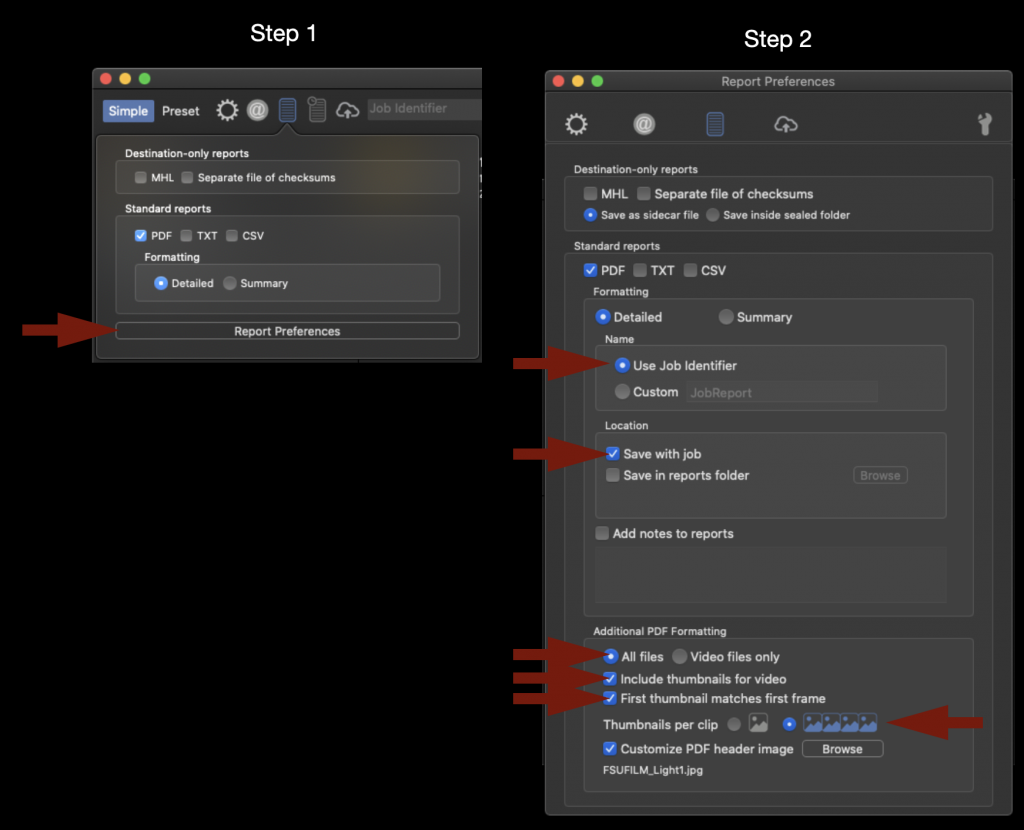
Next make “Report Preferences” and make sure that all the options are check as shown in the example below. This won’t effect the actual offload at all but it will dictate how the pdf that is generated after the offload will be formatted.
When everything looks good you can start the offload by selecting the Blue Arrow.
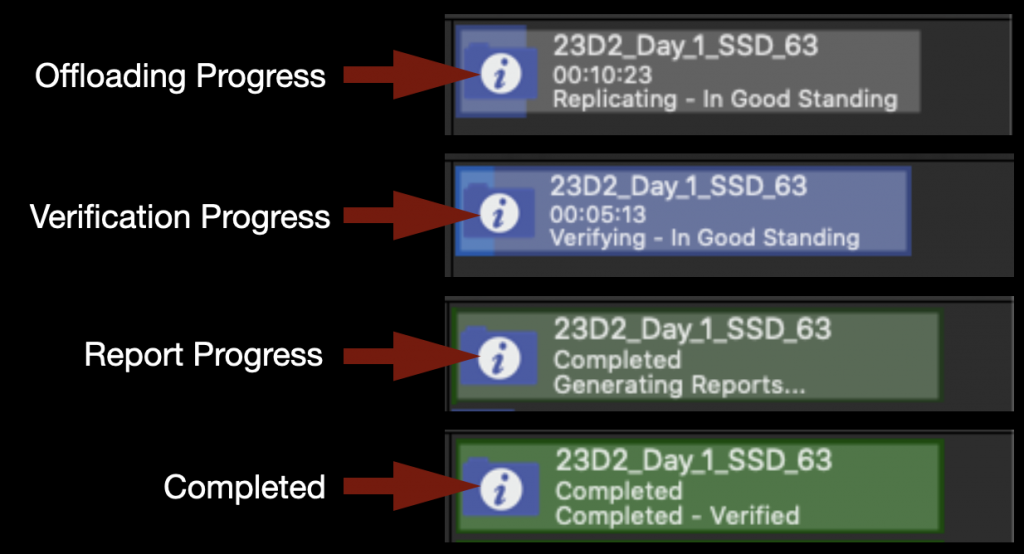
On the right hand side you will see the progress bar appear and you can monitor how long it will take. It will go through several phases as shown below and ho long it takes is dependent on how much media was on the card.
While the video is being offloaded you can go ahead and set the audio offloading at the same time. Just repeat the same process as you did before. To offload the entire contents of the SD Card drag the disk icon and drop it in the box labeled “offload from”.
Next navigate down into the folder tree on the left hand side until you find the proper Show and Day folder for your production. Then drag the folder icon and drop it in the box labeled “offload to”.
In the field labeled “Job Identifier” fill in the information for this offload in the following format: Production#_Day#_Card#.
You can click the blue start arrow again and it will sue up your next offload. When both media cards have finished offloading and are verified it will appear as shown below.
The media is now safely offloaded to the CMPAFilmPost Server.
Verification Reports
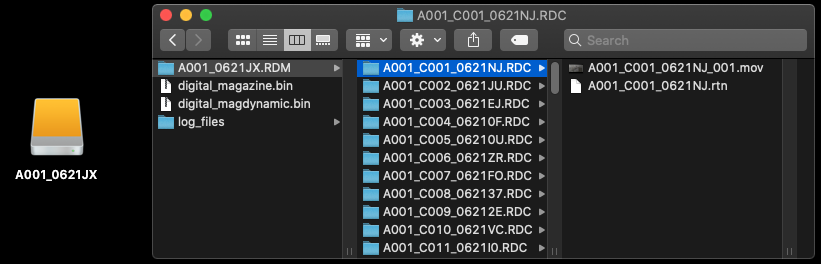
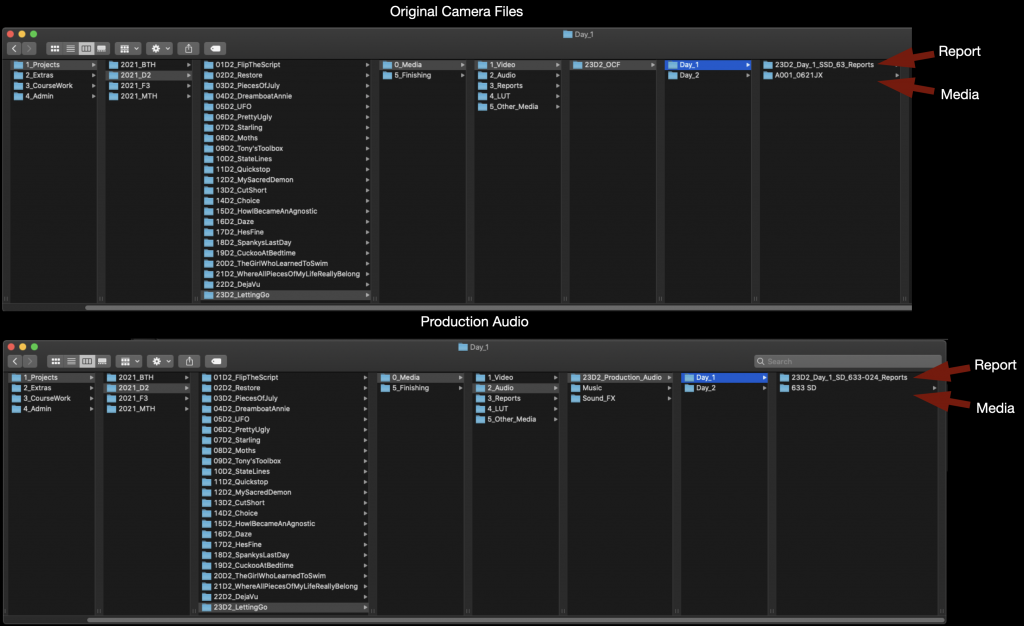
You can find the verification reports alongside the media in the folder that you pointed ShotPut Pro toward.
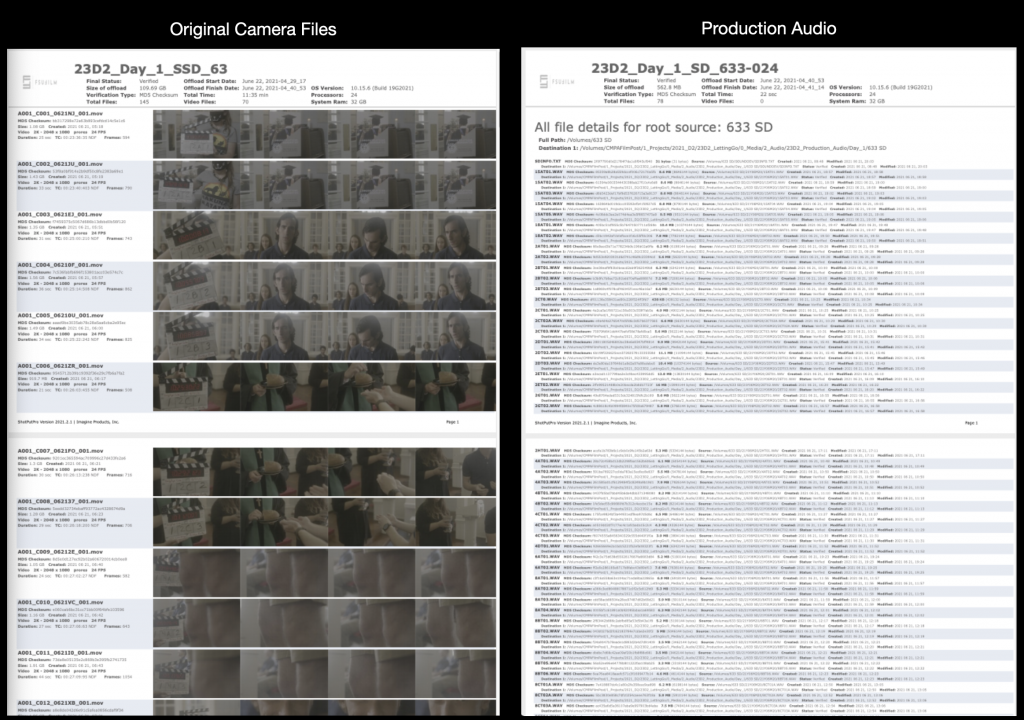
The Verification Reports should look like the examples below.
After checking the reports upload them to the appropriate show folder on Frame.io.
Wrap Up
The SD card will need to be erased after you have verification from ShotPut Pro that the data was transferred safely. Remember to empty the trash after deleting the sound card media as that is the only way to free up space on the card. You do not need to erase the Red Mini Mags as they will be reformatted the next time they are put in the camera. Return the media cards to their cases and return them to the shows cubby in the ingest room. Now that the tape has been removed production will know that they are clear to be used again.
This post explains the process for mounting production servers and accessing designated show volumes used for storing, organizing, and sharing project media. Maintaining a consistent workflow for server access is essential for collaboration across editorial, sound, color, VFX, and other post-production departments.
The procedures outlined here are intended to reduce confusion, prevent file management errors, and ensure that all collaborators are working from the correct media and project structures. Consistent server practices help maintain version control, protect shared assets, and support efficient collaboration across large teams. Developing disciplined organizational habits in post-production environments is a critical professional skill, particularly on projects involving multiple editors, assistants, and departments.
Mounting CMPAFilmPost
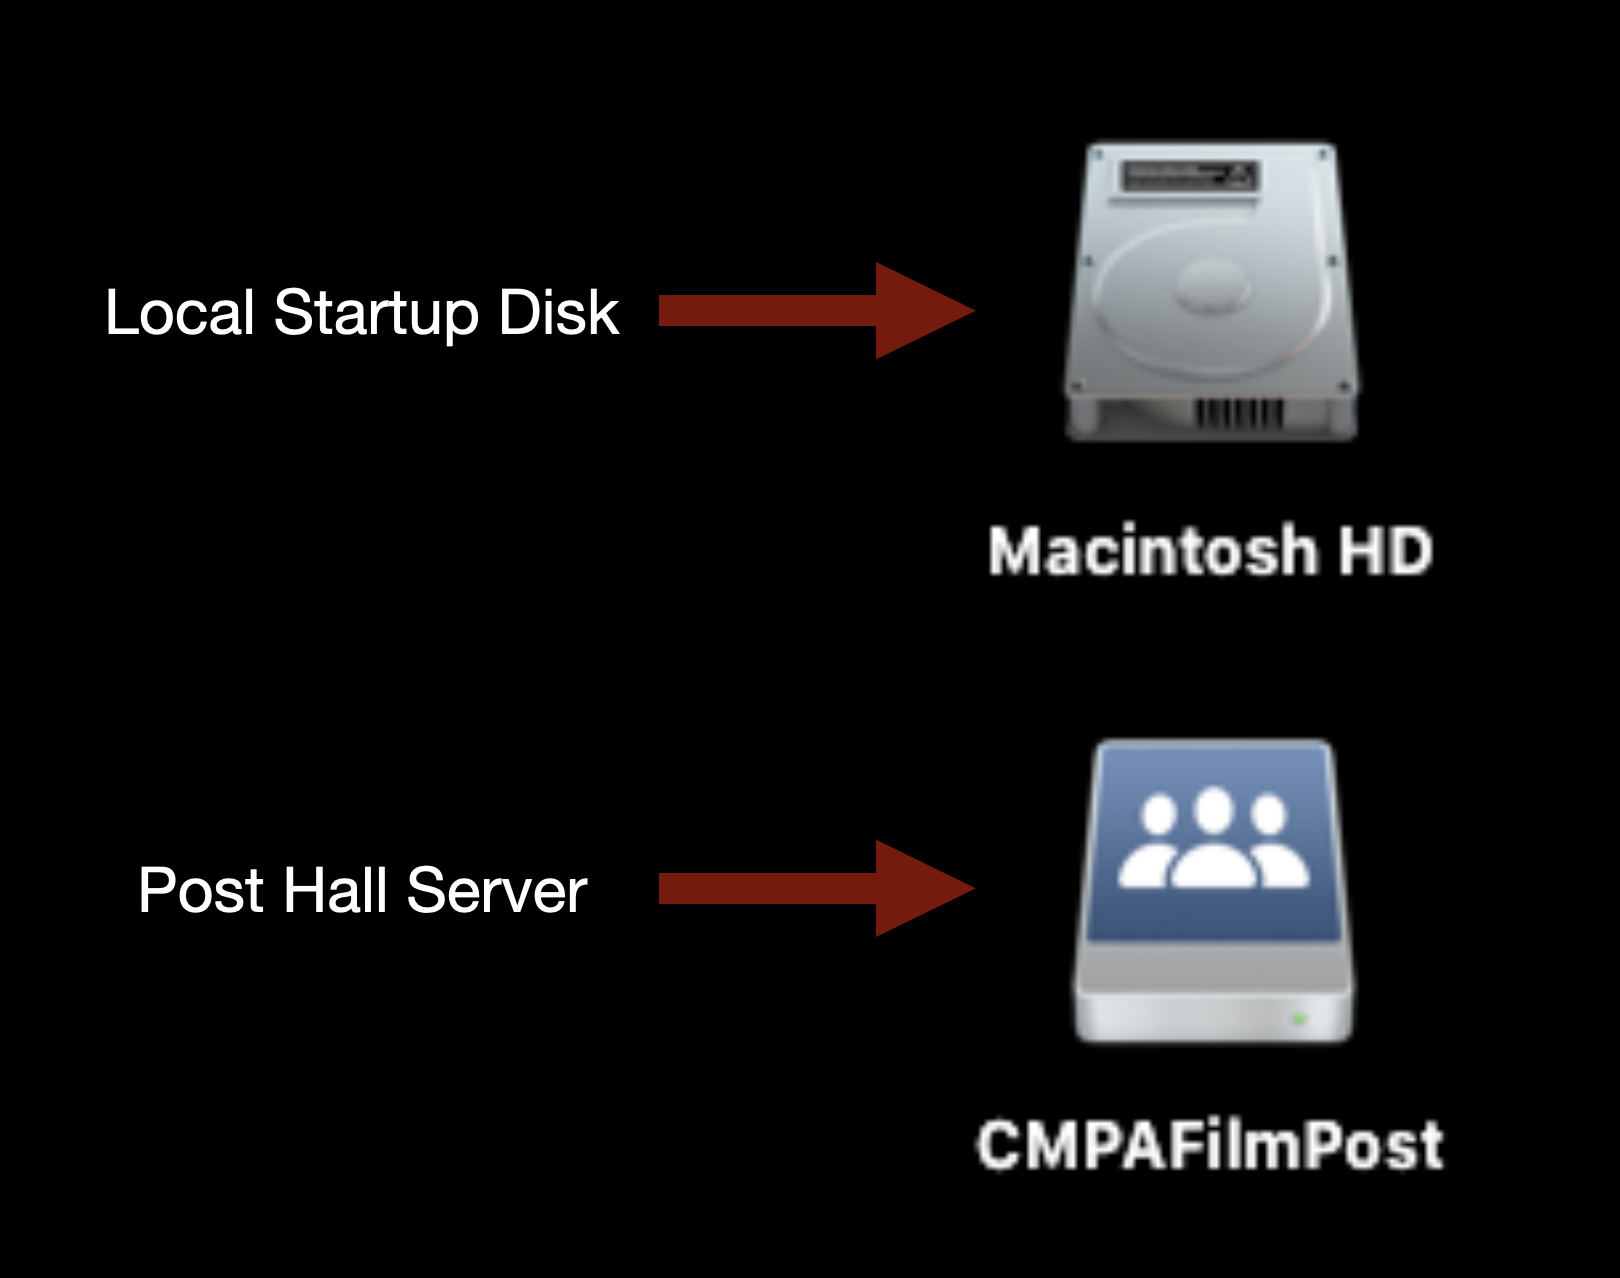
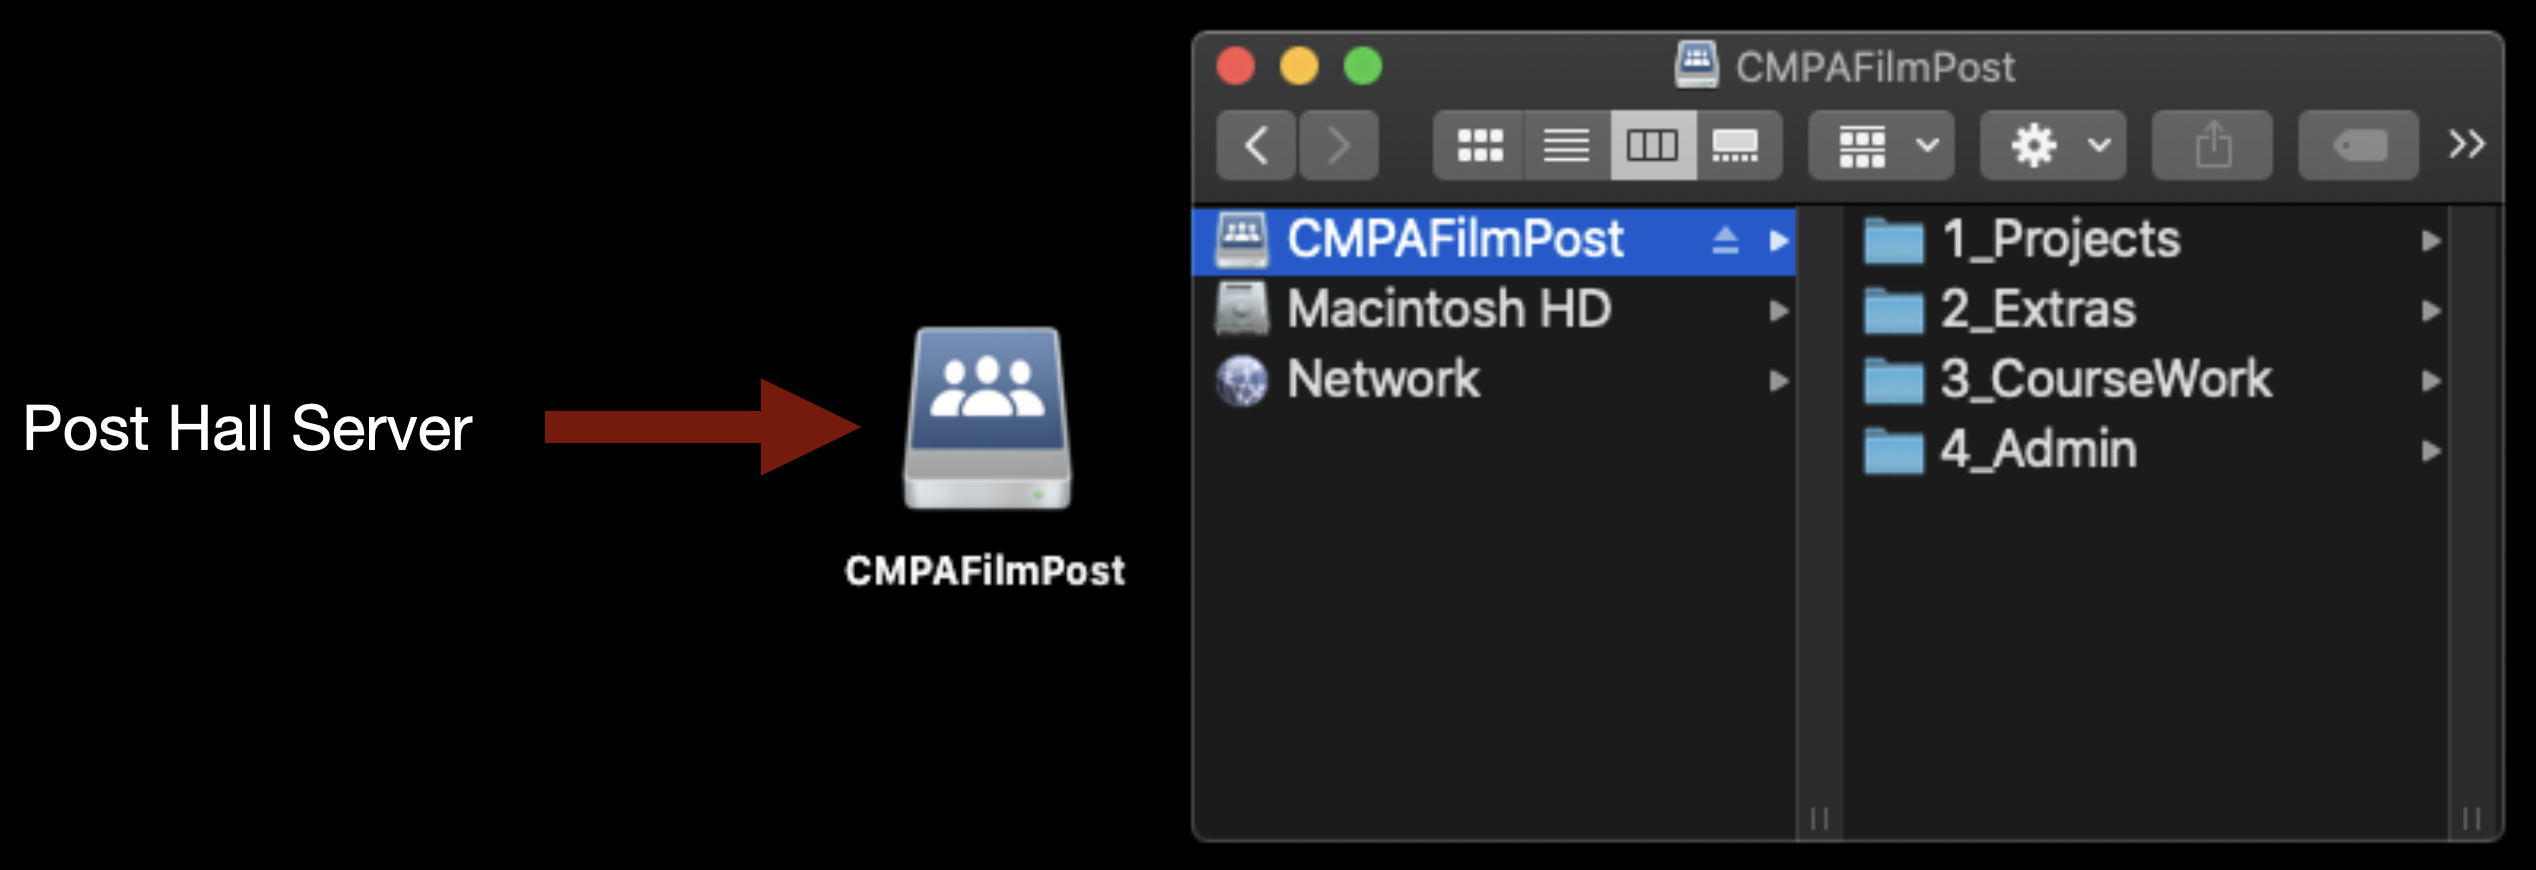
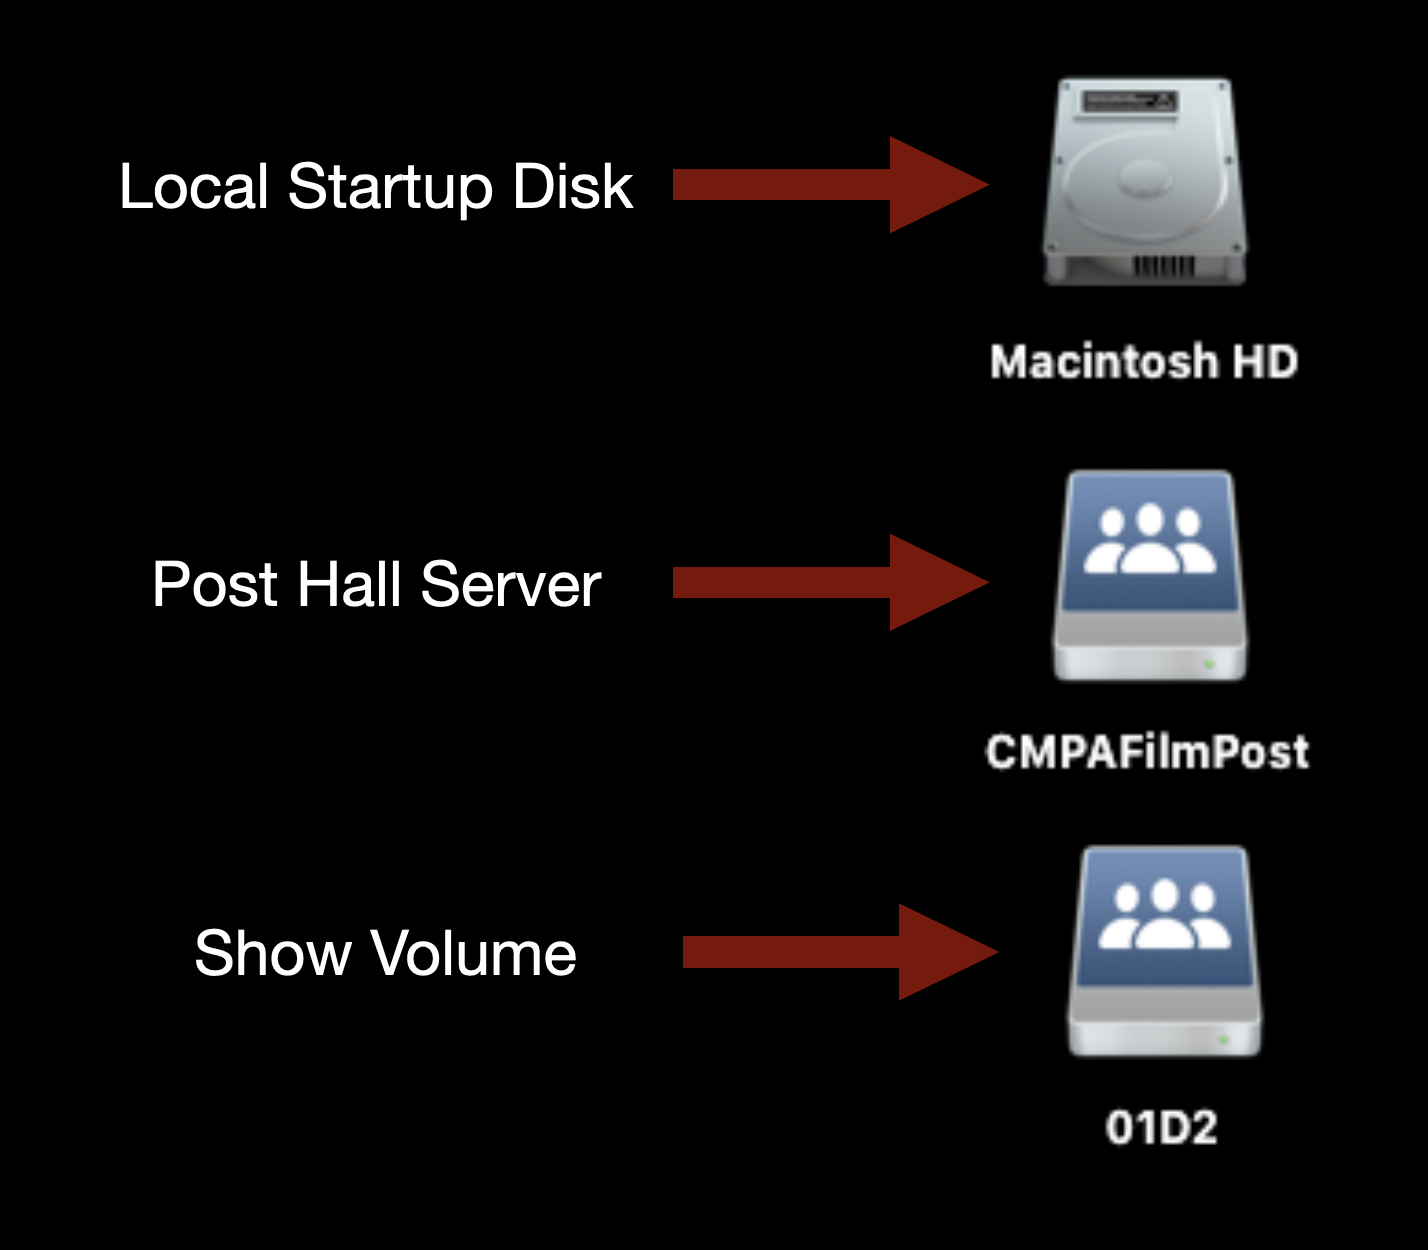
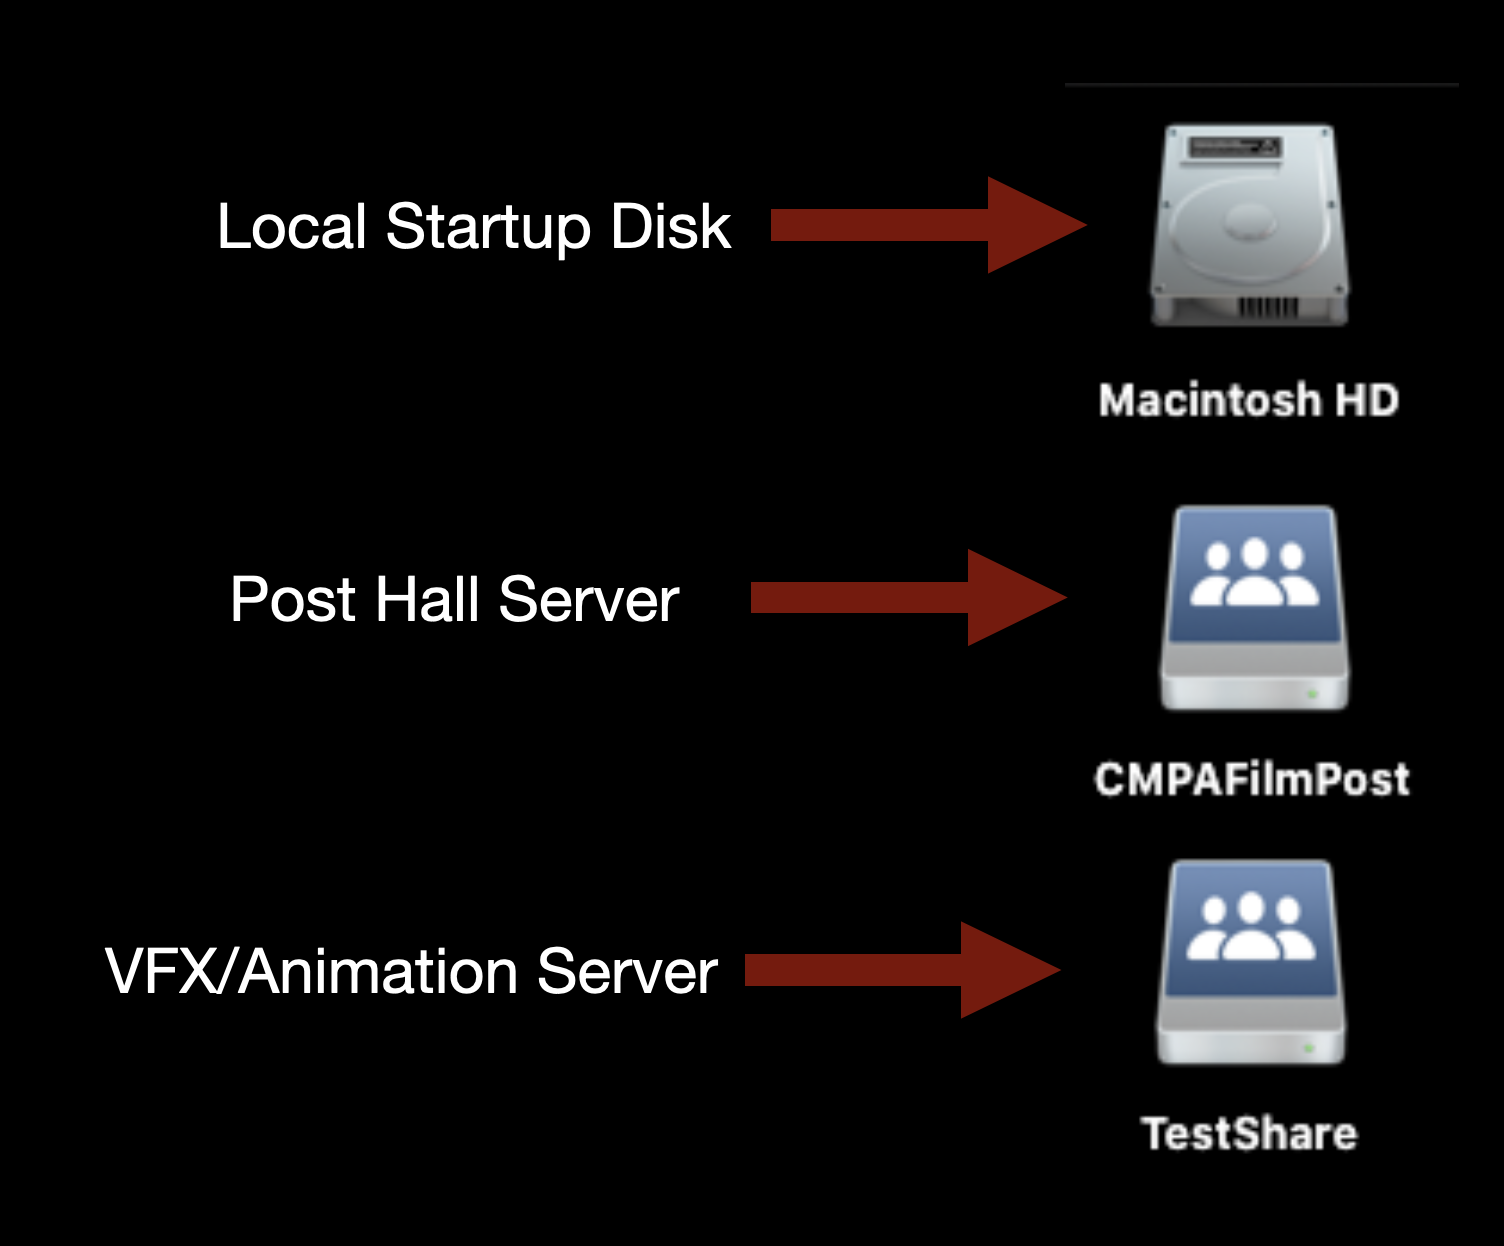
CMPAFilmPost or “the post hall server” should always be mounted on the desktop of your machine and will look like the example below.
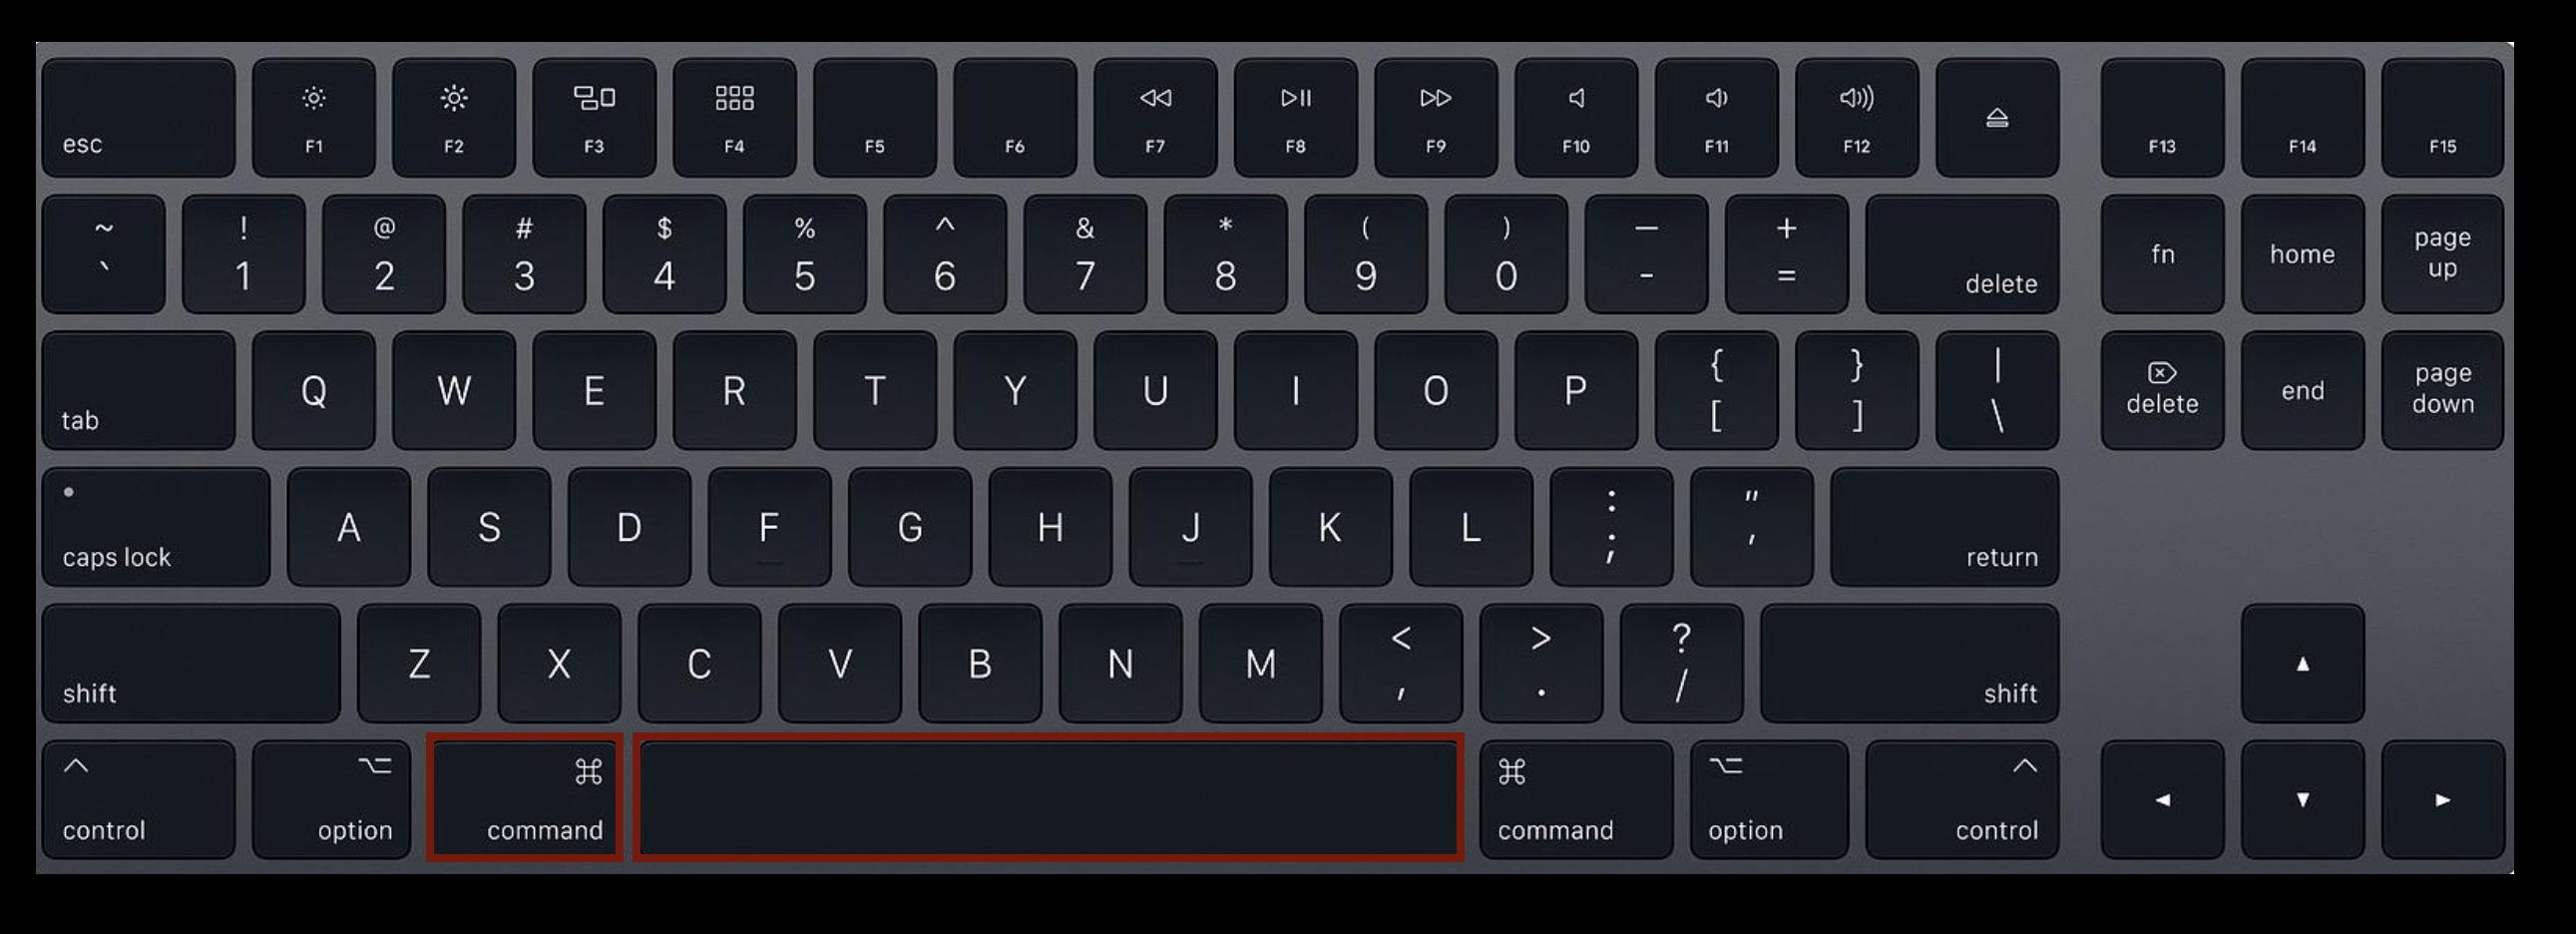
If for some reason it is not mounted type “Command” + “Spacebar” on the keyboard.
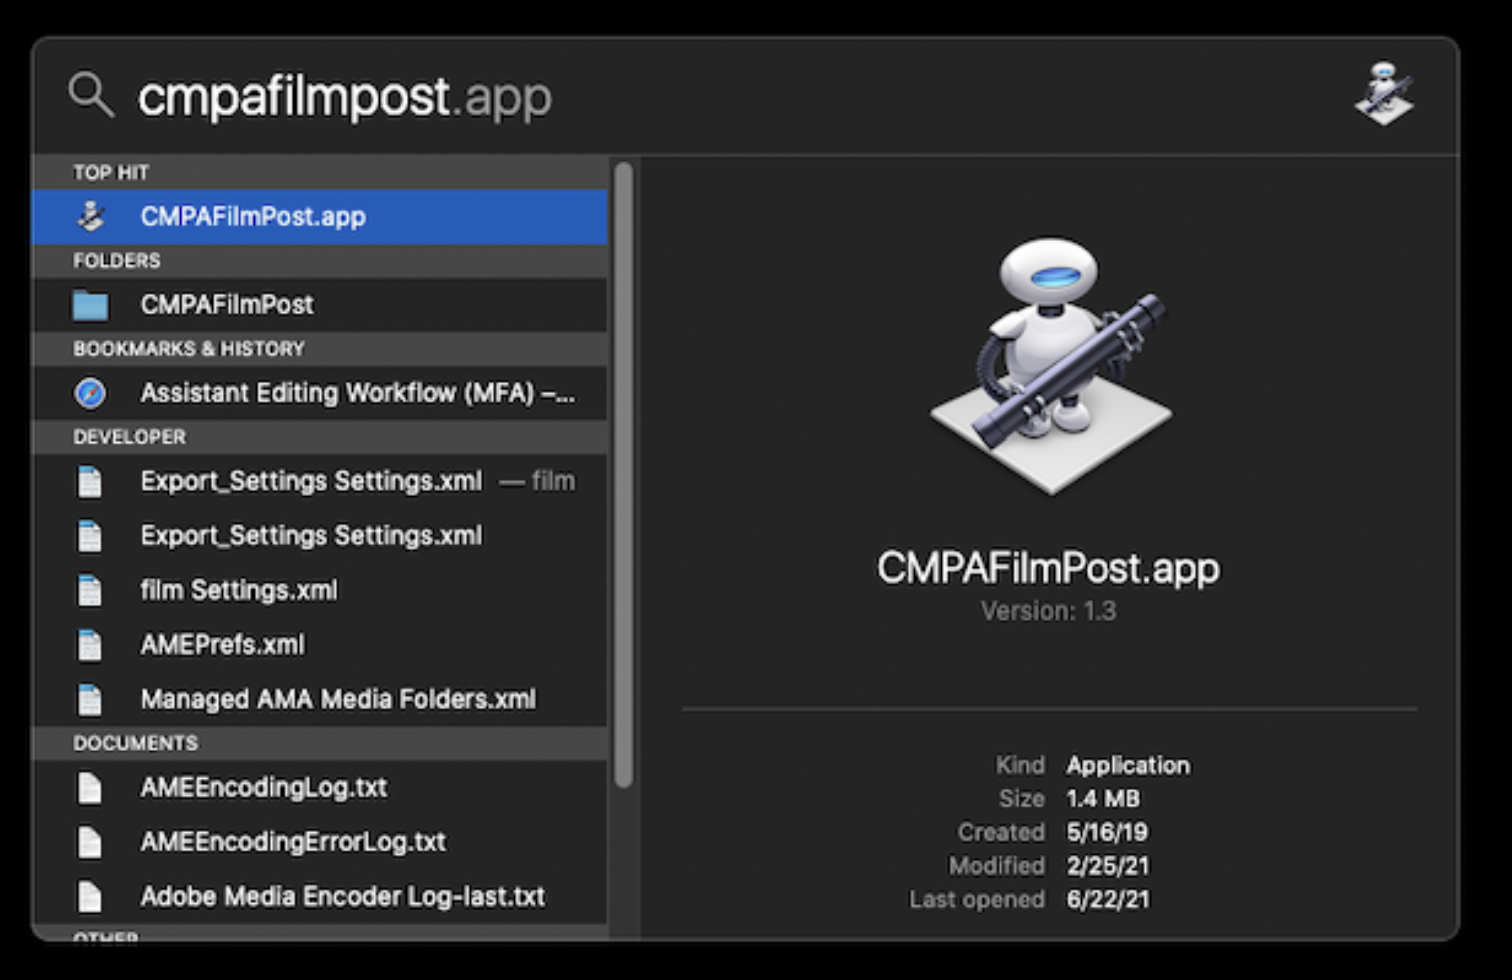
This will bring up the Spotlight Search function.
Type in “cmpafilmpost”. This will find an app that will mount the server. Hit “Enter” and it mount and you will see it on the desktop.
This is the main post hall server. This is where your Original Camera files and Production Audio will live.
Mounting Show Volume
Each film will have its own individual “Show Volume”. This is where your Media Composer Project and ProTools Project will live. You will need to mount the volume specific to the film you are working on.
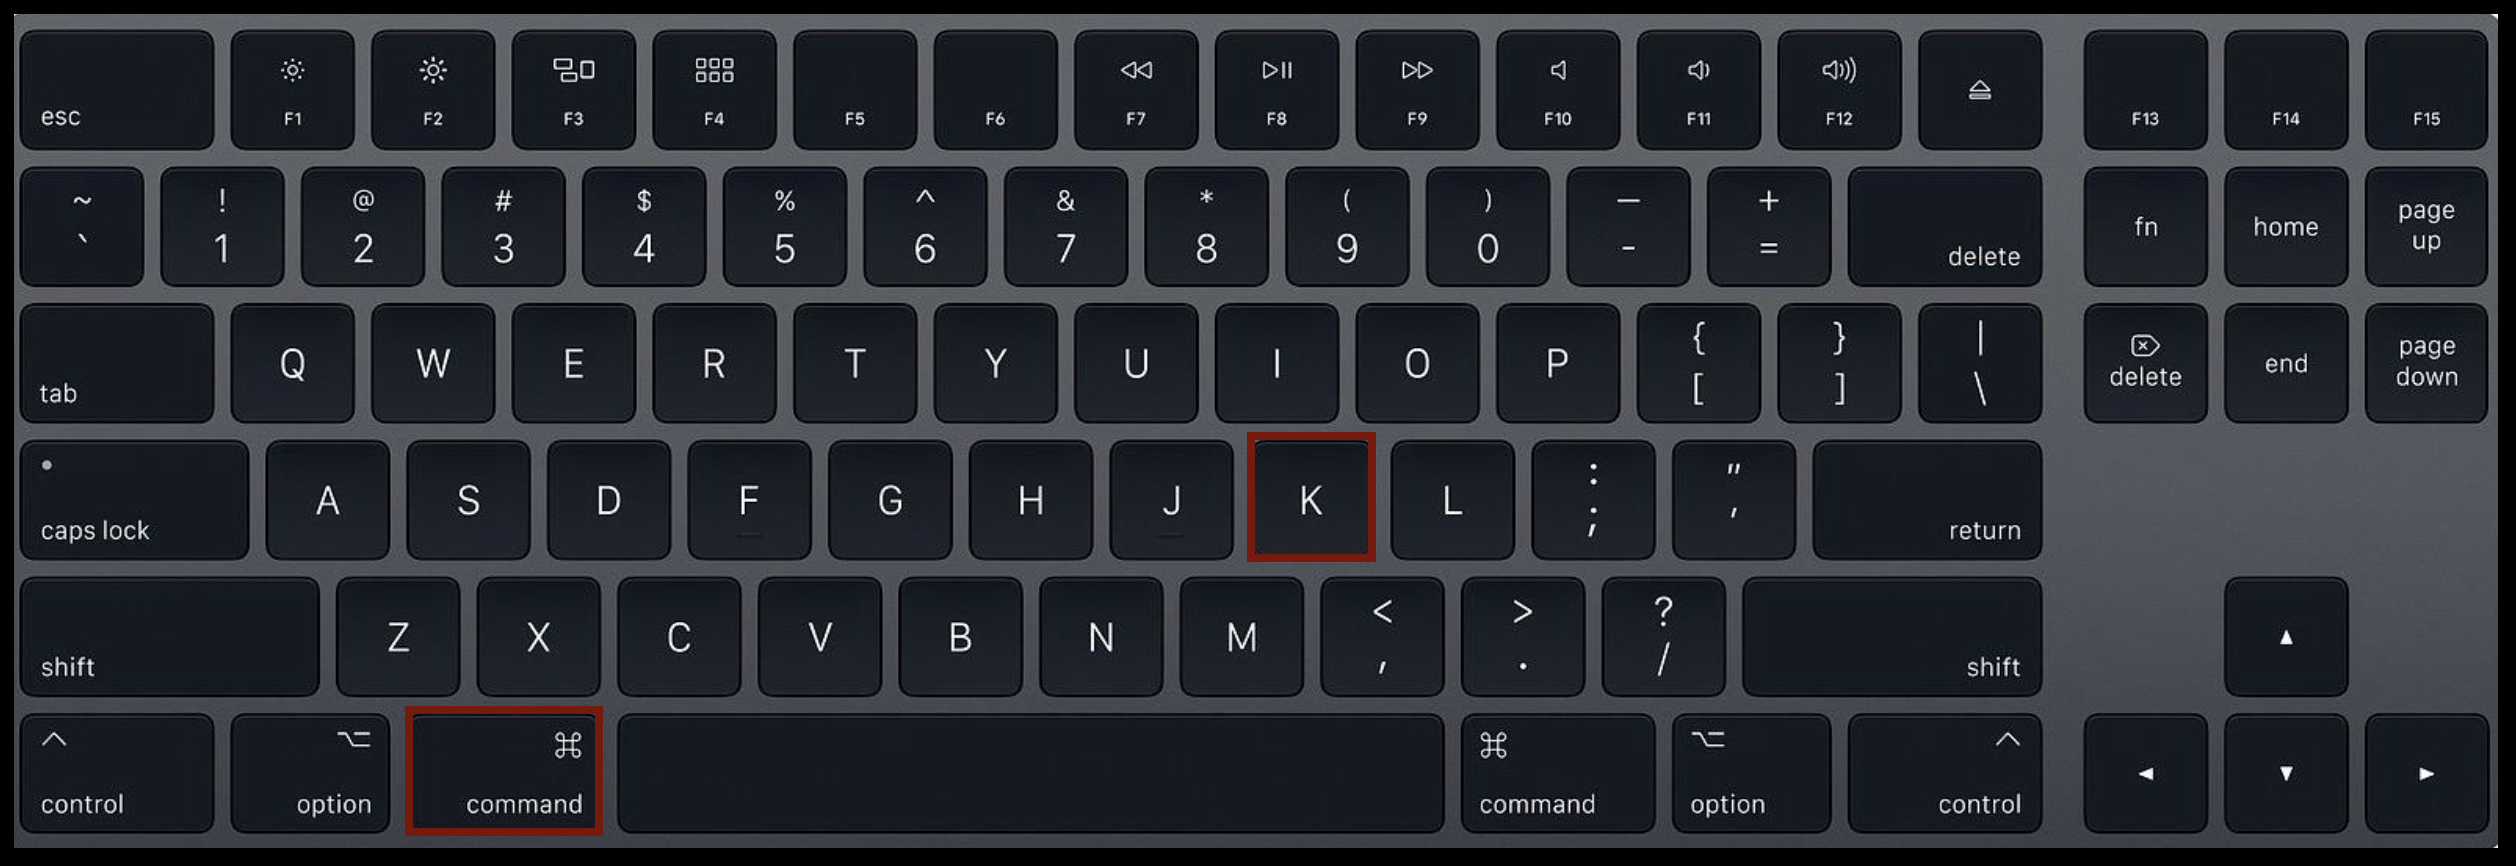
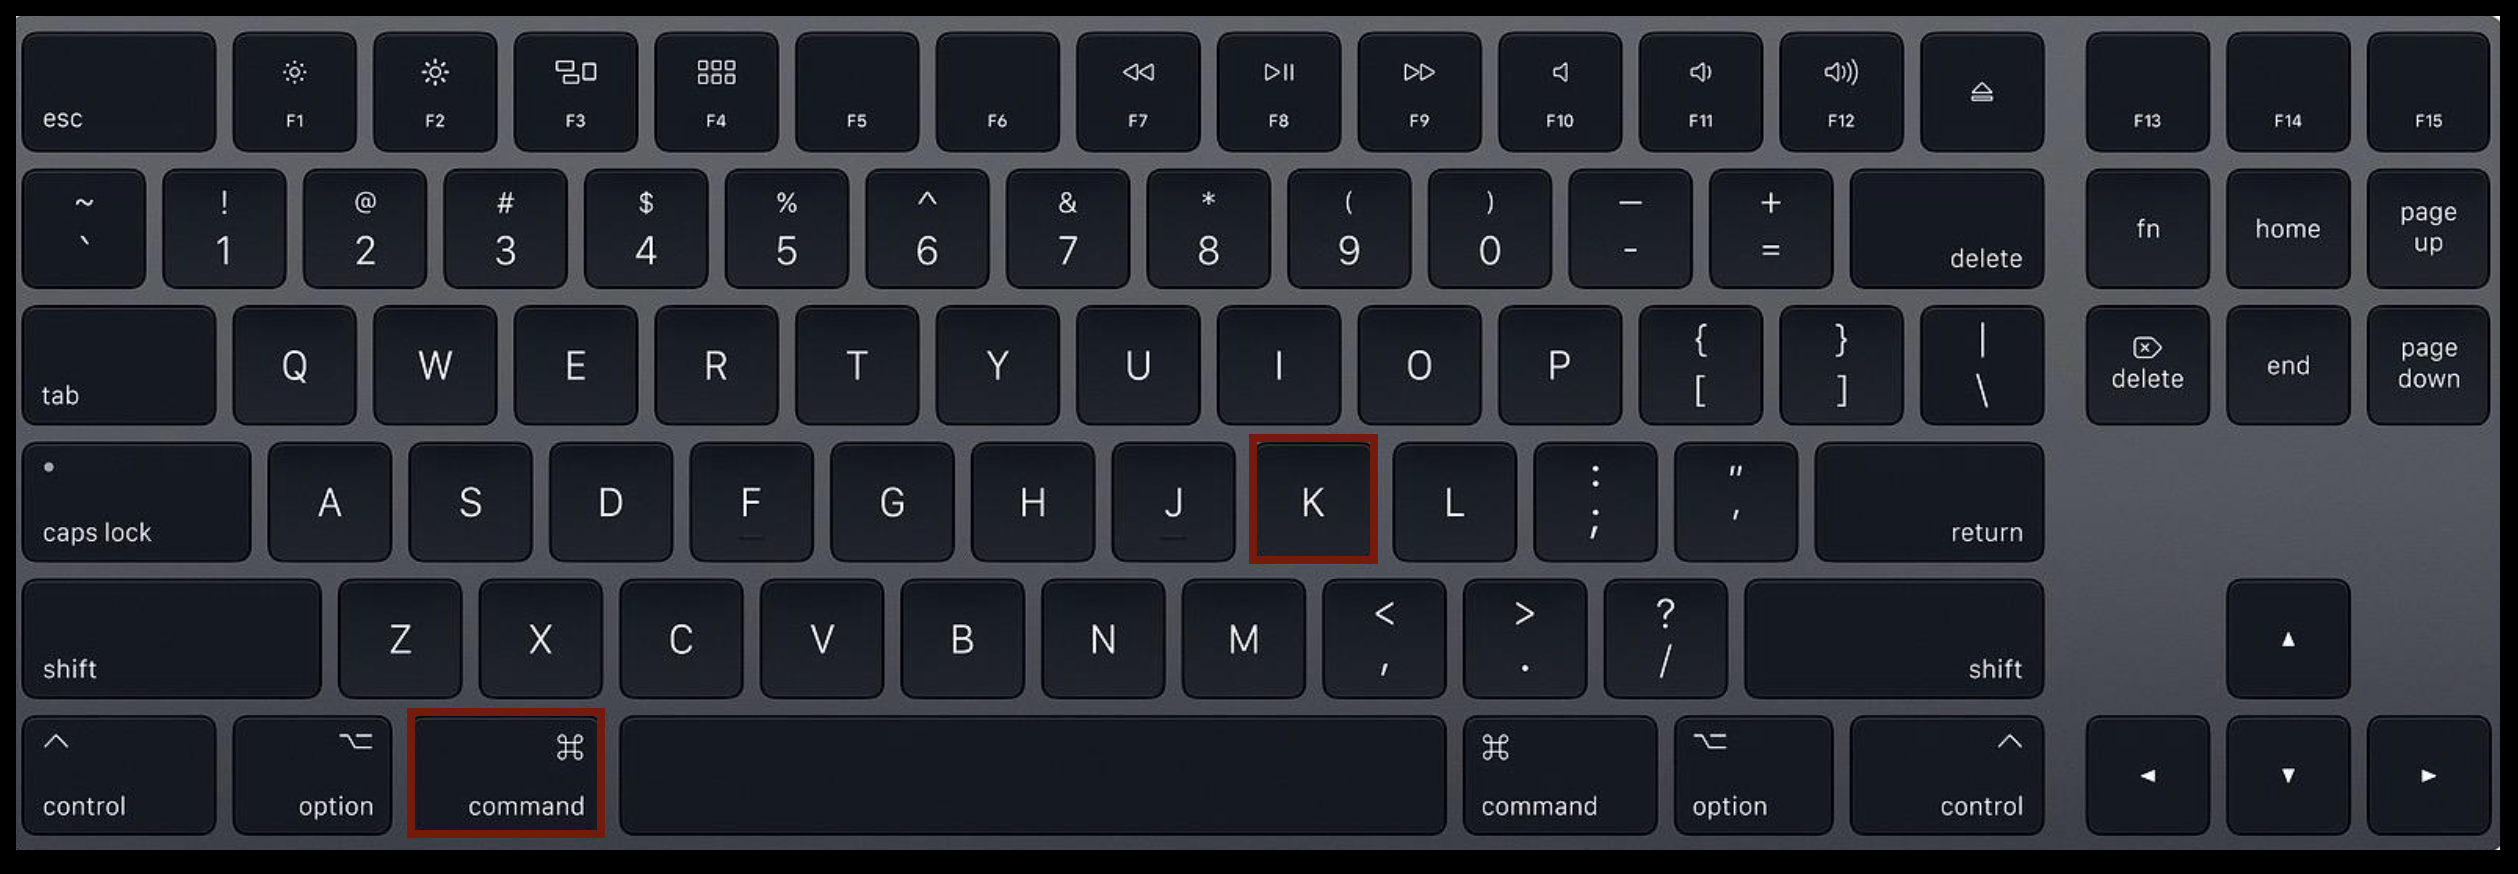
To do so type “Command” + “K” on the keyboard.
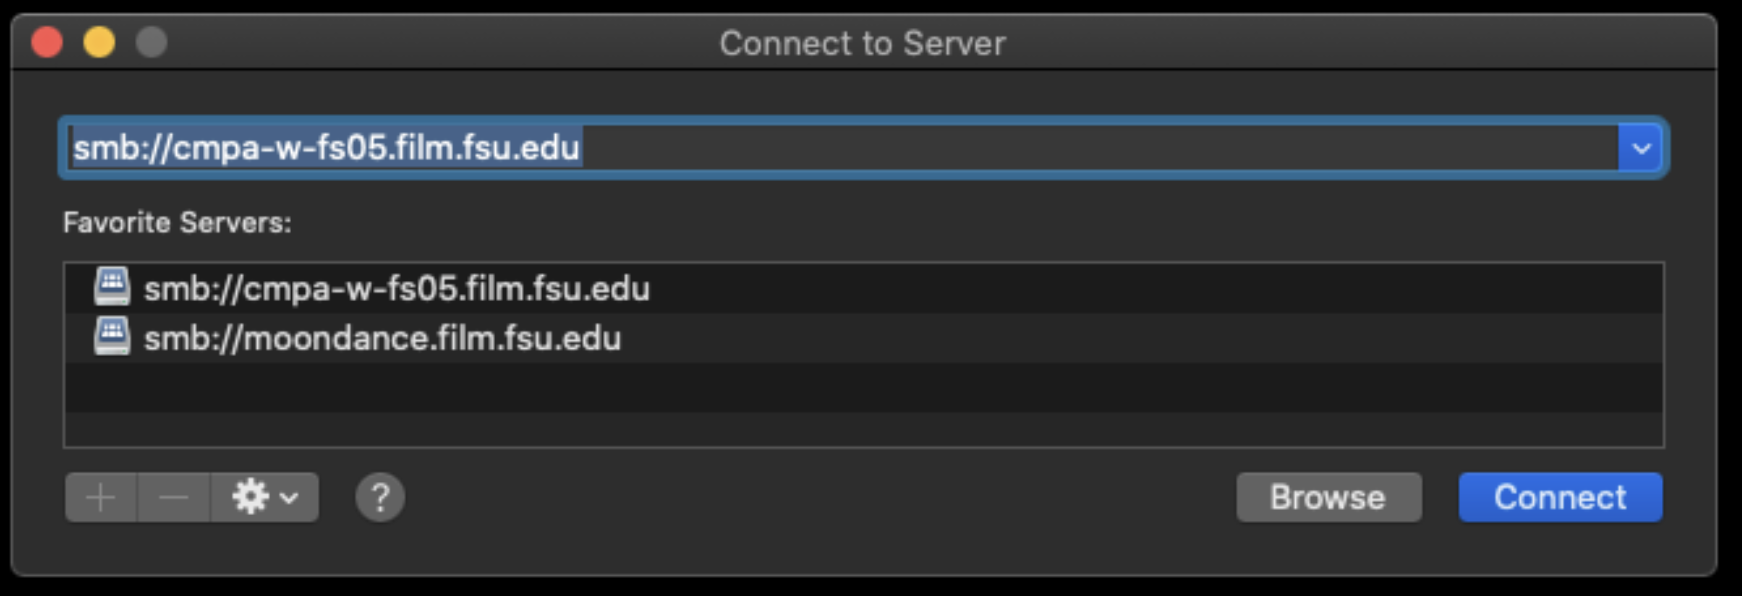
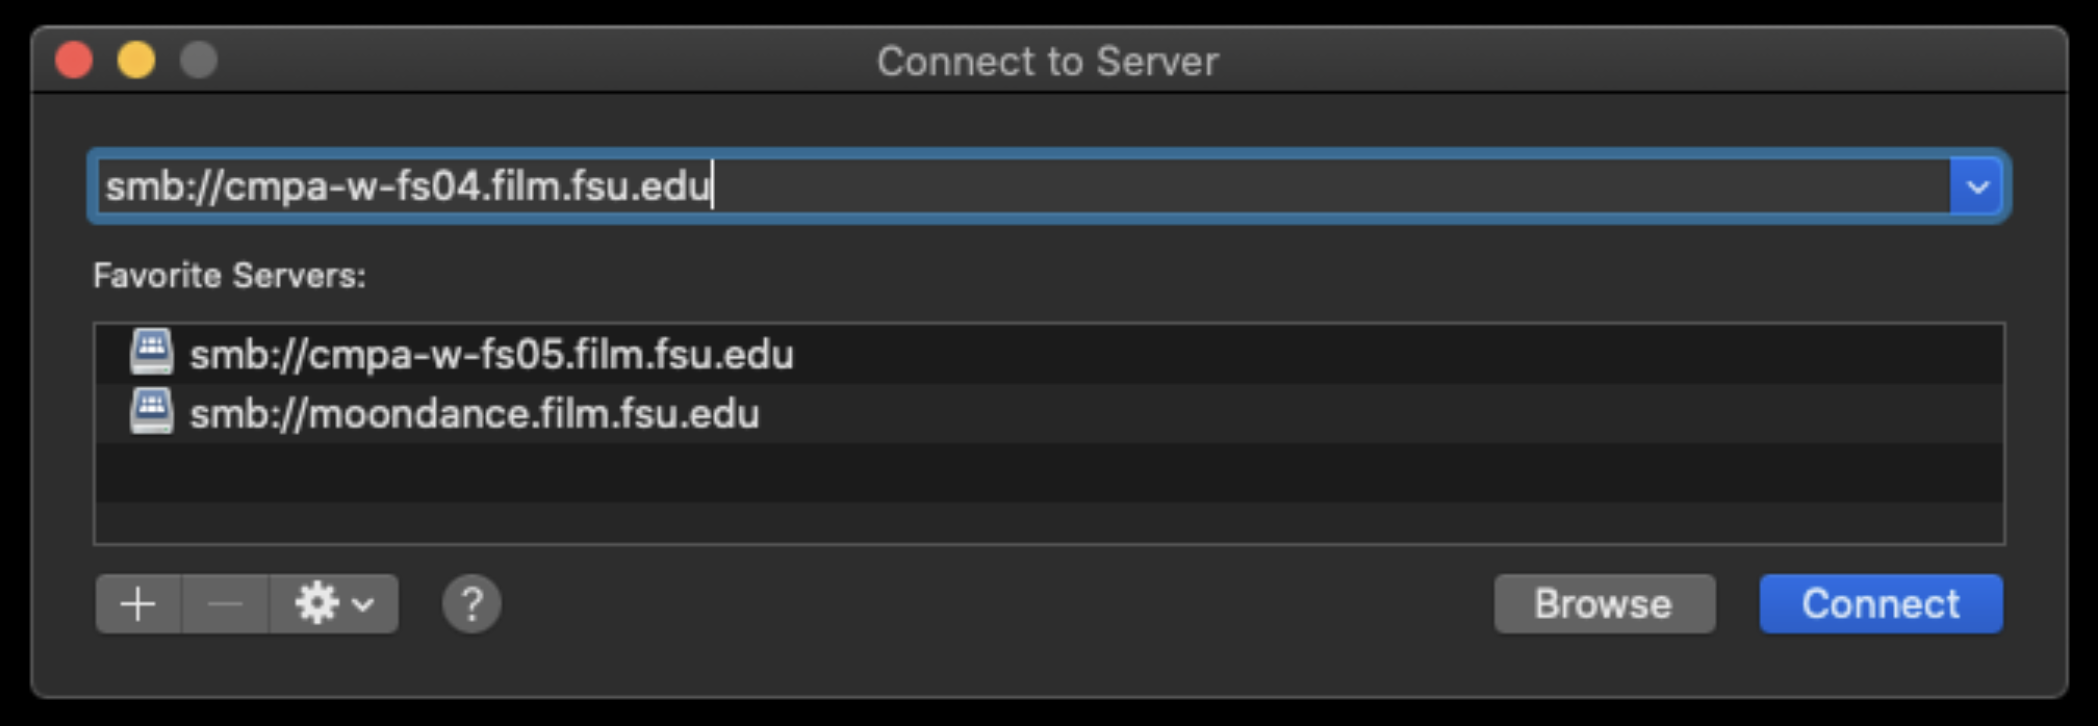
This will bring up the “Connect to Server” prompt. Type in the address: smb://cmpa-w-fs05.film.fsu.edu
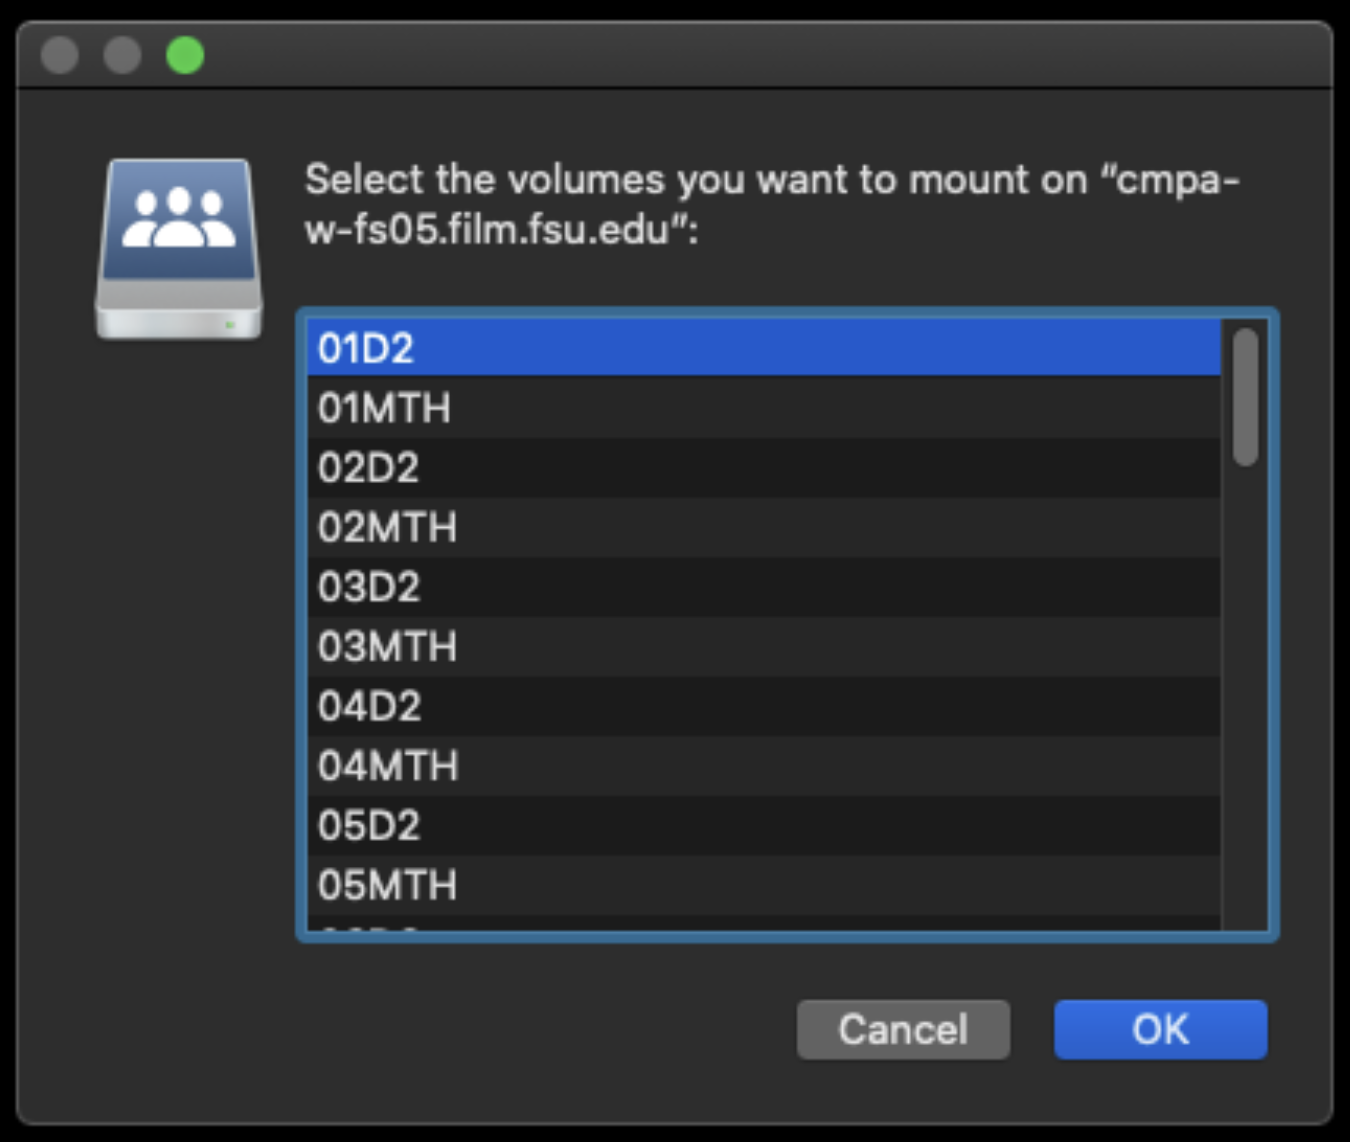
This will show all the possible show volumes that are available to choose from. Select your show number and then hit OK.
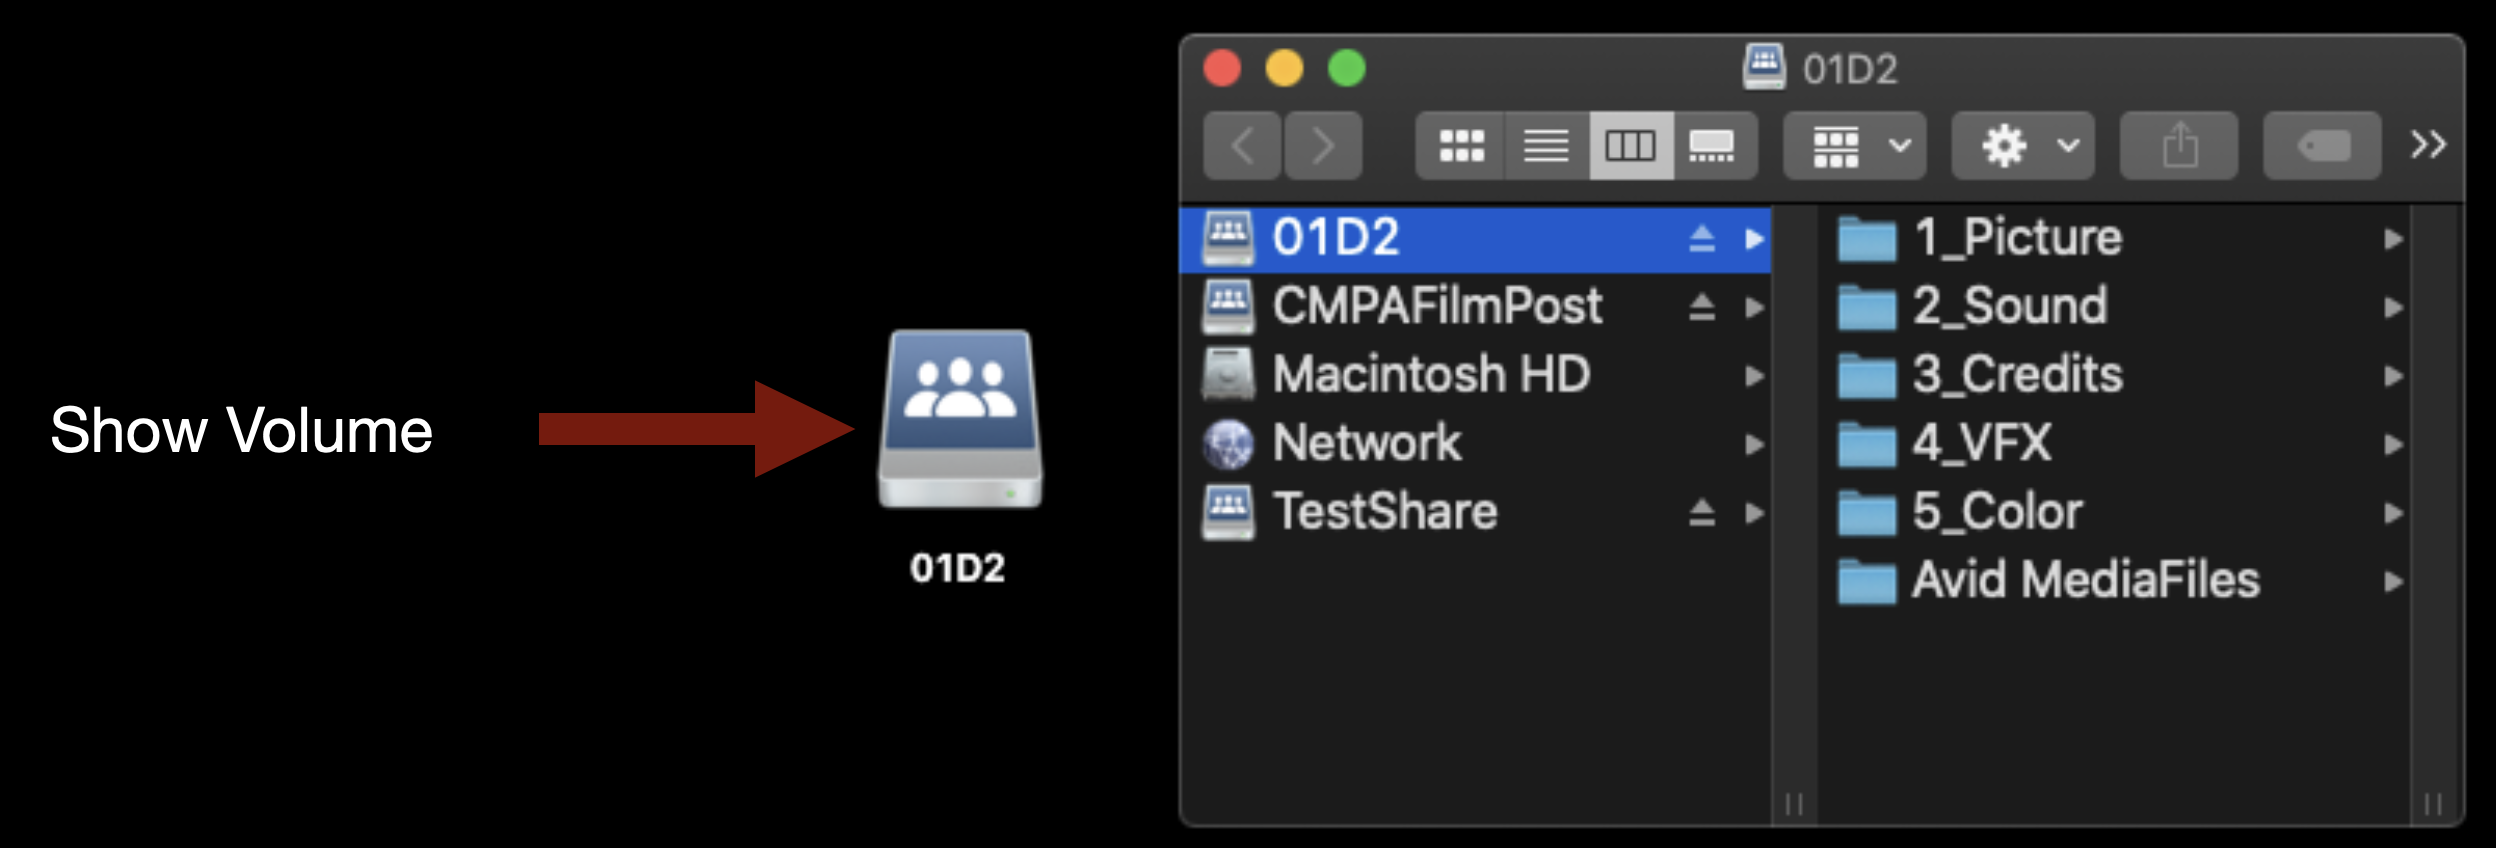
It will mount on the desktop and will look like the example below.
This is the folder structure inside.
Mounting TestShare
TestShare or “the Z Drive” is the server used for VFX and Animation work. If you need to mount it type “Command” +”K”.
This will bring up the “Connect to Server” prompt. Type in the address: smb://cmpa-w-fs04.film.fsu.edu
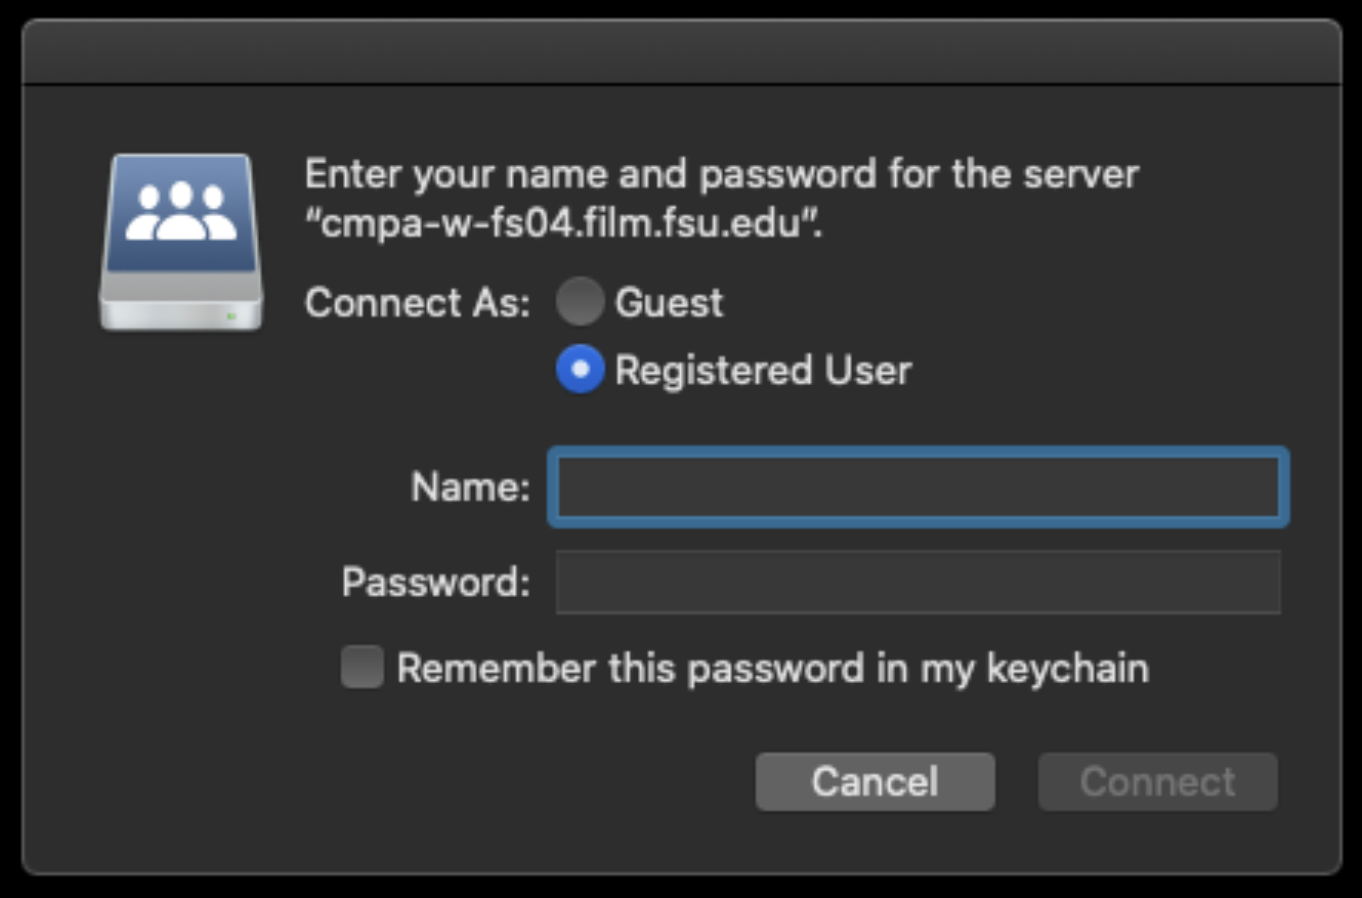
You will need to enter your FSU ID and Password.
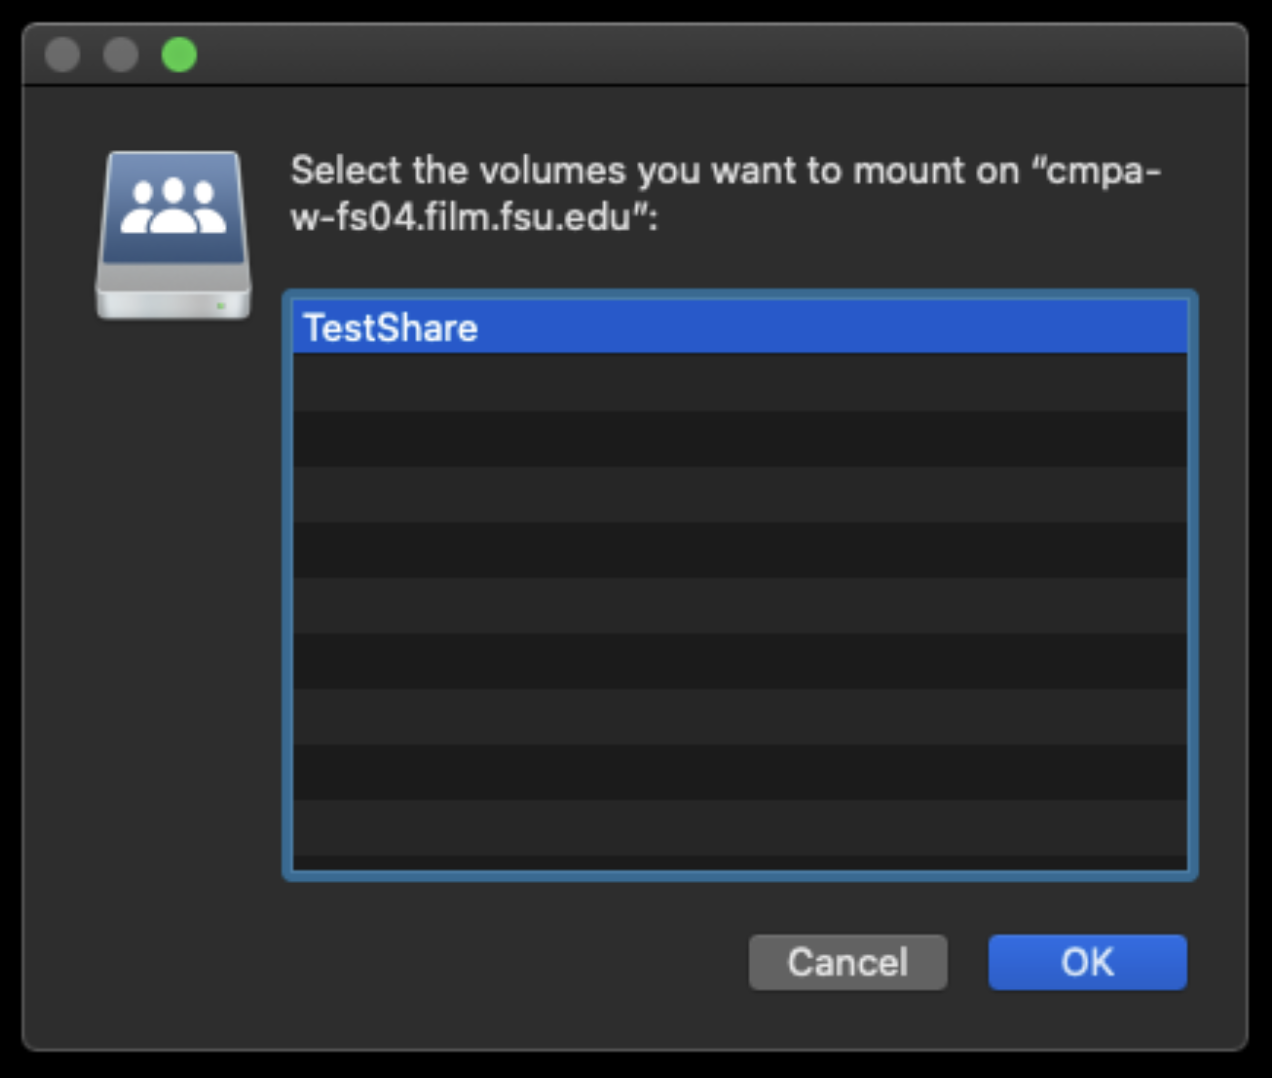
After that it will let you choose “TestShare”. Click OK to mount it.
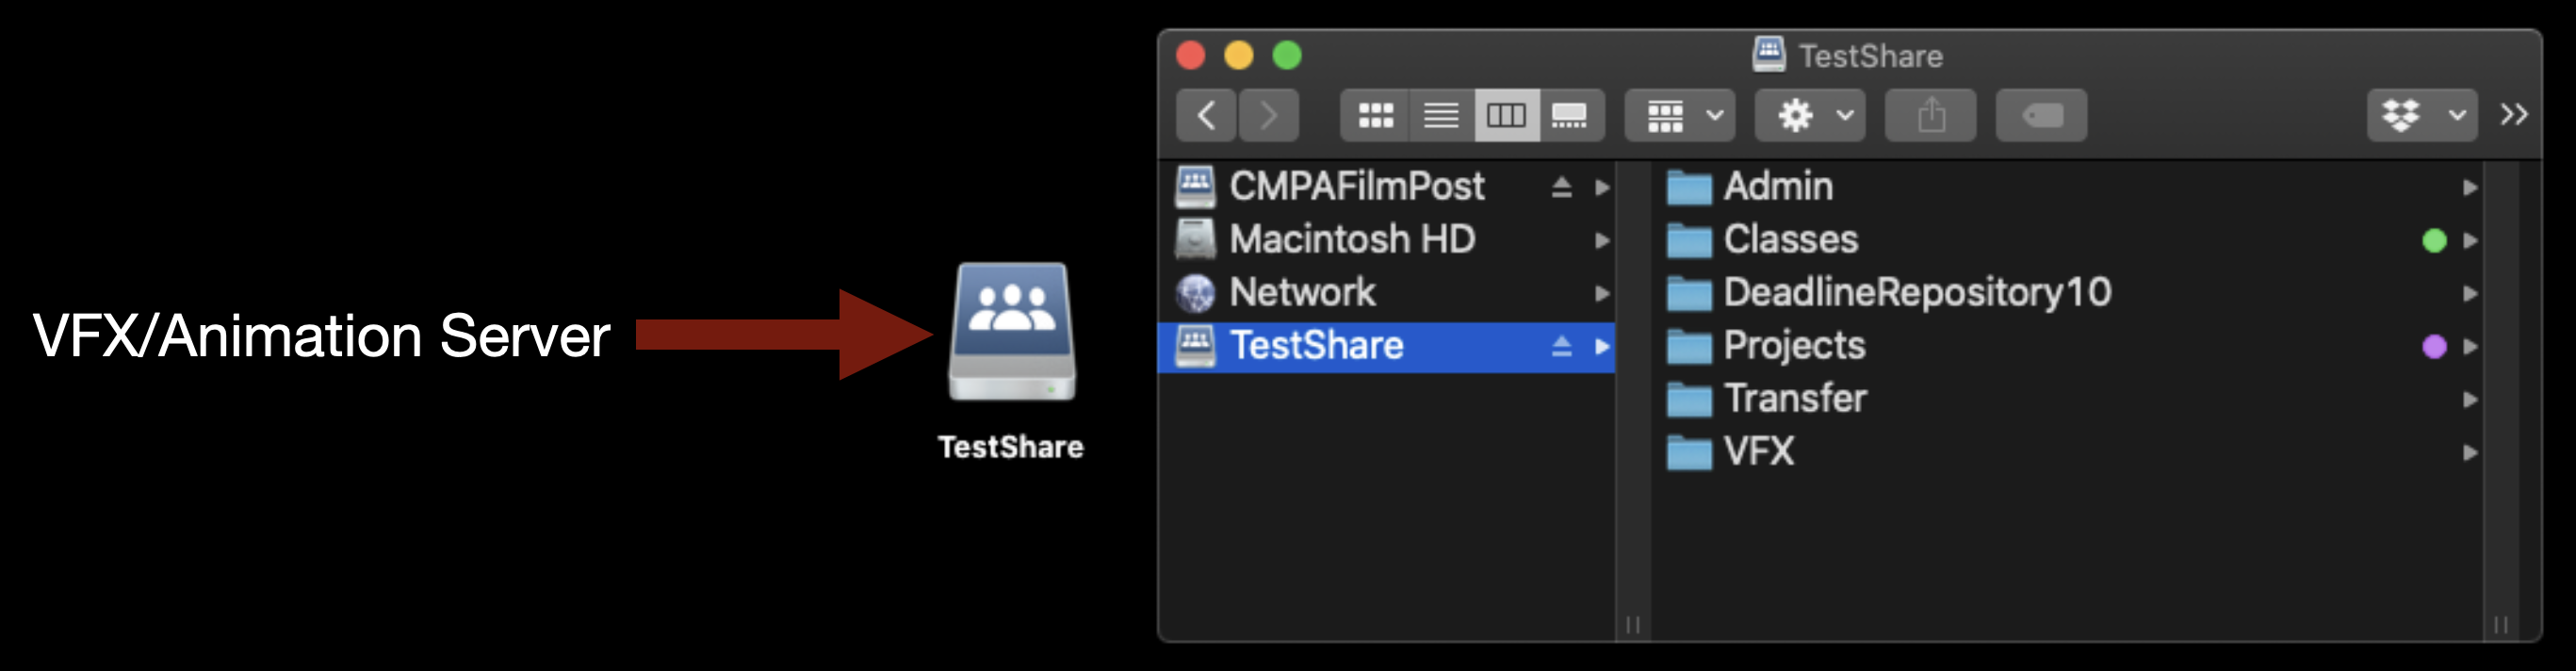
It will mount on the desktop and will look like the example below.