Student productions are expected to follow the program’s typography and font usage guidelines when creating titles, credits, posters, graphics, promotional materials, and other official production-related design assets. This includes using approved fonts where required and maintaining professional formatting standards across deliverables.
Consistent font usage helps create clearer, more professional presentation materials while supporting a more unified visual identity across the program. Typography is an important part of visual communication, and following established standards helps students develop stronger design habits while ensuring that production materials remain clean, legible, and appropriate for exhibition and distribution contexts.
Limitations on Usage
Fonts, like music and images, are protected by intellectual property law. Their use is governed by licensing agreements, and improper usage can lead to legal complications and limit a film’s ability to be distributed. To model professional industry standards and ensure that student work respects the rights of font creators, all fonts used in student productions must be properly licensed and accompanied by a verifiable chain-of-title.
Researching and clearing font licenses requires time from both students and faculty. On early production cycles, which operate on short post schedules, this time is better spent on core filmmaking tasks. These projects are therefore limited to vetted font sources with clear, institutionally-approved licensing. Greater flexibility is granted on capstone cycles, where students have more time and are expected to take responsibility for securing proper font rights.
F1 • F2 • F3 • M1 • M2 • M3
Students may only use fonts from the following sources:
Thumbnail images are often the first point of contact audiences have with a film online, making them an important part of a project’s overall presentation and discoverability. This post provides standardized thumbnail templates to help maintain visual consistency across school-related promotional materials and online showcases.
The use of templates ensures that projects meet technical specifications while encouraging students to think strategically about visual communication and audience engagement. Effective thumbnails should clearly represent the tone and identity of the project while remaining legible and visually compelling across a range of screen sizes and platforms. Developing an understanding of these presentation standards is increasingly important in contemporary distribution environments.
Instructions
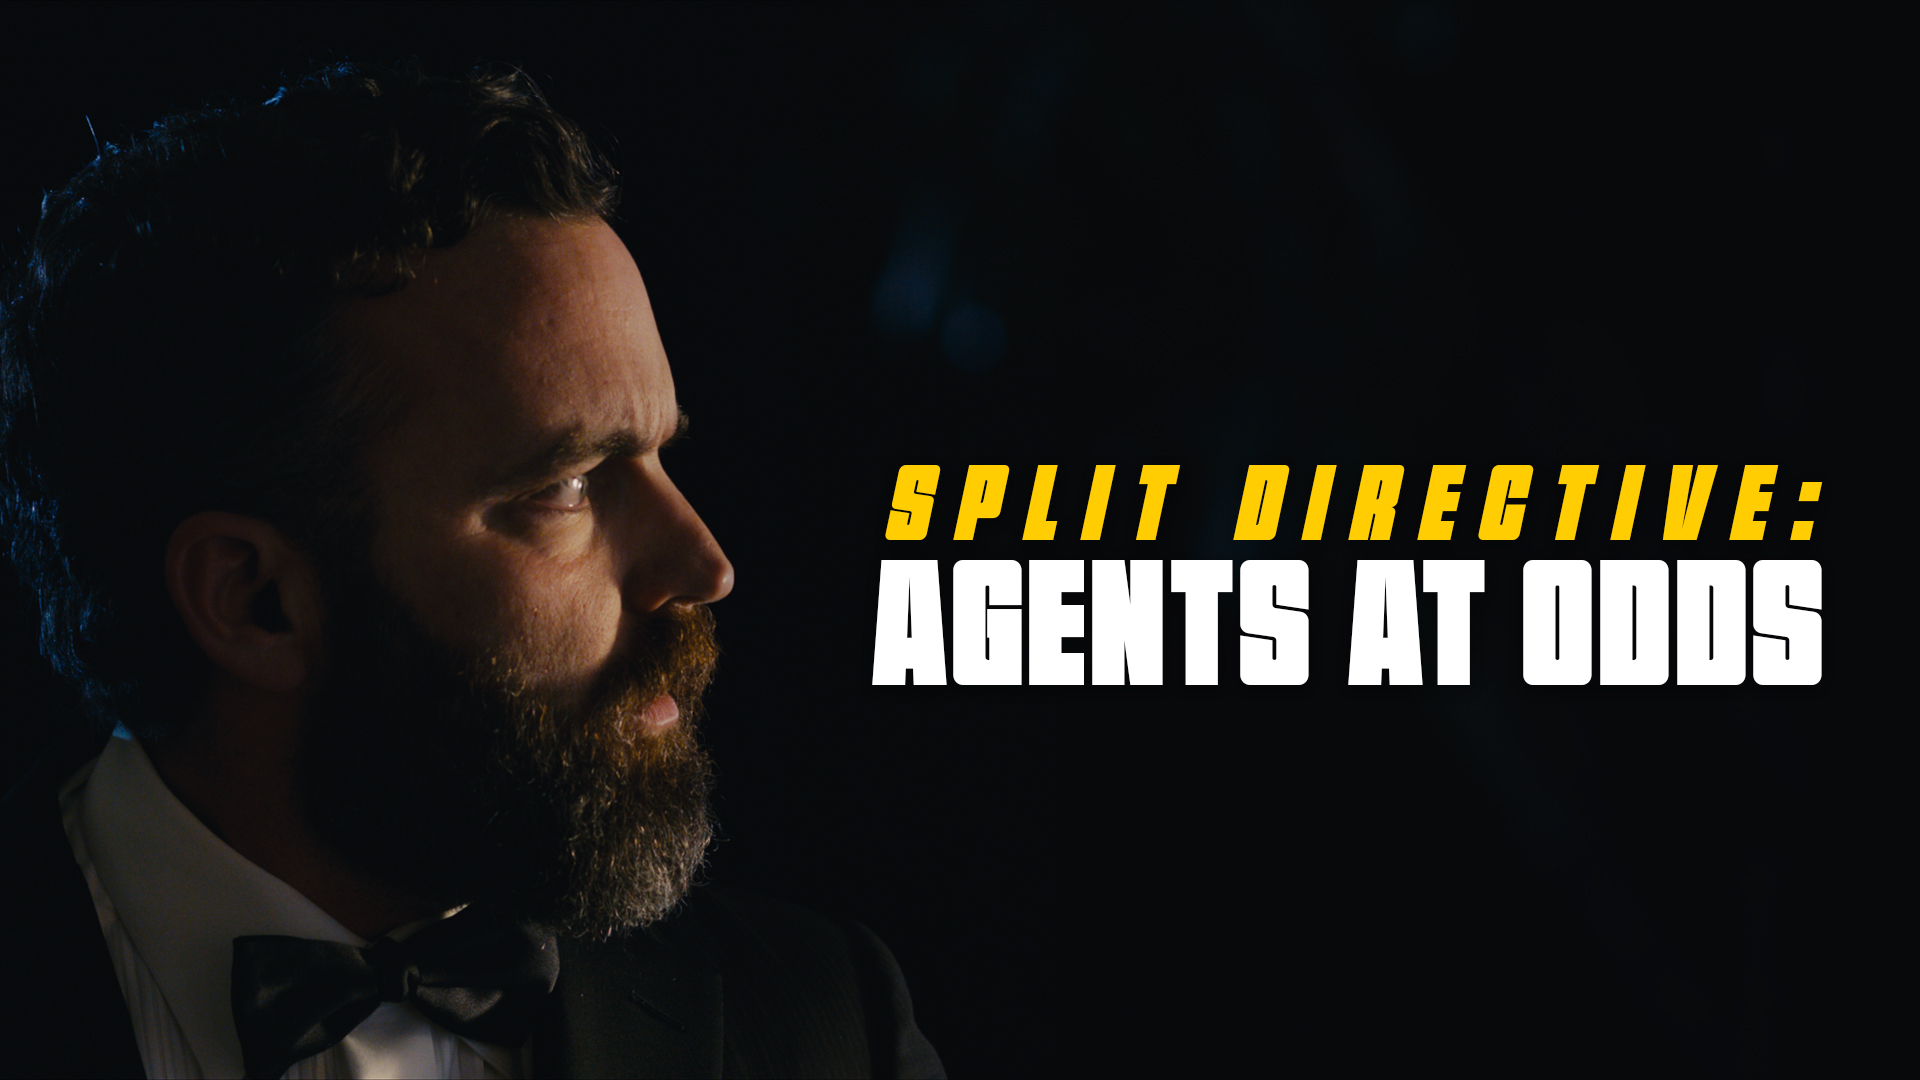
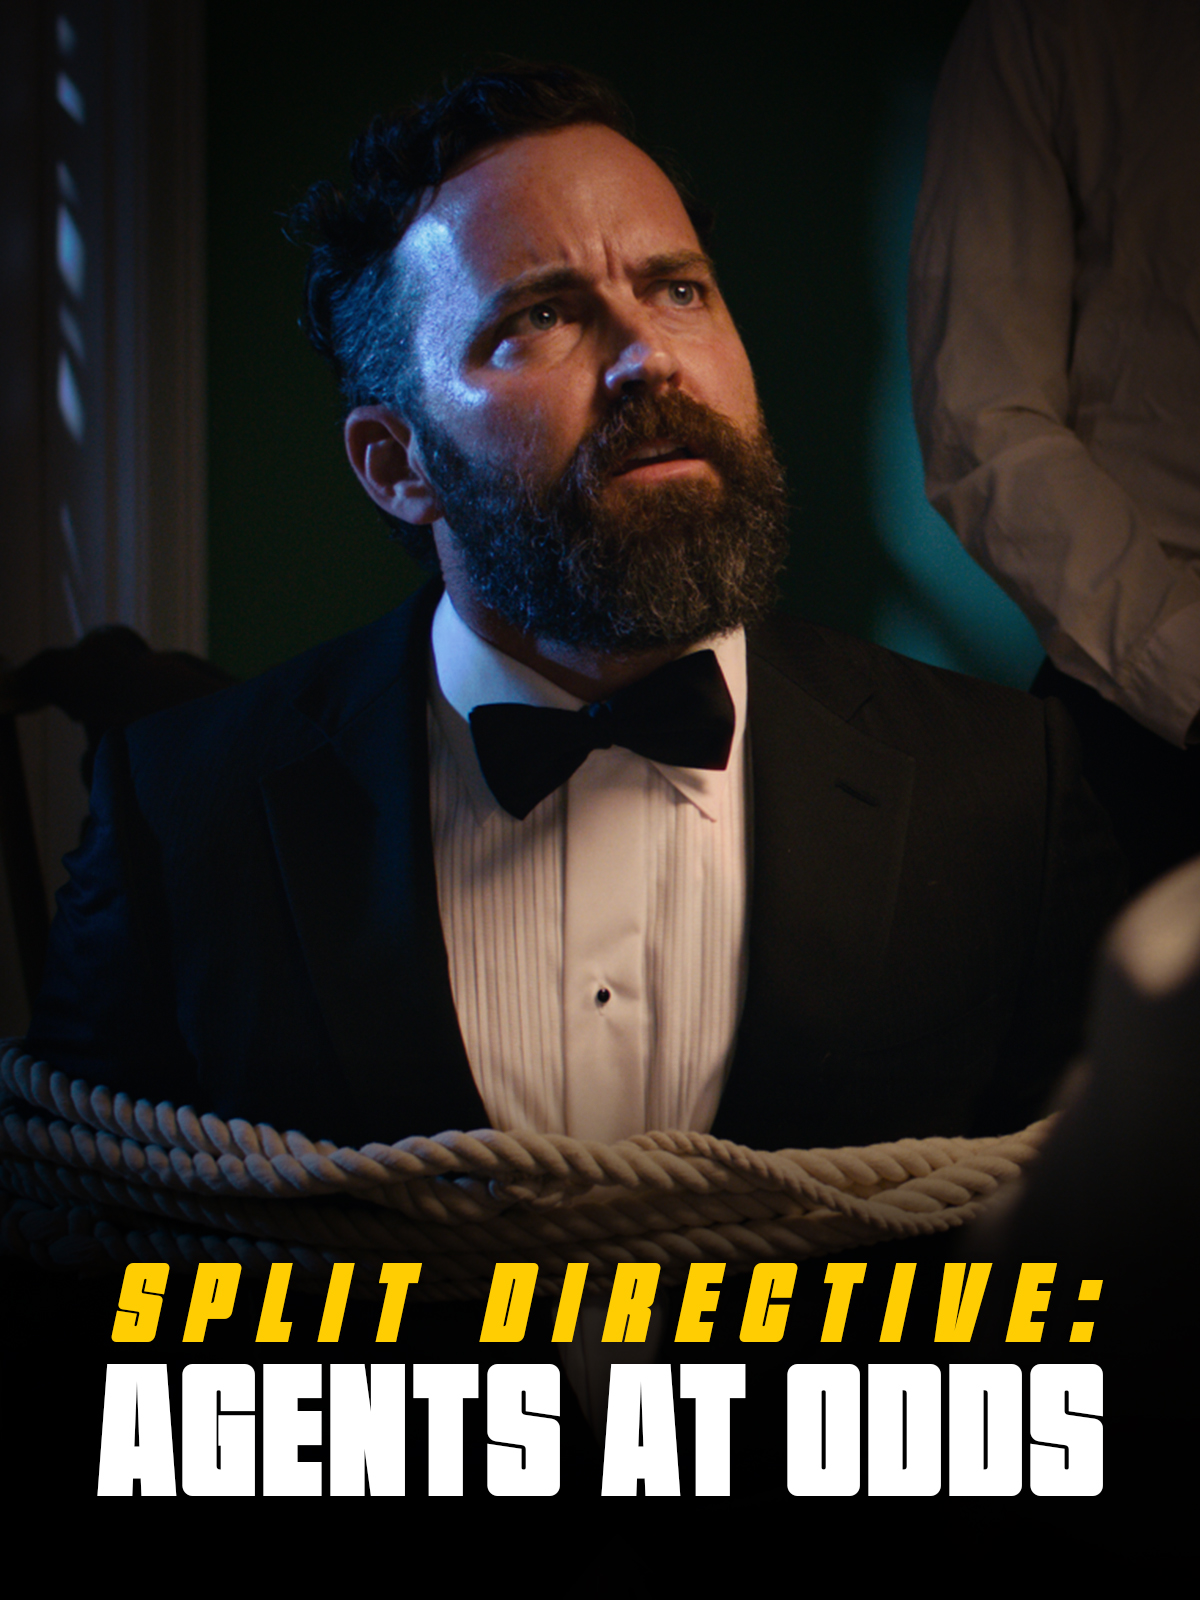
Use these templates to create your thumbnails. To ensure your film is properly represented across a range of platforms, you must create both a horizontal and a vertical thumbnail.
Each thumbnail should contain two elements:
A carefully selected image that fills the entire frame (i.e., no letterboxing or black bars). This image is typically derived from either the poster or one of the production stills.
The title of the film. Ideally, for consistency of branding, this should match the font design of the title on the poster. No other text should appear in the thumbnail.
Examples:
Horizontal (1920x1080px)Vertical (1200x1600px)
Delivery:
Deliver the finished files for each in two formats:
A layered PSD file (include any custom fonts used)
The location list serves as part of the project’s final delivery materials, providing a comprehensive record of all filming locations used during production. In addition to serving as an archival and administrative document, the report helps productions verify that all location-related materials and required paperwork have been properly completed and submitted during the delivery process.
Maintaining accurate location records is important both for redundancy and long-term project documentation. The report provides the school with a centralized reference point in case materials submitted elsewhere become incomplete, missing, or incorrectly labeled. It also encourages productions to carefully review their delivery materials and confirm that all locations, agreements, permits, and related documentation have been properly accounted for before final submission.
Export Instructions
Navigate to the Location Database board in FSU Greenlight.
Select the “My Shows” view at the top.
Batch-select all the items for the show.
Select “Export” from the menu at the bottom.
Delivery Instructions
Locate the exported Excel file on your local drive.
Rename the Excel file, using the following naming convention: 01m2-LocationList.xlsx
Credits sequencing establishes the standardized order and formatting conventions used for on-screen titles and end credits within student productions. These guidelines help ensure that cast, crew, departments, acknowledgments, and institutional requirements are presented consistently and professionally across projects.
Credit order carries both professional and practical significance within film production. In professional filmmaking environments, credit placement and sequencing are often governed by contractual obligations negotiated through unions, guilds, and individual talent agreements. Standardized sequencing helps ensure that contributors are recognized appropriately, prevents omissions or inconsistencies, and creates a cleaner delivery workflow during finishing and final export. Learning industry-standard crediting practices also helps students better understand both the collaborative structure of film production and the professional conventions that govern screen credit attribution.
The Overall Sequence
While every production’s titles and credits are slightly different, the general order goes:
FSUFILM Leader
Lead Titles
Content (Story)
End Credits
Logos
Copyright
A production can choose whether or not to include any Lead Titles at the start of the film. That decision will impact the order of the end credits, as outlined below.
Sequencing for Lead Titles
If lead titles appear at the head of the film, they must appear in this order:
FSUFILM Leader
Above-Title Cast
Title
Supporting Cast
Original Score by
Production Designer
Sound Designer
Editor
Director of Photography
Producer
Writer
Director
Sequencing for End Credits
The order for end credits, if not shown in the lead titles, are:
Director
Writer
Producer
Director of Photography
Editor
Sound Designer
Production Designer
Original Score by
The remaining end credits appear in the following order:
Final title and credit materials must be delivered in a format that allows editorial, finishing, and archival workflows to proceed cleanly and consistently. This includes the submission of properly formatted title cards, end credits, associated project files, and any other required assets needed for final mastering and delivery.
Careful preparation of titles and credits is important because even small formatting errors, missing names, spelling mistakes, or incompatible files can create significant problems late in post-production. The delivery process is designed both to maintain technical consistency across projects and to encourage students to carefully verify the accuracy and completeness of all credited information before final submission.
Delivery Specs
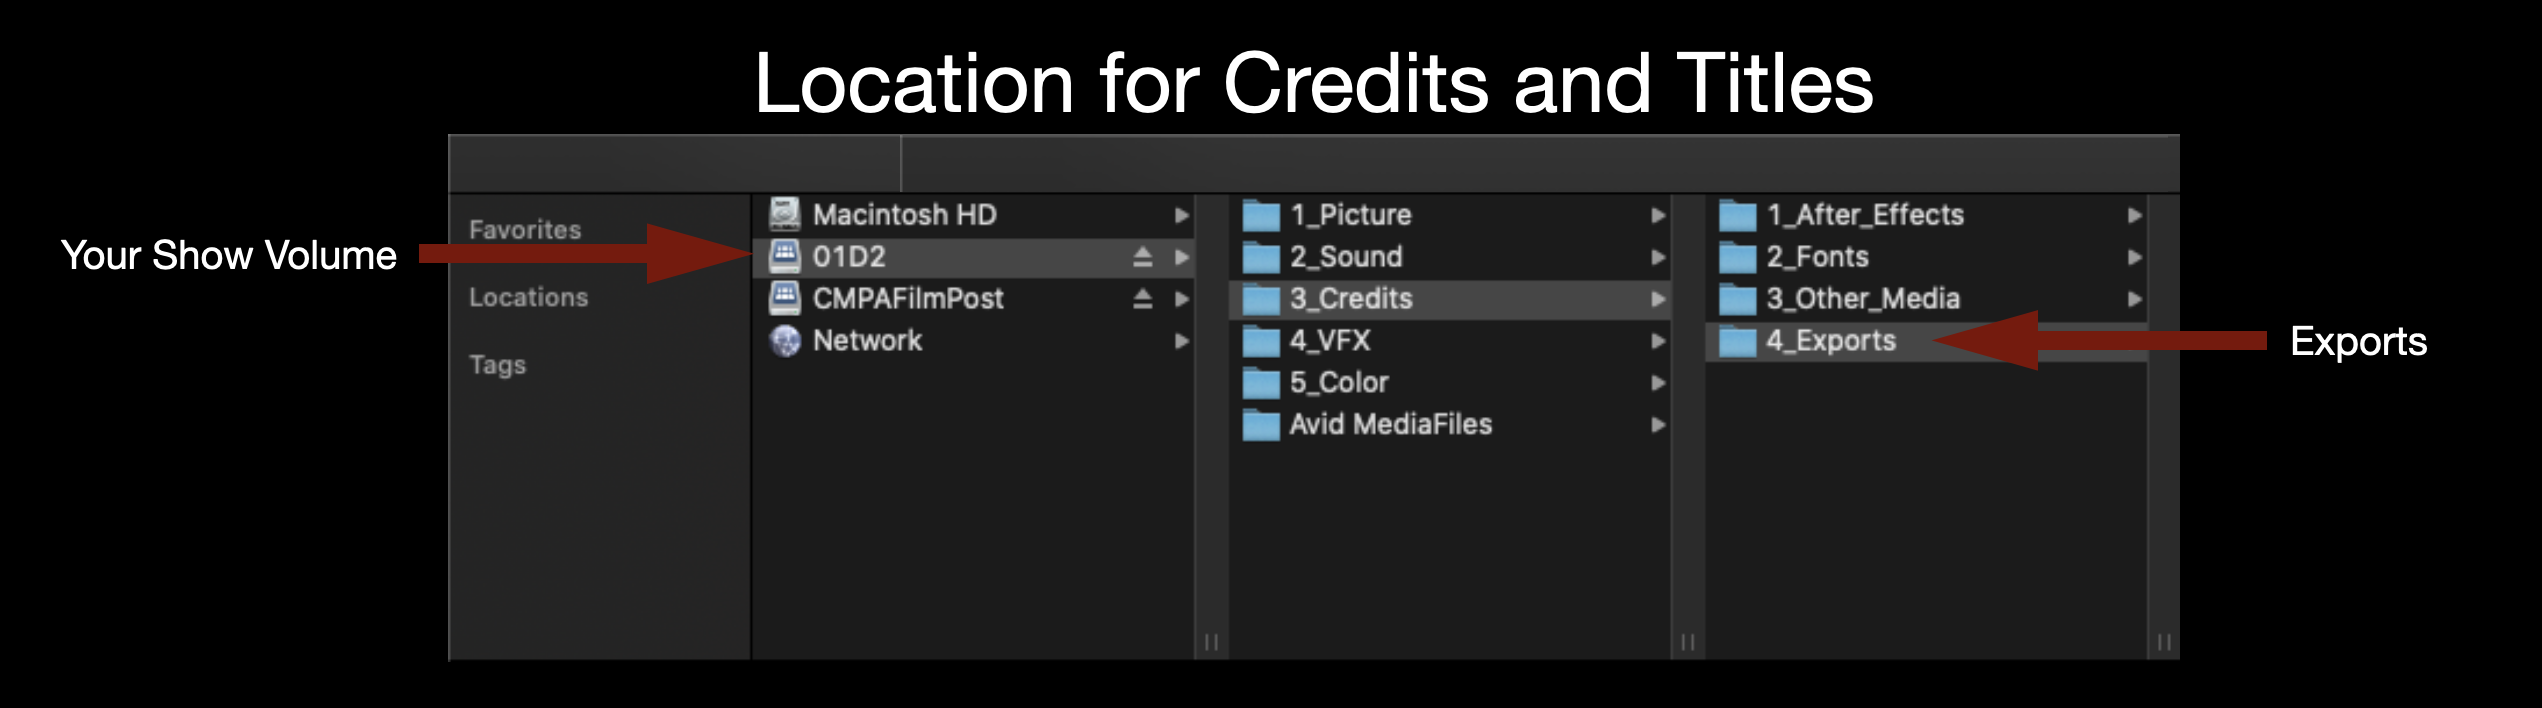
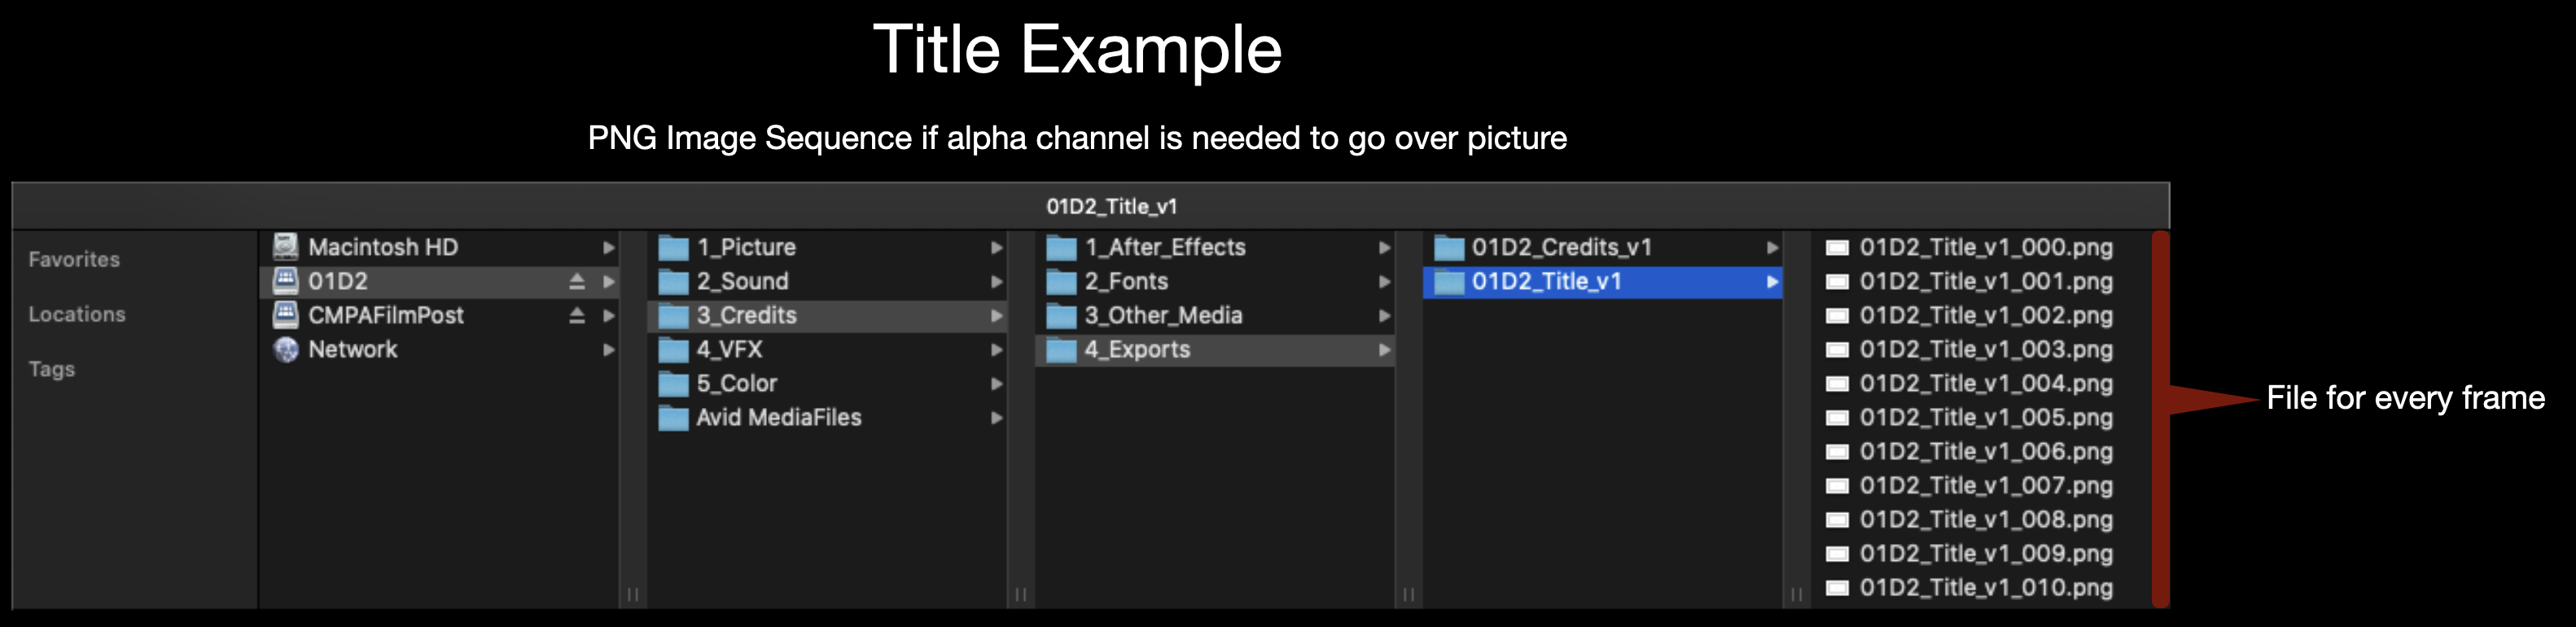
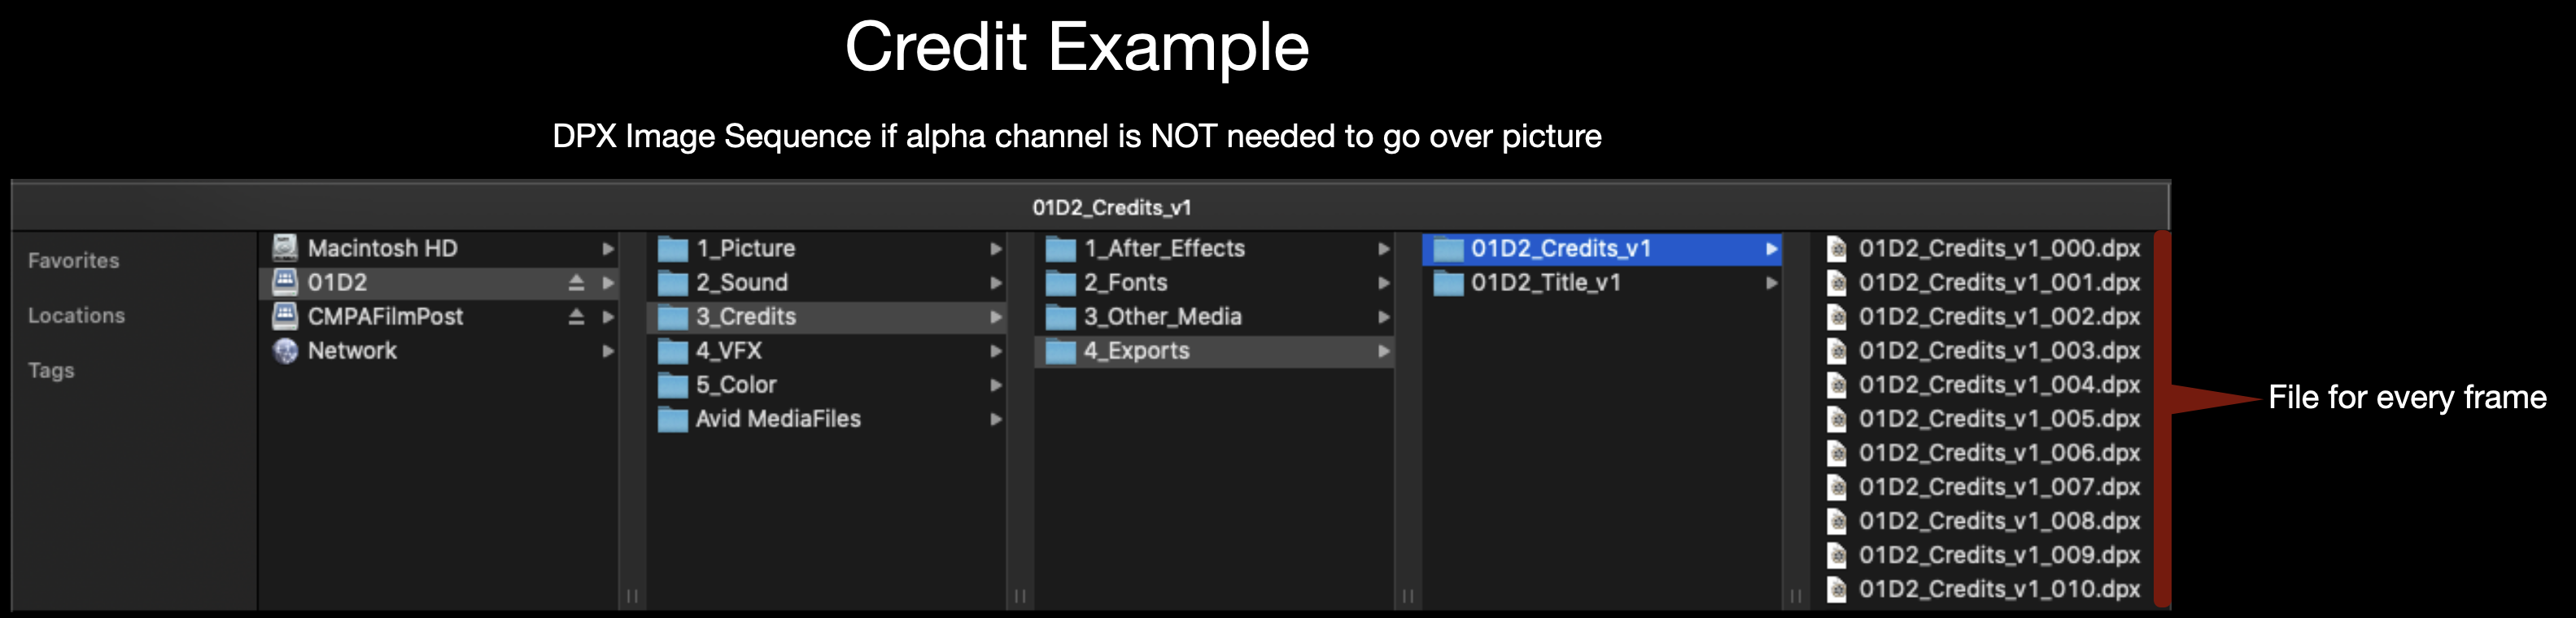
All Credits and Titles should be made in After Effects and delivered as either a DPX sequence or a PNG sequence. A DPX sequence should be used if the titles are going over black and a PNG sequence should be used if the titles need to go over picture since it holds an alpha channel. Either image sequence should be exported for 1920×1080 at 24fps. Make sure to name the image sequence appropriately (Example: 01M2_Credits_v1).
Location to Deliver Credits and TitlesNaming convention for TitlesNaming convention for Credits
Single-system sound workflows record audio directly into the camera during production, creating synchronized picture and sound files at the point of capture. This post outlines the cadence procedures and organizational expectations associated with maintaining consistent single-system recording practices throughout production and post-production.
Consistent cadence workflows help productions maintain clean editorial organization, reduce synchronization problems, and avoid confusion when handling large amounts of footage and audio across multiple shooting days. Establishing disciplined recording and labeling practices early in production helps students develop reliable technical habits that support smoother downstream editorial and finishing workflows.
Cadence
“PICTURE’S UP!”
When you’re ready to go for picture.
“LAST LOOKS!”
“Last Looks” is only for Hair & Makeup and Costumes to do any final touches.
“LET’S LOCK IT UP! WE’RE GOING FOR PICTURE!”
“Lock it up” is to notify everyone to be quiet.
“ROLL CAMERA!”
DP speeds the camera and says “Sound and Camera Speed”.
AC voice slates (i.e 2 Alpha Take 1).
AC calls “Mark” and clacks the slate’s chevrons.
DP calls “Set” when they are framed up, in focus, and ready to go.
Director will then call “Action” and then “Cut”.
1st AD will say “Cut on picture. Stand by.”
After each “Cut,” the 1st AD checks with camera and sound to see how it was for them, then they check with Director to see if they want to go again.
“WE’RE GOING AGAIN!”
Make sure everyone is ready. Then call the cadence once more.
“PICTURE’S UP! LOCK IT UP! ROLL CAMERA!”
Call goes as above until the director calls “Cut”. AD repeats the “Cut”.
AD continues to ask “Going again?” until they are told “Got that”.
Once the AD hears “Got that” they then call:
“GOT THAT! MOVING ON! THANK YOU.”
Moving on…
“NEW DEAL! CAMERAS MOVE! WE’RE GOING TIGHTER!”
“New Deal” means the camera(s) are moving to their next setup position.
“We’re going tighter” references that the set is moving on to a tighter frame. This is because we typically shoot scenes starting with the widest frame and then working towards the tightest frames.
If you’re moving on to the next scene then call:
“GOT THAT SCENE! MOVING ON TO SCENE ‘X’. LET’S CLEAR THE CREW AND BRING IN FIRST TEAM (OR CAST) TO REHEARSE.”
Soundly is a sound effects library and audio workflow tool used to search, organize, preview, and integrate sound assets into post-production workflows. This page outlines expectations and procedures for accessing and using the software within the program’s sound design and editorial environments.
Efficient sound asset management is an important part of professional post-production because sound teams often work with large libraries of effects, ambiences, and design elements across multiple projects. Learning organized search, tagging, preview, and workflow practices helps students build stronger sound design pipelines while developing familiarity with industry-standard audio post-production tools.
About Soundly
Having access to a robust sound effects library is invaluable for filmmakers. While there are a lot of free websites where you can download sound effects, the quality of the files can vary and acquiring the correct licensing rights can be a time-consuming and frustrating endeavor. The College therefore pays an annual fee to license Soundly, which is an application for easy searching through the 6 Terabytes of media in our professional sound effects library. This allows you to have a vast array of high-quality, licensed effects at your fingertips, and it’s engineered to have frictionless integration with Media Composer and ProTools. You can then focus on what really matters: the creative work.
Additionally, Soundly has an AI feature called Voice Designer which allows for text-based voice generation. This is a very useful tool if you need to add, say, the voice of an unseen character or if you need to rough-in a voice during editorial that will later be replaced with ADR.
Soundly Layout and Search
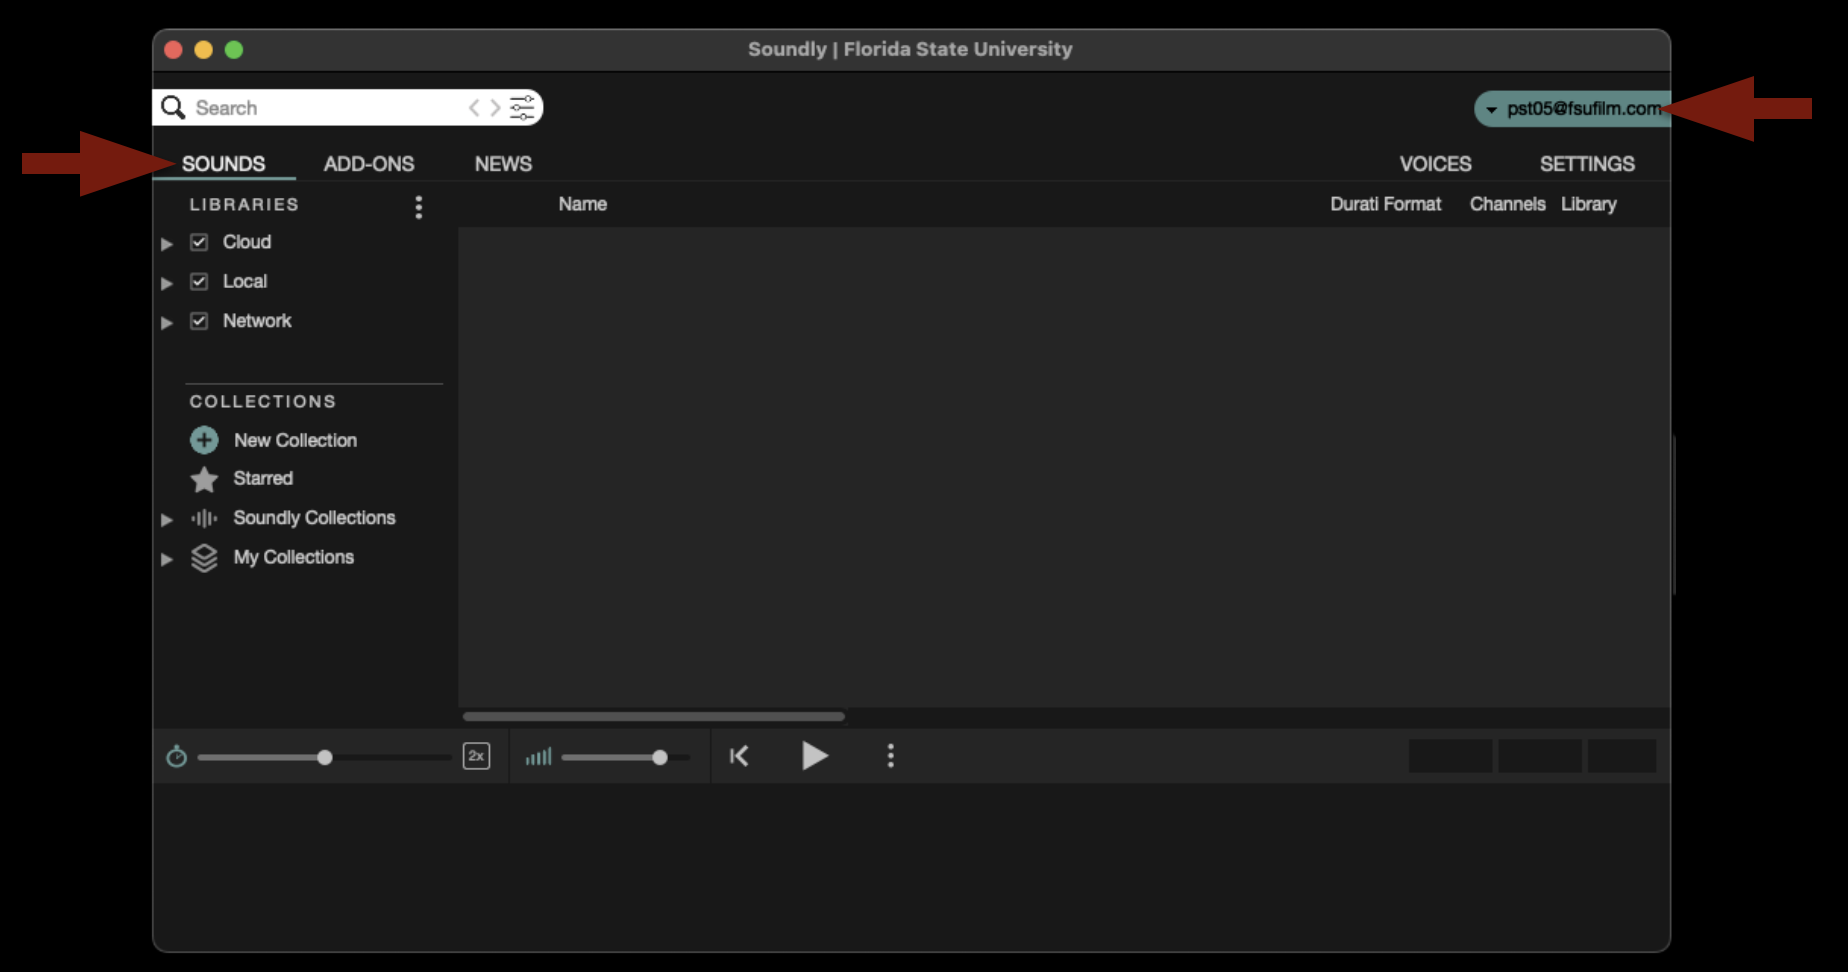
When first launched, the application will open as shown below. If it defaults to a different page, make sure it is set to the “Sounds” tab. Also check that it is signed in to our account as shown below. If it appears that the Soundly application is not signed in to our account correctly, please contact the Post Staff and they can get it fixed.
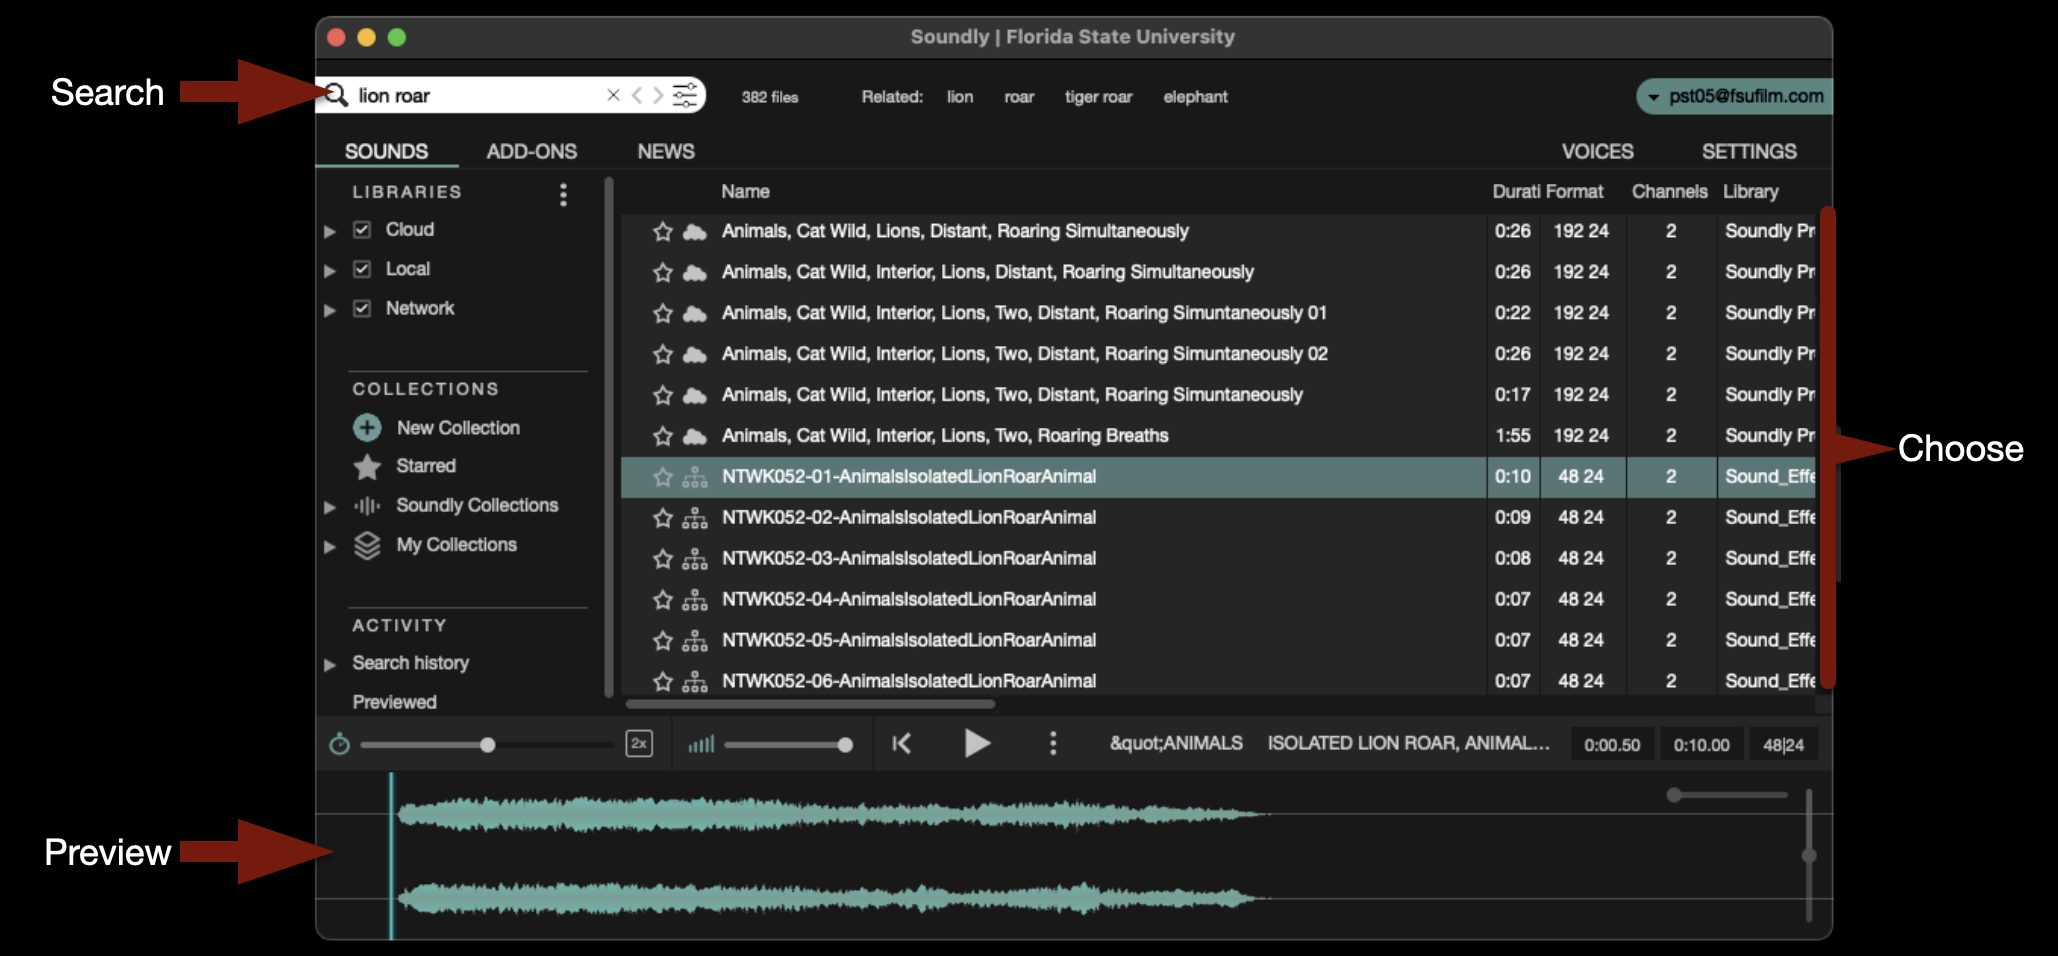
In the upper-left corner is a search field where you can type in keywords to help you find the what you are looking for. The library is vast and contains sound effects, backgrounds, Foley, and more. After you select one of the sound effects that your search revealed, you can preview it in the timeline at the bottom.
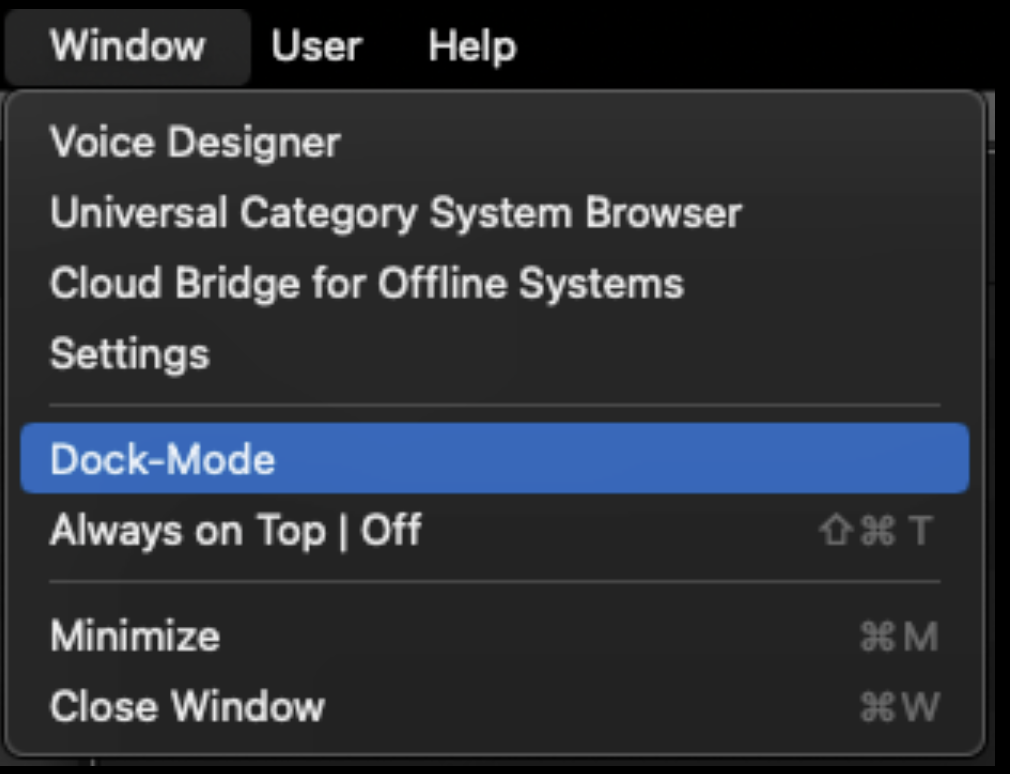
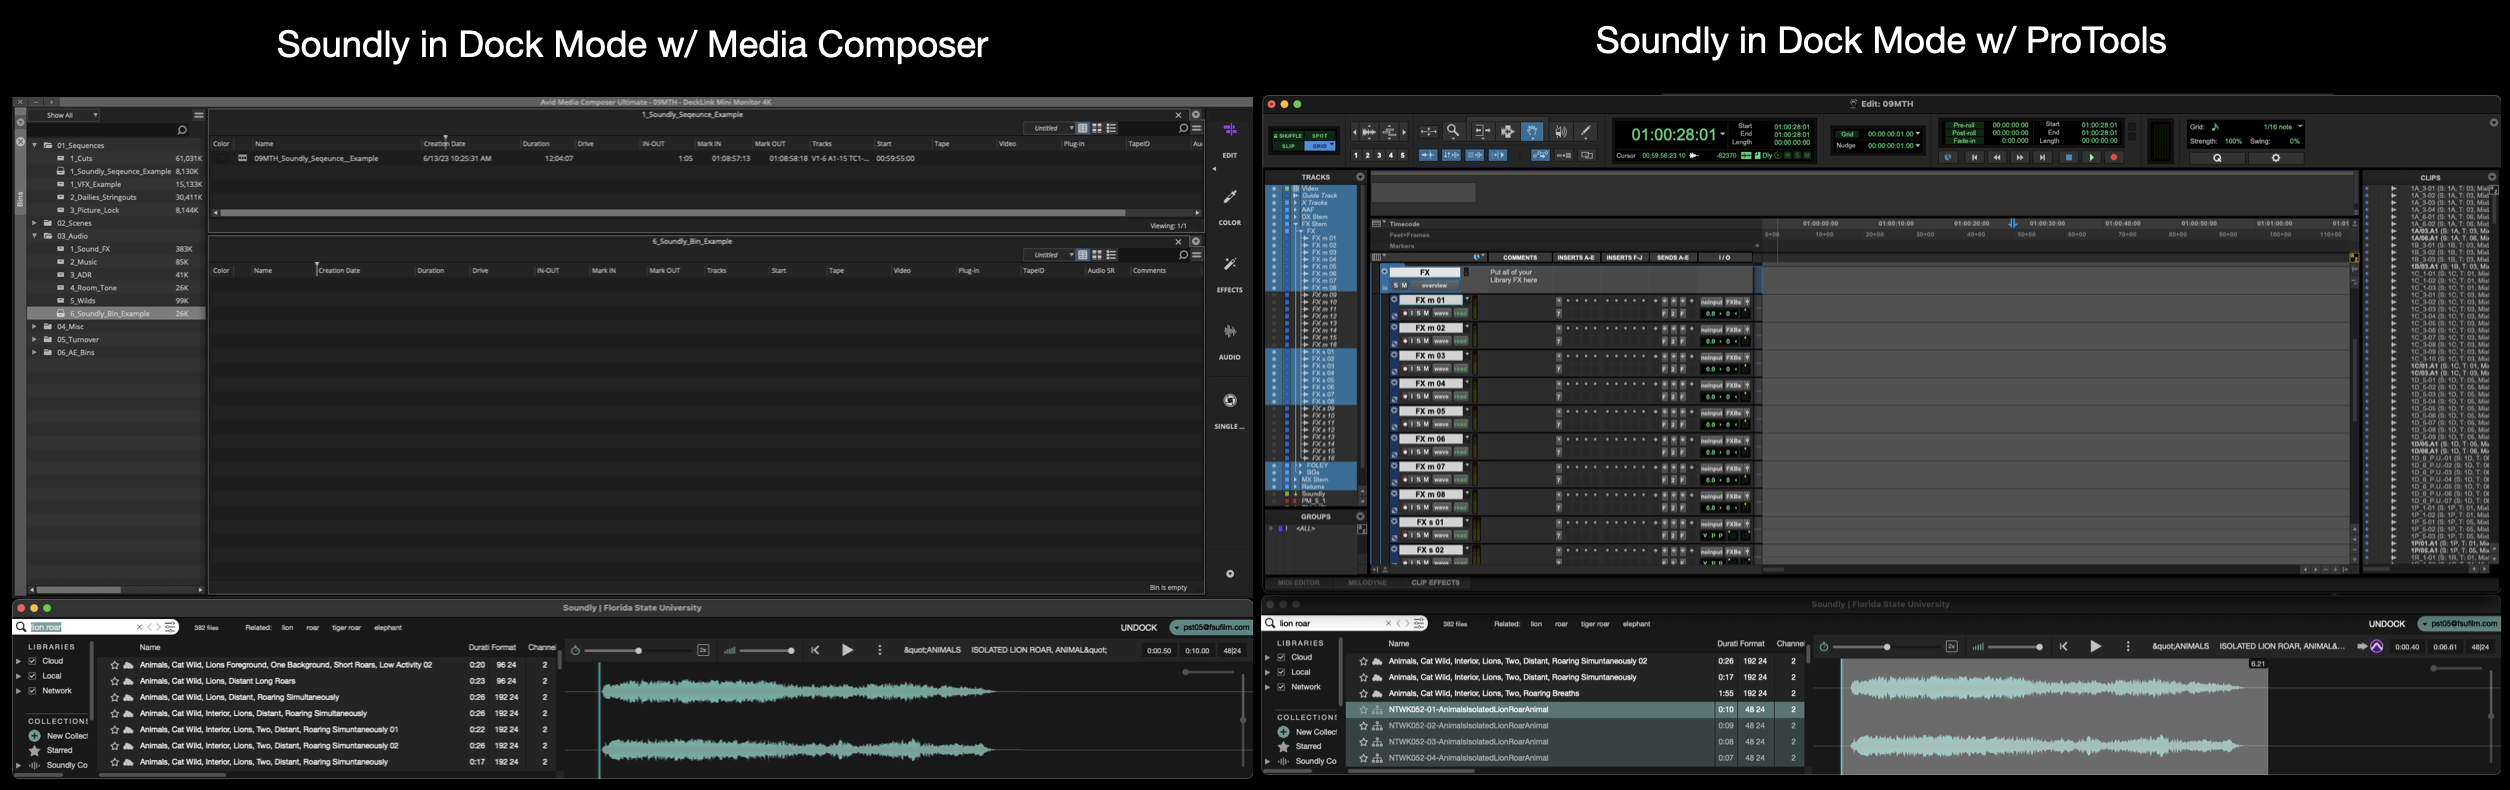
By default, Soundly opens in a big window that can be viewed fullscreen. Sometimes you may prefer to put it in “Dock Mode” which will squeeze the interface down to the bottom third of the screen. To enter “Dock Mode” navigate to the task bar and select Window > Dock Mode.
This can be helpful when you are also working in Media Composer or ProTools, as it will allow you to easily have both interfaces open while you work, as shown below.
Soundly with Media Composer
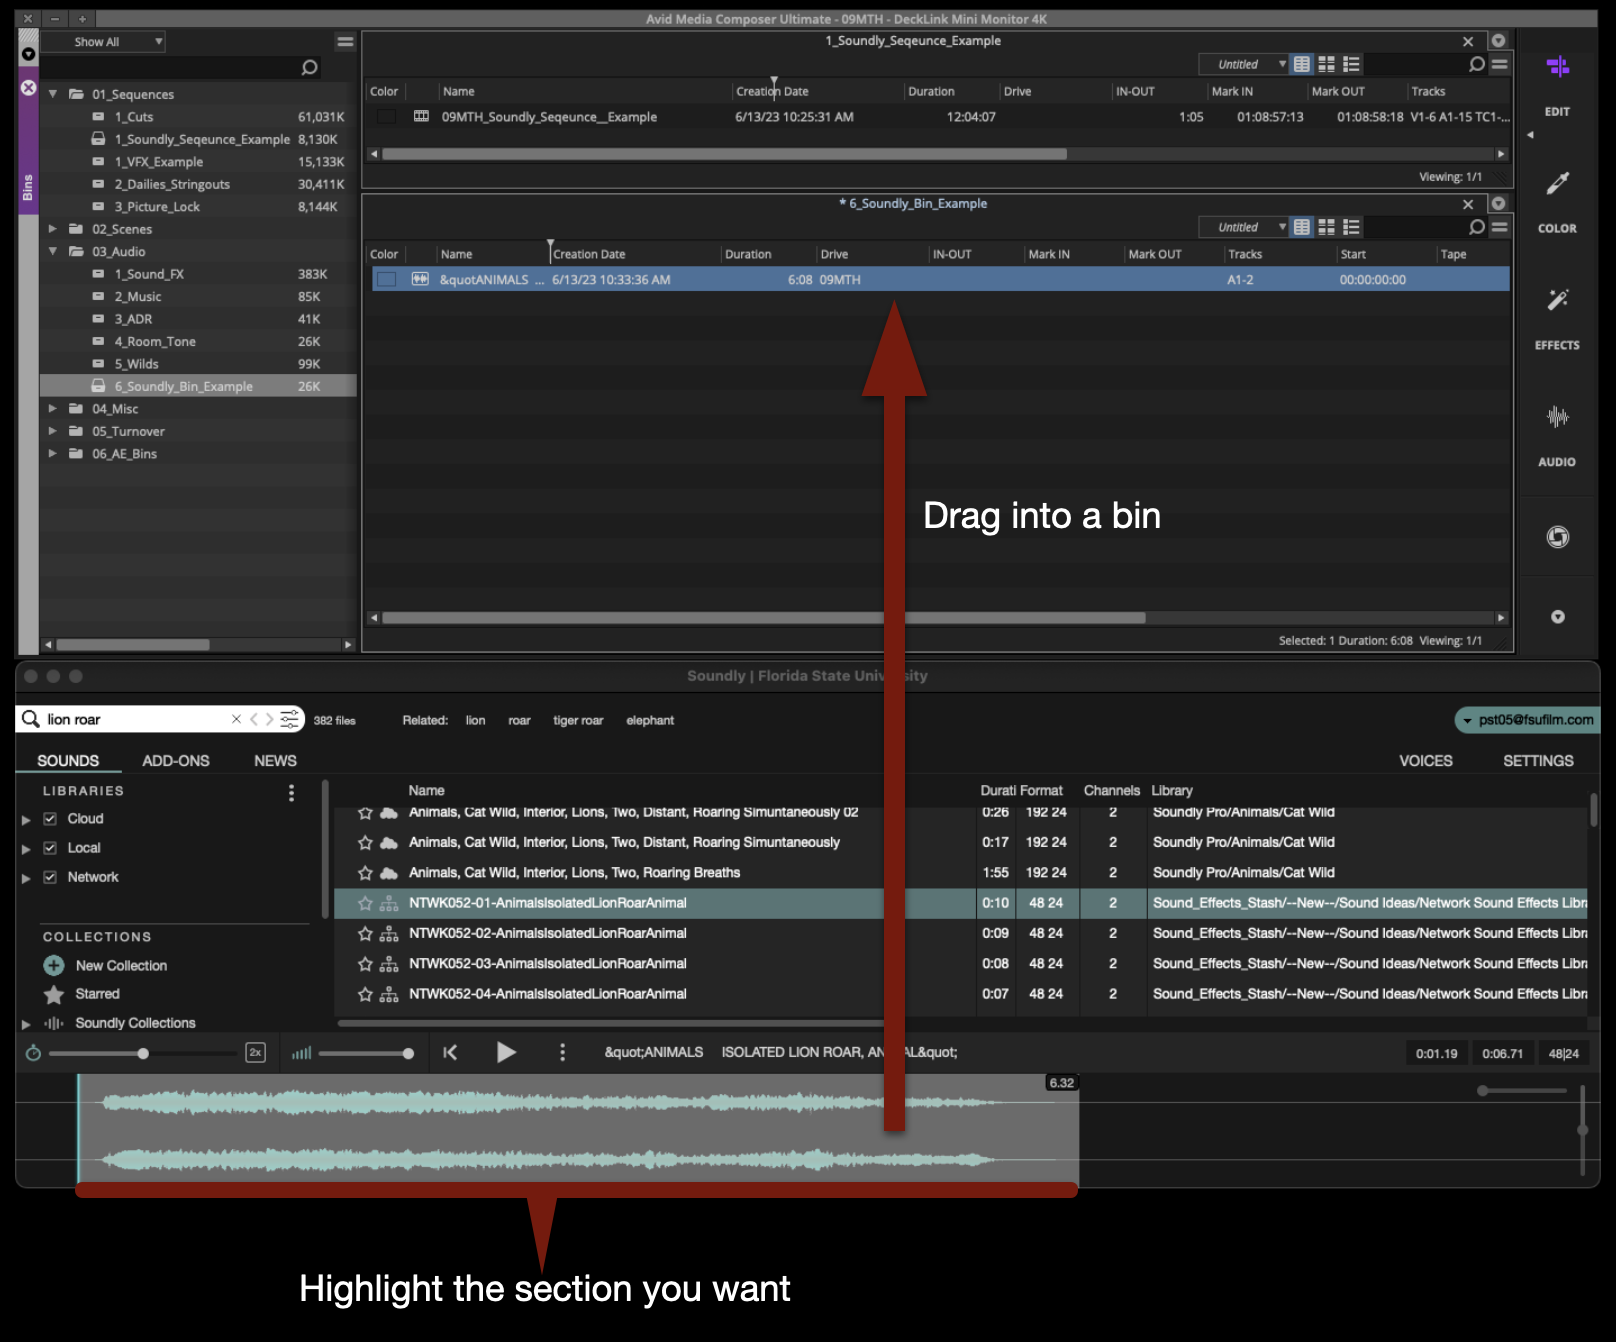
When using Soundly with Media Composer, it is simple to bring sounds from the library into a bin. After you have searched for and have found the sound that you want to bring into Media Composer, highlight the section of waveform you want and drag that into an open bin.
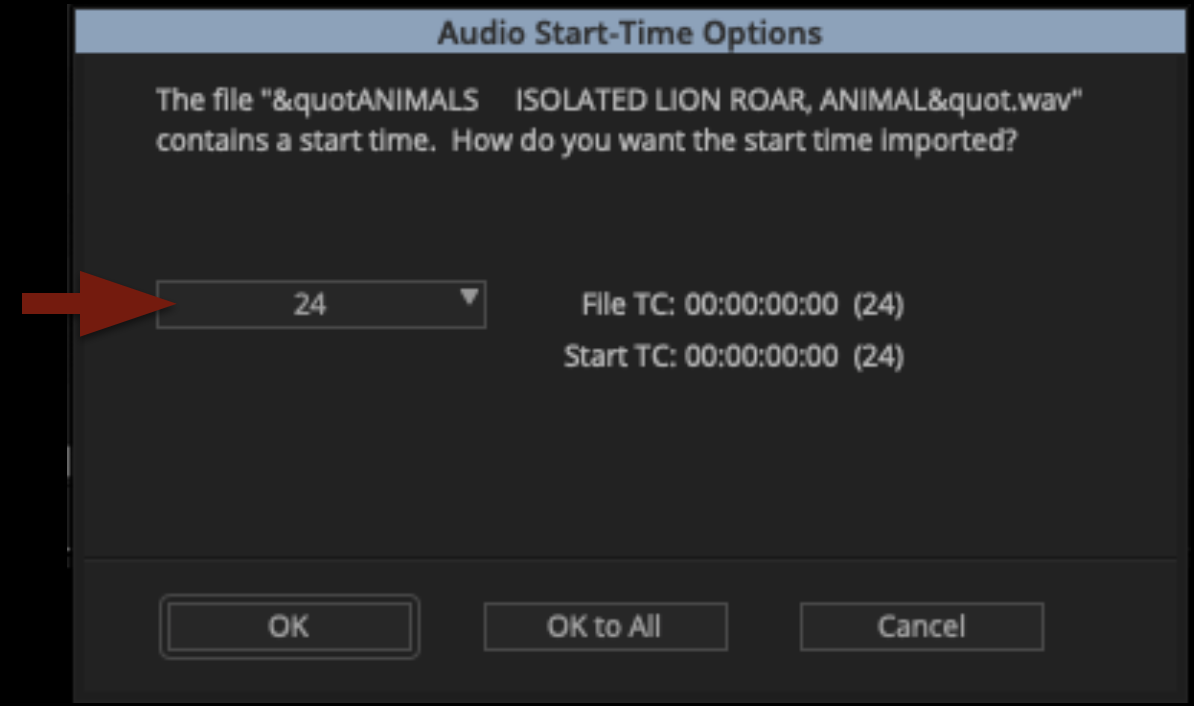
Media Composer will prompt you with a question about the audio start-time. Make sure it is set to 24 and then click “OK”.
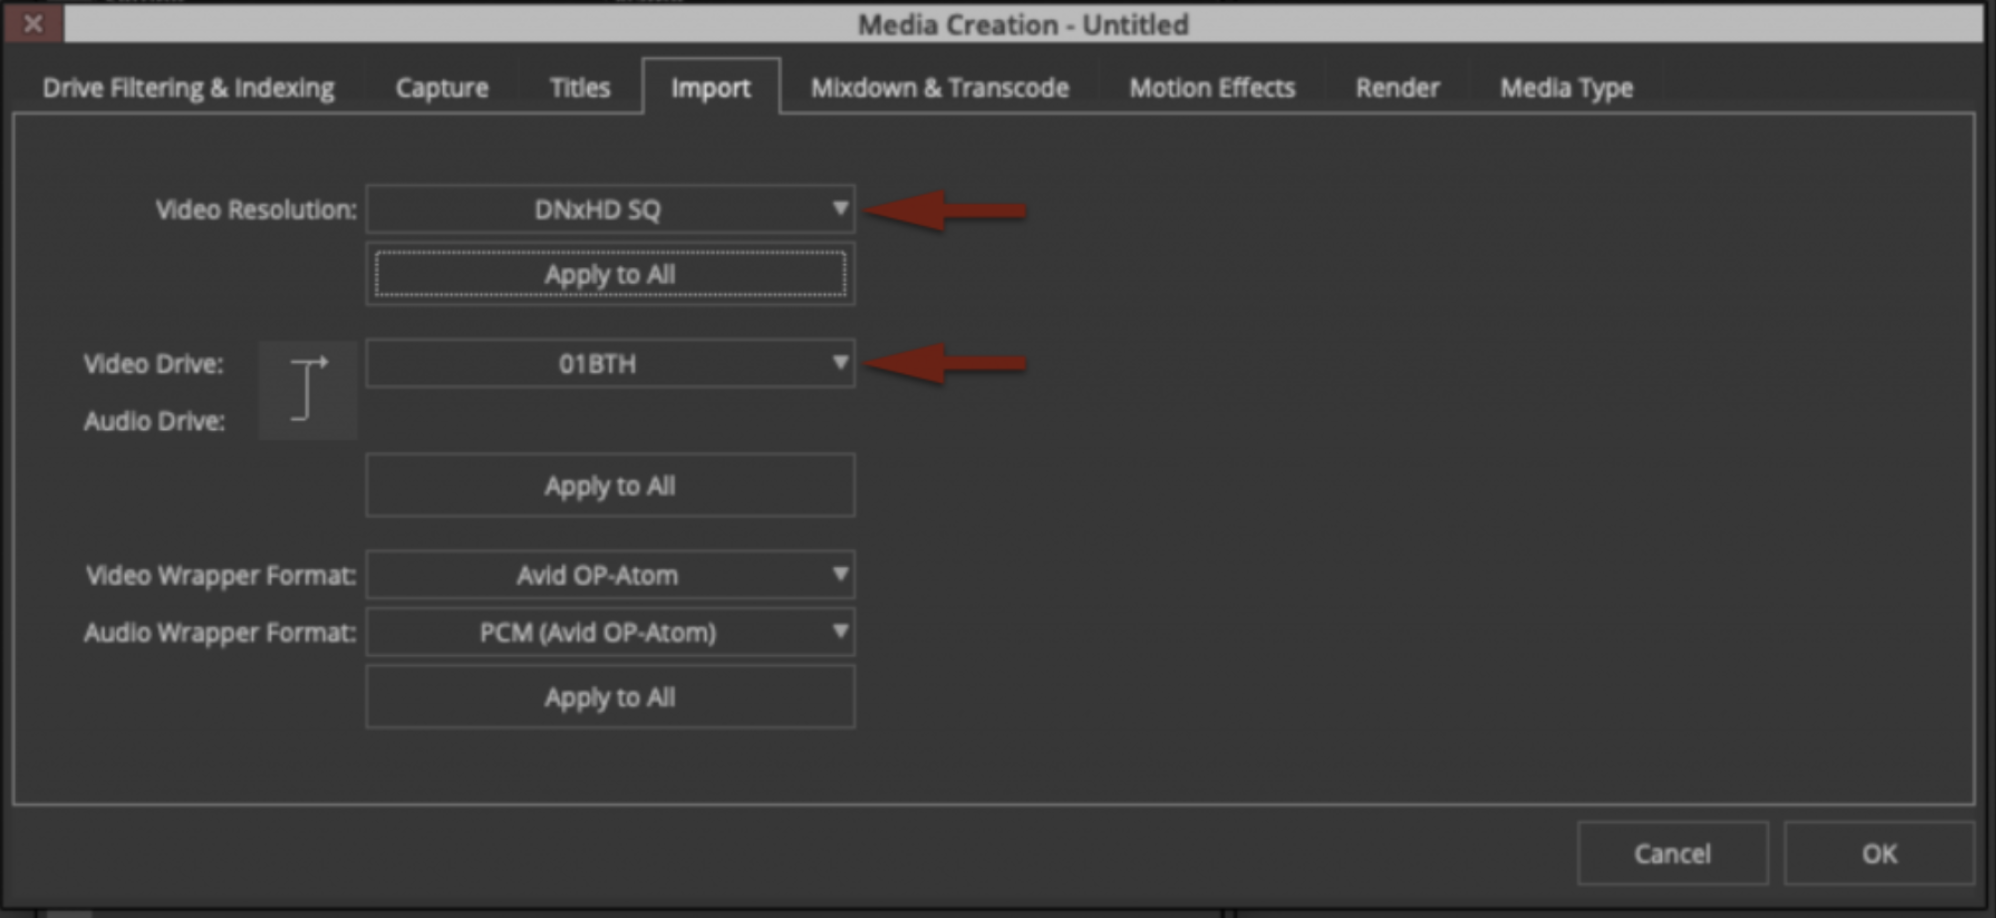
Assuming your media creation settings in Media Composer are set as shown in the example below, the sound will be transcoded into Avid Media and will appear in your bin, ready to work with.
Soundly with ProTools
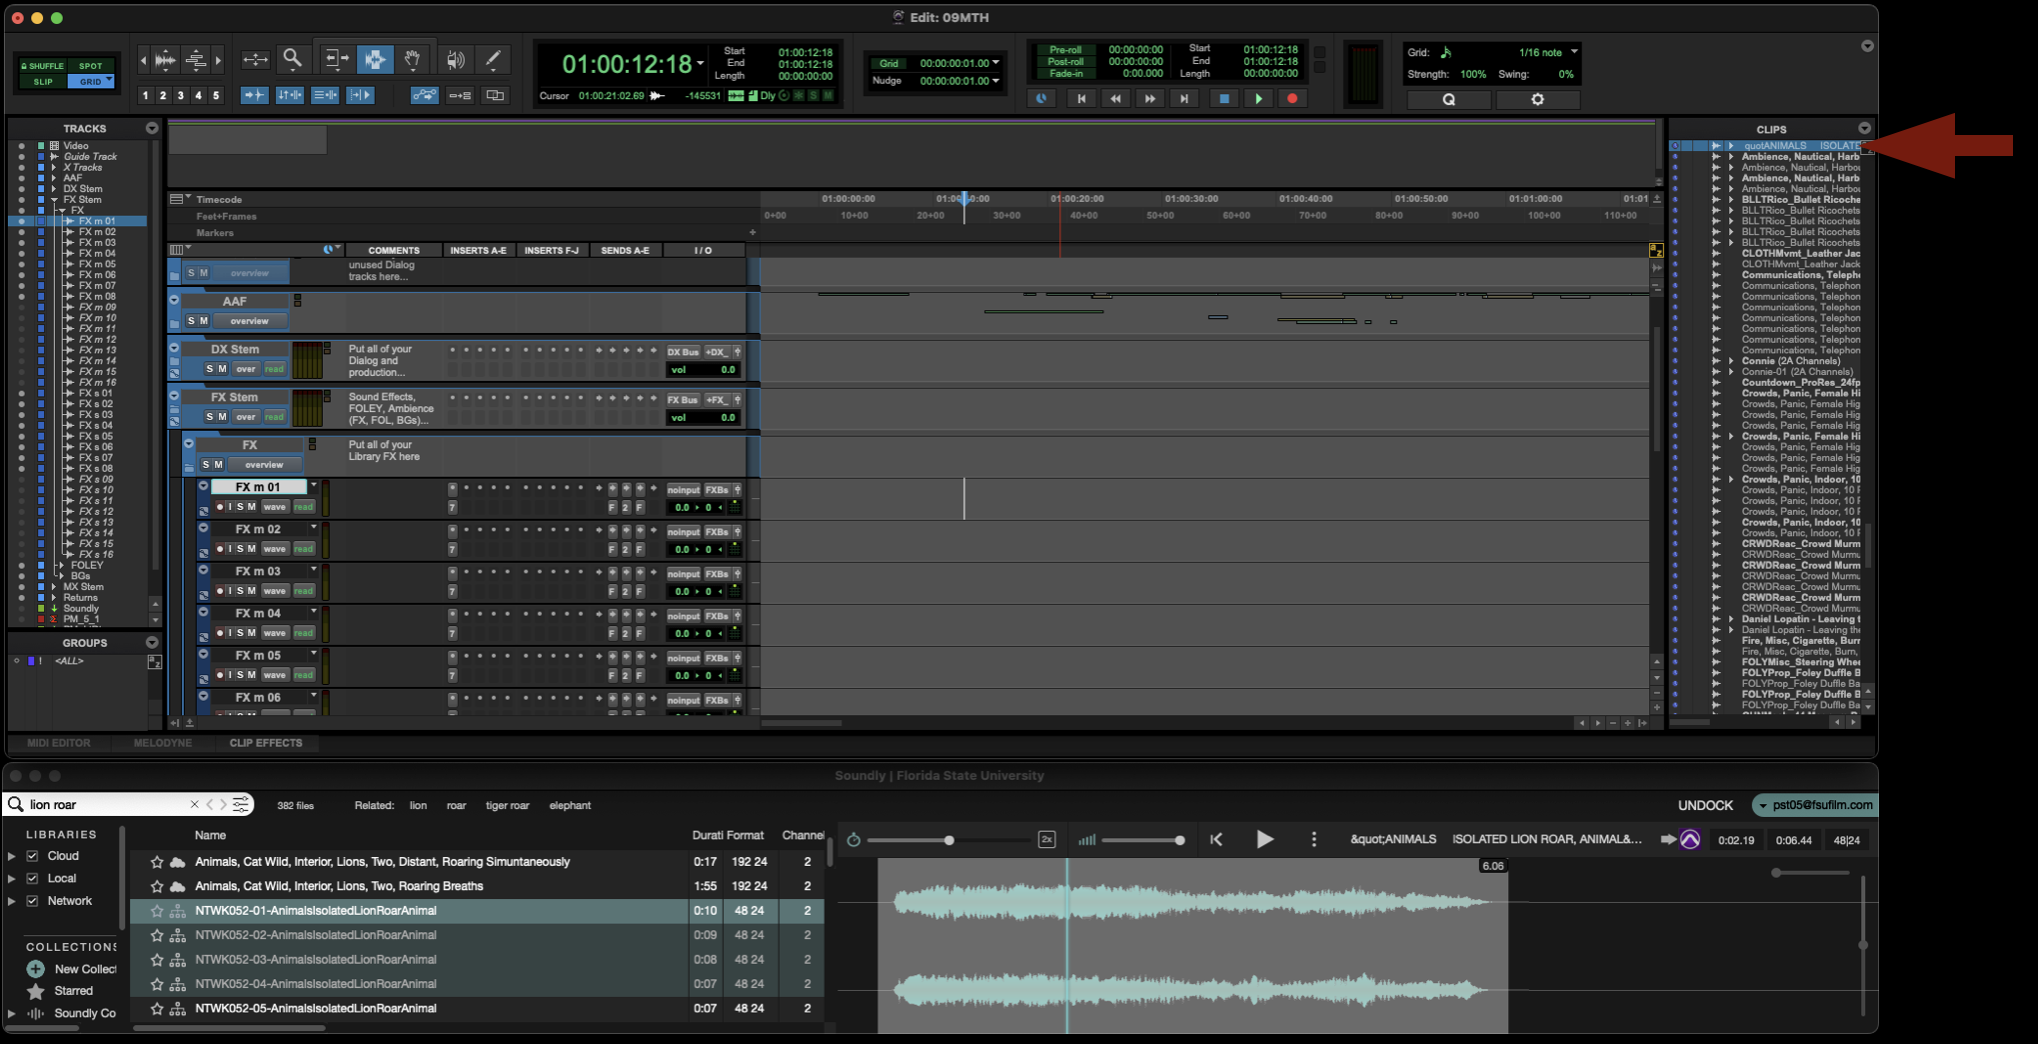
When using Soundly with ProTools, you have two options for bringing sounds into the project. You can either bring the sound into the Clips Bin or spot the sound directly onto a track.
To send a desired sound effect to the Clips Bin, select the sound in Soundly and then press “B” on the keyboard. It will be imported directly to the Clips Bin in ProTools.
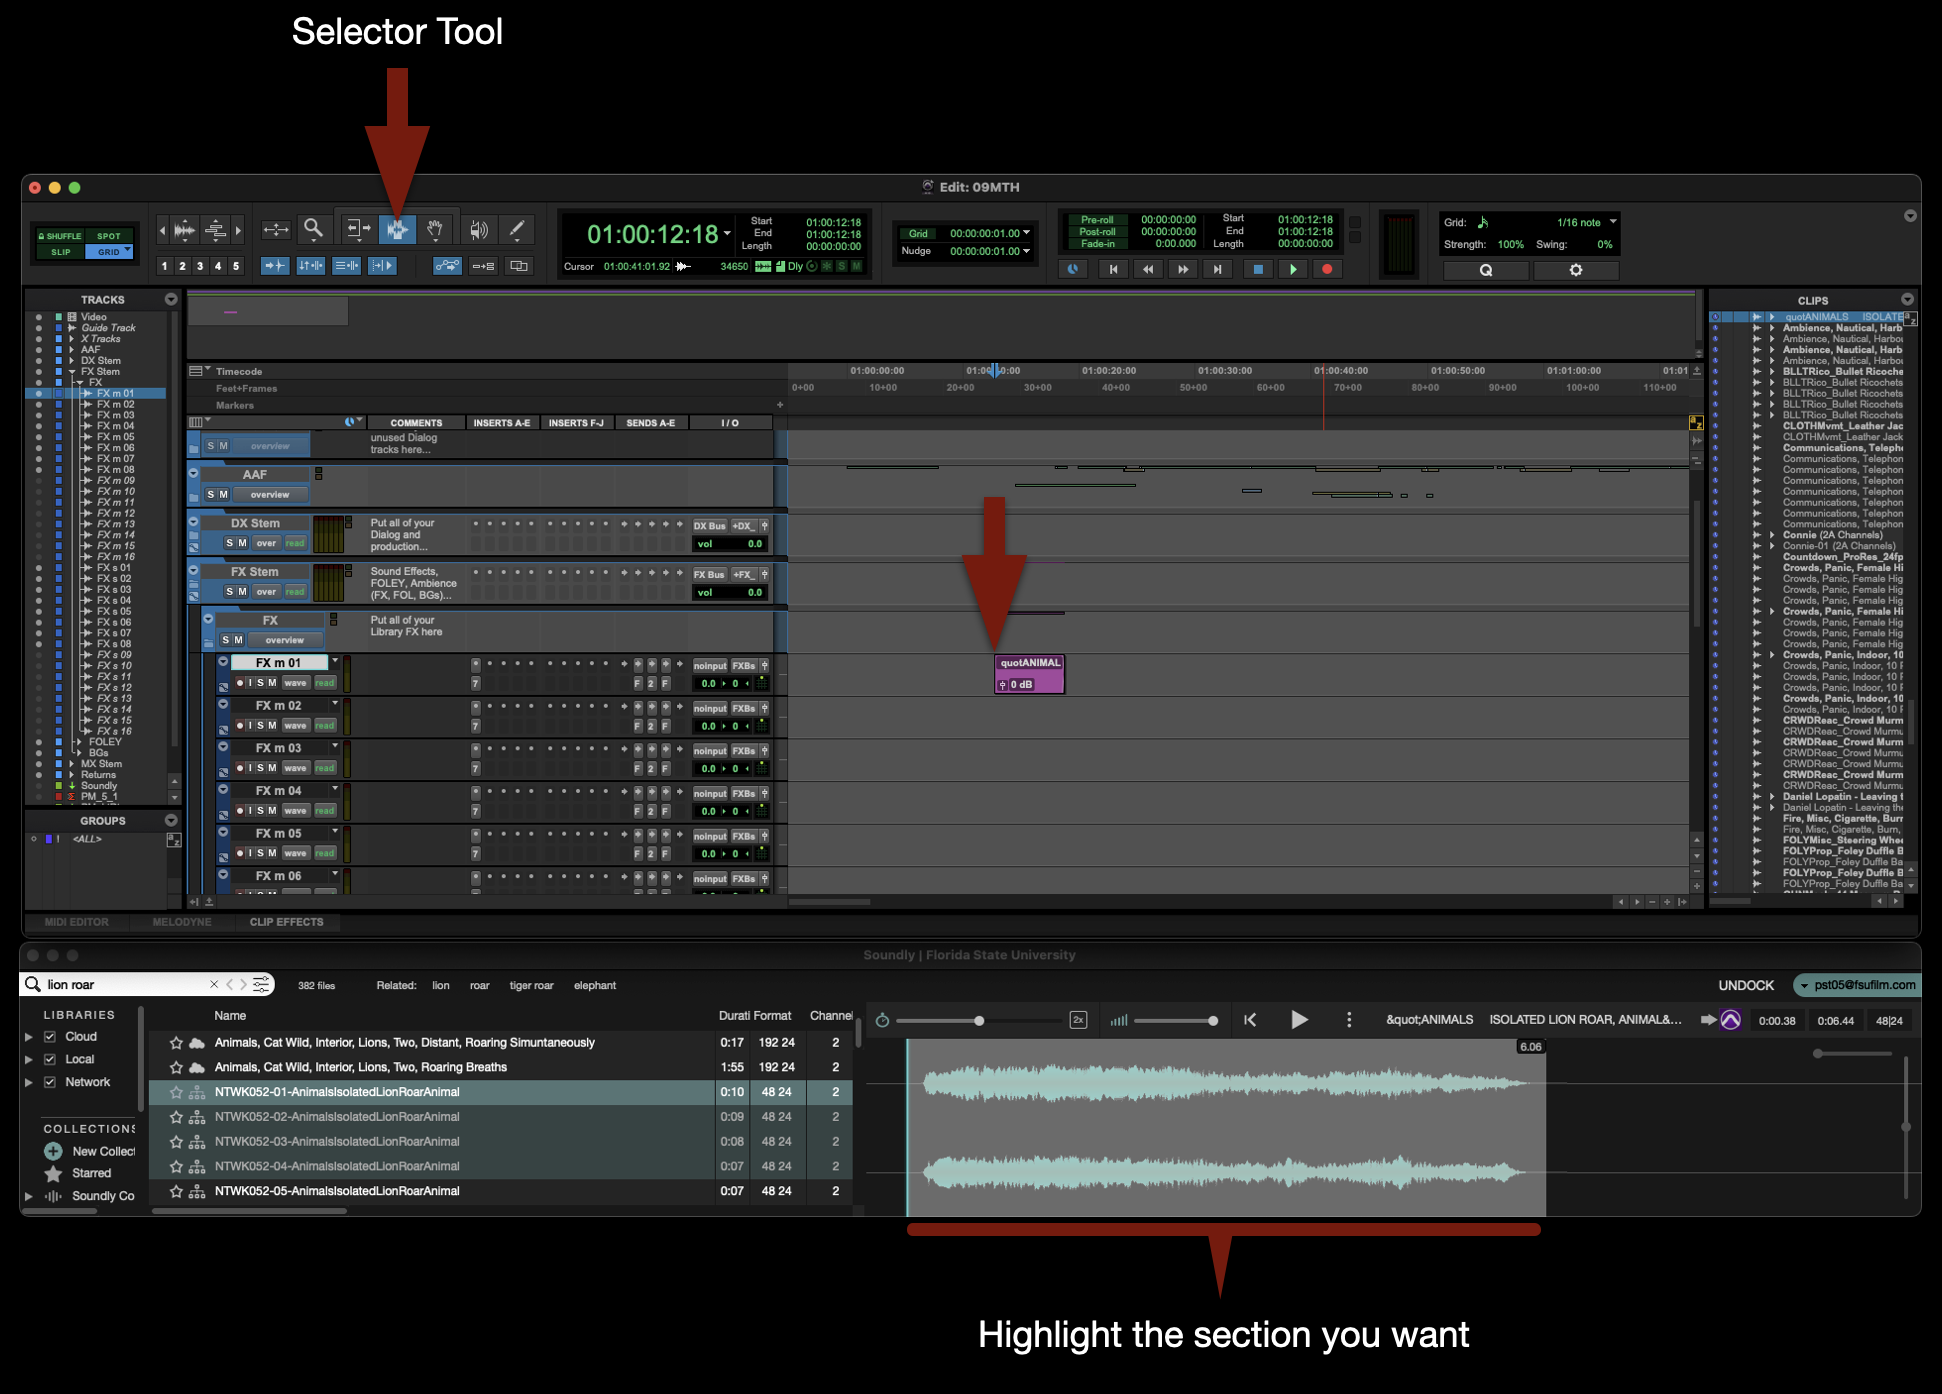
To spot a desired sound effect to a specific marked track, highlight the section of the sound effect you want, use the sector tool to mark a spot on an appropriate track, and then press “S” on the keyboard. It will be imported directly to the track that was marked.
Soundly Voice Designer
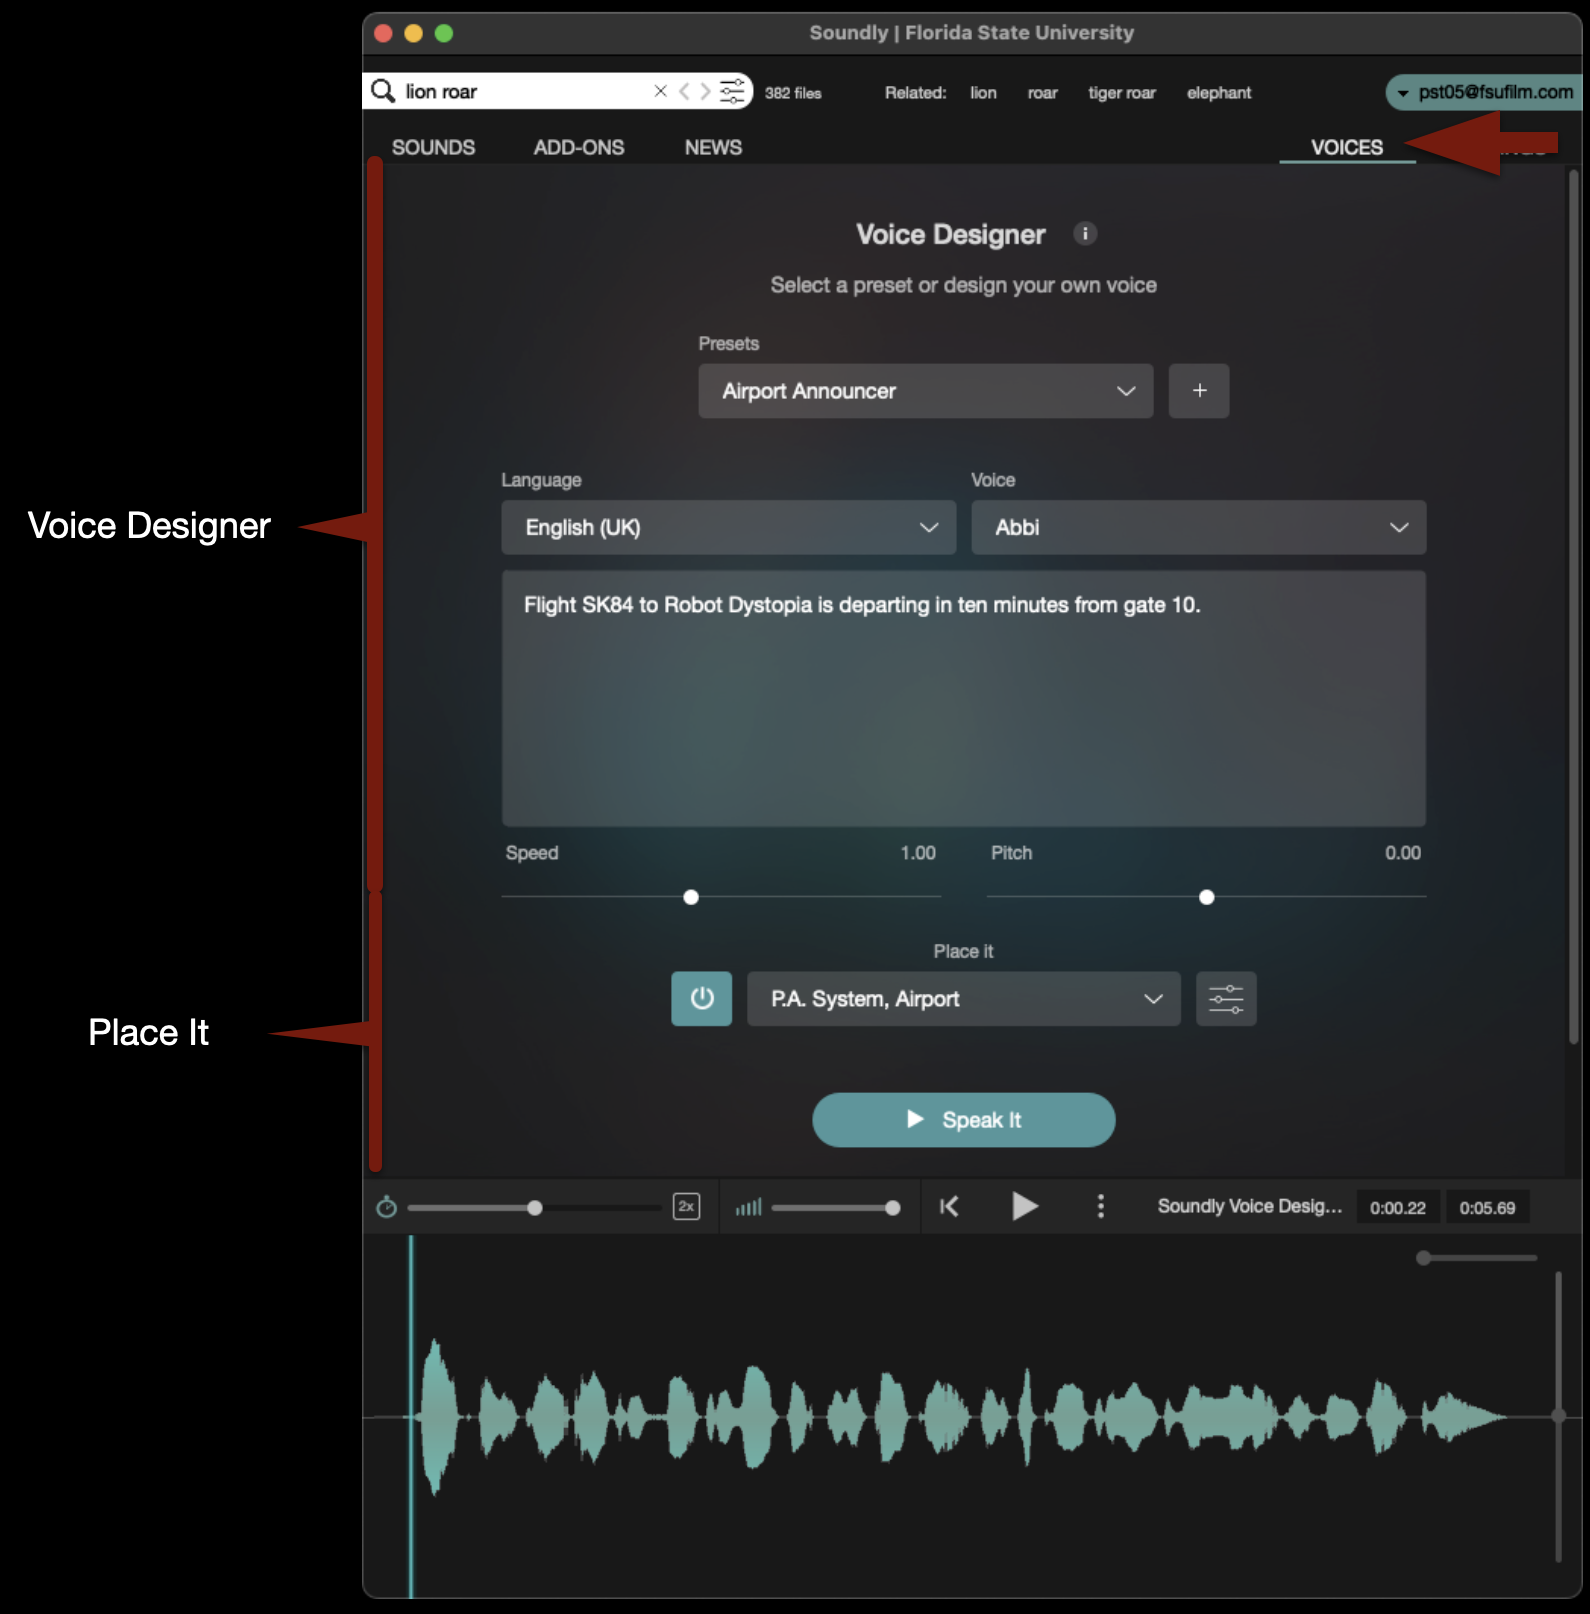
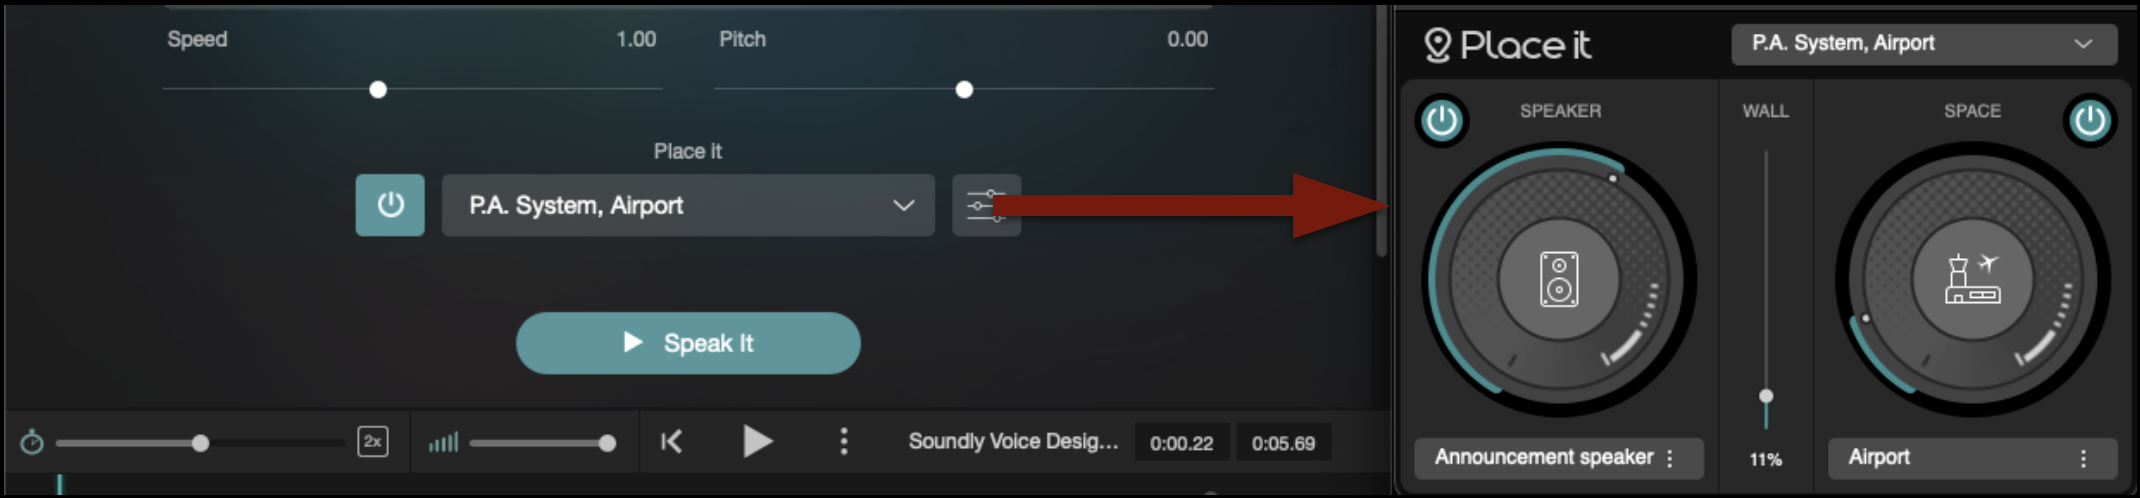
Soundly has a feature called Voice Designer, which uses AI to generate voices based on text input. Utilizing a plugin called “Place It”, it will make the generated voice sound as if it was in a particular place and/or coming out of a particular speaker.
Switch to the Voices tab and you will see the interface appear like the example below.
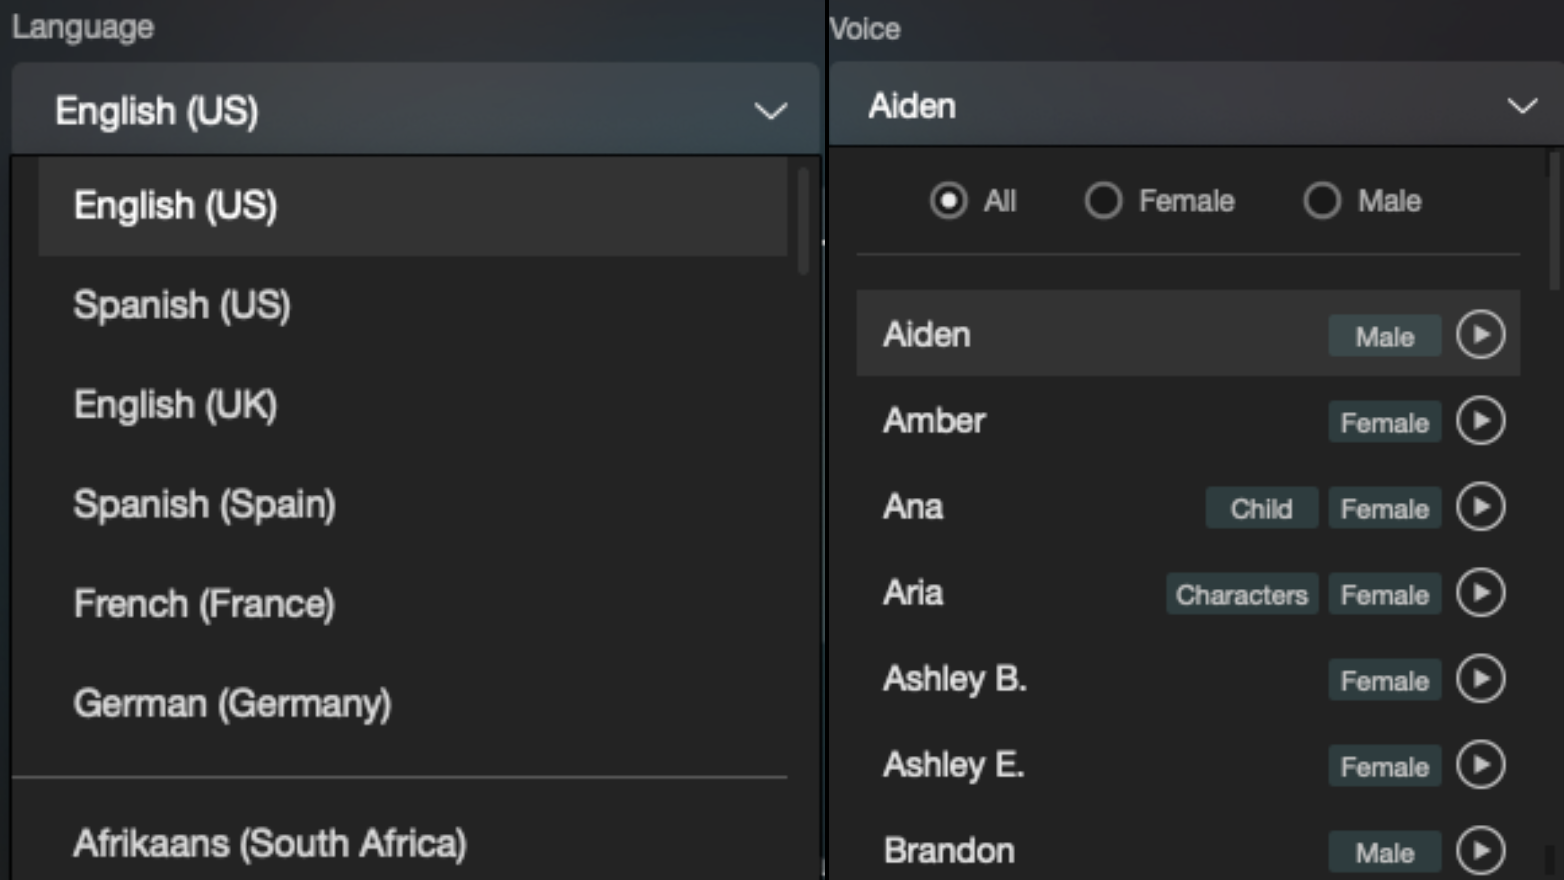
The top section will allow you to type in any dialogue that you need to generate. You will then have options to decide the language and the voice, and you can then generate the voice by clicking “Speak It”. You can also use one of the presets.
The bottom section will allow you to modify that voice. There are presets available or you can click the button shown below and you can choose you own “Speaker” and “Space”.
Importing the Voice Designer media into ProTools and Media Composer is exactly the same process as described above.
Poster artwork and promotional materials often require images to be enlarged beyond their original resolution in order to meet print specifications for large-format exhibition, festival display, or marketing use. This page outlines workflows and best practices for upscaling images while preserving clarity, detail, and overall image quality.
Proper upscaling techniques are important because low-resolution or improperly enlarged images can appear soft, distorted, or visibly degraded when printed at poster size. Understanding how to prepare high-quality promotional assets helps students present their films more professionally while developing practical skills related to marketing deliverables, print workflows, and digital image preparation.
Instructions
Posters are designed and printed at 8250 × 12150px, so it is often necessary to upscale film stills to a higher resolution than they were originally captured in. To do this you can use a software called Topaz Gigapixel AI.
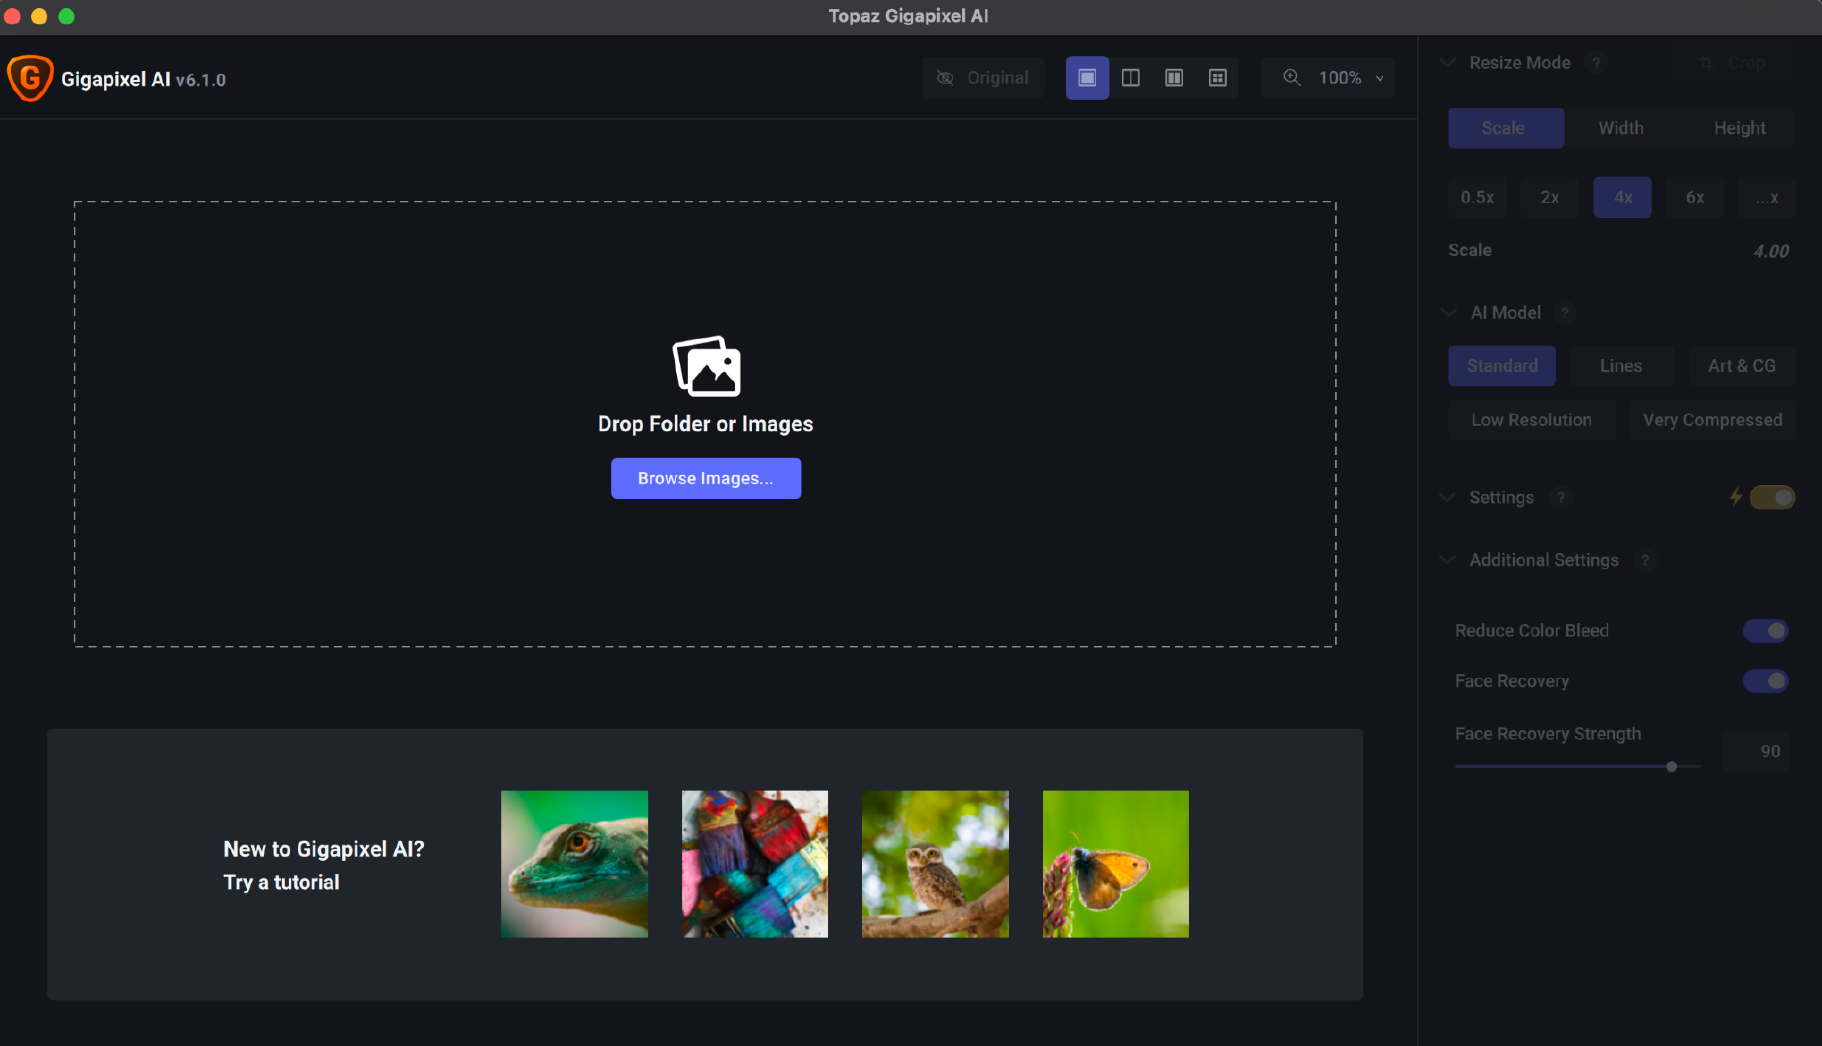
Topaz Gigapixel AI is a standalone application that is installed on all three ingest machines on the post hall. Open the the application by selecting its icon from the dock:
When the application opens, drag a still into the drop zone:
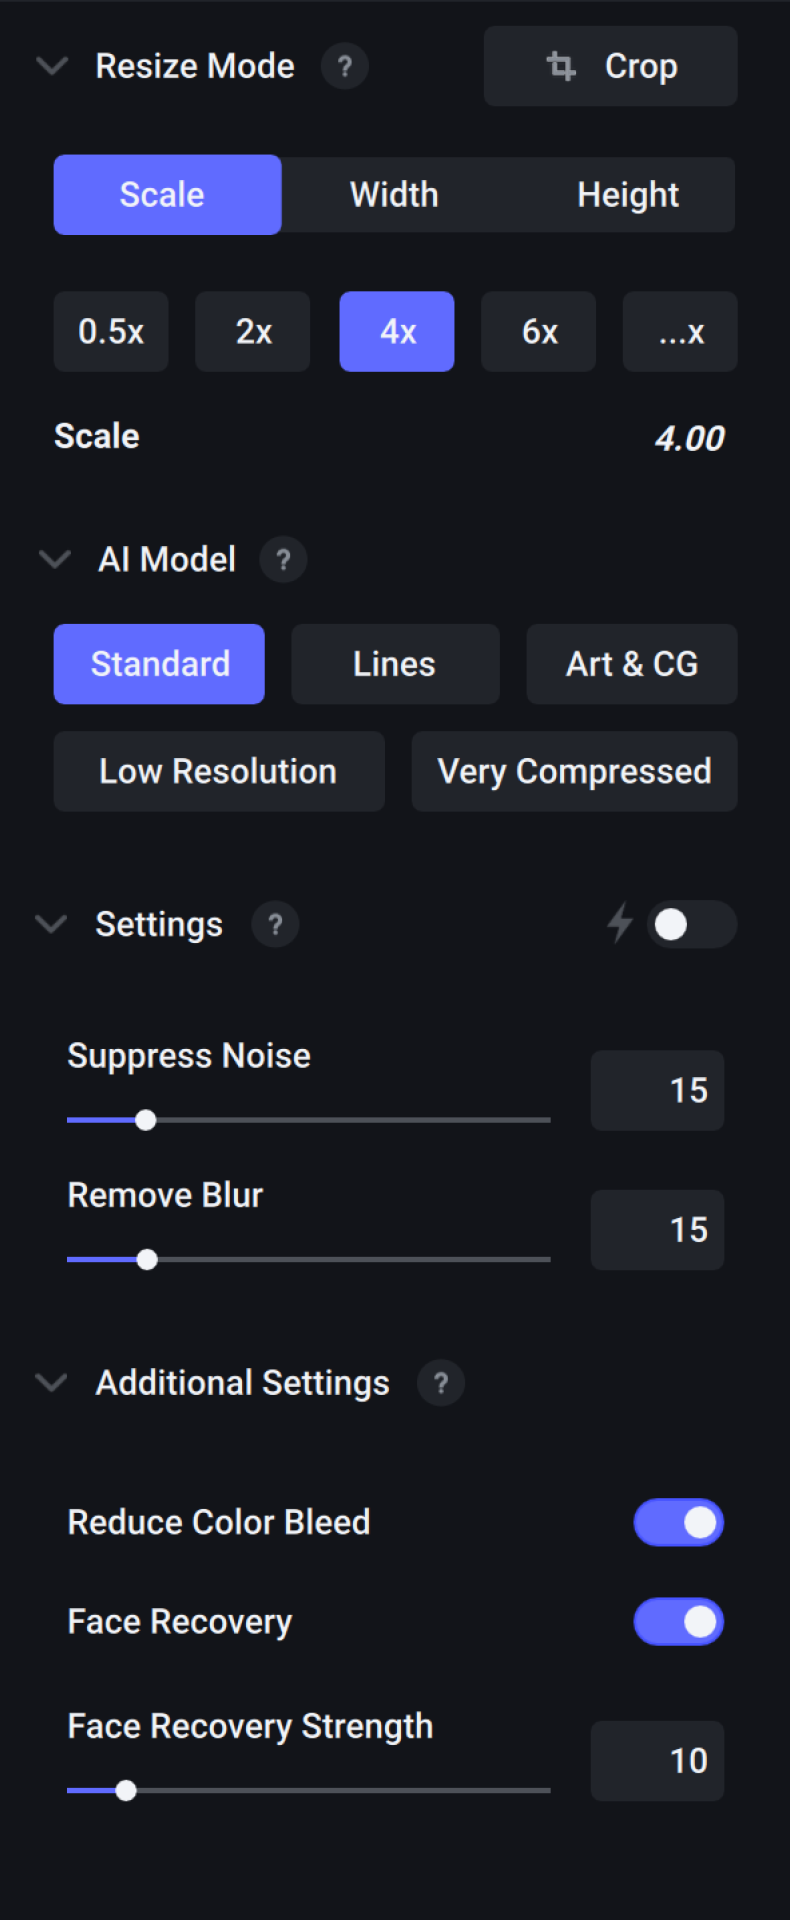
On the right of the interface, you will find the settings options. Configure them as shown in the example below. If you do end up needing to make any tweaks to these settings, do not go over 10% on the Face Recovery Strength.
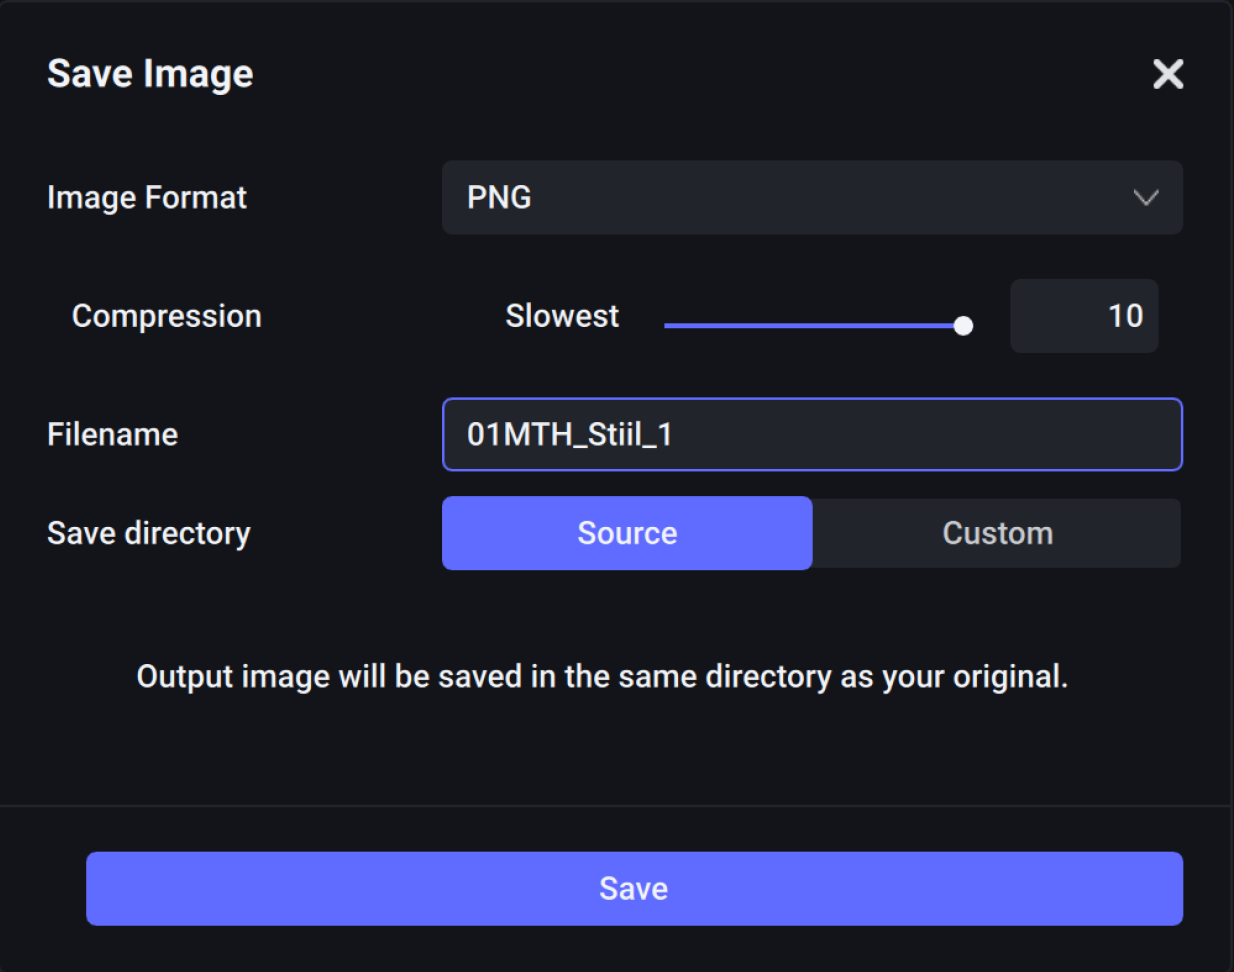
Save your new still as a PNG, as shown in the example below:
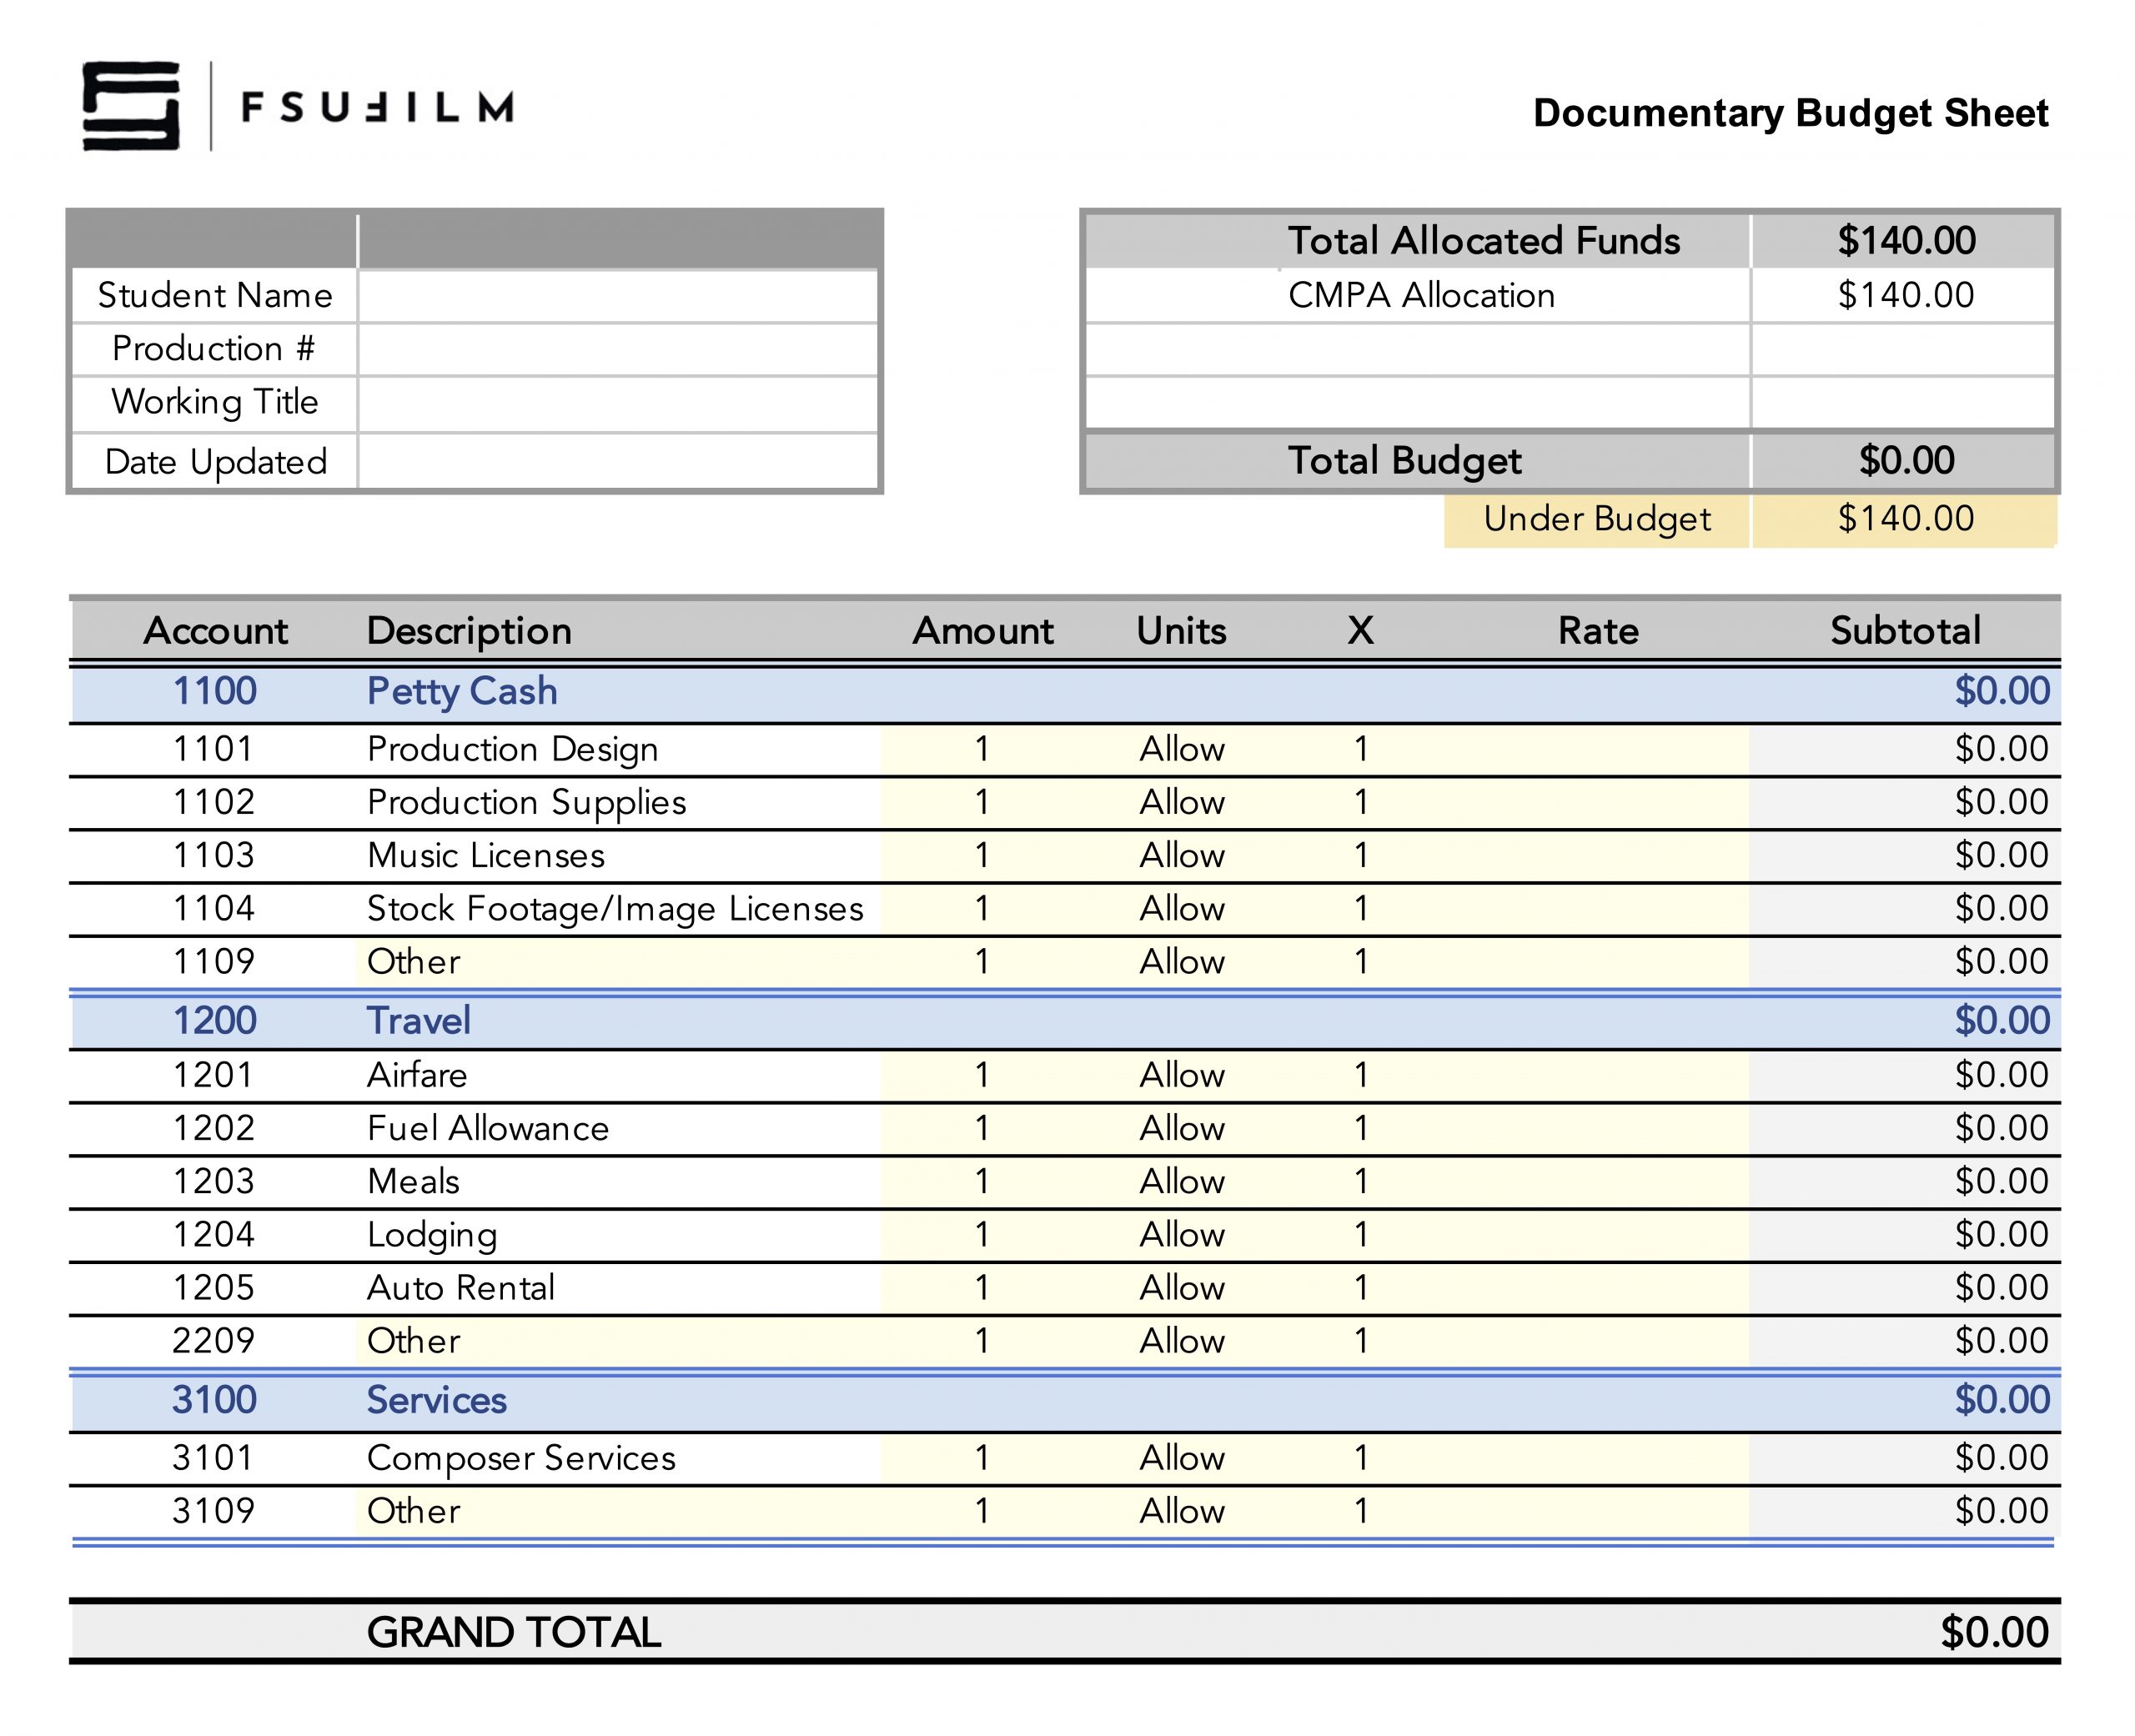
The F2 budget sheet is used to plan, track, and manage the financial needs of the production throughout pre-production, production, and post-production. This document helps productions organize anticipated expenses, monitor spending, and ensure that resources are allocated responsibly across all departments.
Budgeting is a fundamental part of filmmaking because creative decisions are always shaped by practical limitations. The budgeting process encourages students to think critically about priorities, trade-offs, and production logistics while developing realistic production plans. Maintaining an organized and accurate budget also helps productions avoid preventable financial problems that can disrupt schedules, strain resources, or compromise the successful completion of the film.
BFA1 students are required to use this budget sheet to account for how they will spend the allocated budget for their documentary projects. This is a “use-it-or-lose-it” budget, and funds can be used in the following categories: petty cash, travel, and/or services.
In order for the funds to be released, each student will need to submit the budget sheet to the Head of Production in advance of production. Once the budget is approved, instructions will be provided on the process for using those funds, depending on which category the expenses fall within.
Frame.io review links are used to distribute cuts, gather feedback, track revisions, and facilitate communication throughout editorial and post-production workflows. This page outlines expectations for organizing, sharing, and managing review links during the feedback and approval process.
Consistent review workflows help productions avoid confusion around versions, notes, and approvals while making collaboration more efficient across faculty, students, and post-production teams. Structured review practices also help students develop professional habits related to client communication, revision tracking, and collaborative editorial workflows.
CREATE A REVIEW LINK
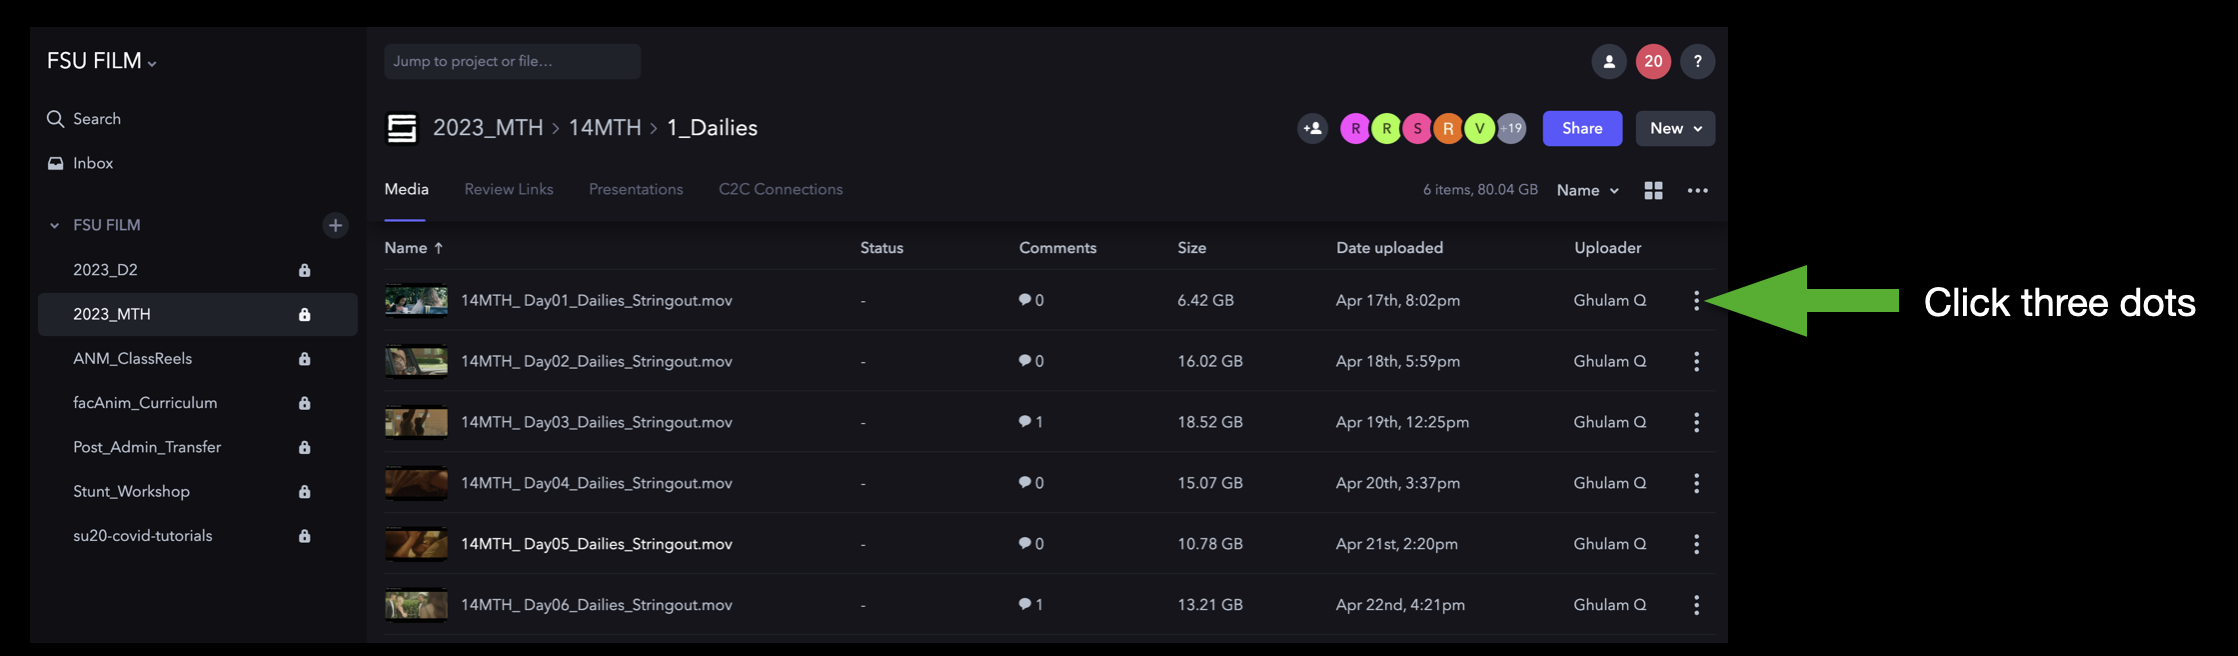
Navigate to the video on Frame.io that you want to share. Then, click the three dots to the right of the video:
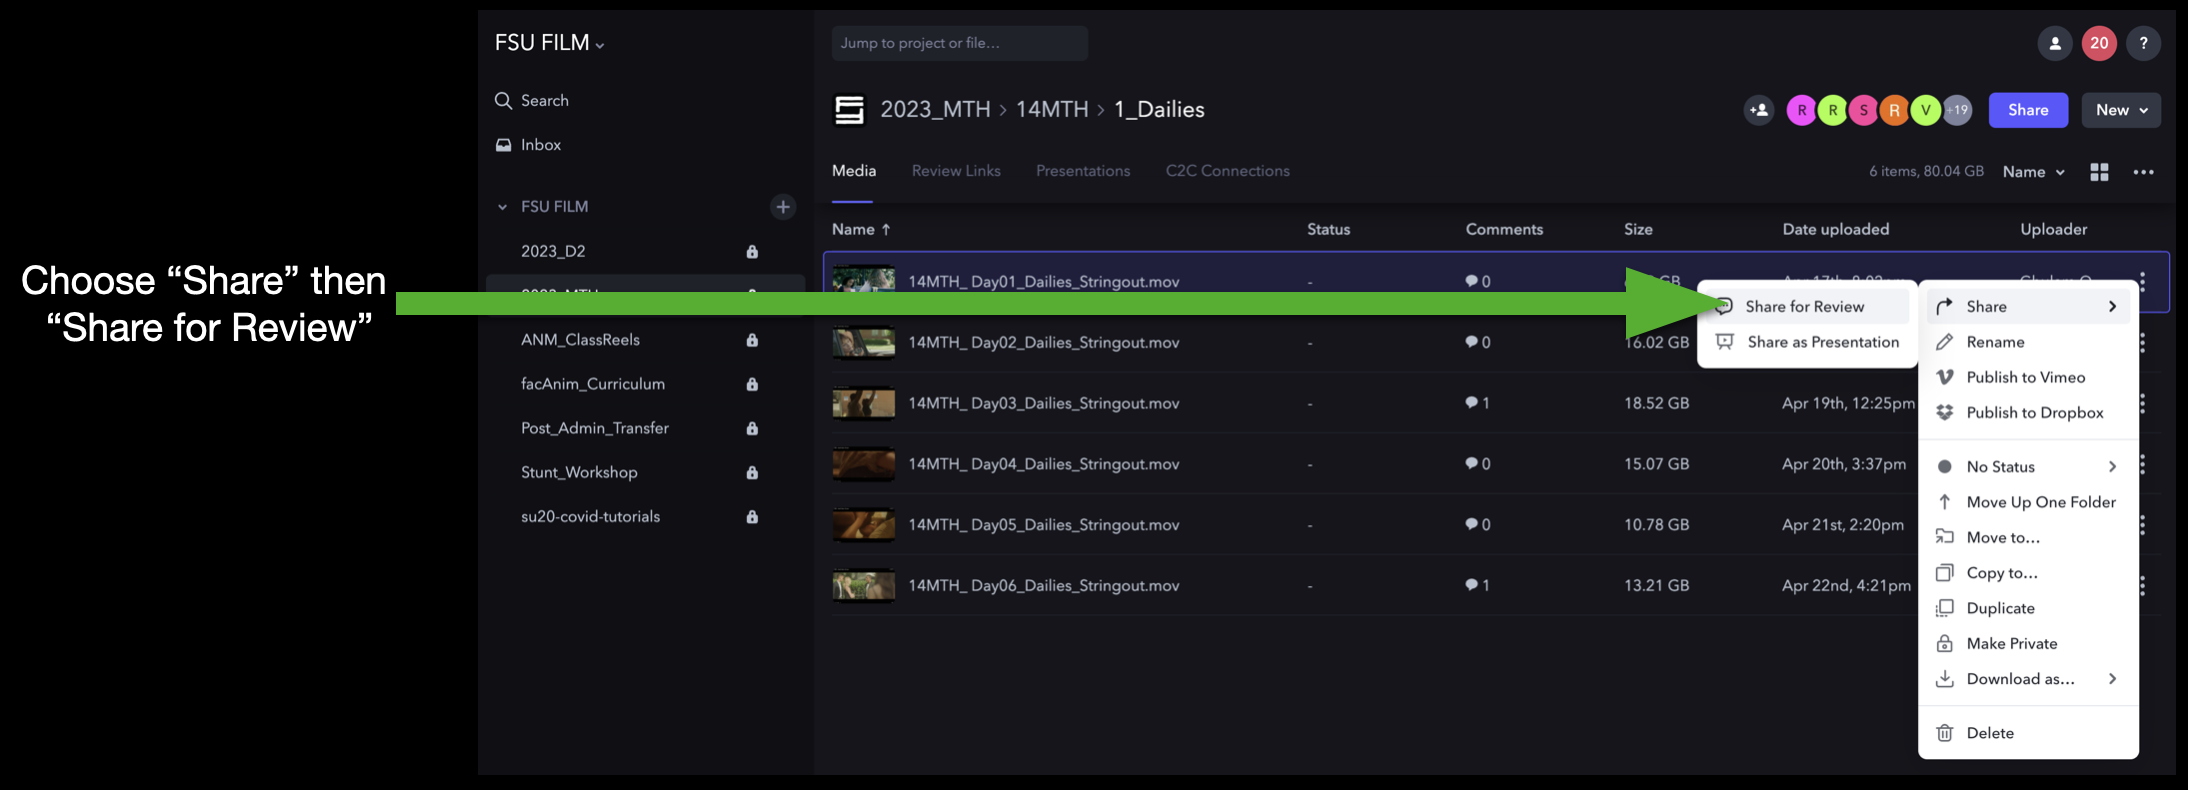
This will open a dropdown menu that you can navigate through. Select “Share” and then “Share for Review”:
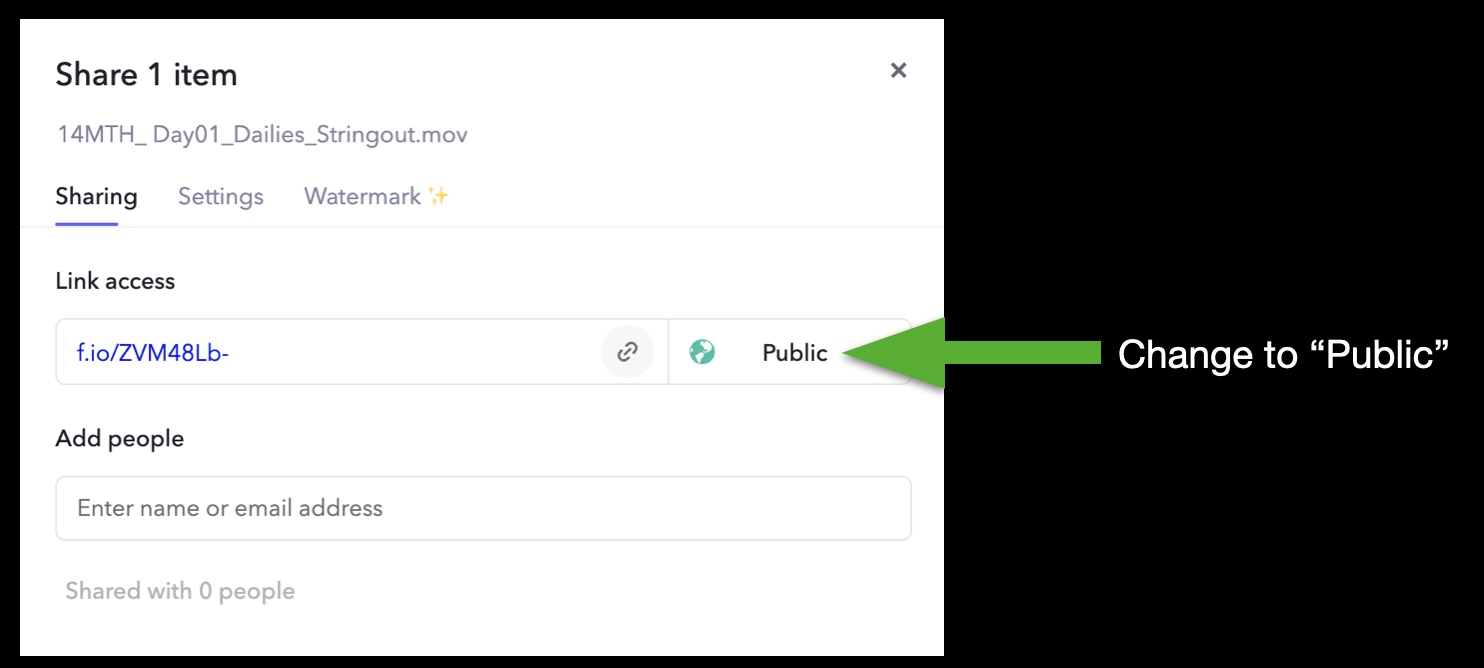
A window will open prompting you to choose what kind of link you want to create. To be able to send the link to someone who’s not already a member of the Frame.io project, you will need to change it to “Public”:
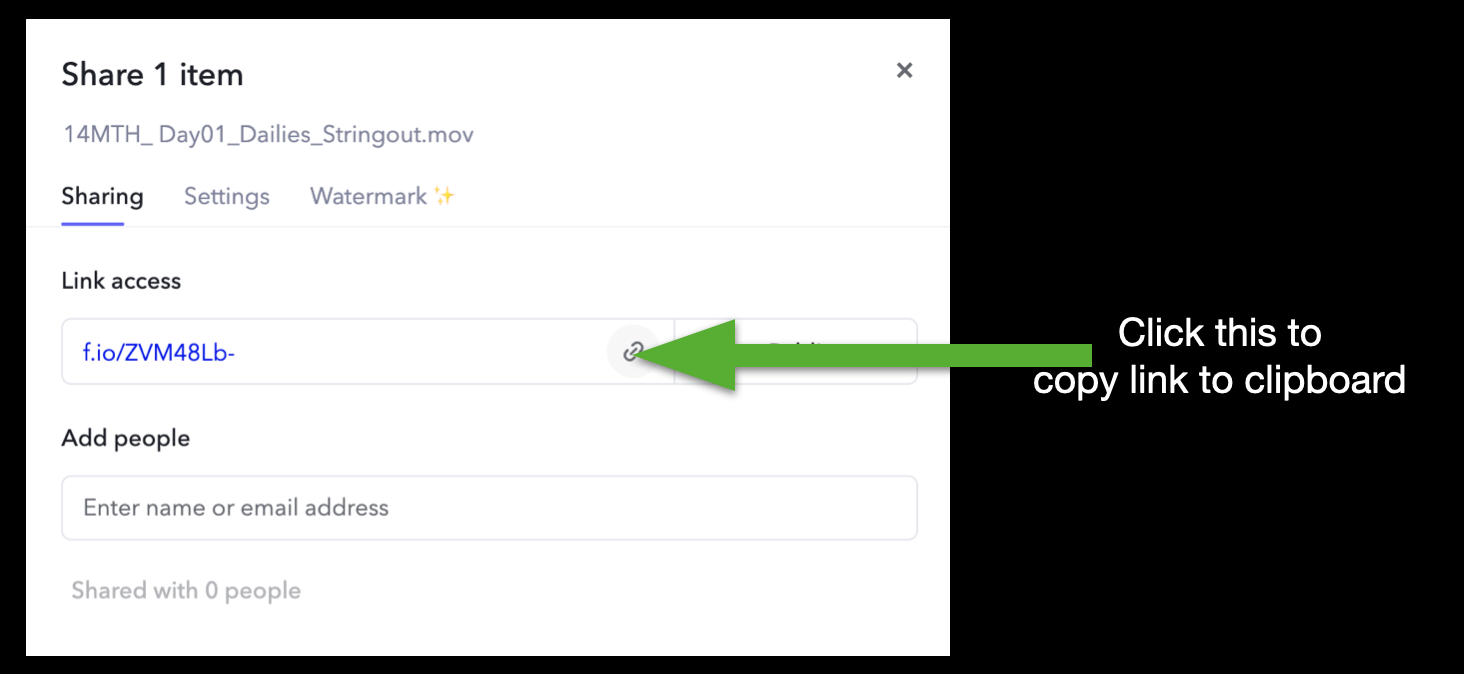
Then, click the icon to copy the link to your clipboard:
Now you can paste this link anywhere, such as in a Teams message or an email, and send it to whomever needs to see it. Please be careful when sharing review links, though; anyone with the link, regardless of who they are, will have access to the linked content on frame.io and will be able to leave comments.
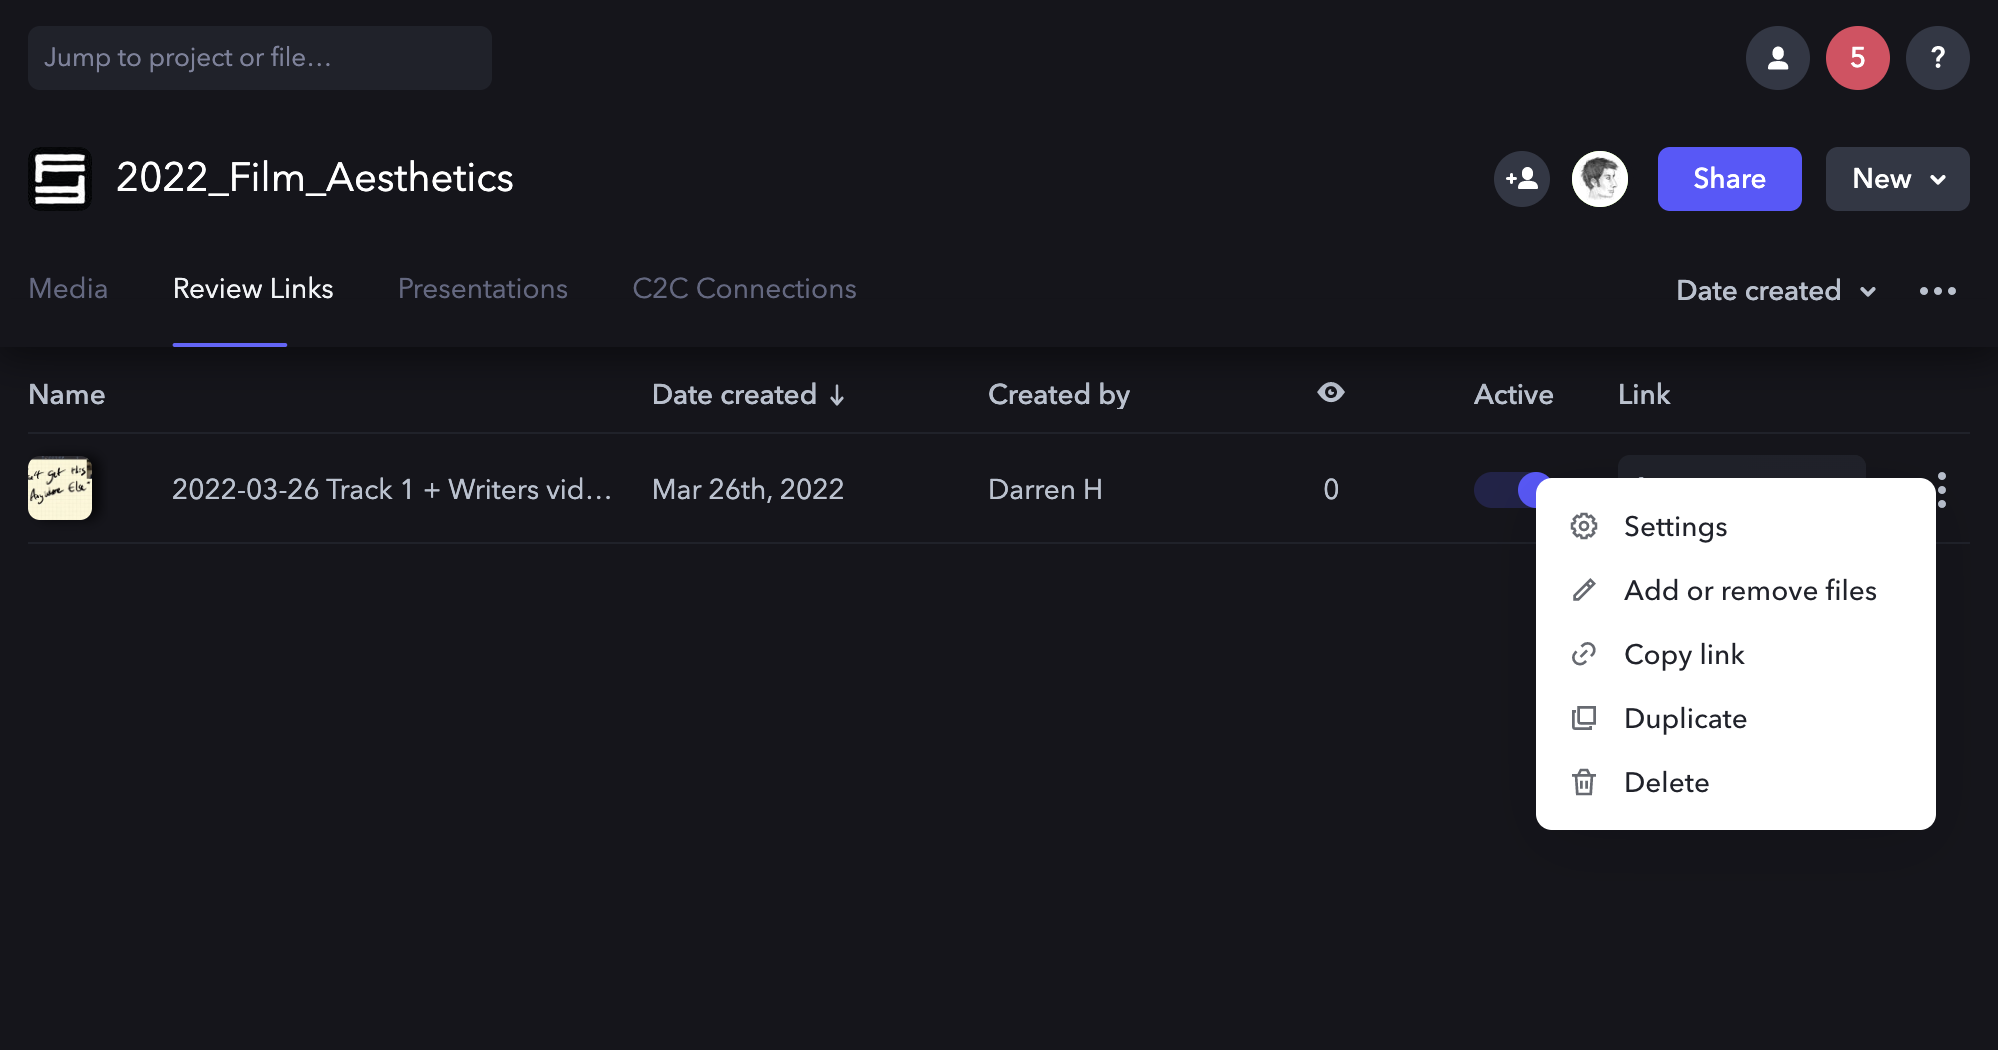
Manage Review Links
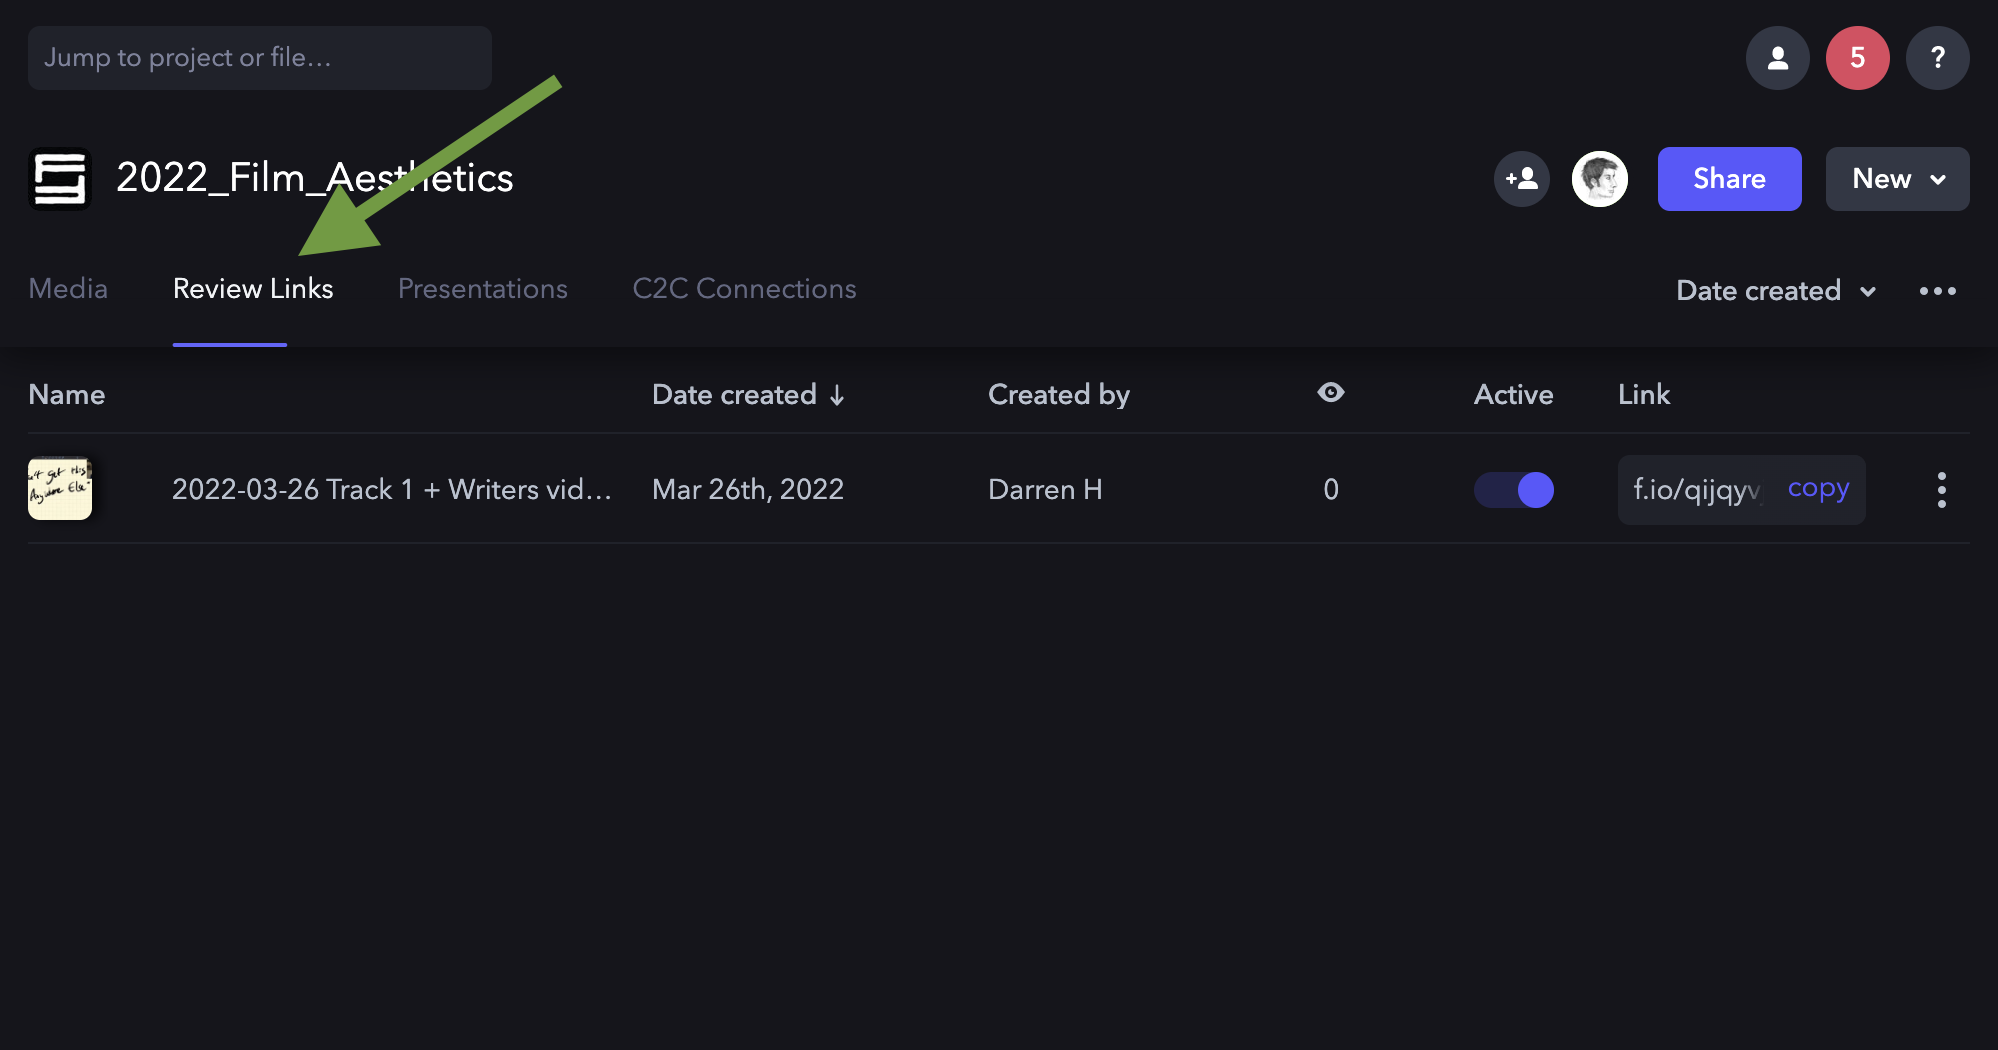
If you need to go back and manage the review links you’ve created, navigate to the main page for project and click on the Review Links tab:
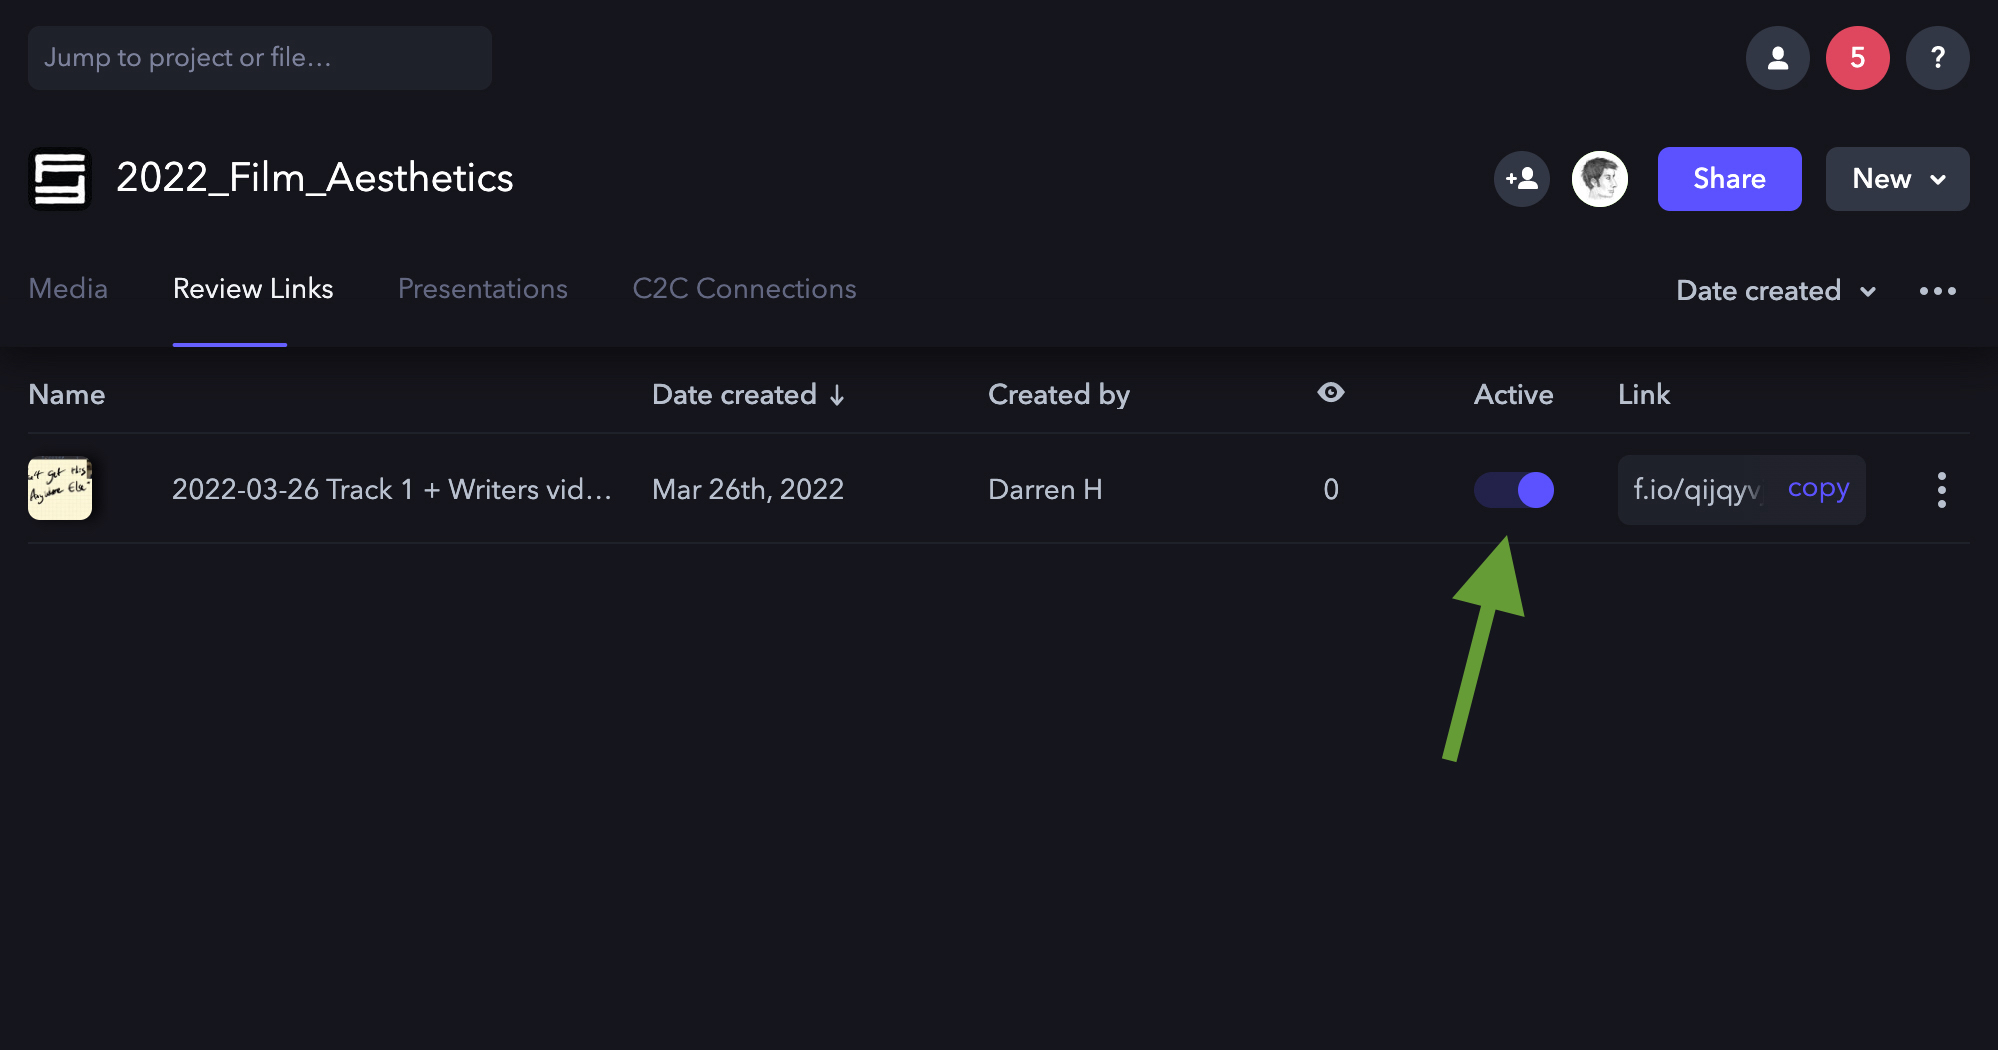
This will display all the links that have been created for that project. If you wish to activate or deactivate a review link, toggle the “Active” button:
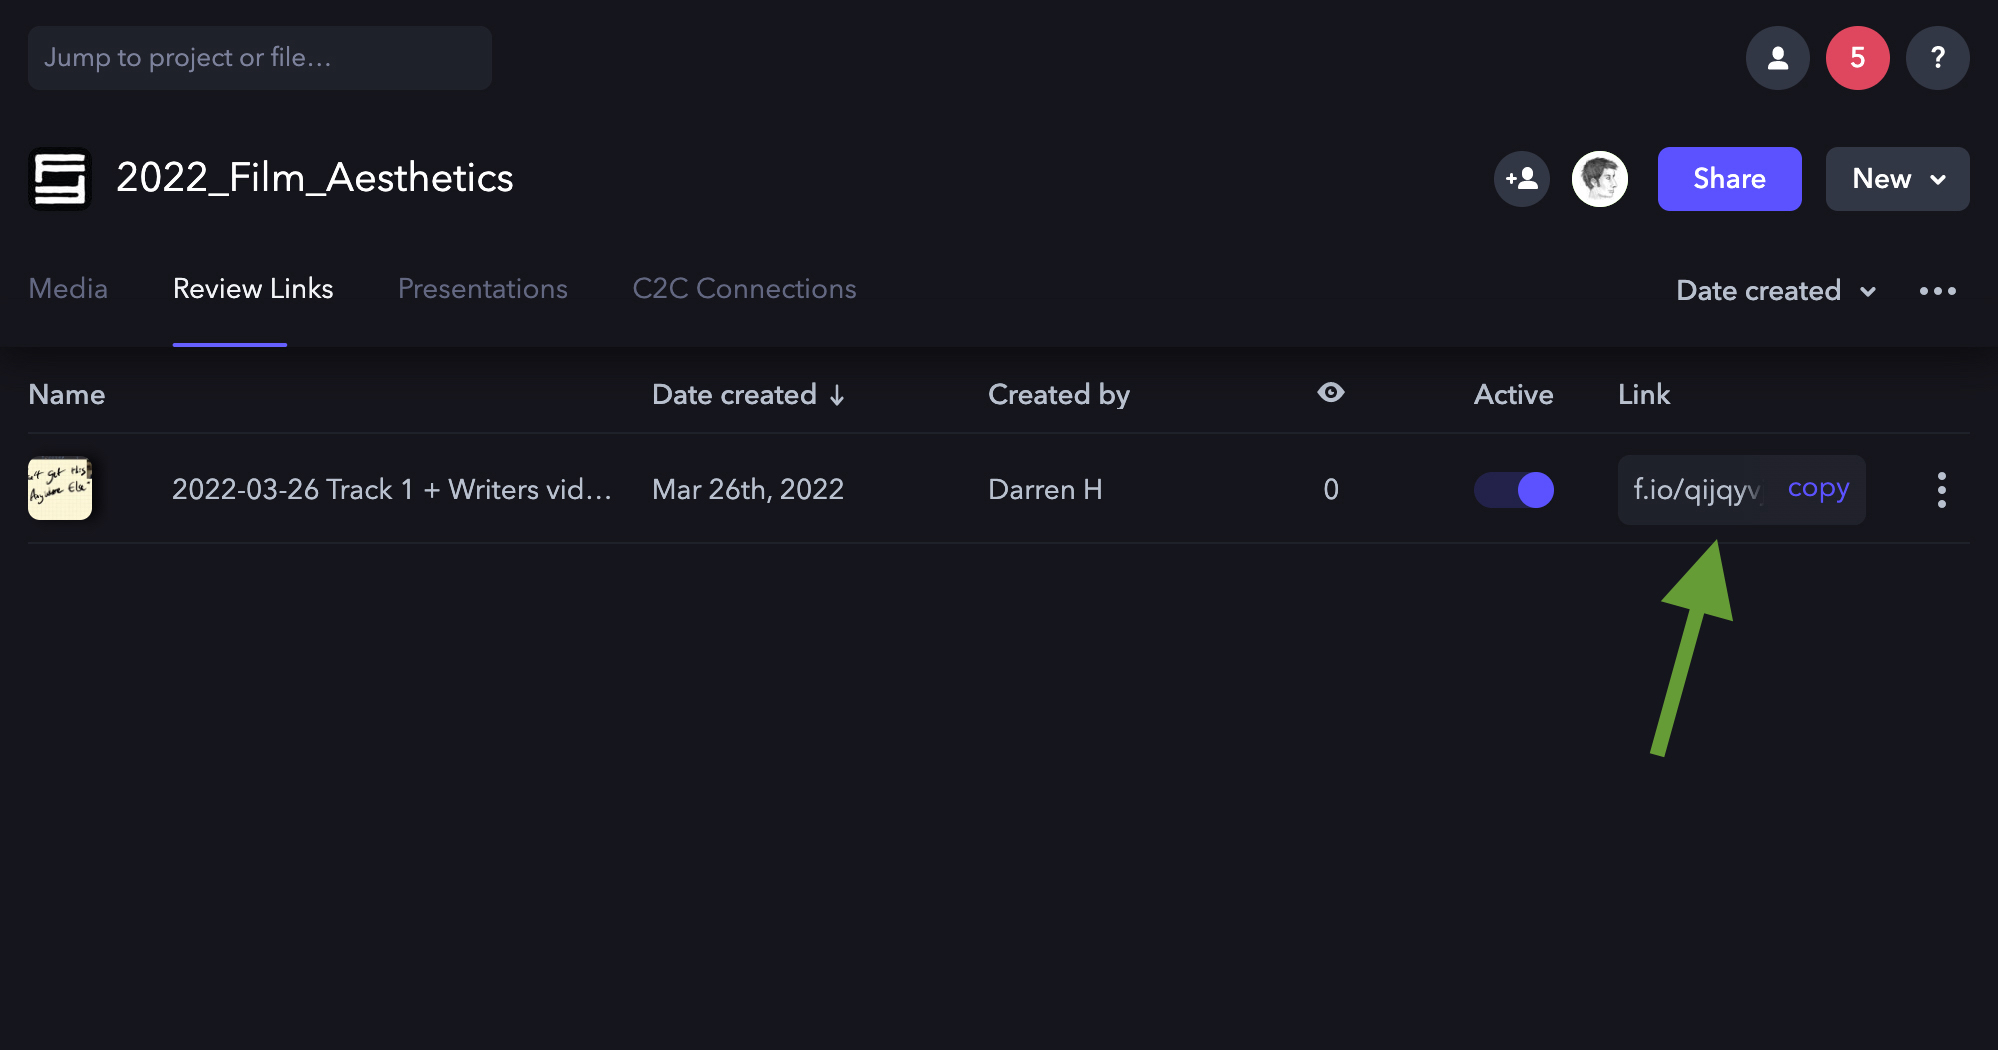
If you need to re-copy the review link, you can do so here:
If you need to adjust settings, add or remove files, or duplicate or delete a review link, click on the three dots and a dropdown menu will appear: