This page outlines the rules and professional standards governing the presentation of titles and credits in student films, including formatting expectations and appropriate content. Screen credits are intended to recognize individuals and entities who contributed directly to the production and are expected to follow established professional conventions.
Maintaining clear standards for titles and credits is important because credits function as an official production record and reflect the professionalism of both the film and its filmmakers. Accurate, properly formatted credits help ensure that contributors are recognized appropriately while reinforcing industry expectations surrounding presentation, attribution, and professional conduct.
Content vs. Credits
For FSUFILM productions, title and credits are limited to a maximum of 60 seconds. This can be divided between Lead Titles and End Credits but combined together their length is not to exceed 60 seconds. This allotted time includes the Logo card and the Copyright card at the end of the credits, each of which must run for two seconds each.
Titles and credits that run over picture or audio that is not “advancing the narrative” will count toward your 60 seconds for titles and credits. Titles and credits that run over picture or audio that is “advancing the narrative” will count toward your Content time.
Remember that the primary purpose of credits is to credit that people which contributed to the creation of the film. Content time is for story, credit time is for credit. Any questions will be left to the discretion of the directing and editing faculty.
Rules
At FSUFILM, we adhere to a professional standard for the presentation of credits and titles in all student films. Film credits serve the sole purpose of recognizing those who contributed directly to the production and are not a space for personal messages, jokes, or informal content. All credits must be accurate, appropriately formatted, and aligned with industry standards to maintain the integrity of the work and the professionalism of our filmmakers.
Every show must adhere to the following rules. No exceptions.
There can be no visual changes made to the FSUFILM leader.
There can be no possessive credits (“A Film by Me”) or production company credits. Only FSU makes these films.
Students must use their real names and are not permitted to take their name off a film.
Whenever possible, students who do more than one job should have their name listed once with all jobs in one place.
Only ATL crew, actors, and the title may have single cards. Everyone else should be in groups, listed efficiently to be legible but not lengthy.
There can be no dedicating the film to someone.
A “Special Thanks” section may be added to thank individuals or businesses that helped support the production, but aren’t credited elsewhere. A few rules:
The list should include only formal names and/or business names. No other language is permitted.
Use real names—not nicknames or terms like Mom & Dad.
If you wish to thank faculty or staff members, rather than singling out individuals, use the more inclusive: “College of Motion Picture Arts Faculty and Staff.”
For production cycles that ran a Spark fundraising campaign, include a general thank you to “Spark Donors” in every film. You may additionally thank individual donors, if you have a special relationship with them and would like for them to be able to see their name on screen.
Thanking a deity of any sort is not permitted. The State does not hold a religious affiliation, so FSU cannot thank any God or Gods.
Final delivery for F2 projects includes the submission of completed media, project files, documentation, and other required materials necessary for archiving, exhibition, festival submission, and long-term program recordkeeping. The items listed below are delivered to the Head of Production through the FSUFILM Greenlight system, which is used to track required materials and verify that projects have completed all delivery requirements in a consistent and organized manner.
Careful delivery practices are an essential part of professional animation and post-production workflows because incomplete or improperly prepared materials can create major problems for distribution, preservation, revisions, or future access to the project. The delivery process also reinforces the importance of organization, version control, and technical precision as productions move from active creation into exhibition and archival stages.
After all location information has been delivered for the show, navigate to the “My Shows” view of the Location board in FSUFILM Greenlight, select all the items for the show, and click Export. Then, deliver the exported Excel file of the Location List. (instructions)
After all cast information has been delivered for the show, navigate to the “My Shows” view of the Cast board in FSUFILM Greenlight, select all the items for the show, and click Export. Then, deliver the exported Excel file of the Cast List. (instructions)
Submit a separate form for each notable resource that was utilized by the production. This may include equipment rentals, unusual vehicles, unique props, distinctive costumes, or hired services offered by vendors such as graphic designers, security firms, or portable toilet providers. Think of things that might help future students track down resources for their films.
Include PDFs of all noteworthy correspondence about the production. This doesn’t need to include run-of-the-mill messages between cast and crew, but should include any documented messages with people like location owners, vendors, and the police. Think of it as “cover your ass” correspondence—so that, when the other party forgets what they had agreed to, there’s a record of what was discussed.
At minimum, the delivery should include a letter of thanks to each interviewee.
Complete a form to deliver the following information about the show: total running time, tagline, logline, 25-word synopsis, 50-word synopsis, keywords, genre, content warnings, rating, aspect ratio, spoken languages, and subtitles.
Enter a separate form for each piece of music used in the film, listing the timecode stamps and documenting the music rights.
If there are no music cues, use this form instead.
MUSIC LIST [su_button url=”https://wkf.ms/40sziFd” target=”blank” style=”flat” background=”#7da21f” color=”#000000″ size=”1″ radius=”20″ class=”deliver-button”]Deliver[/su_button]
After all music cues and releases have been delivered for the show, navigate to the “My Shows” view of the Music board in FSUFILM Greenlight, select all the items for the show, and click Export. Then, deliver the exported Excel file of the Music List.
Upload a PDF of the Stock Image Log Sheet, which lists the use of any video clips, still photographs, and/or artwork used in the finished film whose copyright is owned by someone other than the Film School. If no stock images were used in your film, upload a memo instead stating that “No stock images were used in the film.”
A list of all credits and title cards as they appear on screen. This should be a typed list—not screenshots of the credits from the film. Double-check for accuracy!
Part III – Marketing Materials
Film Festival Strategy [su_button url=”https://wkf.ms/4l9HxhO” target=”blank” style=”flat” background=”#7da21f” color=”#000000″ size=”1″ radius=”20″ class=”deliver-button”]Deliver[/su_button]
A PDF documenting the festival strategy for the film.
Five stills from the film that best support the promotional strategy. One of these will be designated as the “hero” still that will be used as the primary still—i.e., the default one to use if there’s not a good reason for using one of the others.
Additional assets that meaningfully expand your marketing approach, which may include: press kit, teaser trailer, festival cover letters, physical promotional item, EPK/BTS video, social media content pack, pitch deck, website mockup, newsletter or email announcement, etc.
The studio zone defines the geographic area within which productions are generally expected to operate without requiring additional distant-location approval procedures. The zone is based on a set driving distance from University Center A.
Establishing a defined production zone helps the program manage transportation, equipment support, safety oversight, scheduling, faculty access, and logistical coordination more effectively. The policy also helps productions plan realistically within the operational structure and resources available through the school.
Studio Zone Map
Inside the Zone
All shoots within the zone are considered “local” productions.
All F1, F3, M1, M2, and M3 productions must shoot within the studio zone.
This restriction is in place for a number of reasons: to make it possible for faculty and staff to visit locations during preps and shoots; to reduce wear and tear on production vehicles; and, for safety reasons, to place a cap on driving times for cast and crew.
Outside the Zone
All shoots outside the zone are considered “distant” productions.
Under some circumstances, BFA and MFA Capstone productions are permitted to shoot outside of the studio zone. Shooting outside the studio zone causes additional stress on personnel and equipment, so approval is only granted when any and all concerns have been addressed satisfactorily. Permission must be attained in advance by submitting a Distant Location Request to the Head of Production, who has final say on whether a distant location shoot will be approved.
F2 productions are also permitted to shoot outside of the zone. Permission must be attained in advance from the F2 instructor.
This page outlines the restrictions, approval procedures, and cleanup expectations associated with the use of water, liquids, food products, dirt, sand, paint, fake blood, debris, or other potentially messy materials on the sound stages during production activities.
These policies exist to help protect facilities, equipment, locations, and shared production spaces from damage or unsafe conditions. Because messy production elements can create significant cleanup, safety, and operational concerns, productions are expected to plan carefully, communicate clearly, and restore spaces properly after use.
Water effects on the stages
Water must not be allowed to pool on the stage floor, or seep under set pieces or floor covers. If hoses or other connections for water lines are used on stage, lines and connections must be continually monitored for leaks, which must be repaired immediately.
There must always be an approved plan in place to immediately drain off water from a water effect. For rain effects, a gutter may be used to collect water in a small area, but for larger effects, a pool must be used or built from thick plastic and 2×4’s to form a raised edge to trap the water inside. A plan must be made and approved for removal of the water from these pools, and water that will inevitably be tracked around the stage by wet feet and equipment. A pool or other vessel of water may never be left overnight. The Stage Supervisor will monitor water effects. At any time the Stage Supervisor or Set Operations Manager may shut down the production to ensure the safety of crew, equipment and facilities.
Dirt, Sand, Paint, or other messy items
When a production intends to use loose material such as dirt, or wet material such as paint, the student production designer will be required to show preparation for protection of the area and removal of the materials before receiving approval. Dirt contains moisture, so a moisture barrier must be put on the floor, or the dirt must otherwise be kept from coming in contact with the stage floor. As dirt, peanut shells, paint, and other messy materials can be tracked into other areas of the building, plans must be made to clean feet and to prevent such tracking. Mats or drop cloths, and small brushes or brooms must be supplied so crew and cast can clean their feet before exiting the stage or work area.
This page outlines the equipment packages, checkout process, usage expectations, and operational limitations associated with F2 productions.
Equipment policies help ensure that shared resources remain functional, compatible with the school’s production and post-production pipeline, and distributed fairly across productions. Clear procedures also help students plan more effectively, use equipment responsibly, and develop stronger professional habits related to production organization and equipment stewardship.
Equipment Checkout
An equipment checkout for each documentary group will be scheduled prior to production commencing. Each documentary group will be issued a standard equipment package, consisting of a Panasonic EVA1 camera package, a Canon 70D camera package, a sound recording package, a lighting package, a grip package, and expendables.
No personal equipment may be used on F2 projects. This is both to maintain a level playing field for all students and to ensure that all media conforms to the school’s production and post-production pipeline.
A-Camera: Panasonic EVA1
The following procedures for the Panasonic EVA1 must be followed:
The EVA1 must be used as the A-camera for all photography
All interviews must be shot with the EVA1
Standard capture settings for the EVA1 must be 2K at 100mbps
Slow-motion photography on the EVA1 must be discussed in advance with the cinematography instructor
Camera media cards and storage drives will be issued to each show at the final greenlight meeting.
B-Camera: Canon 70D
If a group or individual would like to use a two-camera setup for interviews, a Canon 70D camera and tripod is available for check-out to each group. This is the only camera to be used for this purpose.
Grip, Electric, and Sound
Each group will be issued with an Arri lighting kit, a flag kit, a stand kit, shot bags, expendables, and a sound accessory kit. The full package can be viewed here: Sample Manifest. No special equipment or alternate options are provided for documentary projects.
This page outlines the rules, expectations, and operational procedures governing the use of computer labs, post suites, and shared post-production facilities, such as the ADR/Foley Suite and mixing stages. Violations of these policies may result in disciplinary action.
Lab policies help ensure that shared spaces remain functional, secure, organized, and available to all students working within the program. Clear expectations also support safer working environments, protect equipment and facilities, and reinforce professional habits related to workspace stewardship and collaborative resource usage.
General etiquette
Computer labs and post-production facilities are work spaces. They are not spaces for hanging out and socializing, as this can be distracting to other students who are trying to work. They are also spaces with a lot of technology that needs to remain well-maintained and correctly configured.
Each student is expected to leave a workstation in the same condition they found it, so that the next user doesn’t run into problems.
Access
Labs and post suites are for student-use only. This is to keep our facilities secure and to minimize potential distractions that guests may cause for other students who are trying to focus on their work. If you wish to bring a guest to a lab or the Post Hall, you must seek prior approval from FSU faculty.
Food and drink
Food is never permitted in the computer labs or post suites. Beverages are only permitted if in a BOTTLE WITH A SPORTS CAP. Beverages must be kept in your backpack or bag when you’re not drinking. The container must never be left on the desk or on the floor near the workstations. If you cause damage to any equipment, you will be held responsible for the full replacement costs.
Noise and cell phones
Keep your voice volume down so as not to disrupt or disturb others working in the space. Keep phones on silent/vibrate mode at all times. If you need to take/make a call, step out of the lab.
Workstations
Keep your work area reasonably clean and neat at all times. Always restore your work area to a pristine condition when you leave. Unless rendering, log out of your workstation if you plan to step away from your computer for more than 15 minutes.
All students are responsible for proper care of the equipment. If you lose or break any equipment, you will be held responsible for the full replacement costs. Tablets, mice, and external monitors must not be removed from a workstation under any circumstances. Chairs must also not be removed from the lab.
The downloading of illegal or potentially harmful files on the lab computers is absolutely forbidden. In particular, the FSU network or computers must never be used to download or store pirated movies, music, software, plug-ins, or any other material.
Rendering
Assume all projects will be rendered locally on your assigned workstation. Contact faculty if you feel you cannot complete your show’s rendering on your local workstation. If you set-up renders overnight or over lunch, leave a piece of paper on the desk to indicate that the workstation is busy rendering.
Storyboard panels and walls
You may hang project-based materials on the “storyboard” panels if you wish. Do not post inappropriate or potentially offensive materials to the storyboard panels. Keep it professional. Do not tape or pin anything to bare walls or computer monitors.
Clean up
Please assist with the general upkeep of the labs. It’s a team effort. If you notice that a lab is getting messy, assist by cleaning up some of the mess, even if you weren’t responsible for it.
This page outlines the editorial workflow and post-production process used for F1 documentary projects, including organization, review stages, revisions, faculty feedback, and major editorial milestones.
Documentary editorial often evolves through discovery and restructuring over time rather than following a fully predetermined script. A structured editorial process helps productions manage large amounts of footage more effectively while supporting clearer collaboration, feedback, and storytelling development throughout post-production.
How It Works
This post provides a step-by-step guide covering how to:
Note: On F1 projects, there will be no VFX work allowed outside Media Composer. Only your credits may be generated in After Effects and imported in as a DPX sequence.
Link and Transcode Media
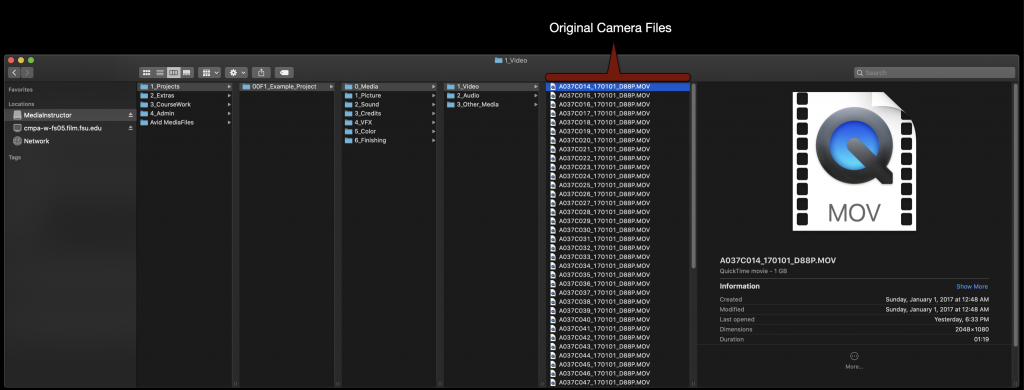
On the first day check the location of your OCF on the local drive of your assigned machine.
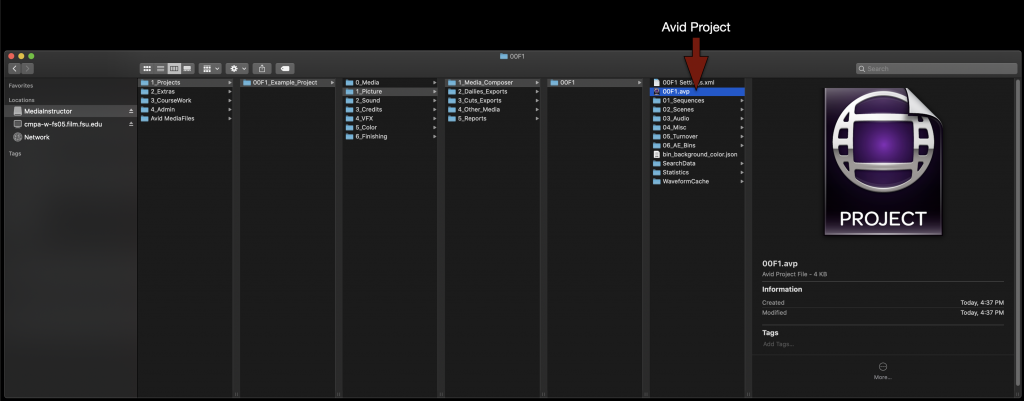
Next open your Media Composer project. It can be found at in the folder tree as shown in the example.
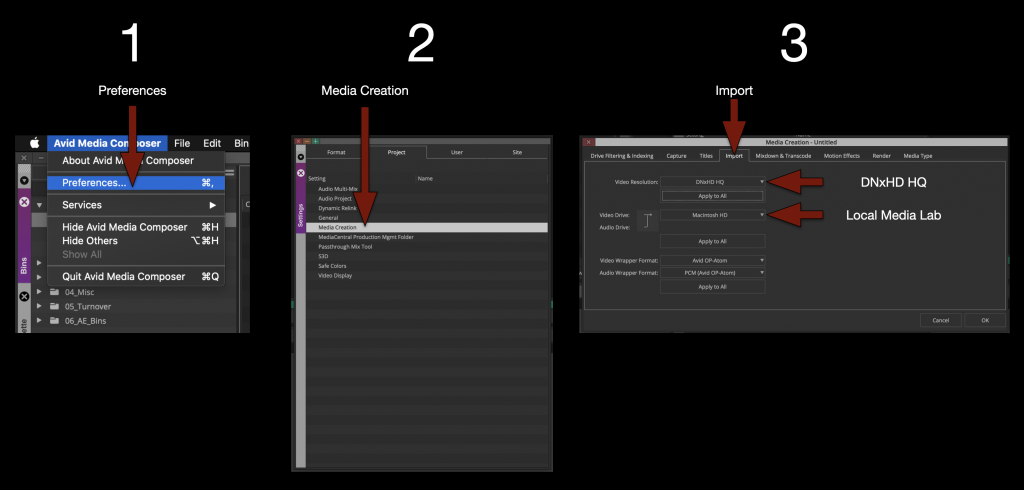
Once your project is open its a good idea to go ahead and set the “Media Creation” settings to the correct resolution and drive.
IMPORTANT! Remember to set your video resolution to “DNxHD HQ”.
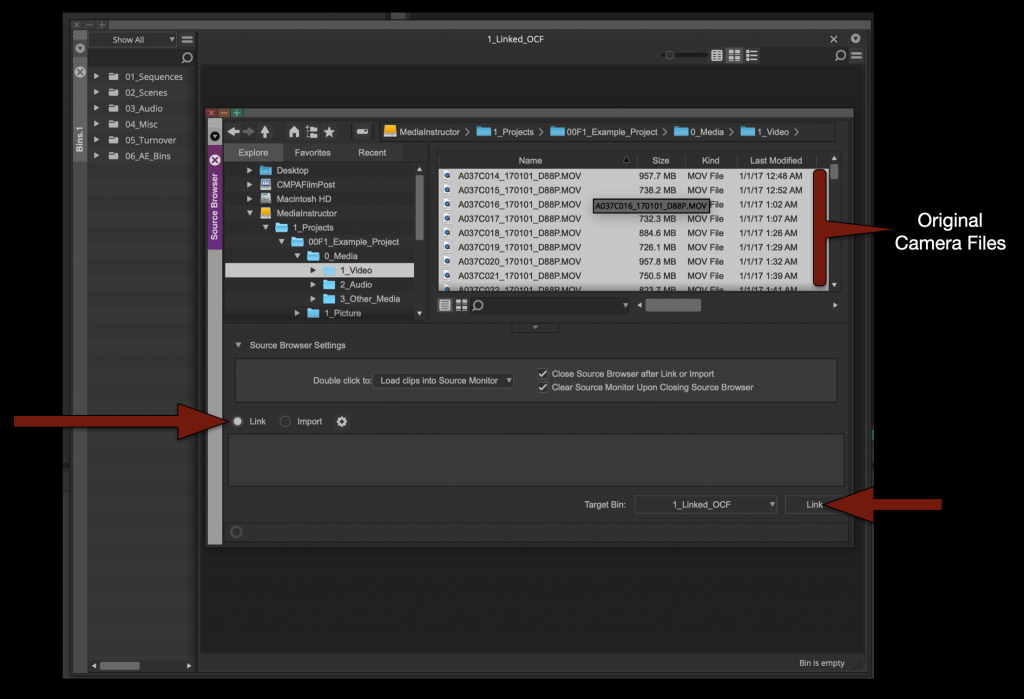
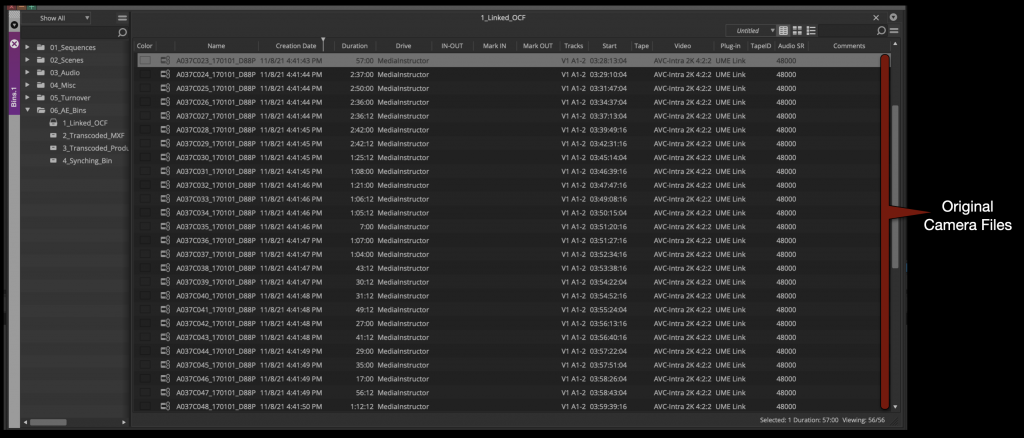
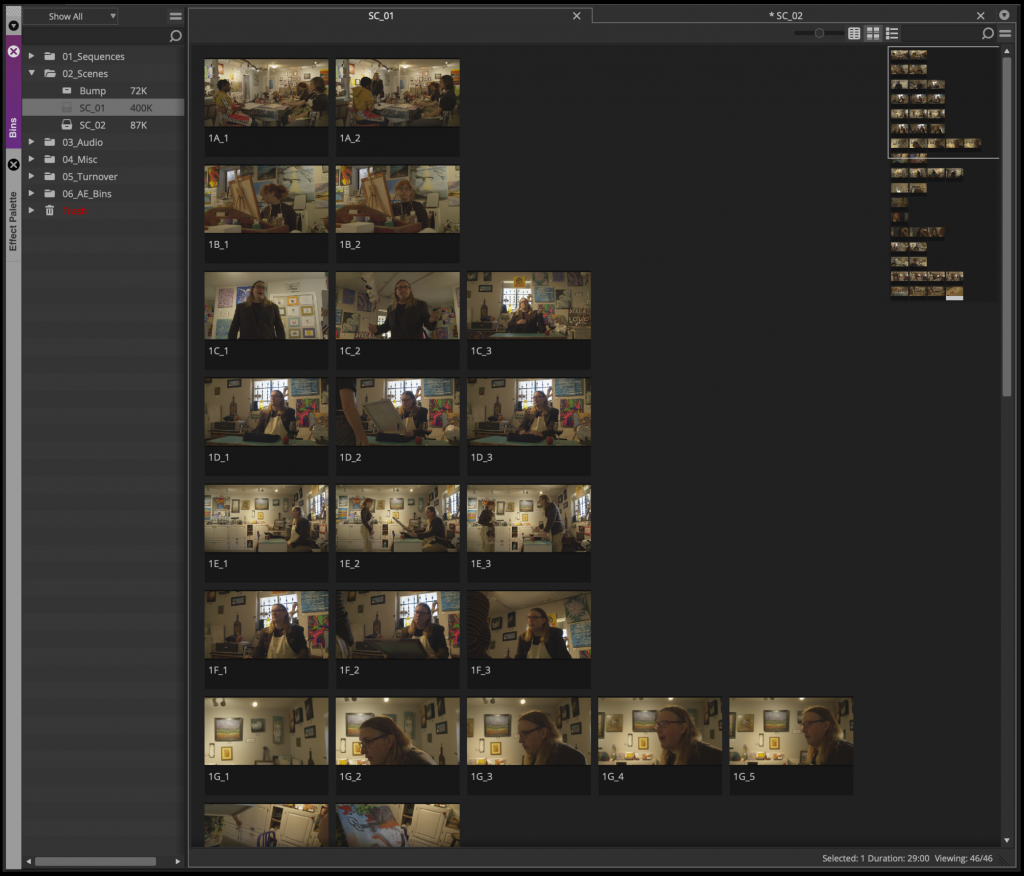
Now open the “Linked OCF” bin and open the “Source Browser”. Select all of the original camera files and link them into the bin.
When everything is linked it it will look like the example below.
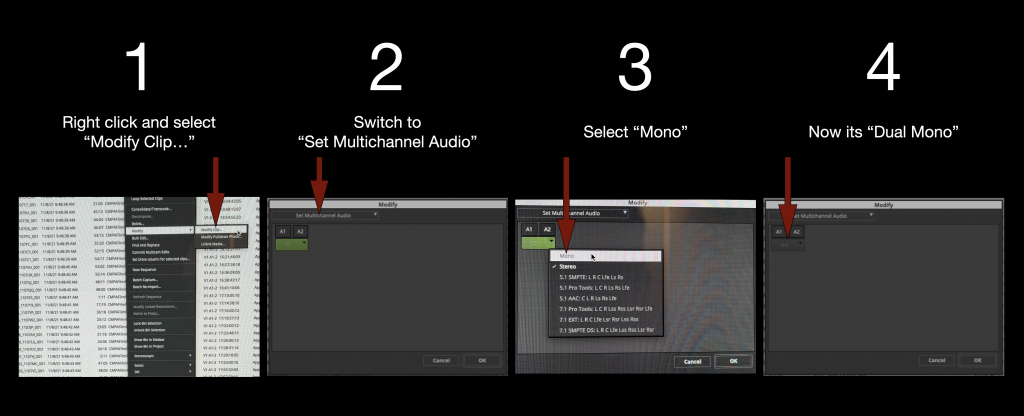
Select all the linked OCF in the bin and switch the audio from “Stereo” to “Dual Mono”.
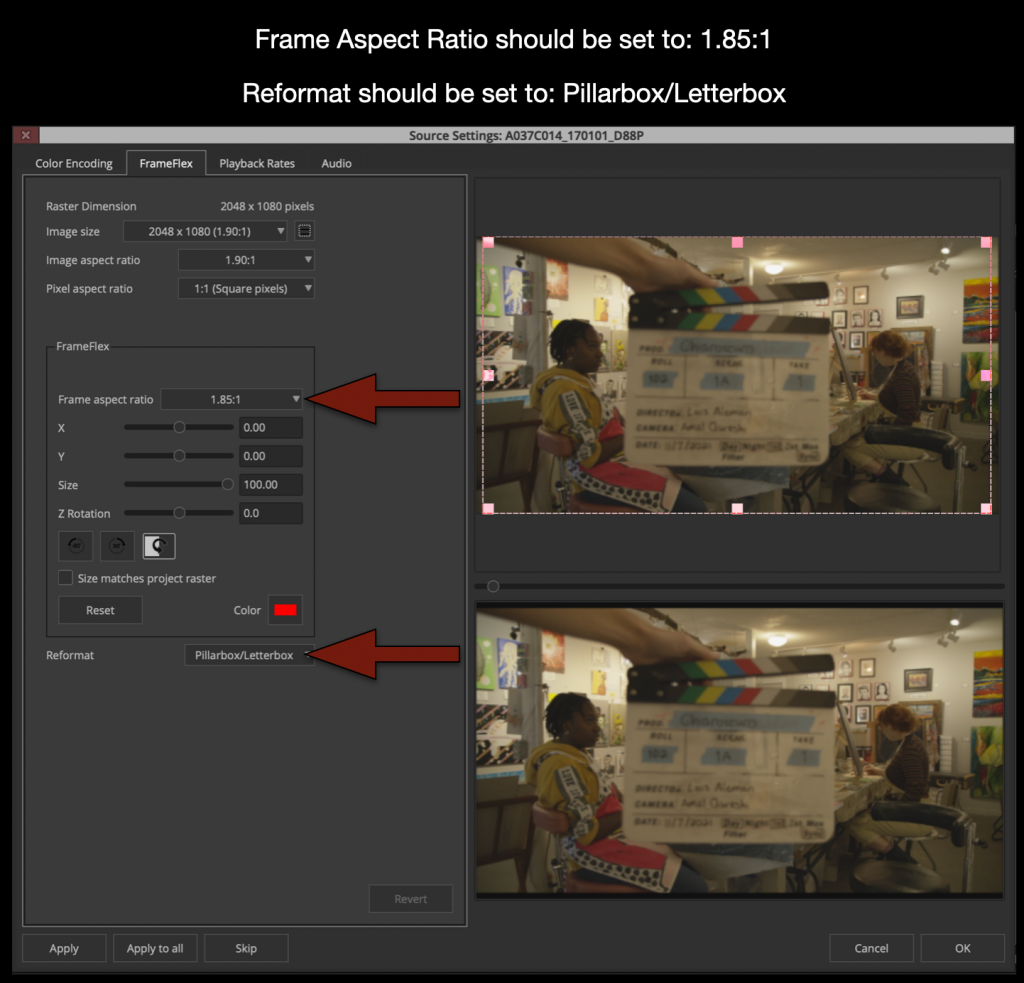
Select all the linked OCF in the bin again and right click and select “Source Settings”. This will open the “Source Settings” window. You will use the FrameFlex tab to set the proper aspect ratio.
Only change the settings for Frame Aspect Ratio and Reformat. Changing anything else or not following these instructions can lead your transcoded footage being stretched or distorted.
Changing these two parameters will ensure that when new Avid Media is created that is 1920×1080 it will have the correct aspect ratio burned in.
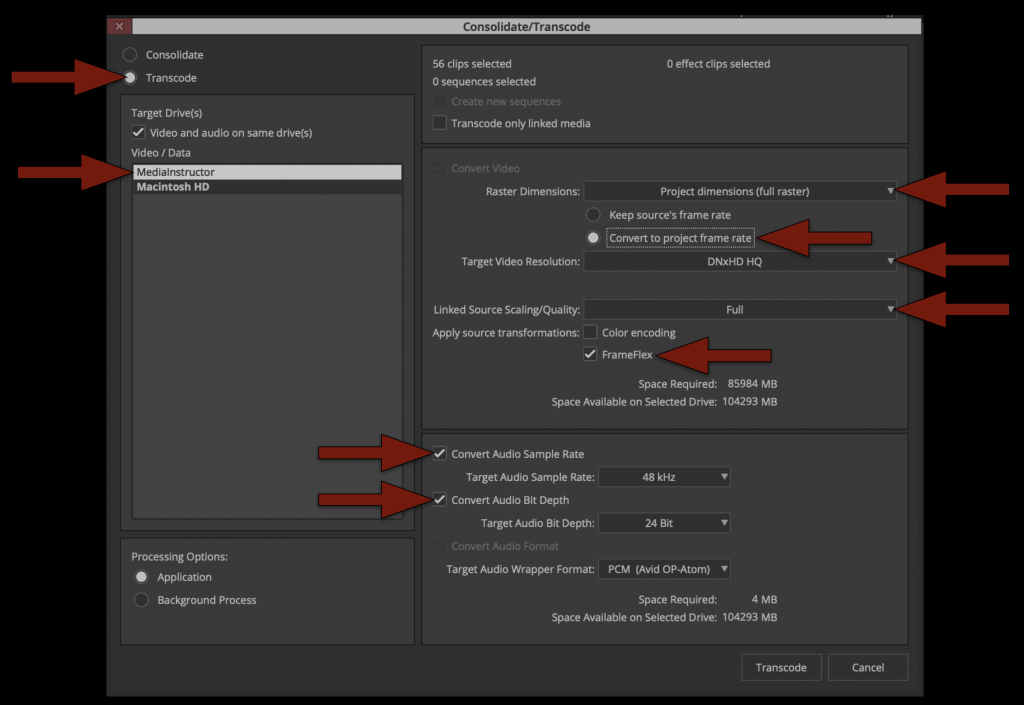
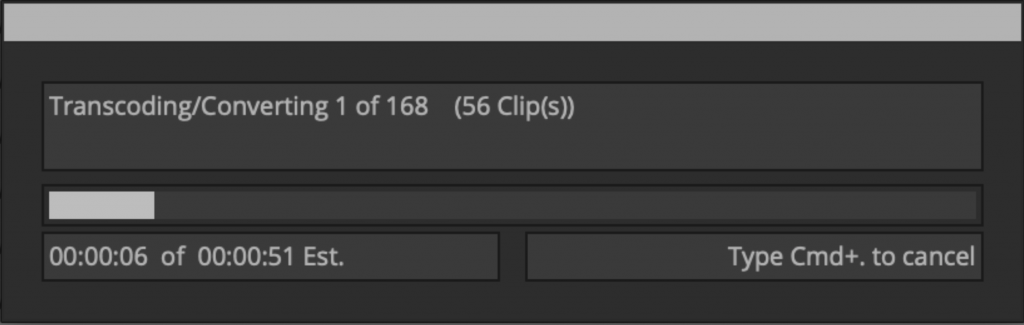
Now that all of your linked media has the proper framing and is set to dual mono its time to transcode to Avid Media. Highlight all of the linked files in the bin by hitting “Command + A”. Then right click on a clip and select “Consolidate/Transcode”.
Study the options with the red arrows shown below. THIS IS VERY IMPORTANT as it determines the kind of media that will be transcoded and used for editing in Media Composer and coloring in Resolve.
The radial button in the top left should be set to “Transcode” Then double check all of the red arrows on the right.
– Target Drive should be local media drive – Target Video Resolution should be DNxHD HQ
Once everything is set properly you can click “Transcode”. This process will take a few minutes as it generates new Avid Media so take a break and relax.
Organize Footage into Avid Bins
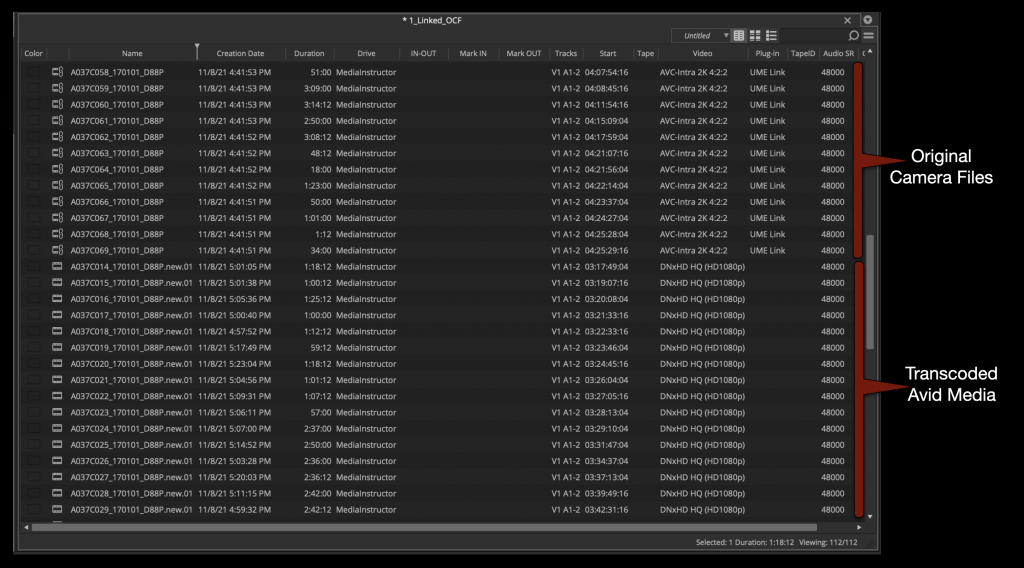
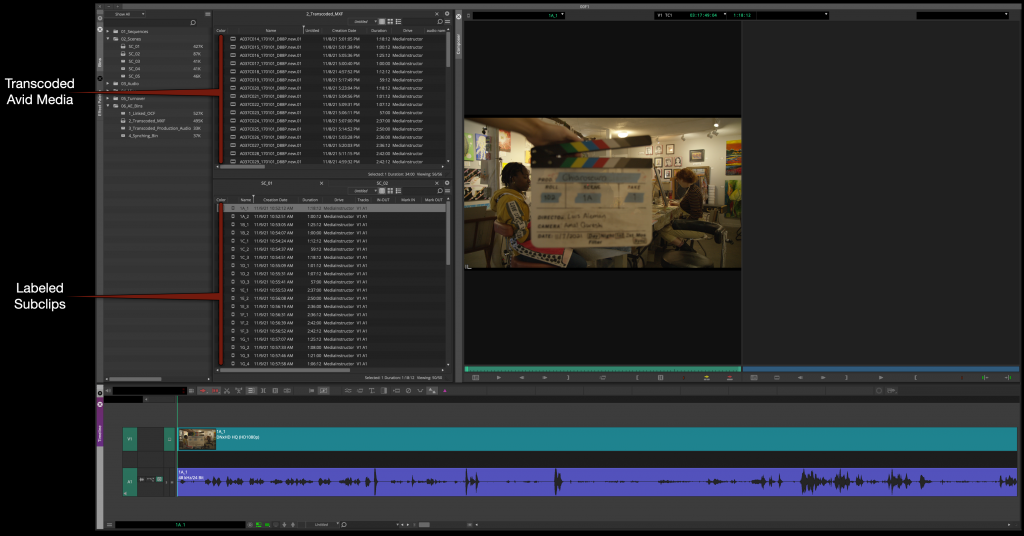
When the transcode is finished you will notice that now you have two versions of everything in your bin. One is the linked OCF and the other is Transcoded MXF Avid Media.
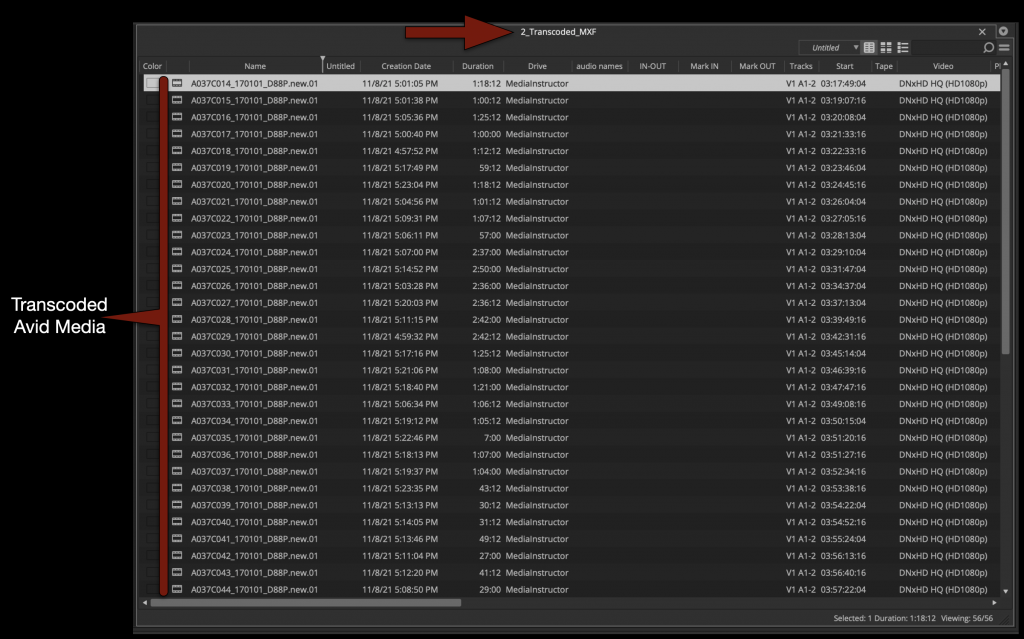
Move the newly transcoded Master Clips to the “Transcoded MXF Bin”. Close the “Linked Bin” you will no longer need it.
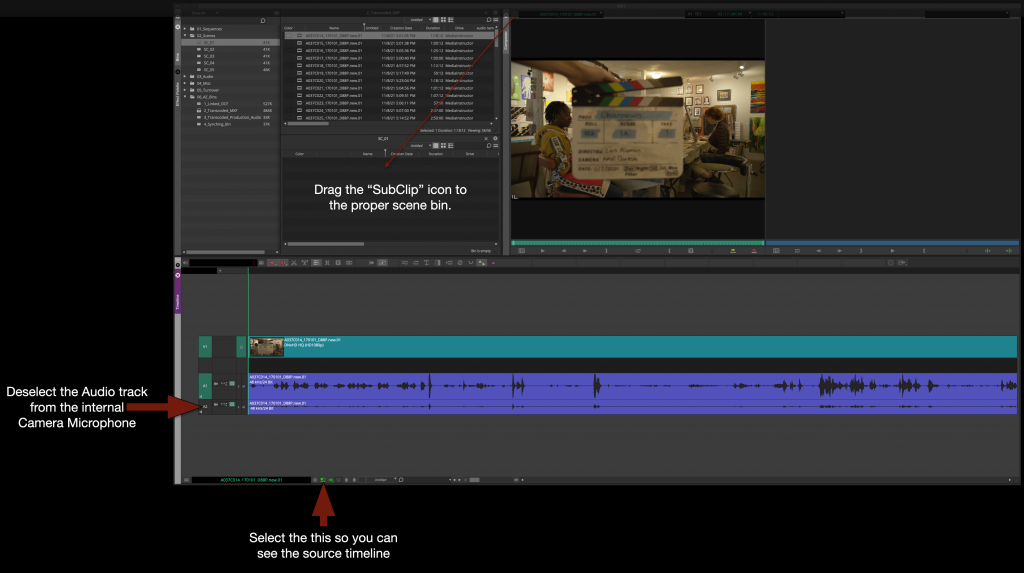
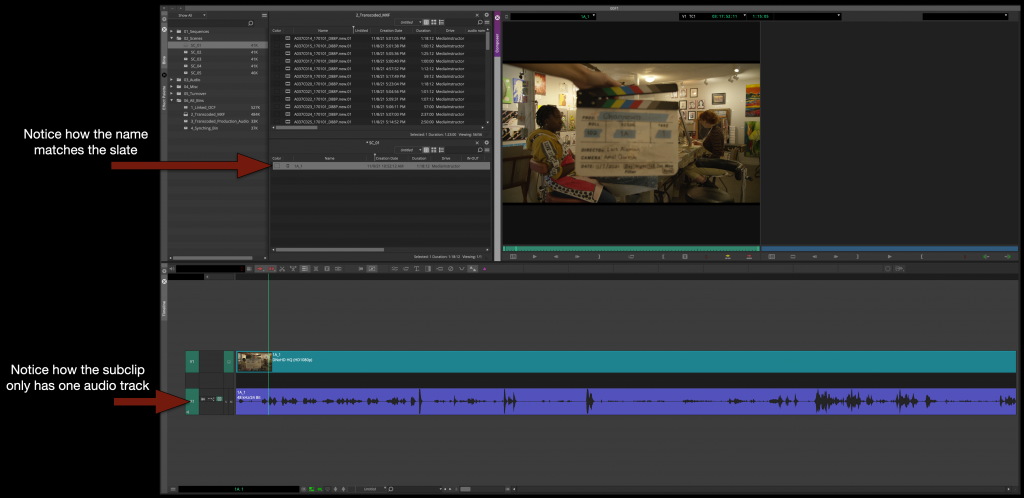
Next, make subclips of all of the Master Clips in the proper “Scene Bins”. This will accomplish three things.
1- It will organize your clips by scene 2- It will let you rename the subclips to match what is on the slate 3- It will let you “remove” the audio from the internal camera microphone
After you make a subclip in the proper scene bin with only the audio from the boom microphone you will be able to rename it based on the slate.
Repeat this for every Master Clip until all of your media is subcliped, labeled, and organized into the proper “Scene Bin”.
This would be the stage that if you have any “Bumped Takes”, “Wild Lines”, or “Room Tone” you would subclip, label and organize taht as well into the proper bin.
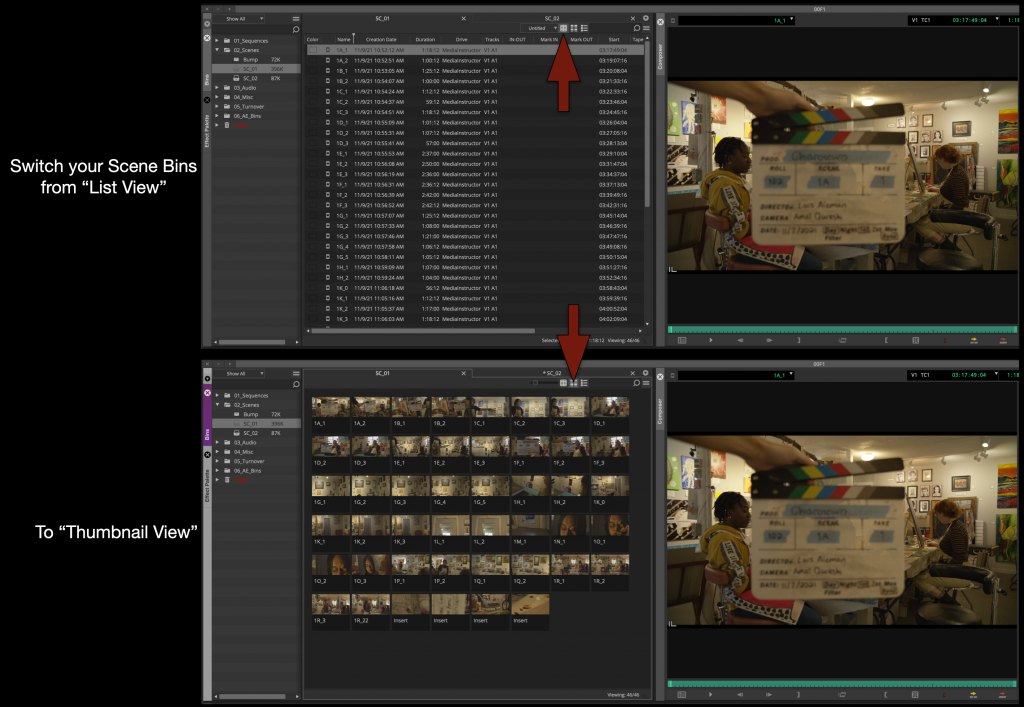
Now that al the subclips are in the right bin, switch your scene bins from “List View” to “Thumbnail View”.
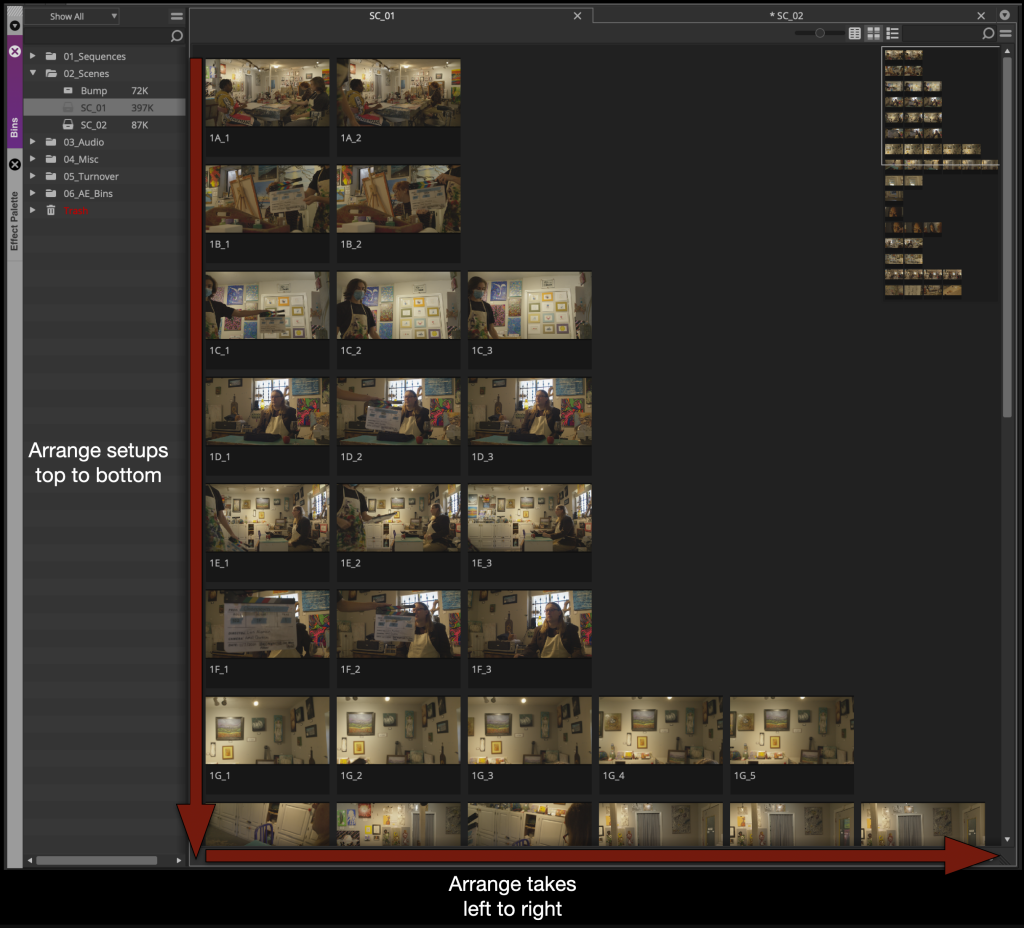
For each scene bin arrange the thumbnails so that the takes are displayed top to bottom and the takes are arranged left to right.
Then single click on each thumbnail and using the “JKL” key scrub and find a good thumbnail frame for each one.
Assemble the Dailies Stringout
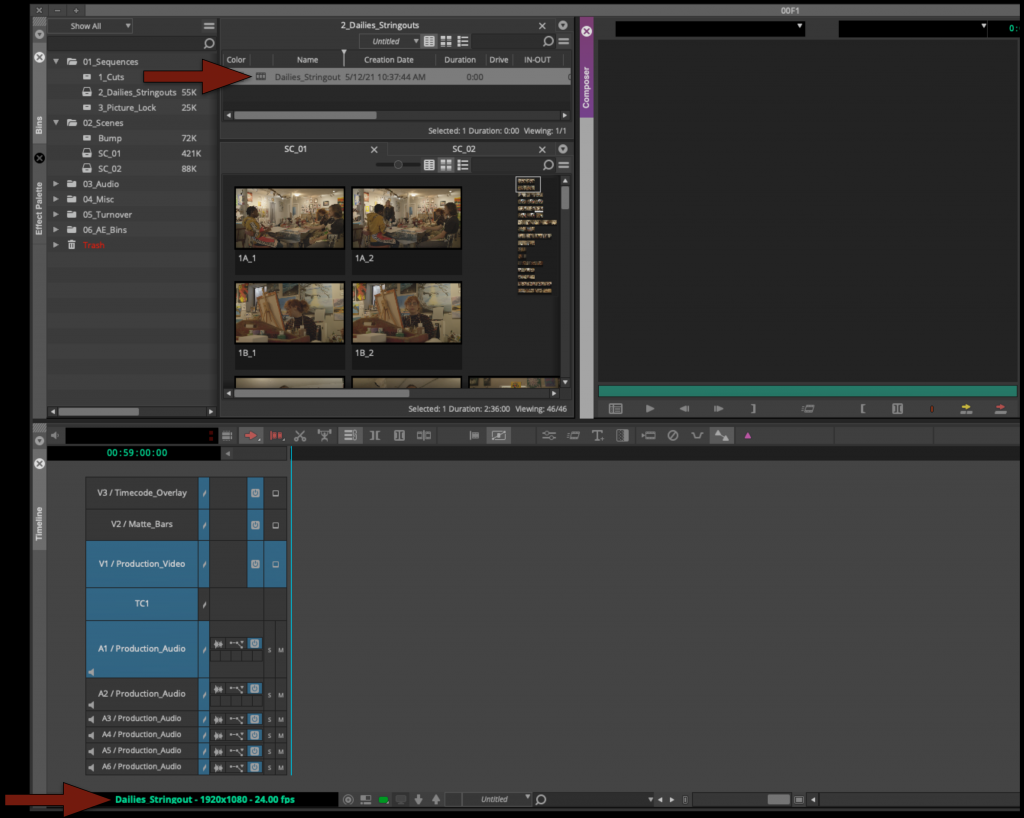
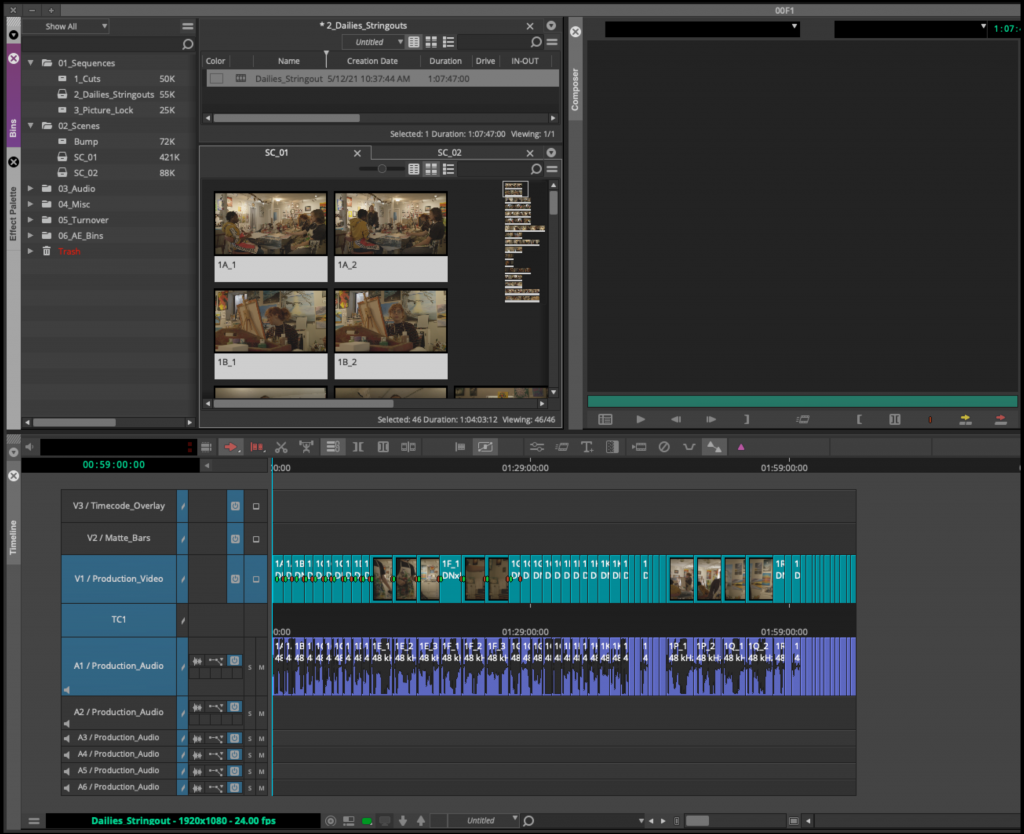
Now you can assemble everything from each scene bin into a Dailies Stringout sequence. It can be found in the sequences folder inside the Dailies Stringout bin.
In scene order assemble all the takes from each scene bin.
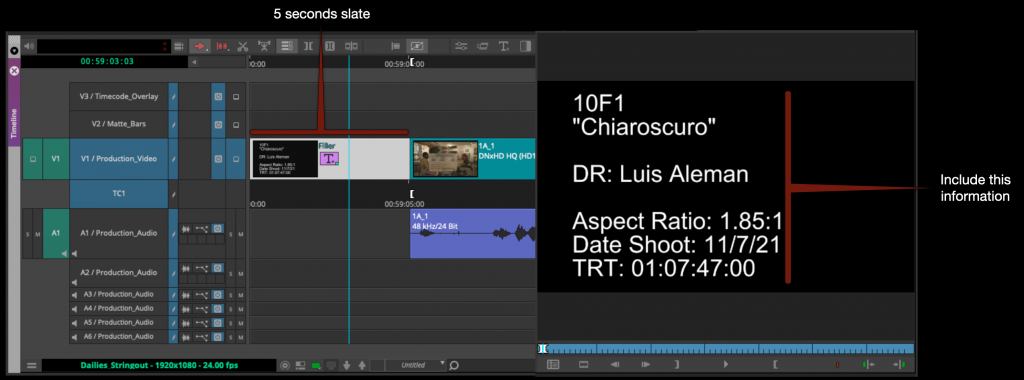
Insert a 5 second slate at the begin of the sequence and using the Avid Title tool fill in the slate with all the information shown in the example below.
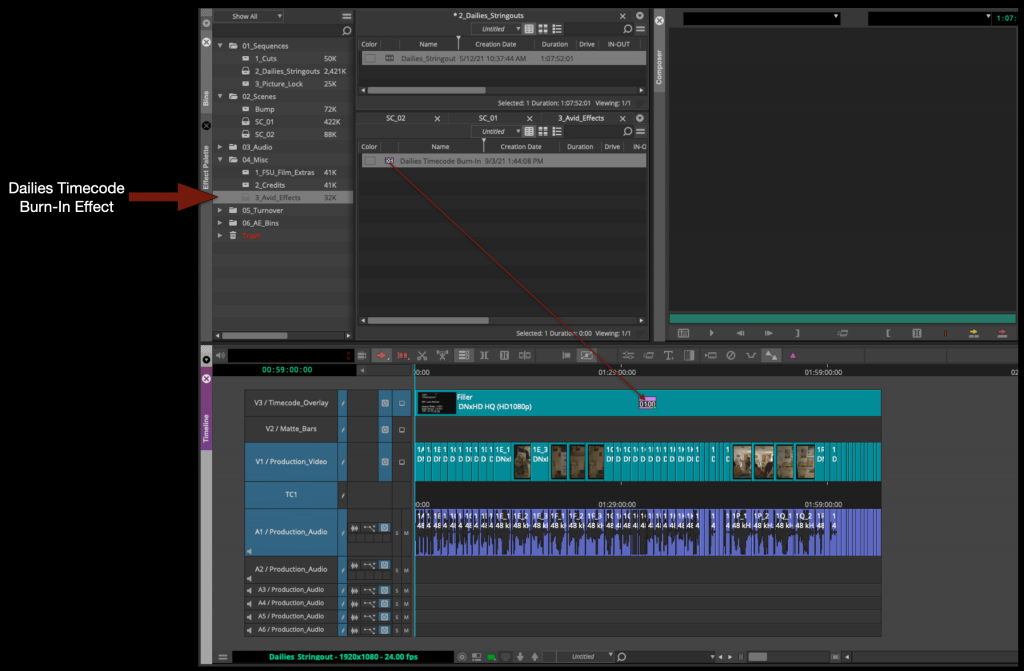
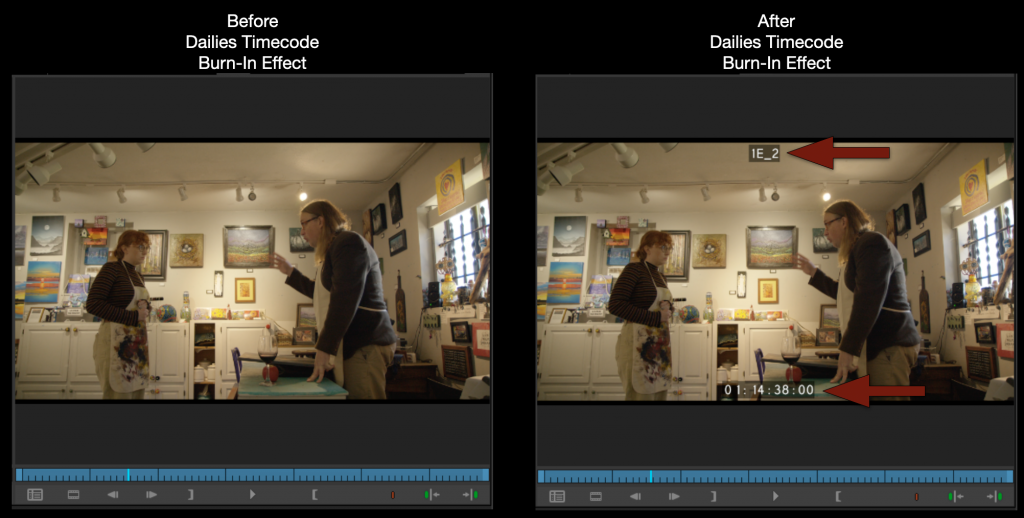
Inside the Avid Effects Bin you will find a Dailies Timecode Burn-In effect. Apply this effect to the fill in the labeled video track.
You will see in the Program Monitor that your Dailies string out now has timecode and shot names burned in.
Export and Upload to Frame.io
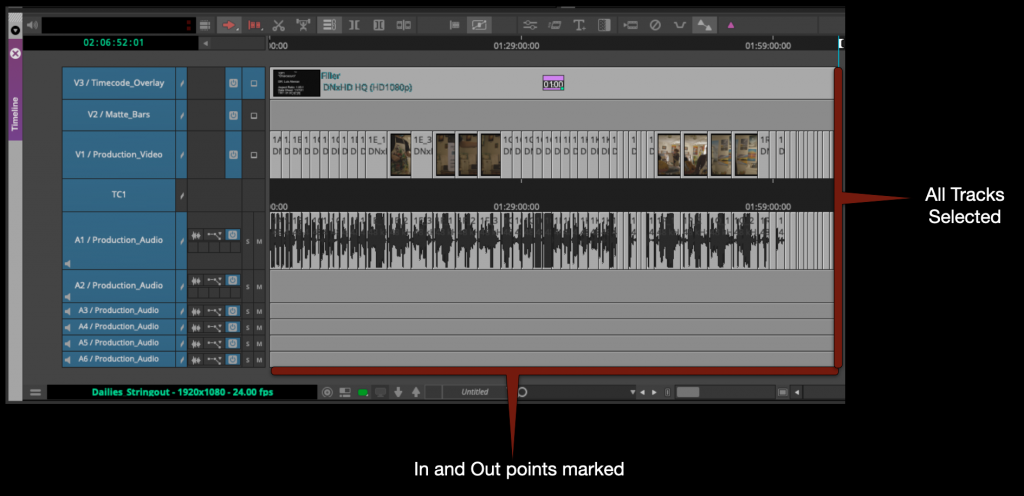
Mark in to out for the entire timeline and select all the video and audio tracks.
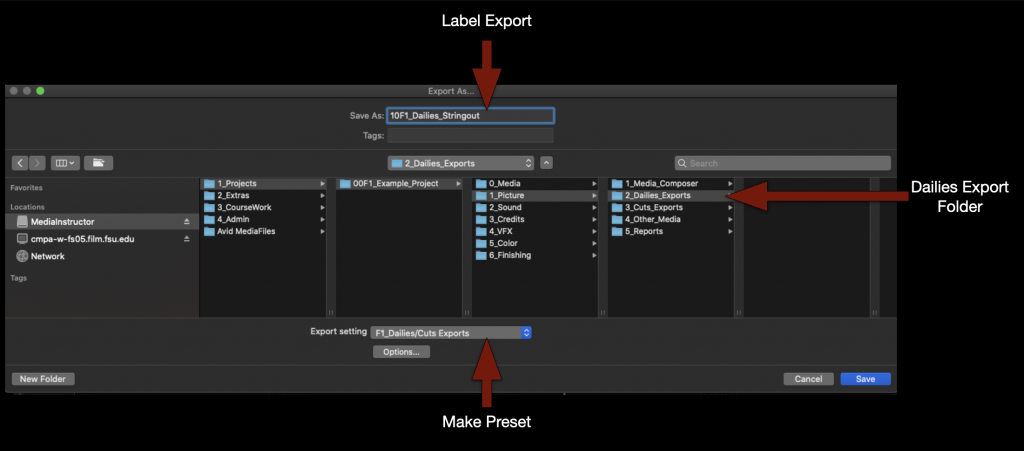
Right click in the program monitor and select export.
Check that the name of the file is correct, that its going the proper folder and that you are using the correct export setting.
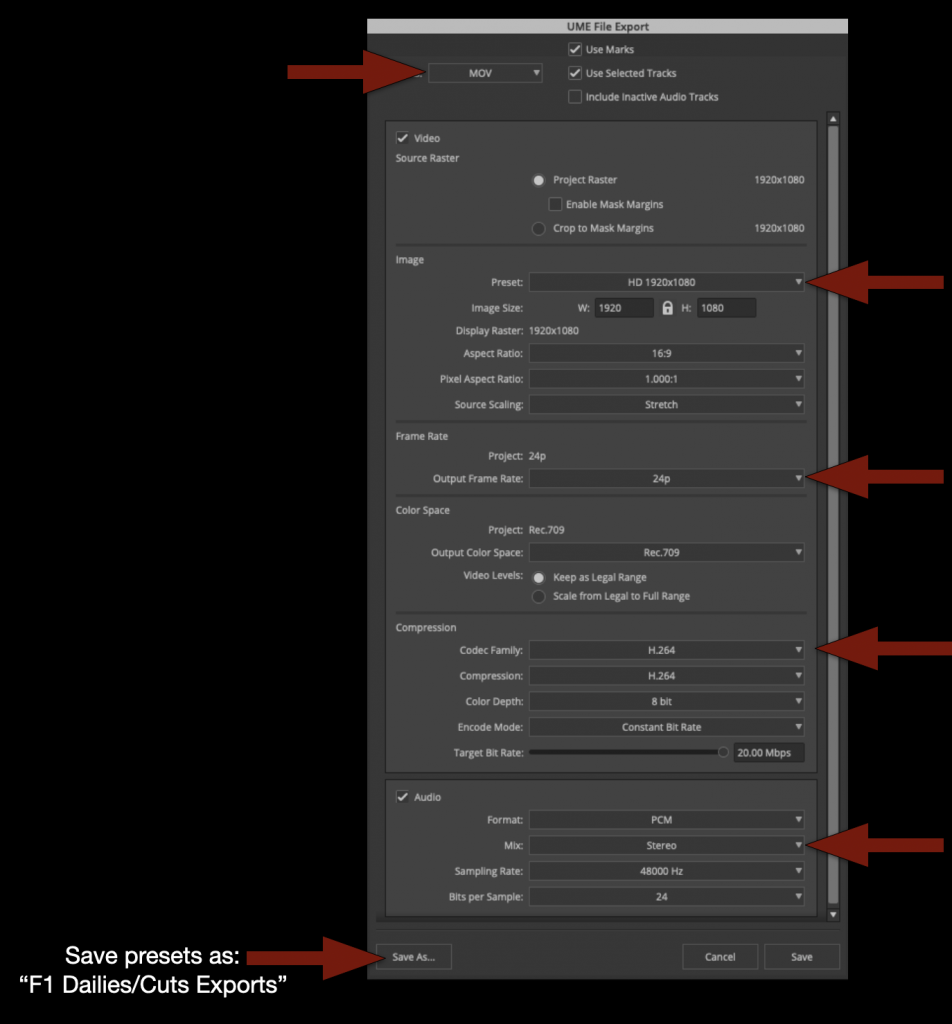
If you don’t yet have a “F1 Dailies/Cuts Export” preset make one using these settings.
When the export is complete you can check to make sure everything is correct and then upload to the proper folder on frame.io.
Review Footage
Now you are ready to review your dailies. Watch everything!
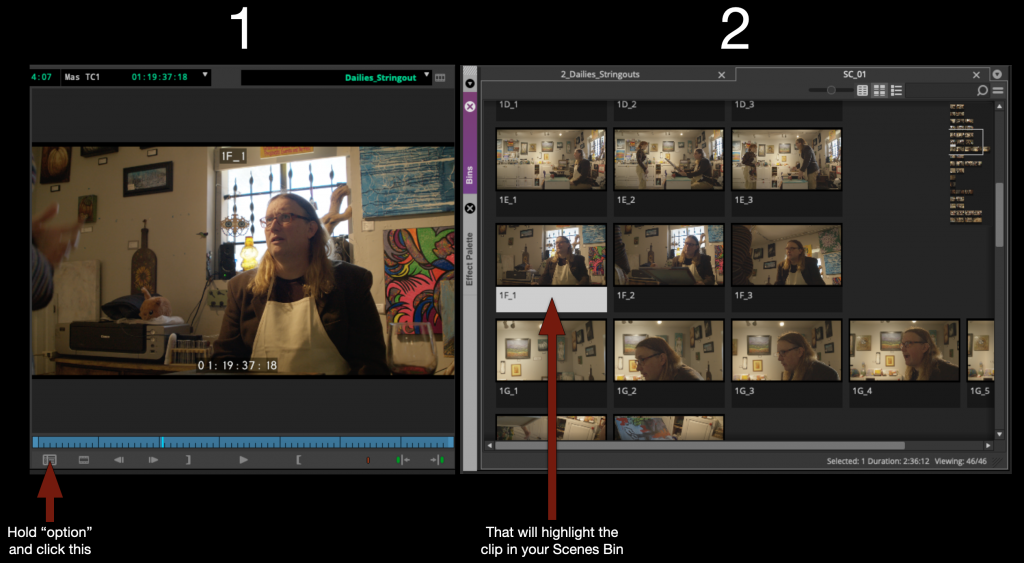
As you are watching the dailies string out sequence in Media Composer you may find that you would like to color code your clips or add written notes to yourself. This is easy to do by using the “Find Bin” button.
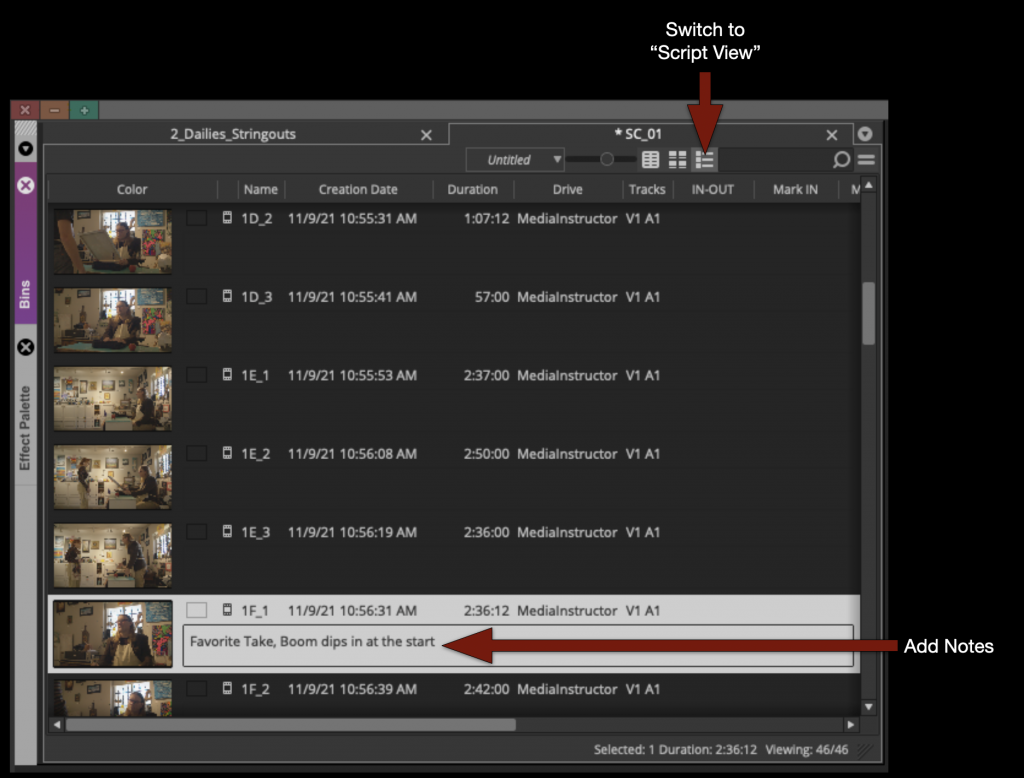
Once the clip is highlighted you an add notes by switching to “Script View” and typing in the comments section.
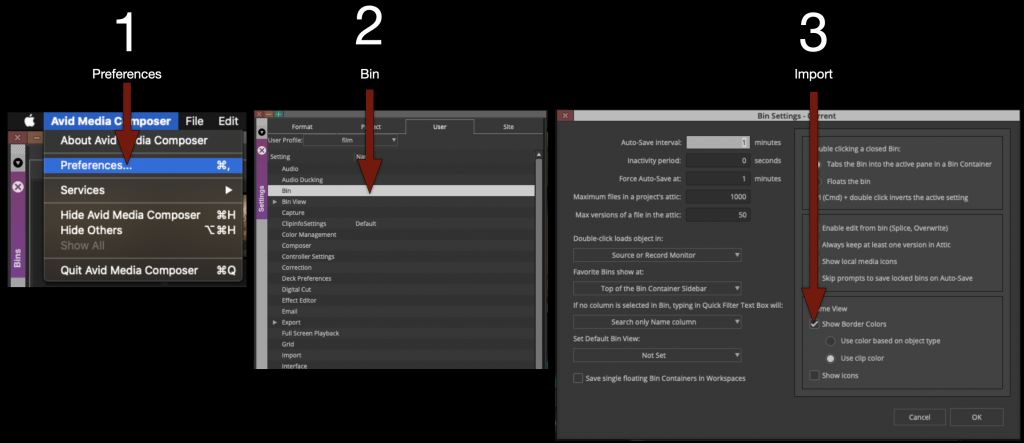
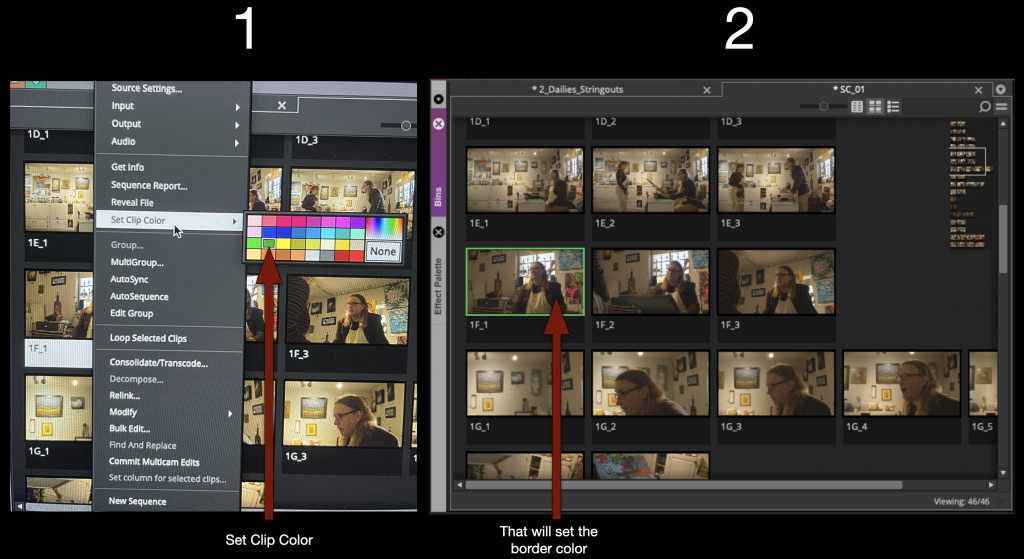
Or if you would like to color code them in “Frame View” you can do taht as well. But first you need to turn something on in the preferences.
Under Preferences – Bin – Check “Show Border Colors”
With that option on you can right click on any thumbnail and set the clip color and it will appear as a border. You can use this to create any kind of organizational system that you like.
Create Front Sequence and Mask
Now that you have reviewed all your footage you are almost ready to begin work on your first cut. But first you need to build the front sequence and apply the mask that you will work underneath.
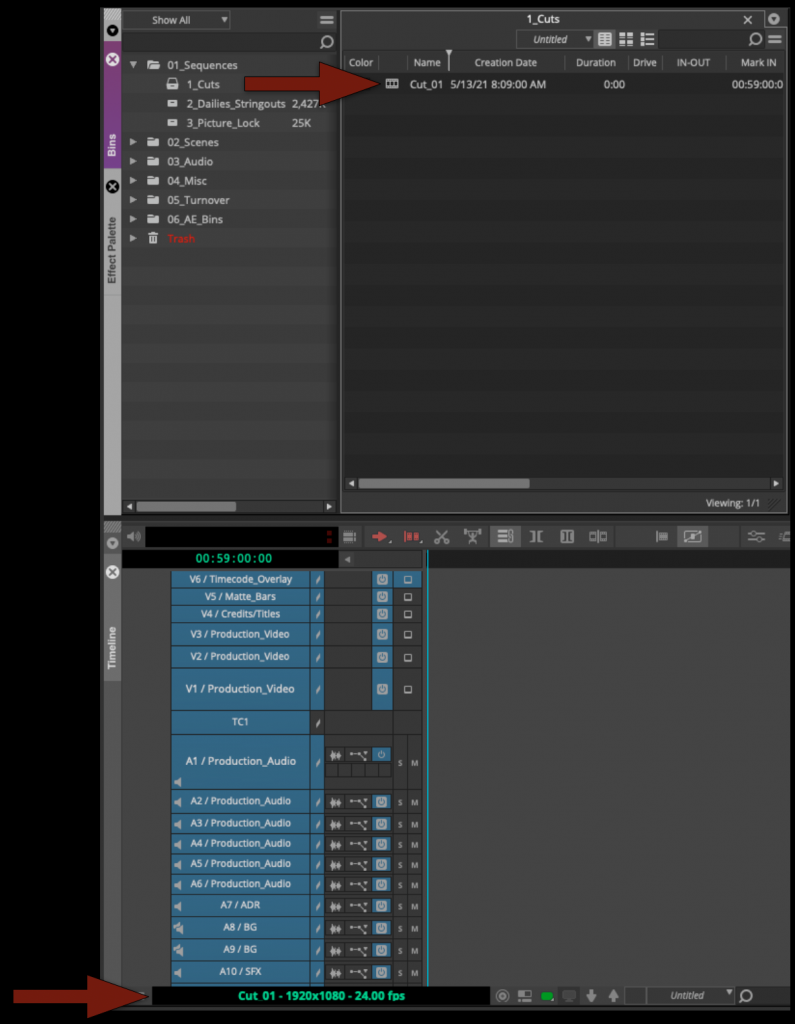
Open the Cut Sequence inside the Cuts Bin.
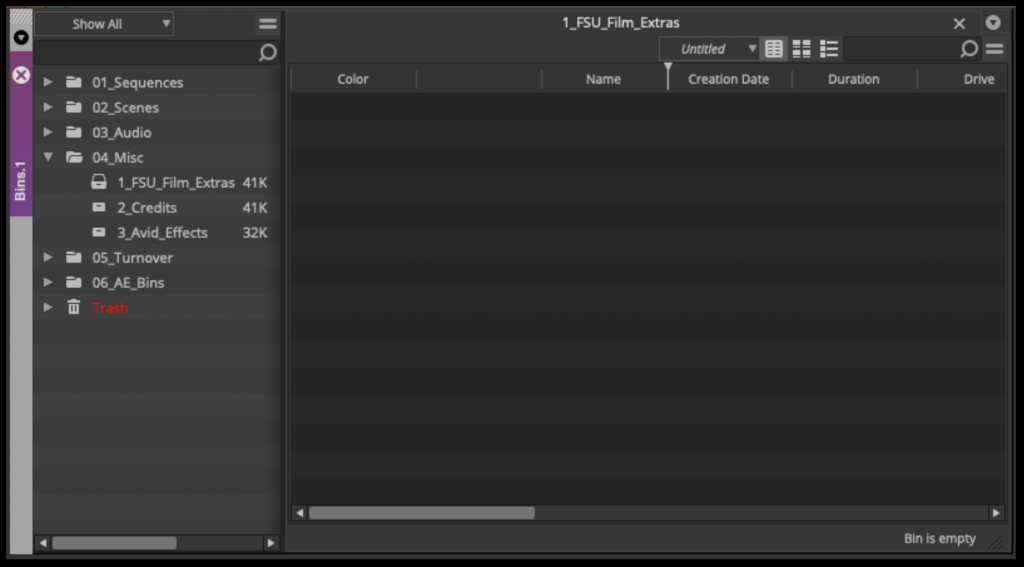
Open the “FSU_Film_Extras” bin.
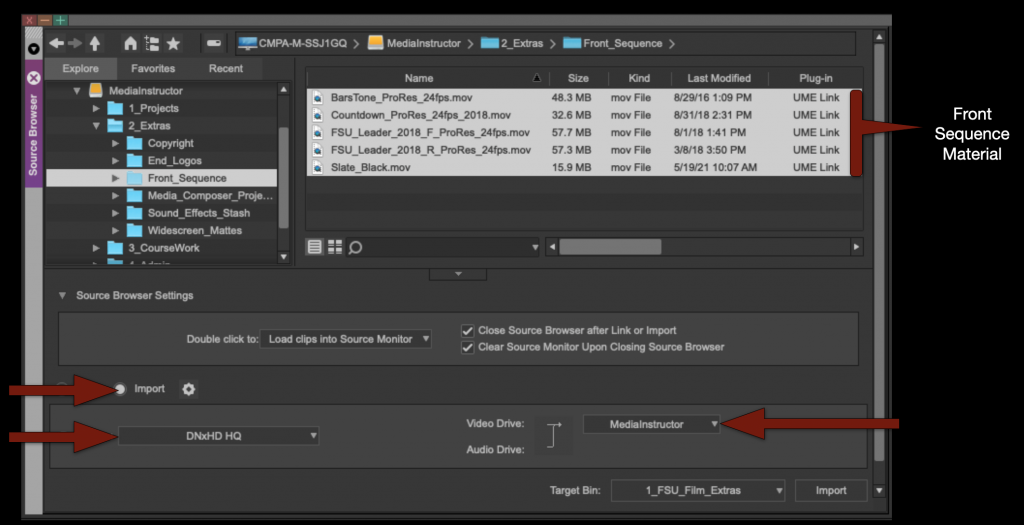
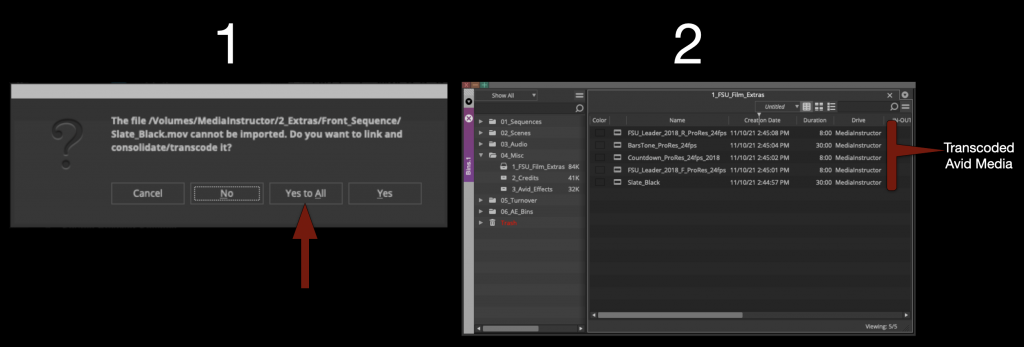
Then using the “Source Browser” import in the front sequence material.
Make sure your Resolution is still set to DNxHD HQ and your Target Drive is correct.
When you click “import” it will say that they will first need to be linked and then transcoded. Select “Yes to All”. It will transcode the media to Avid MXF media.
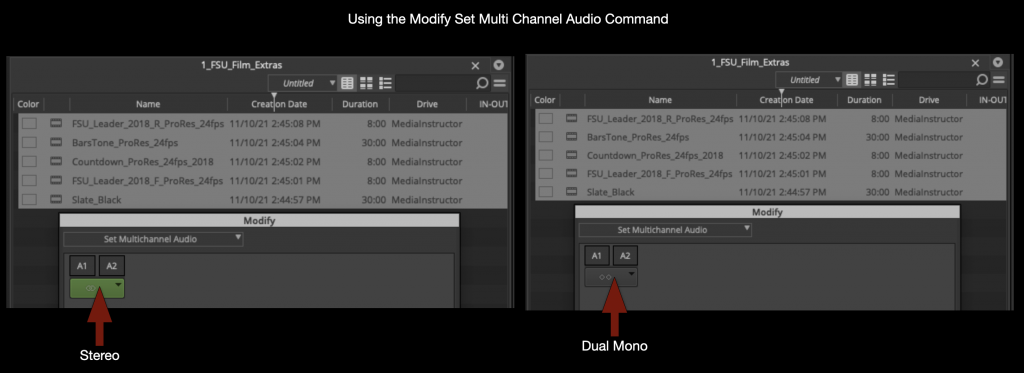
This new medias audio will need to be switched to “Dual Mono”. Select everything and right click to select “Modify”.
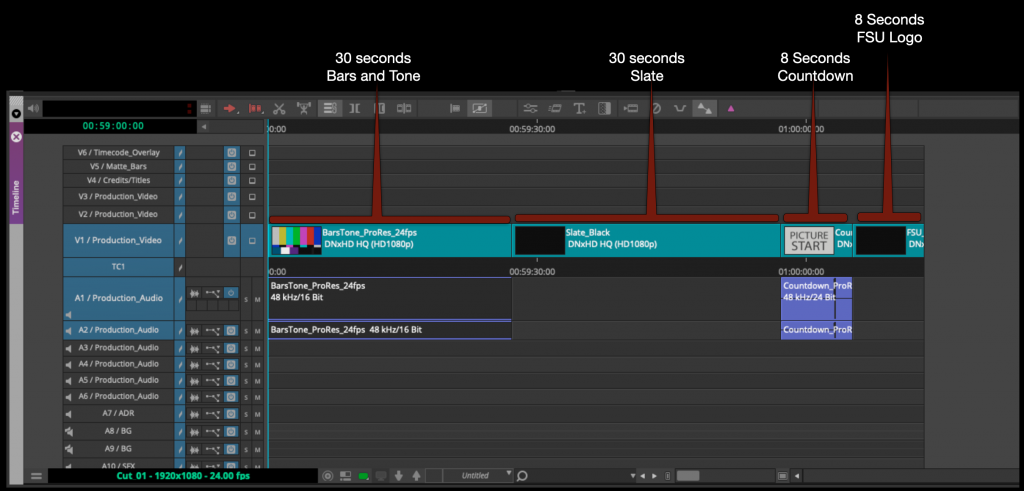
Cut the Front Sequence material into the sequence in the following order:
Your Front Sequence Should be arranged in the following order.
Bars and Tone – 30 seconds – start at Timecode 00:59:00:00
Slate – 30 seconds – start at Timecode 00:59:30:00
Academy Countdown (SMPTE Leader) – 8 seconds – start at Timecode 01:00:00:00
FSU Leader – 8 seconds – start at Timecode 01:00:08:00
This means that the first frame of content will fall on 01:00:21:00. If everything is put together correctly the 2-pop (#2 on the Leader) will fall on 01:00:06:00 (This is very important!)
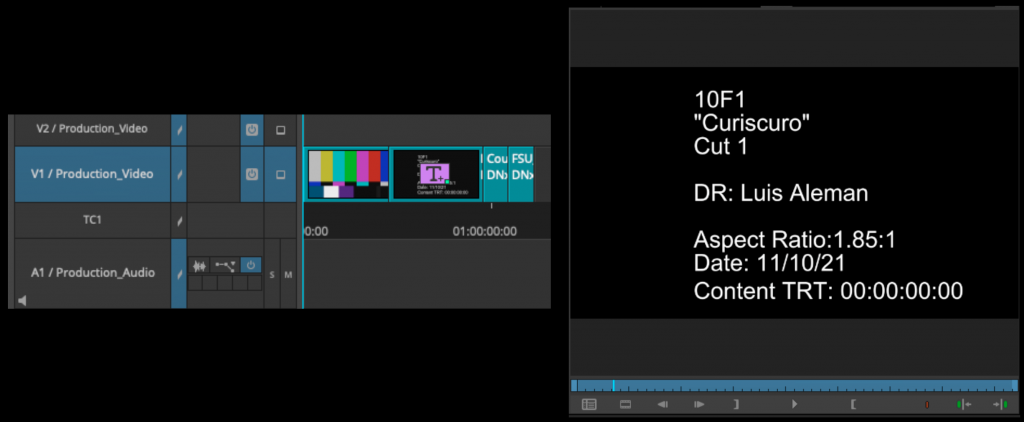
Apply the Avid Title Tool to the 30 second Slate and fill it in as shown in the example below.
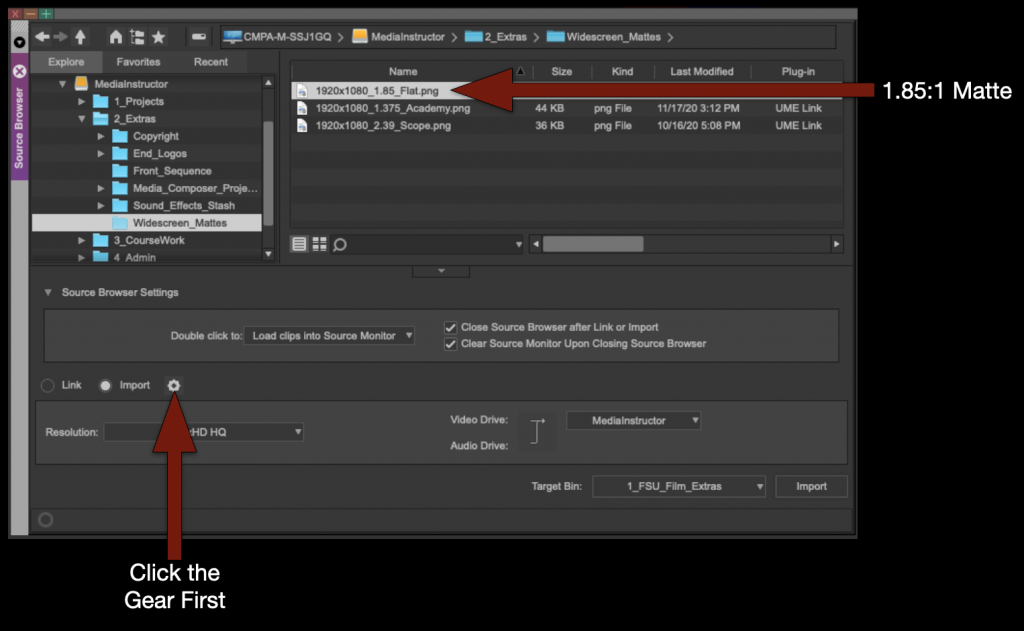
Next to apply the proper masking to the sequence use the source browser to import the Mask into the FSU Film Extras bin.
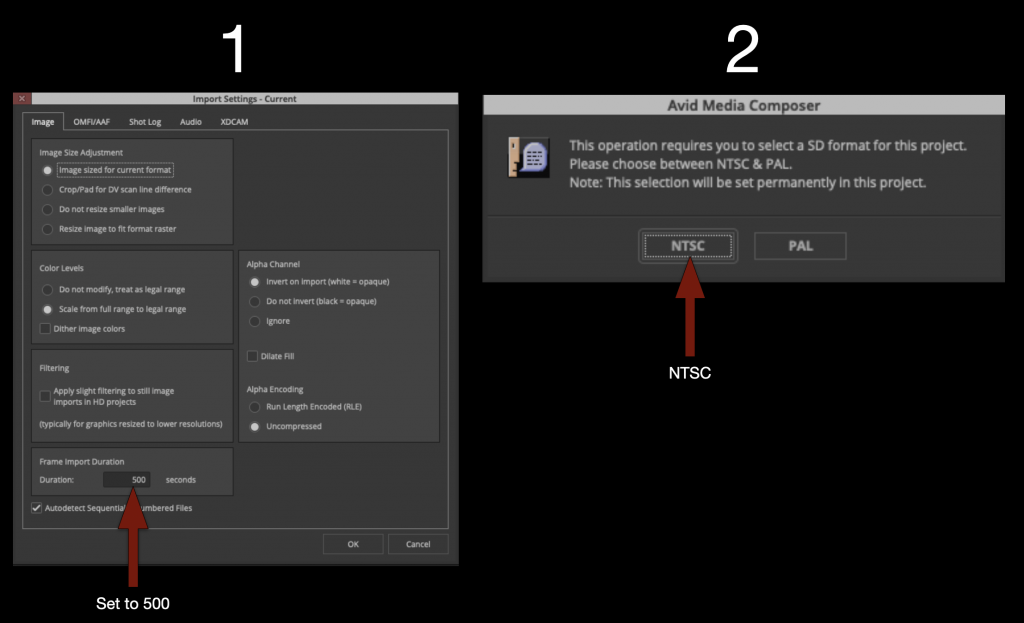
But since the Mask is a still frame you need to tell Media Composer how long to make the new transcoded file to be. In the Source Browser before clicking “Import” select the “Gear” icon.
Under “Import Settings” set the “Frame Import Duration” to 500. Then elect OK and import. It will ask if you prefer NTSC or PAL. Select NTSC.
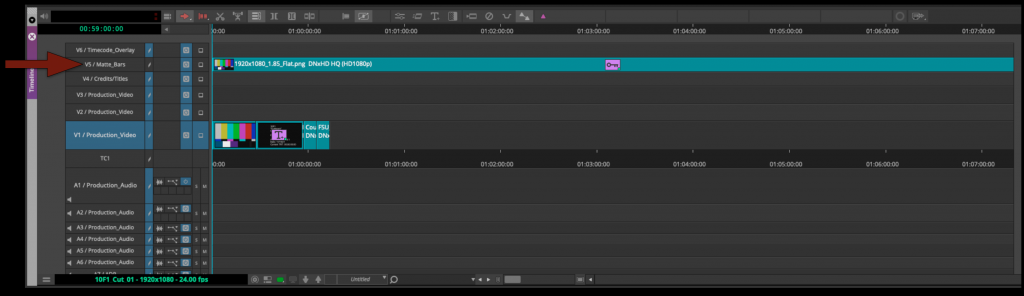
Now that the Mask has been imported into the FSU Film Extras bin you can cut it into the proper track in your sequence.
Duplicate Sequences
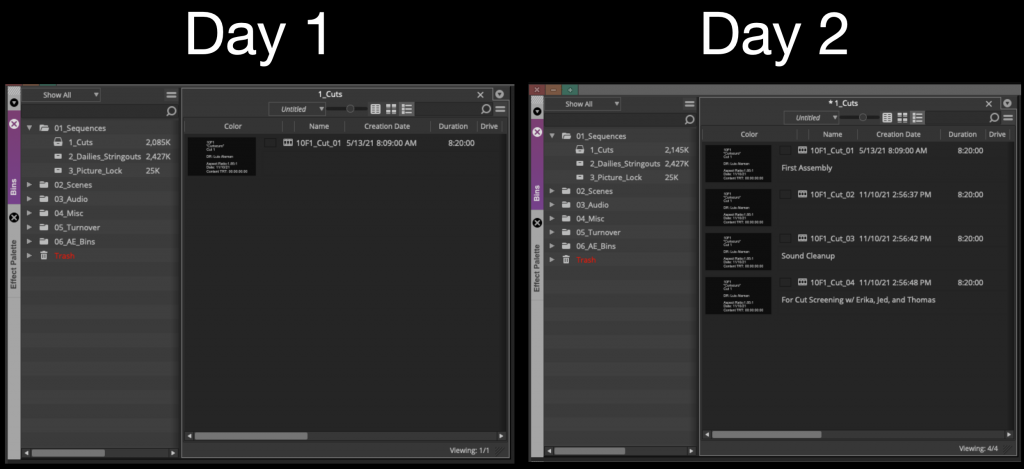
As you begin cutting picture you will find times when you will want to duplicate your sequence. Generally after you have received notes or tried something new. At the very least you should be duplicating your sequence and “versioning up” at least once a day.
Use the “Script View” to make notes about each cut so that you can keep track of the changes between cut.
Import Credits
Before you picture lock its required that your credits be completed using the After Effects Template and exported out as a properly labeled DPX image sequence and imported into Media Composer.
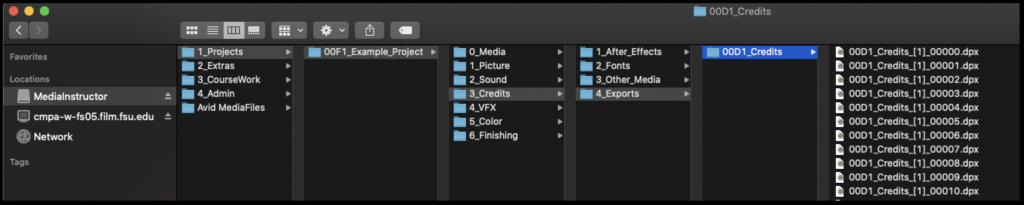
Below is an example of where they should be saved and how they should be named.
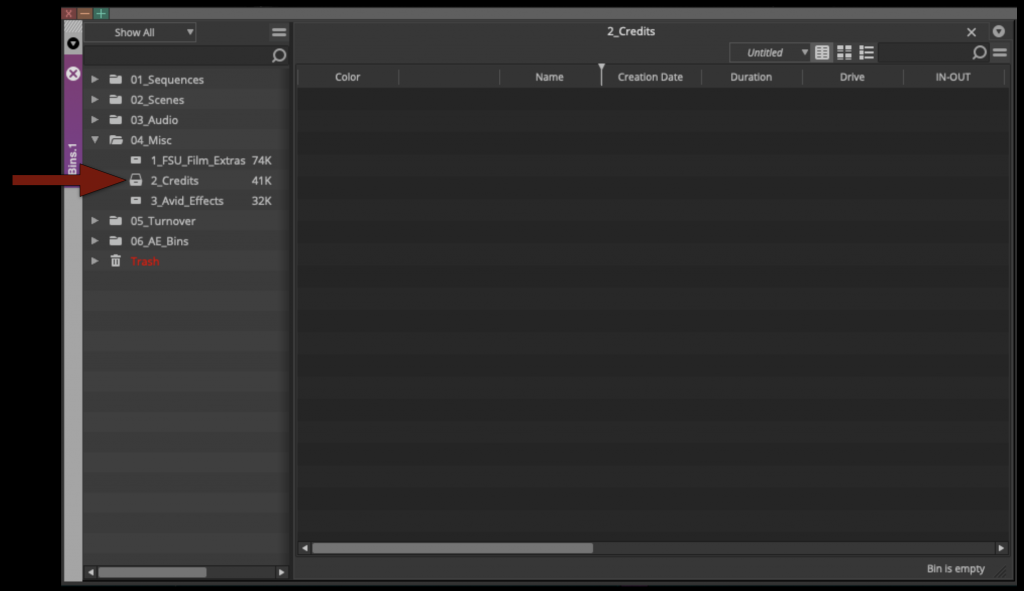
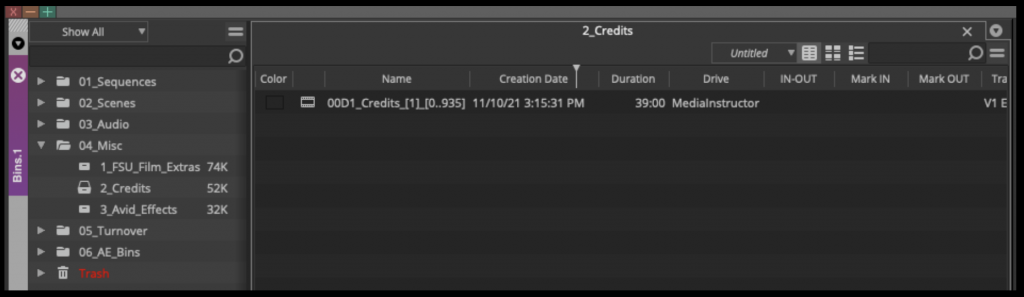
They should be imported into your Credits Bin inside Media Composer which can be found inside the Misc folder.
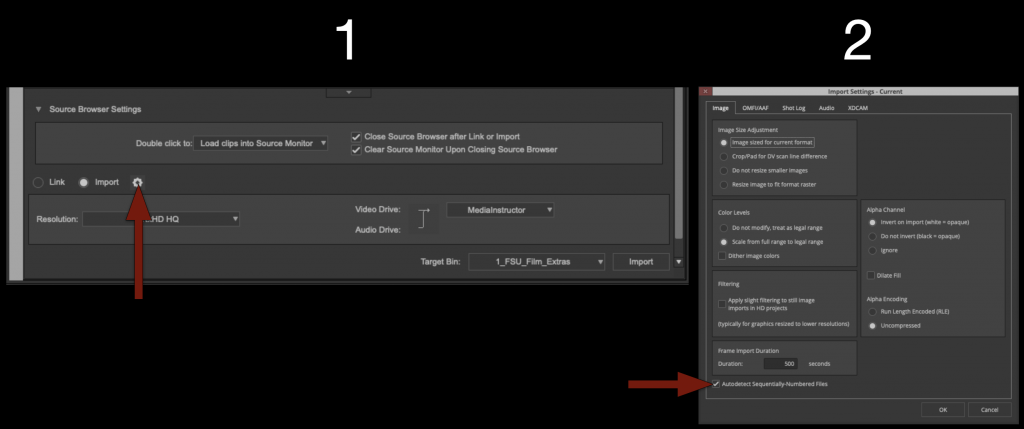
Use the Source Browser to import the credits into the Credits Bin. However since its a DPX image sequence and not a video file we need to tell Media Composer this before importing.
Click the “Gear” icon next to the import selection and then in the “Import Settings” box make sure “Auto detect Sequentially Numbered Files” is selected.
Then elect the first file in the image sequence and click “Import”.
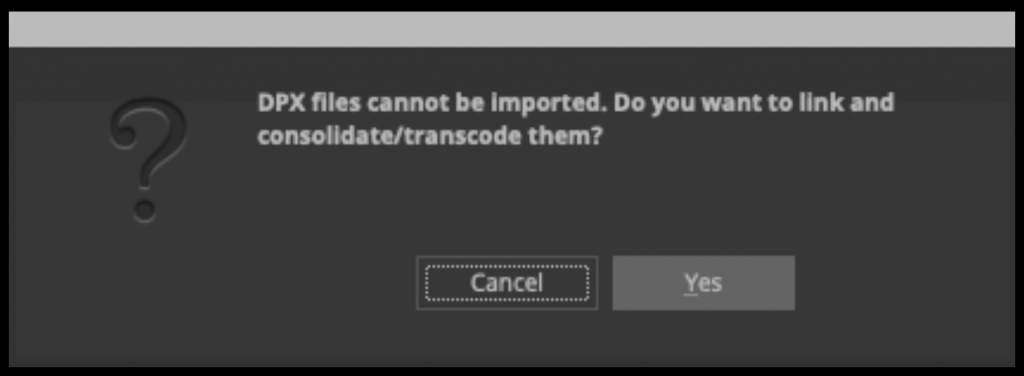
A box will appear saying it needs to be “Linked and then Transcoded”, select yes and wait for it to transcode.
When it’s complete your credits should be in the “Credit Bin” as avid media.
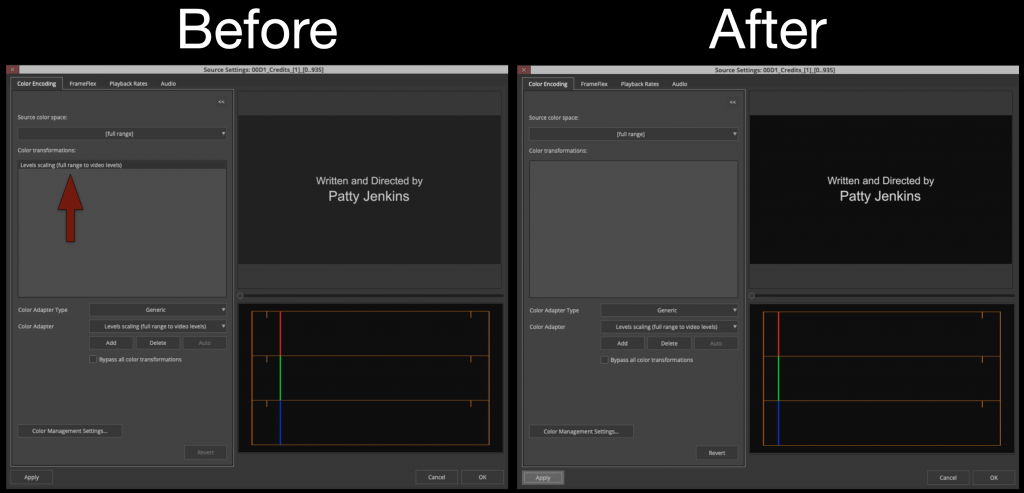
Your credits may look a bit washed out. This is because Avid is trying to compensate for the difference in “Video/Data” levels. Right click on the credits and select “Source Settings”
Under color encoding delete the “Levels Scaling” effect from the color transformations and the black level will then appear correct.
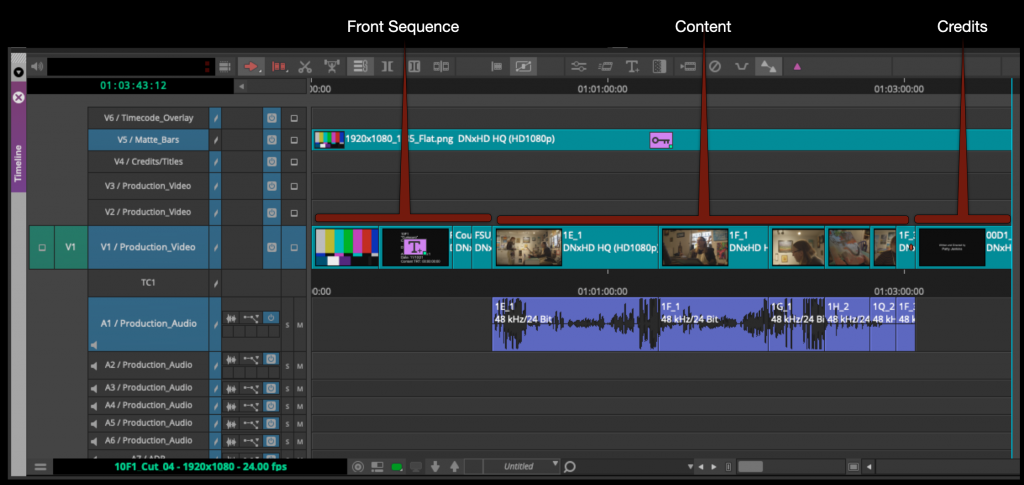
Cut your credits into the sequence after your content.
Picture Lock
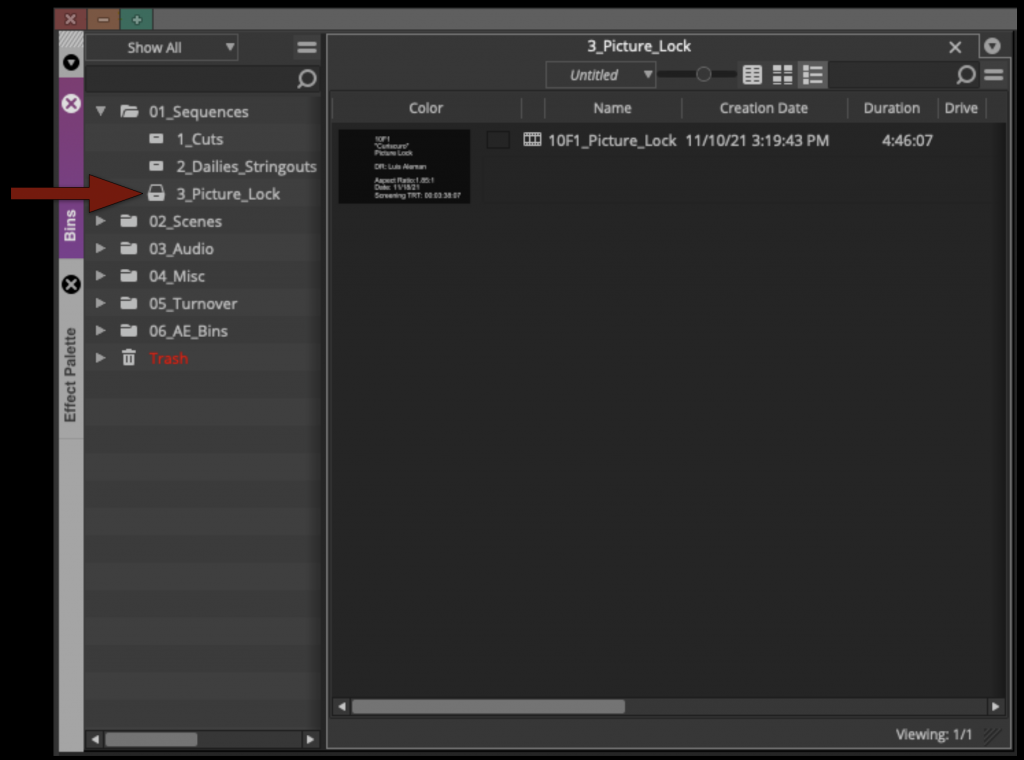
Duplicate your sequence and rename it “XXF1_Picture_Lock” and move that sequence into the “Picture Lock Bin”.
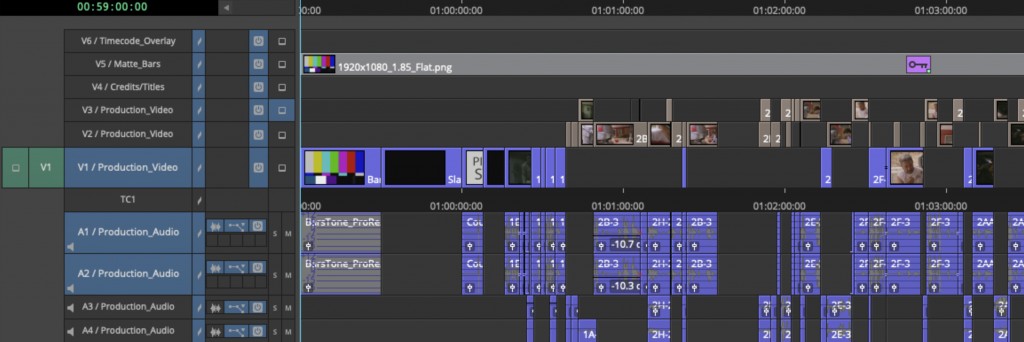
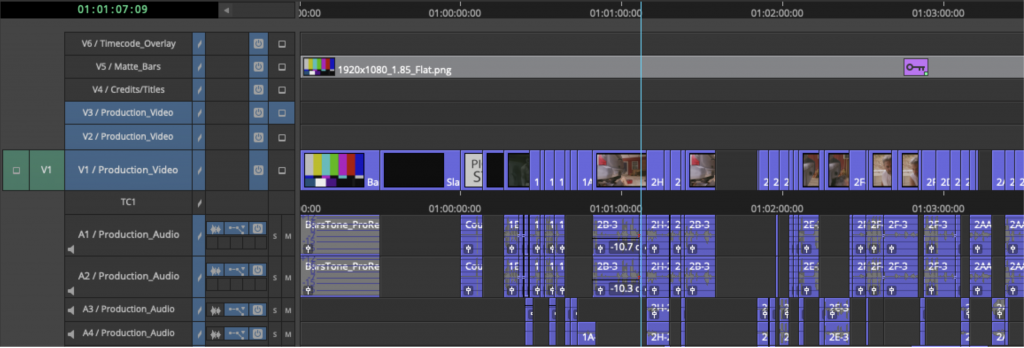
To prep your timeline for coloring your video needs to be condensed onto as few video tracks as possible. It’s understood that, due to the nature of how some video dissolves are built, more than one track is sometimes necessary. The idea is to reduce the amount of tracks and media as much as possible.
Your sequence would go from looking like the example below with video on tracks V1 – V3 that needs to be brought down.
To your sequence looking like the example below with everything consolidated onto one track.
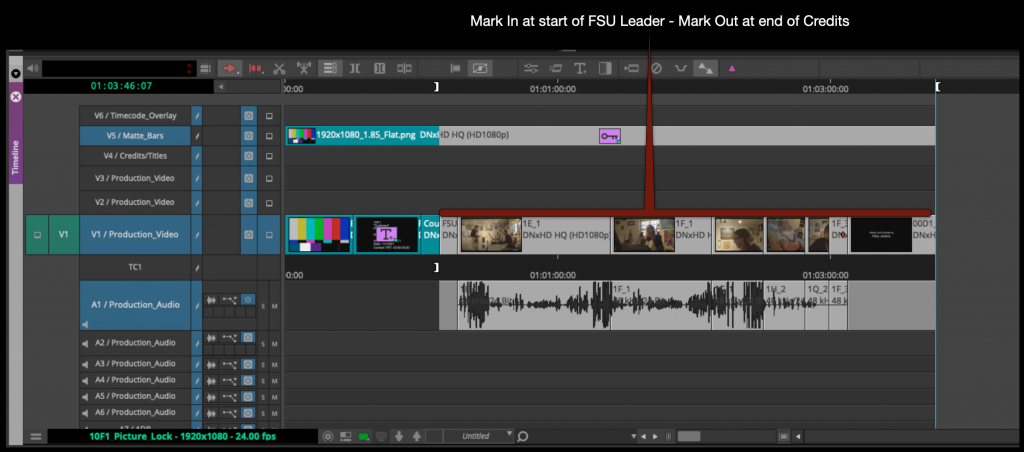
To find you’re Screening Total Run Time mark in at the start of the FSU Leader and then mark out at the end of the credits.
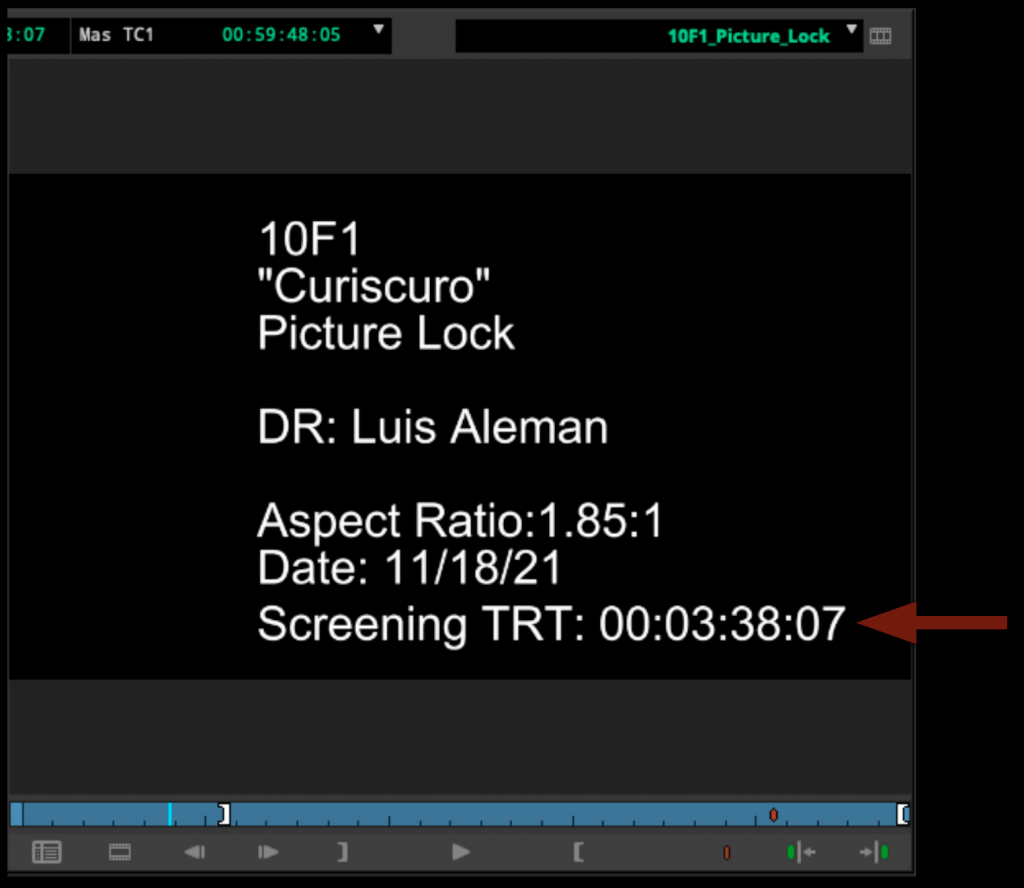
Update the slate in the front sequence with the Screening Total Run time and make sure it includes all the information in the example below.
Congratulations! Your F1 is now picture locked. Save your project and close Media Composer.
This page outlines the safety procedures, approval requirements, and production considerations associated with filming around water or in environments involving water-related hazards. The procedures are recommended for all water work, including, but not limited to ponds, rivers, lakes, swamps, bogs, oceans, pools, and tanks, or any other unduly wet work environment.
Water environments can introduce serious safety risks related to drowning, slipping, electrical hazards, environmental exposure, weather conditions, and equipment operation. Careful planning and oversight help productions identify hazards early, implement appropriate safety measures, and conduct filming more responsibly.
Identification of potential contaminants or hazards
Know as much as you can about the body of water you’re working on or in, including its natural hazards and animal life. The Production Company, Location Manager or the Safety Coordinator should have all relevant information.
The Producer should identify and make known prior to actual filming, all available knowledge regarding currents and natural or man-made hazards, including sub-surface objects, underwater life, and contamination. Upstream activities, such as dams, waste disposal sites, agriculture, chemical plant dumping sites, flash flood dangers, etc. should also be evaluated. If a potential safety hazard is found to exist, the Producer should take appropriate steps to mitigate the hazard.
Prior to personnel entering a body of water, a determination should be made that the water quality meets the applicable regulatory standards for recreational full body contact. Samples of the water should be taken and analyzed for any potential environmental concerns and/or health hazards. If it is determined that a body of water is contaminated or hazardous, the contamination or hazard should be neutralized or the site shall be avoided.
Extreme care should be taken regarding dangerous marine life, including reptiles.
All personnel should be advised to keep all potential contaminants away from the water, including paints, thinners, repellents, gasoline, oils, etc.
Notifying and protecting personnel
All personnel scheduled for water work shall be notified in advance via the Call Sheet. Personnel who are uncomfortable working in or around water should notify their supervisor prior to that day’s call.
All personnel working in or around water shall be provided with the appropriate water safety devices, such as life vests or other water safety gear when appropriate. (See Safety Bulletin: Recommendations for Diving Operations.)
When necessary, the Producer should implement a plan to account for personnel in the water, such as a “buddy” or a check in/check out system.
The Producer should take steps to prevent hyperthermia (elevated body temperature) and hypothermia (reduced body temperature).
Provisions for post-immersion washing should be available.
Lighting and electricity
Special care must be used whether AC or DC electricity is used in or around water. All electrical cables and lights in close proximity to water shall be properly secured to prevent tipping and falling. All wiring, electrical equipment and devices that will, or may be, subject to a submerged condition should be approved for underwater use, be watertight, have no exposed live connections and be constructed such that there is no shock hazard under any likely conditions of use. All applicable provisions of the National Electric Code should be followed. Local regulations may be more restrictive and should be consulted.
When lighting, electrical distribution, or any electrically powered equipment is used in close proximity to water or can make contact with water, the use of GFCI should be evaluated by a qualified person. This includes all areas where water hazards exist. When persons, wardrobe, props, or equipment are wet, the need for GFCI protection should be evaluated.GFCIs should not be used on circuits where removal of power may create a greater hazard, such as airbags, decelerators, emergency egress lighting, etc.
All electrical connections should be made by, or under the supervision of, a qualified person.
Other considerations
Safety lines, nets, watch safety personnel and/or divers should be used when filming in rivers or other bodies of water where potentially hazardous conditions could exist (e.g., swift currents, thick underwater plant life, or rocks).
When necessary for personnel to work in fast-moving rivers, downstream safety pickup personnel and safety equipment should be stationed for downstream emergency rescue.
When using watercraft, be aware of load and rider capacity limits. Only required personnel should be on watercraft; all others should remain on land. (See Safety Bulletin: Guidelines for Boating/Watercraft Safety.)
Safety bulletins
The Industry-Wide Labor-Management Safety Committee provides the following safety bulletins related to water hazards:
7
Recommendations For Diving Operations
15
Guidelines for Boating/Watercraft Safety for Film Crews
17
Water Hazards
Download the relevant bulletins for your production here.
This page outlines the approval procedures, safety expectations, and operational requirements governing stunts, practical effects, atmospheric effects, and other special effects-related production activity.
Stunts and special effects can introduce elevated physical, technical, environmental, and safety risks that require careful planning and oversight before filming takes place. Clear procedures help productions evaluate risks appropriately, coordinate necessary safety measures, and maintain safer working conditions for cast and crew during complex activity.
Approvals
All stunts and special effects must be reviewed by all participants and must be approved by faculty prior to execution to help ensure that they are performed in the safest manner possible. It is the Producer’s responsibility to make sure that the faculty has fully approved any such activities prior to the start of shooting, and any production plans that involve stunts or special effects must be described in detail at the show’s Director’s Prep.
This includes, but is not limited to:
any form of running, jumping, climbing, balancing, or falling actions that are required of actors or stunt personnel;
any fight scenes;
any use of real or prop weapons;
any use of edged or piercing props;
any scenes involving the driving of vehicles;
any operation of potentially dangerous equipment;
any scenes involving animals;
any use of pyrotechnics, explosives, squibs, or fire;
any scenes involving potential water hazards;
any scenes involving potentially hazardous materials.
Stunt coordination
A qualified stunt coordinator must be in charge of all aspects of a physical stunt, including script review, planning, site selection, preparation, testing, rehearsal, modification, and recommendation of the qualified personnel and equipment to be utilized to perform the stunt.
When a Producer requires a performer to perform a stunt or stunt-related activity, an individual qualified by training and/or experience in planning, setting up, and/or performance of the type of stunt involved must be engaged and present on the set. No performer without the requisite training and/or experience shall be required to perform a stunt or stunt-related activity without an opportunity for prior consultation by the performer with such qualified individual. A performer must consent to participation in the stunt prior to its performance.
Advance notice is to be given to stunt personnel in order to plan a safe stunt. If changes are made to these plans, the Producer is to provide sufficient time to safely accommodate the changes and obtain faculty approval for the changes.
An on-site safety meeting, including all participants and others involved, must precede the performance of all stunts. This meeting must be documented and must include a “walk-through” or “dry-run” with the stunt coordinator and/or effects people. An understanding of the intended action, possible deviations, and authority to abort should be made clear. Before rolling cameras, should any substantive change become necessary, the First Assistant Director will again call all persons involved in the stunt to another meeting to confirm everyone’s understanding and agreement to said change(s), and faculty approval must again be obtained.
Under no circumstances should a stunt or special effect be improvised on set without prior faculty approval. Failing to adhere to this policy may result in immediate dismissal from the College of the Producer and any other students deemed responsible for the violation.
Appropriate Personal Protection Equipment (PPE) and/or other safety equipment must be provided to the cast and crew as needed. Wardrobe, hair, and make-up should be presented in sufficient time to determine if such items will impact the execution of the stunt. Final safety approval rests with the stunt coordinator and/or qualified individual.
The stunt coordinator and/or qualified individual shall determine whether safety requires the exclusion of non-essential crew from the stunt area. Perimeter control should be established and maintained. Traffic control procedures shall be reviewed, and special attention should be paid to driving sequences where unauthorized personnel could enter the area. The stunt coordinator and/or qualified individual should be involved in safe placement of cameras, camera operators and all essential crew. There must be a planned escape route and each person involved should personally check all escape routes.
Pyrotechnics, explosives, and fire
Special effects involving pyrotechnics, explosives and/or fire must be noted in advance on the call sheet. Properly licensed individuals must perform all such effects. The necessary permits must be obtained and the appropriate regulatory agencies notified. Explosives must be stored and disposed of properly.
Radios, cell phones, personal electronic devices, transmitting equipment, and remote control equipment should not be used around pyrotechnic or other explosive devices.
Safety bulletins
The Industry-Wide Labor-Management Safety Committee provides the following safety bulletins related to stunts and special effects:
4
Stunts
4A
Specialized Activities
14
Parachuting and Skydiving
16
Recommended Guidelines for Safety with Pyrotechnic Special Effects
18
Guidelines for Safe Use of Stunt Air Bags, Boxes or Other Freefall Catch Systems
19
Recommended Guidelines for the Use of Open Flame on Production
Download the relevant bulletins for your production here.
Film productions frequently rely on lighting systems, power distribution, generators, cabling, and electrical equipment that can create serious hazards if handled improperly. This page outlines the safety procedures and operational expectations governing electrical work and power usage during production activities.
Electrical safety practices are essential because improper equipment handling can result in injury, fire, equipment damage, or unsafe working conditions for the crew. Clear safety standards help productions work more responsibly while reinforcing professional expectations related to training, communication, and on-set safety awareness.
General safeguards
All electrical systems and electrically energized equipment are potentially hazardous, whether Alternating Current (AC) or Direct Current (DC), whether 50 volts, 120 volts or higher. Therefore, electrical equipment should only be used for its intended purpose and only qualified personnel with the appropriate technical knowledge should perform electrical work.
Properly maintain all electrical equipment and wiring. Visually inspect the condition of the plug, cable, and equipment for any signs of excess wear, frayed cables or exposed current-carrying parts. DO NOT USE any equipment that is damaged.
Verify all equipment is in the OFF position prior to plugging or unplugging to avoid creating an arc at the receptacle. Wear protective gloves to avoid injury from a possible flash created by a short-circuit in the equipment.
Do not pull on the cord when unplugging equipment. This can cause one or more of the wires to pull out of its termination in the plug. Always grasp the plug firmly to unplug.
All persons working on or near energized electrical equipment shall wear Personal Protective Equipment (PPE) appropriate for the level of electrical hazard to which they are exposed. This PPE may include non-melting, long-sleeved shirts and long pants, or other Arc Rated (AR) clothing, and closed-toed, nonconductive-soled shoes and Safety Glasses. Garments made from synthetic materials not manufactured specifically for electrical work, such as polyester and nylon, are not suitable to protect from electrical hazards.
Alternating Current and Direct Current
When using both AC and DC systems in the same location, each system must be clearly identified as AC or DC. Always verify that you are not plugging AC equipment into DC systems or DC equipment into AC systems.
All AC electrical systems shall be grounded. All grounded equipment should be tested for continuity between the ground pin on the plug and the metal parts of the equipment before it is put into service. In addition, all cables should be tested for continuity of the ground, neutral and phase conductor
Connecting to house power (tie-in)
Connecting to a premises/house electrical power source, such as a panel board or switchboard, can create the risk of a serious or fatal accident. Such connections shall only be made by a qualified person.
Connecting to an energized system is strongly discouraged. Always consider exposed electrical parts to be energized until you have verified they have been de-energized and locked out/tagged out.
Keep electric panels accessible at all times. There should be no obstructions or storage within three feet (3’) of a panel. Fuses should only be replaced by qualified personnel. When replacing a blown fuse, be sure to select a fuse of proper voltage, interrupting capacity, and amperage for the application.
Prior to a qualified person connecting to a premises/house electrical power system, the following requirements, among others, must be adhered to:
Determine if the electrical system voltage is compatible with the equipment to which it will be connected.
Calculate the electrical panel’s existing maximum ampere load to determine if the remaining capacity is sufficient for the additional equipment being connected.
Use a properly sized circuit breaker or fusible disconnect switch to connect a distribution system to the premises/house electrical power system.
The rated interrupting capacity of the circuit breaker or fuses must meet the available interrupting capacity at the point of connection to the premises/house electrical power system.
Use only approved lugs or devices to connect to the panel bus.
Never use “Alligator” type clamps.
Never connect ahead of the main circuit breaker, fuse box, or meter.
If required, obtain a permit to remove a panel cover.
Use suitable barriers, partitions, or other means to limit access to the connection to protect against accidental contact with energized parts and unauthorized entry into the arc-flash boundary by unauthorized persons or objects.
Replacement of all panels, covers and screws must be done by a qualified person immediately after disconnecting from the premises/house electrical power system.
Generators
Only a qualified operator shall operate a generator. Approach to exposed connections on portable and vehicle mounted generators should be physically restricted or barricaded to non-qualified persons.
The generator should have as much open space as possible on all sides to allow maximum ventilation and minimum interference. Make sure exhaust fumes are ventilated away from enclosed areas, personnel, and air intake ducts, such as trailers and buildings. Be aware of hot surfaces when working around a generator. It is important that all generating sets be protected from the elements and from unauthorized access.
A fire extinguisher specific for the generator unit must be present and readily accessible outside the generator enclosure.
Location and environmental considerations
Cables and devices should be protected from water and from foot and vehicle traffic damage. Electrical distribution systems should be elevated in such a manner that they will not come in contact with running or standing water. When it is necessary to have electrical distribution systems and devices which come into contact with water, such systems shall be designed and listed for use in water.
Remember that lights placed too closely to props, sets and other materials may pose a fire risk and, therefore, make sure that lights are placed far enough away to alleviate risk.
Overhead clearances must be observed and maintained at all times. This applies to ladders, scaffolds, booms, forklifts, aerial lifts, scissor lifts, cranes, rigging, sets, truss work, backdrops and other equipment that could come in contact with power lines.
To prevent electrocutions and injury resulting from contact between overhead power lines and conductive tools, materials, or scaffolds, OSHA recommends that employees be informed that most overhead, high voltage power lines are not insulated and, when in doubt, employees should assume that power lines are not insulated.
Employers should notify the utility company when work must be performed under and/or near overhead power lines where clearances cannot be maintained. In such situations, utility companies should de-energize the power lines or temporarily move or cover them with insulating hoses or blankets before any work is initiated.
Emergency Response
If an electrical accident occurs, notify emergency medical personnel and activate the Emergency Action Plan.
An Emergency Action Plan should include the following items:
Location, method and any necessary tools required for emergency power disconnection
Emergency Medical Services on hand or readily available with working means of contact
Exact location of where the work is being performed
Identification of CPR Trained Personnel
Location of available AEDs
Do not approach any electrical accident until you have been notified by qualified personnel that it is safe to approach.
Properly secure the accident area while maintaining a safe distance to prevent the possibility of additional victims.
DO NOT touch or approach a victim of electric shock while he or she is being shocked. If safe to do so, turn off the power.
Trained personnel should follow proper procedures for Cardiopulmonary Resuscitation (“CPR”) and Automated External Defibrillator (“AED”) use.
Since the possible effects of electrical shock can manifest hours after the event, any victim of electric shock must be evaluated by a qualified medical professional.
Safety bulletins
The Industry-Wide Labor-Management Safety Committee provides the following safety bulletins related to electrical safety:
23
Guidelines for Working with Portable Power Distribution Systems and Other Electrical Equipment
23A
Power Line Distance Requirements
23B
Basic Electrical Safety Precautions for Motion Picture and Television Off Studio Lot Location Productions
23C
Working with 480 Volt Systems
23D
Common Motion-Picture/Television Tasks and Associated Personal Protective Equipment
23E
Guidelines for Meeting National Electrical Code (NEC) Grounding Requirements for Portable Generators Supplying Portable Equipment in the Motion Picture and Television Industry
Download the relevant bulletins for your production here.