After all location information has been delivered for a show, the complete location list for the show needs to be exported from FSUFILM Greenlight as an Excel document and submitted as part of the show’s final delivery. This Excel document serves as a backup of the information in the show’s delivery folder and as confirmation that all the location information has been entered into FSUFILM Greenlight correctly.
Export Instructions
Navigate to the Location Database board in FSU Greenlight.
Select the “My Shows” view at the top.
Batch-select all the items for the show.
Select “Export” from the menu at the bottom.
Delivery Instructions
Locate the exported Excel file on your local drive.
Rename the Excel file, using the following naming convention: 01m2-LocationList.xlsx
After all cast information has been submitted for a show, the complete cast list for the show needs to be exported from FSUFILM Greenlight as an Excel document and submitted as part of the show’s final delivery. This Excel document serves as a backup of the information in the show’s delivery folder and as confirmation that all the cast information has been entered into FSUFILM Greenlight correctly.
Export Instructions
Navigate to the Cast Database board in FSU Greenlight.
Select the “My Shows” view at the top.
Batch-select all the items for the show.
Select “Export” from the menu at the bottom.
Delivery Instructions
Locate the exported Excel file on your local drive.
Rename the Excel file, using the following naming convention: 01m2-CastList.xlsx
While every production’s titles and credits are slightly different, the general order goes:
FSUFILM Leader
Lead Titles
Content (Story)
End Credits
Logos
Copyright
A production can choose whether or not to include any Lead Titles at the start of the film. That decision will impact the order of the end credits, as outlined below.
Sequencing for Lead Titles
If lead titles appear at the head of the film, they must appear in this order:
FSUFILM Leader
Above-Title Cast
Title
Supporting Cast
Original Score by
Production Designer
Sound Designer
Editor
Director of Photography
Producer
Writer
Director
Sequencing for End Credits
The order for end credits, if not shown in the lead titles, are:
Director
Writer
Producer
Director of Photography
Editor
Sound Designer
Production Designer
Original Score by
The remaining end credits appear in the following order:
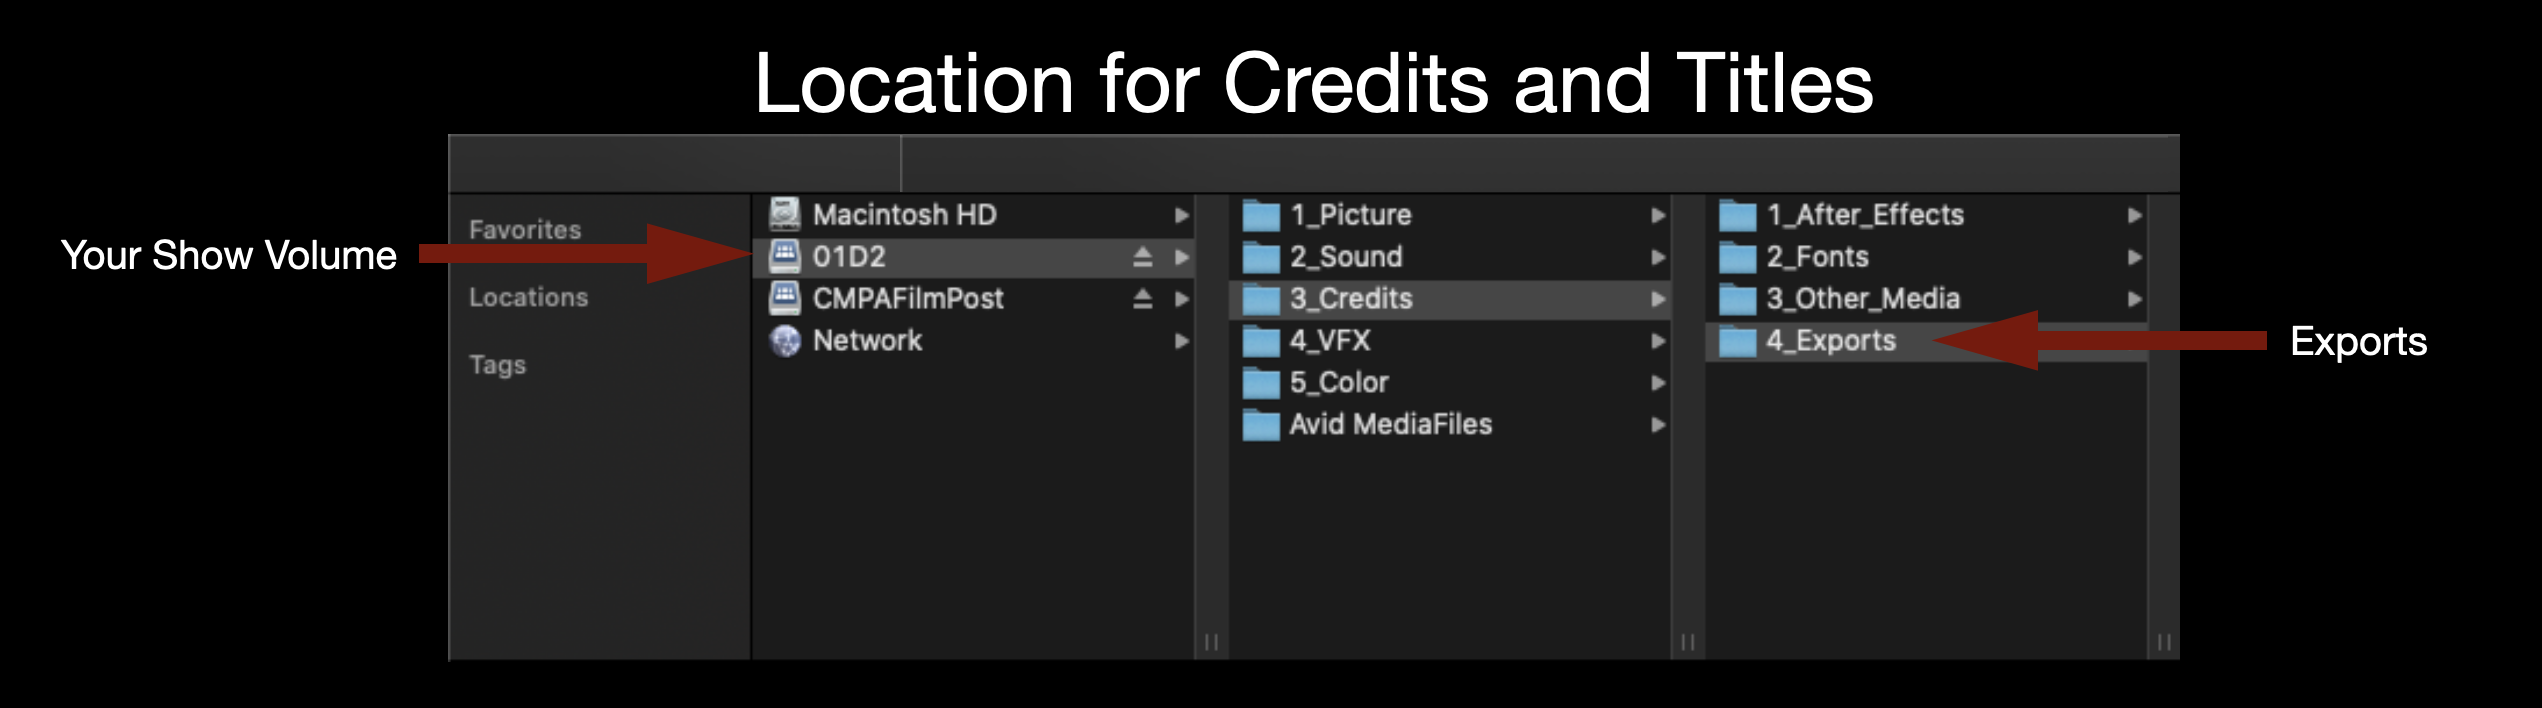
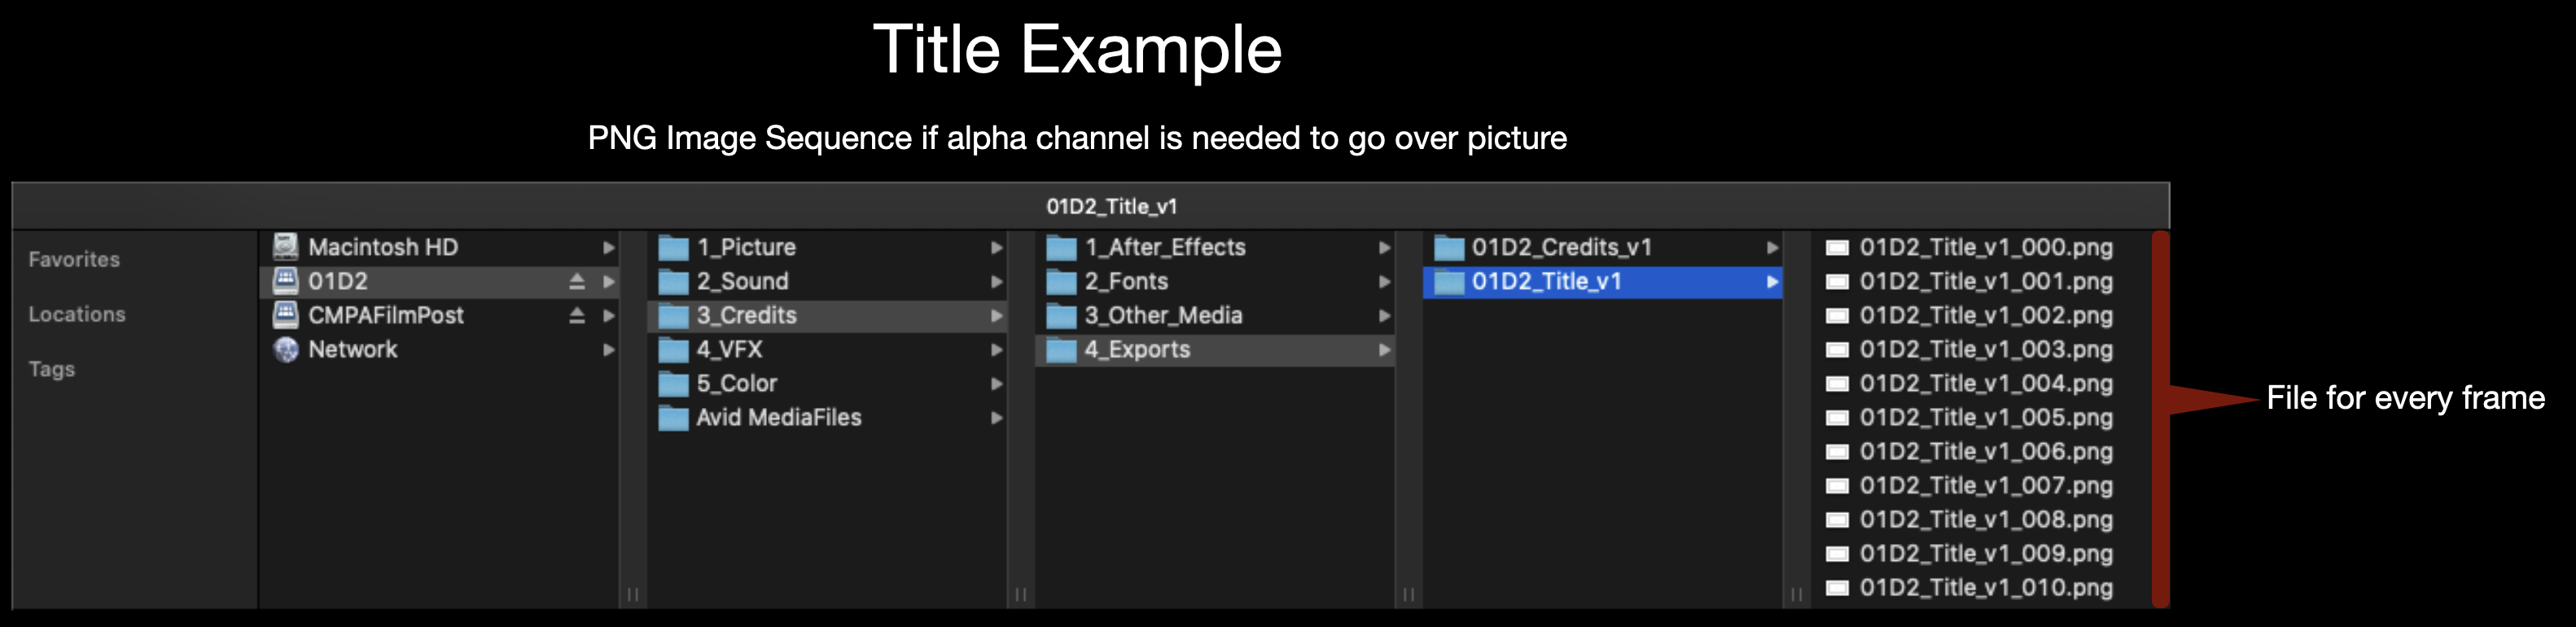
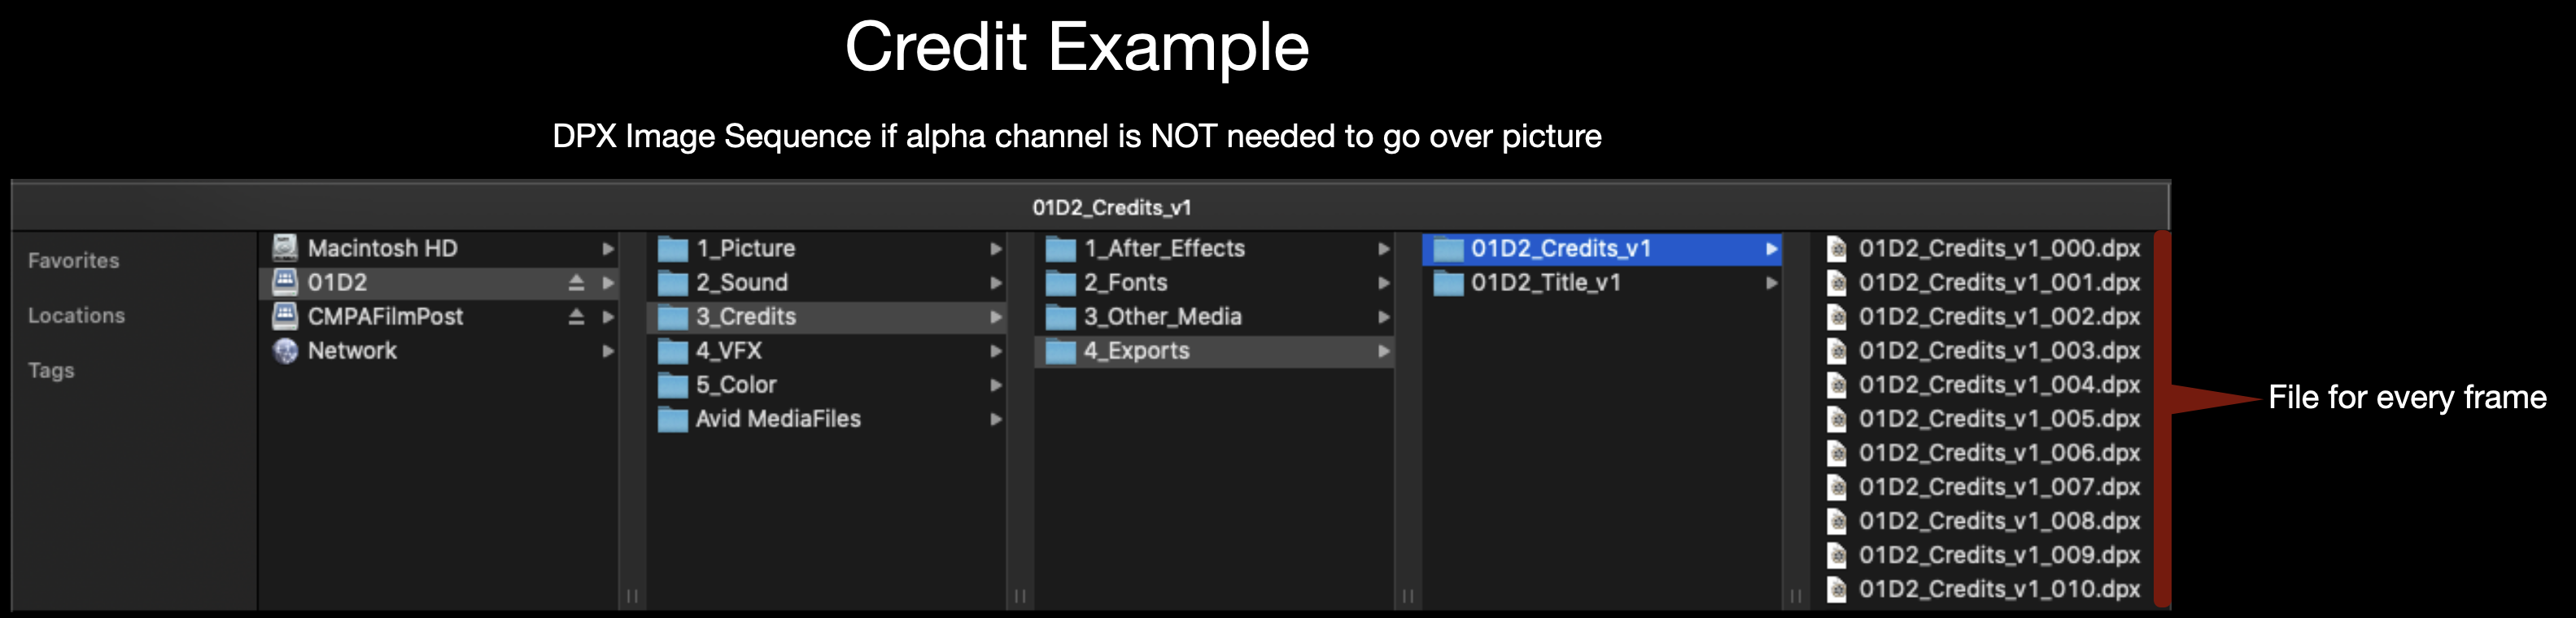
All Credits and Titles should be made in After Effects and delivered as either a DPX sequence or a PNG sequence. A DPX sequence should be used if the titles are going over black and a PNG sequence should be used if the titles need to go over picture since it holds an alpha channel. Either image sequence should be exported for 1920×1080 at 24fps. Make sure to name the image sequence appropriately (Example: 01M2_Credits_v1).
Location to Deliver Credits and TitlesNaming convention for TitlesNaming convention for Credits
This is the correct cadence for productions using dual-system sound. What the 1st AD says is highlighted and said over walkie. It is important that all 1st ADs adhere to this cadence. This enables consistency from show to show, which facilitates clear communication and efficiency on set.
“PICTURE’S UP!”
“LAST LOOKS!”
“Last Looks” is only for Hair & Makeup and Costumes to do any final touches.
“LET’S LOCK IT UP! WE’RE GOING FOR PICTURE!”
“Lock it up” is to notify everyone to be quiet.
“ROLL SOUND!”
2nd AD/PAs call “Rolling!”
Sound voice-slates into the sound recorder and then calls “Sound Speeds”. This is usually called by Boom Ops if they are in communication with the Sound Mixer. If not in communication, the Sound Mixer makes the call.
1st AC speeds the camera and (if necessary) signals to 2nd AC that it’s speeding.
2nd AC calls “Mark” ( A-Camera Mark, B-Camera Mark, etc.) and slates.
If tail-slating, call “Tail-Slating” at this point. After “Cut” is called, slate will enter frame upside down. Call “Mark” and clack the sticks, then turn the slate so it’s readable before the camera is cut.
Operator calls “Set” when they are framed up, in focus, and ready to go.
Director or AD will call “Action”/”Background” and Directors only will call “Cut” and/or “Setting”, with ADs echoing this.
After each “Cut,” the 1st AD checks with camera and sound to see how it was for them, then they check with Director to see if they want to go again.
“WE’RE GOING AGAIN!”
Make sure everyone is ready. Then call the Roll once more.
“PICTURE’S UP! LOCK IT UP! ROLL SOUND!”
Call goes as above until the Director calls “Cut”. AD repeats the “Cut” and PAs follow after AD on walkie.
AD continues to ask “Going again?” until they are told “Got that”.
Once 1st AD hears “Got that” they then call:
“GOT THAT! MOVING ON! THANK YOU.”
“NEW DEAL! CAMERAS MOVE! WE’RE GOING TIGHTER!”
“New Deal” means the camera(s) are moving to their next setup position.
“We’re going tighter” references that the set is moving on to a tighter frame. This is because we typically shoot scenes starting with the widest frame and then working towards the tightest frames.
If you’re moving on to the next scene then call:
“GOT THAT SCENE! MOVING ON TO SCENE ‘X’. LET’S CLEAR THE CREW AND BRING IN FIRST TEAM (OR CAST) TO REHEARSE.”
The role of the 1st AD is an important and multi-faceted one, involving organization, anticipation, communication, problem-solving, leadership, support, morale-building, time-budgeting, and resource allocation. It is a role that is critical in planning and scheduling a film during prep, and one that is vital for smooth set operation during production. A few key things to remember:
The 1st AD always remains on set. If the show has a basecamp away from set, the 1st AD should communicate with the 2nd AD by radio.
The 1st AD tracks time but doesn’t harass people about it. Good ADs never raise their voice because they have not allowed things to reach that point.
It is the responsibility of the 1st AD to know where everyone is. Crew must inform the AD department if they briefly leave set (e.g., “I’m 10-1”).
Above all else, it is the 1st AD’s job to watch, facilitate, and anticipate problems for the betterment of the film, not simply to “make the day.”
It is vitally important that all 1st ADs at the school adhere to the same core protocols and cadence. This enables consistency from show to show, which facilitates clear communication and more efficiency on set. Below are some “cheat sheets” to help remember the 1st AD’s daily flow and cadence.
This guide is only necessary if your show has approved VFX shots.
In the industry, after a VFX vendor has finalized a shot and received the director’s approval, the shot is sent back to editorial to be cut back into the film. This handoff is between a VFX Coordinator on the vendor side and a VFX Editor or Assistant Editor on the picture editing side. When the VFX shots are received by editorial they are checked to make sure they meet the delivery specifications and the agreed upon frame count. In the industry, VFX shots are often finalized at different times by different vendors and sent to editorial to be cut into the film throughout the editorial process.
In our workflow, all VFX shots approved by the director during VFX will be turned back over to editorial all at once. Since the original editor of the show may now be working on another project, it is the primary responsibility of the director to do the work described in this guide. (If the editor is available during this time, they are encouraged to be present.)
Receiving VFX Delivery
The VFX shots should already be delivered to your show volume in the VFX In folder. The only files in this folder should be the final version of each shot. They should be labeled show_shot#_comp_version. If the files are labeled in any other way or if you have more than one version of each shot in the VFX In folder, contact the person who completed the VFX shots so that they can fix anything necessary before proceeding.
Cut in VFX
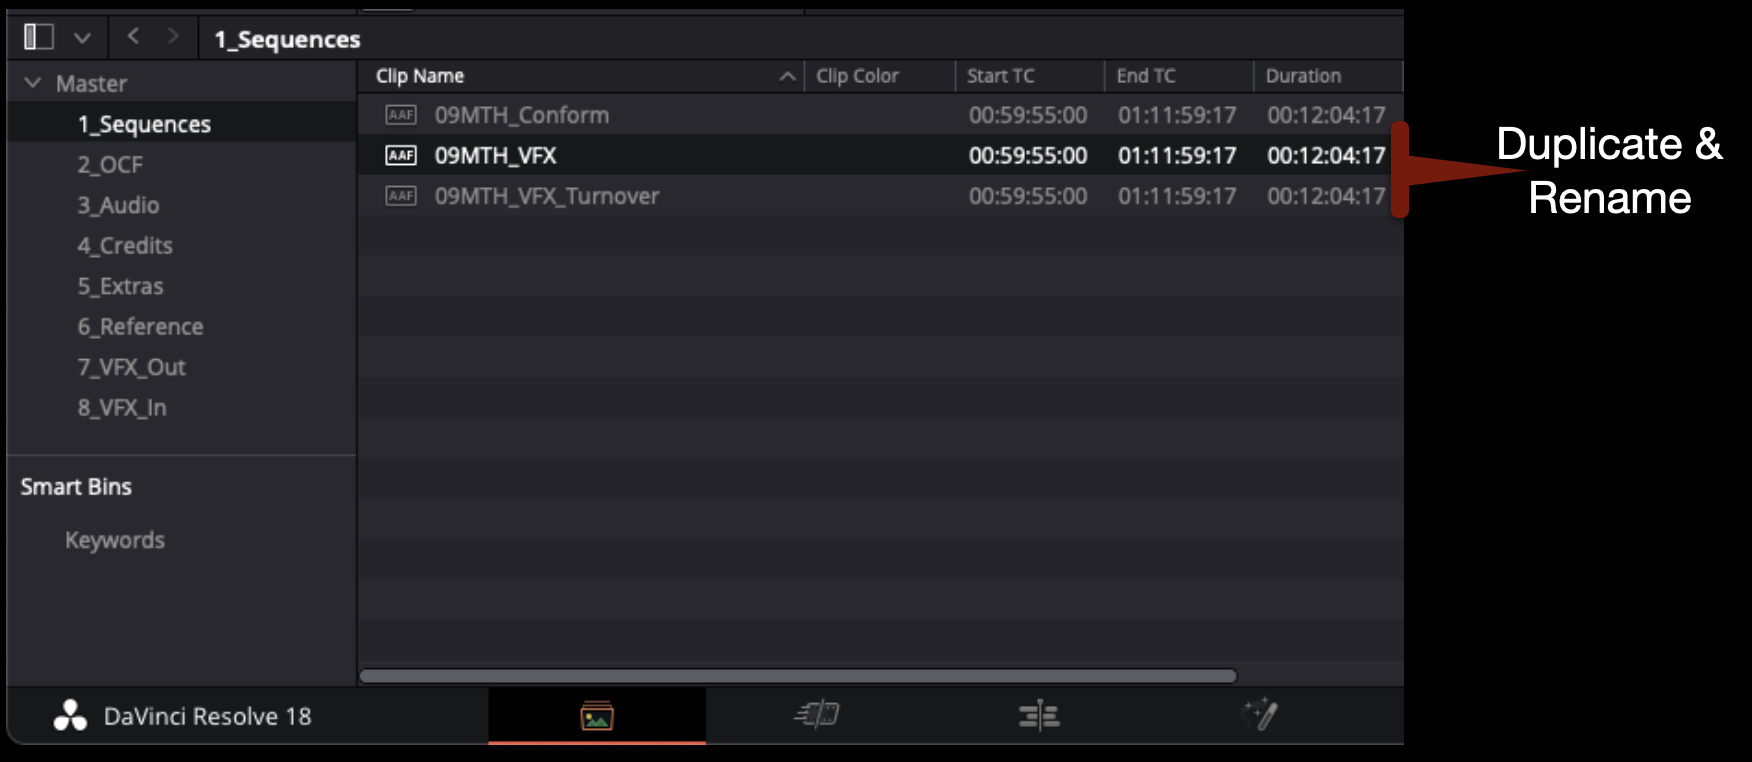
Open the show’s Resolve project. In the Media page, inside the Sequences bin, duplicate the sequence named “show#_VFX_Turnover” and rename the new sequence show#_VFX as shown in the example below.
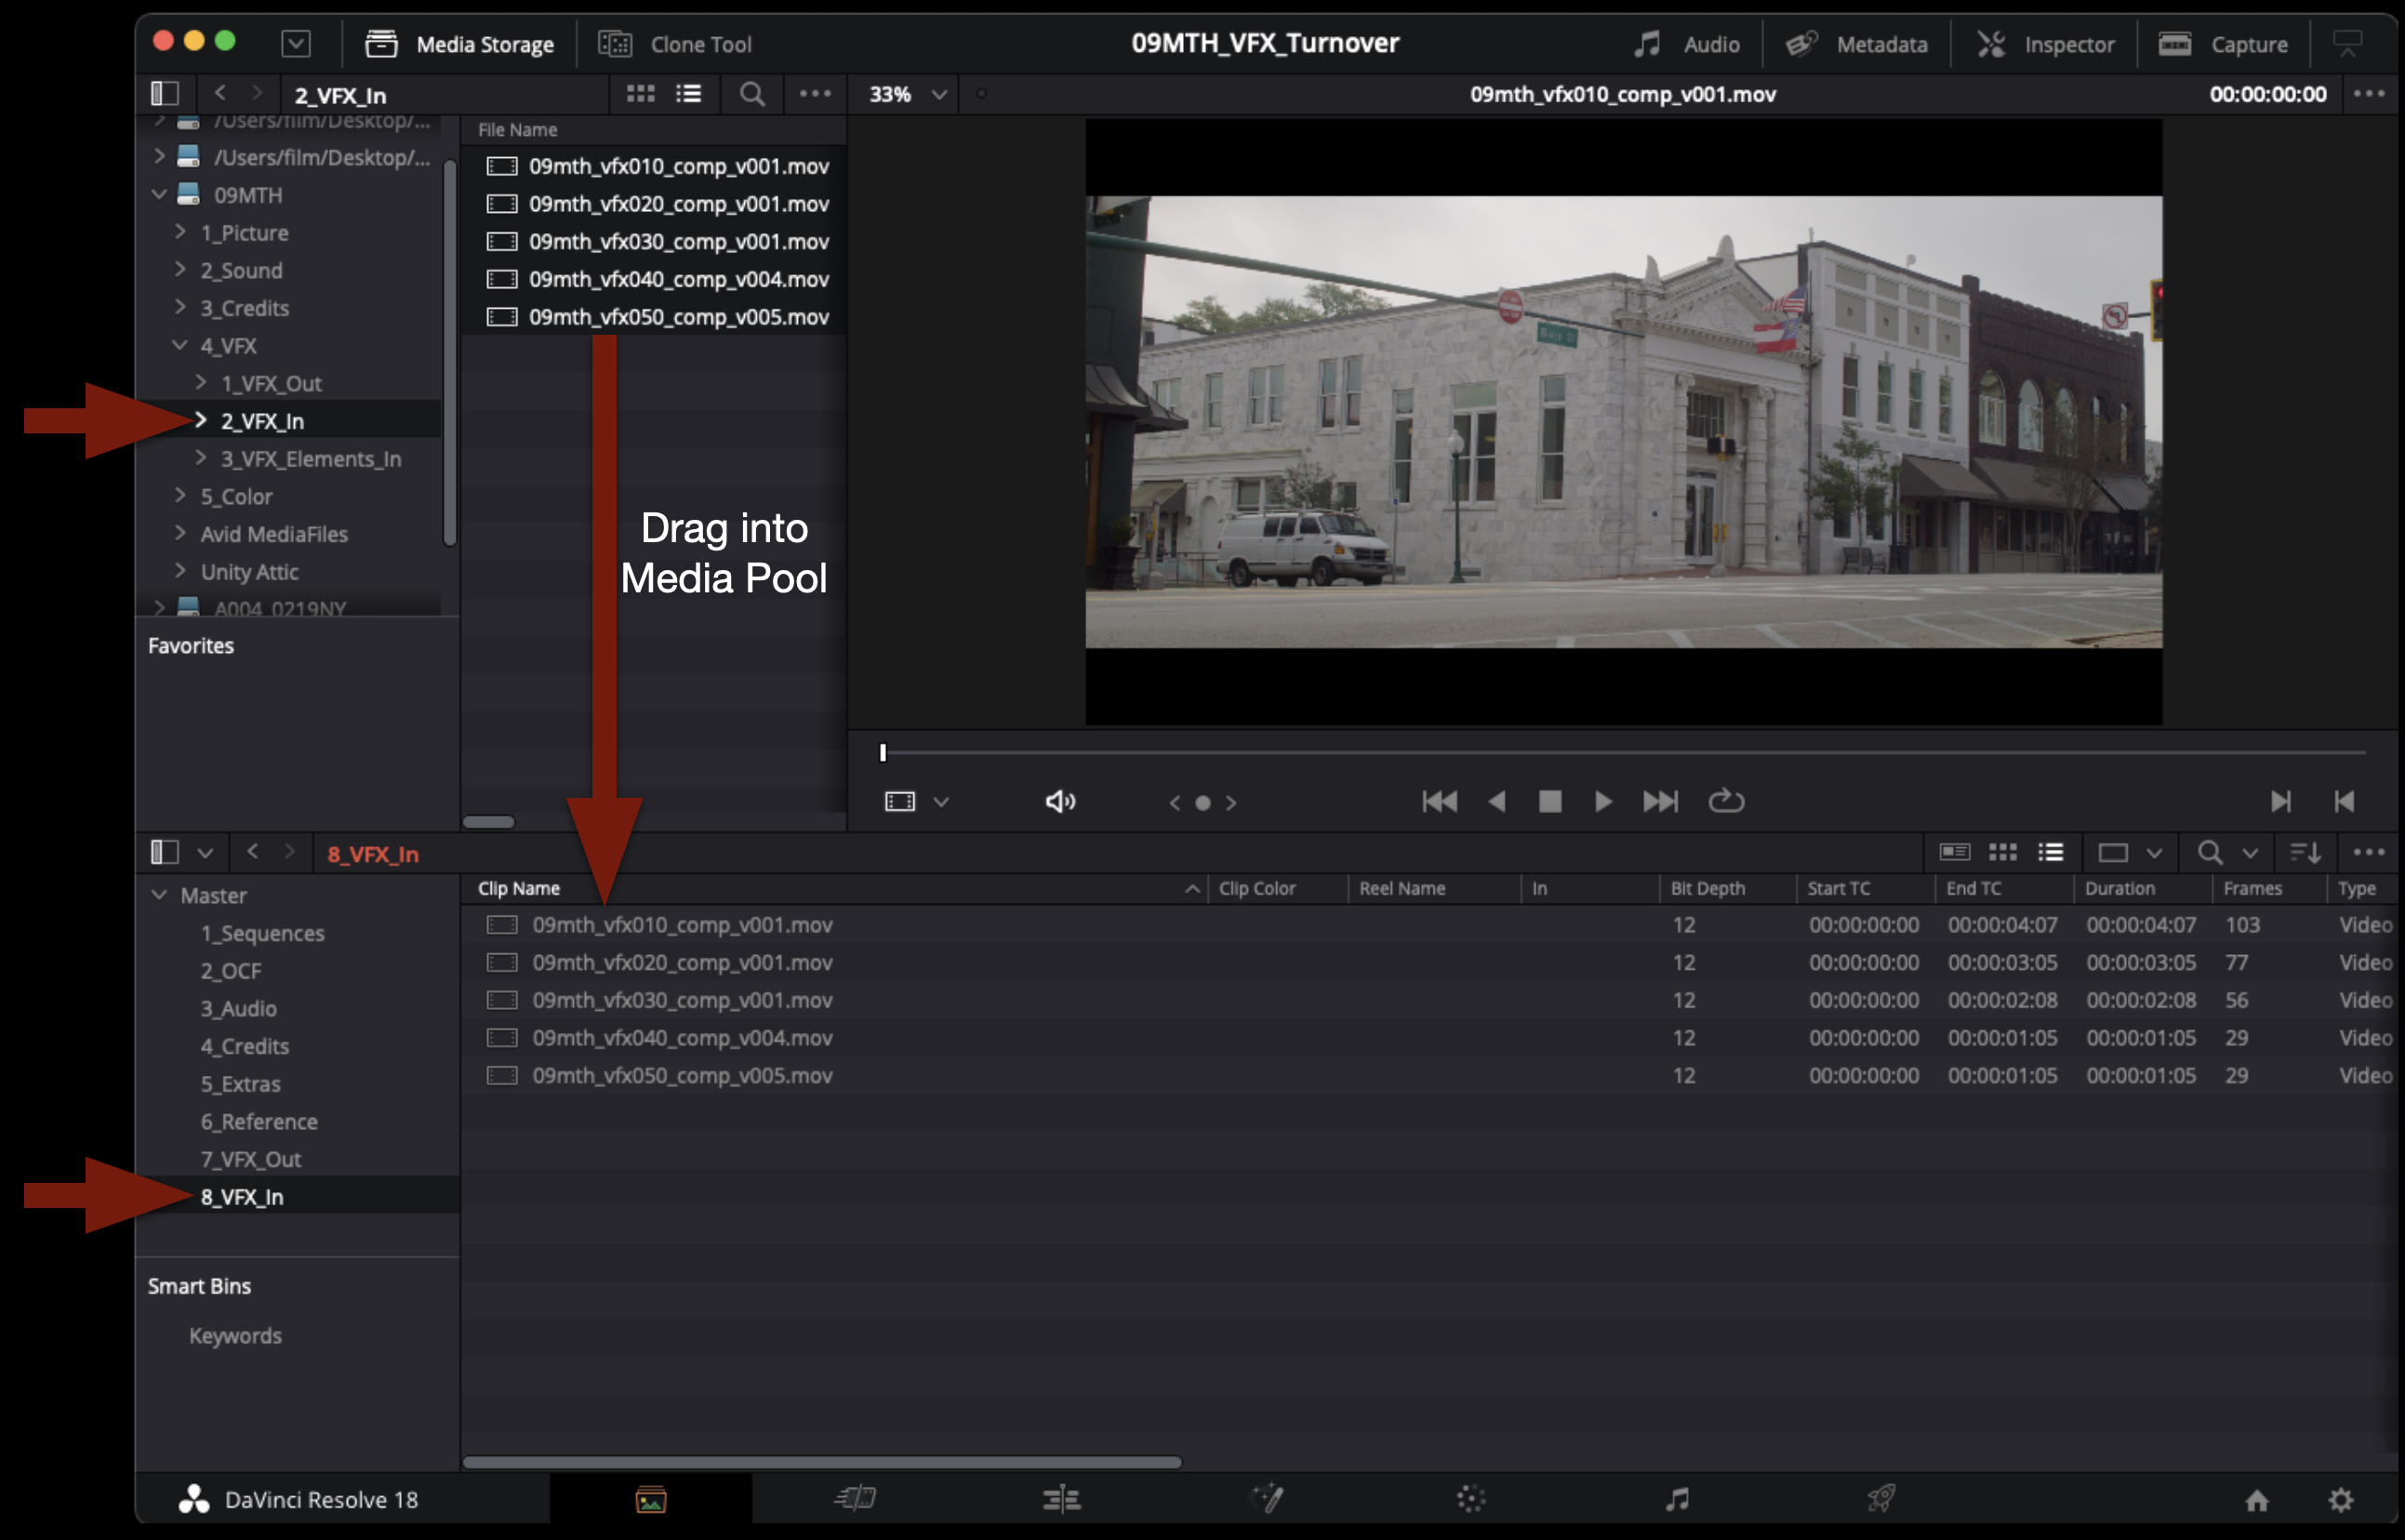
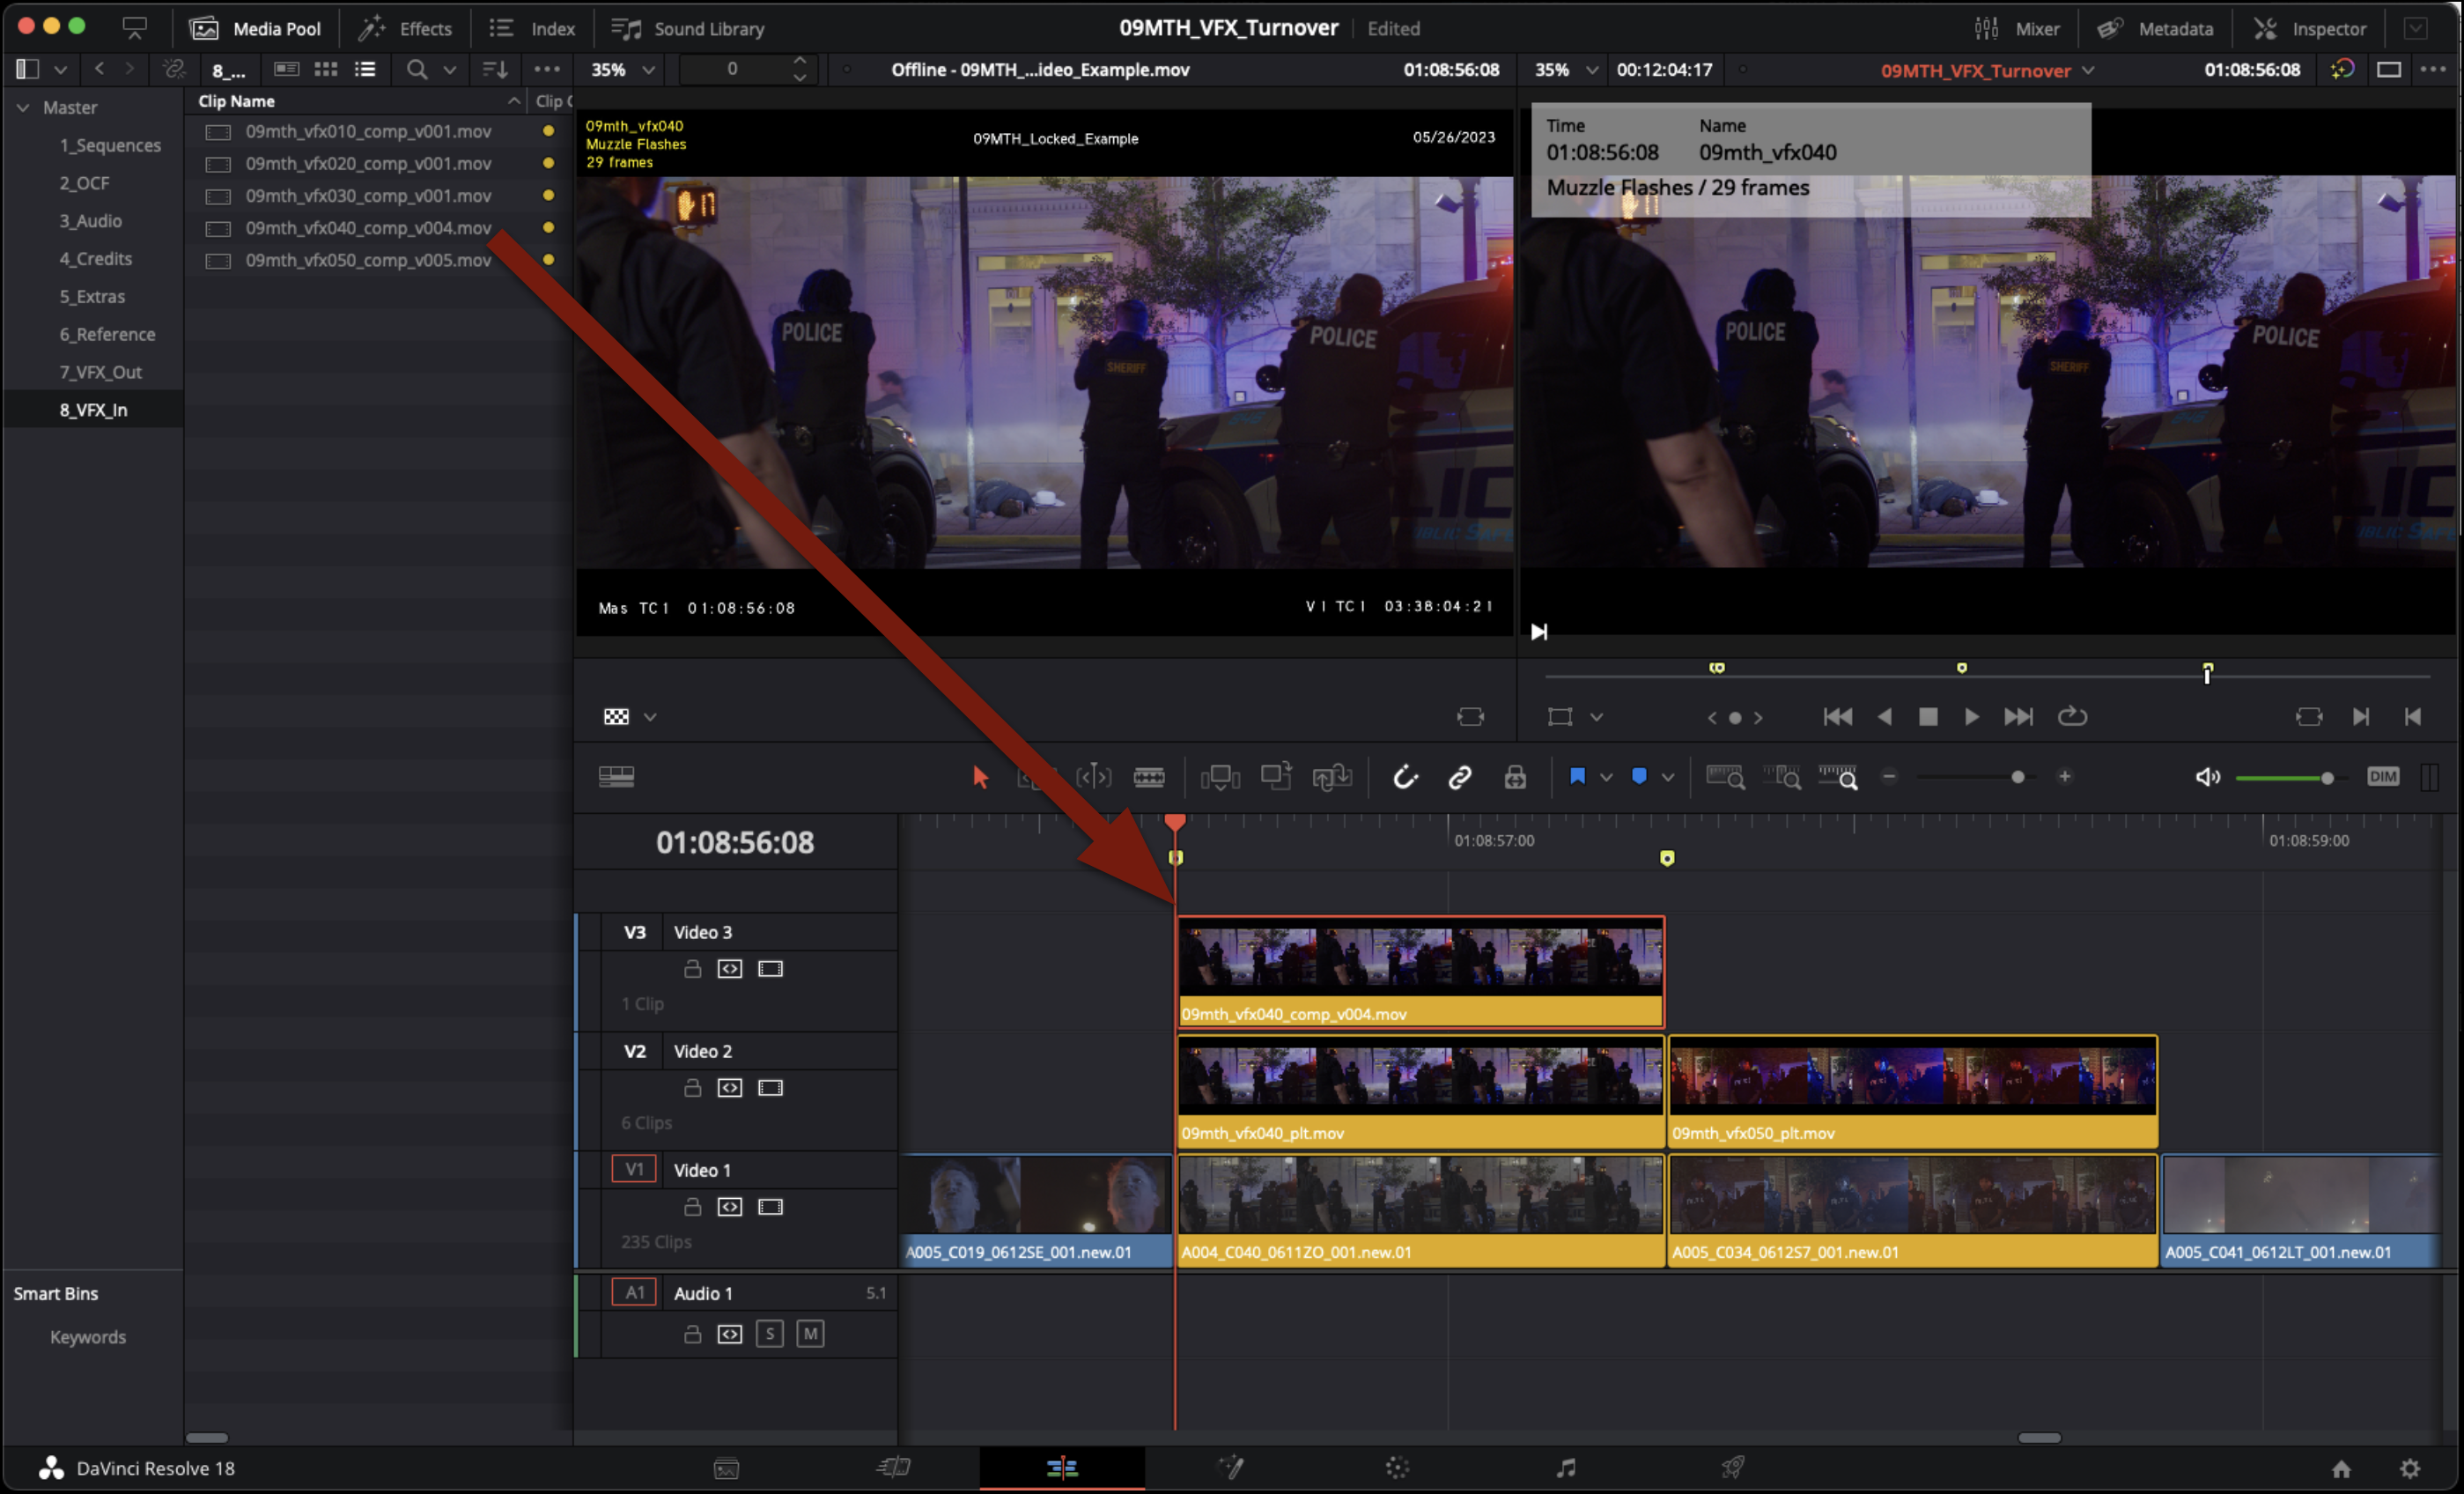
In the Media page, navigate through your media storage to your VFX shots and drag them into the Media Pool to import them.
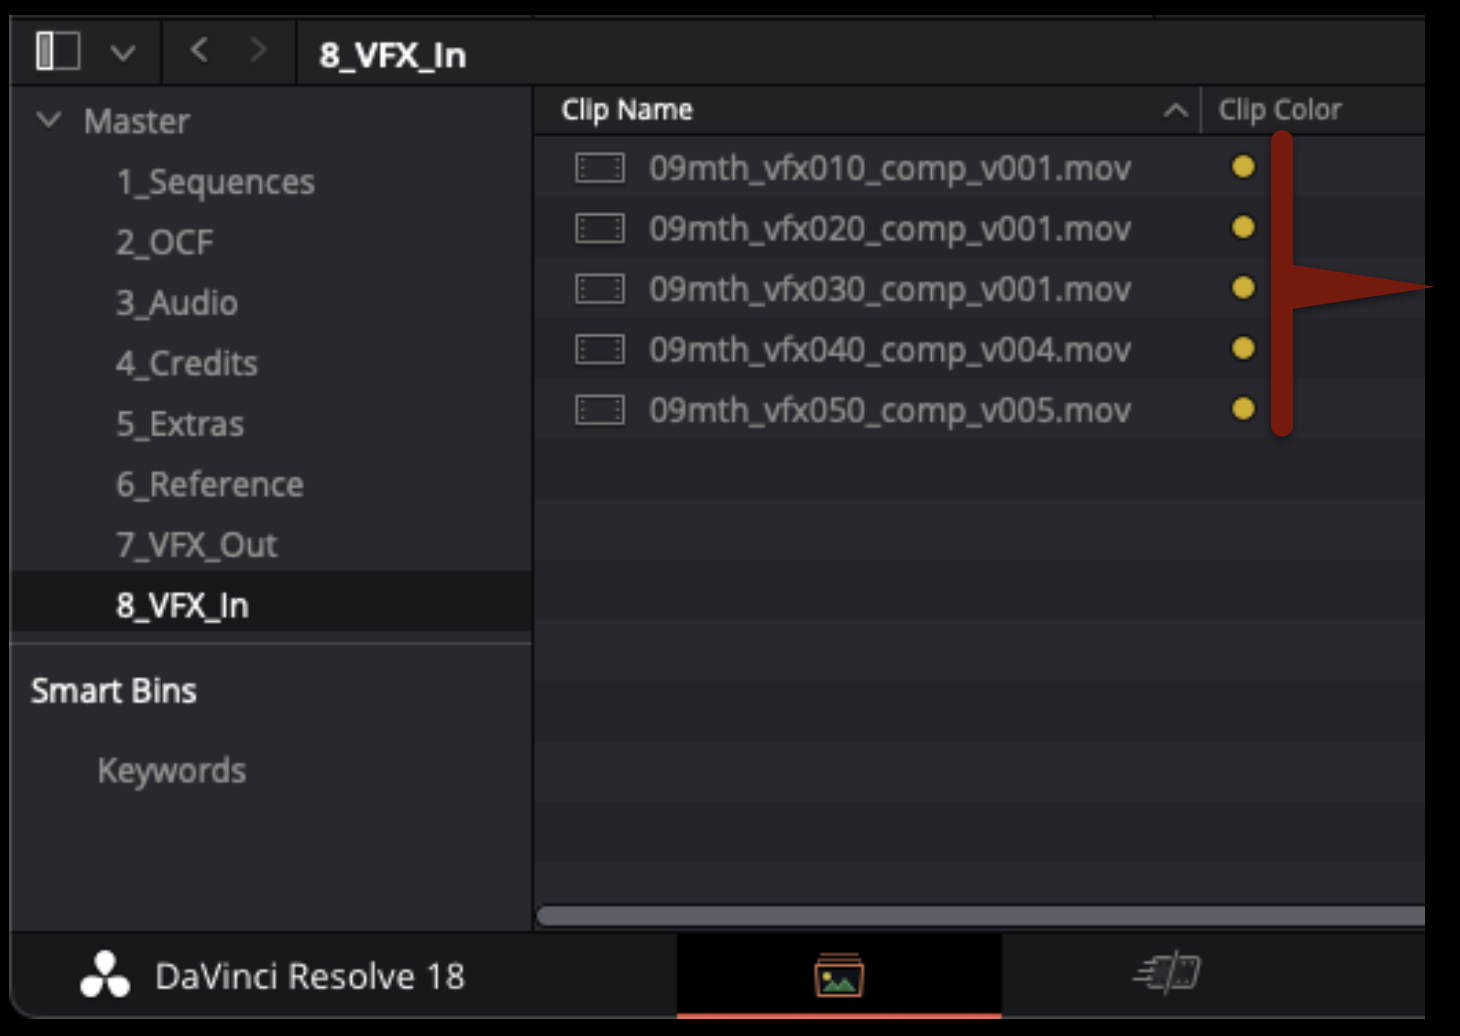
To denote that they are VFX shots, these clips should be changed inside of Resolve so that the clip color is yellow. In the Media Pool, you can highlight them all, right-click, and select clip color.
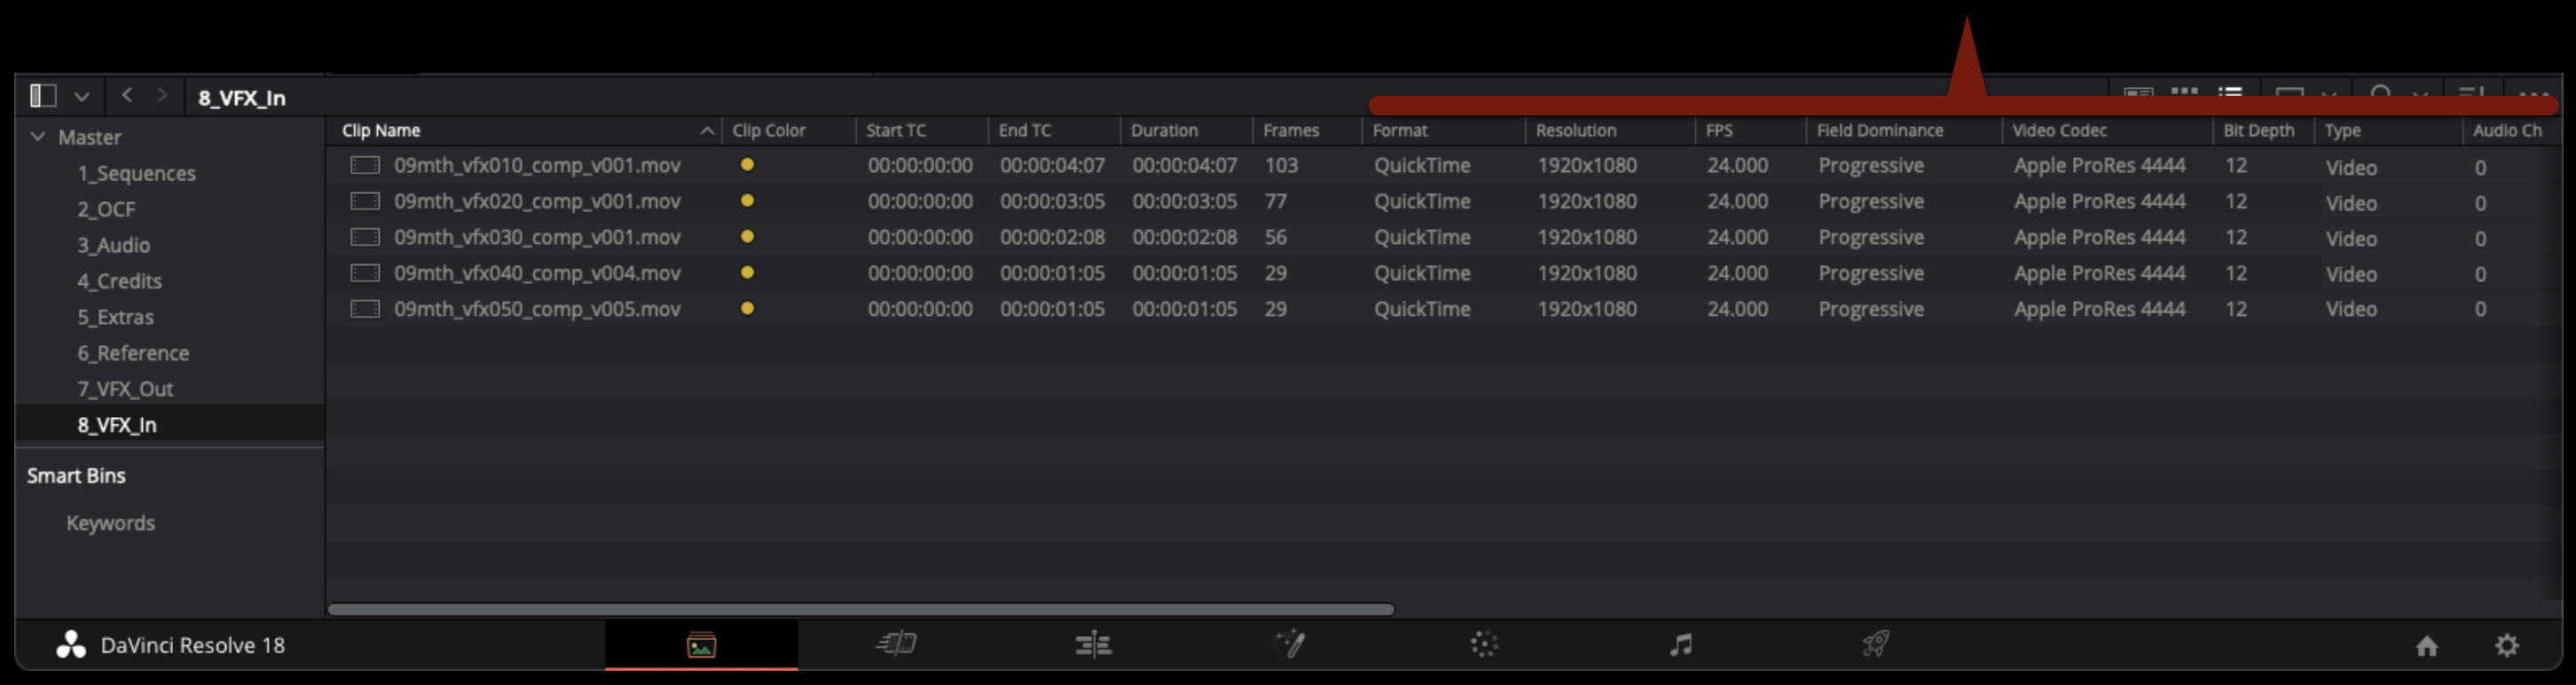
Check that the VFX shots have been delivered to the correct specifications. They should be 1920×1080 AppleProRes4444 QuickTimes at 24fps with no sound channels.
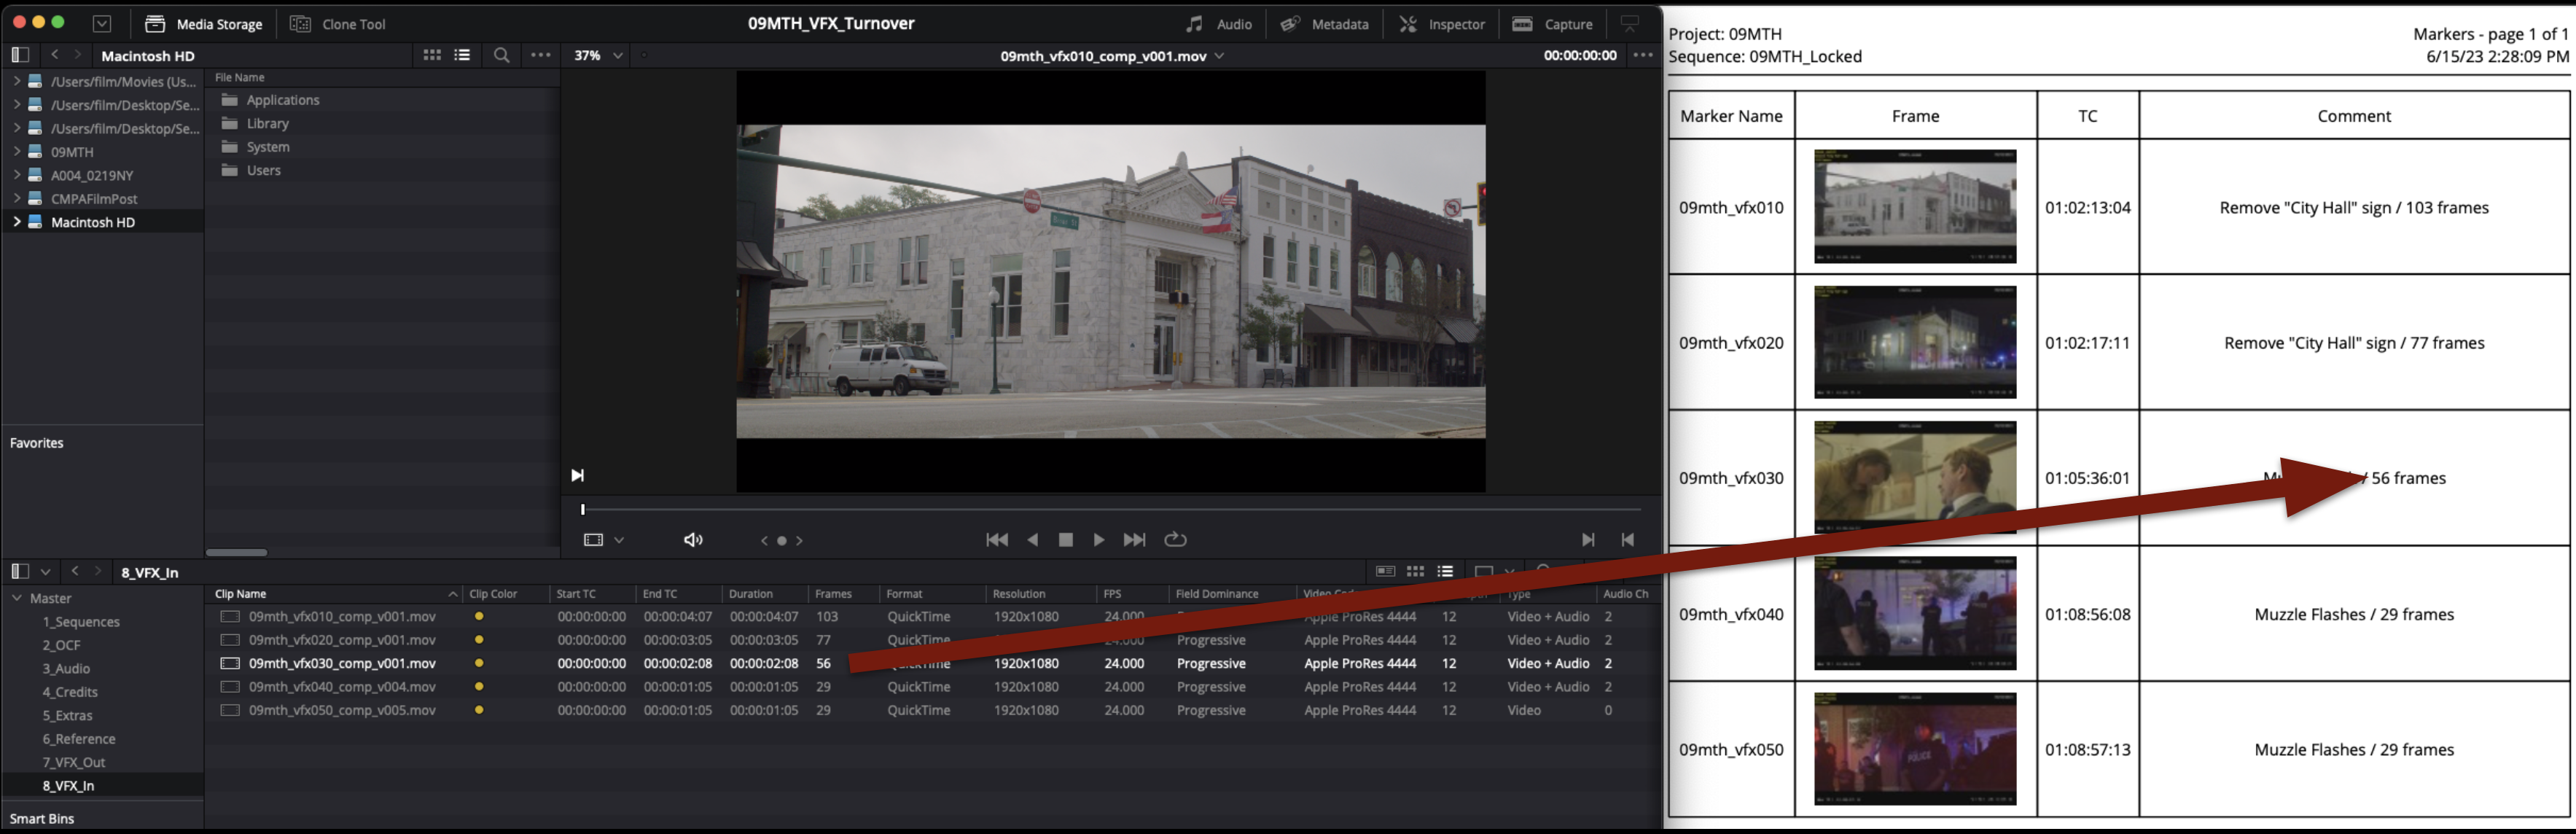
Also check the frame counts of each shot against the the VFX Turnover Sheet to make sure they match.
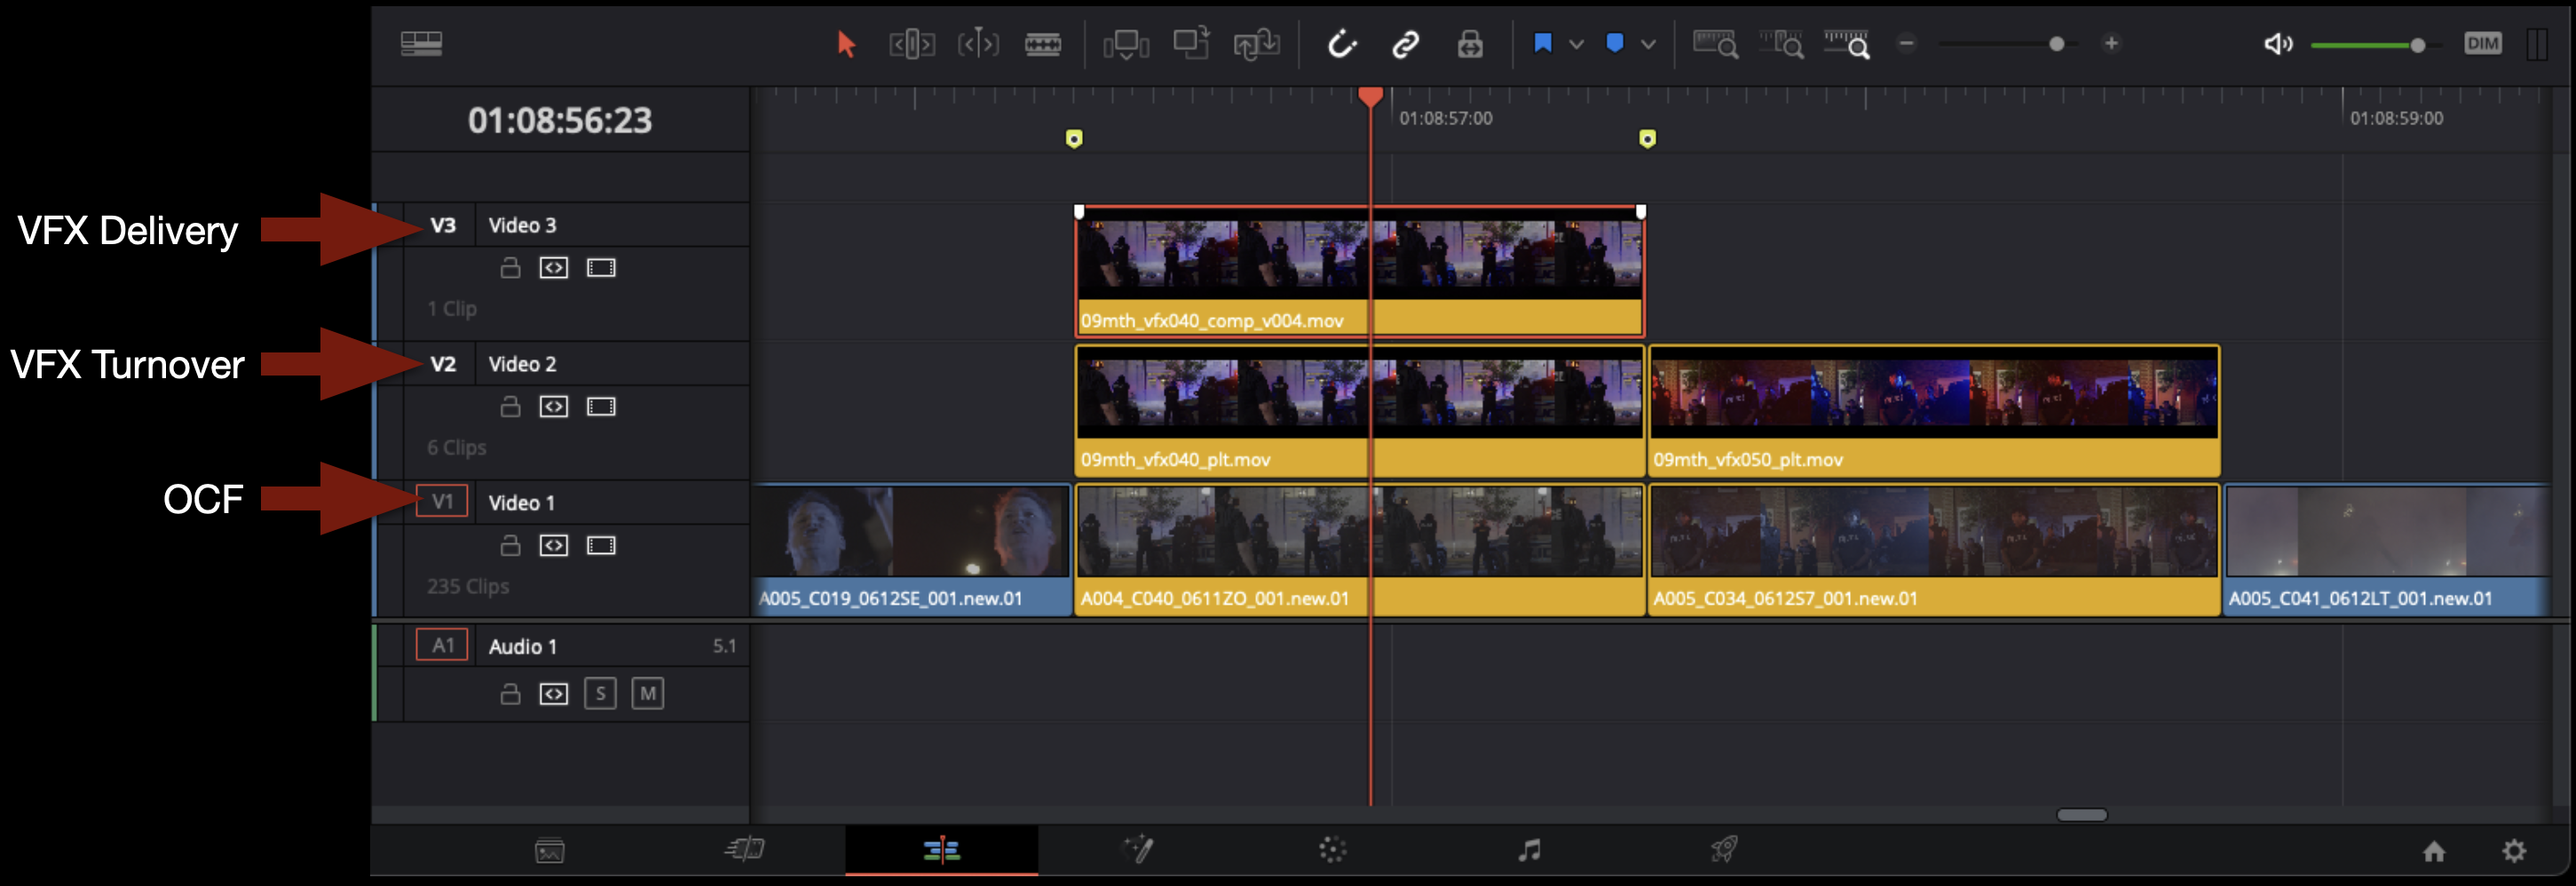
In the Edit page, cut in each VFX shot to Video Track 3.
You should see the progression of the shot as shown in the example below.
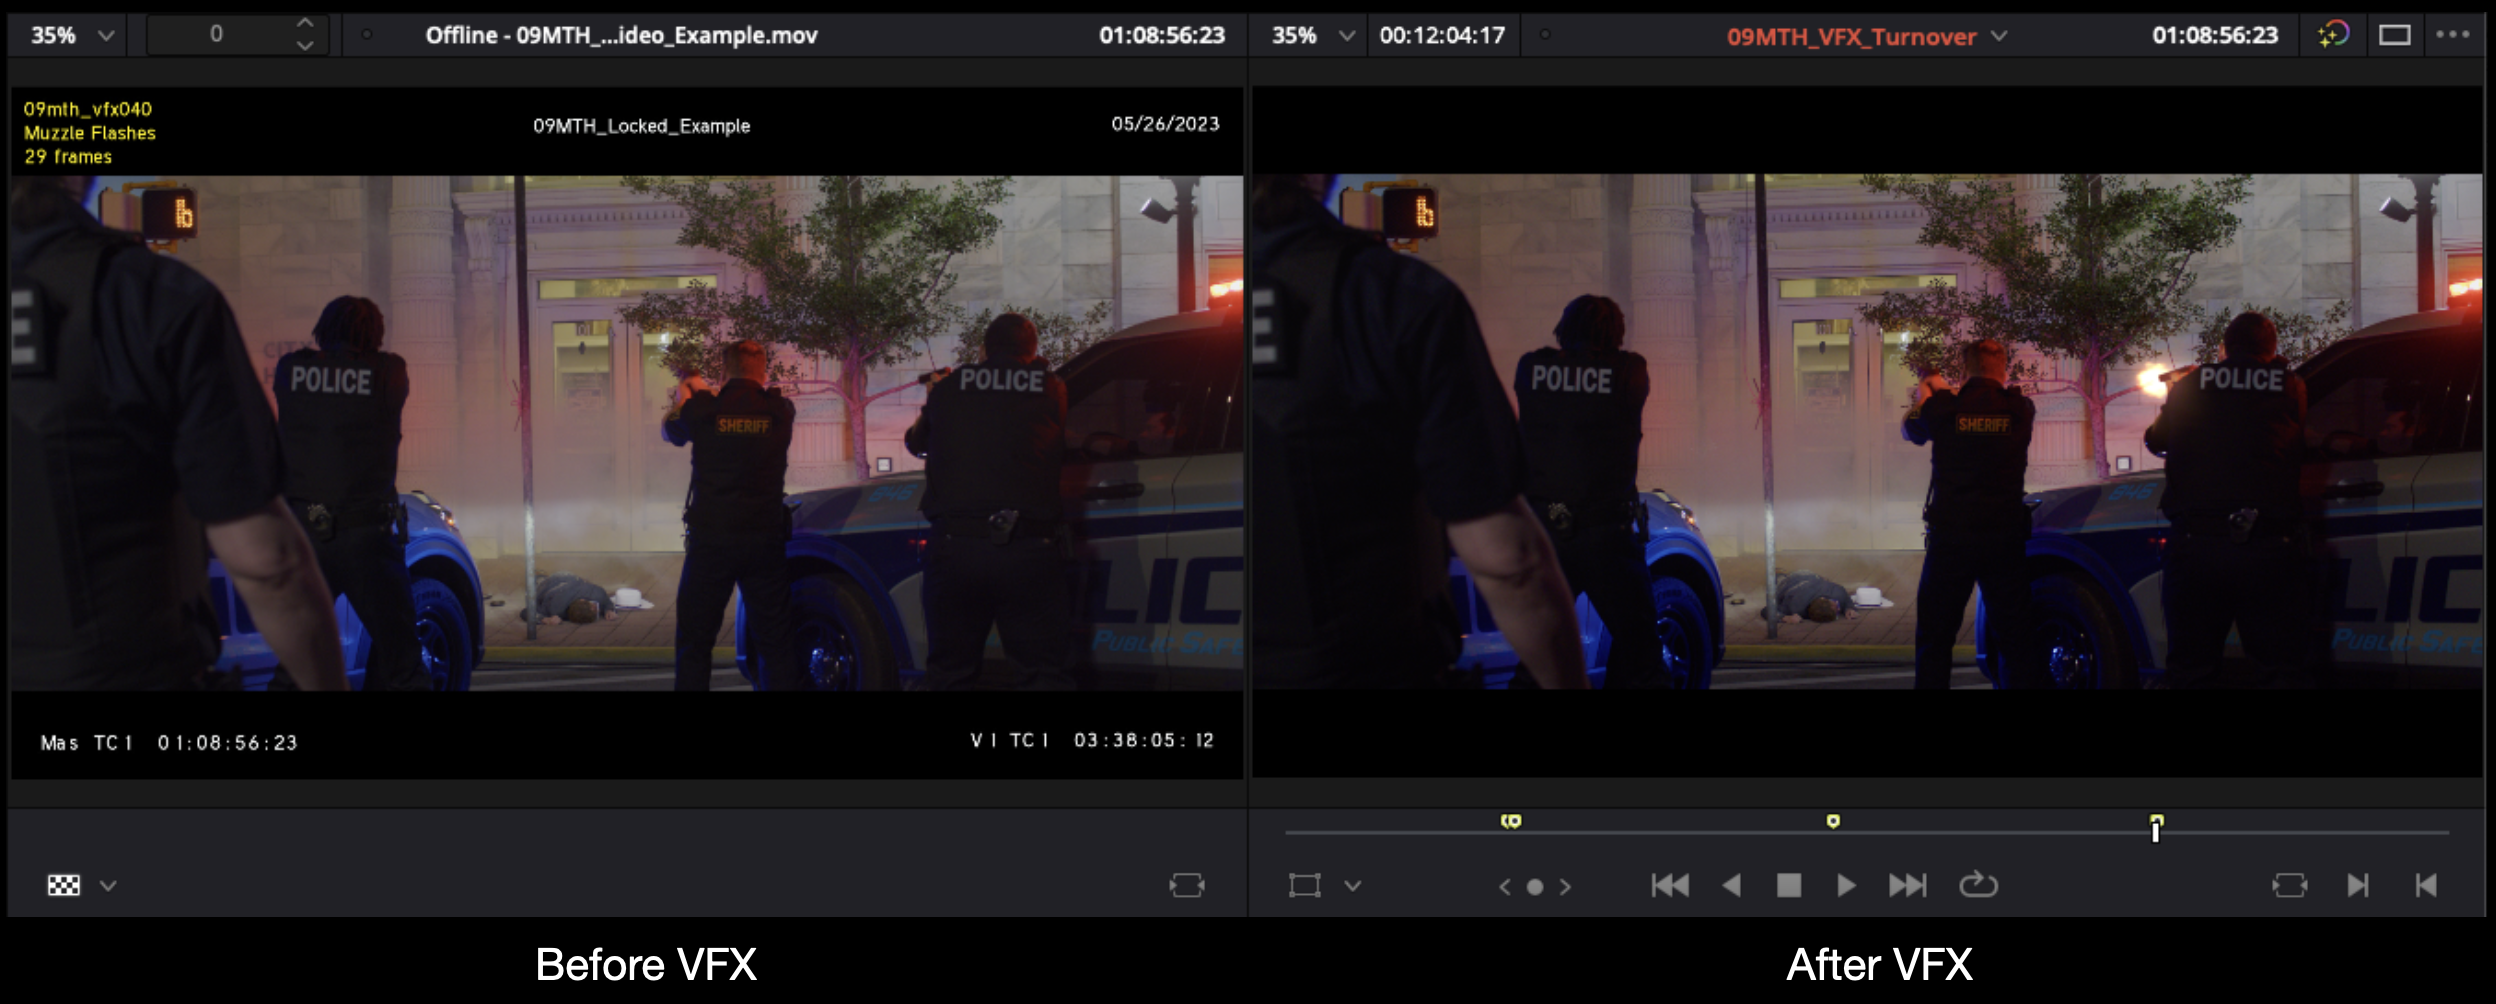
Using the Offline Reference, you should be able to see how the finished VFX shot compares to the locked picture edit.
Repeat for the remaining shots.
Export Reference Video from Resolve
A new reference video will need to be exported for sound design and sound mixing reference.
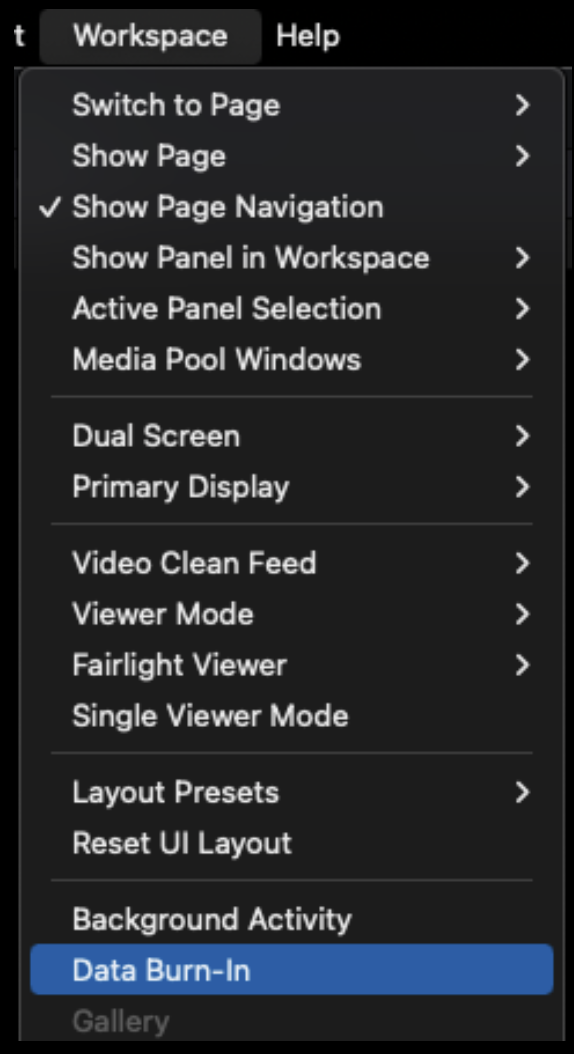
Before exporting, you will want to replicate the Timecode Burn-In Effect from Media Composer to match all the Burn-Ins on the original Reference Video. In Resolve, this is done using the Data Burn-In effect. It can be found under Workspace> Data Burn-in.
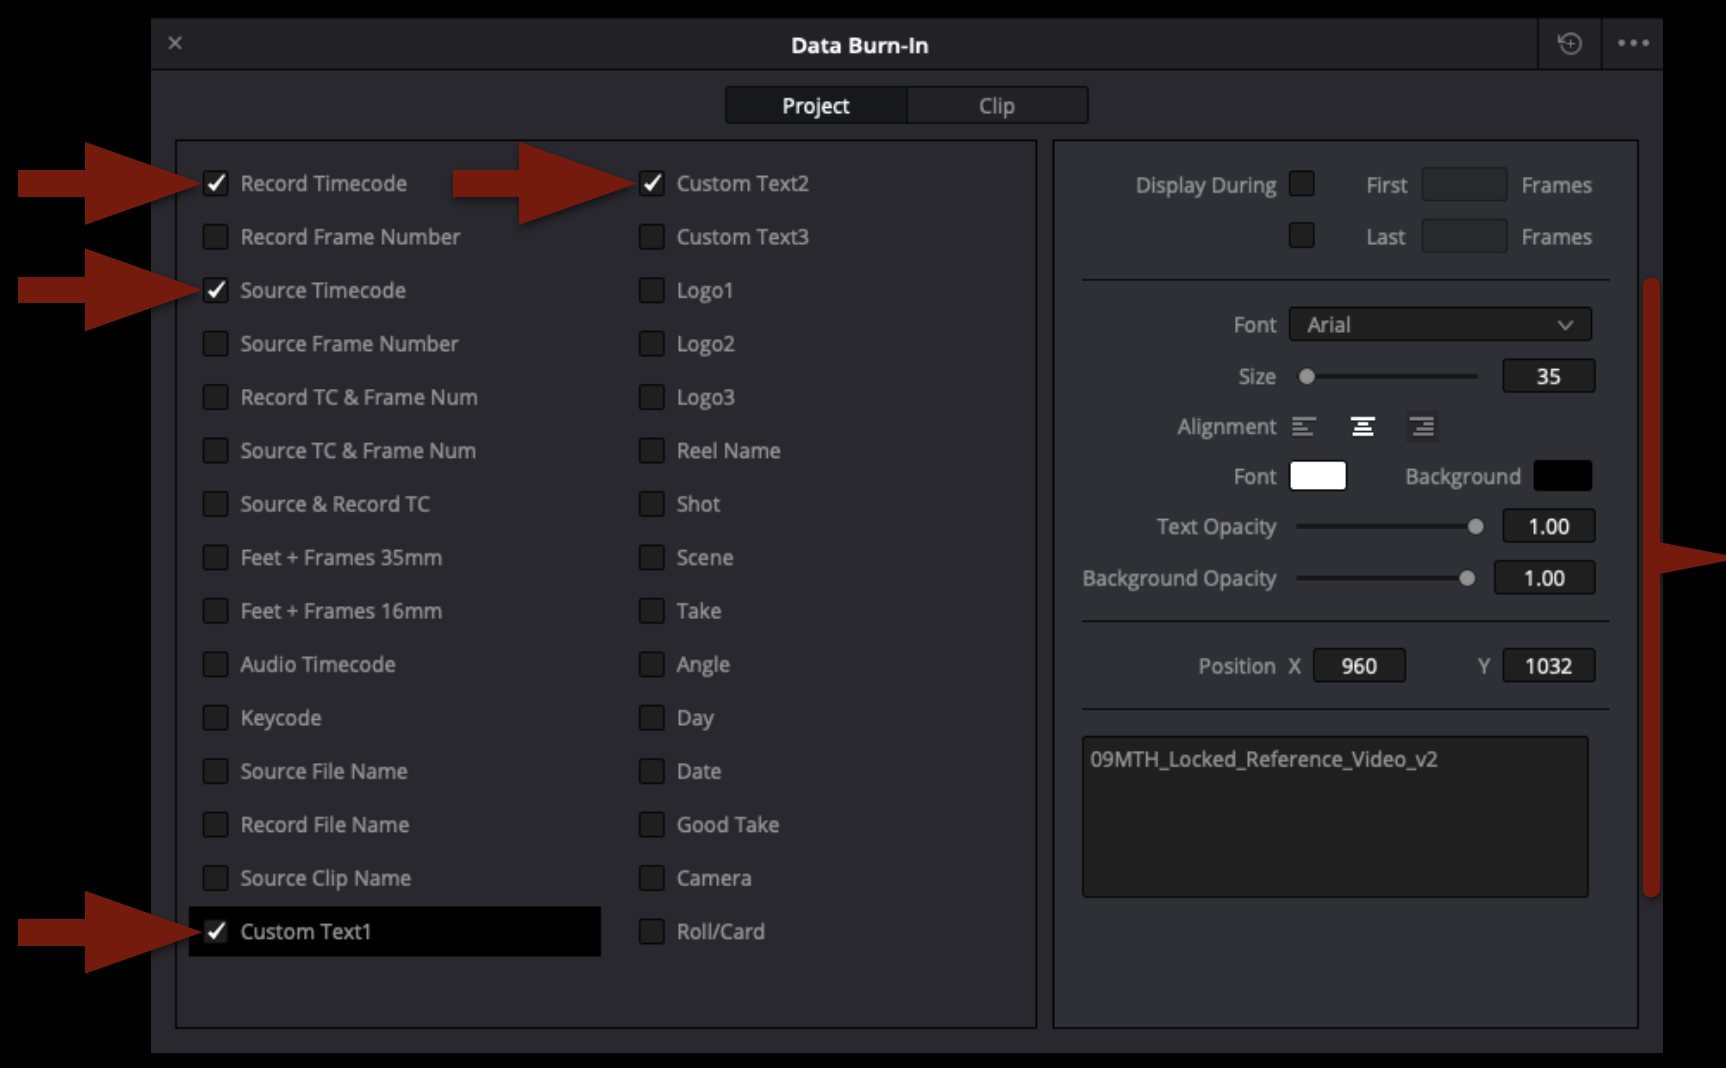
When the effect opens, you will see it is laid out in roughly two sections. On the left, you can choose what metadata you want to select to be burned in. On the right, you can select how and where you want that to be displayed. Select the four boxes shown in the example below and choose the same font and font size. You will need to address the position of each burn-in manually.
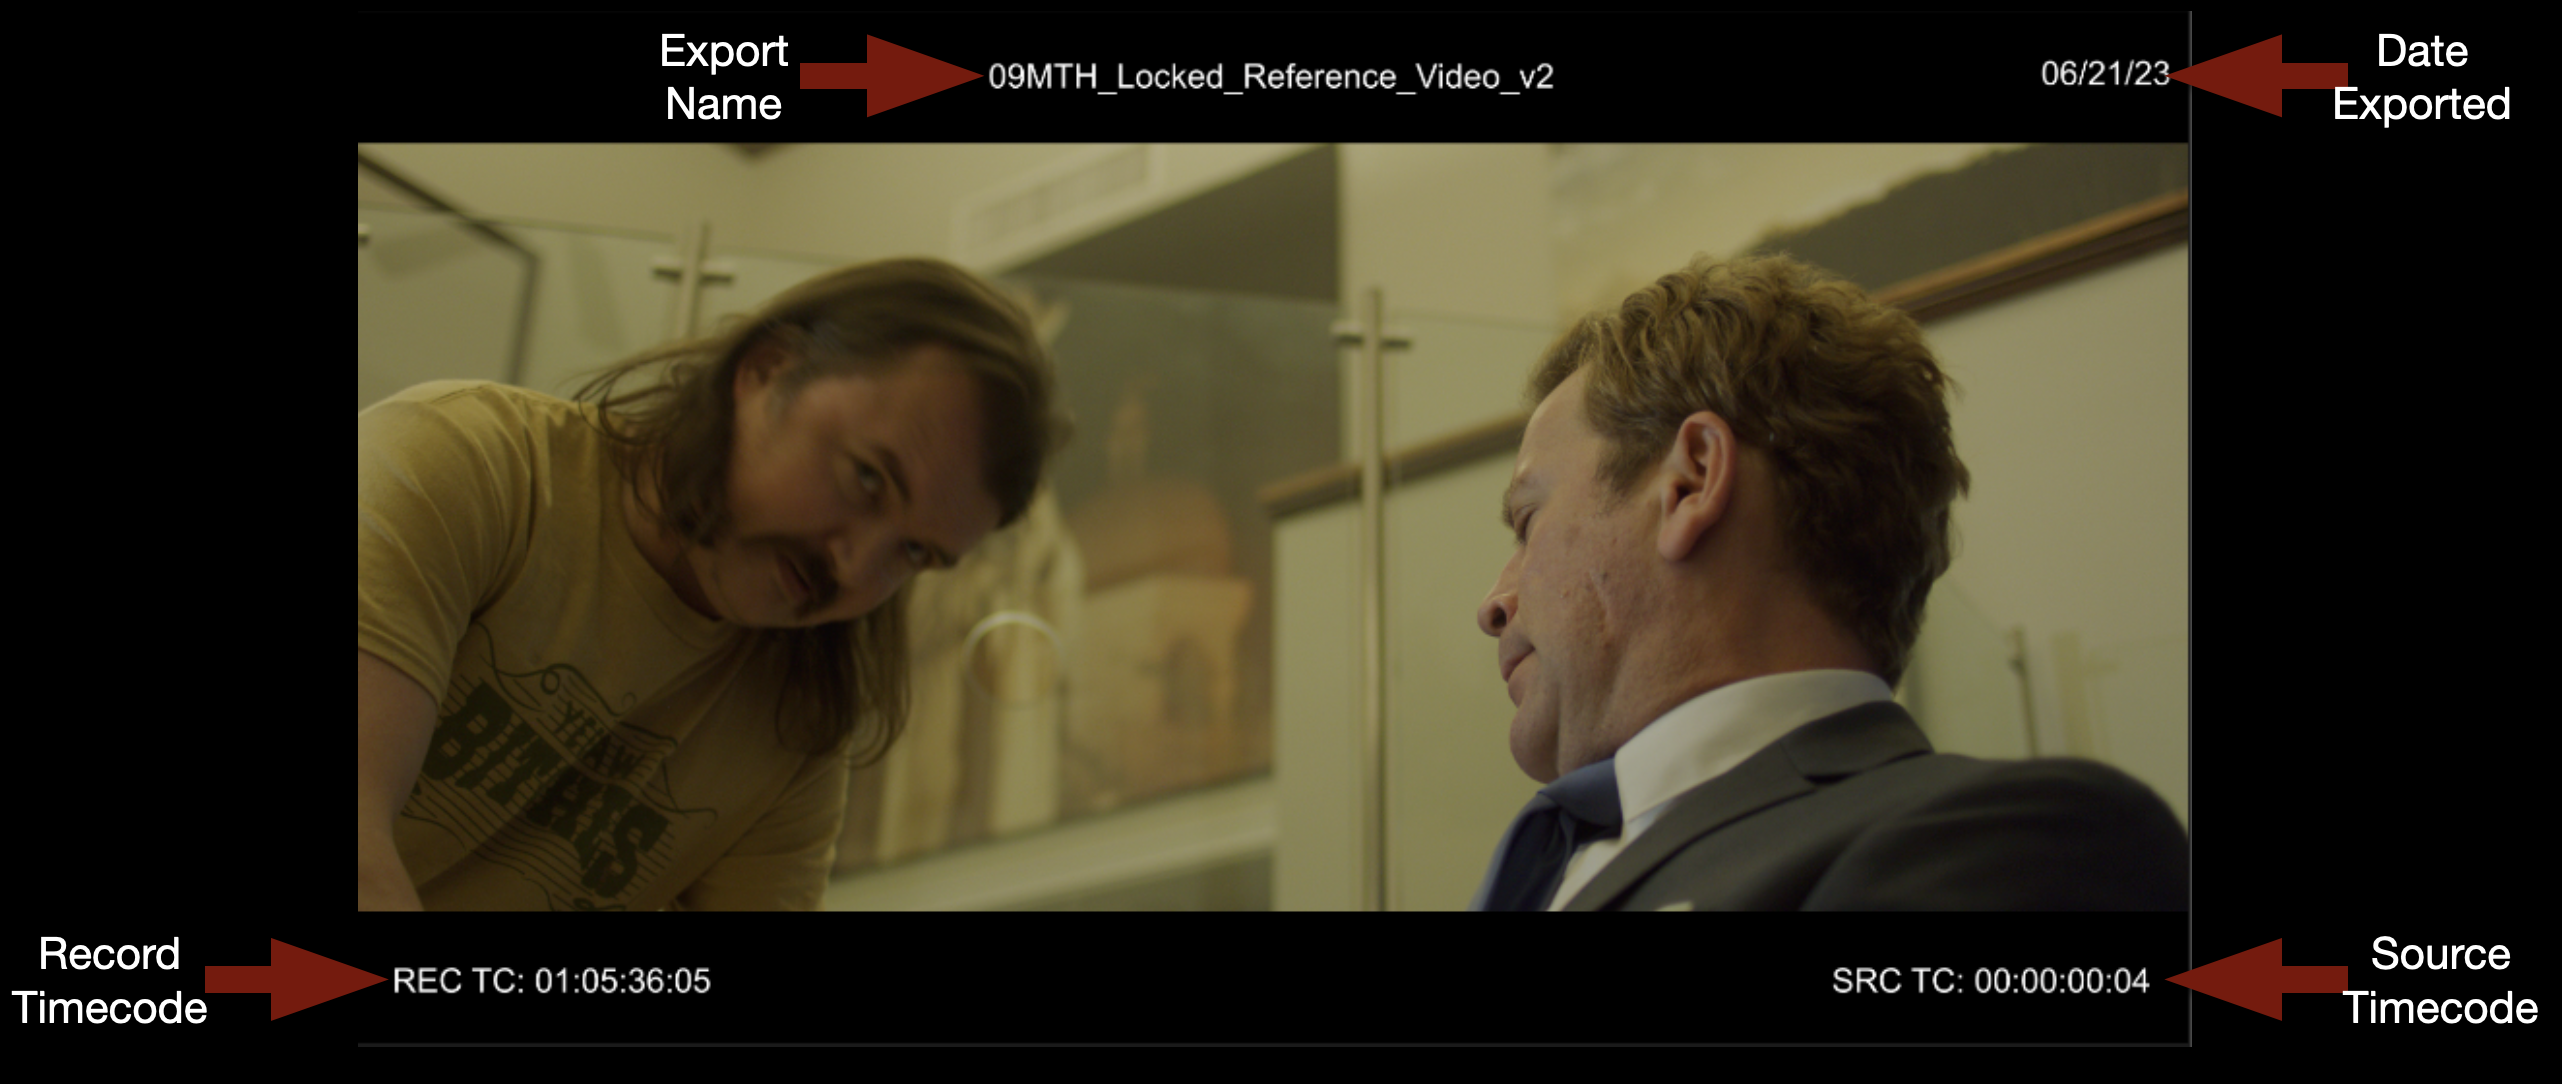
In the example below, you can see what the result of the Data Burn-in effect should look like.
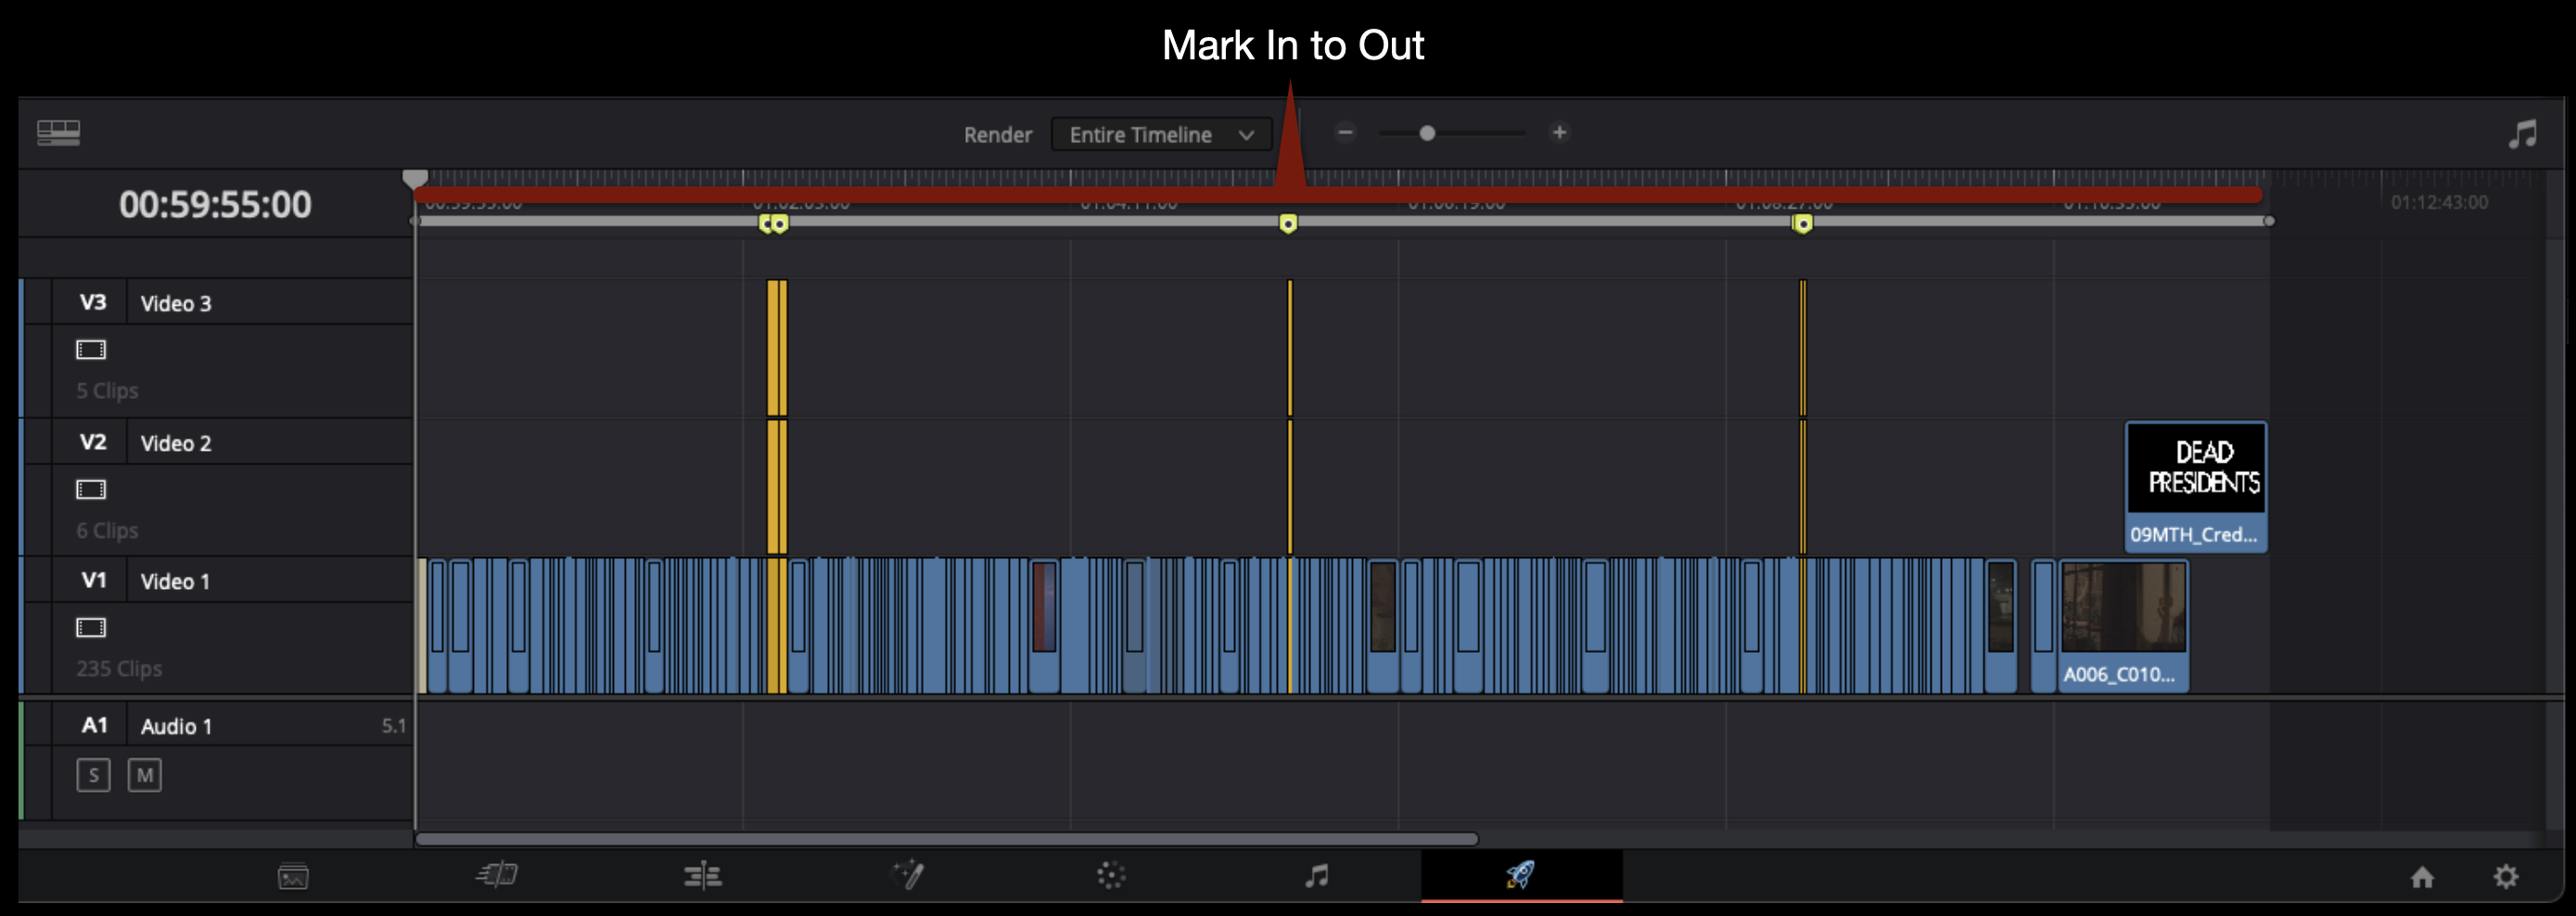
In the Deliver page, make sure you are marked In to Out around the entire sequence.
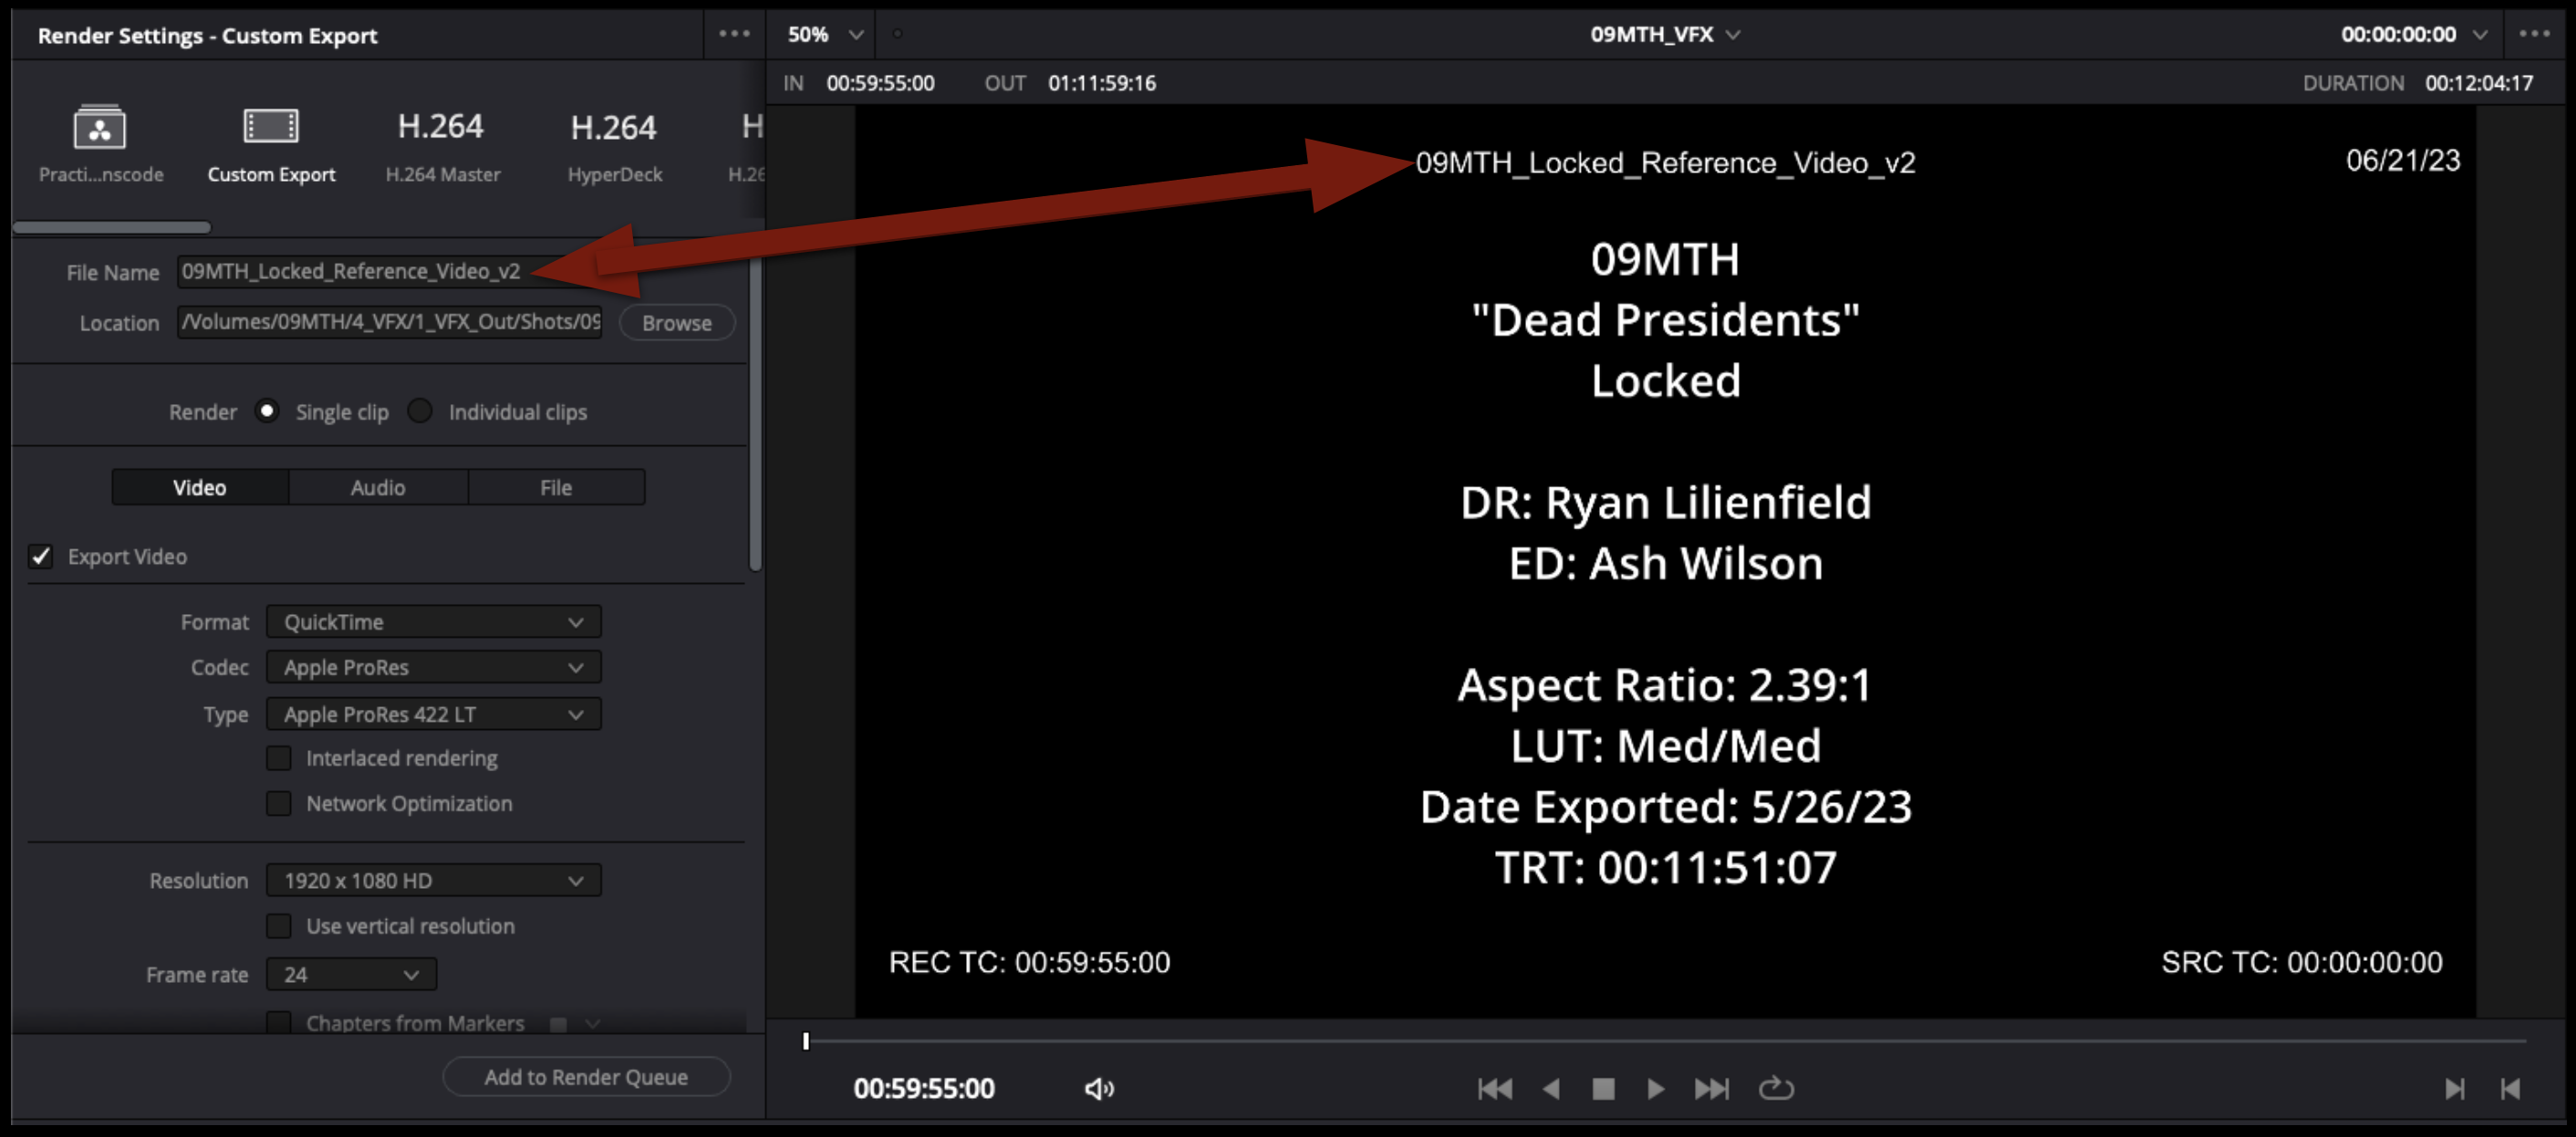
Change the filename to match the export name that you burned in. This name should be one version number up from any previous reference video.
Point the export to the Sound > Reference Video folder on your Show Volume.
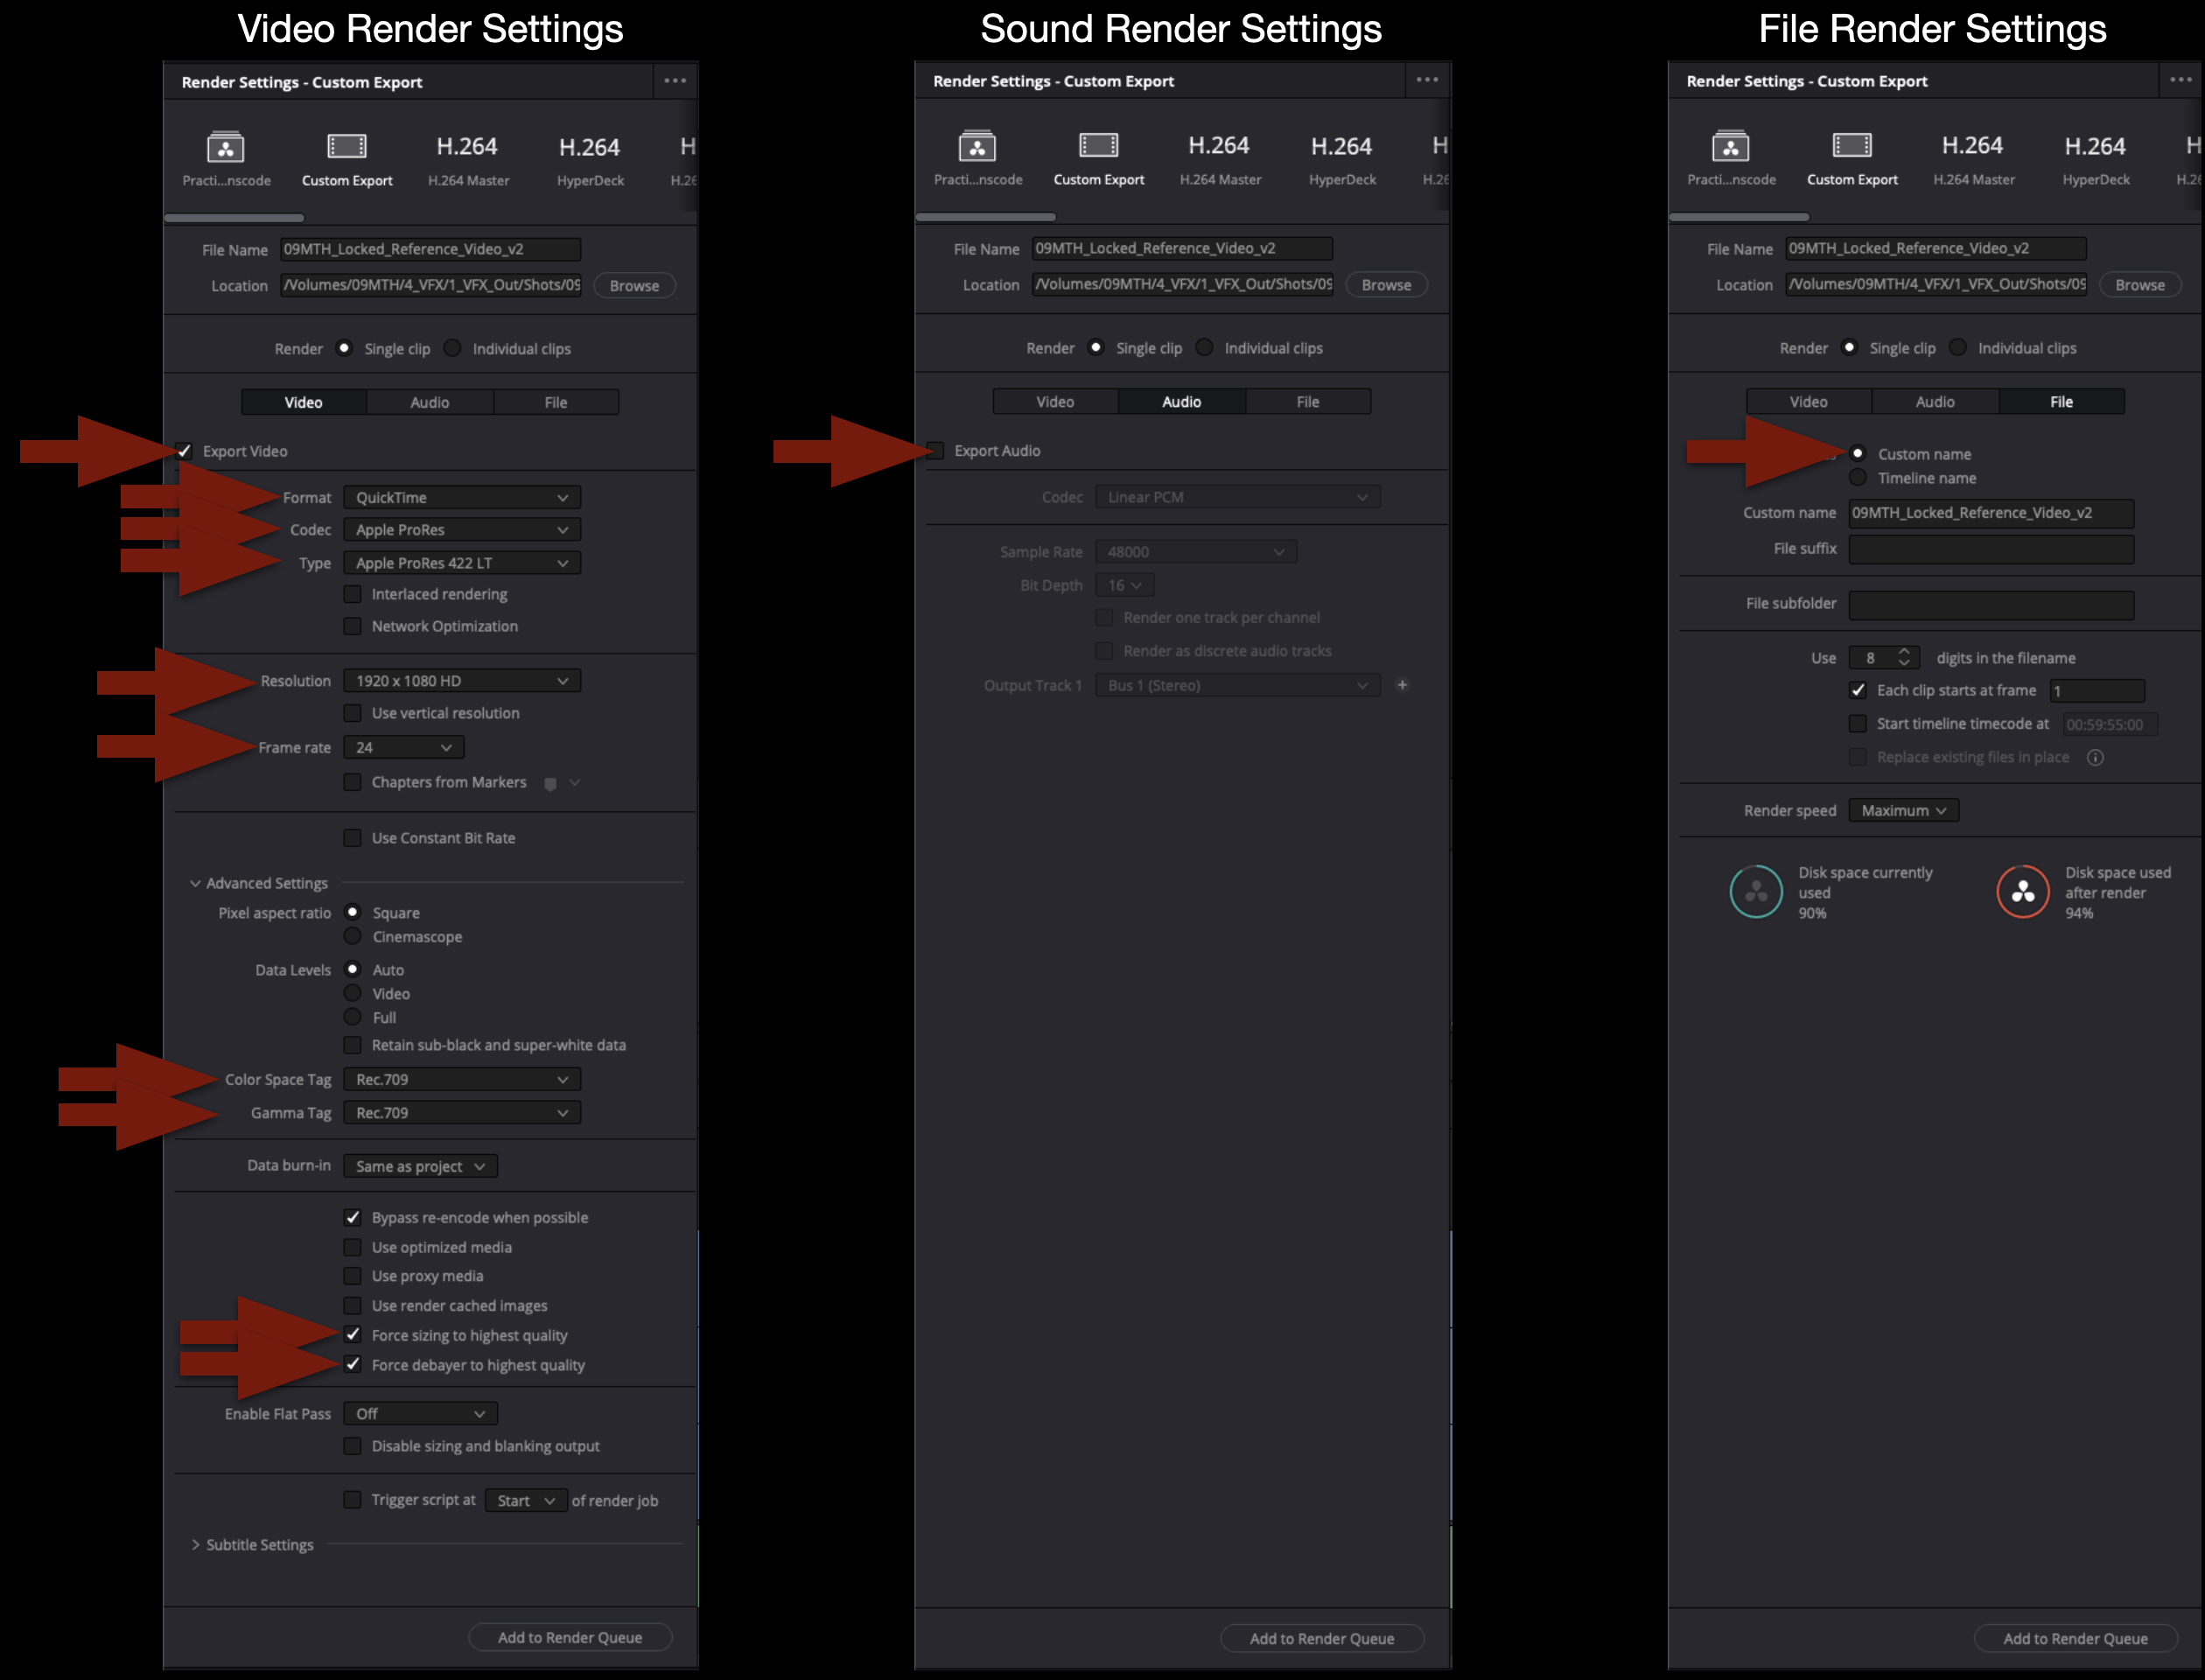
Below are the Render Settings for all reference videos exported from Resolve. Double-check the settings carefully before exporting.
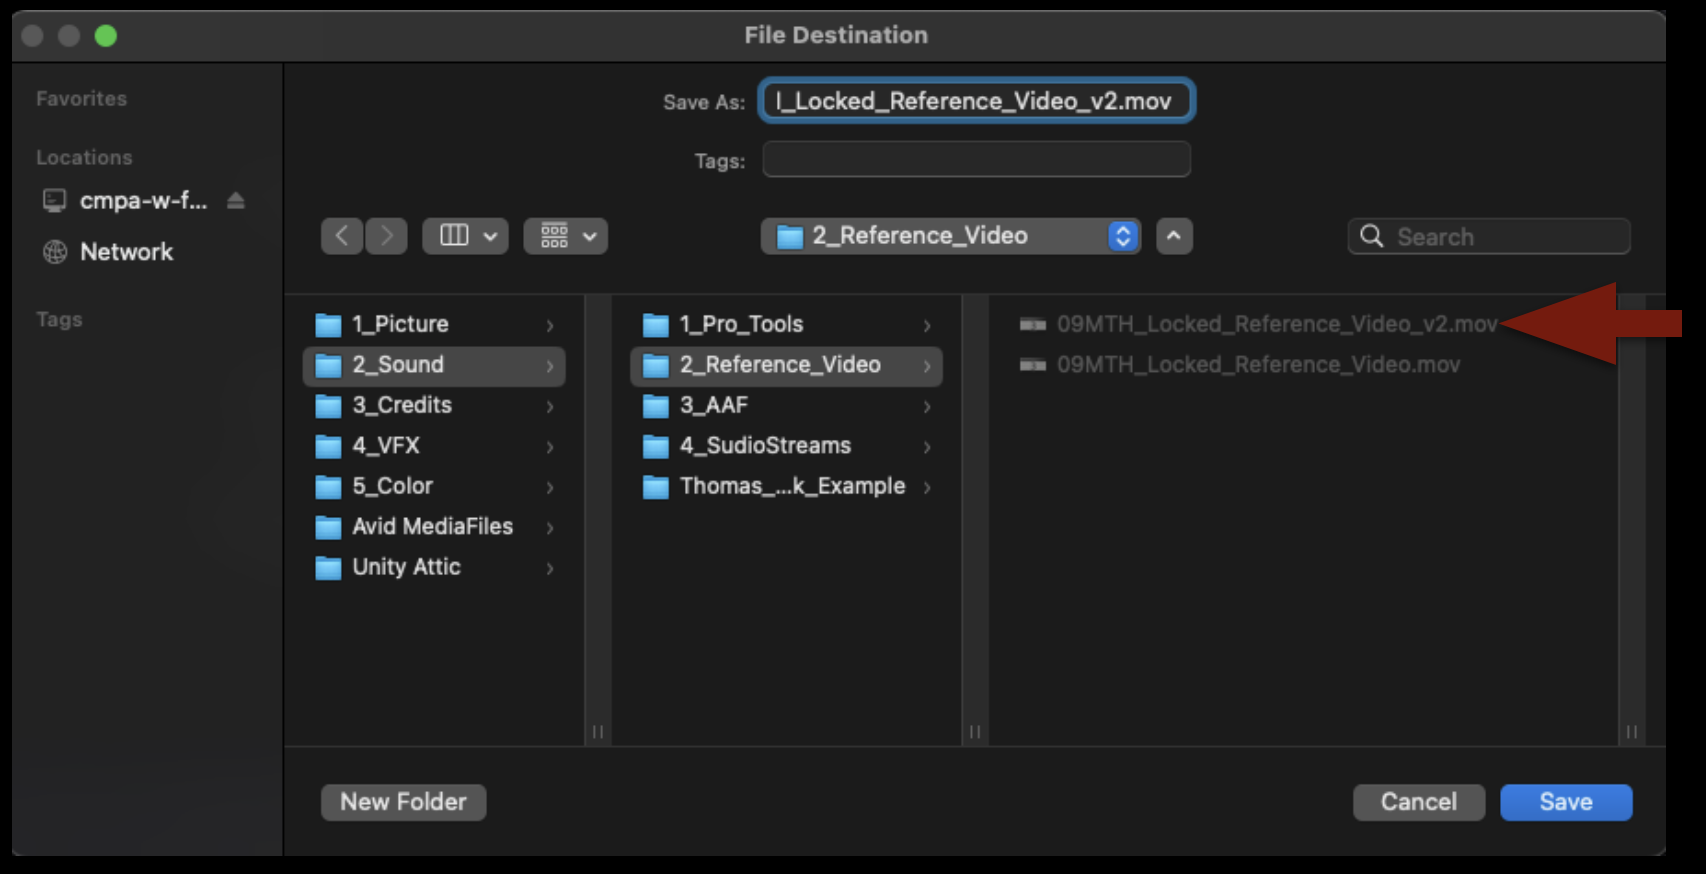
When the export is complete, navigate in the Finder to where it was exported and open it in QuickTime Player to make sure everything is okay.
Wrap Up
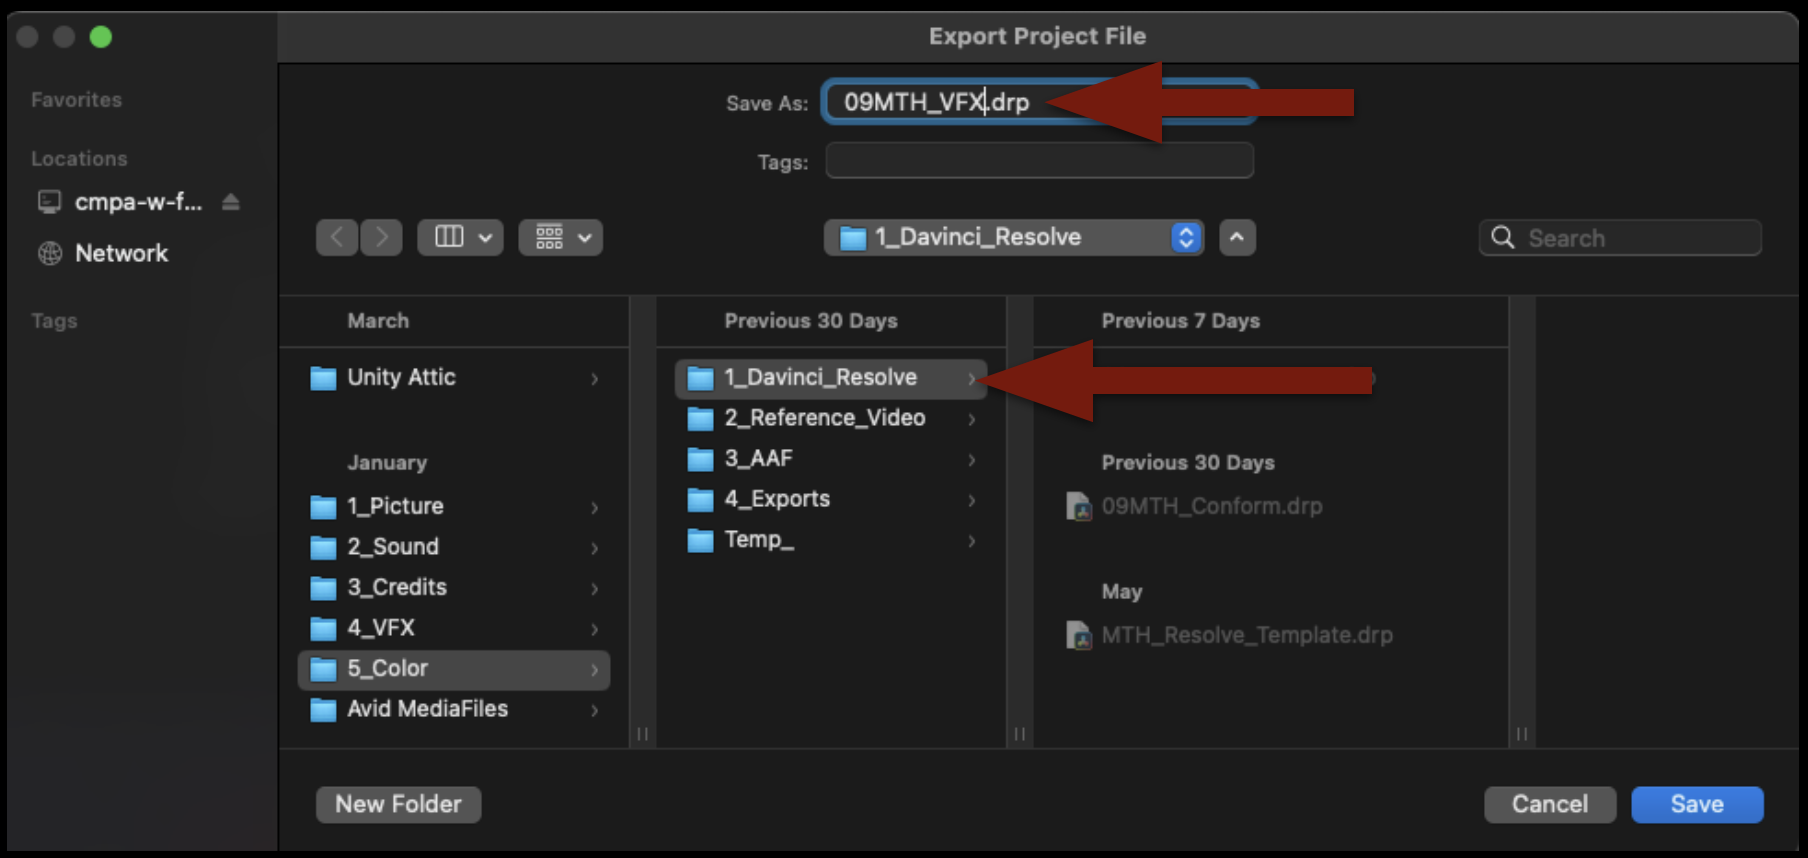
Save the project by hitting “Command+S”. Then go to the task bar and select Export Project… Make sure the project is named accordingly and place it in the proper folder on your show volume.
After you confirm that the .drp file is in the correct place, you can quit Resolve.
This guide is only necessary for shows with approved VFX shots.
In the industry, VFX are rarely completed in the NLE that the editor is using to cut picture. It is common practice for editors or assistant editors to create rough versions of VFX shots inside the NLE as a proof of concept while editing; these are sometimes called “slap comps” and are useful to evaluate how the VFX shot will work in the context of the edit. For the final shots, though, VFX vendors are contracted to do the work. This is for four primary reasons:
The editor is cutting with “offline” quality footage which is of lesser quality
The picture editing application is rarely the best tool to accomplish the required visual effect
The editor is not normally the person with the expertise to accomplish the required visual effect
The editor’s time is more valuably spent on the storytelling aspect of editing
The editorial department coordinates with the VFX vendor to send them all the high quality elements, references, and notes required to create the final shots. It is this process of creating and packaging everything that the VFX vendor needs that is referred to as a “VFX Turnover”. This would normally be done by an assistant editor or VFX editor in the editorial department in coordination with the lab that is storing all the original camera files, and there may be several turnovers during the editorial process for different VFX vendors. In our workflow this responsibility rests on the editor at picture lock. The turnover is completed in DaVinci Resolve after the steps outlined in the Turnover to Color page.
Locked Reference Video
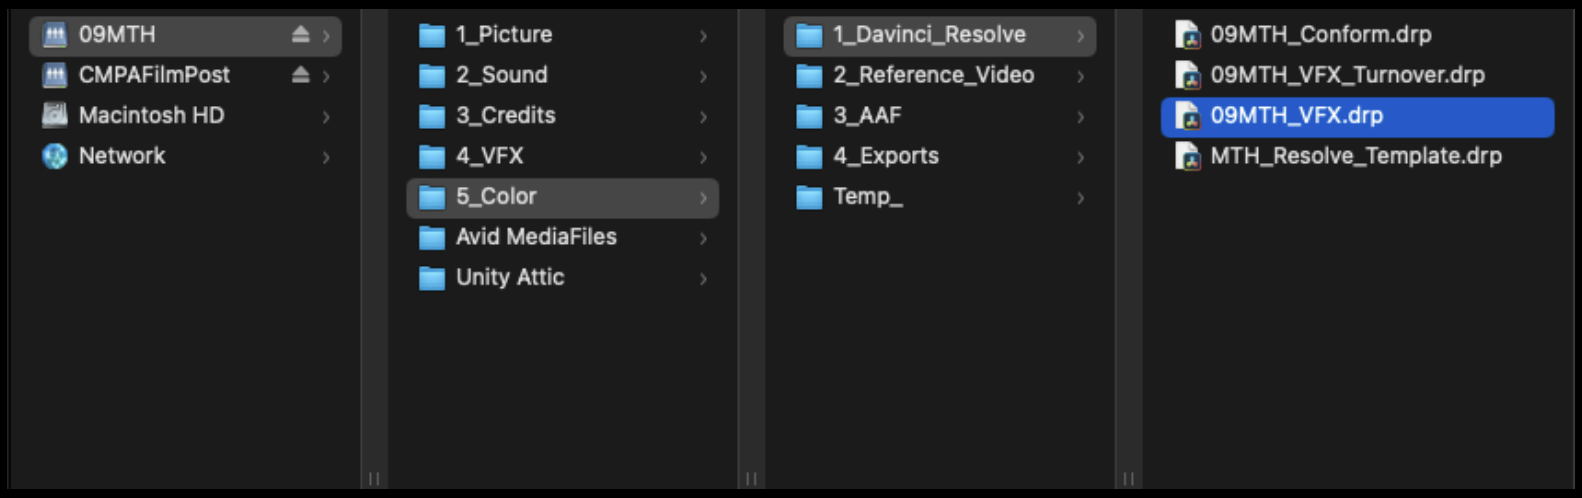
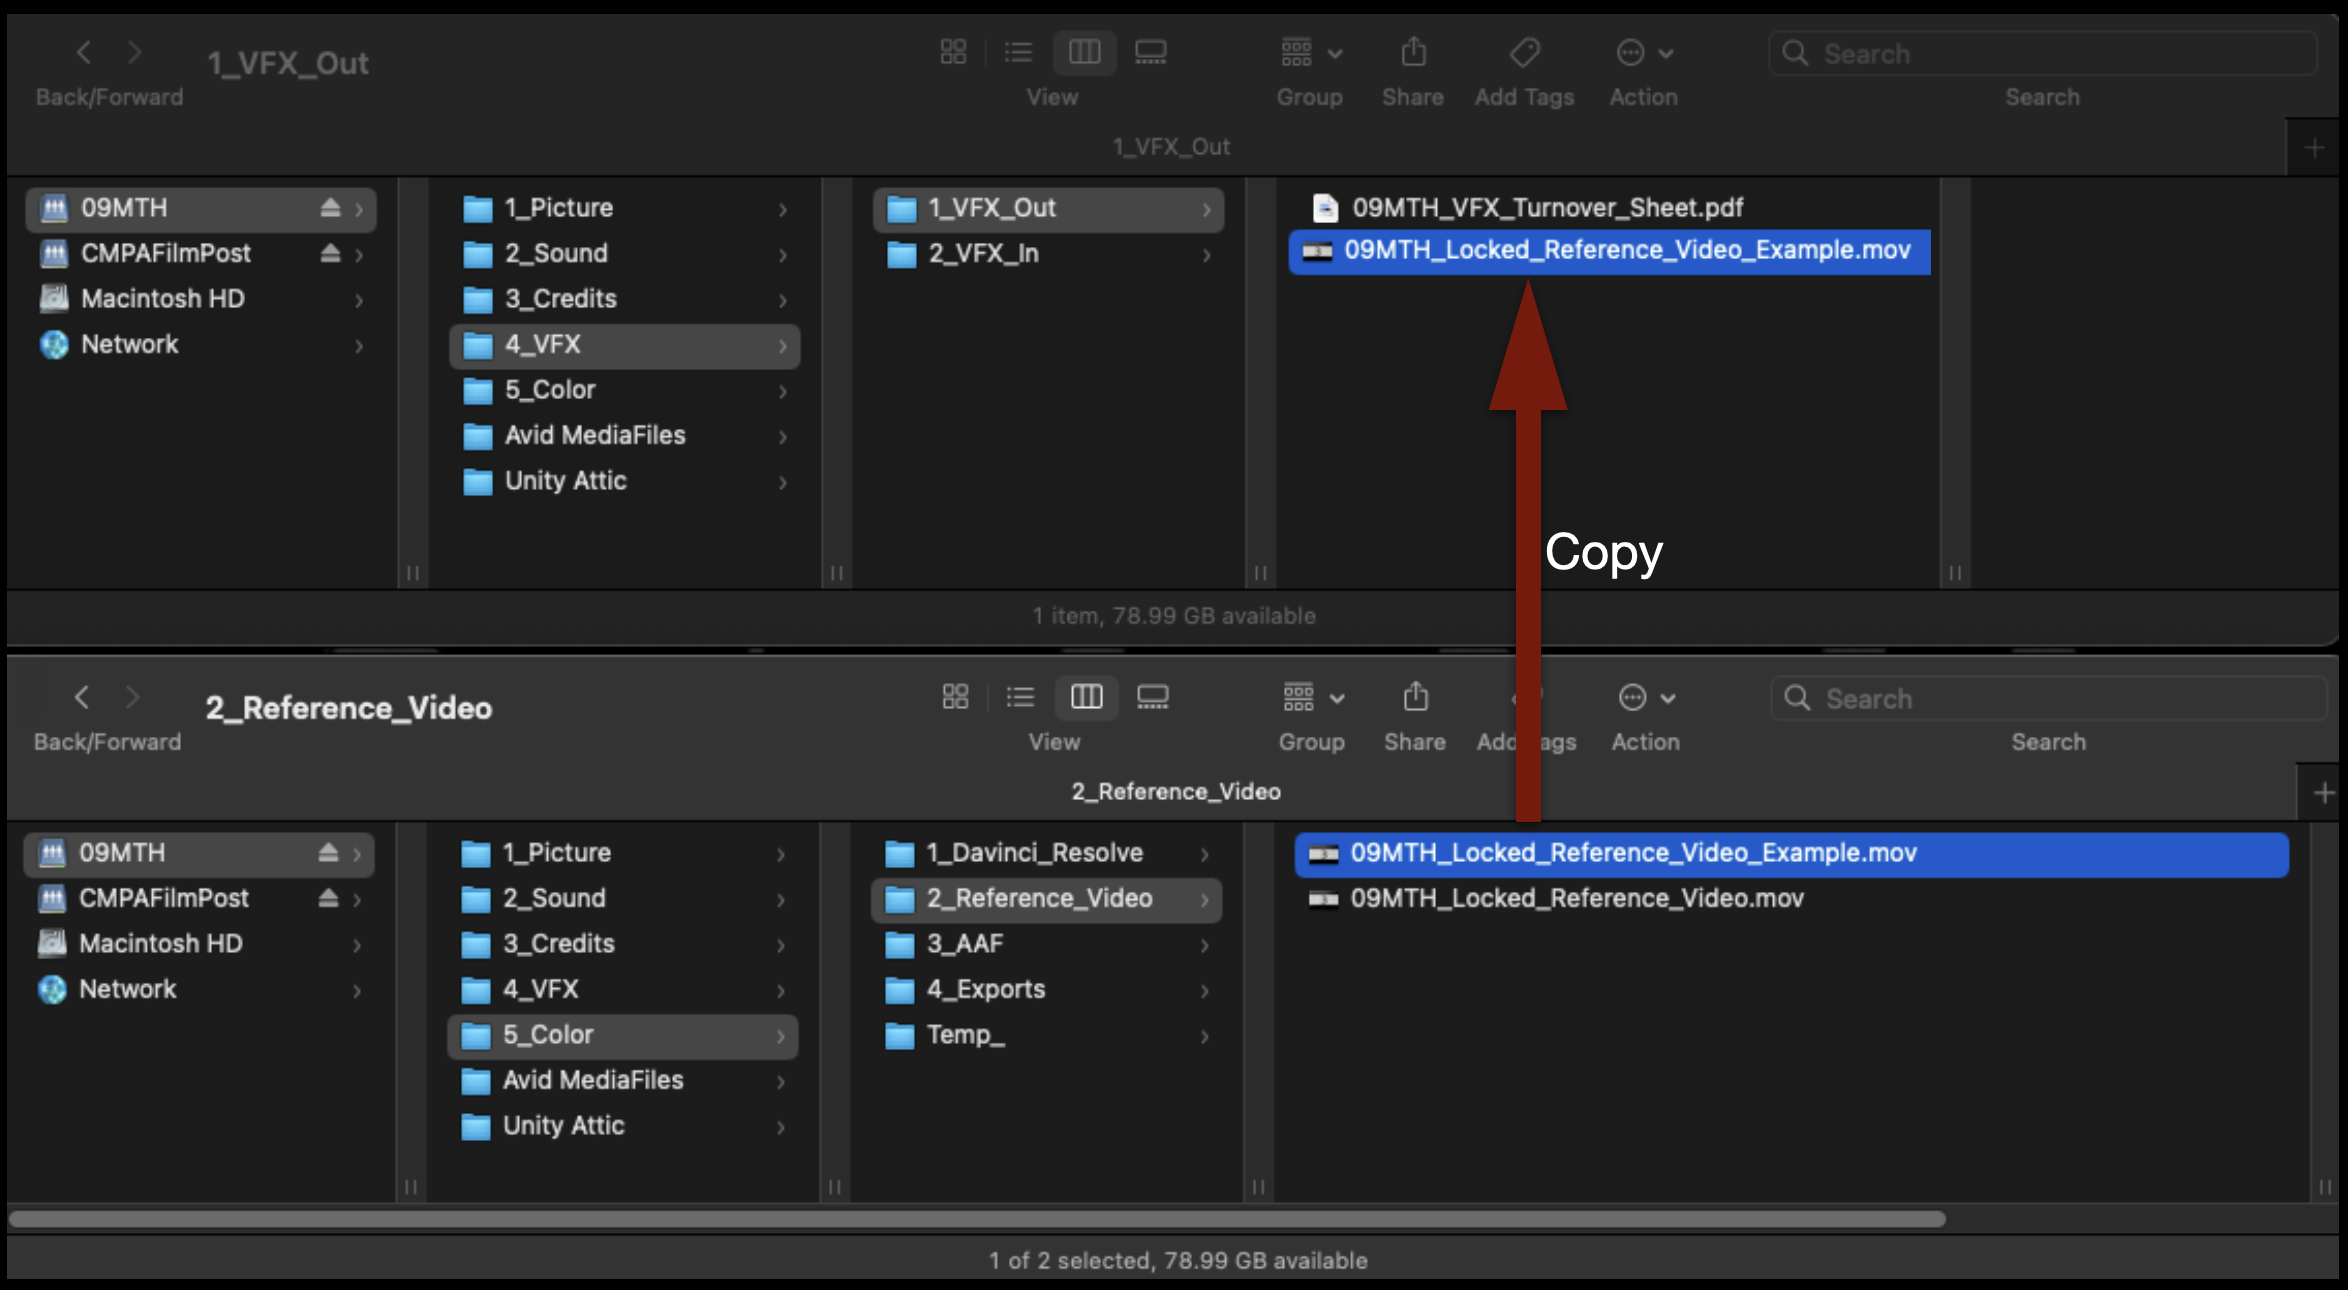
The editor will assemble the “turnover packet” that will be sent to the VFX department in the show volume inside the VFX Out folder. The VFX Out folder should already have the VFX Turnover Sheet that was made at picture lock and outlined in the Picture Lock – VFX Prep guide. The next thing that needs to be added to this folder is a copy of the Locked Reference Video. This is the same reference video that was used in the color and sound turnover.
Copy the Locked Reference Video (don’t move it) from the Color folder to the VFX Out folder.
Resolve Project Setup
Only proceed with these steps after you have completed everything in the Turnover to Color page.
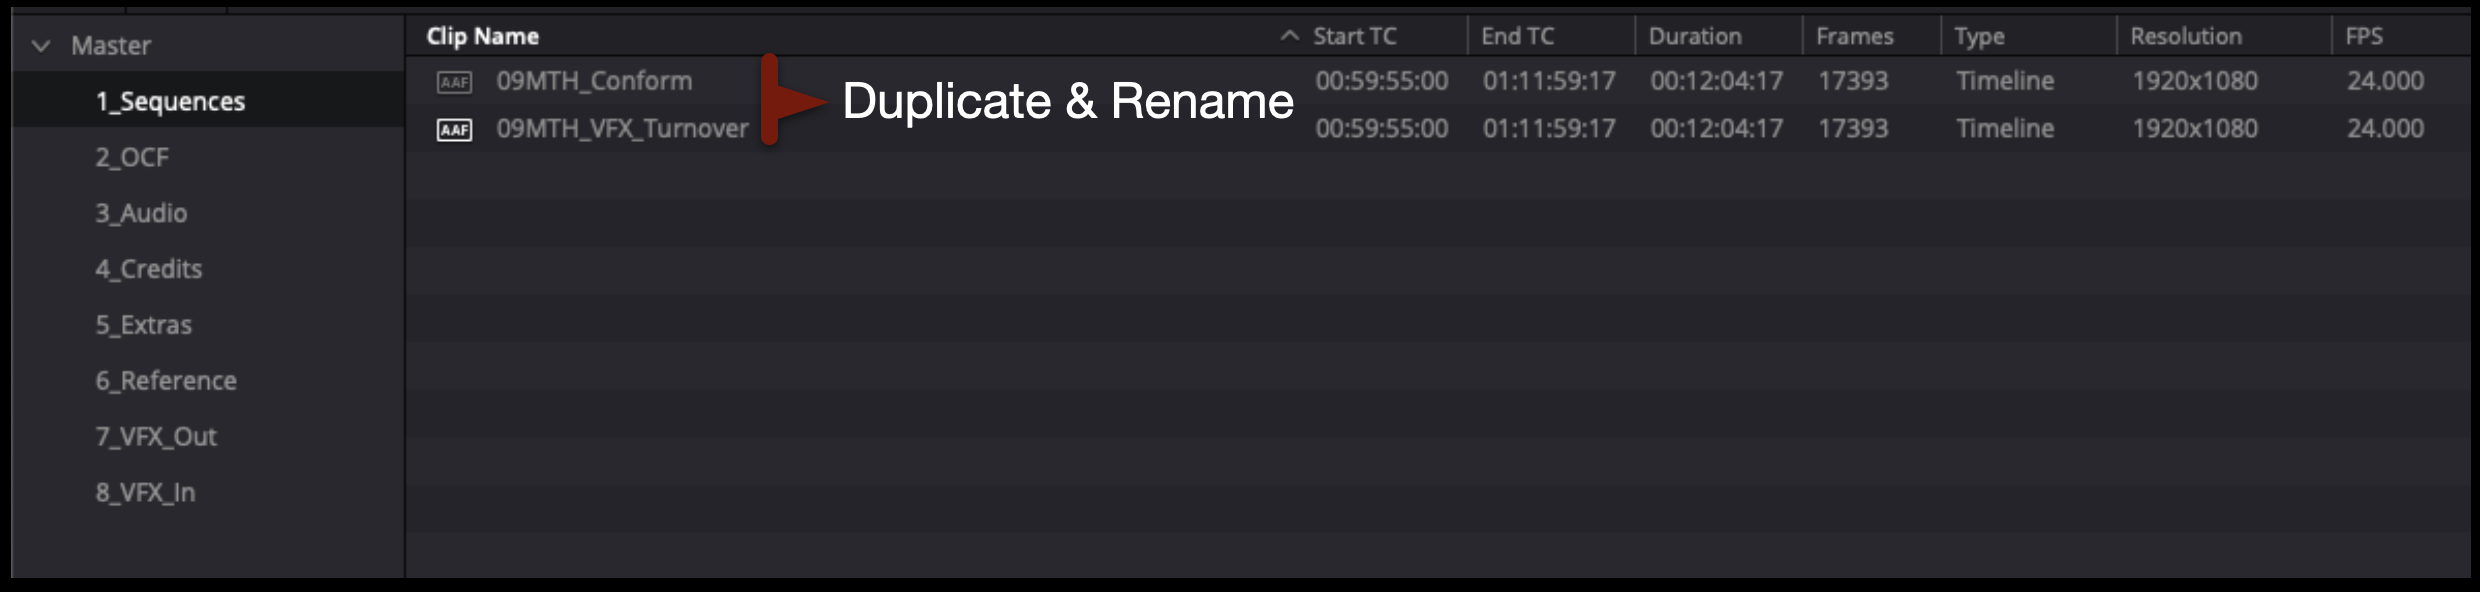
In the Media page inside the Sequences bin, duplicate the sequence named “Conform” and rename the new sequence VFX_Turnover as shown in the example below.
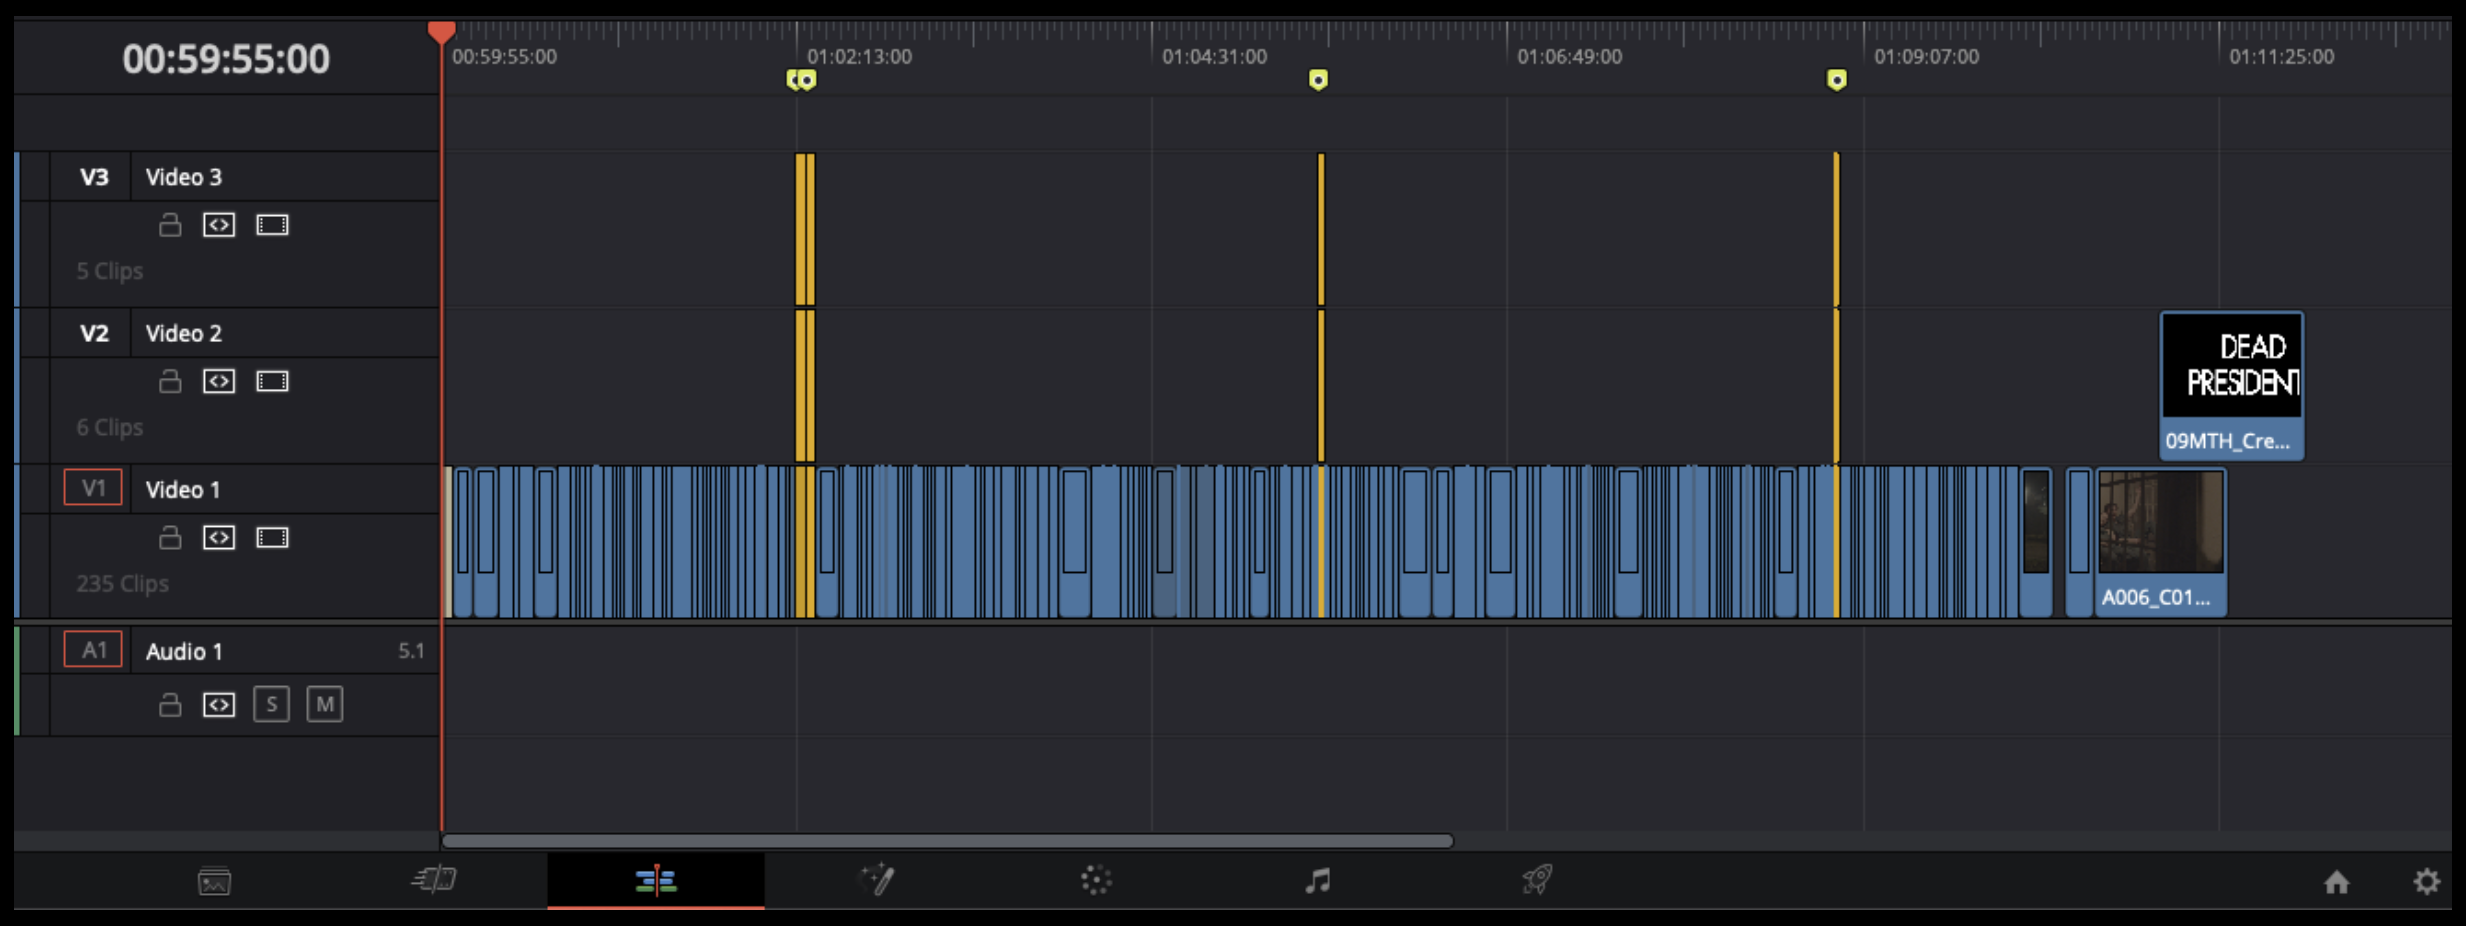
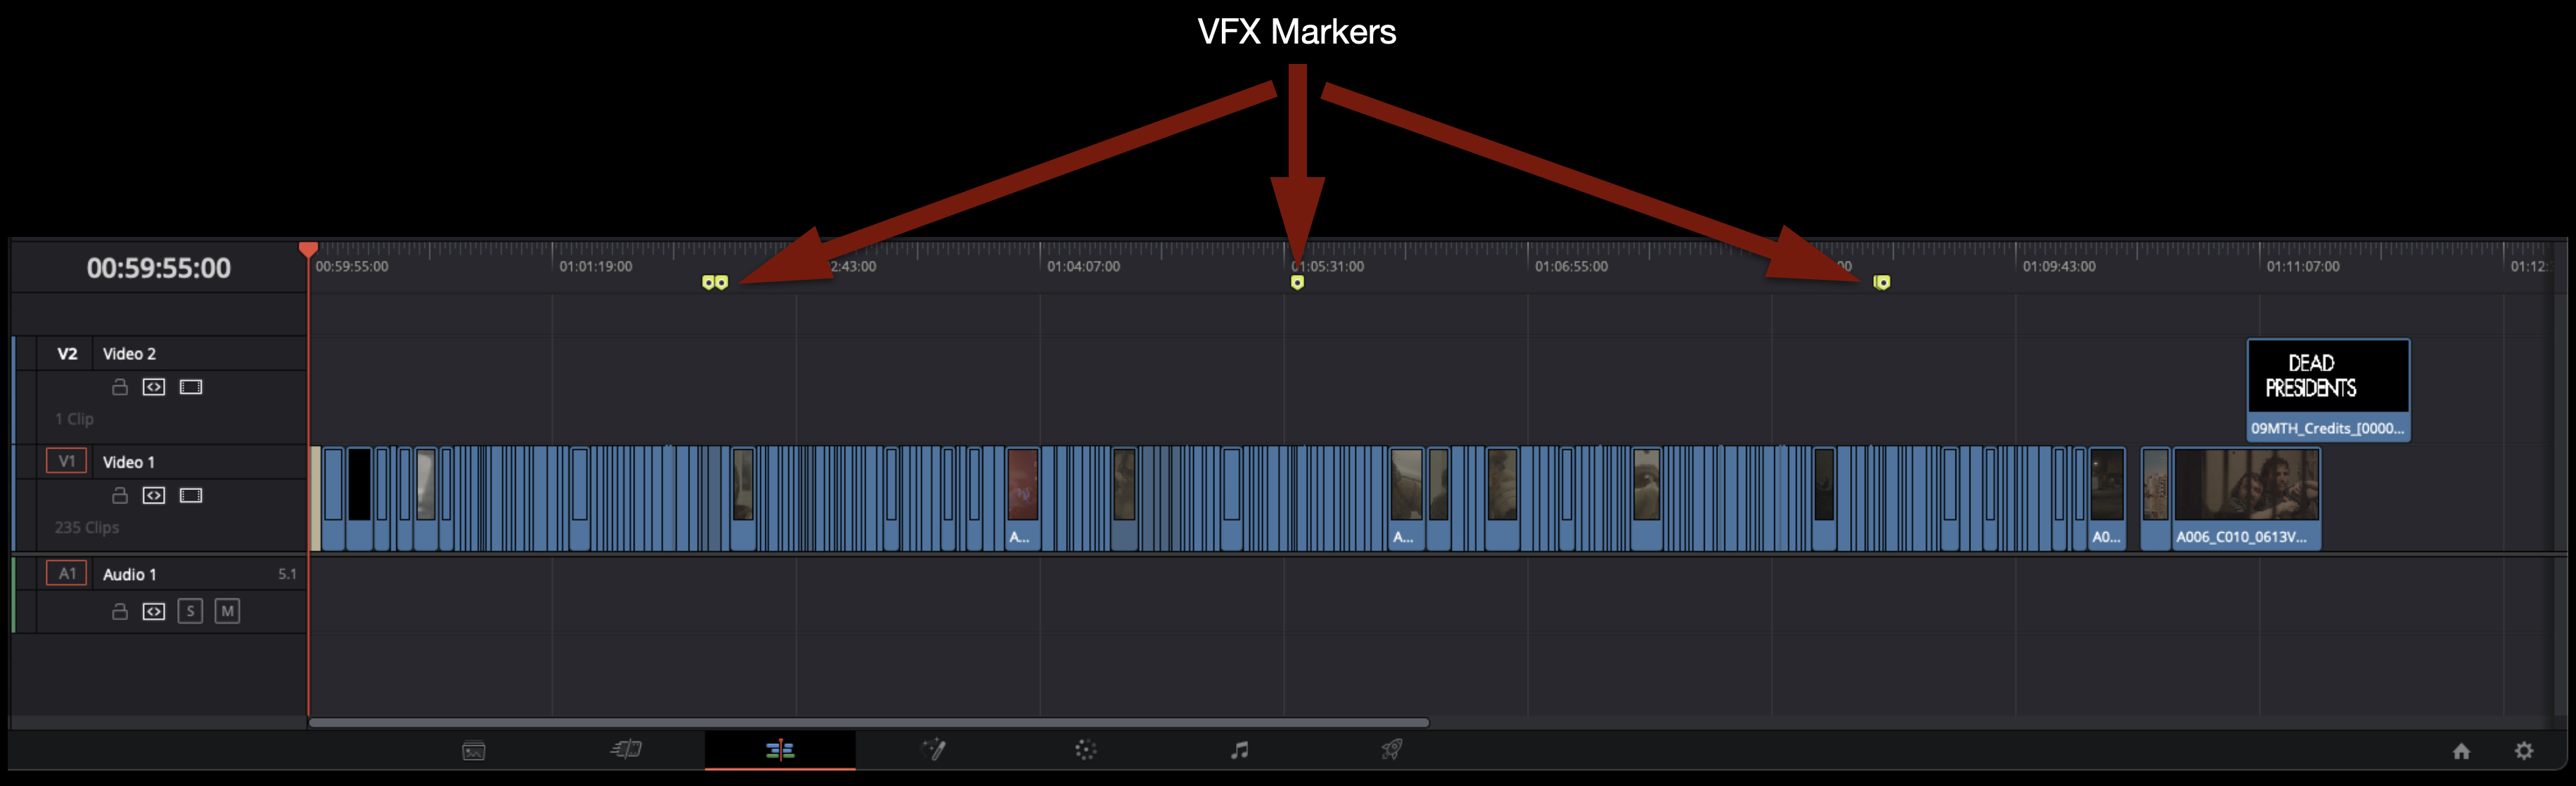
You will notice that the yellow VFX markers that you made in Media Composer to label and track the VFX shots have carried over into your Resolve sequence. In Resolve you can jump between markers quickly by using the keyboard shortcut “Shift + Up-or-Down Arrow”.
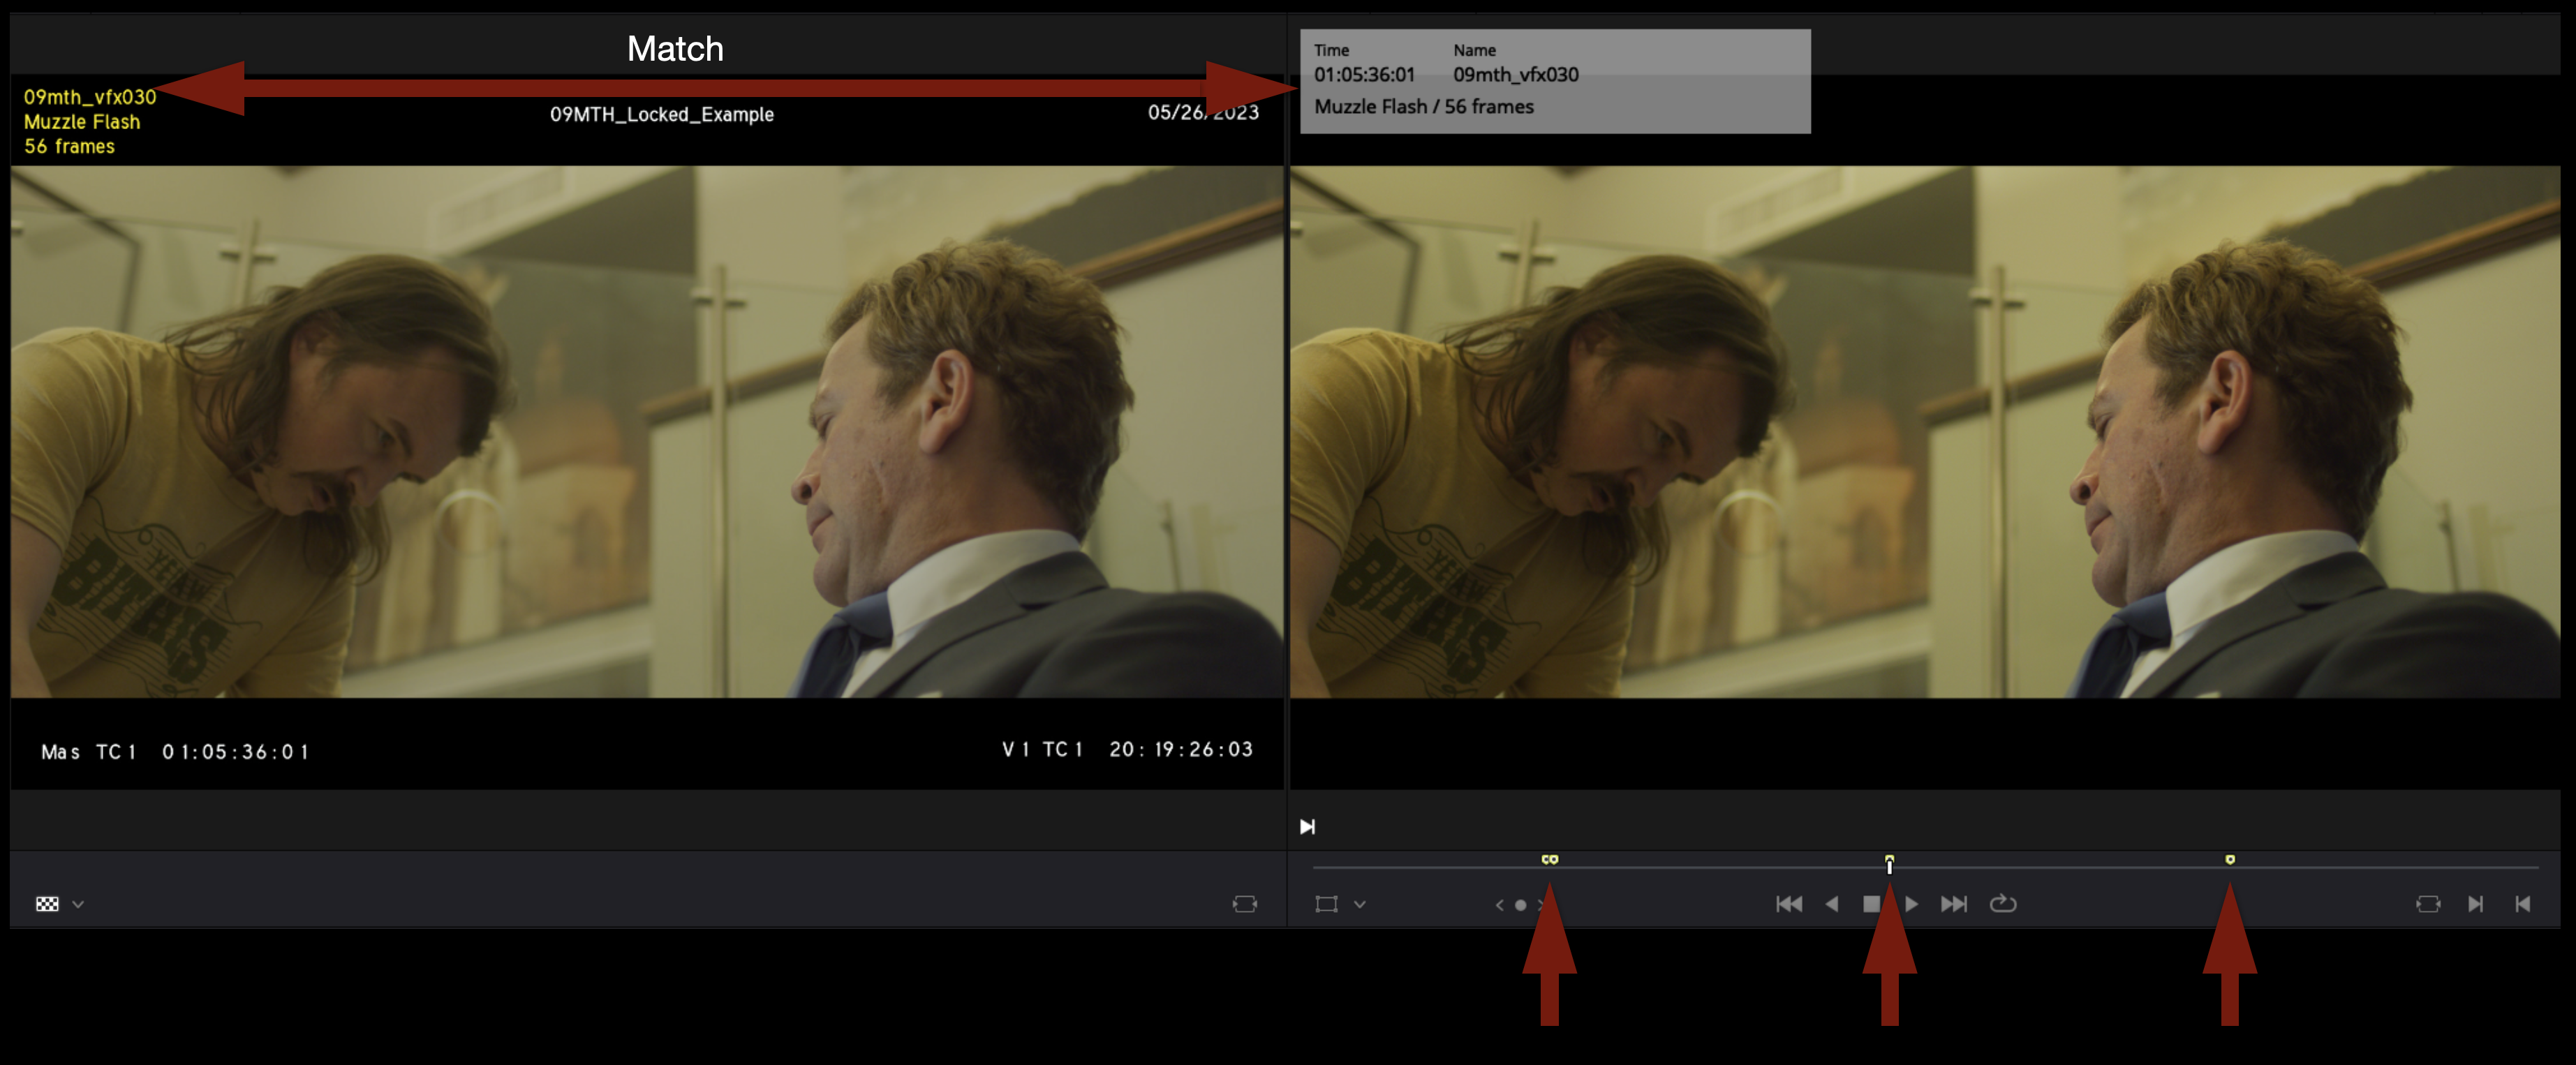
If you select one of the markers, you will see that all of the information that was logged into the marker in Media Composer and is in your VFX Turnover Sheet is present in the Resolve markers.
In the Media page comparing the online reference video and the Resolve sequence, you should notice that the VFX info burnt into the reference media matches the Resolve markers’ information.
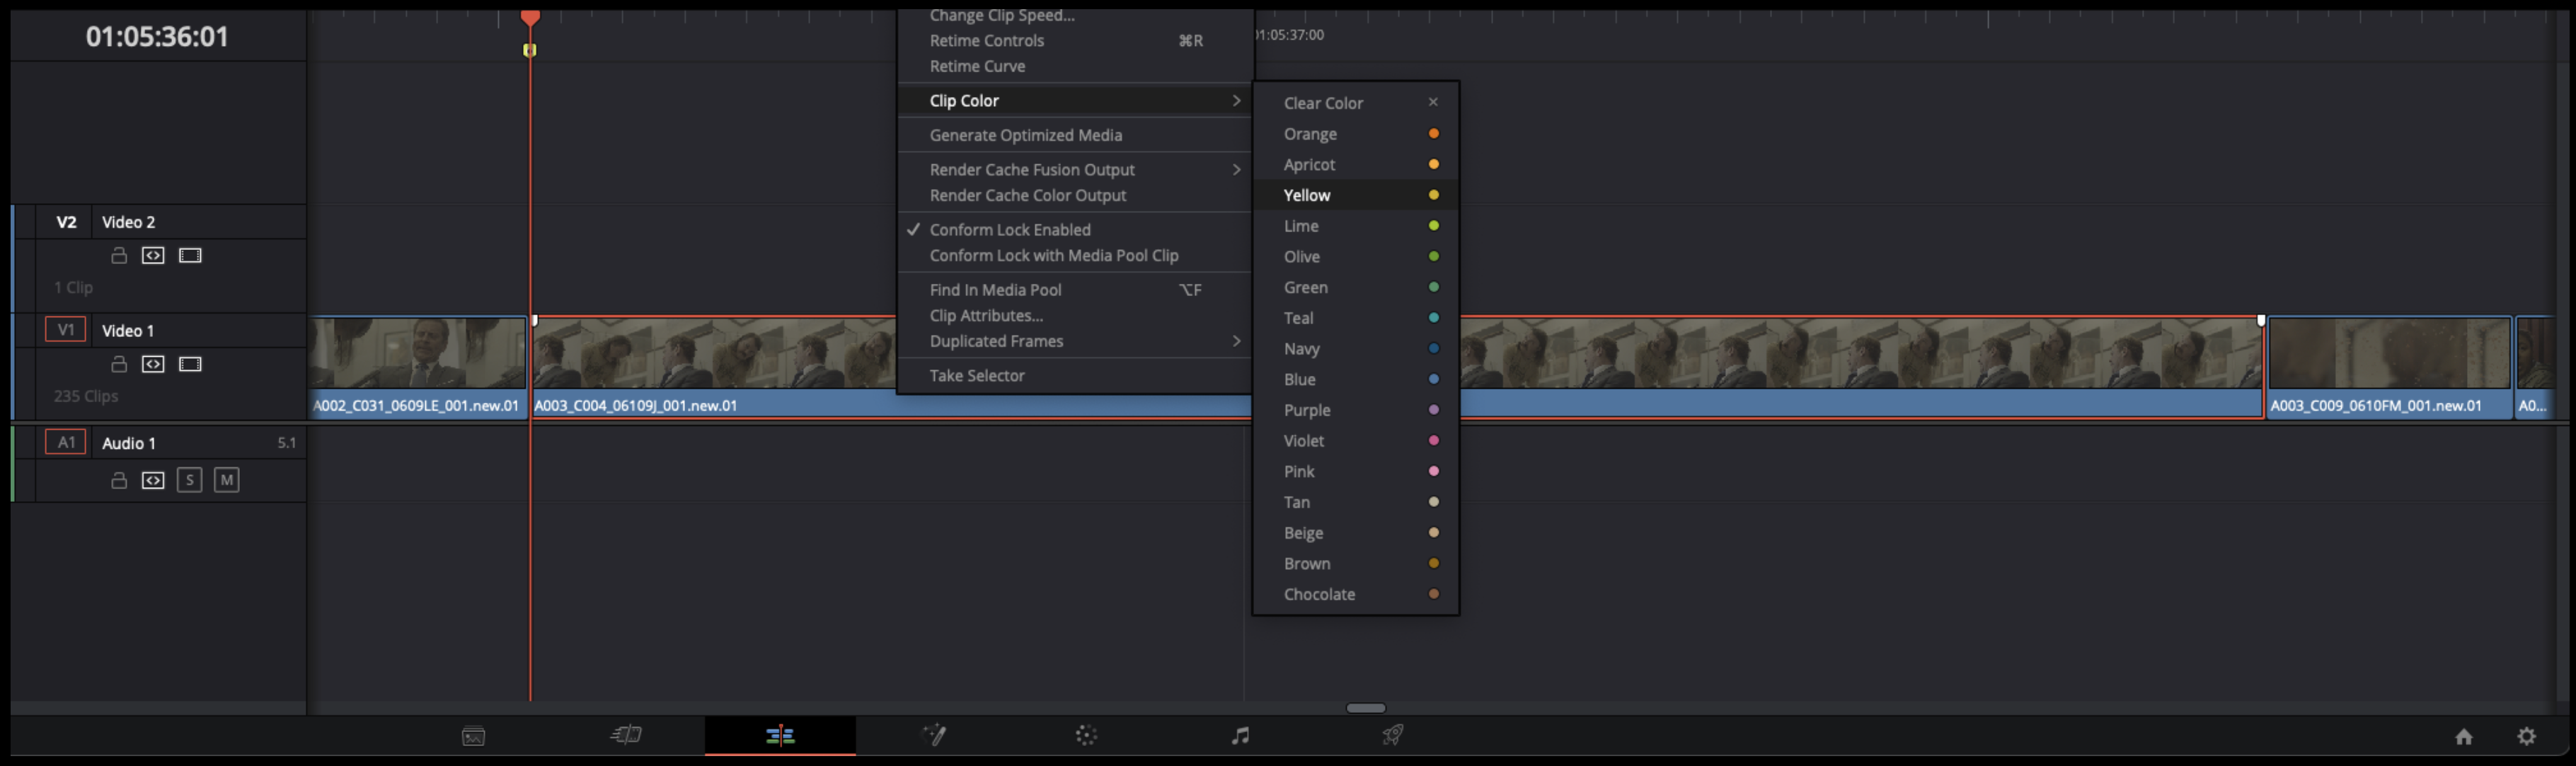
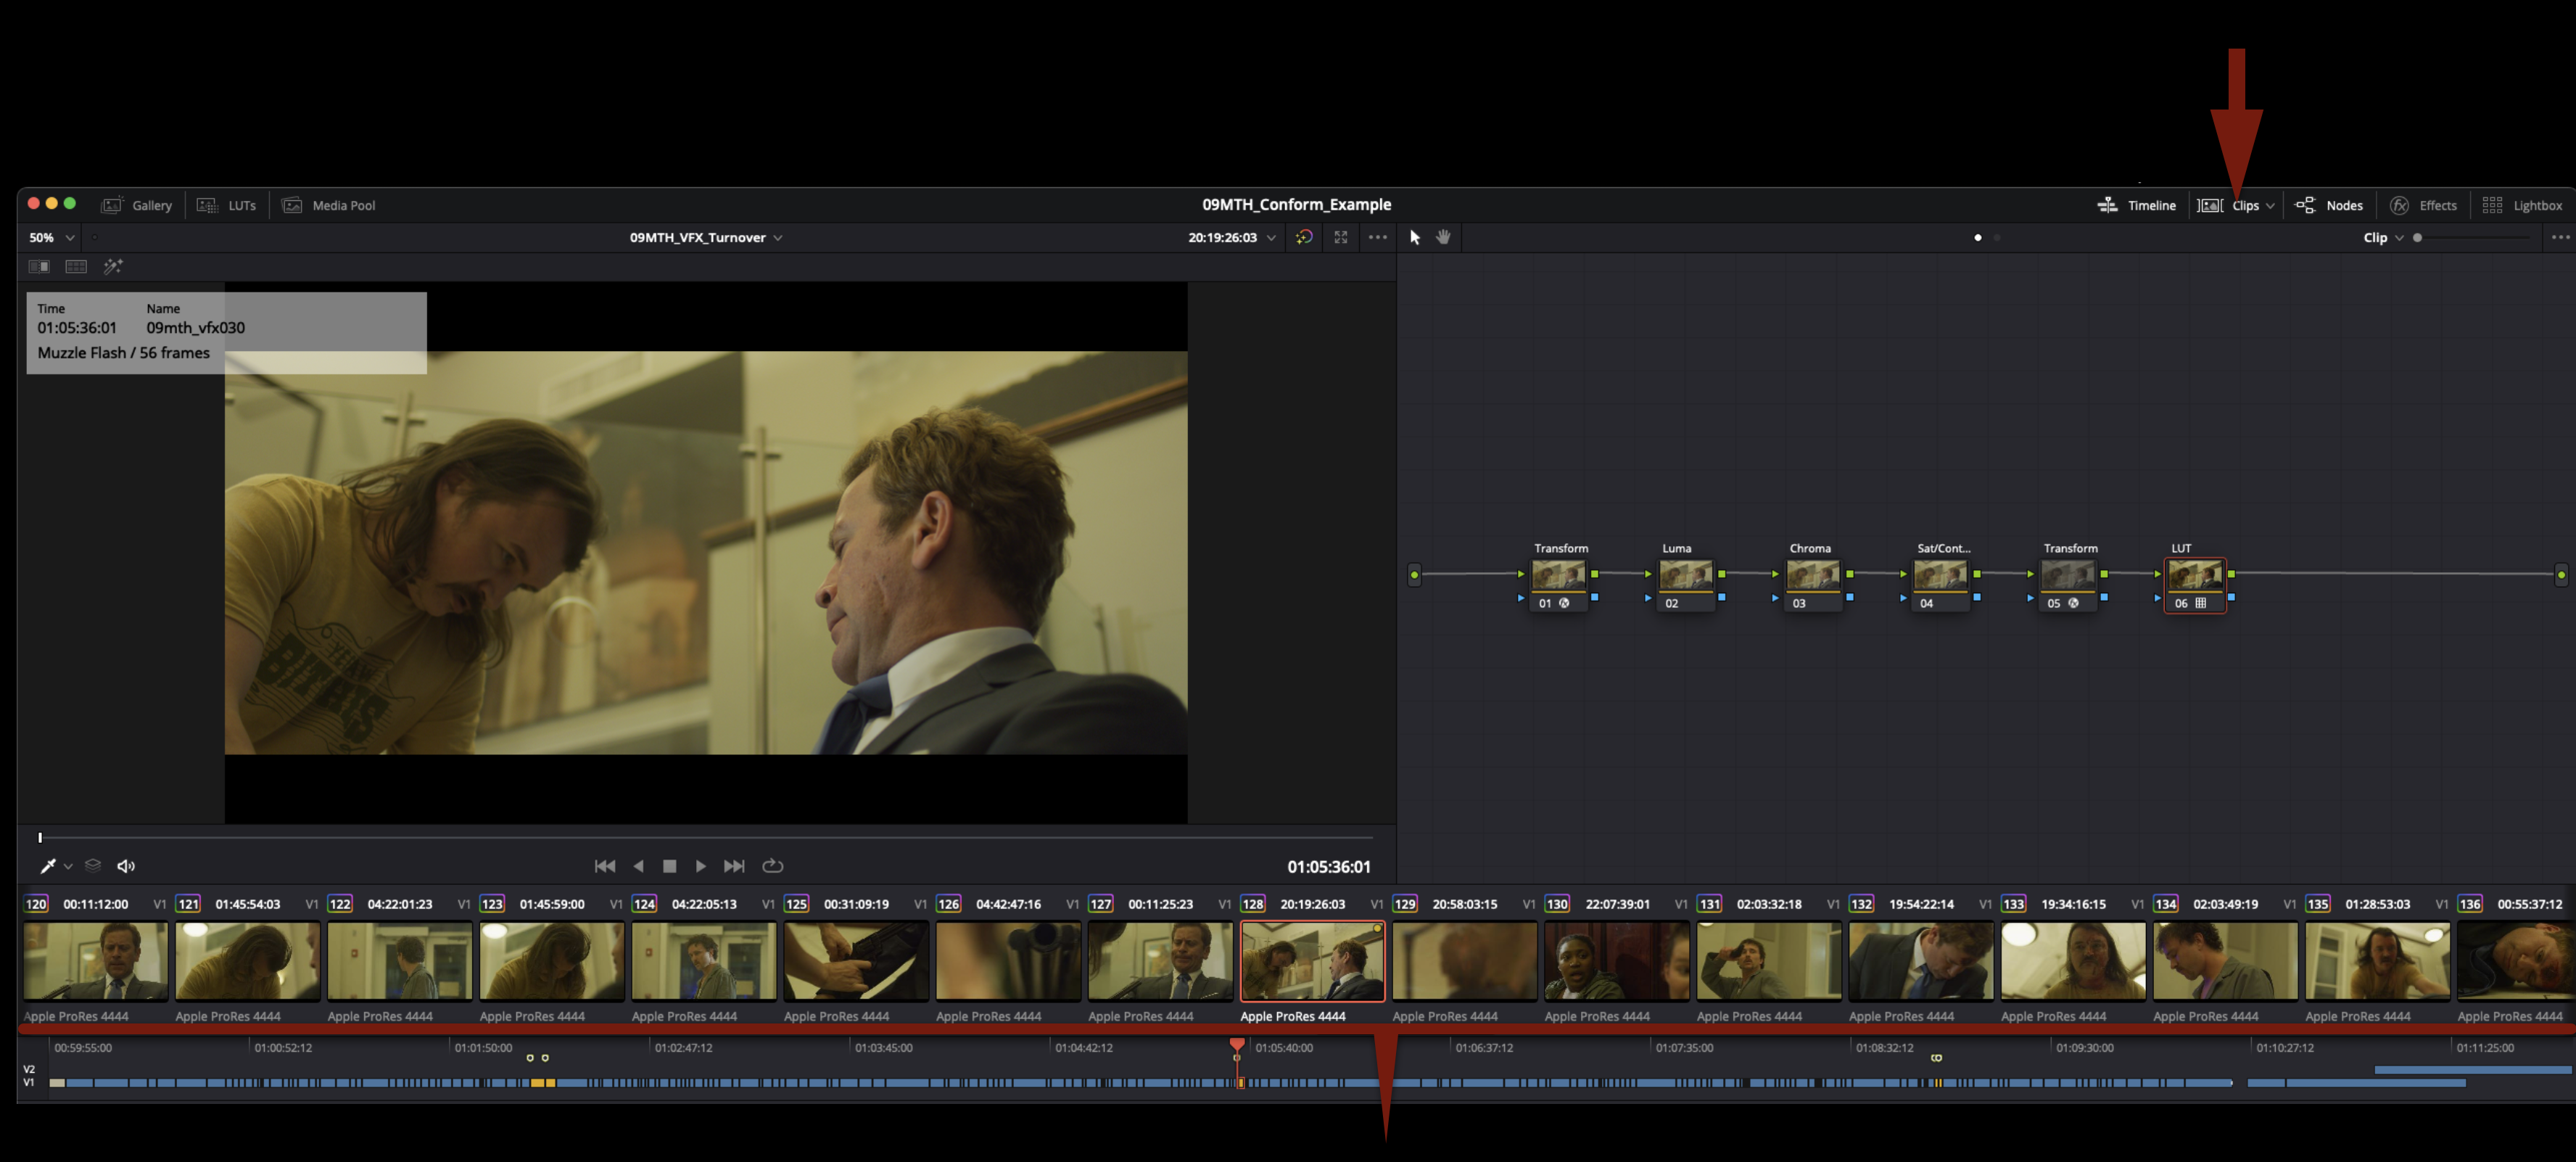
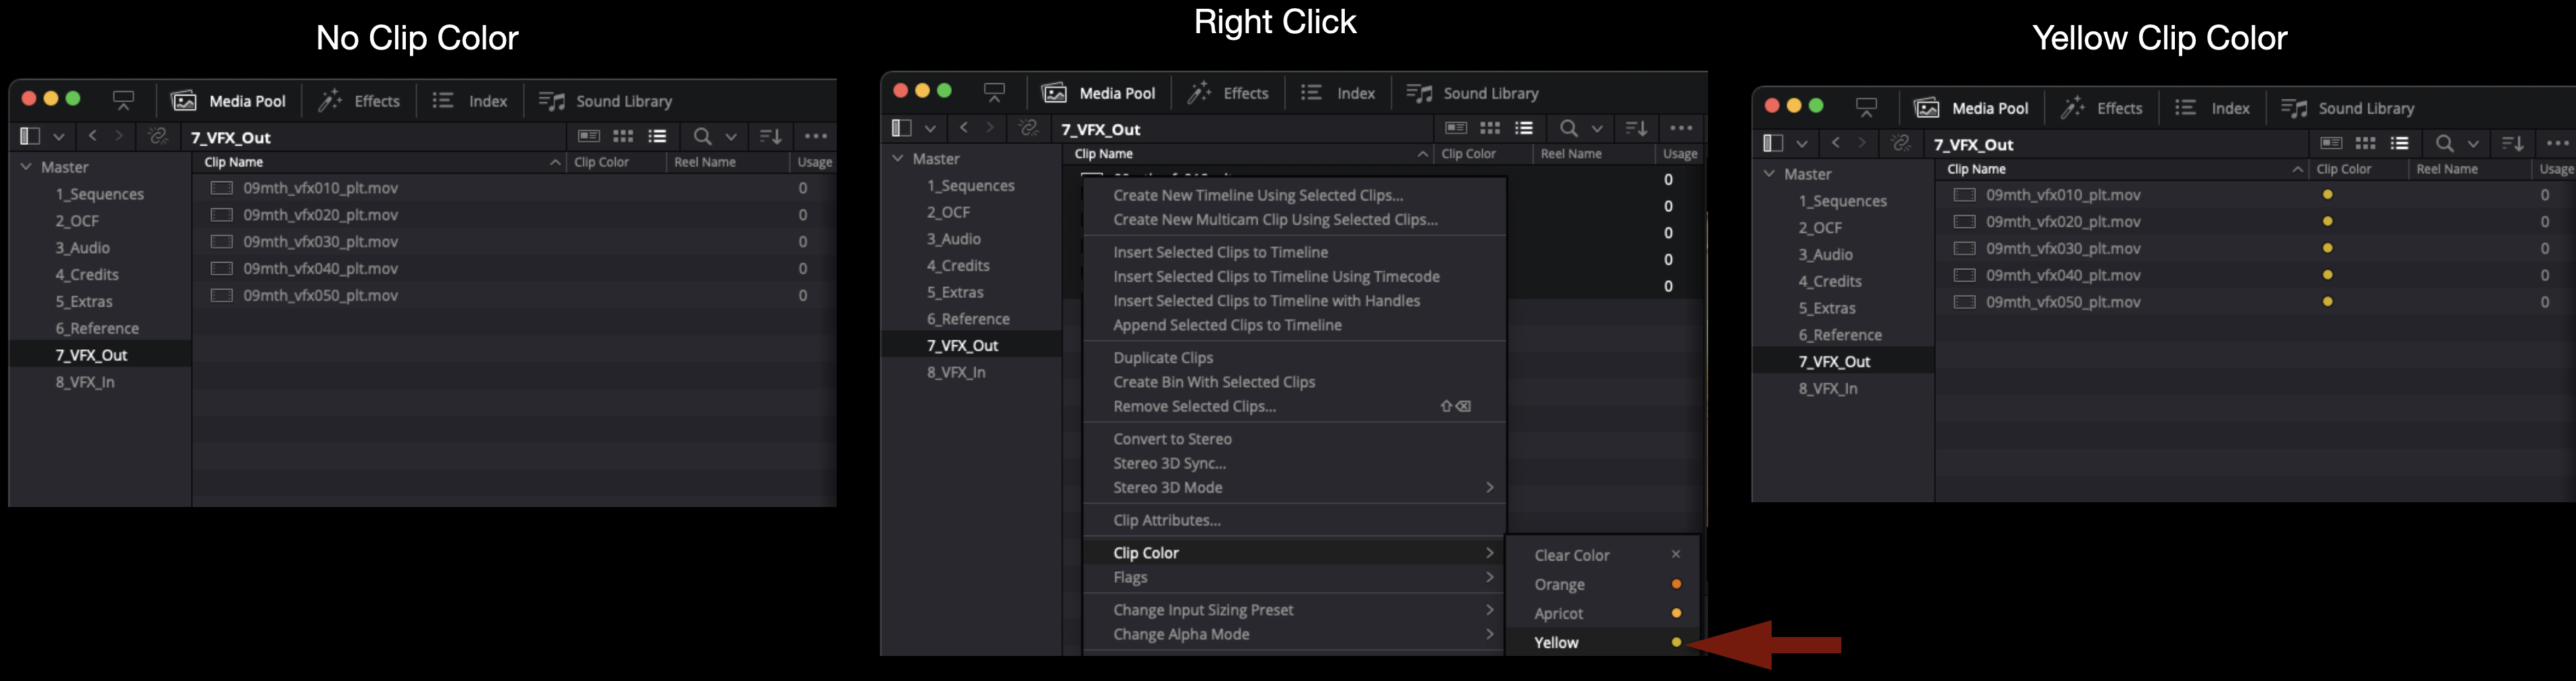
To make the following steps easier, you will need to change the VFX shots in the timeline to a different color. Right-click on each of the VFX shots and then select Clip Color > Yellow.
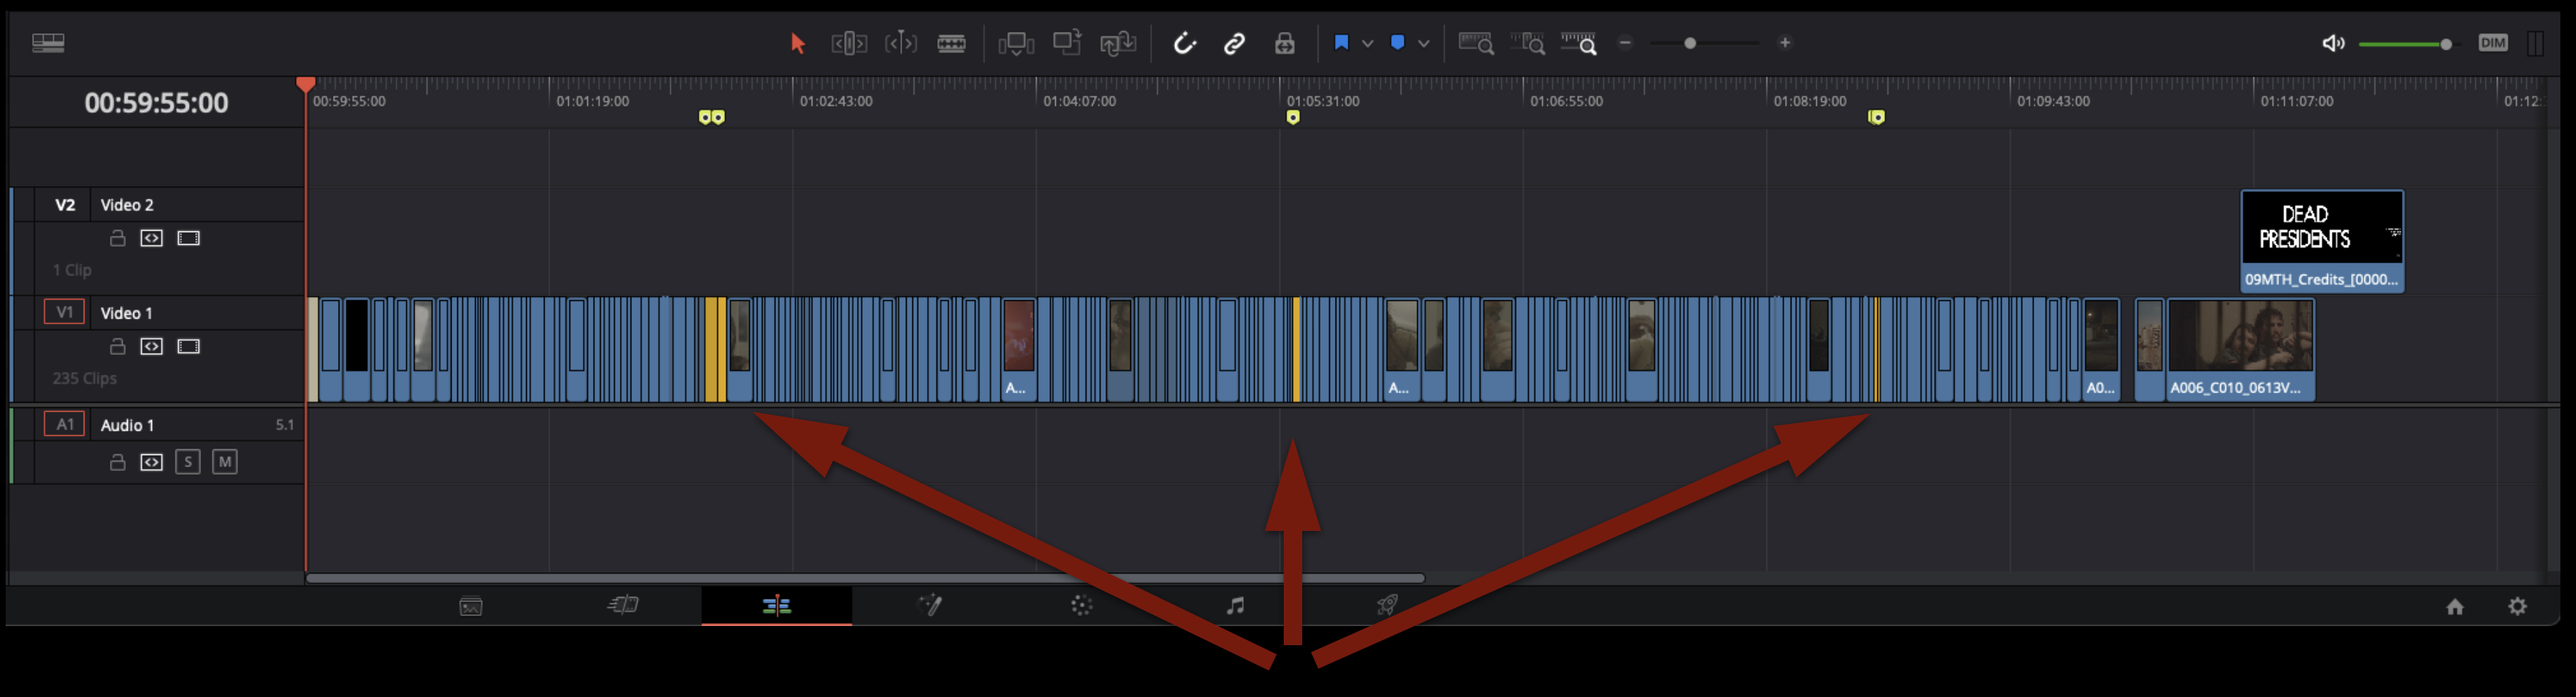
After you have changed the clip color to yellow for all of your VFX shots, your sequence should look similar to the example below.
By default, the Clips Thumbnail Timeline in the Color page displays every clip in the sequence. But now that your VFX shots are tagged with a different color, you can sort by that color. Select clips as shown in the arrow bellow.
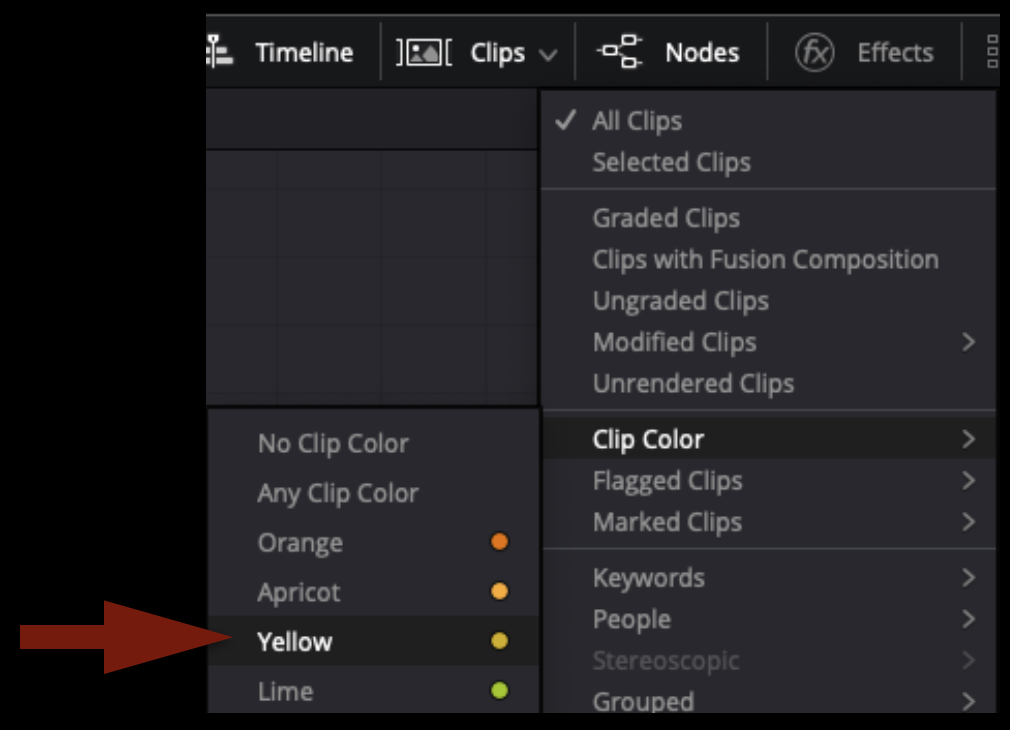
In the dropdown menu, select sort by Clip Color > Yellow.
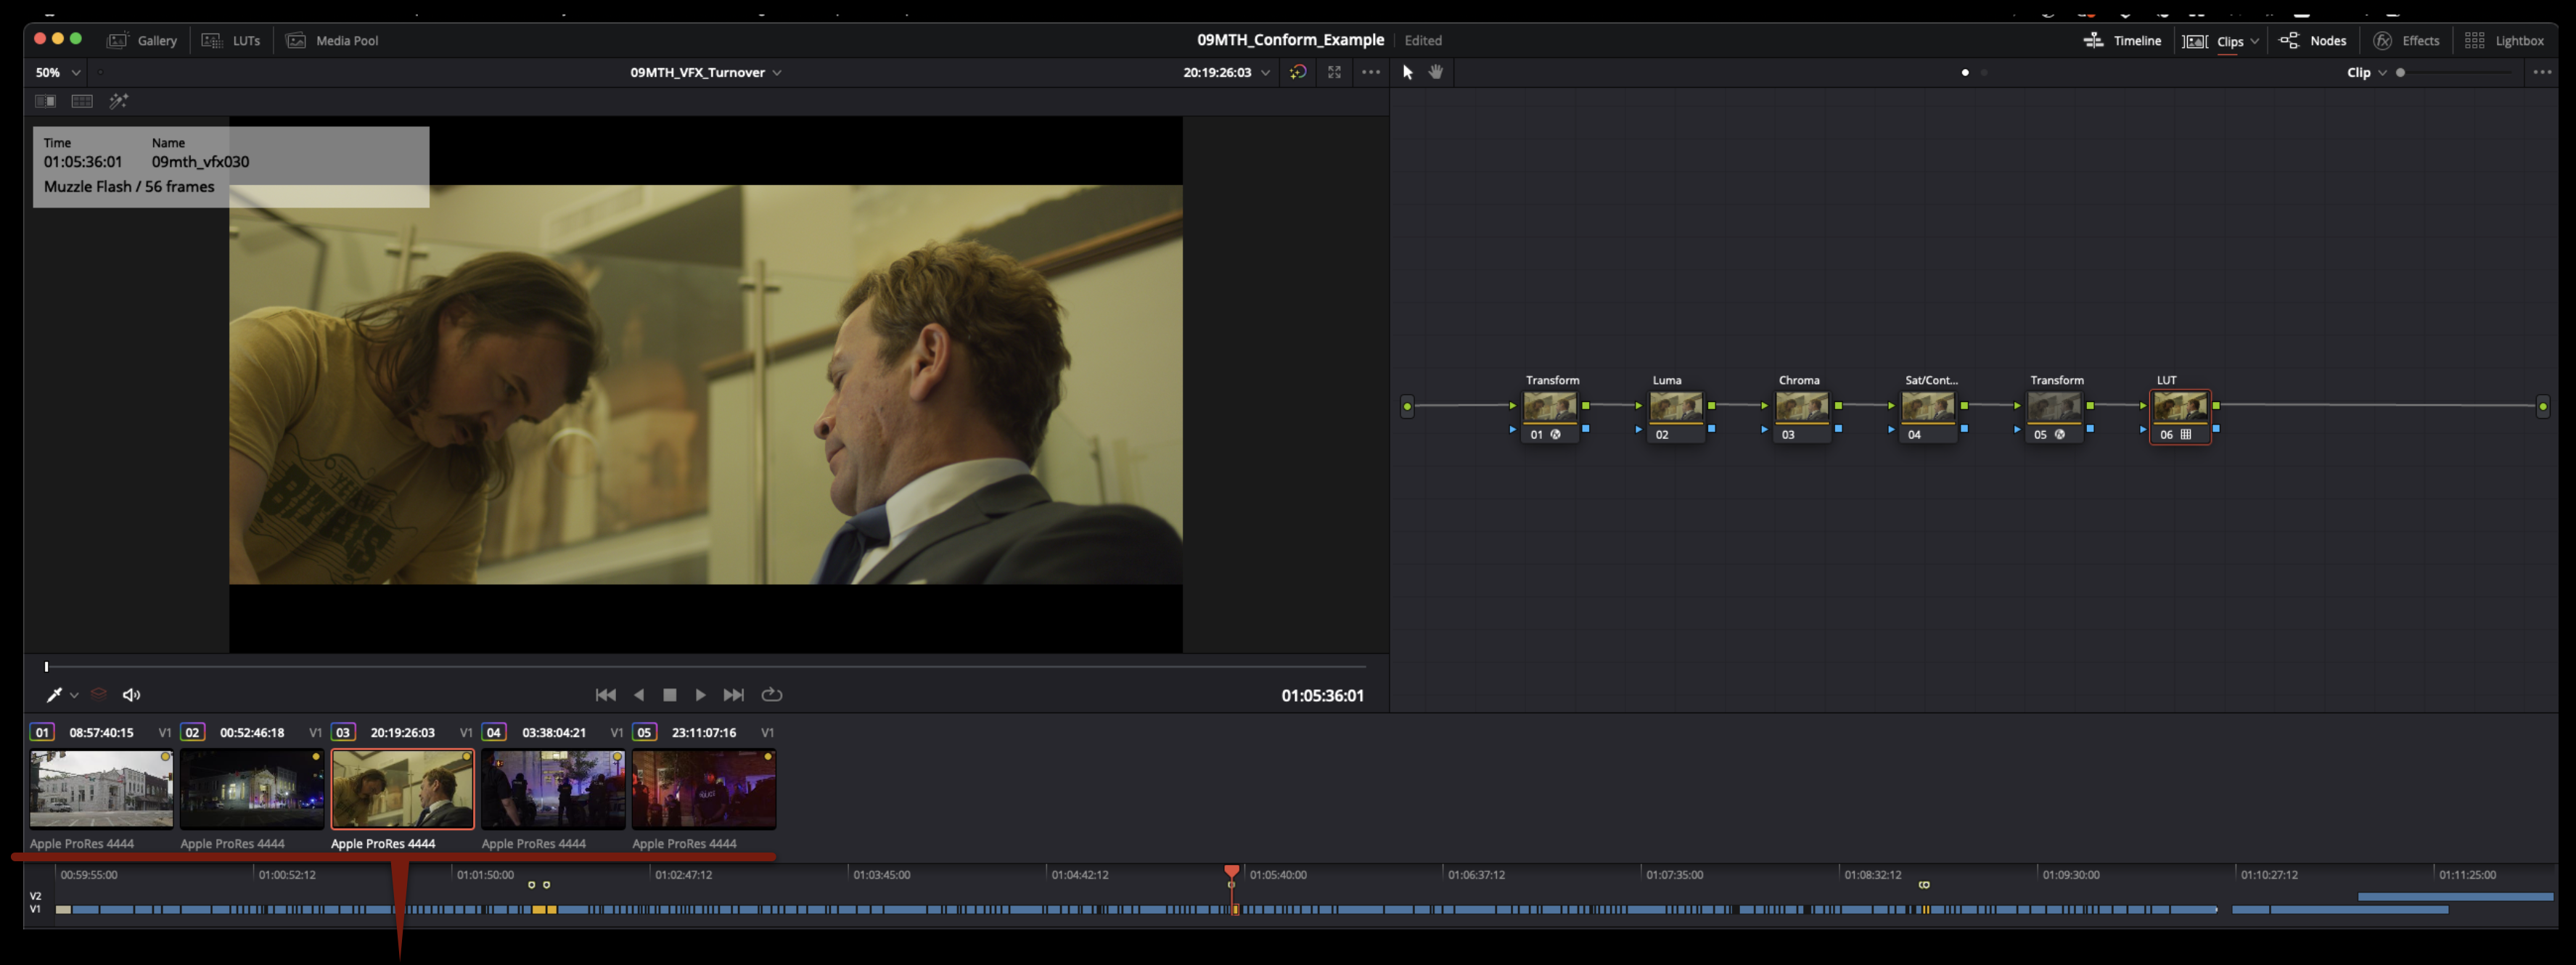
As you can see in the example below, only the VFX clips are now shown in the Clips Thumbnail Timeline.
Exporting VFX Elements
After that prep work is done, you are ready to begin exporting out the elements that will be sent to the VFX department. In our workflow these elements are the exact length as the shot that appears in the locked cut. Under certain circumstances the VFX Faculty may request that these elements get exported with “handles” (i.e., a number of extra frames on either side). However, the default turnover is “no handles”.
NOTE!This guide details how to turnover simple VFX shots requiring only one element or “plate”. This is why in the example shown there is only one “VFX element” per “VFX shot”. More complex VFX shots requiring the compositing of multiple live action elements captured during production are done the same way using the same naming logic. However, if your show has more complex VFX shots like this, please check with VFX Faculty and Post Staff before proceeding for more guidance.
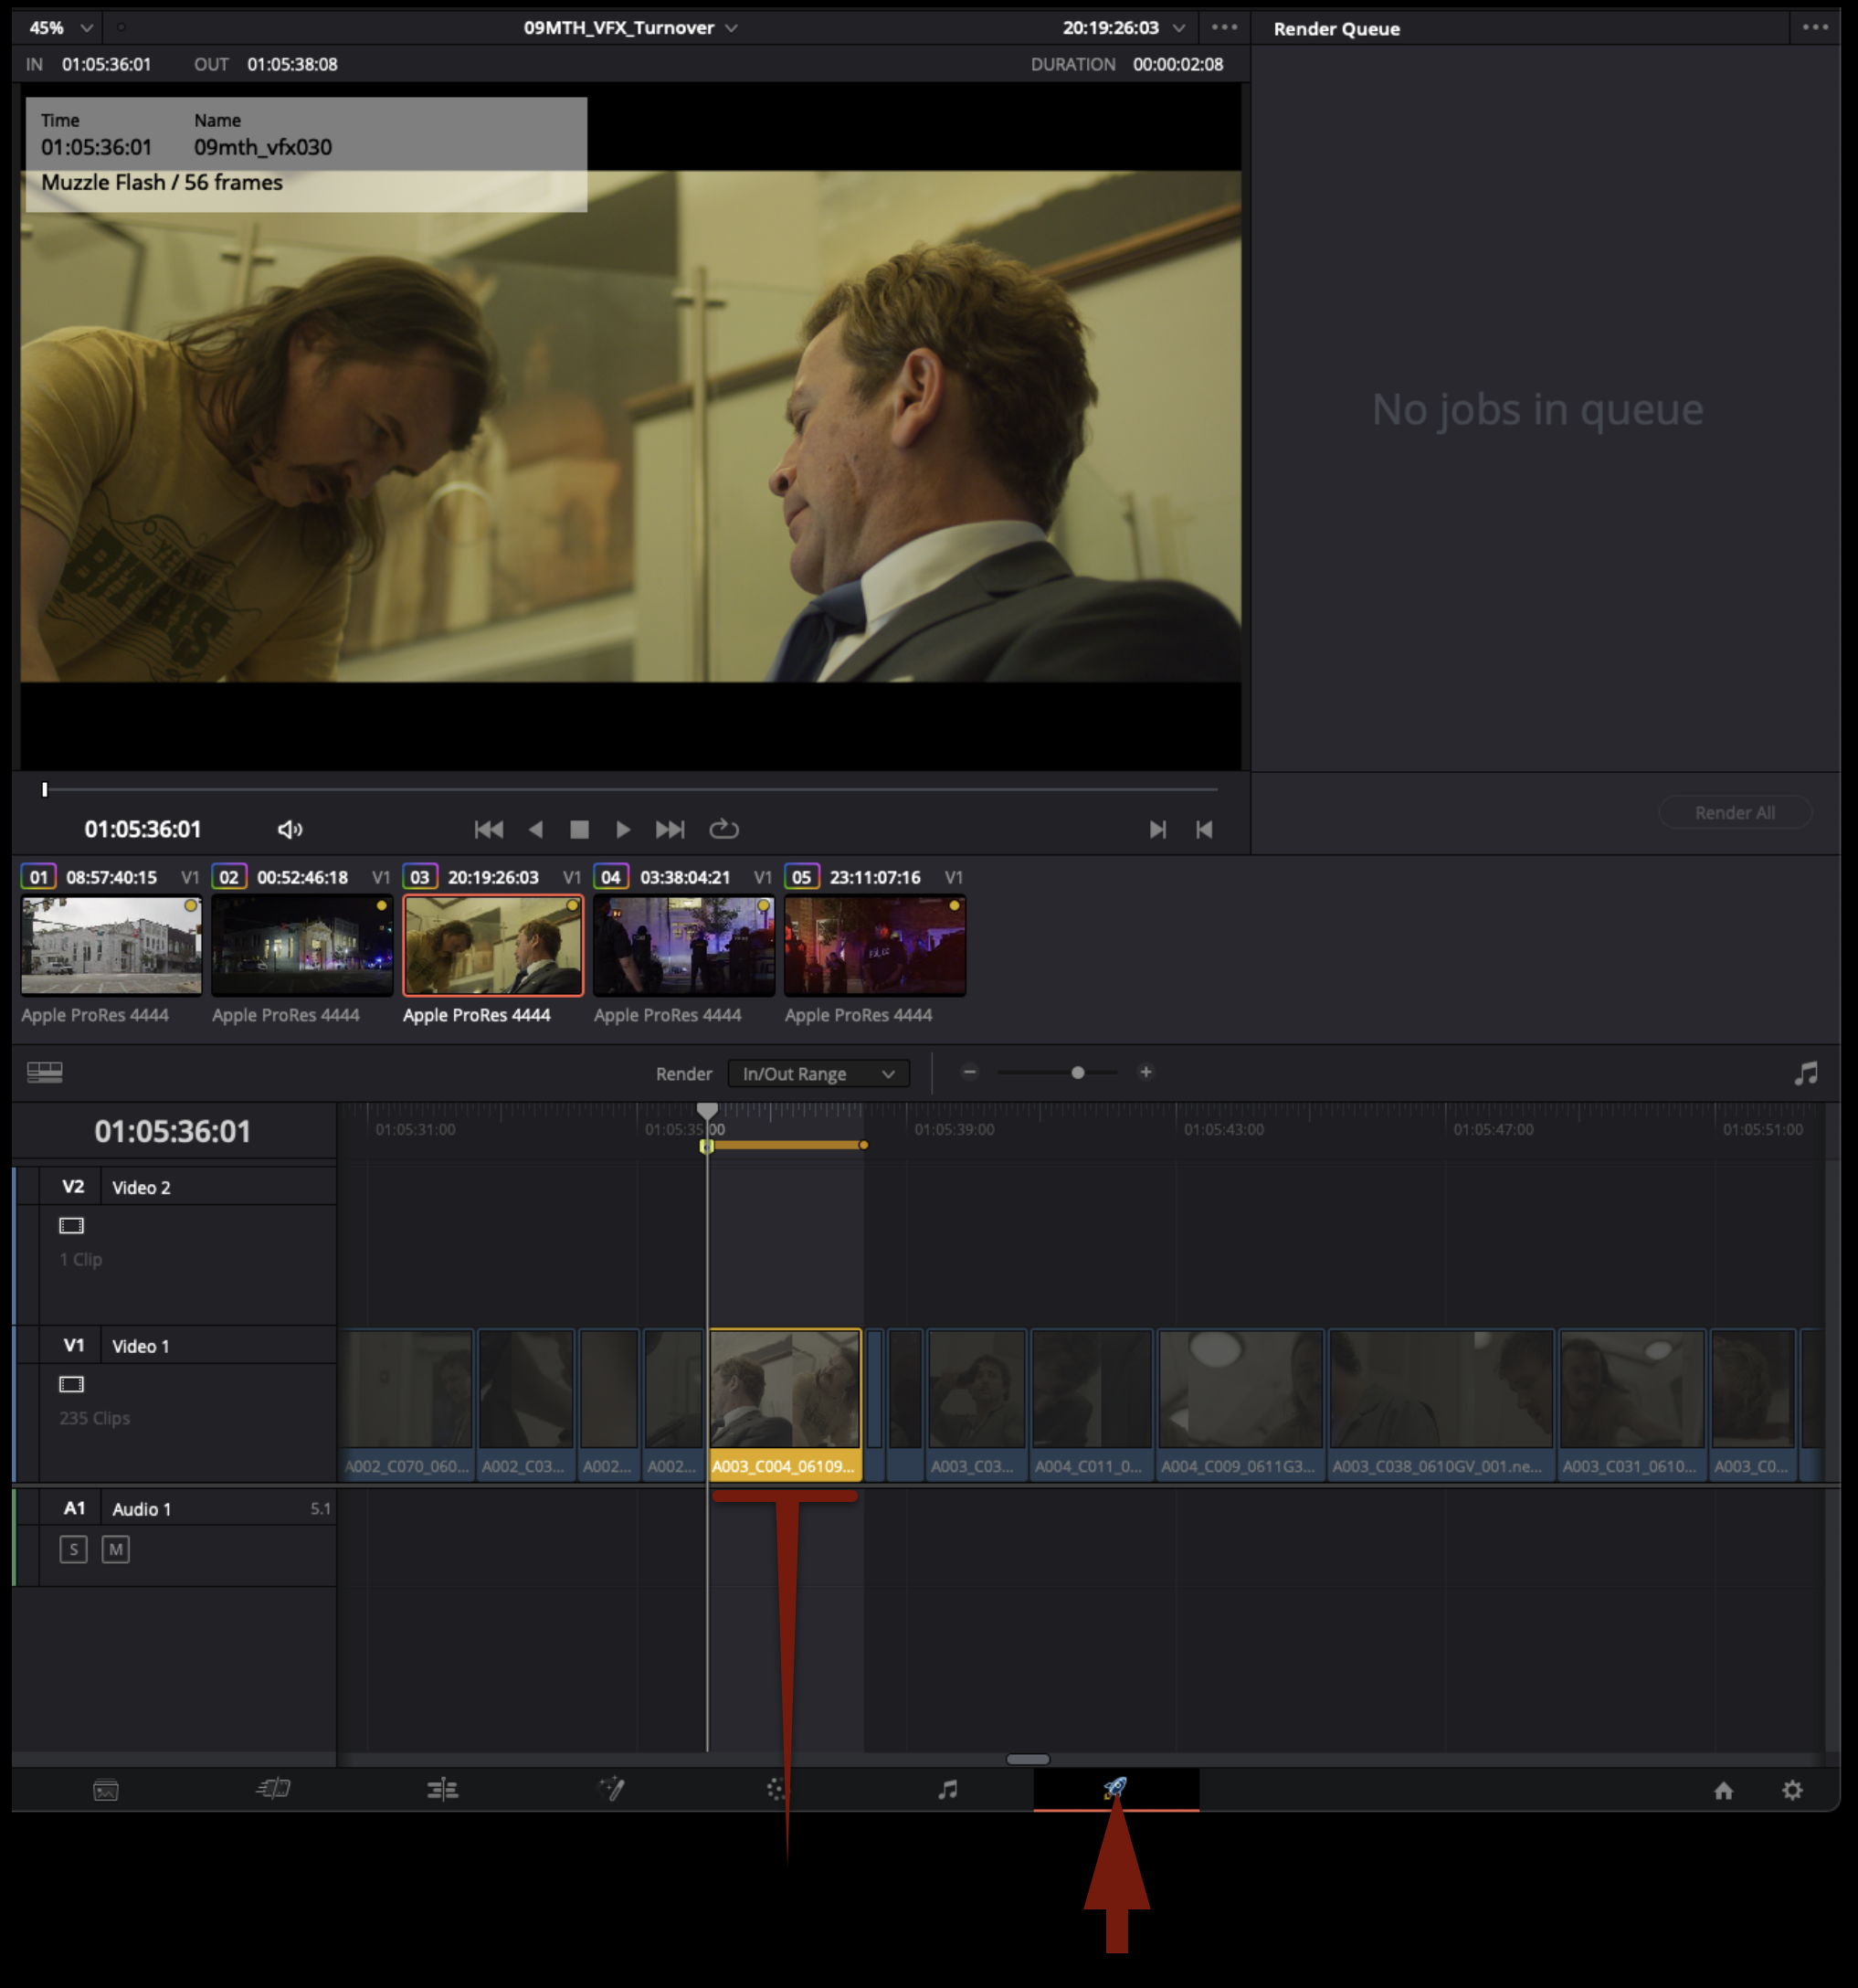
In the Delivery page, you can easily navigate to your VFX shots by selecting them in the Clips Thumbnail Timeline. Once selected, you can hit “I” and “O” on the keyboard to mark in and out around the selected clip. It is important in this step that you have marked around the entire clip and no additional frames on either side. You do not want to turn over elements with extra frames.
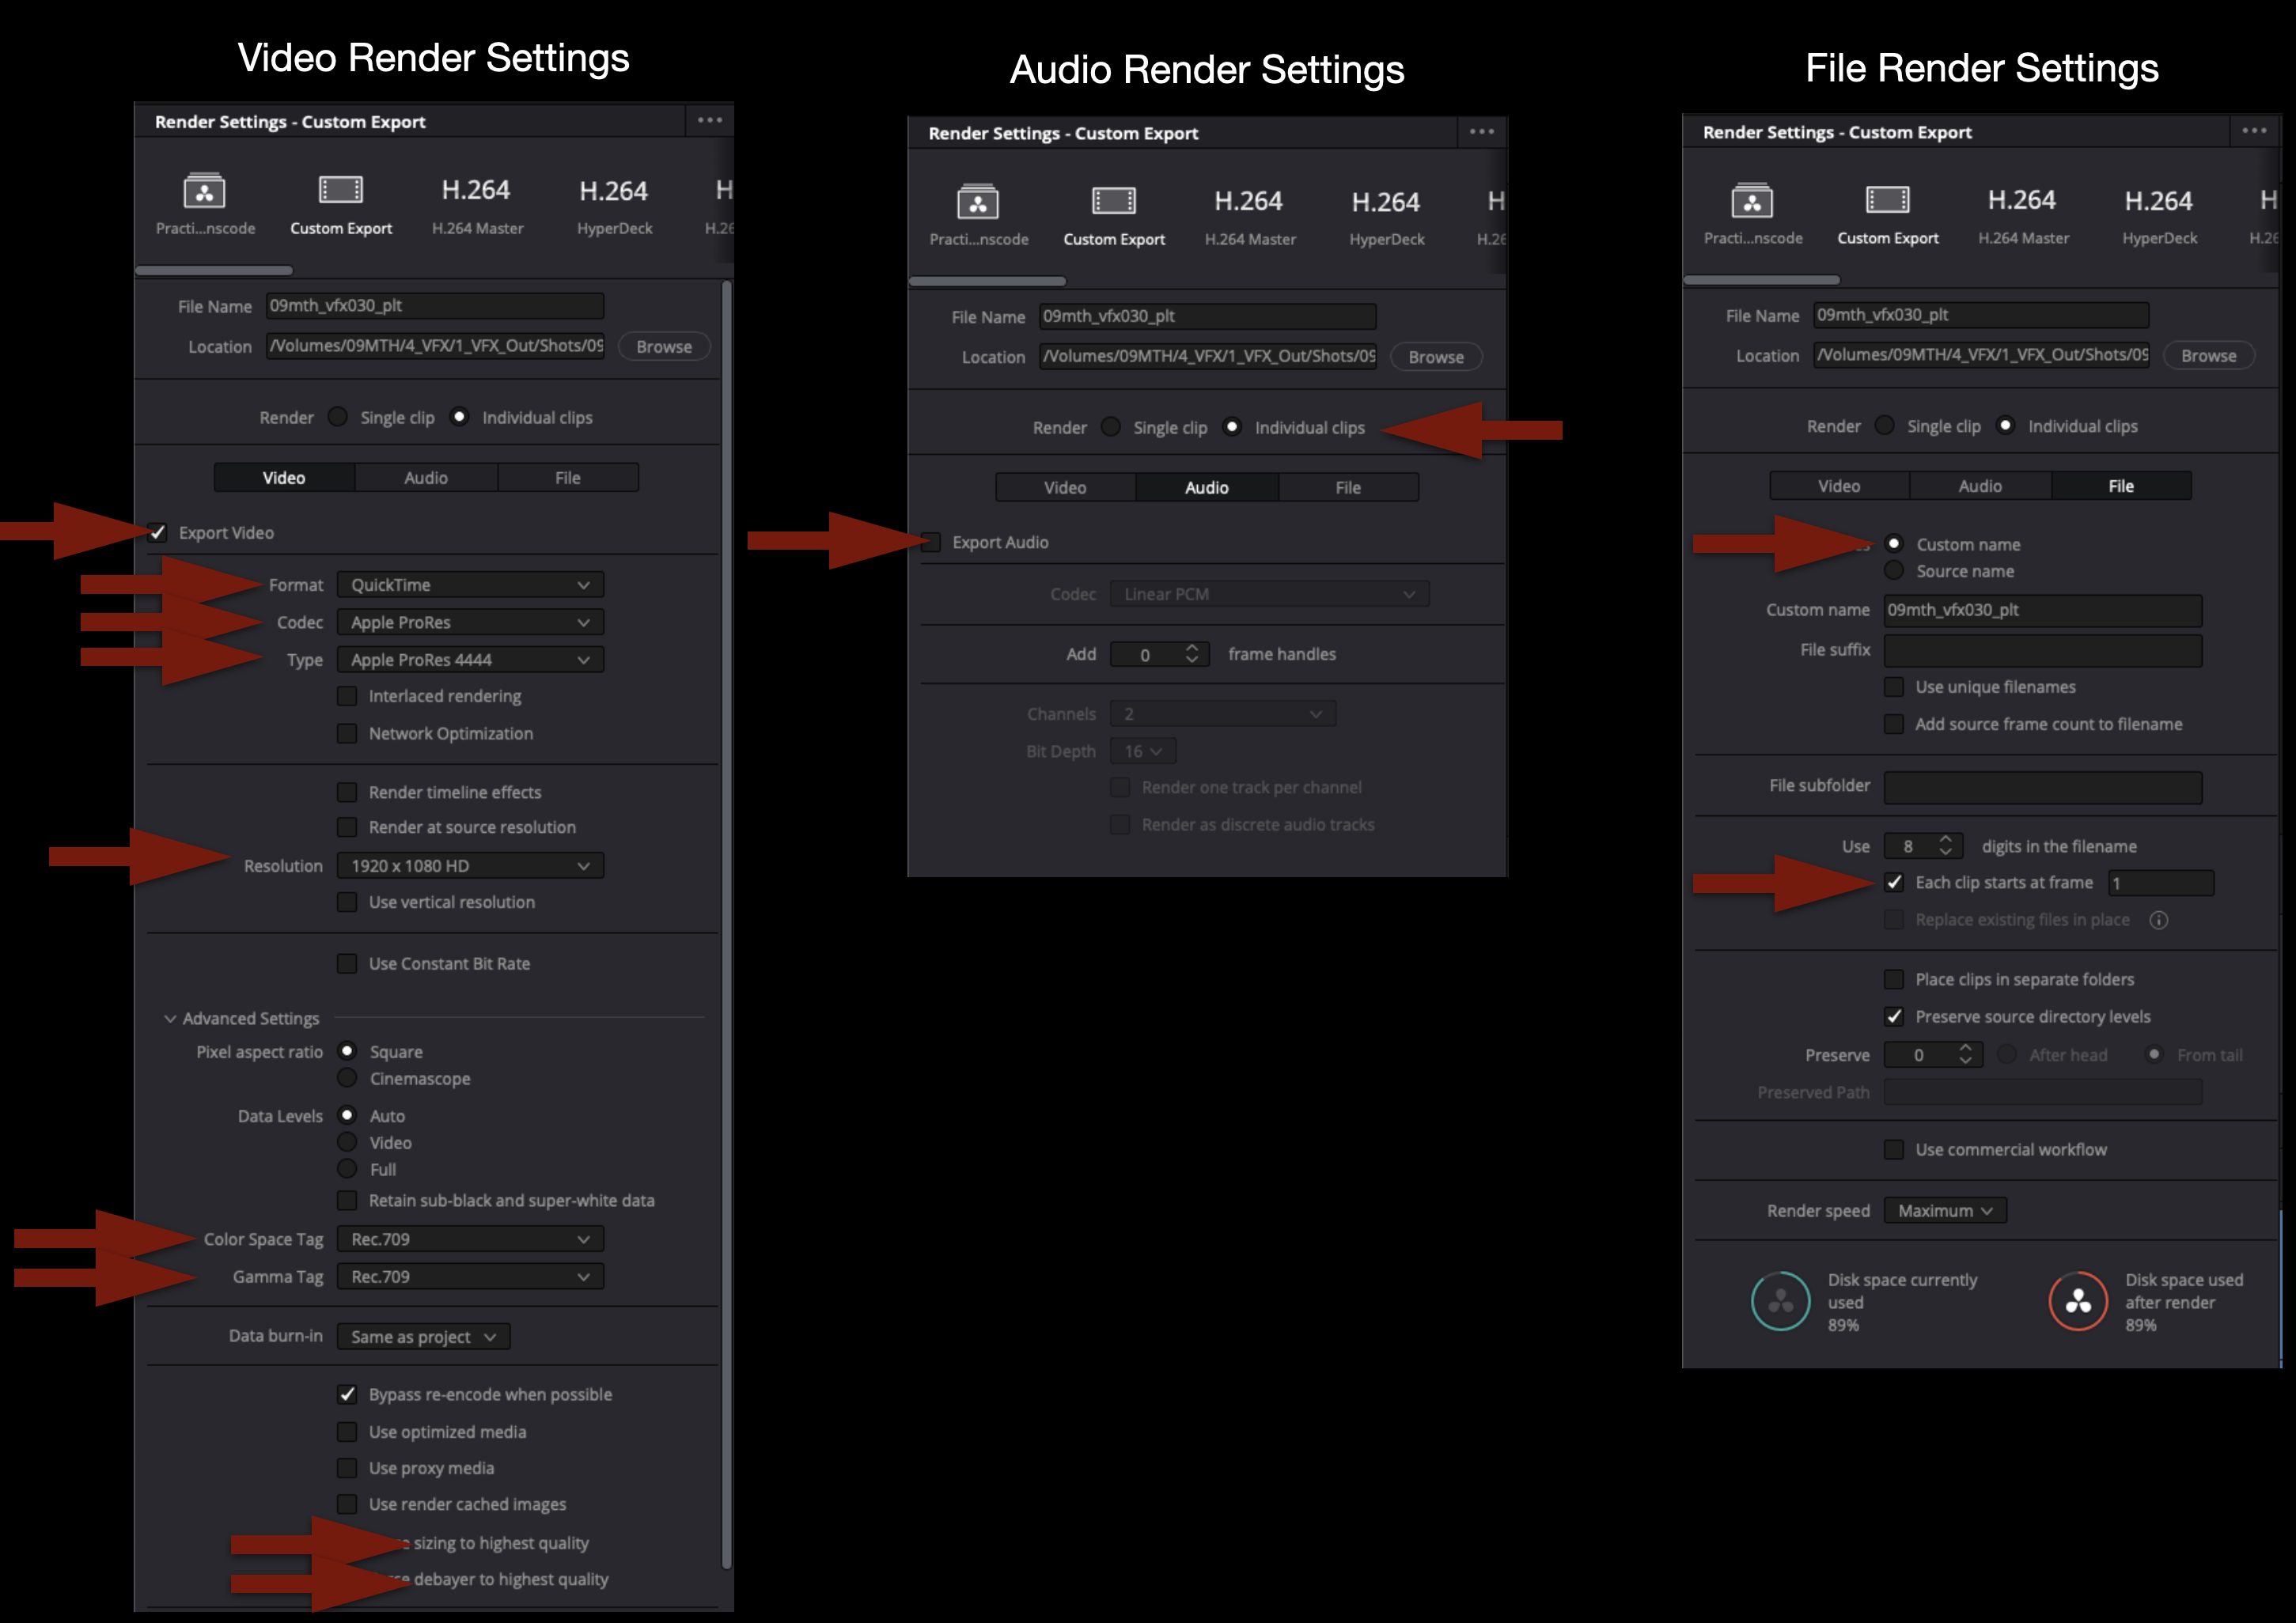
Under Render Setting on the Delivery page, you will need to label each element that you are going to export. The naming convention follows from the “names” or “shot code” that were assigned when the VFX shots were labeled in Media Composer (see the VFX Prep page). This naming convention MUST be followed.
Each element will be named with the assigned VFX name followed by “_plt”. In the example below the VFX shot is named “09mth_vfx030”. The element that is being turned over to the VFX department is a “plate” and thus should be labeled 09mth_vfx030_plt.
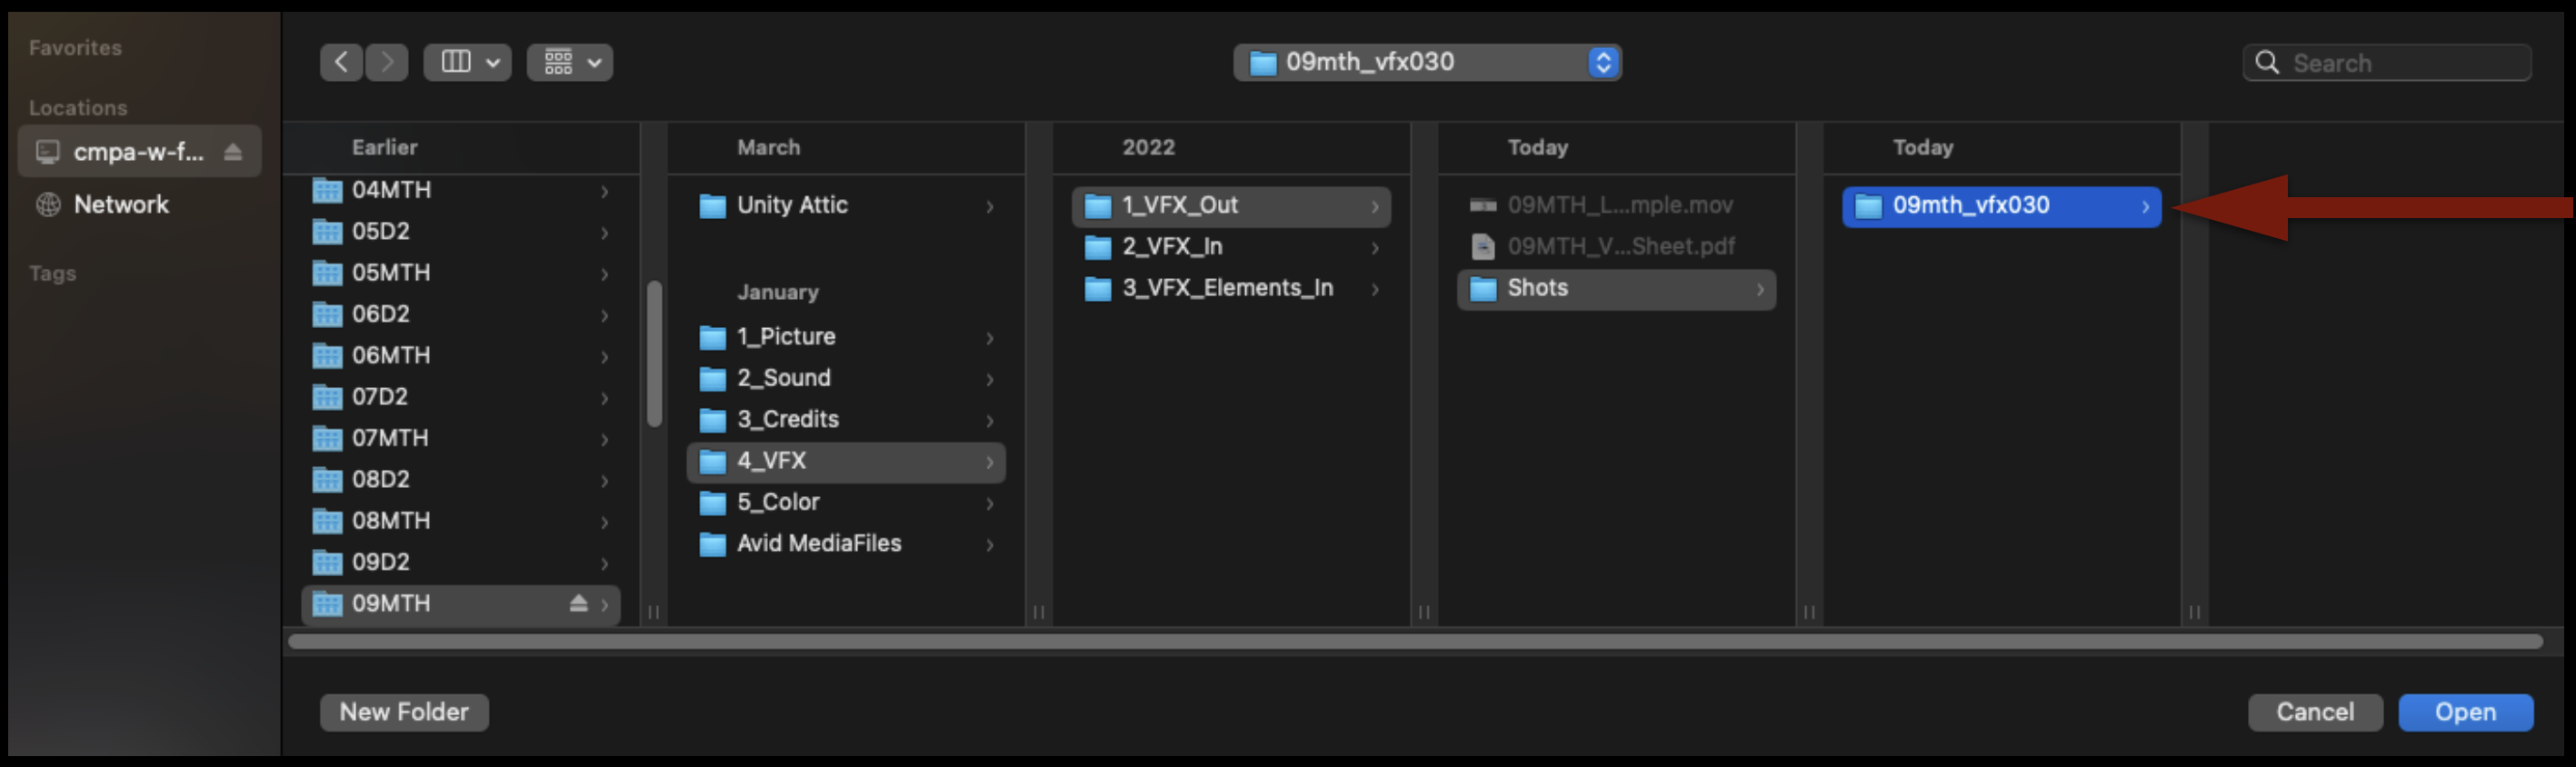
Select Browse to choose where to export. These plates should be exported to your show volume in the VFX > VFX Out > Shots folder. You will need to create the Shots folder and then a separate folder for each VFX shot, based on the VFX shot name.
Below are the Render Settings for all VFX Turnovers. Double-check the settings carefully before exporting.
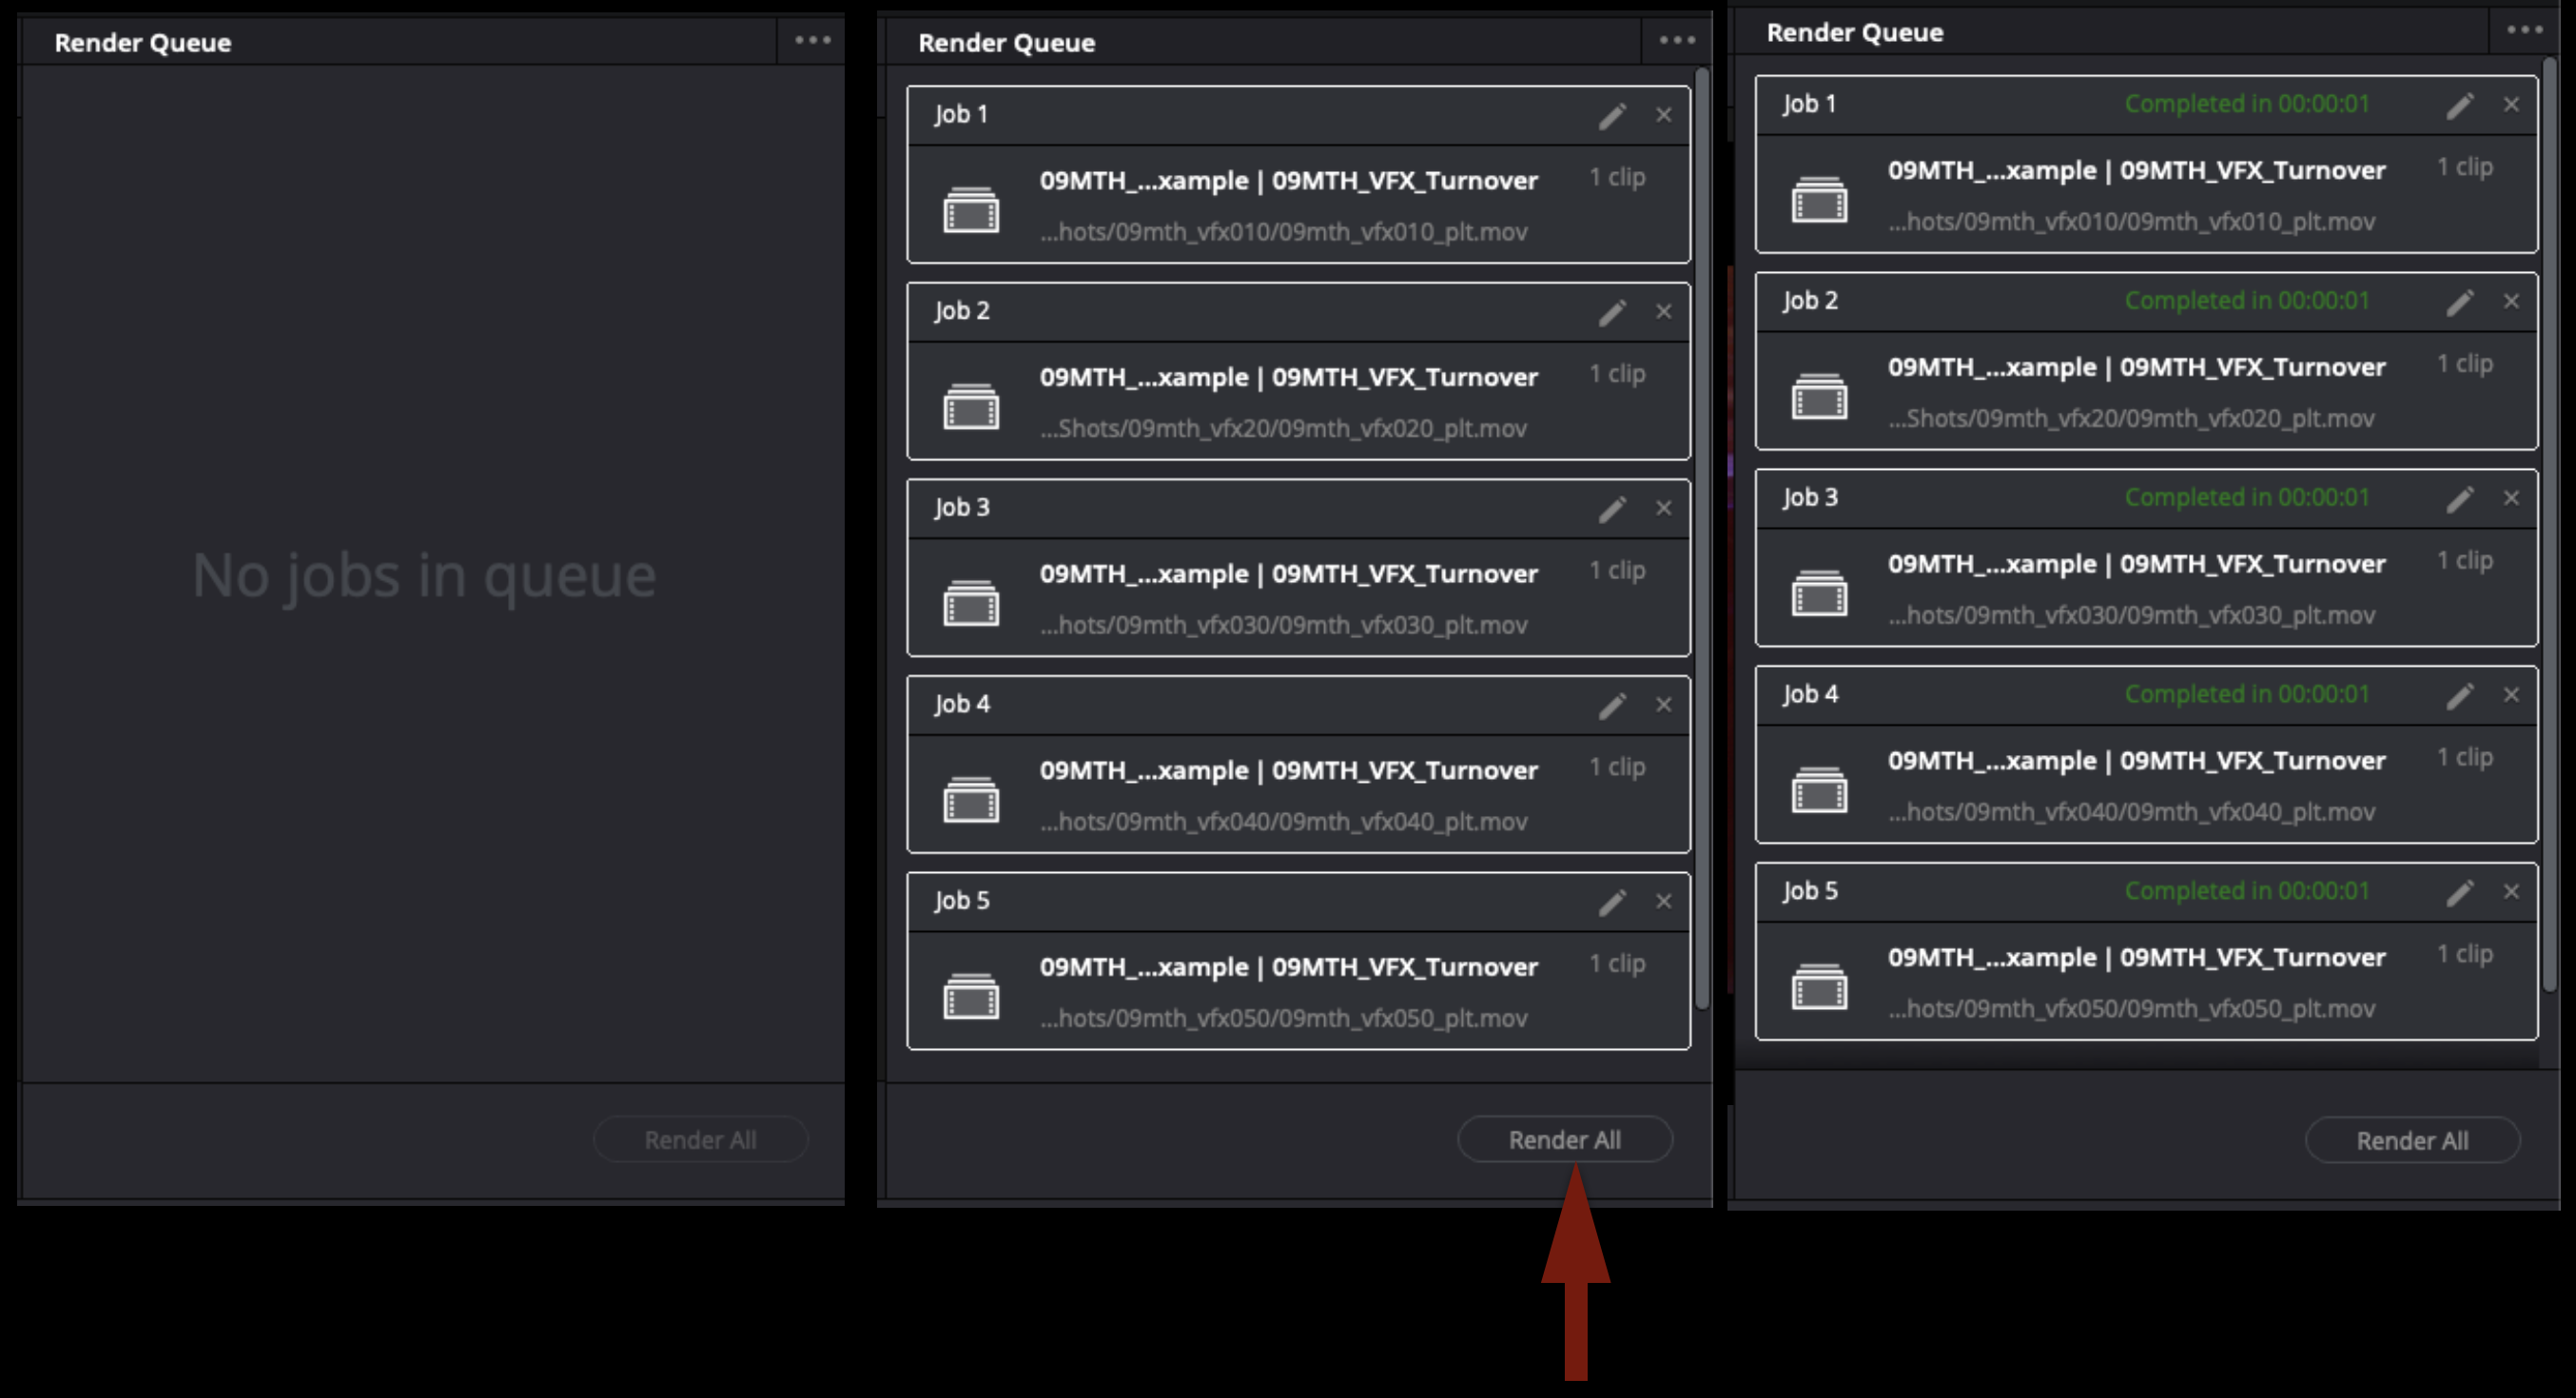
If you have more than one VFX shot or element to export, you can add each export job to the render queue and then render them all at once.
Once all of your renders are complete, it should look something like the example below. Notice how each VFX shot has its own labeled folder and inside that folder are the labeled VFX elements.
Check VFX Renders
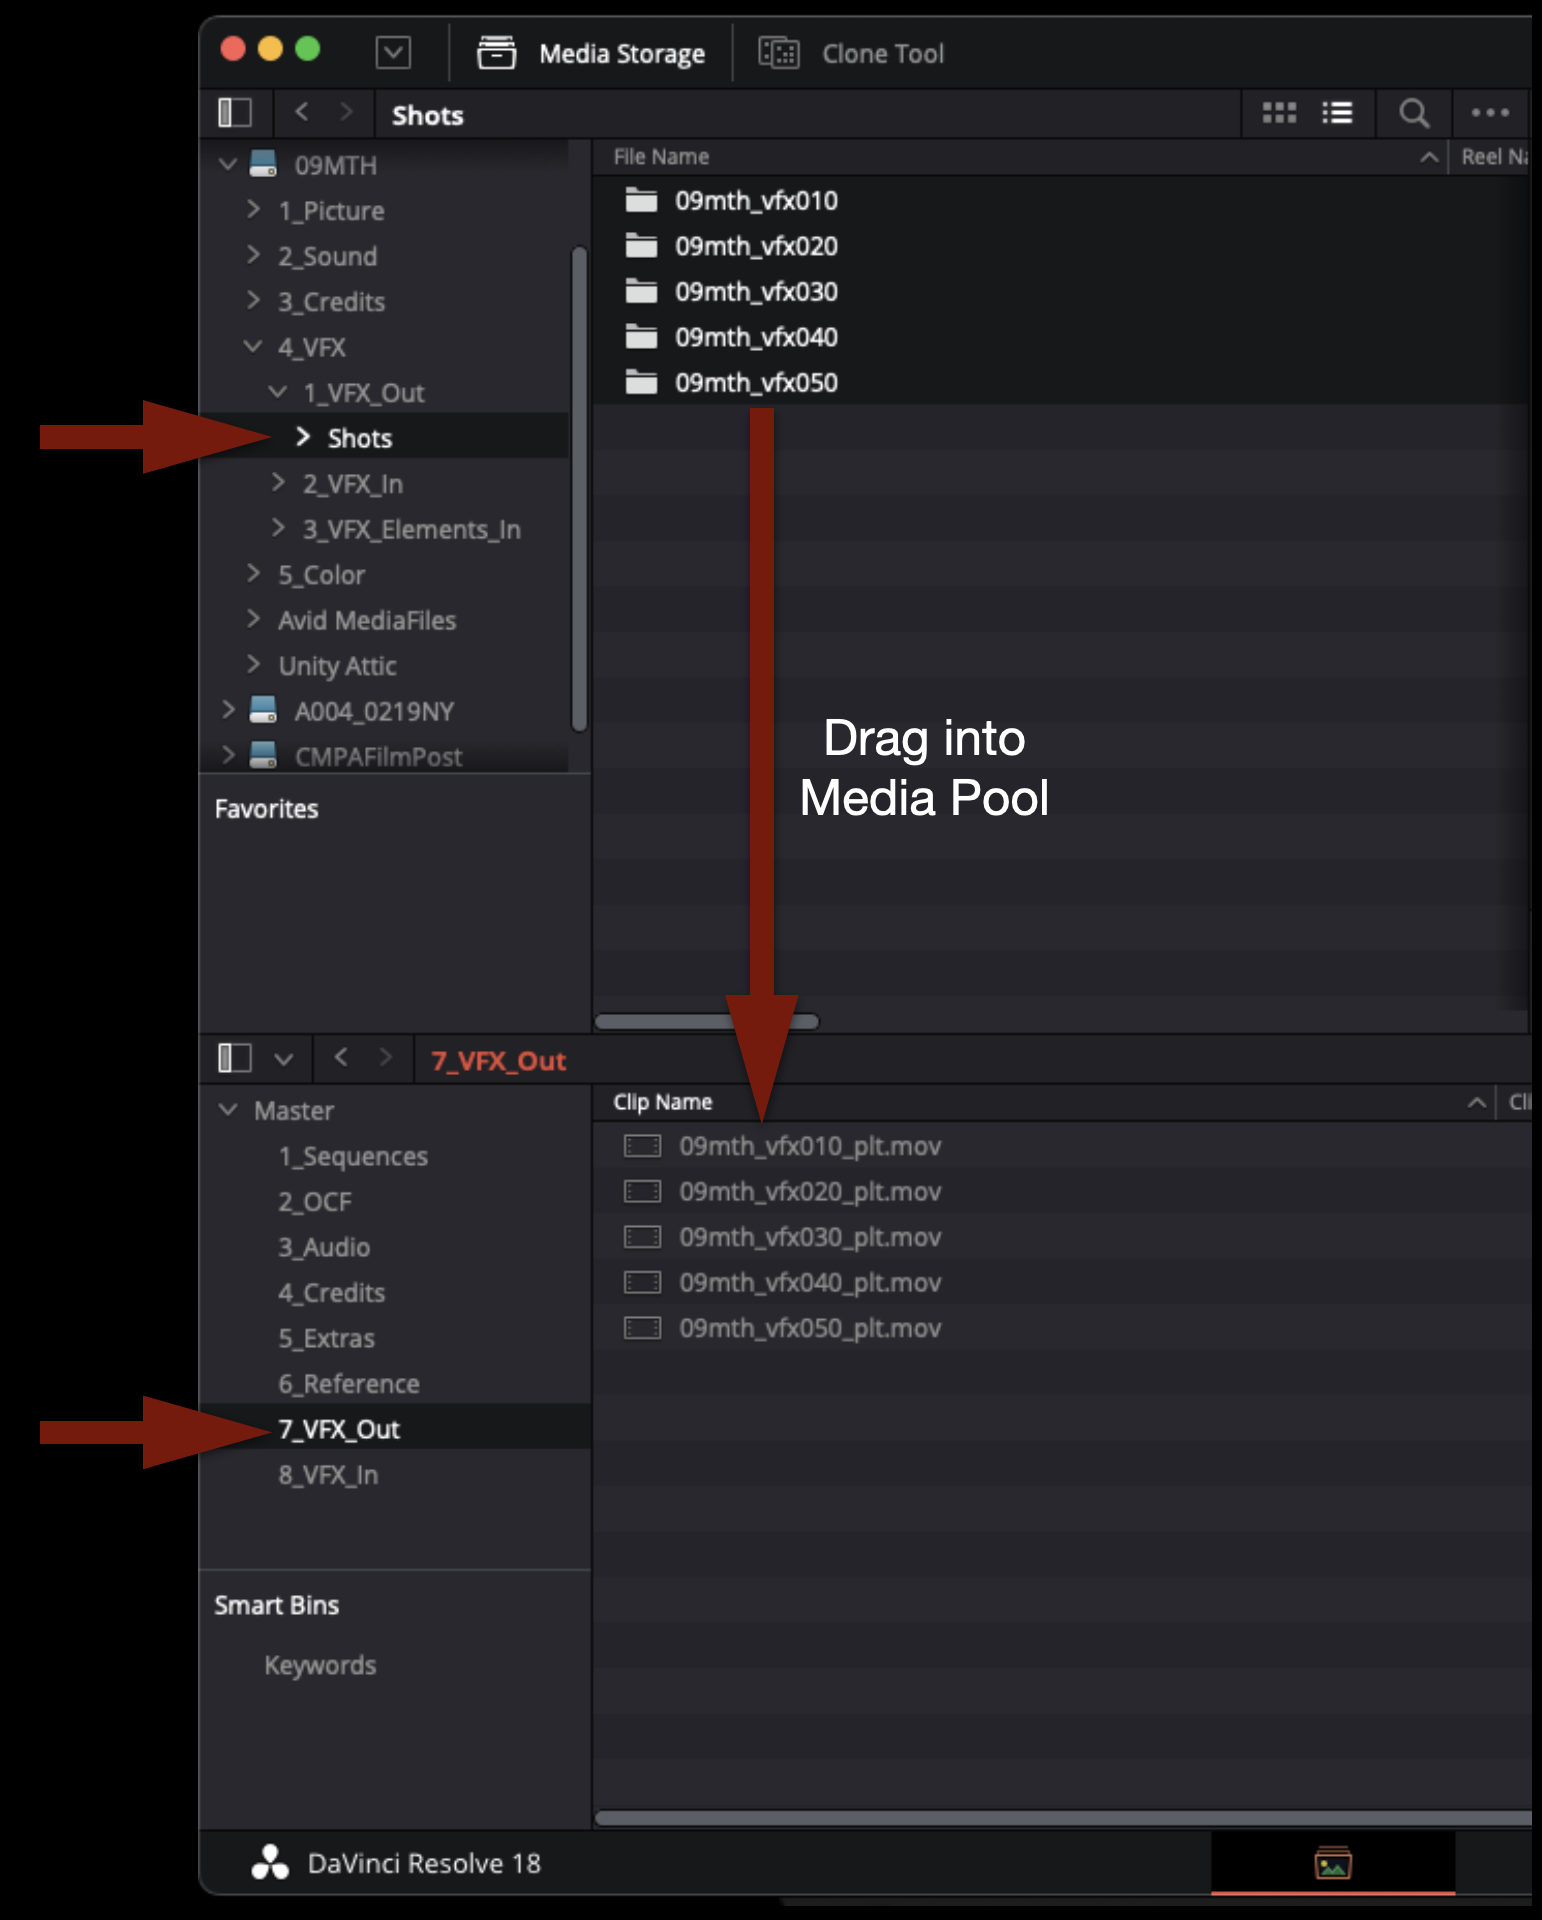
To check that the exports you made of each VFX element are correct, you will need to import them back into the Resolve project. On the Media page, navigate through your media storage to your VFX shots and drag them into the Media Pool to import them.
These clips should also be changed so that that the clip color is yellow inside of Resolve, to denote that they are VFX shots. In the Media Pool, you can highlight them all, right-click, and select clip color.
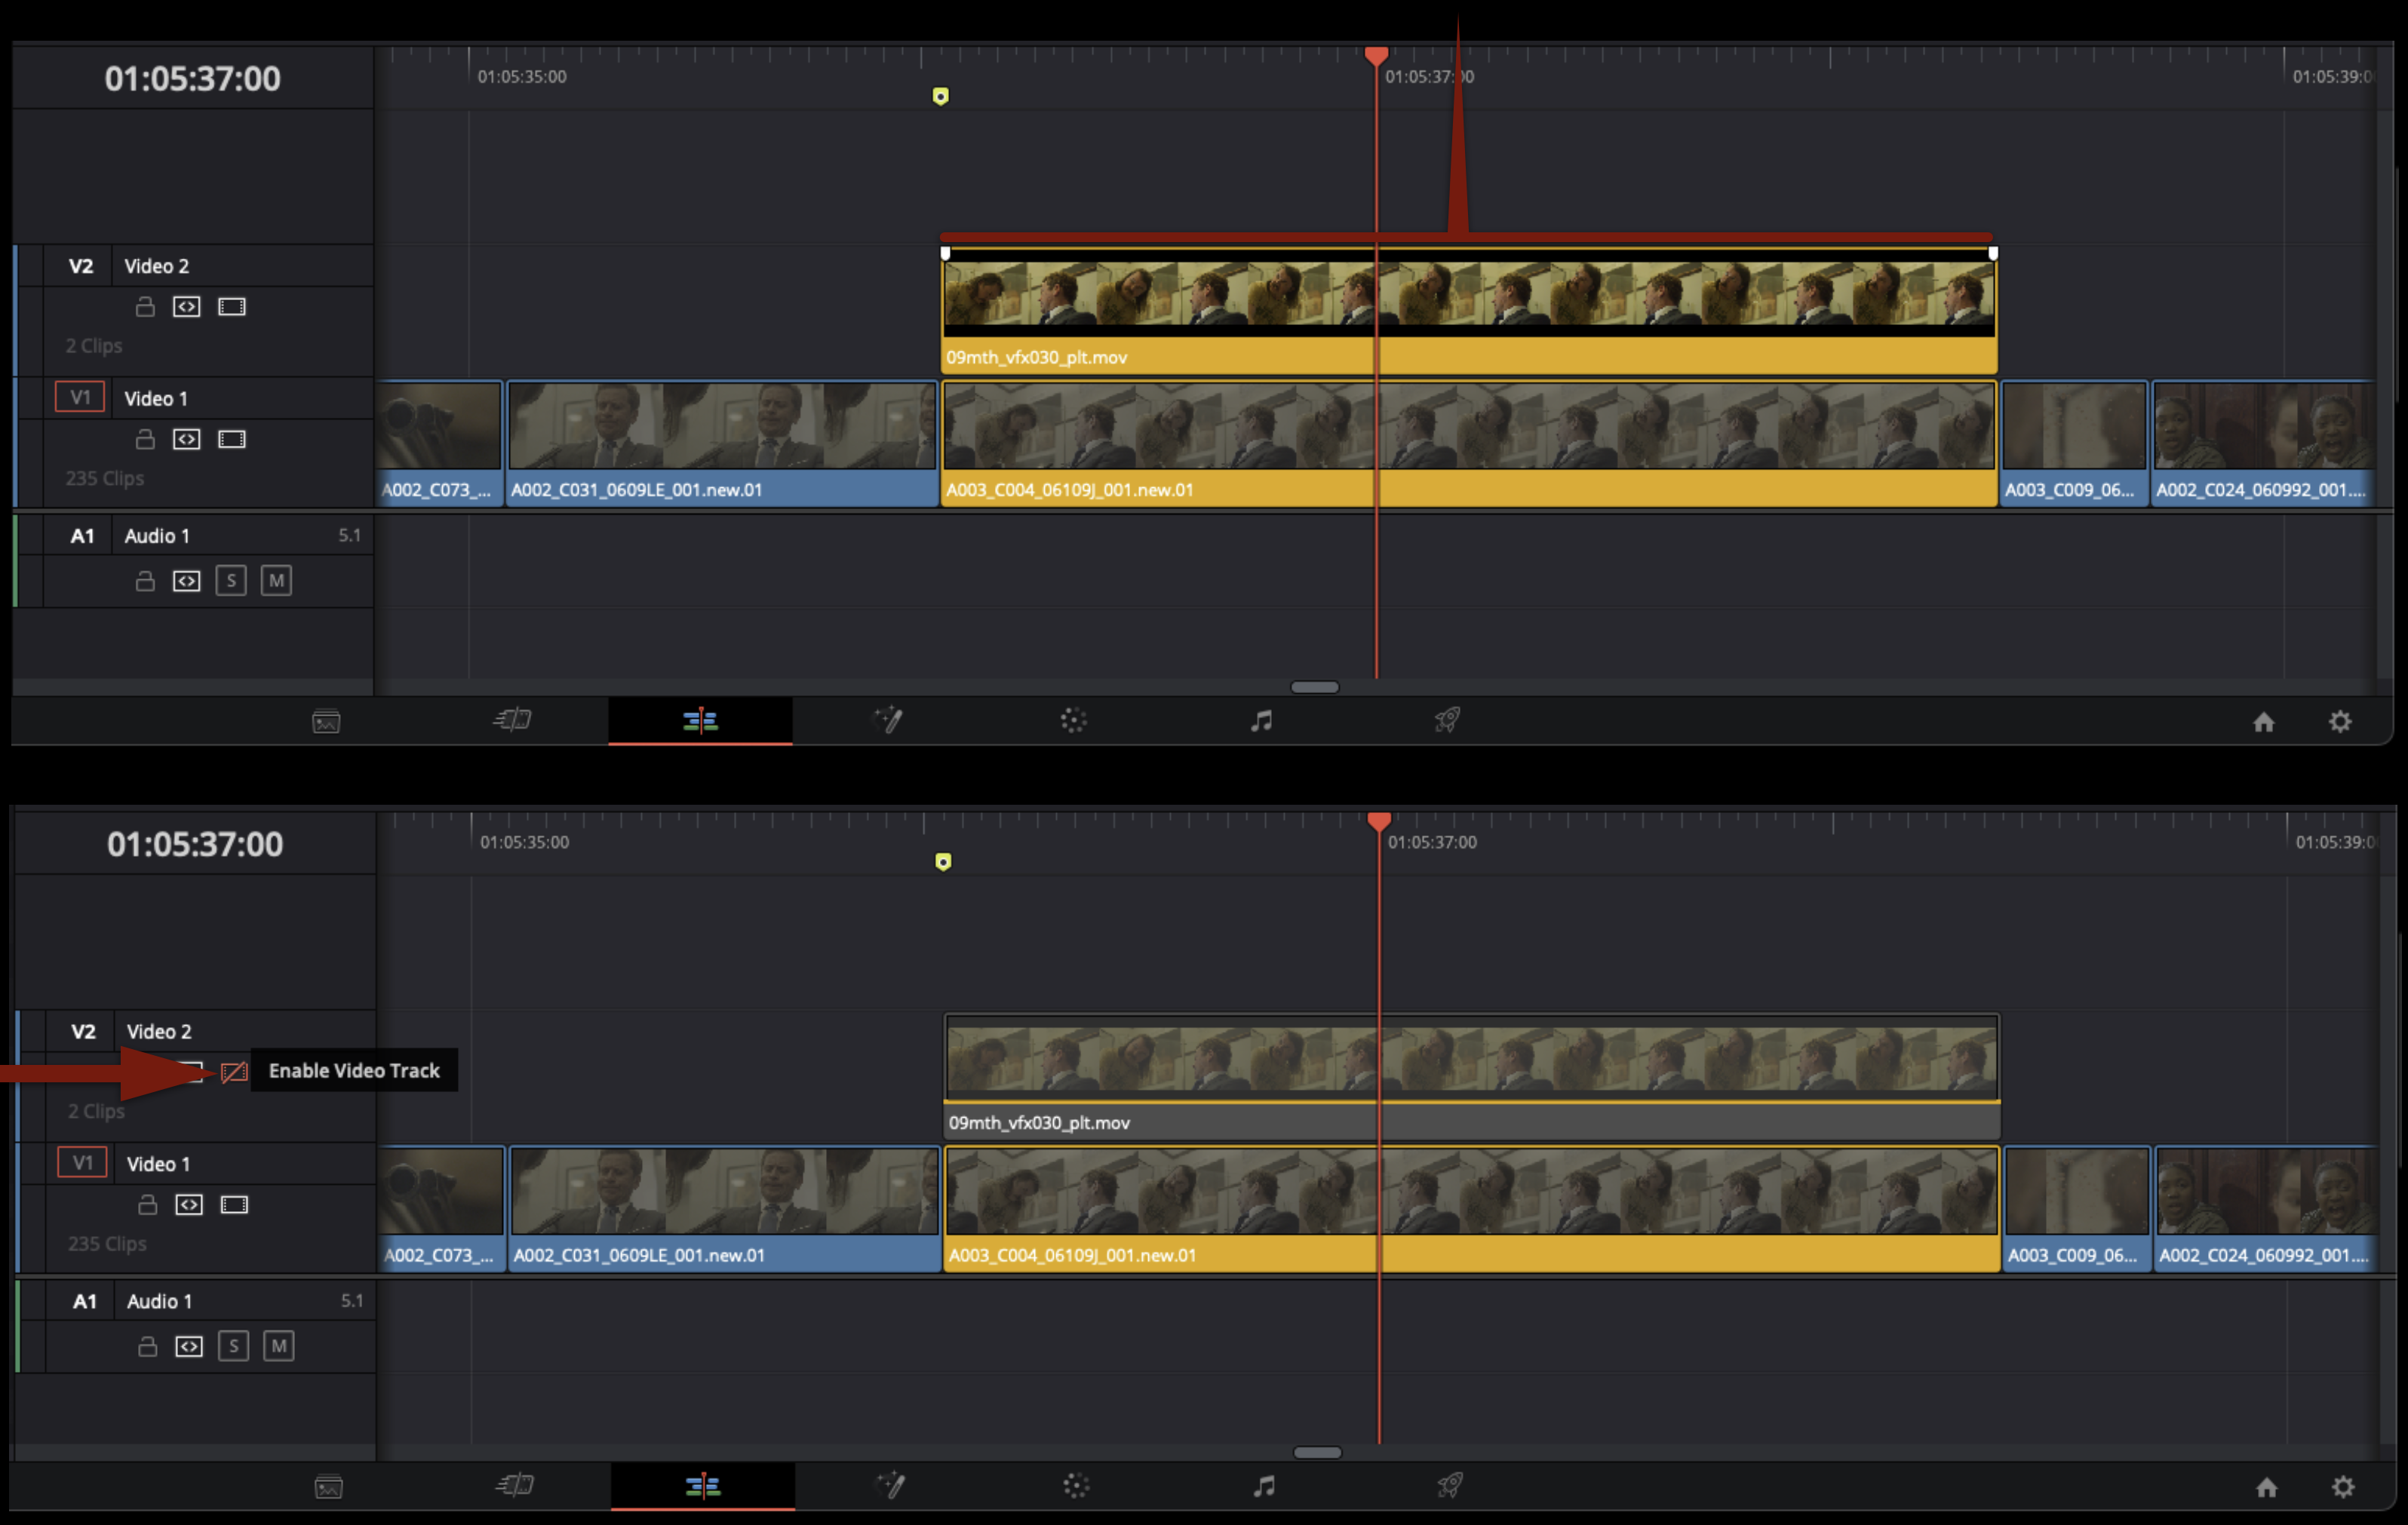
In the Edit page, carefully cut each turned-over VFX element back into the sequence on Video Track 2. This will ensure that you did not miss any VFX shots and that you exported out everything that needed to be turned over.
While the elements are on Video Track 2, you need to double-check two things. First, make sure that the export has the exact same number of frames as the clip below it. It should match exactly. Second, you can toggle Video Track 2 on and off to make sure that both layers are visually identical. You want to ensure that the elements turned over to the VFX department are identical to the Camera Original Files.
Wrap Up
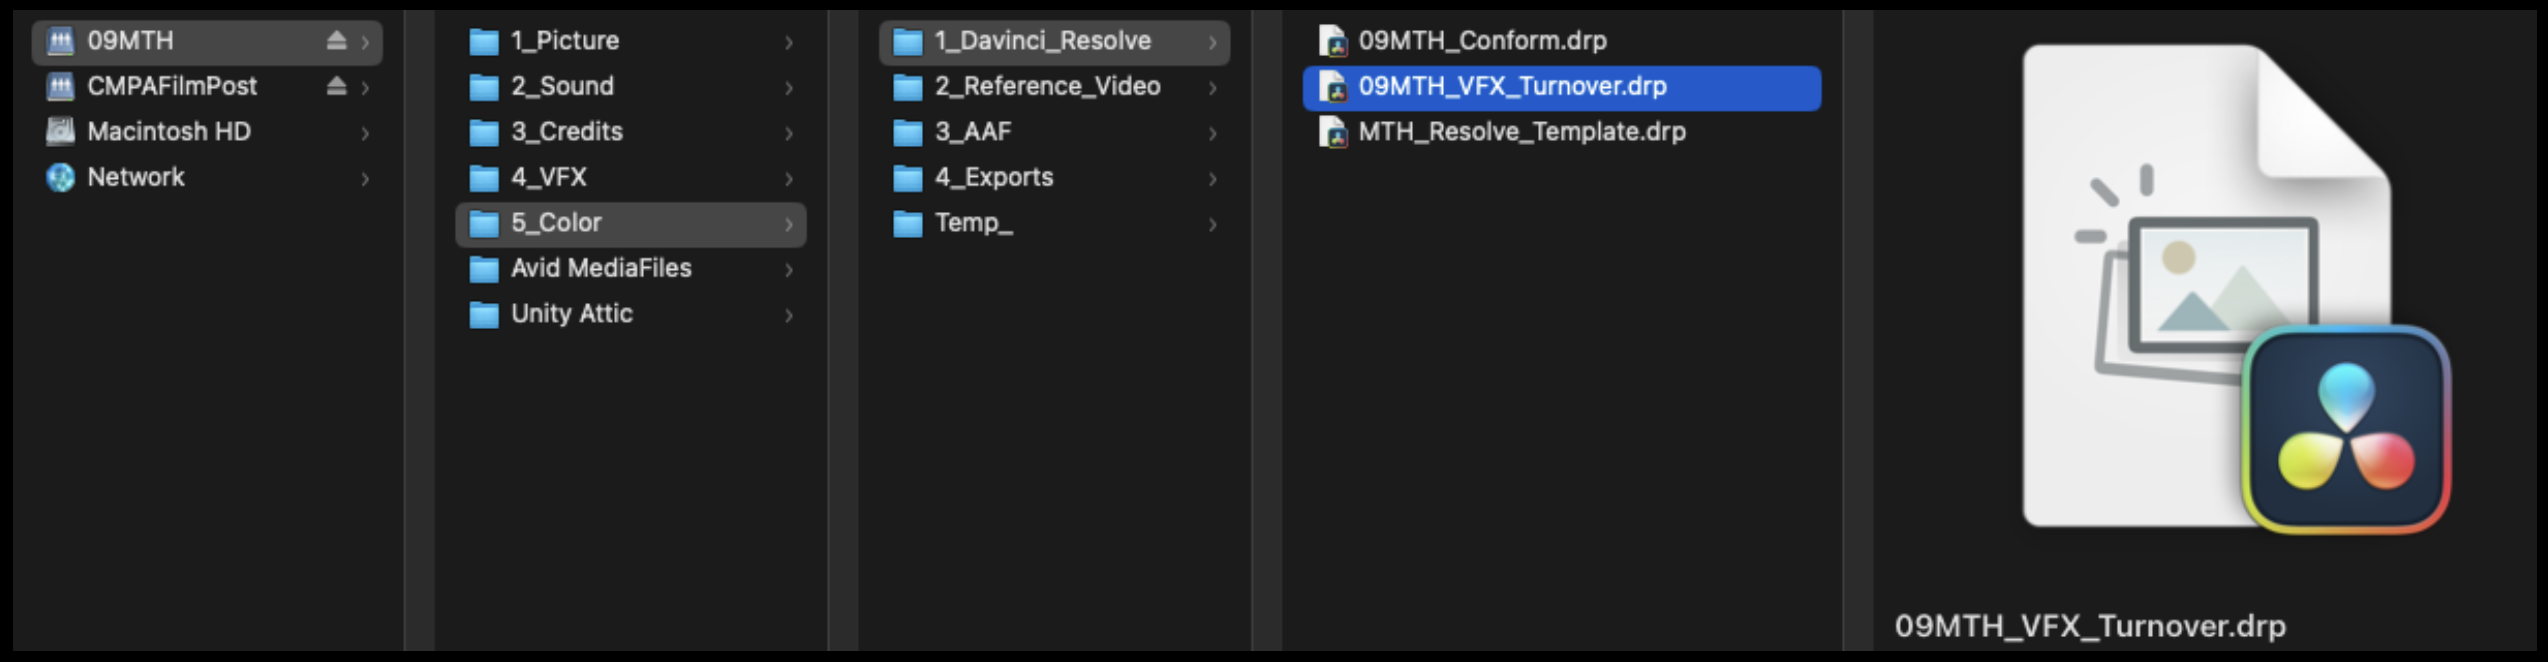
Once you have checked each of the VFX elements that were exported, you should be left with a folder tree in the VFX Out folder that looks like the example below.
The VFX Turnover package, which consists of a Locked Reference Video, VFX Turnover Sheet, and all the VFX Plates are now ready for the VFX Department. In the industry, this package would typically be sent to the VFX Vendor over a secure, cloud-based application or loaded onto a hard drive and shipped. In our workflow, everything can stay in the VFX Out folder on the show volume. When the VFX cycle begins, the VFX artist will copy this folder to the VFX server and begin working from there.
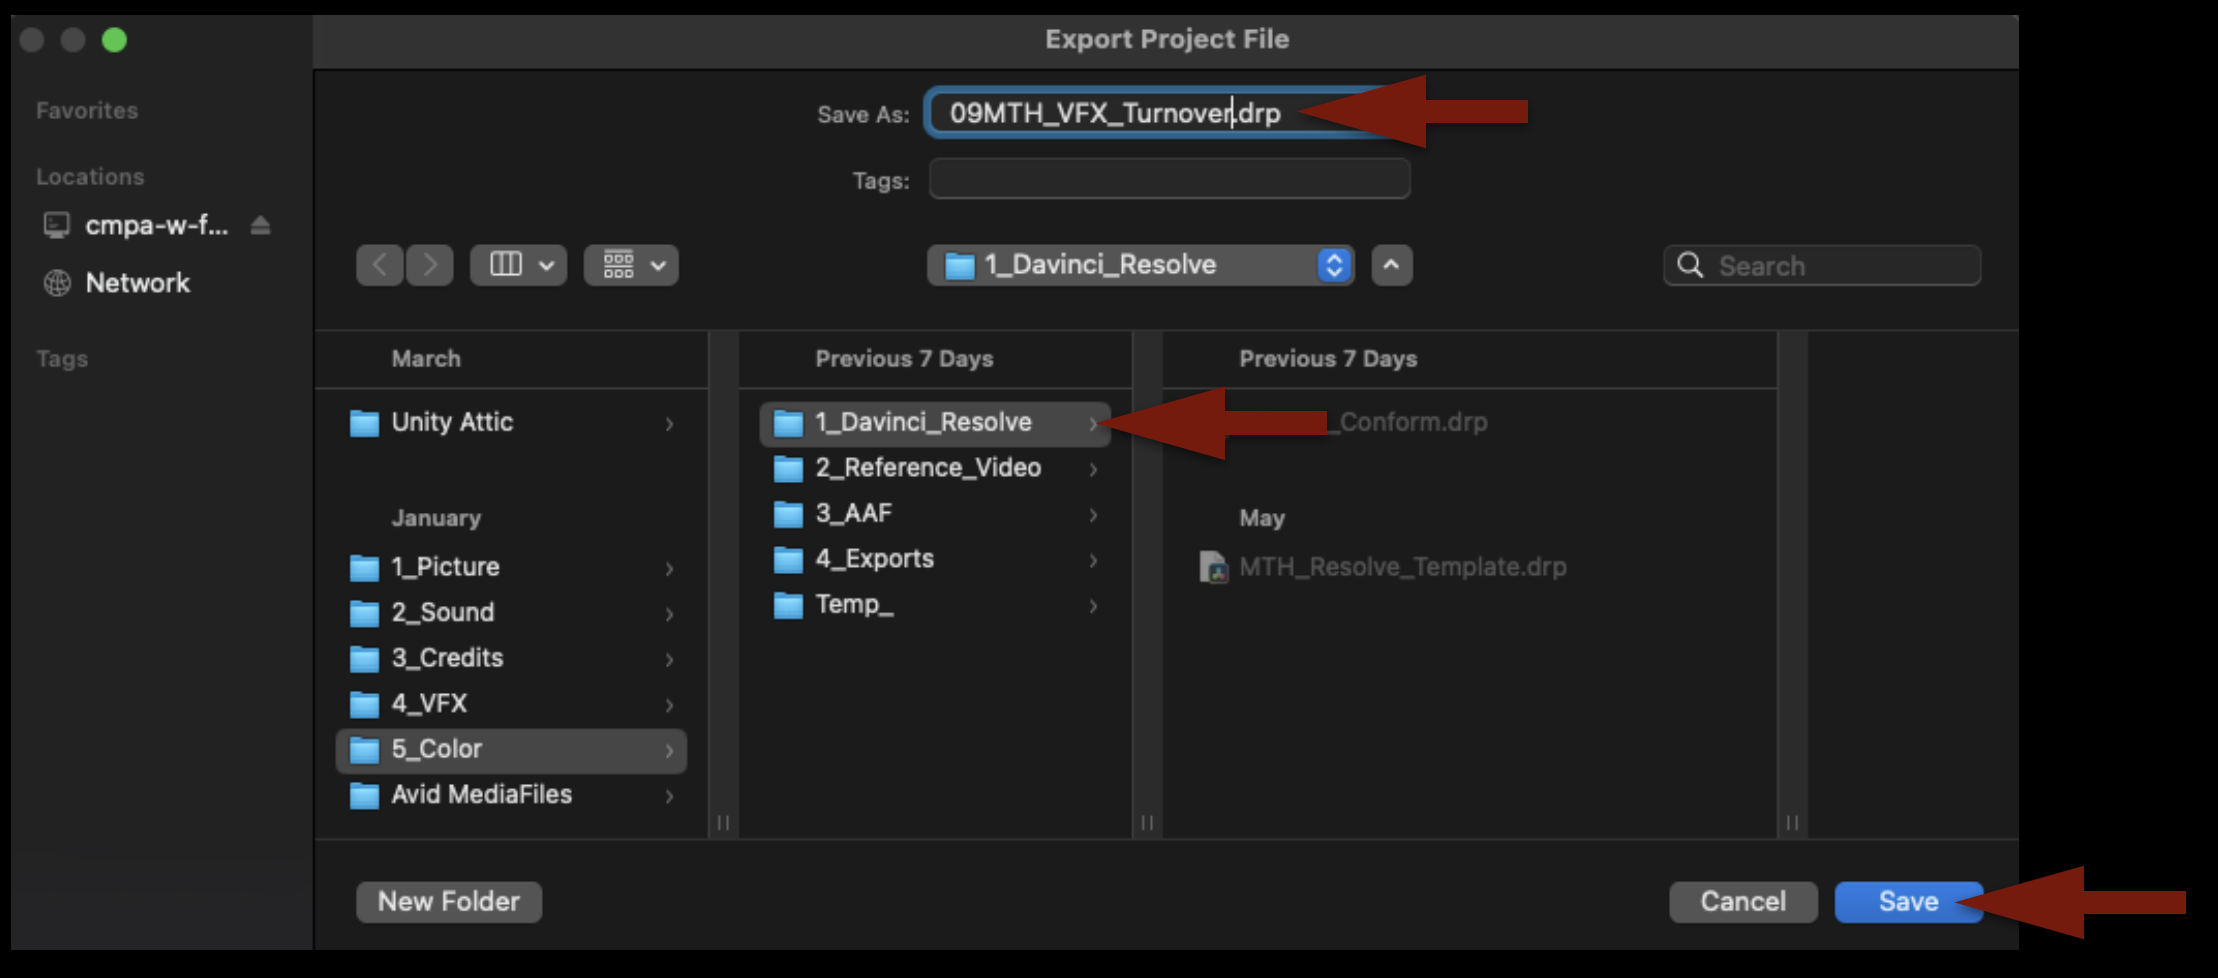
Save the project by hitting “Command+S”. Then go to the task bar and select Export Project… Make sure the project is named accordingly and place it in the proper folder on your show volume:
After you confirm that the .drp file is in the correct place, you can quit Resolve.
This guide is only necessary if your show has approved VFX shots.
In the industry, the process of keeping track of VFX shots in editorial is normally the responsibility of an assistant editor or VFX editor in the editorial department. In our workflow, this responsibility rests on the editor. This guide lays out the steps necessary to properly label VFX shots in Media Composer so that they can be tracked during editorial and then turned over after picture lock. It also shows how to create a VFX Turnover Sheet at picture lock to make the VFX Turnover process easier.
Adding Markers
Every approved VFX shot in your edit needs to be marked and labeled in the order that they appear in the edit. Markers are helpful because you can easily navigate between them by hitting “A” and “S” on your keyboard. They are also very helpful later on when it comes to turning over your VFX elements because they translate over to Resolve.
These markers are how you will assign “names” or “shot codes” to your individual VFX shots. It is important that the naming convention is clear, consistent, and never repeats. This is the naming convention for VFX shots that must be followed:
show#_vfxshot# (example: 09mc_vfx010)
If 09MC had five VFX shots they would be labeled as follows:
09mc_vfx010
09mc_vfx020
09mc_vfx030
09mc_vfx040
09mc_vfx050
Notice that everything is in lowercase. There are no spaces, only underscores. The first shot is labeled “010” instead of “001”. VFX shots should be labeled in “tens”. This is in case a VFX shot is approved and added later; if it comes between two shots, the naming convention will still sort properly.
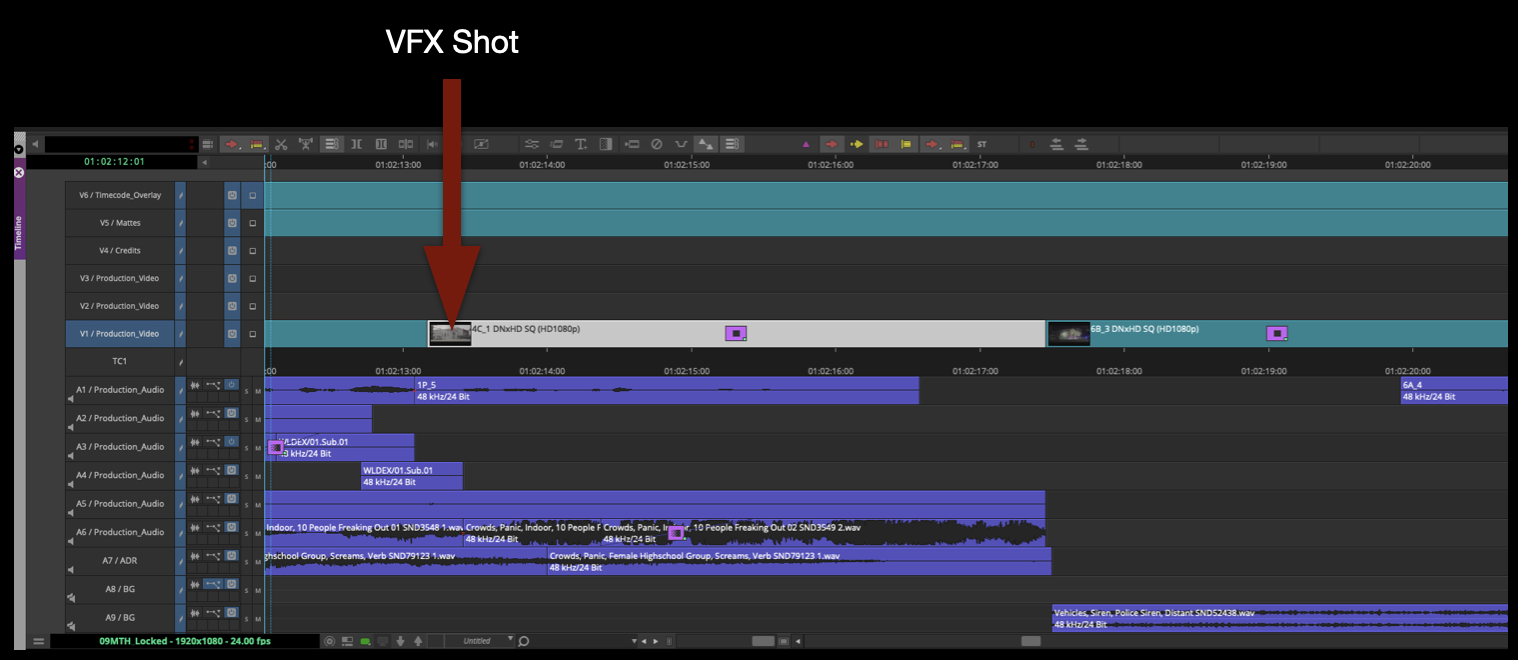
In the example below is a highlighted clip that has been approved to have a sign digitally removed. You will need to add a yellow marker to the first frame of the shot.
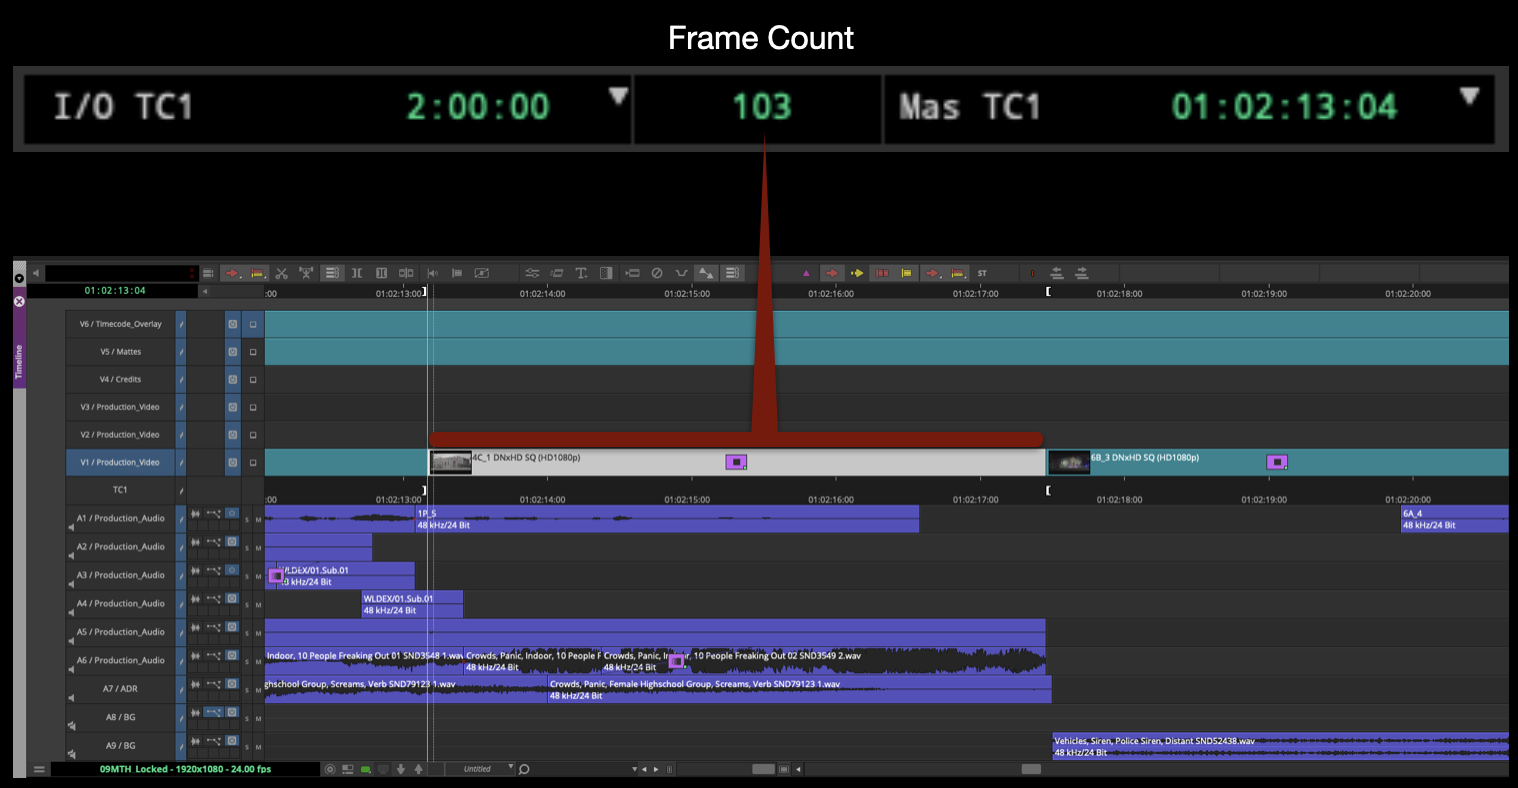
Place the playhead at the first frame of the VFX shot. Make sure only the track with the VFX shot is highlighted and hit “T” on the keyboard. This will add IN and OUT markers around the clip. After the IN and OUT markers are added, you can look at the time code readout above the composer window. The center box will always display the time between IN and OUT markers. If it is displaying in timecode, click it once and it will switch to displaying frames. Once that is done you have the information you need to add the yellow marker.
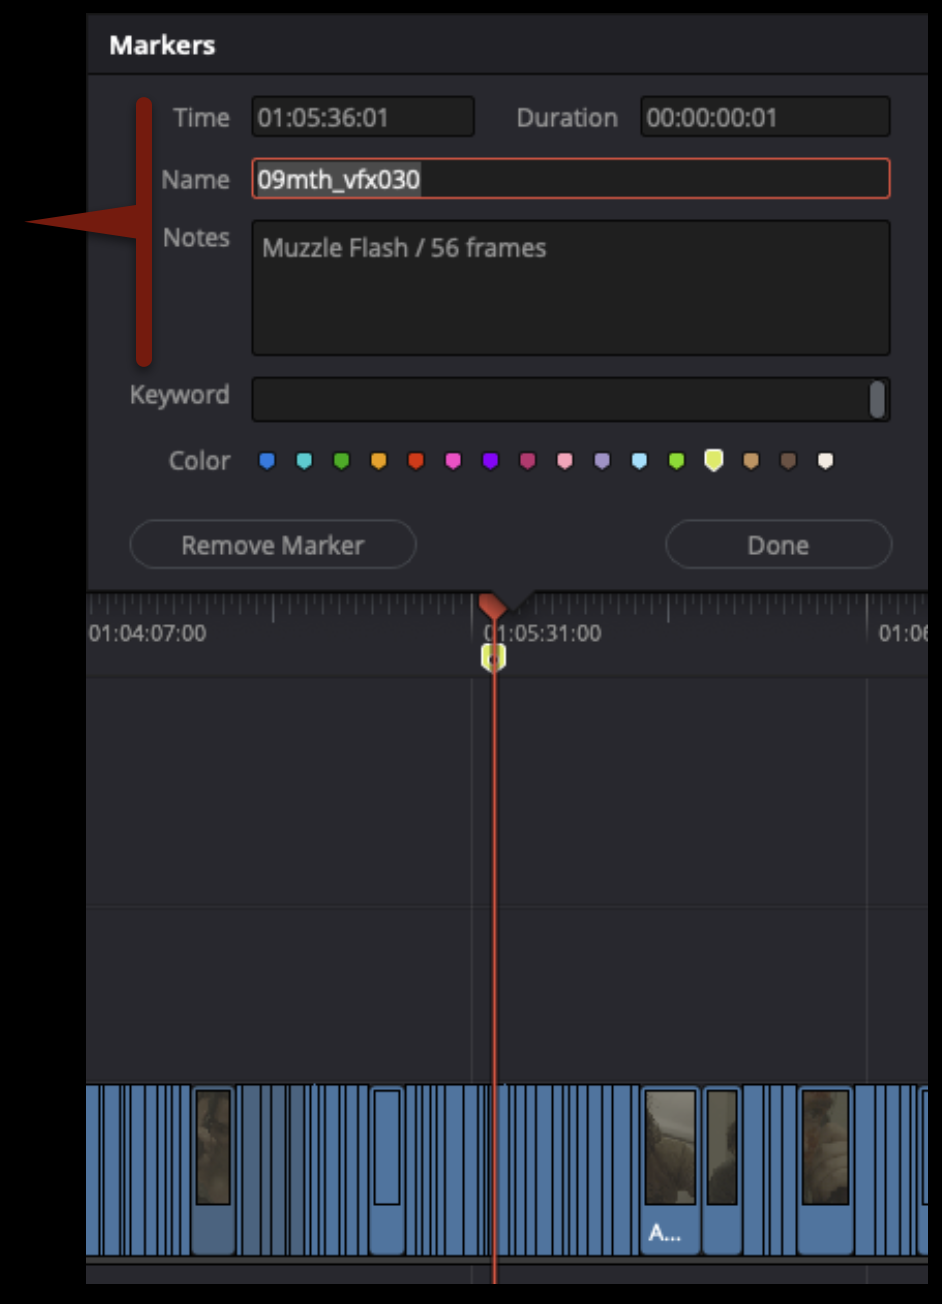
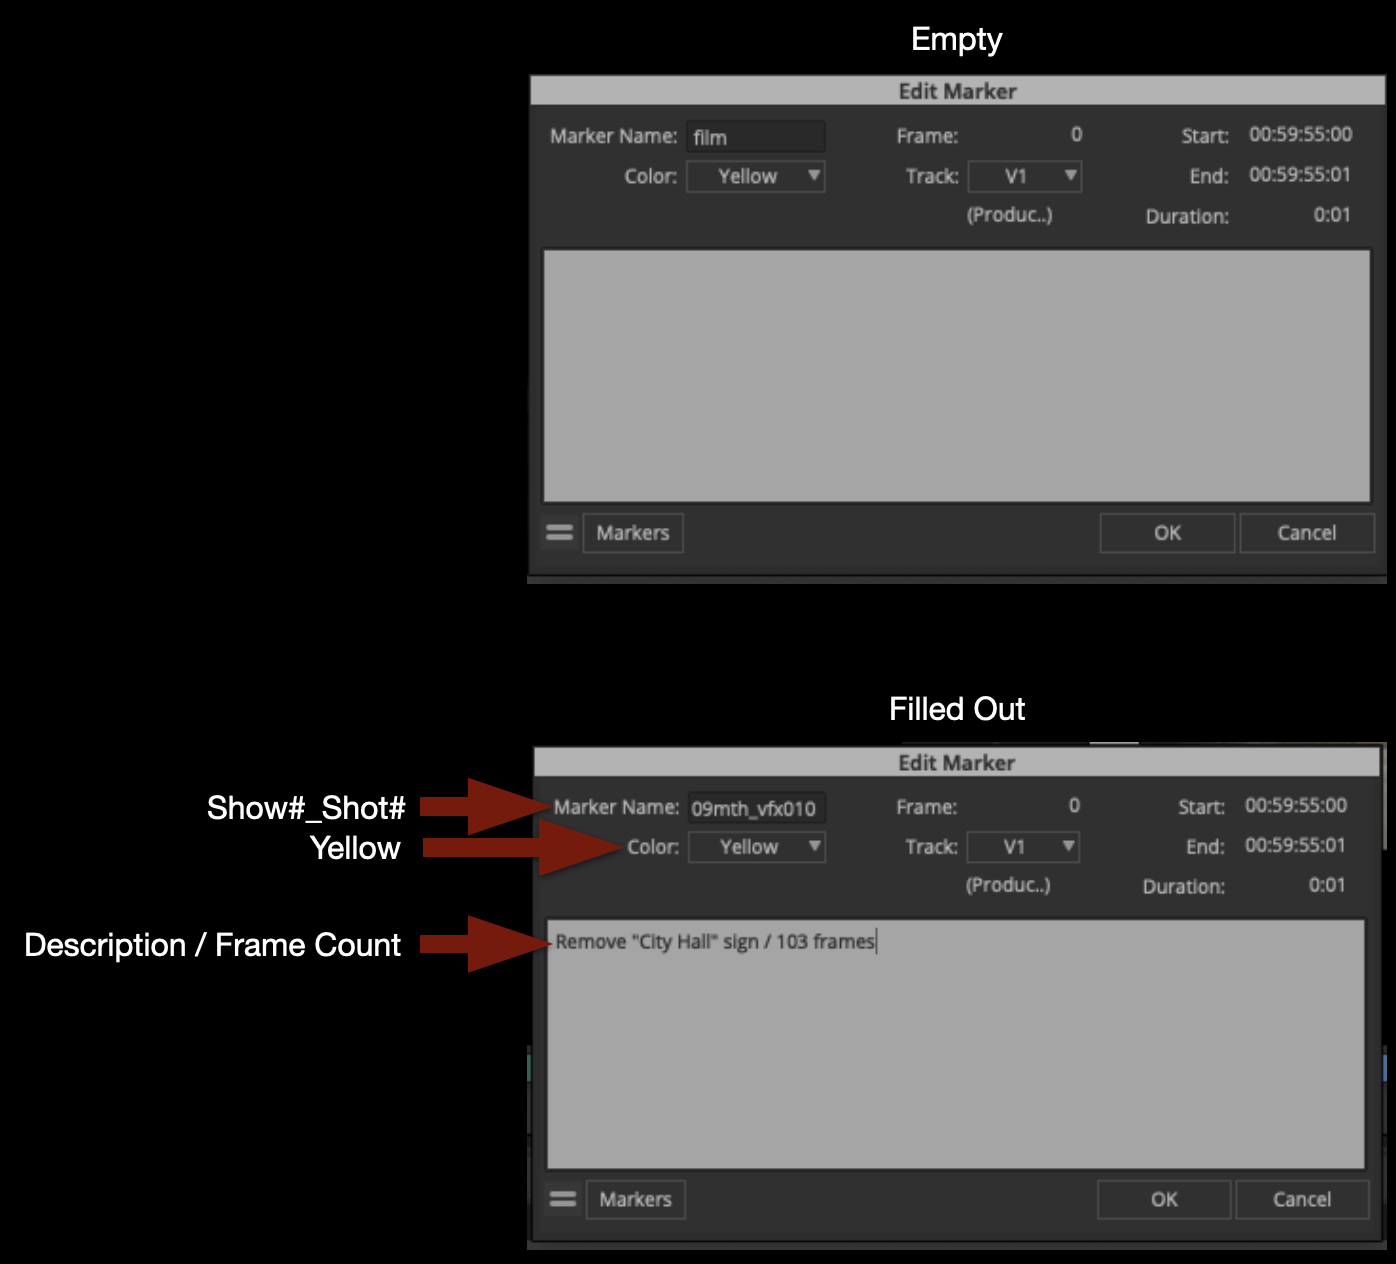
Hit “3” on the keyboard to add the yellow marker to the first frame of the clip. The “Edit Marker” box will appear and you will need to fill it out as shown bellow.
Marker Name: show#_shot#
Color: Yellow
Description: Write a brief description of the effect / the frame count
Click “OK”.
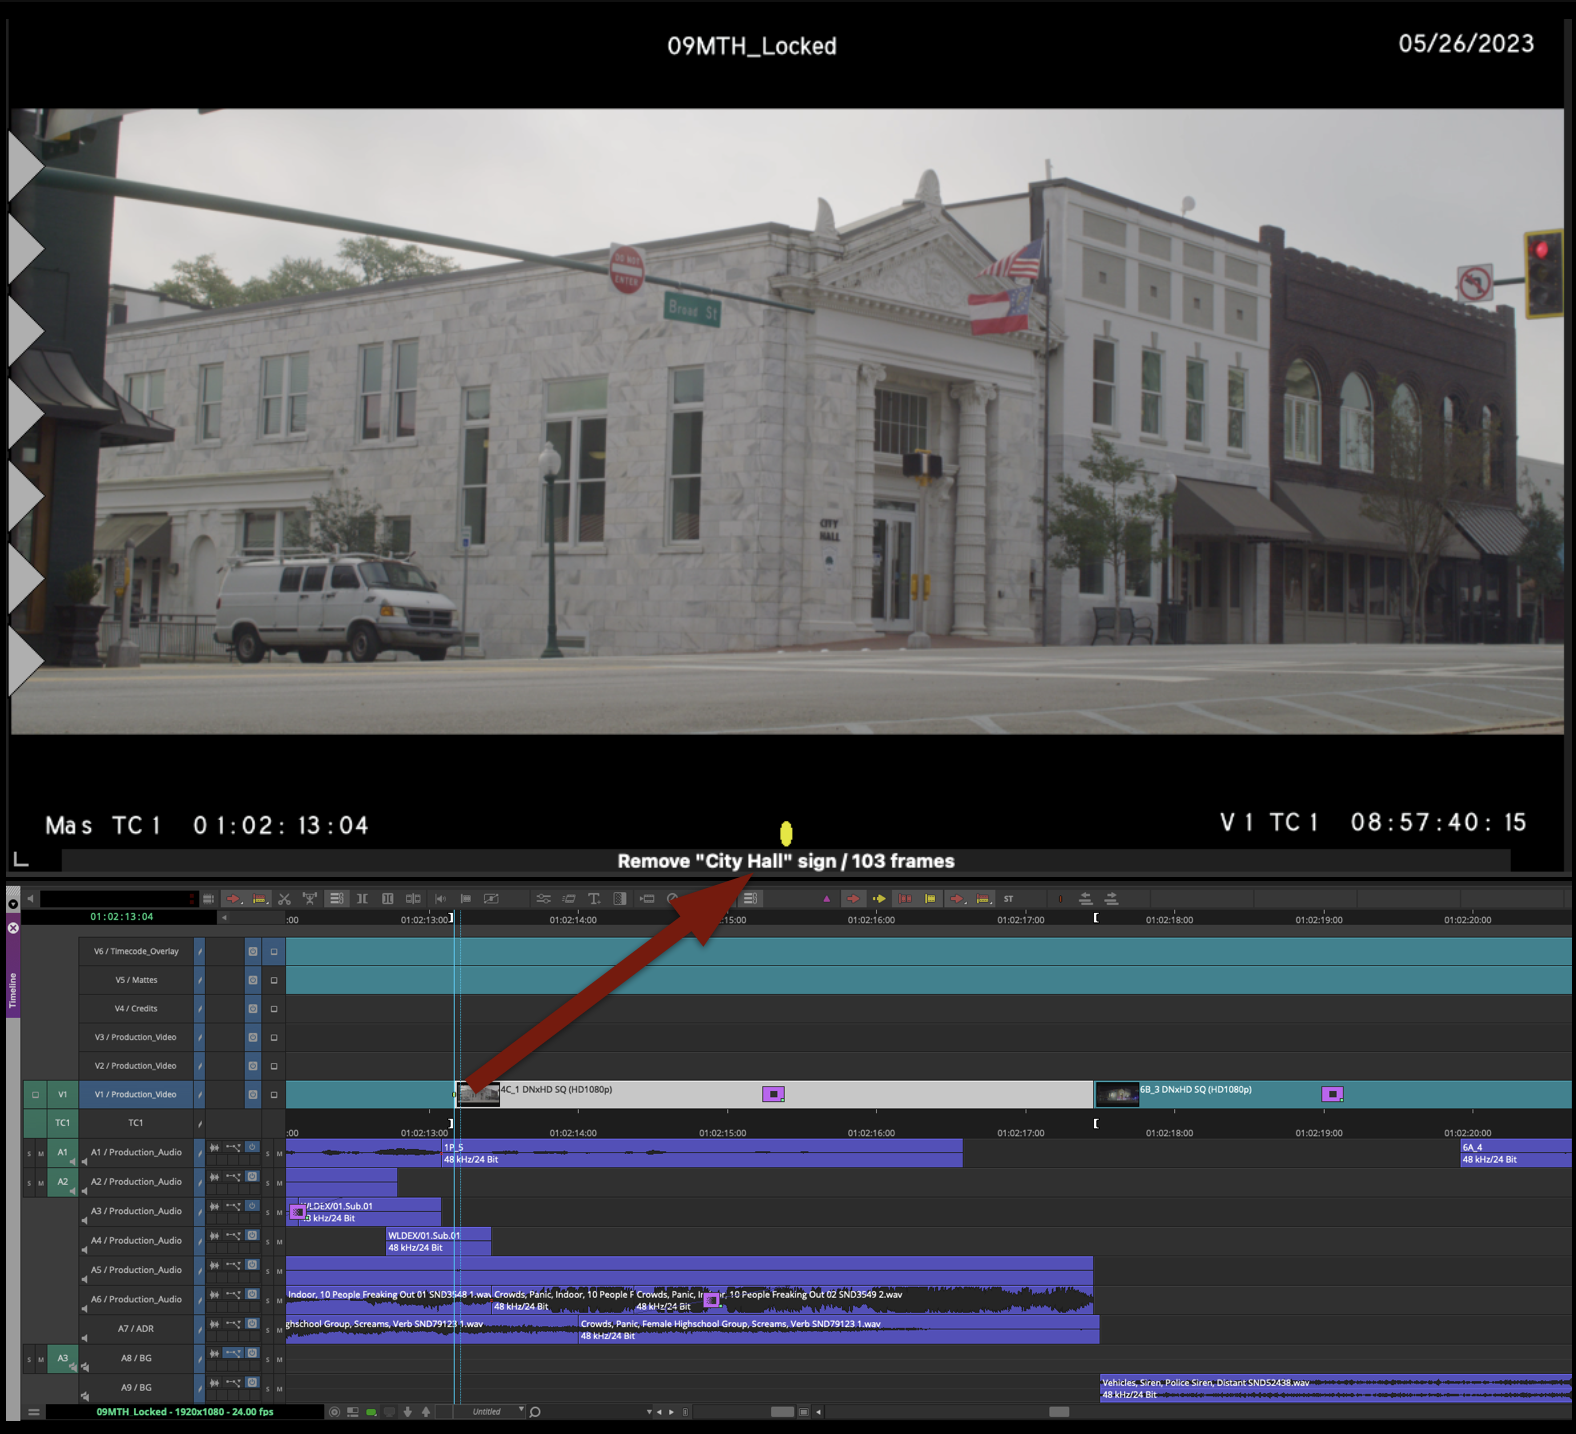
After clicking “OK”, you will see that a small yellow marker has been added to the first frame of the VFX shot. If your playhead is directly on top of that marker, the marker color and description will appear below the record monitor.
Repeat this process for all other VFX shots in your sequence in order.
Adding Timeline Clip Notes
After you have finished adding markers to all the VFX shots, you will want to label them another way as well. Your VFX shots need to have “burn-ins” using the Timecode Overlay Effect as described in the Picture Lock document. Using Timeline Clip Notes is the best way to do this.
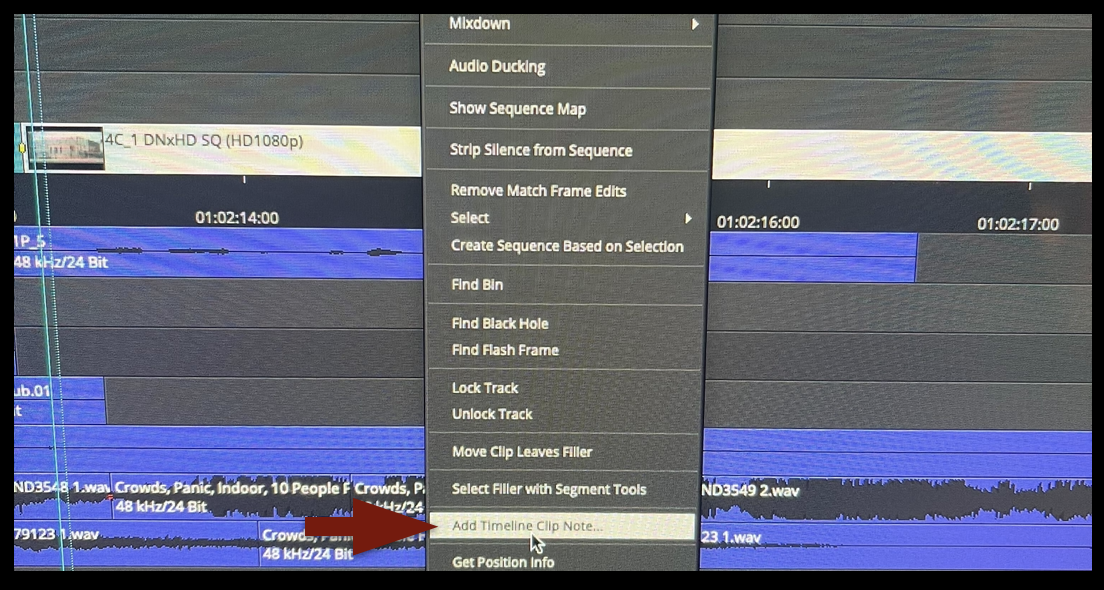
Navigate to each of your VFX shots, right-click on it, and from the dropdown menu choose Add Timeline Clip Note…
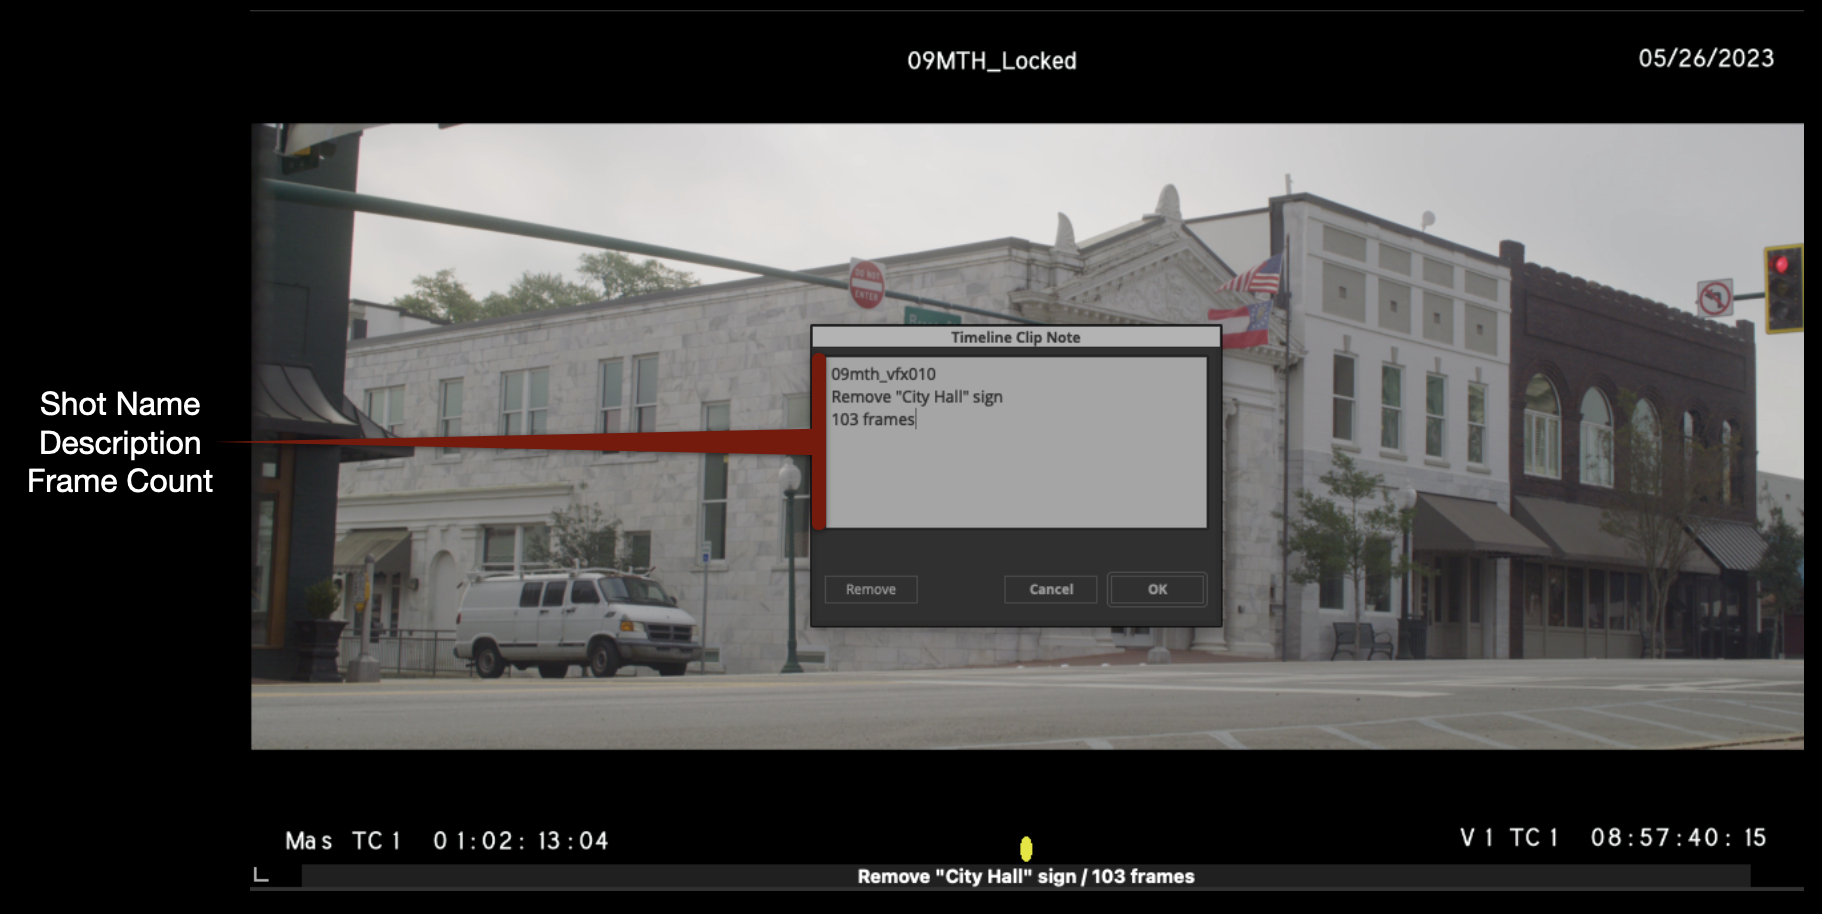
A box will appear that you will need to fill in with the same information that you added to the marker. If your playhead is directly on the marker, it will be easier to do this because the description and frame count will be visible. Format your clip notes exactly as below.
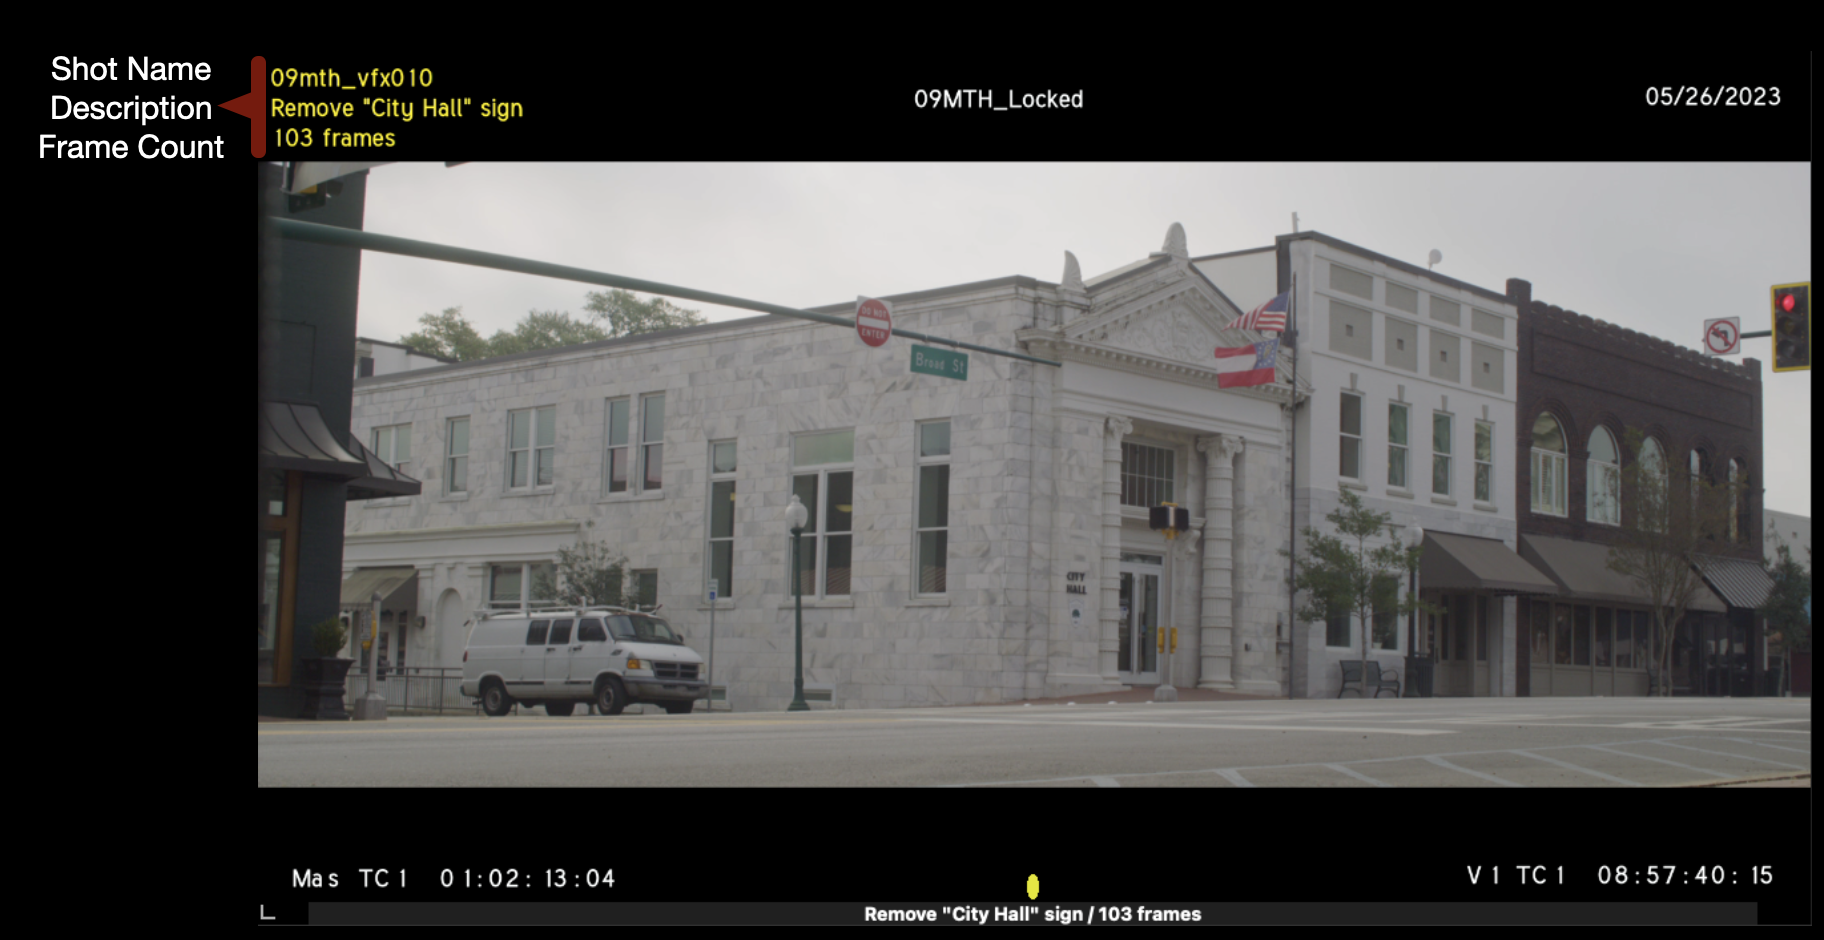
After you click “okay”, if you have the correct Timecode Overlay effect applied, your Clip Note will appear in the upper left corner in yellow as shown in the example below.
VFX Turnover Sheet
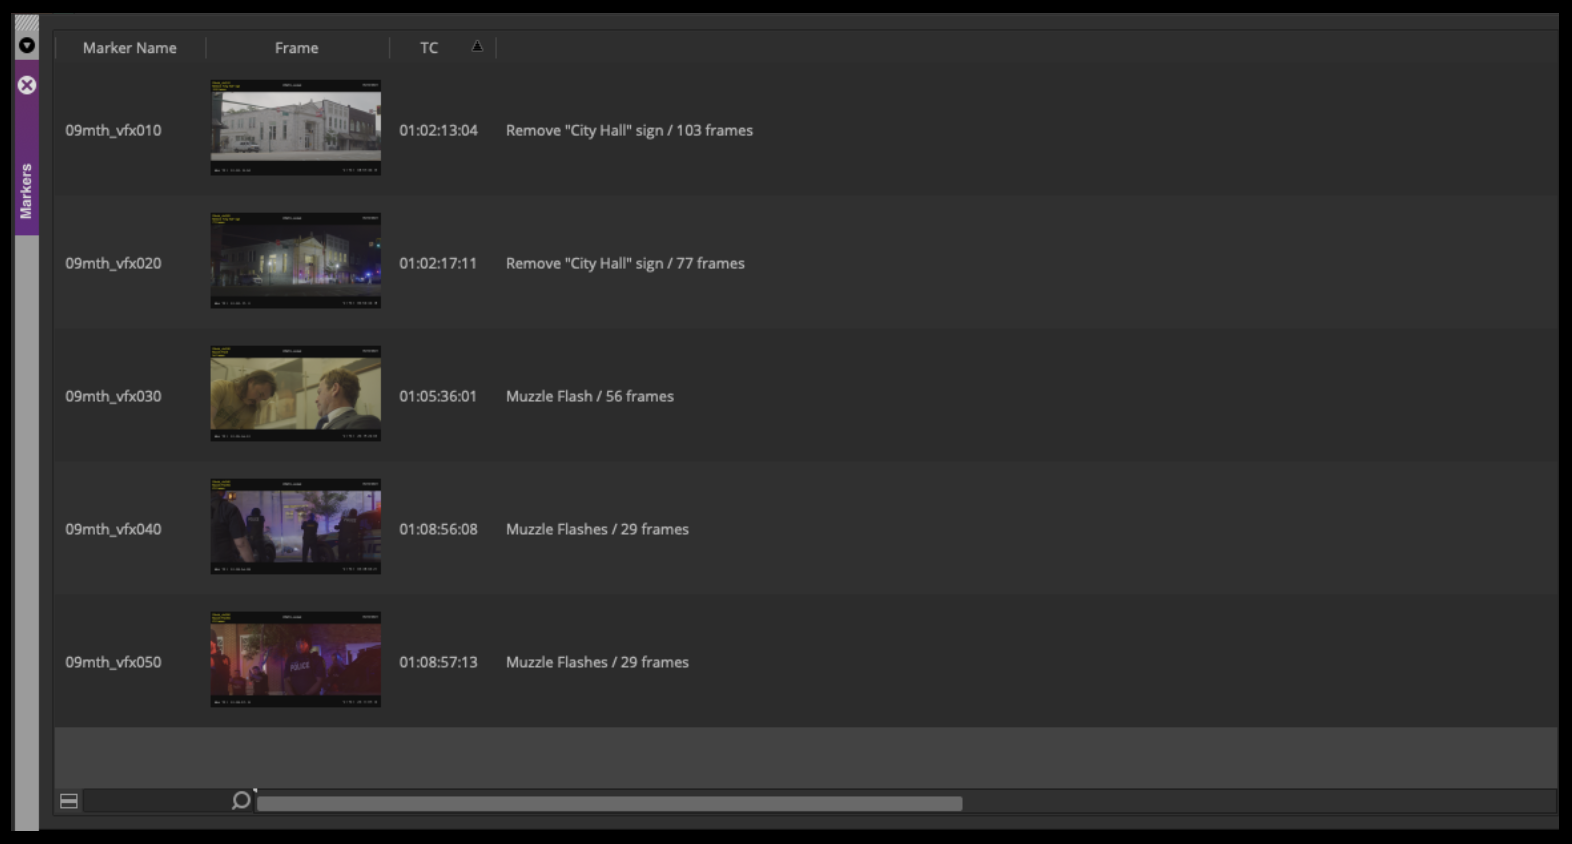
At picture lock, if your show has approved VFX shots you will need to double-check all of your VFX markers and Clip Notes to make sure they are up-to-date in your Locked Sequence. After you have done that, you can export a VFX Turnover Sheet. From the task bar, select Tools > Markers.
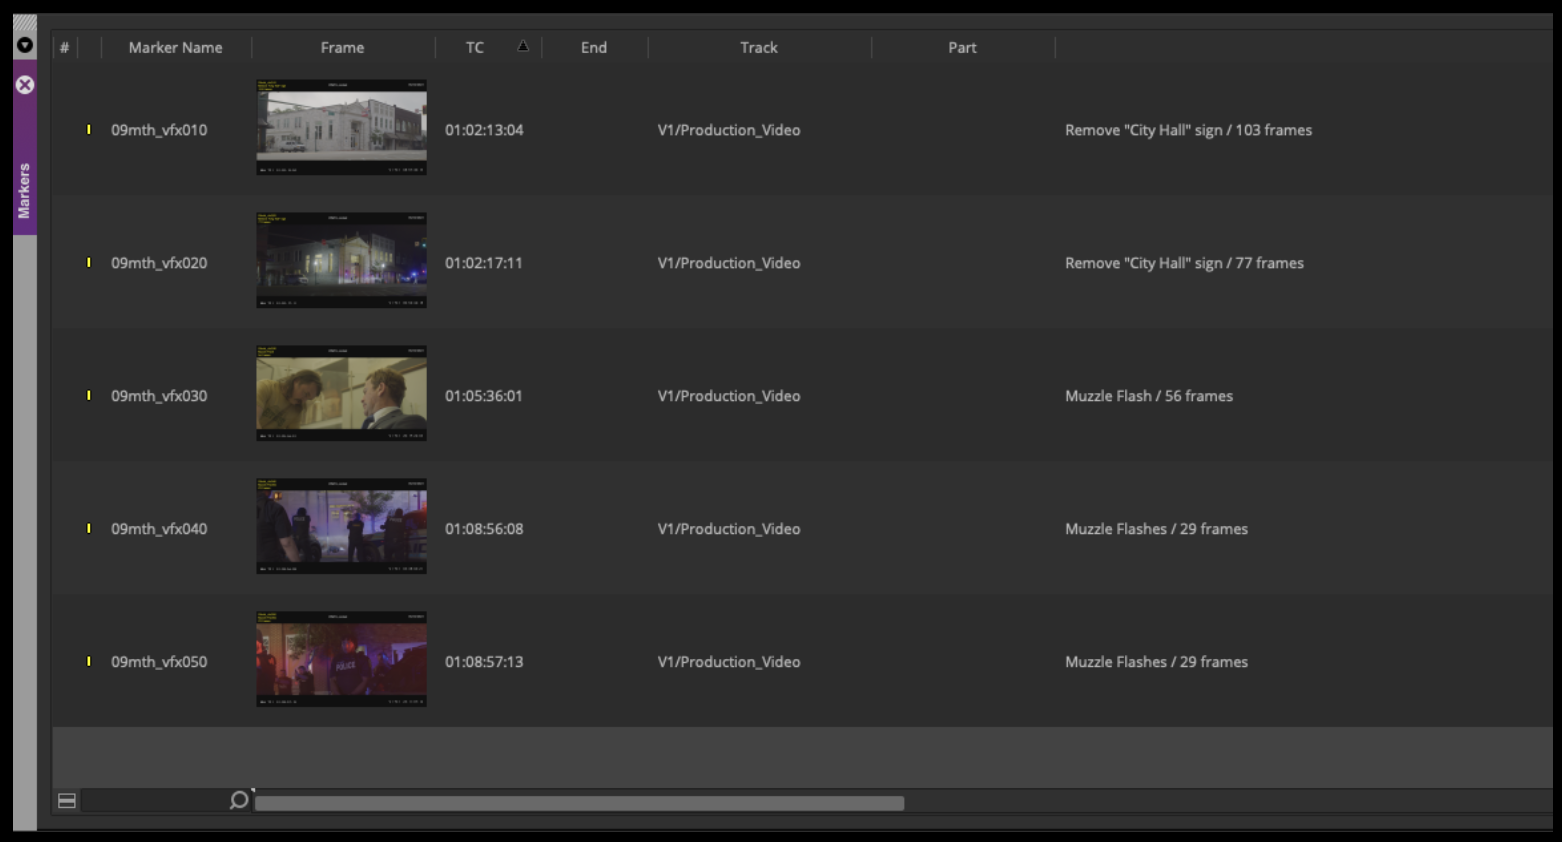
With the Markers tab, open you will see all of your markers laid out in a bin view with several columns across the top. These columns can be sorted and hidden like a normal bin. If you have other Markers displayed here you will need to delete them. For the VFX Turnover Sheet to be accurate, you need to make sure the only markers in your Locked sequence are yellow VFX markers.
Arrange the columns as shown below. Hide all of the other columns leaving only Marker Name, Frame, TC, and Description (in that order). Sort by the Marker Name column so that your VFX shots are in numerical order.
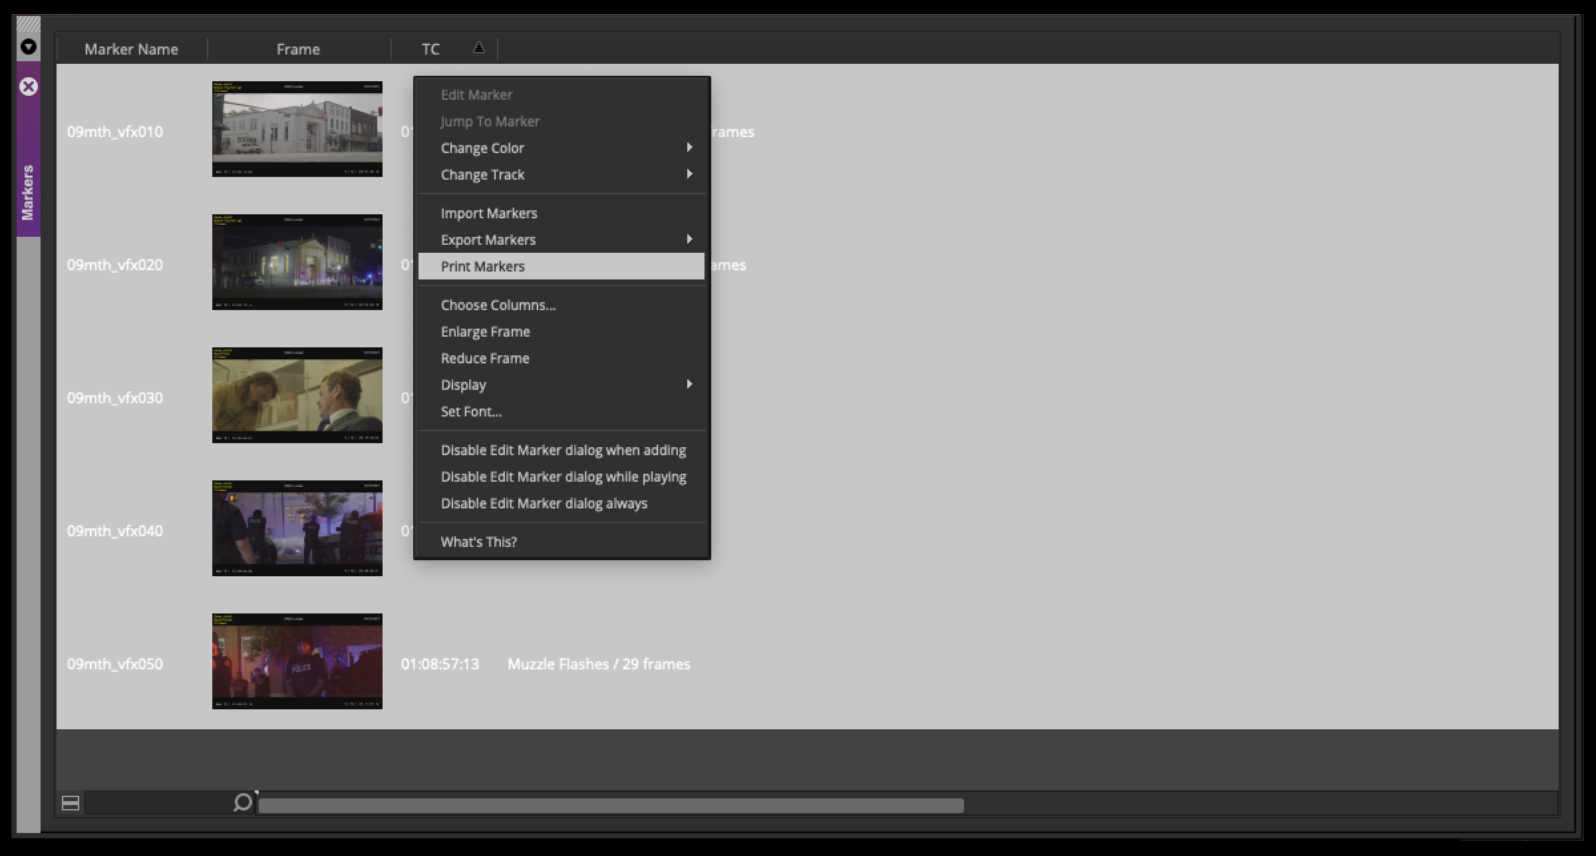
Right-click and select “Print Markers”
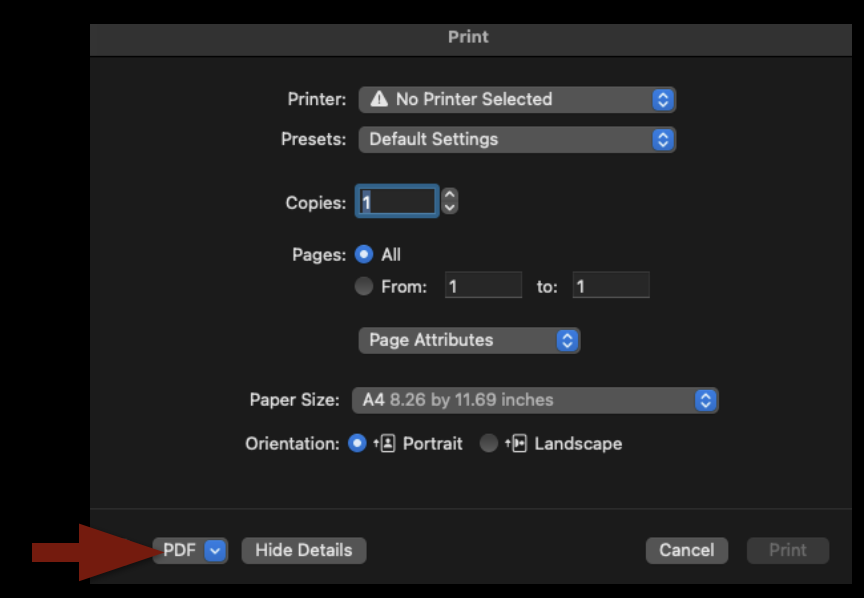
In the Print menu, ignore all the printing options and select “PDF” in the lower-left corner.
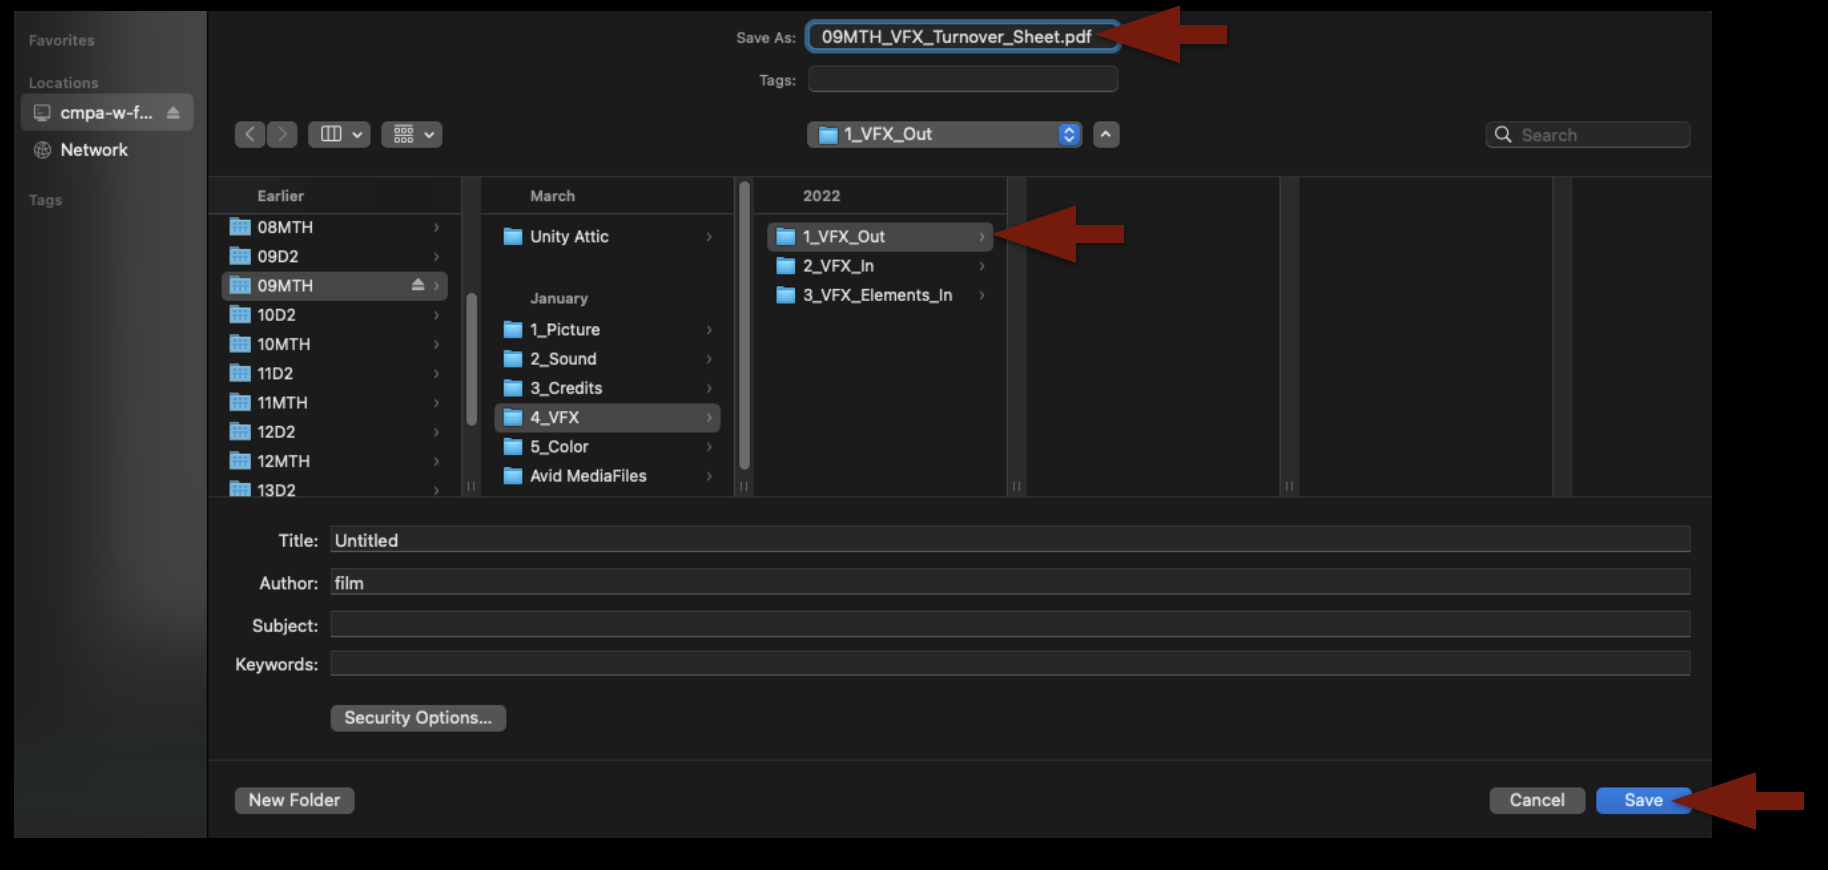
A Finder window will appear so that you can give your PDF a name and location. Label the PDF show#_VFX_Turnover_Sheet and save it in the VFX > VFX Out folder on your show volume.
When you click “Save”, a window will appear asking about Print Scale. The default is 100%. Leave it like that and click “OK”. The PDF that you made should be saved in the folder shown below and when you open it in Preview should appear formatted like the example.
Having access to a robust sound effects library is invaluable for filmmakers. While there are a lot of free websites where you can download sound effects, the quality of the files can vary and acquiring the correct licensing rights can be a time-consuming and frustrating endeavor. The College therefore pays an annual fee to license Soundly, which is an application for easy searching through the 6 Terabytes of media in our professional sound effects library. This allows you to have a vast array of high-quality, licensed effects at your fingertips, and it’s engineered to have frictionless integration with Media Composer and ProTools. You can then focus on what really matters: the creative work.
Additionally, Soundly has an AI feature called Voice Designer which allows for text-based voice generation. This is a very useful tool if you need to add, say, the voice of an unseen character or if you need to rough-in a voice during editorial that will later be replaced with ADR.
Soundly Layout and Search
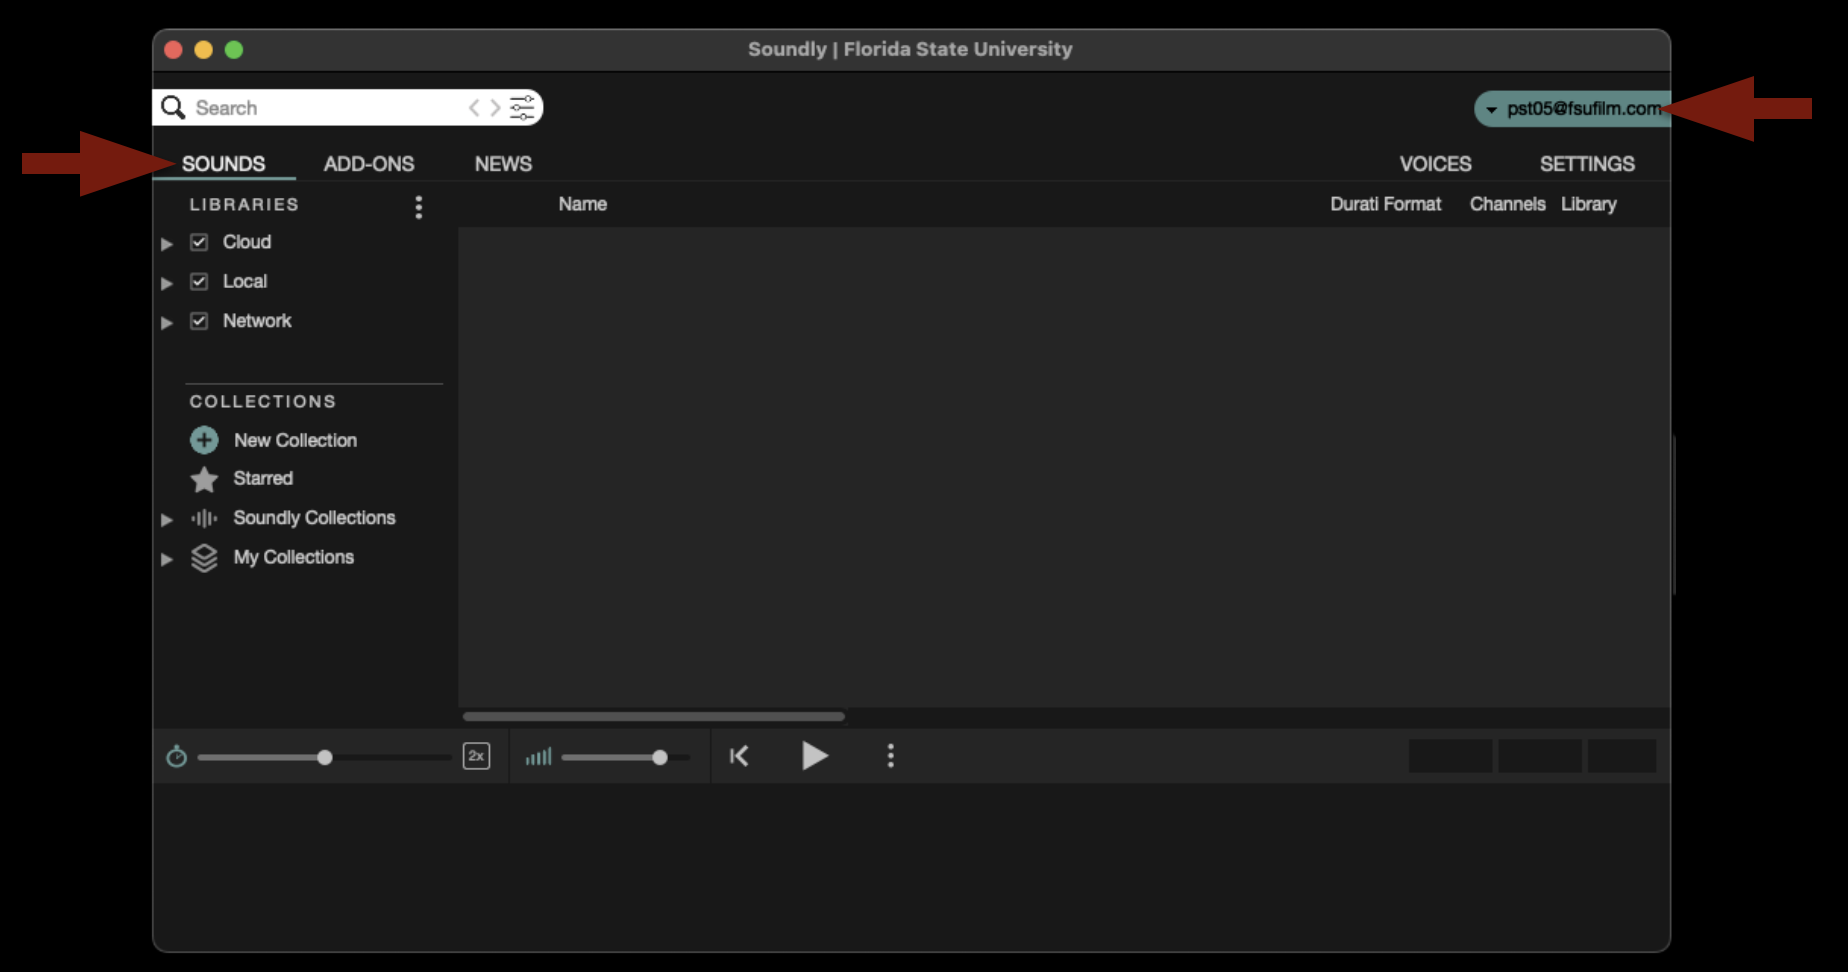
When first launched, the application will open as shown below. If it defaults to a different page, make sure it is set to the “Sounds” tab. Also check that it is signed in to our account as shown below. If it appears that the Soundly application is not signed in to our account correctly, please contact the Post Staff and they can get it fixed.
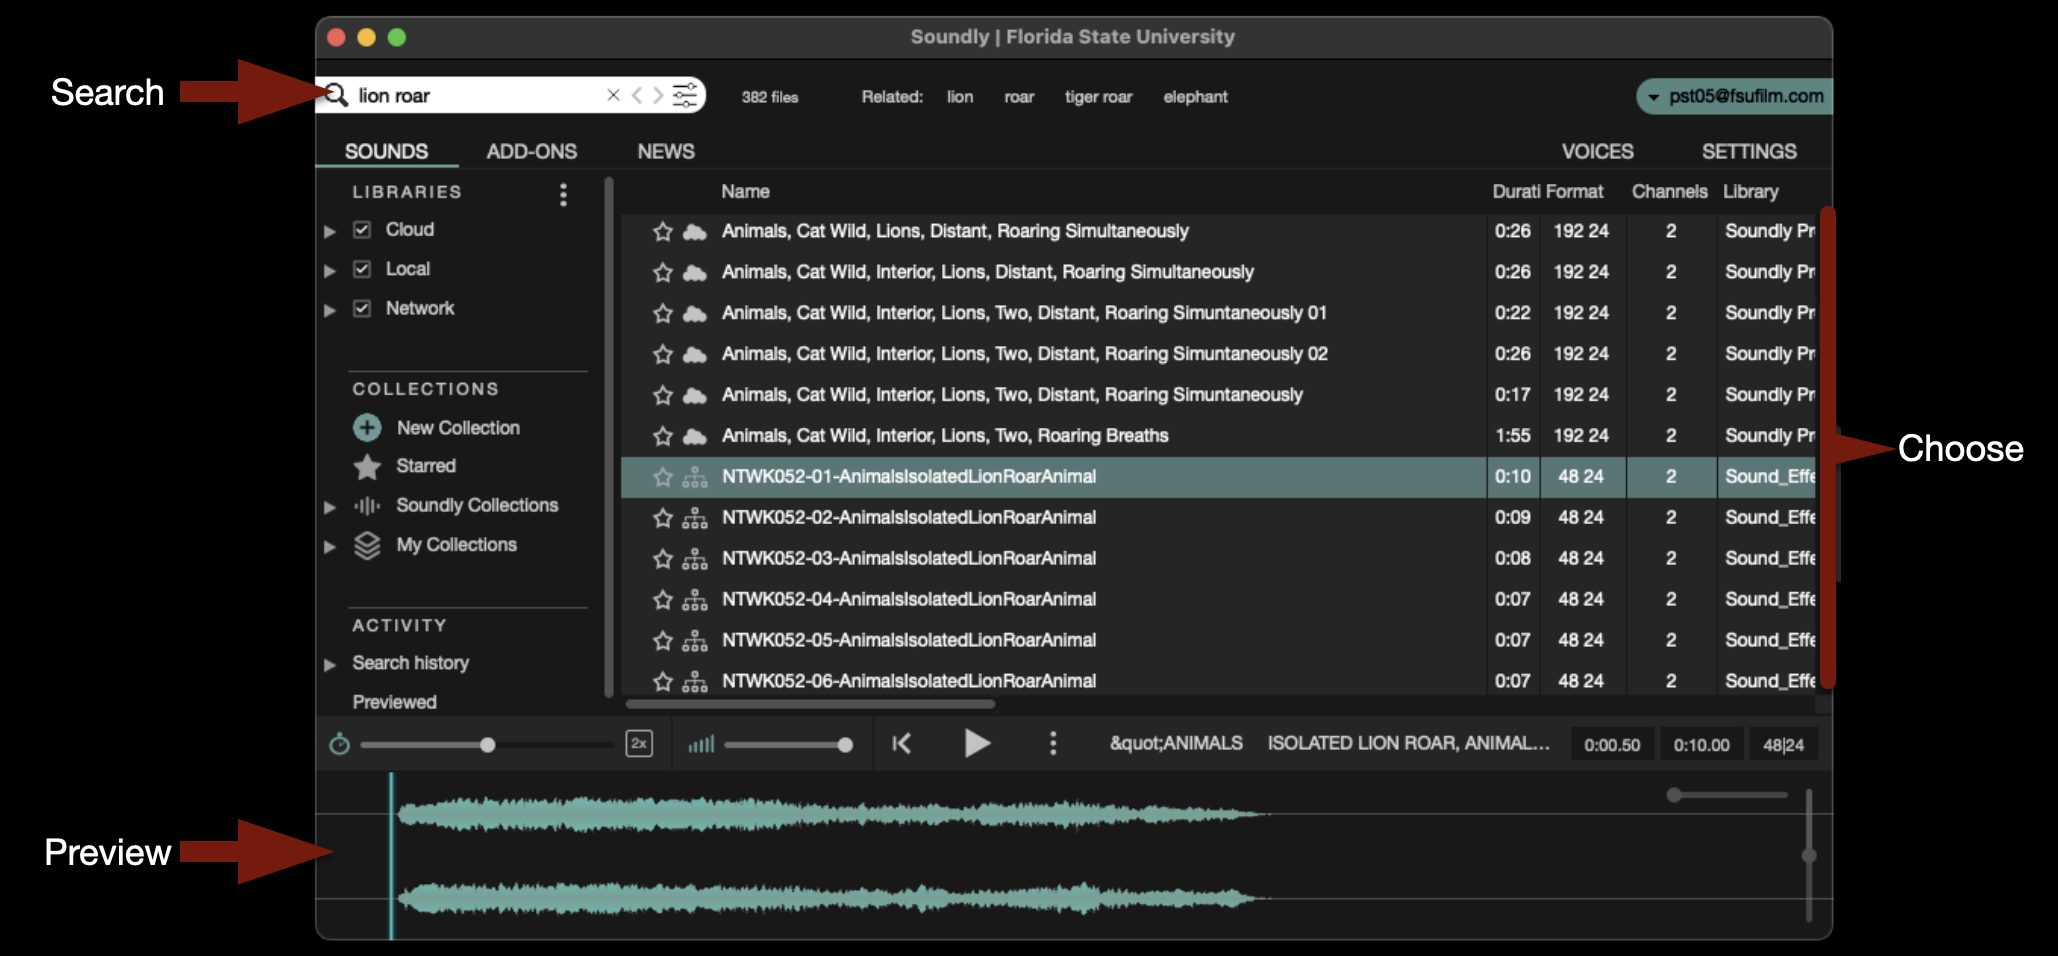
In the upper-left corner is a search field where you can type in keywords to help you find the what you are looking for. The library is vast and contains sound effects, backgrounds, Foley, and more. After you select one of the sound effects that your search revealed, you can preview it in the timeline at the bottom.
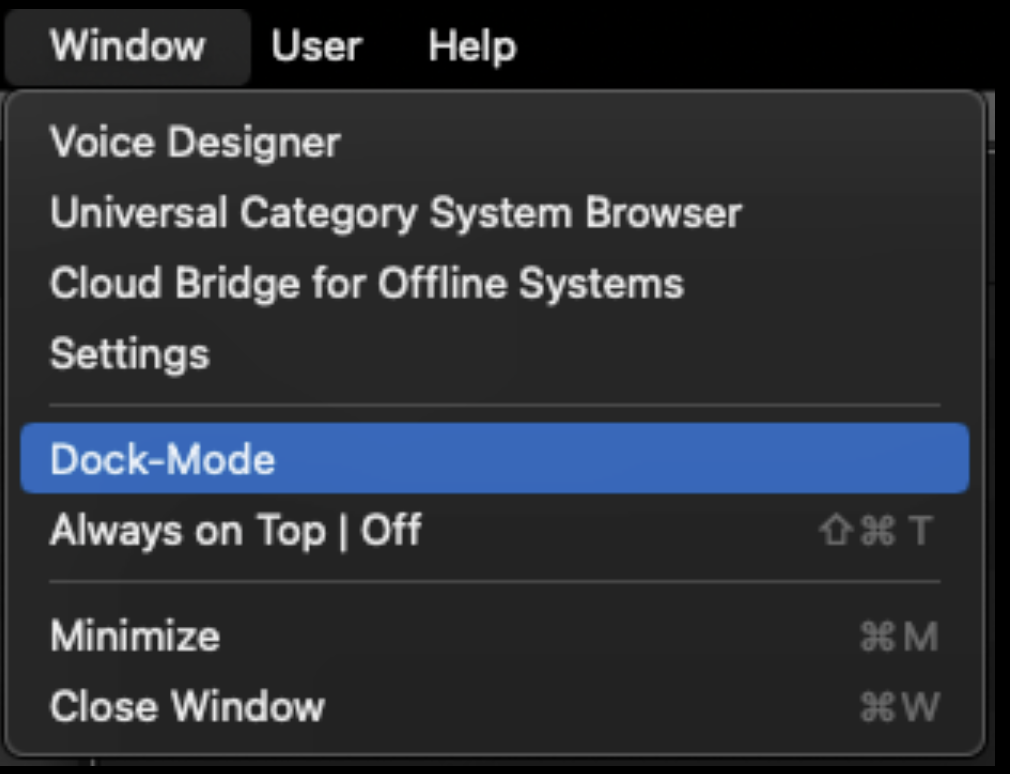
By default, Soundly opens in a big window that can be viewed fullscreen. Sometimes you may prefer to put it in “Dock Mode” which will squeeze the interface down to the bottom third of the screen. To enter “Dock Mode” navigate to the task bar and select Window > Dock Mode.
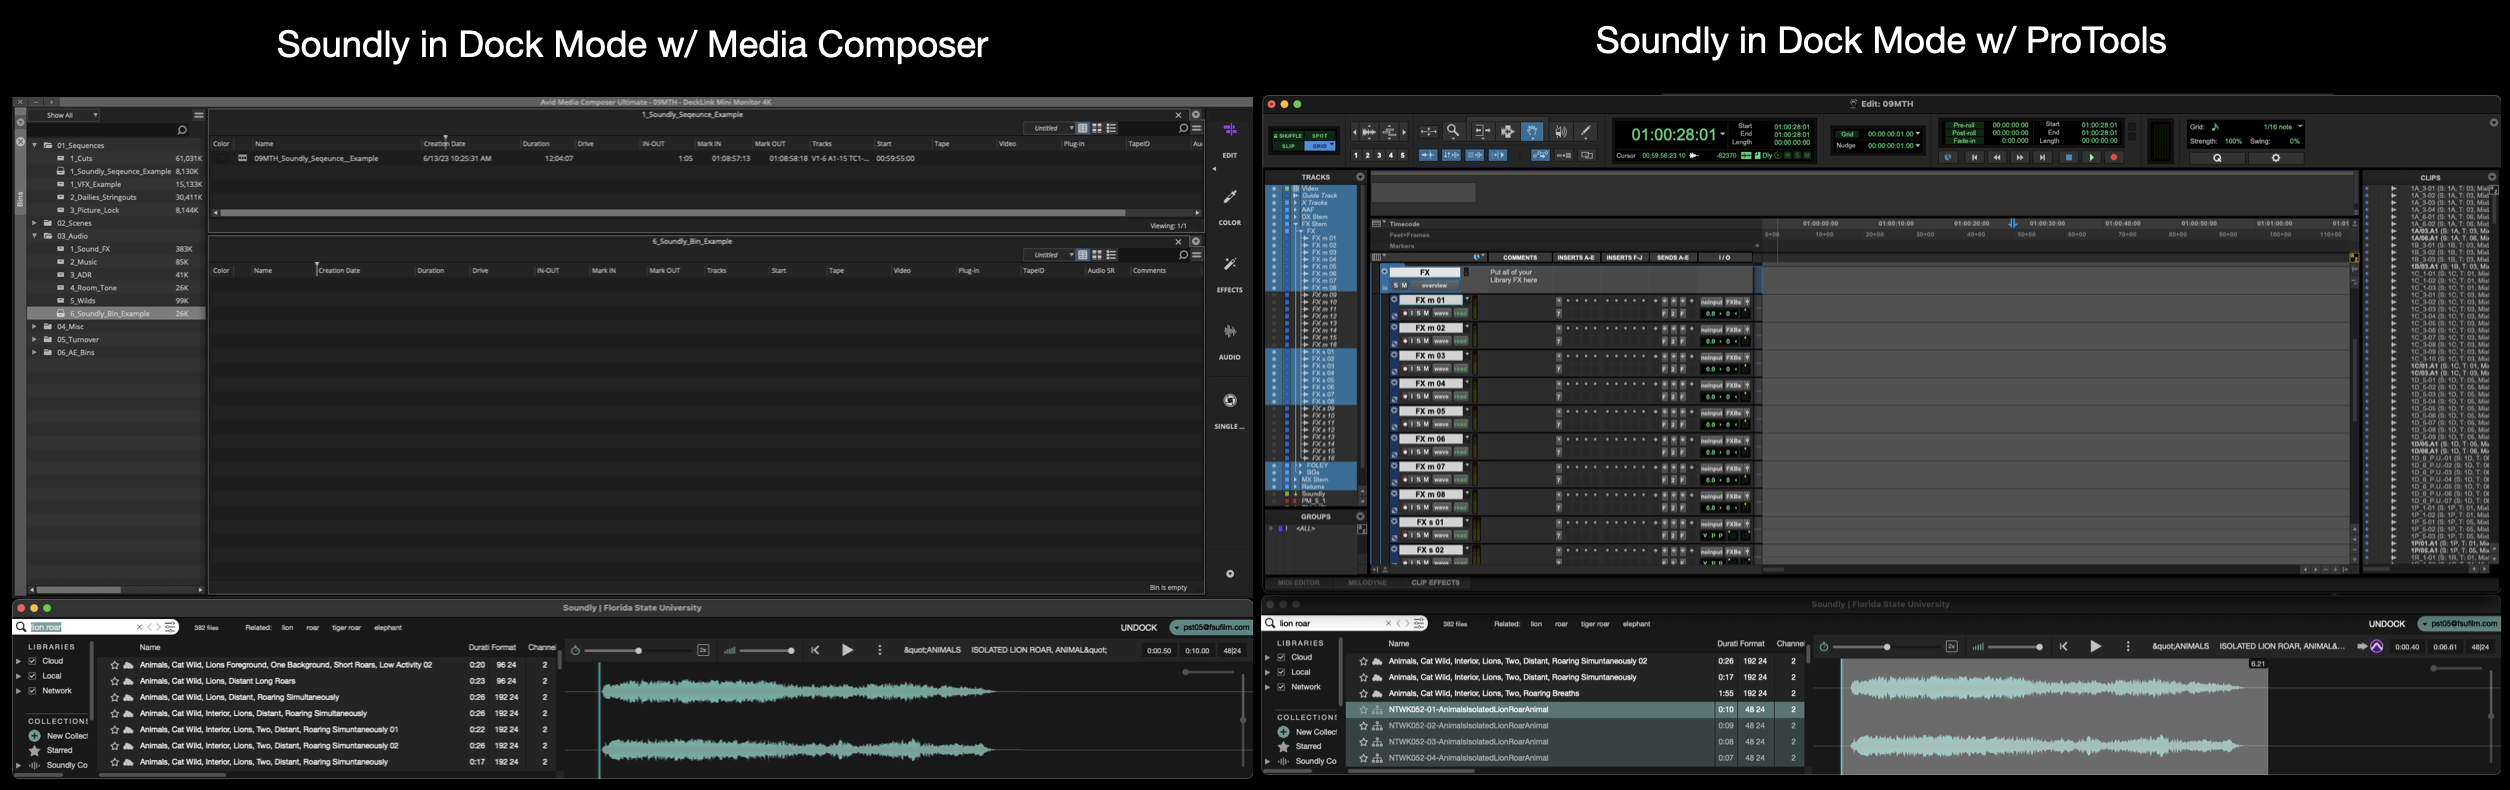
This can be helpful when you are also working in Media Composer or ProTools, as it will allow you to easily have both interfaces open while you work, as shown below.
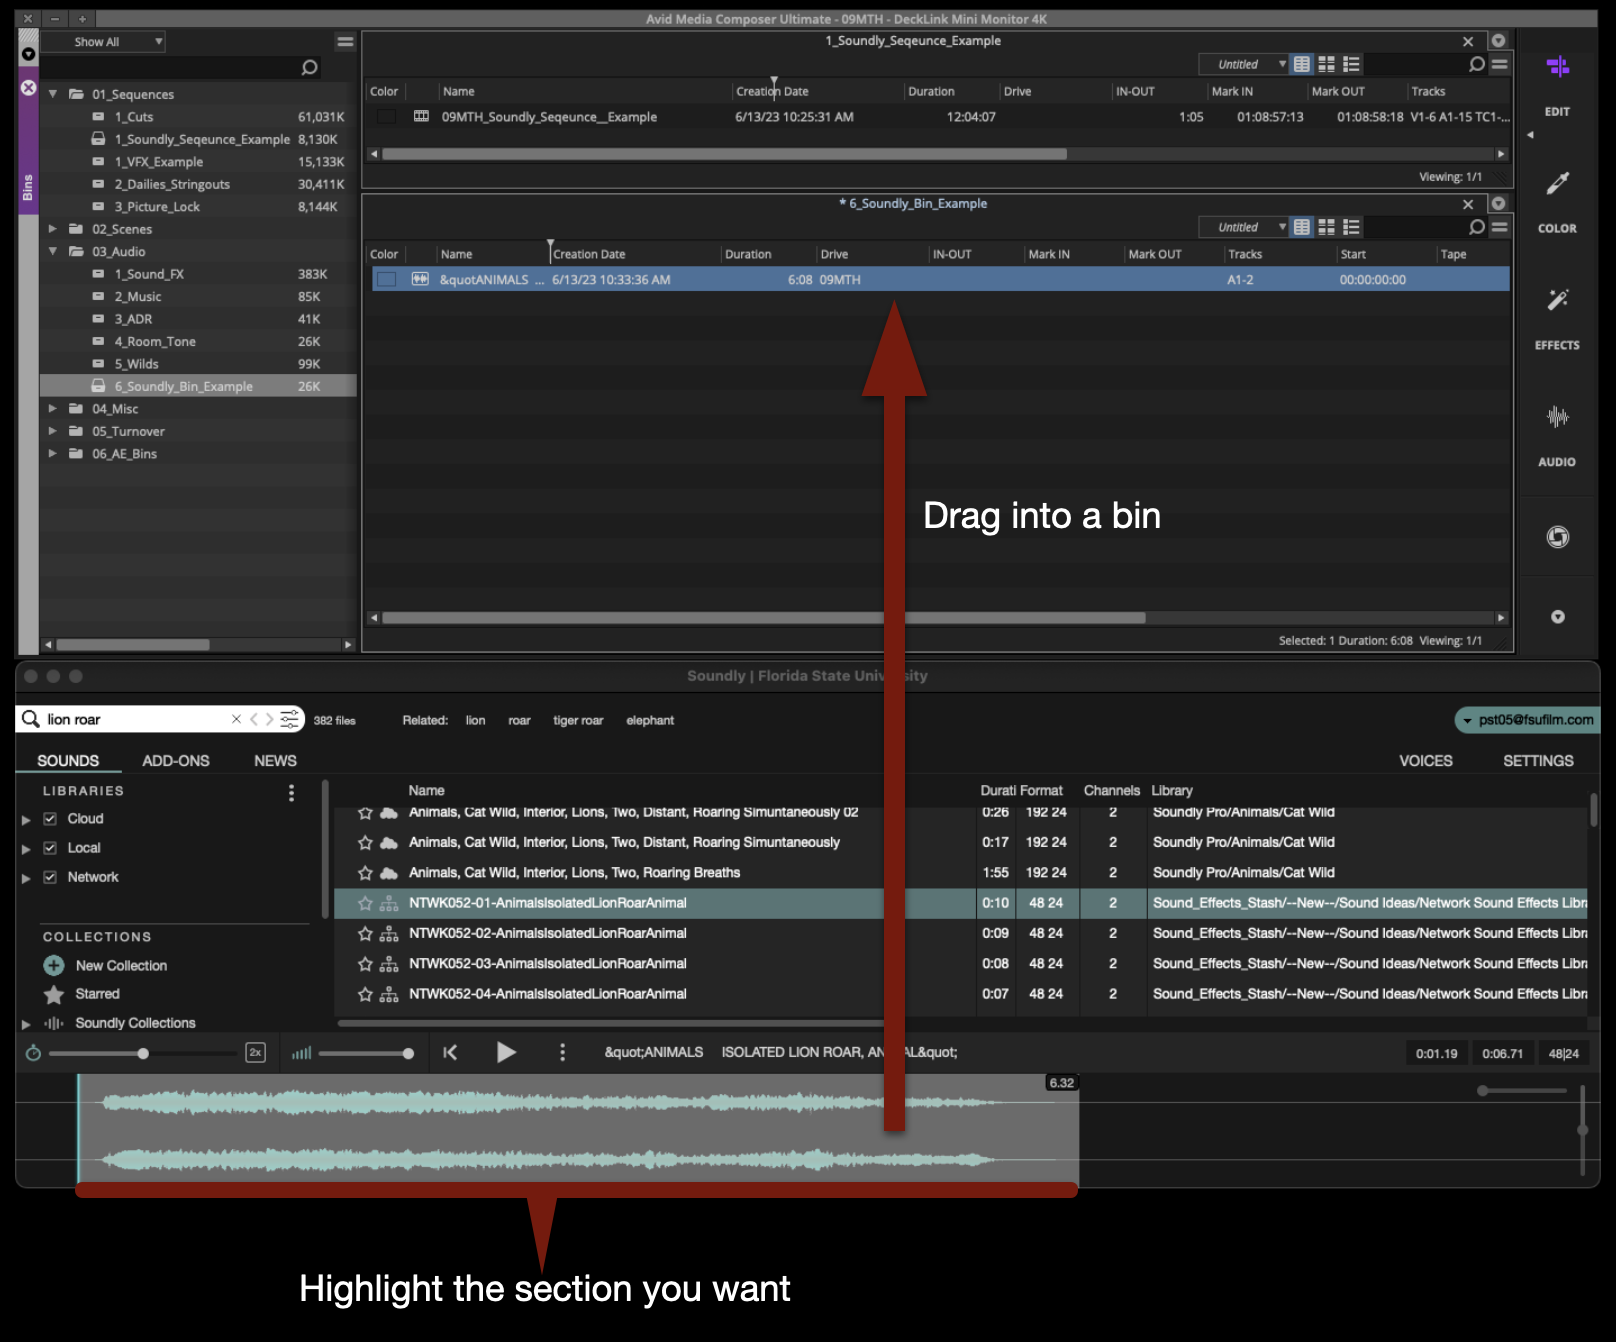
Soundly with Media Composer
When using Soundly with Media Composer, it is simple to bring sounds from the library into a bin. After you have searched for and have found the sound that you want to bring into Media Composer, highlight the section of waveform you want and drag that into an open bin.
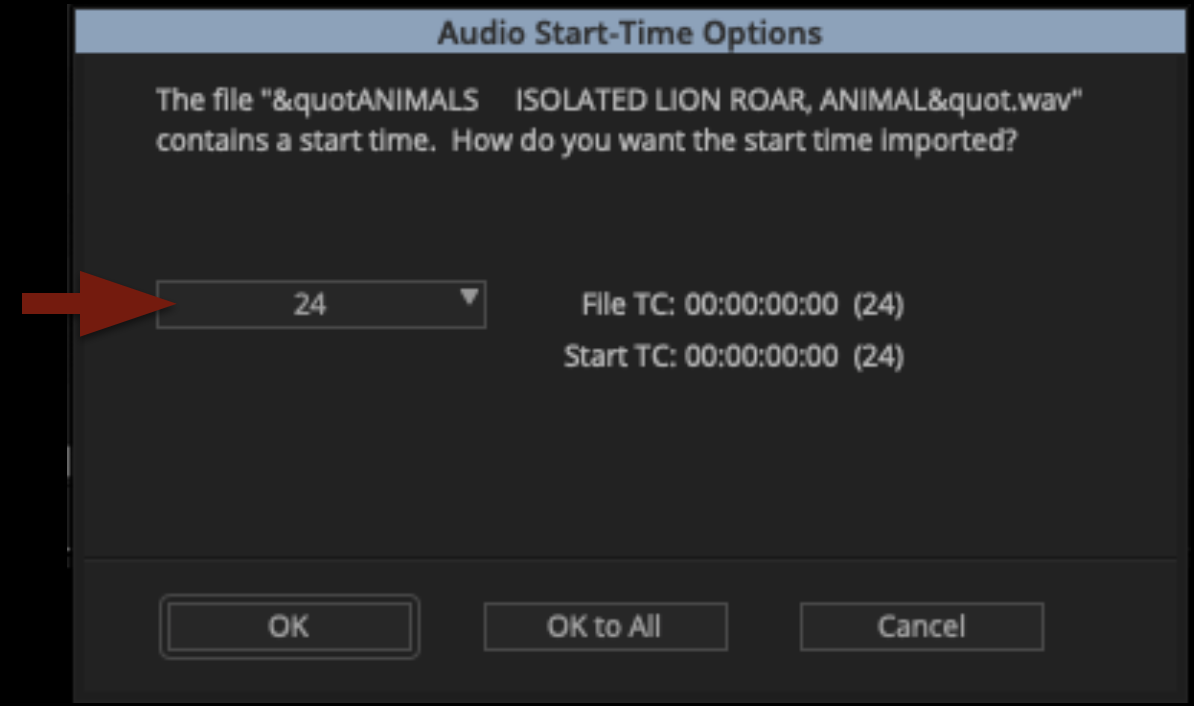
Media Composer will prompt you with a question about the audio start-time. Make sure it is set to 24 and then click “OK”.
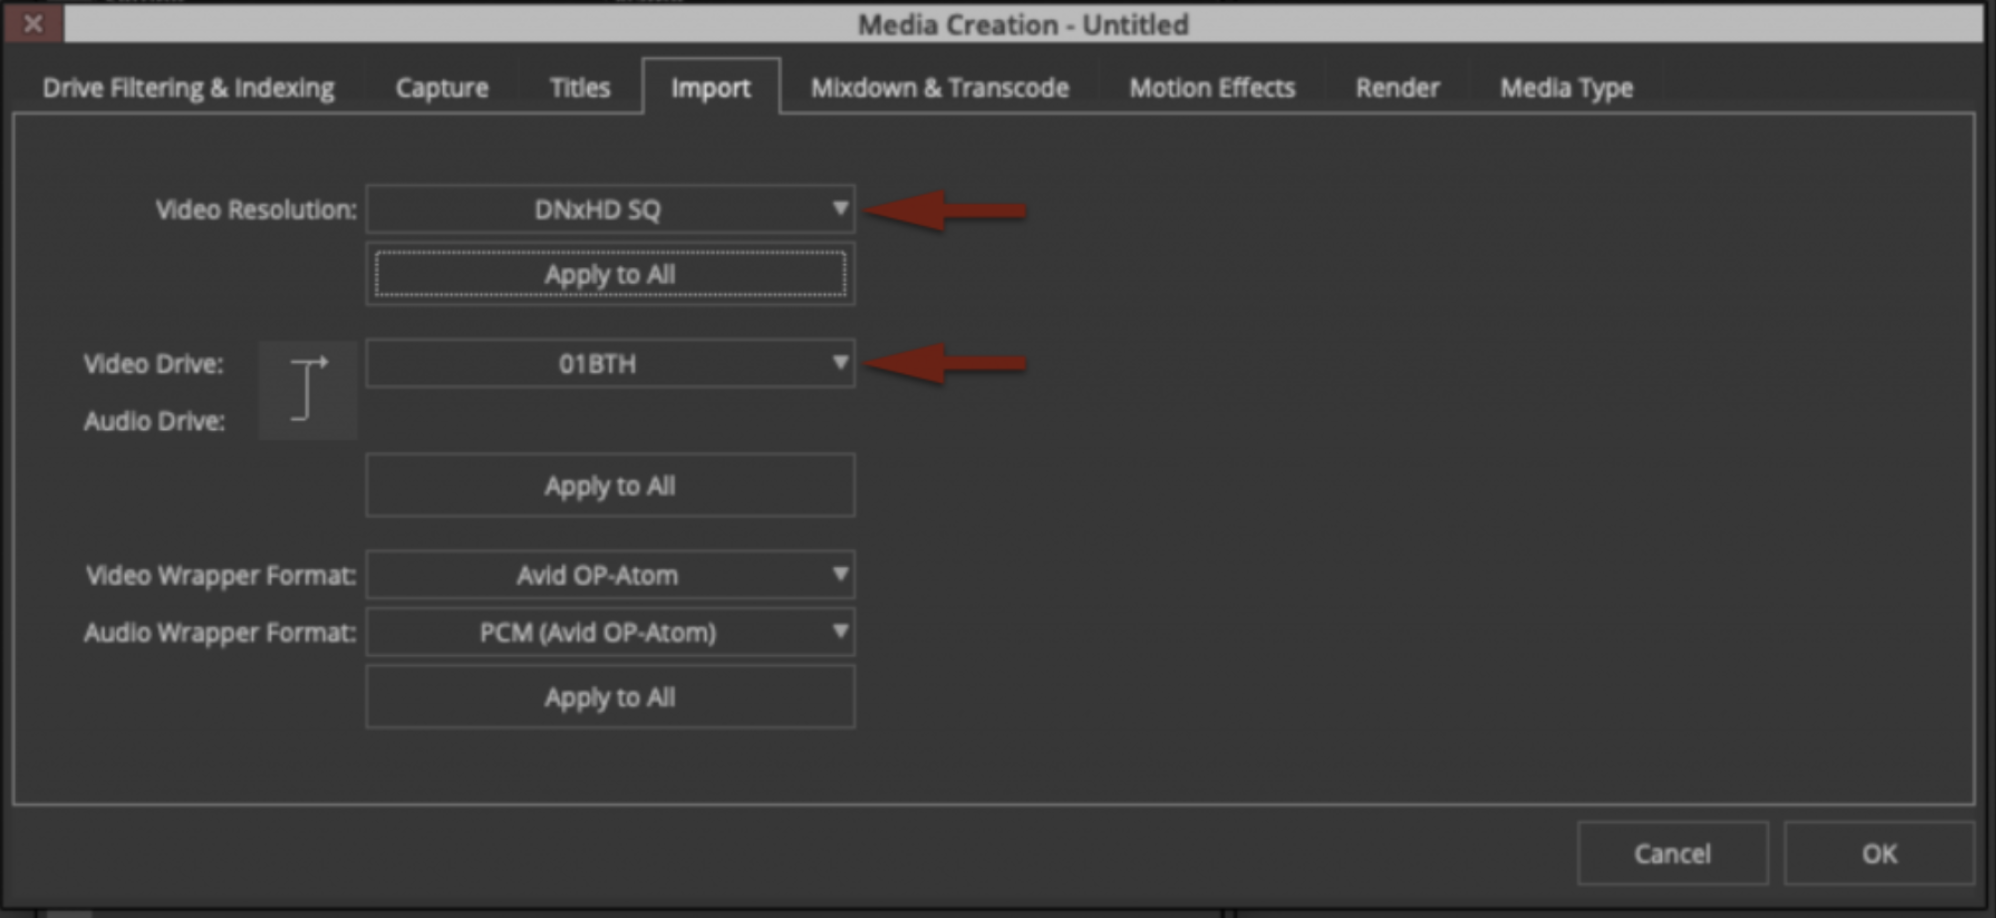
Assuming your media creation settings in Media Composer are set as shown in the example below, the sound will be transcoded into Avid Media and will appear in your bin, ready to work with.
Soundly with ProTools
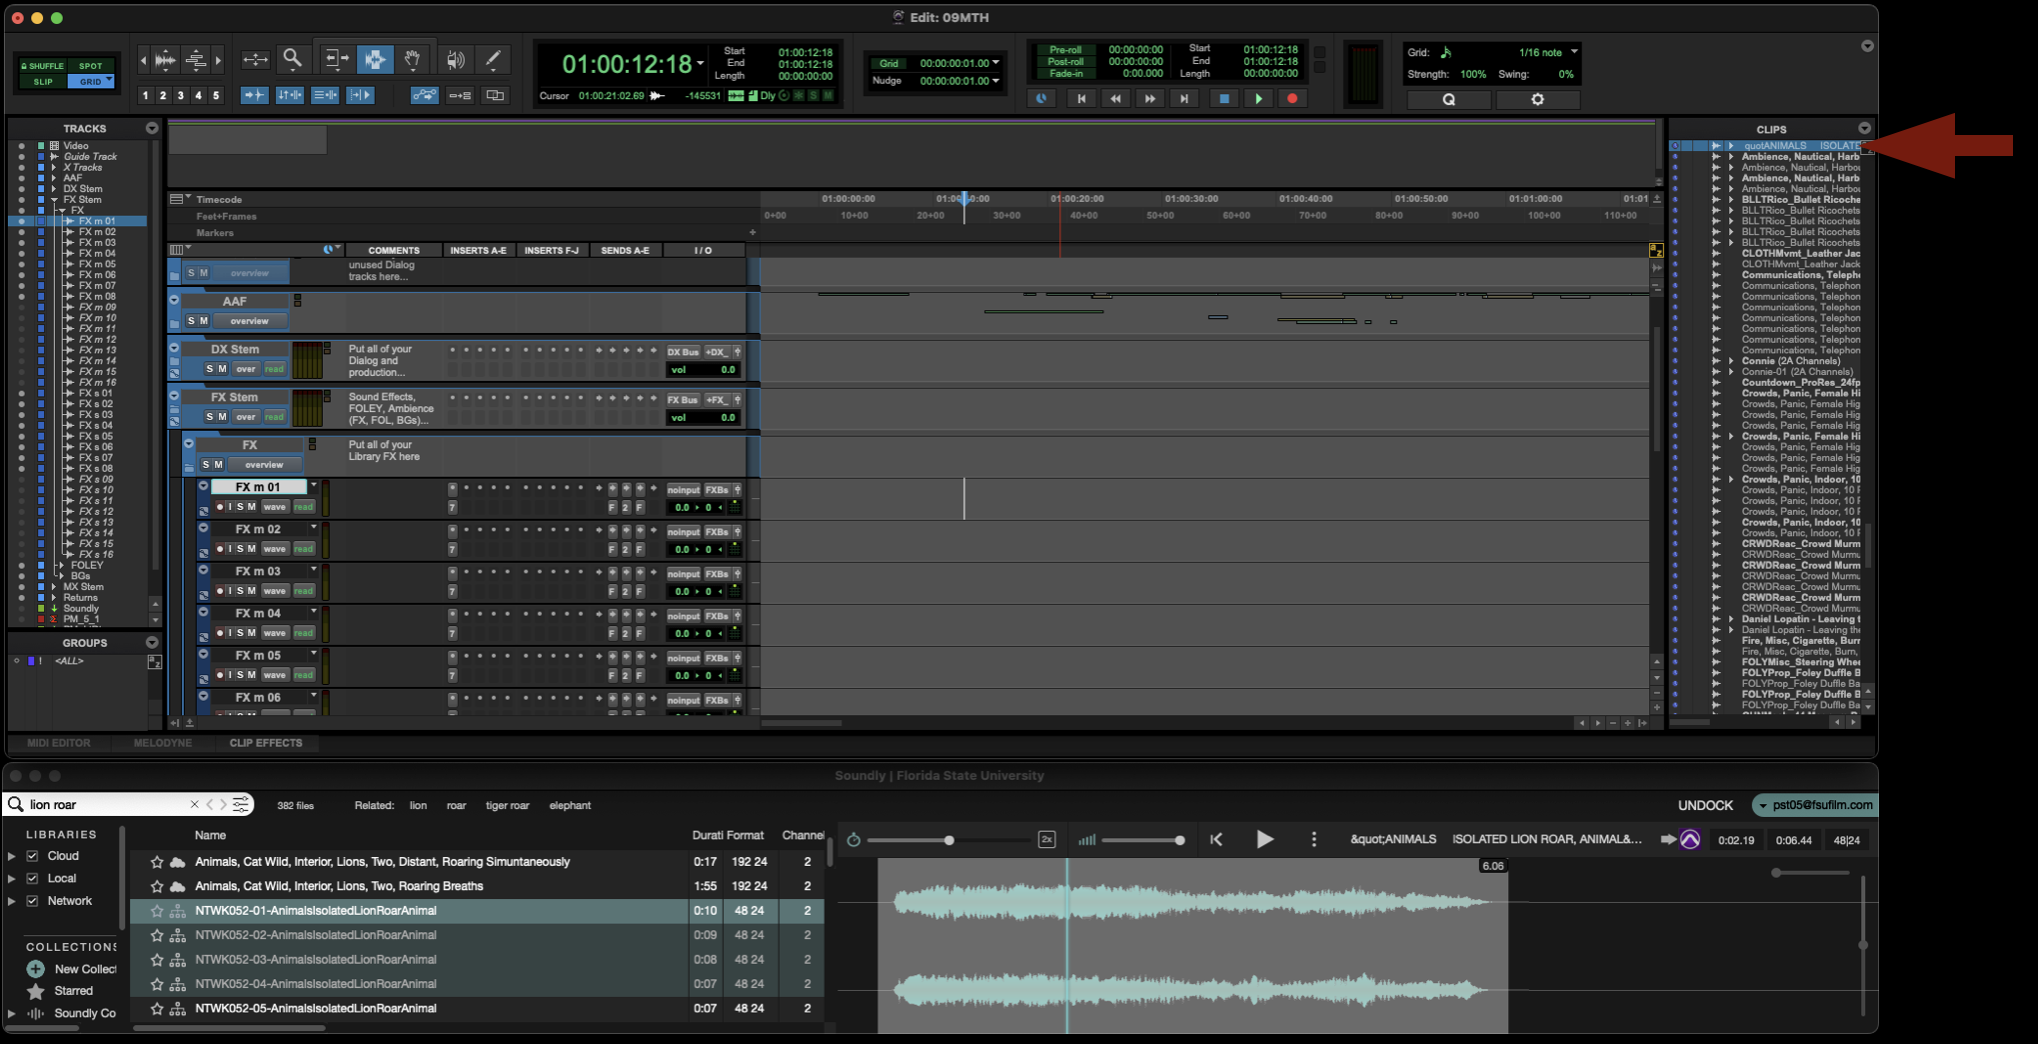
When using Soundly with ProTools, you have two options for bringing sounds into the project. You can either bring the sound into the Clips Bin or spot the sound directly onto a track.
To send a desired sound effect to the Clips Bin, select the sound in Soundly and then press “B” on the keyboard. It will be imported directly to the Clips Bin in ProTools.
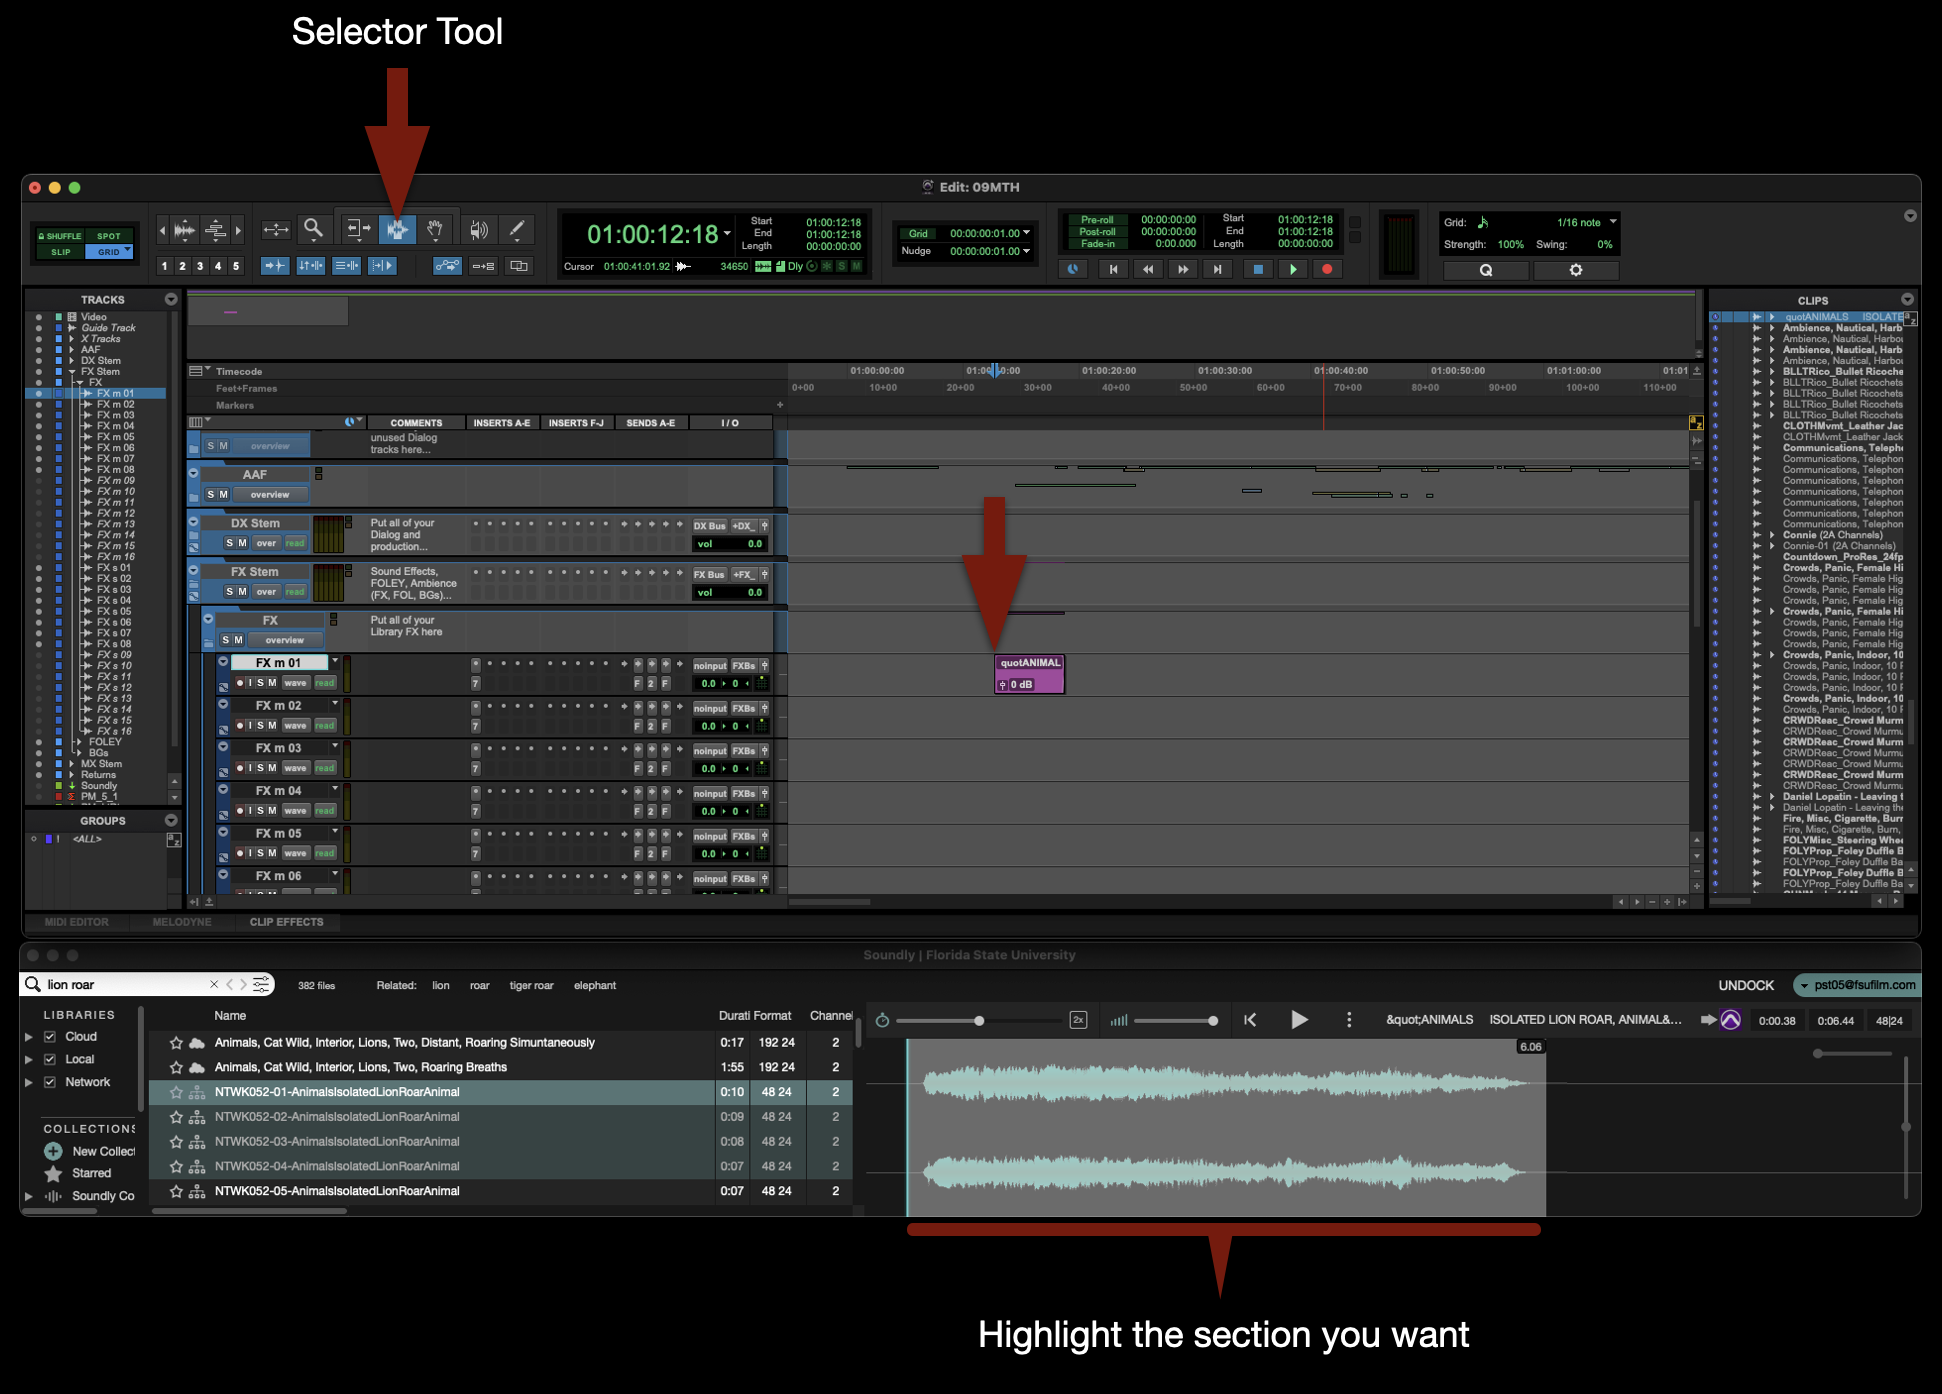
To spot a desired sound effect to a specific marked track, highlight the section of the sound effect you want, use the sector tool to mark a spot on an appropriate track, and then press “S” on the keyboard. It will be imported directly to the track that was marked.
Soundly Voice Designer
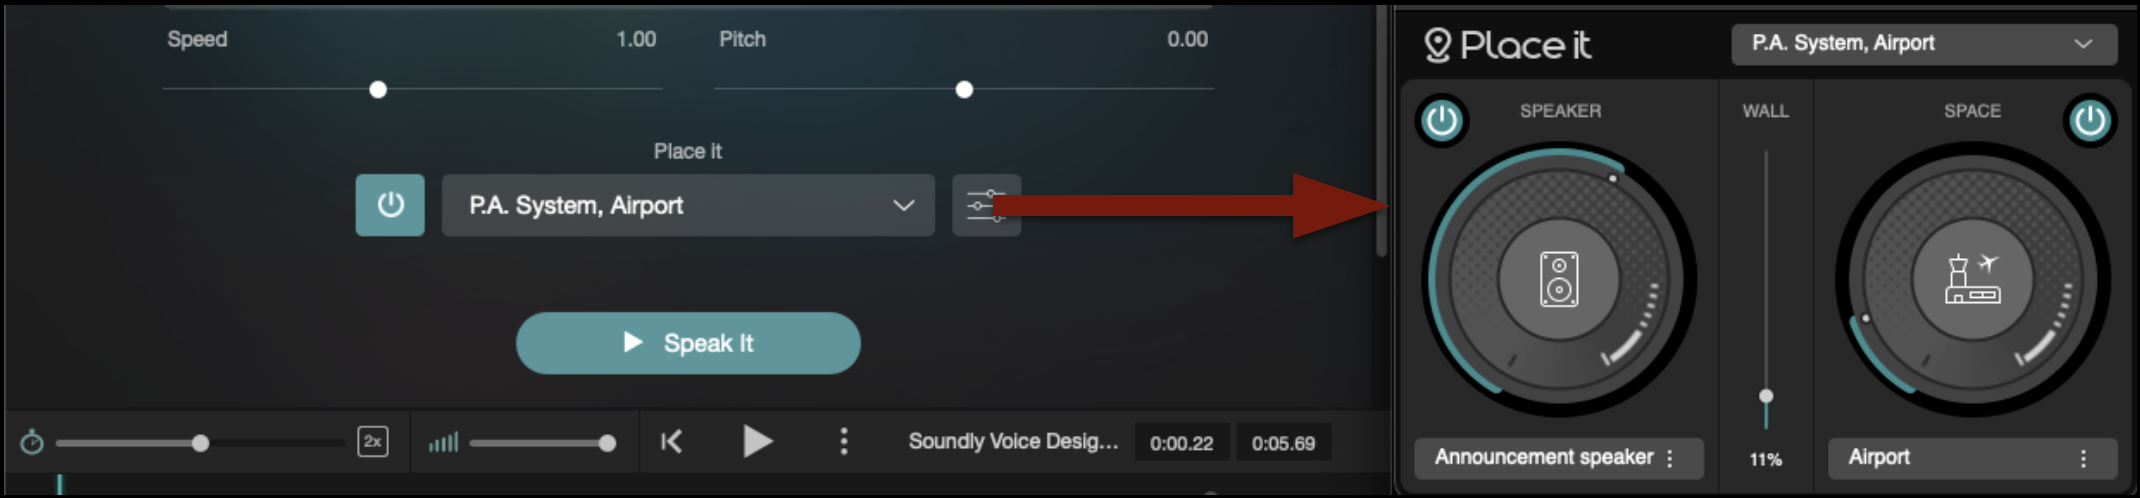
Soundly has a feature called Voice Designer, which uses AI to generate voices based on text input. Utilizing a plugin called “Place It”, it will make the generated voice sound as if it was in a particular place and/or coming out of a particular speaker.
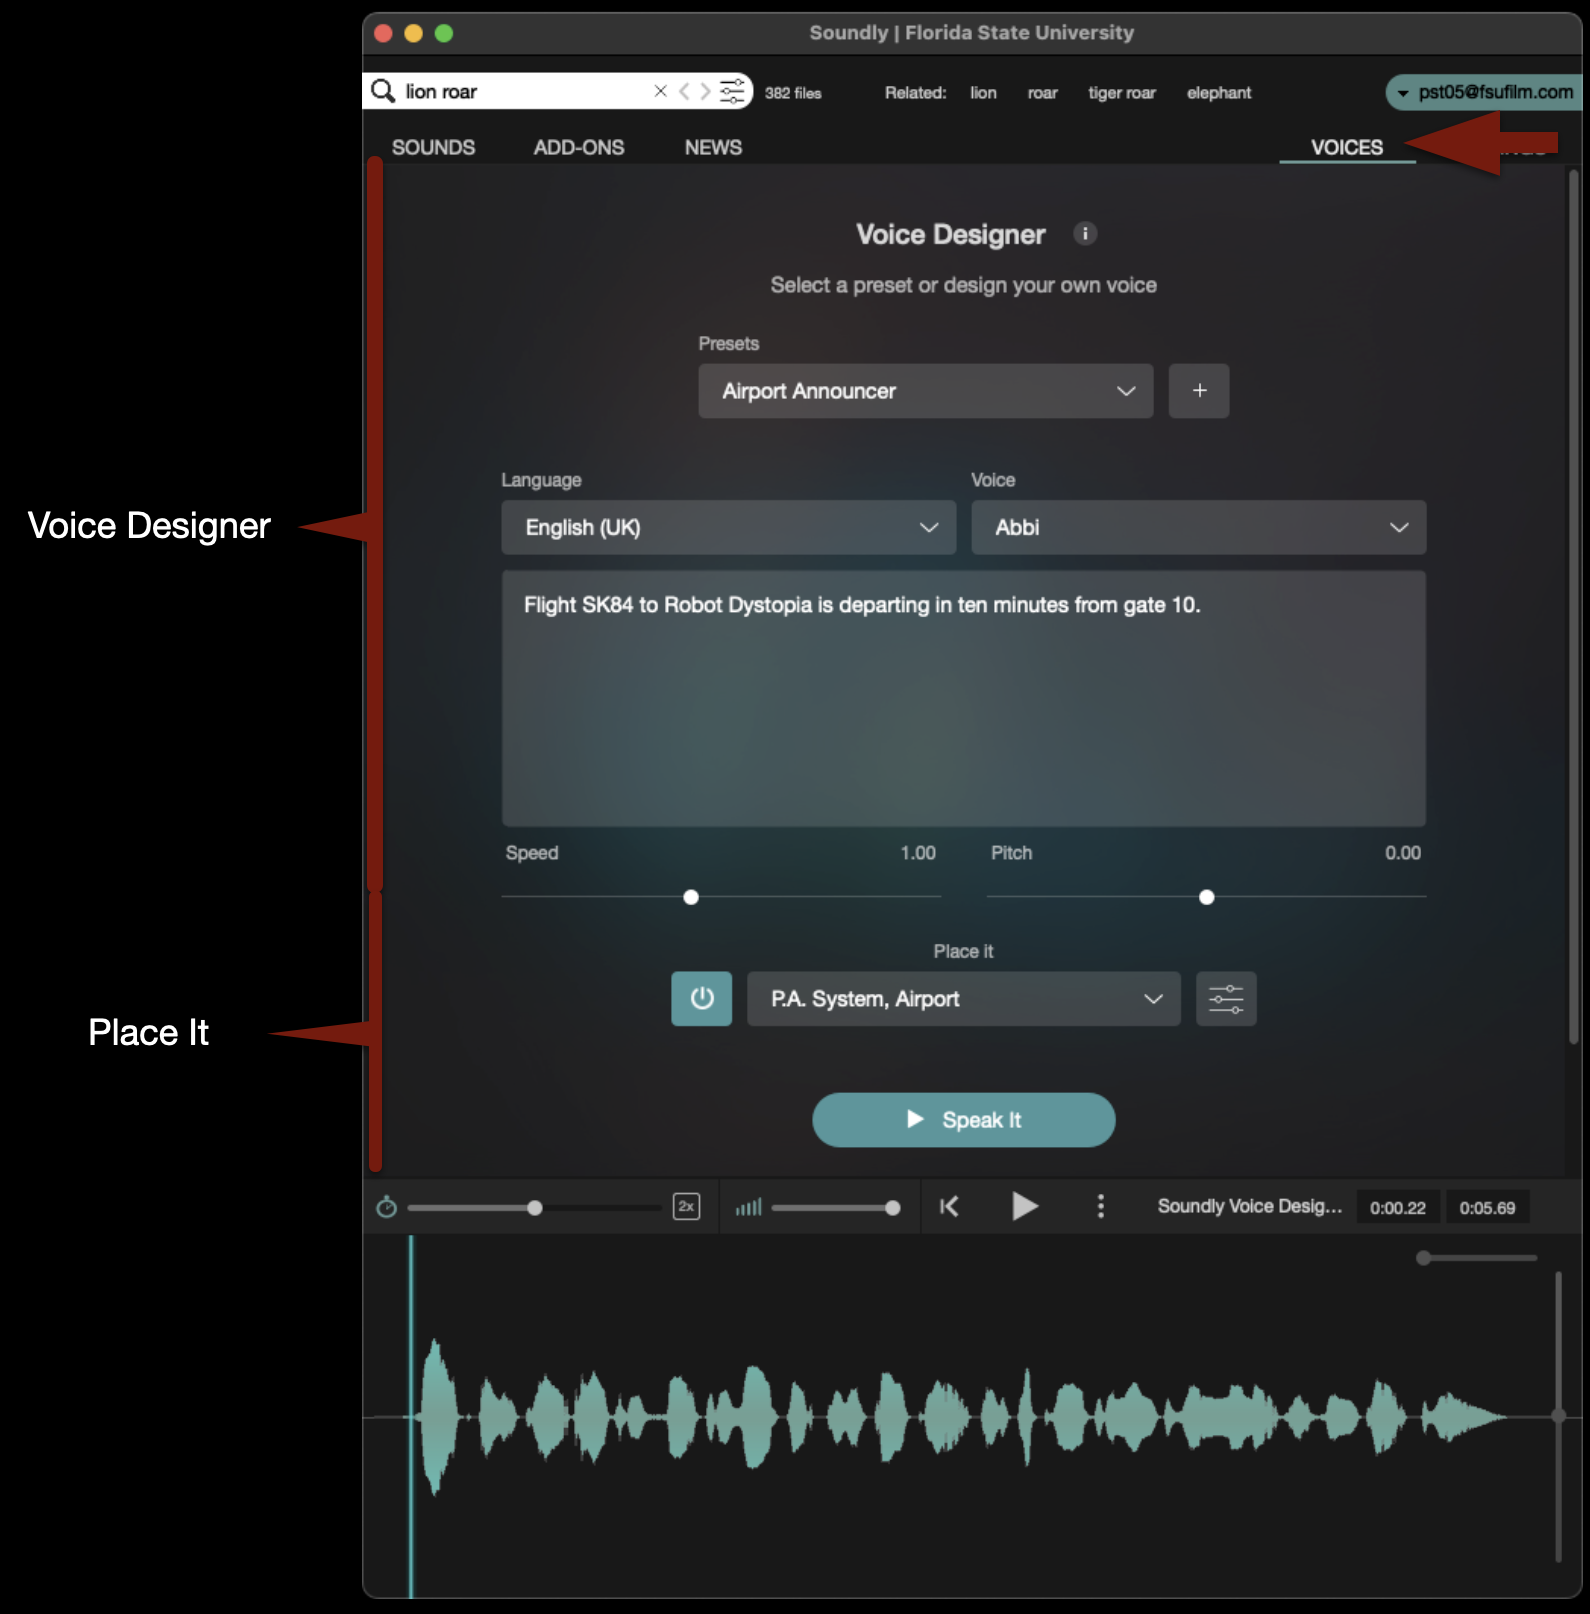
Switch to the Voices tab and you will see the interface appear like the example below.
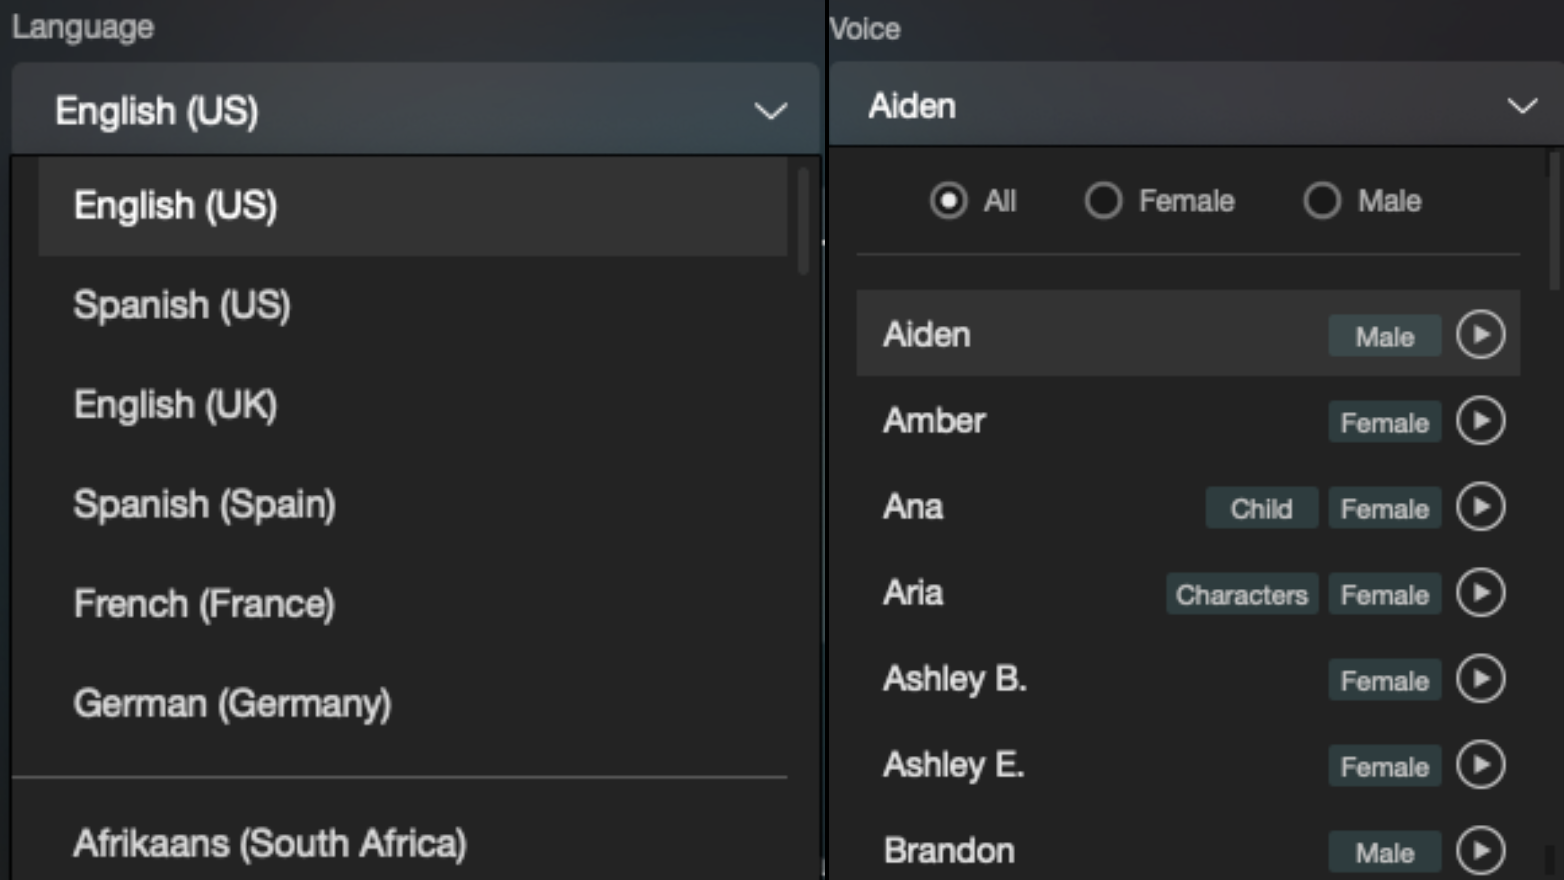
The top section will allow you to type in any dialogue that you need to generate. You will then have options to decide the language and the voice, and you can then generate the voice by clicking “Speak It”. You can also use one of the presets.
The bottom section will allow you to modify that voice. There are presets available or you can click the button shown below and you can choose you own “Speaker” and “Space”.
Importing the Voice Designer media into ProTools and Media Composer is exactly the same process as described above.