Author: andrew

  • M1 Delivery

    Overview

    Final delivery for M1 projects includes the submission of completed media, project files, documentation, and other required materials necessary for archiving, exhibition, festival submission, and long-term program recordkeeping. The items listed below are delivered to the Head of Production through the FSUFILM Greenlight system, which is used to track required materials and verify that projects have completed all delivery requirements in a consistent and organized manner.

    Careful delivery practices are an essential part of professional production and post-production workflows because incomplete or improperly prepared materials can create major problems for distribution, preservation, revisions, or future access to the project. The delivery process also reinforces the importance of organization, version control, and technical precision as productions move from active creation into exhibition and archival stages.

    Due Dates

    Part I – Production Delivery
    To be completed by the Producer by 6:00pm on the Friday following production.

    Part II – Post Production Delivery
    To be completed by the Producer by 6:00pm on the last day of post-production.

    Part I – Production Delivery

    Script [su_button url=”https://wkf.ms/4kwGCqJ” target=”blank” style=”flat” background=”#7da21f” color=”#000000″ size=”1″ radius=”20″ class=”deliver-button”]DELIVER[/su_button]

    • Final shooting script – PDF file
    • Final shooting script – Final Draft file

    Daily Production [su_button url=”https://wkf.ms/44CyJtY” target=”blank” style=”flat” background=”#7da21f” color=”#000000″ size=”1″ radius=”20″ class=”deliver-button”]Deliver[/su_button]

    Locations

    LOCATION INFO & RELEASES [su_button url=”https://wkf.ms/4jcQ2HG” target=”blank” style=”flat” background=”#7da21f” color=”#000000″ size=”1″ radius=”20″ class=”deliver-button”]DELIVER[/su_button]

    LOCATION LIST [su_button url=”https://wkf.ms/4kzgmwe” target=”blank” style=”flat” background=”#7da21f” color=”#000000″ size=”1″ radius=”20″ class=”deliver-button”]DELIVER[/su_button]

    • After all location information has been delivered for the show, navigate to the “My Shows” view of the Location board in FSUFILM Greenlight, select all the items for the show, and click Export. Then, deliver the exported Excel file of the Location List. (instructions)

    Cast

    CAST INFO & RELEASES [su_button url=”https://wkf.ms/3PcfovZ” target=”blank” style=”flat” background=”#7da21f” color=”#000000″ size=”1″ radius=”20″ class=”deliver-button”]DELIVER[/su_button]

    CAST LIST [su_button url=”https://wkf.ms/4dxd8XH” target=”blank” style=”flat” background=”#7da21f” color=”#000000″ size=”1″ radius=”20″ class=”deliver-button”]DELIVER[/su_button]

    • After all cast information has been delivered for the show, navigate to the “My Shows” view of the Cast board in FSUFILM Greenlight, select all the items for the show, and click Export. Then, deliver the exported Excel file of the Cast List. (instructions)

    Crew

    ASSIGNED CREW [su_button url=”https://wkf.ms/460ofqt” target=”blank” style=”flat” background=”#7da21f” color=”#000000″ size=”1″ radius=”20″ class=”deliver-button”]DELIVER[/su_button]

    ADDITIONAL CREW [su_button url=”https://wkf.ms/3HcMV4N” target=”blank” style=”flat” background=”#7da21f” color=”#000000″ size=”1″ radius=”20″ class=”deliver-button”]DELIVER[/su_button]

    Resources [su_button url=”https://wkf.ms/465Dcrv” target=”blank” style=”flat” background=”#7da21f” color=”#000000″ size=”1″ radius=”20″ class=”deliver-button”]DELIVER[/su_button]

    • Submit a separate form for each notable resource that was utilized by the production. This may include equipment rentals, unusual vehicles, unique props, distinctive costumes, or hired services offered by vendors such as animal wranglers, graphic designers, security firms, or portable toilet providers. Think of things that might help future students track down resources for their films.

    Additional Releases [su_button url=”https://wkf.ms/3GxpcfF” target=”blank” style=”flat” background=”#7da21f” color=”#000000″ size=”1″ radius=”20″ class=”deliver-button”]DELIVER[/su_button]

    Correspondence [su_button url=”https://wkf.ms/4kEWNCX” target=”blank” style=”flat” background=”#7da21f” color=”#000000″ size=”1″ radius=”20″ class=”deliver-button”]DELIVER[/su_button]

    • Include PDFs of all noteworthy correspondence about the production. This doesn’t need to include run-of-the-mill messages between cast and crew, but should include any documented messages with people like location owners, vendors, the Animal Care and Use Committee, and the police. Think of it as “cover your ass” correspondence—so that, when the other party forgets what they had agreed to, there’s a record of what was discussed.
    • At minimum, the delivery should include a letter of thanks to each location owner.

    Part II – Post-Production Delivery

    Show Details [su_button url=”https://wkf.ms/4l2DJyT” target=”blank” style=”flat” background=”#7da21f” color=”#000000″ size=”1″ radius=”20″ class=”deliver-button”]Deliver[/su_button]

    • Complete a form to deliver the following information about the show: total running time, tagline, logline, 25-word synopsis, 50-word synopsis, keywords, genre, content warnings, rating, aspect ratio, spoken languages, and subtitles.

    Dialogue List [su_button url=”https://wkf.ms/3G6TV2W” target=”blank” style=”flat” background=”#7da21f” color=”#000000″ size=”1″ radius=”20″ class=”deliver-button”]Deliver[/su_button]

    • Create a PDF using the Dialogue List form. Include all spoken dialogue and written text in the final film. This is to assist subtitling in foreign-language markets.

    Music Requirements

    MUSIC CUES & RELEASES [su_button url=”https://wkf.ms/4lun87a” target=”blank” style=”flat” background=”#7da21f” color=”#000000″ size=”1″ radius=”20″ class=”deliver-button”]Deliver[/su_button]

    • Enter a separate form for each piece of music used in the film, listing the timecode stamps and documenting the music rights.
    • If there are no music cues, use this form instead.

    MUSIC LIST [su_button url=”https://wkf.ms/40sziFd” target=”blank” style=”flat” background=”#7da21f” color=”#000000″ size=”1″ radius=”20″ class=”deliver-button”]Deliver[/su_button]

    • After all music cues and releases have been delivered for the show, navigate to the “My Shows” view of the Music board in FSUFILM Greenlight, select all the items for the show, and click Export. Then, deliver the exported Excel file of the Music List.
    • If there are no music cues, skip this step.

    Production Stills [su_button url=”https://wkf.ms/44iZtAK” target=”blank” style=”flat” background=”#7da21f” color=”#000000″ size=”1″ radius=”20″ class=”deliver-button”]Deliver[/su_button]

    • Five (5) production stills from the final cut of the film (not on-set photos).

    Credits & Title Cards [su_button url=”https://wkf.ms/4n9zIdz” target=”blank” style=”flat” background=”#7da21f” color=”#000000″ size=”1″ radius=”20″ class=”deliver-button”]Deliver[/su_button]

    • A list of all credits and title cards as they appear on screen. This should be a typed list—not screenshots of the credits from the film. Double-check for accuracy!

    Student ID Cards [su_button url=”https://wkf.ms/44hAzS0″ target=”blank” style=”flat” background=”#7da21f” color=”#000000″ size=”1″ radius=”20″ class=”deliver-button”]Deliver[/su_button]

    • A good, clear scanned copy of the Director’s student ID card
    • A good, clear scanned copy of the Producer’s student ID card
  • Casting Breakdowns

    Overview

    Casting breakdowns are documents used to describe the characters being cast for a production, including information such as age range, character description, production details, audition information, and scheduling expectations.

    Well-prepared breakdowns are important because they shape how productions communicate with actors and talent representatives during the casting process. Clear and professional casting materials help productions attract stronger submissions, communicate expectations accurately, and conduct more organized and effective casting searches.

    Components of the breakdown

    Creating a detailed and enticing casting notice is a great way to attract the best actors and to inform them up front about the requirements of the roles.

    The casting breakdown should begin with general information about the production:

    • Title and show number.
    • Brief description or logline that includes the genre.
    • Shooting dates and times.
    • The name of the director and producer.
    • Contact information. This should always include your FSU email address, but can additionally include social media or other handles.
    • The end date for the casting call.

    It should then continue with character breakdowns for all lead and supporting roles:

    • CHARACTER NAME (in all-caps)
    • Gender (if it matters)
    • Size of the role (Lead or Supporting)
    • Age range. It is how old someone looks on camera that counts, not how old they really are. Give a range. However, the younger the person needs to be, the smaller the range should be.
    • Ethnicity (if it matters)
    • Sexuality (if it matters)
    • Pertinent facts about the character: What are the given circumstances that shape this character? This can also include physical qualities that are necessary for the part but cannot be fudged on camera, like height for a basketball player. Remember, beards, tattoos, and hair color can all be grown in, glued on, or changed.
    • Distinguishing characteristics: What makes the character special or different. What drives them as a character? Never use the words ordinary or generic!

    If the role calls for stunts, intimacy, or any other special requirements:

    • If there will be any kind of nudity or sexual intimacy, it must be stated and described.
    • If the actor must work with pets, babies, children, potential allergens, or adverse conditions, they must be described.
    • If the actor must perform any physical feat that is “out of the norm,” it must be described.

    At the end of the casting breakdown, list any smaller roles and extras. You do not need a full breakdown for bit parts or extras, and in most instances a simple list will suffice. Only include additional breakdown information when appropriate.

    Sample Casting Breakdown

    THE WIZARD OF OZ (18F1)

    Victor Fleming, dir. and Mervyn LeRoy, prod.

    Shoots Friday November 18th from 8AM to 9PM.

    The Wizard of Oz is a musical based on the book by L. Frank Baum that follows the journey of a Kansas farm girl as she and her dog Toto are swept up by a tornado to the magical Land of Oz. There she makes unlikely friends to battle the Wicked Witch of the West, expose the great Wizard, and find her way back to Kansas. There’s no place like home.

    Roles available:

    • DOROTHY GALE: Female lead, early teens. Dorothy is a well-scrubbed, polite farm girl from Kansas with an active imagination. She must balance a sweetness of temperament with a sense of justice strong enough to propel her into potentially dangerous situations. Must be comfortable working with small dogs.
    • PROFESSOR MARVEL: Male supporting, 50-70. Professor Marvel is a traveling carnival magician with a dubious past. He tries hard to mask his insecurities with bravado in the hopes he will not be discovered. He is nevertheless a kind-hearted, teddy bear of a man and means no real harm.

    Smaller roles and extras:

    • MAYOR OF MUNCHKINLAND
    • MUNCHKINS
    • FLYING MONKEYS

    Distributing Casting Notices

    You are encouraged to share your casting notices with your actor friends and on social media.

    You may also submit casting notices using this form and they will be posted on the school’s casting notices site.

  • F1 Casting Timeline

    Overview

    This casting timeline outlines the schedule and major milestones associated with the casting process for F1 productions, including preparation, distribution of casting notices, auditions, callbacks, selections, and related deadlines.

    Casting requires coordination between performers, directors, producers, and scheduling logistics that unfold across multiple stages. Establishing a structured timeline helps productions stay organized, make decisions efficiently, and ensure that casting remains aligned with the broader pre-production schedule.

    No later than 4 weeks out

    Search the database and view audition videos (week 8).

    Search through Close-Up—the actor database in FSUFILM Greenlight—using filters to narrow down your search criteria.

    What should you be looking for in an audition or video?

    • The life behind the eyes.
    • That they understand the scene and relationship
    • That they make strong choices.
    • That they have personality and distinctiveness
    • That they make connections with the other actor (reader) and look at them.
    • That they did their homework and are prepared.
    • That they seem like a person you would want to go camping with.

    No later than 3 weeks out

    Hold first round of auditions (week 9).

    Actors should be contacted by email (see sample email) and sent a copy of the script along with the role you would like them to read for. Five-to-seven actors per role. You should then follow-up with a phone call to make a personal connection and make sure there is no confusion about your expectations. Let them know what pages of the script you would like them to prepare for the audition. Sometimes this step can be skipped completely depending on the quality of the videos.

    No later than 2 weeks out

    Callbacks and final casting decisions (week 10).

    No more than three actors per role unless you are still not happy after viewing those three. See above for email and phone protocols. Match them up. Look for chemistry. Make a decision quickly and get commitments from your actors. Find out their schedules so you can plan rehearsal time. Auditions must be at the Film School with a minimum of two people present.

    After you have commitments from your actors, you may send out regret emails to those who auditioned that you will not use. (See sample regret email in the course library on Blackboard).

    1 week out

    Rehearsals (week 11).

    Plan on two hours with your main characters. These rehearsals should involve a table read, an improvisation to build relationships, and some organic blocking. Do not ask for film-worthy performances!

  • Sample Audition Email to Actors

    Overview

    This page provides a sample email template productions may use when communicating with actors regarding audition invitations, scheduling, and related casting information.

    Professional communication with actors is important because casting often forms a performer’s first impression of a production and its organization. Clear, respectful, and well-structured communication helps productions present themselves professionally while reducing confusion during the audition process.

    Sample Messaging

    Below is a sample email to send to potential actors during the casting process. Be sure to also attach a character breakdown and a copy of the script (or sides). Also be sure to copy the show’s Producer, so that they have the email for their records.

    Dear (actor’s name),

    My name is (your name) and I am a film student at the FSU College of Motion Picture Arts. I am casting a short film entitled (film’s title) that shoots on (shooting date). It is the story of (describe the film).

    I saw your audition on our casting website and I would love it if you would consider auditioning for the role of (character name). I have attached a casting breakdown and a working copy of the script, along with the pages I would like you to prepare for the audition.

    I am hoping to hold auditions on (audition date). If you are unavailable at this time, we can schedule another time that works for you. Please call me at (your cell phone number), or reply to this email if you are interested in auditioning for the role.

    Thanks so much for your interest in working with the film school.

    Regards,

    Your full name
    Your crew position
    Your email

    Your cell phone number

  • Sample Regrets Email to Actors

    Overview

    This page provides a sample email template productions may use when informing actors that they were not selected for a role following auditions or callbacks.

    Professional follow-up communication is important because casting processes involve significant time and effort from performers. Thoughtful and respectful correspondence helps productions maintain professionalism, build stronger relationships within the acting community, and reinforce industry-standard communication practices.

    Sample Messaging

    Below is a sample email to send to actors who you auditioned but did not cast in the film. Do not send regret emails until you are sure that the actor you have cast is 100% locked for the role. Make sure you also copy the Producer of the show, so that they have the email for their records.

    Dear (actor’s name),

    Thank you so much for coming to audition for the FSU film, (title of film). We appreciate the time and effort given for this project. Unfortunately, we will not be able to use you at this time, but we hope to see you again soon as we enjoyed meeting you and seeing your work.

    Sincerely,

    Your full name
    Your crew position
    Your email
    Your cell phone number

  • Auditions

    Overview

    Auditions are the formal process through which productions evaluate actors for potential casting within a project. This process may include initial auditions, callbacks, readings, chemistry tests, or other performance evaluations used to assess suitability for specific roles.

    Careful casting is important because performances play a central role in the success of a film and significantly affect the collaborative dynamic of the production process. Well-organized auditions help productions make stronger creative decisions while allowing directors and producers to evaluate not only performance quality, but also professionalism, communication, preparation, and collaborative potential.

    Contacting actors

    To set up an audition, actors should be contacted by email (see sample email) and sent a copy of the script along with the role you would like them to read for. Five-to-seven actors per role. You should then follow-up with a phone call to make a personal connection and make sure there is no confusion about your expectations. Let them know what pages of the script you would like them to prepare for the audition.

    Selecting sides for auditions

    1. Sides should ideally have two characters, but no more than three.
    2. The best sides give the actor a chance to act and react. Therefore, exposition is not a good choice.
    3. Do not choose scenes that are primarily action. If you must see an actor move, give them an improv that is directed (called out).
    4. Sides should be no more than two minutes, preferably closer to one minute.
    5. Sides may be from a script that is not your own if it contains similar characters and situations.
    6. Sides may be specifically written for audition purposes to satisfy the recommendations above. For example, if your character does not speak, you could write an interview of that character for sides. This is a good way to verbalize how a character is feeling. Or, think about if you were making your film into a longer form piece. What scenes do you wish you could write? Write them for sides!
  • Rehearsals

    Overview

    Rehearsals provide actors, directors, and key collaborators with dedicated time to explore performances, blocking, character relationships, scene structure, and production planning before filming begins.

    Rehearsal time is valuable because it allows productions to identify creative and logistical challenges before arriving on set under tighter time constraints. Strong rehearsal practices can improve performances, strengthen communication between actors and directors, and help productions work more efficiently during principal photography.

    Preparation

    Prepare to work with your actors by clarifying your choices and jotting down possible objectives and strategies (active verbs) in your script. Actors want to respect their director. After all, they must put a lot of faith and trust in them. The director is the eyes and ears of the actor. This is true much more in film than it is in theater. The easiest way to lose their respect is to be unprepared and not know what the film is about or what you want from the actors. So do your homework!

    Step 1: Table Read

    • This is the time to share your directorial vision (and those of your creatives) and the only time you should speak intellectually about the script.
    • Make sure the actors know what your vision is and how the other creative elements will be handled as well as how you see them fitting in to the overall theme (spine).
    • Discuss backstory, motivations, objectives, obstacles, etc. with the actors and listen carefully and respectfully to their input. It is their job to contribute creatively. Ask the actors to work on preparing their roles based on this information.

    Step 2: Second Rehearsal

    • This is the time for experimentation. Try different approaches with your actors and ask them to take risks. This is a time to try improvisation and trust exercises to build up the relationship between and with your actors. Keep an open mind. You may be surprised.
    • Don’t ask for film worthy performances. This will make your actors stale when they get to set and not allow them to make discoveries.
    • This is the time for emotional exploration and connections (relationships). It is also a time to get to know your actors and their process so that you can determine what directions and approach will work best for them. You can also identify any quirks they have that will need to be addressed on set.

    Step 3: On-set Rehearsals

    • Forget it all and make sure your actors are listening and making connections.
    • During the shoot it is very important to make sure your actors feel safe and supported. They must feel that you are in control and since they put their trust in you, they rely on you to be their eyes and ears.
    • Actors need feedback! And they don’t want you to accept less than quality work. It is their face up on the screen and they want you to help them be great. You should speak with them before every take to remind them of their scene objectives and what happened the moment before. This is especially important when you shoot out of sequence. You should also give them feedback after every take even if just to say, we messed up sound so we need to do it again. Otherwise, they will think they did something wrong and spend the whole next take worrying about it. Also, let them know what the next shot is so they can relax.
    • The most important thing for the actor on set is for them to really listen to their partner and respond in the moment. Your job is to make sure they do that, and that they do it within the technical considerations of the shot.
  • Toolkit For Directing Actors

    Overview

    This resource provides approaches, techniques, terminology, and communication strategies that directors may use when working with actors during rehearsals and production.

    Directing actors requires more than simply communicating blocking or line readings; it depends heavily on trust, collaboration, emotional clarity, and effective creative communication. Developing stronger actor-director communication skills helps productions create more nuanced performances while supporting healthier and more productive collaborative environments on set.

    Action Verbs

    An action verb is transitive and requires an object. It is something you do to someone or something else; “to be” is never an action verb. This list is a starting off point for you to develop your own list of action verbs.

    to accuse
    to admire
    to admonish
    to adore
    to amuse
    to annoy
    to apologize
    to appease
    to applaud
    to attack
    to avoid
    to bask
    to beg
    to belittle
    to bestow
    to boast
    to brag
    to brood
    to brush off
    to buddy up
    to butter up
    to cajole
    to caress
    to celebrate
    to challenge
    to charm
    to check out
    to coax
    to comfort
    to command
    to confess
    to confide
    to confront
    to congratulate
    to convince
    to cuddle
    to defend
    to deify
    to demand
    to destroy
    to dis
    to discard
    to discover
    to dismiss
    to distract
    to elicit
    to embrace
    to entertain
    to entice
    to erupt
    to escape
    to examine
    to explode
    to exult
    to flatter
    to flaunt
    to flee
    to flirt
    to gloat
    to grieve
    to hide
    to idolize
    to ignore
    to impress
    to incite
    to inspect
    to instruct
    to invade
    to invite
    to lead
    to lure
    to manipulate
    to mimic
    to mock
    to mother
    to mourn
    to ogle
    to overpower
    to patronize
    to perform
    to persuade
    to pester
    to plead
    to ponder
    to pounce
    to preen
    to prepare
    to primp
    to probe
    to protect
    to provoke
    to put down
    to question
    to reach out
    to reason with
    to reject
    to rescue
    to retreat
    to ridicule
    to savor
    to scold
    to scrutinize
    to search
    to seduce
    to seethe
    to shock
    to show off
    to sneak
    to soothe
    to stalk
    to startle
    to strut
    to surrender
    to tantalize
    to taunt
    to teach
    to tease
    to tempt
    to test
    to threaten
    to toss off
    to triumph
    to ward off
    to warn
    to welcome
    to withdraw
    to worship
    to yearn

    Refer to Marina Calderone’s Actions: The Actor’s Thesaurus (book/app) for more examples.

    Other Directing Strategies

    Acceptable directions for actors that are not clarifying a beat objective through the use of an active verb include:

    1. Do this scene AS IF you are __________ (e.g., in a funeral procession, on the floor of the stock market, at a prayer meeting, in a bread line, in front of a firing squad, etc.) Events are dynamic and spur the imagination, and actors’ imaginations are the best tools they have. Ask an actor to use “the magic if” and to find an event or relationship from their own lives they can connect to the character or situation imaginatively and emotionally. It is not necessary that you know it or that they share it with you.
    2. Asking the WHO, WHAT, WHERE, WHY, HOW, and WHEN questions. These questions clarify the circumstances, the super-, scene- and beat-objectives, the motivations, and the strategies of the character in an easy-to-understand format.
    3. Directing the actor to “Keep it simple,” “Think it, don’t show it,” or “Listen to them. Really listen.”
    4. Use FACTS. Facts are objective and help to clarify circumstances.
    5. Use SENSORY IMAGES (sight, sound, feel, taste, smell). Images allow the actor to use recall to make a situation real to them.
    6. Use PHYSICAL TASKS. Physical tasks are kinetic (energy in motion) and allow the actor to create a multi-layered approach as well as provide focus.
    7. THE MOMENT BEFORE. What just happened before this scene takes place? How does that impact what is about to take place?

    Avoid

    1. Avoid asking for moods or results from an actor. Instead, clarify objectives and give active verbs to work with.
    2. Avoid asking an actor to “bring it up.” Instead examine whether the stakes are high enough to motivate the behavior, and if not, raise them or use the “as if” scenario.
    3. Avoid asking an actor to “bring it down.” Instead ask them to listen to their partner and not anticipate what is coming next or to keep it simple and respond truthfully.
    4. Avoid giving line readings to an actor. Remember, the line is unimportant. The motivation for the line is important. Make sure the actor is clear on what the motivation and objective is for the line and ask them to only think of that.
    5. Avoid telling an actor how their character should be feeling or give character judgments. Remember, all characters’ actions are justified to them, even and especially, “villains”!
    6. Avoid using adjectives or adverbs when giving directions. Always use VERBS!
  • F1/Doc Editorial Process

    Overview

    This page outlines the editorial workflow and post-production process used for F1 documentary projects, including organization, review stages, revisions, faculty feedback, and major editorial milestones.

    Documentary editorial often evolves through discovery and restructuring over time rather than following a fully predetermined script. A structured editorial process helps productions manage large amounts of footage more effectively while supporting clearer collaboration, feedback, and storytelling development throughout post-production.

    How It Works

    This post provides a step-by-step guide covering how to:

    Note: On F1 projects, there will be no VFX work allowed outside Media Composer. Only your credits may be generated in After Effects and imported in as a DPX sequence.

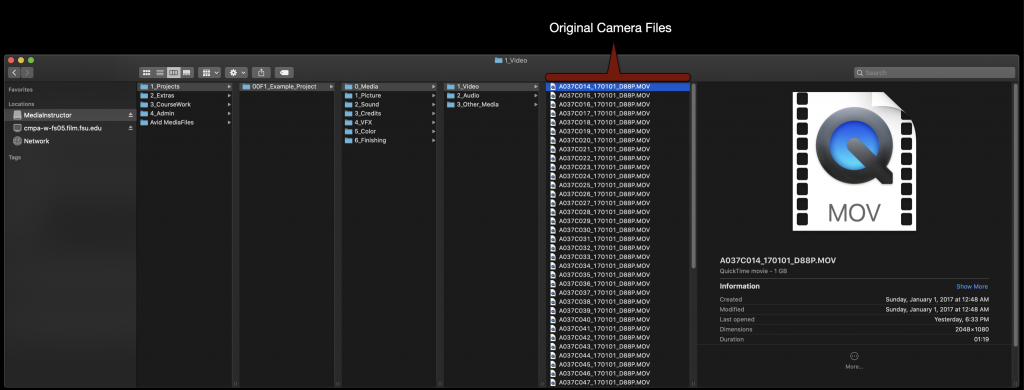
    On the first day check the location of your OCF on the local drive of your assigned machine.

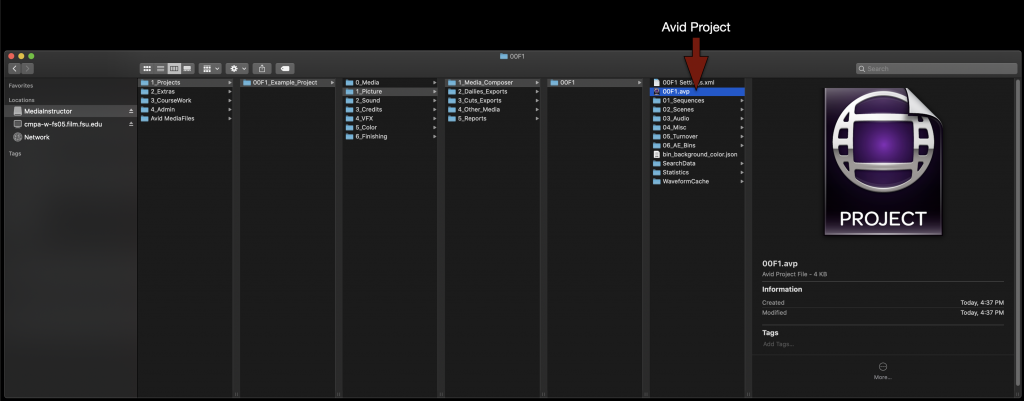
    Next open your Media Composer project. It can be found at in the folder tree as shown in the example.

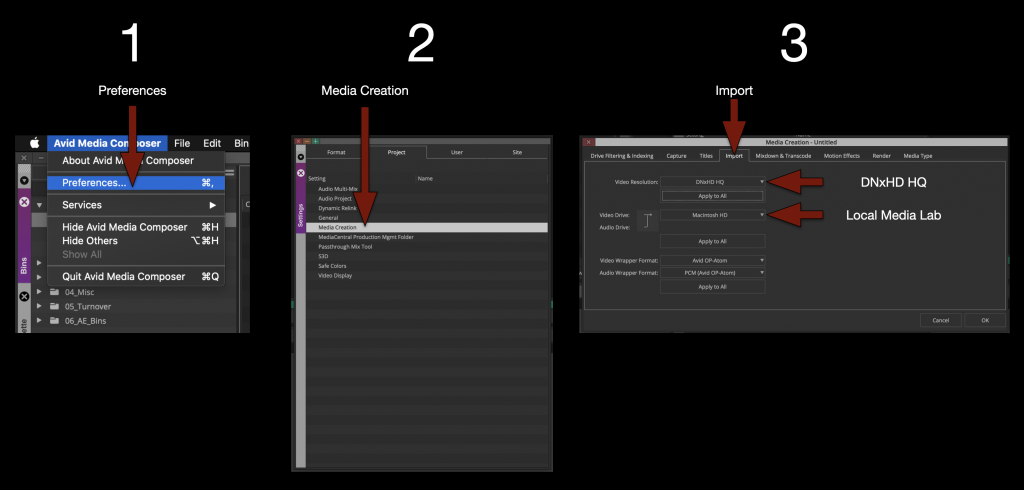
    Once your project is open its a good idea to go ahead and set the “Media Creation” settings to the correct resolution and drive.

    IMPORTANT! Remember to set your video resolution to “DNxHD HQ”.

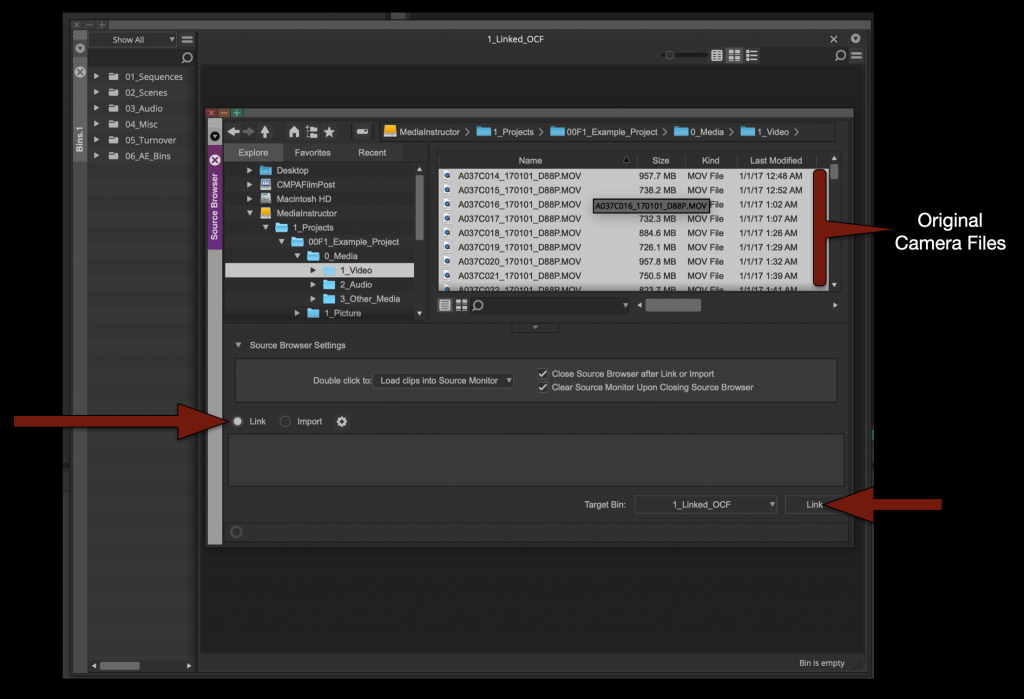
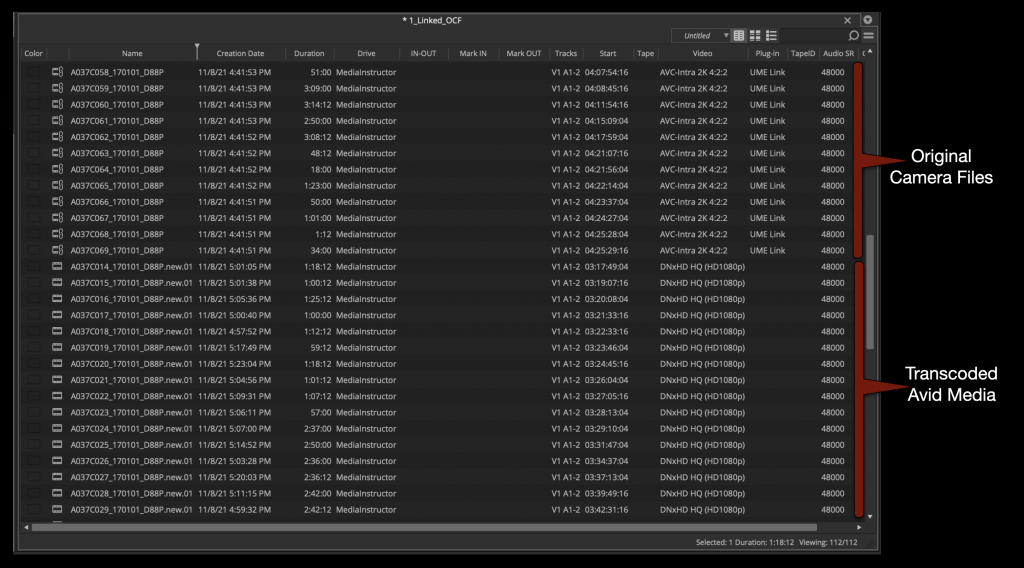
    Now open the “Linked OCF” bin and open the “Source Browser”. Select all of the original camera files and link them into the bin.

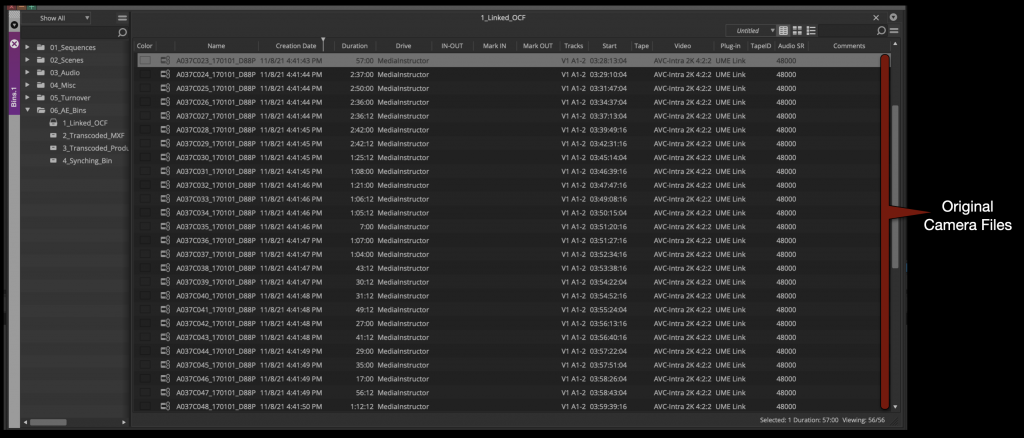
    When everything is linked it it will look like the example below.

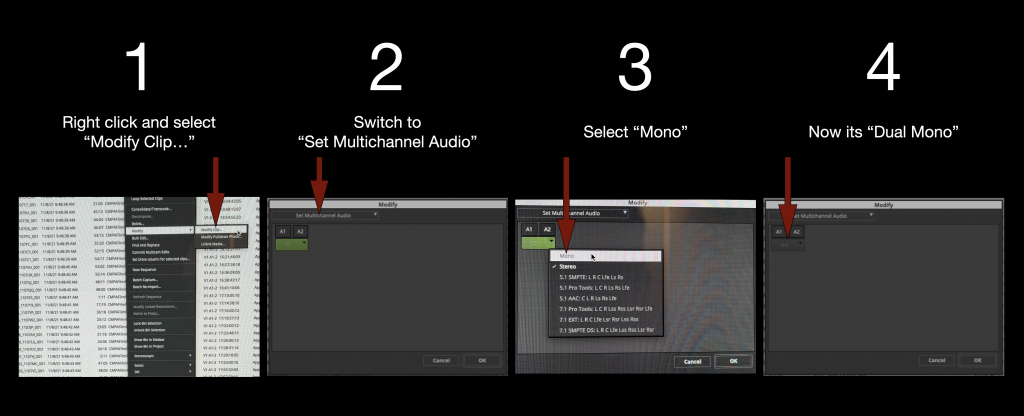
    Select all the linked OCF in the bin and switch the audio from “Stereo” to “Dual Mono”.

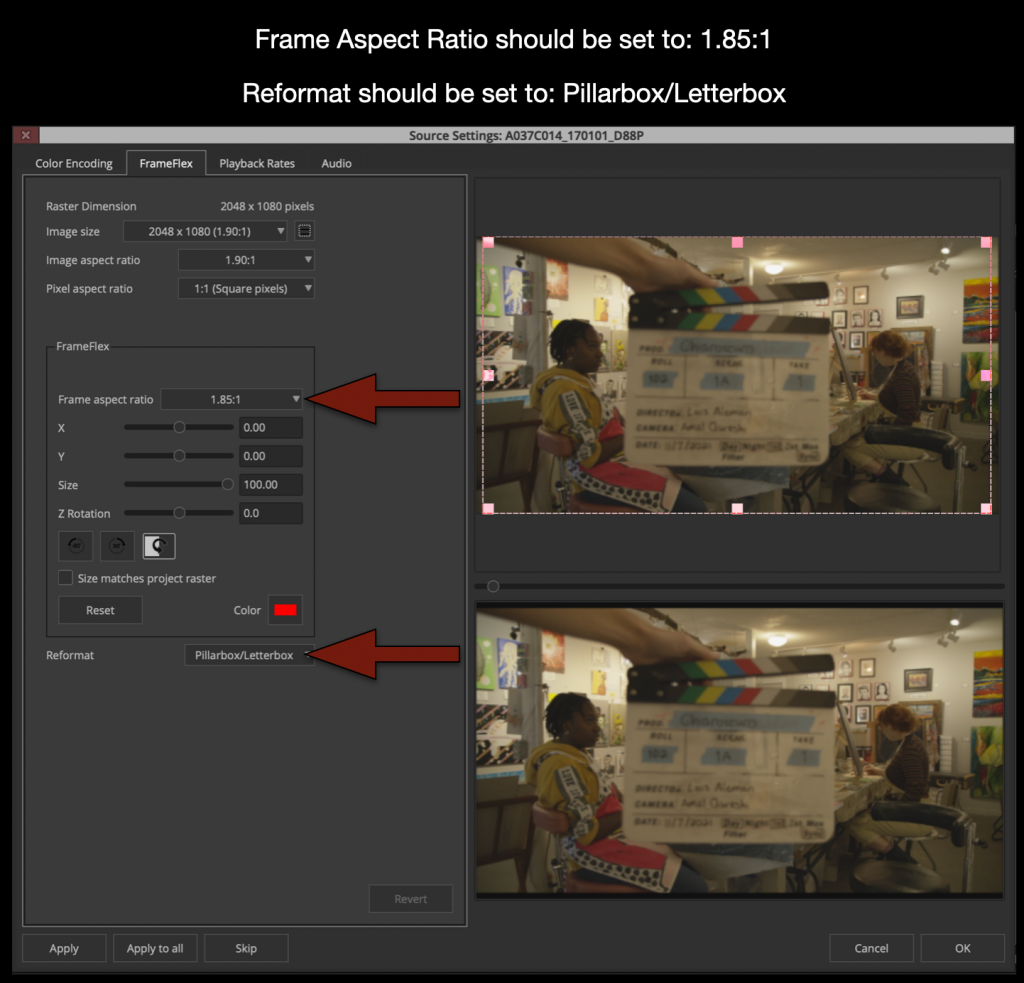
    Select all the linked OCF in the bin again and right click and select “Source Settings”. This will open the “Source Settings” window. You will use the FrameFlex tab to set the proper aspect ratio.

    Only change the settings for Frame Aspect Ratio and Reformat. Changing anything else or not following these instructions can lead your transcoded footage being stretched or distorted.

    Changing these two parameters will ensure that when new Avid Media is created that is 1920×1080 it will have the correct aspect ratio burned in. 

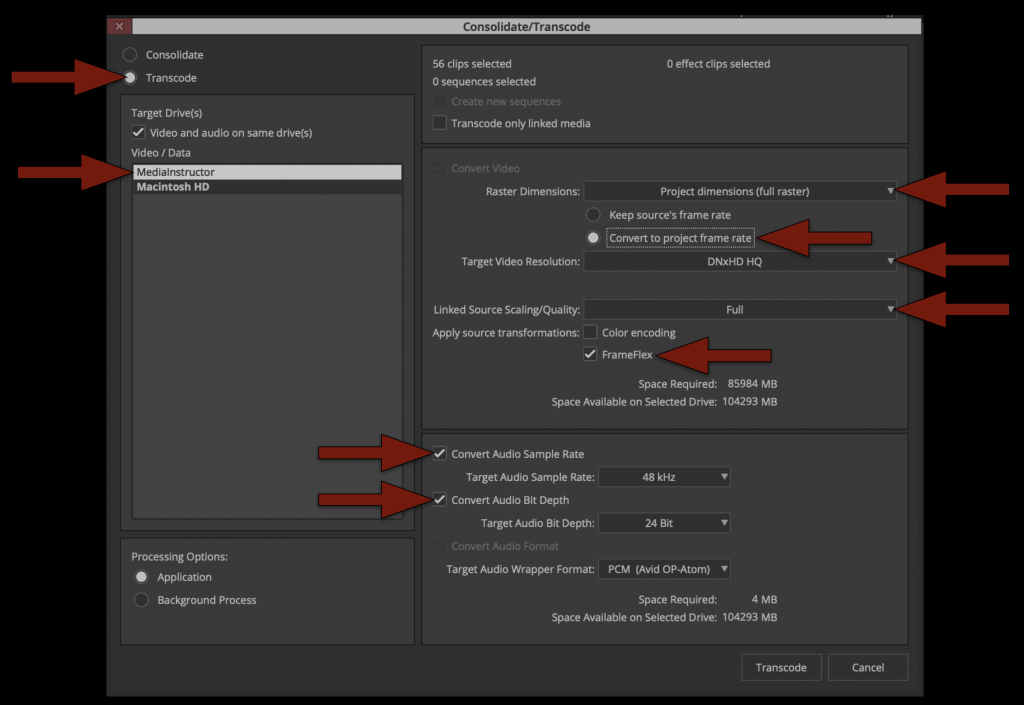
    Now that all of your linked media has the proper framing and is set to dual mono its time to transcode to Avid Media. Highlight all of the linked files in the bin by hitting “Command + A”. Then right click on a clip and select “Consolidate/Transcode”.

    Study the options with the red arrows shown below. THIS IS VERY IMPORTANT as it determines the kind of media that will be transcoded and used for editing in Media Composer and coloring in Resolve. 

    The radial button in the top left should be set to “Transcode” Then double check all of the red arrows on the right.

    – Target Drive should be local media drive
    – Target Video Resolution should be DNxHD HQ

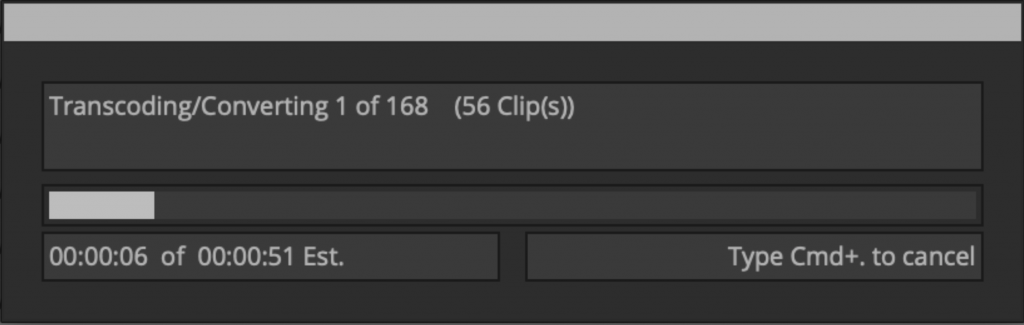
    Once everything is set properly you can click “Transcode”. This process will take a few minutes as it generates new Avid Media so take a break and relax. 

    Organize Footage into Avid Bins

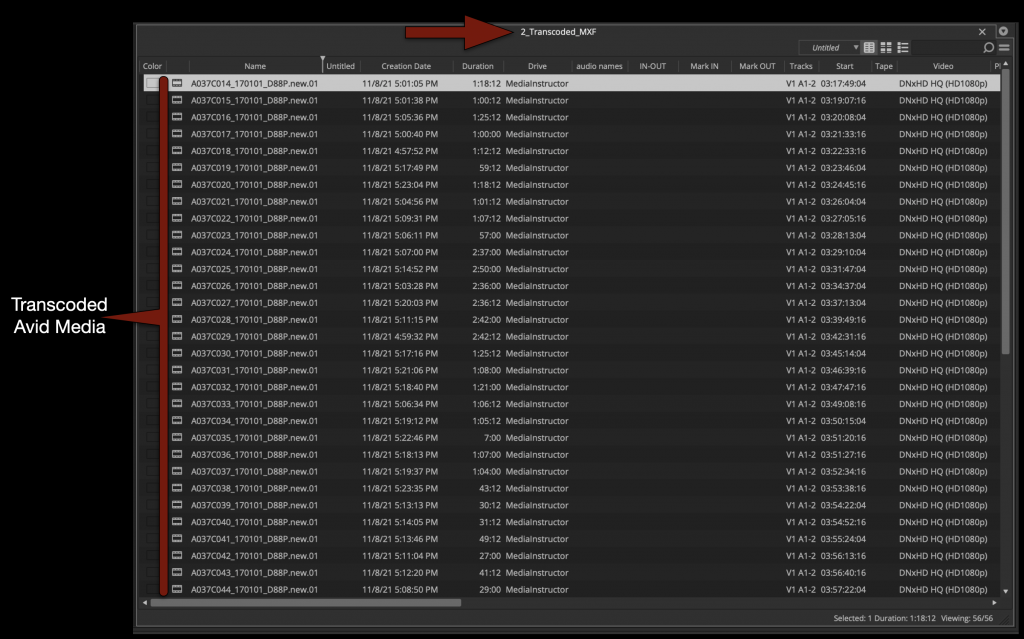
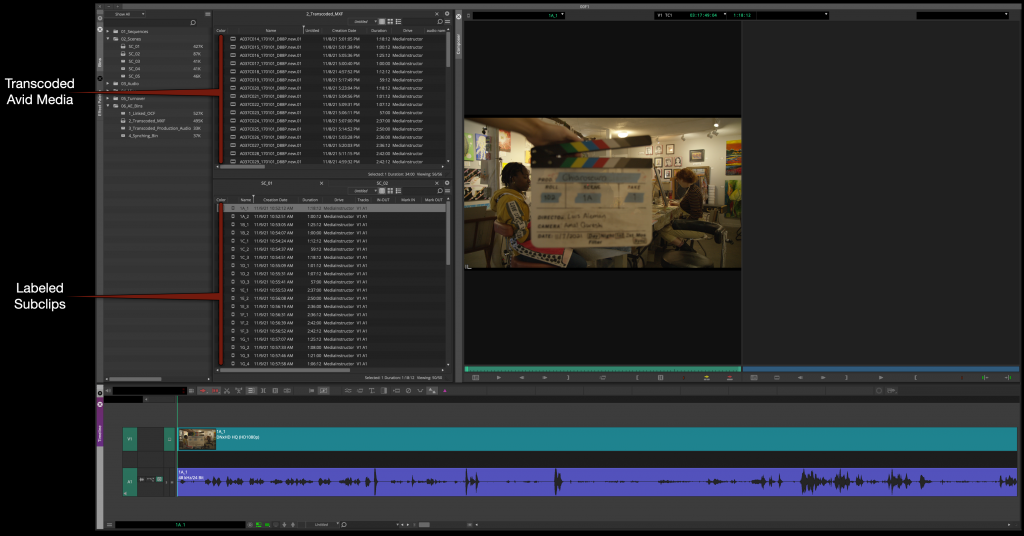
    When the transcode is finished you will notice that now you have two versions of everything in your bin. One is the linked OCF and the other is Transcoded MXF Avid Media.

    Move the newly transcoded Master Clips to the “Transcoded MXF Bin”. Close the “Linked Bin” you will no longer need it.

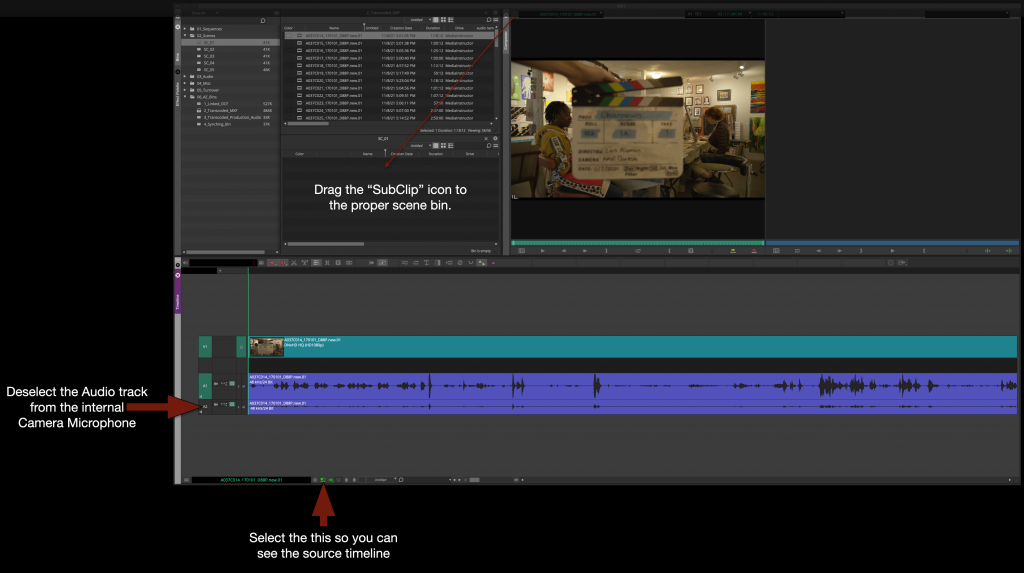
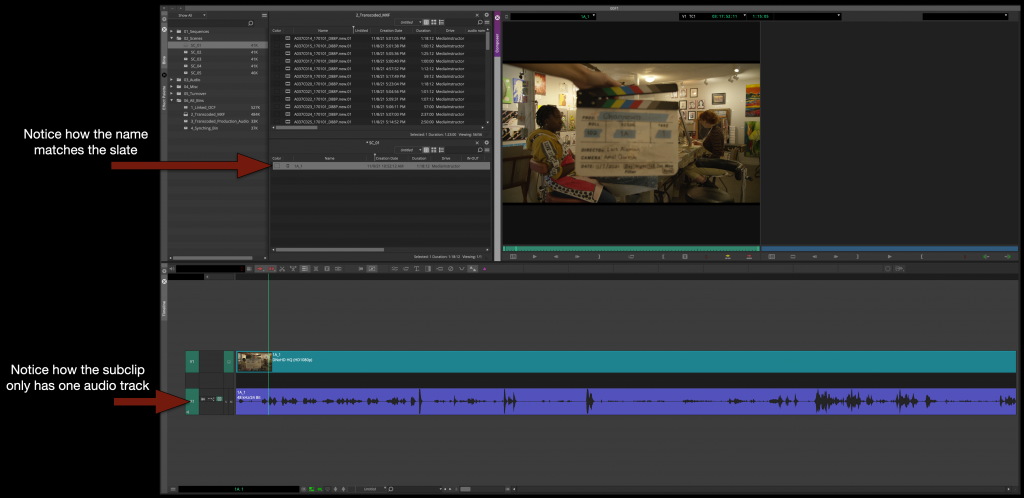
    Next, make subclips of all of the Master Clips in the proper “Scene Bins”. This will accomplish three things.

    1- It will organize your clips by scene
    2- It will let you rename the subclips to match what is on the slate
    3- It will let you “remove” the audio from the internal camera microphone

    After you make a subclip in the proper scene bin with only the audio from the boom microphone you will be able to rename it based on the slate.

    Repeat this for every Master Clip until all of your media is subcliped, labeled, and organized into the proper “Scene Bin”.

    This would be the stage that if you have any “Bumped Takes”, “Wild Lines”, or “Room Tone” you would subclip, label and organize taht as well into the proper bin.

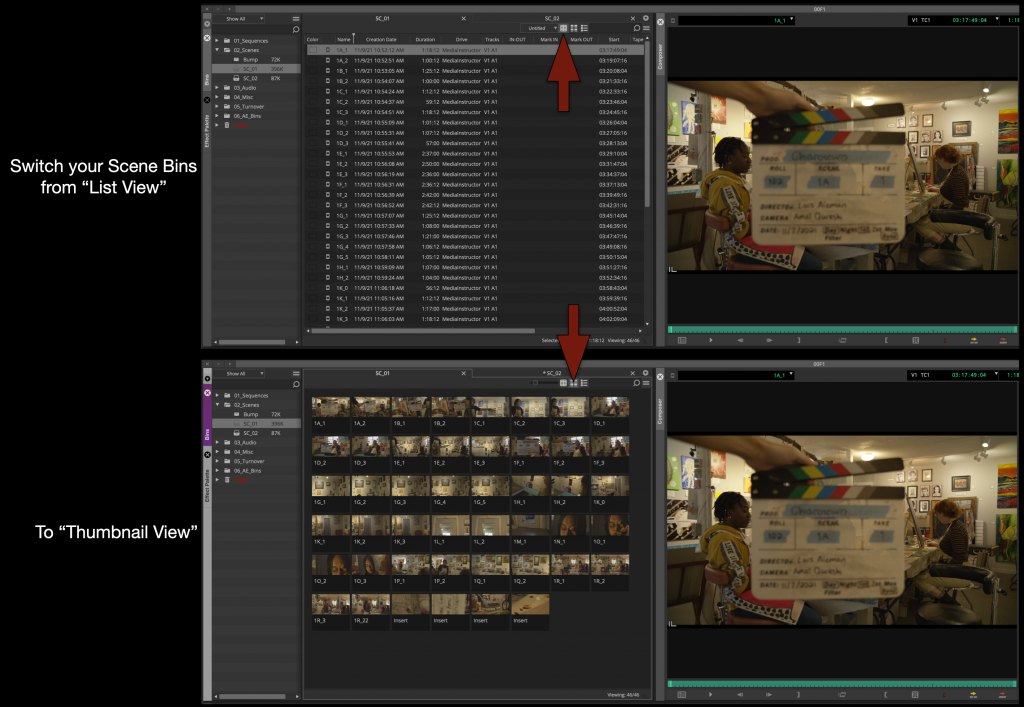
    Now that al the subclips are in the right bin, switch your scene bins from “List View” to “Thumbnail View”.

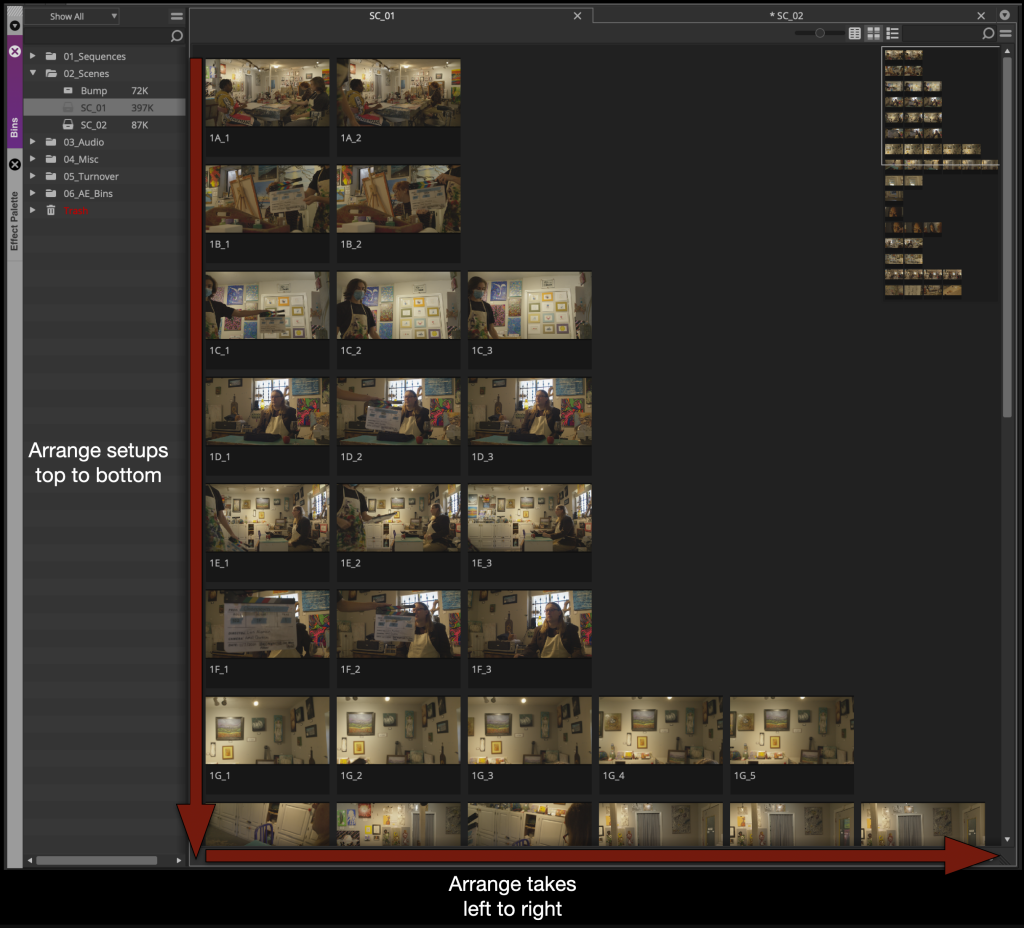
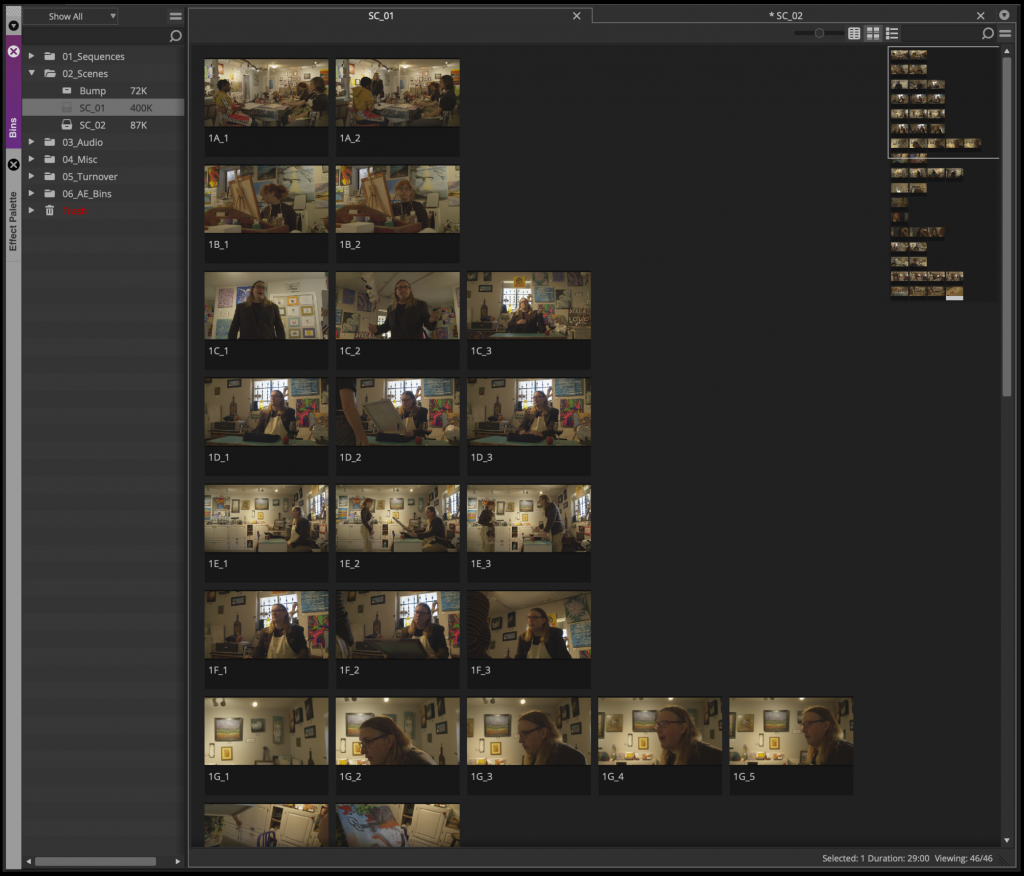
    For each scene bin arrange the thumbnails so that the takes are displayed top to bottom and the takes are arranged left to right.

    Then single click on each thumbnail and using the “JKL” key scrub and find a good thumbnail frame for each one.

    Assemble the Dailies Stringout

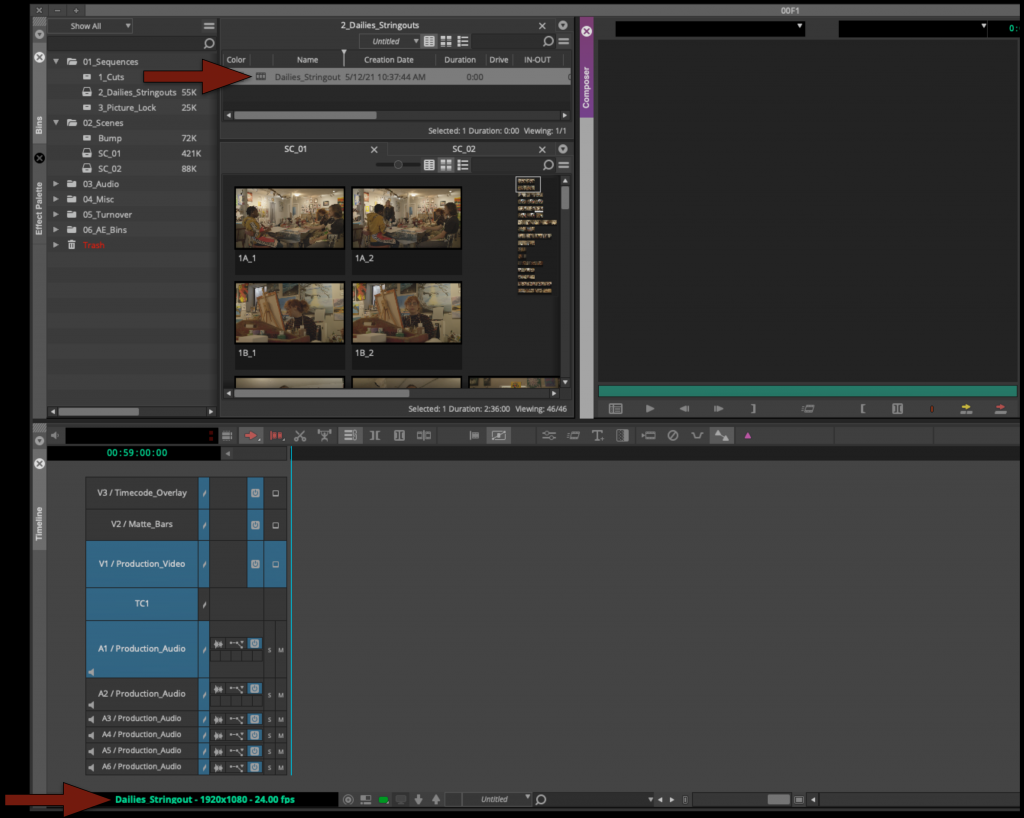
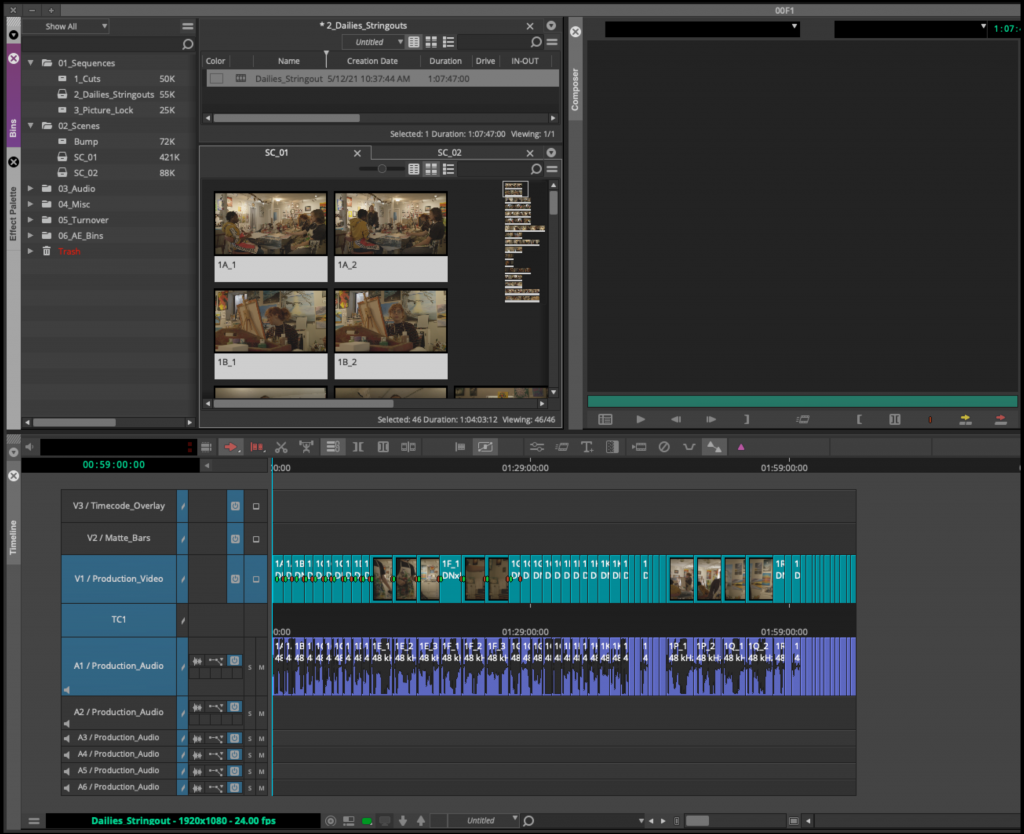
    Now you can assemble everything from each scene bin into a Dailies Stringout sequence. It can be found in the sequences folder inside the Dailies Stringout bin.

    In scene order assemble all the takes from each scene bin.

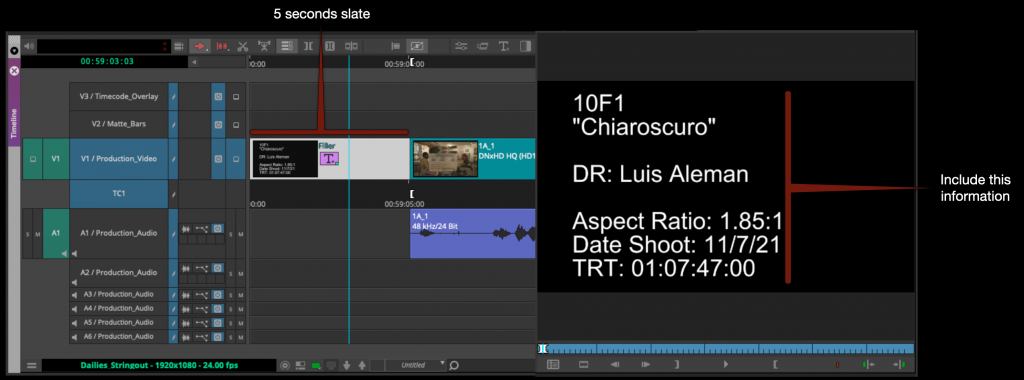
    Insert a 5 second slate at the begin of the sequence and using the Avid Title tool fill in the slate with all the information shown in the example below.

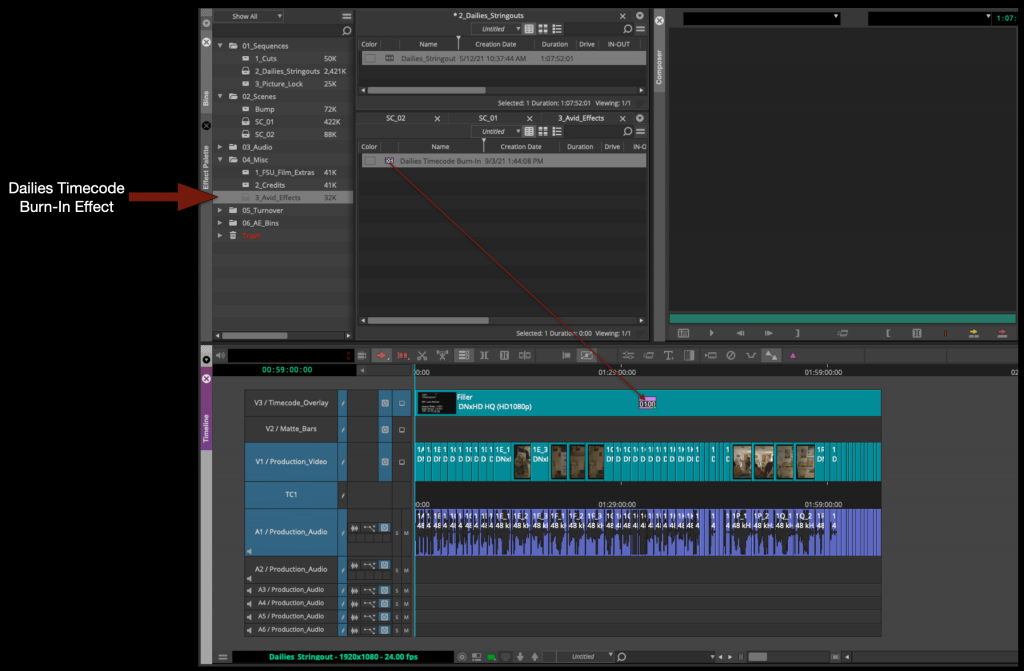
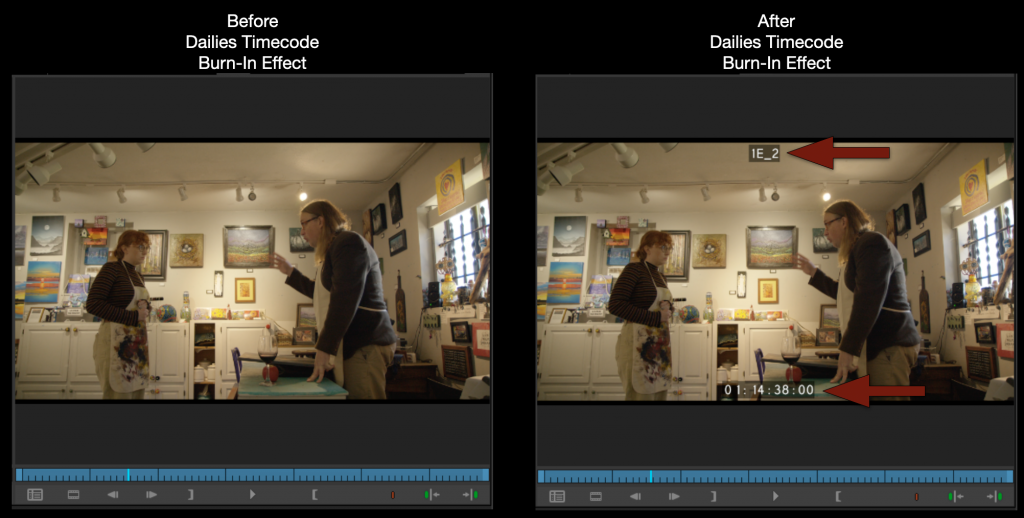
    Inside the Avid Effects Bin you will find a Dailies Timecode Burn-In effect. Apply this effect to the fill in the labeled video track.

    You will see in the Program Monitor that your Dailies string out now has timecode and shot names burned in.

    Export and Upload to Frame.io

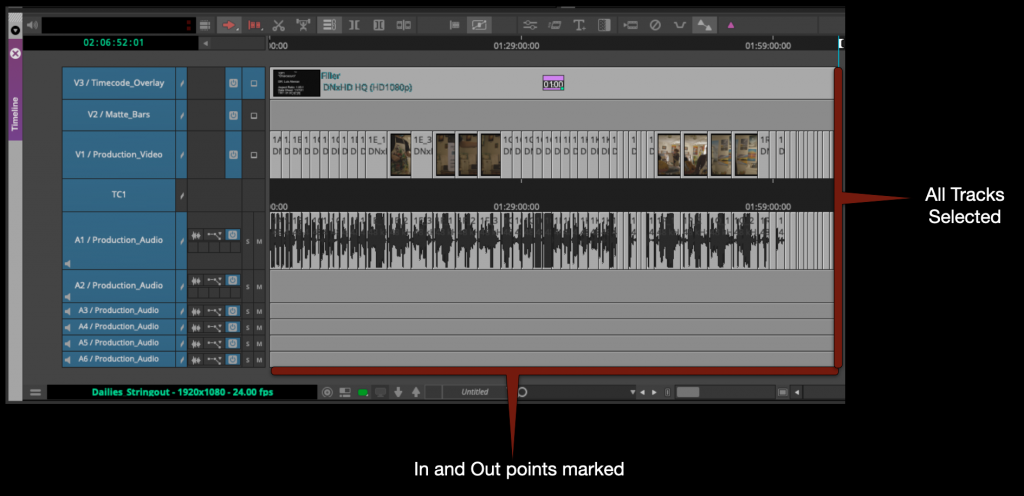
    Mark in to out for the entire timeline and select all the video and audio tracks.

    Right click in the program monitor and select export. 

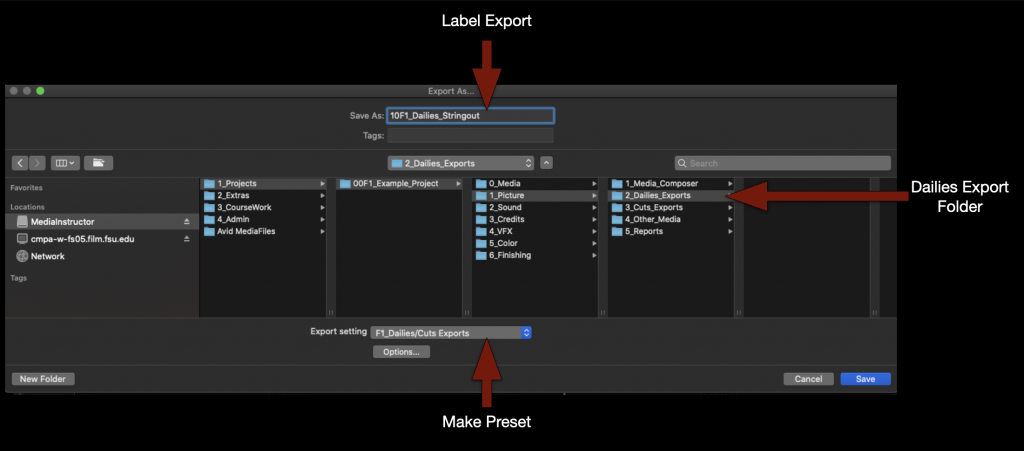
    Check that the name of the file is correct, that its going the proper folder and that you are using the correct export setting.

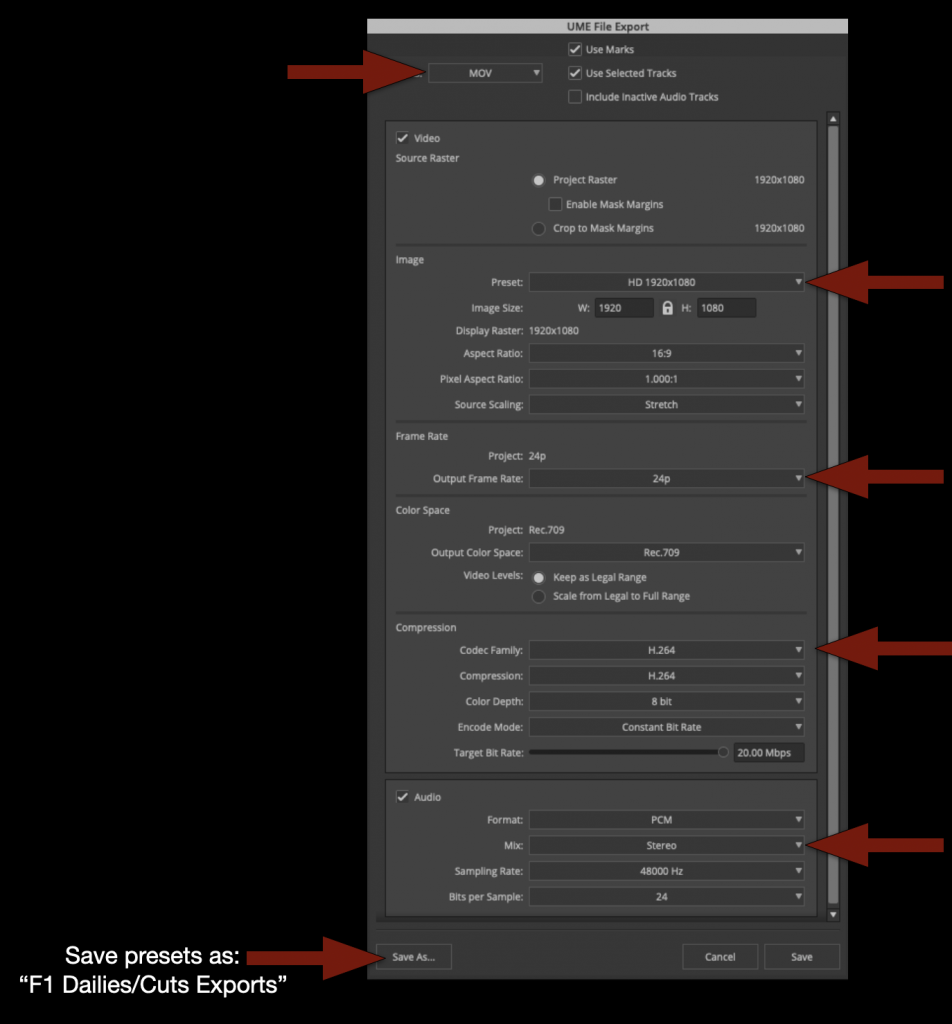
    If you don’t yet have a “F1 Dailies/Cuts Export” preset make one using these settings.

    When the export is complete you can check to make sure everything is correct and then upload to the proper folder on frame.io.

    Review Footage

    Now you are ready to review your dailies. Watch everything!

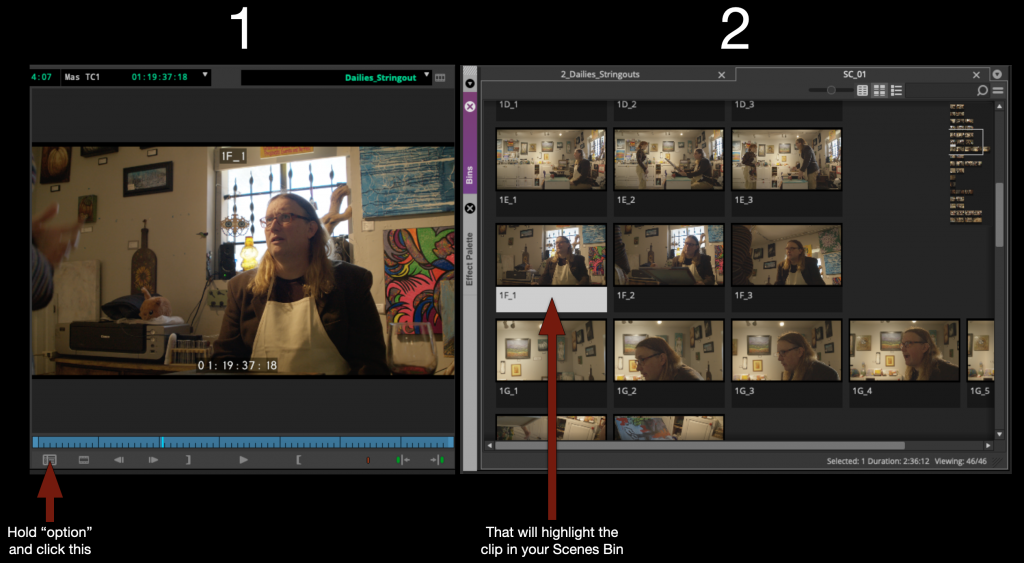
    As you are watching the dailies string out sequence in Media Composer you may find that you would like to color code your clips or add written notes to yourself. This is easy to do by using the “Find Bin” button.

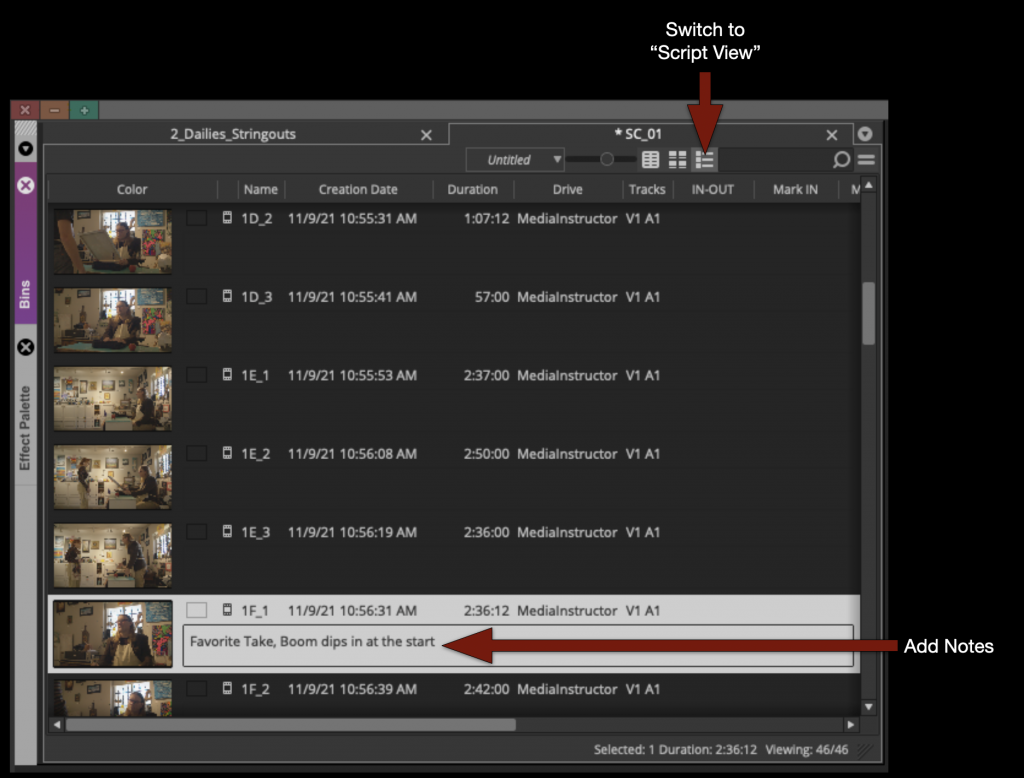
    Once the clip is highlighted you an add notes by switching to “Script View” and typing in the comments section.

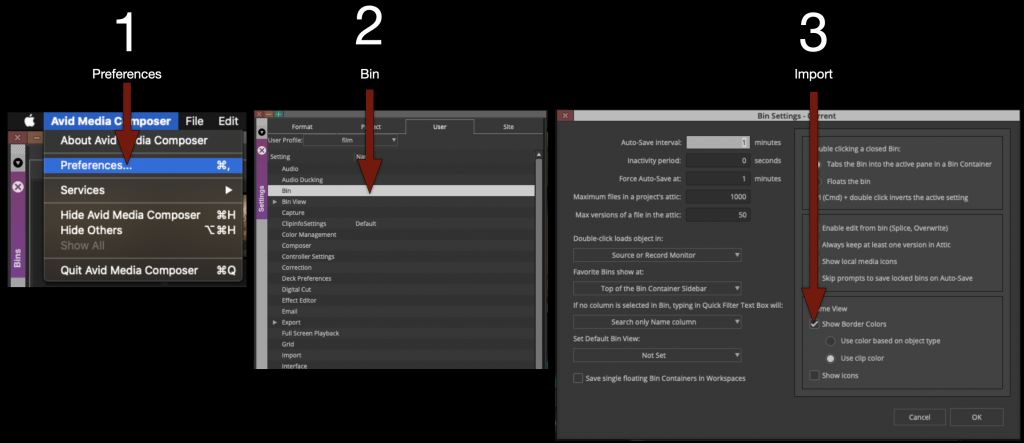
    Or if you would like to color code them in “Frame View” you can do taht as well. But first you need to turn something on in the preferences.

    Under Preferences – Bin – Check “Show Border Colors”

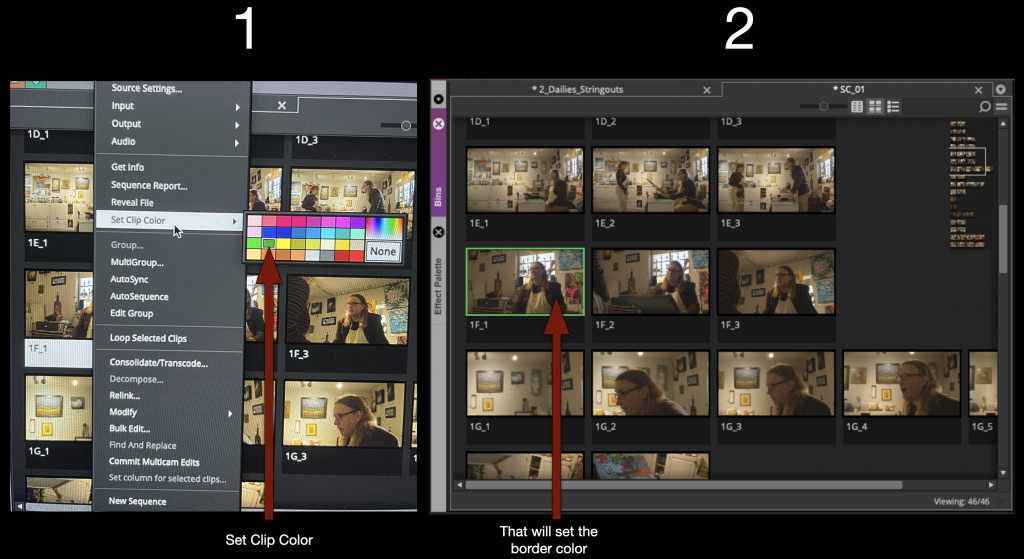
    With that option on you can right click on any thumbnail and set the clip color and it will appear as a border. You can use this to create any kind of organizational system that you like.

    Create Front Sequence and Mask

    Now that you have reviewed all your footage you are almost ready to begin work on your first cut. But first you need to build the front sequence and apply the mask that you will work underneath.

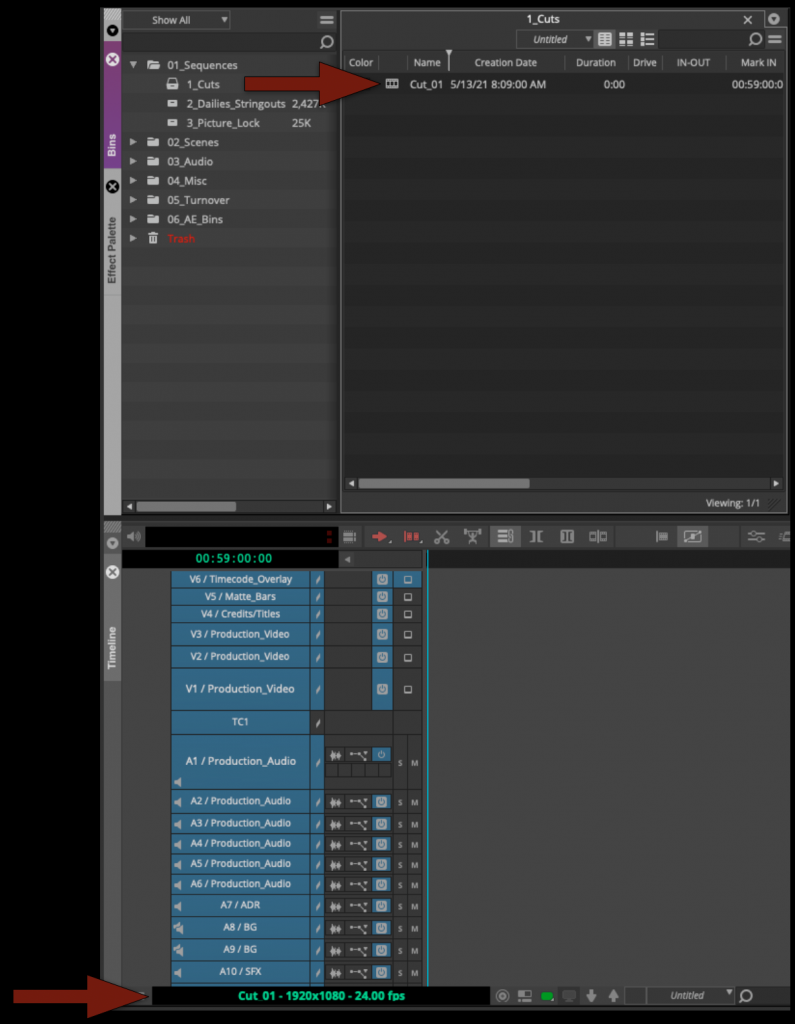
    Open the Cut Sequence inside the Cuts Bin.

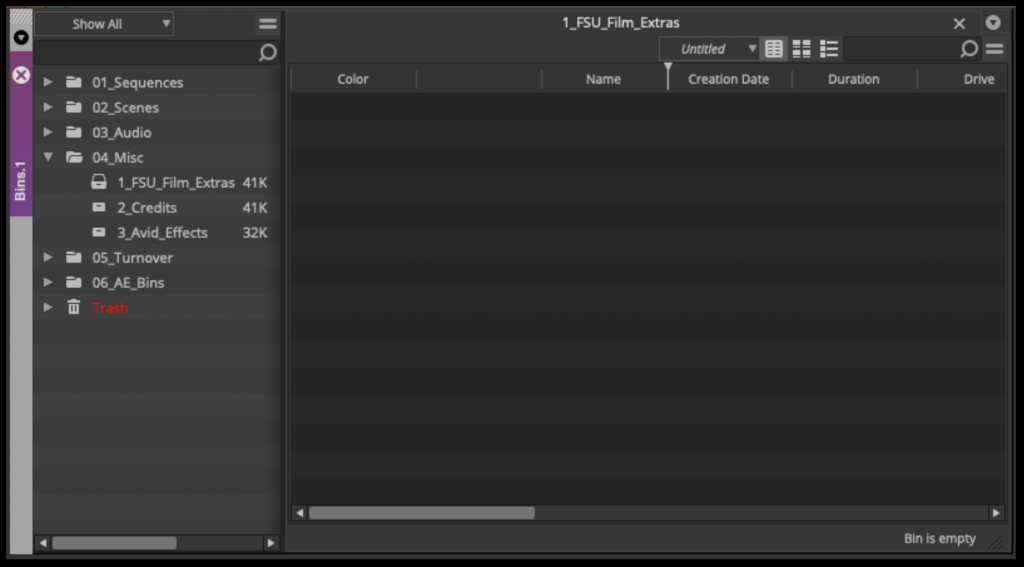
    Open the “FSU_Film_Extras” bin.

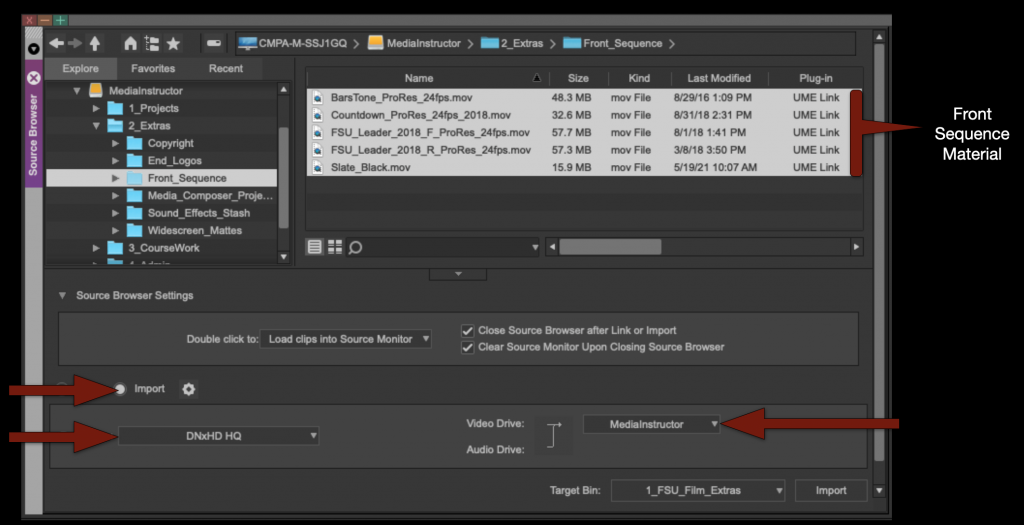
    Then using the “Source Browser” import in the front sequence material.

    Make sure your Resolution is still set to DNxHD HQ and your Target Drive is correct.

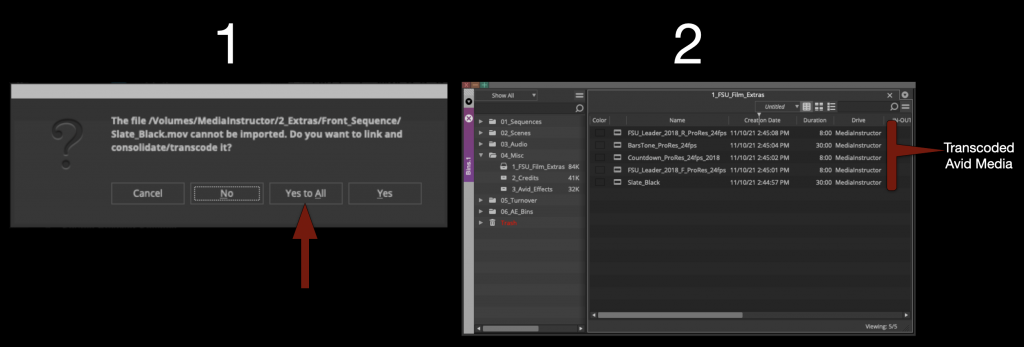
    When you click “import” it will say that they will first need to be linked and then transcoded. Select “Yes to All”. It will transcode the media to Avid MXF media.

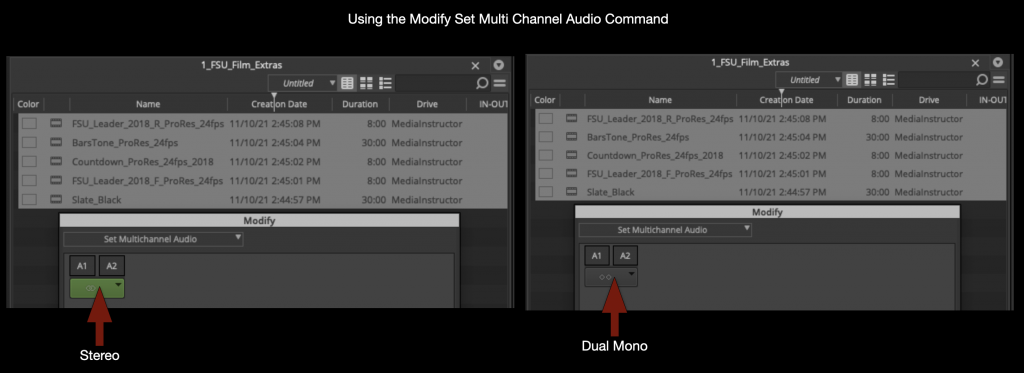
    This new medias audio will need to be switched to “Dual Mono”. Select everything and right click to select “Modify”.

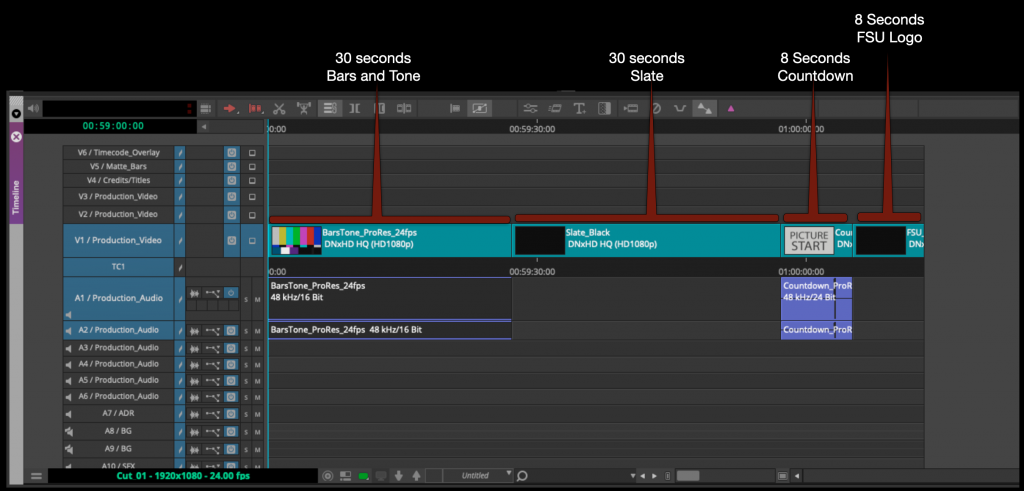
    Cut the Front Sequence material into the sequence in the following order:

    Your Front Sequence Should be arranged in the following order.

    1. Bars and Tone – 30 seconds – start at Timecode 00:59:00:00
    2. Slate – 30 seconds – start at Timecode 00:59:30:00
    3. Academy Countdown (SMPTE Leader) – 8 seconds – start at Timecode 01:00:00:00
    4. FSU Leader – 8 seconds – start at Timecode 01:00:08:00

    This means that the first frame of content will fall on 01:00:21:00. If everything is put together correctly the 2-pop (#2 on the Leader) will fall on 01:00:06:00 (This is very important!)

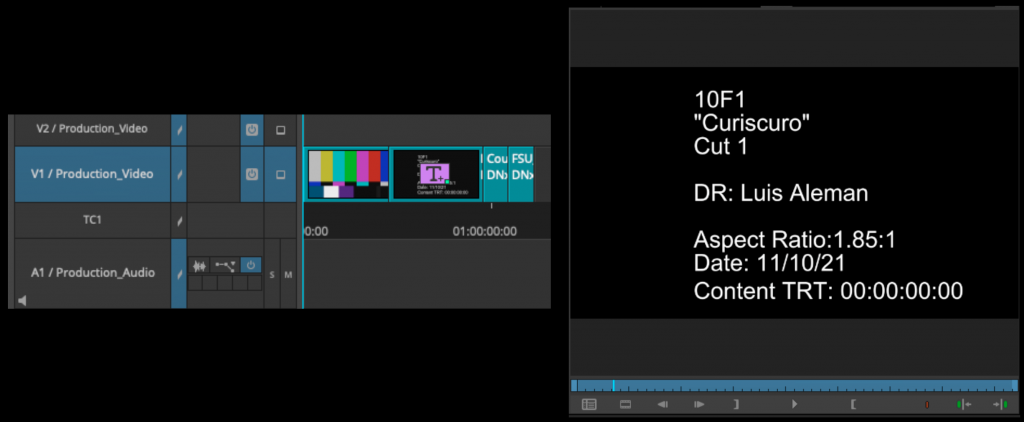
    Apply the Avid Title Tool to the 30 second Slate and fill it in as shown in the example below.

    Next to apply the proper masking to the sequence use the source browser to import the Mask into the FSU Film Extras bin.

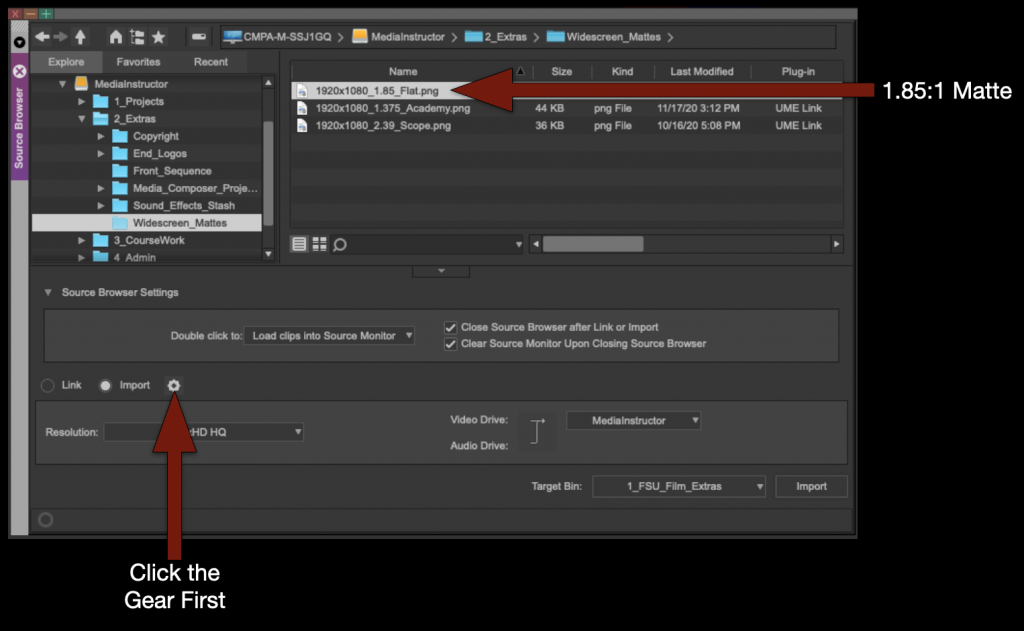
    But since the Mask is a still frame you need to tell Media Composer how long to make the new transcoded file to be. In the Source Browser before clicking “Import” select the “Gear” icon.

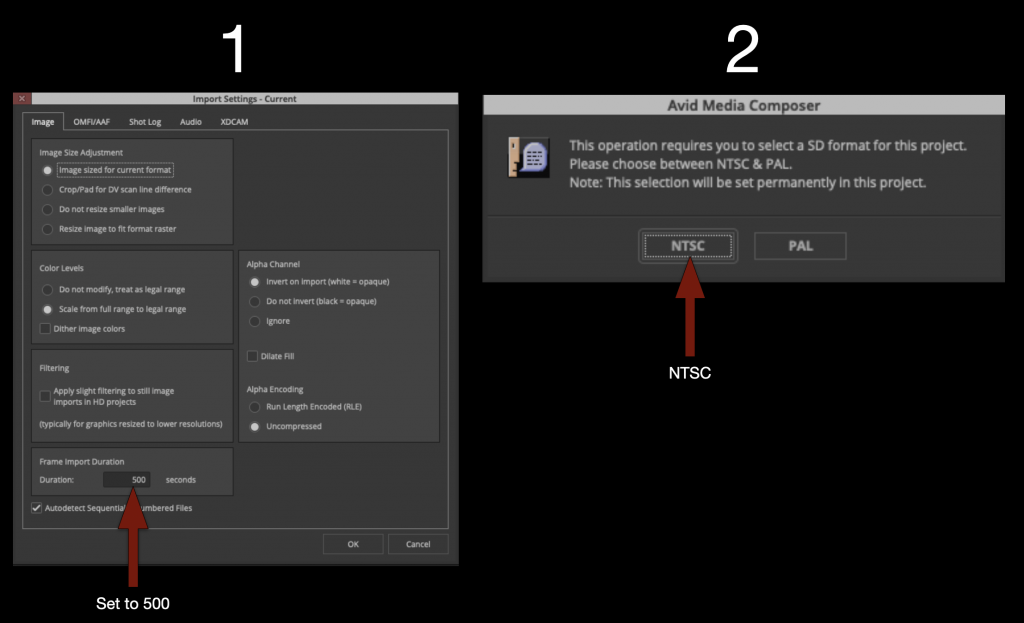
    Under “Import Settings” set the “Frame Import Duration” to 500. Then elect OK and import. It will ask if you prefer NTSC or PAL. Select NTSC.

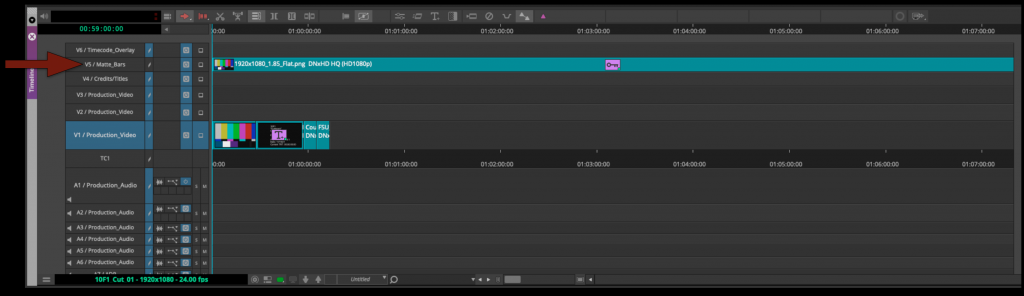
    Now that the Mask has been imported into the FSU Film Extras bin you can cut it into the proper track in your sequence.

    Duplicate Sequences

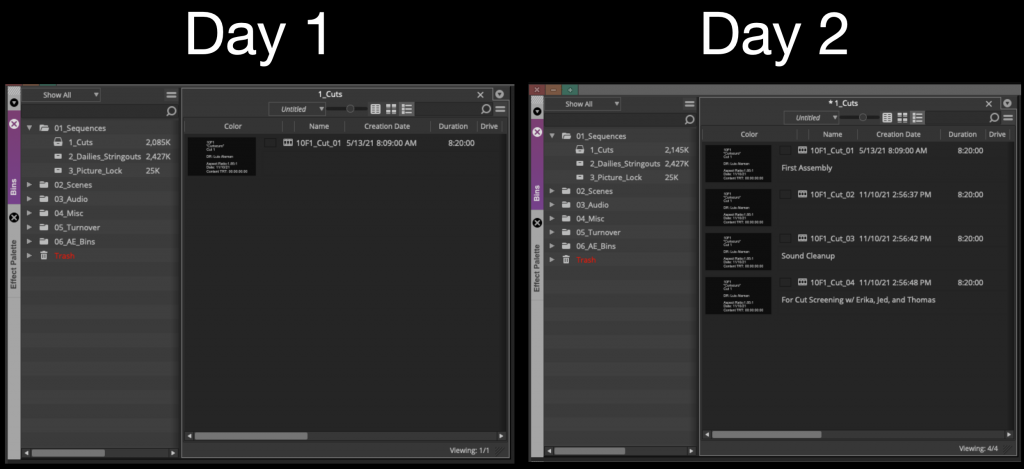
    As you begin cutting picture you will find times when you will want to duplicate your sequence. Generally after you have received notes or tried something new. At the very least you should be duplicating your sequence and “versioning up” at least once a day.

    Use the “Script View” to make notes about each cut so that you can keep track of the changes between cut.

    Import Credits

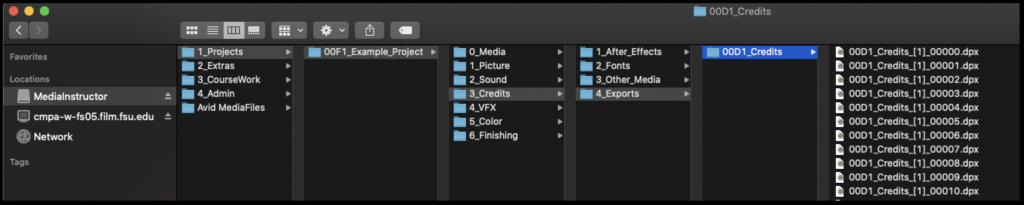
    Before you picture lock its required that your credits be completed using the After Effects Template and exported out as a properly labeled DPX image sequence and imported into Media Composer.

    Below is an example of where they should be saved and how they should be named.

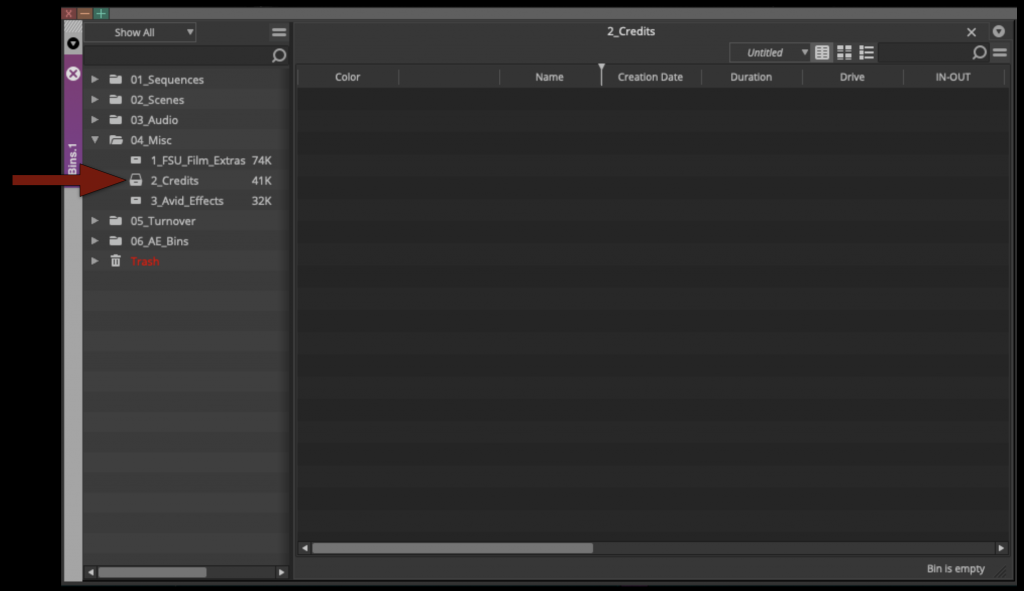
    They should be imported into your Credits Bin inside Media Composer which can be found inside the Misc folder.

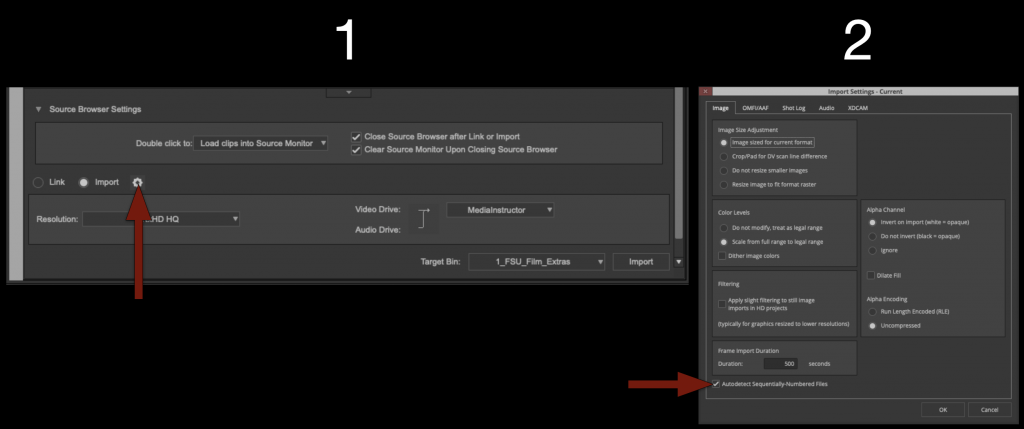
    Use the Source Browser to import the credits into the Credits Bin. However since its a DPX image sequence and not a video file we need to tell Media Composer this before importing.

    Click the “Gear” icon next to the import selection and then in the “Import Settings” box make sure “Auto detect Sequentially Numbered Files” is selected.

    Then elect the first file in the image sequence and click “Import”.

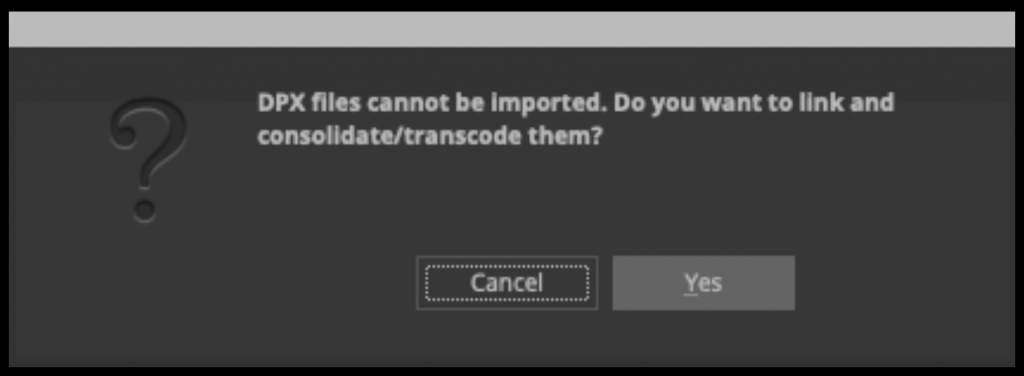
    A box will appear saying it needs to be “Linked and then Transcoded”, select yes and wait for it to transcode.

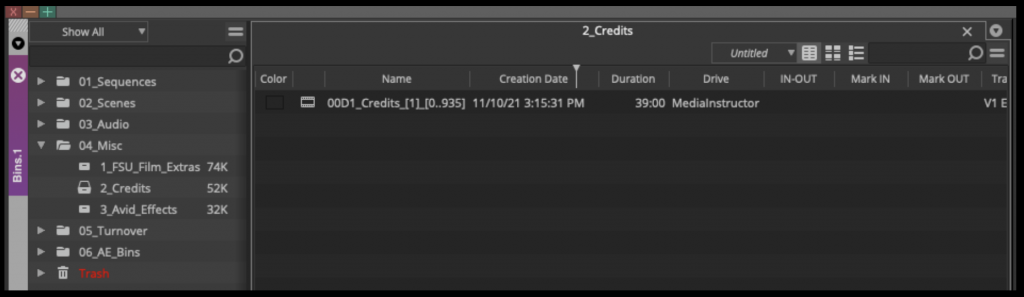
    When it’s complete your credits should be in the “Credit Bin” as avid media.

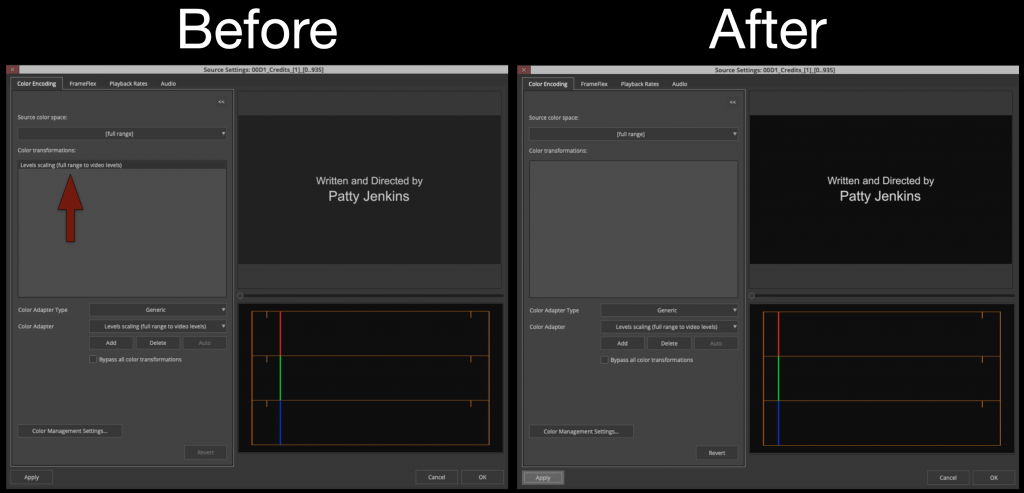
    Your credits may look a bit washed out. This is because Avid is trying to compensate for the difference in “Video/Data” levels. Right click on the credits and select “Source Settings”

    Under color encoding delete the “Levels Scaling” effect from the color transformations and the black level will then appear correct.

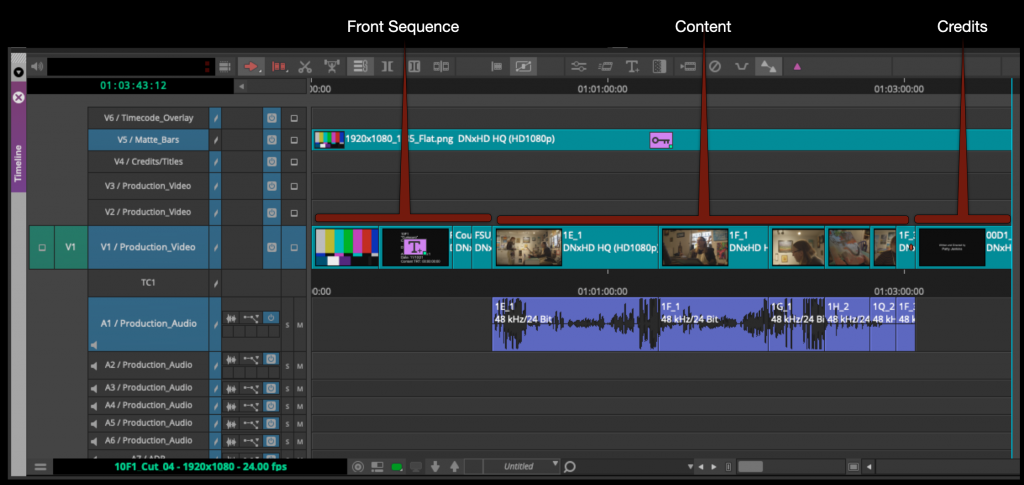
    Cut your credits into the sequence after your content.

    Picture Lock

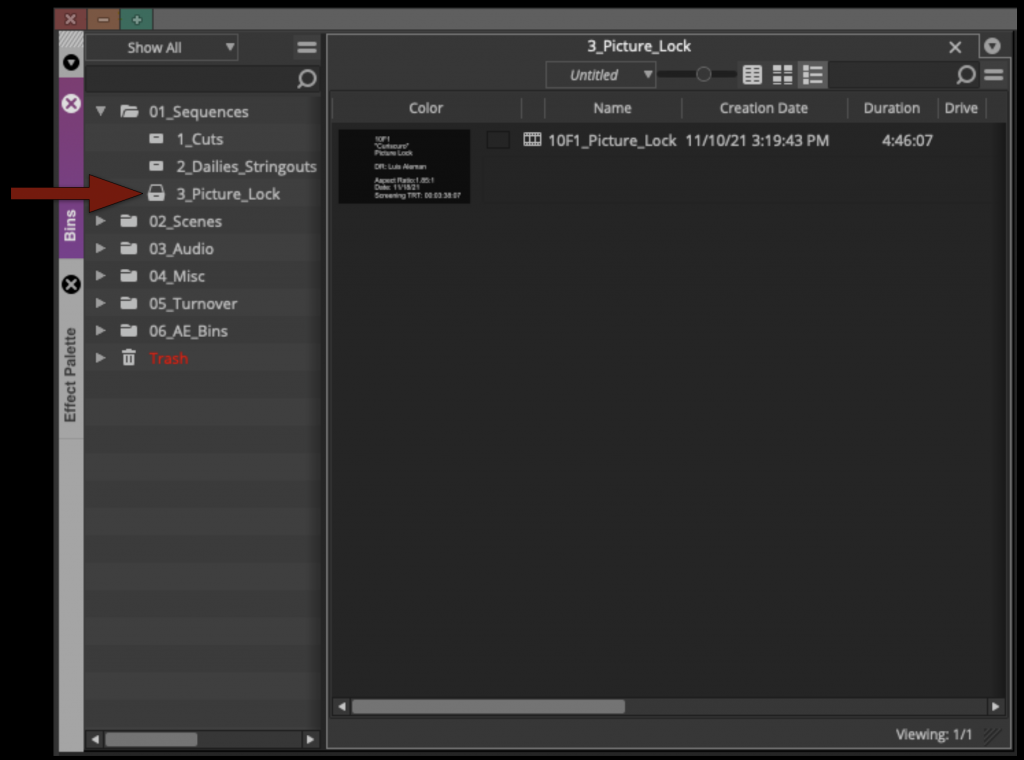
    Duplicate your sequence and rename it “XXF1_Picture_Lock” and move that sequence into the “Picture Lock Bin”.

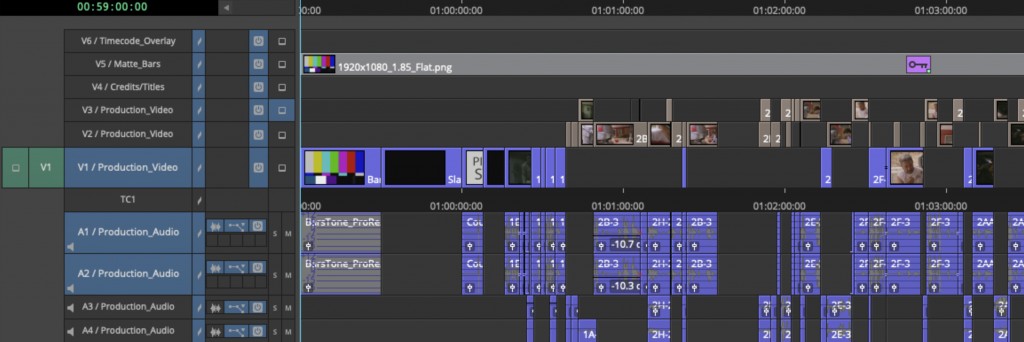
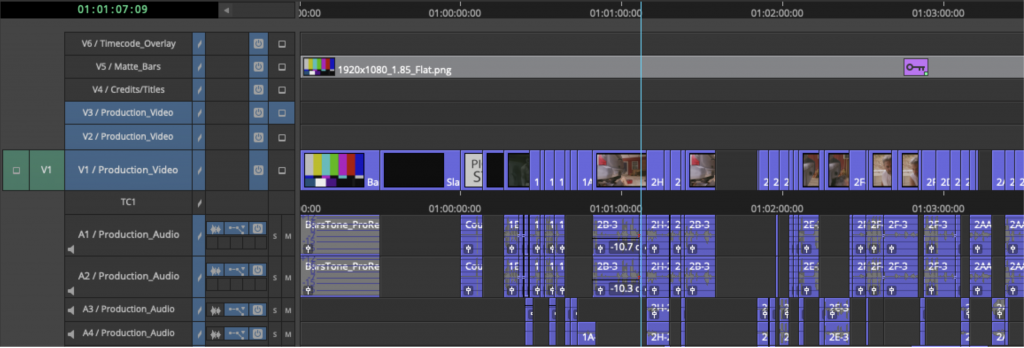
    To prep your timeline for coloring your video needs to be condensed onto as few video tracks as possible. It’s understood that, due to the nature of how some video dissolves are built, more than one track is sometimes necessary. The idea is to reduce the amount of tracks and media as much as possible.

    Your sequence would go from looking like the example below with video on tracks V1 – V3 that needs to be brought down.

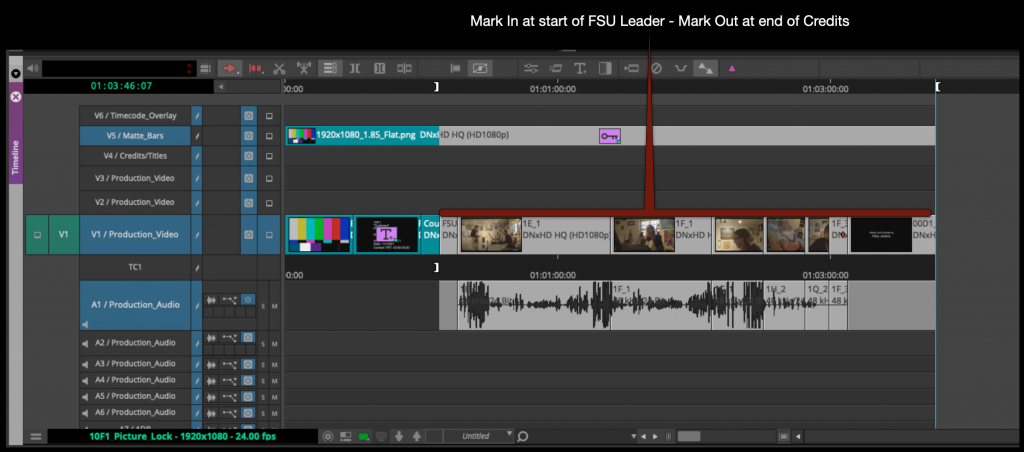
    To your sequence looking like the example below with everything consolidated onto one track.

    To find you’re Screening Total Run Time mark in at the start of the FSU Leader and then mark out at the end of the credits.

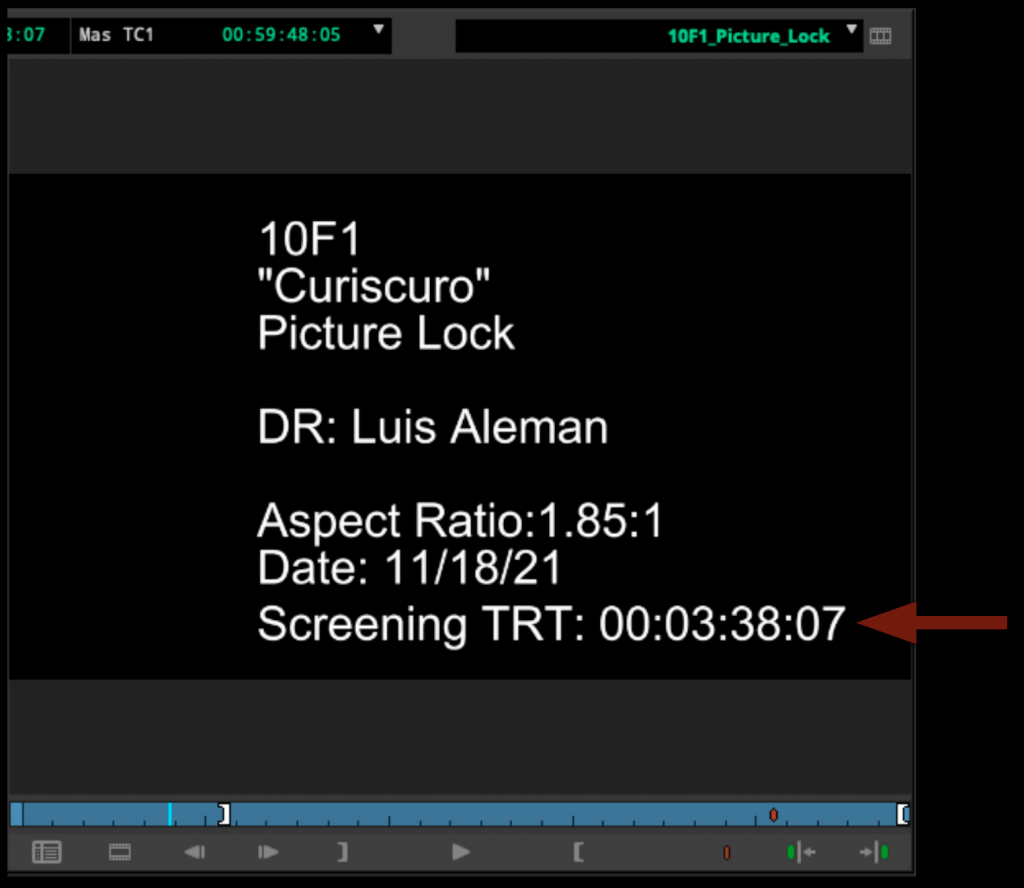
    Update the slate in the front sequence with the Screening Total Run time and make sure it includes all the information in the example below.

    Congratulations! Your F1 is now picture locked. Save your project and close Media Composer.

  • Producer Responsibilities

    Overview

    The producer serves as the primary organizational and managerial lead of the production, overseeing the broader coordination of the project across development, pre-production, production, post-production, and delivery. Responsibilities may include managing schedules, coordinating communication between departments, overseeing logistics, monitoring production progress, helping resolve problems, and ensuring that the production remains aligned with the practical realities of time, staffing, safety, and available resources.

    Within the collaborative structure of film production, the producer is ultimately responsible for helping guide the project to successful completion while balancing creative goals against operational limitations. Unlike roles focused primarily on on-set execution or departmental coordination, the producer maintains a wider view of the entire production process and helps ensure that all parts of the project continue moving forward cohesively. The role also helps students develop leadership, communication, organizational, and decision-making skills that are central to professional producing workflows.
    Pre-Production

    • Assist the Director in Location Scouting.
    • Secure each filming location by completing a Location Agreement and Shooting Plan. Make sure the location owner is clear about the nature of the production, and provide them with a Location Pamphlet.
    • Organize the Tech Scout for each location with at least the ATL. Establish where the restrooms, parking, staging, base camp and set will be. Complete a Location Hazard Assessment Checklist. If any location hazards, then also complete a Hazard Notification Report.
    • Have each actor sign a Performance Agreement.
    • Arrange for volunteers and/or extras if required.
    • Coordinate call times with other Producers in your cycle to ensure 10 hr turnaround.
    • Create a Setup Schedule with the Director and DP (based on the shot list put together by the Director and DP).
    • Prepare all scheduling information and other material required for ATL Prep.
    • Attend ATL prep and takes notes for the Director.
    • Assist the Director with any and all logistical needs to prepare for principal photography.
    • Run the Production Meeting by reading the action of the script. Answer crew members’ questions. Have each crew member sign a Crew Deal Memo.
    • Prepare and make copies of all the paperwork needed on set.
    • Check the weather periodically to monitor adverse conditions. Have a back-up plan.
    • Purchase craft services by the night before production.
    • Pre-order lunch and arrange for it to be picked up by a volunteer on the day of production.
    • Create the Call Sheet, including a map and set diagram, and email no later than 12 hours before call time.
    • Double check every logistical piece of information and make sure nothing has been forgotten.

    On Set

    Start of Day

    • Arrive at set 20-30 minutes before call time.
    • Immediately establish contact with the location owner to make sure everything is still going as planned. Thank them! Check back with them periodically throughout the day as needed.
    • Sign in all crew using the Crew Sign-in sheet.
    • When actors arrive, show them the set, green room, bathrooms, and craft service. Introduce them to crew; and location owner if possible.
    • At call time, have a Safety Meeting with the entire crew. Complete the Safety Meeting Report.
    • Make sure crew have a copy of the Setup Schedule.
    • Make sure actors have a copy of the script or their sides.
    • Make sure crew is staging equipment safely and preparing for the first shot.
    • Make sure the director is focused with the DP and crew on the first shot and figuring out logistical stuff.
      • Where is the camera going?
      • Where are the lights going?
      • Where is the boom operator?
      • General idea on actor blocking.
    • Make sure set dressing is happening (if necessary).
    • Give director time to focus on actors while the crew finishes set up and/or set dressing.
    • When the set is ready, give the director and actors a (5-Minute) call to blocking, rehearsal, and shooting.
    • ALWAYS KEEP ACTORS IN THE LOOP AS TO WHEN THEY MIGHT BE CALLED TO SET!!!

    Throughout shooting day

    • Run through the 1st AD Protocol for each setup.
    • Manage the time on the set by keeping up with the Setup Schedule. Adjust schedule as needed.
    • Look ahead to next setups and make sure departments are prepared and working ahead.
    • Verify with volunteer or caterer that lunch will be brought to set in time to set it up prior to releasing for lunch.
    • At 6 hours after call time, release the cast & crew for lunch. Make sure everyone who eats signs a Meal Sign-In Sheet.

    End of shooting day

    • Complete the Performers Time Report, and have the actors sign it before they are dismissed for the day.
    • Efficiently and safely wrap out equipment, load vehicles, and clean the location. Leave the location better than when you arrived.
    • Whenever possible, do a walk-thru with the location owner to verify everything is in order.
    • Sign-out all crew using the Crew Sign-In Sheet.
    • Be the last to leave (except perhaps Art Dept).
    • Make sure the director backs up all their media.
    • Create the Daily Production Report and distribute within 2 hours after Company Wrap.

    Post-Production

    • Send a Thank You Letter to the location owners.
    • Submit Reimbursement Voucher, along with original itemized receipts and Meal Sign-In sheet to the Head of Production by 5pm Thursday after production.
    • Turn in Production Delivery Paperwork via OneDrive to the Head of Production by the deadline provided.